

Page 1

GDVD171X5
DVD
PLAYER
Page 2

Content
Features of This Unit
Warning and Importance
Wiring Instructions
DVD Information
Remote Control
Preparation
Rear Panel and connections
Basic Functions
Menu Operations
Remote Control Operation
Kodak Picture CD Playback
Troubleshooting
Product Specifications
Guarantee
1
2- 3
4
5- 7
8
9
10
11-15
16-19
20-22
23
24-25
26
27
Page 3

Features of This Unit
1
Page 4

Warning and Importance
Please DO Not expose the unit to rain or moist environment in case of fire or
electric shock!
RISK OF ELECTRIC SHOCK
CLASS1
LASER PRODUCT
Notice:
Please read through this manual before using the unit.
CAUTION
DO NOT OPEN
DO NOT OPEN
THE LIGHTNING SIGN IN THE BLACK TRIGON
REMINDS THE USER OF THE HIGH VOLTAGE
OF THE UNIT.
THE EXCLAMATORY PUNCTUATION IN THE
BLACK TRIGON REMINDS THE USER OF THE
INCIDENTAL MAIN OPERATION AND SERVICE
NOTE WITH THE UNIT.
LASER PRODUCTION SIGN: THE SIGN SHOWS
ON THE REAR PANEL OF THE UNIT.
ATTENTION: DO NOT OPEN THE
COVER OF THE UNIT IN CASE OF
FIRE AND ELECTRIC SHOCK, ANY
MALFUNCTION SHOULD BE
SERVICED BY PROFESSIONAL
PERSON.
*The unit can only be used with the power source the manual and
the unit itself specified.
*Make sure to hold the isolated terminal of the plug to operate when
connecting or pulling out the power cord. Anyway to service or
recreate the power cord is prohibited.
*Turn off the power if you do not use the unit. Make sure to pull out
the power plug if the unit is not used for a long time or when
thundering or lightning.
*Do not place the unit in high-temperature, vibrating, stuffy
environment or directly expose to sunlight. Do not put this unit
together with high-power electric appliance to ensure good
ventilation.
*Make sure the
magnetic source. Do not use alcohol, gasoline or any other
chemical solvent to clean the unit.
unit is far away from fire, heating source and
*Do not spray any liquid or insert any object into the unit. Do not
disassembly the unit.
*Do not use the unit in watery place or put heavy objects on it.
*Take out the disc before moving the unit.
*Make sure to turn off the power and
smoke or unusual smell and make it serviced by professional
pull out the plug when there is
person.
2
Page 5

Warning and Importance
Warning:
The ventilation shound not be impeded by covering the ventilation
openings with items,such as newspapers,table-cloths,curtains,etc.
No naked flame sources,such as lighted candles,should be placed on
the apparatus;
The product use in tropical climates;
Do not install this equipment in a confined space such as a book case or
similar unit .
The
apparatus shall not be exposed to dripping or splashing and that no
objects filled with liquids,such as vases,shall be placed on the apparatus.
This product incorporates copyright protection technology that is
protected by U.S. patents and other intellectual property rights.
Use of this copyright protection technology must be authorized by
Macrovision, and is intended for home and other limited viewing
uses only unless otherwise authorized by Macrovision, Reverse
engineering or disassembly is prohibited.
3
Page 6

4
Page 7

DVD Information
5
Page 8

DVD Information
2. How to purchase DVD disc.
DVD discs like DVD players have a code of region. A DVD player can only
play DVD disc which meets the code of it.
Regions and codes
REGION CODE
1
2
3
4
5
6
U. S. A., CANADA
EUROPEAN COUNTRIES, JAPAN, MIDDLE EAST, SOUTH AFRICA
WEST ASIA(SOUTH KOREA, HONGKONG, TAIWAN),
SOUTHEAST ASIA
AUSTRALIA, CARIBEAN, MEXICO, NEW ZEALAND
AFRICA, RUSSIA, INDIA, NORTH KOREA, PAKISTAN
CHINA
REGIONS
* The characteristics of DVD players.
Different DVD disc has different characteristics. This is because of the
programmer and manufacturer of DVD disc. The following marks
represent the characteristics of DVD discs.
D I G I T A L
SURROUND
REGION CODE AND VIDEO
OUTPUT SYSTEM
DOLBY DIGITAL SURROUND
DTS DIGITAL CINEMA
SURROUNDING
NUMBER OF AUDIO TRACKS
5.1 CHANNEL
HIDE CAPTION
DUAL CHANNEL STEREO
AGE LIMITING
NUMBER OF SUB-TITLES
SCREEN MODES
CHILD LOCK
6
Page 9

DVD Information
REMARK
Some features of this unit are related to the DVD disc s software. Some
features of this unit cannot be performed if the disc does not support the
features or requires special settings. Check the features of the disc before
playing it or follow the instruction on screen menu of the disc.
3. Care of Disc
Video disc contains high density compressed data needs proper
handling.
Hold the disc with fingers, holding the hole at center and the edge.
Do not bend or press the disc. Do not explore the disc to direct
sunlight or heating source.
Store the discs in cabinet, vertically, in dry
moisture or humidity.
Clean the disc with soft dry cloth only, wipe gently, radically
from center to the edge. Do not apply thinner, alcohol spray
when cleaning.
condition, prevent
7
Page 10

Remo te Control
STANDBY
SHUFFLE
SUBTITLE
ANGLE
PROG
GOTO
AUDIO
SETUP
TITLE
REPEAT
PLAY
FAST FORWARD
PAU SE
FAST BACKWARD
OPEN/CLOSE
NUMBER
STEP
DISPLAY
ZOOM
UP ARROW
RIGHT ARROW
ENTER
MENU
A- B
SLOW
NEXT
PREV
RESUME
8
Page 11

Preparation
1. Unpack the Unit.
Check the following attachments in the packing:
Remote Control
AV Cable
User
's Instruction Manual (1)
2. Loading Batteries into the Remote Control.
Turn over the remote control and take down the cover of the remote.
Load two AAA batteries into the battery house in accordance with
the polarities.
Close the cover of the battery house.
(1)
(1)
Caution:
Do not use charging batteries.
Do not use new and old batteries of different types together.
Do not charge the batteries or make them short-circuit.
Do not disassemble, burn or heat the batteries.
If there is battery leakage, please clean the remote casing and load
new batteries.
If the remote is hard to control when very near the unit, please load
new batteries.
Do not expose the remote sensor direct to sunlight to avoid signal
interruption.
The effect of the remote is the best within the range of 7m distance
and 30 angle.
9
Page 12

Front and Rear panel
POWER
1
24
1. POWER
2. DOOR TRAY
3. OPEN/ CLOSE
910
11 121314
1234
15
5678
16
1. SL TRACK
2. SR TRACK
3. CENTER TRACK
4. LEFT TRACK
5. RIGHT TRACK
6. COAXIAL JACK
7. S-VIDEO JACK
8. OPTICAL JACK
9. FL TRACK
BASIC CONNECTION
3
5
4. STOP
5. PLAY/PAU SE
10.FR TRACK
11. SW TRACK
12.Y Jack
13.Cb/Pb JACK
14.Cr/Pr JACK
15.VIDEO JACK
16.SCART OUTPUT JACK
AMPLIFIER COAXIAL AUDIO INPUT TV AV INPUT
10
TELEVISION
Page 13

Basic Functions
.
Open/close
Open the tray by pressing Open/Close button, the tray will
automatically
Insert a disc in the tray and close the disc tray by pressing the Open/
Close button again.
Press Stop button for memory stop function. If you are not going to use
for an extended
period of time, be sure to disconnect the player from the wall outlet.
Play/Pause
come out.
When playing a DVD disc, you can press this button to play or pause.
11
Page 14

Basic Functions
ENTE R
Menu
Menu
When playing the disc, press this button to return root menu, you can choose menu item again.
When playing the disc, press this button to return root menu,
you can choose menu item again.
Zoom
Zoom
The maximum zoom is ×4. Press the Zoom button to select ×1.5,
The maximum zoom is ×4. Press the Zoom button to
select ×2, ×3,×4,1/2,1/3,1/4。In zoom mode,you
×2,×3.In zoom mode, you can press UP, DOWN, LEFT, RIGHT
can press UP, DOWN, LEFT,RIGHT
move the rightwards.
picture upwards, downwards, leftwards,
picture upwards, downwards, leftwards,
rightwards.
SUBTITLE LANGUAGES
This function enables you to select subtitle languages displayed
on TV screen
as many as 32 subtitle languages(only applicable to
disc with same function), repeatedly press the Subtitle button
which indicated the subtitles, and you can begin to select.
ANGLE
While watching a game, a concert or an opera program,
you can:
1. Press the Angle button on the remote control to
select angle one,
the diagram angle one will indicate in the upper
corner of the TV screen.
2. Press the Angle button again to select different
angle . Or you can choose to watch the same action
taken from different points of view.
to
to move the
right
ENTE R
1/4
2/4
AUDIO TRACK
Sel ecti ng a voice language, you can have as many as eigh t di fferen t
selections
of channels(4 k inds for SVC D or CVD ) You can choose
among eigh t voice languages by pr es s ing the AUD IO bu tton.
12
Page 15

Basic Functions
Mp3 Music Discs
This unit will play MP3 files recorded on CD-R and CD-RW discs.
Playing a MP3 file disc
1. Press the OPEN/CLOSE button, the disc tray opens.
2. Insert a MP3 file disc on the disc tray with the label side up.
3. Press the OPEN/CLOSE button, the disc tray closes.
4. The unit will take a short while to load the
playback.
To pause playback
Press the PAUSE button. To resume playback again,
press the PLAY button.
To stop playback
Press the STOP button.
To skip to the next or previous file
Press the NEXT button of the remote control while playing, to
skip ahead to the beginning of the next file. Each time you press
the button consecutively, the beginning of the next file is located and
played back.
Press the PREV (Previous) button of the remote control while
playing, to skip back to the beginning
you press the button consecutively, the beginning of the previous
files is located and played back.
disc and automatically
of the previous file. Each time
On-Screen Display
Tur n on your TV to view the on-screen display of MP3 files.
1. Press the MENU button of the
(directory) folders name.
2. Press the , , or CURSOR button of the remote
control to select the folder,
then press ENT (Enter) button to confirm.
3. Press the
control
button and this
to select the file you want to listen to, then press ENTER
, , or CURSOR button of the remote
selected file is located and played back.
remote control to view in DIR
13
Page 16

Basic Functions
Next Chapter Playing
Next Chapter Jump over the current title to the next one.
Next Title
Press button on remote control to jump to next title.
Previous Title Press button on remote control to playing
返回
声道
previous title.
Single step
You can play the discontinuous pictures frame by frame showing in
the screen,press the St ep button for this function. First press to freeze
the picture. Pr ess again for mov ing a frame. Press Pl ay button to
resume normal play.
Select Playing
You can also select your desire track by using numer ic button(but only
under PBC off mod e).Press numeric button(0-9, 10+) for selecting.
E.g. Track No.22 Pr ess numer ic button 10+ for two ti mes , then press
numer ic button 2. Yo u can press Title button on remot e control for
also
this function.
Repeat Playing
When playing a DVD disc, you can repeat playing segment, single
title, chapter … etc.Pressing repeat button repeatedly.As for repeat
segment, press A-B button on remote control to operate. Press A-B
button once to finish repeat setting A. Press A-B again to finish
repeat setting from A to B. Press A-B
for the third time to cannel
repeat function.
Program Playing
When the DV D have stopped, press PROG button on remote control
for processing edit program. by pressing Nume ric button, it will
Then
reveal the program procedure in the left hand side, whereas
sequent number of track in the right.
P 00:00
14
the
Page 17

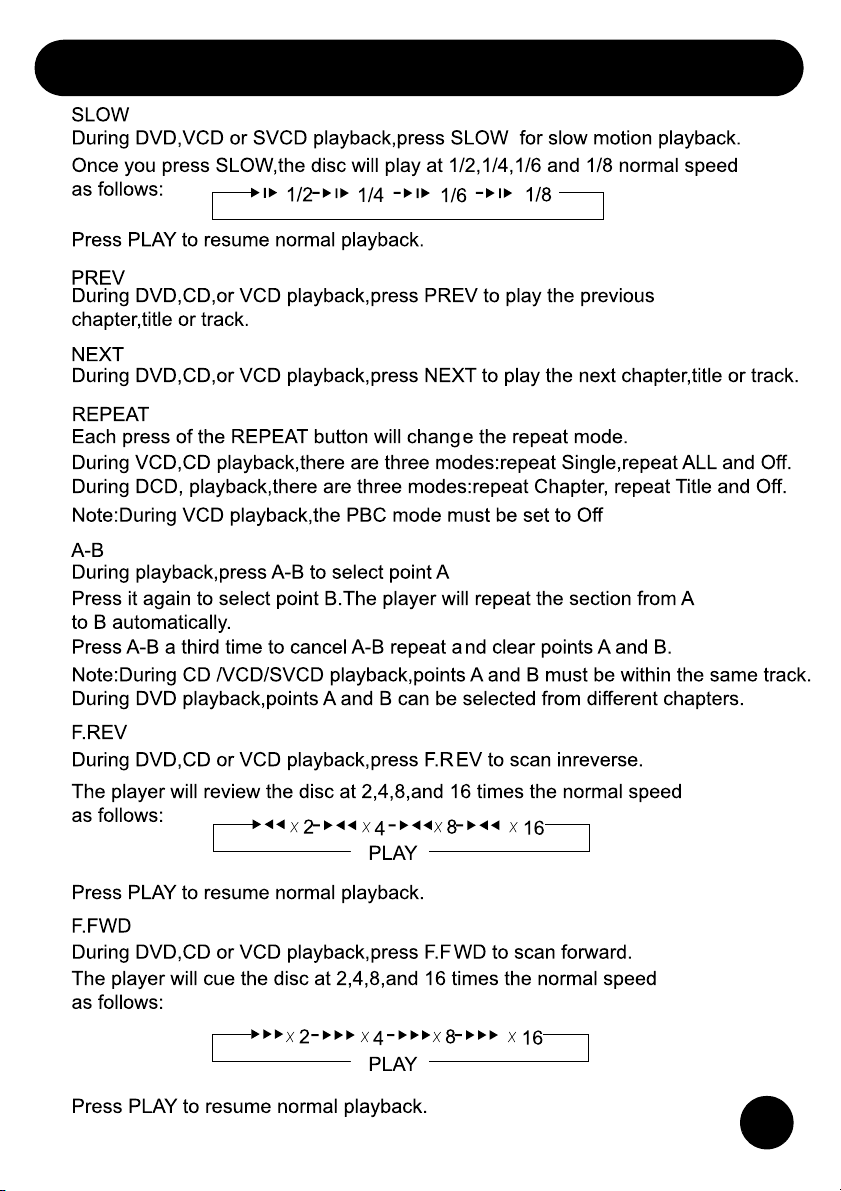
Basic Functions
Fast Forward
Pres s the Fas t For war d but ton on
the remote
cont rol uni t, the movie
play s rapi dl y. Keep co nt inuo us ly
to pr es s the Fas t Back war d but ton,
and the title of the pi ctur e wi ll st art
play ing di sc wi th nor mal sp eed .
Tim e Selection
Slow Forward
Press the Sl ow Fo rwa rd button on
the remot e control until, the mov ie
plays slowly.Keep continuously to
press the Slow Backward
and the title of the picture will start
playing disc with normal speed.
1. While playing VCD disc, press Time button, screen wi ll show the
track,PBC and time of the disc:
VCD TRK 06/17 PBC
02-12-03
2.Us e the directional arrow buttons to select the position,then intput
enter numbers,after that press ENT ER to affirm,the disc wi ll play
from your selection.
3.While playing DVD disc,press Time button, screen wi ll show the
titles and chapters of the disc. Th en do as 2. .
DVD TT 06/17 CH 00/00
02-12-03
Note:
Never input an overtime manifest to the player
playable. Only select the time button
when playing.
than the disc
button,
Tit le
When play ing a di sc , pres s this but ton to return title, yo u can ch oos e
title aga in.
15
Page 18

:4 :3PS
:Auto Fit
:PA L
:YUV
:Standard
Setup Menu Options
Various features of the player can be adjusted in the Setup Menu:
-Press the SETUP button.
-Setup Menu appears.
-Highlight the desired icon. Press the ENTER/ button to activate
the setting submenu.
Language
Enter this menu to setup another language in the OSD display,DVD
disc subtitle, DVD disc
Press the SETUP button.
Highlight " Language."language submenu appears.
Using the DIRECTION KEYS. Highlight the desired item and press the
ENTER/ button.Highlight the desired item.
Press the ENTER/ button to confirm.
Press the SETUP button to save the setting and
audio and DVD disc Start Menu.
exit.
Video Output Selection
Enter this menu to setup the Vid eo setting. Press the SETUP button.
Navigate DIRECTION KEYS to highlight" Video."
Video sub menu appears.
Highlight the desired iterm and press the ENTER/ button.
Highlight the desired item.
Press the ENTER/ button to confirm.
Press the SETUP button to save the setting and exit.
4
:4 :3PS
:Auto Fit
:PA L
:YUV
:Standard
16
Page 19

Setup Menu Options
1) Aspect Ratio:If your TV is a standard 4:3 type,select 4: 3PS or
4: 3LB. If you desire
16×9.Select 16×9 wide.
2) View Mode:select the view mode from Fill/Original/Auto Fit/Pan
Scan.
3) TV System:you can change the TV system from NTSC/PAL/AUTO.
4) Video Out:Select based on
your TV. There are 4 selections: S-VIDEO/ YUV/ P-SCAN
5) Smart Picture:You can change the picture effect as you like.
There are 4 selecttions"Standard/vivid/Cool/Personal.
TV Shape
The aspect ratio of the picture can be varied in line with the features
available on the TV in use.
4: 3 Letter Box
Allows you to view movies in their original aspect ratio. The entire
frame of the movie will be displayed on screen but will occupy a
smaller portion of the screen.
to view widescreen(16×9) DVDs.If your TV is
your connection from the DVD player to
16:9 Widescreen
When you connect to a widescreen TV(16:9),this setting will allow
the original aspect ratio to be displayed.
4: 3 Pan Scan
The image will fit the screen.The left and right edges of the image
may be cut off from the screen.
17
Page 20

Setup Menu Options
Parental control :
Set Password
8. Adult
Digital Output
Compression
Down Sampling
:Off
Off
Off::
Audio Output Selection
Enter this menu to setup the Audio setting.Press SETUP button.
Highlight"Audio".Audio submenu appears.
Highlight the desired item and press ENTER/ button. Highlight the
desired item. Press ENTER/ button to confirm.
Press SETUP button to save the setting and quit.
Digital Output
Compression
Down Sampling
1) Select the Digital Output between PCM/RAW or Off.
2) Set the Compression on or off.
3) Set the Down Sampling on or off.
Rating
:Off
:Off
:Off
Enter this menu to setup the Rating setting. Press SETUP button
Highlight " Rating",rating sub menu appears.
Highlight the desired item and press ENTER/ button. Highlight the
desired item. Press ENTER/ button to confirm.Press SETUP button
to save the setting and quit.The pre- set password is
Parental control :
Set Password
8. Adult
0000.
18
Page 21

Setup Menu Options
Use Default Settings
Screen saver :
On
Misc
Enter this menu to setup the Misc setting,Press SETUP button
Highlight"Misc",Misc submenu appears.
Highlight the desired item and press ENTER/ button. Highlight the
desired item. Press ENTER/ button to confirm.Press SETUP button
to save the setting and quit.
1) Use Default settings, Choose to reset
settings.
2) Screen Saver:You can set the screen saver on or off.
Use Default Settings
the system to the Default
Screen saver :
19
Page 22

Remo te Control Operation
20
Page 23
Remo te Control Operation
21
Page 24

Remo te Control Operation
STOP
ZOOM
VOL
SUBTITLE
ANGLE
LANGUAGE
22
Page 25

Koda k Picture CD Playback
A Kodak picture CD has the size and shape of a regular CD
The max. size of JPEG picture can be supported is 3840*3840
Pixels JPEG stands for Joint Picture Experts Group.It is a
compressing standard. It is the first international standard on Still
Pictuer Compressing: ISO10918- 1 constituted by the Committee on
Still Picture Compressing Stardard of ISO.The pictures
Picture CD are stored in this format( JPEG).This player can decode
the JPEG picture file in a Kodak Picture CD and display the
picture in different modes.
Operation instructions:
Press PAUSE key to stop playback temporarily
Press PREV or NEXT key to select.
You can use number keys to select a particular picture.
Image rotation
There are three modes to rotate a picture: 90°clockwise,180°
clockwise and 90°counter- clockwise operations are allowed only
When a picture is being displayed normally and will be cancelled
automatically when a new picture is displayed.Press ANGLE
repeatedly,you can select the different rotation modes: original,
90deg cw, 180deg cw,90degccw.
.
on Kodak
Zoom function
The player provides both Zoom in and pan function.Each press of the
ZOOM button will zoom the picture as follows:
Q1 Q2 Q3
Q off
Note:During the ZOOM function, slide showtransitions and image
rotation are disabled.
Note:the quality of the pictures displayed on your screen will depend
on the quality of your display equipment, and of the original picture
quality.
23
Page 26

Trouble shooting
24
Page 27

Trouble shooting
In the unlikely event of requiring spare parts,please contact our
spare parts department on:
Tel : 0871 230 0790
Email:sparesdist@albaplc. co. uk
25
Page 28

Specification
MPEG1 MPEG2 MPEG4
26
AC 100V- 240V,50/60Hz,<1A
Page 29

Guarantee
27
Page 30

Warning
Page 31

74-G070502A-A0
Page 32

lssue 25 May 2007
cecustomerservice@albaplc.co.uk
0871 230 1777
 Loading...