

Page 1

GDVD100WLCD
Goodmans Product Information Helpline
0870-873-0080
Portable DVD Player
with Remote Control
User Guide
82-179-00070
Page 2

Table of Contents
Remote Control Location of buttons.............................................................................4
Front View Locations of controls.................................................................................5
Side View Locations of controls ................................................................................. 6
Chapter 1. DVDChapter 1. DVD
Chapter 1. DVD
Chapter 1. DVDChapter 1. DVD
1-1 DVD Playback...................................................................................................7
Basic Playback.......................................................................................................................... 7
Stopping Playback and Returning to The Menu (If a Menu Is Available on The DVD)......................................... 7
Stopping Playback...................................................................................................................... 8
Rapid Advance (Rapid Reverse)...................................................................................................... 8
Skipping Ahead or Back to Chapters................................................................................................ 8
Still Picture (PAUSE).................................................................................................................... 8
Repeat Viewing......................................................................................................................... 9
Repeat Sections Between Two Specific Points (A-B Repeat)..................................................................... 9
1-2 Convenient functions...................................................................................... 10
Scene Information.................................................................................................................... 10
Changing Audio Soundtrack Language............................................................................................ 10
Subtitles................................................................................................................................ 10
Viewing From Another Angle................................................................................. ........................11
To Mute the DVD Player.............................................................................................................. 11
DVD Menu...............................................................................................................................12
Using the Menu Function............................................................................................................ 12
Chapter 2. Audio CDChapter 2. Audio CD
Chapter 2. Audio CD
Chapter 2. Audio CDChapter 2. Audio CD
2-1 Audio CD Playback..........................................................................................13
Basic Playback......................................................................................................................... 13
Stopping Playback.....................................................................................................................13
Rapid Advance (Rapid Reverse)..................................................................................................... 13
Skipping To Previous or Subsequent Tracks.......................................................................................14
Pause Playback........................................................................................................................ 14
Track Information.................................................................................................................... 14
Chapter 3. Special FChapter 3. Special F
Chapter 3. Special F
Chapter 3. Special FChapter 3. Special F
unctionsunctions
unctions
unctionsunctions
3-1 Playing Kodak Picture CDs................................................................................ 15
Basic Playback......................................................................................................................... 15
During Slide Show......................................................................................................................16
Thumbnail Mode....................................................................................................................... 16
3-2 Playing JPEG picture CDs................................................................................. 17
Basic Playback......................................................................................................................... 17
Playing Mode.......................................................................................................................... 17
Thumbnail Mode....................................................................................................................... 18
3-3 Playing MP3 Music Discs.................................................................................. 19
Basic Playback......................................................................................................................... 19
3-4 Playing a CD containing JPEG pictures and MP3 music..............................................20
Basic Playback......................................................................................................................... 20
Playing Mode.......................................................................................................................... 20
Thumbnail Mode....................................................................................................................... 21
2
Page 3

Table of Contents-continued
Chapter 4. SetupChapter 4. Setup
Chapter 4. Setup
Chapter 4. SetupChapter 4. Setup
4-1 Language Setup.............................................................................................22
On Screen Display (OSD) Language Setting...................................................................................... 22
DVD MENU Language Setting.......................................................................................................23
AUDIO Soundtrack Language Selection [DVD]................................................................................... 24
SUBTITLE Language Selection [DVD]...............................................................................................25
4-2 Screen Setup................................................................................................ 26
TV Type Setting........................................................................................................................26
Screen Saver Setting................................................................................................................. 27
TV System Setting.....................................................................................................................28
4-3 AUDIO Setup................................................................................................. 29
Digital Out Setting................................................................................................................... 29
Analog Out Setting....................................................................................................................30
4-4 Custom Setup............................................................................................... 31
MMC/SD Setting.......................................................................................................................31
Parental Control Setting [DVD]..................................................................................................... 32
Password Setting [DVD]............................................................................................................. 33
Angle Mark Setting [DVD]........................................................................................................... 34
Default Setting........................................................................................................................ 35
4-5 LCD Setup................................................................................................... 36
Panel Setting.......................................................................................................................... 36
Colour Setting......................................................................................................................... 36
Bright Setting..........................................................................................................................37
Contrast Setting......................................................................................................................38
Sharpness Setting.....................................................................................................................39
Chapter 5. FChapter 5. F
Chapter 5. F
Chapter 5. FChapter 5. F
or Yor Y
or Y
or Yor Y
our Rour R
our R
our Rour R
eferenceeference
eference
eferenceeference
5-1 Important Safety Information............................................................................40
5-2 Disc Use and Care..........................................................................................42
5-3 Precautions................................................................................................. 43
5-4 Troubleshooting........................................................................................... 44
5-5 Disc Handling and Maintenance......................................................................... 45
5-6 Specifications...............................................................................................46
3
Page 4
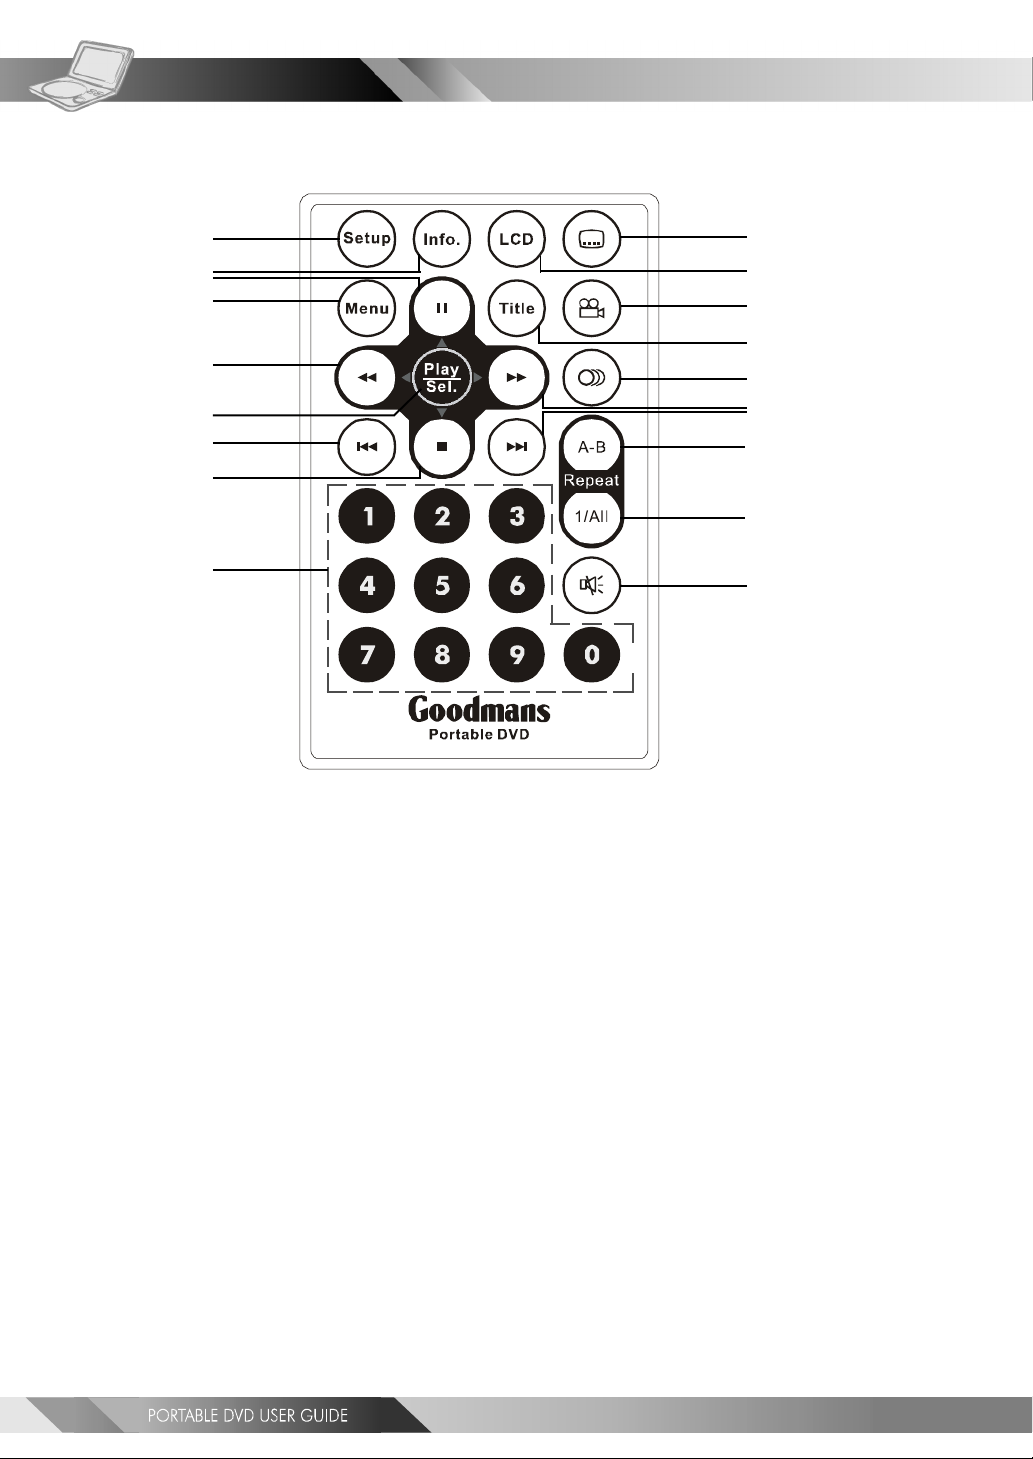
Remote Control Location of buttons
1
2
3
4
10
11
12
13
5
6
7
14
15
16
17
8
18
9
19
1. SETUP button
2. INFO. button
3. PAUSE/UP button
4. MENU button
5. F.BWD/LEFT button
6. PLAY/SEL. button
7. PREVIOUS button
8. STOP/DOWN button
9. NUMERICAL buttons
11. LCD button
12. ANGLE button
13. TITLE button
14. AUDIO button
15. F.FWD/RIGHT button
16. NEXT button
17. A-B REPEAT button
18. REPEAT(1-ALL) button
19. MUTE button
10. SUBTITLE button
4
Page 5
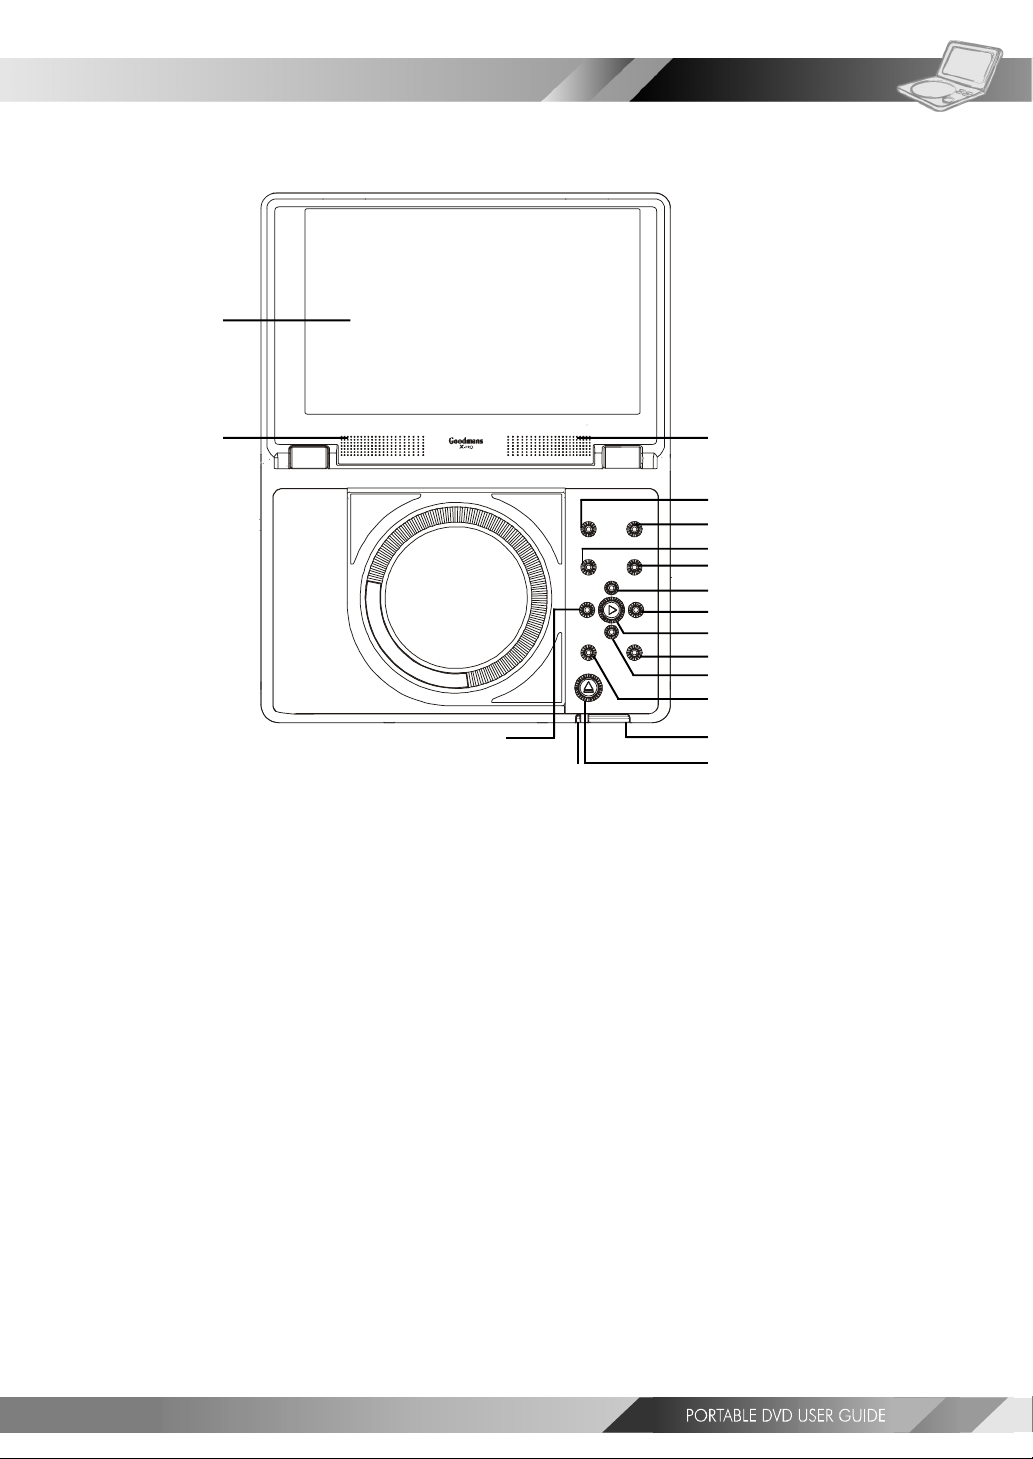
Front View Location of controls
1
2
16
15
1. LCD screen
2. SPEAKERS
3. LCD button
4. SETUP button
5. MODE button
6. MENU button
7. PAUSE/UP button
8. F.FWD/RIGHT button
9. PLAY/SEL. button
10. NEXT button
11. STOP/DOWN button
12. PREVIOUS button
13. Remote Sensor
14. OPEN button
15. POWER indicator/Battery charge indicator
16. F.BWD/LEFT button
2
3
4
5
6
7
8
9
10
11
12
13
14
5
Page 6

LEFT SIDE DIAGRAM
12 3
1. DC IN jack
2. POWER button
3. MMC/SD card slot
Side View Location of controls
RIGHT SIDE DIAGRAM
123456 87
1. Volume control
2. Headphone socket
3. Headphone socket
4. Coaxial output socket (Digtial Audio)
5. AV out/AV in switch button
6. Audio output/input socket
7. Video output/input socket
8. S-Video output socket
6
Page 7
1-1 DVD Playback
DVDDVD
DVD
DVDDVD
Preparation
Please connect the portable DVD player to Power (using the supplied battery or the mains adapter) and
connect the earphones/headphones or connect it to external equipment. If connecting the player to
external equipment:
Turn on the TV set, and select “Video” or “Aux” as the TV’s source.
Turn on the stereo system if the player has been connected to a stereo system.
Slide the AV OUT/IN slide switch to AV OUT.
Basic Playback
Make sure the AV OUT/IN switch is in the OUT position.
1 Turn the power on using the ON/OFF power switch.
2 Press <OPEN> to open the DVD door.
3 Hold the edge of the disc and push the disc gently until it clicks into place with the
printed side up.
Hold the disc without touching its surfaces to avoid scratches, position it with the printed title side facing up.
4 Close the DVD door.
Close the DVD door and the portable DVD player will start playback if there are no menus on the DVD.
If the disc has one or more titles, the menu screen will appear on the screen.
<< NOTE: Follow steps 5 and 6 if a menu is shown on the screen. >>
5 Use < / / / > to select “play”.
<< NOTE: To select a title, input the number, i.e. 1 for chapter 1, 10 for chapter 10, and etc. >>
6 Press <PLAY/SEL.> to start playback.
After operation
When the portable DVD player is not in use, remove the disc and slide the power switch to the off position. Then
close the display panel
Stopping Playback and Returning to The Menu Screen (If a Menu Is Available on The DVD)
Press <MENU>. Press <MENU>.
The portable DVD player stops playback, and then displays the menu screen.
If the disc is placed in upside down (and it is a single sided disc), “NO DISC” will be shown on the display.
For your reference: For your reference:
When “ ” appears while a button is pressed, this indicates that the corresponding function is not available.
7
Page 8
DVDDVD
DVD
DVDDVD
1-1 DVD Playback-continued
Stopping Playback
Press <STOP> once to stop the disc at its present position (PRESTOP). When the play
button is pressed). The disc will start from the playback position. Press <STOP> twice
to stop the disc when the play button is pressed, playback will resume from the beginning.
Rapid Advance (Rapid Reverse)
Press <F.BWD> or <F.FWD> during playback.
To resume playback, press <PLAY/SEL.>.
The speed of advance ( x2, x4, x8, x16, x32) or reverse ( x2, x4, x8, x16,
x32) can be selected by pressing the <F.FWD> or <F.BWD> buttons repeatedly.
Skipping Ahead or Back to Previous Chapters
Skipping Ahead
Press
Subsequent chapters will be shown for each press of this button.
Skipping Back
Press
Previous chapters will be shown for each press of this button.
<NEXT> during playback.
<PREVIOUS> during playback.
Still Picture (PAUSE)
Press <PAUSE> once during playback.
Playback will pause.
*To resume normal playback
---Press <PLAY/SEL.>.
8
Page 9
1-1 DVD Playback-continued
Repeat Viewing
Press <1/ALL REPEAT> during playback.
Press once: Chapter (The current chapter will be repeated.)
Press twice: Title (The current title will be repeated.)
Press three times: Disc (The whole disc will be repeated.)
Press four times: off (Repeat cancelled)
*To return to normal playback
---Press <1/ALL REPEAT> repeatedly until “ Off” appears on the screen.
<< NOTE >>
Repeat playback may not work correctly with some DVDs.This is not a fault with the DVD player.
Repeat Sections Between Two Specific Points (A-B Repeat)
1 Press <A-B> to select starting point (A).
DVDDVD
DVD
DVDDVD
“Repeat A” is shown on the screen.
2 Press <A-B> again to select end point (B).
“Repeat A-B” is shown on the screen. The player will now playback the scenes between Point A and Point B.
*To resume normal playback
---Press
(“ Off” is shown on the screen.)
<< NOTE >>
A-B repeat playback works only when starting Point A and ending Point B are within the same chapter.
<A-B> <A-B>
<A-B> again.
<A-B> <A-B>
9
Page 10
DVDDVD
DVD
DVDDVD
1-2 Convenient functions
Scene Information
Press <INFO.> during playback.
Press <INFO.> button repeatedly and the title number, chapter number, and other information will be shown on
the screen.
*To stop displaying scene information
---Press <INFO.> repeatedly until the information disappears.
Changing Audio Soundtrack Language
You can change the audio language from the one selected at the initial settings to a different language. (This operation
functions only with discs on which multiple audio soundtrack languages are recorded.)
Press <AUDIO> repeatedly until the preferred language is selected.
For your reference:
When the preferred language is not shown even after pressing the button repeatedly, this indicates that language
is not available on the disc.
When the portable DVD player is turned on or after a disc is removed; the language used will be the language which
is selected as the default language in the setup menu. If the default language is not recorded on the disc, the
portable DVD player will playback the first language programmed on the disc.
Subtitles
Repeatedly press <SUBTITLE> until the required subtitle is displayed or until the
subtitles are removed.
<< NOTE: In some cases, the subtitle language may not change immediately to the selected one. >>
For your reference:
If the preferred subtitle language is not shown even after pressing the button repeatedly, this indicates that the
subtitle language is not available on the disc.
When you turn on the DVD player or remove the disc, the portable DVD player will playback the subtitle language
which is selected at the initial setting. If a subtitle language is selected which is not recorded on the disc, the
portable DVD player will us the first subtitle language programmed on the disc.
10
Page 11

1-2 Convenient functions-continued
DVDDVD
DVD
DVDDVD
Viewing From Another Angle
Some DVD discs contain scenes which have been filmed simultaneously from a number of different angles. These scenes
can be viewed from each of these different angles using the <ANGLE> button. (The recorded angles vary
depending on the disc.)
Press <ANGLE> repeatedly during playback until the preferred viewing angle is
selected.
<< NOTE >>
ANGLE will only function on discs where different angles have been recorded. If the “ ” symbol is
shown, there are no alternative angles for the current scene.
To Mute the DVD Player
Press <MUTE> button during playback.
“MUTE” will be shown on the screen, and the audio output will be muted. To unmute the sound, press the mute
button and “MUTE OFF” will be shown on the screen.
11
Page 12
DVDDVD
DVD
DVDDVD
1-2 Convenient functions-continued
DVD Menu
Some DVD discs have unique menu structures called DVD menus. For example, DVDs programmed with complex
content provide guide menus, and those recorded with various languages provide menus for audio and subtitle
language selection. Although the DVD menu’s contents and operation vary from disc to disc, the following explains
basic operation for these menus.
1 Press <TITLE> in stop mode.
The DVD menu available on the disc now appears.
2 Press < / / / > to select the preferred item.
3 Press <PLAY/SEL.>.
You now enter to the selected item.
*To enter other menu screen
---Repeat steps 2 and 3.
*To return to the previous menu screen
---Press <TITLE>.
Using the MENU Function
1 Press <PLAY/SEL.>.
2 Press <MENU>.
A DVD chapter menu with brief broadcast of each paragraph now appears. You may see the introduction
of each chapter and then decide with which chapter to start first.
3 Press < / / / > or number button(s) to select the preferred item.
<< Note: The contents of the menus will vary depending on the DVD.>>
12
Page 13
2-1 Audio CD Playback
Audio DVDAudio DVD
Audio DVD
Audio DVDAudio DVD
Preparation
Please connect the portable DVD player to Power (using the supplied battery or the mains adapter) and
connect the earphones/headphones or connect it to external equipment. If connecting the player to
external equipment:
Turn on the TV set, and select “Video” or “Aux” as the TV’s source.
Turn on the stereo system if the player has been connected to a stereo system.
Slide the AV OUT/IN slide switch to AV OUT.
Basic Playback
1 Turn the power on using the power switch.
2 Press <OPEN> to open the DVD door.
3 Hold the edge of the disc and push the disc gently until it clicks into place with the
printed side up.
Hold the disc without touching its surfaces, position it with the printed title side facing up.
4 Close the DVD door.
The portable DVD player starts playback automatically.
Stopping Playback
Press <STOP> once to stop the disc at its present position (PRESTOP). When the play
button is pressed, playback will start from this position. Press
playback. When the play button is pressed, it will resume from the beginning.
<STOP> twice to stop
Rapid Advance (Rapid Reverse)
Press <F.BWD> or <F.FWD> during playback.
To resume playback, press <PLAY/SEL.>.
The speed of advance ( x2, x4, x8, x16, x32) or reverse ( x2, x4, x8, x16, x32)
can be selected by pressing the <F.FWD> or <F.BWD> buttons repeatedly.
13
Page 14
Audio DVDAudio DVD
Audio DVD
Audio DVDAudio DVD
Skip to Previous or Subsequent Tracks
Skip Ahead
2-1 Audio CD Playback-continued
Press
The next track will be played.
Press the button repeatedly to select subsequent tracks.
Skip Back
Press
The previous track will be played. Press the button repeatedly to select eariler tracks.
<NEXT> during playback.
<PREVIOUS> during playback.
Pause Playback
Press <PAUSE> once during playback.
The player will pause playback.
To return to normal playback
Press <PLAY/SEL.>.
Track Information
Displaying Track Information
Press <INFO.> repeatedly to display the elapsed time, track number and the total
number of tracks on the screen
*To stop displaying track information
---Press <INFO.> repeatedly until the information disappears.
.
14
Page 15

3-1 Playing Kodak Picture CDs
Special FSpecial F
Special F
Special FSpecial F
unctionsunctions
unctions
unctionsunctions
Basic Playback
You can play Kodak picture CDs for viewing on the screen.
Insert a kodak picture CD into the player.
After few seconds, the portable DVD player will start to playback the pictures in slide show automatically.
OR
Enter the number of the picture to be shown using the numerical keys, then press
<PLAY/SEL.> to start slide show with that picture.
Press <INFO.>, the current photo number and total photo numbers will be shown on the screen.
*To pause slide show
---Press <PAUSE>, the slide show will pause.
*To stop slide show
---Press <STOP>, then enter Thumbnail mode.
<<Note: Press <TITLE>, you can also enter Thumbnail mode.>>
*To resume slide show
---Press <PLAY/SEL.> again.
Change the transition effect
Transitional effects can be added between photos. Press <ANGLE> repeatedly during playback to cycle the options
as follows:
Cover Up: Next photo will cover the current from the bottom to the top.
Cover Down: Netx photo will cover the current photo from the top to the bottom.
Uncover Up: The next photo will be uncovered from the bottom.
Uncover Down: The next photo will be uncovered from the top.
Split Horizontal In: The next photo will appear from the bottom and top and meet in the middle.
Split Horizontal Out: The next photo will appear from the middle and expand to fill the screen.
Wide Up: Next photo will expand from bottom to top.
Wide Down: Next photo will expand from top to bottom.
Blinds Horizontal Up: Next photo will appear as strips and then expand upwards to cover current photo.
Blinds Horizontal Down: Next photo will appear as strips and then expand to cover current photo.
Blinds Through Black: Current photo will fade to black and then the next photo will emerge from the black.
No Effect: No effect applied to transition of photos.
15
Page 16

Special FSpecial F
Special F
Special FSpecial F
unctionsunctions
unctions
unctionsunctions
3-1 Playing Kodak Picture CDs-continued
During a Slide Show
1 Press <NEXT> to view the next picture or <PREVIOUS> to view the previous
picture.
2 Press <RIGHT> button or <LEFT> button to rotate the picture.
Press <RIGHT> button to rotate right by 90 degree.
Press <LEFT> button to rotate left by 90 degree.
*To pause slide show
---Press <PAUSE>, the slide show will pause.
*To stop slide show
---Press <STOP>, then enter Thumbnail mode.
<<Note: Press <TITLE> to enter Thumbnail mode.>>
*To resume slide show
---Press <PLAY/SEL.> again.
Thumbnail Mode
1 Press <TITLE> to enter Thumbnail mode.
While in Thumbnail mode, there are 20 pictures per page for viewing.
2 Press < / / / > to select the picture as thumbnails. If you want to view
the selected picture in full size, press
Press <STOP> to return to the thumbnail screen.
<PLAY/SEL.>.
3 Press <NEXT> or <PREVIOUS> to view the next or previous thumbnail page.
16
Page 17

3-2 Playing JPEG picture CDs
Special FSpecial F
Special F
Special FSpecial F
unctionsunctions
unctions
unctionsunctions
Basic Playback
JPEG pictures on a CD can be played back as a slide show.
Load a JPEG picture CD.
After few seconds, the portable DVD player will start to playback the pictures as a slide show automatically.
OR
Enter the number of the picture to be shown using the numerical keys, then press
<PLAY/SEL.>.
Press <INFO.>, the current photo number, number of photos will be shown on the screen.
*To pause slide show
---Press <PAUSE>, the slide show will pause.
*To stop slide show
---Press <STOP>, then enter the File Manager.
*To resume slide show
---Press <PLAY/SEL.> again.
Change the transition effect
Transitional effects can be added between photos. Press <ANGLE> repeatedly during playback to cycle the options
as follows:
Cover Up: Next photo will cover the current from the bottom to the top.
Cover Down: Netx photo will cover the current photo from the top to the bottom.
Uncover Up: The next photo will be uncovered from the bottom.
Uncover Down: The next photo will be uncovered from the top.
Split Horizontal In: The next photo will appear from the bottom and top and meet in the middle.
Split Horizontal Out: The next photo will appear from the middle and expand to fill the screen.
Wide Up: Next photo will expand from bottom to top.
Wide Down: Next photo will expand from top to bottom.
Blinds Horizontal Up: Next photo will appear as strips and then expand upwards to cover current photo.
Blinds Horizontal Down: Next photo will appear as strips and then expand to cover current photo.
Blinds Through Black: Current photo will fade to black and then the next photo will emerge from the black.
No Effect: No effect applied to transition of photos.
File Manager
1 Press < / / / > to choose the required picture, then press <PLAY/
SEL.> to show the picture.
2 Press <NEXT> to skip six pictures or <PREVIOUS> to jump back six pictures.
17
Page 18

Special FSpecial F
Special F
Special FSpecial F
unctionsunctions
unctions
unctionsunctions
3-2 Playing JPEG Picture CDs-continued
Playing Mode
1 Press <NEXT> to view next picture or <PREVIOUS> to view previous
picture.
2 Press <RIGHT> button or <LEFT> button to rotate the picture.
Press <RIGHT> button to rotate right by 90 degrees.
Press <LEFT> button to rotate left by 90 degrees.
*To pause playback
---Press <PAUSE>.
*To stop playback
---Press <STOP>, then enter to the File Manager.
<<Note: Press <TITLE> to enter Thumbnail mode.>>
*To resume playback
---Press <PLAY/SEL.> again.
Thumbnail Mode
1 Press <TITLE> to enter Thumbnail mode.
While in Thumbnail mode, there are 20 pictures per page for viewing.
2 Press < / / / > to select the picture as thumbnails. If you want to view
the selected picture in full size, press
Press <STOP> to return to the thumbnail screen.
<PLAY/SEL.>.
3 Press <NEXT> or <PREVIOUS> to view the next or previous thumbnail page.
18
Page 19

3-3 Playing MP3 Music Discs
Special FSpecial F
Special F
Special FSpecial F
unctionsunctions
unctions
unctionsunctions
Basic Playback
1 Turn the DVD player on using the power ON/OFF switch.
2 Press <OPEN> to open the DVD door.
3 Hold the edge of a MP3 disc and push the disc gently until it clicks into place with
the printed side up.
4 Close the DVD door.
Wait about 5 seconds and playback will start automatically.
< <
/ /
/ /
The File Manager will be displayed. A specific track or folder can be selected using the
or the numberical buttons and then pressing <PLAY/SEL.> button.
<< NOTE >>
Files can only be selected using the File manager when the MP3 disc is stopped.
*To pause playback
---Press <PAUSE>.
*To resume playback
---Press <PLAY/SEL.>.
<
< <
/
/ /
/
/ /
/ /
/
/ /
>>
>
>>
*To stop playback
---Press <STOP>.
Repeat
Press <1/ALL REPEAT> button to change the mode as follows:
Track: The current track will be repeated.
Folder: All tracks in the current folder will be repeated.
Disc: All tracks on the disc will be repeated.
Off: Repeat function turned off. All tracks on the disc will be played once.
19
Page 20

Special FSpecial F
Special F
Special FSpecial F
unctionsunctions
unctions
unctionsunctions
3-4 Playing a CD containing JPEG pictures and MP3 music
Basic Playback
Load a disc containing JPEG pictures and MP3 music.
After few seconds, the File Manager will be displayed and the portable DVD player starts to play back the files in order
automatically.
*To pause playback
---Press <PAUSE>.
*To resume playback
---Press <PLAY/SEL.>.
*To stop playback
---Press <STOP>, it will enter File Manager.
Playing Mode
1 Press <NEXT> to view the next picture or playback the next track.
2 Press <PREVIOUS> to view the previous picture or playback the previous track.
For JPEG pictures only
Press <RIGHT> button or <LEFT> button to rotate the picture.
Press <RIGHT> or <LEFT> button to rotate right or left by 90 degrees.
*To pause playback
---Press <PAUSE>.
*To resume playback
---Press <PLAY/SEL.>.
*To stop playback
---Press <STOP>, it will enter File Manager.
20
Page 21

3-4 Playing a CD containing JPEG pictures and MP3 music
Thumbnail Mode
Special FSpecial F
Special F
Special FSpecial F
unctionsunctions
unctions
unctionsunctions
1 Press <TITLE> to enter Thumbnail mode.
While in Thumbnail mode, there are 20 pictures per page.
2 Press < / / / > to select the picture in the thumbnail. If you want to view
the selected picture in its original size, press
When you view the picture in its original size, you can press <STOP> to view the pictures in the thumbnail.
<PLAY/SEL.>.
3 Press <NEXT> or <PREVIOUS> to view the next or previous thumbnail page.
21
Page 22
SetupSetup
Setup
SetupSetup
On Screen Display (OSD) Language Setting
Allows the default languages for the on screen display (OSD) to be set.
(Default: English)
4-1 Language Setup
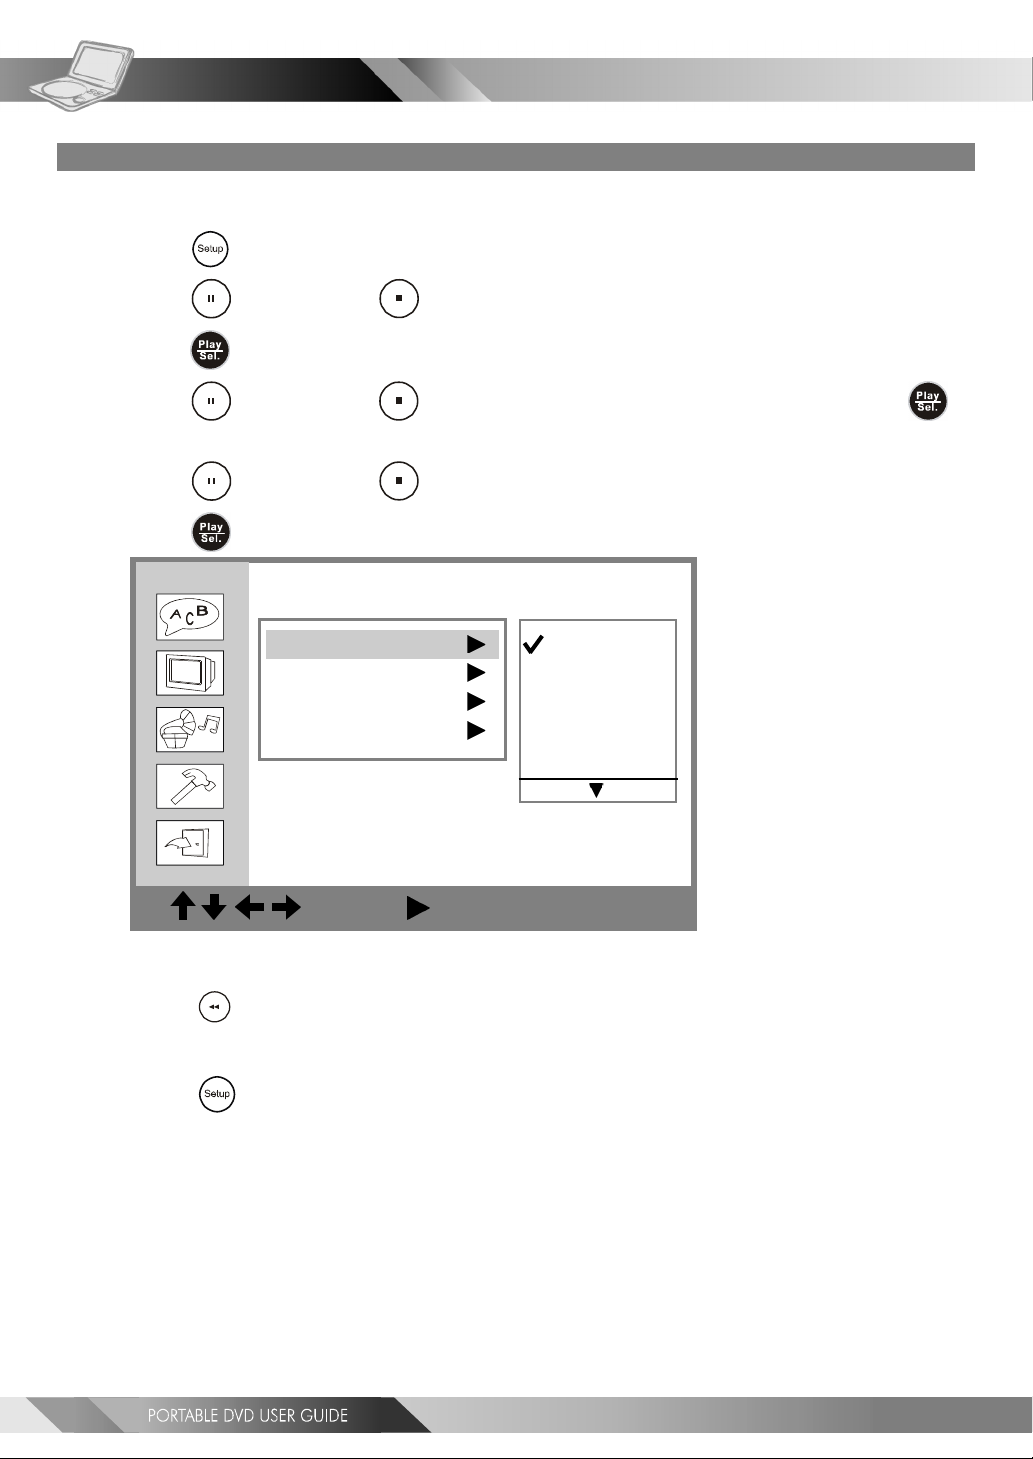
1 Press <SETUP> in the stop mode.
2 Press <UP> button / <DOWN> button to select “Language Setup”, and then
press <PLAY/SEL.>.
3 Press <UP> button / <DOWN> button to select “OSD”, and then press
<PLAY/SEL.>.
4 Press <UP> button / <DOWN> button to select the preferred language.
5 Press <PLAY/SEL.>.
Language Setup
OSD
Menu
Audio
Subtitle
English
French
German
Italian
Spanish
: Move : Select SETUP: Quit
*To go up one menu level
---Press <LEFT> button.
*To exit
---Press <SETUP> to exit or select EXIT from SETUP MENU screen.
22
Page 23

4-1 Language Setup-continued
SetupSetup
Setup
SetupSetup
DVD Menu Language Setting
Set the default language for the menu on the DVD.
(Default: English)
1 Press <SETUP> in the stop mode.
2 Press <UP> button / <DOWN> button to select “Language Setup”, and then
press <PLAY/SEL.>.
3 Press <UP> button / <DOWN> button to select “Menu”, and then press
<PLAY/SEL.>.
4 Press <UP> button / <DOWN> button to select the preferred language.
5 Press <PLAY/SEL.>.
Language Setup
OSD
Menu
Audio
Subtitle
English
Chinese
Japanese
French
German
: Move : Select SETUP: Quit
Note:
If the language selected is not available on the DVD menu, the default language for the DVD will be
displayed.
*To go up one menu level
---Press
*To exit
---Press
<LEFT> button.
<SETUP> to exit or select EXIT from SETUP MENU screen.
23
Page 24

SetupSetup
Setup
SetupSetup
4-1 Language Setup-continued
AUDIO Soundtrack Language Selection [DVD]
Set the preferred audio language for playback.
(Default: English)
1 Press <SETUP> in the stop mode.
2 Press <UP> button / <DOWN> button to select “Language Setup”, and then
press <PLAY/SEL.>.
3 Press <UP> button / <DOWN> button to select “Audio”, and then press
<PLAY/SEL.>.
4 Press <UP> button / <DOWN> button to select the preferred language.
5 Press <PLAY/SEL.>.
ORIGINAL: The top-priority language of each disc will always playback first.
Language Setup
OSD
Menu
Audio
Subtitle
English
Chinese
Japanese
French
German
: Move : Select SETUP: Quit
*To go up one menu level
---Press
*To exit
---Press
For your reference:
If the language selected is not recorded on the disc, the default language of the disc will be used.
<LEFT> button.
<SETUP> to exit or select EXIT from SETUP MENU screen.
24
Page 25

4-1 Language Setup-continued
SetupSetup
Setup
SetupSetup
SUBTITLE Language Selection [DVD]
Set the preferred language for the subtitles.
(Default: Off)
1 Press <SETUP> in the stop mode.
2 Press <UP> button / <DOWN> button to select “Language Setup”, and then
press <PLAY/SEL.>.
3 Press <UP> button / <DOWN> button to select “Subtitle”, and then press
<PLAY/SEL.>.
4 Press <UP> button / <DOWN> button to select the preferred language.
5 Press <PLAY/SEL.>.
Language Setup
OSD
Menu
Audio
Subtitle
English
Chinese
Japanese
French
German
: Move : Select SETUP: Quit
*To go up one menu level
---Press
*To exit
---Press
For your reference:
If the language selected is not recorded on the disc, the default language of the disc will be used.
<LEFT> button.
<SETUP> to exit or select EXIT from SETUP MENU screen.
25
Page 26

SetupSetup
Setup
SetupSetup
4-2 Screen Setup
TV Type Setting
Set the TV picture type that should be displayed on the LCD screen or the connected TV.
(Default: 16:9)
1 Press <SETUP> in the stop mode.
2 Press <UP> button / <DOWN> button to select “Screen Setup”, and then
press <PLAY/SEL.>.
3 Press <UP> button / <DOWN> button to select “TV Type”, and then press
<PLAY/SEL.>.
4 Press <UP> button / <DOWN> button to select a preferred TV display.
5 Press <PLAY/SEL.>.
Screen Setup
TV Type
Screen Saver
TV System
4:3 PS
4:3 LB
16:9
: Move : Select SETUP: Quit
*To go up one menu level
---Press <LEFT> button.
*To exit
---Press <SETUP> to exit or select EXIT from SETUP MENU screen.
4:3 Pan Scan
Select 4:3 PS for a conventional size TV set. Video material formatted in the pan & scan style has
the left and right edges trimmed.
4:3 Letter Box
Select 4:3 LB for a conventional size TV set. Black bands appear at top and bottom of screen
(letter-box style).
16:9 Wide
Select 16:9 for a wide-screen TV set. Played in “FULL” size.
Setting the wide-screen TV to “FULL” mode is also necessary.
Each screen shows an example when the video material for a wide-screen is played.
26
Page 27

4-2 Screen Setup-continued
Screen Saver Setting
Set the screen saver to come on when a disc is stopped and no button is pressed after 10 minutes.
(Default : On)
SetupSetup
Setup
SetupSetup
1 Press <SETUP> in the stop mode.
2 Press <UP> button / <DOWN> button to select “Screen Setup”, and then
press <PLAY/SEL.>.
3 Press <UP> button / <DOWN> button to select “Screen Saver”, and then
press <PLAY/SEL.>.
4 Press <UP> button / <DOWN> button to select “On” or “Off ”.
5 Press <PLAY/SEL.>.
The waiting time of the screen saver is set to 10 minutes.
Screen Setup
TV Type
Screen Saver
TV System
On
Off
: Move : Select SETUP: Quit
*To go up one menu level
---Press <LEFT> button.
*To exit
---Press <SETUP> to exit or select EXIT from SETUP MENU screen.
27
Page 28

SetupSetup
Setup
SetupSetup
4-2 Screen Setup-continued
TV System Setting
The player provides “PAL”, “NTSC” and “AUTO” settings for your selection. When connecting the portable
DVD player to your TV, set the “TV SYSTEM” from the on-screen display to the format that is compatible
with your TV’s system. Set ”NTSC” from on-screen display if connecting to NTSC TV system, set “PAL” if it is
PAL TV, or set “AUTO” if it is a multi-TV system that supports both PAL and NTSC.
(Default: PAL)
1 Press <SETUP> in the stop mode.
2 Press <UP> button / <DOWN> button to select “Screen Setup”, and then
press <PLAY/SEL.>.
3 Press <UP> button / <DOWN> button to select “TV System”, and then
press <PLAY/SEL.>.
4 Press <UP> button / <DOWN> button to select the appropriate TV system
for your clearest view.
5 Press <PLAY/SEL.>.
Screen Setup
TV Type
Screen Saver
TV System
: Move : Select SETUP: Quit
*To go up one menu level
---Press
*To exit
---Press
<LEFT> button.
<SETUP> to exit or select EXIT from SETUP MENU screen.
NTSC
PAL
AUTO
28
Page 29

4-3 Audio Setup
SetupSetup
Setup
SetupSetup
Digital Out Setting
Set the digital output depending on the amplifier connected.
(Default: SPDIF/RAW)
1 Press <SETUP> in the stop mode.
2 Press <UP> button / <DOWN> button to select “Audio Setup”, and then
press <PLAY/SEL.>.
3 Press <UP> button / <DOWN> button to select “Digital Out”, and then
press
<PLAY/SEL.>.
4 Press <UP> button / <DOWN> button to select the preferred digital out
setting.
5 Press <PLAY/SEL.>.
Audio Setup
Digital Out
Analog Out
SPDIF/PCM
SPDIF/RAW
Off
: Move : Select SETUP: Quit
*To go up one menu level
---Press
<LEFT> button.
*To exit
---Press <SETUP> to exit or select EXIT from SETUP MENU screen.
For your reference:
If you have a Dolby Digital 5.1 or DTS capable amplifier, the audio output should normally be set to
SPDIF/RAW. If you have a 2-channel Dolby Digital amplifier, the audio output should normally be set to
SPDIF/PCM. Please check your amplifiiers instruction manual to find the correct settings.
29
Page 30

SetupSetup
Setup
SetupSetup
Analog Out Setting
(Default: 2 Channel)
4-3 Audio Setup-continued
1 Press <SETUP> in the stop mode.
2 Press <UP> button / <DOWN> button to select “Audio Setup”, and then
press <PLAY/SEL.>.
3 Press <UP> button / <DOWN> button to select “Analog Out”, and then press
<PLAY/SEL.>.
4 Press <UP> button / <DOWN> button to select the preferred analog out
setting.
5 Press <PLAY/SEL.>.
Audio Setup
Digital Out
Analog Out
: Move : Select SETUP: Quit
*To go up one menu level
---Press
*To exit
---Press
<LEFT> button.
<SETUP> to exit or select EXIT from SETUP MENU screen.
2 Channel
30
Page 31

4-4 Custom Setup
SetupSetup
Setup
SetupSetup
MMC/SD Setting
1 Press <SETUP> in the stop mode.
2 Press <UP> button / <DOWN> button to select “Custom Setup”, and then
press <PLAY/SEL.>.
3 Press <UP> button / <DOWN> button to select “MMC/SD”, and then
press <PLAY/SEL.>.
4 Press <UP> button / <DOWN> button to select “On” or “Off ”, and then
press
<< Important >>
If you set the MMC/SD setting to “On”, the portable DVD player can only read MMC/SD card.
Switch to MMC/SD mode by pressing the <Mode> button.
<PLAY/SEL.>.
The portable DVD player can’t playback any discs.
Custom Setup
MMC/SD
Parental Ctrl
Password ...
Angle Mark
On
Off
: Move : Select SETUP: Quit
*To go up one menu level
---Press
<LEFT> button.
*To exit
---Press
<SETUP> to exit or select EXIT from SETUP MENU screen.
31
Page 32

SetupSetup
Setup
SetupSetup
4-4 Custom Setup-continued
Parental Control Setting [DVD]
A built-in viewer rating setting enables you to lock the videos that you do not want children to view. For
example, if you set it to PG-13, then the portable DVD player will not play the videos rated R, NC-17 or X
unless the correct password is entered.
(Default: 8 - All DVD discs are allowed to be played.)
1 Press <SETUP> in the stop mode.
2 Press <UP> button / <DOWN> button to select “Custom Setup”, and then
press <PLAY/SEL.>.
3 Press <UP> button / <DOWN> button to select “Parental Ctrl”, and then
press <PLAY/SEL.>.
4 Enter a 4-digit password before selecting ratings and press <PLAY/SEL.>.
Factory pre-set password: 0000
You need to enter “0000” to set the rating for the first time when purchasing your DVD from the
store.
5 Press <UP> button / <DOWN> button to select the preferred ratings.
6 Press <PLAY/SEL.>.
<< Rating Explanations >>
3.PG: Parental Guidance suggested.
4.PG13: Material is unsuitable for children under the age of 13.
6.R: Restricted, children under 17 would not be admitted without an accompanying parent or adult guardian.
7.NC17: No children under the age of 17, not recommended viewing for children under age 17.
*To go up one menu level
---Press
*To exit
<LEFT> button.
Custom Setup
MMC/SD
Parental Ctrl
Password ...
Angle Mark
4: PG13
5
6: R
7: NC 17
8
: Move : Select SETUP: Quit
---Press <SETUP> to exit or select EXIT from SETUP MENU screen.
For your reference:
You can use the parental control lock ONLY with DVD discs featured with the parental lock function.
32
Page 33

4-4 Custom Setup-continued
Password Setting [DVD]
You can change the password that protects the parental settings.
(Default: 0000)
SetupSetup
Setup
SetupSetup
1 Press <SETUP> in the stop mode.
2 Press <UP> button / <DOWN> button to select “Custom Setup”, and then
press <PLAY/SEL.>.
3 Press <UP> button / <DOWN> button to select “Password”, and then
press <PLAY/SEL.>.
4 Enter your old password and then press <PLAY/SEL.>.
Factory pre-set password: 0000
5 Enter your new password and then press <PLAY/SEL.>.
6 Re-enter your password to verify it and then press <PLAY/SEL.>.
Custom Setup
MMC/SD
Parental Ctrl
Password ...
Old: _ _ _ _
Angle Mark t
New: _ _ _ _
Verify: _ _ _ _
: Move : Select SETUP: Quit
*To go up one menu level
---Press <LEFT> button.
*To exit
---Press <SETUP> to exit or select EXIT from SETUP MENU screen.
33
Page 34

SetupSetup
Setup
SetupSetup
4-4 Custom Setup-continued
Angle Mark Setting [DVD]
You can choose to display or hide the angle mark “ ” on the screen which will appear if there are
multiple angle shot for the current scene.
1 Press <SETUP> in the stop mode.
2 Press <UP> button / <DOWN> button to select “Custom Setup”, and then
press
<PLAY/SEL.>.
3 Press <UP> button / <DOWN> button to select “Angle Mark”, and then
press <PLAY/SEL.>.
4 Press <UP> button / <DOWN> button to select “On” or “Off ”, and then
press <PLAY/SEL.>.
<< NOTE >>
Whether the ANGLE MARK is set to “On” or “Off” with this setting, when you press
<ANGLE> button, the portable DVD player will still display multi-angles that are available
on the DVD.
Custom Setup
MMC/SD
Parental Ctrl
Password ...
Angle Mark
On
Off
: Move : Select SETUP: Quit
*To go up one menu level
---Press
*To exit
---Press <SETUP> to exit or select EXIT from SETUP MENU screen.
34
<LEFT> button.
Page 35

4-4 Custom Setup-continued
Default Setting
Returns settings to factory set defaults.
SetupSetup
Setup
SetupSetup
1 Press <SETUP> in the stop mode.
2 Press <UP> button / <DOWN> button to select “Custom Setup”, and then
press <PLAY/SEL.>.
3 Press <UP> button / <DOWN> button to select “Default”, and then press
<PLAY/SEL.>.
4 Press <RIGHT> button to select “Read”, and then press <PLAY/SEL.>.
<< EXCEPTION>>
The viewer rating and the password setting will NOT be changed even though defaults are
selected.
Custom Setup
Parental Ctrl
Password ...
Angle Mark
Default
Read
: Move : Select SETUP: Quit
*To go up one menu level
---Press
*To exit
---Press <SETUP> to exit or select EXIT from SETUP MENU screen.
<LEFT> button.
35
Page 36

SetupSetup
Setup
SetupSetup
Panel Setting
The portable DVD player provides two options about the panel adjustment: “Normal” or “4:3”.
4-5 LCD Setup
1 Press <LCD> repeatedly until “PANEL” is shown.
2 Press <LEFT> button or <RIGHT> button to choose the preferred panel
setting.
PP
ANEL:ANEL:
P
ANEL:
PP
ANEL:ANEL:
PP
ANEL:ANEL:
P
ANEL:
PP
ANEL:ANEL:
*To finish the setup operation
Nor Nor
Nor
Nor Nor
4:3 4:3
4:3
4:3 4:3
malmal
mal
malmal
---Press
Colour Setting
The colour can be set with this option.
<LCD> repeatedly until the LCD setting information disappears.
1 Press <LCD>, the LCD setting information shows on the screen.
2 Press <LCD> repeatedly until “COLOUR” is shown.
3 Press <LEFT> button or <RIGHT> button to choose the preferred colour
setting.
<< NOTE>> The colour range is from +9 to -9.
COLOUR: +9COLOUR: +9
COLOUR: +9
COLOUR: +9COLOUR: +9
COLOUR: +8COLOUR: +8
COLOUR: +8
COLOUR: +8COLOUR: +8
COLOUR: +7COLOUR: +7
COLOUR: +7
COLOUR: +7COLOUR: +7
COLOUR: +6COLOUR: +6
COLOUR: +6
COLOUR: +6COLOUR: +6
COLOUR: COLOUR:
COLOUR:
COLOUR: COLOUR:
COLOUR: COLOUR:
COLOUR:
COLOUR: COLOUR:
COLOUR: COLOUR:
COLOUR:
COLOUR: COLOUR:
COLOUR: COLOUR:
COLOUR:
COLOUR: COLOUR:
-9-9
-9
-9-9
-8-8
-8
-8-8
-7-7
-7
-7-7
-6-6
-6
-6-6
COLOUR: +5COLOUR: +5
COLOUR: +5
COLOUR: +5COLOUR: +5
COLOUR: +4COLOUR: +4
COLOUR: +4
COLOUR: +4COLOUR: +4
COLOUR: +3COLOUR: +3
COLOUR: +3
COLOUR: +3COLOUR: +3
COLOUR: +2COLOUR: +2
COLOUR: +2
COLOUR: +2COLOUR: +2
COLOUR: +1COLOUR: +1
COLOUR: +1
COLOUR: +1COLOUR: +1
COLOUR: 0COLOUR: 0
COLOUR: 0
COLOUR: 0COLOUR: 0
*To finish the setup operation
---Press
36
<LCD> repeatedly until the LCD setting information disappears.
COLOUR: COLOUR:
COLOUR:
COLOUR: COLOUR:
COLOUR: COLOUR:
COLOUR:
COLOUR: COLOUR:
COLOUR: COLOUR:
COLOUR:
COLOUR: COLOUR:
COLOUR: COLOUR:
COLOUR:
COLOUR: COLOUR:
COLOUR: COLOUR:
COLOUR:
COLOUR: COLOUR:
-5-5
-5
-5-5
-4-4
-4
-4-4
-3-3
-3
-3-3
-2-2
-2
-2-2
-1-1
-1
-1-1
Page 37

4-5 LCD Setup-continued
Bright Setting
Increase or decrease the brightness.
SetupSetup
Setup
SetupSetup
1 Press <LCD> repeatedly until “BRIGHT” is shown.
2 Press <LEFT> button or <RIGHT> button to choose the preferred bright
setting.
<< NOTE>> The bright range is from +9 to -9.
BRIGHTBRIGHT
BRIGHT
BRIGHTBRIGHT
BRIGHTBRIGHT
BRIGHT
BRIGHTBRIGHT
BRIGHTBRIGHT
BRIGHT
BRIGHTBRIGHT
BRIGHTBRIGHT
BRIGHT
BRIGHTBRIGHT
BRIGHTBRIGHT
BRIGHT
BRIGHTBRIGHT
BRIGHTBRIGHT
BRIGHT
BRIGHTBRIGHT
BRIGHTBRIGHT
BRIGHT
BRIGHTBRIGHT
BRIGHTBRIGHT
BRIGHT
BRIGHTBRIGHT
BRIGHTBRIGHT
BRIGHT
BRIGHTBRIGHT
BRIGHTBRIGHT
BRIGHT
BRIGHTBRIGHT
*To finish the setup operation
---Press
::
+9 +9
:
+9
::
+9 +9
::
+8 +8
:
+8
::
+8 +8
::
+7 +7
:
+7
::
+7 +7
::
+6 +6
:
+6
::
+6 +6
::
+5 +5
:
+5
::
+5 +5
::
+4 +4
:
+4
::
+4 +4
::
+3 +3
:
+3
::
+3 +3
::
+2 +2
:
+2
::
+2 +2
::
+1 +1
:
+1
::
+1 +1
::
0 0
:
0
::
0 0
<LCD> repeatedly until the LCD setting information disappears.
BRIGHTBRIGHT
BRIGHT
BRIGHTBRIGHT
BRIGHTBRIGHT
BRIGHT
BRIGHTBRIGHT
BRIGHTBRIGHT
BRIGHT
BRIGHTBRIGHT
BRIGHTBRIGHT
BRIGHT
BRIGHTBRIGHT
BRIGHTBRIGHT
BRIGHT
BRIGHTBRIGHT
BRIGHTBRIGHT
BRIGHT
BRIGHTBRIGHT
BRIGHTBRIGHT
BRIGHT
BRIGHTBRIGHT
BRIGHTBRIGHT
BRIGHT
BRIGHTBRIGHT
BRIGHTBRIGHT
BRIGHT
BRIGHTBRIGHT
::
:
::
::
:
::
::
:
::
::
:
::
::
:
::
::
:
::
::
:
::
::
:
::
::
:
::
-9-9
-9
-9-9
-8-8
-8
-8-8
-7-7
-7
-7-7
-6-6
-6
-6-6
-5-5
-5
-5-5
-4-4
-4
-4-4
-3-3
-3
-3-3
-2-2
-2
-2-2
-1-1
-1
-1-1
37
Page 38

SetupSetup
Setup
SetupSetup
Contrast Setting
You can adjust the contrast of video with this setting to a soothing view for your eyes.
4-5 LCD Setup-continued
1 Press <LCD> repeatedly until “CONTRAST” is shown.
2 Press <LEFT> button or <RIGHT> button to choose the preferred contrast
setting.
<< NOTE>> The contrast range is from +9 to -9.
CONTRASTCONTRAST
CONTRAST
CONTRASTCONTRAST
CONTRASTCONTRAST
CONTRAST
CONTRASTCONTRAST
CONTRASTCONTRAST
CONTRAST
CONTRASTCONTRAST
CONTRASTCONTRAST
CONTRAST
CONTRASTCONTRAST
CONTRASTCONTRAST
CONTRAST
CONTRASTCONTRAST
CONTRASTCONTRAST
CONTRAST
CONTRASTCONTRAST
CONTRASTCONTRAST
CONTRAST
CONTRASTCONTRAST
CONTRASTCONTRAST
CONTRAST
CONTRASTCONTRAST
CONTRASTCONTRAST
CONTRAST
CONTRASTCONTRAST
CONTRASTCONTRAST
CONTRAST
CONTRASTCONTRAST
*To finish the setup operation
---Press
::
+9 +9
:
+9
::
+9 +9
::
+8 +8
:
+8
::
+8 +8
::
+7 +7
:
+7
::
+7 +7
::
+6 +6
:
+6
::
+6 +6
::
+5 +5
:
+5
::
+5 +5
::
+4 +4
:
+4
::
+4 +4
::
+3 +3
:
+3
::
+3 +3
::
+2 +2
:
+2
::
+2 +2
::
+1 +1
:
+1
::
+1 +1
::
0 0
:
0
::
0 0
<LCD> repeatedly until the LCD setting information disappears.
CONTRASTCONTRAST
CONTRAST
CONTRASTCONTRAST
CONTRASTCONTRAST
CONTRAST
CONTRASTCONTRAST
CONTRASTCONTRAST
CONTRAST
CONTRASTCONTRAST
CONTRASTCONTRAST
CONTRAST
CONTRASTCONTRAST
CONTRASTCONTRAST
CONTRAST
CONTRASTCONTRAST
CONTRASTCONTRAST
CONTRAST
CONTRASTCONTRAST
CONTRASTCONTRAST
CONTRAST
CONTRASTCONTRAST
CONTRASTCONTRAST
CONTRAST
CONTRASTCONTRAST
CONTRASTCONTRAST
CONTRAST
CONTRASTCONTRAST
::
-9 -9
:
-9
::
-9 -9
::
-8 -8
:
-8
::
-8 -8
::
-7 -7
:
-7
::
-7 -7
::
-6 -6
:
-6
::
-6 -6
::
-5 -5
:
-5
::
-5 -5
::
-4 -4
:
-4
::
-4 -4
::
-3 -3
:
-3
::
-3 -3
::
-2 -2
:
-2
::
-2 -2
::
-1 -1
:
-1
::
-1 -1
38
Page 39

4-5 LCD Setup-continued
Sharpness Setting
You can adjust the sharpness of video with this setting to a soothing view for your eyes.
SetupSetup
Setup
SetupSetup
1 Press <LCD> repeatedly until “SHARPNESS” is shown.
2 Press <LEFT> button or <RIGHT> button to choose the preferred sharpness
setting..
<< NOTE>> The sharpness range is from 0 to 4.
SHARPNESS: 4SHARPNESS: 4
SHARPNESS: 4
SHARPNESS: 4SHARPNESS: 4
SHARPNESS: 3SHARPNESS: 3
SHARPNESS: 3
SHARPNESS: 3SHARPNESS: 3
SHARPNESS: 2SHARPNESS: 2
SHARPNESS: 2
SHARPNESS: 2SHARPNESS: 2
SHARPNESS: 1SHARPNESS: 1
SHARPNESS: 1
SHARPNESS: 1SHARPNESS: 1
SHARPNESS: 0SHARPNESS: 0
SHARPNESS: 0
SHARPNESS: 0SHARPNESS: 0
*To finish the setup operation
---Press
<LCD> repeatedly until the LCD setting information disappears.
39
Page 40

FF
or Yor Y
F
or Y
FF
or Yor Y
our Rour R
our R
our Rour R
eferenceeference
eference
eferenceeference
5-1 Important Safety Information
This manual contains important information about how to safely and properly install, opeprate and
care for this product.
Failure to properly install, operate and care for this product can
increase the risk of electric shock or fire. It can also increase the
risk of monitor failure and possibly personal injury. To reduce the
risk of serious injury, death, or damage.
Read these instruction.
Keep these instructions.
Heed all warnings.
Follow all instructions.
Do not attempt to service or repair the monitor & DVD Player yourself. Refer all servicing to qualified
service personnel.
Do not block any ventilation openings. Do not place the Monitor and DVD Player on a bed, sofa, or
other soft surface that may block ventilation openings.
Do not install the monitor and DVD Player near any heat sources, such as radiators, stoves, or other
devices that produce heat.
Do not use this apparatus near water (for example, sinks, tubs, and pools) or expose it to rain,
moisture, or dripping or splashingliquids. No objects filled with water (such as vases) should
be placed on the apparatus.
Do not attempt to service or repair the monitor & DVD Player yourself. Refer all servicing to qualified
service personnel.
Do not play headphones at a high volume to avoid exposure to excessive sound pressures. You should
use extreme caution or temporarily discontinue use in potentially hazardous situation. Even if
your headset is an open-air type designed to let your hear outside sounds, do not turn up the
volume so high that you can not hear what is around you.
General Electrical Precautions
As with any other electrical devices, failure to take the following precautions can result in
serious injury or death from electrical shock or fire, and will lead to damage to the Monitor
and DVD Player.
Avoid Laser hazards
As the laser beam used in the DVD Player is harmful to eyes, and to avoid electrical hazards, do not
attempt to disassemble the housing. Refer servicing to qualified personnel.
Cleaning
Unplug the unit and turn power off before cleaning this unit.
Goodmans Product Information Helpline: 0870 873 0080
40
Page 41

5-1 Important Safety Information-continued
Avoid damaging the AC adaptor cord.
A. Protect the AC adaptor cord from being walked on or pinched particularly at plugs, and the
point where they exit from the apparatus.
B. Do not jerk, knot, sharply bend, or otherwise abuse the AC adaptor cord.
C. Do not expose the AC adaptor cord to the sources of heat.
D. Keep children and pets away from the AC adaptor cord do not allow them to bite or chew on
it.
E. When disconnecting the AC adaptor cord from DVD Player or a power outlet, pull on the
plug. Do not pull on the cord.
If the AC adaptor cord becomes damaged in any way, stop using it immediately.
IMPORTANT AUDIO SAFETY
Your hearing is very important to you and to us, so please take care when operating this equipment.
It is strongly recommended that you follow the listed guidelines in order to prevent possible damage
to or loss of hearing.
Establish a safe sound level
Over time your hearing will adapt to continuous loud sounds and will give the impression that the
volume has in fact been reduced. What seems normal to you may in fact be harmful. To guard
against this before your hearing adapts set the volume at a low level.
FF
or Yor Y
F
or Y
FF
or Yor Y
our Rour R
our R
our Rour R
eferenceeference
eference
eferenceeference
Declbel
Level dB example
30dB quiet library, soft whisper.
40dB Living room, fridge freezer, bedroom away from traffic.
50dB normal conversation, quiet office, light traffic.
60dB Electric sewing machine
The following noise can be harmful under constant exposure
80dB Average city traffic, alarm clock buzzer at 2 feet, food mixer.
90dB Motorcycle, heavy goods vehicle, petrol lawn mower.
100dB Pneumatic drill, chain saw, garbage truck, discotec/night club.
120dB Rock bandconcert, thunderclap.
Permanent loss of hearing
140dB Threshold of pain, gunshot 2 feet away.
180dB Rocket launching pad.
This product incorporates copyright protection
technology that is protected by method claims of
certain U.S. patents and other intellectual property
rights owned by Macrovision Corporation and other
rights owners. Use of this copyright protection
technology must be authorized by Macrovision
Corporation, and is intended for home and other
limited viewing uses only unless otherwise
authorized by Macrovision Corporation. Reverse
engineering or disassembly is prohibited.
Goodmans Product Information Helpline: 0870 873 0080
41
Page 42

FF
or Yor Y
our Rour R
our R
our Rour R
eferenceeference
eference
eferenceeference
F
or Y
FF
or Yor Y
DO NOT use non-circular DVD discs, otherwise it may lead to damage to this DVD player.
In order to keep the disc surface clean, please hold the DVD disc by its edge.
DO NOT touch the recorded surface of DVD disc.
DO NOT stick anything on the surface of DVD disc. If there is glue and other adhesive article,
please remove it before loading the disc.
DO NOT leave the disc in direct sunlight.
DO NOT leave the disc near a heat source, such as heating pipe.
DO NOT leave a disc inside a car under direct sunlight.
After Playback, always remove the disc from the player and return it to the display/storage
case.
To clean discs, use a dry soft cloth moving the cloth from the centre to the outside across the
disc surface. DO NOT use a rotary motion as this can make the disc unplayable.
DO NOT use Petroleum products or aggrassive cleaning agents, as these will damage the disc.
Use of the in car power lead
This lead is specially designed for the unit. DO NOT use it for other in car products as this
may result in damage to lead or the other equipment.
5-2 Disc Use and Care
42
Goodmans Product Information Helpline: 0870 873 0080
Page 43

5-3 Precautions
Please read these precautions before operating this player.
Power cord protection
To avoid any malfunctioning of the player, and to protect against electric shock, fire or personal injury, please
observe the following.
Hold the plug firmly when connecting or disconnecting the AC power cord.
Keep the AC power cord away from heating appliances.
Never put any heavy object on the AC power cord.
Do not attempt to repair or reconstruct the AC power cord in any way.
Placement
Avoid placing the player in areas of:
direct sunlight radiators, or closed automobiles
high temperature (over 35
large amounts of dust as the internal parts may be seriously damaged.
Non-use periods
When the player is not being used, turn it off. When left unused for a long period of time, the player should be
unplugged from the household mains supply.
Do not insert fingers or other objects inside unit
Touching internal parts of this unit is dangerous, and may cause serious damage to the player. Do not attempt to
disassemble the player.
Do not put any foreign object onto the player on the disc tray.
0
C) or high humidity (over 90%)
FF
or Yor Y
F
or Y
FF
or Yor Y
our Rour R
our R
our Rour R
eferenceeference
eference
eferenceeference
Keep away from water/magnet
Keep the player away from flower vases, tubs, sinks, etc. If liquids are spilled into the player, serious damage
could occur.
Never bring a magnet or magnetized object near the player.
Stacking
Place the player in a horizontal position, and do not place anything heavy on it.
Condensation
Moisture may form on the lens in the following conditions:
immediately after a heater has been turned on
in a steamy or very humid room
when the player is suddenly moved from a cold environment to a warm one
If moisture forms inside this player, it may not operate properly. In this case, turn on the power and wait for one
hour for the moisture to evaporate.
43
Page 44

FF
or Yor Y
F
or Y
FF
or Yor Y
our Rour R
our R
our Rour R
eferenceeference
eference
eferenceeference
5-4 Troubleshooting
Before requesting service for the portable DVD player, check the chart below for a possible cause of the problem you
are experiencing. Some simple checkups or a minor adjustment on your part may eliminate the problem and restore
proper operation.
SYMPTOM (COMMON) REMEDY
No power. · Insert the power plug securely into the power outlet.
The player does not start playback · Condensation may have formed. Try again in 1 to 2 hours to ensure that the condensation
when PLAY is pressed. has evaporated.
The player starts playback but stops · The disc may be dirty and may require cleaning.
immediately. · Ensure that the disc is installed with the label side up.
No picture. · Ensure that the equipment is connected properly.
No sound. · Ensure that the equipment is connected properly.
Distorted sound. · Ensure that the input settings for the TV and stereo system are proper.
No audio at Digital Output. · Check the digital connections.
capabilities.
Distorted picture. · Check the disc for fingerprints and clean it with a soft cloth, wiping it from center
Completely distorted picture or no color · The disc format is not compatible to the TV-set used (PAL/NTSC).
in picture.
Picture is distorted during rapid · The picture will be somewhat distorted at times: this is normal.
advance or rapid reverse.
No rapid advance (or rapid reverse) · Some discs may have sections which prohibit rapid advance (or rapid reverse).
playback.
No 4:3 (16:9) picture. · Choose the correct setup “TV DISPLAY” item which matches the TV set used.
Picture is distorted during rapid · The picture will be somewhat distorted at times: this is normal.
advance or rapid reverse.
No operations perform with the · Check the batteries are installed with the correct polarity (+ and –).
remote control. · The batteries are depleted: replace them with new ones.
No key operation (by the DVD player · Turn the unit off and then back on. Alternatively, turn off the unit, disconnect the AC
power and/or the remote control) is cord and then re-connect it. (The player may not be operating properly due to
effective. lightning, static electricity or some other external factor.)
PLAY does not start playback even · This may be a result of the parental lock function that has been set.
when title is selected. Confirm the “PARENTAL” setup.
Audio soundtrack and/or subtitle · If the audio soundtrack and/or subtitle language does not exist on the disc, the
language is not the one selected language selected at the initial settings will not be seen/heard.
at the initial settings.
No subtitles. · Subtitles appear only with discs that contain them.
Alternative audio soundtrack · An alternative language can not be selected may result of no more than one language
(or subtitle) languages cannot be selected. available.
Angle cannot change. · This function depends on software availability. Even if a disc has a number of angles
recorded, these angles may be recorded for specific scenes only.
· Check if the ON/OFF button on the right of the player is set to on.
· Check if no power at the AC outlet may be the fault by plugging in another appliance for a
test.
· Ensure that the disc format is supported by your DVD player.
· Check if the disc is defective by trying another disc.
· Check the region (local) code.
· Ensure that the input setting for the TV is “Video”.
· Check if external equipment is on.
· Select the same channel and source on the TV as on the player.
· Check if the LCD is on.
· If using a HiFi amplifier, try another sound source.
· Check the Audio Output Setting menu to make sure that Analog Output is selected.
· Check the Volume Adjustment.
· No sound is heard during still picture (pause).
· Check the settings menu to make sure that the digital output is set to on.
· Check if the audio format of the selected audio language matches your receiver
to edge.
· Sometimes a small amount of picture distortion may appear. This is not a malfunction.
· Point the remote control unit at the remote control signal sensor and operate.
· Operate the remote control unit at a distance but no more than 6 meters from the
remote control signal sensor.
· Remove obstacles between the remote control unit and remote control signal sensor.
· Subtitles are hidden from the TV screen. Press SUBTITLE to display the subtitles.
44
Page 45

5-5 Disc Handling and Maintenance
FF
or Yor Y
F
or Y
FF
or Yor Y
our Rour R
our R
our Rour R
eferenceeference
eference
eferenceeference
Handling Precautions
Hold the disc by the edges so the surface will not be soiled with fingerprints. (A)
Fingerprints, dirt and scratches can cause skipping and distortion.
Do not write on the label side with a ball-point pen or other writing utensils that can leave indentations or scratch
the surface of the disc. .
Do not use record cleaning sprays, benzene, thinner, static electricity prevention liquids or any other solvent.
Be careful not to drop or bend the disc.
Do not install more than 1 disc on the disc tray.
Do not try to close the disc cover when the disc is not installed properly.
Be sure to store the disc in its exclusive case when not in use.
If the surface is soiled (B)
Wipe gently with a soft, damp (water only) cloth.
When wiping discs, always move the cloth from the center toward the outer edge.
(If you wipe the discs using a circular motion, circular scratches are likely to occur and may cause noise or skipping.)
(A) (B)
If the disc is brought from a cold to a warm environment, moisture may form on the disc
Wipe this moisture off with a soft, dry, lint-free cloth before using the disc.
Improper disc storage
You can damage discs if you store them in the following places:
Areas exposed to direct sunlight
Humid or dusty areas
Areas directly exposed to a heat outlet or heating appliance
Disc which cannot be played with this player
CD-ROM (Application Program)
CVD
CD-G
DVD with a Locale No. other than that shown on the DVD unit’s Region Code Label on the rear panel
Maintenance
Be sure to turn the unit off and disconnect the AC power cord before maintenance on the unit.
Wipe this unit with a dry soft cloth. If the surfaces are extremely dirty, wipe clean with a cloth which has been
dipped in a weak soap-and-water solution and wrung out thoroughly, and then wipe again with a dry cloth.
Never use alcohol, benzene, thinner, cleaning fluid or other chemicals. And do not use compressed air to remove
dust.
45
Page 46

FF
or Yor Y
F
or Y
FF
or Yor Y
our Rour R
our R
our Rour R
eferenceeference
eference
eferenceeference
5-6 Specifications
DVD VIDEO PLAYER/OUTPUTS/SUPPLIED ACCESSORIES
DVD VIDEO PLAYER
Power supply ~230V 50Hz
Power consumption 15W
Weight 1100 g
External dimensions 269 x 181 x 30.3 mm (W/D/H)
Signal system PAL
Laser semiconductor laser, wavelength 650 nm
OUTPUTS
Video output 1.0 V (p-p), 75 ohms, negative sync
Audio output (digital audio) 0.5 V (p-p), 75ohms
Audio output (analog audio) 2.0 V (rms), 10 ohms
SUPPLIED ACCESSORIES
Remote control 1
Battery pack 2
Scart cable 1
User’s Manual 1
Quick Start Guide 1
Power adaptor 1
Cigarette lighter adaptor 1
Headphone 1
46
 Loading...