

Page 1

Goodmans Product Information Helpline
0870-873-0080
GDVD100W2
Portable DVD Player
with Remote Control
Quick Guide
82-179-01190
Page 2

Package Contents
1. Power Adapter
2. Car-cigarette-lighter Adapter
3. Audio Cable
4. Video Cable
5. Headphone
6. Battery
7. Remote Control
8. Carry Sack
Getting to Know Your Portable DVD Player
FRONT VIEW
LCD screen
SPEAKERS
F.BWD/LEFT button
POWER indicator/Battery charge indicator
SPEAKERS
LCD button
SETUP button
INFO button
MENU button
PAUSE/UP button
F.FWD/RIGHT button
PLAY/SEL. button
NEXT button
STOP/DOWN button
PREVIOUS button
Remote Sensor
OPEN button
LEFT SIDE
DC IN jack POWER button
2
Page 3
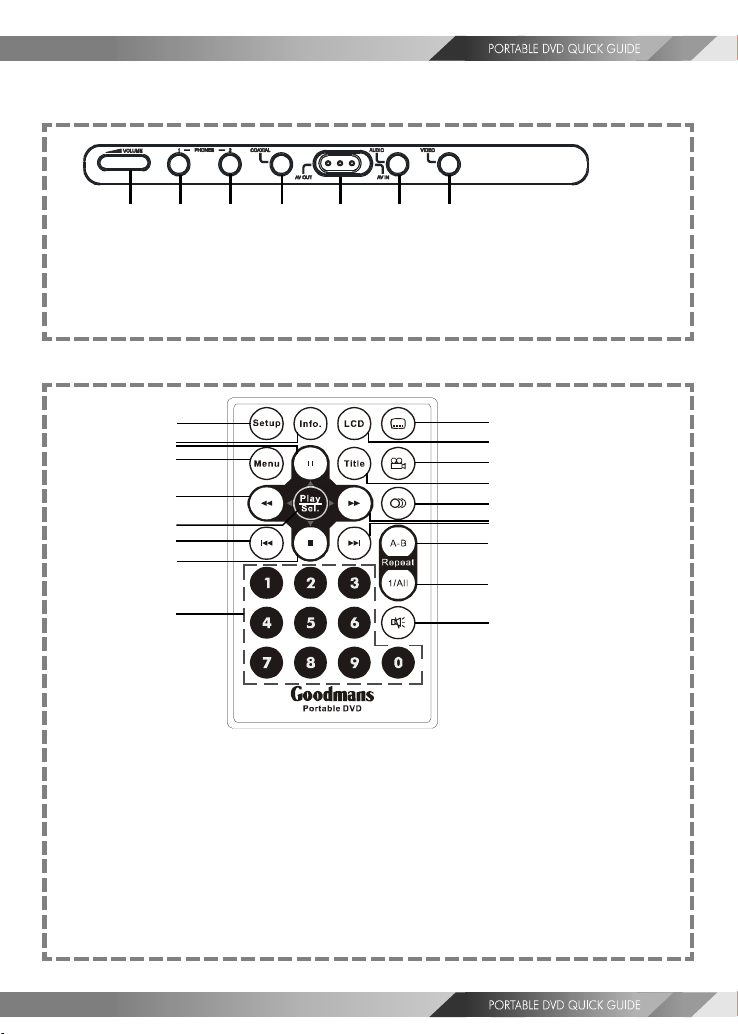
RIGHT SIDE
1234567
1. Volume control 5. AV out/AV in switch button
2. Headphone socket 6. Audio output/input socket
3. Headphone socket 7. Video output/input socket
4. Coaxial output socket
REMOTE CONTROL
1
2
3
4
5
6
7
8
9
1. SETUP button
2. INFO. button
3. PAUSE/UP button
4. MENU button
5. F.BWD/LEFT button
6. PLAY/SEL. button
7. PREVIOUS button
8. STOP/DOWN button
9. NUMERICAL buttons
10. SUBTITLE button
10
11
12
13
14
15
16
17
18
19
11. LCD button
12. ANGLE button
13. TITLE button
14. AUDIO button
15. F.FWD/RIGHT button
16. NEXT button
17. A-B REPEAT button
18. REPEAT(1-ALL) button
19. MUTE button
3
Page 4

BATTERY INSTALLATION FOR THE REMOTE CONTROL
Insert the battery and match the (+) and (-) on battery to the marks inside the
battery compartment.
First-time use:
Remember to remove the insulating Mylon piece
from the battery.
Service life of battery
1. If the remote control unit fails to work even when it is operated near the
player, replace the battery.
2. Use a 3V lithium battery.(CR2025)
CR2025
+
+
OPEN
PUSH
4
Page 5

Quick Operation Guide
STEP 1. Connect it to Power (A)
Connect the supplied adapter to the DC IN socket on the left side of the portable
DVD player.
(A)
STEP 2. Connect it with earphones or connect it to external
equipment. (B)
If you want to enjoy better listening and viewing quality, you can connect the
portable DVD player to external equipment, such as a TV or an amplifier.
Note:
1. Before connections, make sure to turn off the power of the portable DVD
player and external equipment.
2. Make sure to slide AV OUT/IN switch to AV OUT.
5
Page 6

(B)
(White)(Red) (Yellow)
1 2
Note: Make sure the external equipment supports
the audio/video input feature.
Back/front panel of external equipment
L
R
(White)
(Red)
Audio input
1
TV
2
Video input
6
Page 7

STEP 3. Open the display panel. (C)
(C)
STEP 4. Move POWER switch to the ON position to turn on the
portable DVD player. (D)
(D)
STEP 5. Press OPEN button to open the DVD Door. (E)
(E)
STEP 6. Gently hold the edge of the disc, then place it in the
centre and push gently until the disc is securely located
with the printed side up.
STEP 7. Close the DVD Door.
STEP 8. Press PLAY/SEL. to play the disc.
7
Page 8

INPUT FROM EXTERNAL EQUIPMENT
You can input images and sound from external equipment by connecting
the portable DVD player to external equipment with Audio cable or
Video cable.(F)
Note: Make sure to slide AV OUT/IN switch to AV IN.
(F)
(White)(Red) (Yellow)
2
1
Note: Make sure the external equipment supports the audio/
video output feature. External equipment with external
output jack (example: audio output and video output)
Back/front panel of external equipment
L
R
TV
(White)
(Red)
Audio output
Video output
1
2
8
Page 9

Using the Battery Pack
Battery connectors
Before using the battery pack, make sure to charge it. You can only charge
the battery pack while the battery pack attached to the portable DVD
player.
Battery Pack Information (Charge & Playback Time)
Charge Time(hr) DVD Playback Time(hr)
NiMH 3800mAh 4.5 2.5
A. How to charge the battery pack
STEP 1.
First align the battery connectors on the back of the portable DVD
player with the battery pack’s battery connectors. Then push the
battery in and then slide to the arrow direction to lock into place
as shown in figure (A).
(A)
Note:
1. Please turn Power off when attaching or removing the battery pack.
2. If you want to remove the battery pack, refer to “B. How to remove the
battery pack from the portable DVD player.”
STEP 2. Connect the AC adapter (12V, 1.25A) to the DC IN socket on the
left side of the portable DVD player and a household power outlet
as shown in figure (B).
9
Page 10

(B)
STEP 3. Battery charge indicator will turn red and start charging.
STEP 4. When the battery is fully charged, the battery charge indicator
will be off.
Note:
1. The battery pack is not charged while the portable DVD player is turned on.
2. Please use the specific power adapter (12V, 1.25A) to charge the battery pack.
B. How to remove the battery pack from the portable
DVD player
STEP 1.
Please follow the instructions on the back of the portable DVD
player and slowly remove the battery pack from the unit as shown
in figure (C).
10
(C)
Step 1
Step 2
Step 1. Push the Release button in
the direction of the arrow.
Keep the release button in
this position and at same
time slide the battery in the
direction of arrow shown.
Step 2. Slide battery in direction of
arrow and gently pull to
remove battery.
 Loading...