

Page 1
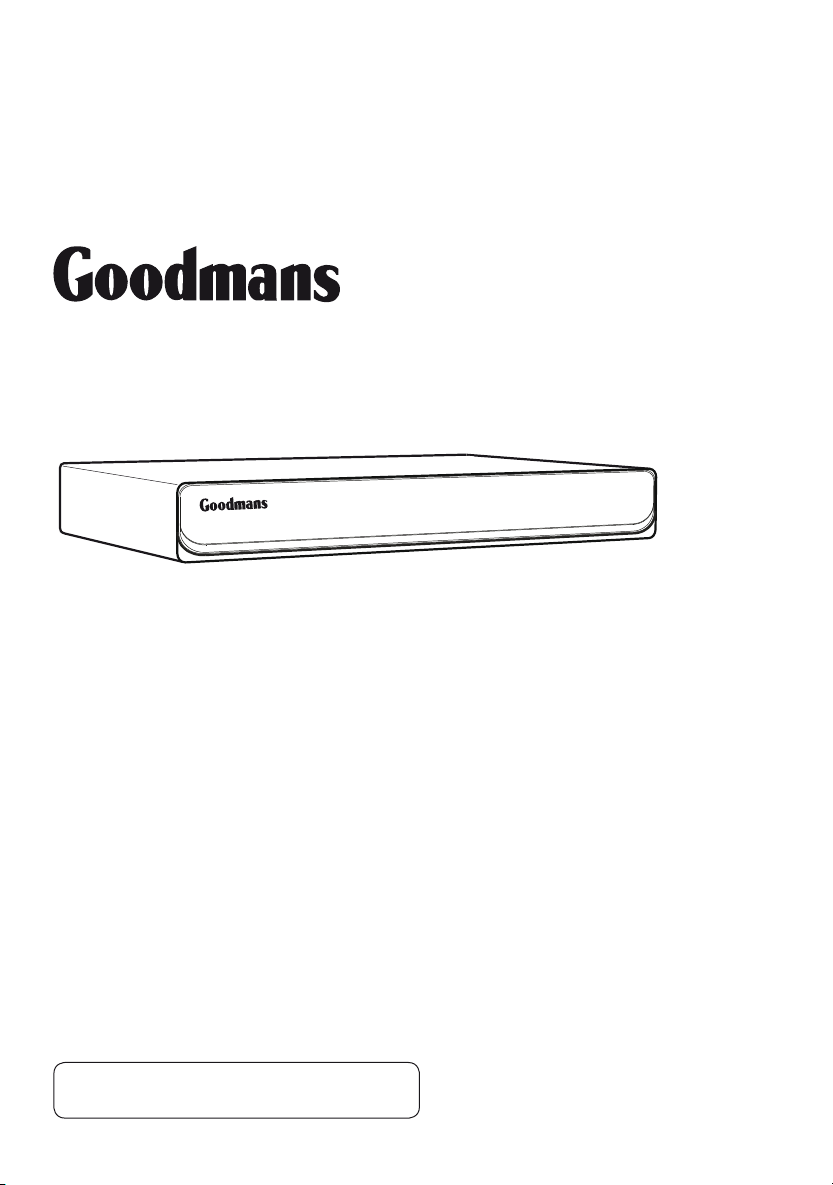
GDB12XIT Digital Box
Instruction Manual
IMPORTANT: Please read all instructions
carefully before use and keep for future reference.
Page 2
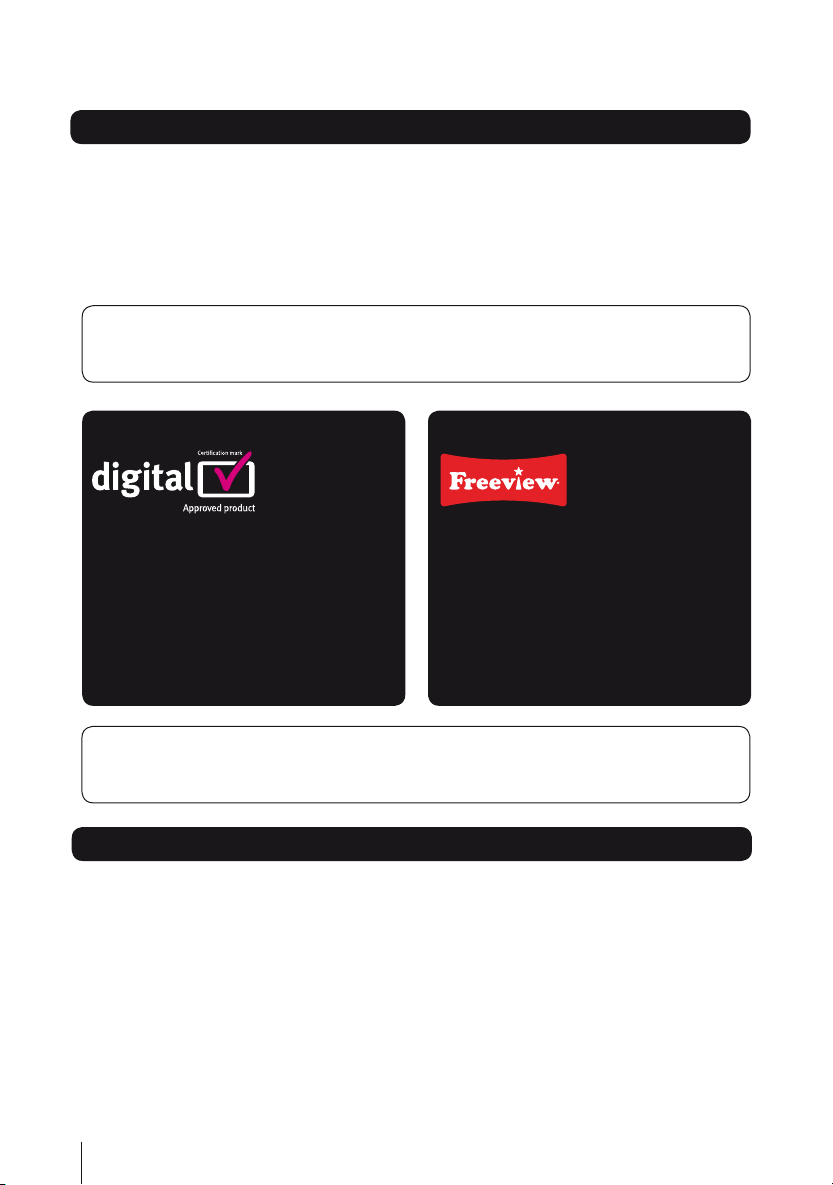
Introduction
Thank you for choosing this GDB12XIT Digital Box.
Not only can it receive over 50 digital TV channels, but you can also listen to
up to 24 digital radio stations, all at the touch of a button.
IMPORTANT: Use of any electrical equipment should be undertaken with care. Please
read the safety section on page 20-21 before using your Digital Box. This appliance is
for household use only.
A Digital Box lets you access the free
digital channels that are broadcast in
the UK. It uses a digital signal, received
through your normal aerial and lets you
watch it through your existing television.
IMPORTANT: The screens and illustrations shown in this instruction manual are
for reference and instruction purposes only, and may not exactly represent the final
product.
Over 50 digital TV channels.
Up to 24 digital radio stations.
No subscription, no contract, no fuss.
No installation, easy set up.
Red button interactive services.
Coverage
Check coverage in your area.
Text your postcode, followed by your house number or name to 83331*.
Or visit www.freeview.co.uk
*e.g. NW9 6NY (Costs no more than a normal text.)
The FREEVIEW service is subject to coverage. An aerial upgrade may be required. The FREEVIEW, FREEVIEW+,
FREEVIEW+ HD words and logos are trade marks of DTV Services LTD. DTV Services Ltd 2002, 2008.
2
Page 3
WIDE
INFO
TEXT
BACKOKEPG
1 2
3
4
5
6
7 8
9
MENU
0
EXIT
SUBT
TV/VCR
VOL
VOLCHCH
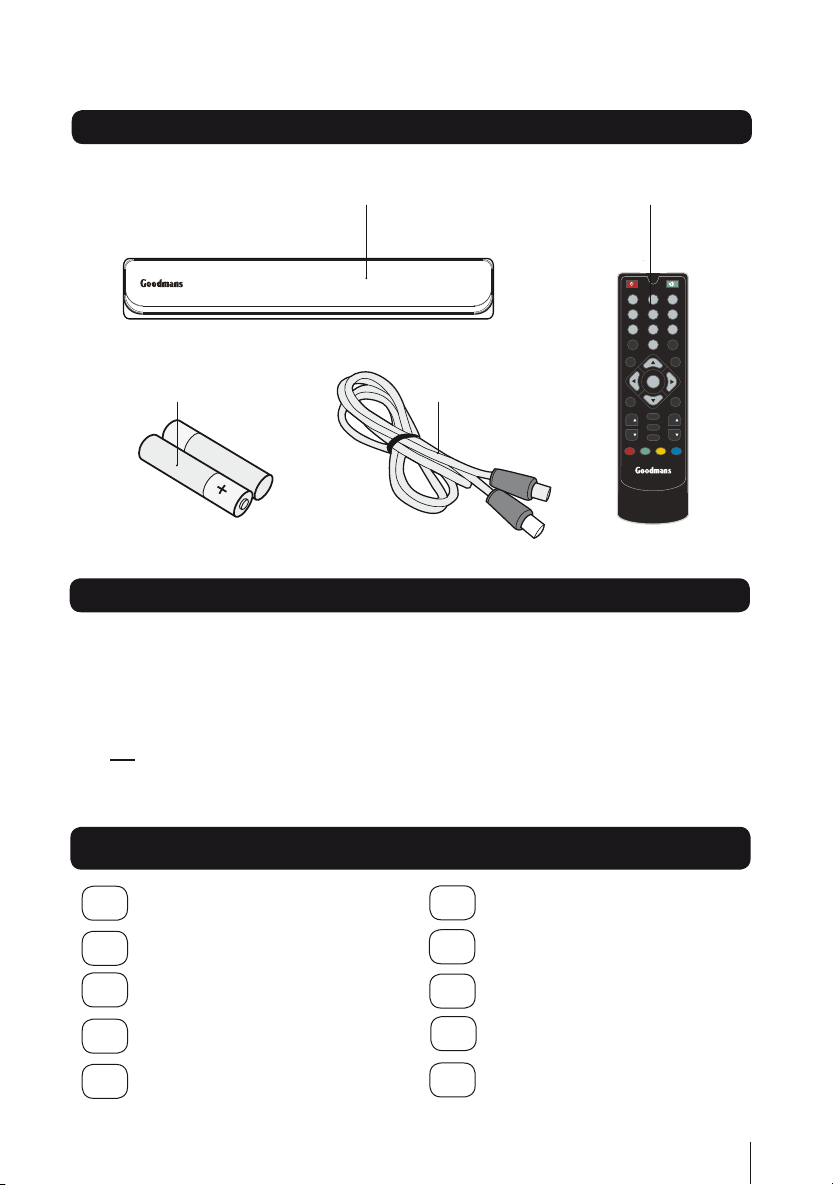
What’s in the box?
Your new Digital Box Remote control
2x AAA Batteries RF lead
Other things you will need
Roof top aerial
It is recommended that you use a wideband rooftop aerial in order for your Digital Box to work
properly. For more information visit www.digitaluk.co.uk.
Scart cable
You will need a Scart cable to connect between your Digital Box and your TV. If you want to
connect a DVD recorder to your Digital Box, you will require an additional Scart cable.
Contents
01 Your Digital Box ...................4
Your remote control ............5
02
Connecting up .....................6
03
Getting started....................7
04
Daily use ....................... 9-12
05
Advanced features ...... 13-16
06
Re-tuning ..........................17
07
Troubleshooting ................18
08
Specifications ...................19
09
Safety ......................... 20-21
10
3
Page 4
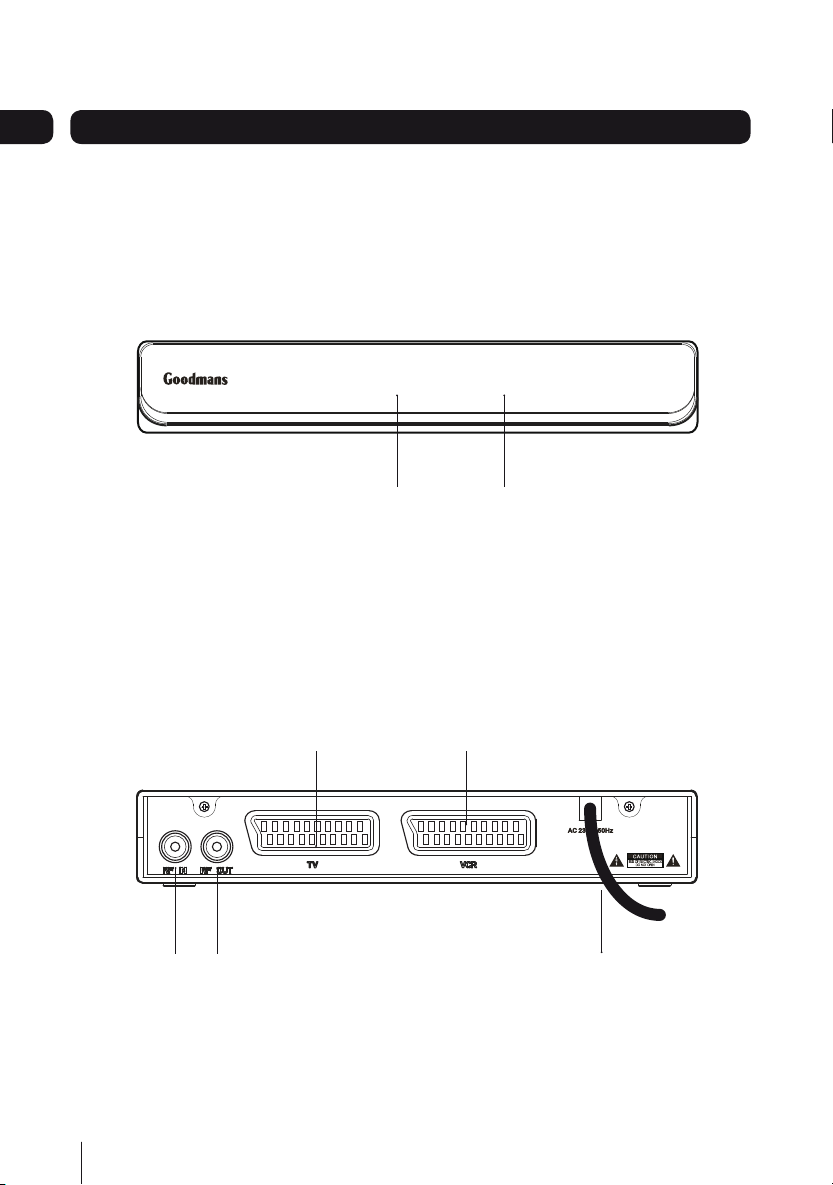
Your Digital Box01
Front view
Back view
Aerial Input.
Connect the aerial
to this socket
TV Scart
Connection to TV
Aerial Output.
Connect the supplied
RF cable to the TV.
Power on/
Standby indicator
for connection to a VCR
or a DVD Recorder
Remote control
AUX Scart
sensor
AC Mains cable
4
Page 5
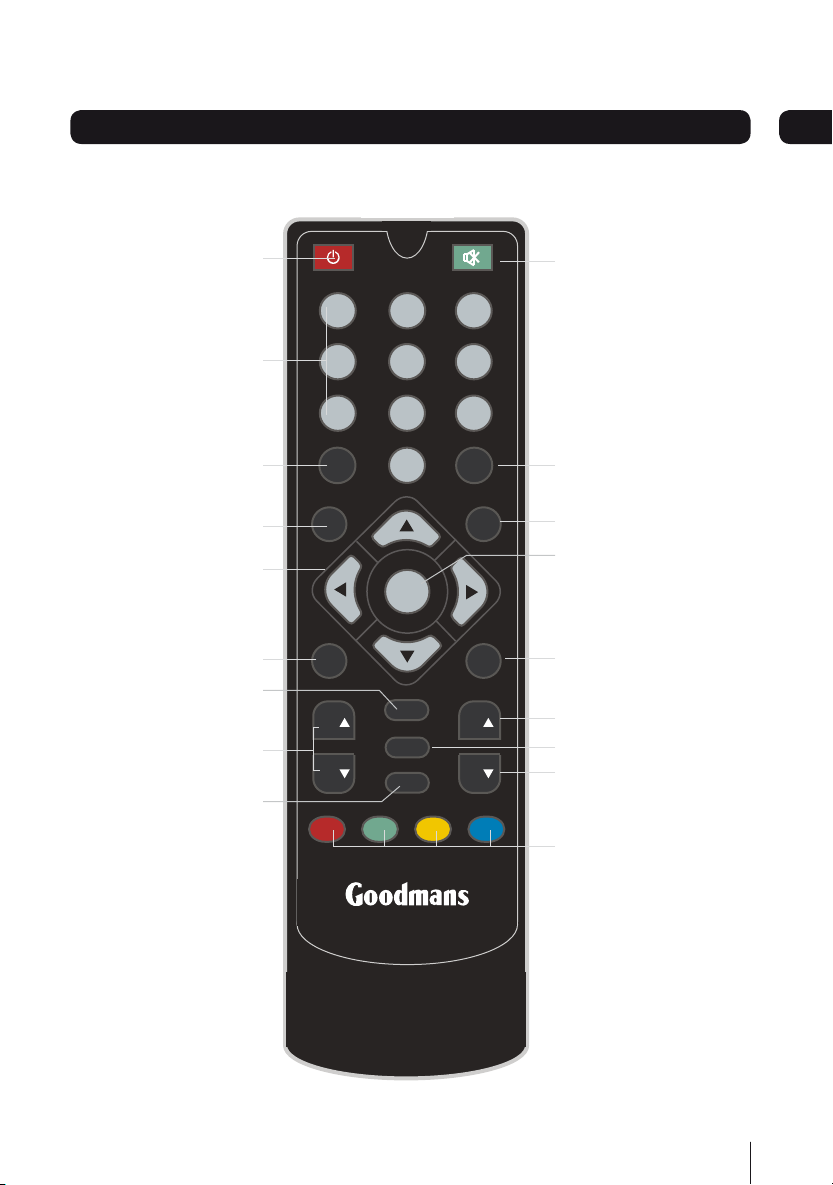
Your remote control 02
WIDE
INFO
TEXT
BACK
OK
EPG
1 2
3
4
5
6
7 8
9
MENU
0
EXIT
SUBT
TV/VCR
VOL
VOL
CH
CH
STANDBY Power On/Standby.
NUMBER PAD Enter values and
select the channel directly by
TV/VCR Changes between the
TV and VCR Scart connections.
MENU Opens the menu so that
you can change the settings of
Navigate up/down/left/right
in menus/on screen displays.
BACK Navigate one step
SUBTITLE Cycle through the
TEXT Display Digital Teletext
entering its number.
your Digital Box.
NAVIGATION
backwards in menus.
available subtitles for
the current broadcast.
VOLUME UP/DOWN
where available.
MUTE Turns the volume on and off.
WIDE Adjust the aspect ratio
of the video output.
EXIT Closes the on screen menus.
OK Confirm selection in menu/on
screen displays.
EPG Display the EPG
Electronic Program Guide.
CHANNEL UP
INFO Display the Info bar.
CHANNEL DOWN
COLOUR BUTTONS
For interactive function
5
Page 6
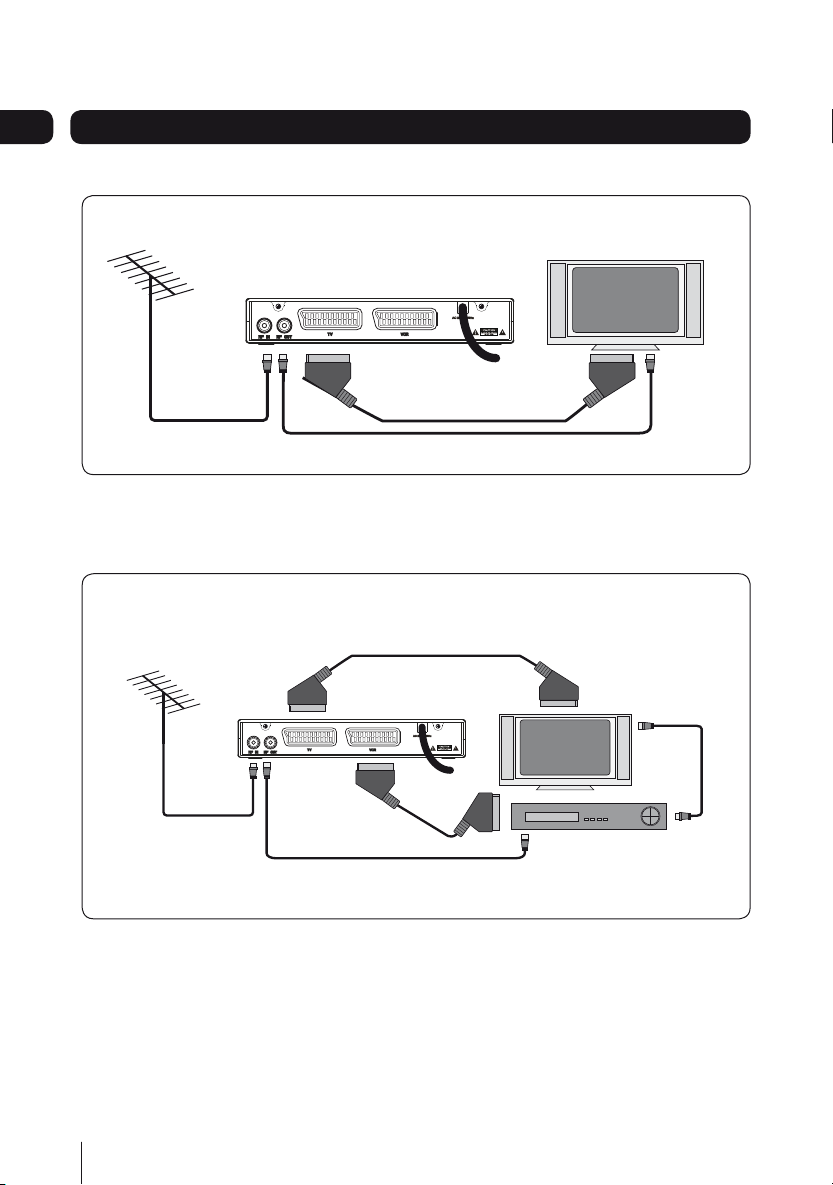
Connecting up03
TV
TV
DVD/RECORDER
TV
Getting connected
Connecting to the TV with SCART
Aerial Lead*
SCART Cable*
Connection to DVD Player
Connecting to the TV and DVD recorder with SCART
SCART Cable*
Aerial Lead*
* Not included in the box
SCART Cable*
RF Lead
RF Lead
RF Lead*
6
Page 7
Getting started
First Time Installation
Press OK to start Tuning Scan
NORMAL
Select Your TV Screen type using the arrow buttons
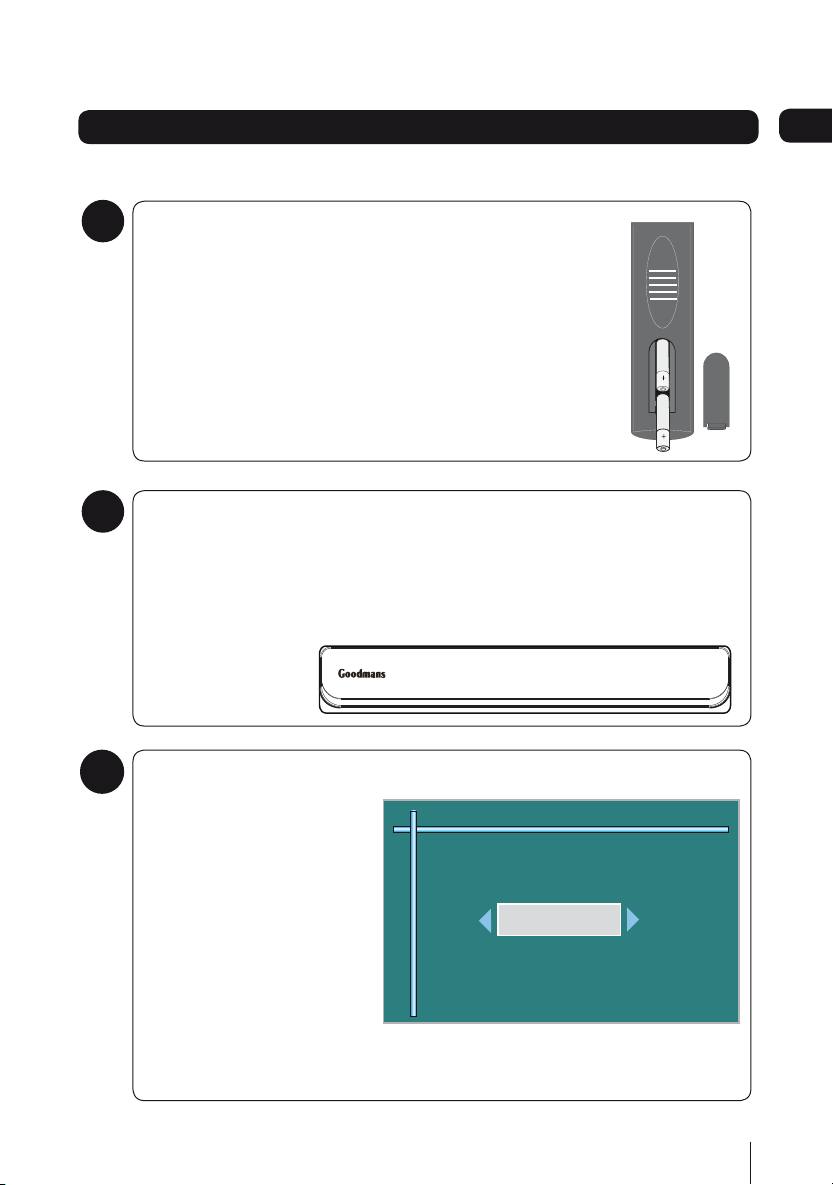
Install batteries in remote
1
Remove the battery cover to reveal the battery compartment.
Align the two size AAA batteries so that the ‘+’ and ‘-’ marks
on the batteries match the ‘+’ and ‘-’ marks inside the battery
compartment.
Push the first battery fully into the slot and then place the second
battery in the slot. The two batteries are in line.
Replace the battery cover.
Plug in and switch on
2
Insert the Digital Box mains plug into a mains socket. The power indicator visible
behind the front panel will light up red (standby) or green (on).
Switch your TV on and if necessary press the ‘STANDBY’ button on the remote
control until the light on the Digital Box front panel lights up green.
04
The Easy install screen
3
The first time installation will
appear on screen. Select the
aspect ratio (screen size),
using the }| buttons to
move between the options:
NORMAL and WIDESCREEN.
Press the OK button to start
the installation. The Digital
Box will automatically begin
to tune.
7
Page 8
22:25-22:35 BBC London News
22:35-22.45 The National Lottery Draws
12/08/2009 22:32:30
1 BBC ONE S 1/1
Tuning Menu
Progress
Signal Strength
17%
84%
BBC ONE
BBC TWO
ITV 1
BBC THREE
BBC FOUR
ITV3
SKY THREE
Exit
Channels 13
04
Getting started
Tuning in
4
When your digital box is tuning
in, you will see the channels
that have been found during
the installation listed (right).
This screen also shows you,
the signal strength and quality
of the signal being received.
It will take a few minutes for
your digital box to find all the
channels.
Installation complete
5
When installation has successfully completed, the channel at the top of the
channel list will be shown on your TV. The information banner for this channel will
be displayed for a few seconds.
Problems installing?
6
If steps 1 to 5 have not installed your digital box, there are a couple of things that
you should retry.
1. Check all connections to your digital box and TV, making sure that they are
secure and connected to the correct sockets. See page 6.
8
2. Try the installation again:
Press the • MENU button on your remote control.
Select ‘System Installation’ using the up and down arrows.•
Press the • button to select ‘Auto Scan’.
Press the • OK button.
Page 9

Daily use
Channel Organiser
Accessories
[Ok] -Select Exit
System Installation
Settings
Channel Manager
EPG Information (7 Day) 15/08/2009 14:42:17
14:30 - 16:30 Colombo Drama
Channel Programmes on Sun 16/08, 14:30-16:30
14:30 Colombo
16:30 Lewis.
place pic here
BBC ONE
BBC TWO
ITV1
Channel 4
FIVE
During an evening of unusual entertainment,
there is magic, illusion, sleight of hand and murder. Lt Colombo sets out to find out how the
crime was committed.
-2Hrs +2Hrs -Day +Day Information Exit Ok Watch
Commonly used features
As with most of your electrical goods, there
will be functions you use everyday, and
others that you need only occasionally.
We’ve put the most commonly used
functions in this section so you can get your
Digital Box up and running as quickly as
possible.
We suggest you read this section carefully,
then use the other sections to dip in to
whenever you need some extra details or
some guidance for settings.
Using the Main Menu
The main menu gives you access to all the
functions and features of your new digital
box and displays the currently selected
channel.
To view the main menu,
Press the MENU button on your remote
1
control.
Use the buttons to select an
2
option, and then press OK to open it.
To go back to the previous screen or menu,
Press the BACK button;
1
Press the EXIT button when you want to
2
close a menu.
Using the EPG
The Electronic Programme Guide, or EPG,
is an on-screen TV guide. It shows all
scheduled programmes in advance for every
tuned in channel.
Press the EPG button on the remote control
to access the guide.
You can use the buttons to select a
different channel. Press OK to watch the
selected channel in the preview window.
To watch the selected programme in full
screen and close the EPG window, press the
EXIT button.
You can use the coloured buttons on your
remote control to change the EPG to a
different time. The red button will move
backwards 2 hours, the green button will go
forwards 2 hours, the yellow button will go
back 24 hours and the blue button will go
forwards 24 hours.
9
Page 10

EPG Information (Now/Next) 15/08/2009 14:42:17
14:30 - 16:30 Colombo Drama
Channel Programmes on Sun 16/08, 14:30-16:30
During an evening of unusual entertainment,
there is magic, illusion, sleight of hand and murder. Lt Colombo sets out to find out how the
crime was committed.
-2Hrs +2Hrs -Day +Day Information Exit Ok Watch
SKY THREE
Yesterday
Channel 4+1
More 4
Film 4
Road Wars
Big Brother
Close
The Scanalous Adve...
The League of Extrao...
Street Wars
The Alan Clarke Diaries
Ugly Betty
The Victorian Sex Ex...
Riff-Raff
11
12
13
14
15
22:25-22:35 BBC London News
22:35-22.45 The National Lottery Draws
12/08/2009 22:32:30
1 BBC ONE S 1/1
Subtitle
Off
Subtitle
On
05
Daily use
Now and Next
You can change the view of the EPG to a
now and next format by pressing the MENU
button when the EPG is open.
The now and next view is handy if you
looking for a programme to watch.
Both EPG views also contains digital radio
channels. These are usually saved to the
higher numbers, starting at around channel
700.
Changing the channel
You can select the channel you want to
watch by using the CH and CH buttons
on the remote control.
As you change the channel the information
bar will be shown on screen for a few
seconds.
Changing the volume
You can change the volume of your Digital
Box by using the VOL and VOL buttons
on the remote control. VOL will increase
the volume and VOL will decrease the
volume.
DON’T FORGET! You may need to check the
volume setting on your TV, as this volume
control changes the digital box only.
To turn the volume off, press the mute
button on the remote control. To turn it back
on, press the mute button again.
Using subtitles
To use subtitles, press the SUBT button on
the remote control. When subtitles have
been turned on, the panel shown below left
will be displayed and the subtitle text will
start to display on screen.
Press the SUBT button again to turn off
subtitles. The panel shown below right will
be displayed and the subtitle text will no
longer be displayed.
DON’T FORGET! Subtitles are only shown
when they are broadcast with the
programme. Not all programmes have
subtitles.
This shows details of the currently showing
and the next programme for the selected
channel.
Alternatively you can use the number
buttons to key in the channel number.
10
Page 11

Daily use
22:25-22:35 BBC London News
22:35-22.45 The National Lottery Draws
12/08/2009 22:32:30
1 BBC ONE S 1/1
Extended EPG 12/08/2009
Coverage of the World Championship Series,
in which the worldís top triathletes, including
Britainsís Alistair Brownlee, do battle in Hyde Park,
London. Matt Chilton comments...
15:00- 16:30 Triathlon World Championship
05
The info banner
The info banner can be accessed when your
are watching a TV programme, by pressing
the INFO button.
The info banner shows you the date, time
and signal strength, and also shows you
details of the programme your watching and
the next programme following it.
If you press the INFO button again, you
will see an extended view, with more
information about the programme. An
example is shown below.
Using digital text
Many digital channels also provide digital
text. For example this could be information
about programmes, the weather, news and
many other topics.
To use digital text, press the TEXT button on
the remote control. An example is shown
below.
DON’T FORGET! Not all channels have
digital text.
11
Page 12

05 Daily use
EPG Information (7 Day) 15/08/2009 14:42:17
14:30 - 16:30 Colombo Drama
Channel Programmes on Sun 16/08, 14:30-16:30
14:30 Colombo
16:30 Lewis.
place pic here
BBC ONE
BBC TWO
ITV1
Channel 4
FIVE
During an evening of unusual entertainment,
there is magic, illusion, sleight of hand and murder. Lt Colombo sets out to find out how the
crime was committed.
-2Hrs +2Hrs -Day +Day Information Exit Ok Watch
Reminder
Ye s
No
Delay
Requested Reminder
America’s Got Talent 08/08/2009 16:30 - 17:00
Overlaps with existing reminder
Flog It! 08/08/2009 16:30 - 17:30
Replace existing reminder
Cancel requested reminder
Overlapping reminders
Setting a reminder
You can set your TV to remind you when a
programme you want to watch is about to
start.
Press the EPG button.
1
Scroll to the programme you want to be
2
reminded about using the arrow buttons.
Press the OK button. A please wait
3
message will be displayed for a short
time and then the EPG will be updated
with your setting.
A clock icon will be placed adjacent to
4
the selected programme name. The
reminder has now been set.
Press the EXIT button when you want
to go back to the programme you were
watching.
‘No’ to delete the reminder, or ‘Delay’
to remind you again in a few minutes.
Press the OK button to confirm.
If a reminder clashes with the start time
6
of a reminder already set, a warning pop
up window will be shown.
Press the red button to delete the old
7
reminder and replace it with the new
one, or press the green button, to cancel
the new reminder and keep the existing
one.
When the reminder time has been
5
reached a pop up box will appear.
12
Use the left and right arrow keys to
choose ‘Yes’ to go to the programme,
Page 13

Advanced features
Channel Organiser
Accessories
[Ok] -Select Exit
System Installation
Settings
Channel Manager
Channels 1/87
BBC ONE
BBC TWO
ITV 1
BBC THREE
BBC
FOUR
ITV3
SKY THREE
Yesterday
Channel 4+1
S.No Channel Lock Skip
1 Lock 2 Skip 3 Del 4 Move [Ok] - Save Exit
05
Organising your channels
You can lock, skip, delete and move channels
in your channel list.
Press the MENU button to display the
1
main menu, see below.
Use the and buttons to select
2
‘Channel Manager’.
Press the button to select ‘Channel
3
Organiser’.
Press the OK button.
4
The channel list will be shown, see
5
below. From this menu you can organise
the list as required: lock, skip, delete and
move.
Press the 1 button to lock the selected
7
channel. When the Parental Lock is
set to on, ‘locked’ channels require a
password to be entered before they
can be watched; a locked channel is
identified in the channel list by a ‘lock’
symbol. The default password is 0000.
Press the 2 button to mark the selected
channel to be skipped when using the
CH and CH buttons to change
channel; a channel marked to be skipped
is identified in the channel list by an
arrow symbol.
Press the 3 button to delete the selected
channel.
Press the 4 button to move the channel
up or down the list.
When an item is deleted it will be
permanently removed from the list and
will no longer be accessible until re-tuned.
To move a channel,
Use the buttons to select the
1
channel.
Use the and buttons to highlight the
6
channel you wish to edit.
Press the 4 button. The channel name
2
will be highlighted in grey.
Use the buttons to move to the
3
position where you want to relocate the
channel.
Press the OK button.
4
DON’T FORGET! You can re-tune your
Digital Box to retrieve channels you have
deleted. See Re-tuning on page 17.
13
Page 14

Systems Setup
Factory Default
Accessories
[Ok] -Select Exit
System Installation
Channel Manager
Settings
OSD & TV
Parental Lock
Accessories
[Ok] -Select Exit
System Installation
Channel Manager
Settings
... System Setup
06
Aspect Ratio
Video Output
OSD Theme
Pref. Language
OSD & TV
Auto
RGB
Theme 1
English
Low Power
On
[Ok] - Select Exit
Advanced features
Settings menu
The settings menu lets you alter the default
settings of your Digital Box via the System
Setup and Factory Default functions.
Press the MENU button to display the
1
main menu.
Use the buttons to select ‘Settings’
2
and display the following window.
System Setup
Press the button to select ‘System
1
Set Up’.
Press the OK button.
2
The settings menu will be displayed.
3
This has two sub menus OSD & TV and
Parental Lock as shown below.
OSD & TV
The ‘OSD & TV’ option will be selected. If
1
not, use the buttons to select ‘it.
Press the OK button.
2
The OSD & TV menu is displayed and is
3
shown below. The OSD & TV function
allows you to set the items listed.
The Aspect Ratio function lets you select the
screen display to be 16:9, 4:3 or AUTO. The
latter will automatically reformat according
to the program format.
The Video Output function lets you choose
to use RGB or CVBS (composite) video. RGB
will give a picture than CVBS.
The OSD Theme option lets you choose from
three different colour schemes for the onscreen and menu displays, theme 1, 2 and 3.
The only difference is the colour.
The Pref Language option lets you choose
from the selection of languages provided
for on-screen display. You can select from:
English, Gaelic, and Welsh.
The Low Power option lets you set the unit to
operate in low or standard power mode. Low
Power can be set to ‘On’ or ‘Off’.
Use the and the }| buttons to
4
select and change the ‘OSD & TV’
options as required.
14
Page 15

Advanced features
Parental PIN
Old Password
New Password
Confirm New Password
Parental Lock
On
0 - 9 [Ok] - Select Exit
Warning all settings and channels stored will
be erased?
Confirmation
Ye s
No
?
Password
06
Parental lock
The Parental Lock function in conjunction
with the Lock function in channel list,
allows you to control the content that may
be viewed on the TV; when set it will also
password protect the re-tune function.
If you change the setting to Off, the
password must be entered to allow the
setting change. The password can be
changed when required.
Use the and the }| buttons to
1
highlight ‘Parental Lock’ and then press
the OK button to display the Parental
Lock window.
A message will be displayed briefly
4
when the the password has been
updated, and then the window will
close. If unsuccessful, you will be
prompted to enter the password again.
Make sure you have noted the new
5
password if one has been set.
DON’T FORGET! You will need to enter your
password when you want to run Factory
Reset, even when Parental Lock is Off.
Factory Default
This function resets all settings to the
factory default settings.
To reset your Digital Box to the original
1
factory settings, select the ‘Factory
Default’ option in the menu.
Use the }| buttons to set ‘Parental
2
PIN’ to On or Off. When you change this
setting, a password entry box asks for
the password. The change will only be
activated when the correct password
has been entered.
To change your password,
Press the button when you enter the
1
Parental Lock window.
New Password will be selected.
2
Enter the new password in and then
3
again to confirm.
Select ‘Yes’ in the box that displays and
2
then press the OK button.
3
You will need to enter the correct
password in the password box when
prompted by the ‘Password’ box.
Enter the password using the numerical
buttons on the remote control.
After the correct 4-digit password
4
15
Page 16

06
S/W Upgrade via OTA
Information
[Ok] -Select Exit
System Installation
Channel Manager
Settings
Accessories
H/W VERSION
S/W VERSION
Model Number
Subtitle Status
Language Status
No of Channel
Transmitter Name
Information
Exit
: 5162v1.0
: A33ST10_17_0100
: GDB12XIT
: OFF
: English
: 53
: Tacolneston
Advanced Features
has been entered your Digital Box will
reset all settings to the factory default
settings and will wait for you to press
the OK button to re-tune as ‘First Time
Installation’ (see page 6).
Accessories
This menu gives you access to the ‘Software
Upgrade’ and ‘Information’ functions.
Software upgrade
Select ‘S/W Upgrade’ to search and install
new software if found. This function does
not affect your settings and stored channels.
Information
The ‘Information’ window gives you
information about your Digital Box, see
below. It is useful to have this information
if you need to contact the call centre for
help.
DON’T FORGET! The information shown
on your screen may differ to the one
shown above.
16
Page 17

Auto scan
Channel Manager
Accessories
OK Exit
System Installation
Settings
Confirmation
Ye s
No
?
Full Rescan/All channels will be deleted?
Password
Information
i
Please Wait ...
Re-tuning
Tuning Menu
Progress
Signal Strength
17%
84%
BBC ONE
BBC TWO
ITV 1
BBC THREE
BBC FOUR
ITV3
SKY THREE
Exit
Channels 13
07
Retuning your Digital Box
As digital switchover happens in your
region, and extra channels and services are
launched, you will need to retune your Digital
Box.
Press the MENU button.
1
Use the buttons to select ‘System
2
Installation’.
Press the } button to select ‘Auto scan’.
3
Press the OK button.
4
When you see the warning popup
5
screen, select ‘YES’ using the the }|
buttons and then press the OK button.
The re-tuning progress screen will be
7
displayed (below) which shows you
how many channels have been found
and saved. Scanning may take several
minutes to complete.
When finished, the following message
8
will be displayed briefly.
The first channel in the channel list will
9
then be displayed. Its ‘Info’ banner will
also be displayed for a short time. Your
Digital Box has now been retuned.
6
If ‘ Parental Lock has been set to ‘On’,
the ‘Password’ box will display. Enter the
password to continue.
17
Page 18

Troubleshooting
08
Please note indoor aerial are not recommended for use with this product (this
includes loft aerials) otherwise you may experience problems with reception
or picture break ups on some channels.
Problem Possible cause What to do
Standby light not lit Mains lead unplugged
No signal found Aerial is disconnected
No picture or sound Tuned to digital teletext channel Switch to another channel
Scrambled channel
message
No response to remote control Digital Box is switched off
Forgotten PIN code Contact the helpline
You have moved your
TV and you find you are
no longer able to receive
digital channels
Mains fuse blown
Aerial is damaged/misaligned
Out of digital signal area
Channel is scrambled This Digital Box is not able to decode
Handset not aimed correctly
Front panel obstructed
Remote batteries exhausted
The aerial feed maybe sent through a
distribution system which can/may reduce
the digital signal now received by the
Digital Box
Check mains lead
Check fuse
Check aerial lead
Check aerial
Ensure that you are capable of receiving
Digital TV
scrambled channels
Plug in and turn on plug
Aim remote at the front panel
Check for obstructions in front of the Digital Box
Replace the remote batteries
Try a signal booster or a direct feed from the
aerial
Need extra help?
If you have a technical enquiry or a
problem with this Digital Box, just call
0871 230 1777
18
Page 19

Specifications
09
Tuner and channel
Decoder
•Transportstream
•Profilelevel
•Inputrate
•Videoformat
•Audioformat
•Videooutput
Connection
•Mainpowercable
•Tuner
•Video
Power supply
•Inputvoltage
•Powerconsumption
•RFinputconnector
(IEC-TYPE, IEC169-2, female)
•RFoutputconnector
(IEC-TYPE, IEC169-2, male)
•Frequencyrange:
470MHz ~862MHz (UHF)
MPEG-2 ISO/IEC 13818
MAX. 15Mbit/s
MPEG-2 Main profile @main level
4:3/16:9 Switchable
MPEG Layer I & II, 32 / 44.1 / 48KHz
RGB, CVBS
Fixed type
Aerial input
Twin scart
AC 100 - 240V ~50/60Hz
MAX. 5W/standby <1W
IMPORTANT: Due to continual revision and improvements to our products design,
specifications are subject to change without notice.
19
Page 20

10
Electrical Information
This Digital Box is fitted with a BS1363/A 13 amp plug. If it is not suitable for your supply
sockets it must be removed and replaced with an appropriate plug. If the plug becomes
damaged and/or needs to be replaced please follow the wiring instructions below. The plug
removed must be disposed of immediately. It must not be plugged into a supply socket as
this will be an electrical hazard. If the fuse needs to be replaced it must be of the same
rating and ASTA approved to BS1362. If the plug is changed, a fuse of the appropriate rating
must be fitted in the plug, adapter or at the distribution board. If the fuse in a moulded plug is
replaced, the fuse cover must be refitted before the appliance can be used.
Wiring Instructions
The supply cable will be either 2-core or 3-core. Follow the appropriate wiring instructions
given below. In both cases ensure that the outer sheath of the cable is firmly held by the
cable clamp.
2- Core plug
WARNING: Do not connect either wire
to the earth terminal.
This symbol indicates that this 2-core appliance is
Class II and does not require an earth connection.
The wire coloured blue must be connected to the terminal
marked with the letter N or coloured black.
The wire coloured brown must be connected to the terminal
marked with the letter L or coloured red.
Fuse
Brown (Live)Blue
(Neutral)
3- Core plug
WARNING: This appliance must be earthed.
The wire coloured green and yellow must be connected to the
terminal marked with the letter E, or by the earth symbol
or coloured green or green and yellow.
The wire coloured blue must be connected to the terminal
marked with the letter N or coloured black.
The wire coloured brown must be connected to the terminal
marked with the letter L or coloured red.
Green & yellow
(Earth)
(Neutral)
Fuse
Brown (Live)Blue
,
20
Page 21

Warnings 10
•UnqualifiedattemptstorepairthisDigital
Box will invalidate the warranty.
•ReferrepairstothisDigitalBoxtoa
qualified service personnel only.
•DonotdisassemblethisDigitalBox.
•Therearedangerous-voltagepartsinside
that may cause electric shock even after
power is disconnected.
•StoreyourDigitalBoxinaclean,dry
environment.
•UnplugtheDigitalBoximmediatelyif
it gets wet, and consult a servicing
technician.
•AlwaysunplugtheDigitalBoxbefore
cleaning it.
•WipedustoffthecabinetoftheDigitalBox
with a clean, dry and soft cloth.
•Donotplaceanyobjectsontopofthe
Digital Box.
•AvoidexposingyourDigitalBoxdirectlyto
sunlight or other heat sources.
•PutyourDigitalBoxinawell-ventilated
area away from high humidity.
•DonotexposethisDigitalBoxtorainor
moisture, dripping or splashing.
•Forstubbornstainsuseadamp(not
dripping) cloth.
•Donotuseanycleaningsolutionsonthis
Digital Box.
Safety Tips
If smoke, abnormal noise or odour comes
out of this Digital Box, unplug from the mains
supply immediately and contact the retailer.
Never try to repair the Digital Box on your
own. Always contact the dealer for repairs.
Note
This manual contains for-reference-only
graphics and information that are subject to
change without notice.
WEEE
This appliance is labelled in
accordance with European Directive
2002/96/EG concerning used
electrical and electronic appliances
(waste electrical and electronic
equipment - WEEE). The guideline
determines the framework for
the return and recycling of used
appliances as applicable throughout
the EU.
21
Page 22

Guarantee
This digital box is guaranteed for twelve months from the date of original purchase. If there is
any defect due to faulty materials or workmanship, contact the Customer Helpline. Have your
receipt of purchase available.
The guarantee is subject to the following provisions:
It is only valid within the boundaries of the country of purchase.•
The product must be correctly installed and operated in accordance with the instructions •
contained in this instruction manual.
The digital box must be used solely for domestic purposes.•
The guarantee will be rendered invalid if the digital box is re-sold or has been damaged by •
inexpert repair.
The manufacturer disclaims any liability for incidental or consequential damages.•
The guarantee is in addition to, and does not diminish, your statutory or legal rights.•
22
Page 23

23
Page 24

When does switcho ver happen?
Visit us at digitaluk.c o.uk call us on 0845 6 50 50 50
†
*
Copeland switches on October 17, 2007
The exact date you
switch depends on the
transmitter you are
served by. To check
when you switch,
go to Digital UK’s
postcode checker on
www.digitaluk.co.uk
swen VTI ruoy kcehC
service or look at Te letext
page 106 to see wha t TV
region you’re in.
How the Digital switchover may
affect you:
Television in the UK is going digital, bringing
us all more choice and new services.
Starting in late 2007 and ending in 2012,
television services in the UK will go
completely digital, TV region by TV region.
The map shows when your area will
switchover to digital. When the TV
switchover happens in your area, there are
at least two occasions when you will need to
re-tune your Digital Box in order to continue
receiving your existing TV channels, and also
to pick up new ones.
Digital UK, the body leading the digital TV
switchover, will advise you when you need
to re-tune during the switchover.
For re-tuning instructions for this Digital Box
please see page 17 of this instruction book.
If you find you can’t receive the extra digital
channels, it may be because your area is
not covered by Freeview yet or that you
need an aerial upgrade.
Visit www.digitaluk.co.uk to check.
If you have any questions, please contact
your equipment supplier or call Digital UK
on 0845 6 50 50 50 or visit
www.digitaluk.co.uk.
Rev2/DTM_V1/NG_04/09/09
 Loading...