

Page 1
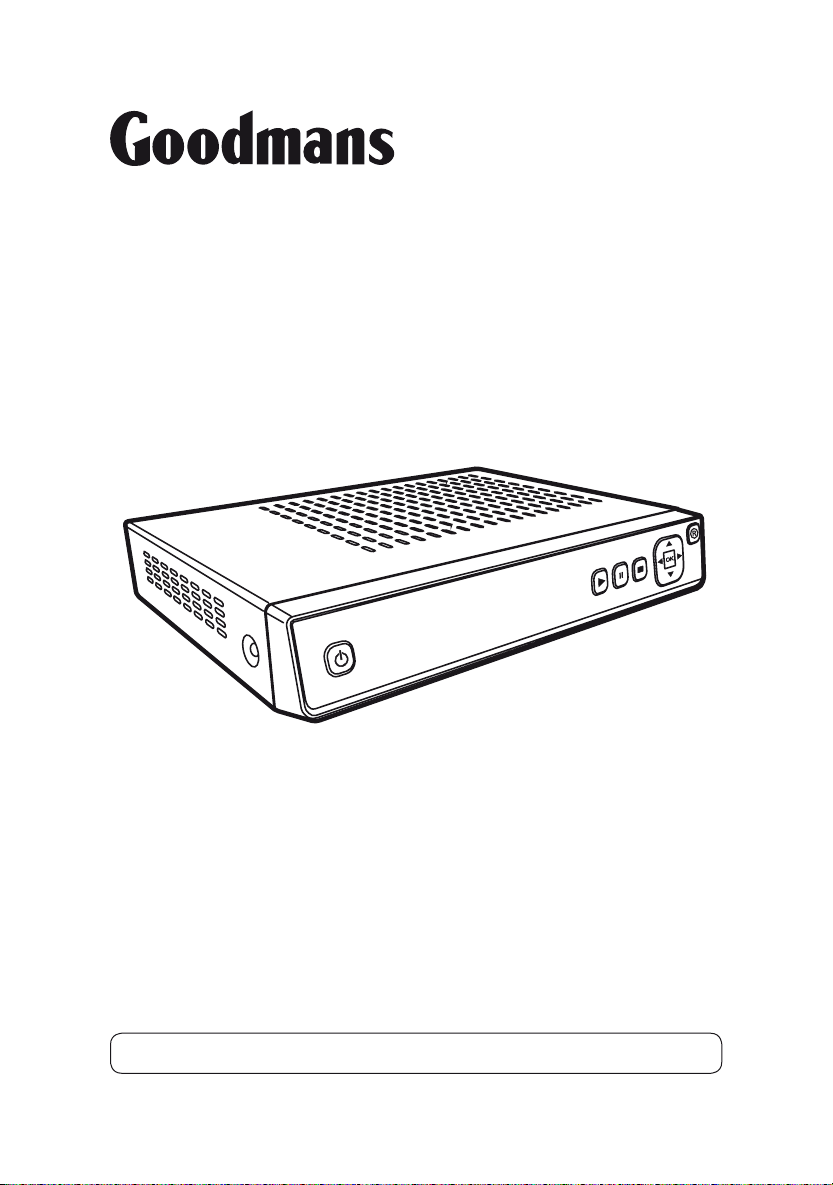
GDB1225DTR Freeview + Digital TV Recorder
OK
R
User Guide
IMPORTANT: Please read all instructions carefully before use and keep for future reference
Page 2
Introduction
Thank you for choosing this Goodmans Freeview + Digital TV
Recorder.
Not only can you receive over 50 digital TV channels, and up to 24
digital radio stations, but you can record two channels at a time,
pause live TV and watch it back at a time to suit you.
It’s really simple to use; it’s all done using the clear, easy to understand on-screen
menus which are operated from the remote control. It also has a reminder function
so that you won’t miss your favourite programmes.
Safety is important
Use of any electrical equipment should be undertaken with care. Please read
the safety section on pages 30 and 31 before using the Freeview+ Digital TV
Recorder. This appliance is for household use only.
A FREEVIEW Digital Box gives you over 50
digital TV channels and up to 24 digital radio
stations, without a subscription or contract.
For more information on FREEVIEW, and to
check reception in your area please visit
www.freeview.co.uk
2
A digital box lets you access digital channels
that are broadcast in the UK. It uses a digital
signal, received through your satellite dish
and lets you watch it through your existing
television.
Page 3
What’s in the box?
OK
R
MENU WIDE CLOCK TV/AV
. abc def
ghi jkl mno
pqrs tuv wxyz
GUIDE INFO
R
OK
LIB
P
SUB SLOW SWAP EXIT
BACK CHLIST TEXT AUDIO
123
456
789
0
Freeview+ Digital TV Recorder
Loop Through Cable
SCART Lead
Quick Start Guide
This User Guide
Remote Control
2 x AAA Batteries
Other things you may need
You will need a wideband rooftop aerial in order for your Freeview+ digital TV
recorder to work properly.
See www.digitaluk.co.uk for more information.
3
Page 4

Contents
01
Your Digital TV Recorder ............5
02
Your remote control
03
Connecting up
04
Get Started
05
Daily use
06
The programme guide
window
Channel Organiser
07
The Library Window
08
.................................10
...................................14
...................6
...........................7
...............................8
..................16
................18
09
The settings menu...................20
10
Retune
....................................23
11
The system information
menu
...................................... 24
Help and Advice
12
13
Specifications
14
Warnings
15
Electrical Safety
......................25
..........................29
................................. 30
......................31
4
Page 5
R
OK
Your Digital TV Recorder
RF IN1RFIN2
TV
RF OUT2RF OUT1
VCR
SPDIF
RS232
SERVICE ONLY
AC IN
230V~50Hz
GDB1225DTR
250gbDigitalTVRecorder
PowerSupply: AC230V~50Hz
MaxPowerConsumption:18W
Helpline:0871 2301777
Front
NAVIGATION
Move up, down, left,
PAUSE
right and OK
Pause live TV and
playback
01
RECORD
Record live TV
STANDBY
Power On /
Standby
Rear
RF IN
from your
TV aerial
LOOP THROUGH CABLE
Must be installed to
enable you to record two
programmes at once
DISPLAY
TV and VCR
Standard definition
SCART outputs
PLAY
Playback
recorded
STOP
Power On /
Standby
programmes
RS232
Factory upgrade
connection
SPDIF Digital audio out
(for connection to a
surround sound system)
POWER Cable
5
Page 6
02
MENU WIDE CLOCK TV/AV
. abc def
ghi jkl mno
pqrstuv wxyz
GUIDE INFO
R
OK
LIB
P
SUB SLOW SWAP EXIT
BACK CH LIST TEXT AUDIO
123
456
789
0
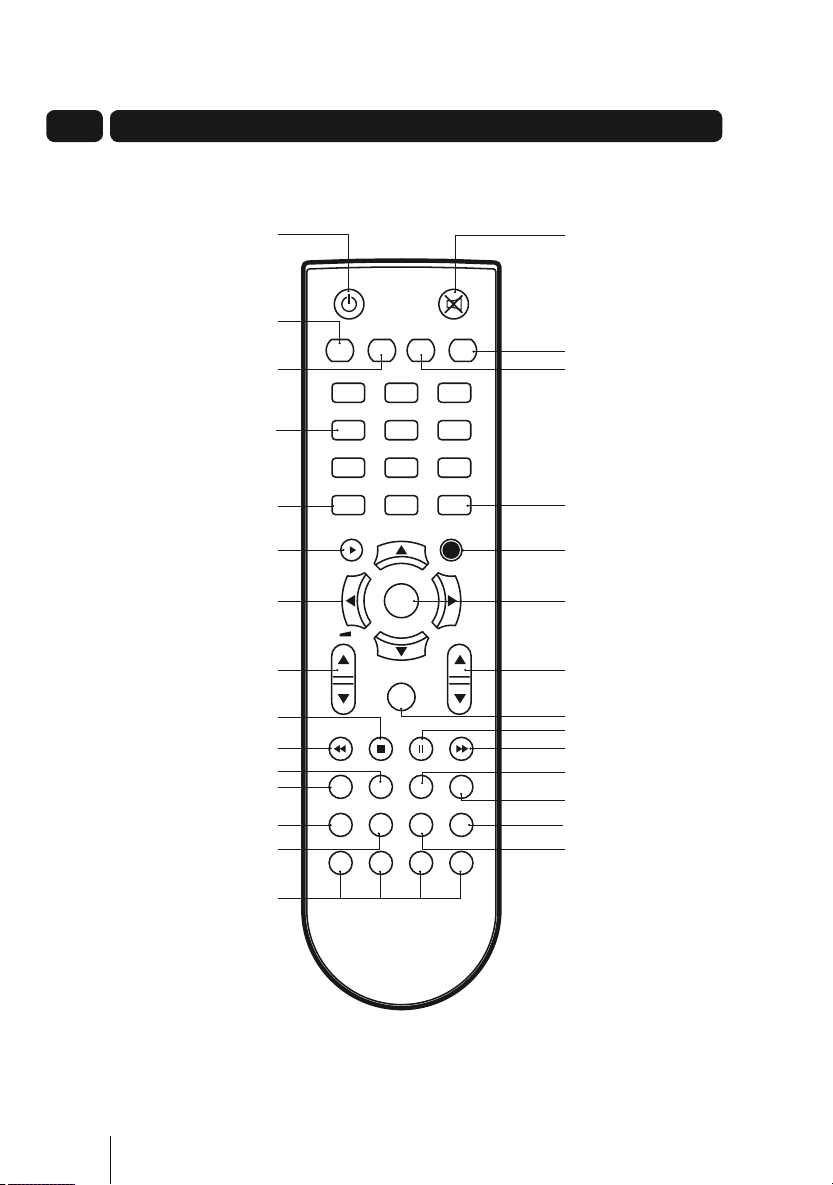
Your Remote Control
Remote Control
WIDE Switches between
4:3 and 16:9 screen sizes
Programme Guide window
Selects options in menu/
SUB Turns subtitles on and off
BACK Takes you back to
For interactive use and
STANDBY
Power On/Standby
MENU Opens the
main menu screen
0 to 9 Selects
channels and
enters your PIN
GUIDE Opens the
PLAY
NAVIGATION
on screen displays
VOLUME
Up and down
STOP
FAST REWIND
SLOW
the previous menu
CH LIST Opens the
channel list menu
COLOUR BUTTONS
navigation of menus
MUTE Turns the
sound on and off
TV/AV Switches between TV
and VCR scart
CLOCK Displays the time on
the screen
INFO Displays the
Information bar
RECORD Used to record a
programme and scheduled
recordings
OK Confirm selection in
menu/on screen displays
P Channels up and down
LIB Opens the library screen
where your recordings are stored
PAUSE
FAST FORWARD
SWAP Changes between
current and previous channels
EXIT Exits screens and Menus
AUDIO Changes the audio
language when available
TEXT Displays digital text
when available
6
Page 7
Connecting up
RF IN1RFIN2
TV
RF OUT2RF OUT1
VCR
SPDIF
RS232
SERVICE ONLY
ACIN
230V~50Hz
GDB1225DTR
250gbDigital TVRecorder
PowerSupply: AC230V~50Hz
MaxPower Consumption:18W
Helpline:0871 2301777
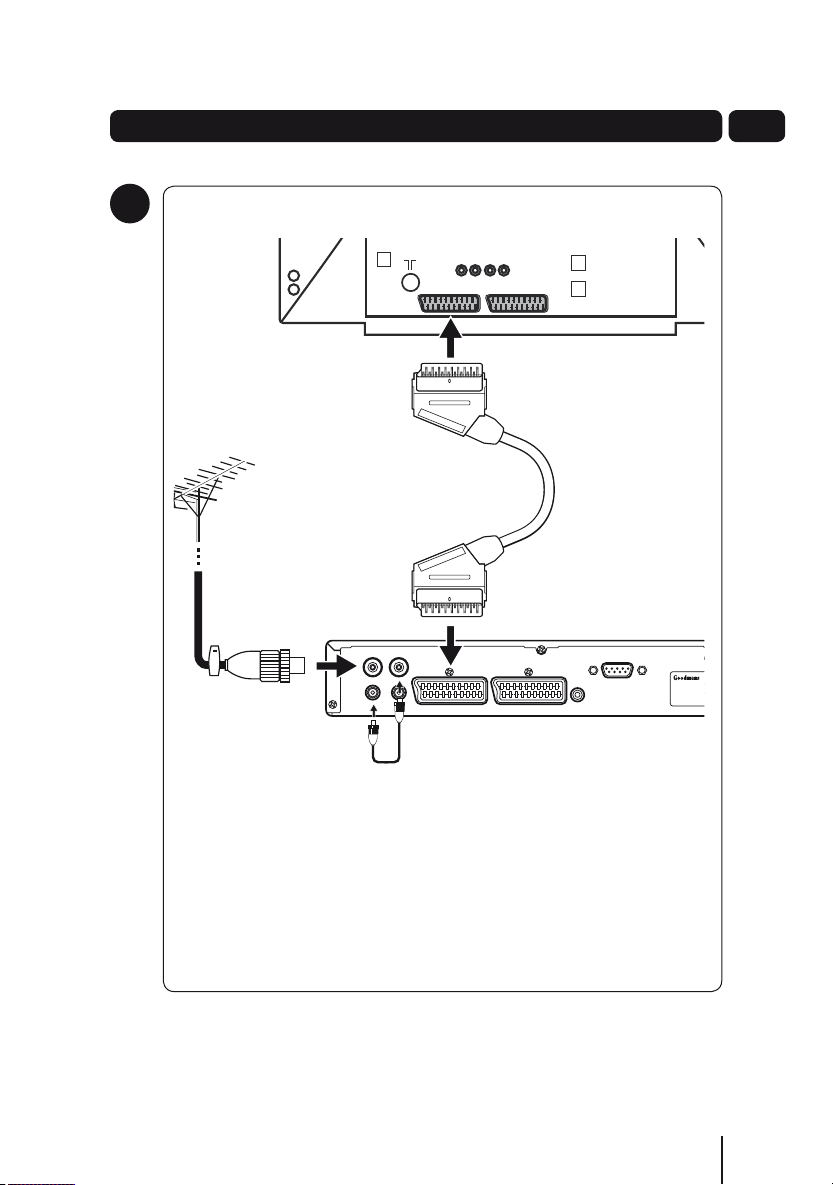
Getting connected
1
03
Connect the cable that comes from your aerial to the RF IN socket on the
back of your Freeview+ digital TV recorder.
Connect the loop through cable between the RF OUT socket and the RF IN
socket (see illustration).
Connect the Scart lead between the TV Scart socket and your TV Scart
socket.
7
Page 8
04 Getting Started
Using the Remote Control
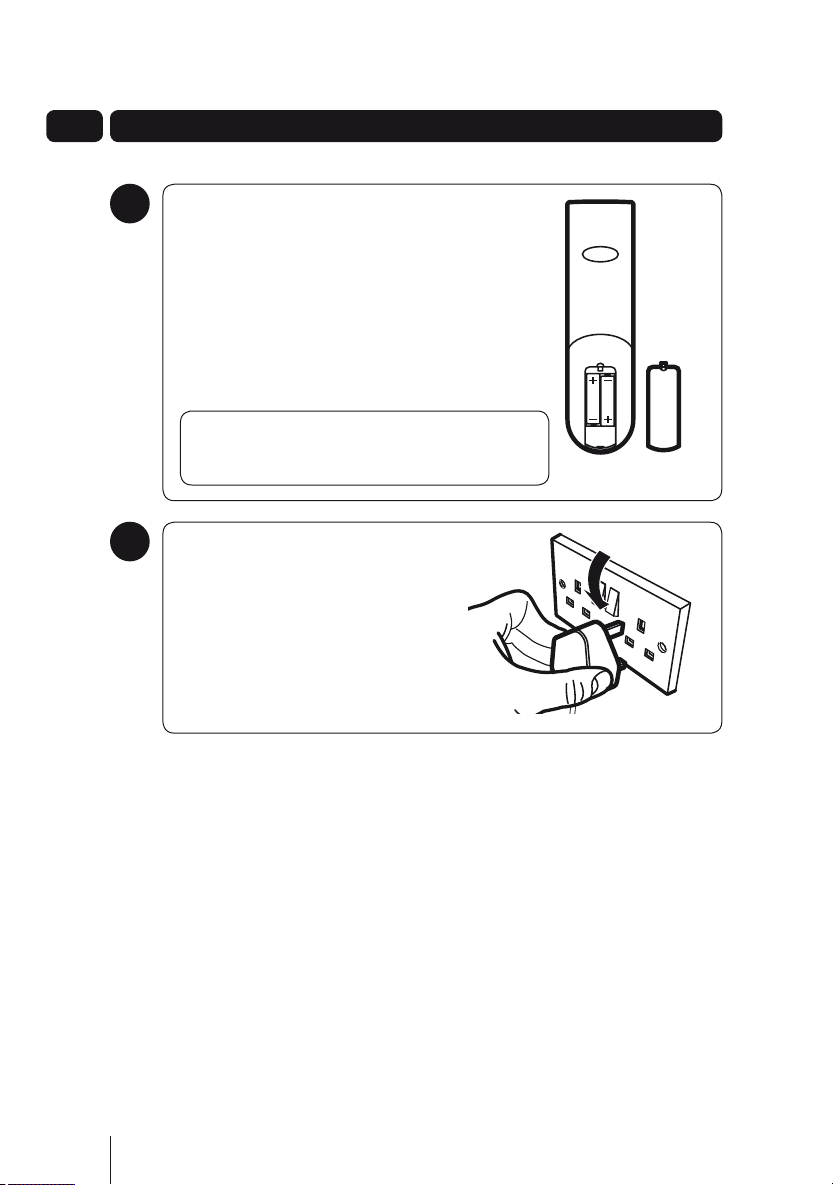
2
Open the battery cover of the remote control and put
two AAA size batteries so that the ‘+’ and ‘-’ marks
on the batteries match the ‘+’ and ‘-’ marks inside
the remote control. Replace the battery cover.
To use the Remote Control, simply direct it towards
the front of the Freeview+ digital TV recorder and
press the desired buttons.
DON’T FORGET! When replacing the batteries
make sure that you use the same size and type.
Plug in and switch on
3
Connect the mains plug to the power
socket and turn the power On.
Switch your TV On.
Press the
remote control.
STANDBY button on your
8
Page 9

Getting Started
MENU WIDE CLOCK TV/AV
To turn on
4
To turn on your new Freeview+ digital TV recorder, press the STANDBY
button on the remote control.
The first time install screen
5
The first time install screen will appear on screen.
Follow the instructions on screen to complete the installation.
04
9
Page 10
05
Daily use
Daily use
We have divided this book into separate
sections, so that you can find the
information you are looking for easily.
This section covers the day to day
functions that you will use most often.
Using standby
When you are not watching TV, you
should set your Freeview+ digital TV
recorder to standby.
Press the
between on (Standby Indicator green)
and standby (Standby Indicator red).
If you plan to leave your Freeview+
digital TV recorder unattended for a
long time, put the Freeview+ digital
TV recorder in standby and wait 30
seconds before switching it off at the
mains.
STANDBY button to switch
Choosing a programme
Open the guide by pressing the GUIDE
button. Use the p and q buttons to
select different channels.
When you have chosen your
programme, press the OK button to
watch it.
Changing channel
You can also select the channel you
want to watch by using the P p button
and P q button on the remote control.
Alternatively you can use the number
buttons to key the channel number.
When you change the channel the
channel information bar will be
displayed for a few seconds.
This shows the details of the
programme currently showing and the
next programme.
10
Page 11
Daily use
05
Changing the volume
You can change the volume using the
VOL p and q buttons on the remote
control.
You can turn off the volume by pressing
the
MUTE button. To turn it back on,
press the MUTE button again.
The information screen
Press the INFO button once to display
details of the programme currently
being shown and the next programme.
If you want to see information about
the programme you are watching, you
can press the INFO button twice.
Use the
current and next programmes.
and buttons to view the
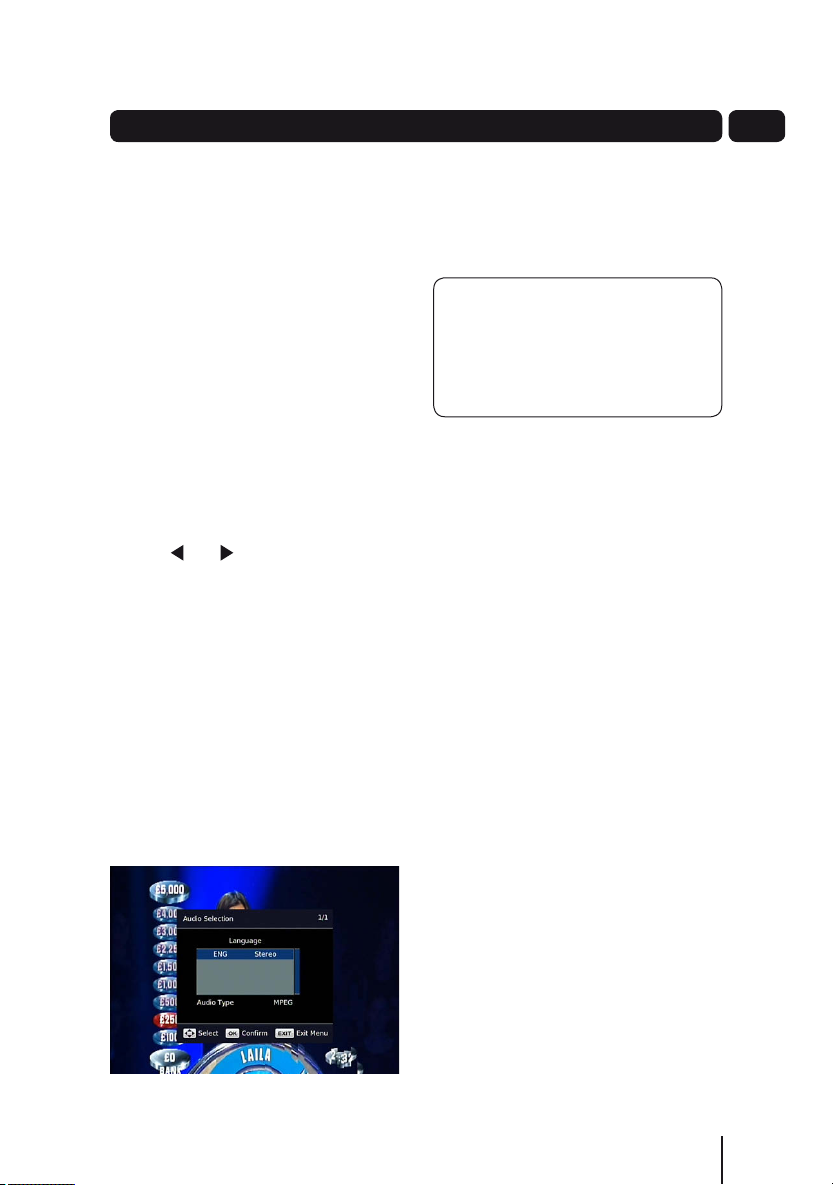
Audio channel
Sometimes different audio languages
are available with certain programmes
or channels.
Press the
available languages.
Use the p and q buttons to select a
different audio channel.
Press the OK button to confirm the
setting.
AUDIO button to see the
Subtitles
Press the SUB button to toggle the
subtitles on and off.
DON’T FORGET! Not all
programmes have subtitles. You can
use the information bar to see if the
[S] icon is shown. It’s shown in the
extended information screen.
Aspect ratio
You can select the aspect ratio or
screen size which best suits your
TV. The options are 4:3 Normal, 16:9
Widescreen or Auto.
Press the
between the available aspect ratios.
WIDE button to toggle
Output source
Press the TV/AV button to switch
between TV and the VCR Scart socket
output.
Back button
Press the BACK button to return to the
previous screen or menu.
Clock
Press the CLOCK button to view the
current time.
11
Page 12

05 Daily use
Pausing live TV
This function is also known as time
shifting and is very useful if you are
watching a programme and the phone
rings.
To pause live TV, press the
button. The time counter will start
and show the amount of time that the
programme has been paused.
To continue to watch TV, press the
PLAY button and the programme will
continue from where you paused it.
You can fast forward and fast rewind
using the
speed and direction are shown on the
screen. To change the speed press the
and buttons again.
The options are:
x2, x4, x8, x16, x32
x2, x4, x8, x16, x32
You can watch in slow motion by
pressing the SLOW button. To change
the speed, press the SLOW button
again.
The options are:
smooth forward 1, 2, 3, 4, 5
smooth rewind 1, 2, 3, 4, 5
To stop time shifting mode and go back
to live TV press the STOP button.
and buttons. The
PAUSE
Digital text
Your Freeview+ digital TV recorder
gives you access to digital text for
information on news events, weather
and a variety of topics.
Digital text services vary depending on
the country and channel.
DON’T FORGET! Some channels
use the RED button to access
digital text whilst you are watching
TV. When this is available it is
identified by a red circle in the top
right part of the screen.
Press the
text. The index page will be displayed.
Use the
a page number or alternatively use
the RED, GREEN, YELLOW or BLUE
buttons to access shortcuts.
Interactive digital text lets you interact
with some TV programmes and
channels. If a programme is interactive,
the broadcaster’s interactive symbol
will be on the screen.
TEXT button to view digital
NUMBER buttons to enter
DON’T FORGET! Many
broadcasters include on-screen
instructions for using digital text on
the index page.
The main menu
You can easily access the library,
channel organiser and various
configuration menus through the main
menu.
12
Page 13

05Daily use
To open the main menu, press the
MENU button.
Use the p and q buttons to navigate
the main menu.
Press the OK button to select an option.
Library - You can open the library
window from the main menu. For
further information about the library
window, see page 18.
Channel Organiser - You can open
the channel organiser from the main
menu. For further information about the
channel organiser, see page 16.
Settings - The settings menu lets you
configure the audio and visual settings
of the Freeview+ digital TV recorder.
For further information about the
settings menu, see page 20.
Retune - The retune menu lets you
retune the Freeview+ digital TV
recorder. For further information about
the retune menu, see page 23.
System Information - The system
information menu provides important
information about your Freeview+
digital TV recorder.
DON’T FORGET! The system
information menu can be accessed
by pressing the MENU followed by
the 0 button.
Swap
Press the SWAP button to switch
between the current and previous
channels.
13
Page 14

06
The programme guide window
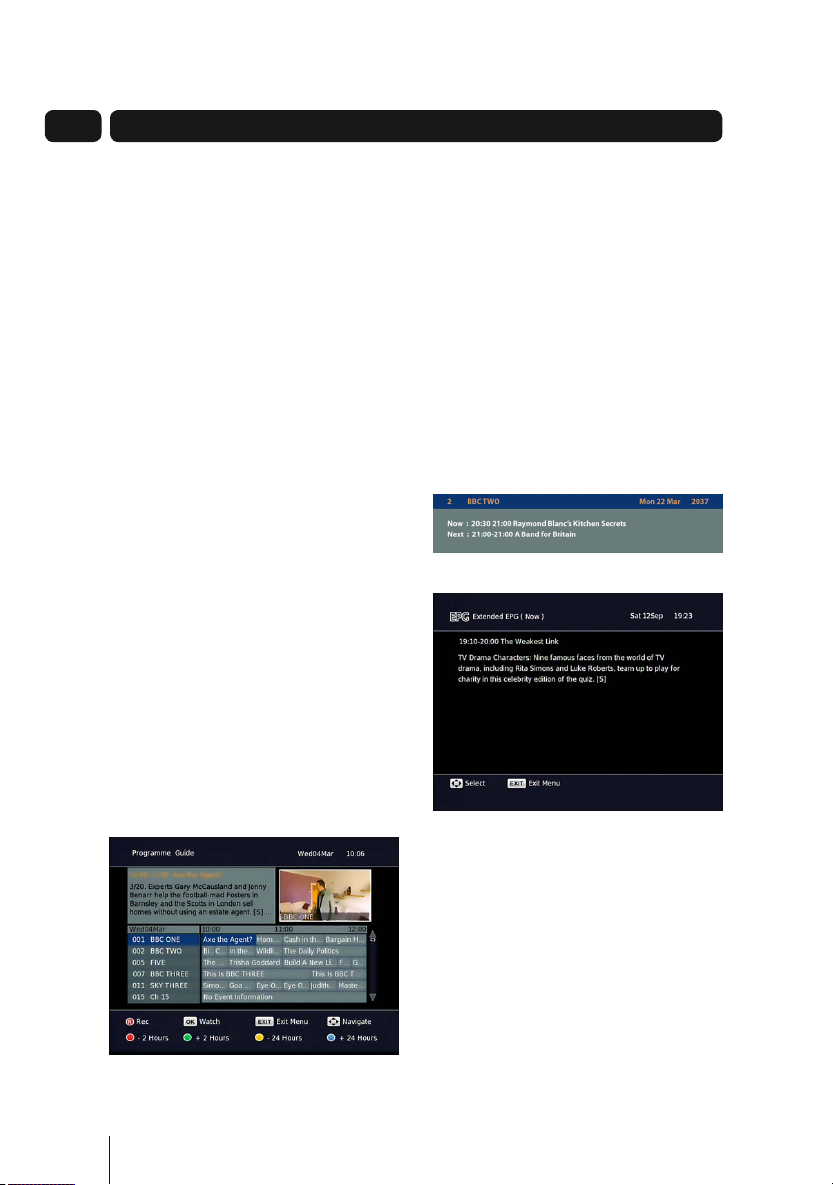
Guide icons
[S] This programme has
subtitles
Clock icon This programme has
been set as a reminder
R icon This programme
is scheduled to be
recorded
Navigation
You can open the programme guide
window by pressing the GUIDE button
on the remote control. The guide shows
you all of the programmes and channels
available for the next 8 days.
Use the p and q buttons to select
different channels.
Use the
programme.
The RED button will move backwards
2 hours (you cannot move backwards
before the current time), the
button will move forwards 2 hours, the
YELLOW button will move backwards
24 hours and the BLUE button will
move forwards 24 hours.
When you have chosen your
programme, press the OK button to
watch it.
and buttons to select the
GREEN
Setting a reminder
You can use the reminder function to let
you know when a programme is going
to start.
Use the
programme.
Press the OK button to set the
reminder.
When the reminder has been set
a clock icon is shown before the
programme name.
and buttons to select a
DON’T FORGET! To cancel a
programme reminder, highlight the
programme where the reminder
has been set, and press the
OK button. The clock icon will
disappear and the reminder will be
cancelled.
14
Page 15

06The programme guide window
When the programme is about to start,
a warning screen will be displayed. You
can change the channel, cancel the
reminder or delay the reminder. Use the
p and q buttons to select the option
and the OK button to confirm your
selection.
Setting a recording
You can record two programmes at the
same time using this Freeview+ digital
TV recorder.
Select a programme you want to record
and press the
If the programme is part of a series
and has a series link you will be asked
if you want to record the series or the
single programme. Use the p and q
buttons to select the option and the OK
button to confirm your selection. When
a recording has been set the record icon
is shown before the programme name.
DON’T FORGET! You can change
channel and watch a programme
or recording when the Freeview+
Digital TV Recorder is recording.
RECORD button.
Recording Clashes
If you try to record more then two
programmes at the same time you will
see a warning screen. If you want to
continue to set the recording select
YES with the button and a list of the
recordings will appear.
Use the p and q buttons to select the
recording you want to cancel and then
press the
will appear in the delete column.
Press the OK button to confirm your
selection.
To cancel the new recording, press the
EXIT button
button the cancel it. A tick
15
Page 16

06 Channel Organiser
You can open the channel organiser
window from the main menu or with
the CH LIST button.
This channel list allows you to delete,
hide and lock channels.
Hiding a channel
You can hide any channel so that it does
not appear in the programme guide
window and it will not be available
when using the P+ or P- buttons. You
may want to do this for channels that
you do not watch regularly.
Use the p and q buttons to select the
channel that you want to hide. Press the
YELLOW button to hide the channel.
When a channel is hidden, the
will be shown to the right side of the
channel name.
Channel list icons
16
This channel has been
hidden
This channel has been
locked and will require
the parental PIN to
unlock it.
DON’T FORGET! Hidden
channels will not be shown in the
programme guide window.
You will only be able to view the
hidden channels using the number
buttons.
To show a channel, use the p and
q buttons to select the channel that
you want to show. Press the
button. The will no longer be shown
and will be available in the programme
guide window again.
YELLOW
Page 17

07Channel Organiser
Locking a channel
You can lock any channel so that it can
only be accessed once the parental PIN
has been successfully entered. You may
want to do this to prevent children from
viewing unsuitable programmes.
Use the p and q buttons to select the
channel that you want to lock. Press the
GREEN button. The lock code window
will appear.
Use the
the parental PIN and then press the OK
button. The icon will be shown at the
right hand side of the channel name.
NUMBER buttons to enter
DON’T FORGET! The default
parental PIN is 0 0 0 0. If you
have forgotten your guidance PIN,
please contact the call centre on
0871 230 1777 for assistance.
The lock code window will appear
again. Use the
enter the parental PIN and then press
the OK button. The icon will no longer
be displayed.
NUMBER buttons to
Deleting a channel
You can permanently delete a channel
from the channel list. Use the p and
q buttons to select the channel you
want to delete. Press the RED button.
A warning will appear asking you if you
want to delete the channel. Use the
and buttons to select YES or NO,
then press OK.
DON’T FORGET! you will need to
do retune to get back any deleted
channels.
Moving a channel
You can move the position of a channel
in the channel list. Use the p and q
buttons to select the channel you want
to move. Press the BLUE button and
the highlight on the selected channel
will change colour. Use the p and q
buttons to move the channel in the
channel list. When the channel is in it’s
new position in the list, press the BLUE
button.
To unlock a channel, use the p and
q buttons to select the channel that
you want to unlock and then press the
GREEN button.
17
Page 18

08
The Library Window
Navigation
You can open the recordings library
window by pressing the LIB button.
This shows you all of your recorded and
scheduled programmes.
Use the p and q buttons to select
each programme.
Previewing a recording
You can preview a recorded programme
in the preview window in the recordings
library. Press the BLUE button.
Renaming a recording
To rename a recording press the
GREEN button. A keypad will appear.
Watching a programme
Programmes that have finished
recording are marked as RECORDED
in on a red background in the Status
column.
Programmes that are recording are
marked as RECORDING on a green
background in the Status column.
Use the p and q buttons to select a
programme you want to watch.
Press the OK button to start playback.
DON’T FORGET! You can start to
watch back a programme that is
recording and don’t have to wait
for it to finish.
18
Use the buttons as directed on the
keypad to rewrite the programme name
as shown at the top of the keypad.
When you have finished press the OK
button to save the new name and go
back to the Library window.
Press the
go back to the Library window, your
changes will not be saved.
EXIT button at any time to
Page 19

The Library Window
08
Deleting a recording
Use the p and q buttons to select a
programme you want to delete. Press
the RED button to delete.
Locking a recording
You can lock a recording so that it can
only be accessed once the parental PIN
has been successfully entered. You may
want to do this to prevent children from
viewing unsuitable programmes.
Use the p and q buttons to select the
recording that you want to lock. Press
the
YELLOW button. The lock code
window will appear.
Use the
the parental PIN and then press the OK
button. The icon will be shown at the
right hand side of the Status column.
NUMBER buttons to enter
DON’T FORGET! The default
parental PIN is 0 0 0 0. If you have
forgotten your parental PIN, please
contact the call centre on 0871
230 1777 for assistance.
HDD information
The HDD information bar shows state of
the Hard Disk Drive (HDD).
The GREEN part is the amount of free
space.
The RED part is the amount used by
recordings.
The YELLOW part is the amount
of space reserved for scheduled
recordings.
To unlock a recording, use the p and
q buttons to select the recording that
you want to unlock and then press the
YELLOW button. The lock code window
will appear again. Use the NUMBER
buttons to enter the parental PIN and
then press the OK button. The icon
will no longer be displayed.
19
Page 20

08
The settings menu
To open the settings menu, press the
MENU button on the remote control
and then select ‘Settings’. Press the OK
button to confirm.
Changing the settings
Use the p and q buttons to select a
setting category.
Press the OK button and then use the
and buttons to view the available
options for a setting category.
If you want to change a setting, use
the
and buttons to select a setting
option.
To exit the settings menu, press the
EXIT button or alternatively press the
BACK button to return to the main
menu.
Display Settings
Aspect Ratio – You will already have
set this as part of the installation
process, but you can change the format
of the screen size here without having
to setup your Freeview+ digital TV
Rrecorder again. You can choose from
4.3 Normal, 16:9 Widescreen and Auto.
Video Output - This setting allows you
to choose the video signal type which
is sent through the Scart sockets on
the rear of the Freeview+ digital TV
recorder. Choosing RGB will provide the
best picture quality for the majority of
TVs. This breaks down the signal into
Red, Green and Blue signals. If your TV
cannot use RGB, you should choose
CVBS. This may produce a reduced
picture quality.
OSD Theme – This changes the
colours for the On Screen Display. There
are three choices Theme 1, Theme 2 or
Theme 3. It a matter of personal choice
which one you choose.
20
Page 21

The settings menu
09
Parental lock
This setting allows you to make
changes to the parental PIN. The default
setting is that you don’t have to enter a
PIN (Off).
To change the password you have to
enter your old password, enter the new
password and then confirm the new
password.
DON’T FORGET! The default PIN
is 0 0 0 0. You will need to enter
the current parental PIN before
you are allowed to change it. If you
have forgotten your PIN, contact
the helpline for assistance.
Factory Reset
This setting allows you to reset all
your settings and perform a first time
installation. For more information on
first time installations, see page 9 or
refer to the quick start guide.
DON’T FORGET! By performing a
first time installation you will reset
all options in the settings menus
and cancel reminders.
Preferred Language
This setting is your preferred default
subtitle language. The options are
English, Gaelic, Irish and Welsh.
DON’T FORGET! Not all
programmes have these languages
available. If your preferred setting
is not available, English language
will be used instead.
210821
Page 22

09
The settings menu
Format HDD
This setting reformats the HDD
DON’T FORGET! Reformating the
HDD will erase all your previously
recorded programmes, including
programmes that have been
locked.
220822
Page 23

10Retune
The retune menu allows you to search
for new channels.
DON’T FORGET! You cannot
perform a retune whilst recording.
To open the retune menu, press the
MENU button on the remote control
and then select Retune.
A warning screen will appear to tell you
that all the channels will be retuned.
Use the
to retune or No to exit Retune.
and buttons to select Yes
Select Yes and your Freeview+ digital
TV recorder will search for all available
channels. The progress and signal
strength bars are shown for reference.
When the retune is complete, the first
available channel will be displayed.
230823
Page 24

11 The system information
To open the system information menu,
press the MENU button on the remote
control and then select ‘System
Information’. Press the OK button to
confirm.
The system information menu provides
important information about your
Freeview+ digital TV recorder.
In the unlikely event that you have to
contact the helpline, you should have
the system information menu open.
DON’T FORGET! The system
information menu can be accessed
by pressing the MENU followed by
the 0 button.
240824
Page 25

Frequently asked questions
Frequently asked question What you can do
The Freeview+ digital TV recorder will
not switch on. What should I do?
The Freeview+ digital TV recorder does
not seem to work and there is nothing
shown on the TV.
The picture appears to be ‘squashed’ or
‘cut off’.
I forgot to plug in the aerial when I set
up the Freeview+ digital TV recorder.
What should I do?
Check the mains power cable and make
sure it is plugged into a suitable power
outlet. Check that the mains supply is
switched On. Connect the power cable
to a different power outlet.
Is the Standby Indicator green? If it is
not:
• Press the
remote control.
• Make sure that all cables are firmly
connected to the Digital TV Recorder
and TV.
• Check that the Digital TV Recorder
is properly plugged into the power
supply.
If the standby indicator is green:
• Check you have the correct channel
and input selected on your TV.
• Check that all cables are correctly
attached.
• Check the brightness level of the TV.
Make sure the aspect ratio settings
are suitable for your TV. For more
information, see page 20.
Switch off your Freeview+ digital TV
recorder at the mains supply. Plug in
the aerial. Switch the Freeview+ digital
TV recorderr mains supply back on and
perform a retune. For more information,
see page 23.
STANDBY button on your
12Help and Advice
250825
Page 26

12 Help and Advice
Frequently asked question What you can do
The picture or sound keeps breaking up. There are several possible causes of this
type of problem.
• Your signal may be weak, you may
have an old, low performance or
damaged aerial, or the cable between
your aerial and TV may be damaged.
Check for any obvious damage to the
aerial and cables and make sure that
the connectors are properly fitted. If
this does not work, get a professional
to check the installation – your aerial
may provide a better signal if it is
moved somewhere else.
• Please remember that older aerials
and indoor aerials aren’t as effective
as new outdoor and roof aerials. Or,
try using a signal amplifier or booster
to improve the reception. Check the
digital TV coverage in your area. For
more information about digital TV
reception, please visit www.freeview.
co.uk.
260826
Page 27

Help and Advice
Frequently asked question What you can do
No channels were found when
searching for channels. I am missing
some channels.
I cannot see digital channels after
I have moved the set top box to a
different house.
I have forgotten my guidance PIN. Contact the helpline on 0871 230 1777
Some TV channels are not available in
every area.
Use the postcode checker on www.
freeview.co.uk.
Your signal may be weak. Get a
professional to check your installation
– your aerial may provide a better
signal if it is moved somewhere else.
Please remember that older aerials and
indoor aerials aren’t as effective as new
outdoor and roof aerials. Or, try using a
signal amplifier or booster to improve
reception. You may need to scan
the digital channels again. For more
information on retuning, see page 23.
You will need to retune your set top box.
For more information on retuning, see
page 23.
who will be able to help you reset
your PIN. Don’t forget to have your
system information available. For more
information, see page 24.
12
270827
Page 28

Help and Advice
12
Frequently asked question What you can do
The Freeview+ digital TV recorder
is behaving in an unusual way, for
example, the wrong information is on
the screen.
Can I change the audio language for the
programme I am watching?
Press the
remote control to turn the Freeview+
digital TV recorder off and then on
again. If there is no improvement, put
the Freeview+ digital TV recorder in
standby, switch it off at the mains and
leave it for 10 seconds
before switching it back on.
If this does not solve the problem,
contact the
helpline on 0871 230 1777 who will be
able to help diagnose the problem. Don’t
forget to have your system information
available. For more information, see
page 24.
Yes. Some channels broadcast other
audio languages. Press the
button when you are watching a
programme to see if other languages
are available.
STANDBY button on your
AUDIO
Need any help or information
setting up?
You may find the information you are
looking for on our web site.
www.thesupportsite.co.uk
or on the freeview website
www.freeview.co.uk
If you still need help or information you
can phone our call centre on:
0871 230 1777
Calls are charged at 10p per minute
when called from a BT land line.
Call charges may vary if using other
networks.
280828
Page 29

Specifications
General
Model Number • GDB1225DTR
Power Supply • 230V AC 50Hz
Power Consumption:
Standby
Nominal Use
Dimensions • 28mm (W) x 55mm (H) x 22mm (D)
Weight • 1.5 kg
IMPORTANT: Due to continual revision and improvements to our products design, specifications are
subject to change without notice.
• < 2W
• 16W Max
Guarantee
The Freeview+ digital TV recorder is guaranteed for twelve months from the date of
original purchase. If any defect due to faulty materials or workmanship, contact the
Goodmans Helpline. Have your receipt of purchase on hand.
The guarantee is subject to the following provisions:
• It is only valid within the boundaries of the country of purchase.
• The product must be correctly installed and operated in accordance with the
instructions contained in this User Guide.
• The Freeview+ digital TV recorder must be used solely for domestic purposes.
• The guarantee will be rendered invalid if the Freeview+ digital TV recorder is re-
sold or has been damaged by inexpert repair.
• The manufacturer disclaims any liability for incidental or consequential damages.
• The guarantee is in addition to, and does not diminish, your statutory or legal
rights.
13
290829
Page 30

14 Warnings
WEEE
This appliance is labelled in
accordance with European
Directive 2002/96/EG
concerning used electrical and
electronic appliances (Waste
Electrical and Electronic
Equipment - WEEE).
The guideline determines the
framework for the return and
recycling of used appliances.
General Safety
This Freeview+ digital TV recorder has
been designed and manufactured to
meet European safety standards, but
like any electrical equipment, care must
be taken if you are to obtain the best
results and safety is to be assured.
Do read these operating instructions
before you attempt to use the
Freeview+ digital TV recorder.
Do ensure that all electrical connections
(including the mains plug, extension
leads and interconnections between
pieces of equipment) are properly made
in accordance with the manufacturer’s
instructions.
Switch off and remove the mains
plug when making or changing any
connections.
Do consult your dealer if you are ever in
doubt about the installation, operation
or safety of your Freeview+ digital TV
recorder.
Don’t continue to operate the
Freeview+ digital TV recorder if you are
ever in doubt about it working normally,
or if it is damaged in any way. Switch
it off withdraw the plug from the mains
and consult your dealer.
Don’t remove any fixed covers as this
may expose you to dangerous voltages.
Don’t leave the Freeview+ digital
TV recorder switched On when it is
unattended for long periods of time,
unless it is specifically stated that it is
designed for unattended operation or
has a standby mode.
Make sure that other people in your
household are conversant with the
Freeview+ digital TV recorder.
Don’t obstruct the ventilation vents
on the Freeview+ digital TV recorder,
for example with curtains or soft
furnishings.
Overheating will cause damage and
shorten the life of the product.
Don’t allow electrical equipment to be
exposed to rain or moisture.
Store the Freeview+ digital TV recorder
in a clean, dry environment.
Do not use any cleaning solutions on
the Freeview+ digital TV recorder.
300830
Page 31

This digital TV recorder is fitted with a BS1363/A 13 amp plug. If it is not suitable
for your supply sockets it must be removed and replaced with an appropriate plug.
If the plug becomes damaged and/or needs to be replaced please follow the wiring
instructions below. The plug removed must be disposed of immediately. It must not
be plugged into a supply socket as this will be an electrical hazard. If the fuse needs
to be replaced it must be of the same rating and ASTA approved to BS1362. If the
plug is changed, a fuse of the appropriate rating must be fitted in the plug, adapter
or at the distribution board. If the fuse in a moulded plug is replaced, the fuse cover
must be refitted before the appliance can be used.
Wiring Instructions
The supply cable will be either 2-core or 3-core. Follow the appropriate wiring
instructions given below. In both cases ensure that the outer sheath of the cable is
firmly held by the cable clamp.
15Electrical Information
2- Core plug
WARNING: Do not connect either wire
to the earth terminal.
This symbol indicates that this 2-core appliance
is Class II and does not require an earth
connection.
The wire coloured blue must be connected to the
terminal marked with the letter N or coloured black.
The wire coloured brown must be connected to the
terminal marked with the letter L or coloured red.
Fuse
(Neutral)
Brown (Live)Blue
3- Core plug
WARNING: This appliance must be earthed.
The wire coloured green and yellow must be
connected to the terminal marked with the letter E, or
by the earth symbol
and yellow.
The wire coloured blue must be connected to the
terminal marked with the letter N or coloured black.
The wire coloured brown must be connected to the
terminal marked with the letter L or coloured red.
Green & yellow
(Earth)
(Neutral)
, or coloured green or green
Fuse
Brown (Live)Blue
310831
Page 32

DCS-MAR10-GDB1225DTR
 Loading...