

Page 1
DAB Clock Radio
GCR1930DAB
Instruction Manual
Before operating this unit,
Please read this instruction manual carefully
Goodmans Product Information Helpline 0870 873 0080
Page 2
Congratulations on you purchase of this latest “state of the art “ Digital Audio Broadcast Radio. Please read through the
following pages to get the most out of this GCR1930DAB.
What’s in the box
On unpacking the unit the following should be located within the packaging
1 x GCR1930DAB Main unit
1 x Instruction Manual
1 x Quick start Guide
Please retain all packaging materials for use in the event of the product needing transportation or in the unlikely event of
the product requiring repair.
Introduction
Page No.
2
Important Notes 3
Getting Started 6
Location Of Controls 7
General Operation 8
Clock Operation 9
DAB Operation – (Including Menu) 11
Troubleshooting guide & Specifications 17
Goodmans Product Information Helpline 0870 873 0080
Page 2
Page 3

Your hearing is very important to you and to us so please take care when operating this equipment. It is strongly
recommended that you follow the listed guidelines in order to prevent possible damage or loss of hearing:
ESTABLISH A SAFE SOUND LEVEL
• Over time your hearing will adapt to continuous loud sounds and will give the impression that the volume has in fact
been reduced. What seems normal to you may in fact be harmful. To guard against this BEFORE YOUR HEARING
ADAPTS set the volume at a low level.
• Slowly increase the level until you can hear comfortably and clearly and without distortion.
• Damage to your hearing is accumulative and is irreversible.
• Any ringing or discomfort in the ears indicates that the volume is too loud.
Once you have established a comfortable listening level, DO NOT INCREASE THE SOUND LEVEL FURTHER.
The following list of typical sound levels may assist you in recognising just how loud you have set the volume level.
IMPORTANT NOTES
DECIBEL
Level dB Example
30dB Quiet library, soft whisper.
40 Living room, fridge freezer bedroom away from traffic.
50 Normal conversation, quiet office, light traffic.
60 Electric sewing machine,
70 Vacuum cleaner, hair dryer, noisy restaurant
THE FOLLOWING NOISE CAN BE HARMFUL UNDER CONSTANT EXPOSURE
80dB Average city traffic, alarm clock buzzer at 2 feet, food mixer.
90dB Motorcycle, heavy goods vehicle, petrol lawn mower.
100 Pneumatic drill, chain saw, garbage truck, discotec / nightclub.
120 Rock band concert, thunderclap.
PERMANENT LOSS OF HEARING
140 THRESHOLD OF PAIN Gunshot 2 feet away.
180 Rocket Launching pad.
Goodmans Product Information Helpline 0870 873 0080
Page 3
Page 4
IMPORTANT NOTES
PRE FITTED MAINS PLUGS
For your convenience a mains plug has been fitted to this appliance. For your safety please
observe the following information
1. Should the fuse in the plug fail remove the plug from the wall socket and replace the fuse
with a 3 Amp ASTA approved to BS 1362 fuse.
2. Never use the plug without the fuse cover fitted. Replacement fuse covers are available
from your dealer or most electrical retail outlets.
3. If the mains plug is cut off from the cable, rewire the replacement plug in accordance with
instruction given in this manual.
4. CAUTION: Under no circumstances should the discarded plug be inserted mains socket. To
prevent a shock hazard carefully dispose of the discarded plug. Do not leave the plug lying
around where children might see it.
WARNING: To prevent fire or shock hazard do not expose this unit to rain or moisture.
CAUTION: DANGEROUS VOLTAGES EXIST INSIDE THIS UNIT, DO NOT REMOVE COVER
(OR BACK). NO USER SERVICEABLE PARTS INSIDE. REFER SERVICING TO
QUALIFIED SERVICE PERSONNEL. DISCONNECT FROM MAINS SUPPLY
WHEN NOT IN USE.
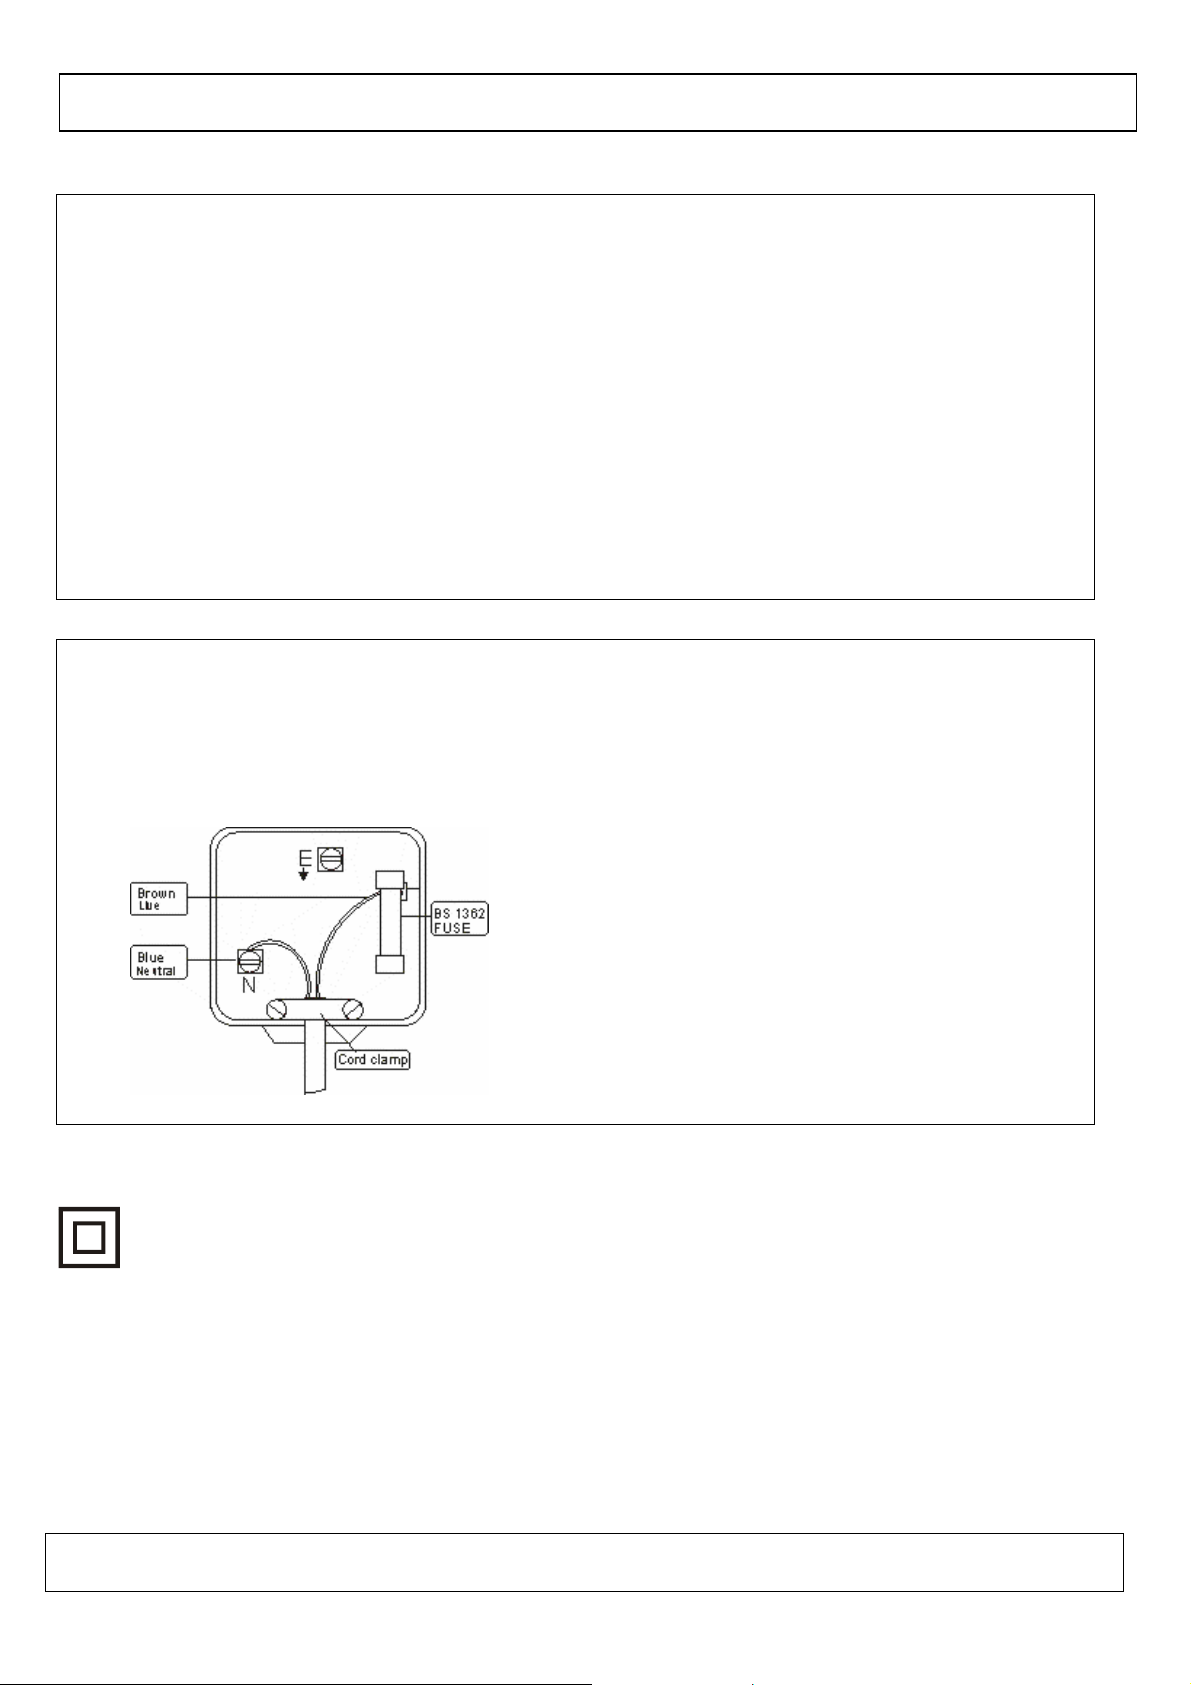
PLUG WIRING DETAILS
The wires in this mains lead are coloured in
accordance with the following wiring codes:
Blue ………………………………………….. Neutral
Brown …………………..…………………………Live
The wires in this mains lead must be connected to
the terminals in the plugs as follows:
Blue Wire……………………………………N or Black
Brown Wire …………………………………. L or Red
Only a 3 Amp fuse should be fitted in the plug or a
5 Amp fuse at the distribution board.
WARNING: UNDER NO CIRCUMSTANCES MUST THE LIVE OR NEUTRAL WIRES BE
CONNECTED TO THE EARTH TERMINAL IN A 3-PIN MAINS PLUG.
This symbol means that this unit is double insulated.
An earth connection is not required.
Goodmans Product Information Helpline 0870 873 0080
Page 4
Page 5

)
SOME DO'S AND DONT'S ON THE SAFE USE OF EQUIPMENT
WARNING:
This equipment has been designed and manufactured to meet European safety standa rds but like any electrical
equipment, care must be taken if you are to obtain the best results and safety is to be assured.
Do read the operating instructions before you attempt to use the equipment.
Do ensure that all electrical connections (Including the mains plug, extension leads an d interconnections between pieces
of equipment) are properly made in accordance with the manufacturer's instructions. Switch off and withdraw the mains
plug when making or changing connections.
Do consult your dealer if you are ever in doubt of the installation, operating, or safety of your equipment.
Don't continue to operate the equipment if you are in any doubt about it working normally, or if it is damaged in any way-
switch off, withdraw the mains plug and consult your dealer.
Don't remove any fixed covers as this may expose dangerous voltages.
Don't leave equipment switched on when it is unattended unless it is specifically stated that it is designed for unattended
operation or has a standby mode. Switch off using the switch on the equipment and make sure that your family knows
how to do this. Special arrangements may need to be made for infirm or handicapped people.
Don't listen to headphones at high volume, as such use can permanently damage your hearing.
Don't obstruct the ventilation of the equipment, for example with curtains or soft furnishings.
IMPORTANT NOTES (Contd.
Overheating will cause damage and shorten the life of the equipment.
Don't allow electrical equipment to be exposed to rain or moisture.
Above all
Never let anyone, especially children, push anything into holes, slots or any other opening as this could result in a fatal
electric shock.
Never guess or take chances with electrical equipment of any kind.
It is better to be safe than sorry!
TO REDUCE THE RISK OF FIRE OR ELECTRIC SHOCK, DO NOT EXPOSE THIS APPLIANCE TO RAIN OR
MOISTURE, DANGEROUS HIGH VOLTAGES ARE PRESENT INSIDE THE ENCLOSURE, DO NOT OPEN THE
CABINET, REFER SERVICING TO QUALIFIED PERSONNEL ONLY.
Goodmans Product Information Helpline 0870 873 0080
Page 5
Page 6

Power Sources
Getting Started
The GCR1930DAB can be powered from the household 230V AC mains Supply via the supplied lead.
AC MAINS
Insert the 3 pin plug into a switched household AC supply socket, ensure the wall outlet socket is
switched ON. The display will now illuminate indicating power is reaching the unit. Slide the switch to
DAB ON to switch the unit on.
Battery Operation (only for back up of time and alarm setting)
Remove the Battery Compartment cover and insert 9V (9V Size Alkaline batteries), observing the
correct polarity replace the cover.
NOTE: Old batteries may swell and leak. To avoid damage to the unit, remove the batteries.
When the unit is to be stored for long periods of time, or if the batteries become exhausted.
Goodmans Product Information Helpline 0870 873 0080
Page 6
Page 7

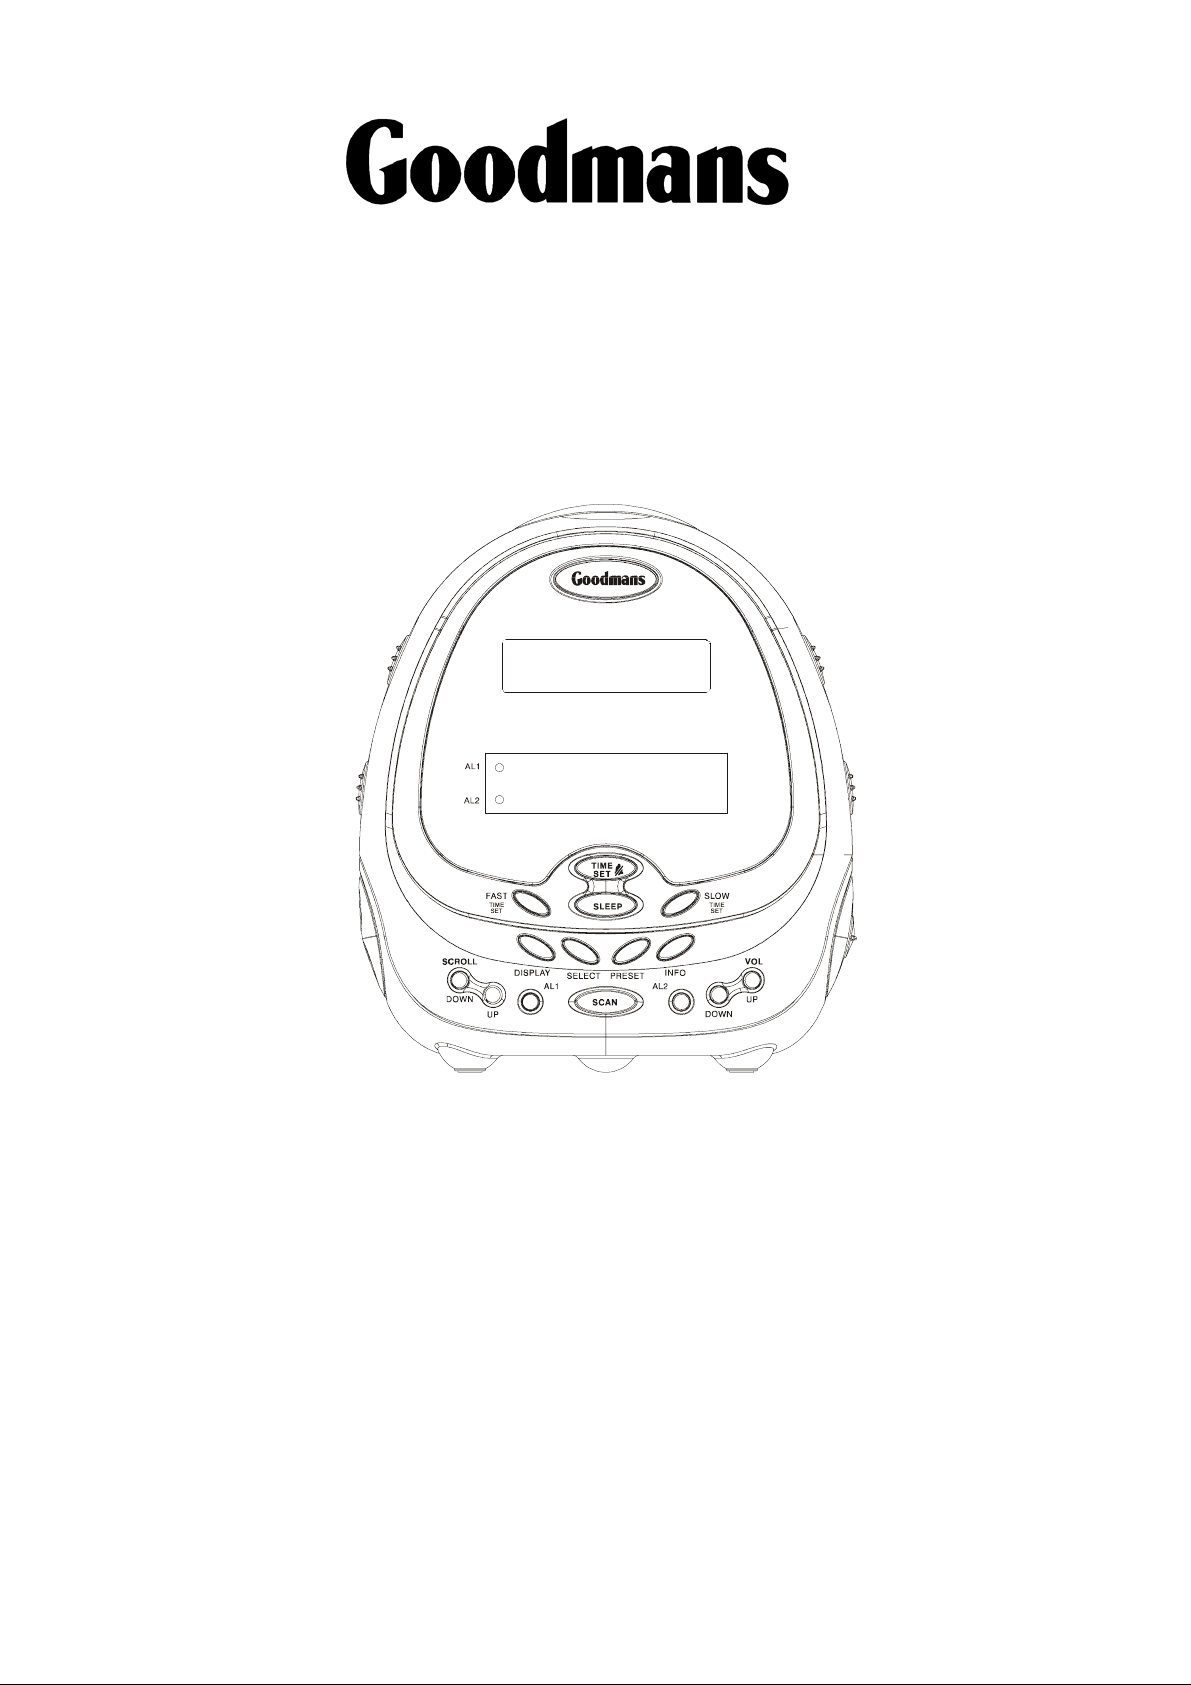
Location of controls
Front View 1. SNOOZE /SLEEP OFF BUTTON
1
2. LOGO
2
3. DAB LCD
3
4. ALARM 1 INDICATOR
5. ALARM 2 INDICATOR
4
5
6. TIME SET / ALARM OFF BUTTON
6
7
7. SLEEP BUTTON
8
9
8. FAST /TIME SET BUTTON
10
27
20
19
18
9. DISPLAY BUTTON
10. SCROLL DOWN BUTTON
11
12 13
15
14 16
17
Left Side 11. SCROLL UP BUTTON
1
12. ALARM 1 BUTTON
13. SELECT BUTTON
23
14. SCAN BUTTON
15. PRESET BUTTON
22
16. ALARM 2 BUTTON
17. VOLUME DOWN BUTTON
18. VOLUME UP BUTTON
19. INFO BUTTON
21
Right Side 20. SLOW BACK/TIME SET BUTTON
21. PHONE JACK
1
28
22. DIMMER HIGH/LOW SWITCH
23. BUZZER HIGH/LOW SIWTCH
24
24. ALARM 1 ON/OFF SWITCH
25
25. ALARM 2 ON/OFF SWITCH
26. DAB ON/OFF/ALARM BY DAB/
BUZZ SW.
27. LED CLOCK DISPLAY
26
28. “T” aerial
Note: Important for best reception unravel and spread the DAB "T" aerial as shown.
Goodmans Product Information Helpline 0870 873 0080
Page 7
Page 8

DAB or Digital Audio Broadcasting represents a new age in broadcasting technology and as with all
new technologies it is significantly different to traditional Analogue FM/AM broadcast methods. The
new system no longer relies on tuning to a given frequency but instead allows the DAB receiver to
provide an active Station List of all available radio programmes/stations at the touch of one button.
Station Lists are described in more detail in the DAB Operation section of this manual.
Before selecting the DAB function make sure that the wire “T” aerial is fully extended and forms a “T”
shape.
1. Connect the unit to the household mains supply.
2. Slide the switch to DAB ON on the left side of unit.
3. The unit will automatically start a scan of the DAB services and after 15 to 20 seconds the first
station in the Station List will begin to playback
NOTE: At this stage it is possible that the display may show “No DAB service” on the first line of the
display and “Check Aerial?” on the second line of the display. This indicates the unit has
been unable to locate any available DAB stations during the search process.
This may be due to :-
a. No DAB stations in the local area Check with the DRDB at www.DRDB.org or
call the reception Helpline on 08707 747474
General operation
b. The radio needs relocating to a better location in order to get adequate reception.
The signal strength indication (See Display button operation) can be used to
assist this process.
4. Assuming there is now a Station List available the other stations on the list can be located . Use
the Scroll Up/Scroll Down buttons then press the select button
5. Use the Volume control to increase or decrease the sound output level as required.
Important Reminder for DAB Reception
Please be reminded that this unit is
specifically designed for reception
of UK only DAB stations restricted
to Band 3 (11B to 12D) only it will
therefore NOT receive DAB stations
in European areas that broadcast
Power Off
To switch the radio OFF slide the DAB switch to DAB OFF.
Note: in this state it will still show the clock in the lower display and draw a small amount of power
from the AC mains supply.
Headphones
A stereo headphone socket is provided for private listening. Connect a pair of low impedance (8-16
ohm) headphones or earphones (not supplied) with a 3.5mm stereo jack plug. When headphones are
connected the main speakers are automatically disconnected.
Goodmans Product Information Helpline 0870 873 0080
Page 8
Page 9

Clock Operation
Setting the Clock
Before any alarm functions can be used on your alarm clock radio you must first set the clock to the
correct time.
1. Place the unit on a flat surface. Plug the main plug into the wall socket and switch on the wall
socket.
2. The clock LED display will flash.
3. Press and hold the TIME SET button and simultaneously press or hold down the FAST forward
button or the SLOW backward button. The LED clock display will fast forward or reverse the
minutes and hour segments. Release all buttons when the correct time is set. The clock is a 24
hours clock.
Display Dimmer Switch
The clock display and DAB radio display backlight has two brightness levels, high (HI) and low (LO).
The level is set by the DIMMER slide switch located on the left side of the clock radio.
Using the Alarms
The alarm function can be set to operate on the following function: wake up to two different alarm
times which you can choose to use independently or simultaneously. AL1 or AL2 or AL1+AL2. They
operate in the same way and can be set to either sound a buzzer or switch on the radio.
Set the Alarms
Press and hold down the alarm button, either ALARM 1 or ALARM 2, and press the FAST forward
and SLOW backward buttons to select the time you wish the alarm to sound.
Noted: This clock is in 24 hours format.
Once the time is set release the alarm button.
Set the FUNCTION slide switch on the right side of the clock radio to either AL. BUZ or AL. DAB
depending on whether you wish the alarm to sound the buzzer or switch on the radio.
Set the relevant alarm on/off slide switch on the right side of the clock radio to the ON position.
Silencing the Alarms
When the alarm sounds it can be cancelled by pressing the TIME SET / Alarm Off button. The alarm
will sound again the next day.
Alternatively the alarm can be cancelled by setting the relevant alarm slide switch on the right side of
the clock radio to the OFF position. In this case the alarm will not sound the next day.
Snooze
To temporarily since the alarm when it sounds, press the SNOOZE button. This silences then alarm
for approximately 7 minutes that it will sound again.
Goodmans Product Information Helpline 0870 873 0080
Page 9
Page 10

)
Buzzer Lever
There has 2 buzzer levels, high (HI) and low (LO). It can be set by BUZZER slide switch at the left
side of the clock radio.
Using the Sleep Function
The sleep function enables you to set the radio to play for a period of up to 59 minutes, then
automatically switch off.
Tune to the desired radio station.
Set the FUNCTION slide switch to the DAB OFF, AL. DAB or AL. BUZ position.
Press and hold down the SLEEP button. The clock display will start to count down from “0:59”
minutes and the radio will come on.
Continue to hold the SLEEP button down until the sleep period you require is displayed then release
the SLEEP button.
If you wish to increase the period hold down the SLEEP button and press either then FAST forward
or SLOW backward button. The time increase up to a maximum of 59 minutes.
Clock Operation (contd.
To cancel the sleep function press the SNOOZE/Sleep Off button. The radio will switch off
immediately.
Goodmans Product Information Helpline 0870 873 0080
Page 10
Page 11

DAB operation
Using the DAB Radio
Initial DAB Station Search
Set the FUNCTION slide switch on the right side of the clock radio, to the DAB ON position.
Press the SCAN button at the front of the clock radio. The clock radio will commence the station
search process.
During the search process the display indicates the progress and stations found, for examples:
Scanning... 17
■■■■■■■■
The symbols on the second line of the display are a bar graph that indicates the progress of the scan.
The number on the first line indicates the number of stations found and will increase as the scan
progresses.
It is possible to manually search for stations.
If there is no stations found check that adequate DAB coverage exists in your area.
Once the search has completed the DAB radio will tune to the first station in the list. Stations are
listed in numerical then alphabetical order.
The station list is retained in memory so the next time you switch the tuner on, the station search
does not take place.
Changing DAB stations
Press either the SCROLL UP or SCROLL DOWN buttons to scroll through the available stations.
The stations will appear on the second line of the display.
When the station you require is displayed press the SELECT button. The radio will now tune to that
station.
Scanning for DAB Stations
Due to the nature of DAB radio, additional stations and services regularly become available. If you
wish to see if there is any new DAB stations introduced in your area, you can initiate a search.
Press the SCAN button to activate a local search for stations on band 3 in the UK. This will take
approximately 10 seconds. If you are using your DAB clock radio outside UK, then a wider search
can be initiated by pressing and holding down the SCAN button for approximately two seconds. In
this case a full scan is performed which will take approximately 20 seconds.
Station Display Symbols
You can see some symbols displayed alongside the station names. These are defined as follows:
This indicates that the station is one of you ten most favourite stations and can be used when
selecting the station order.
? This is displayed before the station name if the station is no available or not active.
Goodmans Product Information Helpline 0870 873 0080
Page 11
Page 12

)
DAB operation (contd.
>> Chevrons displayed after the station name indicate that this is a primary station with secondary
services.
<< Chevrons displayed before the station name indicate that this is a secondary station.
Volume Control
Adjust the sound level by pressing the VOL UP or DOWN buttons.
Setting DAB Presets
You can preset up to 20 DAB stations as follows.
Tune to the station you wish to preset.
Press and hold the PRESET button on the front of the clock radio. ’Empty preset 1’ will be flashing
on the second line of the display.
Note: once you have saved any presets these will be displayed instead of the ‘Empty preset’
message.
Use the SCROLL UP or DOWN buttons to select the desired preset number you wish to use for this
station.
Press the SELECT button, ‘Press #saved’ is displayed, where # is the preset number selected.
Selecting a Preset DAB Station
To select a preset station, press the PRESET button.
Use the SCROLL UP or DOWN buttons to select the desired preset number and press the SELECT
button.
Re-setting the DAB Preset Station
DAB presets cannot be deleted individually but they can be overwritten. For example if you wish to
change a preset from one station to another:
Tune to the new station and press and hold the PRESET button.
Use the SCROLL UP or DOWN buttons to select the desired preset number then press the SELECT
button until the ‘Preset #saved’ message is displayed.
Reset
To delete all of the preset stations and return the clock radio to its factory setting, press and hold
down the INFO button for approximately 2 seconds, and then press the SELECT button.
Goodmans Product Information Helpline 0870 873 0080
Page 12
Page 13

DAB operation (contd.)
Changing the DAB Station Information
It is possible to change the information that is displayed on the second line of the display when
listening to a DAB station. There are seven types of information available as listed below with
examples to the right. To change the information displayed press the DISPLAY button.
• Dynamic Label Segment (DLS): This is
scrolling text information supplied by the DAB
station. It may comprise information on music
titles or details of the programme and is
provided by the broadcaster.
• Program Type (PTY): This is a description of
the type of programme provided by the DAB
station and is provided by the broadcaster.
• Multiplex Name: This will show the multiplex
that is broadcasting the programme you are
listening to.
• Date: This displays the date and is provided by
the broadcaster so will be accurate.
• Channel and Frequency: This displays the
channel number and the transmission
frequency.
• Signal Information: This show the digital bit rate
and the signal mode.
Press DISPLAY
BBC Radio 5 Live
DLS Scroli n g
Press DISPLAY
BBC Radio 5 Live
News
Press DISPLAY
BBC Radio 5 Live
BBC Nation a l D A B
Press DISPLAY
BBC Radio 5 Live
07-08-20 0 3
Press DISPLAY
BBC Radio 5 Live
128 225.64 M H z
• Signal Error Rate: If the transmission signal
contains errors the system can apply a
Press DISPLAY
BBC Radio 5 Live
80kbps Mon o
correction. The amount of signal correction can
be displayed as a numerical value between 0
and 9. As a guide any value up to 50 is
acceptable. For values above this, try to adjust
the position of the antenna.
Press DISPLAY
BBC Radio 5 Live
Signal erro r 7
Goodmans Product Information Helpline 0870 873 0080
Page 13
Page 14

)
DAB operation (contd.
Using the INFO Control
The INFO control enables you to configure some of the system options of the DAB radio. These
options are arranged in a menu structure as shown below.
BBC Radio 5 Live
Signalerro r 7
Press INFO
BBC Radio 5 Live
Press SELECT
Fav statioN
Station o r d e r
Press
SCROLL
-
DOWN
BBC Radio 5 Live
Manual tu n e
Press
SCROLL
DOWN
BBC Radio 5 Live
DRC value
Press
SCROLL
DOWN
BBC Radio 5 Live
SCROLL
then
SELECT
Press SELECT
Press SELECT
SCROLL
then
SELECT
Press SELECT
Fav stati o n
Alphanume r i c
Active st a t i o N
Prune sta t i o n s
preset s
11B 218.6 4 M H Z
DRC 1
DRC 0
DRC
1
/
2
DRC 1
EnglisH
Language EnglisH
Press SCROLL then SELECT
SCROLL
DOWN
BBC Radio 5 Live
Sw versio n
Press SELECT
V1.6
Sw versio n
Press
SCROLL
DOWN
Pressing the INFO button will enter the menu structure. The options are described in the following
paragraphs.
Goodmans Product Information Helpline 0870 873 0080
Page 14
Page 15

.
)
DAB operation (contd.
Station Order
This function enables you to define how the stations are arranged when scrolling the stations list.
To select an option press the INFO button, ‘Station order’ will be displayed.
Press the SELECT button and use the SCROLL buttons to display the desired option. There are five
options available as described below.
• Favourite Station (Fav station))
The DAB tuner monitors the stations that you listen to and will build a list of the ten most listened
to stations. When this option is selected the station list is re-ordered so that these stations appear
at the top of the list. When you scroll through the list you will see that your favourite stations will
have a heart shaped symbol.
• Alphanumeric
This is the default setting. The stations are arranged in numerical then alphabetical order.
• Active Stations
This option will re-order the list with those stations that can be received in your area at the top of
the list and those that cannot at the bottom of the list.
• Prune Stations
This option will remove any stations that have no service in your area form the list.
• Presets ( presets)
This option will re-order the list so that your preset stations appear first.
Press the SELECT button.
Manual Tune
It is possible to manually tune to a specific channel/frequency and add this to the station list.
This function can be used to assist the positioning the antenna to obtain the optimum reception for a
specific channel/frequency.
Press the INFO button. ‘Station order’ will be displayed.
Press the SCROLL DOWN button to display ‘Manual tune’.
Press the SELECT button.
Use the SCROLL buttons to select the channel/frequency.
Press the SELECT button. A rectangle will be displayed on first line of the display. The position of
this rectangle indicates the signal strength, i.e the further towards the right the greater the signal
strength.
□
5A 174 . 9 2 M H z
Adjust the position of the antenna to obtain the optimum signal strength.
Press the SELECT button to return to normal service.
Goodmans Product Information Helpline 0870 873 0080
Page 15
Page 16

)
DAB operation (contd.
Dynamic Range Control (DRC)
DRC adds or removes a degree of compression to compensate for the differences in the dynamic
range between radio stations. For example, a station broadcasting popular music may have a high
level of compression applied since the emphasis is on a constant high listening level, whereas a
station broadcasting classical music will have little or no compression as the listener requires all of
the highs and lows in the music to define the detail.
There are three levels of compression:
• DRC 0 No compression applied.
• DRC 1 Maximum compression applied (this is the default).
• DRC 1/2 Medium compression applied.
Press the INFO button. ‘Station order’ will be displayed.
Press one of the SCROLL buttons until ‘DRC value’ is displayed.
Press the SELECT button. The current DRC level will be displayed on line 1.
Press the SCROLL buttons to select between the three values on line 2 of the display.
When the required value is displayed press the SELECT button.
Language
There is only one option presented –English.
Software Version
This is provided as a reference when servicing is required.
Press the INFO button. ‘Station order’ will be displayed.
Press one of the SCROLL buttons until ‘Sw version’ is displayed. The version number will appear in
line 1.
Goodmans Product Information Helpline 0870 873 0080
Page 16
Page 17

Every effort has been made to ensure this product provides optimum performance in all conditions,
however we appreciate that sometimes difficulties may arise and the following table summarises
some common problems.
Problem Possible cause Remedy
General
No Sound
No DAB stations found
Erroneous information in the
display
No power to unit Check AC supply is
connected and switched on
Check the unit is switched
on
Volume control at Minimum Press volume up until
volume level is more than
20.
Headphones connected to
headphone socket
Aerial not extended Check Aerial and unit
Outside broadcast area Check location reception
Temporary memory problem Switch the unit off then
Remove headphones
position
Use the signal meter on the
unit to check for signal
details at www.drdb.org or
call 08707 74 74 74
back ON this will clear the
problem
If the problem experienced is not listed above or if after checking the remedies the problem still exists,
please call our product information helpline on
0870 873 0080
For further assistance
Goodmans Product Information Helpline 0870 873 0080
Page 17
Page 18

Specifications
AC Supply Voltage: 230VAC, 50Hz
DC Supply Voltage: 9V size batteries (Not Supplied)
Battery Life: up to 20 hours when AC failed with long life alkaline battery up to 4 Months when AC is
available.
Receiver Bands: DAB Band III: 174.928 MHz (5A) – 239.200MHz (13F)
DAB Modes I, II, III and IV
Tuning Range - 11B to 12D local scan, 5A to 13F full scan
DAB sensitivity: -98dBm or better
DAB Adjacent Channel Rejection: -30dB or better
DAB audio decode: 64kbps - 384kbps
Aerials: In built T aerial
Power Output (at 10% THD): 2 x 0.3W RMS
Headphones Socket: 3.5mm diameter.
Speakers: 2 x 3”
Specifications are subject to change and improvement at any time without notice.
Goodmans Product Information Helpline 0870 873 0080
Page 18
 Loading...