

Page 1
GCE67W5DVDK
GCE67W5DVDK
Dual-Screen Portable DVD Player
With Remote Control
User Guide
Goodmans Product Information Helpline
0870-873-0080
82-195-00220
Page 2

Contents
Introduction .................................. 3
Precations ................................ 4
Important Safety Information.... 5,6
Package Contents ........................... 7
Getting Started ........................... 8
Remote Control .......................................... 8
Portable DVD player................................... 9
Moni to r. .. ..... .. .. .. ....... .. .. ....... .. .. ....... .. . 10
Power Supply ............................................... 11
Installing In a Vehicle............... 12,13
Using the Battery Pack............ 14,15
Connections ................................ 16
Connecting to TV .................................. 16
Connecting to Other Audio Equipment... 16
In put fr om Ext ern al Equ ipm ent ... ... . 17
Con necting to Earph ones ... ..... ....... .... 17
DVD Operation ................................ 18
Basic DVD Playback ................................... 18
Stopping Playback and Returning to the Menu Screen
(If a Menu Screen is Available on the Disc) ..... 18
Stopping Playback ..................................... 18
Fast Forward and Backward ........................ 18
Skipping a Chapter Ahead or Back ............ 18
Pausing Playback ...................................... 18
Frame Advance (Step) ..................................... 18
Muting the Player ................................... 18
Repeating Viewing .................................... 18
Displaying Scene Information .................. 19
Changing Audio Soundtrack Language ...... 19
Changing Subtitle Languages ...................... 19
Viewing from Different Angles ................... 19
Using a DVD Menu ................................... 19
Using the Menu Function ............................. 19
Audio CD Playback ....................... 20
Basic Audio CDs Playback ..................... 20
Stopping Playback .................................... 20
Pau sing Playba ck ............................ ... 20
DUAL-SCREEN PORTABLE DVD PLAYER
2
USER GUIDE
Displaying Track Information ................. 20
Skipping a Track Ahead or Back ............ 20
Picture CD Playback .....................21
Basic Picture CDs Playback ......................... 21
Stopping Playback ........................................ 21
Pausing Playback ...................................... 21
Rotating Pictures ..................................... 21
Viewing the Next or Previous Picture ........ 21
Thumbnail Function ..................................... 21
OSD Setup .................................... 22
La ng ua ge Setu p .. .. ..... .. ... .. ..... .. ... .. .. 22
- OSD La ngua ge ................. .... ............... ... 22
- Audio Lan guage ................................... .... 22
- Subtitle Language ....................................... 22
- Menu Language ........ ..... ..... ..... ..... ..... ...... 22
Audio Setup ..... ................. ... ............... 22
- Digital Out ................................................. 22
Video Setup .......................................... 23
- Video Out ................................................... 23
- TV Type ....................................................... 23
- TV System ..................................................... 23
System Setup ........... ........ ........... ....... 24
- Screen Saver .............................................. 24
- Parental Control [DVD] ................................ 25
- Password [DVD] ......................................... 25
- Angle Mark ................................................ 26
- Default ......................................................... 26
LCD Setup ................................. 27
Panel Setting ............................................. 27
Color Setting ............................................. 27
Brightness Setting ........................................ 27
LCD Setting ................................................ 27
Disc Use and Care ........................... 28
Troubleshooting ........................... 29
Disc Handling and Maintenance .... 30
Specications ................................. 31
Page 3
Introduction
Thank you for purchasing GCE67W5DVDK Dual-Screen Portable DVD Player
which has been designed and manufactured to give you many years of trouble-free
service.
You may already be familiar with using a similar product but please take time to
read these instructions which have been written to ensure you get the very best
from your purchase.
NOTE
NOTE: This product incorporates copyright protection technology
that is protected by method claims of certain U.S. patents and other
intellectual property rights owned by Macrovision Corporation and other
rights owners. Use of this copyright technology must be authorised
by Macrovision Corporation, and isintended for home and other
limited viewing uses only, unless otherwise authorised by Macrovision
Corporation. Reverse engineering or disassembly is prohibited.
NOTE
NOTE: Manufactured with permission from Dolby Laboratories. The
‘Dolby’ label and the double-D logo are trademarks of Dolby Laboratories.
Condential unpublished material. © 1992-1997 Dolby Laboratories, Inc.
All rights reserved.
Safety is Important
To ensure your safety and the safety of others, please read the Safety
precautions before you operate this product.
Keep this information in a safe place for future reference.
WARNING! THIS PRODUCT UTILISES A CLASS 1 LASER. USE
OF CONTROLS, ADJUSTMENTS OR PROCEDURES NOT LISTED
IN THIS USER GUIDE MAY RESULT IN HAZARDOUS RADIATION
EXPOSURE.
Goodmans Product Information Helpline: 0870-873-0080
DUAL-SCREEN PORTABLE DVD PLAYER
USER GUIDE
3
Page 4

Precautions
WARNING! ENSURE THAT YOU READ ALL OF THE SAFETY
INSTRUCTIONS BEFORE USING YOUR PORTABLE DVD
PLAYER.
Power Source
The Portable DVD Player must only be connected to a 12VDC 1.25A
supply.
Safety Considerations
Position the power lead and other connected leads so that they are not
likely to be walked on, pinched or where items can be placed on or against
them.
Do not use the Portable DVD Player in humid or damp conditions.
Do not place water lled items, such as a vase, on top of the Portable DVD
Player.
Do not place naked ame sources, such as candles on top of the Portable
DVD Player.
Cleaning
Ensure that the mains adapter is disconnected from the mains supply before
the Portable DVD Player is cleaned.
Do not use any liquids or aerosol cleaners, as this may damage the Portable
DVD Player.
The Portable DVD Player should be cleaned with a soft, damp cloth.
Ventilation
Do not cover any ventilation slots on the Portable DVD Player, as this may
cause it to overheat.
Never allow children to insert foreign objects into holes or slots on the
Portable DVD Player.
Battery Disposal
Please ensure that used batteries are disposed of safely.
DUAL-SCREEN PORTABLE DVD PLAYER
4
USER GUIDE
Page 5
Important Safety Information
This manual contains important information about how to safely and properly install, operate and care
for this product.
Failure to properly install, operate and care for this product can
increase the risk of electric shock or re. It can also increase the
risk of monitor failure and possibly personal injury. To reduce the
risk of serious injury, death, or damage.
Read these instruction.
Keep these instructions.
Heed all warnings.
Follow all instructions.
DO NOT attempt to service or repair the monitor & DVD Player yourself. Refer all servicing to
qualied service personnel.
DO NOT block any ventilation openings. Do not place the Monitor and DVD Player on a bed, sofa, or
other soft surface that may block ventilation openings.
DO NOT install the monitor and DVD Player near any heat sources, such as radiators, stoves, or other
devices that produce heat.
DO NOT use this apparatus near water (for example, sinks, tubs, and pools) or expose it to rain,
moisture, or dripping or splashing liquids. No objects lled with water (such as vases) should
be placed on the apparatus.
DO NOT attempt to service or repair the monitor & DVD Player yourself. Refer all servicing to
qualied service personnel.
DO NOT play headphones at a high volume to avoid exposure to excessive sound pressures. You
should use extreme caution or temporarily discontinue use in potentially hazardous situation.
Even if your headset is an open-air type designed to let your hear outside sounds, do not turn
up the volume so high that you can not hear what is around you.
General Electrical Precautions
As with any other electrical devices, failure to take the following
precautions can result in serious injury or death from electrical shock or
re, and will lead to damage to the Monitor and DVD Player.
Avoid Laser hazards
As the laser beam used in the DVD Player is harmful to eyes, and to avoid electrical
hazards, do not attempt to disassemble the housing. Refer servicing to qualied
personnel.
DUAL-SCREEN PORTABLE DVD PLAYER
USER GUIDE
5
Page 6

Important Safety Information
- continued
IMPORTANT AUDIO SAFETY
Your hearing is very important to you and to us, so please take care when operating
this equipment. It is strongly recommended that you follow the listed guidelines in
order to prevent possible damage to or loss of hearing.
Establish a safe sound level
Over time your hearing will adapt to continuous loud sounds and will give the
impression that the volume has in fact been reduced. What seems normal to you
may in fact be harmful. To guard against this before your hearing adapts set the
volume at a low level.
Declbel
Level dB example
30dB quiet library, soft whisper.
40dB Living room, fridge freezer, bedroom away from trafc.
50dB normal conversation, quiet ofce, light trafc.
60dB Electric sewing machine
The following noise can be harmful under constant exposure
80dB Average city trafc, alarm clock buzzer at 2 feet, food mixer.
90dB Motorcycle, heavy goods vehicle, petrol lawn mower.
100dB Pneumatic drill, chain saw, garbage truck, discotec/night club.
120dB Rock bandconcert, thunderclap.
Permanent loss of hearing
140dB Threshold of pain, gunshot 2 feet away.
180dB Rocket launching pad.
DUAL-SCREEN PORTABLE DVD PLAYER
6
USER GUIDE
Page 7

Package Contents
Included in this package should be:
Portable DVD player X 1
Monitor X 1
Remote Control X 1
Rechargeable battery (2800mAh ) X 1
Power adaptor X 1
12V cigar adaptor X 1
AV-RCA cable X 1
Earphone X 2
Carry bag (for the DVD player) X 1
Mounting straps (for the monitor) X 1
User guide X 1
Quick guide X 1
Should any of these items be missing, please contact the helpline on
0870-873-0080.
DUAL-SCREEN PORTABLE DVD PLAYER
USER GUIDE
7
Page 8
Getting Started
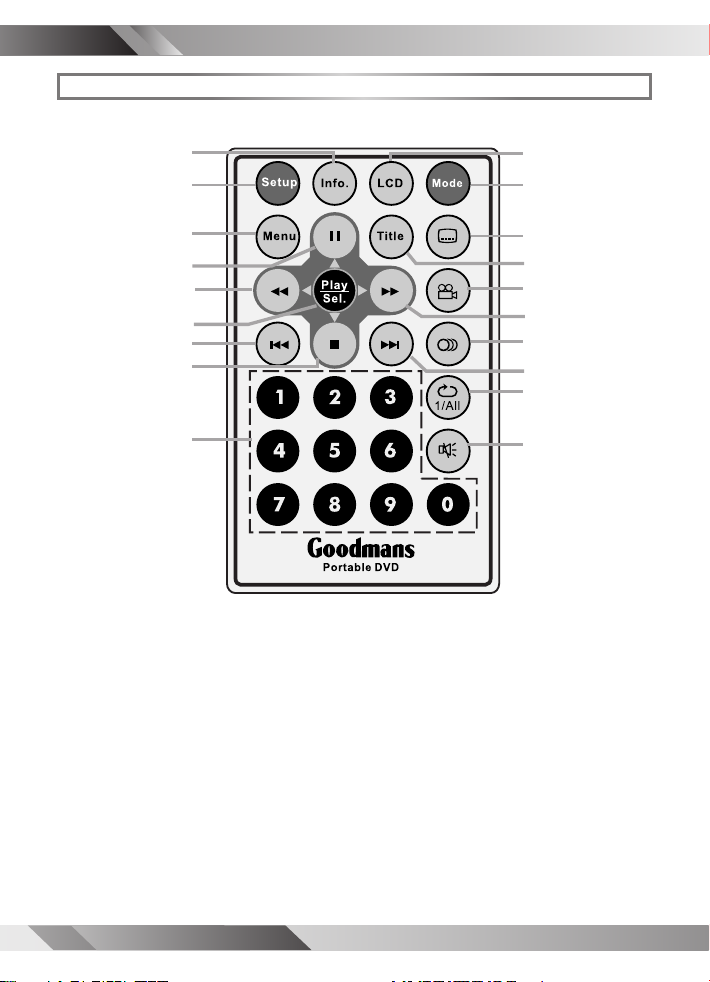
Remote Control
1
2
3
4
5
6
7
8
9
1
INFO. Button
2
SETUP Button
3
MENU Button
4
PAUSE/UP Button
5
F.BWD/LEFT Button
6
PLAY/SEL. Button
7
PREVIOUS Button
8
STOP/DOWN Button
9
Number Buttons
10
LCD Button
11
MODE Button
12
SUBTITLE Button
13
TITLE Button
14
ANGLE Button
15
F.FWD/RIGHT Button
16
AUDIO Button
17
NEXT Button
18
REPEAT 1/ALL Button
19
MUTE Button
10
11
12
13
14
15
16
17
18
19
DUAL-SCREEN PORTABLE DVD PLAYER
8
USER GUIDE
Page 9
10
1
2
3
4
5
6
9
7
11
8
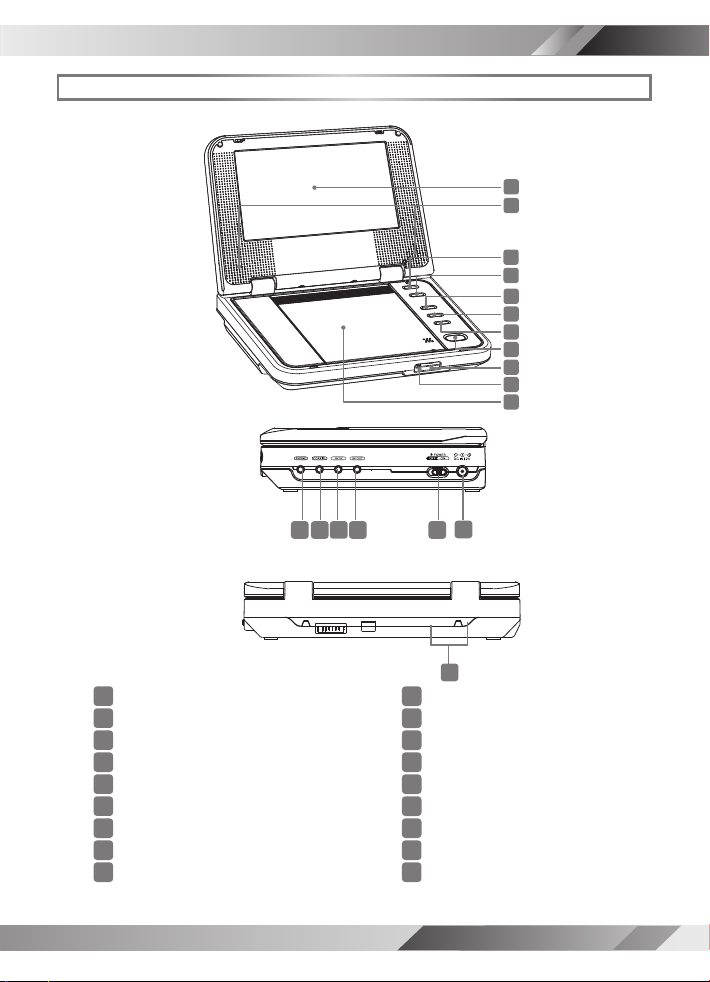
Front Panel
Right Panel
Getting Started
- continued
PORTABLE DVD PLAYER
Back Panel
1
LCD Screen
2
Speakers
3
VOLUME(+) Button
4
VOLUME(-) Button
5
PLAY Button
6
PAUSE Button
7
STOP Button
8
OPEN Button
9
Remote Sensor
17
15
16
14
12
13
18
10
LED Indicator
11
Disc Cover
12
DC IN Socket
13
POWER Switch
14
AV OUT Socket
15
AV IN Socket
16
COAXIAL Socket
17
PHONE Socket
18
Battery Connector
DUAL-SCREEN PORTABLE DVD PLAYER
USER GUIDE
9
Page 10
0.00.20.40.60.81.0
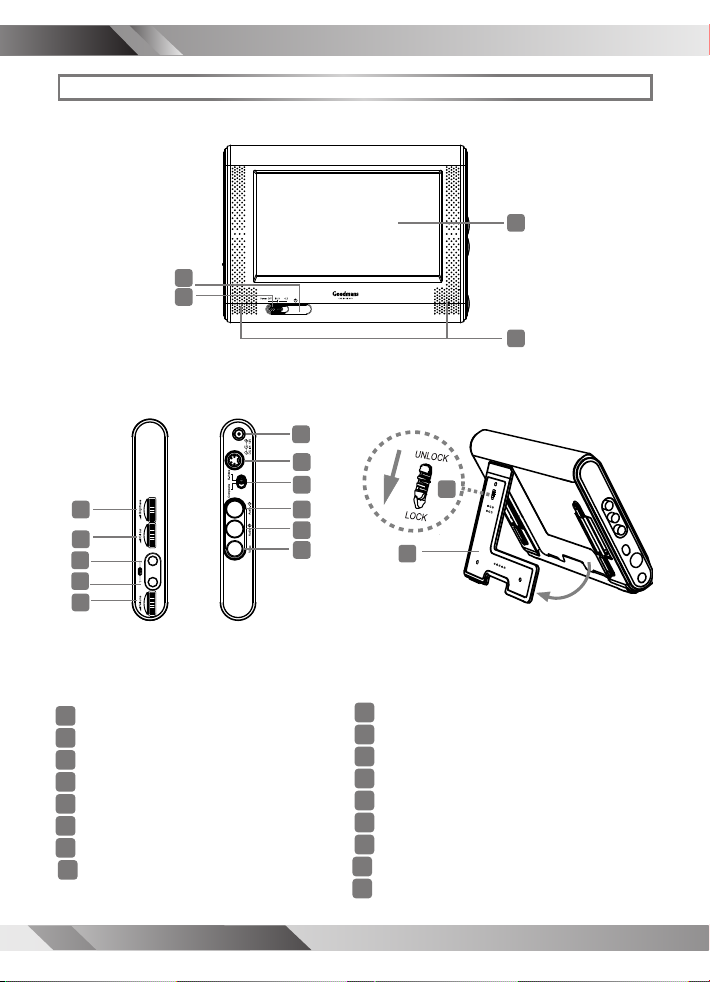
Front Panel
Getting Started
3
4
- continued
MONITOR
1
2
Right/Left Panel
5
6
7
8
9
1
LCD Screen
2
Speakers
3
POWER indicator
4
POWER OFF/16:9/4:3 switch
5
BRIGHTNESS adjustment dial
6
COLOUR adjustment dial
7
Earphone 1 socket
8
Earphone 2 socket
DUAL-SCREEN PORTABLE DVD PLAYER
10
USER GUIDE
10
11
12
13
14
15
Back Panel
17
16
30
9
Volume adjustment dial
10
DC IN socket
11
S-VIDEO socket
12
COMPOSITE/S-VIDEO input switch
13
AUDIO R socket
14
AUDIO L socket
15
VIDEO socket
16
Retractable Stand
17
Lock/Unlock switch
Page 11

Getting Started
- continued
Power Supply
Connect the portable DVD player to Power.
(a) By AC power adaptor
Connect the supplied AC power adaptor (12Vdc, 1.25A), the other end to
the wall outlet.
(b) By cigar adaptor plug
Connect the supplied 12 volt cigar adaptor plug to the DC IN socket on the
player, the other end to the cigar lighter socket.
DUAL-SCREEN PORTABLE DVD PLAYER
USER GUIDE
11
Page 12
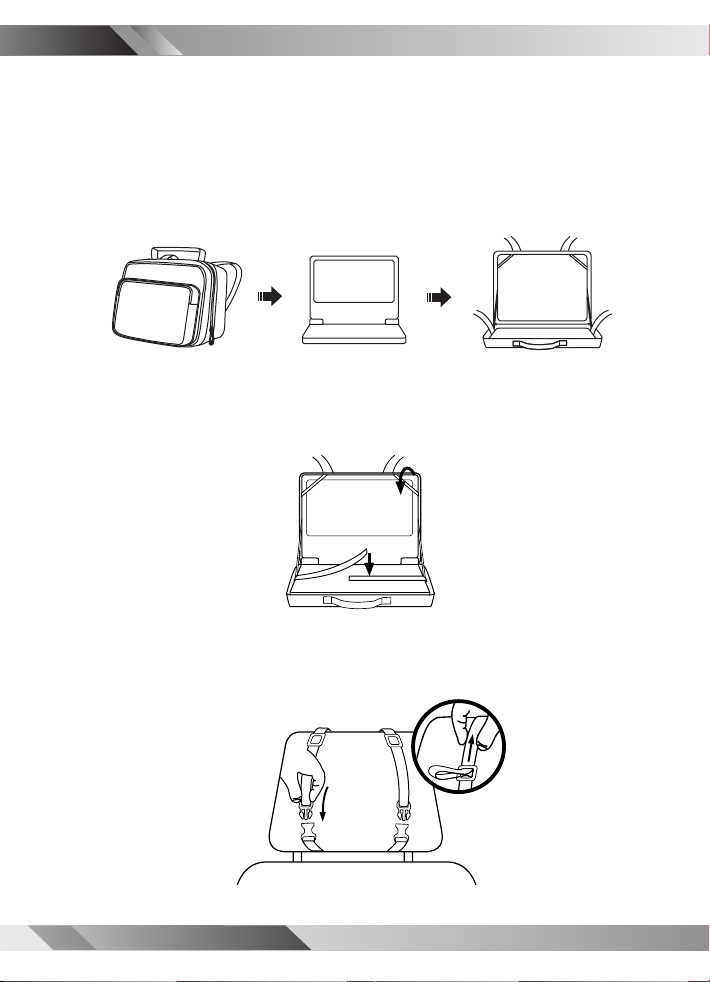
Installing In a Vehicle
For using the Dual-screen Portable DVD Player in a vehicle, please proceed following steps:
Note: Always remember to lock the clips and tighten the straps to ensure
safety of your passengers.
1 Place your portable DVD player into the carry bag.
2 Pull the elastic straps over the top corners of the screen; and
then fasten the straps with the velcros.
3 Loop the straps around the headrest, with the DVD player facing
the rear seat, then fasten the straps with the clip.
DUAL-SCREEN PORTABLE DVD PLAYER
12
USER GUIDE
Page 13
180°
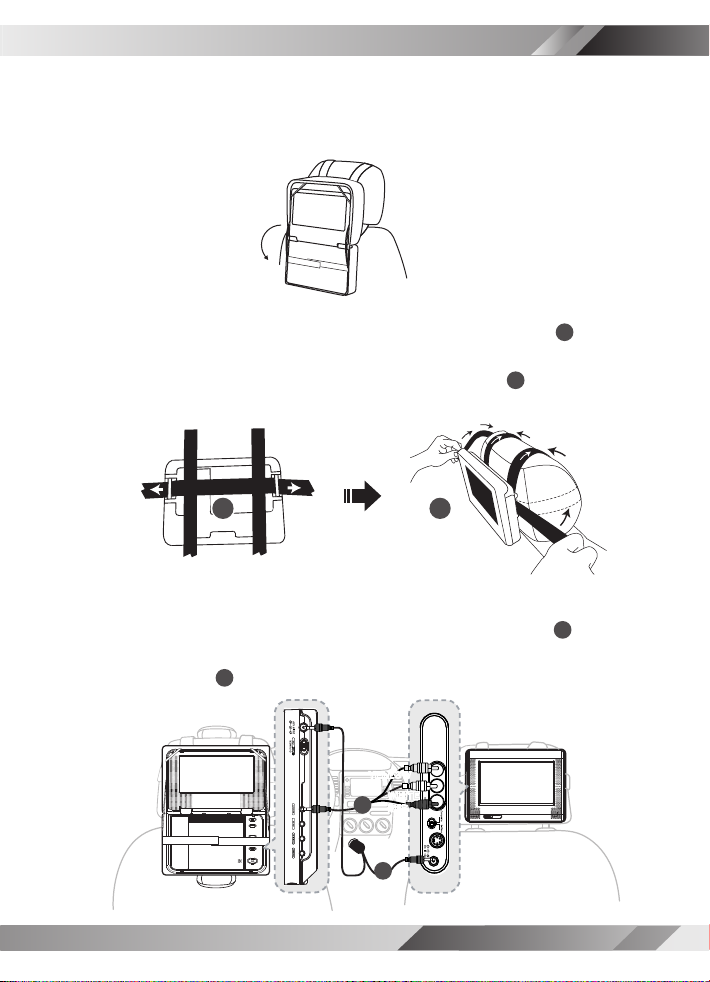
Installing In a Vehicle
- continued
4 Flip down 180 degrees
If you want to place a disc whilst releasing the velcros,
please hold still the DVD player to prevent slip-out of the carry bag.
5 Thread both strap ends through eyelets of the monitor(
). Loop
1
the straps around the headrest, with the screen facing the rear
seat, and then fasten the straps with the velcros (2).
1
2
6 Connect the DVD player and the monitor to your car’s DC12V
cigarette lighter socket with the branched power cord (1). Then,
connect the 3.5mm AV plug to the DVD player and the AV plugs
to the Monitor (2).
YELLOW
YELLOW
WHITEWHITE
2
REDRED
1
DUAL-SCREEN PORTABLE DVD PLAYER
USER GUIDE
13
Page 14

Using the Battery Pack
Battery charge indicator
Battery release button
DC IN socket
Battery connectors
Before using the battery pack, please ensure that it is fully charged. You
can charge the battery pack directly or charge it while the battery pack
attached to the portable DVD player.
Note:
1. Battery will not charge whilst using the unit.
2. The charging time the battery pack is approximately 3.5 hours and the playing time
is approximately 2.5 hours.
Battery Pack Information (Charge & Playback Time)
Charge Time (hr) DVD Playback Time (hr)
NiMH 2800mAh 3.5 2.5
Charge the battery pack directly
Connect the AC power adaptor to the DC IN socket on the left side of the
battery pack and a wall outlet.
DC IN socket
Note:
1. The battery charge indicator will turn red and start charging.
2. When the battery pack is fully charged, the battery charge indicator will turn green.
DUAL-SCREEN PORTABLE DVD PLAYER
14
USER GUIDE
Page 15

Using the Battery Pack - continued
Charge the battery pack while the battery pack attached to
the portable DVD player
1 Please align the portable DVD player’s battery connectors with the battery
pack’s battery connectors. Then attach the battery pack to the portable
DVD player.
Plastic guide
Note:
1. Please turn Power off when attaching or removing the battery pack.
2. If you want to remove the battery pack, press battery release button, then slowly
remove it from the portable DVD player by sliding it carefully away from the player.
Guide holes
2 Connect the AC power adaptor to the DC IN socket on the right side
of the portable DVD player and a wall outlet.
Note:
1. The battery charge indicator will turn red and start charging.
2. When the battery pack is fully charged, the battery charge indicator will turn green.
3. The battery pack is not charged while the portable DVD player is turned on.
4. Please use the specic AC power adaptor to charge the battery pack.
DUAL-SCREEN PORTABLE DVD PLAYER
USER GUIDE
15
Page 16

16
DUAL-SCREEN PORTABLE DVD PLAYER
USER GUIDE
COAXIAL
IN
3
COAXIAL
AV-OUT
VIDEO
IN
AUDIO
IN
R
L
RED
YELLOW
WHITE
Connections
Connecting TV
1 Connect the DVD Player to Power.
Please connect the supplied AC adapter to the DC IN socket on the right side
of the unit.
2 Connect the AV Out of the DVD Player to the Video In and Audio In of
your TV with an Audio/Video Cable.
3
Press Mode button to switch to AV OUT Mode (if the player is in AV IN
Mode).
Note: “AV OUT” appears on the screen after switching the mode.
AV Cable (supplied)
Connecting to Other Audio Equipment
1 Connect the DVD Player to Power.
2 Connect the Coaxial output of the DVD Player to the Coaxial input of
external devices.
“SPDIF RAW” should be selected for digital output. (Refer to “Digital Out” on page 22)
3 Press Mode button to switch AV OUT Mode (if the player is in AV IN
Mode).
Note: “AV OUT” appears on the screen after switching the mode.
Digital 5.1ch Ampli er
(example only)
Coaxial Cable (not supplied)
Page 17

Connections
VIDEO OUT
AV-IN
AUDIO OUT
R
L
RED
YELLOW
WHITE
- continued
Input from External Equipment
1 Connect the DVD Player to Power.
2 Connect the Audio/Video In of the DVD Player to the Audio/Video Out
of external devices.
3 Press Mode button to switch to AV IN Mode (if the player is in AV OUT
mode).
Note: “AV IN” appears on the screen after switching the mode.
AV Cable (supplied)
Connecting to Earphones
You may connect earphones to both the DVD player and the monitor’s
earphone sockets.
Earphones (supplied)
DUAL-SCREEN PORTABLE DVD PLAYER
USER GUIDE
17
Page 18

DVD Operation
Basic DVD Playback
1 Turn on the player. Press
to open the disc cover.
OPEN
2 Hold the edge of the disc to put it in
the disc tray with the printed side up.
3 Close disc cover.
• Close the disc cover and the portable DVD
player starts playback if the disc does not
have any menus recorded on it.
• If the disc has one or more titles recorded on
it, a menu screen will appear on the screen.
4 To play a title, press Up /
Down /
Button(s) to highlight it and then press
Left /
Play/Sel..
Stopping Playback and Returning
to the Menu Screen
(If a Menu Screen is Available on the Disc)
Press Menu.
Stopping Playback
1 Press
mode. In prestop status, the disc can
be played from where the playback
has been stopped by pressing
Play/Sel..
Stop once to enter prestop
Right or Number
2 To completely stop the disc playback,
press
Stop again.
Frame Advance (Step)
1
Press
• The disc is advanced by one frame each
time pressing
Pause to pause playback.
Pause
.
2 To return to normal playback, press
Play/Sel..
Fast Forward and Backward
1 Press Fast Forward or Fast
Backward during playback.
The speed of advance (
x20) or reverse (
changes for each press of
Fast Backward.
x2,
x2,
x4,
x4,
x8 and
x8 and
Fast Forward or
2 To return to normal playback, press
Play/Sel..
Skipping a Chapter Ahead or Back
Skipping Ahead
Press
•
Skipping Back
Press
• When pressing the button once midway
Next during playback.
Skip a chapter each time pressing the button.
Previous during playback.
through a chapter, the player returns to the
beginning of the chapter being played back.
The player skips a chapter each time you
press the button.
x20)
Pausing Playback
1 Press
Pause.
2 To return to normal playback, press
Play/Sel..
DUAL-SCREEN PORTABLE DVD PLAYER
18
USER GUIDE
Muting the Player
1 Press
Mute.
2 To resume the sound, press
again.
Mute
Page 19

DVD Operation
- continued
Repeat Viewing
During playback, press 1/All Repeat
re peat e dly to se lect th e f o llow ing
options:
REP: [ CHAPTER ]
REP: [ TITLE ]
REP: [ OFF ]
: Repeat Chapter
: Repeat Title
: Repeat Off
Displaying Scene Information
1 Press Info. during playback
• Press
title number, chapter number, and other
information will show on the screen.
Info. a number of times, the
2 To stop displaying scene information,
press Info. a number of times until
the information disappears.
Changing Audio Soundtrack Language
1 Press Audio during playback.
2 Press Audio a number of times until
a preferred language is selected.
Note:
• When the preferred language is not selected even
after pressing the button several times, it may indicate that language is not available on the disc.
Changing Subtitle Languages
1 Press Subtitle during playback.
Viewing from Different Angles
1 Press Angle during playback.
2 Press Angle a number of times
until the preferred viewing angle is
selected.
Note:
• This operation works only with discs on which
multiple viewing angles are recorded.
Using a DVD Menu
1 Press
menu available on the disc appears.
2 Press
Right to select the preferred item.
Title
in stop mode. The DVD
Down /
Up /
Left /
3 Press Play/Sel. to enter to the
selected item.
4 T o return to th e previo us menu
screen, press
Using the Menu Function
Title
.
1 Press Play/Sel..
2 Press
3 Press
Right or Number Button(s) to select
the preferred title.
Menu
Up /
.
Down /
Left /
2 Press Subtitle a number of times
until a preferred language is selected.
3 To clear the subtitle display, press
Subtitle unti l
appears on the screen.
: [ OFF ]
DUAL-SCREEN PORTABLE DVD PLAYER
USER GUIDE
19
Page 20
Audio CD Playback
Basic Audio CDs Playback
1 Load an Audio CD.
• For audio CDs without playback control, the
DVD player starts playback.
• For audio CDs provided with playback control, a menu appears after a few seconds.
[ ––– CI TY JA ZZ] 01– ––– –– .
01. CITY JAZZ
02. CLASSICAL
03. MOVIE OST
04. ITALIAN OPERA
05. MUSICAL
06. US POP
07. UK POP
08. HEAVY METAL
09. SONATA
10. RAP
01 . 0 1 – –– –––
02 . 0 2 – –– –––
03 . 0 3 – –– –––
04 . 0 4 – –– –––
05 . 0 5 – –– –––
06 . 0 6 – –– –––
07 . 0 7 – –– –––
08 . 0 8 – –– –––
09 . 0 9 – –– –––
10 . 1 0 – –– –––
2 To play a music track in the menu,
press Left to enter the folder list
on the left of the screen. Press Up /
Down to highlight a folder and then
press Play/Sel..
[ ITA LIA N OPE RA] 01– ––– –– .
01. CITY JAZZ
02. CLASSICAL
03. MOVIE OST
04. ITALIAN OPERA
05. MUSICAL
06. US POP
07. UK POP
08. HEAVY METAL
09. SONATA
10. RAP
3 Press
Right to enter the le list on
the right of the screen. Press Up /
Down to highlight a track and then
press Play/Sel..
01 . 0 1 – –– –––
02 . 0 2 – –– –––
03 . 0 3 – –– –––
04 . 0 4 – –– –––
05 . 0 5 – –– –––
06 . 0 6 – –– –––
07 . 0 7 – –– –––
08 . 0 8 – –– –––
09 . 0 9 – –– –––
10 . 1 0 – –– –––
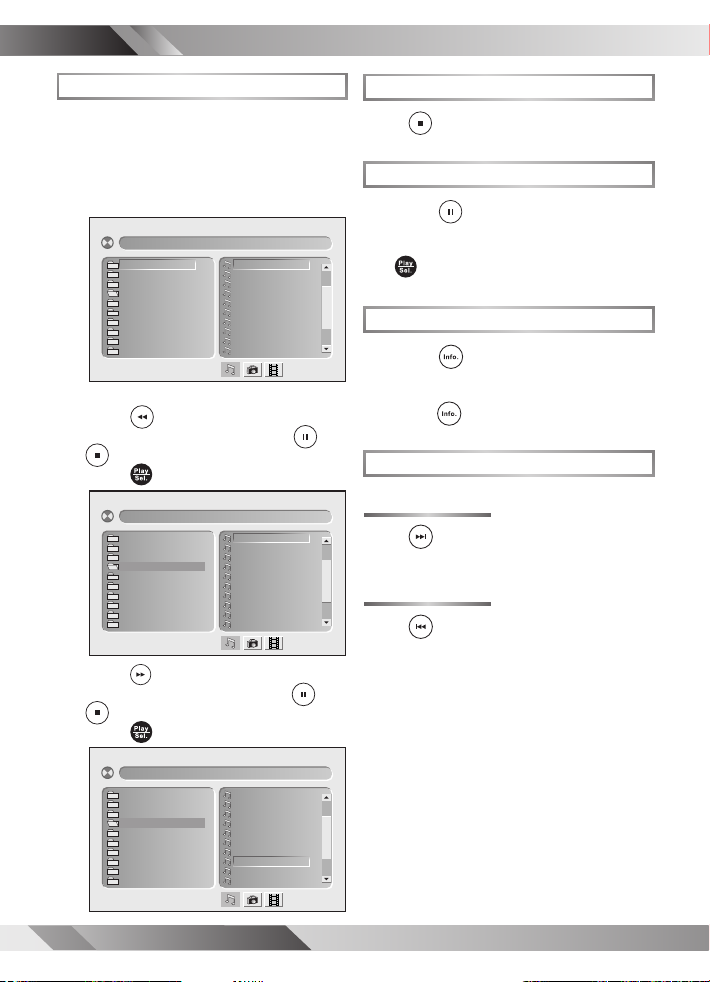
Stopping Playback
Press Stop.
Pausing Playback
1 Press Pause.
2 To return to normal playback, press
Play/Sel..
Displaying Track Information
1 Press Info. during playback.
2 To stop displaying track information,
press Info. again.
Skipping a Track Ahead or Back
Skipping Ahead
Press Next during playback.
• Skip a track each time you press the button.
Skipping Back
Press Previous during playback.
• When you press the button once midway through
a track, the player returns to the beginning of the
track being played back. The player skips a track
each time you press the button.
[ ITA LIA N OPE RA] 08– ––– –– .
01. CITY JAZZ
02. CLASSICAL
03. MOVIE OST
04. ITALIAN OPERA
05. MUSICAL
06. US POP
07. UK POP
08. HEAVY METAL
09. SONATA
10. RAP
DUAL-SCREEN PORTABLE DVD PLAYER
20
USER GUIDE
01 . 0 1 – –– –––
02 . 0 2 – –– –––
03 . 0 3 – –– –––
04 . 0 4 – –– –––
05 . 0 5 – –– –––
06 . 0 6 – –– –––
07 . 0 7 – –– –––
08 . 0 8 – –– –––
09 . 0 9 – –– –––
10 . 1 0 – –– –––
Page 21

Picture CD Playback
Basic Picture CDs Playback
1 Load a Picture CD.
• For Kodak Picture CDs, the DVD player
starts slide show playback.
• For picture CDs with a menu screen, the
menu appears after a few seconds.
2 Press Left to enter the folder list
on the left screen. Press Up /
Down to highlight a folder and then
press Play/Sel..
[C ANA DA] 00 1.J PG
01. JAPAN
02. CANADA
03. FRANCE
04. BRAZIL
05. EGYPT
00 1. 001
00 2. 002
00 3. 003
00 4. 004
00 5. 005
00 6. 006
00 7. 007
00 8. 008
00 9. 009
01 0. 010
3 Press Right to enter the le list
on the right screen. Press Up /
Down to highlight a picture and picture
review is shown on the left screen.
[C ANA DA] 00 1.J PG
00 1. 001
00 2. 002
00 3. 003
00 4. 004
00 5. 005
00 6. 006
00 7. 007
00 8. 008
00 9. 009
01 0. 010
4 To play picture slide show, press
Play/Sel..
Note:
• Some discs may contain both music and picture
le formats. When the player reads the disc,
Audio CD mode
select Picture CD mode, press Right until the
Picture CD icon is selected and then press
Play/Sel..
will be selected rst. To
[C ANA DA] 001 .JP G
01. JAPAN
02. CANADA
03. FRANCE
04. BRAZIL
05. EGYPT
Select Picture CD icon
00 1. 001
00 2. 002
00 3. 003
00 4. 004
00 5. 005
00 6. 006
00 7. 007
00 8. 008
00 9. 009
01 0. 010
Stopping Playback
To stop playback and return to the menu
screen, press Stop.
Pausing Playback
1 Press Pause playback.
2 To return to normal playback, press
Play/Sel..
Rotating Pictures
Press Fast Forward during playback to
rotate the picture clockwise by 90° or press
Fast Backward to rotate the picture
counter-clockwise by 90°.
Viewing the Next or Previous Picture
Press Next to view the next picture or
Previous to view the previous picture.
Thumbnail Function
1 Press
2 Press
Right to select the preferred picture.
Title
Up /
.
Down /
Left /
3 Press Play/Sel. to play.
DUAL-SCREEN PORTABLE DVD PLAYER
USER GUIDE
21
Page 22

OSD Setup
Language Setup
1 Press Setup in stop mode.
2 Press Left / Right to select
LANGUAGE SETUP icon and then
press Play/Sel..
LANGUAGE SETUP
OSD
AUDIO
SUBTITLE
MENU
3 Press Up / Down to select an
option and then press Play/Sel..
OSD Language
LANGUAGE SETUP
OSD
AUDIO
SUBTITLE
MENU
ENGLISH
GERMAN
SPANISH
FRENCH
PORTUGUESE
ITALIAN
Audio Language
LANGUAGE SETUP
OSD
AUDIO
SUBTITLE
MENU
CHINESE
ENGLISH
JAPANESE
FRENCH
SPANISH
PORTUGUESE
ITALIAN
GERMAN
Subtitle Language
LANGUAGE SETUP
OSD
AUDIO
SUBTITLE
MENU
CHINESE
ENGLISH
JAPANESE
FRENCH
SPANISH
PORTUGUESE
GERMAN
OFF
Menu Language
LANGUAGE SETUP
OSD
AUDIO
SUBTITLE
MENU
CHINESE
ENGLISH
JAPANESE
FRENCH
SPANISH
PORTUGUESE
ITALIAN
GERMAN
4 Press Up / Down to select a
preferred language and then press
Play/Sel..
- To leave SETUP MENU, press Setup.
Note: If the language selected is not recorded
on the disc, the player will play the top-priority
language of the disc.
Audio Setup
Digital Out
1 Press Setup in stop mode.
2 Press Left / Right to select
AUDIO SETUP icon and then press
Play/Sel..
DUAL-SCREEN PORTABLE DVD PLAYER
22
USER GUIDE
Page 23

AUDIO SETUP
DIGITAL OUT
OSD Setup
- continued
VIDEO SETUP
VIDEO OUTPUT
TV TYPE
TV SYSTEM
3 Press Up / Down to select
DIGITAL OUT and then press
Play/Sel..
AUDIO SETUP
DIGITAL OUT
SPDIF/OFF
SPDIF/RAW
SPDIF/PCM
4 Press Up / Down to select a
preferred option and then press
Play/Sel..
- To leave SETUP MENU, press Setup.
Note:
• Select RAW when connecting the player’s Digital
Out (Coaxial) socket to a Dolby Digital decoder
or an equipment with a Dolby Digital decoder.
• Selec t PCM when conne cting the playe r’s
Digital Out (Coaxial) socket to a 2-channel
digital stereo amplier. Please do not adjust
the volume to zero.
Video Setup
1 Press Setup in stop mode.
2 Press Left / Right to select
VIDEO SETUP icon and then press
Play/Sel..
Video Output
3 Press Up / Down to select
VIDEO OUTPUT and then press
Play/Sel..
VIDEO SETUP
VIDEO OUTPUT
TV TYPE
TV SYSTEM
CVBS
4 To select the option, press Play/
Sel..
- To leave SETUP MENU, press Setup
TV Type
3 Press Up / Down to select TV
TYPE and then press Play/Sel..
VIDEO SETUP
VIDEO OUTPUT
TV TYPE
TV SYSTEM
4:3PS
4:3LB
16:9
DUAL-SCREEN PORTABLE DVD PLAYER
USER GUIDE
23
Page 24

OSD Setup
a
a
b
b
c
c
- continued
4 Press Up / Down to select a
preferred option and then press
Play/Sel..
4:3 Pan Scan : Select “4:3 PanScan”
for a conventional size TV set.
4:3 Letter Box : Select “4:3 Letter
Box” for a conventional size TV set. Black
bands appear at top and bottom of screen
(letter-box style).
16:9 Wide : Select “16:9 Wide” for a
wide-screen TV set to played in “FULL” size.
TV System
3 Press Up / Down to select
TV SYSTEM and then press
Play/Sel..
VIDEO SETUP
VIDEO OUTPUT
TV TYPE
TV SYSTEM
AUTO
4 To select the option, press Play/
Sel..
- To leave SETUP MENU, press Setup.
System Setup
1 Press Setup in stop mode.
2 Press Left / Right to select
SYSTEM SETUP icon and then press
Play/Sel..
SYSTEM SETUP
SCREEN SAVER
PARENTAL
PASSWORD
ANGLE MARK
DEFAULT
- To leave SETUP MENU, press Setup.
DUAL-SCREEN PORTABLE DVD PLAYER
24
USER GUIDE
Screen Saver
3 Press Up / Down to select
SCREEN SAVER and then press
Play/Sel..
Page 25

OSD Setup
SYSTEM SETUP
SCREEN SAVER
PARENTAL
PASSWORD
ANGLE MARK
DEFAULT
ON
OFF
4 Press Up / Down to select a
preferred option and then press
Play/Sel..
- To leave SETUP MENU, press Setup.
Parental
3 Press Up / Down to select
PARENTAL and the n press
Play/Sel..
SYSTEM SETUP
SCREEN SAVER
PARENTAL
PASSWORD
ANGLE MARK
DEFAULT
1 KID
2 G
3 PG
4 PG-13
5 PG-R
6 R
7 NC-17
8 ADULT
4 Enter 4-digit password and press
Play/Sel..
• Enter factory pre-set password “0000” for
the rst time setup.
- continued
5 Press Up / Down to select a
preferred rating and then press
Play/Sel..
- To leave SETUP MENU, press Setup.
Rating Explanations
1. KID: Kid safe; it is safe even for kids.
2. G: General audience; recommended as
acceptable for viewers of all ages.
3. PG: Parental Guidance suggested.
4. PG-13: Material is unsuitable for children
under the age of 13.
5. PG-R: Parental Guid an ce -r es tr icted;
recommended that parents restrict children
under age 17 from viewing or allow children
to view only when supervised by a parent or
adult guardian.
6. R: Restricted, children under 17 would not
be admitted without an accompanying parent
or adult guardian.
7. NC-17: No children under the age of 17,
not recommended viewing for children under
age 17.
8. ADULT: Adult only.
Note:
• You can use the parental control lock ONLY
with DVD discs featured with the parental lock
function..
• Please keep in mind that discs not encoded with
rating lock protection will play regardless of
rating and content.
SYSTEM SETUP
SCREEN SAVER
PARENTAL
PASSWORD
ANGLE MARK
DEFAULT
X
X
X
X
1 KID
2 G
3 PG
4 PG-13
5 PG-R
6 R
7 NC-17
8 ADULT
Password
3 Press Up / Down to select
PASSWORD and the n press
Play/Sel..
DUAL-SCREEN PORTABLE DVD PLAYER
USER GUIDE
25
Page 26

OSD Setup
- continued
Default
SYSTEM SETUP
SCREEN SAVER
PARENTAL
PASSWORD
ANGLE MARK
DEFAULT
OLD : _ _ _ _
NEW : _ _ _ _
VERIFY: _ _ _ _
4 Enter the previously set password or
factory pre-set password “0000” and
then press Play/Sel..
5 Enter new password and then press
Play/Sel..
6 Enter the password again to verify and
then press Play/Sel..
- To leave SETUP MENU, press Setup.
Angle Mark
3 Press Up / Down to select
ANGLE MARK and then press
Play/Sel..
SYSTEM SETUP
SCREEN SAVER
PARENTAL
PASSWORD
ANGLE MARK
DEFAULT
ON
OFF
3 Press Up / Down to select
DEFAULT and then press Play/
Sel..
SYSTEM SETUP
SCREEN SAVER
PARENTAL
PASSWORD
ANGLE MARK
DEFAULT
READ
4 Press Right to select READ and
then press Play/Sel..
- To leave SETUP MENU, press Setup.
4 Press Up / Down to select a
preferred option and then press
Play/Sel..
- To leave SETUP MENU, press Setup.
Note:
•
Pressing
movies that support this feature regardless of whether
the ANGLE MARK feature is “On” or “Off”
DUAL-SCREEN PORTABLE DVD PLAYER
26
USER GUIDE
Angle will change camera angles for
.
Page 27

LCD Setup
Panel Setting
1 Press LCD a number of times to
select PANEL.
2 Press Left / Right to choose
a preferred panel setting.
PANEL: <− NORMAL −>
PANEL: <− 4:3 −>
- Press
disappears.
LCD again until the LCD setting box
Colour Setting
1 Press LCD a number of times to
select COLOUR.
2 Press Left / Right to choose
a preferred color setting.
- Press
COLOUR: <− +3 −>
COLOUR: <− +2 −>
COLOUR: <− +1 −>
COLOUR: <− 0 −>
COLOUR: <− -1 −>
COLOUR: <− -2 −>
COLOUR: <− -3 −>
LCD again until the LCD setting box
disappears.
Brightness Setting
1 Press LCD a number of times to
select BRIGHT.
2 Press Left / Right to choose
a preferred brightness setting.
- Press
BRIGHT: <− +3 −>
BRIGHT: <− +2 −>
BRIGHT: <− +1 −>
BRIGHT: <− 0 −>
BRIGHT: <− -1 −>
BRIGHT: <− -2 −>
BRIGHT: <− -3 −>
LCD again until the LCD setting box
disappears.
LCD Setting
1 Press LCD a number of times to
select LCD.
2 Press Left / Right to choose
“ON” or “OFF“.
LCD: <− OFF −>
LCD: <− ON −>
- Press
disappears.
LCD again until the LCD setting box
DUAL-SCREEN PORTABLE DVD PLAYER
USER GUIDE
27
Page 28

Disc Use and Care
DO NOT use non-circular DVD discs, otherwise it may lead to damage to this DVD
player. In order to keep the disc surface clean, please hold the DVD disc
by its edge.
DO NOT touch the recorded surface of DVD disc.
DO NOT stick anything on the surface of DVD disc. If there is glue and other
adhesive article, please remove it before loading the disc.
DO NOT leave the disc in direct sunlight.
DO NOT leave the disc near a heat source, such as heating pipe.
DO NOT leave a disc inside a car under direct sunlight.
After Playback, always remove the disc from the player and return it to the display/
storage case.
To clean discs, use a dry soft cloth moving the cloth from the centre to the outside
across the disc surface. DO NOT use a rotary motion as this can make the disc
unplayable.
DO NOT use Petroleum products or aggressive cleaning agents, as these will
damage the disc.
Use of the in car power lead
This lead is specially designed for the unit. DO NOT use it for other in car products
as this may result in damage to lead or the other equipment.
DUAL-SCREEN PORTABLE DVD PLAYER
28
USER GUIDE
Page 29

Troubleshooting
Before requesting service for the DVD Player, check the chart below for a possible cause of the problem
you are experiencing. Some simple checkups or a minor adjustment on your part may eliminate the problem
and restore proper operation.
SYMPTOM (COMMON) REMEDY
No power. • Insert the power plug securely into the power outlet.
• Check if the ON/OFF button on the top of the player is set to on.
• Check if no power at the AC outlet by plugging in another appliance for a test.
The player does not start playback when • Condensation has formed: wait about 1 to 2 hours to allow the player to dry out.
PLAY is pressed. • The player cannot play discs other than DVDs, audio CDs and picture CDs.
• Check if the disc is defective by trying another disc.
• Check the region (local) code.
The player starts playback but stops • The disc may be dirty and may require cleaning.
immediately. • Ensure that the disc is correctly placed in the disc frame.
No picture. • Ensure that the equipment is connected properly.
• Select the same channel and source on the TV as on the player.
No sound. • Ensure that the equipment is connected properly.
Distorted sound. • Ensure that the input settings for the TV and stereo system are proper.
• No sound is heard during still picture (pause) or slow-motion playback.
No audio at Digital Output. • Check the digital connections.
• Check the settings menu to make sure that the digital output is set to on.
•
Distorted picture. • Check the disc for ngerprints and clean with a soft cloth, wiping from center to edge.
• Sometimes a small amount of picture distortion may appear. This is not a mal-function.
Completely distorted picture or no color • The disc format is not according to the TV-set used (PAL/NTSC).
in picture.
Picture is distorted during rapid advance • The picture will be somewhat distorted at times: this is normal.
or rapid reverse.
No rapid advance (or rapid reverse) • Some discs may have sections which prohibit rapid advance (or rapid reverse).
playback.
No 4:3 (16:9) picture. • Choose the correct setup “TV Aspect” item.
No operations perform with the remote • Check the batteries are installed with the correct polarities (+ and –).
control. • The batteries are depleted: replace them with new ones.
• Point the remote control unit at the remote control signal sensor and operate.
• Operate the remote control unit at a distance of not more than 7 meters from the
remote control signal sensor.
• Remove the obstacles between the remote control unit and remote control signal sensor.
No subtitles. • Subtitles appear only with discs that contain them.
•
Alternative audio soundtrack (or subtitle) • An alternative language can not be selected may result of no more than one
language available. languages cannot be selected.
Angle cannot change. • This function depends on software availability. Even if a disc has a number from
angles recorded, these angles may be recorded for specic scenes only.
No sound when connecting to • Check if the disc supports 5.1 Channel.
5.1 Channel speaker • Check if the speaker is properly connected.
• Check if the audio output setting is right.
No key operation (by the DVD Player • Turn the unit off and then back to on. Alternatively, turn off the unit, disconnect
and/or the remote control) is effective. the AC power cord and then re-connect it. (The player may not be operating
properly due to lightning, static electricity or some other external factor.)
Distorted picture or no image • Check if the TV system setting is correct.
• Check If you set output format in “Progressive Scan”, then you have to set
“Component” in the video output setting. The actual output format must match
to the output format setting.
OSD setting • Some setting must be stored by pressing left button.
Check if the audio format of the selected audio language matches your receiver capabilities.
Subtitles are hidden from the TV screen. Press SUBTITLE to display the subtitles.
DUAL-SCREEN PORTABLE DVD PLAYER
USER GUIDE
29
Page 30

Disc Handling and Maintenance
Handling Precautions
Hold the disc by the edges so the surface will not be soiled with nger-
•
prints. (A)
Fingerprints, dirt and scratches can cause skipping and distortion.
Do not write on the label side with a ball-point pen or other writing utensils.
•
Do not use record cleaning sprays, benzine, thinner, static electricity
•
prevention liquids or any other solvent.
Be careful not to drop or bend the disc.
•
Do not install more than 1 disc on the disc tray.
•
Do not try to close the disc tray when the disc is not installed properly.
•
Be sure to store the disc in its exclusive case when not in use.
•
If the surface is soiled (B)
Wipe gently with a soft, damp (water only) cloth.
When wiping discs, always move the cloth from the center hole toward
the outer edge.
(If you wipe the discs using a circular motion, circular scratches are likely
to occur, which will cause noise.)
If the disc is brought from a cold to a warm environment, moisture may
form on the disc
Wipe the moisture off with a soft, dry, lint-free cloth before using the disc.
Improper disc storage
You can damage discs if you store them in the following places:
Areas exposed to direct sunlight
•
Humid or dusty areas
•
Areas directly exposed to a heat outlet or heating appliance
•
Playable disc format
DVD, DVD+RW, DVD+R, DVD-RW, DVD-R, CD-DA, Mixed CD-DA,
•
JPEG le disc and Kodak Picture Disc.
Disc which cannot be played with this player
CD-ROM
•
CVD
•
CD-G
•
Maintenance
Be sure to turn the unit off and disconnect the AC power cord before
•
maintaining the unit.
Wipe this unit with a dry soft cloth.
•
If the surfaces are extremely dirty, wipe clean with a cloth which has
been dipped in a weak soap-and-water solution and wrung out thor-
oughly, and then wipe again with a dry cloth.
Never use alcohol, benzine, thinner, cleaning uid or other chemicals.
•
And do not use compressed air to remove dust.
(A)
(B)
DUAL-SCREEN PORTABLE DVD PLAYER
30
USER GUIDE
Page 31

Specications
GCE67W5DVDK
Portable DVD player
Disk Format. DVD/CD/CD-R/CD-RW
Video System AUTO
Video Decompression MPEG-2(ISO/IEC-13818)/MPEG-1/MPEG4
LCD Display 7” active-matrix TFT type
Terminals:
Audio/Video Section AV Output x 1
Headphone Socket Headphone Socket x 1
Line Voltage
Power Consumption 15W (12V, 1.25A)
Dimensions 210 mm (L) x 155 mm (W) x 41 mm (H)
AV Input x 1
Coaxial Output x 1
AC 100-240 VAC ± 10% (50/60 Hz) Adapter
Monitor
LCD Display 7” active-matrix TFT type
Terminals:
Audio/Video Section
Audio/Video Section AV Input x 1
Headphone Socket Headphone Socket x 2
Line Voltage
Power Consumption 15W (12V, 1.25A)
Dimensions 206 mm (L) x 150 mm (W) x 36 mm (H)
S-Video Input x 1
AC 100-240 VAC ± 10% (50/60 Hz) Adapter
DUAL-SCREEN PORTABLE DVD PLAYER
USER GUIDE
31
Page 32

Goodmans Product Information Helpline: 0870-873-0080
 Loading...