

Page 1
CD/DAB/F M Digital Radio
&DualAlarmClock
GCDR1955DAB
Instruction Manual
SPECIFICATIONS
Programme Play.............................. Up to 20 memories
Earphone output............................... 20mW
Power requirement............................ AC 230V
3 x AAA Battery Clock Memory
Dimension..... .. ... .. ... ... .. ... ..... .. ... ... .. .. 170(W) x195(H) x185(D)mm
Weight............................................. 1.88Kg not including battery (Main Unit)
For improvement purpos es, s pecification and design are subj ect to change without notice
Goodm ans produ ct Inf or mati on Helpline 08708730080
Page 2

TA B L E OF CONTENTS SAFETY PRECAUTIONS
Important safeguards .....................................1
Important notes................................................2
Power Sources ...............................................3
Player Maintenance ........................................3
Disc cleaning, power failure ............................4
Player o peration
Remote control locations ....................... .........5
Location of controls .........................................6
Setting the clock..............................................7
Setting the wake-up time..................................7
Alarm function..................................................8
Volume operation..........................................9
Clock dimmer operation...................................9
DAB operation..................................................9
DAB operat ion............................................10
FM operation..................................................11
Display modes...............................................12
CD operation..................................................13
Factory reset..................................................14
Sleep function.................................................14
Product specifications....................................15
Troubleshooting guide....................................16
WARNING
1. As the laser beam used in this compact disc
player is harmful to the eyes, do not attempt
to disassemble the casing.
2. Stop operation immediately if any liquid or
solid object should fall into the cabinet. Unplug
the unit and have it checked by qualified
personnel.
3. Do not touch the lens or poke at it. if you do,
you may damage the lens and the player may
not operate properly.
4. Do not put anything in the safety slot. If you
do, the laser diode will be ON when the lid is
still opened.
5. This unit employs a laser. The use of controls
or adjustments or performance of procedures
other then those specified herein may result
in exposure to hazardous radiation.
To prevent fire or shock harzard, do not expose
the unit to rain or moisture.
To avoid electric al shock, do no t open the
cabinet. Ref er servicing to qualified presonnel
only.
Goodm ans prod uct Infor mati on Helpli ne 08708730080
Page 3

1. IMPORTANT SAFEGUARDS
For your convenience a mains plug with a fuse has been fitted to this appliance.For your safety please observe the following.
1. Should the fuse fail in the plug remove the plug from the wall socket and replace the fuse with a 3 Amp ASTA approved to BS1362
fuse.
2. Never use the plug without the fuse cover fitted. Replacement fuse covers are available from your dealer or most electrical retail
outlets.
3. IF the mains plug is cut off from the cable, rewire the replacement plug in accordance with the instruction given in this manual.
4. CAUTION: Under no circumstances should the discarded plug be inserted into the mains socket. To prevent a sock hazard carefully
dispose of the discarded plug. Do not leave the plug lying around where children might see it.
WARNING: To pr event fire of shock hazard do not expose this unit to rain or moisture.
CAUTION: DANGEROUS VOLTAGES EXIST INSIDE THI S UNIT, DO NO T REMOVE COVER (OR BACK). NO USER
MAINS PLUG WIRING DETAILS
accordance wit h following wiring code s:
WARNING: UNDER NO CIRCUMSTANCES M UST THE LIVE OR NEUTRAL WIRES BE
CONNECTED TO THE EARTH TERMINAL IN A 3-PIN MAINS PLUG.
SERVICEABLE PARTS INSI DE . REF ER SERVIC I N G TO QUALI F I ED SERVIC E PERSO N NEL DISCO NNECT FROM
MAINS SUPPLY WHEN N OT IN USE.
Thewires in this mains lead are coloured in accordance with the
following wiring codes:
Blu e-------------------------------------------Neutr al
Br o w n ----------------------------------------l iv e
The wires i n this mains l ead mu st b e con nected to th e t erm in als
in the plugs as follo w:
Bl u e Wir e- -- --- --- -- --- ----- --- --- -- --- --- -- N o r Bl ac k
Bro w n Wi r e--------------------------------L o r Red
Only a 3 Amp fuse should be fitted in the plug or a 5 Amp fuse at
the distribution board.
This symbol means that this unit is double insulated.
An earth connection is not required.
CAUT IO N
CLASS 1 LASER PRODUCT
Use of Controls or adjustments or performance
of procedures other than those specified herein
may result in hazardous radiation exposure.
CLEA NING
Always disconnect unit from power supply before
attempting to clean it.
Use soft cloth moistened with soapy water, wipe
gently.
Do not use solvents or abrasive material.
Goodm ans prod uct Infor mati on Helpli ne 08708730080
LA SER SAFETY
This unit employs a laser. Only qualified service
personnel should attempt repair.
DANGER: INVISIBLE LAS ER RADIATION
WHEN OPEN AND INTERLOCK FAILED OR
DEFEATED. AVOID DIRECT EXPOSURE TO
BEAM.
CAUTION: HAZARDOUS LASER RADIATION
WHEN OPEN AND INTERLOCK DEFEATED.
1
Page 4

2. IMPORT ANT NOTES
Your hearing is very important to you and to us so please take care when operation this
equipment. The following guidelines are provided for your information.
ESTAB LISH A SA FE SOUND LEVEL
Over time your hearing will adapt to continuous loud sounds and will give the
impression that the volume has in fact been reduced. What seems normal to you may
in fact be harmful. To guard against this BEFORE YOUR HEARING ADAPTSSset
the volume at a low level.
Slowly increase the level until you can hear comfortably and clearly and without
distortion.
Damage to your hearing is accumulative a nd is irreversible.
Any ringing or discomfort in the ears indicates that the volume is too loud.
Remember listening for prolonged period of time at high volume levels will harm your
hearing.
Once you have established a comfortable listening level, DO NOT INCREASE
THE SOUND LEVEL FURTHER.
The following list of typical sound levels may assist you in recognising just how loud you
have set the volume level.
DECIB E L
Level dB Example
30dB
40
50
60
70
THE FOL L OWI NG NOISE CA N BE HARMFUL UNDER CONSTANT EXPOSURE
80dB
90
100
120
140
180
Quiet library, soft whisper.
Living room, fridge freezer bedroom away from traffic.
Normal conversation, quiet office, light traffic.
Electric sewing machine.
Vacuum cleaner, hair dryer, noisy restaurant.
Average city traffic, alarm clock buzzer at 1 Metre, food mixer.
Motorcycle, heavy goods vehicle, petrol lawn mower.
Pneumatic drill, chain saw, garbage truck, discotec/night-club.
Rock band concert, thunderclap, fast train passing by.
THRESHOLD OF PAINN Gunshot, jet plane taki ng off.
Rocket Launching pad.
Goodm ans prod uct Infor mati on Helpli ne 08708730080
2
Page 5
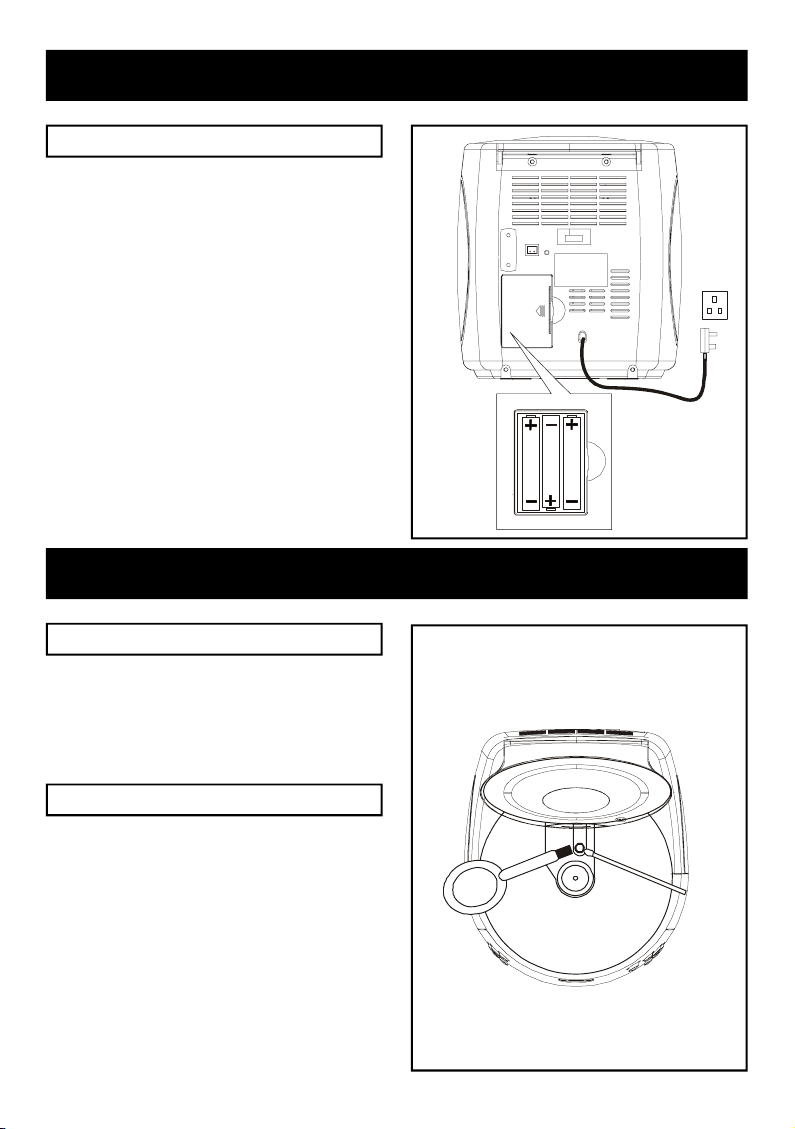
3. POWER SOURCES
1
.
5
V
A
A
A
Power connection
1. Plug the AC 230V Power Cord into an AC
household outlet.
2. For battery back up, insert three (3 x AAA)
1.5V batteries (not included) into the battery
compartment observing correct polarities.
3. The batteries will maintain time function during
a power cut, but not display it.
4. Normal display and function will resume when
power is restored, replace the batteries
annually.
Not e : This is an optional feature, no battery is
needed for normal operation.
4. PLAYER MAINTENANCE
Cleaning the Cabinet
A
A
A
A
A
A
V
V
5
5
.
.
1
1
IMPORTANT : Disconnect from Main Supply
before clean ing.
Wipe with a soft cloth. If the cabinet is very dirty,
dampen the cloth with a weak solution of neutral
detergent and water, and then wipe clean.
Cleaning the Lens
A dirty lens will cause sound skipping and, if the
lens is very dirty, the CD may not work. Open
the disc cover and clean the lens as follow :
Dust Dry Par t icles
Using a camera lens brush/blower, blow on the
lens couple t i m es , then wipe it lightly with the
brush t o remove dust. Then, blow on the lens
once more.
Finger prints
If the lens cannot be cleaned by using a brush/
blower, use a dry cotton s wab.
3
Page 6
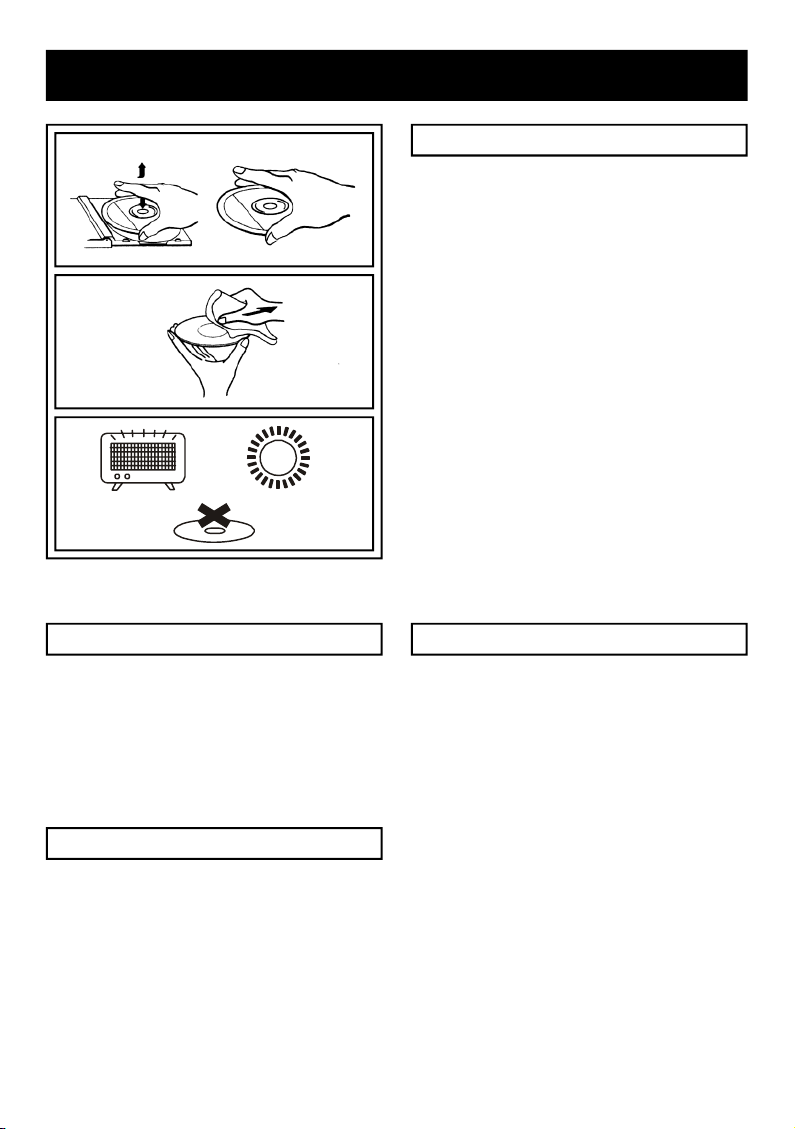
5. DISC CLEANING, POWER F AILURE
Cleani ng the Disc
1. To handle a disc use only one of the two
following methods.
Note : Do not touch the rainbow-coloured side.
2. To wipe a disc, use only a soft cloth. Do not
use benzene or thinner which will damage
the disc. The disc should always be wiped in
a straight line from the centre to the edge. It
should never be wiped in a circular motion.
3. Never place the disc on other equipment or
near any heat source. Avoid positions where
the disc would be subjected to direct sunlight
for long periods.
Power failure
When A C power is interrupt e d, both tim e and
alarm settings will be lost (unles s 3 x AAA
batteries (not supplied) are installed) after power
is restored The digital display will blink to show
power was interrupted. You must reset time and
alarm times.
Battery back up
To keep alarm time and time of day settings in
memory during a brief power failure or accidental
AC c ord unplugged, install 3 x AAA batteries
(not supplied) into the Battery Compartment on
the rear of the unit.
Maintenance and care
1. Electronic products should never be
subjected to extreme temperatures nor high
humidity to ensure good performance and a
long life-time. The clock radio should not be
placed in bathing areas, or around stoves
and radiators, etc. Always leave sufficient
space around the unit for ventilation.
2. If necessary, only clean the cabinet of the
unit with a soft dampened piece of cloth. (be
sure the AC power cord is unplugged from
the outlet) Never use a polish or a strong
detergent for cleaning since this can damage
the finish of the cabinet.
4
Page 7

6. REMOTE CONTROL LOCATIONS
1. STANDB Y / AL/CD S TOP BUT T O N
2. CD/PLAY/PAUSE BUTTON
3. FM/DAB BUTTON
4. MUTE BUTTON
5. SKIP DN / FR / SELECT DN BUTTON
6. SKIP UP / FF / SELECT UP BUTTON
7. SLEEP B UTT ON
8. SELECT BUTTON
9. VOLUME DN BUTTON
10. VOLUME UP BUTTON
1. Press down on the triangular mark of the
compartment cover, and slide the cover off
to open the compartment.
2. Insert 2 x AAA or LR03 batteries in the
remote batteries in t he remote control
observing to the p olar i t y mark i ngs ( "+"
and " -" ) inside the compart ment and
on the batteries.
3. Place the cover over the compartment,
press down lightly, and push it upward
until it snaps on.
Installi ng b atteries i nto the
remote control unit
** BATTERIES NOT INCLUDED **
5
Page 8

7. LOCATION OF CONTROLS
34
28
1. CD DOOR
2. SNOOZE BUTTON
3. SPEAKER
4. IR SENSOR
5. STANDB Y / AL/CD S TOP BUT T O N
6. CD PLAY/PAUS E BUTTON
7. FM/DAB BUTTON
8. REPEAT / AUTOTUNE BUTTON
9. RANDOM / INFO BUTTON
10. POWER ON/MUTE INDICATOR
11. ALARM 1 I NDIC ATOR
12. SELECT BUTTON
13. SKIP DN / FR / SELECT DN BUTTON
14. SKIP UP / FF / SELECT UP BUTTON
15. CLOCK / CD DISPLAY
16. FM/DAB DISPLAY
17. CD DOOR OPEN BUTTON
18. CLOCK DIMMER BUTTON
19. SLEEP BUTTON
20. AL ARM 1 BUTTON
21. AL ARM 2 BUTTON
22. DISPLAY/AL SE T BUTTON
23. SLEEP INDICATOR
24. ALARM 2 I NDIC ATOR
25. PROGRAM/C-ADJ BUT TON
26. VOLUME UP BUTTON
27. VOLUME DN BUTTON
28. HEADPHONE JACK
29. PRESET 3 B UTT ON
30. PRESET 1 B UTT ON
31. PRESET 2 B UTT ON
32. PRESET 4 B UTT ON
33. DAB/FM WIRE AERIAL
34. BATTERY DOOR
35. AC POWER CORD
1
2
3
3
16
15
4
5
6
7
8
9
10
11
12
13
14
17
18
19
20
21
22
23
24
25
26
27
35
6
Page 9

8. SETTING THE CLOCK
F3
When the unit is connected to the power for the
first time, it will be in Standby, the red power indi-
cator will come on and the LED display will show
"0:00" and will flash. Do not press the STANDBY
button, the clock must be set in the Standby mode.
(F.1)
1. Ensure the unit is in Standby mode (Standby
indicator is ON).
2. Press and hold the PROGRAM/C-ADJ button
until the "hour" digit flashes in the display, then
press t he SKIP UP/FF and the SKIP D N/ FR
buttons to set the correct hour. (F.2)
3. Press the PROGRAM/C-ADJ button to confirm
the hour and the "minute" digits will flash, press
the SKIP UP/FF and the SKIP DN/FR buttons
to set the correct minute.
4. Again press the PROGRAM/C-ADJ button to confirm and the clock is set. (F.3)
F1
F2
9. SETTING THE WAKE-UP TIME
1. Press and hold the DISPLAY/AL SET button for more than 2 seconds until the "hour" digit flash in the
display, the Alarm 1 LED indicator will also flash, press the SKIP UP/FF and the SKIP DN/FR
buttons to set the desired hour.
2. Press the PROGRAM/C-ADJ button to confirm the hour and the "minute" digit will flash, press the
SKIP UP/FF and the SKIP DN/FR buttons to set the desired minute.
3. AgainpressthePROGRAM/C-ADJbuttontoconfirmandthetimefortheAlarm1isset.
4. The Alarm 2 LED indicator and the "hour" digit in the display will then flash, repeat the above
proceduretosetthetimefortheAlarm2.
5. To check the Alarm ti me, press the DISPLAY/AL SET button, repeatedly until the corr esp onding
LED indicato r flashes. The time shown in the clock display is the time set for that alarm.
7
Page 10

10. ALARM FUNCTION
This unit incorporates an identical Dual Alarm function. You can set the alarm to wake you to an
electronic buzzer tone, the radio or your favourite CD.
First press the DISPLAY/AL SET button on the front panel to c heck the wake up time settings. Adjust
the wake up time if necessary. Then press the ALARM 1 or the ALARM 2 button to activate the Alarm
and its associated wake up modes as desc ribed in "setting the wake up time" on page 7. The LED
indicators will light up in three different colours to show the different wake up mode settings:
Wake to Buzzer (Gre en in dicat or)
1. Repeatedly press the ALARM button (1 or 2) until the LED indicator turn green.
2. Press the STANDBY button to turn the unit to Standby.
3. At the selected wake up time, the buzzer will sound. It will continue for one hour and then shut off
automatically. To stop the alarm during this hour, press STANDBY button once.
4. When the buzzer is sounding, press the VOL UP or DN button to set the default buzzer level (high
or low).
Wake to FM/DAB (Red indicator)
1. Repeatedly press the ALARM button (1 or 2) until the LED indicator turns red.
2. Press the FM/DAB button to select FM or DAB mode, tune to the desired radio station and adjust
the volume to a sufficient level.
3. Press the STANDBY button to turn the unit to Standby.
4. Attheselectedwakeuptime,theradiowillturnon.Itwillcontinueforonehourandthenshutoff
automatically. To stop the radio during this hour, press STANDBY button once.
Wake to CD (Orange indicator )
1. Repeatedly press t he ALARM button (1 or 2) until the LED indicator goes to orange.
2. CD will flash in the clock display and the track number, press the SKIP UP/FF and the SKIP DN/FR
buttons to select the desired wake up trac k.
3. LoadtheCD,beginplaybackandadjustthevolumetoasufficientlevel.
4. Press the STANDBY button to turn the unit to Standby.
5. At the selected wake up time, the CD will begin to play from the selected t r ack. It will continue for
one hour or until the end of the disc, and then shut off automatically. To stop the CD during this time,
press the STANDBY button once.
6. If the CD is not recognized or no disc is inserted, the buzzer will sound.
Automatic alarm re peat
The alarm will automatically repeat each day at the selected wake up time as long as the Alarm
indicators are lit. To cancel the alarm, press the ALARM button (1 or 2) until the indicators are turned off.
No te: The Ala rm that i s se t t o tu rn on first w ill h ave th e priori ty an d it wo uld c o nti n ue
for a one ho ur d u rat i on, t he Sn o oze f unctio n will j u st s witch o ff t his Alar m off t emporary du rin g th i s dura tion , so if th e se c o n d Alarm is se t to tu rn o n in th
is peri od, it w ill
not function. B u t if th e firs t Al arm is sw i tc hed off befo r e the ti m e , the sec ond al a rm
is se t fo r , then th
e se c on d Alar m will be acti v ated.
8
Page 11

)
1 1. VOLUME OPERATION
)
Press the VOLUME UP/DN button on the unit or (remote control) to set the sound level. To mute the
sound, press MUTE button on the remote control, the "MUTE" indicator will flash. To resume the
sound, press the MUTE button again or just press the VOLUME UP/DN button to disable the MUTE
function.
12. CLOCK DIMMER OPERATION
Press the C L O CK DIMMER button on the front panel t o adjust t he bri g htness of the LED displ ay,
between bright and dim settings.
13. DAB OPERATION
Hints for better reception
This unit uses a single DAB/FM lead wire aerial, to obtain the best performance, the aerial should be
fully extended and the position adjusted until the best reception. For ideal DAB reception, the aerial
should be positioned in a vertical position (keeping it upward or downward behind the uni t) is highly
recommended.
DAB Mode
When the unit is first powered up, it will automatically enter into the DAB mode and perform DAB auto
tune full scan function, the display will show a slide bar to indicate the progress of the scan. Unlike
normal radio, the separate signals from a number of stations are grouped together and transmitted in
a single frequency; these groups are referred to as multiplexes and ensembles. Every time one of these
groups are found, the name of that group will be displayed on the bottom half of the display.
Auto Tune Modes
There are t wo types of aut o tune modes, one is
quick scan and the other is full scan. Quick scan
will only search for the UK DAB Band III channels
and full scan will search all DAB Band III channels.
Once the scan has finished, the radio will select
the first alphanumerically found station.
1. To activate the quick scan, press the
AUTOTUNE button once, the display will
show"Autotune Quick scan" (F.4) and then a
progressing slide bar and "Searching" (F.5)
2. To activate full scan, press and hold the AUTOTUNE button until the display shows "Autotune Full
scan".
3. To explore the stations that have b een found, press the SELECT UP or DN button.
9
Page 12

13. DAB OPERATION
)
Manual Tuning
1. To select manual tuning, press and hold the
SELECT button until the display shows"Manual
tune". (F.6)
2. Press the SELECT UP or DN button to move
through the DAB channels, on the top half of
the dis play will show "5A" to " 13 F" and their
associated f r eq uenci es. W hen your radio
locates a station group (ensemble/multiplex) on
one of the DAB channels, the name of the
station group will appear on the bottom half of
the display. (F.7)
Selecting a radio station
1. To enter the ensemble/multiplex, press the SELECT button, the top half of the display will show the
first station in the ensemble/multiplex.
2. Press the SELECT UP or DN butto n to see what stations are present on the found ensemble/
multiplex, when you have located your desired station, press the SELECT button, and at the same
time, the unit will return to the auto tuning mode.
Auto select On/OFF
To toggle between the auto select "ON" and "OFF",
press t he SELECT UP or DN button and then
quickly press and hold the SELECT button until
the disp lay shows the " Autoselect ON" or
"Autoselect OFF". (F.8) (F.9)
If Autoselect is on, the skip UP/DN button are
used to sele ct a station. When the button is released the station is automatically selected and
tuned to. If autoselect is off, press the select
button to tune to a station after selecting it
using Skip UP/DN button. If select is not pressed
within 4 seconds the disp lay will revert to the
original station.
)
)
)
Presets
You can store up to 4 of your favourite stations to the preset; this will enable you to get access to your
favourite station at a touch of a single button.
1. To store a preset, first tune to your desired station, then press and hold your preferred PRESETbutton
(1 - 4) until the display shows "Preset & stored".
2. To recall a preset station, press the PRESET button (1 - 4) that you have stored.
3. If you press a preset that has not been allocated a station, the display will show "Preset & empty".
1 0
Page 13

14. FM OPERATION
)
Auto Tuning
1. To s elect FM, r ep ea t edly pr es s the FM/DAB
button, until the display will shows "Switching
to FM" and the unit will then automatically tune
to the neare st station. On the top half of the
display will show the station name or the
frequency if the RDS station name is not available.
(F.10) (F.11)
2. To activate auto search up, press the
AUTOTUNE button, the unit will start scanning
up the frequency band and stop automatically
once a station has been found.
3. Press and hold the AUTOTUNE button to
scan down the frequency band.
Manual Tuning
To manually search, repeatedly press the SELECT UP or DN button, until the required station is found.
Mono /Stereo
This unit will receive the selected station automatically in stereo if broadcasted in STEREO and the
reception is strong enough. If this stereo recepti on has a large amount of noise (hi s s ) , pres s the
SELECT button until MONO is shown on display. To return to stereo reception press the SELECT
button until auto is shown.
)
Presets
You can store up to 4 of your favourite stations to the preset; this will enable you to get access to your
favourite station at a touch of a single button.
1. To store a preset, first tune to your desired station, then press and hold your preferred PRESETbutton
(1 - 4) until the display shows "Preset & stored".
2. To recall a preset station, press the PRESET button (1 - 4) that you have stored.
3. If you press a preset that has not been allocated a station, the display will show "Preset & empty".
Note : Each preset will hold 1 DAB and 1 FM station.
1 1
Page 14

15. DISPLAY MODES
Every time the INFO button is pressed, the display will cycle through the following display modes:
InFMmode - RadioText>ProgrammeType>Signalstrength>Frequency>Audiomode>RadioText
In DAB mode - Ensemble/Multiplex > Signal strength > Date > DLS (Scrolling text) >Programme Type >
DLS
DLS stands for Dynamic Label Segment which is a scrolling message that the broadcaster may
include in their transmissions. The message usually includes information such as programme details
etc. If no D LS text is available, the di s pl a y will show "No DLS Text".
Radio text
The broadcaster can include scrolling text that displays information about the present programme. If the
information is not available, the display will show "<RadioText>.
Progarmme type
This describes the style of the programme that is being broadcast. If the information is not available, the
display will show "<Programme Type>".
Signal strength
The display will show a slide bar to indicate the
signal strength, the stronger the signal, the longer
the bar will be from left to right. (F.12)
Date
The date will be automatically updated by the
broadcasted information; In the unlikely event that
no information is r eceived, the display will show
"No CT".
>......
Ensemble/Multiplex (Group name) >......
)
)
Frequency
The frequency of the present station will be
displayed.
Audio mode
In FM mode, the display will show if the station
being received is mono or stereo. (F.13)
If the selected FM station is being received in stereo and there i s a large amount of noise (hiss).
Repeatedly press the select button until mono is shown in the display. To return to stereo reception
repeatedly press until AUTO is shown in the display.
Ensemble/Multiplex (Group name)
The Ensemble/Multiplex is a collection of radio stations that are bundled and transmitted together in a
single frequency. There are national and local multiplexes, local ones contain stations that are specific
to that area.
On some occasions you will see a ">"symbol appeared after the name of the station, this indicates that
there are secondary services available to that station. These secondary services contain extra services
that relate to the primary station.
Not e : For instruction on how to access secondary services, refer to DAB operation.
1 2
Page 15

16. CD OPERATION
NOTE: Although this CD player c an read CD-R and CD-RW discs in addition to normal CDs, the
playability of CD-R and CD-RW discs may be affected by the type of software that was used to create
the discs, as well as the quality and condition of the blank media you are using. 100% playability cannot
be guaranteed. This is not an indication of a problem with the player.
Playin g t he ent i re CD
1. When the unit is ON, pres s the CD/PLAY/PAU SE button to select CD functi on.
2. Press the CD OPEN button to open the CD door, insert the disc with the printed label side facing
up and then close the CD door.
3. The CLOCK display will first show "cd --" then the first track nu mber and playback will commence
automatically.
5. To pause playback, press CD/PLAY/PAUSE, the " : " in the display will flash.
6. To resume playback, press CD/PLAY/PAUSE again.
7. To stop playback, press the STANDBY/AL/CD STOP button.
Select in g a differ ent track during pl ay
1. To play the next track, press the SKIP UP/FF button once.
2. To play the previous track, press the SKIP DN/FR button twice.
3. Press the SKIP DN/FR button once, the cur rent playing trac k will be started again from the
beginning.
Repeat play
1. Press the REPEAT button to select repeat pl ay, to repeat the same track only, press the REPEAT
button once, the Repeat indicator will flash.
2. To repeat the entire disc, press the REPEAT button again, the Repeat indicator will light up and stop
flashing.
3. To cancel repeat play, press the REPEAT button until the Repeat i ndicator goes off.
Random play
1. Press the RANDOM button to select random play, the Random indicator will light up.
2. Press the PLAY/P AUSE button to start random play, the tracks will be play randomly.
3. To cancel random play, press the RANDOM button again until the Random indicator goes off.
Program play
In CD stop mode, a maximum number of 20 tracks c an be programmed to play in any desired order.
1. Load the disc as usual and press the STANDBY/AL/CD STOP button if the CD is playing.
2. Press the PROGRAM button, the display will show "cd 01", the Program indicator will light up and
flash.
3. Press the SKIP UP/FF or the SKIP DN/FR buttons to select the first track to be programmed.
4. When the desired track appears on the display, press the PROGRAM button, the first track to play
is programmed. The display will show "cd 02" and ready for the next entry.
5. Repeat steps 3 & 4 to progr am other tracks for programmed playback.
6. When you have completed programming, press the PLAY/PAUSE button to begin program play. The
Program in dicator will light up and stop flashing. Playback will begin on the first track programmed
and will continue until the last programmed track has played.
7. To erase the program, in CD stop mode, press the CD STOP button once; in CD play mode, press
the S TO P button twice, the Program indicator will turn off.
1 3
Page 16

17. FACTORY RESET
When you move the radio to another part of the country, your pre-tuned DAB stations may no longer be
available and you might need to reset your radio back to its original factory settings; to perform factory
reset, please do the following:
1. Ensure the unit is in Standby mode.
2. Press and hold the SELECT button then press the STANDBY button once.
3. Keep pressing the SELECT button until "System reset" is shown in the LCD display.
4. The unit will perform "Autotune Full scan".
5. After the searching (around 1 minute depends on the no. of stations), tune to the stations in the
normal manner.
Note : Al l of yo ur stored DAB & FM pre s e ts will be lo st o nce t he re set ha s tak en p lac e .
18. SLEEP FUNCTION
Set sleep function
This function allows you to program the unit to switch off itself after a set period of time. You can set your
sleep time in either Standby or On mode; if the sleep time is set in Standby, the unit to will turn On
automatically after the setting is confirmed.
1. To activate the Sleep function, press the SLEEP button, the LED display will show 90 and the Sleep
indicator will light up.
2. To set the sleep time, press and hold the SLEEP button, the time in the display will change in the
below sequence: 90>80>70>..>20>10>9>8>......>3>2>1>90>80>. When the display shows
your desired sleep time, release the SLEEP button, the sleep time is now set.
3. To cancel sleep, press the SLEEP button once again, the Sleep indicator will go off.
1 4
Page 17

PICK-UP
19. PRODUCT SPECIFICATIONS
System
Laser diode
Properties
AUDIO
D/A conversion
Laser diode
Properties
No. of channels
Output level
Speakers
RADIO
Receiving bands
Frequency range
Compact disc digital audio system
Sanyo : Dl-3150-101
Wavelength : = 790 nm +/- 30 nm
Emission Duration : continuous
Laser out : <44.6µW
1-bit DAC 8 times oversampling
20-20,000Hz (+ 1/-3 dB)
Below measurable limits
2 channels (stereo)
Earphone : 20 mW (32 )
3" 8 x 2
FM/DAB
FM 87.5 - 108 MHz
DAB 174 - 240 MHz
λ
GENERAL
Power requirements
Power consumption
Dimension
Weight
Due to the continual improvement of our products th e specifications are subjuect to change.
Goodm ans prod uct Infor mati on Helpli ne 08708730080
AC 230V
4.5 Volt battery back-up
17W
Approx. 170(W) x195(H) x185(D)mm
Approx. 1.88Kg not including battery (Main Unit)
1 5
(3 x AAA)
Page 18

20. TROUBLESHOOTING GUIDE
Every effort has been made to ensure this product provides optimum performance
in all conditions ,however we appreciate that sometimes difficulties may arise and
the following table summarises some common problems.
Problem Possible cause Remedy
General
No Sound
No power to unit
* Check AC supply is
connected
Headphones connected
to headphone socket
No DAB stations found
Erroneous information in
the display
Noisy reception on FM
If the problem experienced is not listed above or if after checking the remedies the
problem still exists , please call our product information helpline on
Aerial not extended
Outside broadcast area
Temporary memory
problem
Aerial Not extended
Weak reception
* Remove headphones
* Check Aerial position
* Use the signal meter
on the unit to check
for signal
* Check location
recep tion details at
www.drdb.org or
call 08707 74 74 74
* Switch the unit off
then back ON this
will clear the problem
* Check Aerial and unit
position
* Use the signal meter
on the unit to check
for signal
*SwitchunittoMono
mode
For further assistance
Goodm ans prod uct Infor mati on Helpli ne 08708730080
0870 873 0080
1 6
 Loading...