

Page 1
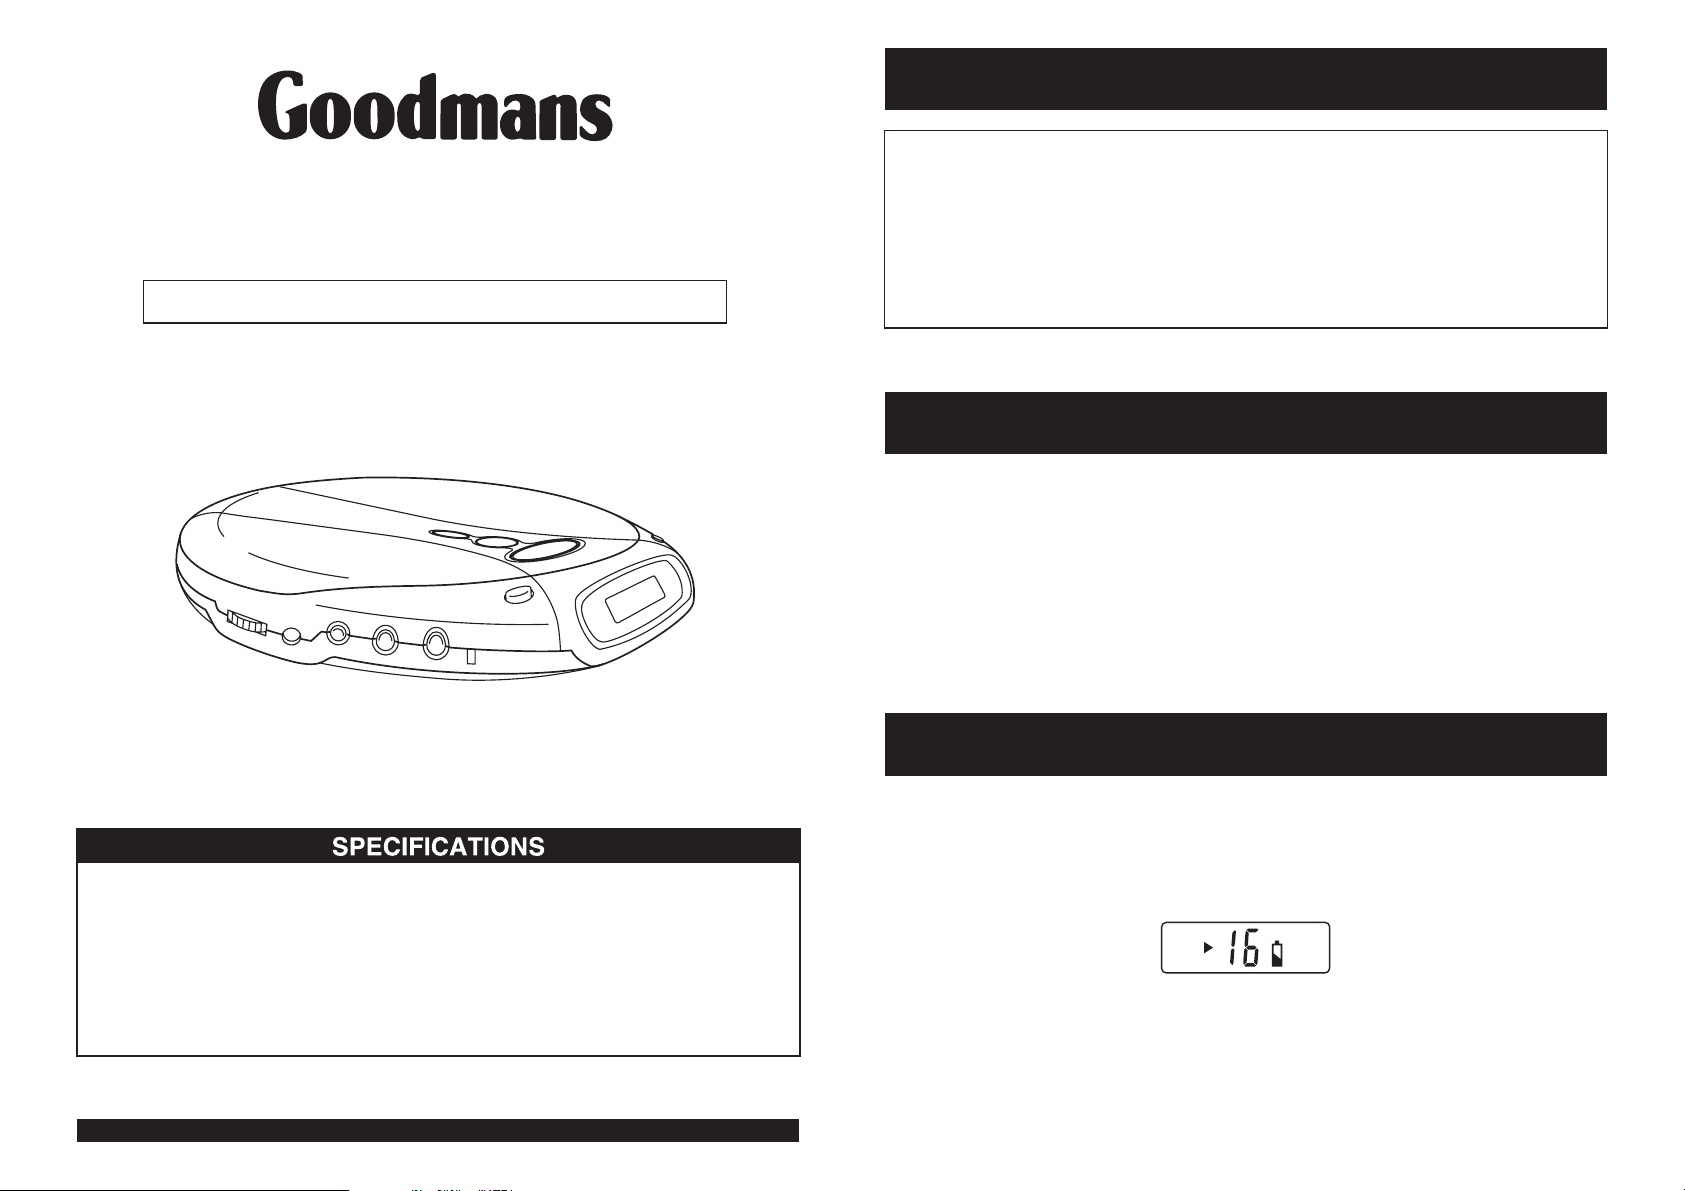
Compact Disc Player
GCD521RR/GCD521RL/GCD521RBL
IMPORTANT NOTES
In order to maximize battery life and provide optimum playing time this product incorporates
an Auto PowerOff function.
The power to the player will automatically switch off approximately 30 seconds after a disc
has finished playing.
Instruction Manual
Programme Play .................................................... Up to 24 memories
Line output ............................................................. 0.6V RMS
Earphone output .................................................... 20mW
Power requirement ................................................ DC 4.5V external and battery 3V
("AA" Cell x 2) (IEC R6, JIS SUM-3
or Ni-Cd rechargeable battery)
Dimension
Weight ................................................................... 212g not including battery (Main Unit)
............................................................. Appro. 154.5(W) x 25(H) x 141(D)mm
Helpline No.: 0870 873 0080
WARNING
1. To prevent fire or shock hazard, do not
expose the unitto rain ormoisture.
2. To avoid electrical shock, do not open the
cabinet. Refer servicing to qualified
personnel only.
3. Do not put anything in the safety slot. If you
do, the laser diode will be ON when the lid
is still opened.
4. The unit employs a laser. The use of
controls or adjustments or performance of
procedures other than those specified
herein may result in exposure to
hazardous radiation.
LOW BATTERY ALERT
When the BATTERY indicator flashes in the LCD display, this means that the batteries are losing
their charge. In this case the CD playerwill not function properly and the batteries must be replaced.
In the case that rechargeable batteries are being used follow the instruction on how to recharge the
batteries detailed in this owner'smanual.
For improvement purposes, specification and design are subject to change without notice.
Goodmans Product Information Helpline 0870 873 0080
Page 2
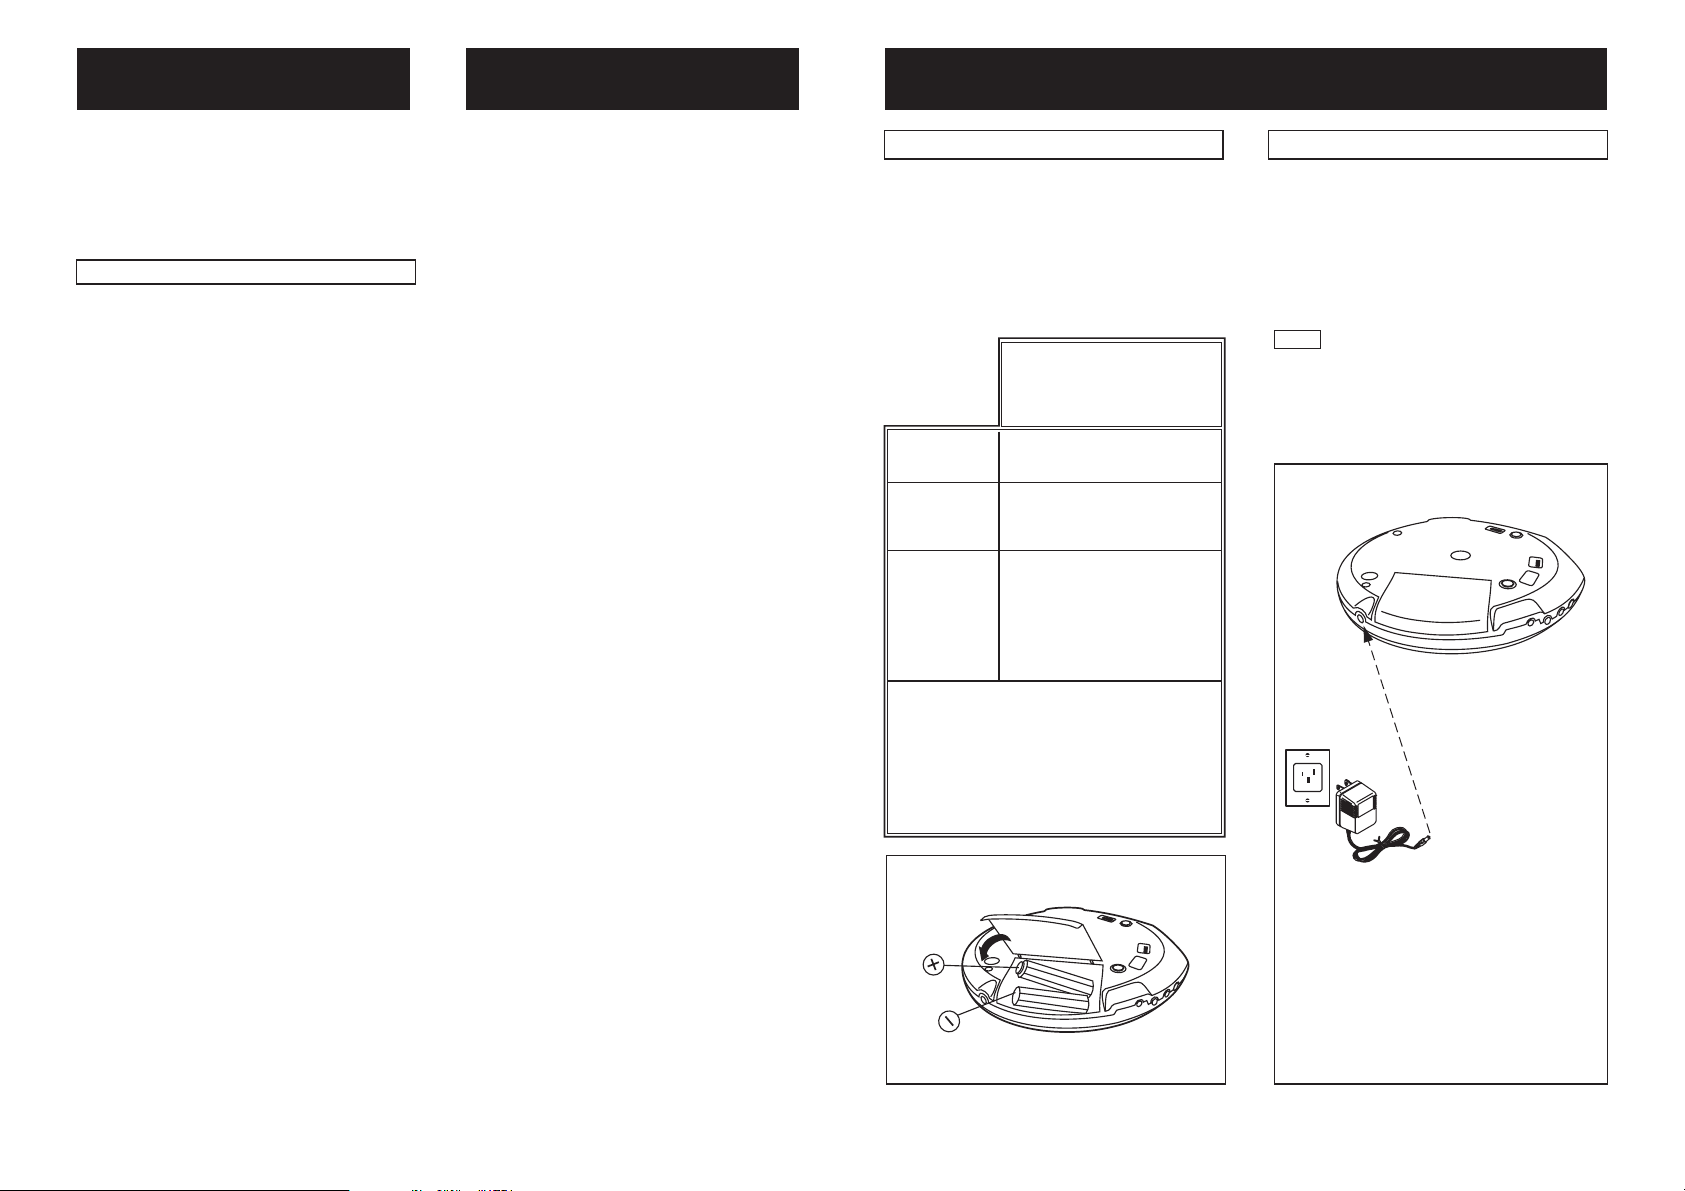
TABLE OF CONTENTS SAFETY PRECAUTIONS
1. POWER SOURCES NORMAL BATTERIES/AC ADAPTOR
Power Sources Normal Batteries/AC Adaptor..... 1
Charging and Use of Rechargeable Batteries..... 2
Earphone and Hi-Fi Connection......................... 3
Player Maintenance........................................... 4
Disc Cleaning and Troubleshooting Guide.......... 5
Product Specifications....................................... 6
Player Operation (see reverse of this sheet)
Basic Disc Play.................................................. 7
Location of Controls........................................... 8
LCD Display Information .................................. 9
Skip Function.................................................. 10
Play Modes.......................................................11
Programme Play................................................
12
1. As the laser beam used in this compact
disc player is harmful to the eyes, do not
attempt to disassemblethe casing.
2. Stop operation immediately if any liquid or
solid object should fall into the cabinet.
Unplug the unit and have it checked by
qualified personnel.
3. Do nottouch the lens or pokeat it. If you do,
you may damage the lens and the player
may not operateproperly.
4. Do not put anything in the safetyslot. If you
do, the laser diode will be ON when the lid
is still opened.
5. The unit employs a laser. The use of
controls or adjustments or performance of
procedures other than those specified
herein may result in exposure to
hazardous radiation.
Battery Power Operation
1. Open the battery compartment cover and
insert two "AA"alkaline batteries inside the
battery compartment.
Be sure to observe
the proper polarity (the "+" and "-" signs) as
indicated inside thebattery compartment.
2. Close thebattery compartmentcover.
Average Playing
Time (Continuous
Play)
Battery Type
Alkaline MN
1500, LR 6 or
Equivalent
Ni-CAD
rechargeable
(min.
specification
recommended
1.2V - 650mA)
Note: Zinc/Carbon, or Zinc/Chloride type
batteries are not recommended for this unit
as their use will result in extremely short
playing times. Wherever possible and for
economy it is recommended that the mains
adaptor supplied with this unit used.
Normal Play Mode
Approx. 10 Hours
Approx. 8 Hours
AC Operation
1. Insert the DC plug at the end of the AC
adaptor (not included) cord into the DC
input socket atthe rearof the unit.
2. Plug the AC adaptor (not included) into a
230V AC poweroutlet socket.
If the AC plug of this unit does not fit in
Note
your AC outlet,a plug adaptor (not included)
should be used.
Consult your local dealer on the type of plug
adaptor required.
WARNING
ENSURE THAT THE BATTERY
RECHARGE SWITCH IS OFF WHEN
USING THE AC ADAPTOR WITH NON
RECHARGEABLE BATTERIES
INSTALLED.
Page 3
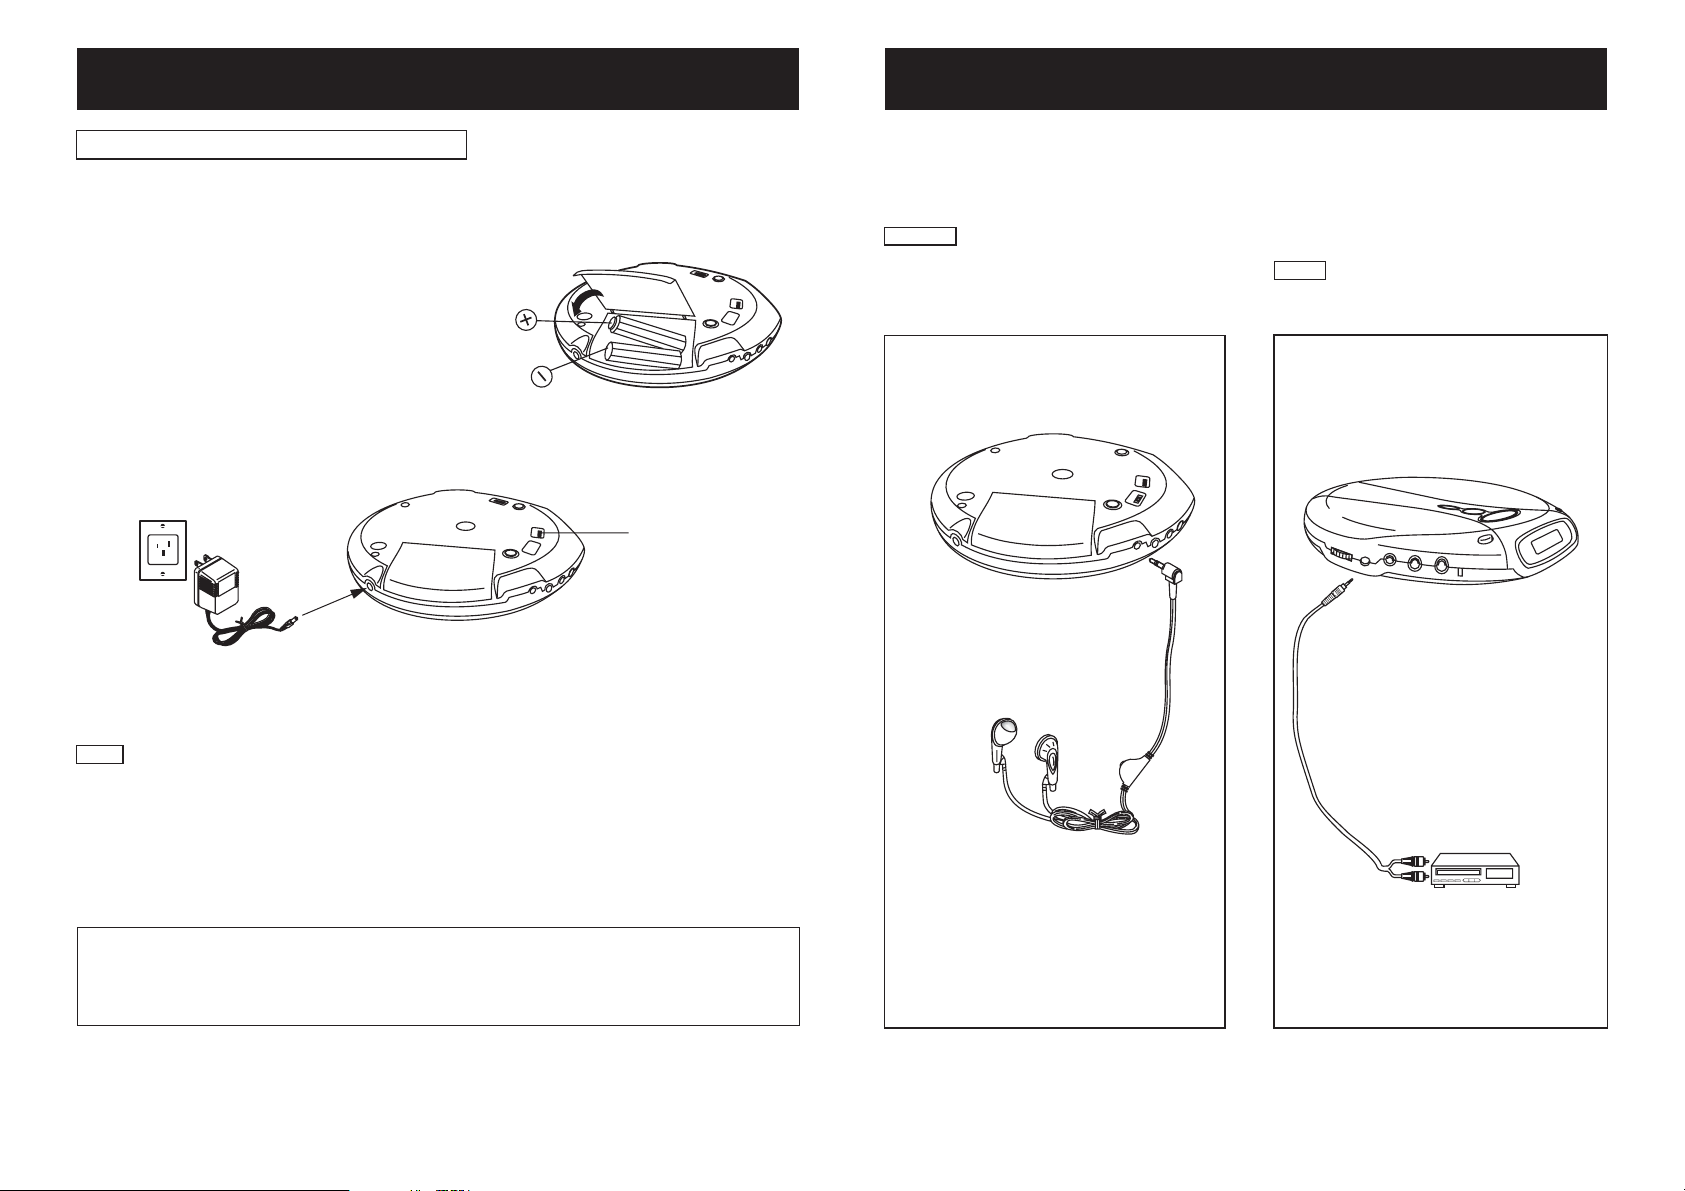
2. CHARGING AND USE OF RECHARGEABLE BATTERIES
3. EARPHONE AND HI-FI CONNECTION
Rechargeable Battery Operation
This unit can fully recharge the specified rechargeable batteries, in approximately 15 hours. The
rechargeable batteries (NOTsupplied) should berecharged before theyare used for thefirst time
because they arelow inpower or theyhave notbeen used fora longperiod (over 60days)
1. Open the battery compartment cover and insert
two of therecommended rechargeablebatteries,
matching polarity. (1.2V 650mA)
2. Plug inthe ACadaptor (not included)and setthe Charge switchto ONposition to startcharging.
The CHARGE indicatorwill illuminate.
CHARGE SWITCH
3. After 15hours, pleaseunplug the ACadaptor andswitch the Chargeswitch tothe OFF position.
DO NOT CHARGE CONTINUOUSLY FOR 24 HOURS OR MORE. DOING SO CAN CAUSE
THE PERFORMANCE OF THE RECHARGEABLE BATTERIES TO DETERIORATE.
you may playDISC whilecharging the batteries.
Note
< Listeningwith the earphone
Connect the plug of the stereo earphones
(included) or headphones (not included)
into the PHONES(GREEN) socket.
Caution
listening to sound for a long period of time
when using headphone.
Avoid excessive volume levels and
TO PHONES
< Connecting to component audio
systems
Connect a stereo connection cable (not
included) into the LINE OUT (BLACK)
socket of the unit and the CD/AUX input of
an audio system.
Note
Always switch the power off before
making any connections between the player
and another unit.
TO LINE OUT
4. If the operating timedecreases drastically even when the rechargeable nickel-cadmiumbatteries
are properly recharged, purchase anew set of rechargeablenickel-cadmium batteries.
5. When charging for the first time or after a long time, playing time may be reduced. In this
case, charge and discharge the batteries several times.
Charging Rechargeable batteries
The charging current for this player is 120mA and has been optimised for over night
charging of MI-MH batteries. NI CAD batteries can still be charged in this player but please
note due to their lower capacity the charging time will need to be reduced.
< Adjust Volumeto the desired level.
TO CD / LINE
INPUT
Page 4

4. PLAYER MAINTENANCE
5. DISC CLEANING AND TROUBLESHOOTING GUIDE
Cleaning the Cabinet
Wipe with a soft cloth. If the cabinet is very dirty, dampen the cloth with a weak solution of neutral
detergent and water, and then wipe clean.
Cleaning the lens
A dirty lens will cause sound skipping and, if the lens is very dirty, the CD may not work. Open the
disc cover andclean thelens as follows:
Dust or DryParticles
Using a camera lens brush/blower, blow on the lens couple times, then wipe it lightly with the
brush to removedust. Then,blow on thelens oncemore.
Finger prints
If the lenscannot becleaned by usinga brush/blower, use a dry cotton swab.
Cleaning the Disc
When a disc becomes dirty, clean it with a cleaning cloth. Wipe the disc from the centre out.
Note
Do not use solvents such as benzine petrol, thinner, commercially available cleaners or anit-static
spray intended for analogue discs.
Should you experience difficulties in the use of this player please refer to the following chart before
contacting your dealer or theplace of purchase.
Troubleshooting Guide
Problem Points to Check
Player fails to function
No sound from Earphones
No sound when played
through an external amplifier
Intermittent Sound Dirty or defective disc
Disc may be inserted upside down
Disc not mounted correctly on chuck
Dirty or defective disc
Dirty pick up lens
Player lid not closed
Moisture/condensation. allow player to warm up to
room temperature for 60 minutes.
AC Power to adaptor switched off
Weak batteries
Auto Power off has occurred.
Earphone plug is not firmly inserted into the Green
Phones socket
Earphones have been inserted into the Black line
output socket
Connection is incorrect
Power to external amplifier not switched on
Dirty pick up lens
Player is subject to excessive vibration or shock
Low battery power
Poor Earphone connection
Page 5

6. PRODUCT SPECIFICATIONS
7. BASIC DISC PLAY
PICK-UP
System
Laser diode
Properties
Error correction
AUDIO
D/A conversion
Frequency response
No. of channels
Output level
Bass boost effect
(100HZ)
Wow and flutter
GENERAL
Power requirements
Power consumption
Dimension
Weight
Compact disc digital audio system
material: GaAIAs
Emission Duration: continuous
Laser output: <44.6 W
Cross-interleave Reed-solomon code
1-bit DAC 8 times oversampling
20-20,000Hz (+1/-3 dB)
2 channels (stereo)
+7dB.
Below measurable limits
- 2 x "AA" alkaline battery
- DC in socket accepts various AC power adaptors.
0.8W (DC 4.5V) UNDER NORMAL CONDITION
Approx. 154.5(W) x 25(H) x 141(D)mm
Approx. 212g excluded(Main Unit, batteries )
=780nmWavelength:
)
(47KrmsV0.6output:Line
)
(3220mWEarphone:
Remove the disc
Hold the edge and gently press the centre
pivot as illustrated, then pickup the disc.
1. Connect the earphones to the PHONES
(GREEN) socket.
2. Press the OPEN button to open the CD
compartment lid.
3. Adjust the VOLUME tominimum.
4. Insert the disc withthe label side facingup.
5. Push down in the centre until disc is locked
in place.
6. Close the lid gentlyuntil a click isheard.
7. Press the PLAY/PAUSE button to start
playing. To turn the power off, press the
STOP button twice.
Toemphasize the bass sound
Set the BASS BOOST switch to ON position.
Note
The bass boost performance will be
dependant on the VOLUME controlsetting.
Note
To pause playback of the CD, press the
PLAY/PAUSE button,
is playing currently flashes in the display.
resume playback, press PLAY/PAUSE again.
The track number that
To
CAUTION:
Wait for the disc to stop rotating before
pressing the OPEN button.
This unit can play 3" (8cm) single CD's
Note
without an adaptor. Do not use a CD single
adaptor for these discs.
Note
Only compact discs marked with the compact
disc logo are guaranteed to work on this
player. Home recorded discs (CDR) recorded
on home pc's may not play or operate
correctly.
Page 6

8. LOCATION OF CONTROLS
9. LCD DISPLAY INFORMATION
Hold the disc with the label side up and
press it onto the spindle until it "clicks" into
10
8
place.
Close the disc compartment, press
PLAY/PAUSE button, the disc will begin to
spin, and " " will show in the display.After
1. LCD DISPLAY
2. CD DOOR OPEN BUTTON
3. PLAY MODE BUTTON
4. PROGRAM BUTTON
5. RANDOM BUTTON
6. LINE OUT SOCKET
7. VOLUME CONTROL
5
6
7
16
9
3
4
17
12
18
8. PLAY/PAUSE / POWER ON BUTTON
9. CHARGE INDICATOR
10. CD DOOR
11. STOP / POWER OFF BUTTON
12. BACKWARD SKIP/SEARCH BUTTON
13. FORWARD SKIP/ SEARCH BUTTON
14. EARPHONE SOCKET
15. DC INPUT SOCKET
16. BATTERY COMPARTMENT
17. BASS BOOST SWITCH
18. CHARGE SWITCH
several seconds the total number of tracks
will flash for one second in the display, and
playback will begin from track 1
automatically.
Display will show " " when the Disc Lid
is opened without pressing STOP button.
If the CD compartment is not loaded
with a Disc, the display will show " ".
If the Player cannot read the disc, " "
will show in the display.
IN STOP MODE
To stop play, press the STOP/OFF button.
Total number of the tracks will appear in
the display. Press STOP/OFF button again,
power will be turned off immediately.
1315
1114
12
During PAUSE mode
The track number that is playing currently
flashes in the display.
Page 7

10. SKIP FUNCTIONS
11. PLAY MODES
Locating a particular track
To go back to the beginning of the
Press lightly and repeatedly.
current or a previous track
To go to the beginning of the following
Press lightly and repeatedly.
tracks
Locating a Particular point in a track
To go back at a high speed
To go forward at a high speed
Keep depressed
Keep depressed
Low level audio will be heard during the search process to assist in locating the correct point in the
track.
SINGLE TRACK REPEAT
Press the PLAY MODE button once during
playback or in stop mode, "REP 1"
appears in the display.
This plays the current track over and over
until you press STOP button.
ALL TRACKS REPEAT
Press the PLAY MODE button twice
during playback or in stop mode,
"REP ALL" shows in the display.
All tracks will be repeated until the STOP
button is pressed.
INTROSCAN PLAY
Press the PLAY MODE button three times
in stop mode or during playback, then
press the PLAY/PAUSE button.
The first 10 seconds of each track on the
disc will be played.
RANDOM PLAY
Press the RANDOM button in stop mode
or during playback, then press
PLAY/PAUSE button.
All tracks on the disc will be played in
random order by the player, then the unit
will shut down automatically.
PLAY MODE
PLAY MODE
PLAY MODE
RANDOM
REP 1
X1
REP ALL
X2
X3
X1
INTRO
RND
STOP
STOP
STOP
STOP
NOTE: In normal mode none of the above symbols show in the display.
NORMAL PLAYBACK
Play the whole disc
PLAY/PAUSE
X1
Page 8

12. PROGRAMMED TRACK PLAY
IMPORTANT NOTES
PROGRAMME
This allows selected tracks on the disc to be played in any desired order. (Up to 24 tracks
can be programmed.)
To set the programmed play
Aprogramme can be set inthe STOP mode or in normalplay mode.
Press the PROGRAM button during play or in stop mode,
the display shows " " and " " flashing.
Press the BACK or Forward SEARCH/SKIP button to
select the first track to be programmed.
Press the PROGRAM button. The first track number is now
stored into memory. And the Display changes to " "
waiting for the next selection.
Repeat steps 2 and 3 to programme additional tracks.
Note: The programme can be reviewed by pressing the
SKIP/SEARCH buttons and can be altered by
repeating steps 2 and 3.
After programming is finished, press the PLAY/PAUSE
button.
PROG
=
" " will stop flashing in the display and
programmed play begins from the first programmed
track.
=
The player stops automatically after all programmed
tracks have been played. The programmed tracks are
stored in memory unless the disc compartment is
opened, or power is turned off.
PROG
0I
02
PROG
PROG
PROG
PROG
Your hearing is very important to you and to us so please take care when operating this
equipment. It is strongly recommended that you follow the listed guidelines in order to prevent
possible damage or loss of hearing.
ESTABLISH A SAFE SOUND LEVEL
Over time your hearing will adapt to continuous loud sounds and will give the impression
i
that the volume has in fact been reduced. What seems normal to you may in fact be harmful.
To guard against this set the volume at a low level.
Slowly increase the level until you can hear comfortably and clearly and without distortion.
i
Damage to your hearing is accumulative and is irreversible.
i
Any ringing or discomfort in the ears indicates the volume is too loud.
i
once you have established a comfortable listening level,
LEVEL FURTHER.
The following list of typical sound levels may assist you in recognizing just how loud you have
set the volume level.
DECIBEL
Level dB Example
30dB Quiet library, soft whisper
40 Living room, fridge freezer bedroom away from traffic.
50 Normal conversation, quiet office, light traffic.
60 Electric sewing machine.
70 Vacuum cleaner, hair dryer, noisy restaurant.
THE FOLLOWING NOISE CAN BE HARMFUL UNDER CONSTANT EXPOSURE
80dB Average city traffic, alarm clock buzzer at 2 feet, food mixer.
90dB Motorcycle, heavy goods vehicle, petrol lawn mower.
100 Pneumatic drill, chain saw, garbage truck,
120 Rock band concert, thunderclap.
BEFORE YOUR HEARING ADAPTS
DO NOT INCREASE THE SOUND
discotec / night-club.
PERMANENT LOSS OF HEARING
140 THRESHOLD OF PAIN Gunshot 2 feet away.
180 Rocket Launching pad.
 Loading...