

Goodman PD1424060M41A, PD1430080M41A, PD1436080M41AA, PD1442100M41A, PD1448100M41A User Manual
...Page 1

Service Instructions
*PD14
14 SEER 81% AFUE Dual Fuel Package Units
with R-410A Refrigerant
& Accessories
This Forced Air Central Unit Design Complies With
Requirements Embodied in The American National
Standard / National Standard of Canada Shown
Below.
ANSI Z21.47•CSA-2.3 Central Furnaces
This manual is to be used by qualified, professionally trained HVAC technicians only. Goodman does not assume
any responsibility for property damage or personal injury due to improper service procedures or services
performed by an unqualified person.
is a registered trademark of Maytag Corporation or its related companies
and is used under license. All rights reserved.
Copyright © 2015 Goodman Company, L.P.
RS6313001r1
December 2015
Page 2
TABLE OF CONTENTS
IMPORTANT INFORMATION ................................. 2 - 3
PRODUCTION IDENTIFICATION............................ 4 - 5
LIGHTING INSTRUCTIONS ......................................... 6
ACCESSORIES................................................... 7 - 12
PRODUCT DESIGN ........................................... 13 - 19
SYSTEM OPERATION ...................................... 20 - 25
SCHEDULED MAINTENANCE........................... 26 - 27
TROUBLESHOOTING CHARTS ......................... 29 - 30
SERVICING TABLE OF CONTENTS ........................ 31
SERVICING ...................................................... 32 - 58
BLOWER PERFORMANCE DATA .................... 59 - 61
WIRING DIAGRAMS.......................................... 62 - 63
ACCESSORIES WIRING DIAGRAM......................... 64
IMPORTANT INFORMATION
Pride and workmanship go into every product to provide our customers with quality products. It is possible, however, that
during its lifetime a product may require service. Products should be serviced only by a qualified service technician who is
familiar with the safety procedures required in the repair and who is equipped with the proper tools, parts, testing instruments
and the appropriate service manual. REVIEW ALL SERVICE INFORMATION IN THE APPROPRIATE SERVICE MANUAL
BEFORE BEGINNING REPAIRS.
IMPORTANT NOTICES FOR CONSUMERS AND SERVICERS
RECOGNIZE SAFETY SYMBOLS, WORDS AND LABELS
WARNING
This unit should not be connected to, or used in conjunction with, any devices that are not design certified for use with
this unit or have not been tested and approved by Goodman. Serious property damage or personal injury, reduced unit
performance and/or hazardous conditions may result from the use of devices that have not been approved or certified by
Goodman.
NLY PERSONNEL THAT HAVE BEEN TRAINED TO INSTALL, ADJUST
SERVICE OR REPAIR (HEREINAFTER
THIS MANUAL SHOULD SERVICE THE EQUIPMENT
JURISDICTIONS THAT REQUIRE ONE OR MORE LICENSES TO SERVICE
THE EQUIPMENT SPECIFIED IN THIS MANUAL, ONLY LICENSED
PERSONNEL SHOULD SERVICE THE EQUIPMENT
INSTALLATION, ADJUSTMENT, SERVICING OR REPAIR OF THE
EQUIPMENT SPECIFIED IN THIS MANUAL, OR ATTEMPTING TO INSTALL
ADJUST, SERVICE OR REPAIR THE EQUIPMENT SPECIFIED IN THIS
MANUAL WITHOUT PROPER TRAINING MAY RESULT IN PRODUCT
DAMAGE, PROPERTY DAMAGE, PERSONAL INJURY OR DEATH
, “
SERVICE
”)
THE EQUIPMENT IN
. IN
ADDITION, IN
. I
MPROPER
HIGH VOLTAGE!
Disconnect ALL power before servicing or installing this unit. Multiple power sources
may be present. Failure to do so may cause pro perty damage, personal injury or death.
To locate an authorized servicer, please consult your telephone book or the dealer from whom you purchased this
product. For further assistance, please contact:
GOODMAN® BRAND PRODUCTS
TOLL FREE
1-877-254-4729 (U.S. only)
email us at: customerservice@goodmanmfg.com
fax us at: (713) 856-1821
(Not a technical assistance line for dealers.)
(Not a technical assistance line for dealers.) Your telephone company will bill you for the call.
Outside the U.S., call 1-713-861-2500.
2
,
Do not store com bustible materials or use gasoline
or other flammable liquids or vapors in the vicinity
of this appliance as property damage or personal
injury could occur. Have your contractor point out
and identify the various cut-off devices, switches,
etc., that serves your co mfort equipment.
,
.
AMANA® BRAND PRODUCTS
TOLL FREE
1-877-254-4729 (U.S. only)
email us at: customerservice@goodmanmfg.com
fax us at: (713) 856-1821
(Not a technical assistance line for dealers.)
O
WARNING
Page 3

IMPORTANT INFORMATION
SAFE REFRIGERANT HANDLING
While these items will not cover every conceivable situation, they should serve as a useful guide.
WARNING
Refrigerants are heavier than air. They can "push out"
the oxygen in your lungs or in any enclosed space.To
avoid possible difficulty in breathing or death:
•
Never purge refrigerant into an enclosed room or
space. By law, all refrigerants must be reclaimed.
•
If an indoor leak is suspected, thoroughly ventilate
the area before beginning work.
• Liquid refrigerant can be very cold. To avoid possible
frostbite or blindness, avoid contact with refrigerant
and wear gloves and goggles. If liquid refrigerant
does contact your skin or eyes, seek medical help
immediately.
• Always follow EPA regulations. Never burn refrig erant, as poisonous gas will be produced.
WARNING
To avoid possible injury, explosion or death, practice
safe handling of re frige rants.
WARNING
The compressor POE oil for R-410A units is
extremely susceptible to moisture absorption and
could cause compressor failure. Do not leave system
open to atmosphere any longer than necessary
for installation.
WARNING
To avoid pos sible exp los ion:
•
Never apply flame or steam to a refrigerant cylinder.
If you must heat a cylinder for faster charging,
partially immers e it in wa rm w ate r.
•
Never fill a cylin de r m ore than 80% fu ll of liqu id
refrigerant.
• Never add anything other than R-22 to an R-22 cylinder
or R-410A to an R-410A cylinder. The service equipment
used must be listed or certified for the type of
refrigerant used.
• Store cylinders in a cool, dry place. Never use a
cylinder as a plat form or a roller.
WARNING
To avoid possible explos ion, use only returnable (not
disposable) service cylinders when removing refrigerant f rom a syst em.
• Ensure the cylinder is free of damage which could
lead to a leak or explosion.
• Ensure the hydrostatic test date does not exceed
5 years.
• Ensure the pressure rating meets or exceeds 400
lbs.
When in doubt, do not use cylinder.
WARNING
System contamina nts, improper se rvice procedure
and/or physical abuse affecting hermetic com pressor
electrical terminals may cause dangerous s ystem
venting.
The successful development of hermetically sealed refrigeration compressors has completely sealed the compressor's
moving parts and electric motor inside a common housing,
minimizing refrigerant leaks and the hazards sometimes
associated with moving belts, pulleys or couplings.
Fundamental to the design of hermetic compressors is a
method whereby electrical current is transmitted to the
compressor motor through terminal conductors which pass
through the compressor housing wall. These terminals are
sealed in a dielectric material which insulates them from the
housing and maintains the pressure tight integrity of the
hermetic compressor. The terminals and their dielectric
embedment are strongly constructed, but are vulnerable to
careless compressor installation or maintenance procedures and equally vulnerable to internal electrical short
circuits caused by excessive system contaminants.
In either of these instances, an electrical short between the
terminal and the compressor housing may result in the loss
of integrity between the terminal and its dielectric embedment. This loss may cause the terminals to be expelled,
thereby venting the vaporous and liquid contents of the
compressor housing and system.
A venting compressor terminal normally presents no danger
to anyone, providing the terminal protective cover is properly
in place.
If, however, the terminal protective cover is not properly in
place, a venting terminal may discharge a combination of
(a) hot lubricating oil and refrigerant
(b) flammable mixture (if system is contaminated
with air)
in a stream of spray which may be dangerous to anyone in the
vicinity. Death or serious bodily injury could occur.
Under no circumstances is a hermetic compressor to be
electrically energized and/or operated without having the
terminal protective cover properly in place.
See Service Section S-17 for proper servicing.
3
Page 4
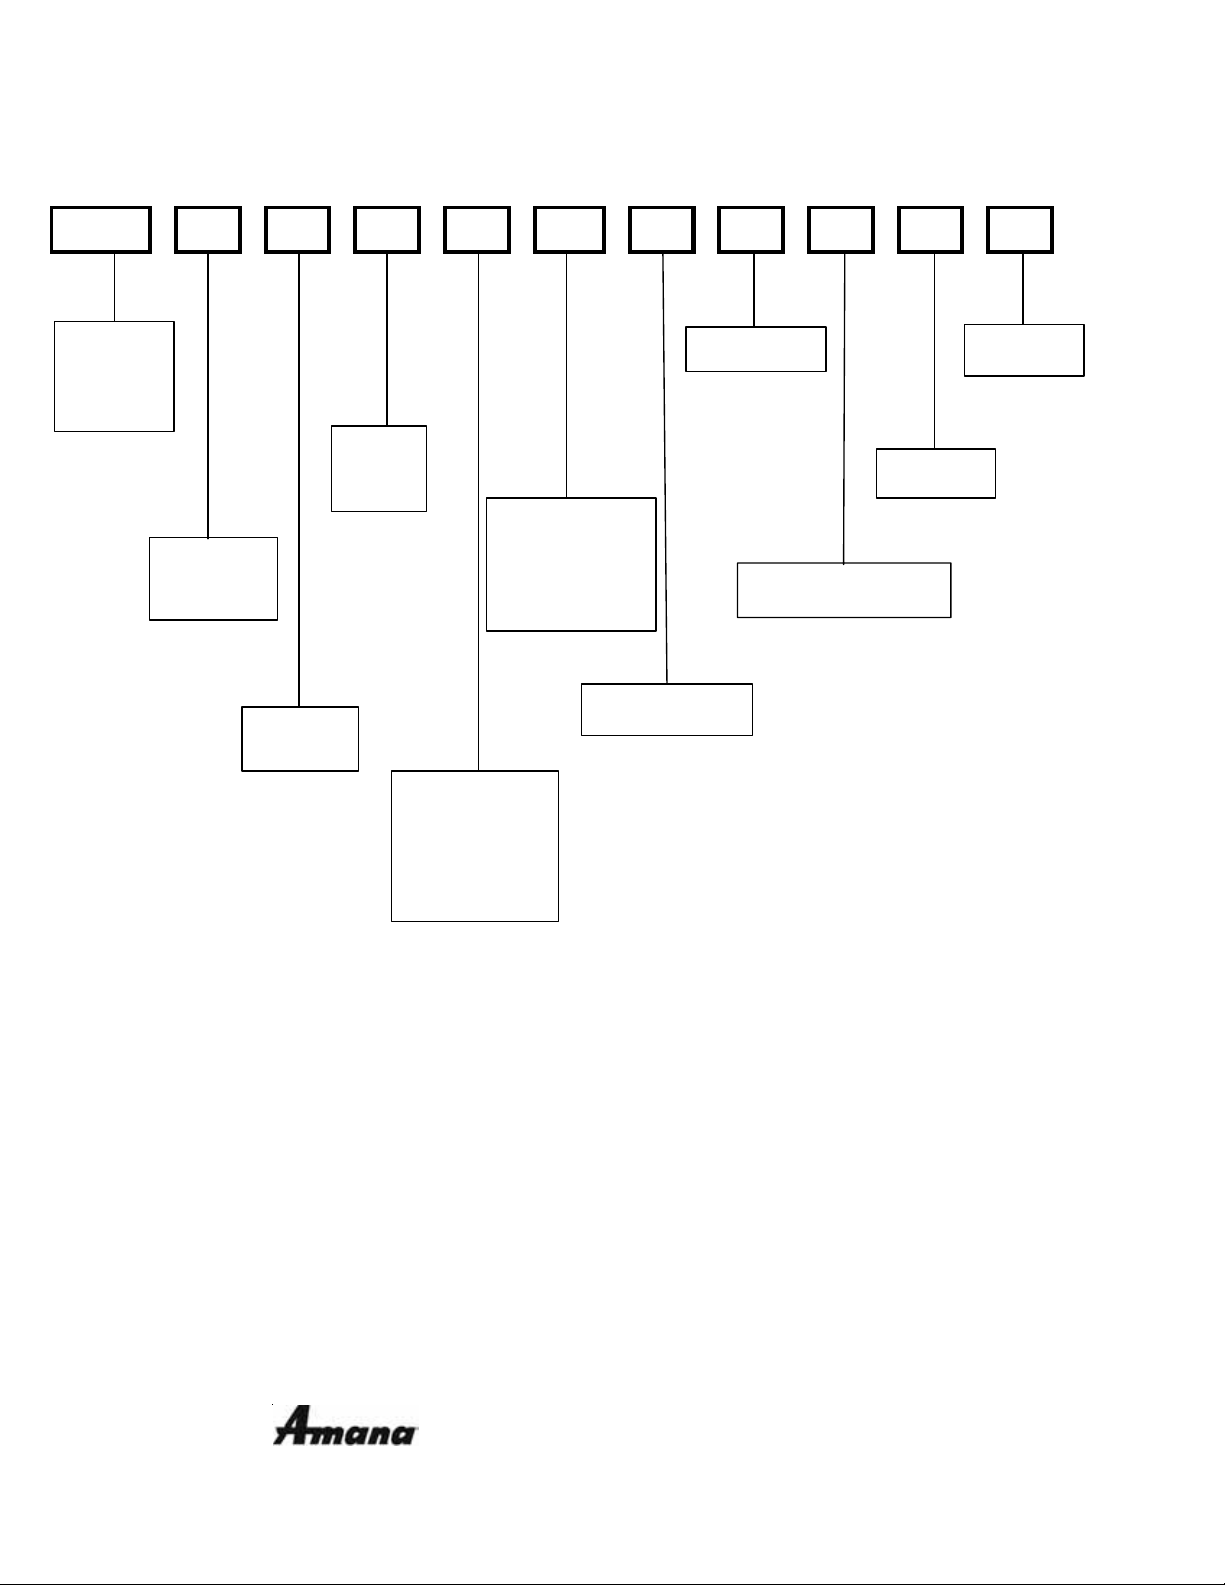
PRODUCT IDENTIFICATION
The model number is used for positive identification of component parts used in manufacturing. Please use this number when
requesting service or parts information.
P D 14 24 070 M 4 1 * *G / A
BRAND:
G: Goodman
Brand
A: Ama n a
®
Brand
®
PRODUCT
TYPE:
Sing le Pa ckag e
Cooling/Heating
D: Dual Fuel
PRODUCT
FAMILY:
PRODUCT
SERIES:
SEER
Rating
24: 24,000 BT U H
30: 30,000 BT U H
36: 36,000 BT U H
42: 42,000 BT U H
48: 48,000 BT U H
HEATI NG I NPUT
060: 60,000 BTUH
070: 69,000 BTUH
080: 80,000 BTUH
090: 92,000 BTUH
100: 100,000 BTUH
115: 115,000 BTUH
NOMINAL
CAPACITY:
REFRIGERANT:
4: R-410A
CONFIGURATION:
M: Multi Position
MINOR
REVISION:
MAJOR
REVISION:
VOLTAGE:
1: 208-230V/1ph/60Hz
is a registered trademark of Maytag Corporation or its related companies
and is used under license. All rights reserved.
These units have R410A refrigerant.
4
Page 5
PRODUCT IDENTIFICATION
Single Phase Dual Fuel Package Units
Model # Description
*PD1424060M41A*
*PD1430080M41A*
*PD1436080M41AA
*PD1442100M41A*
*PD1448100M41A*
*PD1436080M41AB
mana® B rand/Goodman® Brand Pac k age Dual Fuel units, 14 SEER
A
wit h R4 10A. Initial re l ease of 81% A F UE model s.
mana® B rand/Goodman® Brand Pac k age Dual Fuel units, 14 SEER
A
with R410A. Compressor change.
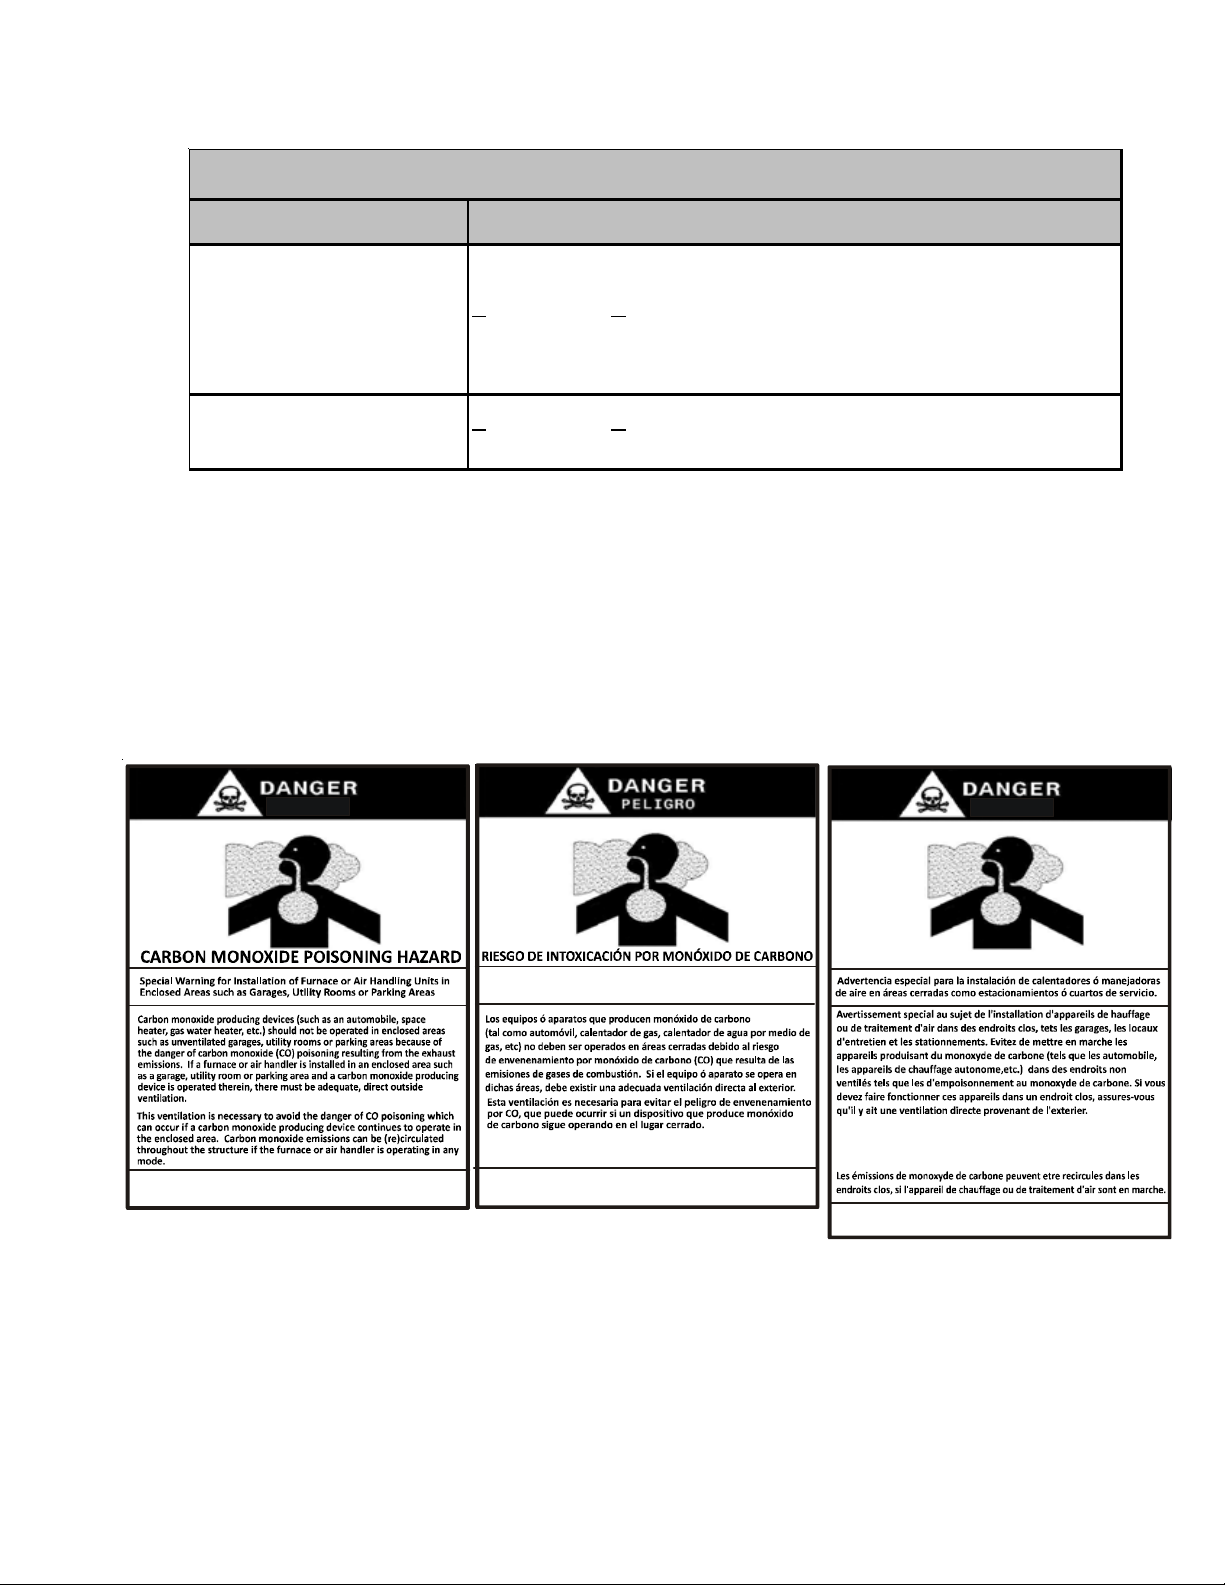
CO can cause serious illness including permanent brain
damage or death.
B10259-216
Advertencia especial para la instalación de calentadores ó manejadoras
de air e e n áreas cerra das como es tacionamientos ó cuarto s de servic io.
Las emisiones de monóxido de carbono puede n circular a través
del aparato cuando se opera en cualquier modo.
El monóxido de carbono puede causar enfermedades severas
como daño cerebral permanente ó muerte.
B10259-216
These units have R410A refrigerant
RISQUE D'EMPOISONNE MENT AU
Cett e ven t i l a t i o n es t nécessa ir e pour év iter le danger d'in t o xicat i on
au CO pouvant survenir si un appareil produisant du monoxyde
de carbone continue de fonctionner au sein de la zone confinée.
Le monoxyde de
des
dommages permanents au cerveau et meme la mort.
carbone peut causer des maladies graves telles que
MONOXYDE DE CARBONE
B10259-216
5
Page 6
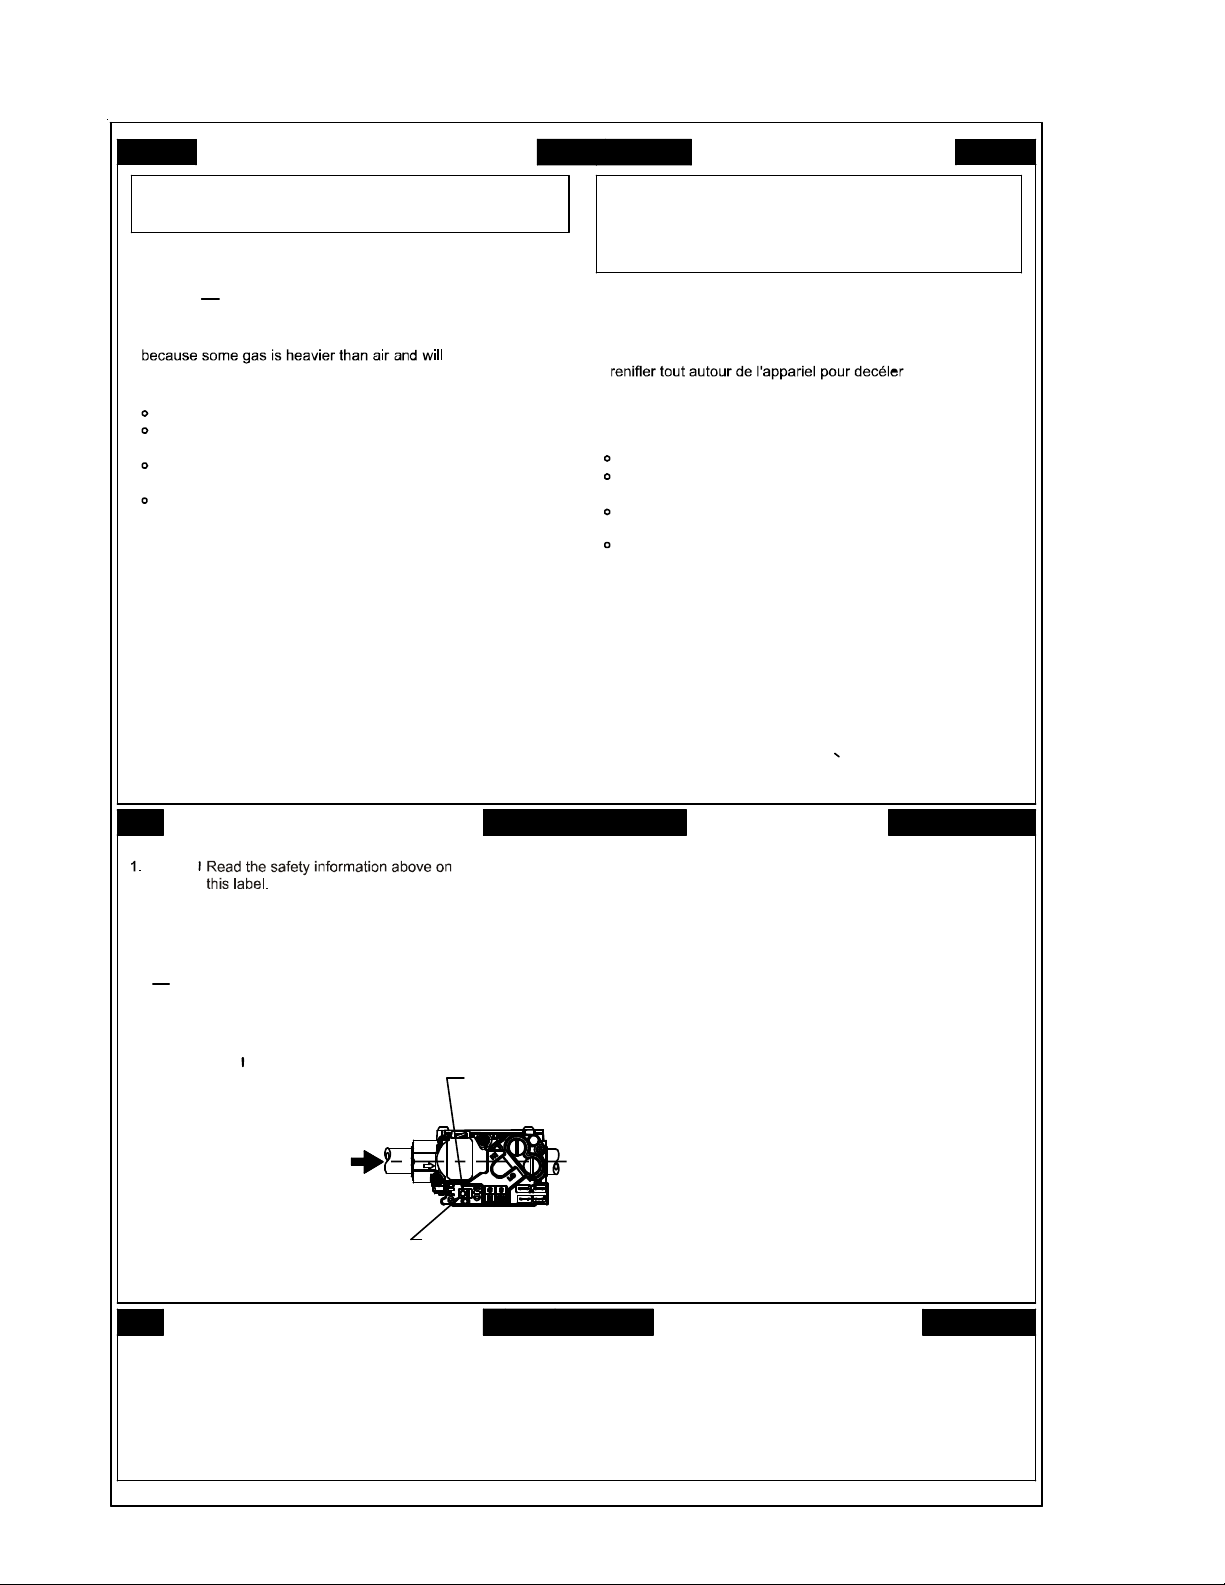
LIGHTING INSTRUCTIONS *PD14**M1AA
g
FOR YOUR SAFETY
READ BEFORE OPERATING
If you do not follow these instructions
WARNING:
explosion may result causing propertyexactly,a fire or
damage, personal injury or
loss of life.
A. This appliance does not have a pilot. It is equipped
with an ignition device which automatically lights
to light the burner by hand.
the burner. Do not try
B. smell all around the appliance
BEFORE OPERATING
area for gas. Be sure to smell next to the floor
settle on the floor.
WHAT TO DO IF YOU SMELL GAS
Do not try to light any appliance.
Do not touch any electric switch;
do not use any phone in your building.
Immediately call your gas supplier from a neighbor's
phone. Follow the gas supplier's instructions.
If you cannot reach your gas supplier,
call the fire department.
C. Use only your hand to push in or turn the gas control lever.
Never use tools. If the lever will not pu sh in or turn by
hand, don't try to repair it, call a qualified service
technician. Force or attempted repair may result in a fire
or exp lo s ion.
D. Do not use this appliance if any part has been underwater.
Immediately c a ll a qualified service technician to inspect
the appliance and to replace any part of the control
system and any gas control which has been underwater.
LIRE AVANT DE METTRE
EN MARCHELIRE
AV ERTISSEMENT:
la lettre les instructions dans le presént manuel
risque de déclencher un incendie ou une explosion
entraînant des dom m a ges maté riels, de s le s ions
corporelles ou la perte de vies humaines.
Cet appareil ne comporte pas de veilleuse. Il est
A.
muni d'un dispositif d'allumage qui allume
autom atiquement le br û l eu r. N e pas tenter
d'allumer le brûleur manuellement.
Quiconque ne respecte pas à
B. AVANT DE LE FAIRE FONCTIONNER,
une odeur de gaz. Renifler prés du plancher, car
certains gaz sont plus lourds que l'air et
peuvent s'accumuler au niveau du sol.
QUE FAIRE S'IL Y A UNE ODEUR DE GAZ
Ne pas tenter d'allumer d'appareils.
Ne toucher à aucun interrupteur; ne pas vous servir
des téléphones dans le bâtiment.
Appelez immédiatement votre fournisseur de gaz depuis
un voisin. Suivez les instructions du fournisseur de gaz
Si vous ne pouvez rejoindre le fournisseur de gaz,
appelez le service des incendies.»
C. Ne pousser ou tourner la manette d'admission du gaz
qu'à la main. Ne jamais emploer d'outil à cette fin.
Si la manette reste coincée, ne tenter pas de la
réparer; appelez un technicien qualifié. Quiconque
tente de forcer la manette ou de la réparer peut
provoquer une explosion ou un incendie . »
D. Ne pas se servir de cet appareil s'il a été plongé dans
l'eau, même partiellement. Faire inspecter l'appareil
par un technicien qualifié et remplacer toutr partie du
systéme de contrôle et toute commande qui ont été
plongées dans l'eau.»
OPERATING INSTRUCTIONS
STOP .
2. Set the thermostat to lowest setting.
3. Turn off all electric power to the appliance.
4. This appliance is equipped with an ignition
device which automatically lights the burner.
Do not try to light the burner by hand.
5. Push the gas control lever to Position.
Do not force .
6. Wait five (5) minutes to clear out any gas. Then
smell for gas, including near the floor. If you
then smell gas, Follow
in the safety. information above
on thi s label if you don't smell
gas, go to next step.
7. Push gas control lever
to
"ON".
8. Replace access panel.
9. Turn on all electric
power to the appliance.
10. Set thermostat to desired setting.
11. If the appliance will not operate,
follow the instructions "To Turn
Off Gas To Appliance" and call your
service technician or gas company.
STOP. "B"
"OFF"
GAS
INLET
ARRIVEE
DU GAZ
MANUAL GAS
LEVER SH OW N
IN "ON" POS
TO TURN OFF GAS TO APPLIANCE
1. Set the thermostat to lowest setting.
2. Turn off all electric power to the appliance
if service is to be performed.
3. Push the gas control lever to Position.
"OFF"
Do not force.
4. Replace control access panel.
ROBINET A GAZ
MANUEL , EN PO S
"ON/MARCHE"
MISE EN MA RCHE
ARRÊTEZ
1. Lisez les instructions de sécurité dans la
section supérieure de cette étiquette.
.
2. Régler le thermostat à la température la plus basse.
3. Couper l'alimentation électrique de l'appareil.
4. Cet appareil menager etant dote d'un systeme
d'allu m a ge automatique , ne pas essa y e r à
allumer le brûleur manuellement.
5. Pousse le levier du contrÔle du gaz a
position.
6. Attendre cinq (5) minutes pour laisser echapper tout le
az. Renifler tout autour de l'appareil, y compris prés du
plancher, pour déceler une odeur de gaz. Si c'est le cas,
Passer à l'etape B des instructions de securite
ARRÊTEZ.
sur la portion superieure de cette etiquette.
S'il n'y a pas d'odeur de gaz, passer à l'etàpe suivante.
7. Pousse le levier du contrôle du gaz à
posi tion.
8. Remettre en place le panneau d'accés.
9. Mettre l'appareil sous tensio n.
10. Régler le thermostat à la température désirée.
11. Si l'ap p areil ne se met pas en marche , suivre les
instructions intitulées Comment couper l'admission
de gaz de l'appareil et appeler un technicien
qualifié ou le fournisseur de gaz.
"OFF/ ARRET"
"ON/MARCHE"
POUR COUPER L'ADMISSION
DE GAZ DE L'APPAREIL
1. Régler le thermostat à la température la plus bassé.
2. Couper l'alimentation électrique de l'appareil s'il
faut procéder à des operations d'entretien.
3. Pousse le levier du contrôle du gaz à
position.
"OFF/ ARRET"
Ne pas forcer.
4. Remettre en place le panneau d'accés.
0140F00000P REV D
6
Page 7
ACCESSORIES
*PD14***M ACCESSORIES
Part Nu mber De scripti o n
OTDFPKG-01 Ou tdoor Thermosta t Kit
LPM-08 Pr opane Conversion Kit for 2-stage 81% AFUE
HA-02 High Altitude Kit
PG C101/102/103 Roof Curb
PG EDJ101 /102 Downflow Economiz er * P D- M, Medium Chassis
PG EDJ103 Downf low E c onomizer, *P D - M, Lar ge Chassis
DHZE CNJ P CGHMM Horizontal E co nomizer, *PD- M, Medium Chassis
DHZE CNJ P CGHML Horizontal E co nomizer, *PD- M, Large Cha ssis
PG MDD101/ 102 Manual 25% Fresh Air Damper Downflo w Applicat i on, Medi um Chassis
PG MDD103 Manual 25% Fresh Air Damper Downflo w Applicat i on, Large Chassis
PG MDH102 Manual 25% Fresh Air Damper Horizontal Applicat ion, Med ium Chassis
PG MDH103 Manual 25% Fresh Air Damper Horizontal Applicat ion, Large Chassis
PG MDMD101/102 M otoriz ed 2 5% Fresh Air Damper Dow nflow Applicat ion , Medium Chassis
PG MDMD103 Motorized 25% Fr esh Air Downflow Applicat io n, Large Chassis
PG MDMH102 Motorized 25% Fr esh Air Damper Horizontal Applicat ion, Medi um Chassis
PG MDMH103 Motorized 25% Fr esh Air Damper Horizontal Applicat ion, Large Chassis
SQ RPG 10 1/102 Squar e to Round A dap ter w/ 16" Round Downf l ow Application, Medium Chassis
SQ RPG 10 3 Square t o Rou nd Adapter w/ 18" Round Downf l ow Application, Large Chassis
SQ RPG H10 1/102 Square t o R ound Adapt er w / 16" R ound Ho r izontal Applicat i on, Medium Chassis
SQ RPG H10 3 Squa r e to Round A dap ter w/ 18" Round Hor izontal Applicat ion, Large Chassis
PG FR101/102/ 103 Internal Filt er Rac k All Chassis
GPGHFR101-103
CDK36 Flush Mount Conc entric Duct Kit
CDK36515 Flush Mount Concentric Duct Kit w/ Filter
CDK36530 Step Down Concent r i c Du ct Kit
CDK36535 Step Down Concent r i c Du ct Kit w/ Filt er
CDK4872 Flush Mount Conc entric Duct Kit
Externa l Hor i zontal Filter Rac k for Goodman/Amana Gas/Elect r ic
& Multi- positi on P ackage U nits All Chassis
CDK4872515 Flush Mount Conc entric Duct Kit w/ Filter
CDK4872530 Step Down Conc e ntri c Duc t Kit
CDK4872535 Step Down Concent r i c Du ct Kit w/ Filt er
NOTE: Complete lineup of thermostats can be found in the Thermostat Specification Sheets.
7
Page 8
ACCESSORIES
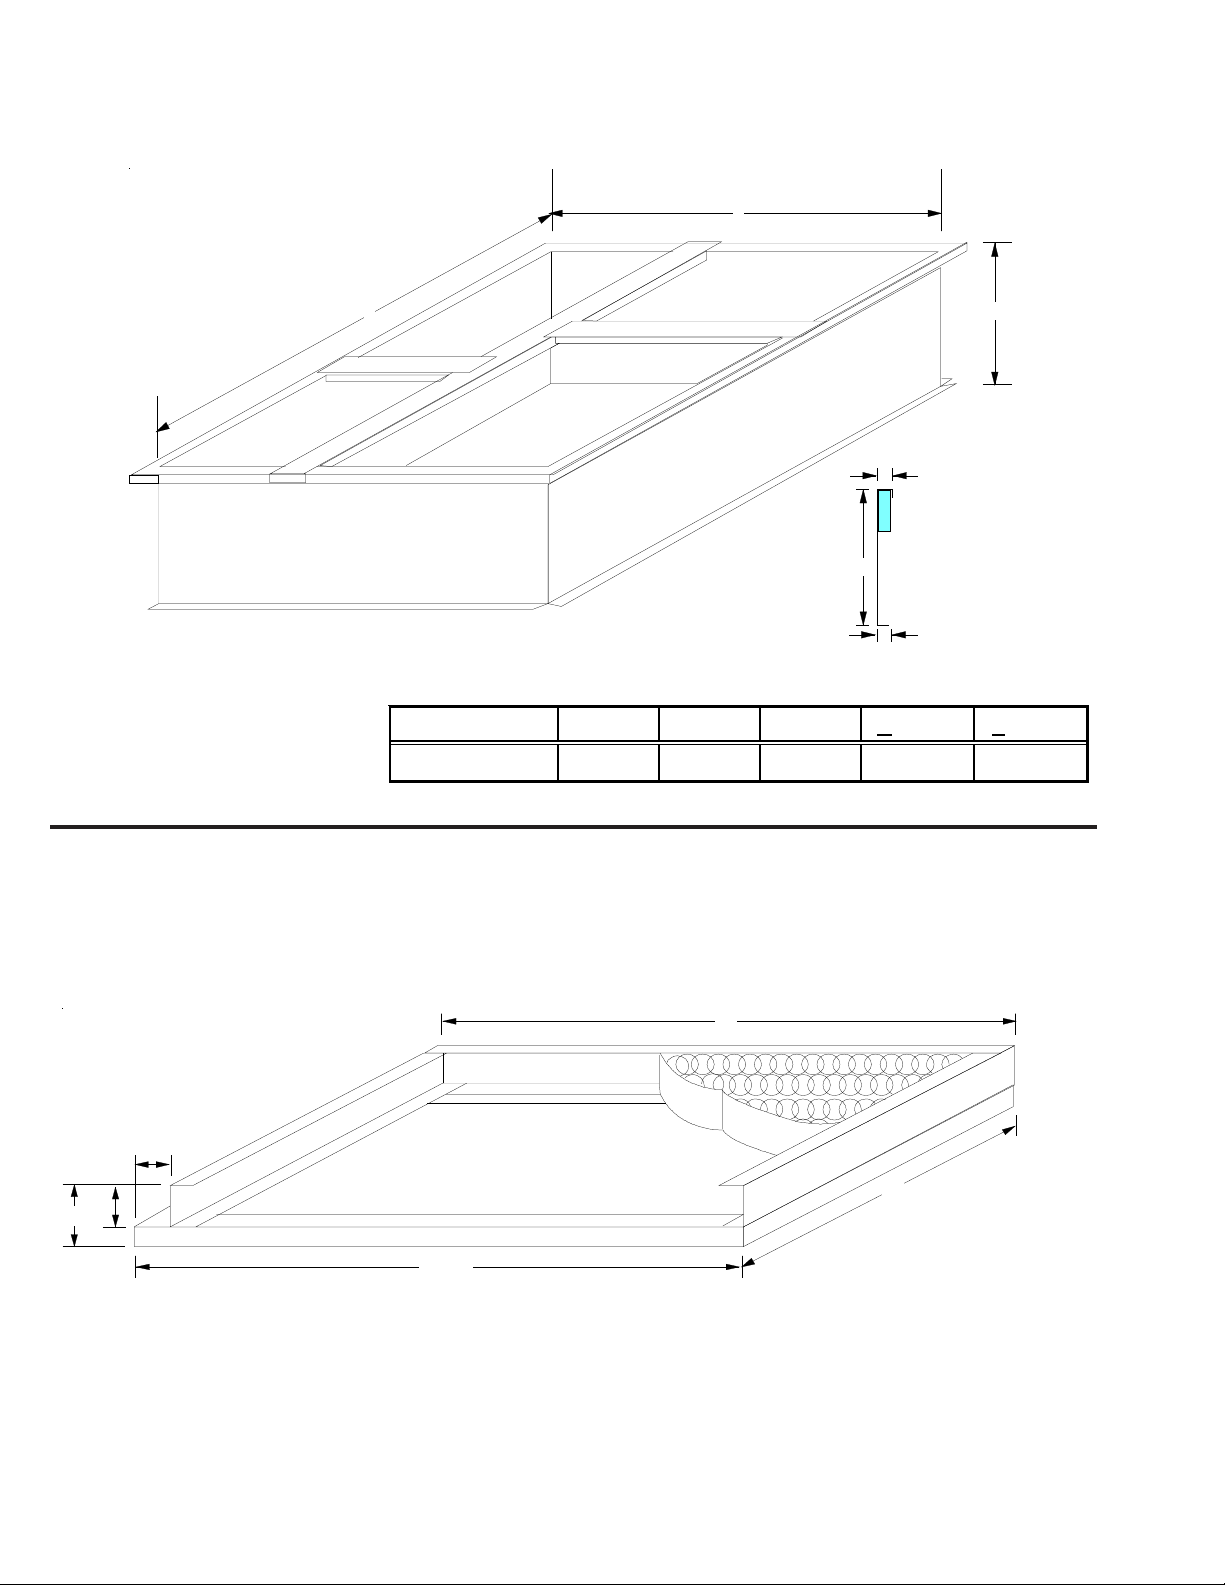
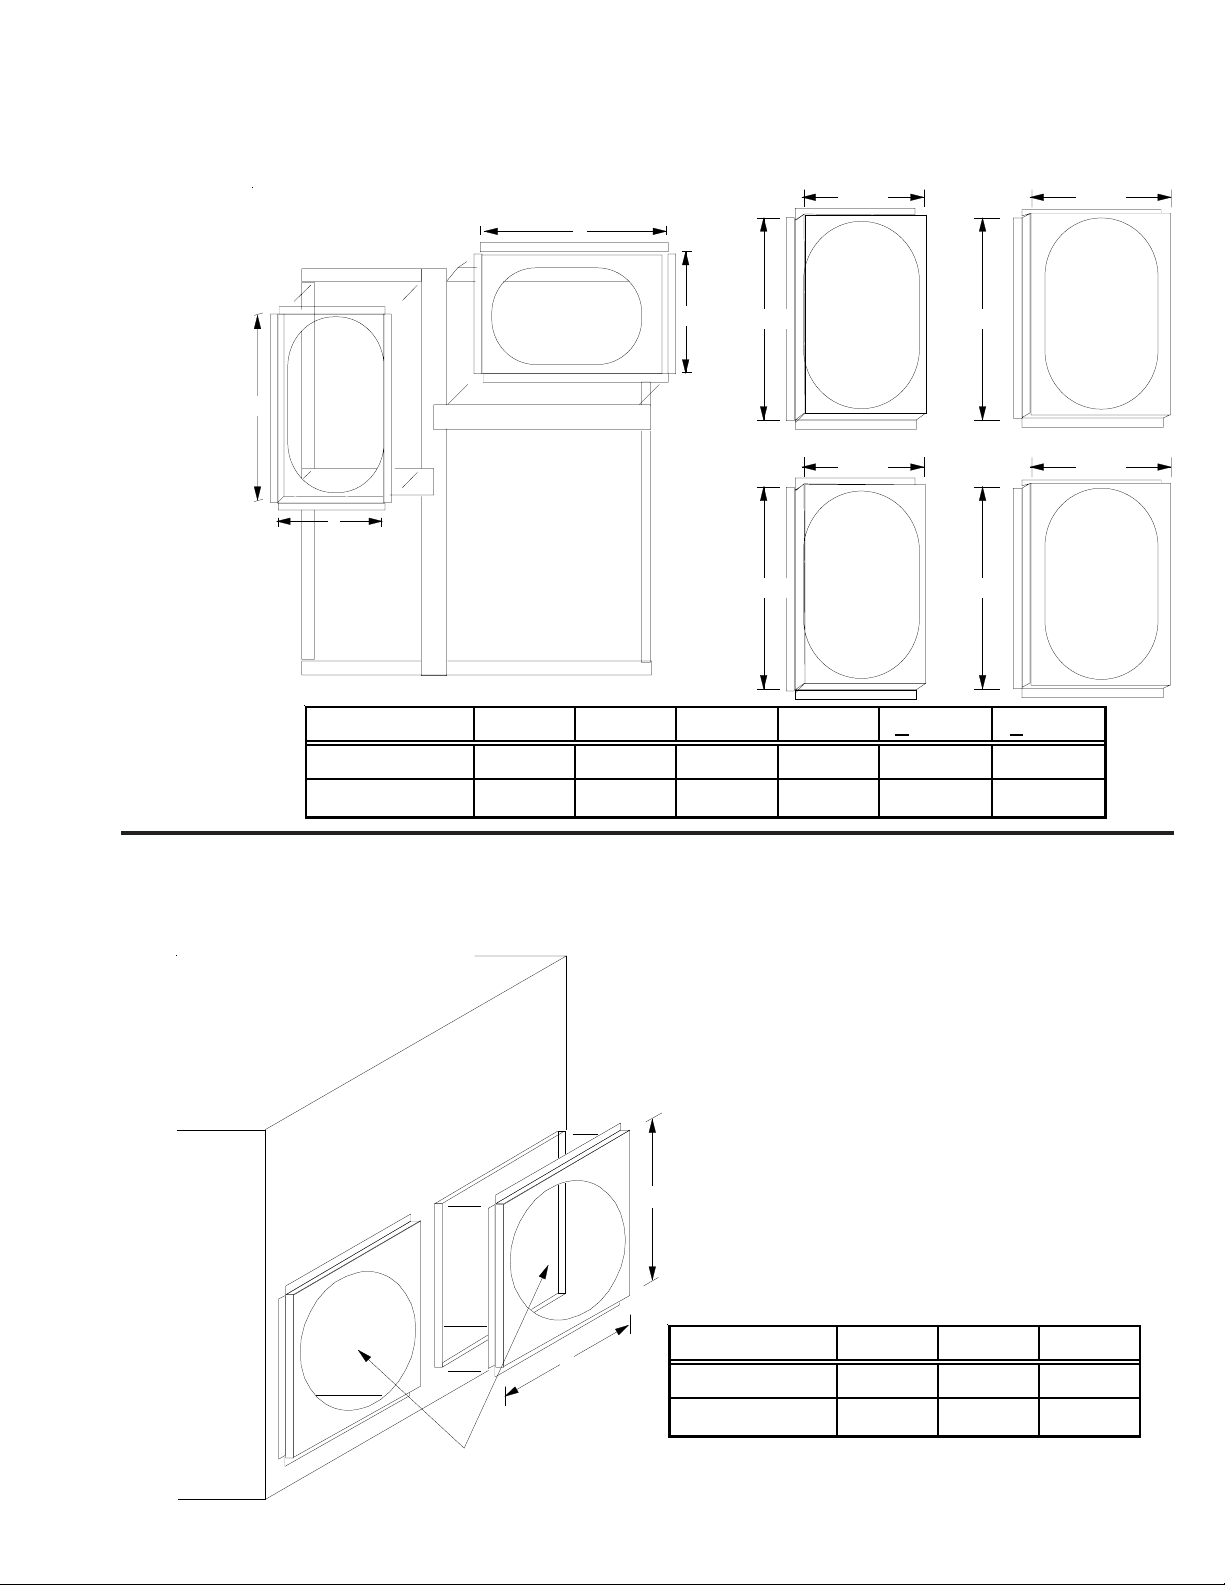
ROOF CURBS
B
A
R
S
C
1 5/8
14 1/2
1 3/8
MODEL A B C RETURN SUPPLY
PGC101/102/103 46 1/4 39 3/8 14 1/2 12 1/2 x 23 15 x 22 1/2
DOWNFLOW FILTER RACK
(PGFR101/102/103)
25
1 1/2
2
3
26 1/2
Filter Size: 14" x 25" x 2"
Measurement in inches.
14
NOTE: PGFR cannot be used with downflow economizers.
8
Page 9
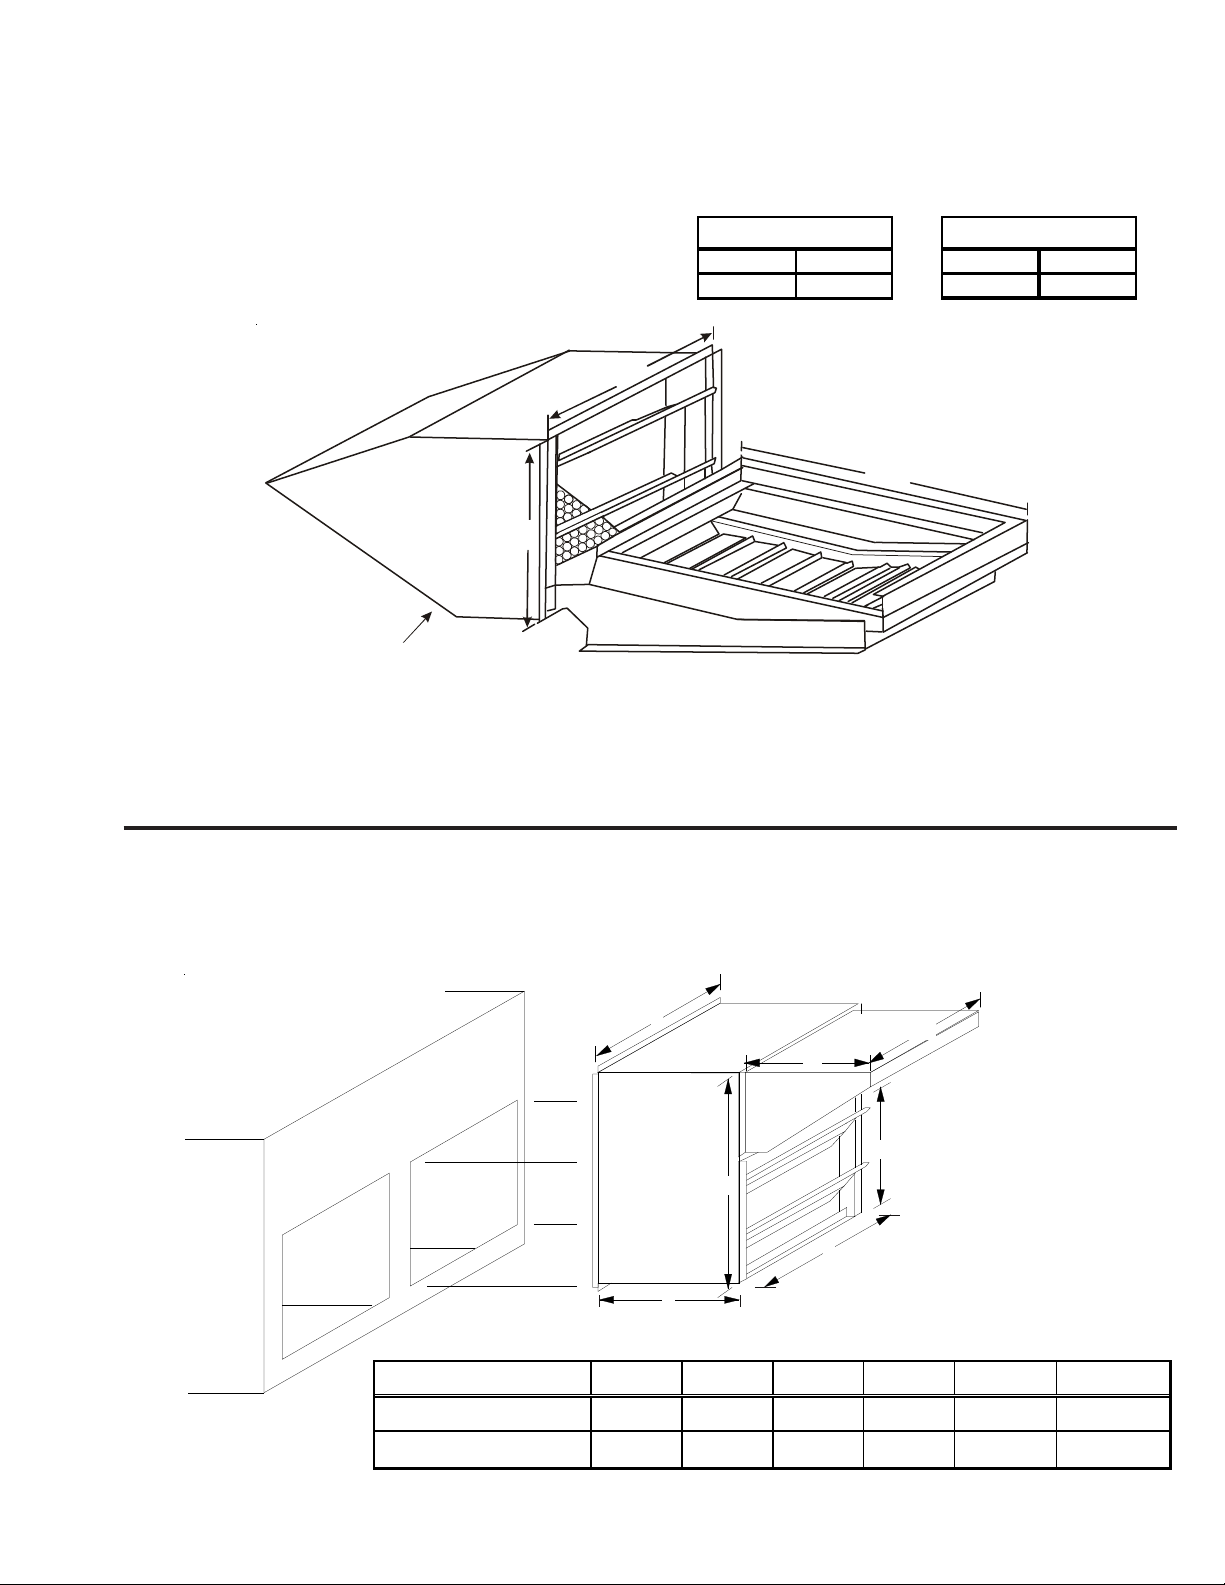
ACCESSORIES
16 X 20 x 2”
FILTER
16 X 20
MIST EL IMI NATOR
PGEDJ103
(DOWNFLOW ECONOMIZER)
PDED103PDED101/102
AB AB
16 -1/4 16 16 18
A
14 X 25 FILTER ATTACHMENT
25
B
+
ECONOMIZER
(HORIZONTAL APPLICATIONS)
B
18
A
E
C
MODEL A B C D E FILTER
DHZECNJPCGHMM 2 5 1/ 4 18 1/8 18 13 3/4 16 1/ 8 16 x 25 x 1
DHZECNJPCGHML 3 5 1/ 4 18 1/8 18 18 1/4 16 1/ 8 16 x 25 x 1
16 1/8
D
Measurement in inches.
9
Page 10
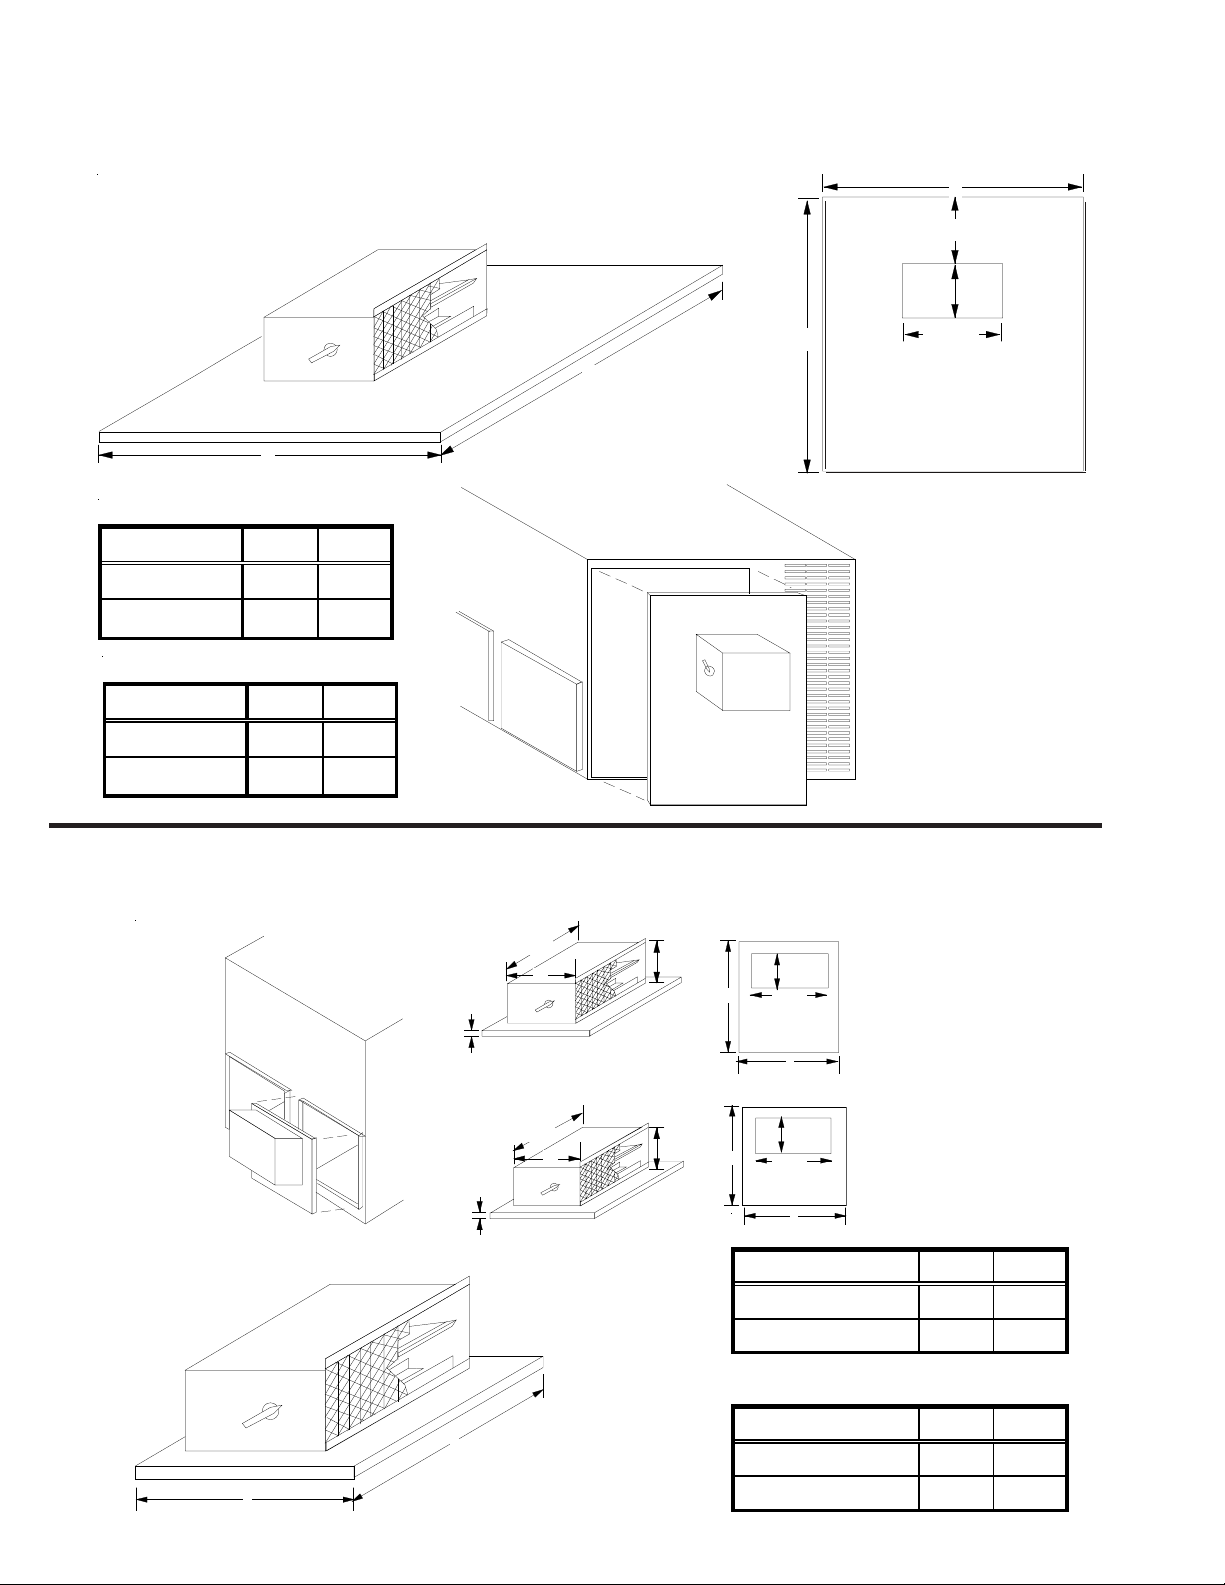
ACCESSORIES
MOTORIZED/MANUAL FRESH AIR DAMPERS -
(HORIZONTAL APPLICATIONS)
B
7 5/8
5 3/4
A
MANUAL
MODEL A B
PG MDH102 31 1/2 29 3/4
PGMD H103 30 29 3/4
MOTORIZED
MODEL A B
PGM DM H102 31 1/2 29 3/4
PGM DM H103 30 29 3/4
MOTORIZED/MANUAL FRESH AIR DAMPERS
B
(DOWNFLOW APPLICATIONS)
A
11 7/8
12 1/8
10
1
PGMDD103
12 1/8
10
1
PGMDD101/102
6
6
BOTTOM VIEW
A
11 7/8
BOTTOM VIEW
A
11 7/8
5 3/4
B
5 3/4
B
MANUAL
MODEL A B
PGMDD101/102 16 16
PGMDD103 18 16
MOTORIZED
MODEL A B
B
PGMDMD101/102 16 16
A
PGMDMD103 18 16
10
Page 11
ACCESSORIES
A
SQUARE TO ROUND CONVERTER
(DOWNFLOW APPLICATIONS)
12 1/4 14 3/4
C
D
S
R
B
MODEL A B C D RETURN SUPPLY
SQRPG101/102 22 3/4 12 1/4 22 1/4 14 3/4 16 16
SQRPG103 22 3/4 12 1/4 22 1/4 14 3/4 18 18
22 3/4 22 1/4
22 3/4 22 1/4
16 ø 16 ø
12 1/4 14 3/4
18 ø 18 ø
SQUARE TO ROUND CONVERTER
(HORIZONTAL APPLICATIONS)
B
C
A
MODEL A B C
SQRPG101/102 16 16 1/2 16 1/2
SQRPG103 18 18 1/2 18 1/2
Measurements are in inches.
11
Page 12
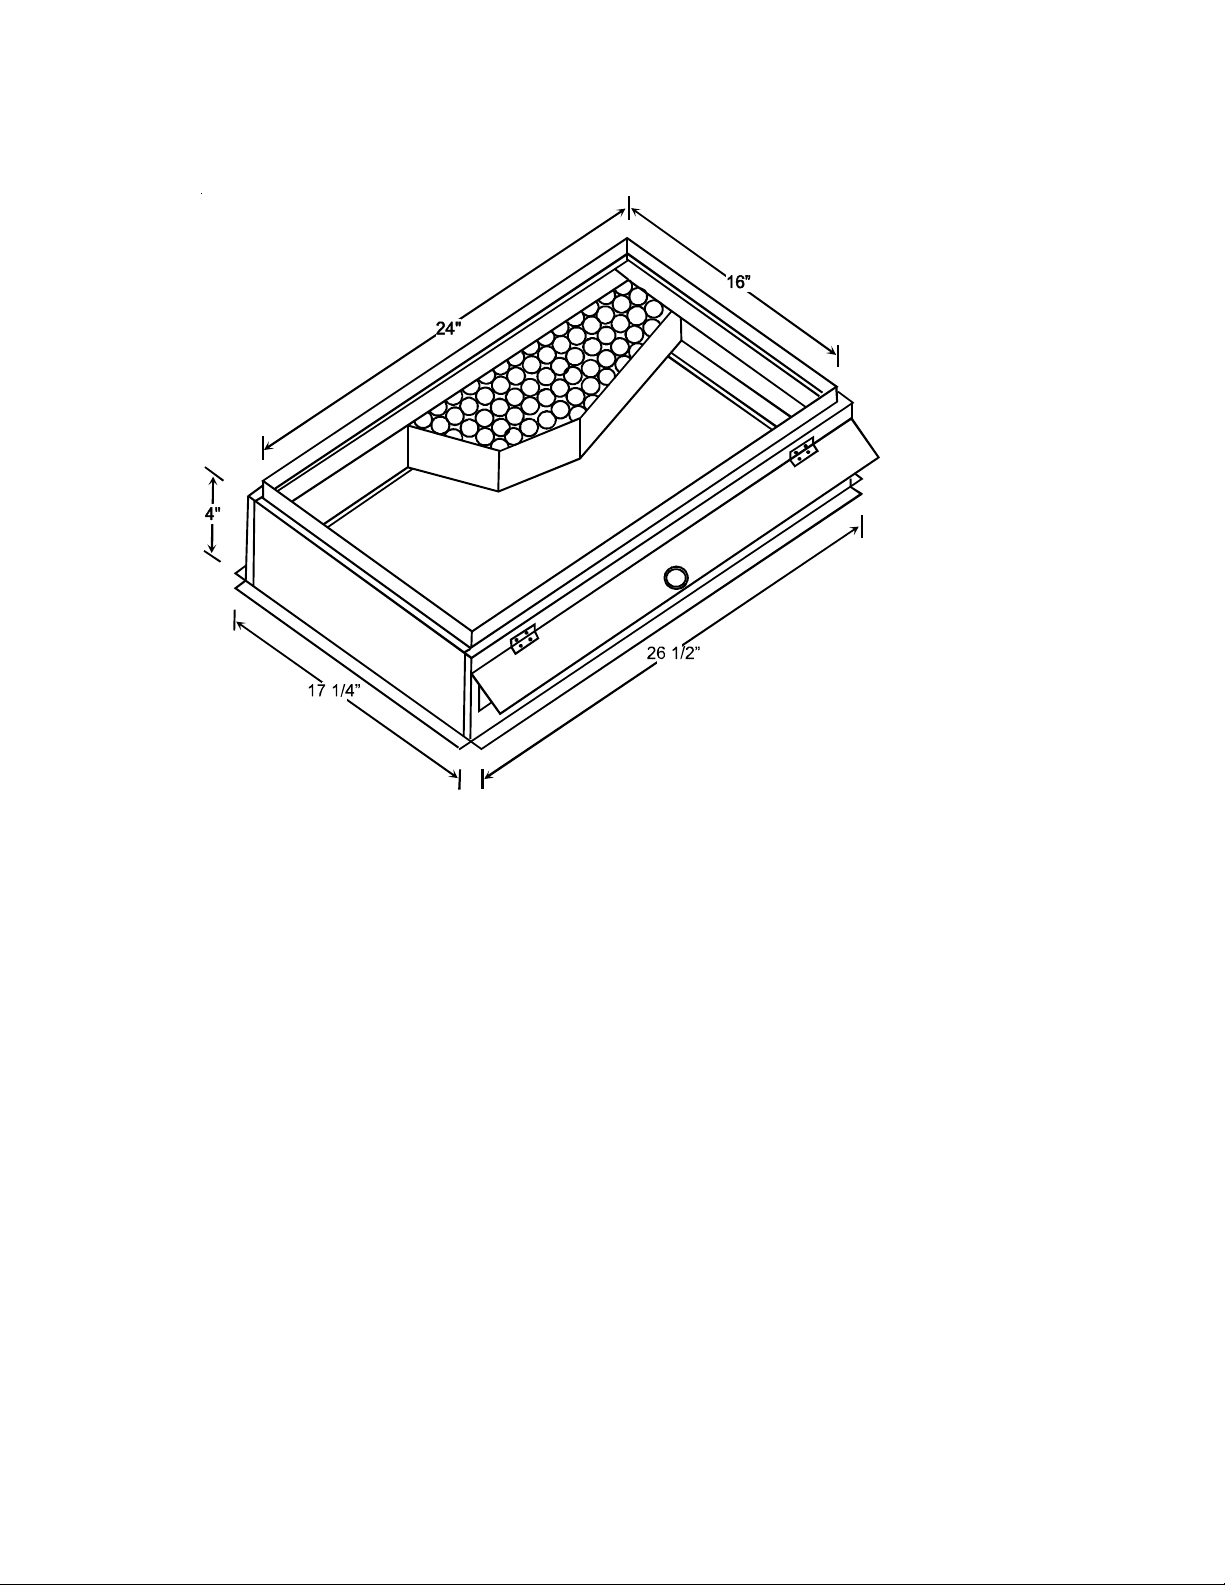
ACCESSORIES
GPGHFR101-103
(EXTERNAL HORIZONTAL FILTER RACK)
16” x 25" x 2" FILTER
12
Page 13
PRODUCT DESIGN
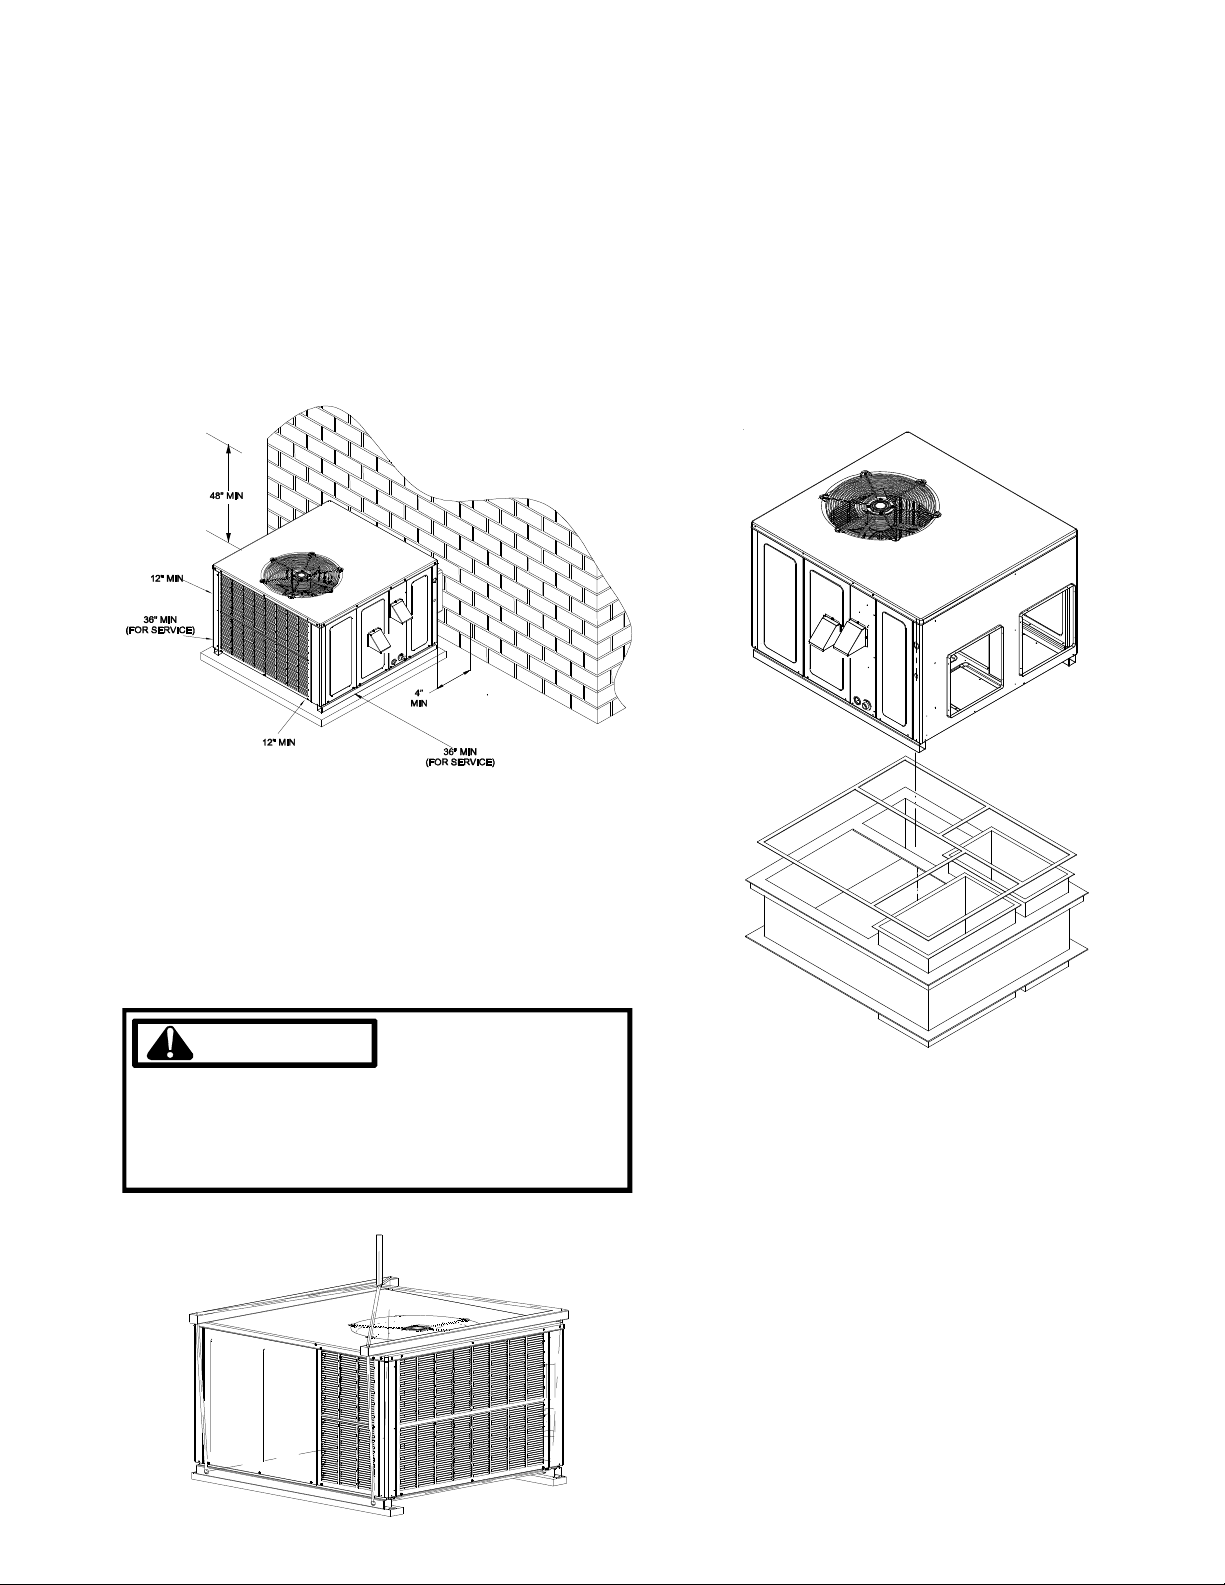
Locations and Clearances
NOTE: To ensure proper condensate drainage, unit must be
installed in a level position.
In installations where the unit is installed above ground level
and not serviceable from the ground (Example: Roof Top
installations) the installer must provide a service platform for
the service person with rails or guards in accordance with local
codes or ordinances or in their absence with the latest edition
of the National Fuel Gas Code ANSI Z223.1.
IMPORTANT NOTE: If using bottom discharge with roof
curb, ductwork should be attached to the curb prior to
installing the unit.
Refer to Roof curb Installation Instructions for proper curb
installation. Curbing must be installed in compliance with the
National Roofing Contractors Association Manual.
Lower unit carefully onto roof mounting curb. While rigging
unit, center of gravity will cause condenser end to be lower
than supply air end.
NOTE: Roof overhang should be no more than 36".
Minimum clearances are required to avoid air recirculation
and keep the unit operating at peak efficiency. A minimum
12 inch clearance is required to the condenser coil.
NOTE: The flue outlet hood is packaged separately inside
the unit and must be installed prior to operation.
WARNING
TO PREVENT POSSIBLE DAMAGE, THE UNIT SHOULD
REMAIN I N AN UPRIGH T POSI TION DURI NG ALL
RIGGING AND MOVI NG OPERATI ONS. TO FACIL ITATE
LIFTING AND MOVI NG IF A CR ANE IS USED , PLAC E
THE UN IT IN AN AD EQUATE CAB LE SL I DE .
NOTE: A roof curb can be used to utilize bottom discharge.
*PD14 Package Units are designed for outdoor installations
only in either residential or light commercial applications.
NOTE: To ensure proper condensate drainage, unit must be
installed in a level position.
The connecting ductwork (Supply and Return) can be connected for either horizontal or down discharge airflow. In the
down discharge applications a matching Roof Curb is recommended .
A return air filter must be installed behind the return air
grille(s) or provision must be made for a filter in an accessible
location within the return air duct. The minimum filter area
should not be less than those sizes listed in the Specification
Section. Under no circumstances should the unit be operated without return air filters.
13
Page 14

PRODUCT DESIGN
A 3/4" - 14 NPT drain connector is provided for removal of
condensate water from the indoor coil. In order to provide
proper condensate flow, do not reduce the drain line size.
NOTE: Tighten drain to a maximum torque of 10 in-lbs.
Refrigerant flow control is achieved by use of a flowrator.
The single phase models use permanent split capacitors
(PSC) design compressors. Starting components are therefore not required. A low MFD run capacitor assists the
compressor to start and remains in the circuit during operation.
A/GPD Package Units are designed for outdoor installations
only in either residential or light commercial applications and
are available in 2, 2.5, 3, 3.5 & 4 ton sizes. They are designed
for 208/230 volt single phase applications.
The connecting ductwork (Supply and Return) can be connected for either horizontal or vertical airflow. In the vertical
application, a matching Roof Curb is recommended.
A return air filter must be installed behind the return air
grille(s) or provision must be made for a filter in an accessible
location within the return air duct (3 phase models have an
internal downflow filter rack). The minimum filter area should
not be less than those sizes listed in the Specification
Section. Under no circumstances should the unit be operated without return air filters.
*PD model units use EEM type indoor blower motors. EEM
motors are constant torque motors with very low power
consumption and are energized by a 24V signal from the
ignition control board. The EEM motors feature an integrated control module.
Air for condensing (cooling cycle) is drawn through the
outdoor coil by a propeller fan, and is discharged vertically
out the top of the unit. The outdoor coil is designed for .0
static. No additional restriction (ductwork) shall be applied.
Conditioned air is drawn through the filter(s), field installed,
across the coil and back into the conditioned space by the
indoor blower.
*PD series package units use the Compliant Scroll compressor; there are a number of design characteristics which are
different from the traditional reciprocating compressor.
- Due to their design Scroll compressors are inherently
more tolerant of liquid refrigerant. NOTE: Even though
the compressor section of a Scroll compressor is more
tolerant of liquid refrigerant, continued flood back or
flooded start conditions may wash oil from the bearing
surfaces causing premature bearing failure.
- These Scroll compressors use "POE" or polyolester oil
which is NOT compatible with mineral oil based lubricants like 3GS. "POE" oil must be used if additional oil
is required.
- Compliant scroll compressors perform “quiet” shutdowns that allow the compressor to restart immediately
without the need for a time delay. This compressor will
restart even if the system has not equalized.
- Operating pressures and amp draws may differ from
standard reciprocating compressors. This information
may be found in the “Cooling Performance Data” section.
A scroll is an involute spiral which, when matched with a
mating scroll form as shown, generates a series of crescent
shaped gas pockets between the two members.
During compression, one scroll remains stationary (fixed
scroll) while the other form (orbiting scroll) is allowed to orbit
(but not rotate) around the first form.
As this motion occurs, the pockets between the two forms
are slowly pushed to the center of the two scrolls while
simultaneously being reduced in volume. When the pocket
reaches the center of the scroll form, the gas, which is now
at a high pressure, is discharged out of a port located at the
center.
During compression, several pockets are being compressed
simultaneously, resulting in a very smooth process. Both
the suction process (outer portion of the scroll members)
and the discharge process (inner portion) are continuous.
ELECTRICAL WIRING
The units are designed for operation on 60 hertz current and
at voltages as shown on the rating plate. All internal wiring
is complete. Ensure the power supply to the compressor
contactor is brought to the unit as shown on the supplied unit
wiring diagram. The 24V wiring must be connected between
the unit control panel and the room thermostat.
LINE VOLTAGE WIRING
Power supply to the unit must be N.E.C. Class 1, and must
comply with all applicable codes. The unit must be
electrically grounded in accordance with the local codes or,
in their absence, with the latest edition of the National
Electrical Code, ANSI/NFPA No. 70, or in Canada, Canadian Electrical Code, C22.1, Part 1. A fused disconnected
must be provided and sized in accordance with the unit
minimum circuit ampacity.
The best protection for the wiring is the smallest fuse or
breaker which will hold the equipment on line during normal
operation without nuisance trips. Such a device will provide
maximum circuit protection.
14
Page 15
PRODUCT DESIGN
WARNING
DO NOT EXCEED THE MAXIMUM OVERCURRENT
DEVICE SIZE SHOWN ON THE UNIT DATA PLATE.
The unit transformer is connected for 230V operation. If the
unit is to operate on 208V, reconnect the transformer primary
lead and the induced draft blower leads as shown on the unit
wiring diagram.
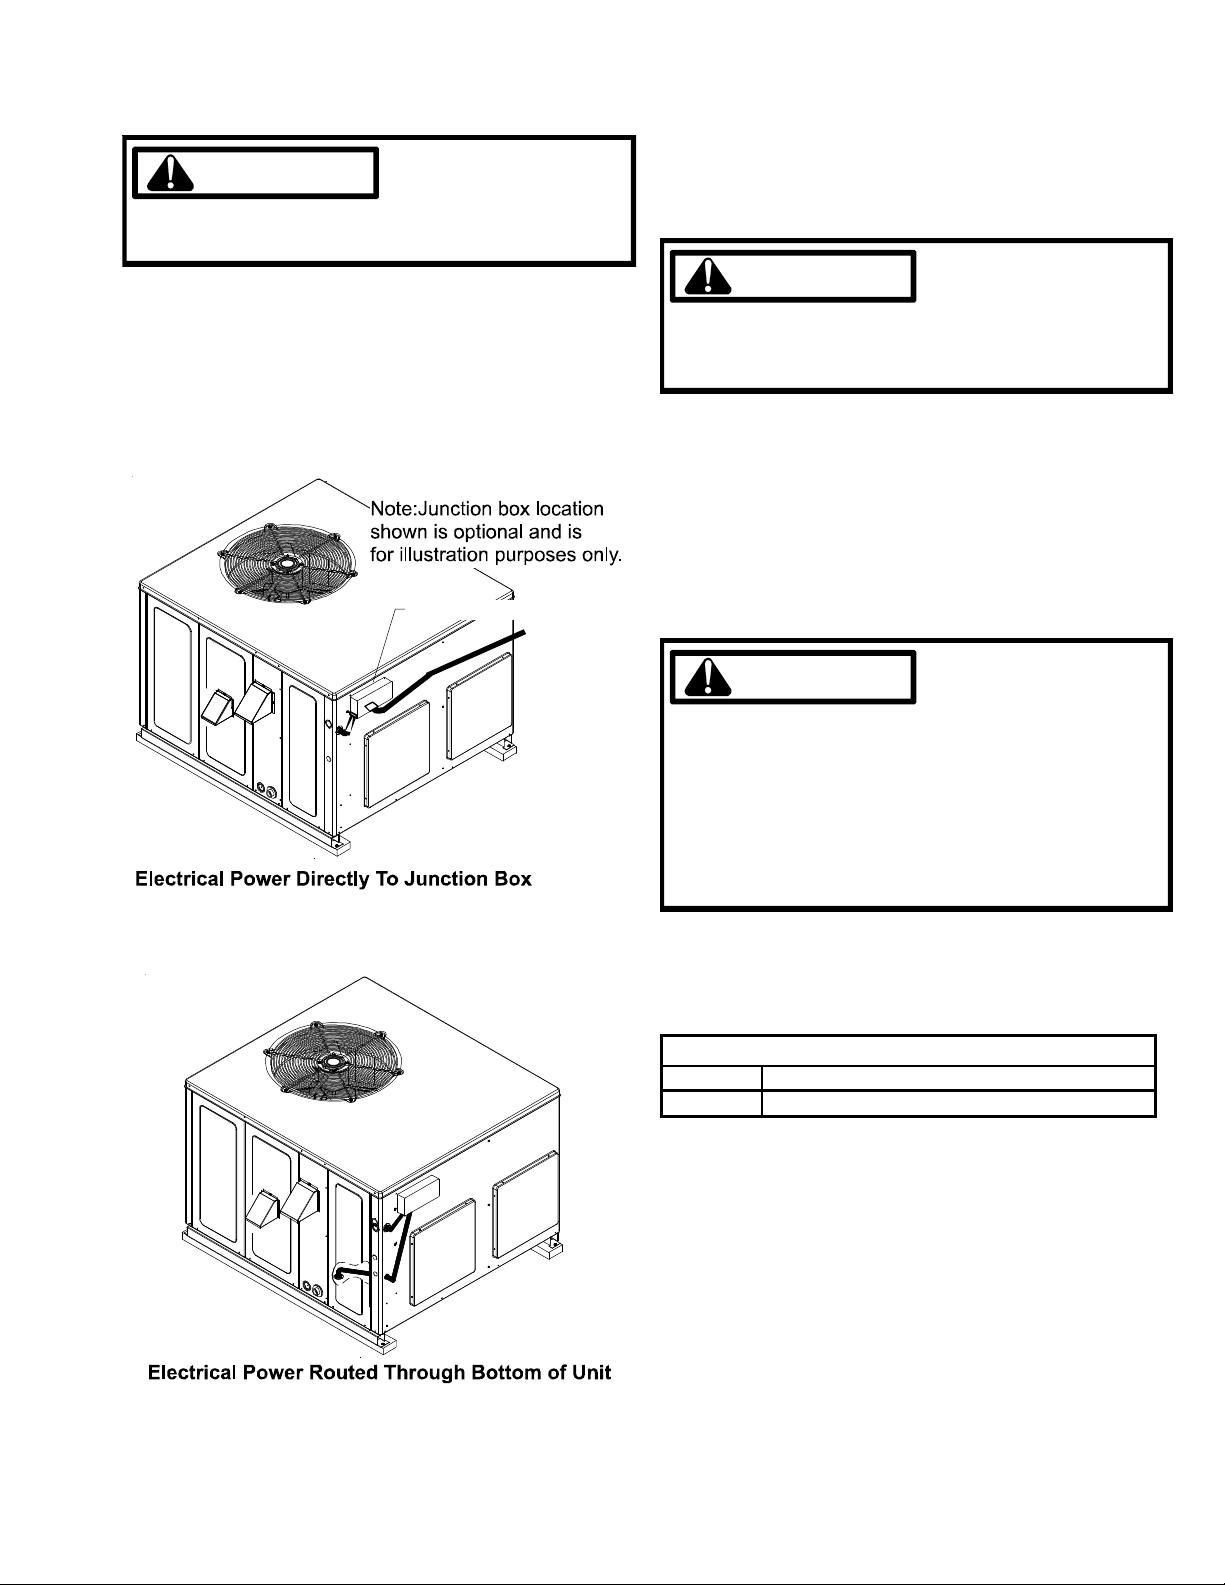
All line voltage connections must be made through weather
proof fittings. All exterior power supply and ground wiring
must be in approved weather proof conduit. Low voltage
wiring from the unit control panel to the thermostat requires
coded cable. See the following figures for ground level and
rooftop wiring.
JUNCTION BOX
WARNING
TO AVOID THE RISK OF PROPERTY DAMAGE,
PERSONAL INJURY OR FIRE, USE ONLY COPPER
CONDUCTORS.
If it is necessary for the installer to supply additional line
voltage wiring to the inside of the package unit, the wiring
must comply with all local codes. This wiring must have a
minimum temperature rating of 105°C. and must be routed
away from the burner compartment. All line voltage splices
must be made inside the unit control box.
GAS SUPPLY AND PIPING
CAUTION
THIS PACKAGE GAS UNIT IS FACTORY SET TO
OPERATE ON NATURAL GAS AT THE ALTITUDES
SHOWN ON THE RATING PLATE. IF OPERATION
ON PROPANE IS REQUIRED, OBTAIN AND INSTALL
THE PROPER CON VERSION KIT(S) BEFORE
OPERATING THIS UNIT. FAILURE TO DO SO
MAY RESULT IN UNSATISFACTORY OPERATION
AND/OR EQUIPMENT DAMAGE.
The rating plate is stamped with the model number, type of
gas, and gas input rating. Make sure the unit is equipped to
operate on the type of gas available.
Inlet Gas Pressure
Natural Min. 5.0" W.C., Max. 10.0" W.C.
Propane Min. 11.0" W.C., Max. 13.0" W.C.
Inlet Gas Pressure Must Not Exceed the Maximum Value
Shown in the table above.
The minimum supply pressure must not be varied downward
because this could lead to unreliable ignition. In addition, gas
input to the burners must not exceed the rated input shown
on the rating plate. Overfiring of the unit could result in
premature heat exchanger failure.
15
Page 16
PRODUCT DESIGN
GAS PIPING
CAUTION
TO AVOID PO SSIBLE UNS ATISFACTO RY OP ERATION
OR EQUIPMEN T DAM AGE D UE TO UND ERFIRING OF
EQUIPMENT, DO NOT UNDERSIZE THE NATURAL
GAS/PROPANE PIPING FROM THE METER/TANK TO
THE FURNA CE. W HEN SIZING A TRUNK L INE PER
THE TABLES , INCLUDE ALL APPLIANCES ON TH AT
LINE THAT COULD BE OPERATED SIMULTANEOUSLY.
The gas pipe supplying the unit must be properly sized based
on the cubic feet per hour of gas flow required, specific gravity
of the gas and length of the run. The gas line installation must
comply with local codes, or in the absence of local codes,
with the latest edition of the National Fuel Gas Code ANSI
Z223.1.
NATURAL GAS CAPACITY OF PIPE IN CUBIC FEET OF
GAS PER HOUR (CFH)
LENGTH OF
PIPE IN FEET
10 132 278 520 1050 1600
20 92 190 350 730 1100
30 73 152 285 590 980
40 63 130 245 500 760
50 56 115 215 440 670
60 50 105 195 400 610
70 46 96 18 0 370 560
80 43 90 17 0 350 530
90 40 84 16 0 320 490
100 38 79 150 305 460
CFH =
BTUH FURNACE INPUT
CALORIFIC VALUE OF GAS
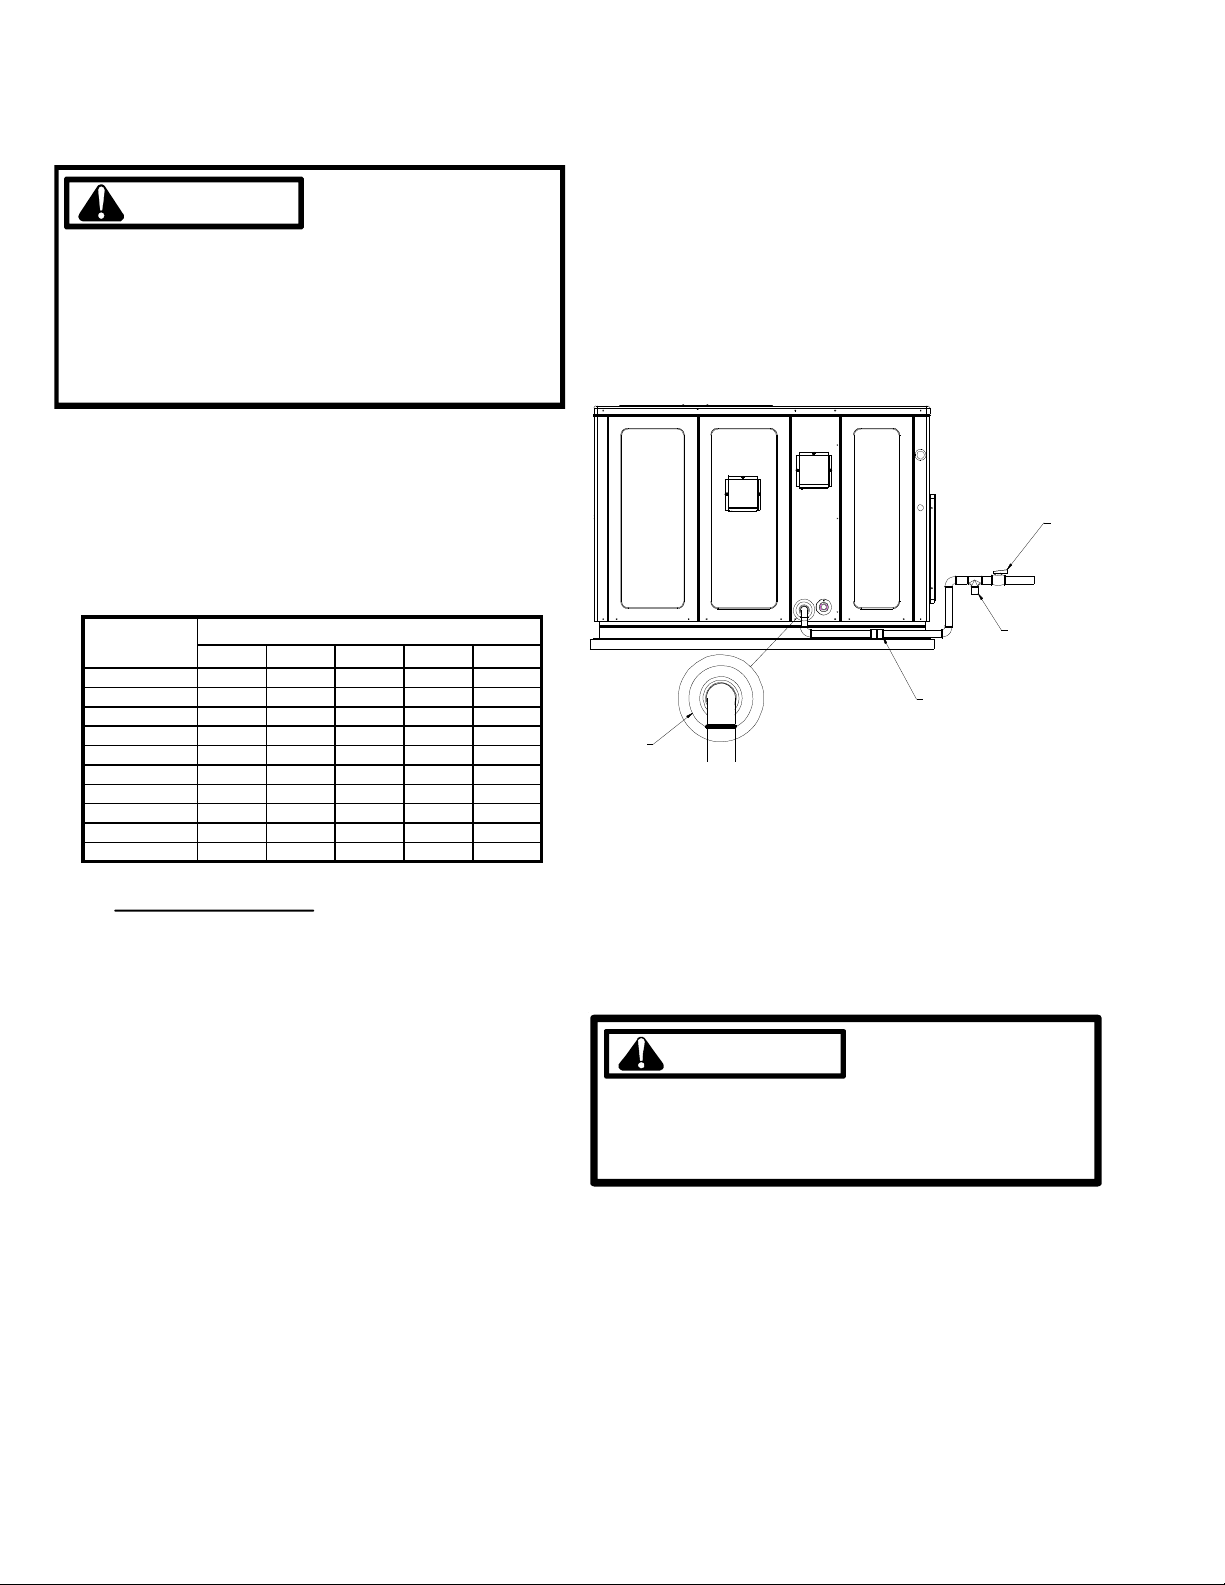
CONNECTING THE GAS PIPING - NATURAL GAS
1. Use black iron or steel pipe and fittings for the building
piping.
2. Use pipe joint compound on male threads only. Pipe joint
compound must be resistant to the action of the fuel used.
3. Use ground joint unions.
4. Install a drip leg to trap dirt and moisture before it can
enter the gas valve. The drip leg must be a minimum of
three inches long.
5. Use two pipe wrenches when making connection to the
gas valve to keep it from turning.
6. Install a manual shut off valve. This shut off valve should
be conveniently located within six (6) feet of the unit, and
between the meter and unit.
7. Tighten all joints securely.
8. Connect the unit to the building piping by one of the
following methods.
a. Rigid metallic pipe and fittings.
b. Semi-rigid metallic tubing and metallic fittings.
Aluminum alloy tubing shall not be used in exterior
locations.
NOMINAL BLACK PIPE SIZE
1/2" 3/4" 1" 1 1/4" 1 1/2"
c. Listed gas appliance connectors used in accor-
dance with the terms of their listing that are
completely in the same room as the equipment.
NOTE: In "b" and "c", the connector or tubing must be
installed so as to be protected against physical and
thermal damage. Aluminum-alloy tubing and connectors
must be coated to protect against external corrosion where
they are in contact with masonry, plaster, or insulation or
are subject to repeated wettings by such liquids as water
(except rain water), detergents, or sewage.
MANUAL
SHUT-OFF
VALVE
DRIP LEG
GROUND JOINT UNION
(INSTALLED AHEAD OF GAS VALVE)
GROMMET
NOTE: The unit gas supply entrance is factory sealed with
plugs. Keep plugs in place until gas supply is ready to be
installed. Once ready, replace the plugs with the supplied
grommets and install gas supply line.
CHECKING THE GAS PIPING
CAUTION
TO A VOID THE POSSIBILITY OF PROPERTY DAMAGE,
PERSONAL INJUR Y OR FIRE, THE FOLLOWING
INSTRUCTIONS MUST BE PERFORMED REGARDING
GAS CONNECTIONS AND PRESSURE TESTING.
The unit and its gas connections must be leak tested before
placing in operation. Because of the danger of explosion or
fire, never use a match or open flame to test for leaks. Never
exceed specified pressure for testing. Higher pressure may
damage the gas valve and cause overfiring which may result
in heat exchanger failure.
This unit must be isolated from the gas supply system by
closing its individual manual shutoff valve during any pressure
testing of the gas supply piping system at test pressures
equal to or less than 1/2 psig (3.48 kPa).
16
Page 17

PRODUCT DESIGN
TANKS AND PIPING - PROPANE UNITS
WARNING
PERSONAL INJURY HAZARD
IRON OXIDE (RUST) CAN REDUCE THE LEVEL OF
ODORANT IN PROPANE GAS. A GAS DETECTING
DEVICE IS THE ONLY RELIABLE METHOD TO DETECT
A PROPANE GAS LEAK. CONTACT YOUR LOCAL
PROPANE SUPPLIER ABOUT INSTALLING A GAS
DETECTING WARNING DEVICE TO ALERT YOU IN
THE EVENT THAT A GAS LEAK SHOULD DEVELOP.
FAILURE TO DETECT A PROPANE GAS LEAK COULD
RESULT IN AN EXPLOSION OR FIRE WHICH COULD
CAUSE SERIOUS PERSONAL INJURY OR DEATH.
All propane gas equipment must conform to the safety
standards of the National Board of Fire Underwriters (See
NBFU Manual 58) or Natural Standards of Canada B149.2,
Installation Code for Propane Gas Burning Appliances and
Equipment.
For satisfactory operation, propane gas pressure must be 10
inch W.C. at the unit manifold with all gas appliances in
operation. Maintaining proper gas pressure depends on
three main factors.
1. Vaporization rate, which depends on (a) temperature of
the liquid, and (b) "wetted surface" area of the container
or containers.
2. Proper pressure regulation. (Two-stage regulation is
recommended from the standpoint of both cost and
efficiency.)
3. Pressure drop in lines between regulators, and between
second stage regulator and the appliance. Pipe size
required will depend on length of pipe run and total load
of all appliances.
Complete information regarding tank sizing for vaporization,
recommended regulator settings, and pipe sizing is available
from most regulator manufacturers and propane gas suppliers.
Propane is an excellent solvent, and special pipe dope must
be used when assembling piping for this gas as it will quickly
dissolve white lead or most standard commercial compounds. Shellac base compounds resistant to the actions
of liquefied petroleum gases such as Gasolac®, Stalactic®,
Clyde's or John Crane are satisfactory.
TYPICAL PROPANE PIPING
First Stage
Regulator
200 PSIG
Maximum
5 to 15 PSIG
(20 PSIG Max.)
Continuous
Second Stage
Regulator
11" W.C.
WARNING
PROPANE TANK SIZING (MINIMUM)
TANK SIZE REQUIRED IF LOWEST OUTDOOR
MAXIMUM GAS TEMPERATURE (AVG. FOR 24 HOURS) REACHES
NEEDED TO
VAPORIZE*
125K BTU/HR
(50 CFH)
250K BTU/HR
(100 CFH)
375K BTU/HR
(150 CFH)
500K BTU/HR
(200 CFH)
750K BTU/HR
(300 CFH)
* AVERAGE RATE/HOUR WITHDRAWL IN 8 HOUR PERIOD
32°F 20°F 10°F 0°F -10°F -20°F -30°F
115
115
115
250
GAL
250
GAL
300
GAL
400
GAL
750
GAL
GAL
250
GAL
400
GAL
500
GAL
1000
GAL
GAL
250
GAL
500
GAL
750
GAL
1500
GAL
GAL
400
GAL
500
GAL
1000
GAL
2000
GAL
250
GAL
500
GAL
1000
GAL
1500
GAL
2500
GAL
400
GAL
1000
GAL
1500
GAL
2000
GAL
4000
GAL
600
GAL
1500
GAL
2500
GAL
3500
GAL
5000
GAL
17
Page 18
PRODUCT DESIGN
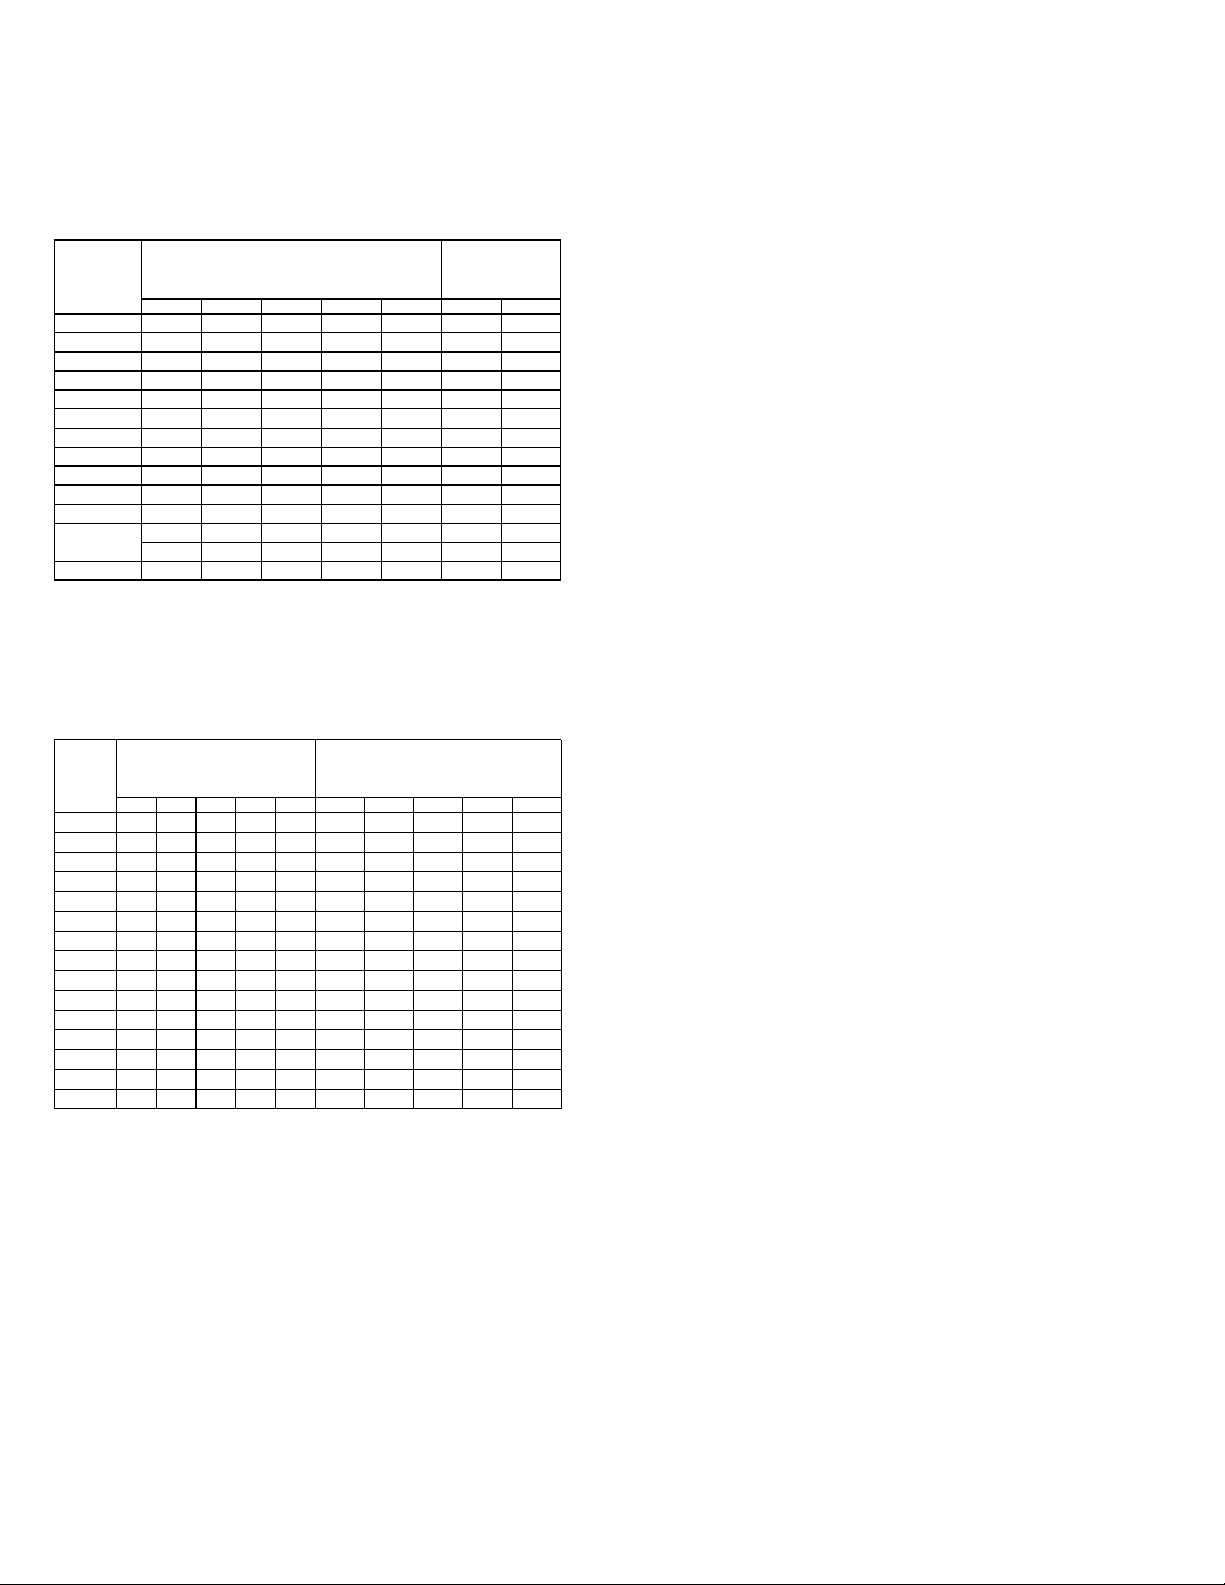
PROPANE GAS PIPING CHARTS
Sizing Between First and Second Stage Regulator
Maximum Propane Capacities listed are based on 1 PSIG Pressure Drop at 10
PSIG Setting. Capacities in 1,000 BTU/HR
PIPE OR
TUBING
LENGTH,
FEET
30 309 700 1,303 2,205 3,394 1,843 3,854
40 265 599 1,115 1,887 2,904 1,577 3,298
50 235 531 988 1,672 2,574 1,398 2,923
60 213 481 896 1,515 2,332 1,267 2,649
70 196 446 824 1,394 2,146 1,165 2,437
80 182 412 767 1,297 1,996 1,084 2,267
90 171 386 719 1,217 1,873 1,017 2,127
100 161 365 679 1,149 1,769 961 2,009
150 130 293 546 923 1,421 772 1,613
200 111 251 467 790 1,216 660 1,381
250 90 222 414 700 1,078 585 1,224
300 89 201 378 634 976 530 1,109
350 82 185 345 584 898 488 1,020
400 76 172 321 543 836 454 949
To convert to Capacities at 15 PSIG Settings -- Multiply by 1.130
To convert to Capacities at 5 PSIG Settings -- Multiply by 0.879
Sizing Between Single or Second Stage Regulator and Appliance*
Maximum Propane Capacities Listed are Based on 1/2" W.C. Pressure Drop at
11" W.C. Setting. Capacities in 1,000 BTU/HR
PIPE OR
TUBING
LENGTH,
FEET
10 49 110 206 348 539 291 608 1,146 2,353 3,525
20 34 76 141 239 368 200 418 788 1,617 2,423
30 27 61 114 192 296 161 336 632 1,299 1,946
40 23 52 97 164 253 137 284 541 1,111 1,665
50 20 46 86 146 224 122 255 480 985 1,476
60 19 42 78 132 203 110 231 436 892 1,337
80 16 36 67 113 174 94 198 372 764 1,144
100 14 32 59 100 154 84 175 330 677 1,014
125 12 28 52 89 137 74 155 292 600 899
150 11 26 48 80 124 67 141 265 544 815
200 10 22 41 69 106 58 120 227 465 697
250 9 19 36 61 94 51 107 201 412 618
300 8 18 33 55 85 46 97 182 374 560
350 7 16 30 51 78 43 89 167 344 515
400 7 15 28 47 73 40 83 156 320 479
*DATA IN ACCORDANCE WITH NFPA PAMPHLET NO. 54
TUBING SIZE, O.D., TYPE L
3/8" 1/2" 5/8" 3/4" 7/8" 1/2" 3/4" 1" 1-1/4" 1-1/2"
TUBING SIZE, O.D., TYPE L
3/8" 1/2" 5/8" 3/4" 7/8" 1/2" 3/4"
NOMINAL PIPE SIZE,
COOLING
The refrigerant used in the system is R-410A. It is a clear,
colorless, non-toxic and non-irritating liquid. R-410A is a
50:50 blend of R-32 and R-125. The boiling point at atmospheric pressure is -62.9°F.
A few of the important principles that make the refrigeration
cycle possible are: heat always flows from a warmer to a
cooler body. Under lower pressure, a refrigerant will absorb
heat and vaporize at a low temperature. The vapors may be
drawn off and condensed at a higher pressure and temperature to be used again.
NOMINAL PIPE SIZE,
SCHEDULE 40
SCHEDULE 40
The indoor evaporator coil functions to cool and dehumidify
the air conditioned spaces through the evaporative process
taking place within the coil tubes.
NOTE: Actual temperatures and pressures are to be obtained
from the expanded ratings in the Technical Information Manual.
High temperature, high pressure vapor leaves the compressor through the discharge line and enters the condenser coil.
Air drawn through the condenser coil by the condenser fan
causes the refrigerant to condense into a liquid by removing
heat from the refrigerant. As the refrigerant is cooled below
its condensing temperature it becomes subcooled.
The subcooled high pressure liquid refrigerant now leaves the
condenser coil via the liquid line until it reaches the indoor
expansion device.
As the refrigerant passes through the expansion device and
into the evaporator coil a pressure drop is experienced
causing the refrigerant to become a low pressure liquid. Low
pressure saturated refrigerant enters the evaporator coil
where heat is absorbed from the warm air drawn across the
coil by the evaporator blower. As the refrigerant passes
through the last tubes of the evaporator coil it becomes
superheated, that is, it absorbs more heat than is necessary
for the refrigerant to vaporize. Maintaining proper superheat
assures that liquid refrigerant is not returning to the compressor which can lead to early compressor failure.
Low pressure superheated vapor leaves the evaporator coil
and returns through the suction line to the compressor where
the cycle begins again.
Heat Pump Models
Any time the room thermostat is switched to cool, the O
terminal is energized. This energizes the 24 volt coil on the
reversing valve and switches it to the cooling position.
When the contacts of the room thermostat close, this closes
the circuit from R to Y and R to G in the unit.
This energizes the compressor contactor and will energize
the EEM indoor blower motor after a 6-second delay.
When the thermostat is satisfied, it opens its contacts
breaking the low voltage circuit causing the compressor
contactor to open and indoor fan to stop after the programmed
60 second off delay on the EEM motor.
If the room thermostat fan selector switch should be set to the
"on" position then the indoor blower would run continuous
rather than cycling with the compressor.
18
Page 19

PRODUCT DESIGN
HEATING/ GAS & L.P.
The heating cycle is accomplished by using a unique tubular
design heat exchanger which provides efficient gas heating
on either natural gas or propane gas fuels. The heat
exchangers compact tubular construction provides excellent
heat transfer for maximum operating efficiency.
Inshot type gas burners with integral cross lighters are used
eliminating the need for adjustable air shutters. The same
burner is designed for use on either natural or propane gas
fuels.
The induced draft blower draws fuel and combustion air into
the burners and heat exchanger for proper combustion. A
pressure switch is used in conjunction with the I. D. blower
to detect a blocked flue condition.
Blower operation is controlled by the ignition control module.
The module allows for field adjustment of the blower delay at
the end of the heating cycle. The range of adjustment is for
90, 120, 150 or 180 seconds. The factory delay setting is 30
seconds delay on 150 seconds delay off.
Direct Spark Ignition (DSI) Systems
APD/GPD units are equipped with a direct spark ignition
system. Ignition is provided by 22,000 volt electronic spark.
A flame sensor then monitors for the presence of flame and
closes the gas valve if flame is lost.
HEATING CYCLE
On a call for first stage heat, the contacts of the room
thermostat close. This energizes terminals R to Y and R to
G, the low voltage circuit to the contactor is completed
starting the compressor and outdoor fan motor. This also
energizes the EEM motor after approximately 6-seconds.
When the thermostat is satisfied, breaking the circuit between R to Y and R to G, the compressor and outdoor fan
motor will stop. The indoor blower will stop after a programmed 60 second off delay.
NOTE: Should the second stage heating contacts in the room
thermostat close, a W1 signal will be sent to the ignition
control and the Y signal would be removed. A normal gas
heating sequence would then follow.
19
Page 20

SYSTEM OPERATION
A/GPD14
IGNITION CONTROL SEQUENCE OF OPERATION
A . Heating Operation: Low stage heat
1. Thermostat type is set to two-stage.
2. Thermostat “W1” input initiates low stage heating.
3. Induced draft blower is energized at high speed for the
pre-purge period. Pre-purge timer begins after control
recognizes pressure switch has closed.
4. Trial-for-ignition period begins after pre-purge period
expires. Low and high stage gas valves are energized
along with the igniter for trial-for-ignition period. Igniter
is de-energized when flame is detected.
5. Flame is achieved and detected during trial-for-ignition
period. Flame stabilization period begins when flame
is detected.
6. De-energize high stage gas valve and switch induced
draft blower to low speed within five seconds of flame
detection.
7. Air circulating blower is energized at low heat speed
after heat ON delay time expires. Heat ON delay timer
begins when flame is detected.
8. Control monitors thermostat, flame, limit, and pressure switch inputs during low stage heating.
9. Thermostat “W1” input is removed.
10. Low stage gas valve is de-energized.
11. Induced draft blower remains energized at low speed
for post purge period.
12. Air circulating blower remains energized at low heat
speed for heat OFF delay. Heat OFF delay begins
when “W1” input is removed.
13. Control returns to Standby and awaits next thermostat
request.
B. Heating Operation: High stage heat
1. Thermostat type is set to two-stage.
2. Thermostat “W1” and “W2” inputs initiate high stage
heating.
3. Induced draft blower is energized at high speed for the
pre-purge period. Pre-purge timer begins after control
recognizes pressure switch has closed.
4. Trial-for-ignition period begins after pre-purge period
expires. Low and high stage gas valves are energized
along with the igniter for trial-for-ignition period. Igniter
is de-energized when flame is detected.
5. Flame is achieved and detected during trial-for-ignition
period. Flame stabilization period begins when flame
is detected.
6. Gas valve and induced draft blower remain at high
stage and high speed.
7. Air circulating blower is energized at high heat speed
after heat ON delay time expires. Heat ON delay timer
begins when flame is detected.
8. Control monitors thermostat, flame, limit, and pressure switch inputs during high stage heating.
9. Thermostat “W1” and “W2” inputs are removed.
10. High and low stage gas valves are de-energized.
11. Induced draft blower switches from high speed to low
speed and remains energized for post purge period.
12. Air circulating blower remains energized at high heat
speed for High Stage Heat OFF Delay period then
switches to low heat speed for the remainder of the
selected heat OFF delay. Heat OFF delay begins
when “W1” and “W2” inputs are removed.
13. Control returns to Standby and awaits next thermostat
request.
A . Cooling Operation: Low stage cool
1. Thermostat type is set to two-stage.
2. Thermostat “Y1” or thermostat “Y1” and “G” input
initiates low stage cooling.
3. IDT/ODT/Pressure/Loss of Charge Switch circuits are
checked for closed condition. Cooling operation can
proceed only if these circuits are closed.
4. Low stage compressor output is energized.
5. Condenser fan motor is energized at low speed.
6. Air circulating blower is energized at low cool speed
after cool ON delay expires. Cool ON delay timer
begins when thermostat inputs are detected.
7. Control monitors thermostat, gas valve, flame, and IDT/
ODT/Pressure/Loss of Charge Switches during low
stage cooling.
8. Thermostat “Y1” or “Y1” and “G” inputs are removed.
9. Low stage compressor output is de-energized. Low
speed condenser fan motor is de-energized.
10. Air circulating blower remains energized at low cool
speed for the cool OFF delay. Cool OFF delay timer
begins when thermostat input is removed.
11. Control returns to Standby and awaits next thermostat
request.
20
Page 21

SYSTEM OPERATION
A/GPD14
IGNITION CONTROL SEQUENCE OF OPERATION
(CONT.)
B. Cooling Operation: High stage cool
Thermostat type is set to two-stage.
Thermostat “Y1” and “Y2” or “Y1”, “Y2” and “G” inputs
initiate high stage cooling.
IDT/ODT/Pressure/Loss of Charge Switch circuits are
checked for closed condition. Cooling operation can
proceed only if these circuits are closed.
1. Low and high stage compressor outputs are energized.
2. Condenser fan motor is energized at high speed.
3. Air circulating blower is energized at high cool speed
after cool ON delay expires. Cool ON delay timer
begins when thermostat inputs are detected.
Control monitors thermostat, gas valve, flame, and IDT/
ODT/Pressure/Loss of Charge Switches during high
stage cooling operation.
Thermostat “Y1” and “Y2” or “Y1”, “Y2” and “G” inputs
are removed.
Low and high stage compressor outputs are de-energized.
High speed condenser fan motor is de-energized.
4. Air circulating blower switches to low cool speed for the
cool OFF delay. Cool OFF delay timer begins when
thermostat input is removed.
Control returns to Standby and awaits next thermostat
request.
A . Continuous Fan Operation
1. Thermostat “G” input initiates Continuous Fan operation.
2. Air circulation blower shall be immediately energized
at the continuous fan speed. For purposes of this
specification, the continuous fan speed shall be the
low heat speed.
3. Thermostat “G” input is removed.
4. Air circulation blower is immediately de-energized.
5. Control returns to Standby and awaits next thermostat
request.
DEFROST CYCLE
NOTE: The defrost board is equipped with a jumper for
SmartShift™ defrost technology operation. This operation
turns the compressor off for 30 seconds at defrost initiation
and termination. The unit is factory shipped for SmartShift™
defrost technology operation. To operate unit at rated efficiencies, move the jumper on the defrost board from “DLY” to
“NORM”.
During operation, the power to the circuit board is controlled
by a temperature sensor, which is clamped to a feeder tube
entering the outdoor coil. Defrost timing periods of 30, 60 and
90 minutes may be selected by setting the circuit board
jumper to 30, 60 and 90 respectively.
Accumulation of time for the timing period selected starts
when the sensor closes (approximately 34°F), and when the
wall thermostat calls for heat. At the end of the timing period,
the unit’s defrost cycle will be initiated provided the sensor
remains closed.
Upon a call for defrost, the blower will continue to run and the
defrost board will send a W1 signal to the ignition control. At
the same time, the compressor will stop for 30 seconds, if the
SmartShift™ defrost technology delay feature is selected on
the defrost board. At this time, the reversing valve shifts from
heat to cool position and condenser fans shut off. The inducer
motor will immediatly energize for a 15 second prepurge.
A 7-second trial for ignition begins by energizing the low and
high stages of the gas valve along with this spark ignition.
Main burners light and control detects presence of flame. The
compressor (after its 30/OFF second delay) restarts in
cooling mode to defrost the condensor coil.
When the sensor opens (approximately 60°F), the defrost
cycle is terminated and the timing period is reset. If the
defrost cycle is not terminated due to the sensor temperature, a twelve minute override interrupts the unit’s defrost
period. At this time the W1 signal is removed from the ignition
control board, the compressor will stop for a 30 second
SmartShift™ defrost technology delay (if selected) and the
reversing valve slides back to its normal heat position.
21
Page 22

SYSTEM OPERATION
PCBAG127 Control Board
DESCRIPTION
The ignition control is designed for use in gas heating/electric
cooling package equipment (rooftop applications) and operates with a two stage heat and two stage cooling system. It
is a direct spark ignition system that uses a 22,000 volt spark
to ignite the burners. A flame sensor is used to monitor the
flame.
The board has the option of using a single or two stage
thermostat. The board also controls the indoor blower and
has an adjustable heat fan off delay.
There is also a fault recall button for recalling the last 5 fault
codes. To recall the fault codes, depress the fault recall
button for at least 2 seconds but not more than 4 seconds.
To clear the fault code memory, depress the fault recall
button for at least 5 seconds.
L2
T1
INDUCER
LOW
K4
Q3
The following tables list the functions for the connectors and
terminals, the timings, and the fault codes for the PCBAG127
control board.
HIGH VOLTAGE!
Disconnect ALL power before servicing
or insta llin g th is uni t. M ult iple power
sources may be present. Failure to do so
may cause property damage, personal injury
or death.
L1
HIGH
LOW
ODF
HIGH
PARK
K6
C9
FS
K3 K5
T2
K7
P2
U6
U1
U2
5
4
U7
3
2
1
U4
U5
U3
K2
K1
22
SPEED UP
SW1
FAULT
RECALL
180
150
120
90
BLOWER
OFF
5 MIN
10MIN
DELAY
NONE
STAGE
DELAY
F1
ECON
R C W1W2G Y2
Y1
Page 23

SYSTEM OPERATION
Pin Voltage Function
1 24VAC Indoor/Outdoor Thermostat (IDT/ODT) Output
2 24VAC High Stage Compressor Output
3 24VAC Pressure Switch/Loss of Charge Switch Input
4 24VAC Indoor/Outdoor Thermostat (IDT/ODT) Input
5 24VAC Pressure Switch/Loss of Charge Switch Output
6 24VAC Low Stage Compressor Output
Table 1: Circuit Definitions and Voltage Ratings
for the 6-Circuit Connector Circuits
Pin Voltage Function
1 24VAC Limit Switch Output
2 24VAC 24VAC Input to Control
3 24VAC Limit Switch Input
4 24VAC Unused
5 24VAC 24VAC Common
6 24VAC Pressure Switch Output
7 24VAC Main Valve High Output
8 24VAC Pressure Switch Input
9 Unused Main Valve Low Output
Table 2: Circuit Definitions and Voltage Ratings
for the 9-Circuit Connector Circuits
Terminal Label
Line Voltage L1 L1
Transformer Line L1 L1
Air Circulating Blower Line 1 L1
Induced Draft Blower Low Speed DI Low or "Inducer Low"
Induced Draft Blower High Speed DI High or "Inducer High"
Condenser Fan Motor Low Speed ODF Low
Condenser Fan Motor High Speed ODF High
Line Voltage L2 L2
Transformer Line L2 L2
Air Circulating Blower Line 2 L2
Induced Draft Blower Line 2 L2
Condenser Fan Motor Line 2 L2
Direct Spark Igniter T1
Flame Detection FS
Table 3: High Voltage Terminals
23
Page 24

SYSTEM OPERATION
Period Timing
Pre-Purge 15 Seconds
Inter-Purge 30 Seconds
Post Purge 30 Seconds
Trial-for-Ignition (TFI) 7 Seconds
Flame Stabilization Period 10 Seconds
Flame Failure Response Time
Low to High Stage Delay Selectable 5 minutes or 10 minutes (Default = 10 minutes)
Heat ON Delay 30 Seconds
Heat OFF Delay
High Stage Heat OFF Delay 30 Seconds
Cool ON Delay 6 Seconds
Cool OFF Delay 45 Seconds
Continuous Fan ON Delay 0 Seconds
Continuous Fan OFF Delay 0 Seconds
Ignition Attempts 3
Recycles Infinite
Automatic Restart 60 Minutes
Pressure Switch Lockout Delay 5 Minutes
Factory Test Mode Active Time 2 Minutes Maximum
2 Seconds within Flame Stabilization Period
2 Seconds or Per ANSI Z21.20 Outside of Flame Stabilization Period
Selectable 90, 120, 150, or 180 Seconds
(Default = 150 Seconds)
Table 4: Control Timings
Color Function
Normal On
Intrnal/Gas Valve Fault Off
Lockout 1
Pressure Switch Stuck Closed 2
Pressure Switch Stuck Open 3
Red
Amber
Open High Temperature Limit 4
Flame Detected with Gas Valve De-Energized 5
Compressor Short Cycle Delay Active 6
Limit Opened 5 Times in Same Call For Heat 7
Indoor Thermostat/Outdoor Thermostat is Open 8
Pressure Switch/Loss of Charge Switch is Open 9
Normal Flame On
No Flame Present Off
Low Flame Current 1
Flame Detected with Gas Valve De-energized 2
Table 5: LED Status Codes and Corresponding System Condition
LED Flashes/Status
24
Page 25

SYSTEM OPERATION
Typical Dual Fuel System in Cooling
Accumulator
Outdoor
Coil
Typical Dual Fuel System in Heating
Accumulator
Outdoor
Coil
25
Page 26

SCHEDULED MAINTENANCE
Package gas units require regularly scheduled maintenance
to preserve high performance standards, prolong the service
life of the equipment, and lessen the chances of costly
failure.
In many instances the owner may be able to perform some
of the maintenance; however, the advantage of a service
contract, which places all maintenance in the hands of a
trained serviceman, should be pointed out to the owner.
HIGH VOL TAGE!
Disconnect ALL power before servicing
or insta llin g this uni t. M ultip le po wer
sources may be present. Failure to do so
may cause property damage, personal injury
or death.
ONCE A MONTH
1. Inspect the return filters of the evaporator unit and clean
or change if necessary. NOTE: Depending on operation
conditions, it may be necessary to clean or replace the
filters more often. If permanent type filters are used, they
should be washed with warm water and dried.
2. When operating on the cooling cycle, inspect the condensate line piping from the evaporator coil. Make sure
the piping is clear for proper condensate flow.
ONCE A YEAR
Qualified Service Personnel Only
1. Clean the indoor and outdoor coils.
2. Clean the cabinet inside and out .
3. Motors are permanently lubricated and do not require
oiling. TO AVOID PREMATURE MOTOR FAILURE, DO
NOT OIL.
4. Manually rotate the outdoor fan and indoor blower to be
sure they run freely.
5. Inspect the control panel wiring, compressor connections, and all other component wiring to be sure all
connections are tight. Inspect wire insulation to be
certain that it is good.
6. Check the contacts of the compressor contactor. If they
are burned or pitted, replace the contactor.
7. Using a halide or electronic leak detector, check all
piping and etc. for refrigerant leaks.
8. Check the combustion chamber (Heat Exchanger) for
soot, scale, etc. Inspect all burners for lint and proper
positioning.
9. Start the system, using the proper instrumentation check
gas inlet and manifold pressures, burner flame and
microamp signal. Adjust if necessary.
10. Start the system and run a Heating Performance Test. If
the results of the test are not satisfactory, see the
"Service Problem Analysis" Guide for the possible cause.
TEST EQUIPMENT
Proper test equipment for accurate diagnosis is as essential
as regular hand tools.
The following is a must for every service technician and
service shop:
1. Thermocouple type temperature meter - measure dry
bulb temperature.
2. Sling psychrometer- measure relative humidity and wet
bulb temperature.
3. Amprobe - measure current.
4. Volt-Ohm Meter - testing continuity, capacitors, motor
windings and voltage.
5. Accurate Leak Detector - testing for refrigerant leaks.
6. High Vacuum Pump - evacuation.
7. Electric Vacuum Gauge, Manifold Gauges and high
vacuum hoses - to measure and obtain proper vacuum.
8. Accurate Charging Cylinder or Electronic Scale - measure proper refrigerant charge.
9. Inclined Manometer - measure static pressure and pressure drop across coils.
Other recording type instruments can be essential in solving
abnormal problems, however, in many instances they may be
rented from local sources.
Proper equipment promotes faster, more efficient service,
and accurate repairs with less call backs.
HEATING PERFORMANCE TEST
Before attempting to diagnose an operating fault, run a
Heating Performance Test and apply the results to the
Service Problem Analysis Guide.
To conduct a heating performance test, the BTU input to the
package gas unit must be calculated.
After the heating cycle has been in operation for at least
fifteen minutes and with all other gas appliances turned off,
the gas meter should be clocked.
To find the BTU input, multiply the number of cubic feet of gas
consumed per hour by the heating value of the gas being
used. (The calorific value of the gas being used is found by
contacting your local utility.)
26
Page 27

SCHEDULED MAINTENANCE
0
1
2
3
4
5
10 Thousand
CUBIC
FEET
8
7
9
8
7
6
1 Thousand
9
6
1
2
3
4
5
2
3
4
0
1
5
1 Million
Quarter
Foot
9
8
8
7
7
6
6
1
9
2
3
4
5
100 Thousand
One
Foot
G AS RAT E -- CUBIC FE ET PE R HOUR
Secon ds for
One
Revolution
10 90 180 360 720 1800 36 25 50 100 200 500
11 82 164 327 655 1636 37 -- -- 97 195 486
12 75 150 300 600 1500 38 23 47 95 189 474
13 69 138 277 555 1385 39 -- -- 92 185 462
14 64 129 257 514 1286 40 22 45 90 180 450
15 60 120 240 480 1200 41 -- -- -- 176 439
16 56 113 225 450 1125 42 21 43 86 172 429
17 53 106 212 424 1059 43 -- -- -- 167 419
18 50 100 200 400 1000 44 -- 41 82 164 409
19 47 95 189 379 947 45 20 40 80 160 400
20 45 90 180 360 900 46 -- -- 78 157 391
21 43 86 171 343 857 47 19 38 76 153 383
22 41 82 164 327 818 48 -- -- 75 150 375
23 39 78 157 313 783 49 -- -- -- 147 367
24 37 75 150 300 750 50 18 36 72 144 360
25 36 72 144 288 720 51 -- -- -- 141 355
26 34 69 138 277 692 52 -- -- 69 138 346
27 33 67 133 265 667 53 17 34 -- 136 340
28 32 64 129 257 643 54 -- -- 67 133 333
29 31 62 124 248 621 55 -- -- -- 131 327
30 30 60 120 240 600 56 16 32 64 129 321
31 -- -- 116 232 581 57 -- -- -- 126 316
32 28 56 113 225 563 58 -- 31 62 124 310
33 -- -- 109 218 545 59 -- -- -- 122 305
34 26 53 106 212 529 60 15 30 60 120 300
35 -- -- 103 206 514
1/4
cu/ft
Size of Test Dial
1/2
cu/ft1cu/ft2cu/ft5cu/ft
Seconds for
One
Revolution
1/4
cu/ft
Size of Test D ial
1/2
cu/ft1cu/ft2cu/ft5cu/ft
27
Page 28

SCHEDULED MAINTENANCE
Example:
It takes forty (40) seconds on the gas meter for the hand on
the cubic foot dial to make one complete revolution, with all
appliances off, except the unit. Using the gas rate chart,
observe the forty (40) seconds, locate and read across to the
one (1) cubic foot dial column. There you will find the number
90, which shows that ninety (90) cubic feet of gas will be
consumed in one (1) hour.
Let's assume the local gas utility has stated that the calorific
value of the gas is 1025 BTU per cubic foot.
Multiplying the ninety (90) cubic feet by 1025 BTU/ft
an input of 92,250 BTU/hr.
Checking the BTU input on the rating plate of the unit being
tested.
EXAMPLE: *PD1436090M41**
INPUT: 92,000 BTU/HR
OUTPUT CAP: 72,900 BTU/HR
Should the figure you calculated not fall within five (5) percent
of the nameplate rating of the unit, adjust the gas valve
pressure regulator or resize orifices. In no case should the
input exceed that shown on the rating plate.
3
gives us
To adjust the pressure regulator on the gas valve, turn down
(clockwise) to increase pressure and input, and out (counterclockwise) to decrease pressure and input.
Since propane gas is not normally installed with a gas meter,
clocking will be virtually impossible. The gas orifices used
with propane are calculated for 2500 BTU gas per cubic foot
and with proper inlet pressures and correct piping size, full
capacity will be obtained.
With propane gas, no unit gas valve regulator is used;
however, the second stage supply line pressure regulator
should be adjusted to give 11" water column with all other gas
consuming appliances running.
The dissipation of the heat transferred to the heat exchanger
is now controlled by the amount of air circulated over its
surface.
The flow rate (CFM) of air circulated is governed by the
external static pressure in inches of water column of duct
work, cooling coil, registers and etc., applied externally to the
unit versus the motor speed tap.
A properly operating unit must have the BTU input and flow
rate (CFM) of air, within the limits shown to prevent short
cycling of the equipment. As the external static pressure
goes up, the temperature rise will also increase. Consult the
proper tables for temperature rise limitation.
CAUTION
ALWAYS CONNECT A MANOMETER TO THE 1/8" PIPE
TAP AT THE GAS VALVE BEFORE ADJUSTING THE
PRESSURE REGULATOR. IN NO CASE SHOULD THE
FINAL MANIFOLD PRESSURE VARY MORE THAN
PLUS OR MINUS .3 INCHES WATER COLUMN FROM
3.5 INCHES WATER COLUMN FOR NATURAL G AS OR
10 INCHES WATER COLUMN FOR PROPANE GAS.
28
Page 29

SERVICING
COOLING ANALYSIS CHART
•
•
•
Compresso r i s noisy
System
Operating
Pressures
Low suction pressure
Low head pr essure
Test Meth od
Remedy
High suction pressure
High head pressure
Test Voltage S-1
Inspect Fuse Size & Type S-4
Inspect Connecti on - Tighten S-2
Test Circuits With Oh mmeter S-3
Test Con tinuity of Overload S-17A
Te s t co ntinu i ty of Therm o s ta t & Wi r i ng S - 3
Check control circuit with voltmeter S-4
Test Capacitor S-15
Test Mo tor Windi ngs S-17B
Use Test Cord S-17D
Te st co nt in u it y of Co il & Con t a cts S-7 , S- 8
Test Ignition Control S-313
Test Control Circuit with Voltmeter S-4
Test Voltage S-1
Repair or Replace S-16
Test Mo tor Windi ngs S-16
Check resistance of A nticipator S-3
Test For Le aks, Add Refrigerant S-103
Replace R estr icte d Part S-112
Inspect Filter-Cl ean or R e place
Inspect Coil - Cl ean
Speed Blower, Check Duct Static Press S-200
Reduce Blower Speed S-2 00
•
Recover Part of Charge S-113
Inspect Coil - Cl ean
Recover Charge, Evacuate, Recharge S-1 14
Re mo ve Ob str u ctio n to Ai r Flow
Chec k W i ndows , Doors, Vent Fa ns, Etc.
Relocate Thermos tat
Readjust Air Volume Dampers
Ref igure C ool ing Load
Replace C ompressor
Test Compressor Efficiency S-104
Reset And Test Control S-12
Test Voltage
Replace Valv e
Remove restri ction or replace expa nsio n dev ice
Tighte n Bulb Bracket
Check Va l v e Operation S-110
Tighten Bolts
Rep lace Valv e or So l en o id S-2 1, 122
Test Control S-24
Check Flow rator & Seat or Replace Flow rator S-111
See Service Procedure Ref.
Complaint
POS SIBLE CAUSE
DOTS IN ANALYSIS
GUID E IN DI CATE
"PO S SIBLE CAUS E"
Power Failure
Blown Fuse
Loos e C on n ec tion
Sho rted or B r oken Wi r es
Ope n Overload
Faulty Thermostat
Faulty Tra nsformer
Sho rted or O pen Capac i tor
Sho rted or G r ounded Co m pr esso r
Compressor Stuc k
Faulty Compressor Contactor
F aul ty Ig nitio n Cont rol
Open Control Circuit
Low Voltage
Faulty Evap. Fan Motor
Sho rted or G r ounded Fan Motor
Improper Cooling Anti cipator
Shortage of Refrigerant
Restricted Liquid Line
Dir ty A ir Filter
Dirty Indoor Coi l
Not enough air across Indoor Coil
T oo much air ac r oss In door Coi l
Overcharge of Refrigerant
Dirty Outdoor Coi l
Noncondensibles
Rec i r cula tion of C ondensing Air
Infiltration of Outdoor Air
Improperly Loc ated Thermostat
Air Flow Unbalan ced
Syst em Under sized
Broken In ternal Par ts
Inefficient Compressor
High Pr es sure Cont rol Open
Unbalanced Power, 3P H
Wrong Type Expansion Valve
Expansion Device Restricted
Expansion Valve Bulb Loose
Inop erative Ex pans ion Valve
Loos e H old-do w n B olt s
Faul ty Reversing Val ve
Faulty Defrost Control
Faulty Defrost Thermostat Test Defrost Th ermost at S- 2 5
Fl owrator Not Se ating Pr operly
SYMPTOM
No Cooling
System will not start
Compressor will not star t - fan runs
Comp. and Cond. Fan will not start
Evaporator fan will not start
Con dens e r fan wi l l no t st a r t
•
•••
•••
••••••
•••
•• ••
••
•••
••
••
•• ••
•
•
•••
••
••
•• • ••
•• • •
••
•
•••
••• • ••
••• • ••
•• •
•
•
Unsa tisfactory
Cooling
Compressor runs - goes off on overload
Compressor cycle s on overload
System runs continuously - little cooling
Too cool and then too warm
Not cool en ough on wa r m days
Ce r tain areas too cool, others too wa rm
••
•• ••
•• ••
••••
••••
••••
•• •
•• •
•••
••
••
•••
•••
29
Page 30

SERVICING
e
Com p laint No Heat Unsatisf actory Heat
POSSIBLE CAUSE
GAS HEATING ANALYSIS CHART
DOTS IN ANALYSIS
GUIDE INDICATE
"PO S S IBL E CAUSE"
Pow er Fa ilure
Blown Fuse
Loose Connection
Shorted or Broken Wires
No Low Voltage
Faulty Thermostat
Faulty Transformer
Poor or High Resistance Ground
Improper Heat Anticipator Setting
Improper Thermostat Location
Faulty Limit or Roll Out Switch
Faulty Flame Sensor
Faulty Ignition Control
Gas Valve or Gas Supply Shut Off
Faulty Induced Draft Blower
Dirty Flame Sens or , Low uA
Flame Sensor not in Flame, Low uA
Faulty Gas Valve
No High Stage Heat (2 Stage Only)
Open Aux illary Limit
Improper Air Flow or Distribution
Locking out on Main Limit
Delayed Ignition
Flashback
Orific e Size
Gas Pressure
Cracked Heat Ex changer
Stuck Gas Valve
Furnace Undersized
Faulty Pressure Switch
Blocked or Restricted Flue
Open Roll Out Switch
Bouncing On Pressure Sw itch
SYMPTOM
System Will No t Start
Burner Won't Ignite
Burner Ignites-Locks Out
Burner Shuts Off prior to T'Stat being Satasfi
Short Cycles
Long Cycles
Soot and /or Fumes
To Much Heat
Not Enough Heat
•
•
•
•
•
••••
•
•
•• ••
•• ••
•• •
•
•••
•
•• •
•
•
•••
••
••
••
•• •
•
•
•••
• •••
•
•••
•••
•
••
••
Test Volt age S-1
Test Volt age S-4
Check Wiring S-2
Check Wiring S-3
Check Transformer S-4
Check Thermostat S-3
Check Transformer S-4
Measure Ground Resistance S-313
Adjust Heat Anticipa t or Setting S-3
Relocate Thermostat
Test Control S-300,S-301,S-302
Test Flame Sensor S-314
Test Control S-313
Turn Valves to On Position S-304
Test Blow er S-303
Clean Flame Sens or S-314
Test/Adjust Position of Flame Sensor S-314
Replace Gas Valve S-304
Check Thermostat, Control, Gas Valve S-3,S-313,S-304
Reset Control S-301
Check Duct Static
Check Controls, Gas Press ., & Temp. Rise S- 300
Test for Delayed Ignition S-308
Test for Flashback S- 309
Check Orifices S-306
Check Gas Pressur e S-307
Check Burner Flames S-302
Replace Gas Valve S-304
Replace with Proper Size Furnace
•
Test Pressure Switch S-310
Check Flue/Drawdown Pressur e S-310
Test Control S-302
Test Negative Pressure S-310
Test M e thod
Reme dy
See Servi ce Procedure Reference
30
Page 31

SERVICING
Table of Contents
S-1 Checking Voltage.......................................... 32
S-2 Checking Wiring............................................ 33
S-3 Checking Thermostat, Wiring & Anticipator .. 33
S-3A Thermostat & Wiring ..................................... 33
S-3B Cooling Anticipator ........................................ 33
S-3C Heating Anticipator........................................3 3
S-4 Checking Transformer & Control Circuit ....... 3 4
S-7 Checking Contactor and/or Relays................ 34
S-8 Checking Contactor Contacts ....................... 34
S-9 Checking Fan Relay Contact ........................ 35
S-12 Checking High Pressure Control ................... 35
S-13 Checking Low Pressure Control .................... 35
S-15 Checking Capacitor....................................... 35
S-15A Resistance Check.........................................36
S-15B Capacitance Check....................................... 36
S-16A Checking Fan & Blower Motor
Windings (PSC Motors) ............................... 37
S-16C Checking ECM Motor Windings.................... 37
S-16D Checking EEM Motors.................................. 37
S-17 Checking Compressor Windings ................... 38
S-17A Resistance Test............................................ 38
S-17B Ground Test.................................................. 39
S-17D Operation Test .............................................. 40
S-18 Testing Crankcase Heater (optional item) .... 40
S-21 Checking Reversing Valve & Solenoid ............... 40
S-24 Testing Defrost Control.................................. 40
S-25 Testing Defrost Thermostat ........................... 4 0
S-100 Refrigeration Repair Practice.........................40
S-101 Leak Testing ................................................. 4 1
S-102 Evacuation .................................................... 41
S-103 Charging........................................................ 42
S-104 Checking Compressor Efficiency .................. 42
S-105B Thermostatic Expansion Valve ...................... 42
S-106 Overfeeding ................................................... 44
S-107 Underfeeding................................................. 44
S-108 Superheat ..................................................... 44
S-109 Checking Subcooling .................................... 46
S-110 Checking Expansion Valve Operation ........... 46
S-111 Fixed Orifice Restriction Devices .................. 46
S-112 Checking Restricted Liquid Line.................... 47
S-113 Refrigerant Overcharge.................................. 47
S-114 Non-condensables ........................................ 47
S-115 Compressor Burnout ..................................... 48
S-122 Reversing Valve Replacement....................... 48
S-200 Checking External Static Pressure ............... 48
S-201 Checking Temperature Rise.......................... 49
S-300 Testing Primary Limit .................................... 49
S-301 Testing Auxiliary Limit................................... 50
S-302 Checking Flame Rollout Switch .................... 50
S-303 Testing Inducer Motor....................................51
S-304 Testing Gas Valve ......................................... 52
S-305 Checking Main Burners................................. 52
S-306 Checking Orifices.......................................... 52
S-307 Checking Gas Pressure................................ 53
S-308 Checking For Delayed Ignition ...................... 54
S-309 Checking for Flashback.................................54
S-310 Checking Pressure Control ........................... 5 5
S-311 High Altitude Application............................... 55
S-313 Testing Ignition Control Module ..................... 56
S-314 Checking Flame Sensor................................ 58
HIGH VOLTAGE!
Disconnect ALL power before servicing or installing this unit. Multiple power sources
may be pre s e nt . Failur e to do so may cause pr operty da m a ge , perso na l injur y or de ath.
31
Page 32

SERVICING
S-1 CHECKING VOLTAGE
HIGH VOLTAGE!
Disconnect ALL power before servicing
or insta llin g th is un it. M ult iple powe r
sources may be present. Failure to do so
may cause property damage, personal injury
or death.
1. Remove doors, control panel cover, etc. from unit being
tested.
With power ON:
WARNING
Line Voltage now present.
2. Using a voltmeter, measure the voltage across terminals
L1 and L2 of the contactor for single phase units, and L3,
for 3 phase units.
3. No reading - indicates open wiring, open fuse(s) no power
or etc. from unit to fused disconnect service. Repair as
needed.
4. With ample voltage at line voltage connectors, energize
the unit.
5. Measure the voltage with the unit starting and operating,
and determine the unit
Locked Rotor Voltage is the actual voltage available at
the compressor during starting, locked rotor, or a stalled
condition. Measured voltage should be above minimum
listed in chart below.
To measure Locked Rotor Voltage attach a voltmeter to
the run "R" and common "C" terminals of the compressor,
or to the T
and allow the compressor to run for several seconds, then
shut down the unit. Immediately attempt to restart the
unit while measuring the Locked Rotor Voltage.
6. Voltmeter should read within the voltage tabulation as
shown. If the voltage falls below the minimum voltage,
check the line wire size. Long runs of undersized wire can
cause low voltage. If wire size is adequate, notify the local
power company in regards to either low or high voltage.
and T2 terminals of the contactor. Start the unit
1
Unit Supply Voltage
Voltage Min. Max.
460 437 506
208/230 198 253
Locked Rotor Voltage.
Max. Voltage Deviation
% Voltage = From Average Voltage X 100
Imbalance Average Voltage
To find the percentage of imbalance, measure the incoming
power supply.
L1 - L2 = 240V
L1 - L3 = 232V Avg. V =
L2 - L3 =
Total 710V
To find Max. deviation: 240 - 236.7 = +3.3
Max deviation was 4.7V
% Voltage Imbalance =
If the percentage of imbalance had exceeded 3%, it must be
determined if the imbalance is in the incoming power supply
or the equipment. To do this rotate the legs of the incoming
power and retest voltage as shown below.
238V 3
232 - 236.7 = -4.7
238 - 236.7 = +1.3
4.7 = 1.99%
236.7
710 = 236.7
L1 - L2 = 240V
L1 - L3 = 227V
L2 - L3 = 238V
L1
L2
L3
Rotate all 3 incoming
legs as shown.
L1 - L2 = 227V
L1 - L3 = 238V
L2 - L3 = 240V
L1
By the voltage readings we see that the imbalance rotated or
traveled with the switching of the incoming legs. Therefore
the imbalance lies within the incoming power supply.
If the imbalance had not changed then the problem would lie
within the equipment. Check for current leakage, shorted
motors, etc.
L3L2
Three phase units require a balanced 3 phase power supply
to operate. If the percentage of voltage imbalance exceeds
3% the unit must not be operated until the voltage condition
is corrected.
32
Page 33

SERVICING
S-2 CHECKING WIRING
HIGH VOL TAGE!
Disconnect ALL power before servicing
or insta llin g this uni t. M ultip le po wer
sources may be present. Failure to do so
may cause property damage, personal injury
or death.
1. Check wiring visually for signs of overheating, damaged
insulation and loose connections.
2. Use an ohmmeter to check continuity of any suspected
open wires.
3. If any wires must be replaced, replace with comparable
gauge and insulation thickness.
S-3 CHECKING THERMOSTAT, WIRING, AND
ANTICIPATOR
THERMO ST AT WIRE SIZING CHART
LENGTH OF RUN
25 fe et 18
50 fe et 16
75 fe et 14
100 fe et 14
125 fe et 12
150 fe et 12
M IN. COPPER WI RE
GAUGE (AWG)
S-3A THERMOSTAT AND WIRING
2. With voltmeter, check for 24 volts at wires C and G.
3. No voltage indicates the trouble is in the thermostat or
wiring.
4. Check the continuity of the thermostat and wiring. Repair
or replace as necessary.
S-3B COOLING ANTICIPATOR
The cooling anticipator is a small heater (resistor) in the
thermostat. During the "off" cycle, it heats the bimetal
element helping the thermostat call for the next cooling
cycle. This prevents the room temperature from rising too
high before the system is restarted. A properly sized
anticipator should maintain room temperature within 1 1/2 to
2 degree range.
The anticipator is supplied in the thermostat and is not to be
replaced. If the anticipator should fail for any reason, the
thermostat must be changed.
S-3C HEATING ANTICIPATOR
The heating anticipator is a wire-wound adjustable heater,
which is energized during the "ON" cycle to help prevent
overheating of the conditioned space.
The anticipator is a part of the thermostat and if it should fail
for any reason, the thermostat must be replaced. See the
following for recommended heater anticipator setting.
To determine the proper setting, use an ammeter to measure
the current on the "W" wire going to the thermostat.
Use an amprobe as shown below. Wrap 10 turns of thermostat wire around the stationary jaw of the amprobe and divide
the reading by 10.
WARNING
Line Voltage now present.
With power ON, thermostat calling for cooling
1. Use a voltmeter to check for 24 volts at thermostat wires
C and Y in the condensing unit control panel.
2. No voltage indicates trouble in the thermostat, wiring or
external transformer source.
3. Check the continuity of the thermostat and wiring. Repair
or replace as necessary.
Indoor Blower Motor
With power ON:
WARNING
Line Voltage now present.
1. Set fan selector switch at thermostat to "ON" position.
10 TURNS OF
THERMOSTAT WIRE
(From "W" on thermostat)
STATIONARY JAW
OF AMPROBE
READS 4 AMPS
CURRENT DRAW
WOULD BE .4 AMPS
Checking Heat Anticipator Amp Draw
33
Page 34

SERVICING
S-4 CHECKING TRANSFORMER AND CON-
TROL CIRCUIT
HIGH VOLTAGE!
Disconnect ALL power before servicing
or insta llin g th is un it. M ult iple powe r
sources may be present. Failure to do so
may cause property damage, personal injury
or death.
A step-down transformer (208/240 volt primary to 24 volt secondary) is provided with each indoor unit. This allows ample
capacity for use with resistance heaters. The outdoor sections do not contain a transformer.
WARNING
Disconnect ALL power before servicing.
1. Remove control panel cover, or etc., to gain access to
transformer.
With power ON:
NOTE: Most single phase contactors break only one side of
the line (L1), leaving 115 volts to ground present at most
internal components.
1. Remove the leads from the holding coil.
2. Using an ohmmeter, test across the coil terminals.
If the coil does not test continuous, replace the relay or
contactor.
S-8 CHECKING CONTACTOR CONTACTS
SINGLE PHASE
HIGH VOL TAGE!
Disconn ect ALL power befo re s erv icin g
or inst all ing th is u nit . M ult ip le po wer
sources may be present. Failure to do so
may cause property damage, personal injury
or death.
1. Disconnect the wire leads from the terminal (T) side of the
contactor.
2. With power ON, energize the contactor.
WARNING
Line Voltage now present.
2. Using a voltmeter, check voltage across secondary
voltage side of transformer (R to C).
3. No voltage indicates faulty transformer, bad wiring, or bad
splices.
4. Check transformer primary voltage at incoming line
voltage connections and/or splices.
5 If line voltage available at primary voltage side of trans-
former and wiring and splices good, transformer is
inoperative. Replace.
S-7 CHECKING CONTACTOR AND/OR RELAYS
HIGH VOLTAGE!
Disconnect ALL power before servicing
or insta llin g th is un it. M ult iple powe r
sources may be present. Failure to do so
may cause property damage, personal injury
or death.
The compressor contactor and other relay holding coils are
wired into the low or line voltage circuits. When the control
circuit is energized, the coil pulls in the normally open
contacts or opens the normally closed contacts. When the
coil is de-energized, springs return the contacts to their
normal position.
WARNING
LINE VOLTAGE NOW PRESENT.
T2
VOLT/OHM
METER
Ohmmete r fo r te st in g hol di n g coil
Voltmeter fo r testing contac ts
TESTING COMPRESSOR CONTACTOR
(Single Phase)
3. Using a voltmeter, test across terminals.
A. L1 - L2 - No voltage. Check breaker or fuses on main
power supply.
B . L2 - T1 - No voltage indicates CC1 contacts open.
If a no voltage reading is obtained - replace the contactor.
T1
CC
L1L2
34
Page 35

SERVICING
THREE PHASE
Using a voltmeter, test across terminals.
A. L1-L2, L1-L3, and L2-L3 - If voltage is present,
proceed to B. If voltage is not present, check breaker
or fuses on main power supply..
B. T1-T2, T1-T3, and T2-T3 - If voltage readings are not
the same as in "A", replace contactor.
T3L3T2
CC
T1
VOLT/OHM
METER
L1
L2
Ohmmeter for testing holding coil
Voltmeter for testing contacts
TESTING COMPRESSOR CONTACTOR
(Three Phase)
S-9 CHECKING FAN RELAY CONTACTS
The fan relays are incorporated into the control board. See
section S-313 for checking control board.
4. Start the system and place a piece of cardboard in front
of the condenser coil, raising the condensing pressure.
5. Check pressure at which the high pressure control cutsout.
If it cuts-out at 610 PSIG ± 10 PSIG, it is operating normally
(See causes for high head pressure in Service Problem
Analysis Guide). If it cuts out below this pressure range,
replace the control. The control should reset at 420 PSIG ±
25 PSIG.
S-13 CHECKING LOW PRESSURE CONTROL
The low pressure control senses the pressure in the suction
line and will open its contacts on a drop in pressure. The low
pressure control will automatically reset itself with a rise in
pressure.
The low pressure control is designed to cut-out (open) at
approximately 7 PSIG ± 3 PSIG. It will automatically cut-in
(close) at approximately 25 PSIG ± 5 PSIG.
Test for continuity using a VOM and if not as above, replace
the control.
S-12 CHECKING HIGH PRESSURE CONTROL
HIGH VOLTAGE!
Disconnect ALL power before servicing
or insta llin g th is un it. M ult iple powe r
sources may be present. Failure to do so
may cause property damage, personal injury
or death.
The high pressure control senses the pressure in the liquid
line. If abnormally high condensing pressures develop, the
contacts of the control open, breaking the control circuit
before the compressor motor overloads. This control is
automatically reset.
1. Using an ohmmeter, check across terminals of high
pressure control, with wire removed. If not continuous,
the contacts are open.
3. Attach a gauge to the dill valve port on the base valve.
With power ON:
S-15 CHECKING CAPACITOR
CAPACITOR, RUN
A run capacitor is wired across the auxiliary and main
windings of a single phase permanent split capacitor motor.
The capacitors primary function is to reduce the line current
while greatly improving the torque characteristics of a motor.
This is accomplished by using the 90° phase relationship
between the capacitor current and voltage in conjunction
with the motor windings so that the motor will give two phase
operation when connected to a single phase circuit. The
capacitor also reduces the line current to the motor by
improving the power factor.
CAPACITOR, START
SCROLL COMPRESSOR MODELS
Hard start components are not required on Scroll compressor equipped units due to a non-replaceable check valve
located in the discharge line of the compressor. However
hard start kits are available and may improve low voltage
starting characteristics.
This check valve closes off high side pressure to the
compressor after shut down allowing equalization through
the scroll flanks. Equalization requires only about one or two
seconds during which time the compressor may turn backwards.
35
Page 36

SERVICING
Your unit comes with a 180-second anti-short cycle to
prevent the compressor from starting and running backwards.
MODELS EQUIPPED WITH A HARD START DEVICE
A start capacitor is wired in parallel with the run capacitor to
increase the starting torque. The start capacitor is of the
electrolytic type, rather than metallized polypropylene as
used in the run capacitor.
A switching device must be wired in series with the capacitor
to remove it from the electrical circuit after the compressor
starts to run. Not removing the start capacitor will overheat
the capacitor and burn out the compressor windings.
These capacitors have a 15,000 ohm, 2 watt resistor wired
across its terminals. The object of the resistor is to discharge
the capacitor under certain operating conditions, rather than
having it discharge across the closing of the contacts within
the switching device such as the Start Relay, and to reduce
the chance of shock to the servicer. See the Servicing
Section for specific information concerning capacitors.
RELAY, START
A potential or voltage type relay is used to take the start
capacitor out of the circuit once the motor comes up to speed.
This type of relay is position sensitive. The normally closed
contacts are wired in series with the start capacitor and the
relay holding coil is wired parallel with the start winding. As
the motor starts and comes up to speed, the increase in
voltage across the start winding will energize the start relay
holding coil and open the contacts to the start capacitor.
Two quick ways to test a capacitor are a resistance and a
capacitance check.
OHMMETER
CAPACITOR
TESTING CAPACITOR RESISTANCE
2. Set an ohmmeter on its highest ohm scale and connect
the leads to the capacitor -
a. Good Condition - indicator swings to zero and
slowly returns to infinity. (Start capacitor with
bleed resistor will not return to infinity. It will still
read the resistance of the resistor).
b. Shorted - indicator swings to zero and stops there
-replace.
c. Open - no reading - replace. (Start capacitor
would read resistor resistance.)
S-15B CAPACITANCE CHECK
Using a hookup as shown below, take the amperage and
voltage readings and use them in the formula:
S-15A RESISTANCE CHECK
HIGH VOLTAGE!
Disconnect ALL power before servicing
or insta llin g this un it. M ult iple powe r
sources may be present. Failure to do so
may cause property damage, personal injury
or death.
1. Discharge capacitor and remove wire leads.
WARNING
Discharge capacitor through a 20 to 30 OHM
resistor before handling.
TESTING CAPACITANCE
36
Page 37

SERVICING
WARNING
Discharge capacitor through a 20 to 30 OHM
resistor before handling.
Capacitance (MFD) = 2650 X Amperage
Voltage
S-16A CHECKING FAN AND BLOWER MOTOR
WINDINGS (PSC MOTORS)
The auto reset fan motor overload is designed to protect the
motor against high temperature and high amperage conditions by breaking the common circuit within the motor,
similar to the compressor internal overload. However, heat
generated within the motor is faster to dissipate than the
compressor, allow at least 45 minutes for the overload to
reset, then retest.
HIGH VOLTAGE!
Disconnect ALL power before servicing
or insta llin g th is un it. M ult iple powe r
sources may be present. Failure to do so
may cause property damage, personal injury
or death.
1. Remove the motor leads from its respective connection
points and capacitor (if applicable).
2. Check the continuity between each of the motor leads.
3. Touch one probe of the ohmmeter to the motor frame
(ground) and the other probe in turn to each lead.
If the windings do not test continuous or a reading is obtained
from lead to ground, replace the motor.
S-16C CHECKING ECM MOTOR WINDINGS
HIGH VOLTAGE!
Disconnect ALL power before servicing
or insta llin g th is un it. M ult iple powe r
sources may be present. Failure to do so
may cause property damage, personal injury
or death.
4. Using an ohmmeter, check the motor windings for continuity to ground (pins to motor shell). If the ohmmeter
indicates continuity to ground, the motor is defective and
must be replaced.
5. Using an ohmmeter, check the windings for continuity
(pin to pin). If no continuity is indicated, the thermal limit
(over load) device may be open. Allow motor to cool and
retest.
Motor
Connector
(3-pin)
WINDING TEST
S-16D CHECKING EEM MOTORS
The EEM motor is a one piece, fully encapsulated, 3 phase
brushless DC (single phase AC input) motor with ball bearing
construction. Unlike the ECM 2.3/2.5 motors, the EEM
features an integral control module.
Note: The GE TECMate will not currently operate the EEM
motor.
1. Using a voltmeter, check for 230 volts to the motor
connections L and N. If 230 volts is present, proceed to
step 2. If 230 volts is not present, check the line voltage
circuit to the motor.
2. Using a voltmeter, check for 24 volts from terminal C to
either terminal 1, 2, 3, 4, or 5, depending on which tap is
being used, at the motor. If voltage present, proceed to
step 3. If no voltage, check 24 volt circuit to motor.
3. If voltage was present in steps 1 and 2, the motor has
failed and will need to be replaced.
Note: When replacing motor, ensure the belly band is between
the vents on the motor and the wiring has the proper drip loop
to prevent condensate from entering the motor.
1. Disconnect the 5-pin and the 16-pin connectors from the
ECM power head.
2. Remove the 2 screws securing the ECM power head and
separate it from the motor.
3. Disconnect the 3-pin motor connector from the power
head and lay it aside.
37
Page 38

SERVICING
C
123
Low Voltage Connections
EEM MOTOR CONNECTIONS
High Voltage
Connections
3/16"
LGN
4
1/4”
5
Ignition of the discharge can also occur at the venting
terminal or inside the compressor, if there is sufficient
contaminant air present in the system and an electrical arc
occurs as the terminal vents.
Ignition cannot occur at the venting terminal without the
presence of contaminant air, and cannot occur externally
from the venting terminal without the presence of an external
ignition source.
Therefore, proper evacuation of a hermetic system is
essential at the time of manufacture and during servicing.
To reduce the possibility of external ignition, all open flame,
electrical power, and other heat sources should be extinguished or turned off prior to servicing a system.
S-17A RESISTANCE TEST
Each compressor is equipped with an internal overload.
The line break internal overload senses both motor amperage
and winding temperature. High motor temperature or amperage heats the disc causing it to open, breaking the common
circuit within the compressor on single phase units.
Heat generated within the compressor shell, usually due to
recycling of the motor, high amperage or insufficient gas to
cool the motor, is slow to dissipate. Allow at least three to
four hours for it to cool and reset, then retest.
Fuse, circuit breaker, ground fault protective device, etc. has
not tripped -
S-17 CHECKING COMPRESSOR
WARNING
Hermetic compressor electrical terminal venting can
be dangerous. When insulating material which
supports a hermetic compressor or electrical terminal
suddenly disintegrates due to physical abuse or as a
result of an electrical short between the terminal and
the compressor housing, the terminal may be
expelled, venting the vapor and liquid contents of the
compressor housing and system.
If the compressor terminal PROTECTIVE COVER and gasket
(if required) are not properly in place and secured, there is a
remote possibility if a terminal vents, that the vaporous and
liquid discharge can be ignited, spouting flames several feet,
causing potentially severe or fatal injury to anyone in its path.
This discharge can be ignited external to the compressor if
the terminal cover is not properly in place and if the discharge
impinges on a sufficient heat source.
HIGH VOLTAGE!
Disconnect ALL power before servicing
or insta llin g th is un it. M ult iple powe r
sources may be present. Failure to do so
may cause property damage, personal injury
or death.
1. Remove the leads from the compressor terminals.
See warnings S-17 before removing compressor
terminal cover .
2. Using an ohmmeter, test continuity between terminals SR, C-R, and C-S, on single phase units or terminals T1,
T2 and T3, on 3 phase units.
C
OHMMETER
S
COMP
R
38
TESTING COMPRESSOR WINDINGS
Page 39

SERVICING
If either winding does not test continuous, replace the
compressor.
NOTE: If an open compressor is indicated, allow ample
time for the internal overload to reset before replacing
compressor.
S-17B GROUND TEST
If fuse, circuit breaker, ground fault protective device,
etc., has tripped, this is a strong indication that an
electrical problem exists and must be found and corrected. The circuit protective device rating must be
checked, and its maximum rating should coincide with
that marked on the equipment nameplate.
With the terminal protective cover in place, it is acceptable to replace the fuse or reset the circuit breaker
TIME ONLY to see if it was just a nuisance opening. If
it opens again,
DO NOT continue to reset.
ONE
WARNING
Disconnect ALL power before servicing.
Disconnect all power to unit, making sure that all
power legs are open.
1. DO NOT remove protective terminal cover. Disconnect the three leads going to the compressor terminals at the nearest point to the compressor.
2. Identify the leads and using a Megger, Hi-Potential
Ground Tester, or other suitable instrument which
puts out a voltage between 300 and 1500 volts, check
for a ground separately between each of the three
leads and ground (such as an unpainted tube on the
compressor). Do not use a low voltage output
instrument such as a volt-ohmmeter.
WARNING
Damage can occur to the glass embedded terminals if
the leads are not pro perly removed. This can result in
terminal and hot oil discharging.
Carefully retest for ground, directly between compressor
terminals and ground.
5. If ground is indicated, replace the compressor.
S-17D OPERATION TEST
If the voltage, capacitor, overload and motor winding test fail
to show the cause for failure:
HIGH VOLTAGE!
Disconnect ALL power before servicing
or insta llin g th is un it. M ult iple powe r
sources may be present. Failure to do so
may cause property damage, personal injury
or death.
1. Remove unit wiring from disconnect switch and wire a test
cord to the disconnect switch.
NOTE: The wire size of the test cord must equal the line wire
size and the fuse must be of the proper size and type.
2. With the protective terminal cover in place, use the three
leads to the compressor terminals that were disconnected at the nearest point to the compressor and
connect the common, start and run clips to the respective
leads.
3. Connect good capacitors of the right MFD and voltage
rating into the circuit as shown.
4. With power ON, close the switch.
HI-POT
COMPRESSOR GROUND TEST
3. If a ground is indicated, then carefully remove the
compressor terminal protective cover and inspect for
loose leads or insulation breaks in the lead wires.
4. If no visual problems indicated, carefully remove the
leads at the compressor terminals.
WARNING
Line Voltage now present.
A . If the compressor starts and continues to run, the cause
for failure is somewhere else in the system.
B . If the compressor fails to start - replace.
39
Page 40

SERVICING
S-18 TESTING CRANKCASE HEATER
(OPTIONAL ITEM)
The crankcase heater must be energized a minimum of four
(4) hours before the condensing unit is operated.
Crankcase heaters are used to prevent migration or accumulation of refrigerant in the compressor crankcase during the
off cycles and prevents liquid slugging or oil pumping on start
up.
A crankcase heater will not prevent compressor damage due
to a floodback or over charge condition.
WARNING
Disconnect ALL power before servicing.
1. Disconnect the heater lead in wires.
2. Using an ohmmeter, check heater continuity - should test
continuous. If not, replace.
S-21 CHECKING REVERSING VALVE AND SO-
LENOID
Occasionally the reversing valve may stick in the heating or
cooling position or in the mid-position.
When stuck in the mid-position, part of the discharge gas
from the compressor is directed back to the suction side,
resulting in excessively high suction pressure. An increase
in the suction line temperature through the reversing valve can
also be measured. Check operation of the valve by starting
the system and switching the operation from COOLING to
HEATING cycle.
If the valve fails to change its position, test the voltage (24V)
at the valve coil terminals, while the system is on the
COOLING cycle.
If no voltage is registered at the coil terminals, check the
operation of the thermostat and the continuity of the connecting wiring from the "O" terminal of the thermostat to the unit.
If voltage is registered at the coil, tap the valve body lightly
while switching the system from HEATING to COOLING, etc.
If this fails to cause the valve to switch positions, remove the
coil connector cap and test the continuity of the reversing
valve solenoid coil. If the coil does not test continuous replace it.
If the coil test continuous and 24 volts is present at the coil
terminals, the valve is inoperative - replace it.
S-24 TESTING DEFROST CONTROL
NOTE: The PCBDM133 and PCBDM160 defrost controls
are shipped from the factory with the compressor delay option
selected. This will de-energize the compressor contactor
for 30 seconds on defrost initiation and defrost termination.
If the jumper is set to Normal, the compressor will continue
to run during defrost initiation and defrost termination. The
control will also ignore the low pressure switch connected
to R-PS1 and PS2 for 5 minutes upon defrost initiation and
5 minutes after defrost termination.
To check the defrost control for proper sequencing, proceed
as follows: With power ON; unit not running.
1. Jumper defrost thermostat by placing a jumper wire
across the terminals "DFT" and "R" ("R-DFT" on
PCBDM133 and PCBDM160) at defrost control board.
2. Connect jumper across test pins on defrost control
board.
3. Set thermostat to call for heating. System should go into
defrost within 21 seconds.
4. Immediately remove jumper from test pins.
5. Using VOM check for voltage across terminals "C & O"
("O-RV" on PCBDM133 and PCBDM160). Meter should
read 24 volts.
6. Using VOM check for voltage across fan terminals DF1
and DF2 on the board. You should read line voltage (208230 VAC) indicating the relay is open in the defrost mode.
7. Using VOM check for voltage across "W2" (W on
PCBDM133 and PCBDM160) & "C" terminals on the
board. You should read 24 volts.
8. If not as above, replace control board.
9. Set thermostat to off position and disconnect power
before removing any jumpers or wires.
NOTE: Remove jumper across defrost thermostat before
returning system to service.
S-25 TESTING DEFROST THERMOSTAT
1. Install a thermocouple type temperature test lead on the
tube adjacent to the defrost control. Insulate the lead
point of contact.
2. Check the temperature at which the control closes its
contacts by lowering the temperature of the control. The
defrost control should close at 34°F ± 5°F.
3. Check the temperature at which the control opens its
contacts by raising the temperature of the control. The
defrost control should open at 60°F ± 5°F.
4. If not as above, replace control.
NOTE: PCBDM133 and PCBDM160 defrost controls have
a three (3) minute compressor off cycle delay.
40
Page 41

SERVICING
S-100 REFRIGERATION REPAIR PRACTICE
DANGER
Always remove the refrigerant charge in a proper
manner before applying heat to the system.
When repairing the refrigeration system:
WARNING
Disconnect ALL power before servicing.
1. Never open a system that is under vacuum. Air and
moisture will be drawn in.
2. Plug or cap all openings.
3. Remove all burrs and clean the brazing surfaces of the
tubing with sand cloth or paper. Brazing materials do not
flow well on oxidized or oily surfaces.
4. Clean the inside of all new tubing to remove oils and pipe
chips.
5. When brazing, sweep the tubing with dry nitrogen to
prevent the formation of oxides on the inside surfaces.
6. Complete any repair by replacing the liquid line drier in the
system, evacuate and charge.
BRAZING MATERIALS
Copper to Copper Joints - Sil-Fos used without flux (alloy
of 15% silver, 80% copper, and 5% phosphorous). Recommended heat 1400°F.
Copper to Steel Joints - Silver Solder used without a flux
(alloy of 30% silver, 38% copper, 32% zinc). Recommended
heat - 1200°F.
Pressure test the system using dry nitrogen and soapy water
to locate leaks. If you wish to use a leak detector, charge the
system to 10 psi using the appropriate refrigerant then use
nitrogen to finish charging the system to working pressure,
then apply the detector to suspect areas. If leaks are found,
repair them. After repair, repeat the pressure test. If no leaks
exist, proceed to system evacuation.
S-102 EVACUATION
WARNING
REFRIGERA NT U NDER PR ESSUR E!
Failure to follow proper procedures may cause
property damage, personal injury or death.
This is the most important part of the entire service procedure. The life and efficiency of the equipment is dependent
upon the thoroughness exercised by the serviceman when
evacuating air (non-condensables) and moisture from the
system.
Air in a system causes high condensing temperature and
pressure, resulting in increased power input and reduced
performance.
Moisture chemically reacts with the refrigerant oil to form
corrosive acids. These acids attack motor windings and
parts, causing breakdown.
The equipment required to thoroughly evacuate the system is
a high vacuum pump, capable of producing a vacuum equivalent to 25 microns absolute and a thermocouple vacuum
gauge to give a true reading of the vacuum in the system
NOTE: Never use the system compressor as a vacuum pump
or run when under a high vacuum. Motor damage could
occur.
S-101 LEAK TESTING
(NITROGEN OR NITROGEN-TRACED)
WARNING
To avoid the risk of fire or explosion, never use
oxygen, high pressure air or flammable gases for leak
testing of a refrigeration system.
WARNING
To avoid possible explosion, the line from the
nitrogen cylinder must include a pressure regulator
and a pressure relief valve. The pressure relief valve
must be set to open at no more than 150 psig.
WARNING
Do not front seat the service valve(s) with the
compressor open, with the suction line of the
comprssor closed or severely restricted.
1. Connect the vacuum pump, vacuum tight manifold set
with high vacuum hoses, thermocouple vacuum gauge
and charging cylinder as shown.
2. Start the vacuum pump and open the shut off valve to the
high vacuum gauge manifold only. After the compound
gauge (low side) has dropped to approximately 29 inches
of vacuum, open the valve to the vacuum thermocouple
gauge. See that the vacuum pump will blank-off to a
maximum of 25 microns. A high vacuum pump can only
produce a good vacuum if its oil is non-contaminated.
41
Page 42

SERVICING
LOW SIDE
GAUGE
AND V ALVE
3. If the vacuum pump is working properly, close the valve to
the vacuum thermocouple gauge and open the high and
low side valves to the high vacuum manifold set. With the
valve on the charging cylinder closed, open the manifold
valve to the cylinder.
4. Evacuate the system to at least 29 inches gauge before
opening valve to thermocouple vacuum gauge.
5. Continue to evacuate to a maximum of 250 microns.
Close valve to vacuum pump and watch rate of rise. If
vacuum does not rise above 1500 microns in three to five
minutes, system can be considered properly evacuated.
6. If thermocouple vacuum gauge continues to rise and
levels off at about 5000 microns, moisture and noncondensables are still present. If gauge continues to rise
a leak is present. Repair and re-evacuate.
7. Close valve to thermocouple vacuum gauge and vacuum
pump. Shut off pump and prepare to charge.
S-103 CHARGING
WARNING
REFRIGERANT UNDER PRESSURE!
* Do not overcharge sy stem w ith refrigerant.
* Do not operate unit in a vacuum or at negative
pressure.
Failure to follow proper procedures may cause
property damage, personal injury or death.
HIGH SIDE
GAUGE
AND VALVE
EVACUATION
Only use refrig erant certified to AHRI standards.
Used refrigerant may cause compressor damage.
Goodman is not responsible for damage or the need
for repairs resulting from the use of unapproved
refrigerant types or used or recycled refrigerant.
Most portable machines cannot clean used
refrigerant to meet AHRI standards.
Operating the compressor with the suction valve
closed will cause serious compressor damage.
Charge the system with the exact amount of refrigerant.
Refer to the specification section or check the unit name-
plates for the correct refrigerant charge.
An inaccurately charged system will cause future problems.
1. Using a quality set of charging scales, weigh the proper
amount of refrigerant for the system. Allow liquid refrigerant only to enter the high side.
2. After the system will take all it will take, close the valve
on the high side of the charging manifold.
3. Start the system and charge the balance of the refrigerant through the low side.
NOTE: R410A should be drawn out of the storage container
or drum in liquid form due to its fractionation properties, but
should be "Flashed" to its gas state before entering the
system. There are commercially available restriction devices that fit into the system charging hose set to accomplish this. DO NOT charge liquid R410A into the compressor.
4. With the system still running, close the valve on the
charging cylinder. At this time, you may still have some
liquid refrigerant in the charging cylinder hose and will
definitely have liquid in the liquid hose. Reseat the liquid
line core. Slowly open the high side manifold valve and
transfer the liquid refrigerant from the liquid line hose and
charging cylinder hose into the suction service valve port.
CAREFUL: Watch so that liquid refrigerant does not
enter the compressor.
Due to their design, Scroll compressors are inherently more
tolerant of liquid refrigerant.
NOTE: Even though the compressor section of a Scroll
compressor is more tolerant of liquid refrigerant, continued
floodback or flooded start conditions may wash oil from the
bearing surfaces causing premature bearing failure.
42
Page 43

SERVICING
12
14
16
18
20
22
24
26
28
30
32
34
36
38
40
42
44
46
48
50
52
54
56
58
60
62
64
66
68
70
72
74
76
78
80
82
84
86
88
90
92
94
96
98
°F
-37.7
-34.7
-32.0
-29.4
-36.9
-24.5
-22.2
-20.0
-17.9
-15.8
-13.8
-11.9
-10.1
-8.3
-6.5
-4.5
-3.2
-1.6
0.0
1.5
3.0
4.5
5.9
7.3
8.6
10.0
11.3
12.6
13.8
15.1
16.3
17.5
18.7
19.8
21.0
22.1
23.2
24.3
25.4
26.4
27.4
28.5
29.5
30.5
31.2
32.2
33.2
34.1
35.1
35.5
36.9
PSIG
100
102
104
106
108
110
112
PSIG
114.0
116.0
118.0
120.0
122.0
124.0
126.0
128.0
130.0
132.0
134.0
136.0
138.0
140.0
142.0
144.0
146.0
148.0
150.0
152.0
154.0
156.0
158.0
160.0
162.0
164.0
166.0
168.0
170.0
172.0
174.0
176.0
178.0
180.0
182.0
184.0
186.0
188.0
190.0
192.0
194.0
196.0
198.0
200.0
202.0
204.0
206.0
208.0
210.0
212.0
214.0
Pressure vs. Temperature Chart
R-410A
°F
37.8
38.7
39.5
40.5
41.3
42.2
43.0
43.8
44.7
45.5
46.3
47.1
47.9
48.7
49.5
50.3
51.1
51.8
52.5
53.3
54.0
54.8
55.5
56.2
57.0
57.7
58.4
59.0
59.8
60.5
61.1
61.8
62.5
63.1
63.8
64.5
65.1
65.8
66.4
67.0
67.7
68.3
68.9
69.5
70.1
70.7
71.4
72.0
72.6
73.2
73.8
PSIG
216.0
218.0
220.0
222.0
224.0
226.0
228.0
230.0
232.0
234.0
236.0
238.0
240.0
242.0
244.0
246.0
248.0
250.0
252.0
254.0
256.0
258.0
260.0
262.0
264.0
266.0
268.0
270.0
272.0
274.0
276.0
278.0
280.0
282.0
284.0
286.0
288.0
290.0
292.0
294.0
296.0
298.0
300.0
302.0
304.0
306.0
308.0
310.0
312.0
314.0
316.0
°F
74.3
74.9
75.5
76.1
76.7
77.2
77.8
78.4
78.9
79.5
80.0
80.6
81.1
81.6
82.2
82.7
83.3
83.8
84.3
84.8
85.4
85.9
86.4
86.9
87.4
87.9
88.4
88.9
89.4
89.9
90.4
90.9
91.4
91.9
92.4
92.8
93.3
93.8
94.3
94.8
95.2
95.7
96.2
96.6
97.1
97.5
98.0
98.4
98.9
99.3
99.7
PSIG
318.0
320.0
322.0
324.0
326.0
328.0
330.0
332.0
334.0
336.0
338.0
340.0
342.0
344.0
346.0
348.0
350.0
352.0
354.0
356.0
358.0
360.0
362.0
364.0
366.0
368.0
370.0
372.0
374.0
376.0
378.0
380.0
382.0
384.0
386.0
388.0
390.0
392.0
394.0
396.0
398.0
400.0
402.0
404.0
406.0
408.0
410.0
412.0
414.0
416.0
418.0
°F
100.2
100.7
101.1
101.6
102.0
102.4
102.9
103.3
103.7
104.2
104.6
105.1
105.4
105.8
106.3
106.6
107.1
107.5
107.9
108.3
108.8
109.2
109.6
110.0
110.4
110.8
111.2
111.6
112.0
112.4
112.6
113.1
113.5
113.9
114.3
114.7
115.0
115.5
115.8
116.2
116.6
117.0
117.3
117.7
118.1
118.5
118.8
119.2
119.6
119.9
120.3
PSIG
420.0
422.0
424.0
426.0
428.0
430.0
432.0
434.0
436.0
438.0
440.0
442.0
444.0
446.0
448.0
450.0
452.0
454.0
456.0
458.0
460.0
462.0
464.0
466.0
468.0
470.0
472.0
474.0
476.0
478.0
480.0
482.0
484.0
486.0
488.0
490.0
492.0
494.0
496.0
498.0
500.0
502.0
504.0
506.0
508.0
510.0
512.0
514.0
516.0
518.0
520.0
°F
120.7
121.0
121.4
121.7
122.1
122.5
122.8
123.2
123.5
123.9
124.2
124.6
124.9
125.3
125.6
126.0
126.3
126.6
127.0
127.3
127.7
128.0
128.3
128.7
129.0
129.3
129.7
130.0
130.3
130.7
131.0
131.3
131.6
132.0
132.3
132.6
132.9
133.3
133.6
133.9
134.0
134.5
134.8
135.2
135.5
135.8
136.1
136.4
136.7
137.0
137.3
PSIG
522.0
524.0
526.0
528.0
530.0
532.0
534.0
536.0
538.0
540.0
544.0
548.0
552.0
556.0
560.0
564.0
568.0
572.0
576.0
580.0
584.0
588.0
592.0
596.0
600.0
604.0
608.0
612.0
616.0
620.0
624.0
628.0
632.0
636.0
640.0
644.0
648.0
652.0
656.0
660.0
664.0
668.0
672.0
676.0
680.0
684.0
688.0
692.0
696.0
°F
137.6
137.9
138.3
138.6
138.9
139.2
139.5
139.8
140.1
140.4
141.0
141.6
142.1
142.7
143.3
143.9
144.5
145.0
145.6
146.2
146.7
147.3
147.9
148.4
149.0
149.5
150.1
150.6
151.2
151.7
152.3
152.8
153.4
153.9
154.5
155.0
155.5
156.1
156.6
157.1
157.7
158.2
158.7
159.2
159.8
160.3
160.8
161.3
161.8
*Based on ALLIED SIGNAL Data
43
Page 44

SERVICING
S-104 CHECKING COMPRESSOR EFFICIENCY
The reason for compressor inefficiency is broken or damaged
scroll flanks on Scroll compressors, reducing the ability of
the compressor to pump refrigerant vapor.
The condition of the scroll flanks is checked in the following
manner.
1. Attach gauges to the high and low side of the system.
2. Start the system and run a “Cooling Performance Test.
If the test shows:
a. Below normal high side pressure.
Above normal low side pressure.
b.
Low temperature difference across coil.
c.
d. Low amp draw at compressor.
And the charge is correct. The compressor is faulty - replace
the compressor.
S-105B THERMOSTATIC EXPANSION VALVE
The expansion valve is designed to control the rate of liquid
refrigerant flow into an evaporator coil in exact proportion to
the rate of evaporation of the refrigerant in the coil. The
amount of refrigerant entering the coil is regulated since the
valve responds to temperature of the refrigerant gas leaving
the coil (feeler bulb contact) and the pressure of the refrigerant in the coil.
This regulation of the flow prevents the return of liquid
refrigerant to the compressor.
The three forces which govern the operation of the valve are:
(1) the pressure created in the power assembly by the feeler
bulb, (2) evaporator pressure, and (3) the equivalent pressure
of the superheat spring in the valve.
0% bleed type expansion valves are used on the indoor coils.
The 0% valve will not allow the system pressures (High and
Low side) to equalize during the shut down period. The valve
will shut off completely at approximately 100 PSIG Pressure.
Good thermal contact between the feeler bulb and the
suction line is essential to satisfactory valve control and
performance.
The bulb must be securely fastened to a clean straight
section of the suction line. Application of the bulb to a
horizontal run of line is preferred. If a vertical installation
cannot be avoided the bulb should be mounted so that the
capillary tubing comes out at the top.
THE VALVES PROVIDED ARE DESIGNED TO MEET THE
SPECIFICATION REQUIREMENTS FOR OPTIMUM PRODUCT OPERATION. DO NOT USE SUBSTITUTES.
S-106 OVERFEEDING
Overfeeding by the expansion valve results in high suction
pressure, cold suction line, and possible liquid slugging of
the compressor.
If these symptoms are observed:
1. Check for an overcharged unit by referring to the cooling
performance charts in the servicing section.
2. Check the operation of the power element in the valve as
explained in S-110 Checking Expansion Valve Operation.
3. Check for restricted or plugged equalizer tube.
S-107 UNDERFEEDING
Underfeeding by the expansion valve results in low system
capacity and low suction pressures.
If these symptoms are observed:
1. Check for a restricted liquid line or drier. A restriction will
be indicated by a temperature drop across the drier.
2. Check the operation of the power element of the valve as
described in S-110 Checking Expansion Valve Operation.
S-108 SUPERHEAT
The expansion valves are factory adjusted to maintain 12 to
15 degrees superheat of the suction gas. Before checking
the superheat or replacing the valve, perform all the procedures outlined under Air Flow, Refrigerant Charge, Expansion Valve - Overfeeding, Underfeeding. These are the most
common causes for evaporator malfunction.
CHECKING SUPERHEAT
Refrigerant gas is considered superheated when its temperature is higher than the saturation temperature corresponding to its pressure. The degree of superheat equals
the degrees of temperature increase above the saturation
temperature at existing pressure. See Temperature Pressure Chart on following page.
44
Page 45

SERVICING
REQUIRED LIQUID LINE TEMPERATURE
LIQUID PRESSURE
AT SERVICE VALVE (PSIG) 8 10 12 14 16 18
189 585654525048
195 605856545250
202 626058565452
208 646260585654
215 666462605856
222 686664626058
229 706866646260
236 727068666462
243 747270686664
251 767472706866
259 787674727068
266 807876747270
274 828078767472
283 848280787674
291 868482807876
299 888684828078
308 908886848280
317 929088868482
326 949290888684
335 969492908886
345 989694929088
354 100 98 96 94 92 90
364 102 100 98 96 94 92
374 104 102 100 98 96 94
384 106 104 102 100 98 96
395 108 106 104 102 100 98
406 110 108 106 104 102 100
416 112 110 108 106 104 102
427 114 112 110 108 106 104
439 116 114 112 110 108 106
450 118 116 114 112 110 108
462 120 118 116 114 112 110
474 122 120 118 116 114 112
486 124 122 120 118 116 114
499 126 124 122 120 118 116
511 128 126 124 122 120 118
REQUIRED SUBCOOLING TEMPERATURE (°F)
45
Page 46

SERVICING
CAUTION
To prevent personal injury, carefully connect and
disconnect manifold gauge hoses. Escaping liquid
refrigerant can cause burns. Do not vent refrigerant
to atmosphere. Recover during system repair
or final unit disposal.
1. Run system at least 10 minutes to allow pressure to
stabilize.
2. Temporarily install thermometer on suction (large) line
near compressor with adequate contact and insulate for
best possible reading.
3. Refer to the superheat table provided for proper system
superheat. Add charge to lower superheat or recover
charge to raise superheat.
Superheat Formula = Suct. Line Temp. - Sat. Suct. Temp.
EXAMPLE:
a. Suction Pressure = 143
b. Corresponding Temp. °F. = 50
c. Thermometer on Suction Line = 61°F.
To obtain the degrees temperature of superheat, subtract
50.0 from 61.0°F.
The difference is 11° Superheat. The 11° Superheat would
fall in the ± range of allowable superheat.
SUPERHEAT AND SUBCOOLING ADJUSTMENT
ON TXV APPLICATIONS
1. Run system at least 10 minutes to allow pressure to
stabilize.
2. Temporarily install thermometer on liquid (small) line
near pressure switches with adequate contact and
insulate for best possible reading.
3. Check subcooling and superheat. Systems with TXV
application should have a subcooling and superheat of
12 - 15 ºF.
a. If subcooling and superheat are low, adjust TXV
to 9 ± 3ºF then check subcooling.
b. If subcooling is low and superheat is high, add
charge to raise subcooling to 10ºF then check
superheat.
c. If subcooling and superheat are high, adjust TXV
valve to 12 - 15 ºF then check subcooling.
d. If subcooling is high and superheat is low, adjust
TXV valve to 12 - 15 ºF superheat and remove
charge to lower the subcooling to 2 - 15 ºF.
The TXV should NOT be adjusted at light load conditions
55º to 60ºF, under such conditions only the subcooling
can be evaluated. This is because suction pressure is
dependent on the indoor coil match, indoor airflow, and
wet bulb temperature. NOTE: Do NOT adjust charge
based on suction pressure unless there is a gross
undercharge.
4. Disconnect manifold set. Installation is complete.
S-109 CHECKING SUBCOOLING
Refrigerant liquid is considered subcooled when its temperature is lower than the saturation temperature corresponding to its pressure. The degree of subcooling equals
the degrees of temperature decrease below the saturation
temperature at the existing pressure.
1. Attach an accurate thermometer or preferably a thermocouple type temperature tester to the liquid line close to
the pressure switch.
2. Install a high side pressure gauge on the high side
(liquid) service valve at the front of the unit.
3. Record the gauge pressure and the temperature of the
line.
4. Compare the hi-pressure reading to the "Required Liquid
Line Temperature" chart on the following page. Find the
hi-pressure value on the left column. Follow that line right
to the column under the design subcooling value. Where
the two intersect is the required liquid line temperature.
Alternately you can convert the liquid line pressure
gauge reading to temperature by finding the gauge
reading in Temperature - Pressure Chart and reading to
the left, find the temperature in the °F. Column.
5. The difference between the thermometer reading and
pressure to temperature conversion is the amount of
subcooling.
Add charge to raise subcooling. Recover charge to lower
subcooling.
Subcooling Formula = Sat. Liquid Temp. - Liquid Line Temp.
EXAMPLE:
a. Liquid Line Pressure = 417
b. Corresponding Temp. °F. = 120°
c. Thermometer on Liquid line = 109°F.
To obtain the amount of subcooling subtract 109°F from
120°F.
The difference is 11° subcooling. See the specification
sheet or technical information manual for the design
subcooling range for your unit.
S-110 CHECKING EXPANSION VALVE OPERA-
TION
1. Remove the remote bulb of the expansion valve from the
suction line.
2. Start the system and cool the bulb in a container of ice
water, closing the valve. As you cool the bulb, the
suction pressure should fall and the suction temperature
will rise.
46
Page 47

SERVICING
3. Next warm the bulb in your hand. As you warm the bulb,
the suction pressure should rise and the suction temperature will fall.
4. If a temperature or pressure change is noticed, the
expansion valve is operating. If no change is noticed, the
valve is restricted, the power element is faulty, or the
equalizer tube is plugged.
5. Capture the charge, replace the valve and drier and
evacuate.
S-111 FIXED ORIFICE RESTRICTOR DEVICES
The fixed orifice restrictor device (flowrator) used in conjunction with the indoor coil is a predetermined bore (I.D.).
It is designed to control the rate of liquid refrigerant flow into
an evaporator coil.
The amount of refrigerant that flows through the fixed orifice
restrictor device is regulated by the pressure difference
between the high and low sides of the system.
In the cooling cycle when the outdoor air temperature rises,
the high side condensing pressure rises. At the same time,
the cooling load on the indoor coil increases, causing the low
side pressure to rise, but at a slower rate.
Since the high side pressure rises faster when the temperature increases, more refrigerant flows to the evaporator,
increasing the cooling capacity of the system.
When the outdoor temperature falls, the reverse takes place.
The condensing pressure falls, and the cooling loads on the
indoor coil decreases, causing less refrigerant flow.
A strainer is placed on the entering side of the tube to prevent
any foreign material from becoming lodged inside the fixed
orifice restriction device.
If a restriction should become evident, proceed as follows:
1. Recover refrigerant charge.
2. Remove the orifice or tube strainer assembly and replace.
3. Replace liquid line drier, evacuate and recharge.
CHECKING EQUALIZATION TIME
During the "OFF" cycle, the high side pressure bleeds to the
low side through the fixed orifice restriction device. Check
equalization time as follows:
1. Attach a gauge manifold to the suction and liquid line dill
valves.
2. Start the system and allow the pressures to stabilize.
3. Stop the system and check the time it takes for the high
and low pressure gauge readings to equalize.
If it takes more than seven (7) minutes to equalize, the
restrictor device is inoperative. Replace, install a liquid line
drier, evacuate and recharge.
S-112 CHECKING RESTRICTED LIQUID LINE
When the system is operating, the liquid line is warm to the
touch. If the liquid line is restricted, a definite temperature
drop will be noticed at the point of restriction. In severe cases,
frost will form at the restriction and extend down the line in the
direction of the flow.
Discharge and suction pressures will be low, giving the
appearance of an undercharged unit. However, the unit will
have normal to high subcooling.
Locate the restriction, replace the restricted part, replace
drier, evacuate and recharge.
S-113 OVERCHARGE OF REFRIGERANT
An overcharge of refrigerant is normally indicated by an
excessively high head pressure.
An evaporator coil, using an expansion valve metering device,
will basically modulate and control a flooded evaporator and
prevent liquid refrigerant return to the compressor.
An evaporator coil, using a fixed orifice restrictor device
(flowrator) metering device, could allow liquid refrigerant to
return to the compressor under extreme overcharge conditions.
Also with a fixed orifice restrictor device (flowrator) metering
device, extreme cases of insufficient indoor air can cause
icing of the indoor coil and liquid refrigerant return to the
compressor, but the head pressure would be lower.
There are other causes for high head pressure which may be
found in the "Service Problem Analysis Guide."
If other causes check out normal, an overcharge or a system
containing non-condensables would be indicated.
If this system is observed:
1. Start the system.
2. Remove and capture small quantities of refrigerant as
from the suction line access fitting until the head pressure
is reduced to normal.
3. Observe the system while running a cooling performance
test. If a shortage of refrigerant is indicated, then the
system contains non-condensables.
S-114 NON-CONDENSABLES
If non-condensables are suspected, shut down the system
and allow the pressures to equalize. Wait at least 15
minutes. Compare the pressure to the temperature of the
coldest coil since this is where most of the refrigerant will be.
If the pressure indicates a higher temperature than that of the
coil temperature, non-condensables are present.
Non-condensables are removed from the system by first
removing the refrigerant charge, replacing and/or installing
liquid line drier, evacuating and recharging.
47
Page 48

SERVICING
S-115 COMPRESSOR BURNOUT
When a compressor burns out, high temperature develops
causing the refrigerant, oil and motor insulation to decompose forming acids and sludge.
If a compressor is suspected of being burned-out, attach a
refrigerant hose to the liquid line dill valve and properly remove
and dispose of the refrigerant.
NOTICE
Violation of EPA regulations may result in fines
or other penalties.
Now determine if a burn out has actually occurred. Confirm
by analyzing an oil sample using a Sporlan Acid Test Kit, AK3 or its equivalent.
Remove the compressor and obtain an oil sample from the
suction stub. If the oil is not acidic, either a burnout has not
occurred or the burnout is so mild that a complete clean-up
is not necessary.
If acid level is unacceptable, the system must be cleaned by
using the clean-up drier method.
CAUTIO N
Do no t allow the slud ge or oil to con tact the skin .
Severe burns may result.
NOTE: The Flushing Method using R-11 refrigerant is no
longer approved by Amana
Suction Line Drier Clean-Up Method
The POE oils used with R410A refrigerant is an excellent
solvent. In the case of a burnout, the POE oils will remove any
burnout residue left in the system. If not captured by the
refrigerant filter, they will collect in the compressor or other
system components, causing a failure of the replacement
compressor and/or spread contaminants throughout the
system, damaging additional components.
Use part number RF000127 suction line filter drier kit. This
drier should be installed as close to the compressor suction
fitting as possible. The filter must be accessible and be
rechecked for a pressure drop after the system has operated
for a time. It may be necessary to use new tubing and form
as required.
NOTE: At least twelve (12) inches of the suction line
immediately out of the compressor stub must be discarded
due to burned residue and contaminates.
1. Remove compressor discharge line strainer.
2. Remove the liquid line drier and expansion valve.
3 Purge all remaining components with dry nitrogen or
carbon dioxide until clean.
4. Install new components
5. Braze all joints, leak test, evacuate, and recharge system.
®
Brand Heating-Cooling.
including liquid line drier.
6. Start up the unit and record the pressure drop across the
drier.
7. Continue to run the system for a minimum of twelve (12)
hours and recheck the pressure drop across the drier.
Pressure drop should not exceed 6 PSIG.
8. Continue to run the system for several days, repeatedly
checking pressure drop across the suction line drier. If
the pressure drop never exceeds the 6 PSIG, the drier has
trapped the contaminants. Remove the suction line drier
from the system.
9. If the pressure drop becomes greater, then it must be
replaced and steps 5 through 9 repeated until it does not
exceed 6 PSIG.
NOTICE: Regardless, the cause for burnout must be determined and corrected before the new compressor is started.
S-122 REVERSING VALVE REPLACEMENT
Remove the refrigerant charge from the system.
When brazing a reversing valve into the system, it is of
extreme importance that the temperature of the valve does
not exceed 250°F. at any time.
Wrap the reversing valve with a large rag saturated with water.
"Re-wet" the rag and thoroughly cool the valve after each
brazing operation of the four joints involved. The wet rag
around the reversing valve will eliminate conduction of heat to
the valve body when brazing the line connection.
The use of a wet rag sometimes can be a nuisance. There
are commercial grades of heat absorbing paste that may be
substituted.
After the valve has been installed, leak test, evacuate and
recharge.
S-200 CHECKING EXTERNAL STATIC PRESSURE
The minimum and maximum allowable duct static pressure
is found in the Technical Information Manual.
Too great of an external static pressure will result in insufficient air that can cause icing of the coil, whereas too much
air can cause poor humidity control, and condensate to be
pulled off the evaporator coil causing condensate leakage.
Too much air can cause motor overloading and in many cases
this constitutes a poorly designed system. To determine
proper air movement, proceed as follows:
1. Using a draft gauge (inclined manometer) measure the
static pressure of the return duct at the inlet of the unit,
(Negative Pressure).
48
Page 49

SERVICING
INCLINED
MANOMETER
SUPPLY
SUPPLY
RETURN
Total External Static
2. Measure the static pressure of the supply duct, (Positive
Pressure).
3. Add the two readings together.
NOTE: Both readings may be taken simultaneously and read
directly on the manometer if so desired.
4. Consult proper table for quantity of air.
If the external static pressure exceeds the minimum or
maximum allowable statics, check for closed dampers, dirty
filters, undersized or poorly laid out ductwork.
S-201 CHECKING TEMPERATURE RISE
Temperature rise is related to the BTUH output of the unit and
the amount of air (CFM) circulated over the heat exchanger.
All units are designed for a given range of temperature
increase. This is the temperature of the air leaving the unit
minus the temperature of the air entering the unit.
The more air (CFM) being delivered through a given unit the
less the rise will be; so the less air (CFM) being delivered, the
greater the rise. The temperature rise should be adjusted in
accordance to a given unit specifications and its external
static pressure.
1. Check BTUH input to unit do not exceed input rating
stamped on rating plate.
2. Take entering and leaving air temperatures.
3. Select the proper speed tap or dip switch setting for direct
drive units.
4. Take motor amperage draw to determine that the motor
is not overloaded during adjustments.
RETURN
T
SUPPLY
T
RETURN
RISE = SUPPLY -TRETURN
T
Checking Temperature Rise
S-300 TESTING PRIMARY LIMIT CONTROL
APD/GPD units use a snap-disk type primary limit device.
Sometimes referred to as "stat on a stick". The limit setting
is fixed and must not be readjusted in the field.
COLOR
Volt / Ohm
Meter
TESTING PRIMARY LIMIT CONTROL
Refer to the specification section to determine the proper limit
cutout temperature for the model being serviced.
IDENTIFYING
SLEEVES
49
Page 50

SERVICING
In all instances the limit control is wired in series with the
ignition control.
If the temperature within the furnace should exceed this
setting, the control will open, de-energizing the ignition
control which in turn will open the electrical circuit to the gas
valve.
The control will automatically reset when the temperature
within the combustion chamber is sufficiently lowered.
HIGH VOLTAGE!
Disconnect ALL power before servicing
or insta llin g th is un it. M ult iple powe r
sources may be present. Failure to do so
may cause property damage, personal injury
or death.
1. Remove electrical power to unit. Some units may have
more than one source of power.
2. Remove the wires from the limit control terminals.
3. Using an ohmmeter, test for continuity across the two
terminals.
4. If limit test open allow unit to cool and retest.
5. If still open, replace the control.
HIGH VOL TAGE!
Disconnect ALL power before servicing
or inst all ing th is u ni t. M ult ip le po wer
sources may be present. Failure to do so
may cause property damage, personal injury
or death.
1. Remove the wires from the auxiliary limit control terminals.
2. Using an ohmmeter, test for continuity across the two
terminals. No reading indicates the control is open.
Push the red reset button, test again - if still open,
replace the control.
VOLT / OHM
M ETER
RED
RESET
BUTTON
S-301 TESTING AUXILIARY LIMIT
The auxiliary limit control is a preset nonadjustable control
mounted in the blower compartment area.
It is connected in series with the rollout switch wiring to the
gas valve. If its temperature should be exceeded, it will open,
interrupting the voltage to the gas valve causing it to open.
An additional limit (primary limit) control is required for safety
control of high temperature within the furnace or ductwork.
AUX. LIM I T
C O LOR
ID EN TIFYIN G
T AB
TESTING AUXILIARY LIMIT CONTROL
S-302 CHECKING FLAME ROLLOUT SWITCH
APD/GPD units are equipped with a temperature-activated
manual reset control. This control is mounted to the manifold
assembly and is wired in series with the auxiliary limit and
gas valve. The control is designed to open should a flame roll
out occur. An over firing condition or flame impingement on
the heat shield can also cause the control to open.
If the rollout control has opened, the circuit between the
ignition control and gas valve will be interrupted and the
ignition control module will go into lockout. The servicer
should reset the ignition control by opening and closing the
thermostat circuit. The servicer should look for the ignitor
glowing which indicates there is power to the ignition control.
The servicer should measure the voltage between each side
of the rollout control and ground while the ignition control is
try to power the gas valve.
50
Page 51

SERVICING
VOLT / OHM
M E TER
RED
RESET
BUTTON
COL O R
IDENTIFYING
TAB
CHECKING FLAME ROLLOUT SWITCH
Limit Switch Operation (Applies to Primary, Auxiliary,
and Roll Out Limits) DSI systems.
If a limit switch opens, the indoor blower is energized on heat
speed and the induced draft blower is energized. The LED on
the control flashes "4" to indicate an open limit switch. The
blower and inducer remain on while the limit switch is open.
The gas valve is de-energized. Power to the thermostat "R"
is removed while the limit switch is open.
When the limit switch re-closes, the induced draft motor runs
through its post purge and the indoor blower goes through the
heat off delay.
If a call for heat exists when the limit switch re-closes, the
control goes through a pre-purge period and then makes an
ignition attempt. The indoor blower remains on (for the delay
off time) during the re-ignition attempt.
1. If no voltage is measured on either side of control it
indicates ignition control or wiring to control problem.
2. If voltage is measured on one side of the control and
not the other, it indicates the control is open.
3. If voltage is measured on both sides of the control the
wiring to gas valve or valve is at fault.
Servicing procedure with furnace not firing.
1. Confirm that the outer door was in place and all screws
tightened. (No leaks under the door.)
2. Check to see if any damage was done to the furnace
especially the wiring.
3. Confirm that heat exchanger is not obstructed by feeling
for discharge air from the flue hood when the combustion
blower is running but the unit is not firing.
If the above steps do not suggest the reason the control has
tripped the furnace should be fired.
1. Remove the heating compartment door.
2. Turn of the power or open the thermostat circuit.
3. Reset the rollout control.
4. Turn power on and put the unit into a call for heating.
CAUTION
Flame rollout could occur. Keep face and hands a
safe distan ce from burn er area.
5. Look under the heat shield as the unit is running.
Flames should be drawn into firing tubes.
a. If only one burners flame is not drawn into the tube,
that tube is restricted.
b. If, without the air circulation blower running, all
flames are not drawn into the tubes either the
collector box, combustion blower, or flue outlet is
obstructed. If the combustion blower or flue outlet
is obstructed, the pressure switch should have
opened preventing the unit from firing, also inspect
the unit pressure switch and wiring.
c . If the burner flame is not drawn into the tube only
when the air circulation blower is running, then a
cracked heat exchanger tube is present.
S-303 TESTING INDUCER MOTOR
HIGH VOLTAGE!
Disconnect ALL power before servicing
or insta llin g th is un it. M ult iple powe r
sources may be present. Failure to do so
may cause property damage, personal injury
or death.
1. Disconnect the motor wire leads from its connection point
at integrated ignition control module.
2. Using and ohmmeter, test for continuity between each of
the motor leads.
3. Touch one probe of the ohmmeter to the motor frame
(ground) and the other probe in turn to each lead.
If the windings do not test continuous or a reading is obtained
to ground, replace the motor.
4. After completing check and/or replacement of induced
draft blower motor.
5. Turn on electrical power and verify proper unit operation.
51
Page 52

SERVICING
S-304 TESTING GAS VALVE
Direct Spark Ignition (DSI) Systems
A two-stage combination redundant operator type gas valve
which provides all manual and automatic control functions
required for gas fired heating equipment is used on 14 SEER
models.
The valve provides control of main burner gas flow, pressure
regulation, and 100 percent safety shut-off.
HIGH VOLTAGE!
Disconnect ALL power before servicing
or insta llin g th is un it. M ult iple powe r
sources may be present. Failure to do so
may cause property damage, personal injury
or death.
1. Ensure gas valve and main gas supply are on.
2. Using a voltmeter, check from the purple and blue wires
on 1 stage gas valves and from C and M on 2 stage gas
valves for 24 volts to gas valve.
3. If 24 volts are present and no gas flows through the valve,
replace valve.
S-305 CHECKING MAIN BURNERS
The main burners are used to provide complete combustion
of various fuels in a limited space, and transfer this heat of the
burning process to the heat exchanger.
Proper ignition, combustion, and extinction are primarily due
to burner design, orifice sizing, gas pressure, primary and
secondary air, vent and proper seating of burners.
BECKETT BURNER
WARNING
Disconnect gas and el ectr ical po wer sup ply.
Gas Valve
On/Off
Switch
Outlet
Outlet Pressure
Tap
Inlet Pressure
W/R 36G54-238
WHITE ROGERS MODEL 36G 2-STAGE GAS VALVE
Tap
In checking main burners, look for signs of rust, oversized and
undersized carry-over ports restricted with foreign material,
etc.
S-306 CHECKING ORIFICES
A predetermined fixed gas orifice is used in all of these
furnaces. That is an orifice which has a fixed bore and
position.
Inlet
A
GAS
STREAM
B
52
Page 53

SERVICING
DENT OR
BURR
GAS
STREAM
The length of Dimension "A" determines the angle of Gas
Stream Defraction, "B".
A dent or burr will cause severe deflection of gas stream.
No resizing should be attempted until all factors are taken
into consideration such as inlet manifold gas pressure,
alignment, and positioning, specific gravity and BTU content
of the gas being consumed.
The only time resizing is required is when a reduction in firing
rate is required for an increase in altitude.
Orifices should be treated with care in order to prevent
damage. They should be removed and installed with a boxend wrench in order to prevent distortion. In no instance
should an orifice be peened over and redrilled. This will
change the angle or deflection of the vacuum effect or
entraining of primary air, which will make it difficult to adjust
the flame properly. This same problem can occur if an orifice
spud of a different length is substituted.
B
Tap
Manometer
Hose
Inlet
Open to
Atmosphere
Manometer
Low Pressure
Adjust
High P ressure
Adjust
Open to
Atmosphere
Outlet
Gas Valve
On/Off
Switch
Manometer
In le t Pre ssu re
Hose
Tap
Outlet Pressure
WHITE ROGERS MODEL 36G 2-STAGE GAS VALVE
Open to
Atmosphere
Open to
Atmosphere
WARNING
Discon nec t gas an d ele ctric al po we r su pply.
1. Check orifice visually for distortion and/or burrs.
2. Check orifice size with orifice sizing drills.
3. If resizing is required, a new orifice of the same physical
size and angle with proper drill size opening should be
installed.
S-307 CHECKING GAS PRESSURE
Gas inlet and manifold pressures should be checked and
adjusted in accordance to the type of fuel being consumed.
WARNING
Discon nec t gas an d ele ctric al po we r su pply.
1. Connect a water manometer or adequate gauge to the
inlet pressure fitting of the gas valve.
2. Remove the pressure tap fitting at the manifold if provided
or check at the gas valve outlet fitting and connect
another manometer or gauge.
Manifold
Pressure
Inlet Pressure
WHITE ROGERS MODEL 36G 1-STAGE GAS VALVE
53
Page 54

SERVICING
A
Pressu re Regulator
Open to
Atmosphere
Inlet Pressure
Inlet
Pressure
Tap
Gas Valve On/Off
Selector Switch
(under cap screw)
Outlet
Pressure
Tap
HONEYWELL MODEL VR8215 1-STAGE GAS VALVE
MEASURING INLET AND MANIFOLD GAS PRESSURE
With Power ON:
WARNING
Line Voltage now present.
3. Put furnace into heating cycle and turn on all other gas
consuming appliances.
For NATURAL GAS:
a. Inlet pressure should be a nominal 7" w.c.
b. (2 stage heat models only) Manifold pressure on
low stage should be 2.0” w.c. ± .3"w.c.
c. Manifold pressure for 1 stage heat models and
high stage for 2 stage heat models should be 3.5”
± .3"w.c.
For PROPANE GAS:
a. Inlet pressure should be a nominal 11" w.c.
b. (2 stage heat models only) Manifold pressure on
low stage should be 6" w.c.
c. Manifold pressure for 1 stage heat models and
high stage for 2 stage heat models should be 10”
w.c.
Manifold Gas Pressure
Natural Gas 3.5" w.c.
Propane Gas 10.0" w.c.
Open to
tmosphere
Manifold
Pressure
If operating pressures differ from above, make necessary
pressure regulator adjustments, check piping size, etc.,
and/or consult with local utility.
S-308 CHECKING FOR DELAYED IGNITION
Delayed ignition is a delay in lighting a combustible mixture
of gas and air which has accumulated in the combustion
chamber.
When the mixture does ignite, it may explode and/or rollout
causing burning in the burner venturi.
If delayed ignition should occur, the following should be
checked:
1. Improper gas pressure - adjust to proper pressure. (See
S-307)
2. Improper burner positioning - burners should be in
locating slots, level front to rear and left to right.
3. Carry over (lighter tube or cross lighter) obstructed clean.
4. Main burner orifice(s) deformed, or out of alignment to
burner - replace.
S-309 CHECKING FOR FLASHBACK
Flashback will also cause burning in the burner venturi, but
is caused by the burning speed being greater than the gasair flow velocity coming from a burner port.
Flashback may occur at the moment of ignition, after a
burner heats up or when the burner turns off. The latter is
known as extinction pop.
Since the end results of flashback and delayed ignition can
be the same (burning in the burner venturi) a definite attempt
should be made to determine which has occurred.
If flashback should occur, check for the following:
1. Improper gas pressure - adjust to proper pressure. See
S-307.
2. Check burner for proper alignment and/or replace burner.
33. Improper orifice size - check orifice for obstruction.
Single Stage
Manifold Gas Pressure
Gas
Natural Low Stage 1.6 - 2.2" w.c. 2.0" w.c.
High Stage 3.2 - 3.8" w.c. 3.5" w.c.
Propane Low Stage 5.7 - 6.3" w.c. 6.0" w.c.
High Stage 9.7 - 10.3" w.c. 10.0" w.c.
Range Nominal
Two Stage
54
Page 55

SERVICING
S-310 CHECKING PRESSURE CONTROL
A pressure control device is used to measure negative
pressure at the induced draft blower motor inlet to detect a
partial or blocked flue.
Pressure Switch Operation (DSI Direct Spark System)
The pressure switch is ignored unless there is a call for heat.
When the control receives a call for heat, the control checks
to see that the pressure switch is open. If the control sees
that the pressure switch is closed before the induced draft
blower is energized, the LED will flash a code of "2" (to
indicate the pressure switch is stuck closed) and the inducer
will remain off until the pressure switch opens.
If the pressure switch opens before the ignition period, the
induced draft blower will remain on and the control will stay
in pre-purge until the pressure switch is closed for an entire
15 second pre-purge period. The LED will flash a code of "3"
to indicate open pressure switch.
If the pressure switch opens after the gas valve has been
energized, the control will de-energize the gas valve and run
the indoor blower through the heat off delay. The inducer
stays on until the pressure switch re-closes. Then the control
makes another ignition attempt.
With Power ON:
WARNING
Line Voltage now present.
4. Energize furnace for heating cycle. The induced draft
blower motor will begin to run. The inclined manometer
should read approximately -1.2" ± 0.3" W.C with no
combustion.
5. Remove and check the two electrical wires and using
the VOM check from Common to NO (Normally Open),
it should read closed (with I.D. motor running). If not as
above, replace pressure control.
6. Reconnect all wires to the control and place in heating
cycle.
7. As the unit fires on high stage, the inclined manometer
negative pressure will drop to -1.0" ± 0.3" W.C.
8. If not as listed, replace control.
Note: the pressure switch must be mounted with the
diaphragm in a vertical position.
S-311 HIGH ALTITUDE APPLICATION
HIGH VOL TAGE!
Disconnect ALL power before servicing
or insta llin g this uni t. M ultip le po wer
sources may be present. Failure to do so
may cause property damage, personal injury
or death.
1. Remove wires from the electrical terminals.
2. Using a VOM check from Common to NO (Normally
Open) - should read open.
If switch reads as noted proceed to Step 3, otherwise
replace control.
3. Remove the pressure control hose from the control and
interconnect with an inclined manometer as shown:
HOSE
TO J-TUBE
1/4" CO PPER TEE
PRESSURE SWITCH
INCLINED
MANOMETER
Reconnect wires to the Common and NO terminals.
High Altitude Derate - U.S. Installations
Only
IMPORTANT NOTE: The gas/electric units naturally derate
with altitude. Do not attempt to increase the firing rate by
changing orifices or increasing the manifold pressure. This
can cause poor combustion and equipment failure. At all
altitudes, the manifold pressure must be within 0.3 inches
W.C. of that listed on the nameplate for the fuel used. At
all altitudes and with either fuel, the air temperature rise
must be within the range listed on the unit nameplate.
Refer to the Installation Manual provided with the LP kit for
conversion from natural gas to propane gas and for altitude
adjustments.
When this package unit is installed at high altitude, the
appropriate High Altitude orifice kit must be installed. As
altitude increases, there is a natural reduction in the
density of both the gas fuel and combustion air. This kit will
provide the proper design certified input rate within the
specified altitude range. High altitude kits are not approved
for use in Canada. For installations above 2,000 feet, use
kit HA-02. The HA-02 kit is used for both Natural and LP gas
at high altitudes.
NOTE: Up to 2,000 feet, no changes are required; above
2,000 feet, refer to the gas/electric package unit specification sheets for required kit(s).
55
Page 56

SERVICING
Use LPM-08 (2 stage heat models) or LPT-03 (1 stage heat
models) propane conversion kit for propane conversions at
altitudes below 2000 feet. Natural gas installations below
2000 feet do not require a kit.
For propane conversions above 2000 feet, high altitude kit
HA-02 is required in addition to the propane conversion kit.
Natural gas and LP gas installations at altitudes > 2000 ft
L2
FS
C9
INDUCER
LOW
T1
K4
Q3
T2
HIGH
K3 K5
L1
LOW
ODF
K7
HIGH
PARK
K6
INPUT/BURNER
U.S. BURNER ORIFICE 45/55 47/55 47/56 - 47/56 48/57 48/58 49/58
CANADA BURNER ORIFICE 45/55 - - 48/57 - - - -
INPUT/BURNER
U.S. BURNER ORIFICE 44/55 44/55 45/56 - 45/56 46/57 47/58 47/58
CANADA BURNER ORIFICE 44/55 - - 47/57 - - - -
INPUT/BURNER
U.S. BURNER ORIFICE 43/55 53/55 44/56 - 44/56 44/56 45/57 45/57
CANADA BURNER ORIFICE 43/55 - - 46/57 - - - -
HIGH ALTITUDE
KIT
HA02
HIGH ALTITUDE
KIT
HA02
HIGH ALTITUDE
KIT
HA02
20,000 BTUH NAT/20,OOO BTUH/L.P.
ELEVATION ABOVE SEA-LEVEL (FEET)
2000 3000 4000 4500 5000 6000 7000 8000
22,500 BTUH NAT/20,OOO BTUH/L.P.
ELEVATION ABOVE SEA-LEVEL (FEET)
2000 3000 4000 4500 5000 6000 7000 8000
25,000 BTUH NAT/20,OOO BTUH/L.P.
ELEVATION ABOVE SEA-LEVEL (FEET)
2000 3000 4000 4500 5000 6000 7000 8000
S-313 TESTING IGNITION CONTROL MODULE
NOTE: Failure to earth ground the unit, or a high resistance
connection in the ground may cause the control to lockout
due to failure to flame sense.
U2
U1
U6
P2
5
4
U7
3
U4
SPEEDUP
SW1
FAULT
RECALL
2
1
180
150
120
90
BLOWER
OFF
DELAY
U5
NONE
5 MIN
10MIN
STAGE
DELAY
U3
F1
ECON
RCW1W2G Y2
K2
K1
Y1
PCBAG127 DSI Control Board
Testing Direct Spark Ignition (DSI) Systems
PCBAG127 Board
Heating Mode
Indoor thermostat calling for heat (15 second prepurge time
and 7 second trial for ignition).
1. Check for 230 volts from L1 terminal of control module to
L2. No voltage - check wire connections, continuity, etc.
2. Check for 24 volts at "R" to "C" thermostat terminals.
a. No voltage - check 3 amp automotive type fuse on
control board. A blown fuse could indicate a short
in the 24 volt circuit (thermostat or limit circuit).
b. Voltage Present - check limit and rollout (S-301
and S-302). If limit and rollout are closed, then
check for 24 VAC at the gas valve terminals.
c . No 24 VAC at gas valve - check 9 pin connector
and wires from ignition control to gas valve. If wires
and connections at 9 pin connector check good,
replace ignition control.
d. Voltage present at gas valve - replace gas valve.
56
Page 57

SERVICING
Testing High Stage Heat Operation with Low Stage
Heat Operating:
1. Board set for 2 stage thermostat:
a. Check for 24 Volts at thermostat terminals W2 and
C on the control board.
b. No voltage - check thermostat and thermostat
wiring.
c . Voltage present - check for 24 volts at gas valve
terminals C and HI.
d. No voltage present at valve - check 9 pin connector
and wires from ignition control to gas valve. If wires
and connections at 9 pin connector check good,
replace ignition control.
e. Voltage present at gas valve - replace gas valve.
2. Board set for 1 stage thermostat:
a. Wait the selected delay time (either 5 or 10
minutes, depending on jumper setting).
b. Check for 24 volts at gas valve terminals C and HI.
c . No voltage present - check 9 pin connector and
wires from ignition control to gas valve. If wires and
connections at 9 pin connector check good, re-
place ignition control.
d. Voltage present at gas valve terminals C and HI -
replace valve.
Testing High Stage Cooling Operation with Low Stage
Cooling Operating:
1. Board set for 2 stage thermostat:
a. Check for 24 volts at thermostat terminals C and
Y2 on control board.
b No voltage - check thermostat and thermostat
wiring.
c . Voltage present - check pressure switch circuit. If
pressure switch circuit checks closed, proceed to
next step.
d. Check for 24 volts to compressor unloader sole-
noid. If no voltage present, check 6 pin connector
and wires from compressor unloader solenoid to 6
pin connector on board. If connector and wires
check good, replace control.
2. Board set for 1 stage thermostat:
a. Wait the selected delay time (either 5 or 10
minutes, depending on jumper setting)
b. Check for 24 volts at compressor unloader sole-
noid.
c. No voltage - check 6 pin connector and wires from
compressor unloader solenoid to 6 pin connector
on board. If connector and wires check good,
replace control.
Cooling Mode
Indoor thermostat calling for cool.
1. Check for 230 volts from L1 terminal of control module to
L2. No voltage - check wire connections, continuity, etc.
2. Check for 24 volts at R and C thermostat terminals on
ignition control.
a. No voltage - check 3 amp automotive type fuse on
control board. A blown fuse could indicate a short
in the 24 volt circuit.
b. Voltage present - proceed to step 3.
3. Check for 24 volts at thermostat terminals C and Y1.
a. No voltage - check thermostat wiring and thermo-
stat.
b. Voltage present - check pressure switch circuit. If
pressure switch circuit checks closed, proceed to
step 4.
4. Check for 24 volts at contactor coil.
a. No voltage - check 6 pin connector and wires from
contactor coil to 6 pin connector on control board.
If wires and connector check good, replace control.
b. Voltage present - replace contactor.
LED
Flashes/Status
Internal Control Fault, M ic ro Controller
Off
1 Loc k out Due t o E x c es s ive Retries
2 Pressure Switch Stuck Closed
3 Pressure Switch Stuck Open
4 Open High Temperature Lim it
5
6 Compressor S hort Cyc le Delay A c tive
7
8
9
St eady O N Norm al
Detected Hardware Failure, or Gas V alve
Detec te d E nergize d When it S hould be
De-energized
Flam e P res ent O uts ide t he F lam e
Detect Mode
Limit Opened Five Times within the
Sam e Call for Heat
Indoor Thermos t at/ O utd oor Thermos tat
is Op en
Pres s ure S witc h/ Los s of Charge Swit ch
is Op en
Red LED Fault Codes
Syste m Condition
57
Page 58

SERVICING
LED
Flashes/Status
2
1 Low Flame Signal Current
Steady ON Normal Flame
OFF No Flame Present
Flame Present Outside the Flame Detect
Mode
Flame Condition
Amber LED Flame Status Codes
NOTE: The flash rate is 0.25 seconds on, 0.25 seconds
off, with a 2-second pause between codes.
S-314 CHECKING FLAME SENSOR
A flame sensing device is used in conjunction with the ignition
control module to prove combustion. If a microamp signal is
not present the control will de-energize the gas valve and
"retry" for ignition or lockout.
DSI Direct Spark Ignition Systems
HIGH VOLTAGE!
Disconnect ALL power before servicing
or insta llin g th is un it. M ult iple powe r
sources may be present. Failure to do so
may cause property damage, personal injury
or death.
1. Disconnect the flame sensor wire from terminal FS of the
ignition control module.
2. Connect a microamp meter in series with this wire and
terminal FS.
3. Be sure the negative side of the meter is to the wire and
the positive of the meter is to terminal FS.
4. Turn on Power.
WARNING
Line Voltage now present.
5. With Power ON, Place the unit into a heating cycle.
6. As soon as flame is established a microamp reading
should be evident once proof of flame (microamp reading)
is established, the hot surface ignitor will be de-energized.
7. The nominal microamp reading is 4 microamps.
8. If the microamp current is less than 0.5 microamp the
control will lockout and flash a code of 1 flash after
attempting to reestablish flame sense.
9. If the microamp reading is less than the minimum specified, check for high resistance wiring connections, the
distance (3/16") between the sensor and burner, flame
sensor connections, dirty flame sensor or poor grounding.
10. If no reading, check for continuity on all components and
if good - replace ignition control module.
NOTE: Contaminated fuel or combustion air can create a
nearly invisible coating on the flame sensor. This coating
works as an insulator causing a loss in the flame sense
signal. If this situation occurs the flame sensor must be
cleaned with steel wool. Do not use sand paper, the silicone
in sand paper will further contaminate the sensor.
58
Flame
Sensor
Flame Sensor
Page 59

BLOWER PERFORMANCE DA T A
*PD1424060M41A* - Rise Range: 35° - 65°
E.S.P
0.1 616 51 55 845 105 53 859 94 885 103 1048 140
0.2 581 60 58 809 116 56 810 102 836 1 11 999 148
0.3 535 69 63 774 124 58 761 109 788 1 18 950 155
0.4 476 79 X 736 134 61 713 117 740 126 901 163
0.5 422 87 X 695 140 65 664 125 692 134 852 171
0.6 365 95 X 646 148 X 615 133 643 142 803 179
0.7 334 101 X 580 161 X --- --- --- --- --- ---
0.8 300 103 X 532 167 X --- --- --- --- --- ---
*PD1424070M41B* - Rise Range: 35° - 65° F
E.S.P
0.1 708 57 50 1004 129 52 859 94 885 103 1048 140
0.2 659 65 57 955 137 54 810 102 836 1 11 999 148
0.3 610 72 63 906 145 56 761 109 788 1 18 950 155
0.4 561 80 X 857 153 59 713 117 740 126 901 163
0.5 512 88 X 808 160 63 664 125 692 134 852 171
0.6 --- --- --- 760 168 X 615 133 643 142 803 179
0.7 --- --- --- --- --- --- --- --- --- --- - -- ---
0.8 --- --- --- --- --- --- --- --- --- --- - -- ---
ST
1
CFMWATTSRISE CFMWATTSRISE CFMWATTSCFMWATTSCFMWATTS
ST
1
CFMWATTSRISE CFMWATTSRISE CFMWATTSCFMWATTSCFMWATTS
T1
Stage Heating Speed
T1
Stage Heating Speed
2nd Stage Heating Speed
2nd Stage Heating Speed
T2
T2
T3
Cooling Speed
T3
Cooling Speed
T4
Cooling Speed
T4
Cooling Speed
T5
Cooling S peed
T5
Cooling S peed
*PD143080M41A* - Rise Range: 35° - 65°
ST
E.S.P
0.1 997 147 45 1276 284 47 1059 137 1071 142 1333 234
0.2 965 155 47 1238 284 48 1008 144 1023 149 1285 242
0.3 922 165 49 1206 289 50 956 151 976 157 1237 250
0.4 886 173 51 1164 302 52 908 158 928 164 1189 257
0.5 835 182 54 1131 314 53 857 166 880 172 1141 265
0.6 781 188 58 1086 319 55 784 175 832 180 1094 273
0.7 731 200 62 1038 319 58 732 180 784 187 --- ---
0.8 677 202 X 984 322 61 673 188 736 195 --- ---
*PD1430090M41B* - Rise Range: 45° - 75° F
E.S.P
0.1 1059 137 49 1260 213 55 105 9 137 1071 142 1333 234
0.2 1008 143. 5 52 1212 221 57 1008 143. 5 1023 149 1285 242
0.3 956 151 54 1165 229 59 956 151 976 157 1237 250
0.4 908 157.5 57 1117 236 62 908 157.5 928 164 1189 257
0.5 857 165.5 60 1069 244 64 857 165.5 880 172 1141 265
0.6 784 175 63 1021 252 68 784 175 832 180 1094 273
0.7 732 180 69 973 259 70 732 180 784 187 --- ---
0.8 673 187.5 72 - - - 673 187.5 736 195 --- ---
1
CFMWATTSRISE CFMWATTSRISE CFMWATTSCFMWATTSCFMWATTS
ST
1
CFMWATTSRISE CFMWATTSRISE CFMWATTSCFMWATTSCFMWATTS
T1
Stage Heating Speed
T1
Stage Heating Speed
2nd Stage Heating Speed
2nd Stage Heating Speed
T2
T2
T3
Cooling Speed
T3
Cooling Speed
T4
Cooling Speed
T4
Cooling Speed
Cooling S peed
Cooling S peed
T5
T5
X = Outside of Temperature Rise Range - Not Recommended.
NOTE:
The shaded area indicates ranges in excess of maximum external static pressure allowable when heating. For satisfactory operation,
external static pressure should not exceed 0.5" w.c.
59
Page 60

BLOWER PERFORMANCE DA T A
*PD1436080M41A* - Rise Range: 35° - 65°
T1
E.S.P
Stage Heating Spee d
1
2nd Stage Heating Speed
ST
CFM WATTS RISE CFM WATTS RISE CFM WATTS CFM WATTS CFM WATTS
0.1 997 147 45 1276 284 47 1317 230 1317 230 1453 269
0.2 965 155 47 1238 284 48 1269 237 1269 237 1405 277
0.3 922 165 49 1206 289 50 1221 245 1221 245 1357 284
0.4 886 173 51 1164 302 52 1174 253 1174 253 1309 292
0.5 835 182 54 1131 314 53 1126 260 1126 260 1261 300
0.6 781 188 58 1086 319 55 1078 268 1078 268 1213 307
0.7 731 200 62 1038 319 58 1030 276 1030 276 --- ---
0.8 677 202 X 984 322 61 982 283 982 283 --- ---
*PD1436090M41B* - Rise Range: 45° - 75° F
T1
E.S.P
ST
1
Stage Heating Spee d
2nd Stage Heating Speed
CFM WATTS RISE CFM WATTS RISE CFM WATTS CFM WATTS CFM WATTS
0.1 1053 143 49 1257 236 55 1136 181 1136 181 1408 304
0.2 1007 151 52 1211 243 57 1090 188 1090 188 1362 311
0.3 961 158 54 1165 250 59 1044 195 1044 195 1315 319
0.4 915 165 57 1119 258 62 997 203 997 20 3 1269 326
0.5 869 173 60 1073 265 64 951 210 951 21 0 1223 334
0.6 823 180 63 1027 273 68 905 218 905 21 8 1177 341
0.7 777 188 69 980 280 70 859 225 859 225 --- ---
0.8 731 195 72 --- --- --- 813 233 813 233 --- ---
T2
T2
T3
Cooling Speed
T3
Cooling Speed
T4
Cooling Speed
T4
Cooling Speed
T5
Cooling Speed
T5
Cooling Speed
*PD1437090M41A* - Rise Range: 45° - 75° F
E.S.P
T1
1ST Stage Heating Speed
2nd Stage Heating Speed
T2
T3
Cooling Speed
T4
Cooling Speed
T5
Cooling Speed
CFM WATTS RISE CFM WATTS RISE CFM WATTS CFM WATTS CFM WATTS
0.1 1059 137 49 1260 213 55 1317 230 1317 230 1453 269
0.2 1008 144 52 1212 221 57 1269 237 1269 237 1405 277
0.3 956 151 54 1165 229 59 1221 245 1221 245 1357 284
0.4 908 158 57 1117 236 62 1174 253 1174 253 1309 292
0.5 857 166 60 1069 244 64 1126 260 1126 260 1261 300
0.6 784 175 63 1021 252 68 1078 268 1078 268 1213 307
0.7 732 180 69 973 259 70 1 030 276 1030 276 --- ---
0.8 673 188 72 - - - 982 283 982 283 --- ---
*PD1442100M41A* - Rise Range: 35° - 65°
E.S.P
T1
ST
1
Stage Heating Spee d
2nd Stage Heating Speed
T2
T3
Cooling Speed
T4
Cooling Speed
T5
Cooling Speed
CFM WATTS RISE CFM WATTS RISE CFM WATTS CFM WATTS CFM WATTS
0.1 1098 167 51 1423 324 53 1354 260 1501 320 1609 365
0.2 1038 178 54 1375 335 55 1296 267 1446 328 1556 373
0.3 991 184 57 1322 347 57 1237 275 1391 336 1504 381
0.4 932 192 60 1275 347 59 1178 283 1336 344 1451 388
0.5 871 204 65 1224 357 61 1120 291 1281 352 1399 396
0.6 811 213 X 1172 364 64 1061 299 1226 359 1347 404
0.7 753 210 X 1130 379 X 1002 306 1171 367 1294 412
0.8 704 221 X 1075 384 X 944 314 1116 375 1242 420
X = Outside of Temperature Rise Range - Not Recommended.
NOTE:
The shaded area indicates ranges in excess of maximum external static pressure allowable when heating. For satisfactory operation,
external static pressure should not exceed 0.5" w.c.
60
Page 61

BLOWER PERFORMANCE DA T A
*PD1442115M41B* - Rise Range: 45° - 75° F
T1
E.S.P
0.1 1090 150 52 1286 231 57 1354 260 1501 320 1609 365
0.2 1025 158 57 1225 239 61 1296 267 1446 328 1556 373
0.3 960 166 62 1165 247 64 1237 275 1391 336 1504 381
0.4 895 174 X 1105 255 X 1178 283 1336 344 1451 388
0.5 830 181 X 1045 262 X 1120 291 1281 352 1399 396
0.6 765 189 --- 984 270 X 1061 299 1226 35 9 1347 404
0.7 699 197 --- 924 278 --- 1002 306 1171 367 1294 412
0.8 634 205 --- --- --- --- 944 314 1116 375 1242 420
*PD1448100M41A* - Rise Range: 35° - 65°
E.S.P
0.1 1098 167 51 1423 324 53 1164 180 1397 315 1758 427
0.2 1038 178 54 1375 335 55 1100 188 1354 320 1709 435
0.3 991 184 57 1322 347 57 1037 196 1306 329 1660 443
0.4 932 192 60 1275 347 59 974 204
0.5 871 204 65 1224 357 61 910 212 1211 343 1563 458
0.6 811 213 X 1172 364 64 847 220 1168 356 1514 466
0.7 753 210 X 1130 379 X 784 2 27 1111 373 1466 474
0.8 704 221 X 1075 384 X 720 235 1066 373 1 417 482
ST
Stage Heating Speed
1
CFMWATTSRISE CFMWATTSRISE CFMWATTSCFMWATTSCFMWATTS
T1
ST
Stage Heating Speed
1
CFMWATTSRISE CFMWATTSRISE CFMWATTSCFMWATTSCFMWATTS
2nd Stage Heating S peed
2nd Stage Heating S peed
T2
T2
T3
Cooling Speed
T3
Cooling Speed
T4
Cooling Speed
T4
Cooling Speed
1261 338
T5
Cooling Speed
T5
Cooling Speed
1612 450
*PD1448115M41B* - Rise Range: 45° - 75° F
T1
E.S.P
0.1 1164 180 56 1435 293 61 1164 180 1675 392 1758 427
0.2 1100 188 59 1378 301 63 1100 188 1624 400 1709 435
0.3 1037 196 62 1322 309 65 1037 196 1573 408 1660 443
0.4 974 204 65 1265 316 68 974 204 1522 416 1612 450
0.5 910 212 70 1208 324 70 910 212 1472 424 1563 458
0.6 847 220 75 1152 332 73 847 220 1421 431 1514 466
0.7 784 227 X 1095 340 X 784 227 1370 439 1 466 474
0.8 720 235 X 1038 348 X 720 235 1319 447 1 417 482
ST
Stage Heating Speed
1
CFMWATTSRISE CFMWATTSRISE CFMWATTSCFMWATTSCFMWATTS
2nd Stage Heating S peed
T2
T3
Cooling Speed
T4
Cooling Speed
Cooling Speed
T5
X = Outside of Temperature Rise Range - Not Recommended.
NOTE:
The shaded area indicates ranges in excess of maximum external static pressure allowable when heating. For satisfactory operation,
external static pressure should not exceed 0.5" w.c.
61
Page 62

WIRING DIAGRAMS
HIGH VOLTAGE!
DISCONNECT ALL POWER BEFORE SERVICING OR INSTALLING THIS
UNIT. MULTIPLE POWER SOURCES MAY BE PRESENT . FAILURE TO
DO SO MAY CAUSE PROPERTY DAMAGE, PERSONAL INJURY OR DEATH.
YL/PK
ALS
PS
RS
RD
DFT
SEE NOTE 3
SEE NOTE 7
YL/PK
RD
RD
R
D
BK
K
B
YL
S RC
COMP
Y
L
LPS
YL
RD
PK
BL/PK
BL/PK
HPS
OR
P1 - PIN # 1
OR
P1 - PIN # 6
YL
P1 - PIN # 8
YL
OR
OR
P1 - PIN # 3
BK
VM
BL
BL
BK
PU
GR
NGL
C
EM
T5T4T3T2
T1
WH
YL
BR
IGN
FS
BR
PU
BK
BR
CM
BL
H
C
RD
F
RCCF
YL
BK
PU
LS
OR
RD
PU
OR
RD
BL
BL
C
C
Y
Y
DC
R-PS1
RD
PS2
PK
CCR
LVDR
HVDR
DF2
DF1
BK
PU
BK
RD
RD
BK
BL
BK
PU
YL
BR
WH
BK
PU
PU
P
BL
BL
6
3
LO
INDUCER
T1
F
ECON
GR
U
RD
2
PU
BL
BL
BK
RD
BL
OR
RD
SEE NOTE 9
R
D
PU
BK
OR
WH
4
1
PU
1
C
BL
P1 - PIN # 5
BK
BK
BK
L1
HI
IIC
BL
BL
1
2
5
3
6
OR
YL
R
RD
BL
PU
T2
T1
OR
3
2
240
208
TR
24V
RD
P1 - PIN # 2
BK
ODF
BK
YL
BR
P1
7
8
9
PU
C
W1
WH
W2
BR
OR
RVC
BK
BL
BL
C
C-RV
CNT
O
O-RV
W
R
R
R-DFT
DFT
RD
OR
RD
PU
OR
OR
RD
BL
BL
BL
OR
PU
OR
U
P
WH
RD
BL
OR
RD
DR
PU
U
P
BL
PU
BK
BL
GR
PU
P
U
PU
PU
L2
FS
GR
5
LO COOL
4
24VAC COM
3
HI COOL
2
HI HEAT
1
LO HEAT
OR
P
L2
C
L1
BL
BL
RD
WH
WH
OR
SEE NOTE 2
BK
RD
BK
HILO
PU
3
6
2
5
4
1
YL
WH
Y1
G
GR
P
U
YL
U
BK
PARK
P2
R
D
RD
CHS
BK
P
U
BK
BK
GND
WH
WH
BK
GR
WH
PU
WH
YL
PU
Y2
YL
BK
SEE NOTE 8
OR
BL
BL
YL
SEE NOTE 6
CH
GR
BK
SEE NOTE 4
2
0
8
2
4
0
/
1
/
6
0
PU
OR
GR
3
6
ECON
2
5
4
1
PU
PU
YL
SEE NOTE 5
YL
321
OTP
WH
PU
YL
62
M
GV
H
C
PU
BR
BL
P1 - PIN # 9
P1 - PIN # 7
P1 - PIN # 5
SEE NOTE 4
W1
R
C
O
THERMOSTAT CLASS 2 WIRES
GY
W2
CONTROL
BOX
0140G01780-B
Wiring is subject to change. Always refer to the wiring diagram on the unit for the most up-to-date wiring.
Page 63

WIRING DIAGRAMS
HIGH VOLTAGE!
DISCONNECT ALL POWER BEFORE SERVICING OR INSTALLING THIS
UNIT. MULTIPLE POWER SOURCES MAY BE PRESENT . FAILURE TO
DO SO MAY CAUSE PROPERTY DAMAGE, PERSONAL INJURY OR DEATH.
L1
IIC
L1
INDUCER
F
R
W1
W2
TO
MICRO
Y2
C
Y1
G
MICRO
LO HEAT
HI HEAT
COOL
R
C
C
R
DIAGNOSTIC
LED - RED
ON
OFF
1 FLASH
2 FLASHES
3 FLASHES
4 FLASHES
5 FLASHES
6 FLASHES
CH
SEE NOTE 9
T1
C
DC
DF2
LO
ODF
HI
LO
HI
L1
L1
P1
2
1
3
6
8
9
7
5
P2
1
4
5
3
1
6
2 3
2
ECON
TO
1
2
5
P9
W2
Y1
W1 G
W1
G
W2
THERMOSTAT
PRESSURE SWITCH OPEN
WITHOUT INDUCER ON
FALSE FLAME DETECTED
COMPR. SHORT CYCLE DELAY
SUPPLY VOLTAGE
208-230/1/60
SEE NOTE 8
CHS
R
C
COMP
S
CM
DF1
HVDR
VM
EM
3
TR
ALS
PS
SEE NOTE 5
DR
5
ECON
6
4
DC
R
C-RV
CNT
R-DFT
C
T1
T2
EM
T3
T4
Y2
1
Y1
++
STATUS
NORMAL OPERATION
NO POWER OR
INTERNAL CONTROL
FAULT
IGNITION FAILURE
OPEN LIMIT SWITCH
T2
C
H
RCCF
F
SEE NOTE 3
SEE NOTE 2
2
1
LS
RS
M
GV
HI
C
4
6
2
1
3
HPS
RVC
O-RV
Y
DFT
R-PS1
DFT
LPS
SEE NOTE 7
C
T5
SEE NOTE 6
2
3
OTP
O
CHECK INPUT POWER
CHECK PRESSURE SW ITCH
CHECK VENT MOTOR
CHECK PRESSURE SWITCHPRESSURE SWITCH CLOSED
CHECK WIRING FOR SHORTS
CHECK MAIN LIMIT SWITCH
CHECK AUXILIARY LIMIT SW.
CHECK ROLLOUT LIMIT SW.
CHECK FOR SHORTS IN
FLAME SENSOR WIRING
3 MIN COMP. SHORT
C
IIC
PARK
L2
L2
L2
L2
O
W
PS2
C
CHECK
CHECK
-
-
CHECK FUSE(S)
REPLACE CONTROL
GAS FLOW
GAS PRESSURE
GAS VALVE
FLAME SENSOR
CHECK TUBING
CHECK GAS VALVE
CYCLE DELAY
COMPONENT LEGEND
L2
ALS AUXILLARY LIMIT SWITCH
C CONTACTOR
CH CRANKCASE HEATER
CHS CRANKCASE HEATER SWITCH
CM CONDENSER MOTOR
COMP COMPRESSOR
DC DEFROST CONTROL BOARD
DFT DEFROST THERMOSTAT
DR DEFROST RELAY
ECON ECONOMIZER PLUG
L2
EM EVAPORATOR MOTOR
F FUSE
FS FLAME SENSOR
GND EQUIPMENT GROUND
GV GAS VALVE
HPS HIGH PRESSURE SWITCH
IIC INTEGRATED IGNITION CONTROL
IGN IGNITOR
LPS LOW PRESSURE SWITCH
LS LIMIT SW ITCH
OTP OUTDOOR THERMOSTAT PLUG
P1 9 PIN CONNECTOR PLUG
P2 6 PIN CONNECTOR PLUG
PS PRESSURE SWITCH
RCCF RUN CAPACITOR COMPRESSOR / FAN
RS ROLLOUT SWITCH
RVC REVERSING VALVE COIL
TR TRANSFORMER
VM VENT MOTOR
NOTES
1. REPLACEMENT WIRE MUST BE THE SAME SIZE AND TYPE OF
INSULATION AS ORIGINAL (AT LEAST 105C). USE COPPER
CONDUCTOR ONLY.
2. FOR 208V TRANSFORMER OPERATION MOVE BLACK WIRE FROM
TERMINAL 3 TO TERMINAL 2 ON TRANSFORMER.
3. FOR 208V VENT MOTOR OPERATION, REMOVE BLUE LEAD FROM
INDUCER LOW TERMINAL. MOVE BLACK LEAD FROM PARK TERMINAL
TO INDUCER LOW TERMINAL, AND PLACE BLUE LEAD ON PARK.
4. USE COPPER CONDUCTORS ONLY.
++ USE NEC CLASS 2 WIRE.
5. FOR ECONOMIZER, REMOVE PLUG FROM ECONOMIZER HARNESS.
CONNECT PLUG FROM ECONOMIZER TO HARNESS.
6. FOR OUTDOOR THERMOSTAT, REMOVE PLUG FROM HARNESS AND
CONNECT PLUG FROM OUTDOOR THERMOSTAT TO HARNESS.
7. TO CHANGE AIRFLOW MOVE YELLOW WIRE (COOLING / HEAT PUMP),
WHITE W IRE (LOW STAGE GAS), OR BROWN W IRE (HIGH-STAGE GAS)
TO SPEED TAP T1, T2, T3, T4, OR T5 AT EVAPORATOR MOTOR.
REFER TO UNIT AIRFLOW TABLES FOR TO DETERMINE THE
APPROPRIATE SPEED TAP FOR APPLICATION. UNITS SHIPPED WITH
YELLOW, WHITE, AND BROWN ON T4, T1, AND T2 RESPECTIVELY.
8. CRANKCASE HEATER AND CRANKCASE HEATER SWITCH FACTORY
EQUIPPED WHEN REQUIRED.
9. DOUBLE POLE CONTACTOR SHOWN. SINGLE POLE CONTACTOR
COULD BE FACTORY EQUIPPED AS AN ALTERNATE CONFIGURATION.
JUNCTION
TERMINAL
INTERNAL TO
INTEGRATED CONTROL
PLUG CONNECTION
IGNITER
SWITCH (PRESS.)
DIAGNOSTIC
LED - RED
7 FLASHES
8 FLASHES
9 FLASHES
DIAGNOSTIC
LED - AMBER
OFF
ON
1 FLASH
2 FLASHES
LIMIT OPEN 5 TIMES IN
SAME CALL FOR HEAT
PSW/LOC OPEN
NO FLAME PRESENT
NORMAL FLAME PRESENT
LOW FLAME SIGNAL
FALSE FLAME DETECTED
STATUS
STATUS
EQUIPMENT GROUND
FIELD GROUND
FIELD SPLICE
SWITCH (TEMP)
OVERCURRENT
PROT. DEVICE
CHECK MAIN LIMIT SWITCH
CHECK AUXILIARY LIMIT SW.
CHECK JUMPER BETWEEN
REFRIGERANT SWITCHES
FA
CTORY WIRING
LINE VOLTAGE
LOW VOLTAGE
OPTIONAL HIGH
VOLTAGE
FIELD
WIRING
HIGH VOLTAGE
LOW VOLTAGE
IRE CODE
W
BK BLACK
BL BLUE
BR BROWN
GR GREEN
OR ORANGE
PK PINK
PU PURPLE
RD RED
WH WHITE
YL YELLOW
CHECK
1 AND 4 ON 6-CIRCUIT
CONNECTORIDT/ODT OPEN
CHECK OPTIONAL
CHECK REFRIGERANT
SWITCHES FOR LOSS OF
CHARGE OR HIGH HEAD
PRESSURE
CHECK
-
-
GAS FLOW
GAS PRESSURE
GAS VALVE
FLAME SENSOR
CHECK GAS VALVE
CHECK FOR SHORTS IN
FLAME SENSOR WIRING
0140G02004-B
Wiring is subject to change. Always refer to the wiring diagram on the unit for the most up-to-date wiring.
63
Page 64

ACCESSORIES WIRING DIAGRAMS
HIGH VOLTAGE!
DISCONNECT ALL POWER BEFORE SERVICING OR INSTALLING THIS
UNIT. MULTIPLE POWER SOURCES MAY BE PRESENT . FAILURE TO
DO SO MAY CAUSE PROPERTY DAMAGE, PERSONAL INJURY OR DEATH.
ECONOMIZER
(O)
GROUND(G)
500-48926-002
MOLEX 3597706**
UX2-1
OCC
EXH1
E-GND
GROUND(G)
(P)
(P)
(Y)
(Y)
Y2-I
Y1-I
UX1-0
Y2-O
W7220
HONEYWELL
(R)
(BL)
(G)
(O)
(BL)
(R)
(P)
(Y)
50048926-002
MOLEX 3597706**
R
C
Y1-O
4
4
COOL 1
Y1
Y1
(P)
(Y)
33
1
2
2
1
COOL 2
Y2
Y2
99
PLUG
ECON
PLUG
GMC
HEAT
R
W2
R
W2
88
6
5
6
5
FAN
G
G
ROOM THERMOSTAT
RV
ECON.
TERMINAL BLOCK
RV - REVERSING VALVE
(ENERGIZED IN COOLING MODE)
OO
C
C
GROUND LUG
50048926-001
OAT
OAT
MAT
MAT
50048926-002
MOLEX 3597706**
(P)
(P)
WIRE DIAGRAM
36240 ECONOMIZER
BLACK
RED
WHITE
1
2
3
+
COM
MS7105K2046/B
24VAC/DC
C
2
.
D
.
.
V
1
0
HONEYWELL ACTUATOR
S-BUS
S-BUS
IAQ 2-10
IAQ COM
ACT 2-10
ACT COM
IAQ 24V+
(W)
(W)
ACT 24V+
RED
BLACK
WHITE
COLOR CODES FOR PLUG 1
50048926-002
MOLEX 3597706**
8 (O) ORANGE
GROUND (G)GREEN
ORANGE = 1 X 78"
GROUND = 1 X 50"
WIRE LENGTHS FOR PLUG 1
MOLEX 3597702**
CONNECT TO
C7400S1000
ENTHALPY CONTROL
(Y) YELLOW
(P) PURPLE
(Y) YELLOW
(P) PURPLE
2
1
COLOR CODES FOR PLUG 2
(BL) BLUE
4
356
(O) ORANGE
(R) RED
(G) GREEN
8
9
WIRE LENGTHS FOR PLUG 2
50048926-001
MOLEX 3597702**
CONNECT TO
C7250A1001
MIXED AIR SENSOR
Y/Y2 (CON TACTOR)(CC2)
Y2 TSTAT
Y1 TSTAT
COMMON
321
654
(CC1)
987
O
Y1 (CONTACTOR)
YELLOW = 2 X 77"
PURPLE = 2 X 77"
BLUE = 1 X 77"
GREEN = 1 X 77"
G
R
Economizer wiring for PGEDJ and HZECNJPCGHM*
Wiring is subject to change. Always refer to the wiring diagram on the unit for the most up-to-date wiring.
64
 Loading...