

Page 1
Installation and Maintenance Manual IM 1110-1
Air-Cooled Scroll Compressor Chiller
Group: Chillers
Part Number: IM1110-1
Date: June 2014
AGZ025D-AGZ190D (REV 0A), Chillers with Pump Packages
R-410A, 60 Hz
© 2014 Daikin Applied
Page 2
Introduction . . . . . . . . . . . . . . . . . . . . . . . . . . . . . . . 3
Manufactured in an ISO-certified facility
©2014 Daikin Applied. Illustrations and data cover the Daikin Applied product at the time of publication and we reserve the right to make
changes in design and construction at anytime without notice.
Selection Procedures . . . . . . . . . . . . . . . . . . . . . . . 8
Pressure Drop Data . . . . . . . . . . . . . . . . . . . . . . . . 15
Installation Information . . . . . . . . . . . . . . . . . . . . . 16
Unit Weights . . . . . . . . . . . . . . . . . . . . . . . . . . . . . . 17
Vibration Isolators . . . . . . . . . . . . . . . . . . . . . . . . . 19
Triple Duty Valve . . . . . . . . . . . . . . . . . . . . . . . . . . 21
Dimensions . . . . . . . . . . . . . . . . . . . . . . . . . . . . . . 23
Electrical Information . . . . . . . . . . . . . . . . . . . . . . 30
Pump Operation . . . . . . . . . . . . . . . . . . . . . . . . . . 46
Start-up and Shutdown . . . . . . . . . . . . . . . . . . . . 52
Setup for BAS Integration . . . . . . . . . . . . . . . . . . 54
System Maintenance . . . . . . . . . . . . . . . . . . . . . . 60
Hazard Identification
DANGER
Dangers indicate a hazardous situation which will result in death or serious injury if not avoided.
WARNING
Warnings indicate potentially hazardous situations, which can result in property damage, severe personal injury, or death if not avoided.
CAUTION
Cautions indicate potentially hazardous situations, which can result in personal injury or equipment damage if not avoided.
This manual contains information on the optional factory-installed pump packages for
AGZ-D (REV 0A) vintage air-cooled scroll chillers. For other product information, go to
www.DaikinApplied.com.
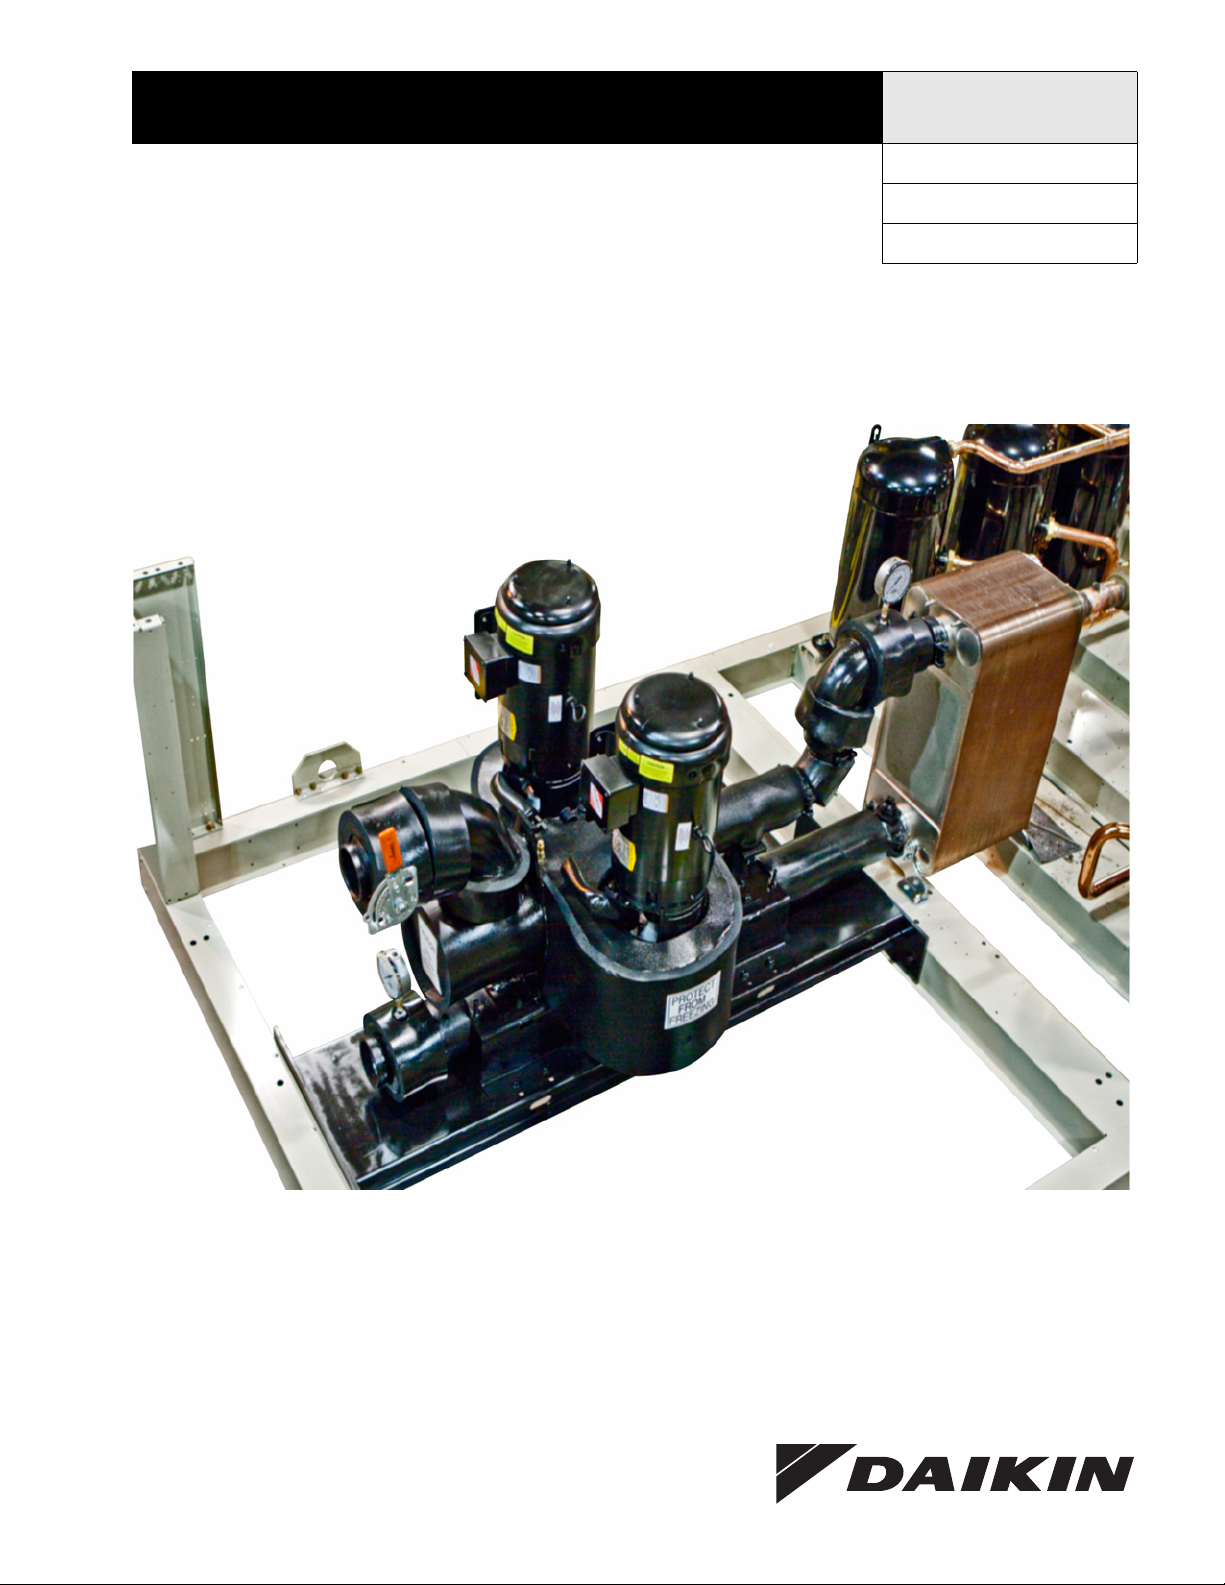
Cover Picture: Pump package shown during manufacture without evaporator insulation installed and without the
shipped loose pump inlet “Y” strainer and outlet triple-duty valve.
2 IM 1110-1
Page 3
Introduction
A
G Z XXX D H
Air-Cooled
Global Design
Scroll Compressor
Nominal Tons
Application
Design Vintage
H = Standard Packaged
Installation is to be performed by qualified personnel who are familiar with local codes and regulations.
Sharp edges on unit and coil surfaces are a potential hazard to personal safety. Avoid contact with them.
Note: Use this manual in conjunction with the current Installation and Maintenance Manual and Operation Manual,
for AGZ-D packaged chillers. Both manuals are available on www.DaikinApplied.com.
General Description
Introduction
WARNING
CAUTION
This manual covers optional on-board, integrated, chilled
water pump package available on all Daikin Model AGZ-D
(REV 0A) chillers. Factory-installed pump packages provide
important benefits:
• Greatly simplify the chilled water system design and
installation
• Provide installation savings by reducing field piping,
wiring and control costs
• Save valuable floor space inside the building
• Reduce project engineering content
• Greatly reduce pump operating cost with the optional
variable flow pump Variable Frequency Drive (VFD)
Standard Components
Single Pump (Model 4380) is a single spring inside seal,
vertical, in-line, radially split-case pump, serviceable without
breaking pipe connections. The motor and pump rotating
assembly can be serviced without removing the pump casing
from the line.
Dual Pumps in a Single Casting (Model 4392) single-spring
inside-seal vertical, in-line, radially split-case pumps, mounted
in a common casing with a common inlet connection and
outlet connection and including a flapper valve to prevent
recirculation when only one pump is operating. An isolation
valve is included that allows one pump to operate when the
other is removed. The pumps are designed for duty/standby,
not parallel operation. All information and performance curves
for the single pump arrangement (Model 4380) can be used for
the dual pump arrangement (Model 4392.)
PLUS
• “Y" type inlet strainer
• Combination triple-duty outlet valve having a drip-tight
discharge shutoff valve, non-slam check valve, and flow
throttling valve
• Combination suction guide with flow stabilizing outlet
vanes and stainless steel strainer with a disposable finemesh strainer for start-up
• Factory power and control wiring from the AGZ-D
chiller to the pump package control panel
• Flow switch mounted and wired
• Interconnecting schedule 40 piping with Victaulic® couplings
• Insulation of all cold surfaces
Options
• Water pressure gauges on the pump suction and discharge
• Expansion tank with size increments from 4.4 to 90 gallons, field installed (small sizes can be factory mounted
• Air separator with air vent, field installed
• Flex piping connections, field installed
• Storage tanks, vertical, insulated. (150, 300, 600, 1000
gallon sizes) with optional immersion heater, field
installed.
IM 1110-1 3
Page 4
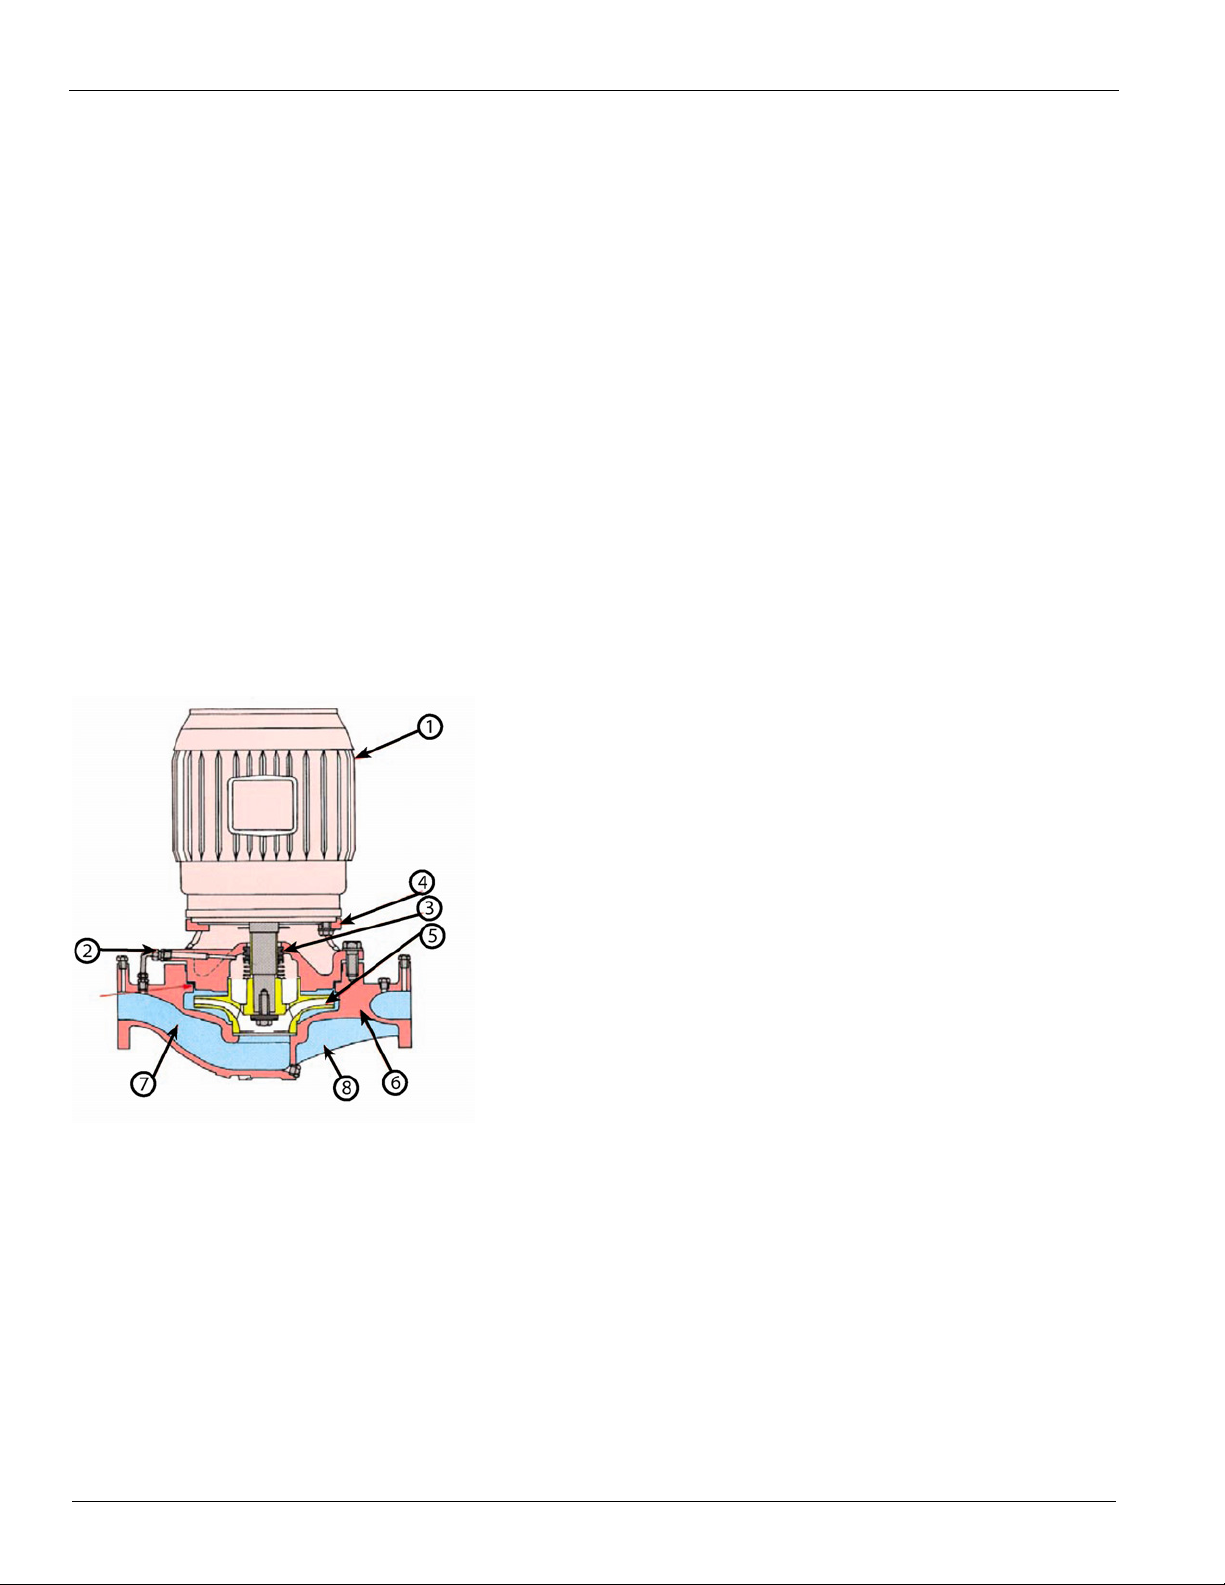
Introduction
1.Industry standard face mounted motor.
2.Flush and vent connection removes entrained air and ensures
liquid at seal face at all times.
3.Inside type mechanical seal with Silicon Carbide seat,
serviceable without breaking pipe connections.
4.Heavy cylindrical bracket with 360° register on both flanges
provides a rigid union of pump and motor.
5.Dynamically balanced impeller assures smooth vibrationfree operation.
6.Radially split casing with equal suction and discharge flange
sizes. Separate tapped openings for gauge, flush and drain
connections.
7.Liberal inlet passageways and straightening vanes provide
optimum suction performance and quiet operation.
8.Ribs cast integral with casing. Machined surface to accept
floor support when specified.
9.Confined casing gasket to meet stringent industrial
temperature and pressure applications.
Optional Variable Flow VFD
The operating cost savings resulting from using variable
chilled water flow via a pump VFD has been well known for
many years. In the past, however, its usage has been somewhat
limited by the cost and uncertainty of field installing the
required system pressure differential sensors.
Daikin Applied can now offer a variable chilled water flow
system, completely self-contained within the pump package,
by simply ordering the optional pump VFD-no external
sensors required.
Including sensorless operation, there are four operating modes
available with the optional factory-installed variable flow
VFD:
1 Sensorless Pressure Control: Onboard measurements
allow control of the pump speed to optimize chilled
water flow with respect to water system pressure.
External pressure sensors are not required, eliminating
design and installation effort. The unit is factoryconfigured for this mode.
2 BAS Input: The pump speed will be controlled
according to the voltage level from a BAS input signal.
Figure 1: Model 4380 Design Features
3 Locally Selected Constant Speed Control: Operation
of the pump at a constant speed selected on the VFD
control panel. Among other things, this mode allows
selecting a pump speed to match the actual system curve.
4 Remote Sensor Control: The VFD is wired to pressure
sensors mounted in the chilled water piping system. This
is the standard VFD control when a sensorless VFD is
not used.
Pump Description
• Pump casing is cast iron.
• The casing suction and discharge connections are the
same size and have tapped seal vent and pressure gauge
connections.
• The mechanical seal is single-spring inside type with
carbon against silicon carbide faces. EPDM elastomer
with stainless steel and hardware are provided.
• Impellers are bronze, trimmed to design conditions and
then balanced.
• The shaft sleeve is bronze extending the full length of
the seal area.
4 IM 1110-1
Page 5

Component Location
Outlet Valve
Wat er
Inlet
Chilled
Wat er
Outlet
“Y”Type
Inlet
Strainer
Inlet
Guide
Dual
Vertical
Pumps
VFD
Controllers
Pump
Package
Control
Brazed-Plate
Evaporator
Gauge Port
Swt.
Guage Port
Figure 2: Component location for models AGZ025D - AGZ070D
Introduction
Chilled
Optional
Evap In Press.
Panel
Triple-Duty
Flow
Drain
Evap Out Press.
Notes:
1 Dual pumps having a common housing and inlet and outlet connections as shown. An available single pump arrangement can
replace the dual pump and will have a similar piping layout.
2 The inlet strainer and triple-duty valve are shipped separate for field installation.
3 The pump package control panel is located under the main unit control panel. The piping connections are on the left side of
the chiller unit when looking at the control panel.
4 Pump drains are located under the pump casing, ¼ in. NPT.
5 Pipe drains are 1 in. NPT.
IM 1110-1 5
Page 6

Introduction
Dual
Vertical
Pumps
Optional
VFD
Controllers
Chilled
Water
Inlet
Chilled
Water
Outlet
Outlet Valve
Flow Switch
Brazed-Plate
Evaporator
Pump Package
Control Panel
Drain Port
Press. Ga. Port
Evap Out
Press. Ga. Port
Figure 3: Component location for models AGZ075D - AGZ130D
Evap In
“Y” Type Strainer
Notes:
1 Dual pump having a common inlet and outlet shown. An available single pump arrangement can replace the dual pump and
Triple-Duty
will have a similar piping layout.
2 The inlet strainer and triple-duty valve are shipped separate for field installation.
3 The pump package control panel is located under the main unit control panel. The piping connections are at the rear of the
unit, opposite the control panel.
4 Pump drains are located under the pump casing, ¼ in. NPT.
5 Pipe drains are 1 in. NPT.
6 IM 1110-1
Page 7
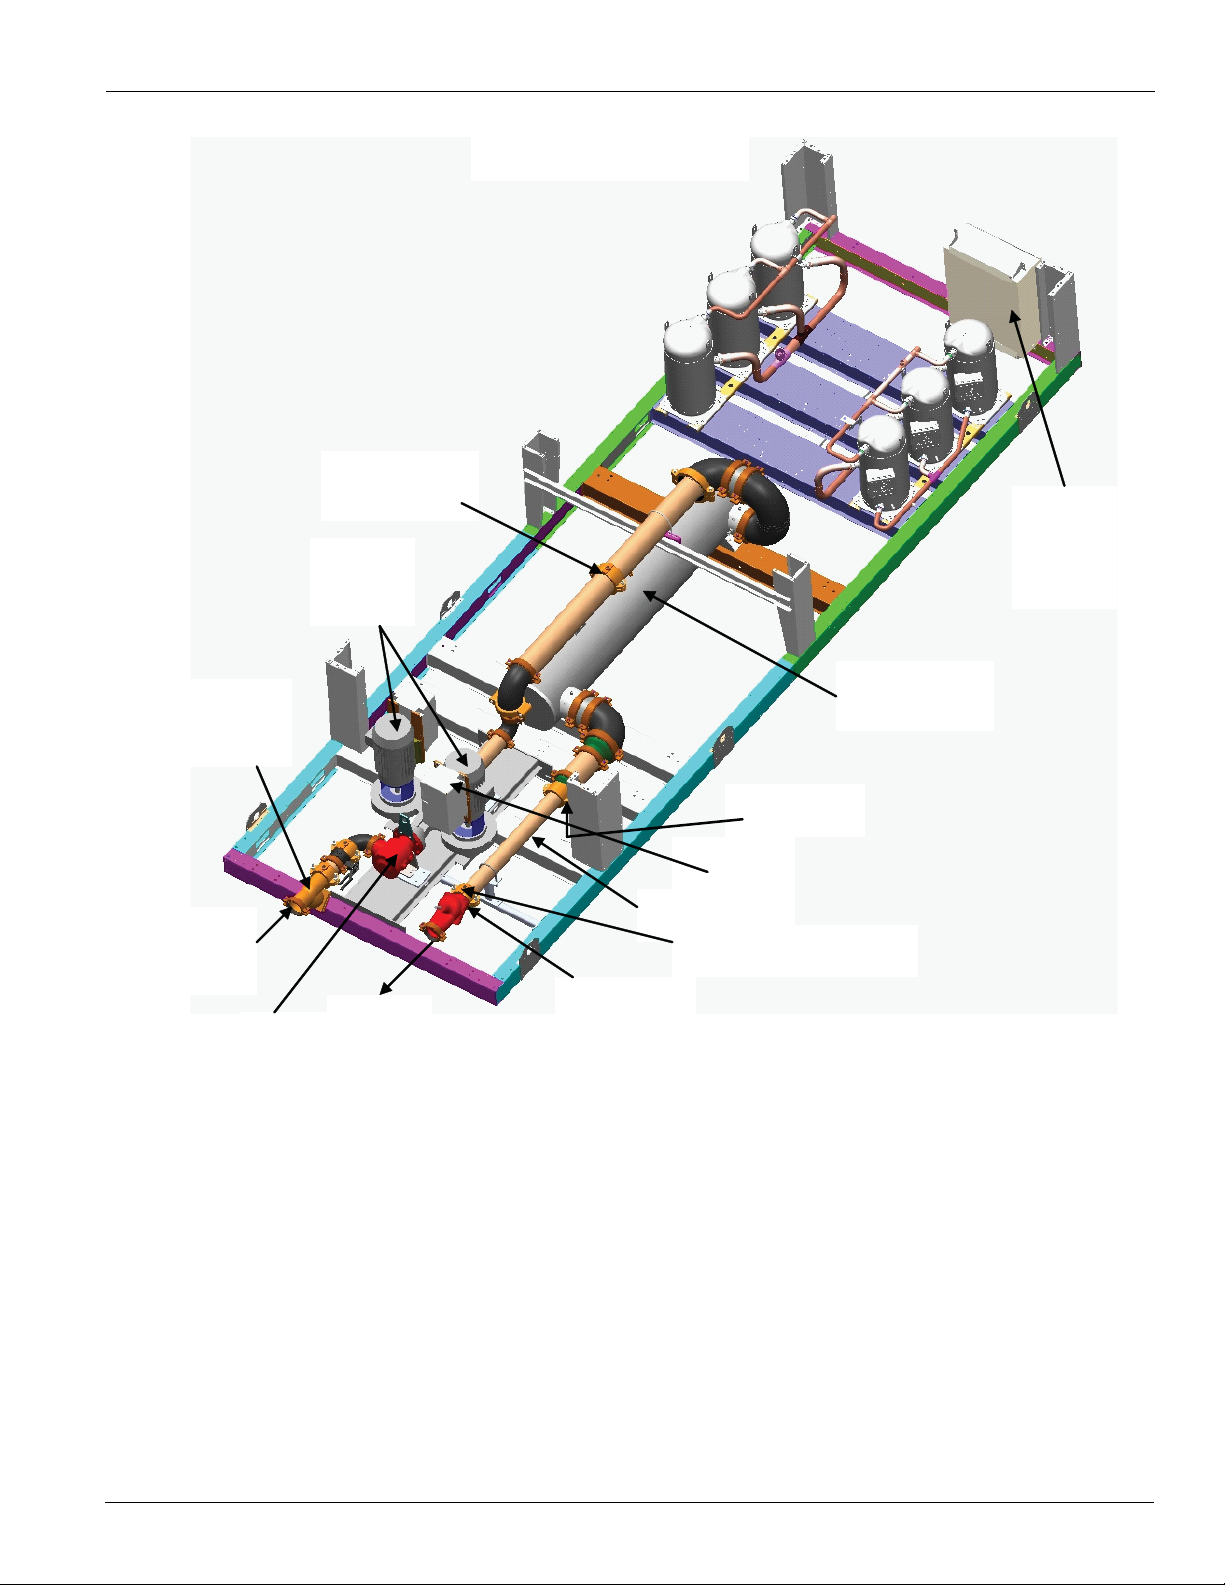
Figure 4: Component location for models AGZ140D - AGZ190D
Dual
Vertical
Pumps
Optional
VFD
Controllers
Chilled
Water
Inlet
Water
Outlet
Inlet
Guide
Outlet valve
Shell-and-Tube
Evaporator
Pump
Package
Control
Panel
“Y” Type
Inlet
Strainer
Evap In
Press Ga. Port
Evap Out Press. Ga. port
Introduction
Drain Port
Flow Switch
Triple-Duty
Chilled
Notes:
1 Dual pump having a common inlet and outlet shown. An available single pump arrangement can replace the dual pump and
will have a similar piping layout.
2 The inlet strainer and triple-duty valve are shipped separate for field installation.
3 The pump package control panel is located under the main unit control panel. The piping connections are at the rear of the
unit, opposite the control panel.
4 Pump drains are located under the pump casing, ¼ in. NPT.
5 Pipe drains are 1 in. NPT.
IM 1110-1 7
Page 8
Selection Procedures
Selection Procedures
Selection Procedure
This section provides material to make pump selections. Your
Daikin Applied sales representative can make computerized
selections and provide pricing. The AGZ-D model size, the
chilled water flow, and the total dynamic external system head
are required to select a pump package.
AGZ Model Size
The AGZ-D model size is determined by the selection program
or selected from the current version of the Daikin Applied
catalog available from your local sales representative or
www.DaikinApplied.com.
Chilled Water Flow
The chilled water flow will either be specified or determined
from the AGZ selection program.
Total Dynamic System Head
The total system dynamic head is the sum of three
components:
1 Internal pump package losses from piping, valves and
fittings from Table 1
2 Evaporator pressure drop from the selection program or
from curves on page 15
3 External system pressure drop as determined by the
system designer.
For systems using a glycol solution:
"For the internal package pressure drop, use Table 1 values.
Glycol has no significant impact.
"For the evaporator pressure drop, the Daikin Applied
selection program includes an automatic correction factor. If
the pressure drop is determined from the pressure drop curves,
use the correction factors from Tab le 2 to calculate the water
pressure drop for glycol. Do not use uncorrected table values
for the evaporator.
"The external system pressure drop must also account for
glycol use.
Table 1: Pump Package Internal Pressure Drop and Water Volume
AGZ-D
MODEL
025 3.7 4 055 7.1 6 090 16.3 11 160 12.7 65
030 4.3 4 060 8.0 8 100 10.3 11 180 15.9 65
035 4.6 4 065 8.7 9 110 10.5 12 190 18.4 65
040 4.9 4 070 9.5 9 125 12.9 13
045 5.6 4 075 10.8 9 130 16.0 14
050 6.3 5 080 14.0 9 140 10.0 65
Note: 1.Internal pump package pressure drop is based on the AGZ nominal flow and includes the pipe, fittings and suction guide/strainer. It does not include
Note: 2.Water volume shown is for pump package components, piping and fittings and includes the evaporator.
PRESS
DROP
(ft)
the evaporator pressure drop. Lower flow rates have a negligible affect on the pump selection.
WATER-
VOLUME
(gal.)
AGZ-D
MODEL
PRESS.
DROP
(ft)
WATER
VOLUME
(gal.)
AGZ-D
MODEL
PRESS.
DROP
(ft)
WATER
VOLUME
(gal.)
AGZ-D
MODEL
PRESS.
DROP
(ft)
WATER
VOLUME
(gal.)
Table 2: Glycol Correction Factors
Ethylene Glycol Propylene Glycol
Freeze
% E.G.
10 26 -3.3 1.097 1.097 1.038 1.101 10 26 -3.3 1.016 1.100 1.019 1.097
20 18 -7.8 1.226 1.226 1.063 1.224 20 19 -7.2 1.032 1.211 1.035 1.201
30 7 -13.9 1.369 1.369 1.095 1.358 30 9 -12.8 1.057 1.380 1.059 1.351
40 -7 -21.7 1.557 1.557 1.134 1.536 40 -5 -20.6 1.092 1.703 1.095 1.598
50 -28 -33.3 1.791 1.791 1.184 1.755 50 -27 -32.8 1.140 2.251 1.142 2.039
Point
° F ° C ° F ° C
Model
025-130
Flow PD Flow PD Flow PD Flow PD
Model
140-190
% P.G.
Flow
Freeze Point
Model
025-130
Model
140-190
8 IM 1110-1
Page 9
Selection Procedures
Pump Nomenclature
2
x 1.5 x 5.5
Suction Size (in.)
Discharge Size (in.)
Unit Nom. Nom. Min. Max. Unit Tota l
Model Tons gpm gpm gpm gpm Head
ft. Size rpm HP Size rpm HP
41 25 2x2x6 1800 1 2x2x6 1800 1
41 50 1.5x1.5x8 1800 2 2x2x8 1800 3
41 75 1.5x1.5x6 3600 3 2x2x8 3600 5
41 100 1.5x1.5x6 3600 5 2x2x6 3600 5
41 125 1.5x1.5x6 3600 5 - - -
66 25 2x2x6 1800 1 2x2x6 1800 1
66 50 2x2x8 1800 3 2x2x8 1800 3
66 75 1.5x1.5x6 1800 5 3x3x6 1800 5
66 100 1.5x1.5x6 3600 5 2x2x6 3600 5
66 125 1.5x1.5x6 3600 5 - - -
87 25 2x2x6 1800 2 2x2x6 1800 2
87 50 2x2x8 1800 3 2x2x8 1800 3
87 75 2x2x6 3600 5 2x2x6 3600 5
47 25 2x2x6 1800 1 2x2x6 1800 1
47 50 2x2x8 1800 3 2x2x8 1800 3
47 75 1.5x1.5x6 3600 3 2x2x8 3600 5
47 100 1.5x1.5x6 3600 5 2x2x6 3600 5
47 125 1.5x1.5x6 3600 5 - - -
76 25 2x2x6 1800 1 2x2x6 1800 1
76 50 2x2x8 1800 3 2x2x8 1800 3
76 75 1.5x1.5x6 3600 3 2x2x6 3600 5
76 100 1.5x1.5x6 3600 5 - - -
10 1 2 5 3 x3x6 1 80 0 2 3 x3x6 18 00 2
10 1 5 0 2 x2x8 1 80 0 3 2 x2x8 18 00 3
10 1 7 5 2 x2x6 3 60 0 5 2 x2x6 36 00 5
Single Pump Dual Pumps
AGZ 025D
27.3 66 41 109
AGZ 030D
31.6 76 47 126
Pump Selection Procedure
A family of pump sizes has been pre-selected for groups of
AGZ units and shown in Table 3.
Selection Examples
Select: a pump for an AGZ 025-D with 65 gpm of water flow
at a 90 ft external head, dual pumps. From Tab le 1., the
internal pump package pressure drop is 3.7 ft.
From the pressure drop curves on page 15, the evaporator
pressure drop is 9.4 ft.
Internal Pump Package 3.7
Evaporator 9.4
External 90.0
Total Head 103.1
Using the required flow and total system head, select the best
pump from the table. Flow values are shown for minimum,
nominal, and near-maximum flow rates for each AGZ size. For
flow rates falling between these values, check the pump
selection for the higher and lower flow. The impeller will be
trimmed for specific job conditions after order placement.
Impeller Size (in.)
From Table 3., select a dual 2 x 2 x 6 pump, 3600 rpm, 7.5 hp.
Although a 5 hp pump is adequate at design conditions, a 7.5
hp pump will provide non-overloading characteristics.
Table 3: AGZ-D Unit/Pump Combinations
Note: Some unit gpm and head combination do not have a valid selection and are absent from the table.
IM 1110-1 9
Page 10

Selection Procedures
Table 3: AGZ-D Unit/Pump Combinations Continued
Unit Nom . Nom. Min. M a x. Unit Tota l
Model Tons gpm gpm gpm gpm Head
52 50 2x2x8 1800 3 2x2x8 1800 3
52 75 1.5x1.5x6 3600 3 2x2x6 3600 5
52 100 1.5x1.5x6 3600 5 2x2x6 3600 5
52 125 1.5x1.5x6 3600 5 2x2x6 3600 7.5
84 25 2x2x6 1800 2 2x2x6 1800 2
84 50 2x2x8 1800 3 2x2x8 1800 3
AGZ 035D
AGZ 040D
AGZ
045D
AGZ 050D
34.9 84 52
37.9 91 57 152
42.6 102 64 170
48.1 115 72 192
140
84 75 2x2x6 3600 5 2x2x6 3600 5
84 100 1.5x1.5x6 3600 5 2x2x6 3600 7.5
84 125 2x2x6 3600 7.5 2x2x6 3600 7.5
112 25 2x2x8 1800 2 2x2x8 1800 2
112 50 2x2x8 1800 3 2x2x8 1800 3
112 75 2x2x6 3600 5 2x2x6 3600 5
112 100 2x2x6 3600 7.5 2x2x6 3600 7.5
57 50 2x2x8 1800 3 2x2x8 1800 3
57 75 1.5x1.5x6 3600 3 3x3x6 3600 5
57 100 1.5x1.5x6 3600 5 2x2x6 3600 5
57 125 1.5x1.5x6 3600 5 2x2x6 3600 7.5
91 25 2x2x6 1800 2 2x2x6 1800 2
91 50 2x2x8 1800 3 2x2x8 1800 3
91 75 2x2x6 3600 5 2x2x6 3600 5
91 100 2x2x6 3600 7.5 2x2x6 3600 7.5
91 125 2x2x6 3600 7.5 2x2x6 3600 7.5
121 25 3x3x6 1800 2 3x3x6 1800 2
121 50 2x2x8 1800 3 2x2x8 1800 3
121 75 2x2x6 3600 5 2x2x6 3600 5
121 100 2x2x6 3600 7.5 2x2x6 3600 7.5
64 50 2x2x8 1800 3 2x2x8 1800 3
64 75 1.5x1.5x6 1800 5 3x3x6 1800 5
64 100 1.5x1.5x6 3600 5 2x2x6 3600 5
64 125 1.5x1.5x6 3600 5 2x2x6 3600 7.5
102 25 3x3x6 1800 2 3x3x6 1800 2
102 50 2x2x8 1800 3 2x2x8 1800 3
102 75 2x2x6 3600 5 2x2x6 3600 5
102 100 2x2x6 3600 7.5 2x2x6 3600 7.5
136 25 3x3x6 1800 2 3x3x6 1800 2
136 50 2x2x8 1800 5 2x2x8 1800 5
136 75 2x2x6 3600 5 2x2x6 3600 5
136 100 2x2x6 3600 7.5 2x2x6 3600 7.5
72 50 2x2x8 1800 3 2x2x8 1800 3
72 75 1.5x1.5x6 3600 3 2x2x6 3600 5
72 100 1.5x1.5x6 3600 5 2x2x6 3600 7.5
72 125 2x2x6 3600 7.5 2x2x6 3600 7.5
115 25 2x2x8 1800 2 2x2x8 1800 2
115 50 2x2x8 1800 3 2x2x8 1800 3
115 75 2x2x6 3600 5 2x2x6 3600 5
115 100 2x2x6 3600 7.5 2x2x6 3600 7.5
154 25 3x3x6 1800 2 3x3x6 1800 2
154 50 2x2x8 1800 5 2x2x8 1800 5
154 75 2x2x6 3600 7.5 2x2x6 3600 7.5
154 100 2x2x6 3600 7.5 2x2x6 3600 7.5
Single Dual
ft. Size rpm HP Size rpm HP
Note: Some unit gpm and head combination do not have a valid selection and are absent from the table.
10 IM 1110-1
Page 11
Table 3: AGZ-D Unit/Pump Combinations Continued
Unit Nom. Nom. M in. Ma x . Unit Tota l Head
Model Tons gpm gpm gpm gpm ft. Size RPM HP Size RPM HP
77 50 2x2x8 1800 3 2x2x8 1800 3
77 75 1.5x1.5x6 3600 3 2x2x6 3600 5
77 100 1.5x1.5x6 3600 5 2x2x6 3600 7.5
77 125 2x2x6 3600 7.5 2x2x6 3600 7.5
124 25 3x3x6 1800 2 3x3x6 1800 2
124 50 2x2x8 1800 3 2x2x8 1800 3
124 75 2x2x6 3600 5 2x2x6 3600 5
124 100 2x2x6 3600 7.5 2x2x6 3600 7.5
165 25 3x3x6 1800 2 3x3x6 1800 2
165 50 3x3x8 1800 5 3x3x8 1800 5
165 75 2x2x6 3600 7.5 2x2x6 3600 7.5
84 50 2x2x8 1800 3 2x2x8 1800 3
84 75 2x2x6 3600 5 2x2x6 3600 5
84 100 1.5x1.5x6 3600 5 2x2x6 3600 7.5
84 125 2x2x6 3600 7.5 2x2x6 3600 7.5
135 25 3x3x6 1800 2 3x3x6 1800 2
135 50 2x2x8 1800 5 2x2x8 1800 5
135 75 2x2x6 3600 5 2x2x6 3600 5
135 100 2x2x6 3600 7.5 2x2x6 3600 7.5
135 125 2x2x6 3600 10 2x2x6 3600 10
180 25 3x3x6 1800 2 3x3x6 1800 2
180 50 3x3x8 1800 5 3x3x8 1800 5
180 75 3x3x6 3600 7.5 3x3x6 3600 7.5
180 100 2x2x6 3600 10 2x2x6 3600 10
180 125 2x2x8 3600 10 2x2x8 3600 10
87 50 2x2x8 1800 3 2x2x8 1800 3
87 75 2x2x6 3600 5 2x2x6 3600 5
87 100 2x2x6 3600 7.5 2x2x6 3600 7.5
87 125 2x2x6 3600 7.5 2x2x6 3600 7.5
139 25 3x3x6 1800 2 3x3x6 1800 2
139 50 2x2x8 1800 5 2x2x8 1800 5
139 75 2x2x6 3600 5 2x2x6 3600 5
139 100 2x2x6 3600 7.5 2x2x6 3600 7.5
139 125 2x2x6 3600 10 2x2x6 3600 10
186 25 3x3x6 1800 2 3x3x6 1800 2
186 50 3x3x8 1800 5 3x3x8 1800 5
186 75 3x3x6 3600 7.5 3x3x6 3600 7.5
186 100 2x2x6 3600 10 2x2x6 3600 10
96 50 2x2x8 1800 3 2x2x8 1800 3
96 75 2x2x6 3600 5 2x2x6 3600 5
96 100 2x2x6 3600 7.5 2x2x6 3600 7.5
96 125 2x2x6 3600 10 2x2x6 3600 10
154 25 3x3x6 1800 2 3x3x6 1800 2
154 50 2x2x8 1800 5 2x2x8 1800 5
154 75 2x2x6 3600 7.5 2x2x6 3600 7.5
154 100 2x2x6 3600 7.5 2x2x6 3600 7.5
154 125 1.5x1.5x8 3600 10 2x2x6 3600 10
205 25 3x3x8 1800 3 3x3x8 1800 3
205 50 3x3x8 1800 5 3x3x8 1800 5
205 75 3x3x6 3600 7.5 3x3x6 3600 7.5
205 100 3x3x6 3600 10 3x3x6 3600 10
AGZ 055D
51.6 124 77
Single Pump Dual Pumps
AGZ 065D
58.1 139 87
206
AGZ 060D
56.1 135 84 224
256
AGZ 070D
64.1 154 96
232
Selection Procedures
Note: Some unit gpm and head combination do not have a valid selection and are absent from the table.
IM 1110-1 11
Page 12

Selection Procedures
Unit Nom. Nom. Min. Max. Unit Total Head
Model Tons gpm gpm gpm gpm ft. Size rpm HP Size rpm HP
1 10 5 0 2 x2x8 1 80 0 3 2 x2x8 18 00 3
1 10 7 5 2 x2x6 3 60 0 5 2 x2x6 36 00 5
110 100 2x2x6 3600 7.5 2x2x6 3600 7.5
110 125 2x2x6 3600 10 2x2x6 3600 10
1 75 5 0 3 x3x8 1 80 0 5 3 x3x8 18 00 5
175 75 3x3x6 3600 7.5 3x3x6 3600 7.5
175 100 2x2x6 3600 10 2x2x6 3600 10
175 125 2x2x8 3600 15 2x2x8 3600 15
2 34 2 5 3 x3x8 1 80 0 3 3 x3x8 18 00 3
2 34 5 0 3 x3x8 1 80 0 5 3 x3x8 18 00 5
234 75 3x3x6 3600 7.5 3x3x6 3600 7.5
234 100 2x2x8 3600 15 2x2x8 3600 15
234 125 2x2x8 3600 15 2x2x8 3600 15
1 22 5 0 2 x2x8 1 80 0 3 2 x2x8 18 00 3
1 22 7 5 2 x2x6 3 60 0 5 2 x2x6 36 00 5
122 100 2x2x6 3600 7.5 2x2x6 3600 7.5
122 125 2x2x6 3600 10 2x2x6 3600 10
1 95 2 5 3 x3x6 1 80 0 3 3 x3x6 18 00 3
1 95 5 0 3 x3x8 1 80 0 5 3 x3x8 18 00 5
195 75 3x3x6 3600 7.5 3x3x6 3600 7.5
195 100 2x2x6 3600 10 2x2x6 3600 10
195 125 2x2x8 3600 15 2x2x8 3600 15
2 60 2 5 3 x3x6 1 80 0 3 3 x3x6 18 00 3
2 60 5 0 3 x3x8 1 80 0 5 3 x3x8 18 00 5
260 75 3x3x6 3600 7.5 3x3x6 3600 7.5
260 100 2x2x6 3600 10 2x2x6 3600 10
260 120 2x2x8 3600 15 2x2x8 3600 15
1 34 5 0 2 x2x8 1 80 0 5 2 x2x8 18 00 5
1 34 7 5 2 x2x6 3 60 0 5 2 x2x6 36 00 5
134 100 2x2x6 3600 7.5 2x2x6 3600 7.5
134 125 2x2x6 3600 10 2x2x6 3600 10
2 14 5 0 3 x3x8 1 80 0 5 3 x3x8 18 00 5
214 75 3x3x6 3600 7.5 3x3x6 3600 7.5
214 100 4x4x6 3600 15 4x4x6 3600 15
214 125 2x2x8 3600 15 2x2x8 3600 15
2 85 2 5 4 x4x6 1 80 0 3 4 x4x6 18 00 3
285 50 3x3x8 1800 7.5 3x3x8 1800 7.5
285 75 3x3x6 3600 10 3x3x6 3600 10
285 100 4x4x6 3600 15 4x4x6 3600 15
1 50 5 0 2 x2x8 1 80 0 5 2 x2x8 18 00 5
150 75 2x2x6 3600 7.5 2x2x6 3600 7.5
150 100 2x2x6 3600 7.5 2x2x6 3600 7.5
150 125 2x2x6 3600 15 2x2x6 3600 15
2 40 2 5 3 x3x8 1 80 0 3 3 x3x8 18 00 3
2 40 5 0 3 x3x8 1 80 0 5 3 x3x8 18 00 5
240 75 3x3x6 3600 7.5 3x3x6 3600 7.5
240 100 2x2x8 3600 15 2x2x8 3600 15
240 125 2x2x8 3600 15 2x2x8 3600 15
3 19 2 5 4 x4x6 1 80 0 3 4 x4x6 18 00 3
319 50 3x3x8 1800 7.5 3x3x8 1800 7.5
319 75 3x3x8 3600 10 3x3x8 3600 10
319 100 4x4x6 3600 15 4x4x6 3600 15
Dual Pumps
73.1 175 110 292
Single Pump
324
AGZ 090D
89.2 214 134 357
AGZ 080D
81.1 195 122
AGZ 100D
99.8 240 150 399
AGZ 075D
Table 3: AGZ-D Unit/Pump Combinations Continued
Note: Some unit gpm and head combination do not have a valid selection and are absent from the table.
12 IM 1110-1
Page 13
Table 3: AGZ-D Unit/Pump Combinations Continued
Unit Nom . Nom. Min. Max. Unit Tota l Hea d
Model Tons gpm gpm gpm gpm ft. Size rpm HP Size rpm HP
159 50 2x2x8 1800 5 2x2x8 1800 5
159 75 2x2x6 3600 7.5 2x2x6 3600 7.5
159 100 2x2x6 3600 7.5 2x2x6 3600 7.5
159 125 2x2x6 3600 15 2x2x6 3600 15
255 25 3x3x6 1800 3 3x3x6 1800 3
255 50 3x3x8 1800 5 3x3x8 1800 5
255 75 3x3x6 3600 7.5 3x3x6 3600 7.5
255 100 2x2x6 3600 10 2x2x6 3600 10
255 125 2x2x8 3600 15 2x2x8 3600 15
340 25 4x4x6 1800 3 4x4x6 1800 3
340 50 3x3x8 1800 7.5 3x3x8 1800 7.5
340 75 4x4x6 3600 10 4x4x6 3600 10
340 100 4x4x6 3600 15 4x4x6 3600 15
176 50 3x3x8 1800 5 3x3x8 1800 5
176 75 3x3x6 3600 7.5 3x3x6 3600 7.5
176 100 2x2x6 3600 10 2x2x6 3600 10
176 125 2x2x8 3600 15 2x2x8 3600 15
281 25 4x4x6 1800 3 4x4x6 1800 3
281 50 3x3x8 1800 7.5 3x3x8 1800 7.5
281 75 3x3x6 3600 10 3x3x6 3600 10
281 100 4x4x6 3600 15 4x4x6 3600 15
375 25 4x4x6 1800 5 4x4x6 1800 5
375 50 3x3x6 3600 10 4x4x8 3600 10
375 75 4x4x6 3600 15 4x4x6 3600 15
375 100 4x4x6 3600 15 4x4x6 3600 15
194 25 3x3x6 1800 3 3x3x6 1800 3
194 50 3x3x8 1800 5 3x3x8 1800 5
194 75 3x3x6 3600 7.5 3x3x6 3600 7.5
194 100 2x2x6 3600 10 2x2x6 3600 10
194 125 2x2x8 3600 15 2x2x8 3600 15
311 25 4x4x6 1800 3 4x4x6 1800 3
311 50 3x3x8 1800 7.5 3x3x8 1800 7.5
311 75 3x3x8 3600 10 3x3x8 3600 10
311 100 4x4x6 3600 15 4x4x6 3600 15
415 25 3x3x6 3600 7.5 4x4x8 3600 10
415 50 4x4x6 3600 10 4x4x8 3600 10
415 75 4x4x6 3600 15 4x4x6 3600 15
415 100 4x4x6 3600 15 4x4x6 3600 15
204 50 3x3x8 1800 5 3x3x8 1800 5
204 75 3x3x6 3600 7.5 3x3x6 3600 7.5
204 100 3x3x6 3600 10 4x4x6 3600 15
204 125 3x3x6 3600 15 3x3x6 3600 15
327 50 3x3x8 1800 7.5 3x3x8 1800 7.5
327 75 3x3x8 3600 10 3x3x8 3600 10
327 100 4x4x6 3600 15 4x4x6 3600 15
327 125 3x3x8 3600 20 3x3x8 3600 20
436 25 4x4x8 1800 5 4x4x8 1800 5
436 50 4x4x8 1800 10 4x4x8 1800 10
436 75 4x4x6 3600 15 4x4x6 3600 15
436 100 3x3x8 3600 20 3x3x8 3600 20
255 159
Single Pump Dual Pumps
311 194
424
AGZ 125D
117.1 281 176 468
AGZ 110D
106.1
518
AGZ 140D
136.2 327 204 545
AGZ 130D
129.6
Selection Procedures
Note: Some unit gpm and head combination do not have a valid selection and are absent from the table.
IM 1110-1 13
Page 14
Selection Procedures
Unit Nom. Nom. Min. Max. Unit Total Head
Model Tons gpm gpm gpm gpm ft. Size rpm HP Size rpm HP
230 50 3x3x8 1800 5 3x3x8 1800 5
230 75 3x3x6 3600 7.5 3x3x6 3600 7.5
230 100 3x3x6 3600 15 3x3x6 3600 15
230 125 3x3x8 3600 15 3x3x8 3600 15
368 25 4x4x6 1800 5 4x4x6 1800 5
368 50 4x4x8 1800 10 4x4x8 1800 10
368 75 4x4x6 3600 15 4x4x6 3600 15
368 100 4x4x6 3600 15 4x4x6 3600 15
368 125 3x3x8 3600 20 3x3x8 3600 20
491 25 4x4x8 1800 7.5 4x4x8 1800 7.5
491 50 4x4x8 1800 10 4x4x8 1800 10
491 75 4x4x6 3600 15 4x4x6 3600 15
491 100 3x3x8 3600 20 3x3x8 3600 20
258 50 3x3x8 1800 5 3x3x8 1800 5
258 75 3x3x6 3600 7.5 3x3x6 3600 7.5
258 100 4x4x6 3600 15 4x4x6 3600 15
258 125 3x3x8 3600 20 3x3x8 3600 20
413 25 4x4x8 1800 5 4x4x8 1800 5
413 50 4x4x8 1800 10 4x4x8 1800 10
413 75 4x4x6 3600 15 4x4x6 3600 15
413 100 4x4x6 3600 15 4x4x6 3600 15
413 125 3x3x8 3600 20 3x3x8 3600 20
551 25 4x4x8 1800 7.5 4x4x8 1800 7.5
551 50 4x4x8 1800 10 4x4x8 1800 10
551 75 4x4x6 3600 15 4x4x6 3600 15
551 100 4x4x6 3600 20 4x4x6 3600 20
270 50 3x3x8 1800 7.5 3x3x8 1800 7.5
270 75 3x3x6 3600 10 3x3x6 3600 10
270 100 4x4x6 3600 15 4x4x6 3600 15
270 125 3x3x8 3600 20 3x3x8 3600 20
432 25 4x4x8 1800 5 4x4x8 1800 5
432 50 4x4x8 1800 10 4x4x8 1800 10
432 75 4x4x6 3600 15 4x4x6 3600 15
432 100 3x3x8 3600 20 3x3x8 3600 20
576 25 4x4x8 1800 7.5 4x4x8 1800 7.5
576 50 4x4x8 1800 15 4x4x8 1800 15
576 75 4x4x6 3600 15 4x4x6 3600 15
576 100 4x4x6 3600 20 4x4x6 3600 20
Single Pump Dual Pumps
258 689
AGZ 160D
153.3 368 230
720
AGZ 190D
180.1 432 270
613
AGZ 180D
172.2 413
Table 3: AGZ-D Unit/Pump Combinations Continued
Note: Some unit gpm and head combination do not have a valid selection and are absent from the table.
14 IM 1110-1
Page 15
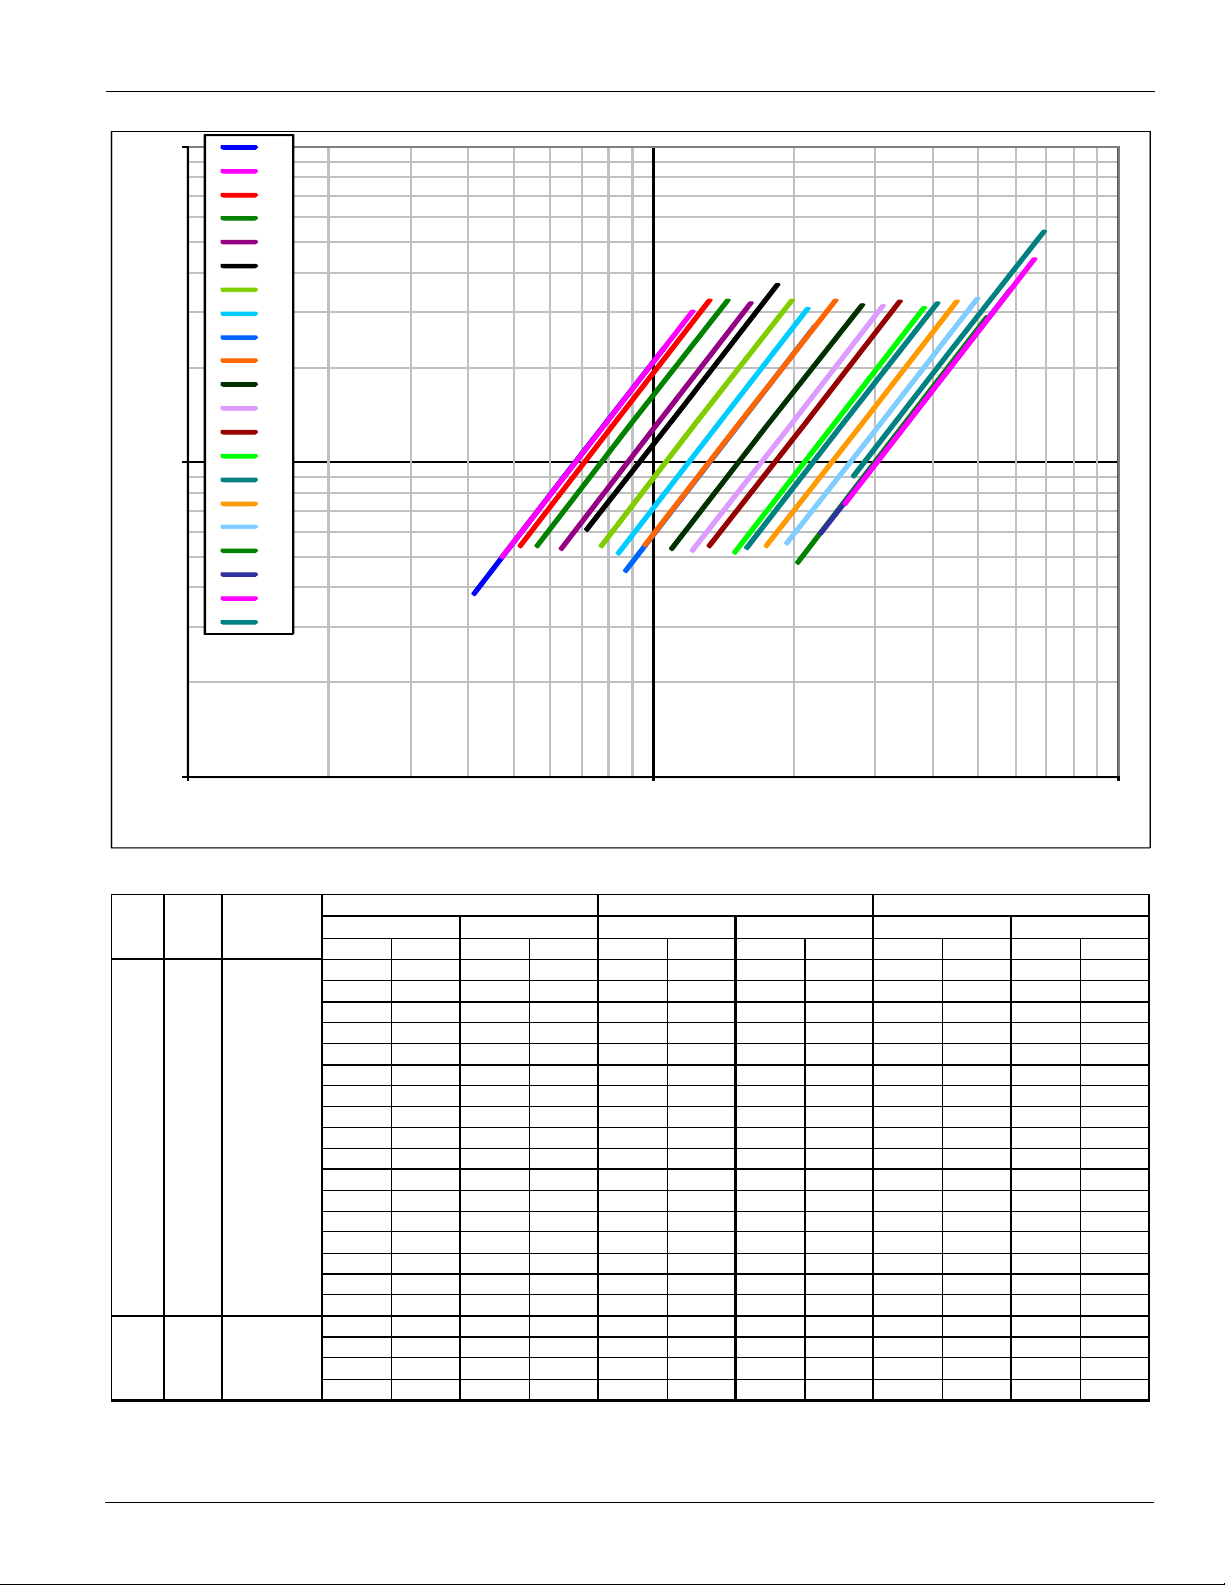
Pressure Drop Data
A
A
B
B
CCD
D
E
E
F
F
G
G
H
H
I
I
J
J
K
K
L
L
M
M
N
N
O
O
P
P
Q
Q
R
R
S
S
T
T
U
U
1
10
100
10 100 1000
D
p
(
f
t
)
Flow Rate (gpm)
A
B
C
D
E
F
G
H
I
J
K
L
M
N
O
P
Q
R
S
T
U
gpm DP ft. lps DP kpa gpm DP ft. lps DP kpa gpm DP ft. lps DP kpa
A025D
41.3 3.8 2.6 11.5 66.0 9.4 4.2 28.1 105.6 23.0 6.7 68.6
B030D
47.4 5.0 3.0 15.0 75.8 12.3 4.8 36.7 121.3 30.0 7.7 89.7
C035D
51.8 5.4 3.3 16.3 82.8 13.3 5.2 39.7 132.5 32.5 8.4 97.0
D040D
56.4 5.4 3.6 16.3 90.2 13.3 5.7 39.7 144.4 32.5 9.1 97.0
E045D
63.5 5.3 4.0 15.9 101.5 13.0 6.4 38.8 162.4 31.8 10.2 94.8
F050D
72.2 6.1 4.6 18.2 115.4 14.9 7.3 44.5 184.7 36.4 11.7 108.7
G055D
77.4 5.4 4.9 16.3 123.8 13.3 7.8 39.7 198.1 32.5 12.5 97.0
H060D
84.2 5.1 5.3 15.3 134.6 12.5 8.5 37.3 215.4 30.5 13.6 91.2
I065D
87.2 4.5 5.5 13.4 139.4 11.0 8.8 32.8 223.1 26.9 14.1 80.2
J070D
96.2 5.4 6.1 16.3 153.8 13.3 9.7 39.7 246.1 32.5 15.5 97.0
K075D
109.7 5.3 6.9 15.8 175.4 12.9 11.1 38.5 280.7 31.5 17.7 94.1
L080D
121.7 5.2 7.7 15.6 194.6 12.8 12.3 38.2 311.4 31.3 19.7 93.4
M090D
132.3 5.4 8.3 16.1 211.7 13.2 13.4 39.4 338.7 32.2 21.4 96.3
N100D
149.7 5.2 9.4 15.4 239.5 12.6 15.1 37.6 383.2 30.8 24.2 91.9
O110D
159.2 5.3 10.0 15.9 254.6 13.0 16.1 38.8 407.4 31.8 25.7 94.8
P125D
175.7 5.4 11.1 16.1 281.0 13.2 17.7 39.4 449.7 32.2 28.4 96.3
Q130D
194.3 5.5 12.3 16.5 310.8 13.5 19.6 40.3 497.3 33.0 31.4 98.5
R140D
204.3 4.8 12.9 14.4 326.9 11.8 20.6 35.2 523.0 28.8 33.0 86.1
S160D
230.0 5.9 14.5 17.7 367.9 14.5 23.2 43.3 588.7 35.4 37.1 105.8
T180D
258.3 7.4 16.3 22.0 413.3 18.0 26.1 53.7 661.2 44.0 41.7 131.3
U190D
270.2 9.0 17.0 26.9 432.2 22.0 27.3 65.7 691.6 53.7 43.6 160.5
Nominal Flow Rate Maximum Flow Rate
IP SI IP SI IP SI
Brazed Plate
Shell-and-Tube
Model
Ev ap o r a t or
Type
Curve
Re f .
Minimum Flow Rate
Figure 5: Pressure Drop Curves
Pressure Drop Data
Table 4: Pressure Drop Data
IM 1110-1 15
Page 16

Installation Information
Installation Information
This section provides additional information on optional pump
packages factory-mounted on Daikin Model AGZ-D (REV
0A) scroll compressor chillers. The current chiller installation,
operating, and maintenance manuals are available at
www.DaikinApplied.com.
Inspection
When the equipment is received, carefully check all items
against the bill of lading to check for a complete shipment.
Check all units for damage upon arrival. All shipping damage
must be reported to the carrier and a claim must be filed with
the carrier. Check the unit's serial plate before unloading the
unit to be sure that it agrees with the power supply available.
Physical damage to unit after acceptance is not the
responsibility of Daikin Applied.
Note: Installation and maintenance are to be performed only
by qualified personnel who are familiar with local codes and
regulations, and experienced with this type of equipment.
Handling and Rigging
Follow the directions in IM 1100 for locating, handling and
rigging the unit. The addition of the optional pump package
does not change installation procedure. However, vibration
isolator selection and location, lifting and operating weights,
dimensions, and electrical data will differ from units without a
pump package. Refer to dimension drawings for center-ofgravity locations.
Field Water Piping
Piping design must be provided by a qualified Architect or
Systems HVAC Design Engineer familiar with piping design,
as well as local codes and regulations. The manufacturer
recommendations are to be used as a general guide, but do not
replace system design by a qualified professional. All field
piping, wiring, and procedures must be performed in
accordance with ASHRAE, EPA, and industry standards.
Use best practice for piping design with a minimum number of
bends and changes in elevation to keep system cost down and
performance up. See AGZ-D installation manual, IM 1100, for
general unit piping information.
The chilled water piping contains vent and drain connections
as well as taps for inlet and outlet pressure gauges. Install a
manual or automatic vent and a drain valve. Install a single,
valved pressure gauge as shown in the chiller unit installation
manual. The unit inlet and outlet connections are marked. It is
prudent to double check the unit dimension drawing to confirm
the connections.
The inlet guide and the outlet triple duty valve are shipped
separately to protect them from shipping damage. Install on
the unit and support as necessary. Support the chilled water
piping independently from the unit.
Flush the system water piping thoroughly before making
connections to the unit evaporator.
System Water Volume
It is important to have adequate water volume in the system to
provide an opportunity for the chiller to sense a load change,
adjust to the change and stabilize. As the expected load change
becomes more rapid, a greater water volume is needed. The
system water volume is the total amount of water in the
evaporator, air handling products and associated piping. If the
water volume is too low, operational problems can occur
including rapid compressor cycling, rapid loading and
unloading of compressors, erratic refrigerant flow in the
chiller, improper motor cooling, shortened equipment life and
other undesirable occurrences.
For normal comfort cooling where the cooling load changes
relatively slowly, we recommend a minimum system volume
in gallons of 2 to 3 times the flow rate (gpm). For example, if
the design chiller flow rate is 350 gpm, we recommend a
minimum system volume of 700 to 1050 gallons.
Since there are many other factors that can influence
performance, systems can successfully operate below these
suggestions. However, as the water volume decreases below
these suggestions, the possibility of problems increases.
Freeze Protection
In installations where the unit is subject to sub-freezing
temperatures, some method of preventing pipe and component
freezing and subsequent damage is required. The pump will
start on a signal from the chiller controller when either the
chilled water leaving or entering temperature reaches the
chiller freeze point setting to help prevent freeze up. If
constant chilled water circulation is not possible or desired,
one or more of the following procedures must be used:
• Drain the outdoor portion of the system and cap with a
nitrogen charge.
• Heat trace all outdoor components.
• Add sufficient anti-freeze to prevent freezing.
Note: the evaporator is equipped with a water heater to help
protect from freezing. This heater does not protect the pump
package piping or components.
Adding of a concentration of a glycol anti-freeze with a freeze
point 10°F below the lowest expected outdoor temperature will
result in decreased capacity and increased pressure drop in the
chiller. AGZ units are selected to provide the required
capacity with the fluid specified when selected.
Temporary Strainer
The suction guide strainer contains a tempory strainer that
must be removed after startup. See page 81 in the Startup and
Shutdown section. for complete instructions.
.
CAUTION
Do not use automotive grade antifreezes as it contains inhibitors harmful to chilled water systems.
Use only glycols designated for use in building cooling systems
16 IM 1110-1
Page 17
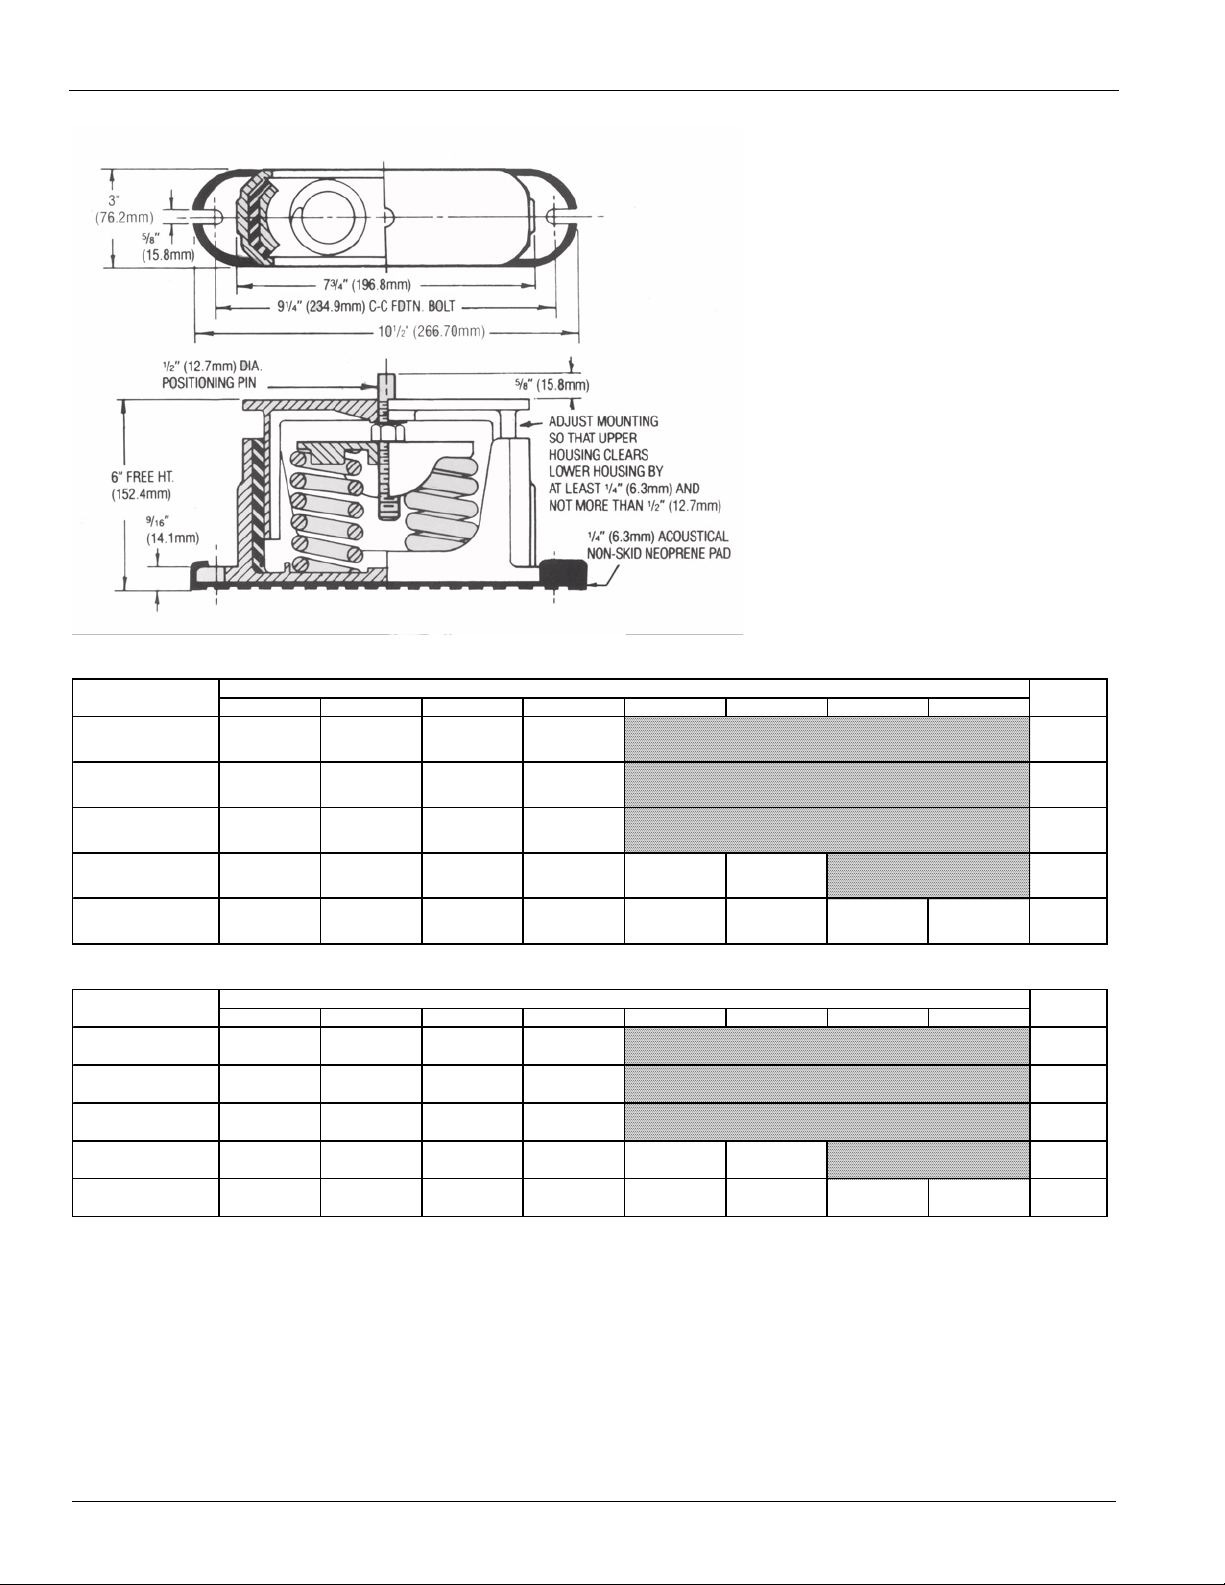
Lifting Locations
CONTROL PANEL
L1
L2
L3
L4
L5
L6
CONTROL PANEL
L1
L2
L3
L4
AGZ190D - Approximate Lifting Locations
See Dimension Drawing for location
AGZ025D-180D - Approximate Lifting Locations
See Dimension Drawing for location
LB S KG LB S KG LB S KG LBS KG LBS KG LB S KG LBS KG LB S KG
AGZ025D
4339 1968 4657
2112
1020 463 1106 502 1062 482 1151 522 - - - -
AGZ030D
4371 1983 4689 2127 1038 471 1098 498 1086 493 1149 521 - - - -
AGZ035D
4376 1985 4694 2129 1046 474 1093 496 1094 496 1143 518 - - - -
AGZ040D
4456 2021 4990 2263 1053 478 1115 506 1111 504 1177 534 - - - -
AGZ045D
4611 2092 5145 2334 1090 494 1155 524 1149 521 1218 552 - - - -
AGZ050D
4686 2126 5220 2368 1113 505 1178 534 1164 528 1231 558 - - - -
AGZ055D
4716 2139 5250 2381 1121 508 1187 538 1169 530 1239 562 - - - -
AGZ060D
4836 2194 5370 2436 1148 521 1228 557 1189 539 1272 577 - - - -
AGZ065D
4866 2207 5502 2496 1154 523 1241 563 1191 540 1281 581 - - - -
AGZ070D
5276 2393 5912 2682 1292 586 1254 569 1385 628 1345 610 - - - -
AGZ075D
6660 3021 7460 3384 1716 778 1611 731 1720 780 1614 732 - - - -
AGZ080D
6750 3062 7550 3425 1757 797 1656 751 1718 779 1620 735 - - - -
AGZ090D
6841 3103 7795 3536 1740 789 1635 742 1787 811 1679 762 - - - -
AGZ100D
6965 3159 7919 3592 1794 814 1707 774 1775 805 1689 766 - - - -
AGZ110D (208/230)
8574 3889 9646 4375 2322 1053 2330 1057 1958 888 1964 891 - - - -
AGZ125D (208/230)
8799 3991 10075 4570 2411 1094 2383 1081 2015 914 1991 903 - - - -
AGZ130D (208/230)
8934 4052 10210 4631 2455 1114 2489 1129 1982 899 2009 911 - - - -
AGZ110D (460/575)
8514 3862 9586 4348 2283 1036 2282 1035 1975 896 1974 895 - - - -
AGZ125D (460/575)
8739 3964 10015 4543 2369 1075 2332 1058 2034 923 2003 909 - - - -
AGZ130D (460/575)
8874 4025 10150 4604 2414 1095 2438 1106 2001 908 2021 917 - - - -
AGZ140D
11147 5056 12743 5780 2636 1196 2767 1255 1698 770 1783 809 1103 500 1158 525
AGZ160D
11297 5124 12893 5848 2716 1232 2803 1271 1734 787 1789 811 1110 503 1146 520
AGZ180D
11462 5199 13058 5923 2769 1256 2903 1317 1740 789 1824 827 1087 493 1140 517
AGZ190D
12308 5583 14223 6451 2032 922 2104 954 2017 915 2089 948 1997 906 2069 938
L1 L2
L IFT I NG W EIG HT BY CORNER ( A L FIN C OIL S)
(SEE NOT E FOR COPPER FI N C OI L S)
NOT E:
To calculate corner lifting w eights f or A GZ 025D-130D (4 lifting points) units w ith copper f in coils add 1/4 of the c opper vs .
aluminum shipping w eight to eac h aluminum cor ner lifting w eight. To calculate cor ner lifting w eights f or AGZ 140D-190D (6 lifting
points) units w ith copper f in coils add 1/6 of the c opper vs . aluminum shipping w eight to each aluminum corner lifting w eight.
AL UM INUM
FIN C OILS
COPPER FIN
COILS
UNIT M ODEL
SHIPPING WEIGHT
L3 L4 L5 L6
Unit Weights
Table 5: Shipping and Lifting Weights
Unit Weights
IM 1110-1 17
Page 18
Unit Weights
L BS KG LBS KG LBS KG LBS KG L BS KG L BS KG L BS KG L BS KG L BS KG L BS KG
AGZ025D
4404 1998 4722
2142
1040 472 1127 511 1074 487 1164 528 - - - - - - - -
AGZ030D
4436 2012 4754 2156 1058 480 1120 508 1097 498 1161 527 - - - - - - - -
AGZ035D
4446 2017 4764 2161 1067 484 1116 506 1106 502 1157 525 - - - - - - - -
AGZ040D
4526 2053 5060 2295 1075 488 1138 516 1123 509 1189 539 - - - - - - - -
AGZ045D
4686 2126 5220 2368 1113 505 1180 535 1162 527 1231 558 - - - - - - - -
AGZ050D
4766 2162 5300 2404 1137 516 1203 546 1178 534 1247 566 - - - - - - - -
AGZ055D
4796 2175 5330 2418 1144 519 1212 550 1184 537 1255 569 - - - - - - - -
AGZ060D
4921 2232 5455 2474 1172 532 1254 569 1206 547 1290 585 - - - - - - - -
AGZ065D
4956 2248 5592 2536 1179 535 1268 575 1209 548 1300 590 - - - - - - - -
AGZ070D
5366 2434 6002 2722 1323 600 1285 583 1400 635 1359 616 - - - - - - - -
AGZ080D
6850 3107 7650 3470 1854 841 1748 793 1672 758 1576 715 - - - - - - - -
AGZ090D
6945 3150 7899 3583 1850 839 1738 788 1731 785 1626 738 - - - - - - - -
AGZ100D
7080 3211 8034 3644 1900 862 1808 820 1728 784 1644 746 - - - - - - - -
AGZ110D (208/230)
8694 3944 9766 4430 1412 640 1416 642 1447 656 1451 658 1482 672 1486 674 - - - -
AGZ125D (208/230)
8929 4050 10205 4629 1470 667 1453 659 1497 679 1479 671 1524 691 1506 683 - - - -
AGZ130D (208/230)
9074 4116 10350 4695 1510 685 1531 694 1502 681 1523 691 1494 678 1514 687 - - - -
AGZ110D (460/575)
8634 3916 9706 4403 1379 626 1378 625 1439 653 1439 653 1500 680 1499 680 - - - -
AGZ125D (460/575)
8869 4023 10145 4602 1435 651 1413 641 1490 676 1467 665 1545 701 1521 690 - - - -
AGZ130D (460/575)
9014 4089 10290 4667 1476 670 1491 676 1495 678 1510 685 1513 686 1528 693 - - - -
AGZ140D
11929 5411 13525 6135 1636 742 1717 779 1524 691 1600 726 1390 630 1459 662 1270 576 1333 605
AGZ160D
12079 5479 13675 6203 1690 767 1744 791 1564 709 1614 732 1413 641 1458 661 1278 580 1319 598
AGZ180D
12244 5554 13840 6278 1731 785 1815 823 1585 719 1661 753 1409 639 1478 670 1252 568 1313 596
AGZ190D
13093 5939 15008 6808 1719 780 1780 807 1650 748 1709 775 1577 715 1633 741 1486 674 1539 698
NOT E:
For AGZ025- 100D (4 mounting points): to calculate cor ner mounting w eights f or units w ith copper f in coils add 1/4 of the copper v s. aluminum operating
w eight to each aluminum mounting w eight. For A GZ110-130D (6 mounting points):: to c alculate c orner mounting w eights f or units w ith copper fin coils add 1/6 of
the copper vs . aluminum operating w eight to each aluminum mounting w eight. For AGZ140-190D (8 Mounting Points) : to calculate corner mounting w eights for
units w ith copper f in coils add 1/8 of the c opper v s. aluminum operating w eight to each aluminum mounting w eight.
M5 M6 M7 M8M1 M2 M3
FIN COIL S
COILS
UNIT MODEL
OPERATING WEIGHT
MOUNTING WEIGHT BY LOCATION (AL FIN COILS)
( SEE NOT E FOR COPPER FI N C OIL S)
M4
Operating Weights & Vibration Isolators
Vibration isolators are recommended for all roof-mounted
installations or wherever vibration transmission is a
consideration. Initially install the unit on shims or blocks at the
"free height" of the isolator. When all piping, wiring, flushing,
charging, etc. is complete, adjust the springs upward to load
them and to provide clearance to free the blocks, which are
then removed.
Table 6: Operating and Mounting Weights
A LUM INUM
COPPER FIN
Installation of spring isolators requires flexible pipe
connections and at least three feet of conduit flex tie-ins.
Support piping and conduit independently from the unit to not
stress connections. Mounting locations are on the unit
dimension drawings beginning on page 23. Isolator selections
are different for AGZ-D units with a pump package than those
without one.
18 IM 1110-1
Page 19
Vibration Isolators
NOTES:
MOUNT MATERIAL TO BE DURULENE RUBBER.1.
MOLDED STEEL AND ELASTOMER MOUNT FOR2.
OUTDOOR SERVICE CONDITIONS.
3. RP-4 MOUNT VERSION WITH STUD IN PLACE.
ALL DIMENSIONS ARE IN DECIMAL INCHES
DRAWING NUMBER 3314814
1.13 ± .25
APPROX.
1.63
.38
DURULENE
MATERIAL
RAISED GRIP RIBS
3.00
3.75
5.00
6.25
3.87
.56 TYP.
4.63
R.28
TYP.
R.250 TYP.
R.750 TYP.
RECESSED
GRIP RIBS
ø .500-13NC-2B
R4
R4
VM&C
VM&C
AG Z - D Un it Kit
Size M1 M2 M3 M4 M5 M6 M7 M8 Number
RP-4 RP- 4 RP-4 RP-4
Brow n Brow n Brow n Brow n
RP-4 RP- 4 RP-4 RP-4
Bric k Brick Br ick Bric k
Red Red Re d Re d
RP-4 RP- 4 RP-4 RP-4 RP- 4 RP- 4
Bric k Brick Br ick Bric k Brick Bric k
Red Red Re d Re d Re d Re d
RP-4 RP- 4 RP-4 RP-4 RP- 4 RP- 4 RP-4 RP-4
Bric k Brick Br ick Bric k Brick Bric k Brick Br ick
Red Red Re d Re d Re d Re d Re d Re d
140, 160, 180, 190
332325110
025, 030, 035, 040,
045, 050
332325107
075, 080, 090, 100
332325108
110, 125, 130
332325109
AGZ-D Unit Ki t
Size M1 M2 M3 M4 M5 M6 M7 M8 Number
RP-4 RP- 4 RP- 4 RP-4
Brow n Brow n Brow n Brow n
RP-4 RP- 4 RP- 4 RP-4
BrickBrickBrickBrick
RedRedRedRed
RP-4 RP- 4 RP- 4 RP-4
Lime Lime Lime Lime
RP-4 RP- 4 RP- 4 RP-4 RP- 4 RP- 4
Brick Brick Brick Brick Brick Brick
Red Red Red Red Red Red
RP-4 RP- 4 RP- 4 RP-4 RP- 4 RP- 4 RP-4 RP-4
Brick Brick Brick Brick Brick Brick Brick Brick
Red Red Red Red Red Red Red Red
RP-4 RP- 4 RP- 4 RP-4 RP- 4 RP- 4 RP-4 RP-4
Lime Lime Lime Lime Lime Lime Lime Lime
332325111
332325107
332325108
332325111
140, 160, 180
190
055. 060, 065, 070
025, 030, 035, 040,
045, 050
075, 080, 090, 100
332325109
332325110
110, 125, 130
Figure 6: RP-4 Rubber-in-Shear Isolator Dimensions
Vibration Isolators
Table 7: Rubber-in-Shear Isolator Locations, Aluminum Fin Coils
RUBBER IN SHEAR I SOL A T ORS - AL UM INUM FIN C OIL S
Table 8: Rubber-in-Shear Isolator Locations, Copper Fin Coils
RUBBER IN SHEAR I SOL A T O RS - Copper FIN COILS
IM 1110-1 19
Page 20
Vibration Isolators
AG Z - D Un i t Kit
Size M1 M2 M3 M4 M5 M6 M7 M8 Number
C2PE-1D-1350 C2PE-1D-1350 C2PE-1D-1350 C2PE-1D-1350
Pu rp le Pur p le Pu r pl e Pur p le
060, 065, 070
C2PE-1D-1800 C2PE-1D-1800 C2PE-1D-1800 C2PE-1D-1800
Green Green Green Green
C2PE-1D-2400 C2PE-1D-2400 C2PE-1D-1800 C2PE-1D-1800
Gray Gray Green Green
C2PE-1D-1800 C2PE-1D-1800 C2PE-1D-1800 C2PE-1D-1800 C2PE-1D-1800 C2PE-1D-1800
Green Green Green Green Green Green
C2PE-1D-2400 C2PE-1D-2400 C2PE-1D-2400 C2PE-1D-2400 C2PE-1D-2400 C2PE-1D-2400 C2PE-1D-2400 C2PE-1D-2400
Gray Gray Gray Gray Gray Gray Gray Gray
025, 030, 035, 040
332320116
332320117
332320118
332320119
075, 080, 090, 100
110, 125, 130
140, 160, 180, 190
332320120
AG Z - D Un i t Kit
Size M1 M2 M3 M4 M5 M6 M7 M8 Number
C2PE-1D-1350 C2PE-1D-1350 C2PE-1D-1350 C2PE-1D-1350
Purple Purple Purple Pur ple
045, 050, 055
C2PE-1D-1800 C2PE-1D-1800 C2PE-1D-1800 C2PE-1D-1800
060, 065, 070
Green Green Green Green
C2PE-1D-2720 C2PE-1D-2720 C2PE-1D-2400 C2PE-1D-2400
White White Gray Gray
C2PE-1D-2400 C2PE-1D-2400 C2PE-1D-2400 C2PE-1D-2400 C2PE-1D-2400 C2PE-1D-2400
Gray Gray Gray Gray Gray Gray
C2PE-1D-2400 C2PE-1D-2400 C2PE-1D-2400 C2PE-1D-2400 C2PE-1D-2400 C2PE-1D-2400 C2PE-1D-2400 C2PE-1D-2400
Gray Gray Gray Gray Gray Gray Gray Gray
025, 030, 035, 040
110, 125, 130
332320122
140, 160, 180, 190
332320120
332320116
332320117
075, 080, 090, 100
332320121
Figure 7: C2P
Table 9: Spring Isolator Locations, Aluminum Fin Coils
SPRING- FL EX I SOL A T ORS - A L UM INUM FI N C OI L S
Table 10: Spring Isolator Locations, Copper Fin Coils
SPRING-FLEX ISOLATORS
20 IM 1110-1
Page 21

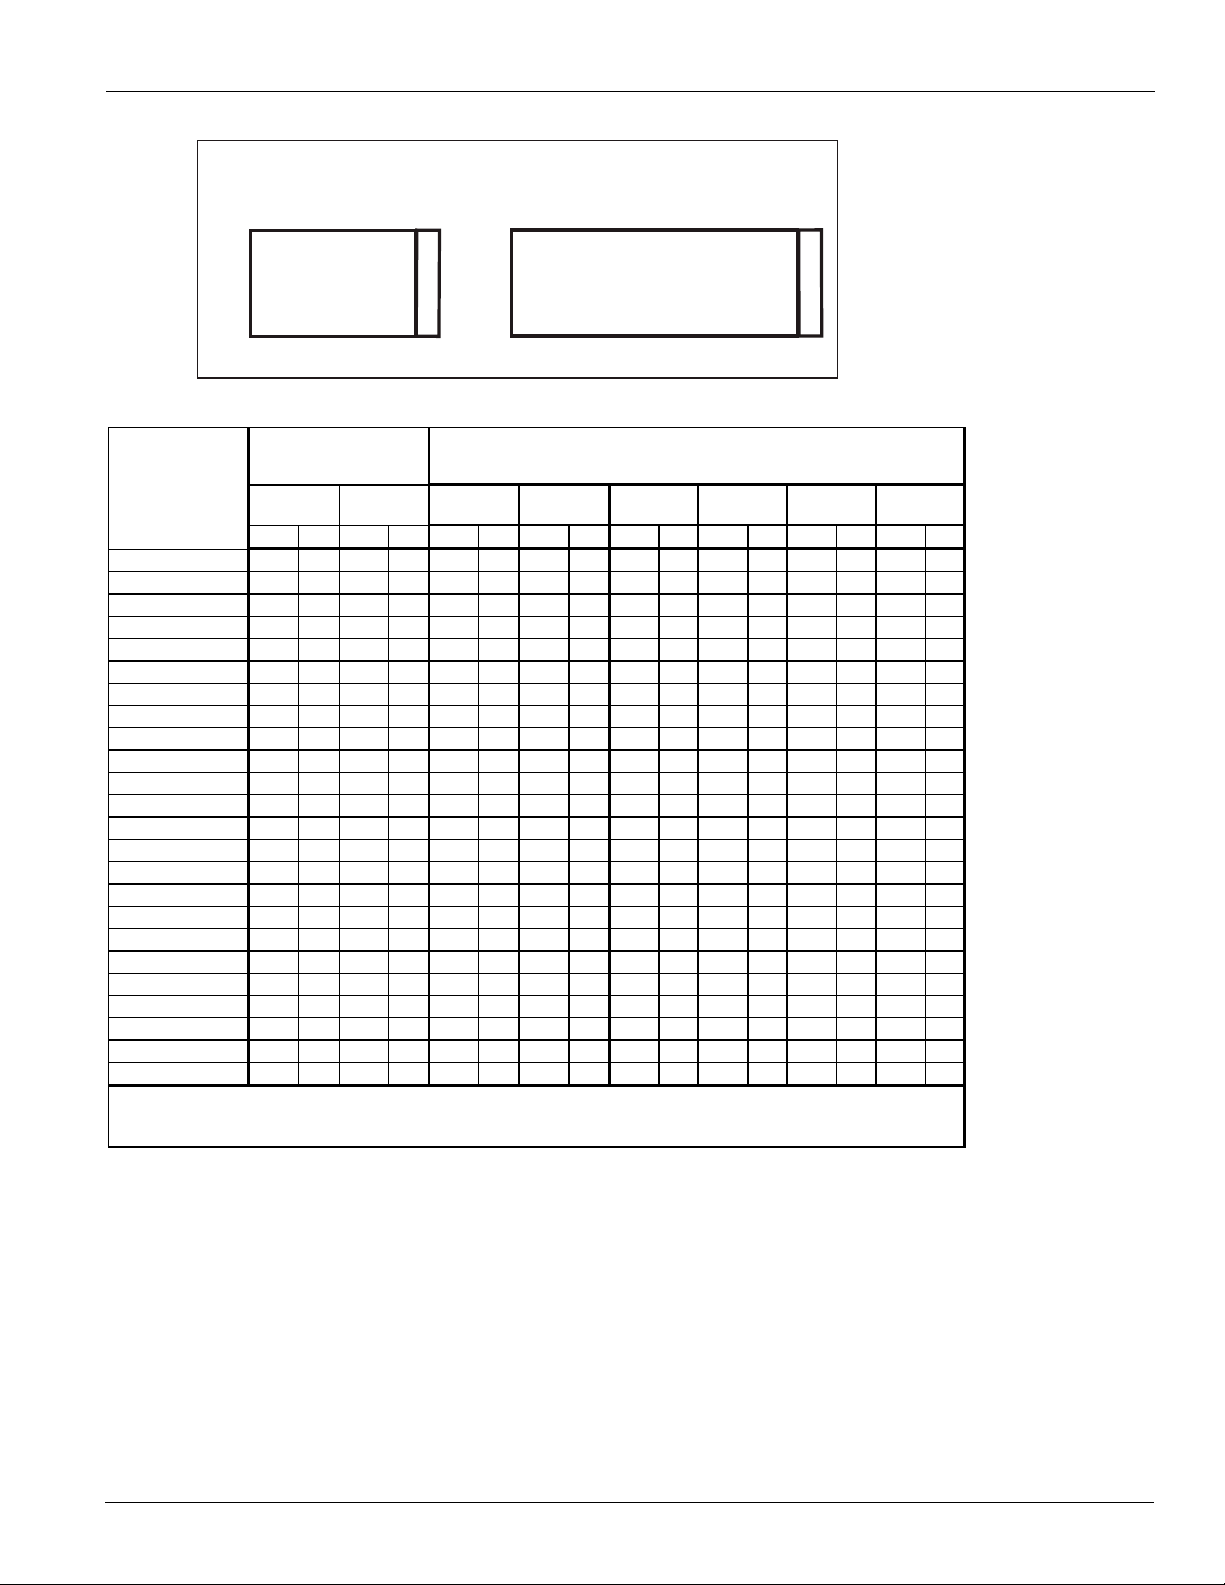
Triple Duty Valve
Flow Indicator
Bonnet “O” Ring
High Strength Resin
Seat EPDM for 8”
and larger
Stainless Steel
Stern
Bronze Disc
Stainless Steel Spring
Flow /Temperate
Measurement orts
Drain Connections
(on opposite side)
Figure 8: Triple Duty Discharge Valve Diagram
Triple Duty Valve
Determining Flow Rate - Valve In Full Open Position
Measure and record the differential pressure across the valve
using a CBDM- 135/60 meter, or pressure gauges with PMP
adapters.
Safety glasses should be used and the probe should not be left
inserted into fittings for prolonged periods of time as leakage
Locate Pressure Differential on left hand side of Performance
Curve (Figure 9) and extend line horizontally across to valve
size being used. Drop line vertically down and read flow rate
from bottom of chart.
Determining Flow Rate - Valve In Throttled Position
Record the size of the valve and stem position using the Flow
Indicator Scale. Calculate percentage of valve opening
referring to table below:
Table 11: Valve Size and Number of Rings
Number of Rings
(valve full open)
Measure and record the differential pressure across the valve
in the throttled position. Project a line vertically up to intersect
with the Valve Curve and from this point project line
horizontally across to the left of the chart and record the
percentage of maximum flow rate.
On the Performance Curve (Figure 9) locate the differential
pressure obtained above and project a line horizontally across
to intercept with Valve Performance Curve. Drop a line
vertically down to read the flow rate at the bottom of the chart.
IM 1110-1 21
CAUTION
from the PMP may occur when probe is removed.
Valve Size 2 1/2 3 4 5 6 8 10 12
5 5 6 9 10 12 18 28
To calculate flow rate of valve in the throttled position,
multiply the flow rate by the percentage flow rate divided by
100.
Example:
• Valve size 4 inch.
• Differential Pressure is 5.4 ft. (1.65 m).
• Number of rings open = 3. Therefore: 3 rings ÷ 6 rings x
100 = 50% throttled.
From the Performance Curve (Figure 9), a 4 inch, valve
with 5.4 ft. pressure drop (1.65 m) represents a flow of 400
USgpm (25.2 l/s).
From Flow Characteristic Curve (Figure 10)., a 4 inch
valve 50% open, represents 34% of maximum flow.
Approximate flow of a 4 inch valve, with a 5.4 ft. (1.65 m)
pressure drop when 50% throttled is:
400 x 34/100 = 136USgpm
or in metric, 25.2 x 34100 = 8.57l/s
Note: To prevent premature valve failure it is not
recommended that the valve operate in the throttled position
with more than 25 ft. pressure differential. Instead the pump
impeller should be trimmed or valves located elsewhere in the
system be used to partially throttle the flow.
Flow Indicator Scale
The valve stem with its grooved
rings and positioning sleeve
indicates the throttled position of
the valve. The quarter turn
graduations on the sleeve, with the
scribed line on the stem provides
for approximate flow measurement.
Note: The valve is shipped in the closed position. The
indicator on the plastic sleeve is aligned with the vertical
scribed line on the stem.
Page 22

Triple Duty Valve
PRESSURE DROP (FT WG)
5
3
1
.5
50
3.0 5.0 10 20 50 100 200 400
100 500 1000 2000 4000 6000
10
20
5.0
2.0
20
10
5.0
2.0
)O HM( PORD ERUSSERP
2
FLOWRATE (USGPM)
FLOWRATE (L/SEC)
Performance Curve
with Valve in Full Open Position
100
80
60
40
20
0
0 20 40 60 80 100
Inherent Flow Characteristic Curve
with Valve in Throttled Position
PERCENT OF MAX FLOW
PERCENT OF FULL OPEN
Figure 9: Performance Curve - Valve in Full Open Position
Figure 10: Flow Characteristic Curve - Valve in Throttled Position
22 IM 1110-1
Page 23

Dimensions
19.9
506
94.3
2396
19.9
506
10.2
260
27.3
693
32.4
823
3.0
EVAP WATER
OUTLET
VICTAULIC
CONNECTION
76
3.0
EVAP WATER
INLET
VICTAULIC
CONNECTION
76
32.2
818
Y
Z
5.0
127
2.0
51
46.7
1186
3.1
80
CG
POWER ENTRY POINTS
ARE ON THE OPPOSITE
SIDE OF CONTROL BOX
.875" KNOCKOUTS
L3
L4
L1
L2
88.0
DIMENSION DOES NOT INCLUDE
LIFTING BRACKETS
2235
94.8
2408
99.9
2538
14.4
366
6.5
165
CONTROL BOX WIDTH
8.1
REF.
205
19.6
498
2.5
64
2.5
64
43.1
1094
43.1
1094
X
POWER ENTRY POINTS
.875" KNOCKOUTS
FRONT OR RIGHT SIDE
FIELD CONTROL
CONNECTIONS
.875" KNOCKOUTS
CG
CONTROL
BOX
PUMP
CONTROL
PANEL
13.3
337
67.8
1721
13.3
337
2.0
52
2.0
52
.75
QTY. 4
19
11.4
290
ISOLATOR MOUNTING HOLE LOCATIONS ON BOTTOM SURFACE OF UNIT BASE
M3 M1
M2M4
L3 L1
L2L4
COMPRESSORS
CIRCUIT #1
COMPRESSORS
CIRCUIT #2
SEE NOTE 1.
PUMPS
EVAP
CERT. DWG, AGZ-D 4 FANS R410A, w/PUMPS
*331749211001*
NOTES:
SUCTION STRAINER, SHUT OFF VALVE AND TRIPLE DUTY VALVE WILL BE SHIPPED LOOSE
FOR FIELD INSTALLATION.
1.
DUE TO VARIATIONS IN PUMP SIZE, OPERATING WEIGHT WITH WATER MAY VARY UP TO
5%.
2.
TO CALCULATE CORNER LIFTING WEIGHTS FOR UNITS WITH COPPER FIN COILS: ADD
1/4 OF THE COPPER
3.
VS. ALUMINUM SHIPPING WEIGHT TO EACH ALUMINUM LIFTING
CORNER WEIGHTS.
Figure 11: AGZ025D - AGZ070D with Pump Package (COG dimensions on page 29 )
Dimensions
IM 1110-1 23
Page 24

Dimensions
24.0
610
134.9
3426
24.0
610
17.4
442
19.4
492
Y
Z
46.7
1186
5.0
127
3.1
80
2.0
51
POWER ENTRY POINTS
OPPOSITE SIDE OF
CONTROL BOX.
.875 KNOCKOUTS
L3
L4
L1
L2
CG
SEE
NOTE 1.
88.0
DIMENSION DOES NOT INCLUDE
LIFTING BRACKETS
2235
95.0
2413
99.9
2537
43.1
1094
14.4
366
6.5
165
CONTROL BOX WIDTH
8.1
REF.
206
43.1
1094
19.6
497
2.5
64
2.5
64
X
FIELD CONTROL
CONNECTIONS
.875 KNOCKOUTS
POWER ENTRY POINTS
.875 KNOCKOUTS
FRONT AND RIGHT SIDE
CONTROL
BOX
CG
PUMP
CONTROL
PANEL
.75
QTY. 4
19
12.4
315
110.1
2796
12.4
315
2.0
52
2.0
52
M3
M1
M2M4
L3 L1
L2L4
COMPRESSORS
CIRCUIT #2
COMPRESSORS
CIRCUIT #1
ISOLATOR MOUNTING HOLE LOCATIONS ON BOTTOM SURFACE OF UNIT BASE
SEE NOTE 1.
PUMPS
EVAP
49.5
1258
11.4
290
31.4
797
3.0
EVAP WATER
INLET
VICTAULIC
CONNECTION
76
3.0
EVAP WATER
OUTLET
VICTAULIC
CONNECTION
76
NOTES:
SUCTION STRAINER, SHUT OFF VALVE AND TRIPLE DUTY VALVE
1.
WILL BE SHIPPED LOOSE FOR FIELD INSTALLATION.
DUE TO VARIATIONS IN PUMP SIZE, OPERATING WEIGHT
2.
WITH WATER MAY VARY UP TO
5%.
TO CALCULATE CORNER LIFTING WEIGHTS FOR UNITS
3.
WITH COPPER FIN COILS: ADD 1/4 OF THE COPPER VS.
ALUMINUM SHIPPING WEIGHT TO EACH ALUMINUM
LIFTING WEIGHT.
CERT. DWG. AGZ-D 6 FANS, R410A w/PUMPS
Sht 1/2 AGZ075D AGZ080D
*3317492120A1*
Figure 12: AGZ075D - AGZ080D with Pump Package (COG dimensions on page 29 )
24 IM 1110-1
Page 25

24.0
610
134.9
3426
24.0
610
17.4
442
19.4
493
Y
Z
46.7
1186
5.0
127
3.1
80
2.0
51
POWER ENTRY POINTS
OPPOSITE SIDE OF
CONTROL BOX.
.875 KNOCKOUTS
L3
L4
L1
L2
CG
SEE
NOTE 1.
88.0
DIMENSION DOES NOT INCLUDE
LIFTING BRACKETS
2235
95.0
2413
99.9
2537
43.1
1094
14.4
366
6.5
165
CONTROL BOX WIDTH
8.1
REF.
206
43.1
1094
19.6
497
2.5
64
2.5
64
X
FIELD CONTROL
CONNECTIONS
.875 KNOCKOUTS
POWER ENTRY POINTS
.875 KNOCKOUTS
FRONT AND RIGHT SIDE
CONTROL
BOX
CG
PUMP
CONTROL
PANEL
.75
QTY. 4
19
12.4
315
110.1
2796
12.4
315
2.0
52
2.0
52
M3
M1
M2M4
L3 L1
L2L4
COMPRESSORS
CIRCUIT #2
COMPRESSORS
CIRCUIT #1
ISOLATOR MOUNTING HOLE LOCATIONS ON BOTTOM SURFACE OF UNIT BASE
SEE NOTE 1.
PUMPS
EVAP
49.5
1258
11.4
290
32.1
816
4.0
EVAP WATER
INLET
VICTAULIC
CONNECTION
102
4.0
EVAP WATER
OUTLET
VICTAULIC
CONNECTION
102
331749212
CERT. DWG. AGZ-D 6 FANS, R410A w/PUMPS
NOTES:
SUCTION STRAINER, SHUT OFF VALVE AND TRIPLE DUTY VALVE
1.
WILL BE SHIPPED LOOSE FOR FIELD INSTALLATION.
DUE TO VARIATIONS IN PUMP SIZE, OPERATING WEIGHT
2.
WITH WATER MAY VARY UP TO
5%.
TO CALCULATE CORNER LIFTING WEIGHTS FOR UNITS
3.
WITH COPPER FIN COILS: ADD 1/4 OF THE COPPER VS.
ALUMINUM SHIPPING WEIGHT TO EACH ALUMINUM
LIFTING WEIGHT.
Figure 13: AGZ090D - AGZ100D with Pump Package (COG dimensions on page 29 )
Dimensions
IM 1110-1 25
Page 26

Dimensions
24.0
610
24.0
610
173.1
4396
5.0
127
2.0
51
Y
Z
47.6
1209
L3
L4
L1
L2
CG
POWER ENTRY POINTS
ARE ON THE OPPOSITE
SIDE OF CONTROL BOX.
.875" KNOCKOUTS
88.0
DIMENSION DOES NOT
INCLUDE LIFTING BRACKETS
2235
95.0
2413
99.9
2538
43.9
1116
6.6
167
6.5
165
11.8
299
2.5
64
2.5
64
43.9
1116
X
EVAP
FIELD CONTROL
CONNECTIONS
.875" KNOCKOUTS
POWER ENTRY POINTS
.875" KNOCKOUTS
FRONT AND RIGHT SIDE
CG
CONTROL
BOX
PUMP
CONTROL
PANEL
25.2
640
67.8
1722
67.7
1719
12.4
315
2.0
52
2.0
52
.75
QTY. 6
19
COMPRESSORS
CIRCUIT #2
COMPRESSORS
CIRCUIT #1
M5 M3 M1
L1L3
L4 L2
M2M4M6
ISOLATOR MOUNTING HOLE LOCATIONS ON BOTTOM SURFACE OF UNIT BASE
PUMPS
SEE NOTE 1.
EVAP
11.4
290
33.1
842
4.0
EVAP WATER
INLET
VICTAULIC
CONNECTION
102
4.0
EVAP WATER
OUTLET
VICTAULIC
CONNECTION
102
44.0
1118
NOTES:
SUCTION STRAINER, SHUT OFF VALVE AND TRIPLE DUTY VALVE
1.
WILL BE SHIPPED LOOSE FOR FIELD INSTALLATION.
DUE TO VARIATIONS IN PUMP SIZE, OPERATING WEIGHT
2.
WITH WATER MAY VARY UP TO
5%.
TO CALCULATE CORNER LIFTING WEIGHTS FOR UNITS
3.
WITH COPPER FIN COILS: ADD 1/4 OF THE COPPER VS.
ALUMINUM SHIPPING WEIGHT TO EACH ALUMINUM
LIFTING WEIGHT.
331749213
CERT. DWG, AGZ-D 8 FANS, R410A, w/PUMPS
Figure 14: AGZ110D - AGZ130D with Pump Package (COG dimensions on page 29 )
26 IM 1110-1
Page 27

Figure 15: AGZ140D - AGZ180D with Pump Package (COG dimensions on page 29 )
268.0
6808
24.0
610
15.5
394
88.7
2252
139.8
3552
2.0
51
5.0
127
Y
Z
3.4
86
47.6
1209
POWER ENTRY POINTS
ARE ON THE OPPOSITE
SIDE OF CONTROL BOX.
.875" KNOCKOUTS
EVAP
L3
L4
L1
L2
CG
50" COILS
L5
L6
SEE NOTE 1.
99.9
2538
95.0
2413
88.0
DIMENSION DOES NOT
INCLUDE LIFTING BRACKETS
2235
43.9
1116
2.5
64
43.9
1116
6.6
167
6.5
165
2.5
64
11.8
298
X
CONTROL
BOX
FIELD CONTROL
CONNECTIONS
.875" KNOCKOUTS
POWER ENTRY POINTS
.875" KNOCKOUTS
FRONT AND RIGHT SIDE
CG
PUMP
CONTROL
PANEL
72.8
1849
81.1
2059
67.7
1719
12.4
315
2.0
52
2.0
52
34.0
863
12.3
313
M5 M3 M1
M2M4M6
L4
L2
L1L3
ISOLATOR MOUNTING HOLE LOCATIONS ON BOTTOM SURFACE OF UNIT BASE
COMPRESSORS
CIRCUIT #2
COMPRESSORS
CIRCUIT #1
M7
M8
L6
L5
SEE
NOTE 1.
NOTES:
SUCTION STRAINER, SHUT OFF VALVE AND TRIPLE DUTY VALVE
1.
WILL BE SHIPPED LOOSE FOR FIELD INSTALLATION.
DUE TO VARIATIONS IN PUMP SIZES, OPERATING WEIGHT
2.
WITH WATER IS APPROXIMATE AND MAY VARY UP TO 5%.
TO CALCULATE L1 THRU L6 LIFTING WEIGHTS FOR UNITS
3.
WITH COPPER FIN COILS: ADD 1/6 OF THE COPPER VS.
ALUMINUM SHIPPING WEIGHT TO EACH L1 THRU L6
ALUMINUM LIFTING WEIGHT.
PUMPS
20.0
508
32.4
822
4.0
EVAP WATER
INLET
VICTAULIC CONNECTION
102
4.0
EVAP WATER
OUTLET
VICTAULIC CONNECTION
102
17.0
432
Dimensions
IM 1110-1 27
Page 28

Dimensions
256.9
6524
37.3
948
110.3
2801
85.2
2165
24.0
610
5.0
127
2.0
51
Z
Y
47.6
1209
3.4
86
POWER ENTRY POINTS
ARE ON THE OPPOSITE
SIDE OF CONTROL BOX.
.875" KNOCKOUTS
EVAP
L5
L6
L3
L4
L1
L2
CG
50"
COILS
99.9
2538
95.0
2413
88.0
DIMENSION DOES NOT
INCLUDE LIFTING BRACKETS
2235
43.9
1116
6.6
167
6.5
165
11.8
299
2.5
64
2.5
64
43.9
1116
X
FIELD CONTROL
CONNECTIONS
.875" KNOCKOUTS
POWER ENTRY POINTS
.875" KNOCKOUTS
FRONT AND RIGHT SIDE
CONTROL
BOX
CG
PUMP
CONTROL
PANEL
.75
QTY. 8
19
14.9
378
90.0
2286
71.9
1826
67.7
1719
12.4
315
2.0
52
2.0
52
M1M3
M2
M5M7
M8
M6 M4
L1
L2
L3
L4
L5
L6
COMPRESSORS
CIRCUIT #2
COMPRESSORS
CIRCUIT #1
ISOLATOR MOUNTING HOLE LOCATIONS ON BOTTOM SURFACE OF UNIT BASE
PUMPS
SEE NOTE 1.
4.0
EVAP WATER
OUTLET
VICTAULIC
CONNECTION
102
30.1
765
17.0
432
4.0
EVAP WATER
INLET
VICTAULIC
CONNECTION
102
24.7
629
NOTES:
SUCTION STRAINER, SHUT OFF VALVE AND TRIPLE DUTY VALVE
1.
WILL BE SHIPPED LOOSE FOR FIELD INSTALLATION.
DUE TO VARIATIONS IN PUMP SIZES, OPERATING WEIGHT
2.
WITH WATER IS APPROXIMATE AND MAY VARY UP TO 5%.
TO CALCULATE L1 THRU L6 LIFTING WEIGHTS FOR UNITS
3.
WITH COPPER FIN COILS: ADD 1/6 OF THE COPPER VS.
ALUMINUM SHIPPING WEIGHT TO EACH L1 THRU L6
ALUMINUM LIFTING WEIGHT.
331749215D0100
AGZD 12 FAN W PUMPS
Figure 16: AGZ190D with Pump Package (COG dimensions on page 29 )
28 IM 1110-1
Page 29

Table 12: Center of Gravity Dimensions
IN M M IN MM IN M M
AGZ025D
45.8 1163 38.6 980 47.7 1212
AGZ030D
45.3 1151 38.3 973 47.8 1214
AGZ035D
45.0 1143 38.1 968 47.8 1214
AGZ040D
45.3 1151 38.7 983 47.9 1217
AGZ045D
45.3 1151 39.6 1006 47.9 1217
AGZ050D
45.2 1148 39.7 1008 47.8 1214
AGZ055D
45.3 1151 39.6 1006 47.7 1212
AGZ060D
45.5 1156 39.6 1006 47.6 1209
AGZ065D
45.6 1158 39.5 1003 47.6 1209
AGZ070D
43.4 1102 37.5 953 48.1 1222
AGZ075D
42.6 1082 40.7 1715 67.5 1715
AGZ080D
42.7 1085 40.5 1702 67.0 1702
AGZ090D
42.6 1082 41.9 1727 68.0 1727
AGZ100D
42.9 1090 41.5 1707 67.2 1707
AGZ110D (208/230)
44.1 1120 40.6 1031 81.2 2062
AGZ125D (208/230)
43.7 1110 39.9 1013 81.0 2057
AGZ130D (208/230)
44.3 1125 39.1 993 79.9 2029
AGZ110D (460/575)
44.0 1118 40.0 1016 82.0 2083
AGZ125D (460/575)
43.7 1110 39.4 1001 81.8 2078
AGZ130D (460/575)
44.2 1123 38.6 980 80.7 2050
AGZ140D
45.1 1146 37.4 950 114.0 2896
AGZ160D
44.7 1135 37.2 945 113.2 2875
AGZ180D
45.0 1143 37.1 942 111.9 2842
AGZ190D
44.8 1138 39.0 991 117.0 2972
UNIT MODEL
CENTER OF GRAV ITY ( COG) L OC ATION
XYZ
Dimensions
IM 1110-1 29
Page 30

Electrical Information
Note: Incoming power and run signals are factory wired.
Note: Single pump panels have only Pump #1
and have a single run signal from the main box.
Electrical Information
Figure 17: Pump Panel Wiring Diagram with Dual Pumps/Dual Control
Power Wiring
As standard, power to the pump package control panel is
factory wired from the chiller electrical panel. When the
optional chiller multi-point power wiring is specified, the
pump power originates from power circuit #1.
There is an option for field power wiring the pumps in lieu of
factory wiring. In this case the necessary electrical data begins
in Table 11 on page 40. In all cases, field power wiring
connections are made to L1, L2, L3 and GND on the pump
panel circuit breaker.
Power wiring to the chiller unit will be as shown in the chiller
catalog and installation manual.
Control Wiring
Control wiring to the chiller unit will be as shown in the chiller
catalog and installation manual except that the flow switch and
pump output signals shown as field wiring will be factory
wired.
Control wiring to start and stop the pump(s) is always factory
wired from the chiller electric panel to the pump package.
Dual pumps have two output signals and single pumps have
one.
The pump panel schematic, Figure 28, shows the standard dual
pump arrangement. Optionally a VFD can be substituted for
the contacts shown. A VFD line reactor can also be added.
A single pump can be ordered, in which case only one run
signal is factory wired in.
VFD Option, the VFD will require field wiring if the optional
BAS control is used or if the VFD is wired to field-mounted
differential switches. The pump BAS protocol will be the same
as specified for the chiller unit. The standard sensorless
arrangement does not require field wiring.
For BAS connection, use RS485 and wire to terminals 68 (+)
and 69 (-) for Modbus, FLN or Metasys protocols. The
terminals are located in the lower-right corner of the pumpmounted VFD enclosure under the keypad.
30 IM 1110-1
Page 31

Table 13: Electrical Data - Single Point
HP FLA
MCA RFS MFS
Pow er Block (1) Disconnect Sw itch (1)
208V 4.6 154 175 175
(1) 2/0 - #14 (2) 300 - 1/0
230V 4.2 153 175 175
(1) 2/0 - #14 (2) 300 - 1/0
460V 2.1 76 90 90
(1) 2/0 - #14 (1) 1/0 - #14
575V 1.7 66 70 70
(1) 2/0 - #14 (1) 1/0 - #14
208V 6.6 156 175 175 (1) 2/0 - #14 (2) 300 - 1/0
230V 6.0 155 175 175
(1) 2/0 - #14 (2) 300 - 1/0
460V 3.0 77 90 90
(1) 2/0 - #14 (1) 1/0 - #14
575V 2.4 67 70 70
(1) 2/0 - #14 (1) 1/0 - #14
208V 7.5 157 175 175 (1) 2/0 - #14 (2) 300 - 1/0
230V 6.8 156 175 175
(1) 2/0 - #14 (2) 300 - 1/0
460V 3.4 78 90 90
(1) 2/0 - #14 (1) 1/0 - #14
575V 2.7 67 70 70
(1) 2/0 - #14 (1) 1/0 - #14
208V 10.6 160 175 175 (1) 2/0 - #14 (2) 300 - 1/0
230V 9.6 159 175 175
(1) 2/0 - #14 (2) 300 - 1/0
460V 4.8 79 90 90
(1) 2/0 - #14 (1) 1/0 - #14
575V 3.9 68 80 80
(1) 2/0 - #14 (1) 1/0 - #14
208V 16.7 166 175 175 (1) 2/0 - #14 (2) 300 - 1/0
230V 15.2 164 175 175
(1) 2/0 - #14 (2) 300 - 1/0
460V 7.6 82 90 90
(1) 2/0 - #14 (1) 1/0 - #14
575V 6.1 70 80 80
(1) 2/0 - #14 (1) 1/0 - #14
208V 4.6 163 175 175
(1) 2/0 - #14 (2) 300 - 1/0
230V 4.2 156 175 175
(1) 2/0 - #14 (2) 300 - 1/0
460V 2.1 85 100 100
(1) 2/0 - #14 (1) 1/0 - #14
575V 1.7 69 80 80
(1) 2/0 - #14 (1) 1/0 - #14
208V 6.6 165 175 175 (1) 2/0 - #14 (2) 300 - 1/0
230V 6.0 158 175 175
(1) 2/0 - #14 (2) 300 - 1/0
460V 3.0 86 100 100
(1) 2/0 - #14 (1) 1/0 - #14
575V 2.4 70 80 80
(1) 2/0 - #14 (1) 1/0 - #14
208V 7.5 165 175 175 (1) 2/0 - #14 (2) 300 - 1/0
230V 6.8 158 175 175
(1) 2/0 - #14 (2) 300 - 1/0
460V 3.4 86 100 100
(1) 2/0 - #14 (1) 1/0 - #14
575V 2.7 70 80 80
(1) 2/0 - #14 (1) 1/0 - #14
208V 10.6 169 175 175 (1) 600 - #2 (2) 300 - 1/0
230V 9.6 161 175 175
(1) 2/0 - #14 (2) 300 - 1/0
460V 4.8 87 100 100
(1) 2/0 - #14 (1) 1/0 - #14
575V 3.9 72 80 80
(1) 2/0 - #14 (1) 1/0 - #14
208V 16.7 175 200 200 (1) 600 - #2 (2) 300 - 1/0
230V 15.2 167 175 175
(1) 2/0 - #14 (2) 300 - 1/0
460V 7.6 90 100 100
(1) 2/0 - #14 (1) 1/0 - #14
575V 6.1 74 80 80
(1) 2/0 - #14 (1) 1/0 - #14
208V 6.6 175 200 200
(1) 600 - #2 (2) 300 - 1/0
230V 6.0 171 200 200
(1) 600 - #2 (2) 300 - 1/0
460V 3.0 88 100 100
(1) 2/0 - #14 (1) 1/0 - #14
575V 2.4 70 80 80
(1) 2/0 - #14 (1) 1/0 - #14
208V 7.5 176 200 200 (1) 600 - #2 (2) 300 - 1/0
230V 6.8 172 200 200
(1) 600 - #2 (2) 300 - 1/0
460V 3.4 89 100 100
(1) 2/0 - #14 (1) 1/0 - #14
575V 2.7 70 80 80
(1) 2/0 - #14 (1) 1/0 - #14
208V 10.6 179 200 200 (1) 600 - #2 (2) 300 - 1/0
230V 9.6 174 200 200
(1) 600 - #2 (2) 300 - 1/0
460V 4.8 90 100 100
(1) 2/0 - #14 (1) 1/0 - #14
575V 3.9 72 80 80
(1) 2/0 - #14 (1) 1/0 - #14
208V 16.7 185 200 200 (1) 600 - #2 (2) 300 - 1/0
230V 15.2 180 200 200
(1) 600 - #2 (2) 300 - 1/0
460V 7.6 93 110 110
(1) 2/0 - #14 (1) 3/0 - #14
575V 6.1 74 80 80
(1) 2/0 - #14 (1) 1/0 - #14
208V 24.2 193 225 225 (1) 600 - #2 (2) 300 - 1/0
230V 22.0 187 200 200
(1) 600 - #2 (2) 300 - 1/0
460V 11.0 96 110 110
(1) 2/0 - #14 (1) 3/0 - #14
575V 9.0 77 80 80
(1) 2/0 - #14 (1) 1/0 - #14
AGZ035D
PUM P
5.0
3.0
1.5
1.0
2.0
3.0
1.5
2.0
M odel Voltage
Pum p
AGZ025D
PUM P
AGZ030D
PUM P
2.0
1.0
1.5
Lug Range
Ratings
5.0
3.0
5.0
7.5
Electrical Information
Note: Power block and disconnect switch sizes are minimums. Larger sizes may be used, however the lug range must be the same.
IM 1110-1 31
Page 32

Electrical Information
HP FLA
MCA RFS MFS
Pow er Block (1) Disconnect Sw itch (1)
208V 6.6 185 200 200
(1) 600 - #2 (2) 300 - 1/0
230V 6.0 183 200 200
(1) 600 - #2 (2) 300 - 1/0
460V 3.0 91 100 100
(1) 2/0 - #14 (1) 1/0 - #14
575V 2.4 70 80 80
(1) 2/0 - #14 (1) 1/0 - #14
208V 7.5 185 200 200
(1) 600 - #2 (2) 300 - 1/0
230V 6.8 183 200 200
(1) 600 - #2 (2) 300 - 1/0
460V 3.4 91 100 100
(1) 2/0 - #14 (1) 1/0 - #14
575V 2.7 70 80 80
(1) 2/0 - #14 (1) 1/0 - #14
208V 10.6 189 200 200
(1) 600 - #2 (2) 300 - 1/0
230V 9.6 186 200 200
(1) 600 - #2 (2) 300 - 1/0
460V 4.8 93 110 110
(1) 2/0 - #14 (1) 3/0 - #14
575V 3.9 72 80 80
(1) 2/0 - #14 (1) 1/0 - #14
208V 16.7 195 225 225
(1) 600 - #2 (2) 300 - 1/0
230V 15.2 192 225 225
(1) 600 - #2 (2) 300 - 1/0
460V 7.6 95 110 110
(1) 2/0 - #14 (1) 3/0 - #14
575V 6.1 74 80 80
(1) 2/0 - #14 (1) 1/0 - #14
208V 24.2 202 225 225
(1) 600 - #2 (2) 300 - 1/0
230V 22.0 199 225 225
(1) 600 - #2 (2) 300 - 1/0
460V 11.0 99 110 110
(1) 2/0 - #14 (1) 3/0 - #14
575V 9.0 77 80 80
(1) 2/0 - #14 (1) 1/0 - #14
208V 6.6 235 250 250
(1) 600 - #2 (1) 600 - #1 & (2) 250 - #1
230V 6.0 234 250 250
(1) 600 - #2 (1) 600 - #1 & (2) 250 - #1
460V 3.0 95 110 110
(1) 2/0 - #14 (1) 3/0 - #14
575V 2.4 79 90 90
(1) 2/0 - #14 (1) 1/0 - #14
208V 7.5 236 250 250
(1) 600 - #2 (1) 600 - #1 & (2) 250 - #1
230V 6.8 235 250 250
(1) 600 - #2 (1) 600 - #1 & (2) 250 - #1
460V 3.4 95 110 110
(1) 2/0 - #14 (1) 3/0 - #14
575V 2.7 79 90 90
(1) 2/0 - #14 (1) 1/0 - #14
208V 10.6 239 250 250
(1) 600 - #2 (1) 600 - #1 & (2) 250 - #1
230V 9.6 238 250 250
(1) 600 - #2 (1) 600 - #1 & (2) 250 - #1
460V 4.8 97 110 110
(1) 2/0 - #14 (1) 3/0 - #14
575V 3.9 81 90 90
(1) 2/0 - #14 (1) 1/0 - #14
208V 16.7 245 250 250
(1) 600 - #2 (1) 600 - #1 & (2) 250 - #1
230V 15.2 243 250 250
(1) 600 - #2 (1) 600 - #1 & (2) 250 - #1
460V 7.6 100 110 110
(1) 2/0 - #14 (1) 3/0 - #14
575V 6.1 83 90 90
(1) 2/0 - #14 (1) 1/0 - #14
208V 24.2 252 300 300
(1) 600 - #2 (1) 600 - #1 & (2) 250 - #1
230V 22.0 250 250 250
(1) 600 - #2 (1) 600 - #1 & (2) 250 - #1
460V 11.0 103 110 110
(1) 2/0 - #14 (1) 3/0 - #14
575V 9.0 86 100 100
(1) 2/0 - #14 (1) 1/0 - #14
208V 6.6 255 300 300
(1) 600 - #2 (1) 600 - #1 & (2) 250 - #1
230V 6.0 254 300 300
(1) 600 - #2 (1) 600 - #1 & (2) 250 - #1
460V 3.0 113 125 125
(1) 2/0 - #14 (1) 3/0 - #14
575V 2.4 99 110 110
(1) 2/0 - #14 (1) 3/0 - #14
208V 7.5 256 300 300
(1) 600 - #2 (1) 600 - #1 & (2) 250 - #1
230V 6.8 255 300 300
(1) 600 - #2 (1) 600 - #1 & (2) 250 - #1
460V 3.4 113 125 125
(1) 2/0 - #14 (1) 3/0 - #14
575V 2.7 100 110 110
(1) 2/0 - #14 (1) 3/0 - #14
208V 10.6 259 300 300
(1) 600 - #2 (1) 600 - #1 & (2) 250 - #1
230V 9.6 258 300 300
(1) 600 - #2 (1) 600 - #1 & (2) 250 - #1
460V 4.8 115 125 125
(1) 2/0 - #14 (1) 3/0 - #14
575V 3.9 101 110 110
(1) 2/0 - #14 (1) 3/0 - #14
208V 16.7 265 300 300
(1) 600 - #2 (1) 600 - #1 & (2) 250 - #1
230V 15.2 263 300 300
(1) 600 - #2 (1) 600 - #1 & (2) 250 - #1
460V 7.6 117 125 125
(1) 2/0 - #14 (1) 3/0 - #14
575V 6.1 103 110 110
(1) 2/0 - #14 (1) 3/0 - #14
208V 24.2 272 300 300
(1) 600 - #2 (1) 600 - #1 & (2) 250 - #1
230V 22.0 270 300 300
(1) 600 - #2 (1) 600 - #1 & (2) 250 - #1
460V 11.0 121 125 125
(1) 2/0 - #14 (1) 3/0 - #14
575V 9.0 106 125 125
(1) 2/0 - #14 (1) 3/0 - #14
AGZ050D
PUM P
1.5
2.0
3.0
5.0
7.5
7.5
AGZ045D
PUM P
1.5
2.0
3.0
5.0
7.5
M odel Voltage
Pum p
AGZ040D
PUM P
1.5
2.0
3.0
Ratings
Lug Range
5.0
Table 14: Electrical Data - Single Point (Continued)
Note: Power block and disconnect switch sizes are minimums. Larger sizes may be used, however the lug range must be the same.
32 IM 1110-1
Page 33

Table 15: Electrical Data - Single Point (Continued)
HP FLA
MCA RFS MFS
Pow er Block (1) Disconnect Sw itch (1)
208V 6.6 263 300 300
(1) 600 - #2 (1) 600 - #1 & (2) 250 - #1
230V 6.0 261 300 300
(1) 600 - #2 (1) 600 - #1 & (2) 250 - #1
460V 3.0 121 125 125
(1) 2/0 - #14 (1) 3/0 - #14
575V 2.4 108 125 125
(1) 2/0 - #14 (1) 3/0 - #14
208V 7.5 264 300 300
(1) 600 - #2 (1) 600 - #1 & (2) 250 - #1
230V 6.8 262 300 300
(1) 600 - #2 (1) 600 - #1 & (2) 250 - #1
460V 3.4 122 125 125
(1) 2/0 - #14 (1) 3/0 - #14
575V 2.7 108 125 125
(1) 2/0 - #14 (1) 3/0 - #14
208V 10.6 267 300 300
(1) 600 - #2 (1) 600 - #1 & (2) 250 - #1
230V 9.6 264 300 300
(1) 600 - #2 (1) 600 - #1 & (2) 250 - #1
460V 4.8 123 125 125
(1) 2/0 - #14 (1) 3/0 - #14
575V 3.9 109 125 125
(1) 2/0 - #14 (1) 3/0 - #14
208V 16.7 273 300 300
(1) 600 - #2 (1) 600 - #1 & (2) 250 - #1
230V 15.2 270 300 300
(1) 600 - #2 (1) 600 - #1 & (2) 250 - #1
460V 7.6 126 150 150
(1) 2/0 - #14 (1) 3/0 - #14
575V 6.1 112 125 125
(1) 2/0 - #14 (1) 3/0 - #14
208V 24.2 281 300 300
(1) 600 - #2 (1) 600 - #1 & (2) 250 - #1
230V 22.0 277 300 300
(1) 600 - #2 (1) 600 - #1 & (2) 250 - #1
460V 11.0 129 150 150
(1) 2/0 - #14 (1) 3/0 - #14
575V 9.0 115 125 125
(1) 2/0 - #14 (1) 3/0 - #14
208V 7.5 272 300 300
(1) 600 - #2 (1) 600 - #1 & (2) 250 - #1
230V 6.8 268 300 300
(1) 600 - #2 (1) 600 - #1 & (2) 250 - #1
460V 3.4 129 150 150
(1) 2/0 - #14 (1) 3/0 - #14
575V 2.7 116 125 125
(1) 2/0 - #14 (1) 3/0 - #14
208V 10.6 275 300 300
(1) 600 - #2 (1) 600 - #1 & (2) 250 - #1
230V 9.6 270 300 300
(1) 600 - #2 (1) 600 - #1 & (2) 250 - #1
460V 4.8 131 150 150
(1) 2/0 - #14 (1) 3/0 - #14
575V 3.9 117 125 125
(1) 2/0 - #14 (1) 3/0 - #14
208V 16.7 281 300 300
(1) 600 - #2 (1) 600 - #1 & (2) 250 - #1
230V 15.2 276 300 300
(1) 600 - #2 (1) 600 - #1 & (2) 250 - #1
460V 7.6 134 150 150
(1) 2/0 - #14 (1) 3/0 - #14
575V 6.1 119 125 125
(1) 2/0 - #14 (1) 3/0 - #14
208V 24.2 288 300 300
(1) 600 - #2 (1) 600 - #1 & (2) 250 - #1
230V 22.0 283 300 300
(1) 600 - #2 (1) 600 - #1 & (2) 250 - #1
460V 11.0 137 150 150
(1) 2/0 - #14 (1) 3/0 - #14
575V 9.0 122 125 125
(1) 2/0 - #14 (1) 3/0 - #14
208V 30.8 295 350 350
(1) 600 - #2 (1) 600 - #1 & (2) 250 - #1
230V 28.0 289 300 300
(1) 600 - #2 (1) 600 - #1 & (2) 250 - #1
460V 14.0 140 150 150
(1) 2/0 - #14 (2) 300 - 1/0
575V 11.0 124 125 125
(1) 2/0 - #14 (1) 3/0 - #14
208V 7.5 280 300 300
(1) 600 - #2 (1) 600 - #1 & (2) 250 - #1
230V 6.8 276 300 300
(1) 600 - #2 (1) 600 - #1 & (2) 250 - #1
460V 3.4 133 150 150
(1) 2/0 - #14 (1) 3/0 - #14
575V 2.7 116 125 125
(1) 2/0 - #14 (1) 3/0 - #14
208V 10.6 283 300 300
(1) 600 - #2 (1) 600 - #1 & (2) 250 - #1
230V 9.6 278 300 300
(1) 600 - #2 (1) 600 - #1 & (2) 250 - #1
460V 4.8 134 150 150
(1) 2/0 - #14 (1) 3/0 - #14
575V 3.9 117 125 125
(1) 2/0 - #14 (1) 3/0 - #14
208V 16.7 289 300 300
(1) 600 - #2 (1) 600 - #1 & (2) 250 - #1
230V 15.2 284 300 300
(1) 600 - #2 (1) 600 - #1 & (2) 250 - #1
460V 7.6 137 150 150
(1) 2/0 - #14 (1) 3/0 - #14
575V 6.1 119 125 125
(1) 2/0 - #14 (1) 3/0 - #14
208V 24.2 296 350 350
(1) 600 - #2 (1) 600 - #1 & (2) 250 - #1
230V 22.0 291 300 300
(1) 600 - #2 (1) 600 - #1 & (2) 250 - #1
460V 11.0 140 150 150
(1) 2/0 - #14 (2) 300 - 1/0
575V 9.0 122 125 125
(1) 2/0 - #14 (1) 3/0 - #14
208V 30.8 303 350 350
(1) 600 - #2 (1) 600 - #1 & (2) 250 - #1
230V 28.0 297 350 350
(1) 600 - #2 (1) 600 - #1 & (2) 250 - #1
460V 14.0 143 150 150
(1) 2/0 - #14 (2) 300 - 1/0
575V 11.0 124 125 125
(1) 2/0 - #14 (1) 3/0 - #14
AGZ065D
PUM P
2.0
3.0
5.0
7.5
10.0
AGZ060D
PUM P
2.0
3.0
5.0
7.5
10.0
AGZ055D
PUM P
1.5
2.0
3.0
5.0
7.5
M odel Voltage
Pum p Ratings
Lug Range
Electrical Information
Note: Power block and disconnect switch sizes are minimums. Larger sizes may be used, however the lug range must be the same.
IM 1110-1 33
Page 34

Electrical Information
HP FLA
MCA RFS MFS
Pow er Block (1) Disconnect Sw itch (1)
208V 7.5 315 350 350
(1) 600 - #2 (1) 600 - #1 & (2) 250 - #1
230V 6.8 313 350 350
(1) 600 - #2 (1) 600 - #1 & (2) 250 - #1
460V 3.4 141 150 150
(1) 2/0 - #14 (2) 300 - 1/0
575V 2.7 119 125 125
(1) 2/0 - #14 (1) 3/0 - #14
208V 10.6 318 350 350
(1) 600 - #2 (1) 600 - #1 & (2) 250 - #1
230V 9.6 316 350 350
(1) 600 - #2 (1) 600 - #1 & (2) 250 - #1
460V 4.8 143 150 150
(1) 2/0 - #14 (2) 300 - 1/0
575V 3.9 120 125 125
(1) 2/0 - #14 (1) 3/0 - #14
208V 16.7 324 350 350
(1) 600 - #2 (1) 600 - #1 & (2) 250 - #1
230V 15.2 324 350 350
(1) 600 - #2 (1) 600 - #1 & (2) 250 - #1
460V 7.6 146 175 175
(1) 2/0 - #14 (2) 300 - 1/0
575V 6.1 123 125 125
(1) 2/0 - #14 (1) 3/0 - #14
208V 24.2 332 400 400
(1) 600 - #2 (1) 600 - #1 & (2) 250 - #1
230V 22.0 328 400 400
(1) 600 - #2 (1) 600 - #1 & (2) 250 - #1
460V 11.0 149 175 175
(1) 2/0 - #14 (2) 300 - 1/0
575V 9.0 126 150 150
(1) 2/0 - #14 (1) 3/0 - #14
208V 30.8 339 400 400
(2) 500 - #6 (1) 600 - #1 & (2) 250 - #1
230V 28.0 334 400 400
(1) 600 - #2 (1) 600 - #1 & (2) 250 - #1
460V 14.0 152 175 175
(1) 2/0 - #14 (2) 300 - 1/0
575V 11.0 128 150 150
(1) 2/0 - #14 (1) 3/0 - #14
208V 10.6 366 400 400
(2) 500 - #6 (1) 600 - #1 & (2) 250 - #1
230V 9.6 365 400 400
(2) 500 - #6 (1) 600 - #1 & (2) 250 - #1
460V 4.8 158 175 175
(1) 2/0 - #14 (2) 300 - 1/0
575V 3.9 129 150 150
(1) 2/0 - #14 (1) 3/0 - #14
208V 16.7 372 400 400
(2) 500 - #6 (2) 500 - 3/0
230V 15.2 370 400 400
(2) 500 - #6 (2) 500 - 3/0
460V 7.6 161 175 175
(1) 2/0 - #14 (2) 300 - 1/0
575V 6.1 132 150 150
(1) 2/0 - #14 (1) 3/0 - #14
208V 24.2 379 450 450
(2) 500 - #6 (2) 500 - 3/0
230V 22.0 377 400 400
(2) 500 - #6 (2) 500 - 3/0
460V 11.0 164 175 175
(1) 2/0 - #14 (2) 300 - 1/0
575V 9.0 135 150 150
(1) 2/0 - #14 (1) 3/0 - #14
208V 30.8 386 450 450
(2) 500 - #6 (2) 500 - 3/0
230V 28.0 383 450 450
(2) 500 - #6 (2) 500 - 3/0
460V 14.0 167 175 175
(1) 2/0 - #14 (2) 300 - 1/0
575V 11.0 137 150 150
(1) 2/0 - #14 (1) 3/0 - #14
208V 46.2 401 450 450
(2) 500 - #6 (2) 500 - 3/0
230V 42.0 397 450 450
(2) 500 - #6 (2) 500 - 3/0
460V 21.0 174 200 200
(1) 600 - #2 (2) 300 - 1/0
575V 17.0 143 150 150
(1) 2/0 - #14 (2) 300 - 1/0
208V 10.6 403 450 450
(2) 500 - #6 (2) 500 - 3/0
230V 9.6 402 450 450
(2) 500 - #6 (2) 500 - 3/0
460V 4.8 176 200 200
(1) 600 - #2 (2) 300 - 1/0
575V 3.9 151 175 175
(1) 2/0 - #14 (2) 300 - 1/0
208V 16.7 409 450 450
(2) 500 - #6 (2) 500 - 3/0
230V 15.2 408 450 450
(2) 500 - #6 (2) 500 - 3/0
460V 7.6 179 200 200
(1) 600 - #2 (2) 300 - 1/0
575V 6.1 153 175 175
(1) 2/0 - #14 (2) 300 - 1/0
208V 24.2 417 500 500
(2) 500 - #6 (2) 500 - 3/0
230V 22.0 415 500 500
(2) 500 - #6 (2) 500 - 3/0
460V 11.0 182 200 200
(1) 600 - #2 (2) 300 - 1/0
575V 9.0 156 175 175
(1) 2/0 - #14 (2) 300 - 1/0
208V 30.8 423 500 500
(2) 500 - #6 (2) 500 - 3/0
230V 28.0 421 500 500
(2) 500 - #6 (2) 500 - 3/0
460V 14.0 185 200 200
(1) 600 - #2 (2) 300 - 1/0
575V 11.0 158 175 175
(1) 2/0 - #14 (2) 300 - 1/0
208V 46.2 439 500 500
(2) 500 - #6 (2) 500 - 3/0
230V 42.0 435 500 500
(2) 500 - #6 (2) 500 - 3/0
460V 21.0 192 225 225
(1) 600 - #2 (2) 300 - 1/0
575V 17.0 164 175 175
(1) 2/0 - #14 (2) 300 - 1/0
AGZ080D
PUM P
3.0
5.0
7.5
10.0
15.0
7.5
10.0
AGZ075D
PUM P
3.0
5.0
7.5
10.0
15.0
M odel Voltage
Pum p
AGZ070D
PUM P
2.0
3.0
5.0
Ratings
Lug Range
Table 16: Electrical Data - Single Point (Continued)
Note: Power block and disconnect switch sizes are minimums. Larger sizes may be used, however the lug range must be the same.
34 IM 1110-1
Page 35

Table 17: Electrical Data - Single Point (Continued)
HP FLA
MCA RFS MFS
Pow er Block (1) Disconnect Sw itch (1)
208V 10.6 437 500 500
(2) 500 - #6 (2) 500 - 3/0
230V 9.6 436 500 500
(2) 500 - #6 (2) 500 - 3/0
460V 4.8 193 225 225
(1) 600 - #2 (2) 300 - 1/0
575V 3.9 170 200 200
(1) 600 - #2 (2) 300 - 1/0
208V 16.7 443 500 500
(2) 500 - #6 (2) 500 - 3/0
230V 15.2 441 500 500
(2) 500 - #6 (2) 500 - 3/0
460V 7.6 195 225 225
(1) 600 - #2 (2) 300 - 1/0
575V 6.1 172 200 200
(1) 600 - #2 (2) 300 - 1/0
208V 24.2 450 500 500
(2) 500 - #6 (2) 500 - 3/0
230V 22.0 448 500 500
(2) 500 - #6 (2) 500 - 3/0
460V 11.0 199 225 225
(1) 600 - #2 (2) 300 - 1/0
575V 9.0 175 200 200
(1) 600 - #2 (2) 300 - 1/0
208V 30.8 457 500 500
(2) 500 - #6 (2) 500 - 3/0
230V 28.0 454 500 500
(2) 500 - #6 (2) 500 - 3/0
460V 14.0 202 225 225
(1) 600 - #2 (2) 300 - 1/0
575V 11.0 177 200 200
(1) 600 - #2 (2) 300 - 1/0
208V 46.2 472 500 500
(2) 500 - #6 (2) 500 - 3/0
230V 42.0 468 500 500
(2) 500 - #6 (2) 500 - 3/0
460V 21.0 209 250 250
(1) 600 - #2 (2) 300 - 1/0
575V 17.0 183 200 200
(1) 600 - #2 (2) 300 - 1/0
208V 10.6 496 600 600
(2) 500 - #6 (2) 500 - 3/0
230V 9.6 495 600 600
(2) 500 - #6 (2) 500 - 3/0
460V 4.8 227 250 250
(1) 600 - #2 (2) 300 - 1/0
575V 3.9 203 250 250
(1) 600 - #2 (2) 300 - 1/0
208V 16.7 502 600 600
(2) 500 - #6 (2) 500 - 3/0
230V 15.2 501 600 600
(2) 500 - #6 (2) 500 - 3/0
460V 7.6 230 250 250
(1) 600 - #2 (2) 300 - 1/0
575V 6.1 205 250 250
(1) 600 - #2 (2) 300 - 1/0
208V 24.2 510 600 600
(2) 500 - #6 (2) 500 - 3/0
230V 22.0 507 600 600
(2) 500 - #6 (2) 500 - 3/0
460V 11.0 234 250 250
(1) 600 - #2 (1) 600 - #1 & (2) 250 - #1
575V 9.0 208 250 250
(1) 600 - #2 (2) 300 - 1/0
208V 30.8 516 600 600
(2) 500 - #6 (2) 500 - 3/0
230V 28.0 513 600 600
(2) 500 - #6 (2) 500 - 3/0
460V 14.0 237 250 250
(1) 600 - #2 (1) 600 - #1 & (2) 250 - #1
575V 11.0 210 250 250
(1) 600 - #2 (2) 300 - 1/0
208V 46.2 532 600 600
(2) 500 - #6 (2) 500 - 3/0
230V 42.0 527 600 600
(2) 500 - #6 (2) 500 - 3/0
460V 21.0 244 250 250
(1) 600 - #2 (1) 600 - #1 & (2) 250 - #1
575V 17.0 216 250 250
(1) 600 - #2 (2) 300 - 1/0
208V 10.6 539 600 600
(2) 500 - #6 (2) 500 - 3/0
230V 9.6 538 600 600
(2) 500 - #6 (2) 500 - 3/0
460V 4.8 227 250 250
(1) 600 - #2 (1) 600 - #1 & (2) 250 - #1
575V 3.9 186 200 200
(1) 600 - #2 (2) 300 - 1/0
208V 16.7 545 600 600
(2) 500 - #6 (3) 500 - 3/0
230V 15.2 544 600 600
(2) 500 - #6 (3) 500 - 3/0
460V 7.6 229 250 250
(1) 600 - #2 (1) 600 - #1 & (2) 250 - #1
575V 6.1 188 200 200
(1) 600 - #2 (2) 300 - 1/0
208V 24.2 553 600 600
(2) 500 - #6 (3) 500 - 3/0
230V 22.0 550 600 600
(2) 500 - #6 (3) 500 - 3/0
460V 11.0 233 250 250
(1) 600 - #2 (1) 600 - #1 & (2) 250 - #1
575V 9.0 191 200 200
(1) 600 - #2 (2) 300 - 1/0
208V 30.8 559 600 600
(2) 500 - #6 (3) 500 - 3/0
230V 28.0 556 600 600
(2) 500 - #6 (3) 500 - 3/0
460V 14.0 236 250 250
(1) 600 - #2 (1) 600 - #1 & (2) 250 - #1
575V 11.0 193 200 200
(1) 600 - #2 (2) 300 - 1/0
208V 46.2 575 600 600
(2) 500 - #6 (3) 500 - 3/0
230V 42.0 570 600 600
(2) 500 - #6 (3) 500 - 3/0
460V 21.0 243 250 250
(1) 600 - #2 (1) 600 - #1 & (2) 250 - #1
575V 17.0 199 200 200
(1) 600 - #2 (2) 300 - 1/0
AGZ110D
PUM P
3.0
5.0
7.5
10.0
15.0
AGZ100D
PUM P
3.0
5.0
7.5
10.0
15.0
AGZ090D
PUM P
3.0
5.0
7.5
10.0
15.0
M odel Voltage
Pum p Ratings
Lug Range
Electrical Information
Note: Power block and disconnect switch sizes are minimums. Larger sizes may be used, however the lug range must be the same.
IM 1110-1 35
Page 36

Electrical Information
HP FLA
MCA RFS MFS
Pow er Block (1) Disconnect Sw itch (1)
208V 10.6 587 600 600
(2) 500 - #6 (3) 500 - 3/0
230V 9.6 586 600 600
(2) 500 - #6 (3) 500 - 3/0
460V 4.8 271 300 300
(1) 600 - #2 (1) 600 - #1 & (2) 250 - #1
575V 3.9 217 250 250
(1) 600 - #2 (2) 300 - 1/0
208V 16.7 593 600 600
(2) 500 - #6 (3) 500 - 3/0
230V 15.2 591 600 600
(2) 500 - #6 (3) 500 - 3/0
460V 7.6 274 300 300
(1) 600 - #2 (1) 600 - #1 & (2) 250 - #1
575V 6.1 219 250 250
(1) 600 - #2 (2) 300 - 1/0
208V 24.2 600 600 600
(2) 500 - #6 (3) 500 - 3/0
230V 22.0 598 600 600
(2) 500 - #6 (3) 500 - 3/0
460V 11.0 277 300 300
(1) 600 - #2 (1) 600 - #1 & (2) 250 - #1
575V 9.0 222 250 250
(1) 600 - #2 (2) 300 - 1/0
208V 30.8 607 600 600
(2) 500 - #6 (3) 500 - 3/0
230V 28.0 604 600 600
(2) 500 - #6 (3) 500 - 3/0
460V 14.0 280 300 300
(1) 600 - #2 (1) 600 - #1 & (2) 250 - #1
575V 11.0 224 250 250
(1) 600 - #2 (2) 300 - 1/0
208V 46.2 622 700 700
(2) 500 - #6 (3) 500 - 3/0
230V 42.0 618 700 700
(2) 500 - #6 (3) 500 - 3/0
460V 21.0 287 300 300
(1) 600 - #2 (1) 600 - #1 & (2) 250 - #1
575V 17.0 230 250 250
(1) 600 - #2 (1) 600 - #1 & (2) 250 - #1
208V 10.6 630 700 700
(2) 500 - #6 (3) 500 - 3/0
230V 9.6 629 700 700
(2) 500 - #6 (3) 500 - 3/0
460V 4.8 312 350 350
(1) 600 - #2 (1) 600 - #1 & (2) 250 - #1
575V 3.9 245 250 250
(1) 600 - #2 (1) 600 - #1 & (2) 250 - #1
208V 16.7 636 700 700
(2) 500 - #6 (3) 500 - 3/0
230V 15.2 635 700 700
(2) 500 - #6 (3) 500 - 3/0
460V 7.6 315 350 350
(1) 600 - #2 (1) 600 - #1 & (2) 250 - #1
575V 6.1 247 250 250
(1) 600 - #2 (1) 600 - #1 & (2) 250 - #1
208V 24.2 644 700 700
(2) 500 - #6 (3) 500 - 3/0
230V 22.0 642 700 700
(2) 500 - #6 (3) 500 - 3/0
460V 11.0 318 350 350
(1) 600 - #2 (1) 600 - #1 & (2) 250 - #1
575V 9.0 250 250 250
(1) 600 - #2 (1) 600 - #1 & (2) 250 - #1
208V 30.8 651 700 700
(2) 500 - #6 (3) 500 - 3/0
230V 28.0 648 700 700
(2) 500 - #6 (3) 500 - 3/0
460V 14.0 321 350 350
(1) 600 - #2 (1) 600 - #1 & (2) 250 - #1
575V 11.0 252 250 250
(1) 600 - #2 (1) 600 - #1 & (2) 250 - #1
208V 46.2 666 700 700
(2) 500 - #6 (3) 500 - 3/0
230V 42.0 662 700 700
(2) 500 - #6 (3) 500 - 3/0
460V 21.0 328 350 350
(1) 600 - #2 (1) 600 - #1 & (2) 250 - #1
575V 17.0 258 250 250
(1) 600 - #2 (1) 600 - #1 & (2) 250 - #1
208V 16.7 652 700 700
(2) 500 - #6 (3) 500 - 3/0
230V 15.2 651 700 700
(2) 500 - #6 (3) 500 - 3/0
460V 7.6 322 350 350
(1) 600 - #2 (1) 600 - #1 & (2) 250 - #1
575V 6.1 253 250 250
(1) 600 - #2 (1) 600 - #1 & (2) 250 - #1
208V 24.2 660 700 700
(2) 500 - #6 (3) 500 - 3/0
230V 22.0 657 700 700
(2) 500 - #6 (3) 500 - 3/0
460V 11.0 326 350 350
(1) 600 - #2 (1) 600 - #1 & (2) 250 - #1
575V 9.0 256 250 250
(1) 600 - #2 (1) 600 - #1 & (2) 250 - #1
208V 30.8 666 700 700
(2) 500 - #6 (3) 500 - 3/0
230V 28.0 663 700 700
(2) 500 - #6 (3) 500 - 3/0
460V 14.0 329 350 350
(1) 600 - #2 (1) 600 - #1 & (2) 250 - #1
575V 11.0 258 250 250
(1) 600 - #2 (1) 600 - #1 & (2) 250 - #1
208V 46.2 682 700 700
(4) 500 - #6 (4) 500 - 3/0
230V 42.0 677 700 700
(4) 500 - #6 (4) 500 - 3/0
460V 21.0 336 350 350
(2) 500 - #6 (1) 600 - #1 & (2) 250 - #1
575V 17.0 264 250 250
(1) 600 - #2 (1) 600 - #1 & (2) 250 - #1
208V 59.4 695 700 700
(4) 500 - #6 (4) 500 - 3/0
230V 54.0 689 700 700
(4) 500 - #6 (4) 500 - 3/0
460V 27.0 342 350 350
(2) 500 - #6 (1) 600 - #1 & (2) 250 - #1
575V 22.0 269 250 250
(1) 600 - #2 (1) 600 - #1 & (2) 250 - #1
AGZ140D
PUM P
5.0
7.5
10.0
15.0
20.0
10.0
15.0
AGZ130D
PUM P
3.0
5.0
7.5
10.0
15.0
M odel Voltage
Pum p
AGZ125D
PUM P
3.0
5.0
7.5
Lug Range
Ratings
Table 18: Electrical Data - Single Point (Continued)
Note: Power block and disconnect switch sizes are minimums. Larger sizes may be used, however the lug range must be the same.
36 IM 1110-1
Page 37

Table 19: Electrical Data - Single Point (Continued)
HP FLA
MCA RFS MFS
Pow er Block (1) Disconnect Sw itch (1)
208V 16.7 738 800 800
(4) 500 - #6 (4) 500 - 3/0
230V 15.2 736 800 800
(4) 500 - #6 (4) 500 - 3/0
460V 7.6 355 400 400
(2) 500 - #6 (1) 600 - #1 & (2) 250 - #1
575V 6.1 301 350 350
(1) 600 - #2 (1) 600 - #1 & (2) 250 - #1
208V 24.2 745 800 800
(4) 500 - #6 (4) 500 - 3/0
230V 22.0 743 800 800
(4) 500 - #6 (4) 500 - 3/0
460V 11.0 358 400 400
(2) 500 - #6 (1) 600 - #1 & (2) 250 - #1
575V 9.0 304 350 350
(1) 600 - #2 (1) 600 - #1 & (2) 250 - #1
208V 30.8 752 800 800
(4) 500 - #6 (4) 500 - 3/0
230V 28.0 749 800 800
(4) 500 - #6 (4) 500 - 3/0
460V 14.0 361 400 400
(2) 500 - #6 (1) 600 - #1 & (2) 250 - #1
575V 11.0 306 350 350
(1) 600 - #2 (1) 600 - #1 & (2) 250 - #1
208V 46.2 767 800 800
(4) 500 - #6 (4) 500 - 3/0
230V 42.0 763 800 800
(4) 500 - #6 (4) 500 - 3/0
460V 21.0 368 400 400
(2) 500 - #6 (2) 500 - 3/0
575V 17.0 312 350 350
(1) 600 - #2 (1) 600 - #1 & (2) 250 - #1
208V 59.4 781 800 800
(4) 500 - #6 (4) 500 - 3/0
230V 54.0 775 800 800
(4) 500 - #6 (4) 500 - 3/0
460V 27.0 374 400 400
(2) 500 - #6 (2) 500 - 3/0
575V 22.0 317 350 350
(1) 600 - #2 (1) 600 - #1 & (2) 250 - #1
208V 16.7 892 1000 1000
(4) 500 - #6 (4) 500 - 3/0
230V 15.2 816 800 800
(4) 500 - #6 (4) 500 - 3/0
460V 7.6 402 450 450
(2) 500 - #4 (2) 500 - 3/0
575V 6.1 345 350 350
(2) 500 - #6 (1) 600 - #1 & (2) 250 - #1
208V 24.2 900 1000 1000
(4) 500 - #6 (4) 500 - 3/0
230V 22.0 822 800 800
(4) 500 - #6 (4) 500 - 3/0
460V 11.0 405 450 450
(2) 500 - #6 (2) 500 - 3/0
575V 9.0 348 350 350
(2) 500 - #6 (1) 600 - #1 & (2) 250 - #1
208V 30.8 906 1000 1000
(4) 500 - #6 (4) 500 - 3/0
230V 28.0 828 800 800
(4) 500 - #6 (4) 500 - 3/0
460V 14.0 408 450 450
(2) 500 - #6 (2) 500 - 3/0
575V 11.0 350 350 350
(2) 500 - #6 (1) 600 - #1 & (2) 250 - #1
208V 46.2 922 1000 1000
(4) 500 - #6 (4) 500 - 3/0
230V 42.0 842 800 800
(4) 500 - #6 (4) 500 - 3/0
460V 21.0 415 450 450
(2) 500 - #6 (2) 500 - 3/0
575V 17.0 356 400 400
(2) 500 - #6 (1) 600 - #1 & (2) 250 - #1
208V 59.4 935 1000 1000
(4) 500 - #6 (4) 500 - 3/0
230V 54.0 854 800 800
(4) 500 - #6 (4) 500 - 3/0
460V 27.0 421 450 450
(2) 500 - #6 (2) 500 - 3/0
575V 22.0 361 400 400
(2) 500 - #6 (2) 500 - 3/0
208V 16.7 908 1000 1000
(4) 500 - #6 (4) 500 - 3/0
230V 15.2 831 800 800
(4) 500 - #6 (4) 500 - 3/0
460V 7.6 409 450 450
(2) 500 - #6 (2) 500 - 3/0
575V 6.1 351 350 350
(2) 500 - #6 (1) 600 - #1 & (2) 250 - #1
208V 24.2 915 1000 1000
(4) 500 - #6 (4) 500 - 3/0
230V 22.0 838 800 800
(4) 500 - #6 (4) 500 - 3/0
460V 11.0 412 450 450
(2) 500 - #6 (2) 500 - 3/0
575V 9.0 354 350 350
(2) 500 - #6 (1) 600 - #1 & (2) 250 - #1
208V 30.8 922 1000 1000
(4) 500 - #6 (4) 500 - 3/0
230V 28.0 844 800 800
(4) 500 - #6 (4) 500 - 3/0
460V 14.0 415 450 450
(2) 500 - #6 (2) 500 - 3/0
575V 11.0 356 350 350
(2) 500 - #6 (1) 600 - #1 & (2) 250 - #1
208V 46.2 937 1000 1000
(4) 500 - #6 (4) 500 - 3/0
230V 42.0 858 800 800
(4) 500 - #6 (4) 500 - 3/0
460V 21.0 422 450 450
(2) 500 - #6 (2) 500 - 3/0
575V 17.0 362 350 350
(2) 500 - #6 (2) 500 - 3/0
208V 59.4 950 1000 1000
(4) 500 - #6 (4) 500 - 3/0
230V 54.0 870 800 800
(4) 500 - #6 (4) 500 - 3/0
460V 27.0 428 450 450
(2) 500 - #6 (2) 500 - 3/0
575V 22.0 367 350 350
(2) 500 - #6 (2) 500 - 3/0
AGZ190D
PUM P
5.0
7.5
10.0
15.0
20.0
AGZ180D
PUM P
5.0
7.5
10.0
15.0
20.0
AGZ160D
PUM P
5.0
7.5
10.0
15.0
20.0
M odel Voltage
Pum p
Lug Range
Ratings
Electrical Information
Note: Power block and disconnect switch sizes are minimums. Larger sizes may be used, however the lug range must be the same.
IM 1110-1 37
Page 38

Electrical Information
HP FLA MCA RFS MFS Power Block (1) Disconnect Switch [1] MCA RFS MFS Power Block ( 1) Disconnect Switch [1]
208V 4.6 83 110 110 ( 1) 2/0 - #14 ( 1) 1/0 - #14 78 100 100 (1) 2/ 0 - #14 ( 1) 1/0 - #14
230V 4.2 83 110 110 ( 1) 2/0 - #14 ( 1) 1/0 - #14 78 100 100 (1) 2/ 0 - #14 ( 1) 1/0 - #14
460V 2.1 41 50 50 (1) 2/0 - #14 ( 1) 1/0 - #14 39 50 50 (1) 2/0 - #14 (1) 1/0 - #14
575V 1.7 36 45 45
34 45 45
208V 6.6 85 110 110 ( 1) 2/0 - #14 ( 1) 1/0 - #14 78 100 100 (1) 2/ 0 - #14 ( 1) 1/0 - #14
230V 6.0 84 110 110 ( 1) 2/0 - #14 ( 1) 1/0 - #14 78 100 100 (1) 2/ 0 - #14 ( 1) 1/0 - #14
460V 3.0 42 50 50 (1) 2/0 - #14 ( 1) 1/0 - #14 39 50 50 (1) 2/0 - #14 (1) 1/0 - #14
575V 2.4 36 45 45
34 45 45
208V 7.5 86 110 110 ( 1) 2/0 - #14 ( 1) 1/0 - #14 78 100 100 (1) 2/ 0 - #14 ( 1) 1/0 - #14
230V 6.8 85 110 110 ( 1) 2/0 - #14 ( 1) 1/0 - #14 78 100 100 (1) 2/ 0 - #14 ( 1) 1/0 - #14
460V 3.4 43 50 50 (1) 2/0 - #14 ( 1) 1/0 - #14 39 50 50 (1) 2/0 - #14 (1) 1/0 - #14
575V 2.7 37 45 45
34 45 45
208V 10.6 89 110 110 ( 1) 2/0 - #14 (1) 1/0 - #14 78 100 100 (1) 2/0 - #14 (1) 1/ 0 - #14
230V 9.6 88 110 110 ( 1) 2/0 - #14 ( 1) 1/0 - #14 78 100 100 (1) 2/ 0 - #14 ( 1) 1/0 - #14
460V 4.8 44 50 50 (1) 2/0 - #14 ( 1) 1/0 - #14 39 50 50 (1) 2/0 - #14 (1) 1/0 - #14
575V 3.9 38 45 45
34 45 45
208V 16.7 95 110 110 ( 1) 2/0 - #14 (1) 3/0 - #14 78 100 100 (1) 2/0 - #14 (1) 1/ 0 - #14
230V 15.2 94 110 110 ( 1) 2/0 - #14 (1) 1/0 - #14 78 100 100 (1) 2/0 - #14 (1) 1/ 0 - #14
460V 7.6 47 60 60 (1) 2/0 - #14 ( 1) 1/0 - #14 39 50 50 (1) 2/0 - #14 (1) 1/0 - #14
575V 6.1 40 50 50
34 45 45
208V 4.6 88 110 110 ( 1) 2/0 - #14 ( 1) 1/0 - #14 83 110 110.3 (1) 2/ 0 - #14 (1) 1/0 - #14
230V 4.2 84 110 110 ( 1) 2/0 - #14 ( 1) 1/0 - #14 80 100 100.3 (1) 2/ 0 - #14 (1) 1/0 - #14
460V 2.1 46 60 60 (1) 2/0 - #14 ( 1) 1/0 - #14 44 60 60. 3 ( 1) 2/0 - #14 (1) 1/0 - #14
575V 1.7 37 50 50
36 45 45.3
208V 6.6 90 110 110 ( 1) 2/0 - #14 ( 1) 1/0 - #14 83 110 110.3 (1) 2/ 0 - #14 (1) 1/0 - #14
230V 6.0 86 110 110 ( 1) 2/0 - #14 ( 1) 1/0 - #14 80 100 100.3 (1) 2/ 0 - #14 (1) 1/0 - #14
460V 3.0 47 60 60 (1) 2/0 - #14 ( 1) 1/0 - #14 44 60 60. 3 ( 1) 2/0 - #14 (1) 1/0 - #14
575V 2.4 38 50 50
36 45 45.3
208V 7.5 91 110 110 ( 1) 2/0 - #14 ( 1) 1/0 - #14 83 110 110.3 (1) 2/ 0 - #14 (1) 1/0 - #14
230V 6.8 87 110 110 ( 1) 2/0 - #14 ( 1) 1/0 - #14 80 100 100.3 (1) 2/ 0 - #14 (1) 1/0 - #14
460V 3.4 47 60 60 (1) 2/0 - #14 ( 1) 1/0 - #14 44 60 60. 3 ( 1) 2/0 - #14 (1) 1/0 - #14
575V 2.7 38 50 50
36 45 45.3
208V 10.6 94 125 125 ( 1) 2/0 - #14 (1) 1/0 - #14 83 110 110.3 (1) 2/ 0 - #14 ( 1) 1/0 - #14
230V 9.6 89 110 110 ( 1) 2/0 - #14 ( 1) 1/0 - #14 80 100 100.3 (1) 2/ 0 - #14 (1) 1/0 - #14
460V 4.8 48 60 60 (1) 2/0 - #14 ( 1) 1/0 - #14 44 60 60. 3 ( 1) 2/0 - #14 (1) 1/0 - #14
575V 3.9 40 50 50
36 45 45.3
208V 16.7 100 125 125 (1) 2/0 - #14 ( 1) 3/0 - #14 83 110 110.3 (1) 2/0 - #14 (1) 1/0 - #14
230V 15.2 95 110 110 ( 1) 2/0 - #14 (1) 3/0 - #14 80 100 100.3 (1) 2/ 0 - #14 ( 1) 1/0 - #14
460V 7.6 51 60 60 (1) 2/0 - #14 ( 1) 1/0 - #14 44 60 60. 3 ( 1) 2/0 - #14 (1) 1/0 - #14
575V 6.1 42 50 50
36 45 45.3
208V 6.6 90 110 110 ( 1) 2/0 - #14 ( 1) 1/0 - #14 94 125 125 (1) 2/ 0 - #14 ( 1) 1/0 - #14
230V 6.0 86 110 110 ( 1) 2/0 - #14 ( 1) 1/0 - #14 93 125 125 (1) 2/ 0 - #14 ( 1) 1/0 - #14
460V 3.0 47 60 60 (1) 2/0 - #14 ( 1) 1/0 - #14 46 60 60 (1) 2/0 - #14 (1) 1/0 - #14
575V 2.4 38 50 50
36 45 45
208V 7.5 91 110 110 ( 1) 2/0 - #14 ( 1) 1/0 - #14 94 125 125 (1) 2/ 0 - #14 ( 1) 1/0 - #14
230V 6.8 87 110 110 ( 1) 2/0 - #14 ( 1) 1/0 - #14 93 125 125 (1) 2/ 0 - #14 ( 1) 1/0 - #14
460V 3.4 47 60 60 (1) 2/0 - #14 ( 1) 1/0 - #14 46 60 60 (1) 2/0 - #14 (1) 1/0 - #14
575V 2.7 38 50 50
36 45 45
208V 10.6 94 125 125 ( 1) 2/0 - #14 (1) 1/0 - #14 94 125 125 (1) 2/0 - #14 (1) 1/ 0 - #14
230V 9.6 89 110 110 ( 1) 2/0 - #14 ( 1) 1/0 - #14 93 125 125 (1) 2/ 0 - #14 ( 1) 1/0 - #14
460V 4.8 48 60 60 (1) 2/0 - #14 ( 1) 1/0 - #14 46 60 60 (1) 2/0 - #14 (1) 1/0 - #14
575V 3.9 40 50 50
36 45 45
208V 16.7 100 125 125 (1) 2/0 - #14 ( 1) 3/0 - #14 94 125 125 (1) 2/ 0 - #14 ( 1) 1/0 - #14
230V 15.2 95 110 110 ( 1) 2/0 - #14 (1) 3/0 - #14 93 125 125 (1) 2/0 - #14 (1) 1/ 0 - #14
460V 7.6 51 60 60 (1) 2/0 - #14 ( 1) 1/0 - #14 46 60 60 (1) 2/0 - #14 (1) 1/0 - #14
575V 6.1 42 50 50
36 45 45
208V 24.2 107 125 125 (1) 2/0 - #14 ( 1) 3/0 - #14 94 125 125 (1) 2/ 0 - #14 ( 1) 1/0 - #14
230V 22.0 102 125 125 (1) 2/0 - #14 ( 1) 3/0 - #14 93 125 125 (1) 2/ 0 - #14 ( 1) 1/0 - #14
460V 11.0 55 70 70 (1) 2/0 - #14 (1) 1/0 - #14 46 60 60 (1) 2/0 - #14 (1) 1/0 - #14
575V 9.0 45 50 50
36 45 45
1.0
1.5
2.0
3.0
1.5
Model Voltage
Pum p
2.0
3.0
5.0
5.0
AGZ025D
PUMP
AGZ030D
PUMP
1.0
Multiple Point Field Data - Circuit #1
Multiple Point Field Data - Circuit #2
Ratings
Ratings
AGZ035D
PUMP
1.5
2.0
3.0
5.0
7.5
Table 20: Electrical Data - Multi-Point
Note: Power block and disconnect switch sizes are minimums. Larger sizes may be used, however the lug range must be the same.
38 IM 1110-1
Lug Range
(1) 2/0 - #14 (1) 1/0 - #14
(1) 2/0 - #14 (1) 1/0 - #14
(1) 2/0 - #14 (1) 1/0 - #14
(1) 2/0 - #14 (1) 1/0 - #14
(1) 2/0 - #14 (1) 1/0 - #14
(1) 2/0 - #14 (1) 1/0 - #14
(1) 2/0 - #14 (1) 1/0 - #14
(1) 2/0 - #14 (1) 1/0 - #14
(1) 2/0 - #14 (1) 1/0 - #14
(1) 2/0 - #14 (1) 1/0 - #14
(1) 2/0 - #14 (1) 1/0 - #14
(1) 2/0 - #14 (1) 1/0 - #14
(1) 2/0 - #14 (1) 1/0 - #14
(1) 2/0 - #14 (1) 1/0 - #14
(1) 2/0 - #14 (1) 1/0 - #14
(1) 2/0 - #14 (1) 1/0 - #14
(1) 2/0 - #14 (1) 1/0 - #14
(1) 2/0 - #14 (1) 1/0 - #14
(1) 2/0 - #14 (1) 1/0 - #14
(1) 2/0 - #14 (1) 1/0 - #14
(1) 2/0 - #14 (1) 1/0 - #14
(1) 2/0 - #14 (1) 1/0 - #14
(1) 2/0 - #14 (1) 1/0 - #14
(1) 2/0 - #14 (1) 1/0 - #14
(1) 2/0 - #14 (1) 1/0 - #14
(1) 2/0 - #14 (1) 1/0 - #14
(1) 2/0 - #14 (1) 1/0 - #14
(1) 2/0 - #14 (1) 1/0 - #14
(1) 2/0 - #14 (1) 1/0 - #14
(1) 2/0 - #14 (1) 1/0 - #14
Lug Range
Page 39

Table 21: Electrical Data - Multi-Point (Continued)
HP FL A MC A RFS M FS Po we r Bl oc k ( 1) Di s co n n ect Sw it ch [ 1] M CA RFS MFS Po w e r Bl oc k ( 1 ) Di s c o nn ec t Sw i tc h [ 1]
208V 6.6 100 125 125 (1) 2/0 - #14 (1) 3/0 - #14 94 125 125 (1) 2/0 - #14 ( 1) 1/0 - #14
230V 6.0 99 125 125 (1) 2/0 - #14 (1) 3/0 - #14 93 125 125 (1) 2/0 - #14 ( 1) 1/0 - #14
460V 3.0 49 60 60
46 60 60
575V 2.4 38 50 50
36 45 45
208V 7.5 101 125 125 (1) 2/0 - #14 (1) 3/0 - #14 94 125 125 (1) 2/0 - #14 ( 1) 1/0 - #14
230V 6.8 100 125 125 (1) 2/0 - #14 (1) 3/0 - #14 93 125 125 (1) 2/0 - #14 ( 1) 1/0 - #14
460V 3.4 50 60 60
46 60 60
575V 2.7 38 50 50
36 45 45
208V 10.6 104 125 125 (1) 2/0 - #14 (1) 3/0 - #14 94 125 125 (1) 2/0 - #14 ( 1) 1/0 - #14
230V 9.6 103 125 125 (1) 2/0 - #14 (1) 3/0 - #14 93 125 125 (1) 2/0 - #14 ( 1) 1/0 - #14
460V 4.8 51 60 60
46 60 60
575V 3.9 40 50 50
36 45 45
208V 16.7 110 125 125 (1) 2/0 - #14 (1) 3/0 - #14 94 125 125 (1) 2/0 - #14 ( 1) 1/0 - #14
230V 15.2 108 125 125 (1) 2/0 - #14 (1) 3/0 - #14 93 125 125 (1) 2/0 - #14 ( 1) 1/0 - #14
460V 7.6 54 70 70
46 60 60
575V 6.1 42 50 50
36 45 45
208V 24.2 118 150 150 (1) 2/0 - #14 (1) 3/0 - #14 94 125 125 (1) 2/0 - #14 ( 1) 1/0 - #14
230V 22.0 115 150 150 (1) 2/0 - #14 (1) 3/0 - #14 93 125 125 (1) 2/0 - #14 ( 1) 1/0 - #14
460V 11. 0 57 70 70
46 60 60
575V 9.0 45 50 50
36 45 45
208V 6.6 127 150 150 (1) 2/0 - #14 (1) 3/0 - #14 120 150 150 ( 1) 2/0 - #14 (1) 3/0 - #14
230V 6.0 126 150 150 (1) 2/0 - #14 (1) 3/0 - #14 120 150 150 ( 1) 2/0 - #14 (1) 3/0 - #14
460V 3.0 52 70 70
49 60 60
575V 2.4 43 50 50
40 50 50
208V 7.5 128 175 175 (1) 2/0 - #14 (1) 3/0 - #14 120 150 150 ( 1) 2/0 - #14 (1) 3/0 - #14
230V 6.8 127 150 150 (1) 2/0 - #14 (1) 3/0 - #14 120 150 150 ( 1) 2/0 - #14 (1) 3/0 - #14
460V 3.4 52 70 70
49 60 60
575V 2.7 43 50 50
40 50 50
208V 10.6 131 175 175 (1) 2/0 - #14 (1) 3/0 - #14 120 150 150 ( 1) 2/0 - #14 ( 1) 3/0 - #14
230V 9.6 130 175 175 (1) 2/0 - #14 (1) 3/0 - #14 120 150 150 ( 1) 2/0 - #14 (1) 3/0 - #14
460V 4.8 53 70 70
49 60 60
575V 3.9 44 50 50
40 50 50
208V 16.7 137 175 175 (1) 2/0 - #14 (1) 3/0 - #14 120 150 150 ( 1) 2/0 - #14 ( 1) 3/0 - #14
230V 15.2 135 175 175 (1) 2/0 - #14 (1) 3/0 - #14 120 150 150 ( 1) 2/0 - #14 ( 1) 3/0 - #14
460V 7.6 56 70 70
49 60 60
575V 6.1 47 60 60
40 50 50
208V 24.2 144 175 175 (1) 2/0 - #14 (2) 300 - 1/0 120 150 150 (1) 2/ 0 - #14 ( 1) 3/0 - #14
230V 22.0 142 175 175 (1) 2/0 - #14 (1) 3/0 - #14 120 150 150 ( 1) 2/0 - #14 ( 1) 3/0 - #14
460V 11. 0 60 70 70
49 60 60
575V 9.0 49 60 60
40 50 50
208V 6.6 137 175 175 (1) 2/0 - #14 (1) 3/0 - #14 131 175 175 ( 1) 2/0 - #14 (1) 3/0 - #14
230V 6.0 137 175 175 (1) 2/0 - #14 (1) 3/0 - #14 131 175 175 ( 1) 2/0 - #14 (1) 3/0 - #14
460V 3.0 61 80 80
58 80 80
575V 2.4 54 70 70
51 70 70
208V 7.5 138 175 175 (1) 2/0 - #14 (1) 3/0 - #14 131 175 175 ( 1) 2/0 - #14 (1) 3/0 - #14
230V 6.8 138 175 175 (1) 2/0 - #14 (1) 3/0 - #14 131 175 175 ( 1) 2/0 - #14 (1) 3/0 - #14
460V 3.4 61 80 80
58 80 80
575V 2.7 54 70 70
51 70 70
208V 10.6 141 175 175 (1) 2/0 - #14 (1) 3/0 - #14 131 175 175 ( 1) 2/0 - #14 ( 1) 3/0 - #14
230V 9.6 140 175 175 (1) 2/0 - #14 (1) 3/0 - #14 131 175 175 ( 1) 2/0 - #14 (1) 3/0 - #14
460V 4.8 63 80 80
58 80 80
575V 3.9 55 70 70
51 70 70
208V 16.7 148 200 200 (1) 2/0 - #14 (2) 300 - 1/0 131 175 175 (1) 2/ 0 - #14 ( 1) 3/0 - #14
230V 15.2 146 175 175 (1) 2/0 - #14 (2) 300 - 1/0 131 175 175 (1) 2/ 0 - #14 ( 1) 3/0 - #14
460V 7.6 66 80 80
58 80 80
575V 6.1 57 70 70
51 70 70
208V 24.2 155 200 200 (1) 2/0 - #14 (2) 300 - 1/0 131 175 175 (1) 2/ 0 - #14 ( 1) 3/0 - #14
230V 22.0 153 200 200 (1) 2/0 - #14 (2) 300 - 1/0 131 175 175 (1) 2/ 0 - #14 ( 1) 3/0 - #14
460V 11. 0 69 90 90
58 80 80
575V 9.0 60 70 70
51 70 70
Ratings
Multiple Point Field Data - Circuit #1 Multiple Point Field Data - Circuit #2
Ratings
AGZ040D
PUMP
1.5
2.0
3.0
5.0
7.5
5.0
7.5
AGZ045D
PUMP
1.5
2.0
3.0
5.0
7.5
Model Voltage
Pum p
AGZ050D
PUMP
1.5
2.0
3.0
Electrical Information
Lug Range
(1) 2/0 - #14 (1) 1/0 - #14
(1) 2/0 - #14 (1) 1/0 - #14
Note: Power block and disconnect switch sizes are minimums. Larger sizes may be used, however the lug range must be the same.
(1) 2/0 - #14 (1) 1/0 - #14
(1) 2/0 - #14 (1) 1/0 - #14
(1) 2/0 - #14 (1) 1/0 - #14
(1) 2/0 - #14 (1) 1/0 - #14
(1) 2/0 - #14 (1) 1/0 - #14
(1) 2/0 - #14 (1) 1/0 - #14
(1) 2/0 - #14 (1) 1/0 - #14
(1) 2/0 - #14 (1) 1/0 - #14
(1) 2/0 - #14 (1) 1/0 - #14
(1) 2/0 - #14 (1) 1/0 - #14
(1) 2/0 - #14 (1) 1/0 - #14
(1) 2/0 - #14 (1) 1/0 - #14
(1) 2/0 - #14 (1) 1/0 - #14
(1) 2/0 - #14 (1) 1/0 - #14
(1) 2/0 - #14 (1) 1/0 - #14
(1) 2/0 - #14 (1) 1/0 - #14
(1) 2/0 - #14 (1) 1/0 - #14
(1) 2/0 - #14 (1) 1/0 - #14
(1) 2/0 - #14 (1) 1/0 - #14
(1) 2/0 - #14 (1) 1/0 - #14
(1) 2/0 - #14 (1) 1/0 - #14
(1) 2/0 - #14 (1) 1/0 - #14
(1) 2/0 - #14 (1) 1/0 - #14
(1) 2/0 - #14 (1) 1/0 - #14
(1) 2/0 - #14 (1) 1/0 - #14
(1) 2/0 - #14 (1) 1/0 - #14
(1) 2/0 - #14 (1) 1/0 - #14
(1) 2/0 - #14 (1) 1/0 - #14
(1) 2/0 - #14 (1) 1/0 - #14
(1) 2/0 - #14 (1) 1/0 - #14
(1) 2/0 - #14 (1) 1/0 - #14
(1) 2/0 - #14 (1) 1/0 - #14
(1) 2/0 - #14 (1) 1/0 - #14
(1) 2/0 - #14 (1) 1/0 - #14
(1) 2/0 - #14 (1) 1/0 - #14
(1) 2/0 - #14 (1) 1/0 - #14
(1) 2/0 - #14 (1) 1/0 - #14
(1) 2/0 - #14 (1) 1/0 - #14
(1) 2/0 - #14 (1) 1/0 - #14
(1) 2/0 - #14 (1) 1/0 - #14
(1) 2/0 - #14 (1) 1/0 - #14
(1) 2/0 - #14 (1) 1/0 - #14
(1) 2/0 - #14 (1) 1/0 - #14
(1) 2/0 - #14 (1) 1/0 - #14
(1) 2/0 - #14 (1) 1/0 - #14
(1) 2/0 - #14 (1) 1/0 - #14
(1) 2/0 - #14 (1) 1/0 - #14
(1) 2/0 - #14 (1) 1/0 - #14
(1) 2/0 - #14 (1) 1/0 - #14
(1) 2/0 - #14 (1) 1/0 - #14
(1) 2/0 - #14 (1) 1/0 - #14
(1) 2/0 - #14 (1) 1/0 - #14
(1) 2/0 - #14 (1) 1/0 - #14
(1) 2/0 - #14 (1) 1/0 - #14
(1) 2/0 - #14 (1) 1/0 - #14
(1) 2/0 - #14 (1) 1/0 - #14
(1) 2/0 - #14 (1) 1/0 - #14
(1) 2/0 - #14 (1) 1/0 - #14
Lug Range
IM 1110-1 39
Page 40

Electrical Information
HP FL A MC A RFS M FS Po we r Bl oc k ( 1) Di s co n n ect Sw it ch [ 1] M CA RFS MFS Po w e r Bl oc k ( 1 ) Di s c o nn ec t Sw i tc h [ 1]
208V 6.6 137 175 175 (1) 2/0 - #14 (1) 3/0 - #14 139 175 175 ( 1) 2/0 - #14 (1) 3/0 - #14
230V 6.0 137 175 175
138 175 175
460V 3.0 61 80 80 (1) 2/0 - #14 ( 1) 1/0 - #14 67 90 90 ( 1) 2/0 - #14 (1) 1/0 - #14
575V 2.4 54 70 70
60 80 80
208V 7.5 138 175 175 (1) 2/0 - #14 (1) 3/0 - #14 139 175 175 ( 1) 2/0 - #14 (1) 3/0 - #14
230V 6.8 138 175 175
138 175 175
460V 3.4 61 80 80 (1) 2/0 - #14 ( 1) 1/0 - #14 67 90 90 ( 1) 2/0 - #14 (1) 1/0 - #14
575V 2.7 54 70 70
60 80 80
208V 10.6 141 175 175 (1) 2/0 - #14 (1) 3/0 - #14 139 175 175 ( 1) 2/0 - #14 ( 1) 3/0 - #14
230V 9.6 140 175 175
138 175 175
460V 4.8 63 80 80 (1) 2/0 - #14 ( 1) 1/0 - #14 67 90 90 ( 1) 2/0 - #14 (1) 1/0 - #14
575V 3.9 55 70 70
60 80 80
208V 16.7 148 200 200 (1) 2/0 - #14 (2) 300 - 1/0 139 175 175 (1) 2/ 0 - #14 ( 1) 3/0 - #14
230V 15. 2 146 175 175
138 175 175
460V 7.6 66 80 80 (1) 2/0 - #14 ( 1) 1/0 - #14 67 90 90 ( 1) 2/0 - #14 (1) 1/0 - #14
575V 6.1 57 70 70
60 80 80
208V 24.2 155 200 200 (1) 2/0 - #14 (2) 300 - 1/0 139 175 175 (1) 2/ 0 - #14 ( 1) 3/0 - #14
230V 22. 0 153 200 200
138 175 175
460V 11.0 69 90 90 ( 1) 2/0 - #14 ( 1) 1/0 - #14 67 90 90 ( 1) 2/0 - #14 (1) 1/0 - #14
575V 9.0 60 70 70
60 80 80
208V 7.5 147 200 200 (1) 2/0 - #14 (2) 300 - 1/0 139 175 175 (1) 2/ 0 - #14 ( 1) 3/0 - #14
230V 6.8 144 175 175
138 175 175
460V 3.4 70 90 90 (1) 2/0 - #14 ( 1) 1/0 - #14 67 90 90 ( 1) 2/0 - #14 (1) 1/0 - #14
575V 2.7 62 80 80
60 80 80
208V 10.6 150 200 200 (1) 2/0 - #14 (2) 300 - 1/0 139 175 175 (1) 2/ 0 - #14 ( 1) 3/0 - #14
230V 9.6 147 200 200
138 175 175
460V 4.8 71 90 90 (1) 2/0 - #14 ( 1) 1/0 - #14 67 90 90 ( 1) 2/0 - #14 (1) 1/0 - #14
575V 3.9 64 80 80
60 80 80
208V 16.7 156 200 200 (1) 2/0 - #14 (2) 300 - 1/0 139 175 175 (1) 2/ 0 - #14 ( 1) 3/0 - #14
230V 15. 2 153 200 200
138 175 175
460V 7.6 74 100 100 (1) 2/0 - #14 (1) 1/0 - #14 67 90 90 ( 1) 2/0 - #14 ( 1) 1/0 - #14
575V 6.1 66 80 80
60 80 80
208V 24.2 164 200 200 (1) 2/0 - #14 (2) 300 - 1/0 139 175 175 (1) 2/ 0 - #14 ( 1) 3/0 - #14
230V 22. 0 160 200 200
138 175 175
460V 11.0 78 100 100 (1) 2/0 - #14 ( 1) 1/0 - #14 67 90 90 ( 1) 2/0 - #14 (1) 1/0 - #14
575V 9.0 69 90 90
60 80 80
208V 30.8 170 225 225 ( 1) 600 - #2 (2) 300 - 1/ 0 139 175 175 (1) 2/0 - #14 (1) 3/0 - #14
230V 28. 0 166 200 200
138 175 175
460V 14.0 81 100 100 (1) 2/0 - #14 ( 1) 1/0 - #14 67 90 90 ( 1) 2/0 - #14 (1) 1/0 - #14
575V 11. 0 71 90 90
60 80 80
208V 7.5 151 200 200 (1) 2/0 - #14 (2) 300 - 1/0 143 175 175 (1) 2/ 0 - #14 ( 1) 3/0 - #14
230V 6.8 148 200 200
142 175 175
460V 3.4 72 90 90 (1) 2/0 - #14 ( 1) 1/0 - #14 68 90 90 ( 1) 2/0 - #14 (1) 1/0 - #14
575V 2.7 62 80 80
60 80 80
208V 10.6 154 200 200 (1) 2/0 - #14 (2) 300 - 1/0 143 175 175 (1) 2/ 0 - #14 ( 1) 3/0 - #14
230V 9.6 151 200 200
142 175 175
460V 4.8 73 90 90 (1) 2/0 - #14 ( 1) 1/0 - #14 68 90 90 ( 1) 2/0 - #14 (1) 1/0 - #14
575V 3.9 64 80 80
60 80 80
208V 16.7 160 200 200 (1) 2/0 - #14 (2) 300 - 1/0 143 175 175 (1) 2/ 0 - #14 ( 1) 3/0 - #14
230V 15. 2 157 200 200
142 175 175
460V 7.6 76 100 100 (1) 2/0 - #14 (1) 1/0 - #14 68 90 90 ( 1) 2/0 - #14 ( 1) 1/0 - #14
575V 6.1 66 80 80
60 80 80
208V 24.2 168 200 200 (1) 2/0 - #14 (2) 300 - 1/0 143 175 175 (1) 2/ 0 - #14 ( 1) 3/0 - #14
230V 22. 0 164 200 200
142 175 175
460V 11.0 79 100 100 (1) 2/0 - #14 ( 1) 1/0 - #14 68 90 90 ( 1) 2/0 - #14 (1) 1/0 - #14
575V 9.0 69 90 90
60 80 80
208V 30.8 174 225 225 ( 1) 600 - #2 (2) 300 - 1/ 0 143 175 175 (1) 2/0 - #14 (1) 3/0 - #14
230V 28. 0 170 225 225
142 175 175
460V 14.0 82 100 100 (1) 2/0 - #14 ( 1) 1/0 - #14 68 90 90 ( 1) 2/0 - #14 (1) 1/0 - #14
575V 11. 0 71 90 90
60 80 80
AGZ055D
PUMP
1.5
2.0
3.0
5.0
7.5
AGZ060D
PUMP
2.0
3.0
5.0
7.5
10.0
AGZ065D
PUMP
2.0
3.0
5.0
7.5
10.0
Model Voltage
Pum p
Multiple Point Field Data - Circuit #1 Multiple Point Field Data - Circuit #2
Ratings
Ratings
Table 22: Electrical Data - Multi-Point (Continued)
Note: Power block and disconnect switch sizes are minimums. Larger sizes may be used, however the lug range must be the same.
40 IM 1110-1
Lug Range
(1) 2/0 - #14 (1) 3/0 - #14
(1) 2/0 - #14 (1) 1/0 - #14
(1) 2/0 - #14 (1) 3/0 - #14
(1) 2/0 - #14 (1) 1/0 - #14
(1) 2/0 - #14 (1) 3/0 - #14
(1) 2/0 - #14 (1) 1/0 - #14
(1) 2/0 - #14 (2) 300 - 1/0
(1) 2/0 - #14 (1) 1/0 - #14
(1) 2/0 - #14 (2) 300 - 1/0
(1) 2/0 - #14 (1) 1/0 - #14
(1) 2/0 - #14 (1) 3/0 - #14
(1) 2/0 - #14 (1) 1/0 - #14
(1) 2/0 - #14 (2) 300 - 1/0
(1) 2/0 - #14 (1) 1/0 - #14
(1) 2/0 - #14 (2) 300 - 1/0
(1) 2/0 - #14 (1) 1/0 - #14
(1) 2/0 - #14 (2) 300 - 1/0
(1) 2/0 - #14 (1) 1/0 - #14
(1) 2/0 - #14 (2) 300 - 1/0
(1) 2/0 - #14 (1) 1/0 - #14
(1) 2/0 - #14 (2) 300 - 1/0
(1) 2/0 - #14 (1) 1/0 - #14
(1) 2/0 - #14 (2) 300 - 1/0
(1) 2/0 - #14 (1) 1/0 - #14
(1) 2/0 - #14 (2) 300 - 1/0
(1) 2/0 - #14 (1) 1/0 - #14
(1) 2/0 - #14 (2) 300 - 1/0
(1) 2/0 - #14 (1) 1/0 - #14
(1) 600 - #2 (2) 300 - 1/0
(1) 2/0 - #14 (1) 1/0 - #14
(1) 2/0 - #14 (1) 3/0 - #14
(1) 2/0 - #14 (1) 1/0 - #14
(1) 2/0 - #14 (1) 3/0 - #14
(1) 2/0 - #14 (1) 1/0 - #14
(1) 2/0 - #14 (1) 3/0 - #14
(1) 2/0 - #14 (1) 1/0 - #14
(1) 2/0 - #14 (1) 3/0 - #14
(1) 2/0 - #14 (1) 1/0 - #14
(1) 2/0 - #14 (1) 3/0 - #14
(1) 2/0 - #14 (1) 1/0 - #14
(1) 2/0 - #14 (1) 3/0 - #14
(1) 2/0 - #14 (1) 1/0 - #14
(1) 2/0 - #14 (1) 3/0 - #14
(1) 2/0 - #14 (1) 1/0 - #14
(1) 2/0 - #14 (1) 3/0 - #14
(1) 2/0 - #14 (1) 1/0 - #14
(1) 2/0 - #14 (1) 3/0 - #14
(1) 2/0 - #14 (1) 1/0 - #14
(1) 2/0 - #14 (1) 3/0 - #14
(1) 2/0 - #14 (1) 1/0 - #14
(1) 2/0 - #14 (1) 3/0 - #14
(1) 2/0 - #14 (1) 1/0 - #14
(1) 2/0 - #14 (1) 3/0 - #14
(1) 2/0 - #14 (1) 1/0 - #14
(1) 2/0 - #14 (1) 3/0 - #14
(1) 2/0 - #14 (1) 1/0 - #14
(1) 2/0 - #14 (1) 3/0 - #14
(1) 2/0 - #14 (1) 1/0 - #14
(1) 2/0 - #14 (1) 3/0 - #14
(1) 2/0 - #14 (1) 1/0 - #14
Lug Range
Page 41

Table 23: Electrical Data - Multi-Point (Continued)
HP FL A MC A RFS M FS Po we r Bl oc k ( 1) Di s co n n ect Sw it ch [ 1] M CA RFS MFS Po w e r Bl oc k ( 1 ) Di s c o nn ec t Sw i tc h [ 1]
208V 7.5 171 225 225
163 225 225
230V 6.8 169 225 225 ( 1) 600 - #2 (2) 300 - 1/ 0 162 225 225 (1) 2/0 - #14 (2) 300 - 1/0
460V 3.4 76 100 100 (1) 2/0 - #14 (1) 1/0 - #14 73 100 100 (1) 2/0 - #14 ( 1) 1/0 - #14
575V 2.7 64 80 80
62 80 80
208V 10. 6 174 225 225
163 225 225
230V 9.6 172 225 225 ( 1) 600 - #2 (2) 300 - 1/ 0 162 225 225 (1) 2/0 - #14 (2) 300 - 1/0
460V 4.8 78 100 100 (1) 2/0 - #14 (1) 1/0 - #14 73 100 100 (1) 2/0 - #14 ( 1) 1/0 - #14
575V 3.9 66 90 90
62 80 80
208V 16. 7 180 250 250
163 225 225
230V 15.2 178 225 225 ( 1) 600 - #2 (2) 300 - 1/ 0 162 225 225 (1) 2/0 - #14 (2) 300 - 1/0
460V 7.6 81 110 110 (1) 2/0 - #14 (1) 1/0 - #14 73 100 100 (1) 2/0 - #14 ( 1) 1/0 - #14
575V 6.1 68 90 90
62 80 80
208V 24. 2 187 250 250
163 225 225
230V 22.0 184 250 250 ( 1) 600 - #2 (2) 300 - 1/ 0 162 225 225 (1) 2/0 - #14 (2) 300 - 1/0
460V 11.0 84 110 110 (1) 2/0 - #14 ( 1) 1/0 - #14 73 100 100 (1) 2/0 - #14 (1) 1/0 - #14
575V 9.0 71 90 90
62 80 80
208V 30. 8 194 250 250
163 225 225
230V 28.0 190 250 250 ( 1) 600 - #2 (2) 300 - 1/ 0 162 225 225 (1) 2/0 - #14 (2) 300 - 1/0
460V 14.0 87 110 110 (1) 2/0 - #14 ( 1) 1/0 - #14 73 100 100 (1) 2/0 - #14 (1) 1/0 - #14
575V 11. 0 73 90 90
62 80 80
208V 10. 6 197 250 250
187 250 250
230V 9.6 196 250 250 ( 1) 600 - #2 (2) 300 - 1/ 0 187 250 250 ( 1) 600 - #2 ( 2) 300 - 1/ 0
460V 4.8 85 110 110 (1) 2/0 - #14 (1) 1/0 - #14 81 110 110 (1) 2/0 - #14 ( 1) 1/0 - #14
575V 3.9 70 90 90
66 90 90
208V 16. 7 203 250 250
187 250 250
230V 15.2 202 250 250 ( 1) 600 - #2 (2) 300 - 1/ 0 187 250 250 ( 1) 600 - #2 (2) 300 - 1/ 0
460V 7.6 88 110 110 (1) 2/0 - #14 (1) 1/0 - #14 81 110 110 (1) 2/0 - #14 ( 1) 1/0 - #14
575V 6.1 72 90 90
66 90 90
208V 24. 2 211 250 250
187 250 250
230V 22.0 209 250 250 ( 1) 600 - #2 (2) 300 - 1/ 0 187 250 250 ( 1) 600 - #2 (2) 300 - 1/ 0
460V 11.0 92 110 110 (1) 2/0 - #14 ( 1) 1/0 - #14 81 110 110 (1) 2/0 - #14 (1) 1/0 - #14
575V 9.0 75 100 100
66 90 90
208V 30. 8 218 250 250
187 250 250
230V 28.0 215 250 250 ( 1) 600 - #2 (2) 300 - 1/ 0 187 250 250 ( 1) 600 - #2 (2) 300 - 1/ 0
460V 14.0 95 125 125 (1) 2/0 - #14 ( 1) 1/0 - #14 81 110 110 (1) 2/0 - #14 (1) 1/0 - #14
575V 11. 0 77 100 100
66 90 90
208V 46. 2 233 300 300
187 250 250
230V 42.0 229 300 300 ( 1) 600 - #2 (2) 300 - 1/ 0 187 250 250 ( 1) 600 - #2 (2) 300 - 1/ 0
460V 21.0 102 125 125 (1) 2/0 - #14 (1) 3/0 - #14 81 110 110 (1) 2/0 - #14 ( 1) 1/0 - #14
575V 17. 0 83 100 100
66 90 90
208V 10. 6 197 250 250
224 300 300
230V 9.6 196 250 250 ( 1) 600 - #2 (2) 300 - 1/ 0 224 300 300 ( 1) 600 - #2 ( 2) 300 - 1/ 0
460V 4.8 85 110 110 (1) 2/0 - #14 (1) 1/0 - #14 99 125 125 (1) 2/0 - #14 ( 1) 3/0 - #14
575V 3.9 70 90 90
88 110 110
208V 16. 7 203 250 250
224 300 300
230V 15.2 202 250 250 ( 1) 600 - #2 (2) 300 - 1/ 0 224 300 300 ( 1) 600 - #2 (2) 300 - 1/ 0
460V 7.6 88 110 110 (1) 2/0 - #14 (1) 1/0 - #14 99 125 125 (1) 2/0 - #14 ( 1) 3/0 - #14
575V 6.1 72 90 90
88 110 110
208V 24. 2 211 250 250
224 300 300
230V 22.0 209 250 250 ( 1) 600 - #2 (2) 300 - 1/ 0 224 300 300 ( 1) 600 - #2 (2) 300 - 1/ 0
460V 11.0 92 110 110 (1) 2/0 - #14 ( 1) 1/0 - #14 99 125 125 (1) 2/0 - #14 (1) 3/0 - #14
575V 9.0 75 100 100
88 110 110
208V 30. 8 218 250 250
224 300 300
230V 28.0 215 250 250 ( 1) 600 - #2 (2) 300 - 1/ 0 224 300 300 ( 1) 600 - #2 (2) 300 - 1/ 0
460V 14.0 95 125 125 (1) 2/0 - #14 ( 1) 1/0 - #14 99 125 125 (1) 2/0 - #14 (1) 3/0 - #14
575V 11. 0 77 100 100
88 110 110
208V 46. 2 233 300 300
224 300 300
230V 42.0 229 300 300 ( 1) 600 - #2 (2) 300 - 1/ 0 224 300 300 ( 1) 600 - #2 (2) 300 - 1/ 0
460V 21.0 102 125 125 (1) 2/0 - #14 (1) 3/0 - #14 99 125 125 (1) 2/0 - #14 ( 1) 3/0 - #14
575V 17. 0 83 100 100
88 110 110
AGZ070D
PUMP
2.0
3.0
5.0
7.5
10.0
7.5
10.0
15.0
AGZ075D
PUMP
3.0
5.0
7.5
10.0
15.0
Model Voltage
Pum p
AGZ080D
PUMP
3.0
5.0
Multiple Point Field Data - Circuit #1 Multiple Point Field Data - Circuit #2
Ratings
Ratings
Electrical Information
Lug Range
(1) 600 - #2 (2) 300 - 1/0
(1) 2/0 - #14 (1) 1/0 - #14
Note: Power block and disconnect switch sizes are minimums. Larger sizes may be used, however the lug range must be the same.
IM 1110-1 41
(1) 600 - #2 (2) 300 - 1/0
(1) 2/0 - #14 (1) 1/0 - #14
(1) 600 - #2 (2) 300 - 1/0
(1) 2/0 - #14 (1) 1/0 - #14
(1) 600 - #2 (2) 300 - 1/0
(1) 2/0 - #14 (1) 1/0 - #14
(1) 600 - #2 (2) 300 - 1/0
(1) 2/0 - #14 (1) 1/0 - #14
(1) 600 - #2 (2) 300 - 1/0
(1) 2/0 - #14 (1) 1/0 - #14
(1) 600 - #2 (2) 300 - 1/0
(1) 2/0 - #14 (1) 1/0 - #14
(1) 600 - #2 (2) 300 - 1/0
(1) 2/0 - #14 (1) 1/0 - #14
(1) 600 - #2 (2) 300 - 1/0
(1) 2/0 - #14 (1) 1/0 - #14
(1) 600 - #2 (2) 300 - 1/0
(1) 2/0 - #14 (1) 1/0 - #14
(1) 600 - #2 (2) 300 - 1/0
(1) 2/0 - #14 (1) 1/0 - #14
(1) 600 - #2 (2) 300 - 1/0
(1) 2/0 - #14 (1) 1/0 - #14
(1) 600 - #2 (2) 300 - 1/0
(1) 2/0 - #14 (1) 1/0 - #14
(1) 600 - #2 (2) 300 - 1/0
(1) 2/0 - #14 (1) 1/0 - #14
(1) 600 - #2 (2) 300 - 1/0
(1) 2/0 - #14 (1) 1/0 - #14
(1) 2/0 - #14 (2) 300 - 1/0
(1) 2/0 - #14 (1) 1/0 - #14
(1) 2/0 - #14 (2) 300 - 1/0
(1) 2/0 - #14 (1) 1/0 - #14
(1) 2/0 - #14 (2) 300 - 1/0
(1) 2/0 - #14 (1) 1/0 - #14
(1) 2/0 - #14 (2) 300 - 1/0
(1) 2/0 - #14 (1) 1/0 - #14
(1) 2/0 - #14 (2) 300 - 1/0
(1) 2/0 - #14 (1) 1/0 - #14
(1) 600 - #2 (2) 300 - 1/0
(1) 2/0 - #14 (1) 1/0 - #14
(1) 600 - #2 (2) 300 - 1/0
(1) 2/0 - #14 (1) 1/0 - #14
(1) 600 - #2 (2) 300 - 1/0
(1) 2/0 - #14 (1) 1/0 - #14
(1) 600 - #2 (2) 300 - 1/0
(1) 2/0 - #14 (1) 1/0 - #14
(1) 600 - #2 (2) 300 - 1/0
(1) 2/0 - #14 (1) 1/0 - #14
(1) 600 - #2 (2) 300 - 1/0
(1) 2/0 - #14 (1) 1/0 - #14
(1) 600 - #2 (2) 300 - 1/0
(1) 2/0 - #14 (1) 1/0 - #14
(1) 600 - #2 (2) 300 - 1/0
(1) 2/0 - #14 (1) 1/0 - #14
(1) 600 - #2 (2) 300 - 1/0
(1) 2/0 - #14 (1) 1/0 - #14
(1) 600 - #2 (2) 300 - 1/0
(1) 2/0 - #14 (1) 1/0 - #14
Lug Range
Page 42

Electrical Information
HP FLA MCA RFS MFS Powe r Block ( 1) Disconnect Switch [1] MCA RFS MFS Power Block (1) Disconnect Switch [1]
208V 10.6 235 300 300 ( 1) 600 - #2 (2) 300 - 1/0 224 300 300 ( 1) 600 - #2 ( 2) 300 - 1/ 0
230V 9.6 234 300 300 ( 1) 600 - #2 (2) 300 - 1/0 224 300 300 ( 1) 600 - #2 (2) 300 - 1/0
460V 4.8 104 125 125 (1) 2/ 0 - #14 ( 1) 3/0 - #14 99 125 125 (1) 2/0 - #14 ( 1) 3/0 - #14
575V 3.9 91 12 5 125
88 110 110
208V 16.7 241 300 300 ( 1) 600 - #2 (1) 600 - #1 & (2) 250 - #1 224 300 300 ( 1) 600 - #2 ( 2) 300 - 1/ 0
230V 15.2 240 300 300 ( 1) 600 - #2 (2) 300 - 1/0 224 300 300 ( 1) 600 - #2 ( 2) 300 - 1/ 0
460V 7.6 107 125 125 (1) 2/ 0 - #14 ( 1) 3/0 - #14 99 125 125 (1) 2/0 - #14 ( 1) 3/0 - #14
575V 6.1 94 12 5 125
88 110 110
208V 24.2 249 300 300 ( 1) 600 - #2 (1) 600 - #1 & (2) 250 - #1 224 300 300 ( 1) 600 - #2 ( 2) 300 - 1/ 0
230V 22.0 246 300 300 ( 1) 600 - #2 (1) 600 - #1 & (2) 250 - #1 224 300 300 ( 1) 600 - #2 ( 2) 300 - 1/ 0
460V 11.0 110 125 125 ( 1) 2/0 - #14 (1) 3/0 - #14 99 125 125 (1) 2/ 0 - #14 ( 1) 3/0 - #14
575V 9.0 97 12 5 125
88 110 110
208V 30.8 255 300 300 ( 1) 600 - #2 (1) 600 - #1 & (2) 250 - #1 224 300 300 ( 1) 600 - #2 ( 2) 300 - 1/ 0
230V 28.0 252 300 300 ( 1) 600 - #2 (1) 600 - #1 & (2) 250 - #1 224 300 300 ( 1) 600 - #2 ( 2) 300 - 1/ 0
460V 14.0 113 150 150 ( 1) 2/0 - #14 (1) 3/0 - #14 99 125 125 (1) 2/ 0 - #14 ( 1) 3/0 - #14
575V 11. 0 99 125 125
88 110 110
208V 46.2 271 350 350 ( 1) 600 - #2 (1) 600 - #1 & (2) 250 - #1 224 300 300 ( 1) 600 - #2 ( 2) 300 - 1/ 0
230V 42.0 266 350 350 ( 1) 600 - #2 (1) 600 - #1 & (2) 250 - #1 224 300 300 ( 1) 600 - #2 ( 2) 300 - 1/ 0
460V 21.0 120 150 150 ( 1) 2/0 - #14 (1) 3/0 - #14 99 125 125 (1) 2/ 0 - #14 ( 1) 3/0 - #14
575V 17.0 105 125 125
88 110 110
208V 10.6 268 350 350 ( 1) 600 - #2 (1) 600 - #1 & (2) 250 - #1 257 350 350 ( 1) 600 - #2 (1) 600 - #1 & (2) 250 - #1
230V 9.6 267 350 350 ( 1) 600 - #2 (1) 600 - #1 & (2) 250 - #1 257 350 350 ( 1) 600 - #2 (1) 600 - #1 & ( 2) 250 - #1
460V 4.8 123 175 175 (1) 2/ 0 - #14 ( 1) 3/0 - #14 118 150 150 (1) 2/0 - #14 ( 1) 3/0 - #14
575V 3.9 110 150 150
106 150 150
208V 16.7 274 350 350 ( 1) 600 - #2 (1) 600 - #1 & (2) 250 - #1 257 350 350 ( 1) 600 - #2 (1) 600 - #1 & (2) 250 - #1
230V 15.2 273 350 350 ( 1) 600 - #2 (1) 600 - #1 & (2) 250 - #1 257 350 350 ( 1) 600 - #2 (1) 600 - #1 & (2) 250 - #1
460V 7.6 126 175 175 (1) 2/ 0 - #14 ( 1) 3/0 - #14 118 150 150 (1) 2/0 - #14 ( 1) 3/0 - #14
575V 6.1 112 150 150
106 150 150
208V 24.2 282 350 350 ( 1) 600 - #2 (1) 600 - #1 & (2) 250 - #1 257 350 350 ( 1) 600 - #2 (1) 600 - #1 & (2) 250 - #1
230V 22.0 279 350 350 ( 1) 600 - #2 (1) 600 - #1 & (2) 250 - #1 257 350 350 ( 1) 600 - #2 (1) 600 - #1 & (2) 250 - #1
460V 11.0 129 175 175 ( 1) 2/0 - #14 (1) 3/0 - #14 118 150 150 (1) 2/0 - #14 (1) 3/0 - #14
575V 9.0 115 150 150
106 150 150
208V 30.8 288 400 400 ( 1) 600 - #2 (1) 600 - #1 & (2) 250 - #1 257 350 350 ( 1) 600 - #2 (1) 600 - #1 & (2) 250 - #1
230V 28.0 285 400 400 ( 1) 600 - #2 (1) 600 - #1 & (2) 250 - #1 257 350 350 ( 1) 600 - #2 (1) 600 - #1 & (2) 250 - #1
460V 14.0 132 175 175 ( 1) 2/0 - #14 (1) 3/0 - #14 118 150 150 (1) 2/0 - #14 (1) 3/0 - #14
575V 11.0 117 150 150
106 150 150
208V 46.2 304 400 400 ( 1) 600 - #2 (1) 600 - #1 & (2) 250 - #1 257 350 350 ( 1) 600 - #2 (1) 600 - #1 & (2) 250 - #1
230V 42.0 299 400 400 ( 1) 600 - #2 (1) 600 - #1 & (2) 250 - #1 257 350 350 ( 1) 600 - #2 (1) 600 - #1 & (2) 250 - #1
460V 21.0 139 175 175 ( 1) 2/0 - #14 (1) 3/0 - #14 118 150 150 (1) 2/0 - #14 (1) 3/0 - #14
575V 17.0 123 150 150
106 150 150
208V 10.6 284 350 350 ( 1) 600 - #2 (1) 600 - #1 & (2) 250 - #1 274 300 300 ( 1) 600 - #2 (1) 600 - #1 & (2) 250 - #1
230V 9.6 283 350 350 ( 1) 600 - #2 (1) 600 - #1 & (2) 250 - #1 274 300 300 ( 1) 600 - #2 (1) 600 - #1 & ( 2) 250 - #1
460V 4.8 120 150 150 (1) 2/ 0 - #14 ( 1) 3/0 - #14 115 125 125 (1) 2/0 - #14 ( 1) 3/0 - #14
575V 3.9 98 11 0 110
94 110 110
208V 16.7 290 350 350 ( 1) 600 - #2 (1) 600 - #1 & (2) 250 - #1 274 300 300 ( 1) 600 - #2 (1) 600 - #1 & (2) 250 - #1
230V 15.2 289 350 350 ( 1) 600 - #2 (1) 600 - #1 & (2) 250 - #1 274 300 300 ( 1) 600 - #2 (1) 600 - #1 & (2) 250 - #1
460V 7.6 123 150 150 (1) 2/ 0 - #14 ( 1) 3/0 - #14 115 125 125 (1) 2/0 - #14 ( 1) 3/0 - #14
575V 6.1 100 125 125
94 110 110
208V 24.2 298 350 350 ( 1) 600 - #2 (1) 600 - #1 & (2) 250 - #1 274 300 300 ( 1) 600 - #2 (1) 600 - #1 & (2) 250 - #1
230V 22.0 296 350 350 ( 1) 600 - #2 (1) 600 - #1 & (2) 250 - #1 274 300 300 ( 1) 600 - #2 (1) 600 - #1 & (2) 250 - #1
460V 11.0 126 150 150 ( 1) 2/0 - #14 (1) 3/0 - #14 115 125 125 (1) 2/0 - #14 (1) 3/0 - #14
575V 9.0 103 125 125
94 110 110
208V 30.8 305 350 350 ( 1) 600 - #2 (1) 600 - #1 & (2) 250 - #1 274 300 300 ( 1) 600 - #2 (1) 600 - #1 & (2) 250 - #1
230V 28.0 302 350 350 ( 1) 600 - #2 (1) 600 - #1 & (2) 250 - #1 274 300 300 ( 1) 600 - #2 (1) 600 - #1 & (2) 250 - #1
460V 14.0 129 150 150 ( 1) 2/0 - #14 (1) 3/0 - #14 115 125 125 (1) 2/0 - #14 (1) 3/0 - #14
575V 11.0 105 125 125
94 110 110
208V 46.2 320 350 350 ( 1) 600 - #2 (1) 600 - #1 & (2) 250 - #1 274 300 300 ( 1) 600 - #2 (1) 600 - #1 & (2) 250 - #1
230V 42.0 316 350 350 ( 1) 600 - #2 (1) 600 - #1 & (2) 250 - #1 274 300 300 ( 1) 600 - #2 (1) 600 - #1 & (2) 250 - #1
460V 21.0 136 150 150 ( 1) 2/0 - #14 (1) 3/0 - #14 115 125 125 (1) 2/0 - #14 (1) 3/0 - #14
575V 17.0 111 125 125
94 110 110
AGZ090D
PUMP
3.0
5.0
7.5
10.0
15.0
AGZ100D
PUMP
3.0
5.0
7.5
10.0
15.0
AGZ110D
PUMP
3.0
5.0
7.5
10.0
15.0
Model Voltage
Pum p
Multiple Point Field Data - Circuit #1 Multiple Point Field Data - Circuit #2
Ratings
Ratings
Table 24: Electrical Data - Multi-Point (Continued)
Note: Power block and disconnect switch sizes are minimums. Larger sizes may be used, however the lug range must be the same.
42 IM 1110-1
Lug Range
(1) 2/0 - #14 (1) 1/0 - #14
(1) 2/0 - #14 (1) 1/0 - #14
(1) 2/0 - #14 (1) 3/0 - #14
(1) 2/0 - #14 (1) 3/0 - #14
(1) 2/0 - #14 (1) 3/0 - #14
(1) 2/0 - #14 (1) 3/0 - #14
(1) 2/0 - #14 (1) 3/0 - #14
(1) 2/0 - #14 (1) 3/0 - #14
(1) 2/0 - #14 (1) 3/0 - #14
(1) 2/0 - #14 (1) 3/0 - #14
(1) 2/0 - #14 (1) 3/0 - #14
(1) 2/0 - #14 (1) 3/0 - #14
(1) 2/0 - #14 (1) 3/0 - #14
(1) 2/0 - #14 (1) 3/0 - #14
(1) 2/0 - #14 (1) 3/0 - #14
(1) 2/0 - #14 ( 1) 1/0 - #14
(1) 2/0 - #14 ( 1) 1/0 - #14
(1) 2/0 - #14 ( 1) 1/0 - #14
(1) 2/0 - #14 ( 1) 1/0 - #14
(1) 2/0 - #14 ( 1) 1/0 - #14
(1) 2/0 - #14 ( 1) 3/0 - #14
(1) 2/0 - #14 ( 1) 3/0 - #14
(1) 2/0 - #14 ( 1) 3/0 - #14
(1) 2/0 - #14 ( 1) 3/0 - #14
(1) 2/0 - #14 ( 1) 3/0 - #14
(1) 2/0 - #14 ( 1) 3/0 - #14
(1) 2/0 - #14 ( 1) 3/0 - #14
(1) 2/0 - #14 ( 1) 3/0 - #14
(1) 2/0 - #14 ( 1) 3/0 - #14
(1) 2/0 - #14 ( 1) 3/0 - #14
Lug Range
Page 43

Table 25: Electrical Data - Multi-Point (Continued)
HP FLA MCA RFS MFS Powe r Block (1) Disconnect Switch [1] MCA RFS MFS Power Block (1) Disconnect Switch [1]
208V 10.6 284 350 350 ( 1) 600 - #2 (1) 600 - #1 & (2) 250 - #1 321 400 400 ( 1) 600 - #2 ( 1) 600 - #1 & (2) 250 - #1
230V 9.6 283 350 350 ( 1) 600 - #2 (1) 600 - #1 & (2) 250 - #1 321 400 400 ( 1) 600 - #2 ( 1) 600 - #1 & (2) 250 - #1
460V 4.8 120 125 125
159 200 200
575V 3.9 98 110 110
125 150 150
208V 16.7 290 350 350 ( 1) 600 - #2 (1) 600 - #1 & (2) 250 - #1 321 400 400 ( 1) 600 - #2 ( 1) 600 - #1 & (2) 250 - #1
230V 15.2 289 350 350 ( 1) 600 - #2 (1) 600 - #1 & (2) 250 - #1 321 400 400 ( 1) 600 - #2 ( 1) 600 - #1 & (2) 250 - #1
460V 7.6 123 150 150
159 200 200
575V 6.1 100 125 125
125 150 150
208V 24.2 298 350 350 ( 1) 600 - #2 (1) 600 - #1 & (2) 250 - #1 321 400 400 ( 1) 600 - #2 ( 1) 600 - #1 & (2) 250 - #1
230V 22.0 296 350 350 ( 1) 600 - #2 (1) 600 - #1 & (2) 250 - #1 321 400 400 ( 1) 600 - #2 ( 1) 600 - #1 & (2) 250 - #1
460V 11. 0 126 150 150
159 200 200
575V 9.0 103 125 125
125 150 150
208V 30.8 305 350 350 ( 1) 600 - #2 (1) 600 - #1 & (2) 250 - #1 321 400 400 ( 1) 600 - #2 ( 1) 600 - #1 & (2) 250 - #1
230V 28.0 302 350 350 ( 1) 600 - #2 (1) 600 - #1 & (2) 250 - #1 321 400 400 ( 1) 600 - #2 ( 1) 600 - #1 & (2) 250 - #1
460V 14. 0 129 150 150
159 200 200
575V 11. 0 105 125 125
125 150 150
208V 46.2 320 350 350 ( 1) 600 - #2 (1) 600 - #1 & (2) 250 - #1 321 400 400 ( 1) 600 - #2 ( 1) 600 - #1 & (2) 250 - #1
230V 42.0 316 350 350 ( 1) 600 - #2 (1) 600 - #1 & (2) 250 - #1 321 400 400 ( 1) 600 - #2 ( 1) 600 - #1 & (2) 250 - #1
460V 21. 0 136 150 150
159 200 200
575V 17. 0 111 125 125
125 150 150
208V 10.6 332 400 400 ( 1) 600 - #2 (1) 600 - #1 & (2) 250 - #1 321 400 400 ( 1) 600 - #2 ( 1) 600 - #1 & (2) 250 - #1
230V 9.6 331 400 400 ( 1) 600 - #2 (1) 600 - #1 & (2) 250 - #1 321 400 400 ( 1) 600 - #2 ( 1) 600 - #1 & (2) 250 - #1
460V 4.8 164 200 200
159 200 200
575V 3.9 129 150 150
125 150 150
208V 16.7 338 400 400 ( 2) 500 - #6 (1) 600 - #1 & (2) 250 - #1 321 400 400 ( 1) 600 - #2 ( 1) 600 - #1 & (2) 250 - #1
230V 15.2 336 400 400 ( 2) 500 - #6 (1) 600 - #1 & (2) 250 - #1 321 400 400 ( 1) 600 - #2 ( 1) 600 - #1 & (2) 250 - #1
460V 7.6 167 200 200
159 200 200
575V 6.1 131 150 150
125 150 150
208V 24.2 345 400 400 ( 2) 500 - #6 (1) 600 - #1 & (2) 250 - #1 321 400 400 ( 1) 600 - #2 ( 1) 600 - #1 & (2) 250 - #1
230V 22.0 343 400 400 ( 2) 500 - #6 (1) 600 - #1 & (2) 250 - #1 321 400 400 ( 1) 600 - #2 ( 1) 600 - #1 & (2) 250 - #1
460V 11. 0 170 200 200
159 200 200
575V 9.0 134 150 150
125 150 150
208V 30.8 352 400 400 ( 2) 500 - #6 (1) 600 - #1 & (2) 250 - #1 321 400 400 ( 1) 600 - #2 ( 1) 600 - #1 & (2) 250 - #1
230V 28.0 349 400 400 ( 2) 500 - #6 (1) 600 - #1 & (2) 250 - #1 321 400 400 ( 1) 600 - #2 ( 1) 600 - #1 & (2) 250 - #1
460V 14. 0 173 200 200
159 200 200
575V 11. 0 136 150 150
125 150 150
208V 46.2 367 450 450 ( 2) 500 - #6 (1) 600 - #1 & (2) 250 - #1 321 400 400 ( 1) 600 - #2 ( 1) 600 - #1 & (2) 250 - #1
230V 42.0 363 450 450 ( 2) 500 - #6 (1) 600 - #1 & (2) 250 - #1 321 400 400 ( 1) 600 - #2 ( 1) 600 - #1 & (2) 250 - #1
460V 21. 0 180 200 200
159 200 200
575V 17. 0 142 175 175
125 150 150
208V 16.7 346 400 400 ( 2) 500 - #6 (1) 600 - #1 & (2) 250 - #1 329 400 400 ( 1) 600 - #2 ( 1) 600 - #1 & (2) 250 - #1
230V 15.2 344 400 400 ( 2) 500 - #6 (1) 600 - #1 & (2) 250 - #1 329 400 400 ( 1) 600 - #2 ( 1) 600 - #1 & (2) 250 - #1
460V 7.6 171 200 200
163 200 200
575V 6.1 134 150 150
128 150 150
208V 24.2 353 400 400 ( 2) 500 - #6 (1) 600 - #1 & (2) 250 - #1 329 400 400 ( 1) 600 - #2 ( 1) 600 - #1 & (2) 250 - #1
230V 22.0 351 400 400 ( 2) 500 - #6 (1) 600 - #1 & (2) 250 - #1 329 400 400 ( 1) 600 - #2 ( 1) 600 - #1 & (2) 250 - #1
460V 11. 0 174 200 200
163 200 200
575V 9.0 137 150 150
128 150 150
208V 30.8 360 400 400 ( 2) 500 - #6 (1) 600 - #1 & (2) 250 - #1 329 400 400 ( 1) 600 - #2 ( 1) 600 - #1 & (2) 250 - #1
230V 28.0 357 400 400 ( 2) 500 - #6 (1) 600 - #1 & (2) 250 - #1 329 400 400 ( 1) 600 - #2 ( 1) 600 - #1 & (2) 250 - #1
460V 14. 0 177 200 200
163 200 200
575V 11. 0 139 150 150
128 150 150
208V 46.2 375 450 450 ( 2) 500 - #6 (2) 500 - 3/0 329 400 400 ( 1) 600 - #2 ( 1) 600 - #1 & (2) 250 - #1
230V 42.0 371 450 450 ( 2) 500 - #6 (2) 500 - 3/0 329 400 400 ( 1) 600 - #2 ( 1) 600 - #1 & (2) 250 - #1
460V 21. 0 184 225 225
163 200 200
575V 17. 0 145 175 175
128 150 150
208V 59.4 388 450 450 ( 2) 500 - #6 (2) 500 - 3/0 329 400 400 ( 1) 600 - #2 ( 1) 600 - #1 & (2) 250 - #1
230V 54.0 383 450 450 ( 2) 500 - #6 (2) 500 - 3/0 329 400 400 ( 1) 600 - #2 ( 1) 600 - #1 & (2) 250 - #1
460V 27. 0 190 225 225
163 200 200
575V 22. 0 150 175 175
128 150 150
AGZ125D
PUMP
3.0
5.0
7.5
10.0
15.0
10.0
15.0
20.0
AGZ130D
PUMP
3.0
5.0
7.5
10.0
15.0
Model Voltage
Pum p
AGZ140D
PUMP
5.0
7.5
Multiple Point Field Data - Circuit #1 Multiple Point Field Data - Circuit #2
Ratings
Rat ings
Electrical Information
Lug Range
(1) 2/0 - #14 (1) 3/0 - #14
(1) 2/0 - #14 (1) 3/0 - #14
Note: Power block and disconnect switch sizes are minimums. Larger sizes may be used, however the lug range must be the same.
(1) 2/0 - #14 (1) 3/0 - #14
(1) 2/0 - #14 (1) 3/0 - #14
(1) 2/0 - #14 (1) 3/0 - #14
(1) 2/0 - #14 (1) 3/0 - #14
(1) 2/0 - #14 (1) 3/0 - #14
(1) 2/0 - #14 (1) 3/0 - #14
(1) 2/0 - #14 (1) 3/0 - #14
(1) 2/0 - #14 (1) 3/0 - #14
(1) 2/0 - #14 (2) 300 - 1/0
(1) 2/0 - #14 (1) 3/0 - #14
(1) 2/0 - #14 (2) 300 - 1/0
(1) 2/0 - #14 (1) 3/0 - #14
(1) 600 - #2 (2) 300 - 1/0
(1) 2/0 - #14 (1) 3/0 - #14
(1) 600 - #2 (2) 300 - 1/0
(1) 2/0 - #14 (1) 3/0 - #14
(1) 600 - #2 (2) 300 - 1/0
(1) 2/0 - #14 (2) 300 - 1/0
(1) 600 - #2 (2) 300 - 1/0
(1) 2/0 - #14 (1) 3/0 - #14
(1) 600 - #2 (2) 300 - 1/0
(1) 2/0 - #14 (1) 3/0 - #14
(1) 600 - #2 (2) 300 - 1/0
(1) 2/0 - #14 (1) 3/0 - #14
(1) 600 - #2 (2) 300 - 1/0
(1) 2/0 - #14 (2) 300 - 1/0
(1) 600 - #2 (2) 300 - 1/0
(1) 2/0 - #14 (2) 300 - 1/0
(1) 2/0 - #14 ( 2) 300 - 1/ 0
(1) 2/0 - #14 (1) 3/0 - #14
(1) 2/0 - #14 ( 2) 300 - 1/ 0
(1) 2/0 - #14 (1) 3/0 - #14
(1) 2/0 - #14 ( 2) 300 - 1/ 0
(1) 2/0 - #14 (1) 3/0 - #14
(1) 2/0 - #14 ( 2) 300 - 1/ 0
(1) 2/0 - #14 (1) 3/0 - #14
(1) 2/0 - #14 ( 2) 300 - 1/ 0
(1) 2/0 - #14 (1) 3/0 - #14
(1) 2/0 - #14 ( 2) 300 - 1/ 0
(1) 2/0 - #14 (1) 3/0 - #14
(1) 2/0 - #14 ( 2) 300 - 1/ 0
(1) 2/0 - #14 (1) 3/0 - #14
(1) 2/0 - #14 ( 2) 300 - 1/ 0
(1) 2/0 - #14 (1) 3/0 - #14
(1) 2/0 - #14 ( 2) 300 - 1/ 0
(1) 2/0 - #14 (1) 3/0 - #14
(1) 2/0 - #14 ( 2) 300 - 1/ 0
(1) 2/0 - #14 (1) 3/0 - #14
(1) 2/0 - #14 ( 2) 300 - 1/ 0
(1) 2/0 - #14 (1) 3/0 - #14
(1) 2/0 - #14 ( 2) 300 - 1/ 0
(1) 2/0 - #14 (1) 3/0 - #14
(1) 2/0 - #14 ( 2) 300 - 1/ 0
(1) 2/0 - #14 (1) 3/0 - #14
(1) 2/0 - #14 ( 2) 300 - 1/ 0
(1) 2/0 - #14 (1) 3/0 - #14
(1) 2/0 - #14 ( 2) 300 - 1/ 0
(1) 2/0 - #14 (1) 3/0 - #14
Lug Range
IM 1110-1 43
Page 44

Electrical Information
HP FL A MC A RFS M FS Po we r Bl oc k ( 1) Di s co n n ect Sw it ch [ 1] M CA RFS MFS Po w e r Bl oc k ( 1 ) Di s c o nn ec t Sw i tc h [ 1]
208V 16.7 346 400 400 ( 2) 500 - #6 ( 1) 600 - #1 & (2) 250 - #1 415 500 500 ( 2) 500 - #6 (2) 500 - 3/0
230V 15. 2 344 400 400
415 500 500
460V 7.6 171 200 200 ( 1) 600 - #2 (2) 300 - 1/ 0 196 225 225 ( 1) 600 - #2 ( 2) 300 - 1/ 0
575V 6.1 134 150 150
176 225 225
208V 24.2 353 400 400 ( 2) 500 - #6 ( 1) 600 - #1 & (2) 250 - #1 415 500 500 ( 2) 500 - #6 (2) 500 - 3/0
230V 22. 0 351 400 400
415 500 500
460V 11.0 174 200 200 ( 1) 600 - #2 (2) 300 - 1/ 0 196 225 225 ( 1) 600 - #2 (2) 300 - 1/ 0
575V 9.0 137 150 150
176 225 225
208V 30.8 360 400 400 ( 2) 500 - #6 ( 1) 600 - #1 & (2) 250 - #1 415 500 500 ( 2) 500 - #6 (2) 500 - 3/0
230V 28. 0 357 400 400
415 500 500
460V 14.0 177 200 200 ( 1) 600 - #2 (2) 300 - 1/ 0 196 225 225 ( 1) 600 - #2 (2) 300 - 1/ 0
575V 11. 0 139 150 150
176 225 225
208V 46.2 375 450 450 ( 2) 500 - #6 (2) 500 - 3/ 0 415 500 500 ( 2) 500 - #6 (2) 500 - 3/ 0
230V 42. 0 371 450 450
415 500 500
460V 21.0 184 225 225 ( 1) 600 - #2 (2) 300 - 1/ 0 196 225 225 ( 1) 600 - #2 (2) 300 - 1/ 0
575V 17. 0 145 150 150
176 225 225
208V 59.4 388 450 450 ( 2) 500 - #6 (2) 500 - 3/ 0 415 500 500 ( 2) 500 - #6 (2) 500 - 3/ 0
230V 54. 0 383 450 450
415 500 500
460V 27.0 190 225 225 ( 1) 600 - #2 (2) 300 - 1/ 0 196 225 225 ( 1) 600 - #2 (2) 300 - 1/ 0
575V 22. 0 150 150 150
176 225 225
208V 16.7 471 500 500 ( 2) 500 - #6 (2) 500 - 3/ 0 454 500 500 ( 2) 500 - #6 (2) 500 - 3/ 0
230V 15. 2 430 500 500
415 500 500
460V 7.6 212 250 250 ( 1) 600 - #2 (2) 300 - 1/ 0 204 250 250 ( 1) 600 - #2 ( 2) 300 - 1/ 0
575V 6.1 182 225 225
176 225 225
208V 24.2 478 600 600 ( 2) 500 - #6 (2) 500 - 3/ 0 454 500 500 ( 2) 500 - #6 (2) 500 - 3/ 0
230V 22. 0 437 500 500
415 500 500
460V 11.0 215 250 250 ( 1) 600 - #2 (2) 300 - 1/ 0 204 250 250 ( 1) 600 - #2 (2) 300 - 1/ 0
575V 9.0 185 225 225
176 225 225
208V 30.8 485 600 600 ( 2) 500 - #6 (2) 500 - 3/ 0 454 500 500 ( 2) 500 - #6 (2) 500 - 3/ 0
230V 28. 0 443 500 500
415 500 500
460V 14.0 218 250 250 ( 1) 600 - #2 (2) 300 - 1/ 0 204 250 250 ( 1) 600 - #2 (2) 300 - 1/ 0
575V 11. 0 187 225 225
176 225 225
208V 46. 2 500 600 600
454 500 500
230V 42.0 457 500 500 ( 2) 500 - #6 (2) 500 - 3/ 0 415 500 500 ( 2) 500 - #6 (2) 500 - 3/ 0
460V 21. 0 225 250 250
204 250 250
575V 17. 0 193 225 225
176 225 225
208V 59.4 513 600 600 ( 2) 500 - #6 (2) 500 - 3/ 0 454 500 500 ( 2) 500 - #6 (2) 500 - 3/ 0
230V 54. 0 469 500 500
415 500 500
460V 27.0 231 250 250 ( 1) 600 - #2 (2) 300 - 1/ 0 204 250 250 ( 1) 600 - #2 (2) 300 - 1/ 0
575V 22. 0 198 225 225
176 225 225
208V 16.7 478 600 600 ( 2) 500 - #6 (2) 500 - 3/ 0 462 500 500 ( 2) 500 - #6 (2) 500 - 3/ 0
230V 15.2 438 500 500 ( 2) 500 - #6 (2) 500 - 3/ 0 423 500 500 ( 2) 500 - #6 (2) 500 - 3/ 0
460V 7.6 216 250 250 ( 1) 600 - #2 (2) 300 - 1/ 0 208 250 250 ( 1) 600 - #2 ( 2) 300 - 1/ 0
575V 6.1 185 225 225
179 225 225
208V 24. 2 486 600 600
462 500 500
230V 22.0 445 500 500 ( 2) 500 - #6 (2) 500 - 3/ 0 423 500 500 ( 2) 500 - #6 (2) 500 - 3/ 0
460V 11.0 219 250 250 ( 1) 600 - #2 (2) 300 - 1/ 0 208 250 250 ( 1) 600 - #2 (2) 300 - 1/ 0
575V 9.0 188 225 225
179 225 225
208V 30.8 492 600 600 ( 2) 500 - #6 (2) 500 - 3/ 0 462 500 500 ( 2) 500 - #6 (2) 500 - 3/ 0
230V 28. 0 451 500 500
423 500 500
460V 14.0 222 250 250 ( 1) 600 - #2 (2) 300 - 1/ 0 208 250 250 ( 1) 600 - #2 (2) 300 - 1/ 0
575V 11. 0 190 225 225
179 225 225
208V 46.2 508 600 600 ( 2) 500 - #6 (2) 500 - 3/ 0 462 500 500 ( 2) 500 - #6 (2) 500 - 3/ 0
230V 42.0 465 500 500 ( 2) 500 - #6 (2) 500 - 3/ 0 423 500 500 ( 2) 500 - #6 (2) 500 - 3/ 0
460V 21. 0 229 250 250
208 250 250
575V 17. 0 196 225 225
179 225 225
208V 59.4 521 600 600 ( 2) 500 - #6 (2) 500 - 3/ 0 462 500 500 ( 2) 500 - #6 (2) 500 - 3/ 0
230V 54.0 477 500 500 ( 2) 500 - #6 (2) 500 - 3/ 0 423 500 500 ( 2) 500 - #6 (2) 500 - 3/ 0
460V 27.0 235 250 250 ( 1) 600 - #2 ( 1) 600 - #1 & (2) 250 - #1 208 250 250 ( 1) 600 - #2 (2) 300 - 1/0
575V 22. 0 201 250 250
179 225 225
AGZ160D
PUMP
5.0
7.5
10.0
15.0
20.0
AGZ180D
PUMP
5.0
7.5
10.0
15.0
20.0
AGZ190D
PUMP
5.0
7.5
10.0
15.0
20.0
Model Voltage
Pum p
Multiple Point Field Data - Circuit #1 Multiple Point Field Data - Circuit #2
Ratings
Ratings
Table 26: Electrical Data - Multi-Point (Continued)
Note: Power block and disconnect switch sizes are minimums. Larger sizes may be used, however the lug range must be the same.
44 IM 1110-1
Lug Range
(2) 500 - #6 (1) 600 - #1 & (2) 250 - #1
(1) 2/0 - #14 (1) 3/0 - #14
(2) 500 - #6 (1) 600 - #1 & (2) 250 - #1
(1) 2/0 - #14 (1) 3/0 - #14
(2) 500 - #6 (1) 600 - #1 & (2) 250 - #1
(1) 2/0 - #14 (1) 3/0 - #14
(2) 500 - #6 (2) 500 - 3/0
(1) 2/0 - #14 (2) 300 - 1/0
(2) 500 - #6 (2) 500 - 3/0
(1) 2/0 - #14 (2) 300 - 1/0
(2) 500 - #6 (2) 500 - 3/0
(1) 600 - #2 (2) 300 - 1/0
(2) 500 - #6 (2) 500 - 3/0
(1) 600 - #2 (2) 300 - 1/0
(2) 500 - #6 (2) 500 - 3/0
(1) 600 - #2 (2) 300 - 1/0
(2) 500 - #6 (2) 500 - 3/0
(1) 600 - #2 (2) 300 - 1/0
(1) 600 - #2 (2) 300 - 1/0
(2) 500 - #6 (2) 500 - 3/0
(1) 600 - #2 (2) 300 - 1/0
(1) 600 - #2 (2) 300 - 1/0
(2) 500 - #6 (2) 500 - 3/0
(1) 600 - #2 (2) 300 - 1/0
(2) 500 - #6 (2) 500 - 3/0
(1) 600 - #2 (2) 300 - 1/0
(1) 600 - #2 (2) 300 - 1/0
(1) 600 - #2 (2) 300 - 1/0
(1) 600 - #2 (2) 300 - 1/0
(2) 500 - #6 (2) 500 - 3/0
(1) 600 - #2 (2) 300 - 1/0
(2) 500 - #6 (2) 500 - 3/0
(1) 600 - #2 (2) 300 - 1/0
(2) 500 - #6 (2) 500 - 3/0
(1) 600 - #2 (2) 300 - 1/0
(2) 500 - #6 (2) 500 - 3/0
(1) 600 - #2 (2) 300 - 1/0
(2) 500 - #6 (2) 500 - 3/0
(1) 600 - #2 (2) 300 - 1/0
(2) 500 - #6 (2) 500 - 3/0
(1) 600 - #2 (2) 300 - 1/0
(2) 500 - #6 (2) 500 - 3/0
(1) 600 - #2 (2) 300 - 1/0
(2) 500 - #6 (2) 500 - 3/0
(1) 600 - #2 (2) 300 - 1/0
(2) 500 - #6 (2) 500 - 3/0
(1) 600 - #2 (2) 300 - 1/0
(1) 600 - #2 (2) 300 - 1/0
(2) 500 - #6 (2) 500 - 3/0
(1) 600 - #2 (2) 300 - 1/0
(1) 600 - #2 (2) 300 - 1/0
(2) 500 - #6 (2) 500 - 3/0
(1) 600 - #2 (2) 300 - 1/0
(2) 500 - #6 (2) 500 - 3/0
(1) 600 - #2 (2) 300 - 1/0
(1) 600 - #2 (2) 300 - 1/0
(1) 600 - #2 (2) 300 - 1/0
(1) 600 - #2 (2) 300 - 1/0
Lug Range
Page 45

Electrical Information
PUMP PUMP MIN. CIRCUIT POWER SUPPLY FIELD FUSE SIZE OR
MOTOR V OLTS MOTOR A MPA CITY FIELD WIRE FIELD SUPP'D HUB ( IN.) MA X. CKT. BREA KER
1.0 208 4.6 6.0 3 10 AWG 1 0.5 10 10
1.0 230 4.2 6.0 3 10 AWG 1 0.5 6 6
1.0 460 2.1 3.0 3 10 AWG 1 0.5 3 3
1.5 208 6.6 9.0 3 10 AWG 1 0.5 10 10
1.5 230 6 8.0 3 10 AWG 1 0.5 10 10
1.5 460 3 4.0 3 10 AWG 1 0.5 6 6
2.0 208 7.5 10.0 3 10 A WG 1 0.5 15 15
2.0 230 6.8 9.0 3 10 AWG 1 0.5 15 15
2.0 460 3.4 5.0 3 10 AWG 1 0.5 6 6
3.0 208 10.6 14.0 3 10 AWG 1 0.5 20 20
3.0 230 9.6 12.0 3 10 A WG 1 0.5 20 20
3.0 460 4.8 6.0 3 10 AWG 1 0.5 10 10
5.0 208 16.7 21.0 3 10 AWG 1 0.5 35 35
5.0 230 15.2 19.0 3 10 AWG 1 0.5 30 30
5.0 460 7.6 10.0 3 10 A WG 1 0.5 15 15
7.5 208 24.2 31.0 3 10 AWG 1 0.5 50 50
7.5 230 22.0 28.0 3 10 AWG 1 0.5 45 45
7.5 460 11.0 14.0 3 10 AWG 1 0.5 20 20
10.0 208 30.8 39.0 3 8 A WG 1 0.5 60 60
10.0 230 28.0 35.0 3 10 AWG 1 0.5 60 60
10.0 460 14.0 18.0 3 10 AWG 1 0.5 30 30
15.0 208 46.2 58.0 3 6 A WG 1 0.75 100 100
15.0 230 42.0 53.0 3 6 A WG 1 0.75 90 90
15.0 460 21.0 27.0 3 10 AWG 1 0.5 45 45
20.0 208 59.4 75.0 3 4 A WG 1 1.0 125 125
20.0 230 54.0 68.0 3 4 A WG 1 1.0 110 110
20.0 460 27.0 34.0 3 10 AWG 1 0.5 60 60
25.0 208 74.8 94.0 3 3 A WG 1 1.0 150 150
25.0 230 68.0 85.0 3 4 A WG 1 1.0 150 150
25.0 460 34.0 43.0 3 8 A WG 1 0.5 70 70
Table 27: Electrical Data, Pumps Only (for field-wired pumps)
HP FLA ( EA ) ( MCA ) QTY WIRE GA QTY NOM. SIZ E RECOM. MAX.
1.0 575 1.7 3.0 3 10 AWG 1 0.5 3 3
1.5 575 2.4 3.0 3 10 AWG 1 0.5 3 3
2.0 575 2.7 4.0 3 10 AWG 1 0.5 6 6
3.0 575 3.9 5.0 3 10 AWG 1 0.5 6 6
5.0 575 6.1 8.0 3 10 AWG 1 0.5 10 10
7.5 575 9.0 12.0 3 10 A WG 1 0.5 20 20
10.0 575 11.0 14.0 3 10 AWG 1 0.5 20 20
15.0 575 17.0 22.0 3 10 AWG 1 0.5 35 35
20.0 575 22.0 28.0 3 10 AWG 1 0.5 45 45
25.0 575 27.0 34.0 3 10 AWG 1 0.5 60 60
Note 1: Use above data when field wiring pumps separately from the chiller unit. Data is for individual pump. Include a field supplied
circuit breaker.
Note 2: Consult chiller catalog or installation manual for unit electrical data.
IM 1110-1 45
Page 46

Pump Operation
Pump Operation
Pump Start Control (MicroTech® III)
The standard arrangement is for the MicroTech III unit
controller pump output signal to automatically start and stop
the pump(s). The specific starting method is determined by the
Evap Pump Control setpoint. This setting allows the following
configurations:
• #1 only - Pump A will always be used
• #2 only - Pump B will always be used
• Auto - The primary pump is the one with the least run hours;
the other is used as a backup
• #1 Primary - Pump A used normally; pump B is backup
• #2 Primary - Pump B used normally; pump A is backup
#1 Only or #2 Only
Selecting [#1 only] or [#2 only] will run only the pump
selected; the other is unavailable. This mode is useful for
running only one pump if the other is out of service. [#1 only]
is the factory default setting when there is only one pump on
the pump package.
Primary/Standby Pump Staging
The pump designated as primary will start first. If the
evaporator state is START for a time greater than the
RECIRCULATE TIMEOUT setpoint and there is no flow, then
the primary pump will be deenergized and the standby pump
will start. When the evaporator is in the RUN state, if flow is
lost for more than half of the FLOW PROOF setpoint value,
the primary pump will shut off and the standby pump will
start. Once the standby pump is started, the FLOW LOSS
alarm logic will apply if flow cannot be established in the
evaporator START state, or if flow is lost in the
EVAPORATOR RUN state.
Auto Control
AUTO pump control is the factory default on two-pump units;
the primary/standby logic above is in effect. When the
evaporator is not in the RUN state, the run hours of the pumps
will be compared. The pump with the least hours will be
designated as the primary at this time.
Optional Local Control at Pump Panel
This control method can be selected at time of order placement
and provides for one start output from the MicroTech III unit
controller to start or stop pumps and two non-VFD pumps.
Pump operation is controlled by a selector switch located on
the door of the pump control panel. Pump #1 and Pump #2 will
run the respective pump exclusively, with no duty/standby
feature. The Auto position will alternate pump selection
through an alternating relay, changing pump with each start.
This option does not have the desirable automatic duty/standby
attribute normally associated with dual pumps. In case of a
pump failure, the second pump must be started manually on
the selector switch.
Pump Operating Control
Constant Flow
The pumps will run at constant speed and will start and stop
automatically with the chiller unit. When the chiller is enabled
to run by having its MicroTech III unit controller in the Auto
state or by a signal from a BAS (not necessarily with
compressors running based on availability of a cooling load),
the pump panel will receive a signal to start. When there is
sufficient flow to close the flow switch within a timed period
(recirc timer), a proof-of-flow signal is sent to the chiller and
the pump is in the Run state. If there is a call for cooling based
on the chilled water temperature, the chiller will commence its
compressor startup procedure. If there is no call for cooling,
the chiller will be on stand-by, waiting for load.
If the flow switch does not see flow, the pump remains in the
Start state until flow is established, at which time the pump
will be in the Run state. Flow is recognized when the flow
switch indicates flow for longer than the recir timer setpoint.
The Run state is a control condition established by satisfying
certain conditions. The Start state means that a digital signal
has been sent to the pump for it to start running.
If say, a chilled water valve is closed, the pump may receive a
Start signal and will run dead-headed but not actually be in the
Run state as defined by the controller. No alarm is given in
this condition. When the valve is opened, the flow switch will
see flow, will signal this to the chiller controller, and the pump
will go to the official Run state.
When starting the chiller, it is prudent to be sure there is flow
so the chiller compressors will be able to start based on a call
for cooling due to high chilled water temperature. Observing
water pressure gauges can confirm flow.
Flow interruption will open the flow switch, sending a signal
to the chiller to shut down and also de-energize the pump. If
the chiller is turned off, the pump will shut off after a timed
period to allow water circulation during refrigerant
pumpdown.
Operation of the evaporator pump is controlled by the Pump
Transition diagram in Figure 18. The pump will start on a
signal from the chiller controller when either the chilled water
leaving or entering temperature reaches the chiller freeze point
setting to help prevent freeze up.
46 IM 1110-1
Page 47

Figure 18: Pump Transition Diagram
OFF
RUN START
Evap Reci rc Time
TEST: Unit State=OFF & All
Comp Stat e=OFF & NO Evap
water freeze condition
TEST: Unit State = AUTO AND At lea st
one circuit is enabled for st art
OR
Evap wat er fr eeze condition
Unit State= OFF & Al l
Comp State=OFF & NO Ev ap
water fr eeze condit ion
Power
Pump Operation
TEST:
TEST: Flow OK for
Variable Flow
There are four possible pump operating modes when the pump
package is equipped with the variable frequency drive (VFD)
option:
1 Sensorless Pressure Control
2 BAS Control
3 Remote Sensor Control
4 Locally SElected Constant Speed Control
Sensorless Pressure Control is the factory default setting.
Sensorless Pressure Control
Speed and pressure is adjusted to match the system load. The
control curve is designed to replicate sensor positions at
varying distances from the pump. Sensorless control is an
innovative concept in circulating pumps. Pump performance
and characteristic curves for ten different speeds are embedded
in the memory of the speed controller during manufacture.
This data includes power, pressure and flow across the flow
range of the pump.
These measurements enable the pump to continuously identify
the head and flow at any point in time, giving accurate
pressure control without the need for external feedback
signals. Patented software technology within the controller
ensures trouble-free operation in all conditions.
reduced, the pump automatically reduces the head developed
according to the pre-set control curve. It is often found that
using a remote differential pressure sensor to sense the
pressure across a remote load could theoretically result in
loads close to the pump being under-pumped. The situation
would be where the load at a loop extremity is satisfied and the
control valve closes while a load close to the pump needs full
flow. The probability of this occurring is remote but it is
possible. One answer to this is to move the sensor closer to the
pump (two-thirds out in the system is a popular
recommendation) although physically re-positioning the
sensor at commissioning stage can be a costly exercise. With
Sensorless pump control it is possible to replicate the moving
of a sensor by adjusting the head setting 'Hmin'.
Figure 19: Pump Control Curve
Incorporating the pump's hydraulic data into the controller and
removing sensors results in true integration of all components
and removes the risk of remote sensor failure.
The default control mode for Sensorless pumps 'Quadratic
Pressure Control' where the controller is set to control the
speed according to a 'control curve' between max and min flow
(seeFigure 19). Fitting a differential pressure sensor at the
most remote load, across the supply piping and return piping
encompassing the valve and coil set, is generally the best
installation scheme for energy efficiency.
Sensorless control can replicate this control without the need
for the remote sensor. As the flow required by the system is
IM 1110-1 47
BAS Control
The pump will speed up or slow down based on an input from
the BAS. The pump control protocol is the same as ordered for
the chiller unit.
Remote Sensor Control
The VFD is wired to pressure differential switch(s) mounted in
the chilled water piping system. This is the standard VFD
control when a sensorless VFD is not used
Page 48

Pump Operation
(a)
(b)
(c) Status Li ne
Locally Selected Constant Speed Control
This mode is selected by pressing the Hand on key. Operation
of the pump at a constant speed as selected on the VFD control
panel. This mode allows selecting a pump speed to match the
system curve.
Operating the VFD Controller
The VFD incorporates an integrated graphic local display and
keypad to select mode, change parameters and view status and
alarms. A diagram of the controller and explanation of its
operation begins on page 86.
The unit is shipped in the sensorless mode. If this mode is to
be used, no programming is required.
Figure 20: Graphical Local Control Panel (GLCP)
Status Li ne
Data Lines
to two variables when not in status mode and in the case of
Alarm/ Warning. The number of the Active Set-up (Sensorless
mode being setup 1) is shown.
Line 1-2: Operator data lines displaying data and variables
defined or chosen by the user. By pressing the [Status] key, up
to one extra line can be added. It shows up to 5 variables with
related unit, regardless of status. In case of alarm/warning, the
warning is shown instead of the variables. Normal setup is to
show feet of head and gpm.
Status line: Status shows the state of the inverter such as Run
OK, Running on Auto Remote Running
Operating variables on the data lines (b) will vary depending
on the operating mode.
• Sensorless: displays gpm and head
• External Sensor: displays gpm and head
• BAS: configured by the BAS
• Hand: displays Hz
Status Display I
This read-out state is standard after start-up or initialization.
Use [INFO] to obtain information about the value/
measurement linked to the displayed operating variables
Control Functions
1 Graphical display with Status lines.
2 Menu keys and indicator lights (LED's) - selecting mode,
changing parameters and switching between display
functions.
3 Navigation keys and indicator lights (LEDs).
4 Operation keys and indicator lights (LEDs).
Graphical Display
The LCD-display is back-lit with a total of 6 alpha-numeric
lines. All data is displayed on the LCP which can show up to
five operating variables while in [Status] mode.
Graphic Display Lines
Status line: The status line is programmable with the normal
setup displaying hertz on the left, Pump kw in the middle and
rpm on the right. Showing the status when in status mode or up
(1.1, 1.2, 1.3, 2, and 3).See the operating variables shown in
the display Figure 21. 1.1, 1.2 and 1.3 are shown in small size.
2 and 3 are shown in medium size.
Status Display II
See the operating variables (1.1, 1.2, 1.3, and 2) shown in the
display in Figure 21.
Figure 21: Status Display II
In the example, Speed, Motor current, Motor power and
Frequency are selected as variables in the first and second
lines.1.1, 1.2 and 1.3 are shown in small size. 2 is shown in
large size.
Display Contrast Adjustment
Press [status] and [?] for darker display
Press [status] and [?] for brighter display
48 IM 1110-1
Page 49

Pump Operation
Indicator Lights
Figure 22: LED Indicator Lights
If certain threshold values are
exceeded, the alarm and/or
warning LED lights up (See
Figure 22). A status and alarm
text appear on the control
panel. The On LED is
activated when the frequency
converter receives power
from mains voltage, a DC bus
terminal, or an external 24V
supply. At the same time, the
back light is on.
• Green LED/On: Control section is working.
• Yellow LED/Warn.: Indicates a warning, may turn into
Alarm.
• Flashing Red LED/Alarm: Indicates an alarm.
CONTROL KEYS
Menu Keys
The menu keys are divided into functions. The keys below the
display and indicator lamps are used for parameter set-up,
including choice of display indication during normal
operation.
Figure 23: Menu Keys
Back Cancel Info
These keys are only used for programming
Navigation Keys
The four navigation arrows (up, down, right, and left) are used
to navigate between the different screen choices. Use the keys
to move the cursor.
Figure 25: Navigation Keys
OK
Is used for choosing a parameter marked by the cursor and for
enabling the change of a parameter.
Pump Control Keys
Operation Control Keys for local control are found at the
bottom of the control panel. The key in use will have an LED
illuminated above it.
Figure 26: Pump Control Keys
Status
Three different readouts can be chosen by pressing the [Status]
key repeatedly. Normal display is as shown in Figure 21.
Quick Menu
Used for programming only.
Main Menu
Used for programming all parameters.
Alarm Log
Displays an Alarm list of the ten latest alarms (numbered A1A10). To obtain additional details about an alarm, use the
arrow keys to maneuver to the alarm number and press [OK].
Information is displayed about the condition of the frequency
converter before it enters the alarm mode.
The Alarm log button on the LCP allows access to both Alarm
log and Maintenance log.
Back/Cancel/Info Keys
Figure 24: Back/Cancel/Info Keys
Hand On
Enables control of the pump speed via the graphic keypad. It
will over-ride any other mode setting. Raise or lower the
frequency (speed) using the up and down arrow keys. The
pump will run even without a start signal from the chiller. If
selected when in the Auto mode, it will start operation at the
current speed, from which the speed can be changed. When
going back to auto, it will be at the last Hand on speed, but
quickly return to the correct automatic speed.
NOTE: The low water device (flow switch) input must be
made for the pump to start in either hand mode or auto mode.
Off
Stops the pump in any operating mode.
Auto-On
Enables the pump to be controlled by either the sensorless
control, the BAS or by the remote pressure sensor, depending
on which operating mode is being used. When a start signal is
applied on the control terminals the pump will start.
NOTE: For the pump to operate in either Sensorless mode or
any other automatic control mode it is necessary to have
pressed the [Auto on] button.
Reset
Used for resetting the frequency converter after an alarm (trip).
IM 1110-1 49
Page 50

Pump Operation
Warnings and Alarms
A warning or an alarm is signaled by the relevant LED on the
front of the GLCP and indicated by a code on the display. A
warning remains active until its cause is no longer present.
Under certain circumstances operation of the pump may still
be continued. Warning messages may be critical, but are not
necessarily so. Warnings should be attended to ASAP as they
can revert to an Alarm-shutting down the unit.
Viewing Warnings & Alarms
To view the warning or alarm details, press the Alarm Log key
in the middle of the GLCP. Press the ? or ? key to go to the
Alarm Log line and press OK. Navigate to the appropriate
alarm number, press OK and view the alarm description,
number and date-time stamp. A detailed description with some
corrective measures is below in the section titled Warning/
Fault Messages.
Resetting Alarms
In the event of an alarm, the inverter will have tripped. Alarms
must be reset to restart operation once their cause has been
rectified. In many cases the auto reset function will restart the
pump. Alternatively the [RESET] button on the control panel
can be pressed.
NOTE: After a manual reset using the [RESET] button on the
control panel, the [AUTO ON] button must be pressed to
restart the pump.
If an alarm cannot be reset, the reason may be that its cause
has not been rectified, or the alarm is trip-locked (see also
table on following page).
Alarms that are trip-locked offer additional protection, means
that the mains supply must be switched off before the alarm
can be reset. After being switched back on, the inverter is no
longer blocked and may be reset as described above once the
cause has been rectified.
Alarms that are not trip-locked can also be reset using the
automatic reset function Reset Mode (Note: automatic wakeup is possible!)
Selected warning and fault messages follow.
Warning/Fault Messages
WARNING/ALARM 3 - No motor
No motor has been connected to the output of the inverter.
WARNING/ALARM 9 - Inverter overloaded
The inverter is about to cut out because of an overload (too
high current for too long). The counter for electronic, thermal
inverter protection gives a warning at 98% and trips at 100%,
while giving an alarm. You cannot reset the inverter until the
counter is below 90%.The fault is that the inverter is
overloaded by more than nominal current for too long.
WARNING/ALARM 10 - Motor ETR over temperature
According to the electronic thermal protection (ETR), the
motor is too hot. You can choose if you want the inverter to
give a warning or an alarm when the counter reaches 100% in
programming par. 1-90 Motor Thermal Protection. The fault is
that the motor is overloaded by more than nominal current for
too long. Check that the motor in programming par. 1-24
Motor Current is set correctly.
WARNING/ALARM 11 - Motor thermistor over temp
The thermistor or the thermistor connection is disconnected.
You can choose if you want the inverter to give a warning or
an alarm in par. 1-90 Motor Thermal Protection. Check that the
thermistor is connected correctly between terminal 53 or 54
(analog voltage input) and terminal 50 (+ 10 Volts supply), or
between terminal 18 or 19 (digital input PNP only) and
terminal 50. If a KTY sensor is used, check for correct
connection between terminal 54 and 55.
WARNING/ALARM 13 - Over Current
The inverter peak current limit (approx. 200% of the rated
current) is exceeded. The warning will last approx. 8-12 sec,
then the inverter trips and issues an alarm. Turn off the inverter
and check if the motor shaft can be turned and if the motor size
matches the inverter.
ALARM 14 - Earth fault
There is a discharge from the output phases to earth, either in
the cable between the inverter and the motor or in the motor
itself. Turn off the inverter and remove the earth fault.
ALARM 16 - Short-circuit
There is short-circuiting in the motor or on the motor
terminals. Turn off the inverter and remove the short-circuit.
WARNING 23 - Internal fans
External fans have failed due to defective hardware or fans not
mounted.
WARNING/ALARM 4 - Mains phase loss
A phase is missing on the supply side, or the mains voltage
imbalance is too high. This message also appears in case of a
fault in the input rectifier on the inverter. Check the supply
voltage and supply currents to the inverter.
50 IM 1110-1
WARNING/ALARM 29 - Drive over temperature
If the enclosure is IP00, IP20/Nema1 or IP21/TYPE 1, the
cutout temperature of the heat-sink is 95°C +5°C. The
temperature fault cannot be reset, until the temperature of the
heatsink is below 70°C. The fault could be Ambient
temperature too high or Too long motor cable
Page 51

Pump Operation
ALARM 30 - Motor phase U missing
Motor phase U between the frequency converter and the motor
is missing. Turn off the frequency converter and check motor
phase U.
ALARM 31 - Motor phase V missing
Motor phase V between the inverter and the motor is missing.
Turn off the inverter and check motor phase V.
ALARM 32 - Motor phase W missing
Motor phase W between the inverter and the motor is missing.
Turn off the frequency converter and check motor phase W.
ALARM 33 - Inrush fault
Too many power ups have occurred within a short time period.
WARNING/ALARM 36 - Mains failure
This warning/alarm is only active if the supply voltage to the
inverter is lost and par. 14-10 Mains Failure is NOT set to
OFF. Possible correction check the fuses to the frequency
converter
WARNING/ALARM 37 - Phase Imbalance
There is a current imbalance between the power units.
fan speed is increased to the maximum in case the power part
or control card is very hot. If the temperature is below 15 °C
the warning will be present.
ALARM 68 - Safe Stop
Safe Stop has been activated. To resume normal operation,
apply 24 VDC to terminal 37 then send a Reset signal (via
Bus, Digital I/O or by pressing [Reset]).
ALARM 69 - Pwr. Card Temp
Power card over temperature.
ALARM 92 - No Flow
A no load situation has been detected for the system. See
parameter group 22-2*.
ALARM 93 - Dry Pump
A no flow and high speed indicates that the pump has run dry.
See parameter group 22-2*.
ALARM 96 - Start Delayed
Start of the motor has been delayed due to short cycle
protection is active. See parameter group 22-7*.
VFD Operation
WARNING 49 - Speed limit
The speed has been limited by range in par. 4-11 Motor Speed
Low Limit [RPM] and par. 4-13 Motor Speed High Limit
[RPM].
ALARM 50 - AMA calibration failed
Contact Daikin Applied service.
ALARM 51 - AMA check Unom and Inom
The setting of motor voltage, motor current, and motor power
is presumably wrong. Check the settings.
WARNING 59 - Current limit
The current is higher than the value in par. 4-18 Current Limit.
WARNING 60 - External Interlock
External Interlock has been activated. To resume normal
operation, apply24 V DC to the terminal programmed for
External Interlock and reset the inverter (via Bus, Digital I/O
or by pressing [Reset]).
WARNING 66 - Heatsink Temperature Low
The heat sink temperature is measured as 0 °C. This could
indicate that the temperature sensor is defective and thus the
The VFD constantly monitors the chilled water system's state.
When the building cooling load drops, air side controls will
start to close in order to control the space temperature. At that
instant in time, the pump power draw will start to drop. The
drive will notice this and slow down the pump (Hz output will
decrease), which then triggers a decrease in flow and head
since the pump impeller rpm is dropping.
The reverse is true, when the load increases (valves open), the
power draw will increase and the drive will speed up (Hz goes
up) and the flow and head increases.
Both flow and head will fluctuate and since they are being read
instantaneously, as opposed to an averaged value, even the
slightest change is registered on the screen. This gives the
readings a jumpy appearance.
A building's cooling load tends to change slowly and it may be
difficult to discern load changes by merely observing the VFD
display. However, the pump rpm, Hz and kW can be noted
over time and used for reference. A given building load will
have a discrete reading.
Observing the pump kW power input at various cooling loads
will indicate the large amount of electrical energy saved by the
VFD.
IM 1110-1 51
Page 52

Start-up and Shutdown
e
Start-up and Shutdown
In addition to making any settings required, it is often
desirable to run the pumps without the chiller running to check
the chilled water circuit. De-energize the compressors by
turning off the three switches located in the unit left-hand
control panel (SW1, PS1 and PS2). Energize the unit by
closing the main disconnect located in the right-hand panel
door. Non-VFD pumps can then be operated using the switch
located on the door of the pump control panel. Use the dispay
keypad on VFD unit for operation. Press the Hand on key and
use the ? or ? key to regulate the pump speed and flow. The
VFD should be changed to the Auto mode for normal
operation.
Setting the Operating Mode
For convenience, the operating parameters for each of the three
operating modes have pre-programmed setups.
Setup #1 Sensorless
The pump control is factory set for this mode and no field
changes or programming is required.
Setup #2 External Sensor
Normally a differential pressure sensor.
Setup #3 BAS
Hand On
Manual operation - not programmed.
Change from the sensorless default setup #1 to setup #2 or #3
on the graphic keypad display as follows. See Figure 20,
page 48 for key locations.
1 Press the OFF key. The keypad display will remain
powered.
2 Press the MAIN MENU key. Should show parameter "0-
** Operations/Display".
3 Press OK.
4 Press ▼ key to 0-1 "Set UP Operations".
5 Press "OK". Display goes to 0-10 "Active Setup"
6 Press "OK". Display will show boxed #1, #2, or #3
7 Press ▼ or ▲ key to select either mode #2 or #3. #1 is
factory default.
8 Press OK. The upper right-hand corner of the display
should show 2(2) or 3(3) depending on the choice.
9 Press AUTO for normal operation.
10 Press STATUS to return to the normal operating screen.
Pre-start Up
Follow the chiller start-up procedure outlined in the current
chiller installation and operating manual, available on
www.DaikinApplied.com. In addition, check that the pump
package is operating normally in accordance with its sequence
of operation.
Check rotation of the pump by bumping it. It should be
clockwise when viewed from the top of the motor looking
down at the fan rotation.
Do not run the pump without fluid in the system. Fluid is
required to cool and lubricate the pump.
Before starting pump(s) and with water in the pump, purge the
seal flush line by cracking the vent valve until water appears.
The valve will protrude from the pump insulation. The seal is
the highest point in the pump and requires water for sealing
and lubrication.
VFD equipped pumps are shipped with the pump VFD
controller in the AUTO mode. Confirm this by checking the
VFD controller and pressing the Auto key if necessary. The
AUTO ON button is located at the bottom on the controller.
See Figure 20, page 48.
Check that the "Y" strainer
valve is open (horizontal
position) and the triple-
Vent
Valv
duty valve is open.
Hold-down Bolts
Start Up
Occasionally the impeller may be temporarily bound up and
will not turn at start up. If this is the case, loosen the insulation
and loosen the hold-down bolts holding the motor assembly to
the pump casing (do not remove them) and bump the pump.
The pump package is shipped with three strainers:
• A "Y" type strainer at the unit inlet connection
• A perforated strainer located in the inlet guide assembly at
the inlet of the pump.
• A fine mesh temporary start-up strainer located in the inlet
guide.
The "Y" strainer has a finer mesh than the inlet guide strainer
and should catch most debris before it reaches the inlet guide
strainer, which also functions as suction flow direction device.
No special attention need be paid to the suction guide strainer
at initial start-up. It will strain the pumped fluid and stabilize
the flow into the pump suction automatically.
Removing Temporary Strainer
The temporary strainer must be removed following system
clean up as follows:
After all debris has been removed from the system, or a
maximum of 24 running hours, stop the pump and close the
pump isolation valves. Drain the suction guide by removing
the drain plug or opening the blowdown valve, if installed.
Remove the insulation disc held on with Velcro (the disc has a
"CAUTION Remove Startup Strainer After 24 Hours” sticker).
Remove the suction guide cover and remove the strainer
assembly from the valve body.
52 IM 1110-1
Page 53

Start-up and Shutdown
The temporary fine-mesh start-up strainer is tack-welded to the
permanent stainless steel strainer. This temporary strainer
should now be removed from the permanent strainer. The finemesh strainer is designed to remove small particulate from
new piping systems and could easily clog with debris if left in
place. This will be detrimental to the operation of the pump.
Replace the permanent strainer into the fitting body, once the
temporary strainer is removed.
Inspect the cover O-ring and replace if necessary. Replace the
cover into the body. Ensuring that the strainer is properly
seated, tighten the cover bolts diagonally, evenly and firmly.
The seal may drip at initial start up as it breaks in. If the drip
continues for more than a few hours, service may be required.
Figure 27: Temporary Strainer to be Removed
Seasonal Shutdown
Follow the instructions in the chiller unit for seasonal
shutdown procedures. In addition for the pump package:
No components or piping on the pump package are heat traced.
If heat tracing is field installed, carefully remove the factory
insulation, install the heat tracing and carefully replace the
insulation, being careful to seal it against moisture penetration.
If draining the chilled water system, see diagrams beginning
on page 5 for the location of drain points in the piping and
pumps, both of which must be thoroughly drained.
IM 1110-1 53
Page 54

Setup for BAS Integration
Setup for BAS Integration
Introduction
The VFD pump supports an optional interface that allows
control by a Building Automation System (BAS). The pump
can be integrated to a BAS via BACnet® MS/TP,
LONWORKS® or Modbus network protocols. The
appropriate MicroTech® III communication module must be
selected as a factory-installed option on the AGZ-D chiller.
The chiller communication module determines the
corresponding protocol of the VFD pump package frequency
converter. The VFD pump controller ships from the factory
with the protocol option that matches the communication
module selected with the chiller. Note that while BACnet IP is
offered as a factory-installed option on the AGZ-D chiller,
BACnet IP is not offered on the VFD frequency converter. If a
chiller unit is ordered with BACnet IP, the VFD will be
provided with BACnet MS/TP. The VFD controller comes
with an attached "option card" for BACnet and LonWorks.
The VFD controller is a native Modbus device and does not
require an "option card" for the Modbus protocol.
Network parameters are set using the VFD controller's
graphical interface. The following sections describe the
parameters that are required to enable communications from
the VFD pump directly to the BAS via BACnet MS/TP,
LONWORKS, or Modbus. Selecting a specific
communication protocol changes various default parameter
settings to match that protocol's specifications along with
making additional protocol-specific parameters available from
the BAS.
Configuring the VFD Controller for BACnet
MS/TP Communication
This following section assumes you are using a BACnet
Option Card in conjunction with the AGZ-D pump package
frequency converter (see Figure 28). It is also assumed that the
VFD pump controller is connected to a "master" BAS or PC
equipped with a serial communication card supporting all the
BACnet communication services required by your application,
and that all requirements stipulated in the BACnet standard, as
well as those pertaining to the VFD pump controller are
strictly observed as well as all limitations therein fully
respected.
The BACnet Option Card is designed to communicate with
any master complying with the BACnet standard. Familiarity
with the PC used as a master in the system is assumed.
Light Emitting Diodes (LEDs)
Two bi-colored LEDs indicate communication activity and
status of BACnet communications. These indicators can be
seen when the BACnet Option Card is connected to the VFD
pump controller. Descriptions of the two LEDs are
summarized in Table 29 and Table 30.
Figure 28: BACnet Option Card
VFD Network Integration
Use the VFD controller's graphical interface to set unit
parameters and factory defaults for unit setpoints. Refer to the
previous section in this IOMM for details on how to use the
graphical interface.
Network configuration involves: 1) selecting the Control
Protocol for BACnet, LONWORKS, or Modbus, and 2) then
setting the specific network parameters as required by each
protocol. The addressing parameters specific to BACnet,
LONWORKS, and Modbus are described separately in the
sections that follow.
The comprehensive set of network parameters available from
the VFD pump to the BAS (i.e. point lists) are provided in
separate AGZ-D VFD Pump Controller Operations Manuals
for each protocol. These point lists can be found on
www.DaikinApplied.com in both the MicroTech III Controls
and AGZ-D chiller literature pages. For questions regarding
the VFD pump operation and set up, please contact the chiller
Technical Response Group (TRC) at 877-349-7782.
Note: AGZ-D chiller VFD controllers support only BACnet MS/
TP, LONWORKS, and Modbus communications. Daikin
Applied does not support other protocol options that may
be offered by the VFD manufacturer.
Steps for BACnet MS/TP Configuration
1 Set the basic BACnet MS/TP network parameters using
the VFD graphical interface. These BACnet parameters
are described in Table 28 below. It is recommended that
additional parameters available in menu 8-* should
remain at factory defaults. See VFD installation manual
for further details (available on
www.DaikinApplied.com).
2 Cycle power to the VFD controller for changes to take
effect.
3 Verify connection from BAS to VFD - terminals 62 (+)
and 63 (-) on top of BACnet Option Card. Refer to
Table 28 .
4 The VFD controller is now ready for network
configuration from the BAS. Refer to the BACnet
Operations Manual for the AGZ-D VFD Controller,
which is available on www.DaikinApplied.com, for a
complete points list and additional configuration
information.
54 IM 1110-1
Page 55

Setup for BAS Integration
Table 28: BACnet MS/TP Network Configuration Parameters
Parameter Setting for BACnet; Note Default Value
Option A [3] ; During initial power-up, the frequency
8-02 Control Source
8-30 Protocol BACnet Digital and control word
8-31 Address
8-32 Baud Rate
8-70 BACnet Device Instance
8-72 MS/TP Max Masters
8-73 MS/TP Max Info Frames
converter automatically sets this parameter to Option A
[3] if it detects a valid fieldbus option installed in slot A
0-127; This value must be unique throughout the
MSTP trunk
9600/19,200/38,400/76,800 baud;
All devices on the MSTP trunk must be set to the same
baud rate
0-4194303; This value must be unique throughout the
entire BACnet network.
1-127; Dependent on the Number of Masters in the
system
1-65534; Defines how many info/data frames the
device is
allowed to send while holding the token
Figure 29: BACnet MS/TP Connection
FC Port [1]
Note: This parameter cannot be adjusted while
the motor is running.
FC RS485
9600 baud
1
127
1
Table 29: LED 1 - Net Activity
IM 1110-1 55
Page 56

Setup for BAS Integration
Table 30: LED 2 - BACnet Option Card Activity
Configuring the VFD Controller for LONWORKS Communication
Introduction
This following section assumes you are using a LONWORKS
Option Card in conjunction with the AGZ-D pump package
frequency converter (see Figure 30, LONWORKS
Connection). The LONWORKS Option Card is LonMark 3.4
certified. It is designed to communicate with any system
complying with the FTT-10A and 78kbps LONWORKS
standard. Familiarity with this technology is assumed.
The LONWORKS communications structure is similar to that
of a local area network (LAN) in that messages are continually
exchanged between a number of processors. A LONWORKS
system is a local operating network (LON). LON technology
offers a means for integrating various distributed systems that
perform sensing, monitoring, control, and other automated
functions. A LON allows these intelligent devices to
communicate with one another through a variety of
communications media using a standard protocol. LON
technology supports distributed, peer-to-peer communications.
That is, individual network devices can communicate directly
with one another without the need for a central control system.
Data are transported by means of standard network variable
types (SNVTs) which provide the interface for communication
between devices from different manufacturers. LONWORKSdefined functional profiles determine the functionality and
network variables for a particular family of devices (e.g.
frequency converters, pumps etc.) are also available, and
supported by the LONWORKS option.
The VFD controller typically does not involve network
addressing to enable BAS communication. However, there are
several basic steps required for LONWORKS integration,
which are described in the following section. Additionally, the
available network parameters are available via the graphical
interface as shown in Tab le 31.
Figure 30: LONWORKS Connection
Service Pin Switch
The service pin generates a service-pin message that contains
the Neuron® ID and the program code identification of the
node. A service-pin message is a network message that is
generated by a node and broadcast on the network. It can be
used to commission the VFD controller to the LONWORKS
network. The service pin switch is located on the lower righthand corner of the LonWorks Option Card. See Figure 30 for
location of the service pin.
Light Emitting Diodes (LEDs)
Two LEDs indicate communication activity and status of the
LonWorks Option Card. These indicators can be seen when the
LonWorks Option Card is connected to the VFD pump
controller. Descriptions of the two Service LEDs are
summarized in and Tab le 32
Steps for LONWORKS Configuration
1 Commission the VFD controller by pressing the service
pin (see Figure 30). Doing so generates a service-pin
message, which is broadcast on the network and contains
the Neuron ID and the program code identification of the
node.
56 IM 1110-1
Page 57

Setup for BAS Integration
Par am ete r Default Value
8-02 Control Sour ce
FC Port [1]
11-0 Neuron ID
Variable/This item w ill be
blank if the communication
module is not commiss ioned.
11-10 Drive Profile
VSD Profile [0]
Bit St at us
0 Internal Fault
1 Internal Fault
2 Internal Fault
3 Internal Fault
4 Internal Fault
5Reserved
6Reserved
7Reserved
8Reserved
9 Invalid type change for changeable types
10 Initialization error
11 Internal communication error
12 Software revision mismatch
13 Bus not active
14 Option not present
15 LON input (nvi/nci) exc eeds limits
11-17 XIF Re vision
0 N/A
11-18 LonWork s Revis ion
0 N/A
11-21 Store Data Values
When activated (set to [2]
Store all setups), all
parameters are stored in
[2] Off w hen all parameter
values have been stored.
N/A
0 N/A/This parameter contains the vers ion of the external
interf ace f ile on the Neuron C chip on the LON option
0 N/A/This parameter contains the softw are version off the
application program on the Neuron C c hip on the LON option.
Off [0] or Store all setups [2]/This parameter is used to activate
storing of data in non-v olatile memory.
Value (Range)/Definition
Option A [3]/During initial pow er-up, the frequency converter
automatically sets this parameter to Option A [3] if it detects a
valid fieldbus option installed in slot A
Variable/This is the neuron ID of the Lonw orks module.
VSD Prof ile [0]/This parameter indicates the LONMA RK
functional profile
11-15 LON War ning Word
(0-FFFF) / This par ameter c onta ins LON s pecif ic w ar n ings .
2 Cycle power to the unit controller after 1)
commissioning a device, 2) de-commissioning an
existing device, and 3) subsequent re-commissioning of
an existing device.
3 Review the LONWORKS network parameters as
described in Table 31 below. It is recommended that
remaining items in menus 8-* and 11-* remain at factory
defaults. See VFD installation manual, available on
www.DaikinApplied.com for further details.
Table 31: LONWORKS Network Parameters
4 Verify connection from VFD to BAS - terminals 79 (Net
A) and 80 (Net B) on top of LONWORKS Option Card.
See Figure 30 for terminal locations.
5 The VFD controller is now ready for network
configuration from the BAS. Refer to the LONWORKS
Operations Manual for the AGZ-D VFD Controller,
which is available on www.DaikinApplied.com, for a
complete points list and additional configuration
information.
EEPROM; the value returns to
Note: It is recommended that remaining items in menus 8-* and 11-* remain at factory defaults. See VFD installation manual,
available on www.DaikinApplied.com for further details.
IM 1110-1 57
Page 58

Setup for BAS Integration
Situation LED Activity De scription
Configured state
(normal operation)
½ sec. ON, then
continuously OFF
The node is conf igures and running
normally.
Non-configured state Flashing ½ Hz
Node is not configures but has an
application. Proceed w ith loading node.
Applicationless state
1 sec. ON, 2 sec. OFF,
then continuously ON
Node has no application, the LonWorks
option needs replacing or reprogramming
Watchdog res ets
Short f lash about eac h 3
sec.
Indicates problem w ith application. The
LonWorks option needs replacing.
Faulty har dw are Steady ON or OFF The LonWorks option needs replacing.
Table 32: MS: Service LED (Red)
Configuring the VFD Controller for Modbus
Communication
Introduction
The VFD controller (frequency controller) is a native Modbus
device. In other words, it does not require any additional
communication card or other hardware for integration into a
building automation system (BAS) via the Modbus network.
The configuration process is described in the following
section. It is assumed that the user is familiar with Modbus
technology and terminology.
Standard Modbus network rules apply. The network is a daisychain of unit controllers including the master (in this case, the
BAS) and all slaves (VFD controller). The Modbus standard
recommends that the network be terminated on each end with
the characteristic impedance of the network (about 120 ohms).
Follow the guidelines stated in the Modbus specifications.
Steps for Modbus Configuration
Configurable Parameters
Table 33 defines the network parameters of the Modbus
Communication Module that are available via the graphical
interface. The Modbus network address and data transmission
rate (Baud Rate) are available via the local control panel. At a
minimum, you must set the network address and verify the
correct baud rate before establishing network communication
between the VFD controller and the BAS. Change remaining
parameters as required for your network.
1 Set the Modbus network parameters as described in
Table 21. It is recommended that remaining items in
menus 8-* remain at factory defaults. See VFD
installation manual, available on
www.DaikinApplied.com for further details.
2 Cycle power to the VFD controller for changes to take
effect.
3 Verify connection from BAS to VFD - terminals 68 (+)
and 69 (-) on the main control board of the frequency
converter. Refer to Figure 35.
4 The VFD controller is now ready for network
configuration from the BAS. Refer to the Modbus
Operations Manual for the AGZ-D VFD Controller,
which is available on www.DaikinApplied.com, for a
complete points list and additional configuration
information.
58 IM 1110-1
Page 59

Setup for BAS Integration
Paramete r Value (Range)/Definition De fault Value
8-02 Control Source
FC Port [1]/ On-board RS-485 port FC Port [1]
8-30 Protocol
Modbus RTU [2]/The protocol
setting for the communication port
FC [0]
8-31 Address
throughout the entire Modbus
netw ork.
1
8-33 Parity/Stop Bits
Ev en parity, 1 stop bit [0]; Odd
Parity, 1 Stop Bit [1]; No Parity, 1
Stop Bit [2]; No Parity, 2 Stop Bits
[3]/Set to matc h the netw ork
settings
Ev en parity, 1 stop bit [0]
8-32 Baud Rate
2400 - 115200/This value should
be set the same as all other
devices on the trunk.
9600 baud [2]
Table 33: Modbus Network Parameters
1-247/The Modbus Address of the
VFD; This address must be unique
Note: Note: Remaining items in menus 8-* should likely remain at factory defaults. See VFD installation manual for further details.
Figure 31: Modbus RTU Connection
IM 1110-1 59
Page 60

System Maintenance
System Maintenance
DANGER
Electric equipment can cause electric shock with a risk of severe personal injury or death. Turn off, lock out and tag all power
before continuing with following service. Panels can have more than one power source.
CAUTION
Service must be performed by trained, experienced refrigeration personnel familiar with equipment operation, maintenance,
correct servicing procedures, and the safety hazards inherent in this work. Causes for repeated tripping of equipment protection
controls must be investigated and corrected.
Lubrication
No routine lubrication is required on pump packages. The
pump motors are TEFC and permanently lubricated. The
pump seal is cooled and lubricated by the pumped fluid.
Mechanical Seal
Mechanical seals require no special attention. The mechanical
seal is fitted with a flush line. The seal is flushed from
discharge of the pump casing and is flushed/vented to the
suction on close coupled pumps.
POE type oil is used for compressor lubrication. ARNING
Do not run the pump unless properly filled with water as the
mechanical seals need a film of liquid between the faces for
WARNING
POE oil must be handled carefully using proper protective
equipment (gloves, eye protection, etc.) The oil must not come
in contact with certain polymers (e.g. PVC), as it may absorb
moisture from this material. Also, do not use oil or refrigerant
additives in the system.
For unit lubrication requirements, consult the current version
of the chiller operation manual at www.DaikinApplied.com.
proper operation.
Mechanical seals may 'weep' slightly at start-up. Allow the
pump to continue operating for several hours and the
mechanical seal to 'seat' properly prior to calling for service
personnel.
Electrical Terminals
Electrical connections should be checked for tightness during
initial startup and annually thereafter.
Figure 32: Pump Preventative Maintenance Schedule
PREVENTATIVE MAINTENANCE SCHEDULE
OPERATION WEEKLY
MONTHLY
(Notes)
ANNUAL
(Notes)
General
Visually inspect unit for loose or damaged components and visible leaks X
Inspect thermal insulation for integrity X
Clean and paint as required X
Electrical
Check contactors for pitting, replace as required X
Check terminals for tightness, tighten as necessary X
Clean control panel interior X
Visually inspect components for signs of overheating X
Strainers
Clean strainers (Note 3) X
Notes:
Monthly operations include all weekly operations.Annual (or spring start-up) operations include all weekly and monthly
operations.If several monthly strainer checks indicate a clean system, the frequency can be extended.
60 IM 1110-1
Page 61

System Maintenance
Pump Removal
The 4392 pump must be shut down and drained in order to
remove either pump's rotating assembly. If it is desired to run
the remaining pump during the replacement procedure, a
blanking plate and gasket can be installed to seal off the
removed pump cavity. The removal procedure is as follows:
1 Stop, isolate and drain the 4392 unit, in the usual manner
2 For the pump to be serviced:
3 Isolate and disconnect the motor cable.
4 Close the flush / vent line valve and disconnect the
tubing from the adapter fitting.
5 Line mark the parts (Casing /Adapter & Adapter Motor)
to confirm re-assembly locations.
6 Remove the adapter/casing bolts and lift the rotating
assembly (motor, adapter, impeller, etc) out of the casing.
7 Remove the existing gasket and ensure the gasket
surfaces on the adapter and casing are smooth & clean.
8 Insert the 4392 blanking plate fit and cross-tighten bolts
evenly (to 50 ft-lbs)
• 6-inch impeller (PN 427804-0612 - Plate with Gasket).
• 8-inch impeller (PN 427804-0812 - Plate with Gasket)
9 Open system isolation valves and re-start the duty pump.
10 Reverse process when repaired rotating assembly is
ready for installation.
IM 1110-1 61
Page 62

Page 63

Page 64

Daikin Applied Training and Development
Now that you have made an investment in modern, efficient Daikin Applied equipment, its care should be a high priority. For
training information on all Daikin Applied HVAC products, please visit us at www.DaikinApplied.com and click on Training, or
call 540-248-9646 to speak with the Training Department.
Warranty
All Daikin Applied equipment is sold pursuant to its standard terms and conditions of sale, including Limited Product Warranty.
Consult your local Daikin Applied sales representative for warranty details. To find your local Daikin Applied representative, go
to www.DaikinApplied.com.
Aftermarket Services
To find your local parts office, visit www.DaikinApplied.com or call 800-37PARTS (800-377-2787).
To find your local service office, visit www.DaikinApplied.com or call 800-432-1342.
This document contains the most current product information as of this printing. For the most up-to-date product information,
please go to www.DaikinApplied.com.
© 2014 Daikin Applied • www.DaikinApplied.com • 800-432-1342 6/14
 Loading...