

Goldmund EIDOS 38 User Manual

GOLDMUND EIDOS 38
DVD TRANSPORT

GOLDMUND EIDOS 38
DVD TRANSPORT
USER MANUAL

WARNING !
This high quality DVD player possess technical features which are necessary
for an accurate tracking of the today's best DVDs and CDs.
Only a careful use can provide all satisfactions you are expecting.
All handling must be performed according to the following instructions to
avoid to deteriorate the player.
Nevertheless, if the instructions are perfectly carried out, you will notice that
the use of the GOLDMUND EIDOS 38 transport is quite simple and
convenient.
IMPORTANT : PLEASE DO NOT CONNECT ANY WIRE OR MOVE ANY
PART BEFORE READING THE FOLLOWING INSTRUCTIONS.
3

1. FEATURES AND COMPATIBILITY
Please read very carefully the following instructions. This high-precision DVD
player will provide the best tracking conditions for today's high-quality DVDs
and CDs.
Compatibility
Please note that the Goldmund Eidos 38 is compatible with the following
formats :
- DVD Video 12 and 8cm size, one or two layers, single sided or twosided.
- VIDEO CD 12 and 8cm size, single sided.
- Audio CD 12 and 8cm size, single sided.
Energy Saving Design
Goldmund Eidos 38 meets the Energy Star guidelines for energy efficiency.
Associated Equipment
If you bought the Eidos 38 and you are technicians, musicians, and all those
who demand the very best in sound transcription, we strongly recommend the
use of one of our separate D/A converter, the Goldmund Mimesis 20, Mimesis
21+ or SRDA2.
2. UNPACKING
You will find in the packing :
- the DVD transport itself,
- the power cord.
- this user manual.
- the warranty card, to be sent back to Goldmund immediately to benefit of the
Goldmund 3 years warranty and upgrade programs.
Unpack carefully the above-mentioned parts.
Keep the whole packing for future use.
WARNING: If you need to return the DVD transport to the factory or to your
local representative for a warranty repair, please note that it must be
repackaged in the original packing. Otherwise new packing will be charged as
well as the repair of damages occurred due to poor packing conditions.
4

3. POWER SUPPLY VOLTAGE SELECTION
The power supply of your unit has been adjusted to operate with the mains
AC voltage of your area. Check on the back panel of the unit in any doubt. If
you move after purchasing the DVD player to an area using different mains
voltage, do not forget to switch the back panel selector to the new voltage of
your area. The unit can operate indifferently with 50 or 60 Hz mains.
4. CHOICE OF THE DVD PLAYER LOCATION
If you are not using one of the Goldmund tables, you will have to select a very
rigid support for your DVD transport.
Due to the specific quality of its Goldmund "Mechanical Grounding"
construction, the Goldmund DVD Player is less critical than other designs in
placement selection. Feedback is mostly so low that no special precaution is
required. Nevertheless, position the player as far as you can of the speakers if
you want to totally avoid the air coupling between the speakers and the DVD
player.
Select a position of the support where the transport is set to have the most
rigid possible connection to the floor. Solid coupling is essential, and if your
support is standing on a suspended floor, optimal result requires that you
arrange the support to have at least one foot over a supporting beam or close
enough from a supporting wall.
5. POWER CONNECTION
Plug the AC power cord to the back of the Eidos 38 and in a wall socket.
Switch the back power switch ON.
The front display will glow on as soon as you press any key or when pressing
the remote control STANDBY/ON button, meaning the unit is now powered
on.
5

6. BACK PANEL CABLE CONNECTIONS
Video Connections
The EIDOS 38 offers 3 different type of Video signal outputs :
o 75 Ohms RCA coaxial Composite Video connector.
o S-Video Output connector.
o 3 x 75 Ohms RCA coaxial Component Video Output connectors.
Depending of you specific installation you may choose one of the above video
outputs.
If you use the Component Video Outputs, move the small switch located on
the rear panel to "COMPONENT".
If you use the S-Video or Composite Video Outputs, place the switch to
"VIDEO – S-VIDEO".
Always use high quality cables for getting the best picture. The best results
will be achieved by using high quality coaxial cable on Component Video
Output connectors or high-quality S-Video cable on the S-Video Output
connector. Both may be of equivalent quality if the associated equipment is
properly tuned (especially for color and hue). On some type of projectors or
screen, the component video may be found of higher quality. On some
doublers or quadruplers, the S-Video may be providing better results. Always
experiment the best selection in readjusting the color and hue accordingly.
Audio Connections
The Goldmund Eidos 38 is equipped in standard with the following output
standard connector :
o 75 Ohms RCA coaxial SPDIF connector.
You may use this connector to connect your DVD to a D/A converter or digital
preamplifier.
Goldmund recommends that the greatest care is taken when selecting the
cable linking the DVD to the D/A converter or digital preamplifier. The very
accurate signal provided by the Eidos 38 can easily be ruined by an imperfect
connection.
Use a "Goldmund Lineal" cable from the coaxial output if you want to reach
the most accurate jitter-free connection.
6

8. INITIAL SETUP
The Setup Navigator has been designed to simplify the process of getting the
DVD player ready to perform. Designed as a series of on-screen
multiple-choice questions, the Setup Navigator automatically sets the audio,
video, and language settings according to how the questions are answered.
Once this procedure is complete, it will be possible to begin using the DVD
player.
The procedure described below provides a detailed description of the
contents of each question that appears on the screen.
NOTE
Some DVDs start playing automatically when loaded in the player. Because
the Setup Navigator cannot be used if a disc is playing, it is recommended to
set up the player using the Setup Navigator before loading a DVD for the first
time. If a DVD has been loaded, be sure to press STOP before proceeding.
1. Press STANDBY/ON on the remote control.
2. Press SETUP.
When SETUP is pressed for the first time, a special setup screen appears.
Though the Setup Navigator may be used more than once, this screen only
appears the first time SETUP is pressed.
3. Use the cursor buttons to make a selection :
• If you are going to use the Setup Navigator, it is not necessary to
change the setting on the first screen. Please proceed to the next step
• If you do not want to set up the player using the Setup Navigator, use
the cursor button M to select [Auto Start Off I at this time. The Setup
Navigator function may still be used at a later time in manual Setup screen
menu operation (see below).
4. Press ENTER after each selection. The next screen is displayed.
You may use the same process again for each setup function.
To change the answer to a prior question
Use the cursor button (◄) to return to previous screens. Please note,
however, that you cannot go forward using the cursor button (►) so it will be
necessary to answer all the questions that occur after the screen that was
returned to.
To exit the Setup Navigator
Press SETUP while on any of the screens to exit the Setup Navigator.
Please note that if the Setup Navigator is exited before all the questions are
answered, no settings are changed.
7

To return to the Setup screen
Press RETURN.
The Setup Navigator is exited and the Setup screen General menu screen
appears.
Please note that no settings are changed if RETURN is pressed before the
Setup Navigator is finished,
Setting the OSD (On-Screen-Display) Language
The OSD Language screen establishes the language that is used by the
player in menus and on-screen messages. Additionally, the language that is
established at this setting will also be used for the default audio and subtitle
language.
Settings: English*
Francais
Espanol
* Factory setting
Note :
In addition to setting the OSD language, the audio and subtitle language are
also set at this time. It you wish to change the audio or subtitle language to a
different language, make changes in the Setup screen Language menu
[Audio Language] and [Subtitle Language] as needed (see below).
Setting the TV screen size
The [TV Type] screen establishes the size, or more appropriately the width to
height ration of your television or monitor. The width-to-height ratio of
conventional TVs is 4:3, while the width-to-height ratio of wide screen and
high-definition TVs is 16:9. This width-to-height ratio is also called the aspect
ratio.
Settings: Widescreen (16:9)*
Standard (4:3)
* Factory setting
Note :
There are two screen formats that can be used to display wide-screen format
DVDs: letter box and pan & scan. When [Standard (4:3)] is selected in the
Setup Navigator, the letter box screen format is automatically selected. To
switch the preference to the pan & scan format, make changes in the Setup
screen Video menu [TV Screen] setting (see below).
8

Setting digital audio connections to AV processor or decoder
The [Digital Jack] screen establishes whether digital connections have been
made to an AV amplifier, receiver, or external decoder. As there are
numerous options available, please refer to the instructions supplied with the
component the player is connected to determine what digital audio formats
can be decoded.
Settings: Dolby Digital*
Dolby Digital/DTS
Dolby Digital/MPEG
Dolby D/DTS/MPEG
PCM
Not Connected
* Factory setting
Setting compatibility with 96 kHz output
The [96 kHz PCM Audio] screen establishes whether or not the processor or
converter the player is connected to is capable of processing an audio signal
with a sampling rate of 96 kHz. This screen only appears if connections have
been made to an external AV component as determined in previous screens.
Settings:
No*
Select if the connected AV component cannot process an audio signal
with a sampling rate of 96 kHz.
Yes
Select if the connected AV component can process an audio signal
with a sampling rate of 96 kHz.
Don't Know
Select if you are uncertain whether the
connected AV component can process an
audio signal with a sampling rate of 96 kHz.
* Factory setting
Confirming the settings
The [Exit Setup Navigator] is the final screen in the Setup Navigator.
Settings:
Save Changes
Select to have the player make all of the necessary audio, video and
language settings automatically.
Delete Changes
Select to exit the Setup Navigator without changing any of the system
settings,
9

Start Again
Select to return to the [OSD Language] screen of the Setup Navigator
and do the settings again.
* Factory setting
To exit the Setup screen
When you have completed setting up the Player using the Setup Navigator or
if you exit the Setup Navigator, the Setup screen General menu appears.
Press SETUP to close the Setup screen.
9. FRONT PANEL CONTROLS
Front Panel Keys
- OPEN : Located near the disc drawer opening, this button opens the tray
to load the CD or DVD. Closes the tray when it is open.
place discs in the disc tray with the label side facing up.
- PLAY : This key is used to start or resume Playback. It also cancels the
"Pause" function.
- PAUSE : Key used for the pause function. When the "Pause" function is
switched off by pressing the "Start" key, the selection will start back at the
exact location where it was interrupted.
- STOP : Press to stop playback. Pressing once enables playback to
resume from a point shortly before the location where it stopped. Pressing
twice causes the disc to return to the beginning of the disc if playback starts
again.
- >> : Press to advance to chapters/tracks. Press and hold to perform
fast-forward scanning.
- << : Press to go back to previous chapters/tracks. Press and hold to
perform reverse playback scanning.
These functions, accessible from the keyboard can also be achieved by the
remote-control transmitter. (see below for all Remote Control functions)
10
When loading a disc,
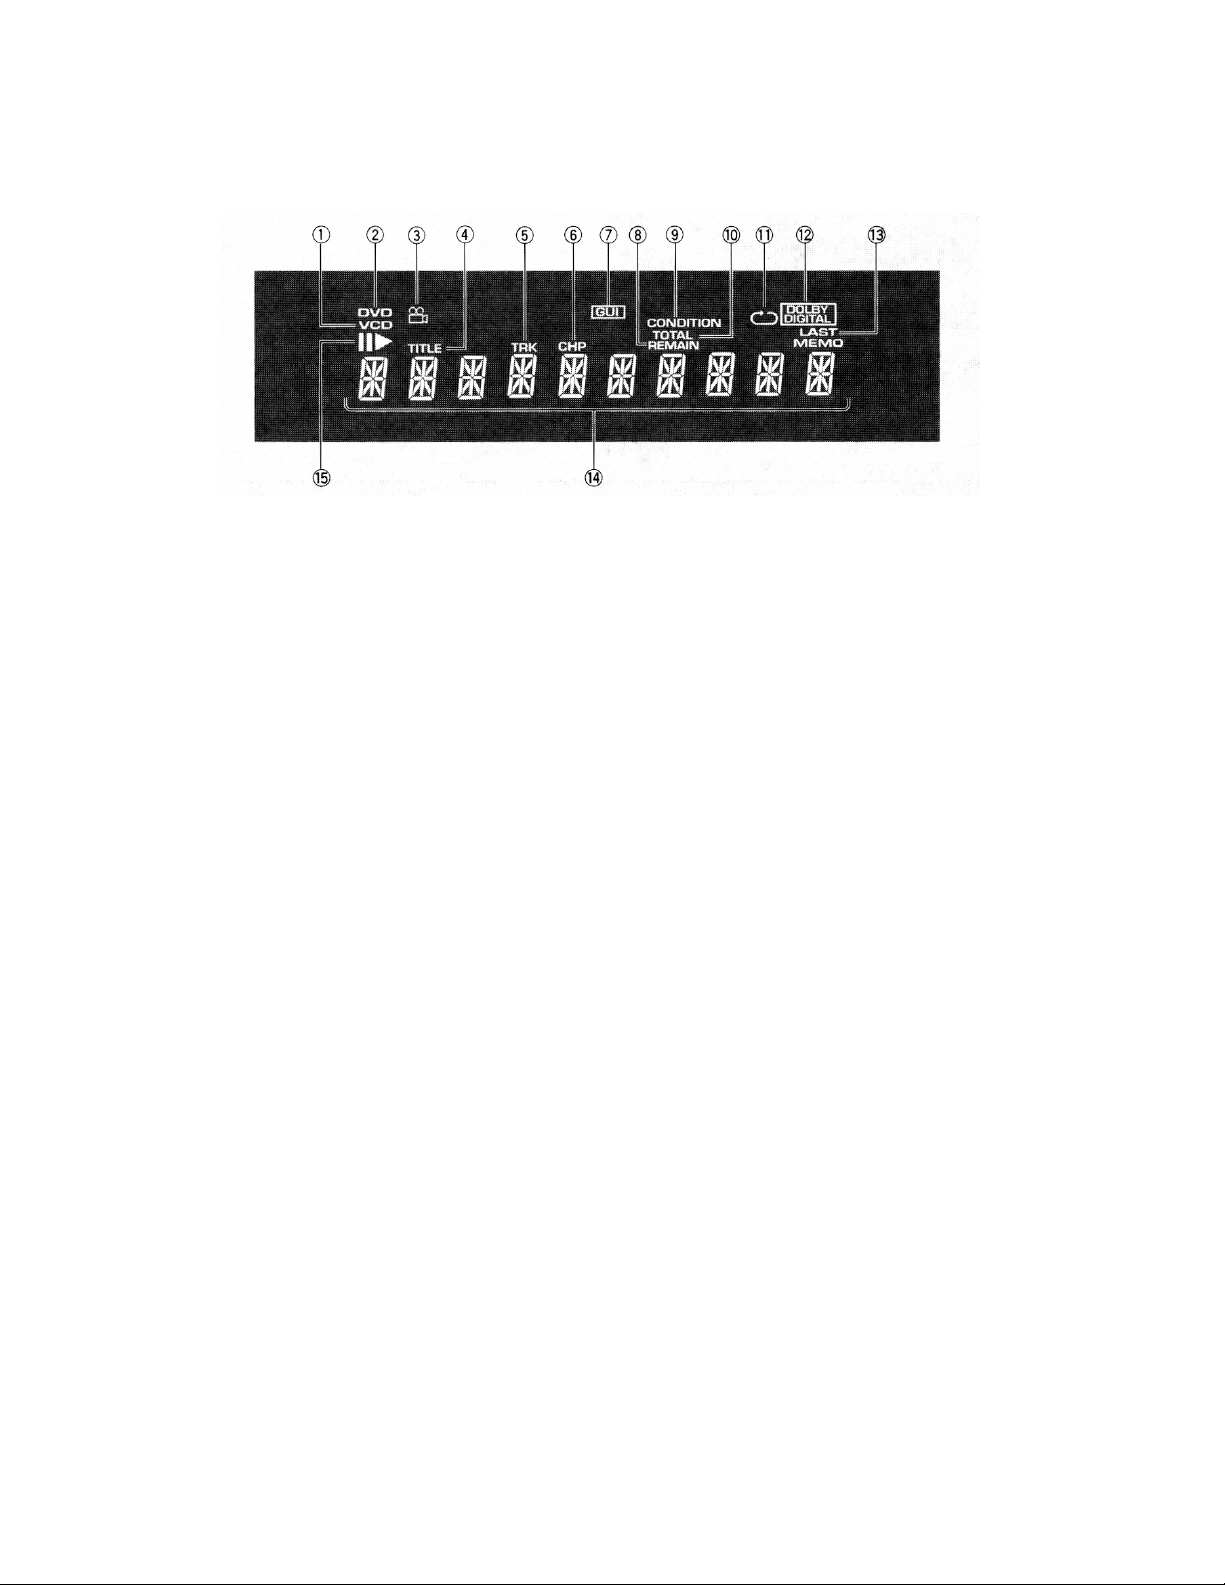
Front Panel Display
1. VCD indicator : VCD lights when a Video CD is loaded. CD lights when
an audio CD is loaded.
2. DVD indicator : Lights when a DVD is loaded.
3. MOVIE CAMERA indicator : Indicates Multi-Angle playback is in
progress (see below).
4. TITLE indicator : Indicates a title number is being displayed.
5. TRK indicator : Indicates a track number is being displayed.
6. CHIP indicator : Indicates a chapter number is being displayed.
7. GUI indicator : Indicates an on-screen menu operation is being
performed (see below).
8. REMAIN indicator : Indicates that the remaining playback time of a title
or chapter/track is being displayed.
9. CONDITION indicator : Indicates that Condition Memory settings are
memorized for the currently loaded DVD (see below).
10. TOTAL indicator : Indicates that the disc in the player is stopped and
DISPLAY has been pressed (see below).
11. REPEAT indicator : Indicates that the Repeat function is on and that
the current title, chapter, or track is being repeated (see below).
12. DOLBY DIGITAL indicator : Indicates Dolby Digital audio playback.
13. LAST MEMO indicator : Indicates the Last Memory location is recorded
in memory for the currently loaded DVD or Video CD (see below).
14. Counter display : Displays the playback mode, type of disc, title and
chapter/track numbers, playback time, etc.
15. PAUSE & PLAY indicators : ► lights when any disc is playing. When a
disc is paused, ║ lights.
11
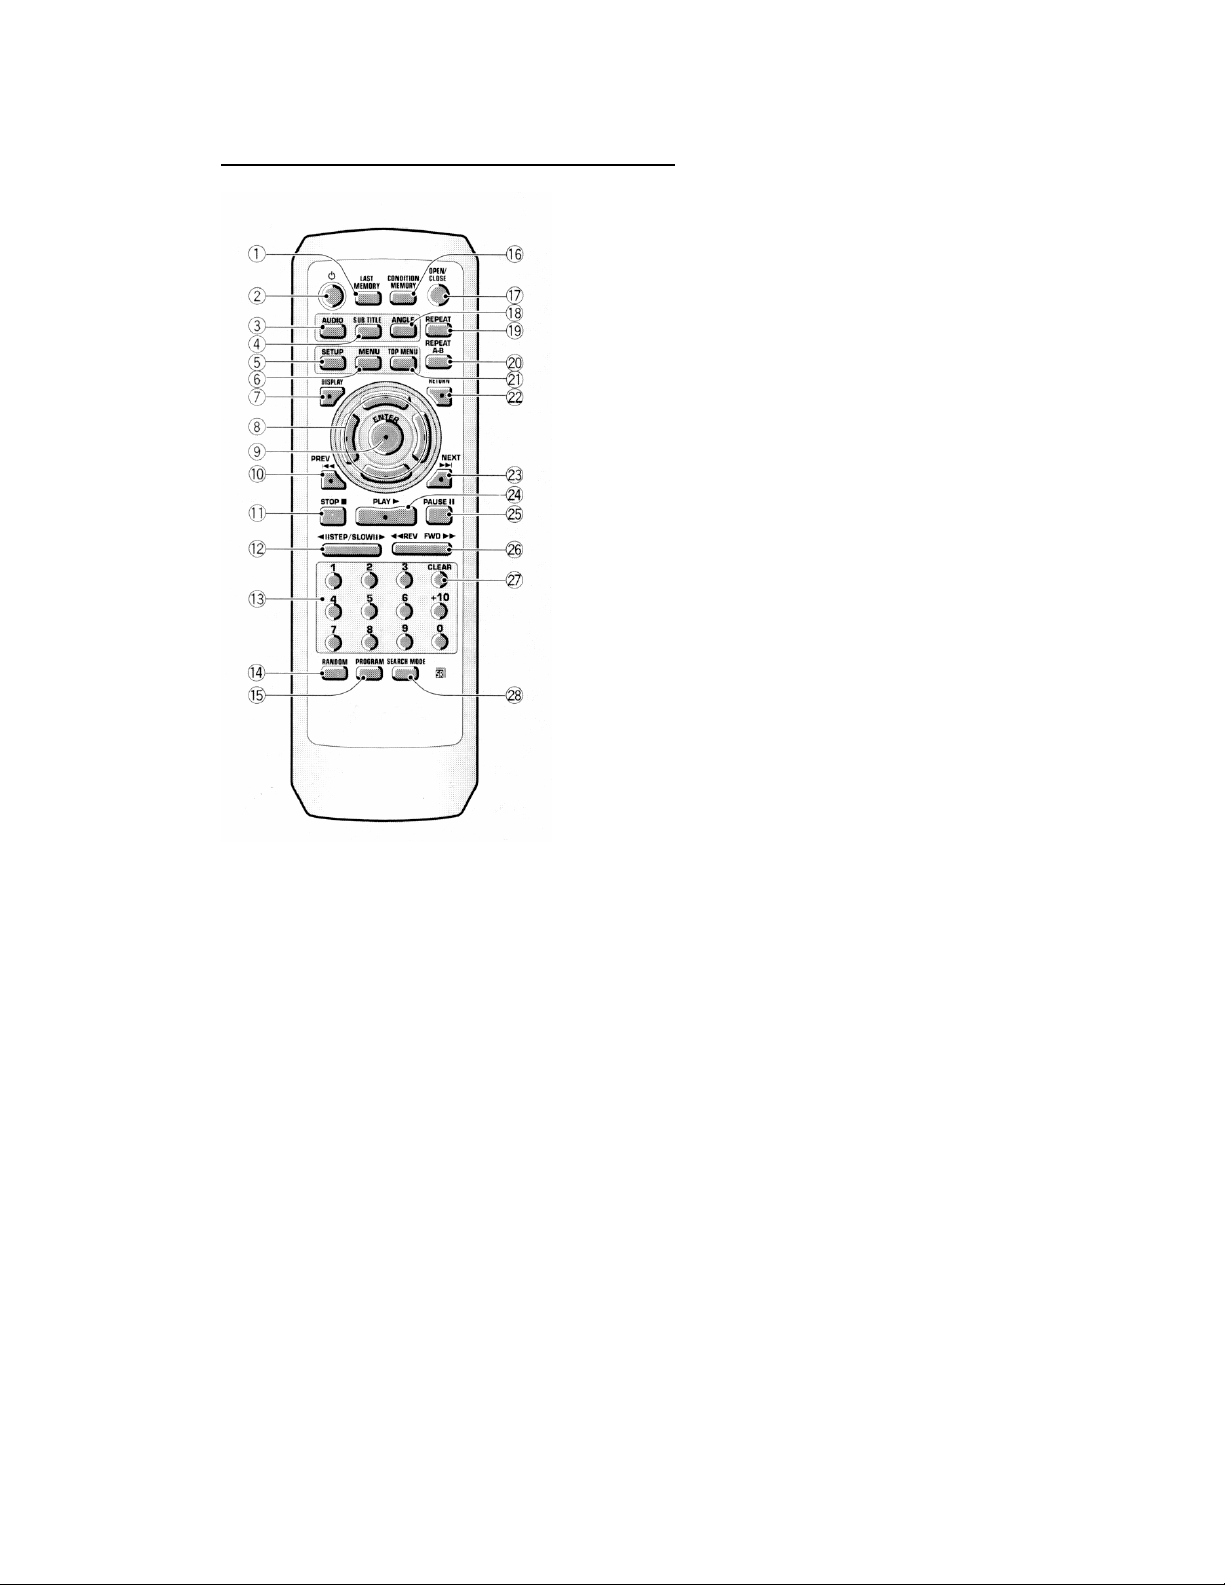
10. REMOTE CONTROL FUNCTIONS
(Buttons indicated with * are used for menu operation.)
1. LAST MEMORY button
You can resume DVD or Video CD playback from the point you last
watched even if the disc is removed from the player. Press LAST
MEMORY during playback to set a Last Memory point. When you want to
resume playback of that disc, press LAST MEMORY in the stop mode and
playback starts from the memorized point. Last Memory locations can be
stored for up to 5 DVDs and 1 Video CD (see below).
2. STANDBY / ON button
Press to switch the player on or to put in standby
3. AUDIO button
Press repeatedly to select one of the audio languages and/or audio
formats programmed on a DVD (see below). For Video CD and CD, each
press changes the audio output as follows : ► Stereo ---- 1/L (Left) -----2/R (Right) ► Stereo, etc…
12

4. SUBTITLE button
Press repeatedly to select one of the subtitle languages programmed on a
DVD or to turn the subtitles off (see below).
5. SETUP button
Press when the player is in either play or stop mode to open and close the
Setup screen (see below).
6. MENU button*
Use to display or close the DVD menu screen (see below).
7. DISPLAY button
Press during playback to display statistical disc information. Press
repeatedly to display different information (see below).
8. CURSOR buttons (arrows)*
Use to move through the options on menu screens and to change settings.
9. ENTER button*
Use to implement settings selected with the cursor buttons or to set items
highlighted in a menu.
10. PREV (previous) button
During playback, press PREV to go back to a previous chapter/track.
11. STOP button
Press to stop playback. Pressing once enables playback to resume from a
point shortly before the location where it was stopped. Pressing twice
causes the disc to return to the beginning of the disc when playback starts
again.
12. STEP/SLOW b uttons
Press STEP/SLOW during playback to view slow playback. In pause
mode, press STEP/SLOW ► to advance DVDs and Video CDs frame by
frame and STEP/SLOW ◄ to back up a few frames at a time.
13. Number buttons (1-9, 0, +10)*
Use to perform direct title and chapter/track searches, and to input
numerical values.
14. RANDOM button
Press to play chapters/tracks in random order (see below).
15. PROGRAM button
You can program titles, chapters, or tracks to play back in a desired order.
Programs can be a maximum of 24 steps. Additionally, DVD programs for
up to 24 discs can be stored in the player's memory for future use (see
below).
16. CONDITION MEMORY b utton
13
 Loading...