

Page 1
TM
Aqua Pod Handheld Remote Control
for
Aqua LogicAqua Logic
Aqua Logic
Aqua LogicAqua Logic
and
Automation and Chlorination
®
G
Operation Manual
LD
LINE
ONTROLS
C
www.goldlinecontrols.com
Page 2

IMPORTANT SAFETY INSTRUCTIONS
When using this electrical equipment, basic safety precautions should always be followed, including the following:
• READ AND FOLLOW ALL INSTRUCTIONS
• Warning - To reduce the risk of injury, do not permit
children to use this product unless they are closely
supervised at all times.
• Dry Handheld unit before charging.
• Do not allow charging base to come in contact with water .
• SA VE THESE INSTRUCTIONS
Compatibility
This Aqua Pod handheld remote control is compatible with all Pro Logic controls
using an AQL2-BASE-RF base station.
The Aqua Pod is also compatible with all Aqua Logic controls operating with software
revision r2.60 or higher using an AQL2-BASE-RF base station operating with software revision r3.00 or higher. Note that the Aqua Pod will NOT communicate with a
AQL-BASE-RF base station. T o verify the software level of your Aqua Logic control
and base station, press the Menu button (possibly multiple times) until “Diagnostic
Menu“ is displayed. Press the “>” or “<” keys (possibly multiple times) until the main
software revision level is displayed (the revision should be 2.60 or higher). Next,
press the “>” key (possibly multiple times) until the “RF Base” revision level is shown
(the revision should be 3.00 or higher).
Installation
Installation
The Aqua Pod uses a rechargeable built-in battery pack which will require an initial
charge when you first receive the unit. Charge the Aqua Pod for at least 5 hours
before attempting to use it without the charger . Note that the Aqua Pod can be used
normally while connected to the charger. Installation of the Aqua Pod requires that
you follow the steps below.
1. Battery is installed at the factory: Do not attempt to open the Aqua Pod.
2. Base Station r equir ed: For operation of the Aqua Pod, the Pro Logic or Aqua
Logic control must have a base station (AQL2-BASE-RF) installed. The base
station allows the control unit to communicate with the Aqua Pod remote.
3. T each the unique Pro Logic/Aqua Logic ID code: The base station attached to
the control has a unique ID code that ensures that your unit will not affect other
systems in the neighborhood, and likewise, their remotes will not affect your
system. To teach the ID code to the Aqua Pod remote unit:
1
Page 3

Settings
Menu
a. On any Pro Logic or Aqua Logic display/
keypad unit press the “Menu” button (possibly multiple times) until “Settings Menu”
is displayed.
Teach Wireless:
+ to start
b. Press “<“ or “>” (again, possibly multiple
times) until “T each W ireless” is displayed.
c. Press the “+” button to start the teaching
Press and hold
wireless button
Teach Wireless:
Teach Wireless:
Successful
Successful
process.
d. Press and hold any button on the Aqua Pod
remote for 4 seconds. The Pro Logic/Aqua
Logic display should say “T each W ireless:
Successful”.
4. Installation is complete: you can now use the Aqua Pod remote.
Charging the Aqua Pod
Plug the included charging stand into a standard 120VAC wall outlet, away from the
pool area. It is not recommended that you use an extension cord with this product
near the pool. Slide the Aqua Pod into the charging stand and charge for at least 5
hours before attempting to operate remotely. Charge the Aqua Pod at temperatures
between 32ºF and 113ºF (0º - 45ºC). The Aqua Pod can be used while in the stand no
matter what state the battery is in. A fully char ged battery will provide about 300 oneminute uses under typical conditions.
About battery power:
When the Aqua Pod is not in the char ging stand, the unit uses battery power and will
take steps to extend battery life. After one minute of no button presses by the user,
the unit will briefly display “Shutting down to save battery power” and will go into
“sleep” mode. If the “System Off” button is pressed while the Aqua Pod is sleeping,
all Pro Logic/Aqua Logic outputs will turn off immediately . For all other buttons, the
Aqua Pod will wake only . Once awake, any subsequent button presses will perform
their normal functions.
When the Aqua Pod is in the charging stand, the unit uses wall power while it also
charges the battery. It will always be “awake”, as long as it's sitting in the charger.
Note that the battery will slowly lose charge if the unit is not plugged into charging
stand even if it is not used. The battery should be charged every 4-5 days, depending
on usage.
The Aqua Pod will display a series of information about its status and the status of the
battery. Refer to the “Operating S tatus” section of this manual for an explanation of
each of these displays.
NOTE: The built-in Lithium Ion battery pack is not replaceable and should offer at
least 5 years of service.
2
Page 4
Range and Location
The Aqua Pod is wireless and portable. Its unique weathertight housing and floating
design allows it to be used outdoors, even while inside the pool or spa.
The Aqua Pod must be used within 200 ft. (assuming the signal will have to travel
through walls) or 400 ft. (line of sight) from the Base Station which is typically mounted
on the Pro Logic/Aqua Logic main control unit at the pool equipment pad. Note that
the AQL2-BASE-RF Base Station can also be mounted up to 500 ft. away from the
control unit to shorten the distance between it and any wireless remote. See the
“Remote Mounting of the Base Station” section of the Base Station manual for more
details.
The wireless remote display/keypad communicates with the base station on the Pro
Logic/Aqua Logic control unit using 900 MHz RF (frequency hopping spread spectrum ) technology.
If the display information is not being updated on a regular basis or if the Pro Logic/
Aqua Logic is not responding to buttons being pressed, then refer to the Troubleshooting section for assistance in resolving these problems.
Operation
The Aqua Pod handheld control gives the user the power to program all the operating
parameters of the Pro Logic/Aqua Logic control system remotely as well as viewing
equipment status and temperatures. The following information discusses the Aqua
Pod's display and pushbuttons.
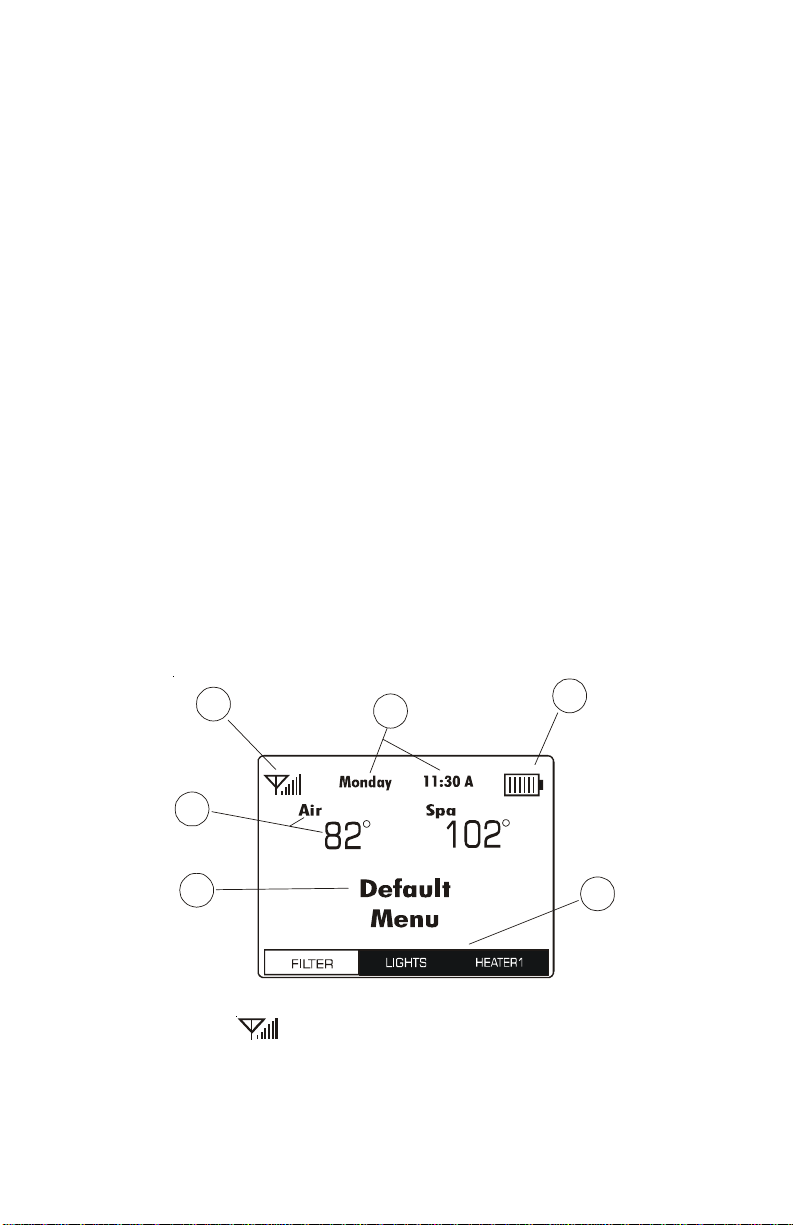
Aqua Pod Display
Refer to the diagram and corresponding information below .
1
3
2
4
5
1. Signal Present
The Signal Present icon shows the status of the radio connection between the Aqua
Pod and the AQL2-BASE-RF base station. When the icon appears, there is adequate
signal strength for communication between the Aqua Pod and the AQL-BASE-RF.
When no icon is displayed, the signal is too low for communications. Note that signal
strength will decrease as the Aqua Pod is moved further away from the AQL2-BASERF or if obstructions such as walls, fences, etc. are located between the Aqua Pod and
AQL2-BASE-RF.
3 8
6
Page 5

2. Charging Indicator
The Charging Indicator will display when the Aqua Pod's battery is charging. This
occurs when the Aqua Pod is sitting in the charging stand and the stand is plugged
into the wall. During charging, the battery bars will move from left to right. When the
battery is fully charged, the Charging Indicator will stop moving and show all bars.
Note that when the battery charge is low, the message “Please plug in to charge
battery” will appear every few seconds. If the battery charge gets too low to continue
powering the Aqua Pod, the display will show “Battery dead! Please char ge now”.
3. Day/Time, System Off and Check System error
Normally, the day of the week and time is shown in this location on the display. The
day and time are sent from the control automatically. Note that all timers will refer to
this information for starting and stopping timed events. If this information is not
accurate, pool/spa equipment may not run properly.
When the Pro Logic/Aqua Logic is in System Off mode, “System Off” will blink in this
location on the display. When an error occurs that requires someone to check the
system, “Check System” will blink in this location on the display. Refer to the Pro
Logic/Aqua Logic manual for Troubleshooting.
4. Pool, Spa and Air Temperatures
This location of the display will show the pool, spa and/or air temperatures depending
on how the system is configured. Note that “---” is displayed in place of the Pool or
Spa temperature if the filter pump is off. “Err” is displayed when a temperature sensor
or its wiring is either open or shorted.
5. Menu
This location on the Aqua Pod's display is used for the direct communication to the
Pro Logic/Aqua Logic control system. Access to the Pro Logic/Aqua Logic menus
and submenus are displayed here. This information follows the Pro Logic/Aqua
Logic's local display, as well as any other remote control connected to the system.
Any programming changes made from the Aqua Pod, Pro Logic/Aqua Logic or any
remote in the system will be displayed here. When no changes have been made from
any location for more than 2 minutes, the Aqua Pod will scroll through each display of
the Pro Logic/Aqua Logic's default menu. Refer to the Pro Logic/Aqua Logic Installation and Operation manuals for more information.
6. Softkeys
The Aqua Pod allows for easy On/Off/Auto control of your pool equipment. Using
the Aqua Pod's softkey pushbuttons, any of your pool's equipment shown in this
location of the display can be turned On/Off or returned to automatic operation.
When equipment assigned to a softkey is on, the equipment name will be displayed
behind a solid backfill (see diagram on page 3). When the output is off, the name will
be displayed with no backfill.
Aqua Pod Pushbuttons
Refer to the corresponding information and the diagram on page 5.
1. SoftKey Pushbuttons
Three softkey pushbuttons are provided to allow the user to conveniently turn on or
off pool equipment that has been previously designated in the Scroll Softkeys and
Softkey Set Mapping menus. Refer to Softkey Set Mapping section on page 6 for
information on how to assign specific pool equipment to each softkey or to change
the assigned keys.
4
Page 6

1
2
3
2. Pro Logic or Aqua Logic Programming Pushbuttons
These keys are used for programming and controlling the Pro Logic/Aqua Logic.
They operate in the same manner as the Pro Logic/Aqua Logic's local keypad buttons. Refer to the Pro Logic/Aqua Logic Installation and Operation manual for detailed information on the use of these buttons.
3. System Off
Pressing this button will turn all outputs off, even if the unit is asleep. They will
remain off regardless of any programmed control logic until the System Off button is
pushed again (on this or any other remote control) or the “SER VICE” button is pressed
on the control's local display/keypad. If the Aqua Pod is asleep, waking it by pressing
this button will shut all of the outputs off.
NOTE: System Off is not implemented for the Aqua Logic P-4 (AQL-P-4) and Aqua
Plus (AQL-PLUS) using software revision r2.60.
Aqua Pod Operation
The Aqua Pod will control and program the Pro Logic/Aqua Logic in the same manner
as the local keypad/display except for the differences described below. Complete
instructions on how to program and view/change settings are available in the Pro
Logic/Aqua Logic Installation and Operation manuals. Use the Aqua Pod's programming buttons for these commands.
Aqua Pod Backlight
Unlike the local keypad/display and other Pro Logic/Aqua Logic remotes, the Aqua
Pod's backlight cannot be set to “Always on”. At any menu, the backlight operates in
the following manner:
• Press and hold “+” key for 1.5 seconds - backlight turns on for one minute
• Press any key while backlight is still on - one minute timer starts over
• Press and hold “–” key for 1.5 seconds - turns backlight back off
SoftKeys
The following two menus are available for the Aqua Pod but are not shown in the Pro
Logic/Aqua Logic menus. These menus are directly accessible by repeatedly pushing the Aqua Pod's MENU button. Refer to these menus and the information on page
6 to map and operate softkeys.
5
Page 7

Select Softkeys
<previous next>
Press repeatedly until “Select Softkeys” menu is displayed
Scrolls through available Softkey Sets
Select Softkey Set
Use the “<” or “>” keys to scroll through all Softkey Sets. A
Softkey Set is a group of three pieces of pool equipment that
can be controlled by the three softkey pushbuttons. The
Softkey Sets are displayed in the Softkeys portion of the Aqua
Pod's display. Each softkey pushbutton controls the equipment that is displayed directly above it. You can define and
make changes to Softkey Sets in the Softkey Set Mapping
menu.
Map Softkeys
locked
Press repeatedly until “Map Softkeys locked” menu is displayed
Press BOTH buttons SIMULTANEOUSLY for 5 seconds to unlock
Softkey Set Mapping
Push the “<” and “>” for 5 seconds to unlock and enter the
Softkey Set Mapping menu. After entering this menu, one of
the displayed softkeys will be flashing. The flashing selection
can be changed by pressing the “+” or “-” keys. When the
desired selection is displayed, press the “<” or “>” keys to
advance to the previous/next softkey . Create all desired softkey
sets using this procedure.
Refer to the diagram below for more information.
Softkey Set Mapping
After entering the Softkey Set Mapping menu, refer to the diagram below for mapping
information. After exiting the Softkey Set Mapping menu, the Aqua Pod will return to
normal operation.
Softkey currently being mapped bl inks .
Softkey Set 1:
Pool
Yar d L ig ht
(L)
Fountain
(A1)
Heat Pump
(H)
Gazebo Light
(A2)
To exit the So ftkey Set Mapping
menu, press the corresponding
button to Save, Cancel or Reset.
Softkey Set 2:
Cleaner
(PS)
(V3)
Press the “<” or “>” buttons to move
to the previous/next Softkey set. Note
that the selection will blink while being
mapped.
Press the “+” or “-” buttons to scroll
through the available selections to map
the Softkey.
6
Page 8

Y ou can SAVE, CANCEL or RESET at any time within the Softkey Set Mapping menu
by pressing the corresponding softkey pushbutton below.
SAVE - This selection will save all changes that have been made to the softkey sets
since entering the menu.
CANCEL - This selection will cancel all changes that have been made since entering
the Softkey Set Mapping menu and revert back to the previously saved selections.
RESET - After prompting for confirmation, this selection will revert the Softkey Sets to
the original factory default settings. All saved selections will be lost.
Operating Status
Because the Aqua Pod is battery operated, it displays various information about its
condition and the status of its battery . Refer to the section below for an explanation
of these displays:
Shutting down to
save battery power
When not in the charging stand, the Aqua Pod will briefly show this display and go
into “sleep” mode after one minute if no buttons are pressed. This mode conserves
the battery power while the remote is not in use. While asleep, the display will be off.
To “wake” the unit up, push any button on the keypad.
Aqua Pod is now
refreshing display
When the Aqua Pod “wakes”, it will show this display while it collects status information from the control unit.
Please plug in to
charge battery
When the battery is low, the Aqua Pod will alternate between this display and the
normal status display . Under typical conditions, there are at least 10 more one-minute
uses available when this display is first shown. The battery will slowly lose charge if
the unit is not put into the charging stand.
Battery dead!
Please charge now!
This display is shown briefly, immediately before the unit shuts down. The Aqua Pod
will not operate again (to protect the battery) until it is inserted into the base charger .
Using wall power
Battery charging now
This display is shown briefly when the Aqua Pod is first placed in its char ging stand.
7
Page 9

TROUBLESHOOTING
1. Can’t find the “T each Wir eless” display: From the Pro Logic/Aqua Logic con-
trol (or any direct wired display/keypad) press the “menu” button (possibly more
than once) until “Settings Menu” is displayed. Next, press the “<” or “>” buttons (possibly more than once) until the “Teach Wireless” display appears. If
you get to the point where “Settings Menu” appears again, then this means that
the Pro Logic/Aqua Logic control unit is not communicating with the base station. Check that the 4 wire cable from the base station is plugged into the
“wireless” connector on the main printed circuit board. If this connector is
already plugged in (for more than 30 seconds), then call Goldline T echnical Service for assistance.
2. “T each Wir eless” failed: Ensure that the remote is powered when pressing the
button. This is indicated by any message on the display of the remote. If the
remote is powered, then the next most likely cause is that the distance between
the base station and the remote is too great—try moving the remote closer to the
base station.
3. Unreliable communication with remote devices: The most likely cause is that
the distance between the base station and the remote is too great—try moving
the remote closer to the base station.
4. Wireless display/keypad not functioning (no display):
If the display/keypad located on the main unit is working correctly, check that
there is battery power to the Aqua Pod. Plug the charging stand into an active
120VAC outlet and insert the Aqua Pod. The display should activate and Aqua
Pod should function normally .
5.
The last keypress
was not received
This is usually a temporary problem caused by interference from other equipment that is using the same radio frequency. Try pressing the button again.
6.
The base station
is not responding
If this is the first time you are using your remote, or if you have just installed a
new base station, run the “T each W ireless” procedure from any other Pro Logic/
Aqua Logic wired display/keypad. Also, the radio signal may be too weak—try
pointing the remote in the direction of the pool equipment or try moving closer
to the pool equipment.
Teach Wireless needs
7.
to be run
Refer to page 1. Run the “T each W ireless” procedure from any other direct wired
Pro Logic/Aqua Logic display/keypad.
Teach Wireless Fail.
8.
Please try again.
This is usually caused by a button being held down for more than 4 seconds,
falsely triggering the Teach Wireless mode. It can also be displayed if the Pro
Page 10

Logic/Aqua Logic is not in the Teach Wireless mode. If the Pro Logic/Aqua
Logic is in Teach Wireless, then the radio signal may be too weak—try moving
closer to the Pro Logic/Aqua Logic main control unit base station.
9.
Display Error x
call 888-921-7665
An internal problem has occurred in the Aqua Pod. Call the Goldline Tech support department (Monday through Friday, from 8AM to 8PM eastern time) to find
out how to obtain a replacement wireless remote display/keypad.
10. Blank screen or erroneous display after "wake" up:
If the Aqua Pod's screen is blank or displays the wrong information after "wake"
up, press the MENU button. This will refresh the display and should correct the
problem.
11. Softkeys do not respond:
There are sporadic reports of Softkeys occasionally not functioning while other
keys continue to function normally. If this happens, reset the Aqua Pod by
pressing the "System Off" button (bottommost key on the Aqua Pod) while
pressing and holding the "<" button. The display will clear and the Aqua Pod will
go through a brief start up routine before functioning normally.
12. "Refreshing Display" continuously displayed:
If the Pro Logic/Aqua Logic's power is off, the Aqua Pod will display this message. In this case, returning power to the Pro Logic/Aqua Logic or "reteaching"
(see Installation instructions) the Aqua Pod will correct the problem.
13. T each fails:
The Aqua Pod can only be used with the AQL2-BASE-RF base station. Be
certain that the proper base station is being used. When teaching, be certain that
the Pro Logic/Aqua Logic control shows "press and hold wireless button" and
that the Aqua Pod is close to the Pro Logic/Aqua Logic.
14. Interference with 900MHz devices (baby monitors, video monitors, etc.):
T o determine if there is a problem, be certain that the interference stops when the
Pro Logic/Aqua Logic's power is turned off. If so, try different channels on the
affected device. Also, try changing the Pro Logic/Aqua Logic's wireless channel. This is described in the Pro Logic/Aqua Logic Installation manual. Note that
some interference may not be able to be resolved.
15. Frequent "last keypress was not received" messages:
This message may be due to interference with other 900MHz devices or because
the Aqua Pod is being used outside of the usable range. Follow step 14 above to
determine if there is an interference problem. If the Aqua Pod is too far from the
base station, consider locating the base station closer by using the Remote
Mount Kit.
9
Page 11

LIMITED WARRANTY (effective 01/01/09) Goldline warrants its Aqua Rite, Aqua Rite Pro,
Aqua Logic, Pro Logic and E-Command products to be free of defects in materials and
workmanship, under normal use and service for a period of three (3) years. This warranty
is applicable from the initial date of installation on private residential swimming pools in the US
and Canada. The warranty is not transferable and applies to the original owner only.
Aqua Trol, commercial installations, installations outside of the US and Canada, accessory
products and replacement parts are covered under the terms of the warranty for a period of
one (1) year.
Proof of purchase is required for warranty service. If written proof of purchase is not
provided, the manufacturing date code will be the sole determinant of the date of installation
of the product.
To obtain warranty service or repair, please contact the place of purchase or the nearest
Goldline authorized warranty service center. For more information on authorized service
centers please contact the Hayward/Goldline Technical Service Support Center ( 61 Whitecap Road, North Kingstown RI, 02852) or visit the Goldline web site,
www.goldlinecontrols.com.
WARRANTY EXCLUSIONS:
1. Material supplied or workmanship performed by others in process of installation.
2. Damage resulting from improper installation including installation on pools larger than the
product rating.
3. Problems resulting from failure to install, operate or maintain the product(s) in accordance with the recommendations contained in the owners manual(s).
4. Problems resulting from failure to maintain pool water chemistry in accordance with the
recommendations in the owners manual(s).
5. Problems resulting from tampering, accident, abuse, negligence, unauthorized repairs or
alternations, fire, flood, lightning, freezing, external water, degradation of natural stone
used in or immediately adjacent to a pool or spa, war or acts of God.
DISCLAIMER. THE EXPRESS LIMITED WARRANTY ABOVE CONSTITUTES THE ENTIRE WARRANTY OF GOLDLINE WITH RESPECT TO ITS POOL AUTOMATION AND
CHLORINATION PRODUCTS AND IS IN LIEU OF ALL OTHER WARRANTIES, EXPRESSED OR IMPLIED, INCLUDING WARRANTIES OF MERCHANTABILITY OR FITNESS FOR A PARTICULAR PURPOSE. THIS WARRANTY GIVES YOU SPECIFIC
LEGAL RIGHTS, AND YOU MAY ALSO HAVE OTHER RIGHTS WHICH VARY FROM
STATE TO STATE. IN NO EVENT SHALL GOLDLINE BE RESPONSIBLE FOR ANY
CONSEQUENTIAL, SPECIAL OR INCIDENTAL DAMAGES OF ANY NATURE WHATSOEVER, INCLUDING, BUT NOT LIMITED TO, PERSONAL INJURY, PROPERTY DAMAGE, DAMAGE TO OR LOSS OF EQUIPMENT, LOST PROFITS OR REVENUE, COSTS
OF RENTING REPLACEMENTS, AND OTHER ADDITIONAL EXPENSES, EVEN IF THE
SELLER HAD BEEN ADVISED OF THE POSSIBILITY OF SUCH DAMAGES. SOME
STATES DO NOT ALLOW THE EXCLUSION OF LIMITATION OF INCIDENTAL OR
CONSEQUENTIAL DAMAGES, SO THE ABOVE LIMITATION OR EXCLUSION MAY
NOT APPLY TO YOU.
NO WHOLESALER, AGENT, DEALER, CONTRACTOR OR OTHER PERSON IS AUTHORIZED TO GIVE ANY WARRANTY ON BEHALF OF GOLDLINE.
THIS WARRANTY IS VOID IF THE PRODUCT HAS BEEN ALTERED IN ANY WAY AFTER
LEAVING THE FACTORY.
10
Page 12

Li Ion Battery Disposal
T
At the end of the battery's useful life, it must be recycled or disposed of properly.
Contact your local county, or state hazardous waste management authorities for
information on recycling or disposal programs in your area.
FCC Statement
This device complies with part 15 of the FCC rules. Operation is subject to the
following two conditions: (1) This device may not cause harmful interference, and
(2) this device must accept any interference received, including interference that
may cause undesired operation.
Changes or modifications not expressly approved by Goldline Controls could
void the user’s authority to operate this equipment.
NOTE: This equipment has been tested and found to comply with the limits for a
Class B digital device, pursuant to Part 15 of the FCC Rules. These limits are
designed to provide reasonable protection against harmful interference in a residential installation. This equipment generates, uses and can radiate radio frequency energy and, if not installed and used in accordance with the instructions,
may cause harmful interference to radio communications. However, there is no
guarantee that interference will not occur in a particular installation. If this equipment does cause harmful interference to radio or television reception, which can
be determined by turning the equipment off and on, the user is encouraged to try
to correct the interference by one or more of the following measures:
— Reorient or relocate the receiving antenna.
— Increase the separation between the equipment and receiver.
— Connect the equipment into an outlet on a circuit different from that to which
the receiver is connected.
— Consult the dealer or an experienced radio / TV technician for help.
Industry Canada Statement
This Class B digital apparatus complies with Canadian ICES-003.
Cet appareil numérique de la classe B est conforme à la norme NMB-003 du Canada.
The term “IC” before the certification / registration number only signifies that the
Industry Canada technical specifications were met.
Refer to www.goldlinecontrols.com for latest
manual revisions, additional information and helpful service.
G
LD
LINE
ONTROLS
C
North Kingstown, RI 02852 USA
Copyright © 2008 Goldine Controls
092146G
 Loading...