


Tablet ORION 101
OWNER’S MANUAL
Tablet ORION 101
INSTRUKCJA OBSŁUGI
VISIT OUR WEBSITE
WWW.GOCLEVER.COM
TO SEE MORE PRODUCTS TAB, NAVIO, DVR, DVB-T
Przed skorzystaniem z urządzenia zapoznaj się z niniejszą instrukcją obsługi
oraz zachowaj ją na przyszłość

2
Contents / Spis treści
English
3
Polski
16
Warunki gwarancji
29

3
Precautions
Important Declaration
1. Before using the tablet PC, please read all information provided by us, so that you can use
this product correctly. Please make sure that you have read this manual carefully before
using this product.
2. Our company reserves the copyright of this manual, any random duplication or
interpretation of the full or partial manual is forbidden in commercial activities.
3. The information covered in this manual is all based on the latest information when
compiling the manual, and products are subject to change without notice for further
improvement. We are not committed to any mistakes or incidences caused by the manual.
For additional product information, visit the website: www.goclever.com.
4. When using this product, please make backup for the data by yourself and this company
will just be responsible for the product's hardware itself, and will not undertake any
responsibility for any loss or damage of personal data and information due to wrong
operations of hardware.
This manual includes important information on safety precautions and proper usage of this
product. To prevent any accident, please make sure that you have read this manual carefully
before using this product. Do not keep this product in a place with a high temperature,
humidity or too much dust. Especially do not place this product in a car with all windows
closed in summer, and keep out direct sunlight.
Avoid dropping or shocking this product heavily and avoid shaking the IPS display
violently, otherwise, the IPS display may be damaged or cannot play correctly.
Please choose a suitable volume. Avoid excessively high volume when using a
headset. If you feel any ear noise, please decrease the volume or stop using.
Do not break the connection suddenly when this product is conducting formatting,
uploading or downloading operations, otherwise there may be program errors.
This company will not undertake any responsibility for any memory loss due to
product damage, repairing or other reasons.
Do not dissemble this product by yourself and do not clean the surface of this product
with alcohol, thinner or benzene.
Do not use this product in a place where the using of electronic device is prohibited,
such as on a plane.
4
Do not use this product while driving a car or walking on the street, otherwise traffic
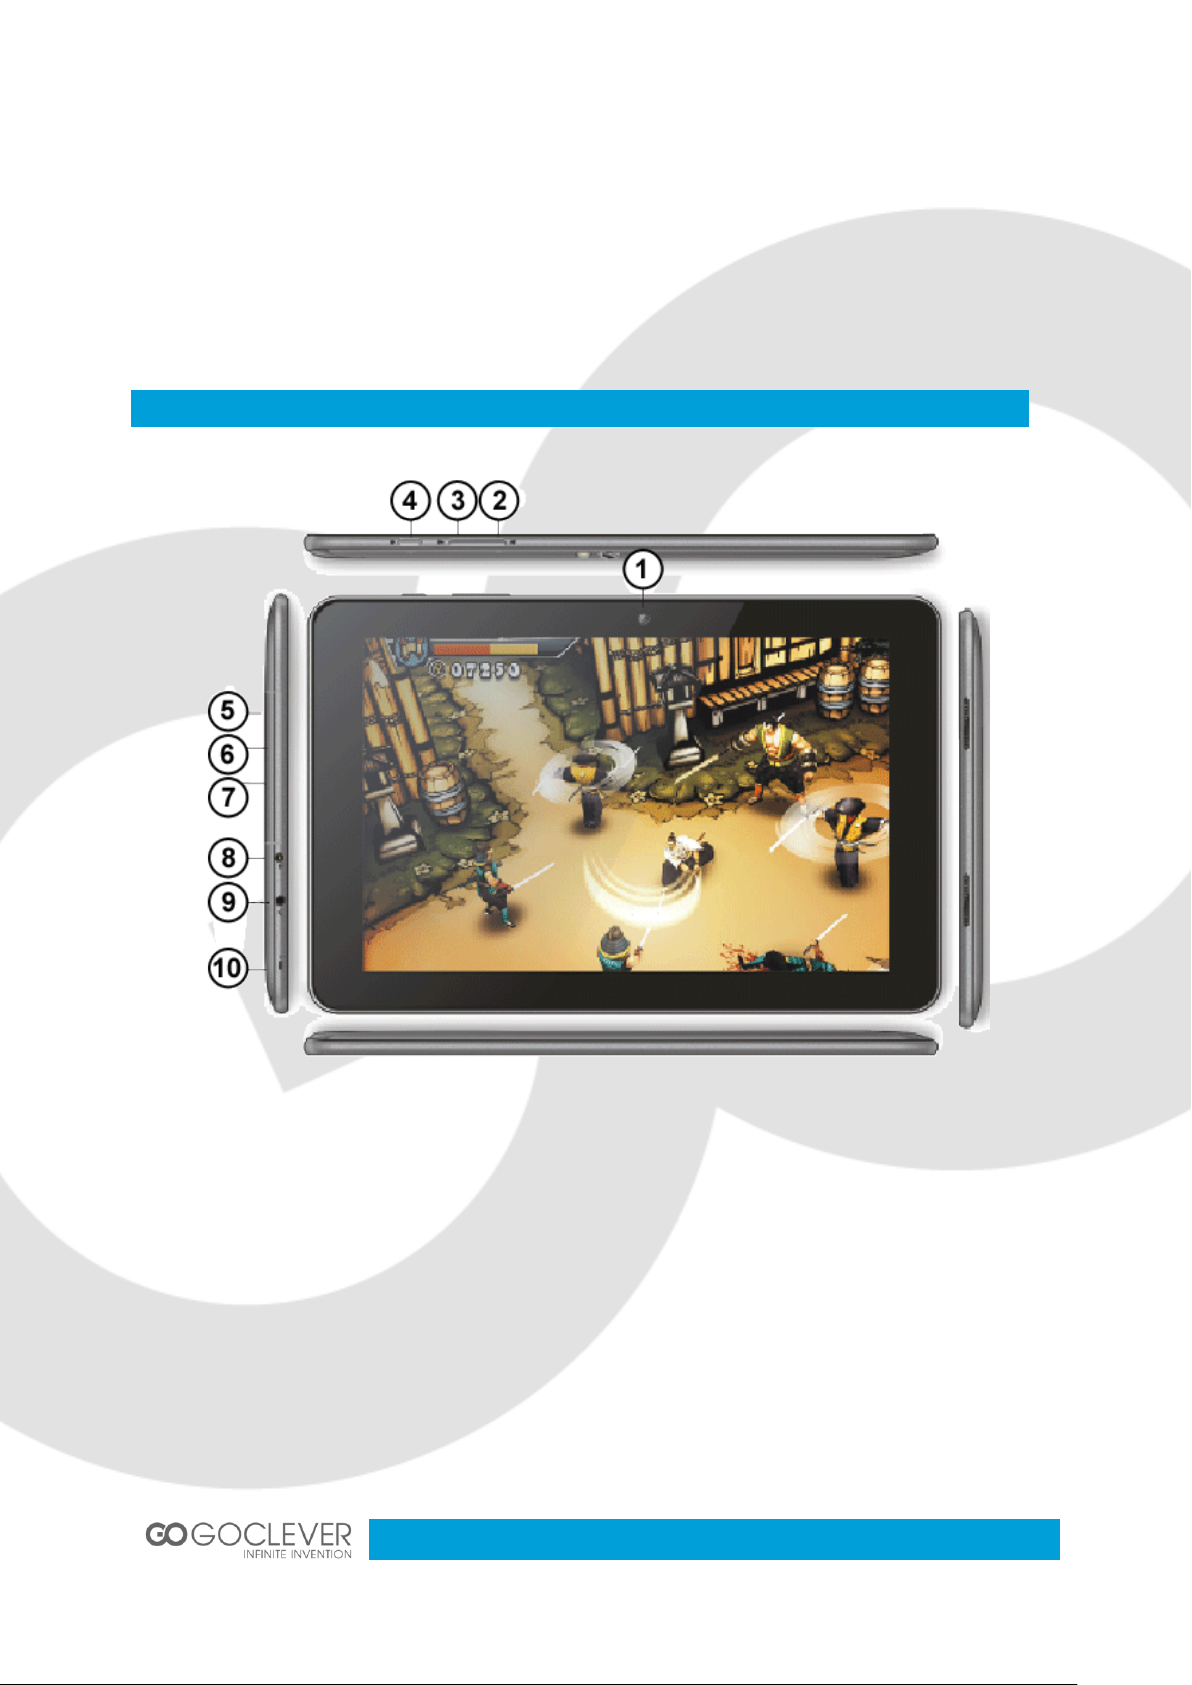
Appearance and Buttons
1. Front camera
2. “V -”: Volume down
3. “V +”: Volume up
4. Power Button - long press this button to
turn On/Off the player, short press this
button to lock screen in order to avoid
operation error
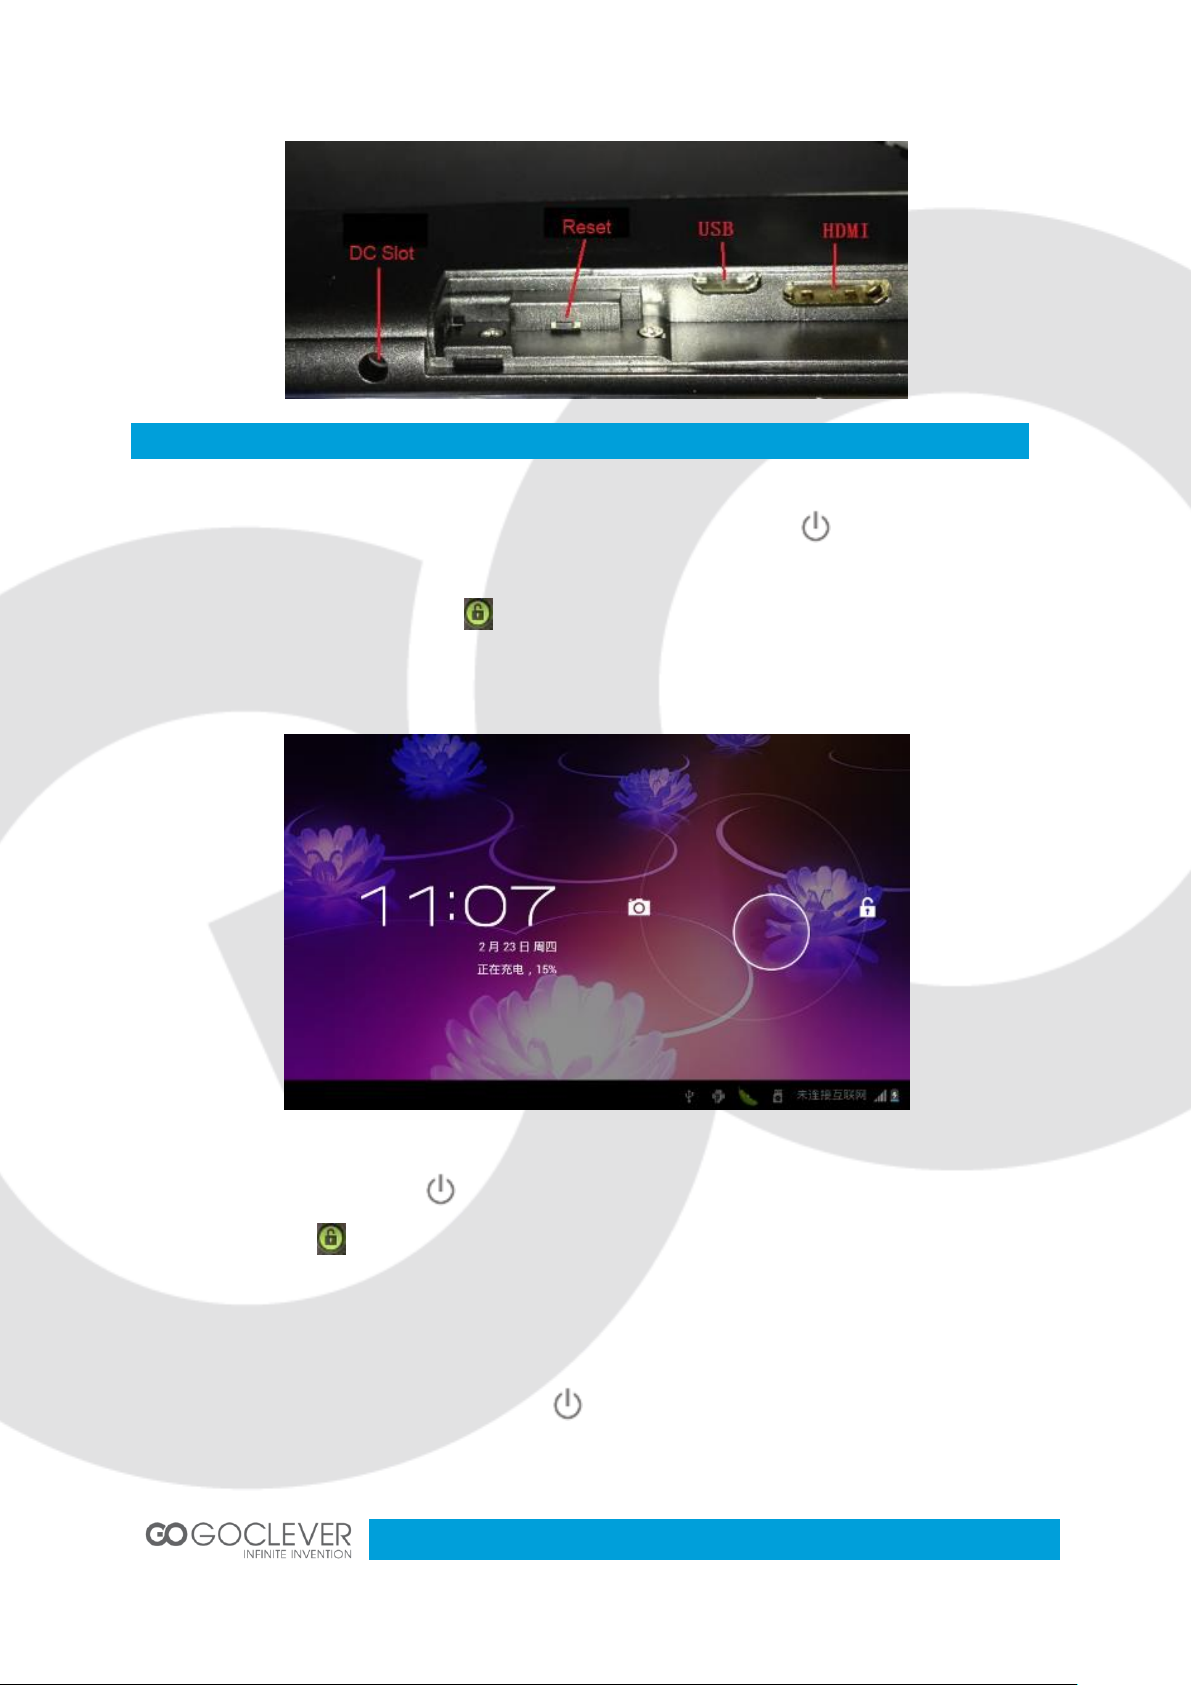
5. Memory card slot
6. HDMI slot
7. USB Port: Micro USB 5 Pin data cable
supports external U-disc, MP3, MP4, wired
mouse, 3G wireless Internet card, etc.
8. DC charge port: 5V DC charger (2.5MM
plug)
9. Earphone Jack
10. MIC
accident may occur.
Our company reserves the right to make any improvement on this product. No further
notice will be provided on any variation on the specification and design of this
product!
This device is not waterproof.
5
Quick Start
Power On/Off and unlock: at the status of power off, long press “ ” for three seconds to
turn on. It will take some time to power on, please wait. It will take about 100 seconds to
enter system, drag unlock icon “ ” to the camera icon on the left to take photo and to the
unlocking icon on the right to unlock, see below:
Energy-saving and locking mode: at the process of using, system will automatically enter
energy-saving mode, press “ ” to wake up the screen, system will enter unlocking mode in
one second, slip “ ” to unlock.
Notes: At the status of energy saving mode, the main operation won’t stop, only LCD screen
will be off, showing black screen. Music or film continues playing.
Power Off: At the status of using, press “ ” for 5 seconds, the screen will show power off
option. Select “Power off” option, confirm your choice and system will automatically turn off.
Select “Cancel” to cancel power off operation.
6
Battery and Charge
Computer Connection & File Transfer
Notes: At the status of low-power, it will have warning voice; connect the DC adapter and
begin to charge, it will automatically turn off. If the product cannot boot, please check the
battery.
Battery should be charged for 8 to 12 hours for the first time
Please use charger approved by our company for charging
Please don’t disconnect the charger until device is fully charged
Battery icon will show whether it is fully charged
Don’t charge in high temperature environment (like under direct sunshine)
Lithium battery doesn’t need to discharge. User can charge the battery when there is
still power left
While charging, it is normal that both charger and device will heat up
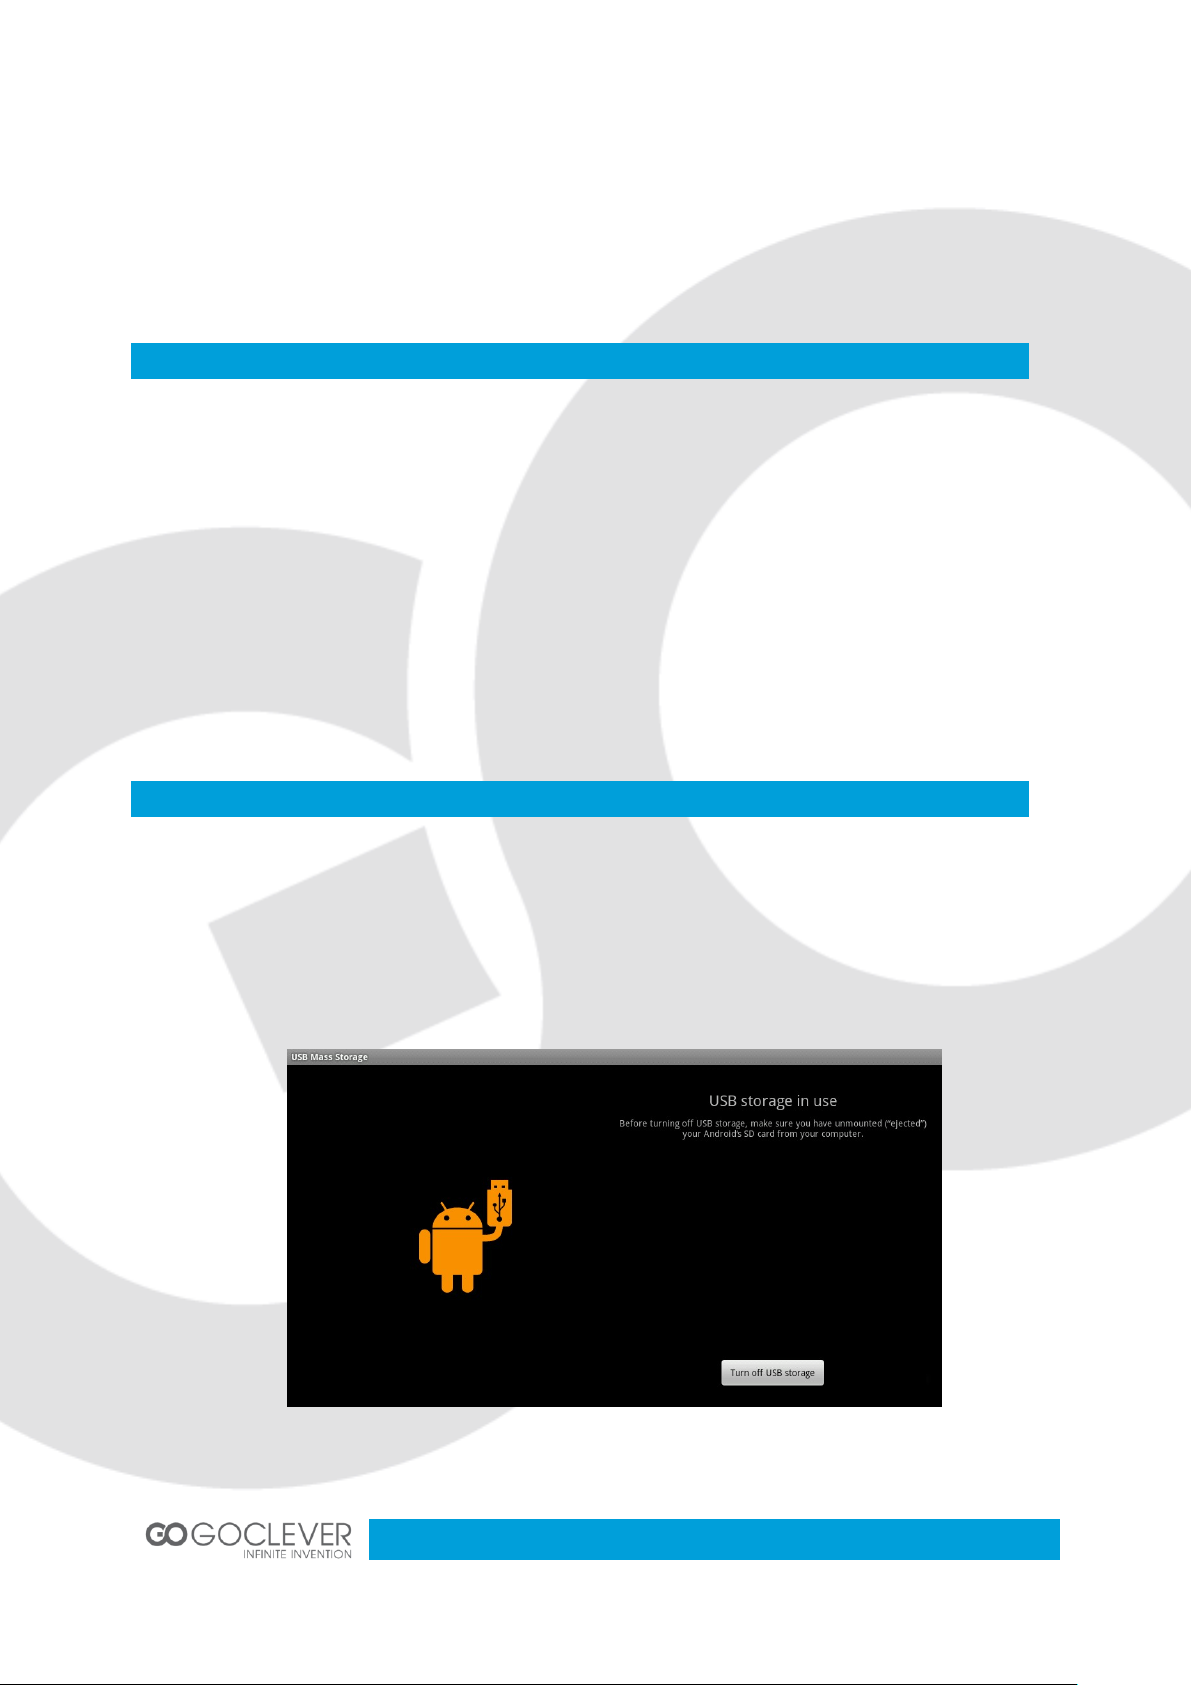
Connect the device to computer with USB cable
The default mode is battery charging mode
To change the default charging mode to transfer mode, roll down the status bar and
switch to USB storage status (see picture below)
7
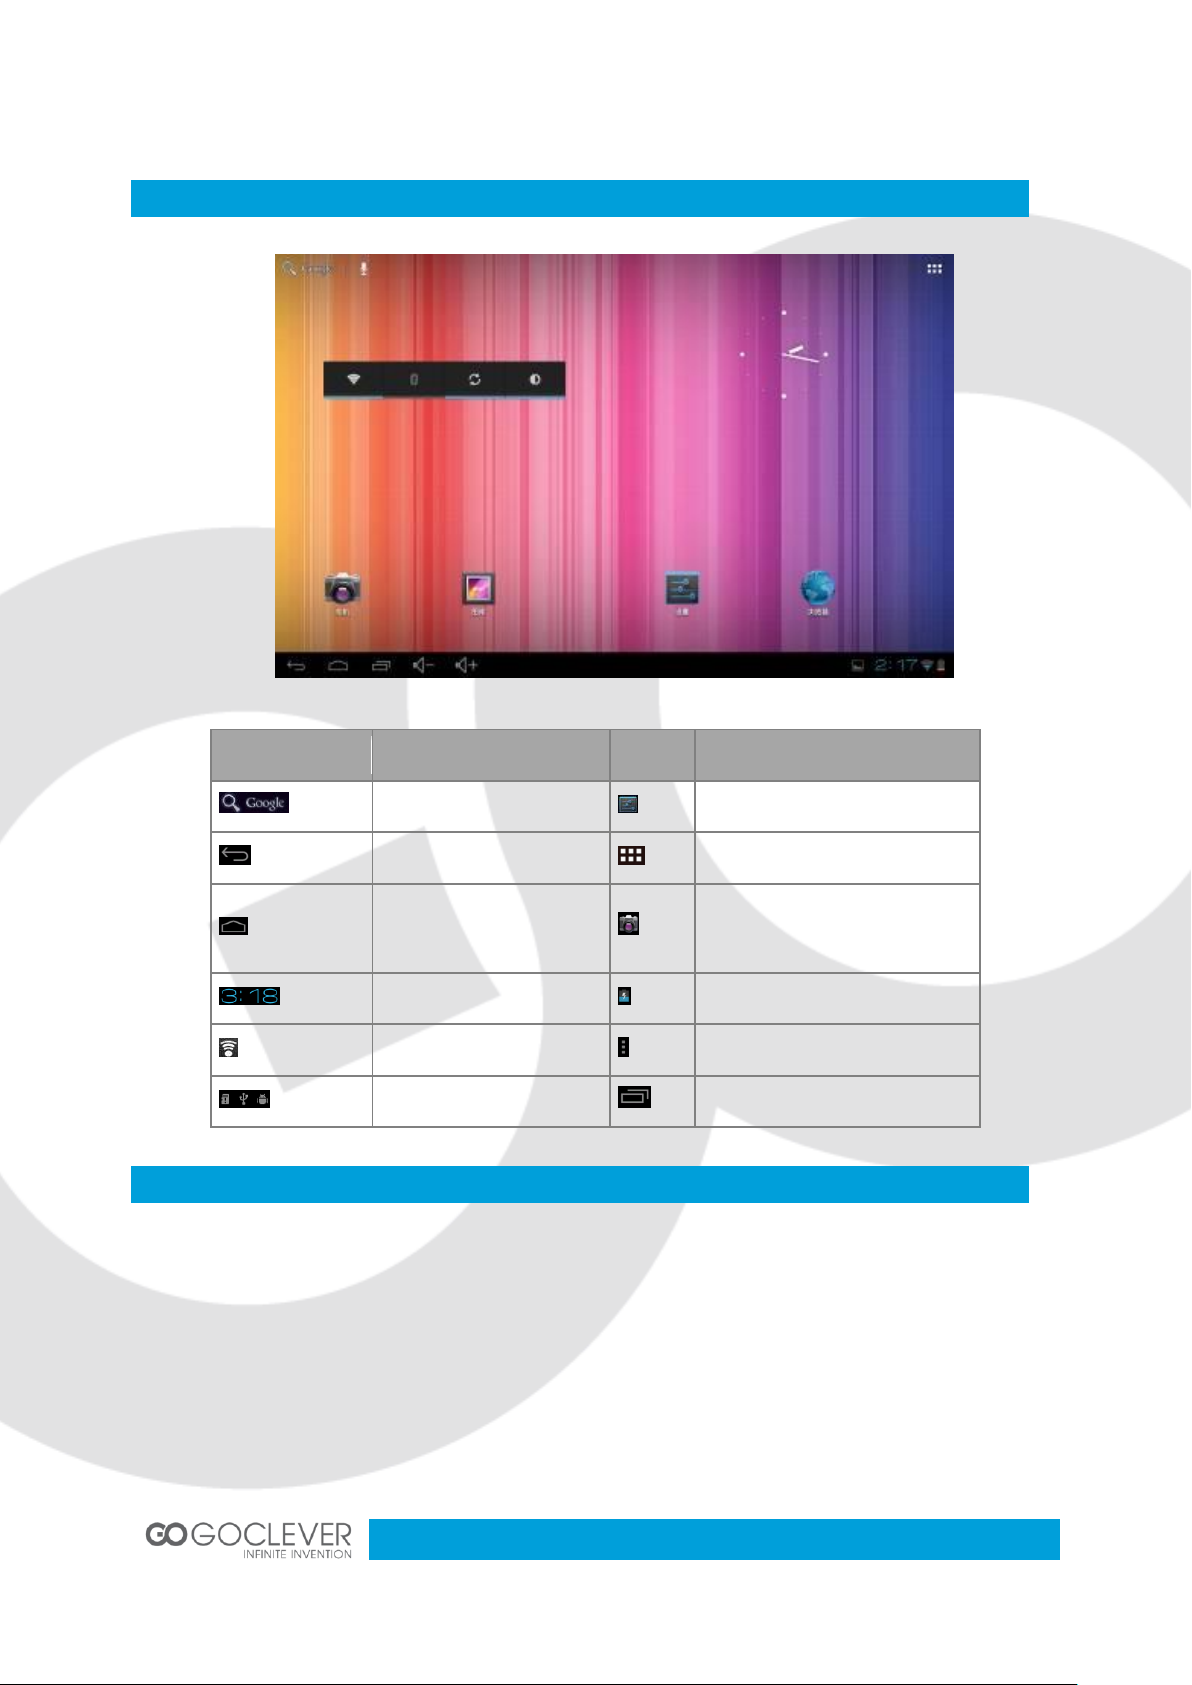
Main Interface Functions
Icon
Definition
Icon
Definition
Google search
Setting
Back
Application list
Back to main interface
from any interface
Camera
System current time
Battery
Wi-Fi signal
Menu
Mass storage status
Setting menu
Application Installation
Download and copy your application into memory card
Insert memory card into the device
Open “Setting/application program”
Select “Unknown sources”
Find your application file and install it on the device
If you want to uninstall the application, select “Apk installer”, then select
“Manager” to enter applications list and select the application you want to delete
8
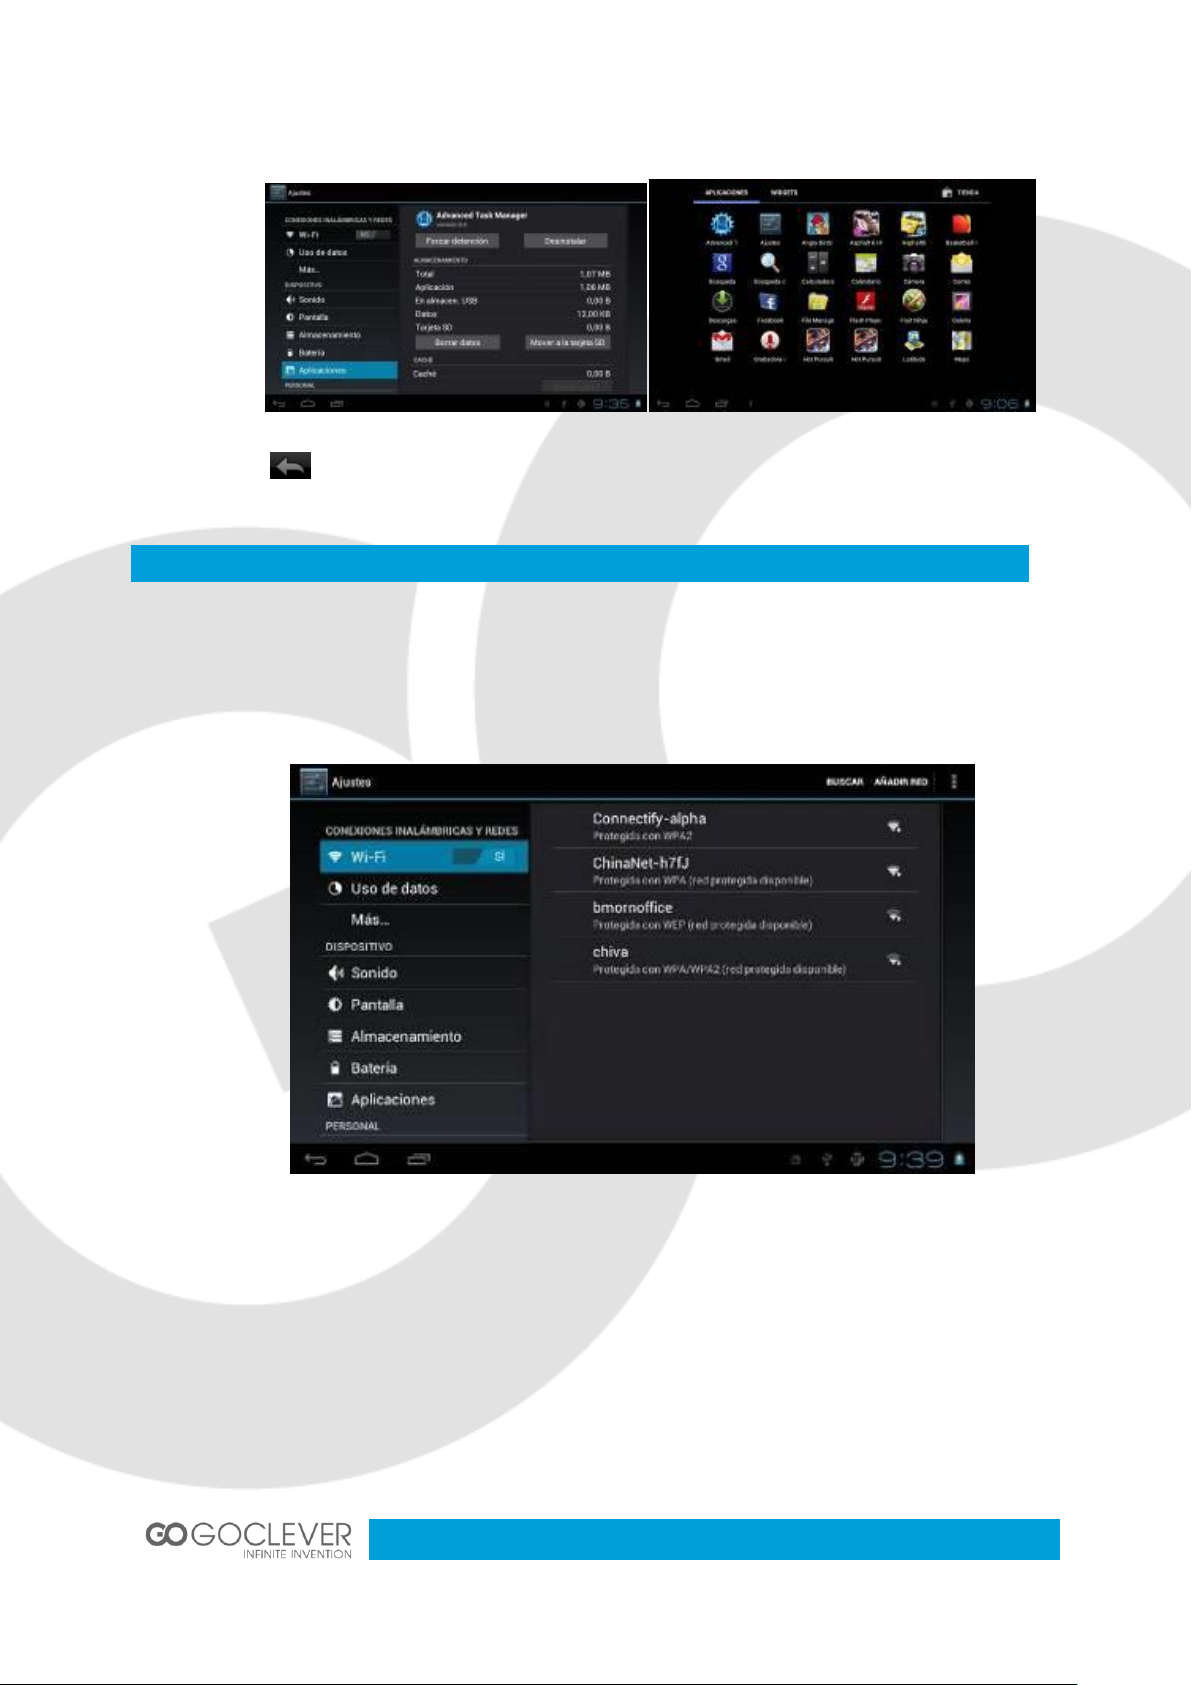
Internet
Click to go back to previous interface
Wi-Fi connection.
Click the main interface shortcut, select “Internet connection manager”, click “Wi-Fi
settings”, enter Wi-Fi setting interface and turn on the Wi-Fi switch (see picture below)
The device will automatically scan for wireless networks
Select your network
Enter the password when prompted and connect to the network to get access to the
Internet
9
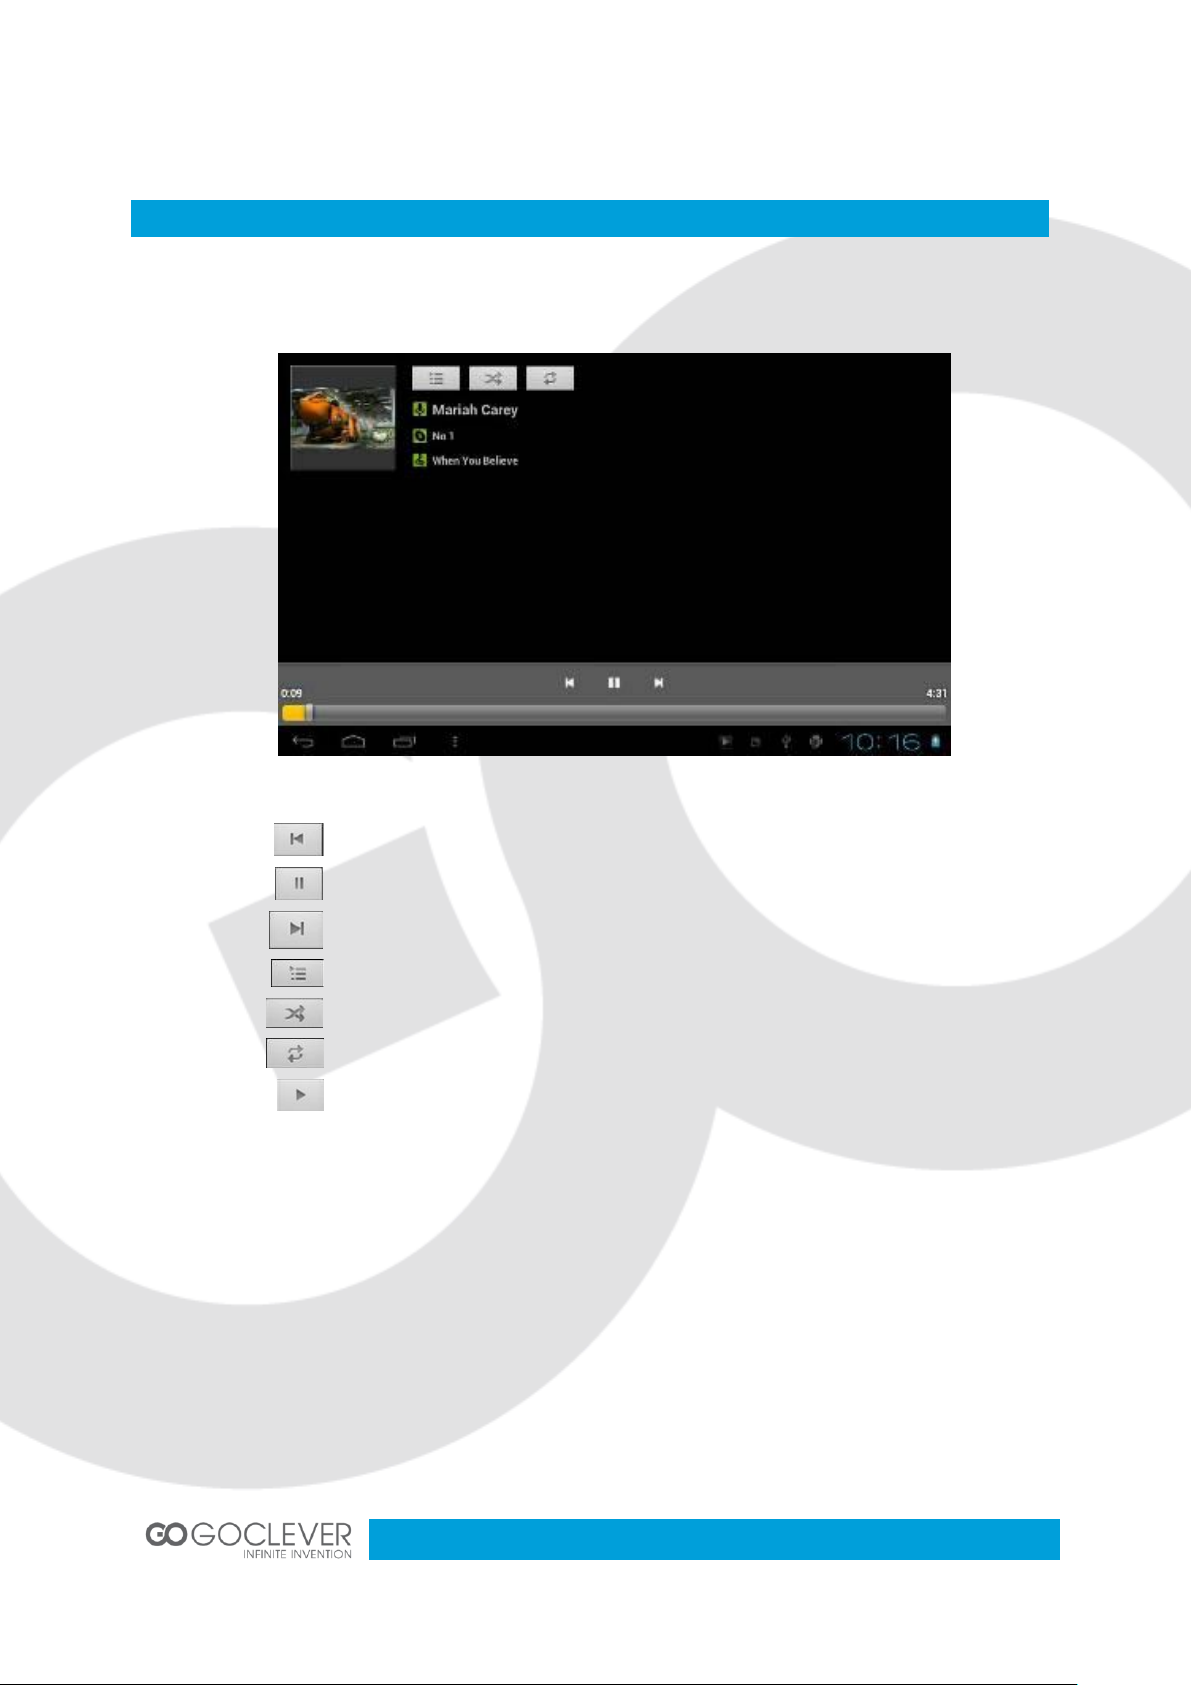
Music Player
Play the previous music, long press to fast reverse
Pause
Play the next song, long press to fast forward
Display the present playing list
Select the random playing mode
Select the repeat playing mode
Play
Click the music icon to enter the music player interface. Select your music file.
10
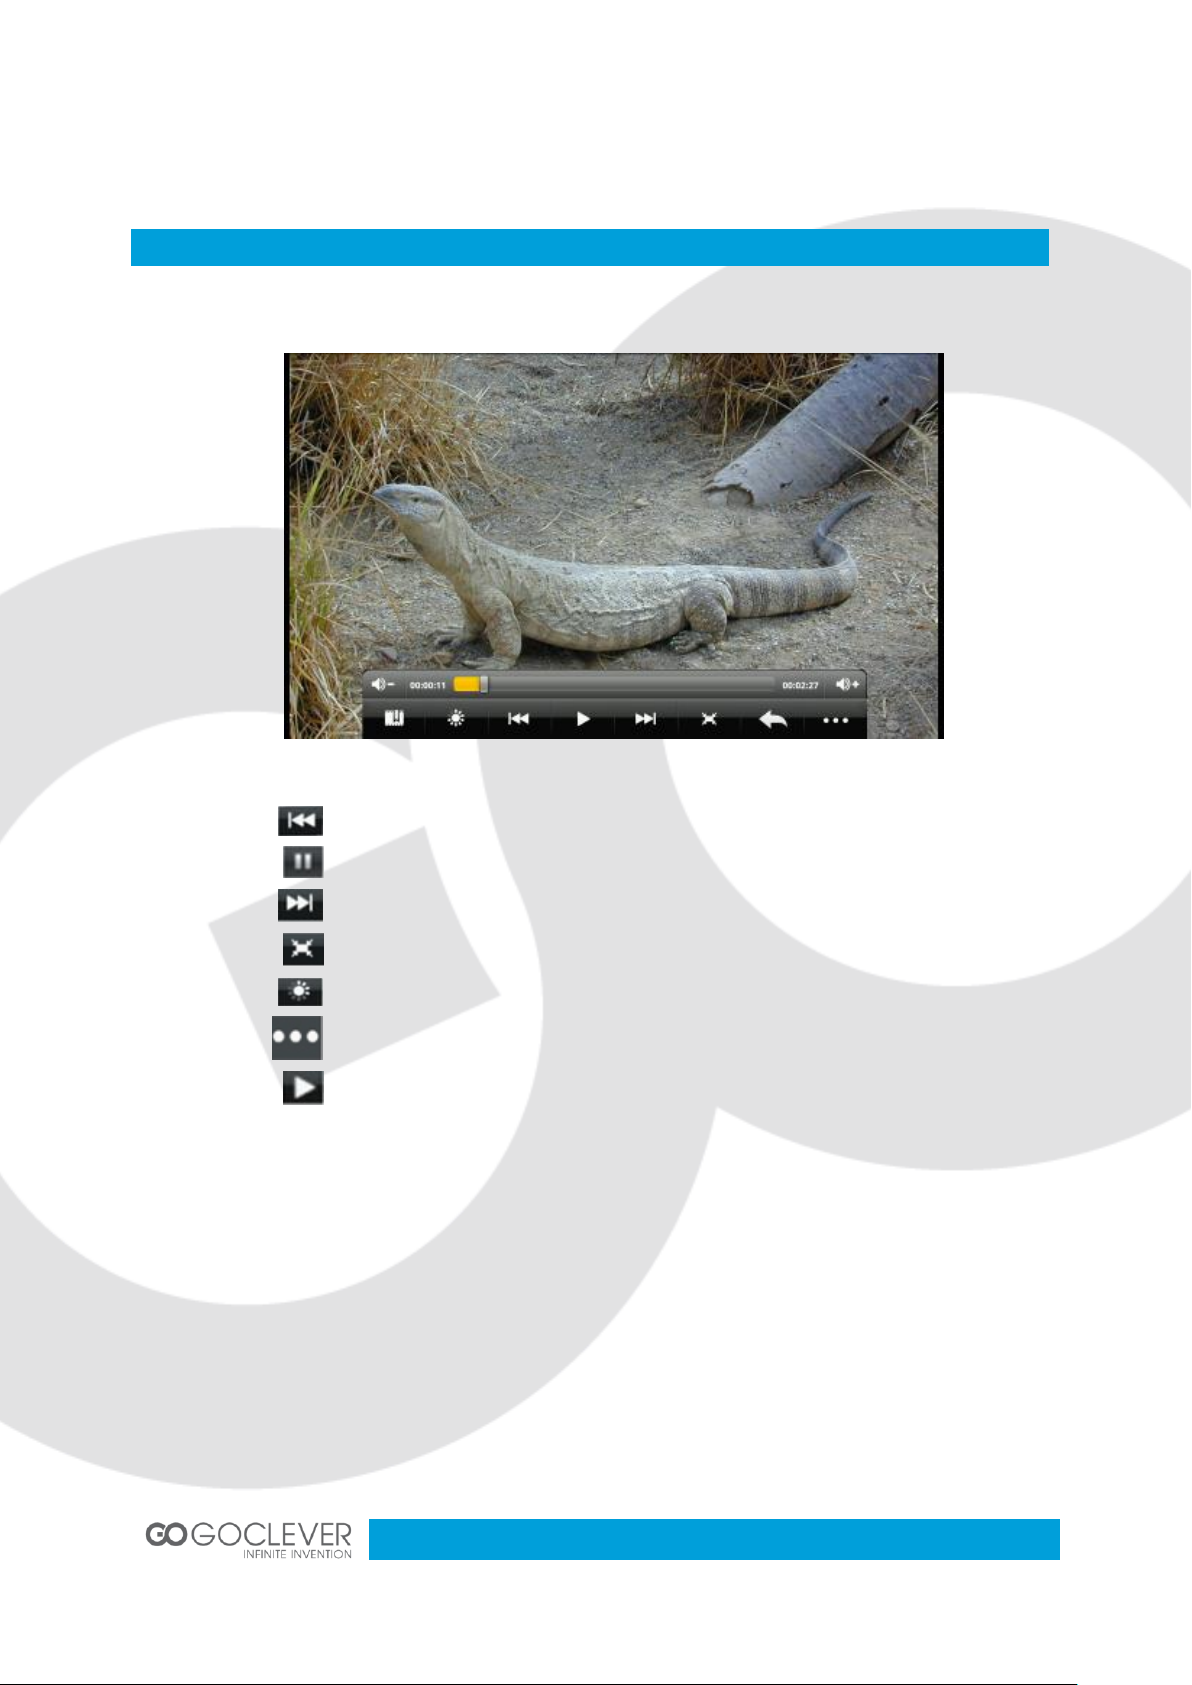
Video Player
Play the previous video, long press to fast reverse
Pause
Play the next video, long press to fast forward
Screen adjustment
Click to set up brightness
Enter video settings
Play
Click the video icon to enter the video player interface. Select your video file.
11
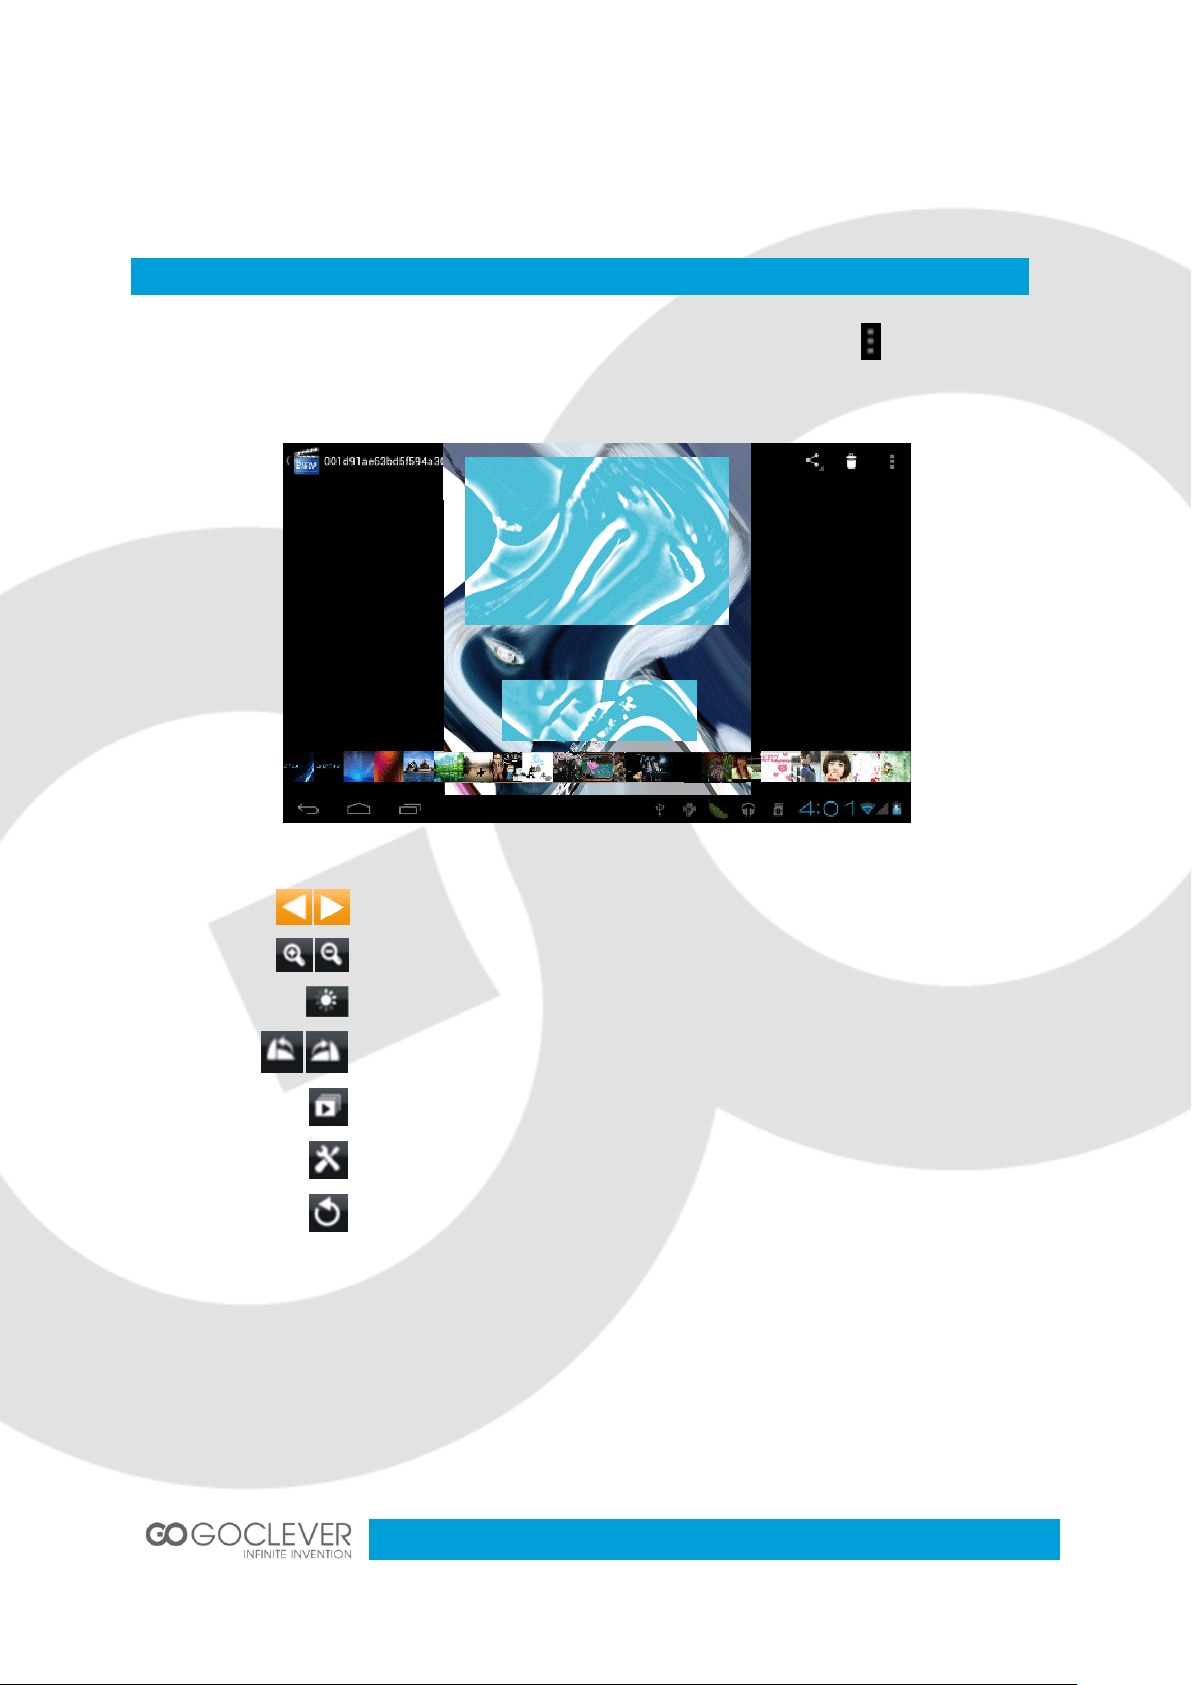
Photo Browser
Select pictures
Zoom in/out the picture
Brightness setting
Rotate the picture
Enter the slideshow mode
Enter video settings
Return to previous menu
Click the photo gallery icon to enter the photo browser interface. Click icon to bring up
photo menu.

12
Camera
Take a picture
Switch front/rear camera (if available)
Enter video record mode
Begin record (video mode)
Stop and save the recording (video mode)
File Manager
Select the camera icon, to enter the camera mode. In this interface you can take a picture or
record a video.
Select the file manager icon, then
select “microSD” or “Local Disk” to
expand the folders and related files.
Here you can copy, move, paste or
rename files. To edit a file, hold a
finger on it and bring up the edit
menu.

13
External Devices
Memory Card
USB mass storage devices
The device can support USB disk and some other devices like MP3 or MP4 players.
Please don’t use external devices with low battery power.
USB mouse/keyboard
After connecting a mouse, a mouse pointer will appear on the screen. The left mouse
button is a confirm button, the right mouse button is a return button. Use the middle
mouse button to slide menus up and down.
After connecting a keyboard, some keys will not work. We are recommending a
standard USB keyboard.
The device comes with memory card slot. It supports microSD up to 32GB but no less than
1GB. Remember to use all memory cards properly:
When card is working, don’t pull it out
Avoid using memory card in high temperature or high humidity environment
Keep the memory card away from liquids
To pull out a memory card, push it a little and it will pop up
Do not force pull or push a memory card

14
Troubleshooting
1. The first time to turn on the device takes too long time.
After updating the system of the device, it will take 2-3 minutes to install the
application software. Then, the speed of turning on the device will be faster than
before.
2. Sometimes, the temperature of the device is a little high.
It is the common situation that the temperature of the device is a little high when use
several applications at the same time or the backlight is maximum or it is charging.
3. The device cannot connect to the Wi-Fi network.
Make sure the wireless router works well.
The distance between the device and the wireless router should be within 50m and
there is no wall or other barriers between them.
Please make sure the user and the password are correct.
4. Cannot surf the Internet.
Please make sure the distance between the device and the wireless hot spot is within
50m.
Please re-connect the Wi-Fi.
5. The system cannot run in some situation.
When installing some third party applications, the system may not run. It is suggested
to long click the Power button for 6 seconds to turn off the device.
6. Cannot set the E-mail or register the application system
Please make sure the connection of the Internet works well.
Please make sure the way to set the e-mail is correct.
7. Cannot read the data of the memory card
Please make sure the memory card inserted into the device correctly.
Please make sure that your memory card capacity is between 1 and 16GB

15
8. Sometimes, the device runs slowly.
This is the common situation. But you can close some applications in the last
management interface, or uninstall some third party application to release more
system resources.
9. Bluetooth connect
1. Keyboard set switch to ON and press Connect button
2. Tablet Settings->Bluetooth set ON
3. When tablet find on list Goclever Keyboard tap on it.
4.Using keyboard keys input 4 code PIN and press Enter
5. Now you can you keyboard with tablet after success Pair

16
Tablet ORION 101
INSTRUKCJA OBSŁUGI
VISIT OUR WEBSITE
WWW.GOCLEVER.COM
TO SEE MORE PRODUCTS TAB, NAVIO, DVR, DVB-T
Przed skorzystaniem z urządzenia zapoznaj się z niniejszą instrukcją obsługi
oraz zachowaj ją na przyszłość

17
Ostrzeżenia
Ważne Informacje
1. Przed skorzystaniem z urządzenia, przeczytaj wszystkie dostępne informacje. Upewnij się,
że przeczytane instrukcje są dla Ciebie zrozumiałe.
2. Nasza firma posiada wszelkie prawa autorskie niniejszej instrukcji obsługi. Zabrania się jej
powielania zarówno w części jak i w całości.
3. Informacje zawarte w niniejszej instrukcji obsługi opierają się na najnowszych dostępnych
danych, jednak firma zastrzega sobie prawo do ich zmiany bez wcześniejszego uprzedzenia.
Firma nie ponosi odpowiedzialności za jakiekolwiek błędy wynikłe z używania niniejszej
instrukcji obsługi. Dodatkowe informacje dostępne są na stronie www.goclever.com.
4. Podczas korzystania z urządzenia, pamiętaj o wykonaniu kopii bezpieczeństwa
przechowywanych na nim danych. Firma nie ponosi odpowiedzialności za uszkodzenie lub
utracenie danych wynikłe z niewłaściwego korzystania z urządzenia.
Niniejsza instrukcja obsługi zawiera ważne informacje dotyczące bezpiecznego i
poprawnego korzystania z urządzenia. Przeczytaj poniższe wskazówki, aby zapobiec
uszkodzeniu urządzenia lub skaleczeniu ciała. Nie przechowuj urządzenia w
pomieszczeniach, w których panuje wysoka temperatura lub wysoka wilgotność powierza.
Nie zostawiaj urządzenia w samochodzie, w miejscu, w którym będzie ono narażone na
bezpośrednie działanie promieni słonecznych.
Staraj się nie narażać urządzenia na wstrząsy, które mogą uszkodzić ekran IPS.
Wybieraj odpowiedni poziom głośności dźwięku podczas korzystania z zestawu
słuchawkowego. Zaprzestań używania słuchawek, jeżeli słyszysz szum w uszach.
Nie przerywaj połączenia sieciowego, jeżeli urządzenie jest w trakcie pobierania
danych. Nie wyjmuj karty pamięci podczas zapisu lub odczytu danych.
Firma nie ponosi odpowiedzialności za szkody wynikłe z utraty danych.
Nie demontuj urządzenia. Nie czyść urządzenia przy użyciu środków zawierających
alkohol, rozpuszczalnik lub benzynę.
Nie używaj urządzenia w miejscach, w których korzystanie z urządzeń
elektronicznych jest zabronione (np. w samolocie)
Nie używaj urządzenia podczas prowadzenia pojazdu lub podczas przechodzenia
przez jezdnię samochodową.

18
Firma zastrzega sobie prawo do wprowadzania ulepszeń produktu bez
Wygląd i Przyciski
1. Przedni aparat
2. “V -”: Zmniejsz poziom głośności
3. “V +”: Zwiększ poziom głośności
4. Przycisk zasilania – przytrzymaj przycisk
przez kilka sekund, aby włączyć/wyłączyć
urządzenie, naciśnij przycisk, aby
zablokować ekran.
5. Gniazdo kart pamięci
6. Gniazdo HDMI
7. Port USB: 5-pinowy kabel USB z
obsługą zewnętrznych urządzeń pamięci
masowej, myszy, klawiatury, Internetu 3G i
innych
8. Gniazdo zasilania: 5V (wtyczka 2.5mm)
9. Wejście słuchawkowe
10. Mikrofon
wcześniejszego ostrzeżenia i zmian w specyfikacji.
Urządzenie nie jest wodoodporne.

19
Szybki Start
Włączanie/wyłączanie urządzenia i odblokowywanie ekranu: aby włączyć urządzenie,
przytrzymaj przycisk “ ” przez około trzy sekundy. Urządzenie uruchomi się po kilkunastu
sekundach. Załadowanie systemu zajmuje około 100 sekund. Będąc na ekranie blokady,
przeciągnij ikonę “ ” na ikonę odblokowanej kłódki, aby rozpocząć pracę:
Blokowanie ekranu i oszczędzanie baterii: po kilku minutach bezczynności, system przejdzie
w tryb oszczędzania baterii. Wciśnij przycisk “ ” aby przywrócić system do normalnej pracy
i podświetlić ekran. Użyj ikony “ ” aby odblokować ekran.
Uwaga: Tryb oszczędzania baterii nie przerwie odtwarzania filmu oraz muzyki, ale wyłączy
podświetlenie ekranu.
Wyłączanie urządzenia: przytrzymaj przycisk “ ” przez około pięć sekund. System
wyświetli informację o potwierdzeniu wyłączenia urządzenia. Wybierz opcję wyłączenia, aby
zamknąć system.
Uwaga: Urządzenie przypomni o niskim poziome baterii charakterystycznym dźwiękiem.
Jeżeli urządzenie nie chce się uruchomić, należy podłączyć ładowarkę i spróbować
uruchomić je ponownie po kilku minutach.

20
Ładowanie Baterii
Połączenie z Komputerem i Transfer Plików
Bateria powinna być ładowana przez 8 do 12 godzin przy pierwszym użyciu
Używaj tylko i wyłącznie oryginalnej ładowarki dostarczonej przez producenta
Nie odłączaj ładowarki, jeżeli baterie nie są w pełni naładowane
System zasygnalizuje koniec ładowania poprzez odpowiednią ikonę na ekranie
Nie używaj ładowarki w wysokich temperaturach (np. podczas działania
bezpośrednich promieni słonecznych)
Bateria litowa może być ładowana nawet wtedy, gdy jej energia nie została
wykorzystana do końca
Podczas ładowania bateria i ładowarka mogą się nagrzewać
Podłącz urządzenie do komputera za pomocą kabla USB
Urządzenie przejdzie w tryb ładowania baterii
Aby wyłączyć tryb ładowania baterii i przejść w tryb transferu danych, rozwiń pasek
zadań i uruchom funkcję pamięci masowej (patrz obrazek poniżej)

21
Funkcje Interfesju Głównego
Ikona
Definicja
Ikona
Definicja
Wyszukaj w Google
Ustawienia
Wstecz
Lista aplikacji
Powrót do interfejsu
głównego
Aparat
Czas systemowy
Bateria
Moc sygnału sieci Wi-Fi
Menu
Status pamięci masowej
Menu ustawień
Instalacja Aplikacji
Pobierz i nagraj aplikację na kartę pamięci
Umieść kartę pamięci w urządzeniu
Wybierz opcję “Ustawienia/programy aplikacji”
Wybierz opcję “Nieznane źródło”
Wyszukaj swoją aplikację i rozpocznij instalację
Jeżeli chcesz usunąć aplikację, wybierz opcję “Instalator apk”, następnie wybierz
opcję „Manager” i odszukaj aplikację, którą zamierzasz odinstalować

22
Internet
Użyj przycisku aby powrócić do poprzedniego interfejsu
Połączenie z siecią Wi-Fi.
Kliknij ikonę ustawień, wybierz opcję “Manager połączeń bezprzewodowych”, kliknij
opcję „Ustawienia Wi-Fi” i uruchom funkcję Wi-Fi (patrz obrazek poniżej)
Urządzenie automatycznie wyszuka dostępne sieci bezprzewodowe
Wybierz pożądaną sieć
Wprowadź hasło, aby połączyć się z siecią i uzyskać dostęp do Internetu

23
Odtwarzacz Muzyki
Odtwarzaj poprzedni utwór, przytrzymaj, aby przewinąć
nagranie w tył
Wstrzymaj odtwarzanie
Odtwarzaj następny utwór, przytrzymaj, aby przewinąć
nagranie w przód
Wyświetl listę odtwarzania
Włącz tryb odtwarzania losowego
Włącz tryb zapętlenia odtwarzania
Uruchom odtwarzanie
Kliknij ikonę odtwarzacza muzyki, a następnie wybierz pożądany utwór muzyczny.

24
Odtwarzacz Wideo
Odtwarzaj poprzedni plik, przytrzymaj, aby przewinąć
nagranie w tył
Wstrzymaj odtwarzanie
Odtwarzaj następny plik, przytrzymaj, aby przewinąć
nagranie w przód
Dostosuj ekran
Ustaw jasność ekranu
Przejdź do ustawień wideo
Uruchom odtwarzanie
Kliknij ikonę odtwarzacza wideo, a następnie wybierz pożądany plik wideo.

25
Przeglądarka Fotografii
Wybierz obraz
Powiększ/pomniejsz obraz
Ustawienia jasności obrazu
Obróć obraz
Uruchom pokaz slajdów
Przejdź do ustawień
Wróć do poprzedniego ekranu
Kliknij ikonę galerii fotografii, aby przejść do oglądania zdjęć. Kliknij ikonę aby przywołać
menu opcji.

26
Aparat
Wykonaj zdjęcie
Przełącz kamerę z tylnej na przednią (funkcja
opcjonalna)
Przejdź w tryb nagrywania wideo
Rozpocznij nagrywanie wideo (tryb wideo)
Zatrzymaj i zapisz nagranie (tryb wideo)
Manager Plików
Wybierz ikonę aparatu, aby przejść do interfejsu, w którym będziesz mógł wykonać zdjęcia
lub nagrywać filmy wideo.
Wybierz ikonę manager plików, a
następnie opcję “karta pamięci” lub
“dysk lokalny”, aby przeglądać
foldery i pliki. Manager plików
pozwala na kopiowanie, usuwanie,
zmienianie nazw plików i inne
operacje. Aby edytować plik,
przytrzymaj palec na nazwie pliku i
wybierz opcję z menu.

27
Urządzenia Zewnętrzne
Karta Pamięci
Urządzenia masowej pamięci USB
Urządzenie obsługuje pamięć przenośną USB oraz niektóre odtwarzacze MP3 i MP4
Nie podłączaj urządzeń zewnętrznych, jeżeli baterie tabletu są wyczerpane.
Klawiatura/mysz USB
Po podłączeniu myszy, na ekranie pojawi się wskaźnik myszy. Lewy przycisk myszy
odpowiada za przycisk potwierdzający, lewy przycisk myszy odpowiada za przycisk
powrotu do poprzedniego ekranu, natomiast za pomocą środkowego przycisku myszy
można przesuwać menu w górę lub w dół.
Po podłączeniu klawiatury, nie wszystkie jej przyciski mogą funkcjonować poprawnie.
Zaleca się używanie standardowej klawiatury USB.
Urządzenie posiada gniazdo kart pamięci, które obsługuje karty o pojemności od 1 do 16GB.
Pamiętaj o zachowaniu zasad korzystania z kart pamięci:
Nie wyjmuj karty pamięci z gniazda podczas zapisu lub odczytu danych
Unikaj korzystania z karty w warunkach wysokiej temperatury lub wilgotności
powietrza
Unikaj kontaktu karty z cieczami
Aby wyciągnąć kartę pamięci z gniazda, delikatnie ją popchnij, a karta odskoczy
Nie wyciągaj ani nie wpychaj karty pamięci na siłę

28
Rozwiązywanie Problemów
1. Urządzenie uruchamia się zbyt długo.
Przy pierwszym uruchomieniu lub po aktualizacji systemu, urządzenie zainstaluje
aplikacje, co może potrwać od 2 do 3 minut.
2. Czasami urządzenie robi się zbyt gorące.
Urządzenie może wytwarzać większe ciepło podczas korzystania z wielu aplikacji lub
pełnego podświetlenia ekranu lub podczas ładowania baterii.
3. Urządzenie nie może połączyć się z siecią Wi-Fi.
Upewnij się, że router pracuje poprawnie.
Odległość urządzenia od routera nie powinna być większa niż 50m. Na przeszkodzie
nie powinny stać żadne ściany.
Upewnij się, że hasło do sieci bezprzewodowej jest poprawne.
4. Nie można przeglądać stron internetowych.
Odległość urządzenia od routera nie powinna być większa niż 50m. Na przeszkodzie
nie powinny stać żadne ściany.
Połącz się ponownie z siecią Wi-Fi.
5. System nie działa poprawnie w niektórych sytuacjach.
Po instalacji oprogramowania innych firm, system może nie działać właściwie. Wyłącz
urządzenie przytrzymując przycisk zasilania i włącz ponownie.
6. Nie można wysyłać e-maili oraz obsługiwać aplikacji wymagających połączenia z
Internetem.
Upewnij się, że połączenie z Internetem działa poprawnie
Upewnij się, że poprawnie skonfigurowałeś swoją skrzynkę pocztową
7. Nie można odczytać danych z karty pamięci.
Upewnij się, że karta pamięci jest poprawnie umieszczona w urządzeniu.
8. Urządzenie działa zbyt wolno.
Jeżeli urządzenie działa zbyt wolno, zamknij część aplikacji działających w tle lub
usuń część oprogramowania innych firm.

29
9. Bluetooth połączenie
1. Klawiatura przełącznik ustaw na ON następnie wciśnij Connect
2. Tablet wejdź w Ustawienia->Bluetooth włącz
3. Tablet wyszuka urządzenia Bluetooth, dotknij na liście aby połączyć z klawiaturą
4.Klawiatura wprowadź PIN wyświetlony na ekranie tabletu następnie Enter
5. Po poprawnym parowaniu możesz korzystać z klawiatury.
Warunki gwarancji:
1. GOCLEVER SP. Z O.O. z siedzibą w Poznaniu ( 60-431 ) przy ul. Sianowskiej 4A zwany dalej
Gwarantem zapewnia, że urządzenie marki GOCLEVER, jest wolne od wad konstrukcyjnych i
materiałowych, które mogłyby naruszyć jego funkcjonalność, o ile przestrzegana była instrukcja
obsługi dostarczona przy zawarciu umowy.
2. Gwarancja obowiązuje wyłącznie na terytorium Polski.
3. Gwarant bezpłatnie usunie ewentualną niesprawność urządzenia, zgodnie z postanowieniami
niniejszej gwarancji pod warunkiem przedstawienia wypełnionej w dniu zakupu karty gwarancyjnej
wraz z kopią dowodu zakupu. Dokonywanie zmian i skreśleń w karcie gwarancyjnej przez osoby
nieupoważnione powoduje utratę uprawnień wynikających z niniejszej gwarancji.
4. Okres gwarancji na urządzenia GOCLEVER wynosi 24 miesiące, licząc od daty sprzedaży
sprzętu, jednak nie dłużej niż 27 miesięcy od daty produkcji umieszczonej na Produkcie.
5. Tryb przyjmowania produktów uszkodzonych w systemie DOOR to DOOR przysługuje nabywcy
w terminie 12 miesięcy od daty zakupu, jednak nie dłużej niż 15 miesięcy od daty produkcji. Po
przekroczeniu tych terminów użytkownik powinien przesłać uszkodzone urządzenie do punktu
serwisowego na własny koszt po wcześniejszym uzyskaniu numeru RMA zgodnie z procedurą
reklamacyjną. Natomiast koszt przesyłki do klienta po naprawie pokrywa Gwarant.
6. Gwarancja dla wyświetlaczy LCD i akumulatorów zamontowanych w urządzeniach GOCLEVER
wynosi 6 miesięcy od daty zakupu, jednak nie dłużej niż 9 miesięcy od daty produkcji, w ekranach
TFT LCD 3,5” do 10” dopuszczalne jest wystąpienie do 5 błędnych pikseli (białe, czarne lub tzw. subpiksele).
7. Okres gwarancji na akcesoria dołączone do urządzenia (np. uchwyty, kable itp.) wynosi 1 miesiąc
od daty sprzedaży z wyłączeniem uszkodzeń mechanicznych ( nie dotyczy gwarancja door-to-door )
8. Wady ujawnione w okresie gwarancji będą usuwane bezpłatnie w możliwie najkrótszym terminie
nie przekraczającym 21 dni roboczych od przyjęcia urządzenia na serwis. W przypadku konieczności
sprowadzenia części zamiennych z zagranicy, termin powyższy może ulec przedłużeniu o kolejne 30
dni.
9. Reklamujący zobowiązany jest zgłosić usterkę poprzez formularz reklamacyjny na stronie www.
http://autorma.goclever.com/. W Przypadku nie zgłoszenia usterki i wysłania jej do gwaranta bez
uzyskania numeru reklamacyjnego przesyłka nie zostanie przyjęta na serwis.
10. Usterka musi być zgłoszona do serwisu nie później niż 14 dni od jej zaistnienia.
11. Nabywca zobowiązany jest dostarczyć produkt w oryginalnym opakowaniu, wraz ze wszystkimi
akcesoriami. Odpowiedzialność za uszkodzenia wynikające z użycia opakowania zastępczego ponosi
nabywca.
12. Sprzęt nie odebrany z serwisu w ciągu 3 miesięcy od ukończenia naprawy przepada na rzecz
serwisu.
13. W przypadku nieuzasadnionej reklamacji (reklamacji sprawnego urządzenia lub gdy uszkodzenie
powstało z winy klienta) zgłaszający reklamację zostanie obciążony kosztami ekspertyzy oraz
transportu.
14. Gwarancja nie obejmuje:
1. jakiegokolwiek używania sprzętu wykraczającego poza opis zakresu jego pracy;
2. roszczeń z tytułu parametrów technicznych urządzenia, o ile są one zgodne z podanymi przez
producenta w instrukcji obsługi lub innych dokumentach o charakterze normatywnym;

30
3. uszkodzeń powstałych z przyczyn zewnętrznych, np.: uszkodzeń mechanicznych, skutków
zjawisk atmosferycznych, zanieczyszczeń, zalań, przepięć, itp.
4. wadliwego działania nieautoryzowanego oprogramowania zainstalowanego na urządzeniu
15. W przypadku, gdy naprawa gwarancyjna wymaga wymiany części, element wymieniony pozostaje
własnością Gwaranta. Części użyte do wymiany mogą być innej marki o parametrach technicznych co
najmniej równoważnych.
16. Nabywca traci prawa gwarancyjne w przypadku zerwania plomb gwarancyjnych, tabliczki
znamionowej z numerem seryjnym lub stwierdzenia przez serwis producenta dokonywania
nieautoryzowanych napraw lub zmian systemowy bądź konstrukcyjnych urządzenia.
17. Gwarant może uchylić się od dotrzymania terminowości usługi gwarancyjnej, jeżeli zaistnieją
nieprzewidziane okoliczności o charakterze siły wyższej np.: klęska żywiołowa, niepokoje społeczne
itp.
18. Gwarant nie odpowiada za szkody i straty powstałe w wyniku niemożności korzystania z
urządzenia będącego w naprawie.
19. Uprawnienia z tytułu gwarancji nie obejmują prawa kupującego do domagania się zwrotu
utraconych korzyści w związku z wadami urządzenia.
20. Gwarant nie odpowiada za szkody powstałe w wyniku utraty danych na nośnikach magnetycznych,
informujemy również że mapy przywracane będą zgodne ze stanem produkcyjnym.
21. Stosunek prawny pomiędzy nabywcą urządzenia i Gwarantem regulowany jest wyłącznie
postanowieniami niniejszej gwarancji. Dalej idące roszczenia odszkodowawcze są wyłączone chyba,
że wynikają one z bezwzględnie obowiązujących przepisów prawa.
22. Gwarancja niniejsza ma charakter uzupełniający w stosunku do uprawnień nabywcy
przysługujących wobec sprzedawcy. Gwarancja nie wyłącza, nie ogranicza ani nie zawiesza
uprawnień nabywcy wynikających z niezgodności towaru z umową.
Najszybszą metodą rozwiązywania wielu problemów jest kontakt przez zgłoszenie
serwisowe pod adresem:
od poniedziałku do piątku w godzinach: 9:00 – 16:30
Wszelkie pytania prosimy wysyłać pocztą elektroniczną
Central Service POLAND
4a Sianowska Street
60-431 Poznan, POLAND
email: serwis@goclever.com
tel.: +48 618488767
Technical Support United Kingdom
tel.: 0844 8566848
email: uk@goclever.com
Technical Support Ireland
email: ireland@goclever.com
www.AUTORMA.GOCLEVER.com
Centralny Serwis Klienta Funkcjonuje
tel. (061) 84 88 767.
na adres serwis@goclever.pl

31
Technical Support Spain
tel: 902104953
email: rma@gocleverspain.com
Partner Services
BELARUS
220053, Republic of Belarus, Minsk,
V.Slutskoi 67-2
email: belarus@goclever.com
tel.:+375 (17) 3354883
CROATIA
PlayCom, www.playcom.hr
ulica grada Vukovara 249, 10000 Zagreb
email: info@play.com.hr
tel.: +385 025618433, +358 016184115
CZECH REPUBLIC
Bouncer s.r.o
Slavonicka 324, 67531 Jemnice, Czech Republic
email: servis@goclever.cz
tel.: +420 546 606 021
ROMANIA
S.C. Cordon Electronics S.R.L.
Str. Spataru Preda nr 12, sector 5, Bucuresti
email: office@cordongroup.ro
tel.: +40 372324762, +40 213009905
SERBIA
ET Servis d.o.o. Beograd Member of Logo Group
Bulevar kralja Aleksandra 261, 11000 Beograd
email: servis@etservis.rs
tel.: +381 112042109, +381 112042101
SLOVENIA
BIROTEHNA d.o.o
Litijska cesta 256
SI-1261 Ljubljana-Dobrunje
+386 015853777
e-mail: servis@birotehna.si
UKRAINE
Service Center KROK-TTC
Geroev Dnepra 2A, 04212 Kiev
email: info@krok-ttc.com
tel.: +380 800504504

32


 Loading...