

Page 1

User guide
Bedienungsanleitung
Manual del usuario
Guide d’utilisation
Gebruikersshandleiding
Guia do utilizador
Istruzioni d’uso
Brugsanvisning
Bruksanvisning
Käyttöohje
D
ES
F
NL
P
I
DK
S
FIN
81-00057 A Rev. B
GN7170_userguide.ind 1 13/08/04 9:55:24
Page 2

English – GN 7170 user guide
This user guide provides you with information and instructions on
assembling, using and maintaining your GN 7170. This guide contains the
following sections:
Contents
1. Product information GN 7170 ................................ 4
1.1 Parts and signatures
2. Setting up ............................................................. 5
2.1 Telephone jack requirements
2.2 Installation prerequisites and guidelines
2.3 Connecting battery
2.4 Attaching belt clip
2.5 Connecting AC (electrical) power
2.6 Connecting the telephone line and switching
the unit on
2.7 Assembling and connecting the headset stand
and headset
3. Features & customization ...................................... 7
3.1 Language setting selection
3.2 Area code selection
3.3 Ringer tone selection
3.4 Default setting selection
3.5 Activating custom calling features:
FLASH/PROGRAM button
3.6 Wearing styles: headband or earwrap
4. Operating the GN 7170 .......................................... 8
4.1 Making/answering and ending calls
4.2 Redial
4.3 CHARGE/IN USE indicator
4.4 Muting the microphone
4.5 Clearing static interference: CHANNEL button
4.6 Temporary Tone Dialing
4.7 Canceling instruction *TONE/CANCEL button
4.8 Locating misplaced handset
4.9 Ringer switch
4.10 Volume
4.11 Call Timer
5. Caller ID features .................................................. 10
5.1 Call Waiting Caller ID
5.2 Receiving and Storing CID Records
5.3 Reviewing CID Records
GN7170_userguide.ind 2 13/08/04 9:55:25
Page 3

6. Transferring CID records to memory ....................... 11
6.1 Transferring a CID record to your GN 7170´s memory
6.2 Replacing a CID record´s memory location in your
GN 7170´s memory
6.3 Deleting the current CID record
6.4 Deleting all CID records
6.5 Dialing a Caller ID number
6.6 Changing the CID number format
7. Memory function ................................................... 12
7.1 Storing a name and number in memory
7.2 Changing a stored number
7.3 Storing a redial number
7.4 Dialing a stored number
7.5 Inserting a pause in the dialing sequence
7.6 Reviewing and deleting numbers
7.7 Chain dialing from the memory
8. Display messages and sound signals ...................... 15
8.1 Display message table
8.2 Sound signals table
9. Frequently asked questions ................................... 16
10. Operational and safety informations ..................... 17
10.1 Changing the battery
10.2 Battery precautions
10.3 General product care
GN7170_userguide.ind 3 13/08/04 9:55:25
Page 4

4
1. Product information GN 7170
The GN 7170 is as a telephone-headset solution, combining all the benefits of a full-featured wireless telephone and a headset. The wireless GN 7170 offers full Caller ID (CID) features (identifies
callers before you answer the phone, displays the time and date of each call, records up to 40
Caller ID messages sequentially and keeps records of missed calls while away).
The wireless GN 7170 also gives you full mobility in the office during your calls, increased work
productivity thanks to hands-free multitasking productivity and all the health benefits associated
with use of a headset.
Note: In order to fully benefit from the GN 7170’s Caller ID (CID) features, you must subscribe
to either the standard Name/Number Caller ID service or Call Waiting Caller ID services, which are
provided by your local telephone network provider.
Parts and signatures
1 Base unit
1a Page button
1b CHARGE/IN USE indicator
2 Cordless phone
6
5
11
3
8
9
10
1
1a
1b
2
7
4
3 Headset (with two wearing styles)
4 Headset stand
5 AC/DC power adapter
6 Telephone line cord
7 Belt clip
8 Headband
9 Earwrap
10 Ear cushion
11 Mute switch
GN7170_userguide.ind 4 13/08/04 9:55:28
Page 5

5
2 Cordless phone
2a Display
2b Volume controls or
2c Redial button
2d Headset cord receptor
2e Memory (MEM) button
2f Tone button
2g Delete/Channel button
2h Call back/Talk button
2i Format button
2j Ringer Off/ON button
2k Program/Flash button
*Battery
*The battery is located inside the GN 7170 cordless
phone battery compartment and must be connected
correctly prior to charging.
2. Setting up
Before beginning installation, ensure that the following prerequisites and guidelines are noted.
2.1 Telephone jack requirements
To use the GN 7170, you need an RJ11C type modular telephone jack. If you don’t have a modular
jack, contact your corporate telephone network administrator and/or your local telephone service
provider.
Installation prerequisites
• Never install telephone wiring during a lightening storm.
• Never install telephone jacks in wet locations unless the jack is specifically designed for wet
locations.
• Never touch non-insulated telephone wires or terminals, unless the telephone line has been
disconnected at the network interface.
• Use caution when installing or modifying telephone lines.
• Temporarily disconnect any equipment connected to the phone lines such as faxes, other phones
or modems.
2.2 Installation guidelines
• Install the GN 7170 near both a telephone (modular) jack and an electrical outlet.
• Avoid sources of noise and RF emission, such as a window by a busy street, such as electric motors, microwave ovens and fluorescent lighting, computer monitors and other cordless
phone.
• Avoid heat sources, such as heating air ducts, heating appliances, radiators and direct sunlight.
• Avoid areas of excessive moisture or extremely low temperature.
• Avoid dusty locations.
About frequency interference. Some cordless telephones operate at frequencies that may cause
interference to nearby TVs, microwave ovens or VCRs. To minimize or prevent such interference,
the GN 7170’s base unit should not be placed near or on top of such appliances. If you experience interference, move your GN 7170’s base unit further away from such interference-causing
appliances.
2
2h
2a
2b
2c
2d
2g
2f
2e
2i
2j
2k
GN7170_userguide.ind 5 13/08/04 9:55:38
Page 6

6
About the GN 7170’s digital security system. Your GN 7170 uses a digital security system to provide protection against false ringing, unauthorized access and charges to your phone line. When
you place the handset into the base unit, the GN 7170 verifies its built-in security code. After a
power outage or battery change, place the cordless phone into the base unit for about 20 seconds
to automatically reset the built-in security code.
2.3 Connecting battery
Connect the battery by completing the following:
1. Remove the battery compartment door on the cordless phone.
2. Plug the battery cord into the jack located on the inside battery
compartment.
3. Replace the battery compartment door.
2.4 Attaching belt clip
Attach the belt clip by completing the following:
1. Insert the sides of the belt clip into the slots on each side of
the handset.
2. Snap the ends of the belt clip into place.
2.5 Connecting AC/DC (electrical) power
Note: Before using your GN 7170, you must allow it to charge for
12 hours prior to first use. If you don’t fully charge the GN 7170, battery
performance will be compromised.
Do not connect the GN 7170’s telephone line to the modular jack
until the GN 7170 has fully charged for 12 hours.
To connect the electrical supply, complete the following:
1. Plug the AC/DC power adapter into the back of the GN 7170’s base unit.
2. Plug the other end of the AC/DC power adapter into an electrical outlet.
• The CHARGE/IN USE indicator will turn on, verifying that the battery is charging.
• The CHARGE/IN USE indicator will not turn on if the cordless phone is not placed
in the base correctly.
2.6 Connecting the telephone line and switching the unit on
To connect the telephone line and switch on the unit, complete the following:
1. Plug the GN 7170’s telephone line cord into the TEL LINE jack on the
bottom of the base.
2. Plug the other end of the GN 7170’s telephone line cord into a modular
jack in the wall.
3. Set the cordless phone RINGER switch to the ON position.
4. Place the cordless phone into the base unit for charging.
2.7 Assembling and connecting the headset stand and headset
To assemble and connect the headset stand and headset to the cordless phone,
complete the following:
1. Insert the flat end of the stand into the slot on the bottom of
the base.
GN7170_userguide.ind 6 13/08/04 9:55:48
Page 7

7
2. Gently snap on the headband around the headset receiver.
3. Insert the headset’s plug into the cordless phone headset jack.
4. Place the headset into the headset stand, or place the headband on your head so that it rests
comfortably on your head and that the ear cushion rests on your ear.
Note: The microphone on the boom arm should be pointed in the direction of your mouth.
3. Features and Customization
There are 5 programmable menus available: language, area code, ringer tone, tone/pulse dialing,
and default setting selection. We suggest you customize your GN 7170 in this order:
3.1 Language setting selection
1. Press the FLASH/PROGRAM button until 1ENG 2FRA 3ESP shows in the display.
1ENG is the default position.
2. Use the or button (or the number keypad) to scroll to your selection.
3. Press the FLASH/PROGRAM button to store the selection.
3.2 Area code selection
To select the area code, complete the following:
1. Press the FLASH/PROGRAM button until AREA CODE shows in the display.
• --- is the default setting.
2. Use the number keypad to enter your 3-digit area code.
Note: If you make a mistake, press the CH/DELETE button to erase the wrong area code.
Repeat step 2.
3. Press the FLASH/PROGRAM button to store the selection.
3.3 Ringer tone selection
To select the ringer tone, complete the following:
1. Press the FLASH/PROGRAM button until RINGER/TONE shows in the display.
1 is the default position.
2. Use the or button (or the number keypad) to move the display’s arrow indicator to 1,
2 or 3.
3. Press the FLASH/PROGRAM button to store the selection.
Tone/pulse dialing selection
Note: The GN 7170 automatically defaults to touch-tone dialing. If you don’t know which type
of service you have, contact your corporate telephone network administrator and/or your local
telephone service provider.
To select tone/pulse dialing, complete the following:
1. Press the FLASH/PROGRAM button until 1TONE 2 PULSE shows in the display.
• 1TONE is the default position (touch-tone dialing).
2. Use the or button (or the number keypad) to move the display’s arrow indicator to
1TONE or 2 PULSE.
3. Press the FLASH/PROGRAM button to store the selection.
3.4 Default setting selection
If required, you may return your GN 7170 to its factory-set default settings by completing the
following:
1. Press the FLASH/PROGRAM button until DEFAULT shows in the display.
• 1 NO is the default setting.
GN7170_userguide.ind 7 13/08/04 9:55:52
Page 8

8
2. Use the or button (or the number keypad) to move the display’s arrow indicator to 1
NO or 2 YES.
3. Press the FLASH/PROGRAM button to store the selection.
• You will hear a confirmation tone.
3.5 Activating custom calling features: FLASH/PROGRAM button
Pressing the FLASH/PROGRAM button will activate custom calling features such as call waiting or
call transfer. Such features are provided by your telephone operator.
Note: When accessing custom calling features, do not press the TALK/CALL BACK button as this
will hang up the call.
3.6 Wearing styles: headband or earwap
You may choose between a headband or earwrap wearing style for
your headset.
To attach an earhook:
1. Gently push on the foam side of the headset receiver with your thumb to
push out the headset receiver from the headband ring.
2. Insert the thin end of the flexible earhook into one of the earhook
clutches. There are 2 clutches, allowing you to wear the headset on
either ear.
To attach a headband:
3. Pull out the earwap from the retaining clutch.
4. Gently snap the headband around the headset receiver.
4. Telephone operation
4.1 Making/answering and ending calls
Before making/answering calls, note the following:
• The cordless phone must be out of its base unit to make/answer.
You can still receive calls with the cordless phone in its base.
• Placing the cordless phone into the base during a call will hang up the call.
• Keep the headset plugged into the cordless phone.
To make calls:
1. Remove the cordless phone from the base unit (if not out).
2. Press the TALK/CALL BACK button on the cordless phone.
3. Dial the desired number.
Note: You may also dial the desired number, followed by pressing the TALK/CALL BACK button on
the headset.
To answer calls:
1. Remove the cordless phone from the base unit (if not out).
2. Press the TALK/CALL BACK button on the headset, and take the call.
To end calls, simply press the TALK/CALL BACK button or place the cordless phone into the base
unit for charging.
GN7170_userguide.ind 8 13/08/04 9:55:55
Page 9

9
4.2 Redial
You may redial the previously-dialed number (maximum of 32 digits) by pressing the REDIAL button.
4. 3 CHARGE/IN USE indicator
The base unit’s CHARGE/IN USE indicator is lit when the handset is charging in the base unit, or
when the handset’s RINGER switch is set to the ON position.
The base unit’s CHARGE/IN USE indicator flashes during a phone call, or when the PAGE/FIND button is pressed.
4.4 Muting the microphone
To mute the microphone and temporarily stop the transmission of your voice,
slide the mute switch on the headset’s cord.
4.5 Clearing static interference: CHANNEL button
The CH/CHANNEL button can be pressed to get rid of static interference.
Press and release to proceed to a clear channel.
4.6 Temporary Tone Dialing
Note: This feature is only useful if you use pulse dialing service.
Temporary Tone Dialing lets pulse (rotary) service phone users temporarily
access touch-tone services offered by banks, supermarkets, etc. For example, when you call your
bank, you may need to enter your account number, or make a menu-selection on an automated
service.
To use Temporary Tone Dialing, complete the following:
1. Remove the handset from the base unit (if not out).
2. Press the TALK/CALL BACK button on the handset.
3. Dial the telephone number.
4. When you call is answered by an automated service, press the *TONE/CANCEL button on the
handset to temporarily change from pulse to tone dialing.
5. Follow the automated instructions as required.
6. Press the TALK/CALL BACK button to hang up. The handset automatically returns to pulse (rotary)
dialing mode.
4.7 Canceling instruction: *TONE/CANCEL button
Press the *TONE/CANCEL button to cancel any command you initiated.
4.8 Locating misplaced handset
To locate a misplaced cordless phone, press the PAGE/FIND button on the base unit. The cordless
phone will beep continuously for 2 minutes, or until any other button on the cordless phone is
pressed. You may also press PAGE/FIND to cancel the cordless phone’s beeping.
Note: The RINGER switch does not have to be ON for this feature to work.
4.9 Ringer Switch
The handset RINGER switch must be ON for the cordless phone to ring during incoming calls.
Talk
Mute
GN7170_userguide.ind 9 13/08/04 9:56:03
Page 10

10
4.10 Volume
To adjust the volume, ensure the RINGER switch is ON, and press the buttons. There are
four volume levels. increases volume, decreases volume.
The volume LED is in the handset’s display, and the volume level is shown in the display.
• VOL 1 is the lowest volume level
• VOL 4 is the highest volume level.
4.11 Call Timer
The total talk time of a call is displayed on the bottom line of the handset display.
5. Caller ID (CID) features
Caller ID (CID) features include various caller identification and call
waiting functions. The storing, reviewing, transferring and
reformatting of CID information as well as making phone calls using
CID information is part of the overall Caller ID functionality.
Note: Caller ID is a local network operator service and may not be available in all locations. You
must subscribe to the operator’s service in order to use this feature.
The cordless phone will receive and display Caller ID information transmitted by your local network
operator service. This information may include the phone number, date and time; or the name,
phone number, date, and time. The handset stores up to 40 calls for later review.
The local network operator-provided CID information may also be transferred to the GN 7170’s
own memory. See the Transferring CID records to memory section.
5.1 Call Waiting Caller ID
Note: Call Waiting Caller ID is a local network operator service and may not be available in all loca-
tions. You must subscribe to the operator’s service in order to use this feature.
Provided you subscribe to Call Waiting Caller ID service from your local network operator, you may
see in the display who is your second caller while on a call.
• You will hear the call waiting beep when a second call comes in.
• The caller identification information appears in the display after you hear the dial tone.
To activate Caller Waiting ID, press the FLASH/PROGRAM button to put the first person on hold and
answer the second incoming call.
5.2 Receiving and Storing CID Records
Note: Check with your local network operator for name service availability.
When you receive a call, the information is transmitted by the network operator to your Caller ID
handset between the first and second ring.
When the GN 7170’s Caller ID memory is full (40 numbers), a new call record automatically replaces
the oldest call record in memory. Note the following display explanations:
• NEW appears in the display for calls received that have not been reviewed.
• REPT indicates that a new call from the same number was received more than once.
FRED PAGE
Time Date New call
Caller ID nameCaller ID phone number
317-555-1234
GN7170_userguide.ind 10 13/08/04 9:56:05
Page 11

11
5.3 Reviewing CID Records
As calls are received and stored, the display is updated to let you know how many calls have been
received. Note the following functionality:
• Press the button to scroll through the call records from the most recent to the oldest.
• Press the button to scroll through the call records from the oldest to the newest.
6. Transferring CID records to memory
It is also possible to store received or reviewed CID information to your GN 7170’s own memory.
Stored information may then be reformatted or used to, for example, make calls.
Note: It is important that you format CID records correctly before storing in memory. It is not possible to re-format CID records stored in memory.
6.1 Transferring a CID record to your GN 7170’s memory
You may transfer a Caller ID record to your GN 7170’s memory by completing the following:
1. Use the or button to scroll to the desired record.
2. Press the MEM button.
3. Press the desired memory location.
• You will hear a confirmation tone.
For example, press the number 1 key to store the record in memory location 1.
6.2 Replacing a CID record’s memory location in you GN 7170’s memory
You may then replace a transferred CID record in a memory location with a new CID record.
Complete the following:
1. Repeat steps 1-3 as above.
2. Press the MEM button.
REPLACE MEMO? will be displayed in the display.
3. Press *TONE/CANCEL to exit, or press the MEM button again. The new CID record will now
replace the old CID record in that memory location.
• You will hear a confirmation tone.
6.3 Deleting the current CID record
To delete the current CID record, complete the following:
Make sure the GN 7170 is OFF (not in talk mode).
1. Use the or button to display the desired CID record.
2. Press CH/DELETE.
• The display will show DELETE?
3. Press *TONE/CANCEL to exit, or press the CH/DELETE button again to erase the record.
• You will hear a confirmation tone.
• The display shows DELETED.
• The next CID record will be shown in the display.
6.4 Deleting all CID records
To delete all CID records, complete the following:
1. Make sure the GN 7170 is OFF (not in talk mode)
2. Use the or button to display any CID record.
3. Press and hold CH/DELETE until the cordless phone beeps and DELETE ALL? Shows in the dis-
play.
4. Press *TONE/CANCEL to exit, or press the CH/DELETE button again to erase all records.
• You will hear a confirmation tone.
• The display shows NO CALLS.
GN7170_userguide.ind 11 13/08/04 9:56:06
Page 12

12
6.5 Dialing a Caller ID number
To dial a number from your Caller ID records, complete the following:
1. Make sure the GN 7170 is OFF (not in talk mode)
2. Use the or button to display the desired CID record.
3. Press the TALK/CALL BACK button. The number dials automatically.
6.6 Changing the CID number format
The format button lets you change the format of the displayed CID number if, for example, the
number is not dialing correctly. The available formats are as follows:
• 7-digit: 7-digit phone number
• 10-digit: 3 -digit area code + 10-digit phone number
• 11-digit: long distance code “1” + 3-digit area code + 10-digit phone number
To change the CID number format number from your Caller ID records, complete the following:
1. Use the or button to scroll to the number you want to call back.
2. If the number will not dial correctly, press the FORMAT button. If necessary, press the FORMAT
button again until the correct format of the desired number is displayed.
3. Press the TALK/CALL BACK button, the number will now dial automatically.
7. Memory function
The GN 7170 can store up to ten 24-digit numbers in its memory, which can be accessed for quick dialing. Additionally, the GN 7170 can also store up to 40 Caller ID records in its Caller ID memory log.
7.1 Storing a name and number in memory
To store a name and number in memory, complete the following:
1. Make sure the GN 7170 is OFF (not in talk mode)
2. Press the MEM button.
3. Press the desired memory location (0 through 9)
4. Press the MEM button again.
• The display shows ENTER NAME (maximum 15 characters)
Note: You may skip entering the name; proceed to step 6.
5. Use the number pad to enter the name.
For example, to enter the name Bill:
Press the number 2-key twice for the letter B.
Press the number 4-key three times for the letter i.
Press the number 5-key three times for the letter l.
Press the number 5-key three times for the letter l.
Note: If you enter the wrong letter, press CH/DELETE button to backspace.
6. Press the MEM button to save the name.
• The display shows ENTER TEL NUMBR.
7. Use the number pad to enter the number you want to store (maximum 24-digit number).
8. Press the MEM button again to store the number.
• You will hear a confirmation tone.
7.2 Changing a stored number
To change a stored number, complete the following:
1. Repeat steps 1-6 in the Storing a name and number in memory section.
2. Press the REDIAL button.
3. Press the MEM button again to store the number.
• You will hear a confirmation tone.
GN7170_userguide.ind 12 13/08/04 9:56:07
Page 13

13
7.3 Storing a redial number
To store a redial number, complete the following:
1. Repeat steps 1-6 in the Storing a name and number in memory section.
2. Press the REDIAL button.
3. Press the MEM button again to store the number.
• You will hear a confirmation tone.
To replace an old redial number, complete the following:
1. Repeat steps 1-6 in the Storing a name and number in memory section.
2. Press the MEM button.
• REPLACE MEMO shows in the display.
3. Press *TONE/CANCEL to exit, or press the MEM button again to replace the old redial number
with a new redial number in that memory location.
• You will hear a confirmation tone.
7.4 Dialing a stored number
There are 2 ways to dial a stored number.
A) To dial a stored number:
1. Make sure the cordless phone is ON by pressing the TALK/CALL BACK button.
2. Press them MEM button.
3. Press the number (0 to 9) for the desired memory location.
• The number will dial automatically.
B) To dial a stored number:
1. Make sure the cordless phone is OFF (not in TALK mode).
2. Press the MEM button.
3. Use the or button to scroll through the stored numbers in memory until the desired
number is shown.
4. Press TALK/CALL BACK.
•The number will dial automatically.
7.5 Inserting a pause in the dialing sequence
You may insert a delay into the dialing sequence of a stored number. This is sometimes necessary
when a pause is needed to wait for a dial tone (for example, after you dial 9 to access an outside
line, or to wait for a computed access tone).
To insert a pause, press the # pause key twice within one second when storing a phone number.
The pause in the number will be shown with a P.
7.6 Reviewing and deleting numbers
You may review and/or delete stored number by completing the following:
1. Press the MEM button, then use the use the or button to scroll and view the
number.
2. While the desired entry is displayed, press the CH/DELETE button to delete the entry.
• The display shows DELETE?
3. Press *TONE/CANCEL to exit, or press the CH/DELETE button again to delete the entry.
• If the CH/DELETE button is pressed, DELETED will be shown on the display.
GN7170_userguide.ind 13 13/08/04 9:56:08
Page 14
14
7.7 Chain dialing from the memory
Chain dialing from the memory is ideal for making calls that require a sequence of numbers to be
dialed, such as using a calling card to call a frequently-dialed long distance number.
Chain dialing from the memory works by storing the sequences of numbers in the GN 7170’s
memory locations (0 through 9). See the Storing a name and number in memory section for relevant instructions, and specifically step 3 (choosing the memory location).
For example, you might save the following sequences of numbers (your long distance carrier’s
access number, your calling card number and your authorization code) into the following memory
locations (0 through 9) of your GN 7170:
The number for... Memory location (0 through 9)
Long distance carrier’s access number: 1 123 123 1234
7
Your calling card number: 123456789
8
Authorization code: 1234
9
To chain dial from the memory, complete the following (refer to the above table’s example):
1. Make sure the cordless phone is ON.
2. Press the MEM button, and then press 7.
• The 7 represents your long distance carrier’s access number.
3. When you hear the access tone, press the MEM button again, and then press 8.
• The 8 represents your calling card number.
4. When you hear the second access tone, press the MEM button again, and then press 9.
• The 9 represents your authorization code.
The complete sequence of numbers will now be dialed.
GN7170_userguide.ind 14 13/08/04 9:56:08
Page 15

15
8. Display messages and sound signals
8.1 Display messages table
Display message Meaning
INCOMPLETE DATA
Caller information has been interrupted during transmission or the
phone line is excessively noisy.
ENTER NAME
Prompt telling you to enter the name for one of the 10 memory loca
-
tions.
ENTER TEL NUMBR
Prompt telling you to enter the telephone number for one of the 10
memory locations.
DELETE?
Prompt asking you if you want to erase Caller ID records or one of the
10 numbers stored in the GN 7170’s outbound memory.
DELETE ALL? Prompt asking you if you want to erase all Caller ID records.
DELETED Prompt confirming the Caller ID/Memory record is erased.
END OF LIST Indicates that there is no additional information in the Caller ID.
NEW Indicates call or calls have not been reviewed.
UNKNOWN NAME/
CALLER/NUMBER
The incoming call is from an area not services by Caller ID or the infor
-
mation was not sent.
PAGING Someone has pressed the page button on the base.
BLOCKED CALL The person’s name is blocked from transmission.
REPT
Repeat call message. Indicates that a new call from the same number
was received more than once.
NO DATA No Caller ID information was received.
EMPTY Indicates a memory location is vacant.
NO CALLS Indicates no CID records have been stored.
MESSAGE WAITING Indicates a message is available.
MESG WAITING OFF Indicates a message is deactivated
PRESS TALK KEY
Prompt indicating the Caller ID number is a direct dial number (DDN)
that can not be formatted.
UNABLE TO DIAL Indicates the Calling number is incomplete and can not be dialed out.
8.2 Sound signals table
Sound signal Meaning
A long warbling tone (with ringer on). Signals an incoming call.
Two long beeps. Confirmation tone.
One short and one long beep. Page signal.
One short beep every 7 seconds. Low battery warning.
Three short beeps. Error tone.
GN7170_userguide.ind 15 13/08/04 9:56:09
Page 16

16
9. Frequently asked questions
Q. I’ve installed my GN 7170 and connected the power source, but the cordless phone’s
display is not working.
• Verify that you have connected the battery (inside the battery compartment) correctly. Connect
the battery cord into the receptor located inside the battery compartment.
• Ensure that the battery is fully charged.
Q. My Caller ID features don’t seem to work/the display is not working.
• Caller ID features are provided by your local telephone operator and may not necessarily be
available in all locations. You must subscribe to your telephone operator’s services to use this
feature.
• The Caller ID Error message is displayed the cordless phone detects anything other than valid
Caller ID information during the silent period after the first ring. The message indicates the presence of noise on the line.
• Ensure that the battery is fully charged.
Q. I’ve connected my phone, but there is no dial tone.
• Make sure the base power cord is connected to a working outlet.
• Make sure the telephone line cord is connected to the base unit and the wall jack.
• Ensure the headset is correctly plugged into the base, and that the handset’s RINGER switch is
ON.
• Make sure your cordless phone is within range of your base unit 150 feet/45 meters.
• Ensure the battery is fully charged (for 12 hours before initial use), and also verify that the battery is connected correctly inside the battery compartment.
• Ensure the headset is properly connected to the headset jack on the side of the cordless phone.
With the GN 7170, conversation across the phone can only occur through the headset.
Q. The dial tone is OK, but I still can’t dial out.
Make sure the tone/pulse setting is programmed correctly.
Q. I’m experiencing static/interference during my phone calls.
• The cordless phone may be out of range of the base, which is 150 feet/45 meters.
• You may need to relocate the base unit to another position to reduce interference. Other electrical devices, aluminum siding, heating ducts or metal constructions may case interference.
Atmospheric conditions such as storms may also cause temporary interference or poor reception.
• Ensure that the GN 7170’s base is connected to the telephone jack and power supply.
• Follow the instructions given in this guide to change the channel of your GN 7170 to a clearer
one.
• Another device is plugged into the same power supply source as the GN 7170 may cause static
and interference to your calls.
Q. My cordless phone beeps unusually before/during calls.
• Your security code may have to be reset. Place the cordless phone into the base for 20 seconds
and follow the given instructions to reset your security code.
• The charging contacts of your cordless phone and base unit may need cleaning. Use a dry, soft
cotton cloth to clean these charging contacts.
• The battery may need replacing. This is often the case if it occurs when you press the TALK/CALL
BACK button.
GN7170_userguide.ind 16 13/08/04 9:56:09
Page 17
17
Q. What is the range of my GN 7170?
The GN 7170 has a range of up to 150 feet/45 meters in standard office environments. Factors
such as other electrical devices or office walls may compromise the GN 7170’s range.
Q. The CHARGE/IN USE indicator on the base unit is flashing.
Provided your local telephone operator offers voice messaging services and that you subscribe to
these, the CHARGER/IN USE indicator flashes (when not in use) to indicate that you have a mes
-
sage waiting. It stops flashing when the message has been reviewed.
Q. Can I use my GN 7170 headset with other telephones?
The GN 7170’s headset may be used with other 2.5 mm-ready cordless or mobile phones, however, the GN 7170’s headset and cordless phone have been optimized for use with each other to
give you the best performance.
10. Operational and safety information
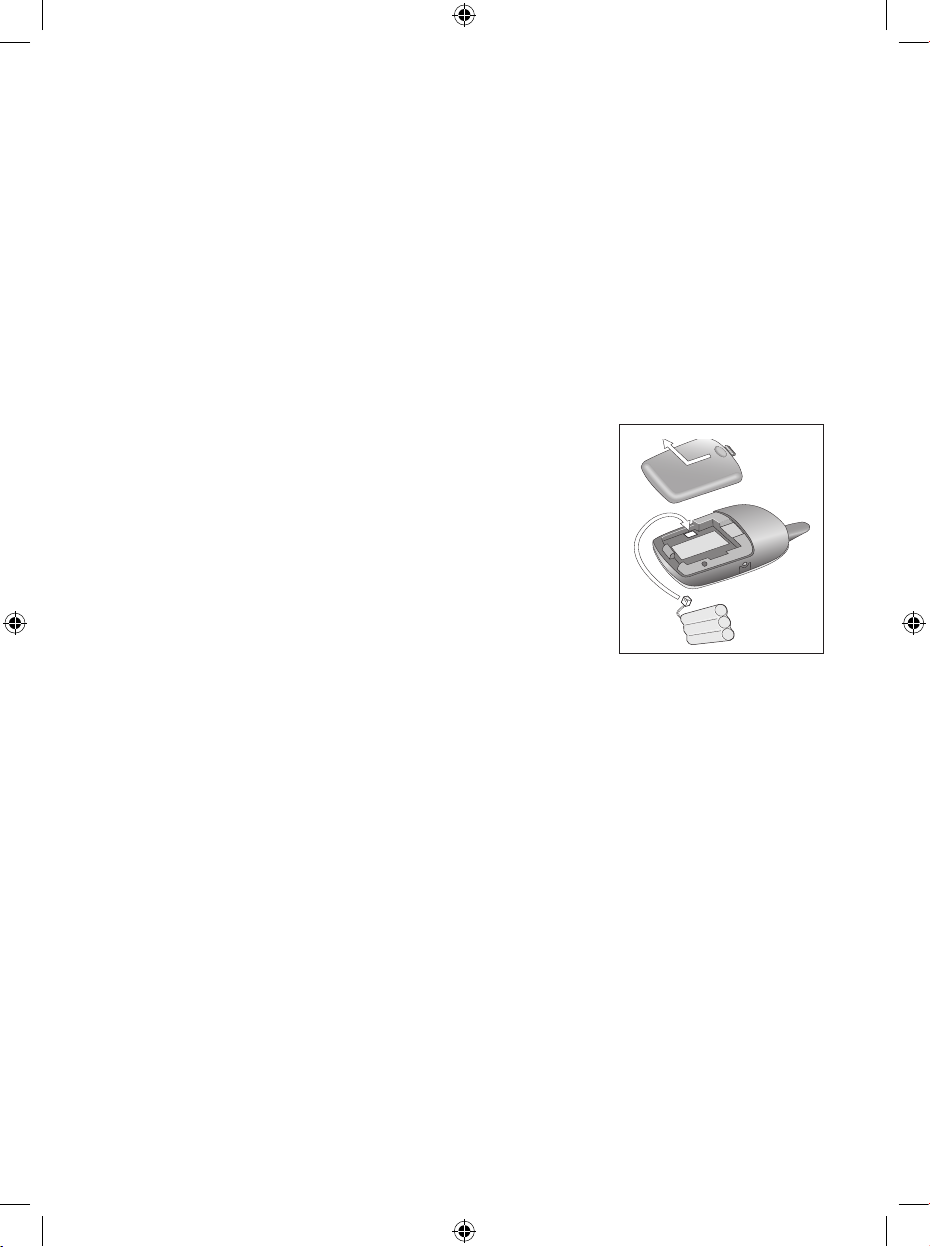
10.1 Changing the battery
The GN 7170 comes with a user-replaceable battery.
Make sure the telephone is OFF before replacing the battery.
To replace the battery, complete the following steps:
1. Remove the battery compartment door.
2. Disconnect the battery plug from the jack in the cordless
phone, and remove the battery.
3. Insert the new battery pack and connect the cord into
the jack inside the cordless phone.
4. Replace the battery compartment door.
5. Place the cordless phone in the base to charge.
Caution: Use only a GN Netcom-recommended replacement battery. A correct OEM replacement,
rechargeable 3.6V, 600mAh Nickel-Metal Hydride battery pack consisting of 3 AAA cells wired in
series, can be purchased at most leading electronic retailers. The use of other batteries may result
in the risk of personal injury or fire.
For more information, please contact GN Netcom – Product Support at 1-800-826-4656.
Note: Allow the battery to fully charge for 12 hours prior to initial use or use after battery replacement. Battery performance will be compromised if the battery is not fully charged before use.
10.2 Battery precautions
• Do not burn, dissemble, mutilate or puncture. Like other batteries of this type, toxic materials
could be released which can cause injury.
• To reduce the risk of fire or personal injury, use only the GN Netcom-recommended replacement
battery (see Caution note above)
• Keep batteries out of the reach of children.
• Remove batteries if storing over 30 days.
10.3 General product care
To keep your GN 7170 working and looking look, follow these guidelines:
• Avoid putting the phone near heating appliances and devices that generate electrical noise (for
example, motors, fluorescent lamps).
GN7170_userguide.ind 17 13/08/04 9:56:10
Page 18

18
• Do NOT expose the base unit or cordless phone to direct sunlight or moisture.
• Avoid dropping any parts and avoid other rough treatment of the GN 7170.
• Clean with a soft cloth.
• Never use a strong cleaning agent or abrasive powder because this will damage the finish of the
GN 7170’s parts.
• Retain the original packaging in case you need to ship the phone at a later date.
This telephone system meets FCC standards for hearing Aid Compatibility.
GN7170_userguide.ind 18 13/08/04 9:56:11
 Loading...