

Page 1
400544000-GB-15.09-Rev.A.indd 1 11-11-2015 16:16:40
resound.com
WIRELESS CONNECTIVITY
User guide
Page 2

Welcome
Congratulations on your purchase of a ReSound Multi Mic. The
Multi Mic is a high quality por table speech and audio streamer
that streams speech and audio directly to your hearing instrument. It supports both one-to-one communication when worn by
a single speaker and can also be used as a table microphone
solution picking up speech from multiple speakers.
Additionally, the Multi Mic supports pickup of tele-loop signals,
FM signals (Europin FM receiver required) and line-in signals
(mixed mono).
Please read this manual carefully to fully benefit from the Multi
Mic. Ask your hearing care professional if you have any questions.
For further information you can also visit the http://www.resound.
com/hearing-aids/accessories.
For your safety, carefully read the chapter Important Information,
starting on page 33.
FCC ID : X26SM-2P
2
400544000-GB-15.09-Rev.A.indd 2 11-11-2015 16:16:40
Page 3

Statement:
This device complies with Part 15 of the FCC Rules and ICES-003
of the IC Rules. Operation is subject to the following two conditions: (1) this device may not cause harmful interference, and (2)
this device must accept any interference received, including interference that may cause undesired operation.
Note: This equipment has been tested and found to comply with
the limits for a Class B digital device, pursuant to Part 15 of the
FCC Rules and ICES-003 of the IC rules. These limits are designed to provide reasonable protection against harmful interference in a residential installation. This equipment generates, uses
and can radiate radio frequency energy and, if not installed and
used in accordance with the instructions, may cause harmful interference to radio communications. However, there is no guarantee that interference will not occur in a particular installation. If this
equipment does cause harmful interference to radio or television
reception, which can be determined by turning the equipment off
and on, the user is encouraged to try to correct the interference
by one or more of the following measures:
• Reorient or relocate the receiving antenna.
• Increase the separation between the equipment and the receiver.
3
400544000-GB-15.09-Rev.A.indd 3 11-11-2015 16:16:40
Page 4

• Connect the equipment into an outlet on a circuit different
from that to which the receiver is connected.
Consult the dealer or an experienced radio/TV technician for help.
Changes or modifications can void the user’s authority to operate
the equipment.
Intended use
To enable hearing instrument users to follow speech or listen to
other audio signals.
This product is in compliance with the following regulatory requirements:
In EU: The device conforms to the Essential Requirements according to Annex I of Council Directive 93/42/EEC for medical
devices (MDD) and Essential Requirements and other relevant
provisions of Directive 1999/5/EC (R&TTE).
The declaration of conformity may be consulted at www.resound.
com
In US: FCC CFR 47 Part 15, subpart C
In Canada: IC 6941C-SM2P
4
400544000-GB-15.09-Rev.A.indd 4 11-11-2015 16:16:40
Page 5

Operation is subject to the following two conditions:
1. this device may not cause interference, and
2. this device must accept any interference, including interference
that may cause undesired operation of the device.
For other identified applicable international regulatory requirements in countries outside EU and US, please refer to local country requirements for these areas.
In JP: Japanese Radio Law and Japanese Telecommunications
Business Law Compliance.
This device is granted pursuant to the Japanese Radio Law
(電波法) and the Japanese Telecommunications Business Law
(電気通信事業法). This device should not be modified (otherwise
the granted designation number will become invalid).
5
400544000-GB-15.09-Rev.A.indd 5 11-11-2015 16:16:40
Page 6

Contents
Welcome..........................................2
Statement .........................................3
Intended use .......................................4
Description ........................................8
Getting Started ....................................10
Turning your Multi Mic ON and OFF ....................12
Pairing to your hearing instruments.....................12
Start streaming ....................................15
Stop streaming ....................................16
Microphone directionality ............................18
Wearing the Multi Mic ...............................18
Status light indicator (LED) ...........................20
Modes of operation.................................22
Using the Mode button ..............................24
Volume control and mute ............................26
Mute light indicator . . . . . . . . . . . . . . . . . . . . . . . . . . . . . . . . .28
Special features ...................................28
6
400544000-GB-15.09-Rev.A.indd 6 11-11-2015 16:16:40
Page 7

Test mode........................................31
Important Information ...............................33
General warnings ..................................34
General precautions ................................35
Built-in battery care ................................36
Battery warning....................................37
Charger care ......................................38
Technical specifications .............................40
Temperature test, transport and storage information .......40
Warranty .........................................40
What is covered by this warranty? .....................41
What is not covered by the warranty....................41
Troubleshooting guide ..............................42
400544000-GB-15.09-Rev.A.indd 7 11-11-2015 16:16:40
7
Page 8
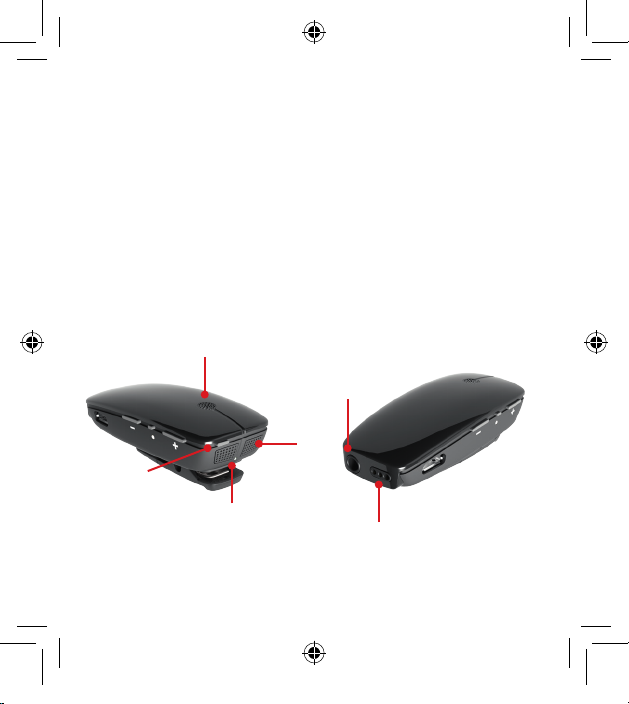
Description
1 Power button
2 Microphone inlet
3 Microphone inlet
4 Status light indicator (LED)
5 Line-in
6 FM connector
2
1
5
3
8
400544000-GB-15.09-Rev.A.indd 8 11-11-2015 16:16:40
4
6
Page 9
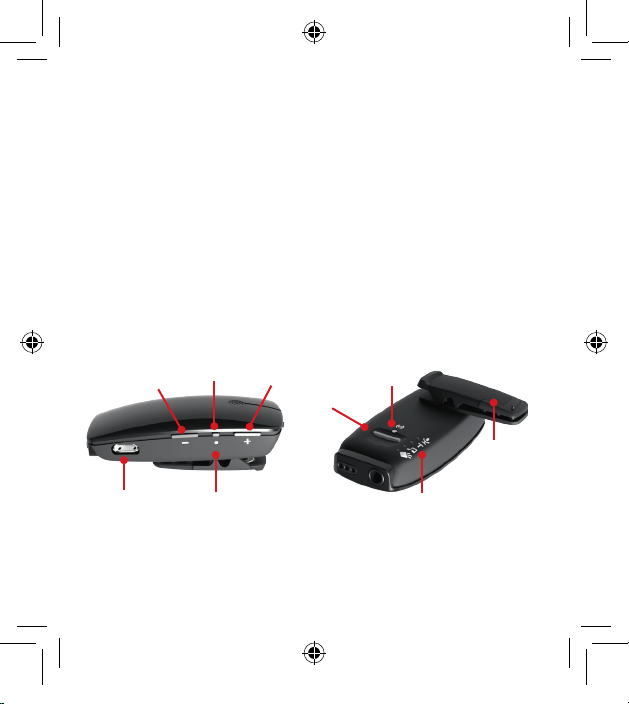
7 Volume down
8 Mute button
9 Volume up
10 Micro USB for charging
11 Mute light indicator (LED)
12 Mode and batter y status light indicators (LEDs)
13 Mode button
14 Paring button
15 Mounting clip
400544000-GB-15.09-Rev.A.indd 9 11-11-2015 16:16:41
10
8
7
9
14
13
15
11
12
9
Page 10
Getting Started
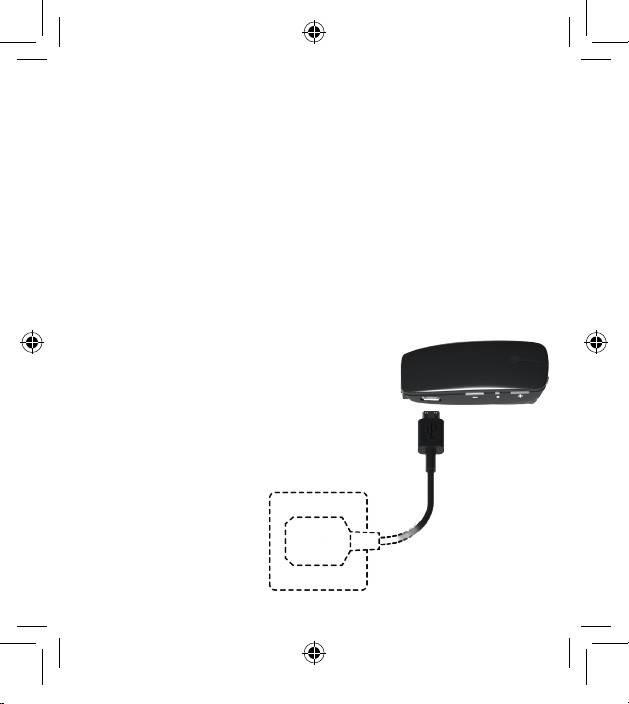
Before using your Multi Mic, you need to charge the rechargeable
battery. To charge it, plug the charging cable into the Multi Mic as
shown in the picture below.
Next, plug the other end of the charging cable into the charger
and into a power outlet.
During the charging process, the status LED indicator will show
a solid red light. When fully charged and still connected to the
charger, the LED will turn solid red, interrupted by a green blink
every 2 seconds.
Charging an empty battery typically takes about 3 hours. It is safe
to leave the charger connected overnight –
the batter y cannot be overcharged.
10
400544000-GB-15.09-Rev.A.indd 10 11-11-2015 16:16:41
Page 11

• When charging your Multi Mic for the first time, let it charge for
at least 3 hours, even if the battery indicator indicates that the
battery is fully charged.
• For safety reasons, recharge the battery only with chargers
supplied by ReSound.
Note: To protect the Multi Mic when not in use, please place
i
it in the carrying pouch delivered with the product.
Do not charge the Multi Mic while it is on your body.
11
400544000-GB-15.09-Rev.A.indd 11 11-11-2015 16:16:42
Page 12

Turning your Multi Mic ON and OFF
To turn the Multi Mic ON, press and hold the Power button (see
page 8) for approximately 1.5 seconds, until the status LED turns
green. After releasing the Power button, the status LED will blink
green every 2 seconds.
To turn the Multi Mic OFF, press and hold the ON/ OFF button for
approximately 1.5 seconds, until the status LED turns red – indicating that the unit is shutting down.
If the battery level is low, the status LED will blink orange once
every second.
Pairing to your hearing instruments
Note! The following information is primarily intended for your
hearing care professional, who in most cases will complete the
necessary tasks needed before the Multi Mic can be used with
your hearing instruments. However, the process is designed to be
simple and most people can do it themselves.
It is possible to pair up to three ReSound streaming devices - e.g.
one Multi Mic and two T V streamers (optional Unite™ accessory)
- with a given pair of hearing instruments. Therefore, channel 1, 2
or 3 must be selected when starting the pairing process.
12
400544000-GB-15.09-Rev.A.indd 12 11-11-2015 16:16:42
i
Page 13

Pairing the Multi Mic in channel 1
1. Make sure the Multi Mic is turned ON. Your hearing instruments must be OFF – open the battery doors.
2. With the tip of a pen
or similar object, press
the small pairing button once, as shown in
the picture to the right.
The status LED will now
blink orange once every
2 seconds to indicate that
the Multi Mic is ready to be
paired in channel 1. Your
Multi Mic will remain in Pairing mode for 20 seconds.
3. While in Pairing mode, close the battery doors on both hearing
instruments and make sure they are ON. A successful pairing
will be indicated by an audible melody being played in both
hearing instruments and the status LED (see page 8) will stay
solid orange for 3 seconds. You are now ready to use the Multi
Mic!
13
400544000-GB-15.09-Rev.A.indd 13 11-11-2015 16:16:42
Page 14
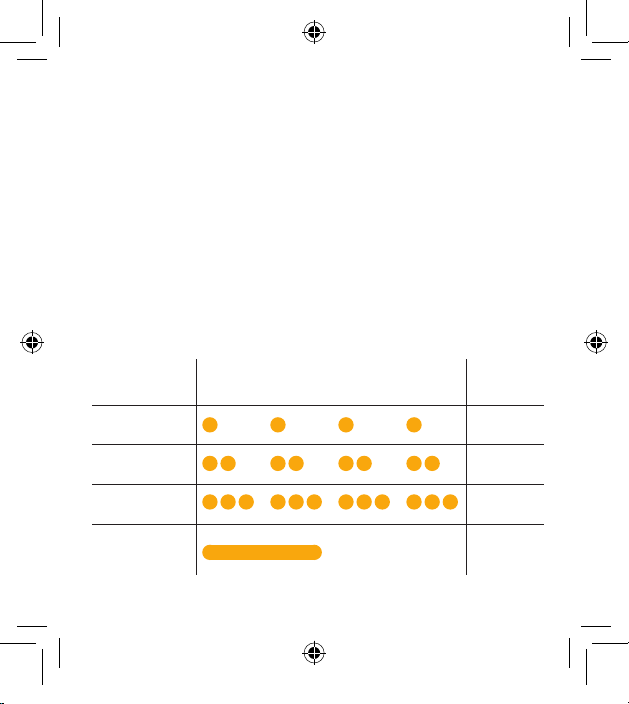
Pairing the Multi Mic in channel 2 or 3 (For people using more
than one streaming device)
To pair the Multi Mic in channel 2, press the pairing button twice.
The status LED will now blink yellow twice ever y 2 seconds to
indicate that it is ready to be paired in channel 2. Close the batter y
doors on the hearing instruments.
To pair the Multi Mic in channel 3, press the pairing button three
times. The LED will now blink yellow three times every 2 seconds
to indicate that it is ready to be paired in channel 3. Close the battery doors on the hearing instruments.
Pairing blinking pattern:
Pairing button
pushes
1 1
2 2
3 3
Successful
pairing
Indication
Light indicator pattern Channel
14
400544000-GB-15.09-Rev.A.indd 14 11-11-2015 16:16:42
Page 15

Start streaming
Turn ON the Multi Mic and make sure your hearing instruments
are turned ON. Streaming can be started in one of three ways.
1. Press and hold the push or toggle button on both hearing
instruments for about three seconds in order to listen to a
streamed audio signal*. If ear to ear program coordination is
activated in you hearing instruments, you only have to activate
streaming on one of the hearing instruments.
2. If you have a ReSound Unite™ Remote Control (optional
accessory), simply press the streaming button
on the
Remote Control*.
3. If you use a ReSound app offering remote control functionality,
simply select the Multi Mic program in the program screen*.
*Once the hearing instruments connect to the Multi Mic, a short
“streaming activation” melody will play in your hearing instruments followed by the streamed sound.
Start streaming from a 2nd or 3rd streaming device
If your hearing instruments are paired to more than one streaming device, you can start streaming from one of these devices in
three ways.
15
400544000-GB-15.09-Rev.A.indd 15 11-11-2015 16:16:42
Page 16

1. Press and hold the hearing instrument program button for
about 3 seconds two or three times in a row to access the 2nd
or 3rd ReSound streaming device.
2. If you use a Unite™ Remote Control (optional accessory),
press the streaming button on the Unite™ Remote Control a
2nd or 3rd time to access the 2nd or 3rd ReSound streaming
device.
3. If you use a ReSound app offering remote control functionality,
simply select the desired streaming program in the program
screen.
Stop streaming
Streaming can be stopped in the following three ways:
1. Push the program button on your hearing instruments once*.
2. If you have a ReSound Unite™ Remote Control (optional accessory), press the “P” button, located in the center of the key
pad*. You may also press the home button to return to your
default settings.
3. If you use a ReSound app, select the desired program in the
program screen.
*This will return the hearing instruments to the last program used.
16
400544000-GB-15.09-Rev.A.indd 16 11-11-2015 16:16:42
Page 17

i
Multi Mic gets out of range and in range again within 5 minutes,
your hearing instruments will automatically reconnect and continue streaming. This also applies if the Multi Mic is turned off and
on again within 5 minutes.
400544000-GB-15.09-Rev.A.indd 17 11-11-2015 16:16:42
Note! You may get out of range from your Multi Mic. If your
17
Page 18

Microphone directionality
The Multi Mic can both be used for picking up the voice from one
speaker wearing the Multi Mic as well as a table microphone solution picking up the voices of multiple speakers.
Wearing the Multi Mic
Using the Multi Mic with one speaker
When the Multi Mic is used for listening to one speaker of interest, it should be clipped onto the speaker’s shirt. Alternatively,
the Multi Mic can be hung around the speakers neck using the
lanyard supplied with the device.
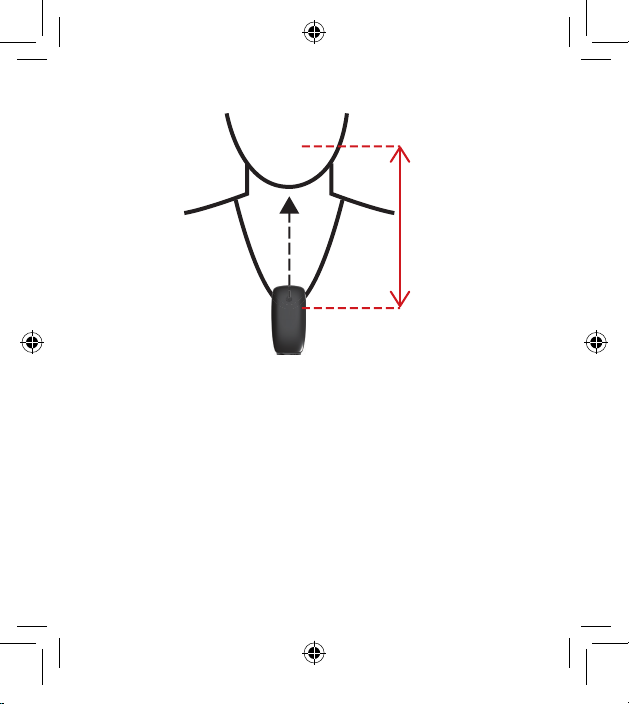
Place the device within a range of 10-40cm (4-16 inches) from the
speaker’s mouth as shown on the next page. When using the clip,
make sure that the Multi Mic is mounted vertically with the Status
LED pointing towards the mouth.
When worn vertically, the Multi Mic automatically switches into a
mode minimizing background noise.
18
400544000-GB-15.09-Rev.A.indd 18 11-11-2015 16:16:42
Page 19
Using the Multi Mic as a table microphone
Place the Multi Mic horizontally on a level sur face (e.g. a table) in
close proximity to the group of people you want to listen to. Placing the Multi Mic horizontally on a table automatically switches it
into a mode optimized for picking up the voices of multiple speakers.
400544000-GB-15.09-Rev.A.indd 19 11-11-2015 16:16:43
10 - 40 cm
4-16 inches
19
Page 20
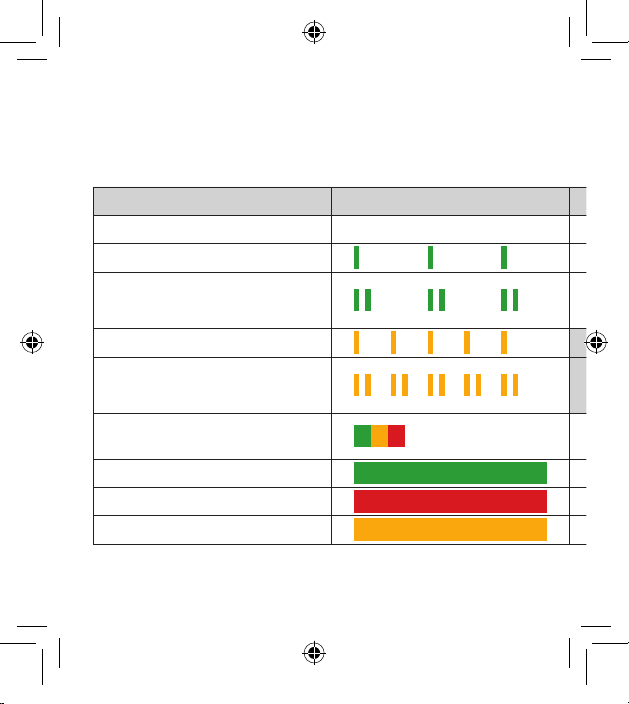
Status light indicator (LED)
Charging Fully charged
No LED indication No LED indication
No LED indication No LED indication
3 seconds 3 seconds
3 seconds 3 seconds
Constant lit Constant lit
The LED on your Multi Mic serves as a multipurpose user interface, providing information on the status of your device.
Power/Charging No charging
Powered Off
Powered On (Normal)
Powered On
(Volume control disabled and MIC or
FM mode selected)
Powered On (Low batter y)
Powered On (Low batter y)
(Volume control disabled and Mic or
FM mode selected)
Volume control locked or unlocked
(See page 28)
Turning power ON indication 3 seconds
Turning power OFF indication 3 seconds
Test mode (See page 31) Constant lit
20
400544000-GB-15.09-Rev.A.indd 20 11-11-2015 16:16:43
Page 21
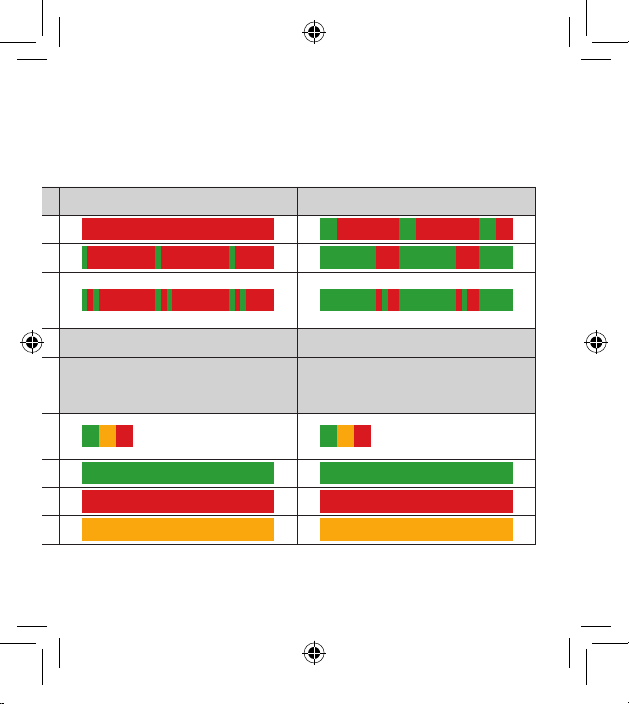
Charging Fully charged
No LED indication No LED indication
No LED indication No LED indication
400544000-GB-15.09-Rev.A.indd 21 11-11-2015 16:16:43
3 seconds 3 seconds
3 seconds 3 seconds
Constant lit Constant lit
21
Page 22
Modes of operation
The Multi Mic is a versatile speech and audio streamer offering
both microphone pickup while worn vertically on the body, or as
a table microphone while placed horizontally on e.g. a table. It
also offers extended audio source connectivity options by being
able to receive telecoil signals, FM signals (optional FM receiver
needed) and connecting to auxiliary audio sources through the
built-in mini-jack line input. It is possible to stream speech and
audio in the following ways:
From the built-in microphones
In microphone mode the Multi Mic will send sound from
the environment to the hearing instruments. The Multi Mic
will optimize the speech pick-up depending on how it is
used. When wearing it vertically on the body (using the clip
or the lanyard) the Multi Mic will be in a mode, minimizing
background noise.
When placed horizontally on a table, the Multi Mic will
switch into an optimized Table mode, enabling pick-up of
speech from more speakers placed around the unit.
From the built-in Telecoil, receiving audio from a teleloop
system (available at e.g. some theatres, schools, churches,
etc.). Note: Telecoil mode will not be available when the
Multi Mic is charging.
22
400544000-GB-15.09-Rev.A.indd 22 11-11-2015 16:16:43
Page 23
From an external, analogue audio source. In line-in mode
the Multi Mic can receive audio from an audio device such
as a mobile phone, MP3 player, tablet, computer or TV. To
use this mode, the audio device must be connected to the
Multi Mic using a mini-jack cable (included with the Multi
Mic). When an audio device is connected, line-in mode will
automatically be selected. Other modes can be selected
by clicking on the mode button until the desired mode is
reached. In this mode, the hearing aid user will wear the
Multi Mic or have it nearby.
From an external FM receiver. In FM mode the Multi Mic
can receive audio from a FM transmitter. This requires that
an FM receiver (optional accessory) is attached to the Multi
Mic via the 3-pin Euro pin connector. When the receiver is
inserted the FM mode will automatically be selected. Other
modes can be selected by clicking on the mode button
until the desired mode is reached. In this mode the hearing
aid user will wear the Multi Mic or have it nearby. The Multi
Mic will now be able to transmit the received FM signal to
the hearing instruments.
Note: Line-in and FM modes can only be selected if a cable
i
or an FM receiver is inserted into the Multi Mic.
23
400544000-GB-15.09-Rev.A.indd 23 11-11-2015 16:16:43
Page 24

Using the Mode button
The Mode button (see page 9) is utilized to view current mode,
switch between different input modes and check the battery status of the Multi Mic.
Current mode:
To view the current mode of operation, press the Mode button
once. The corresponding mode LED on the backside of the Multi
Mic will light up for 3 seconds.
Changing mode:
To change the mode of operation, do the following:
1. Press the Mode button once. The Mode LED corresponding
to the current mode will be lit.
2. Within 3 seconds, press the Mode button again to change
mode.
3. Repeat step 2 until the desired mode is obtained.
24
400544000-GB-15.09-Rev.A.indd 24 11-11-2015 16:16:43
Page 25

Checking the battery status
To view the current battery status press and hold the Mode button for at least 3 seconds until one or more of the Mode LEDs
starts to blink.
- 75 – 100 % remaining battery capacity: All Mode LEDs blink
- 50 – 75 % remaining battery capacity: Three Mode LEDs
blink (FM + Line-in + TC)
- 25 – 50 % remaining battery capacity: Two Mode LEDs blink
(FM + Line-in)
- <25 % remaining battery capacity: One Mode LED blinks
(FM)
Note: When less than 30 minutes of operating time is left
i
(low battery condition) the status LED will start blinking orange
(see Light Indicator chapter).
25
400544000-GB-15.09-Rev.A.indd 25 11-11-2015 16:16:43
Page 26
Volume control and mute
Volume control
Multi Mic is designed to provide a comfortable listening level from
the moment it is activated. However, for some devices or listening environments you may want to adjust the volume. This can
be accomplished in a variety of ways. Keep in mind that volume
adjustments apply to the streamed signal only.
• Use the “+” and “-“ buttons (see page 9) to adjust volume to a
comfortable level.
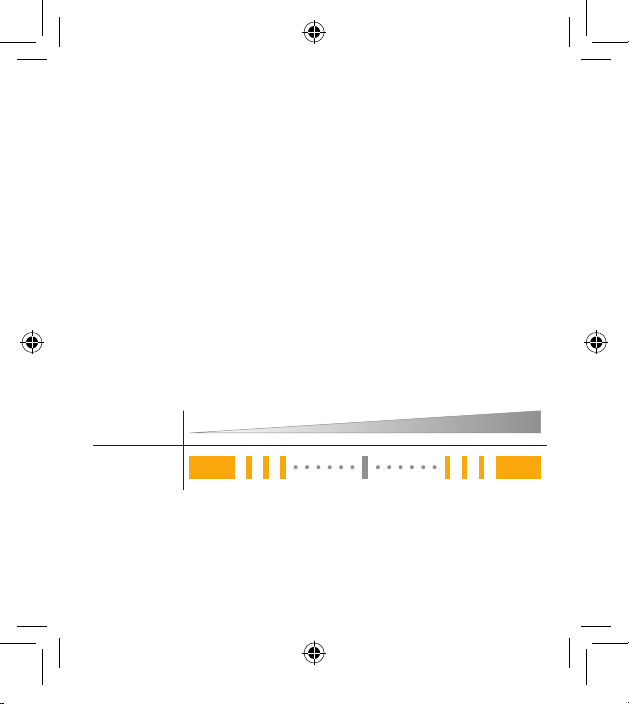
Every volume change on the on the Multi Mic will be indicated by
a short blink of the Mute LED. When reaching the ma ximum or
minimum volume level the Mute LED will show a longer (1 second)
steady orange light.
Volume
Blink
26
400544000-GB-15.09-Rev.A.indd 26 11-11-2015 16:16:43
Page 27

i
when restarted.
The Resound Unite™ Remote Control (optional accessory) can
also be used to adjust the streaming volume in the hearing instrument. Please ask your hearing care professional for more information about this accessory.
Mute
The signal from the Multi Mic can be muted, should the wearer of
the device want to engage in conversations or activities irrelevant
for the hearing instrument user.
• To mute the signal press the Mute button (see page 9) once.
• To unmute the signal press the Mute button once. The Mute
Note: Changing mode or restarting the Multi Mic, while muted, will
unmute the signal.
400544000-GB-15.09-Rev.A.indd 27 11-11-2015 16:16:43
Note: The Multi Mic will revert to its default level for all modes
The Mute LED will now star t blinking orange.
LED will now stop blinking orange.
27
Page 28
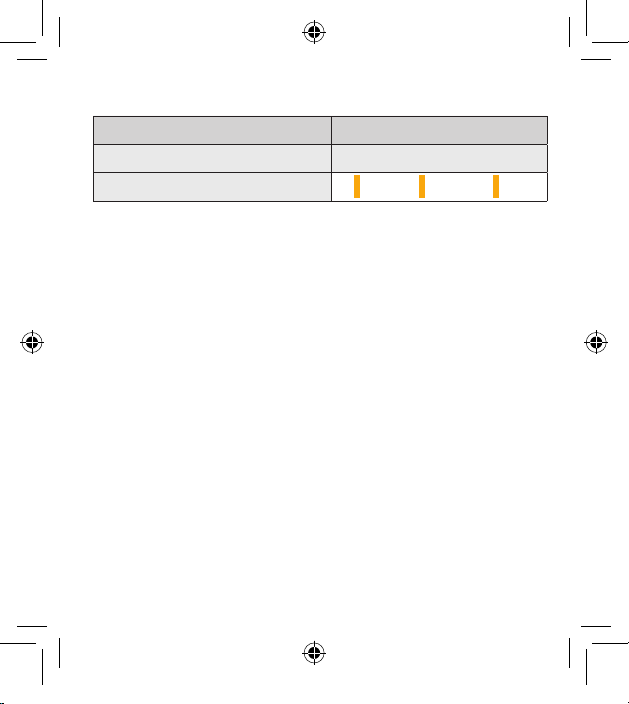
Mute Light indicator
Configuration/Blinking pattern Mute Light indicator
Normal Operation (Unmuted)
Normal Operation (Muted)
Special features
Drop detection
In the event that the Multi Mic falls from a height of more than
75 cm (30 inches), a built-in sensor will mute the output streamed
to the hearing instruments for up to 2 seconds. This is done to
protect the hearing instrument user from very loud and unpleasant impact noise should the unit be accidentally dropped during
use.
Volume control lock
If needed, the volume of the Multi Mic can be locked to a specific
level.
The volume level can be locked for Microphone and FM mode
only. When the volume control is locked, it will be fixed to the level
it had when the Multi Mic was powered OFF, but it is still possible
to use the mute/unmute functionality of the device.
28
400544000-GB-15.09-Rev.A.indd 28 11-11-2015 16:16:43
Page 29

How to lock the volume control
• Make sure the Multi Mic is turned OFF.
• Press and hold the volume ‘-‘ button and the Power ON button for 1.5 seconds until the status LED turns green (Multi Mic
powering up) and release the Power button.
• Keep pressing the volume ‘-‘ button until a green-orange-red
LED sequence is shown on the status LED after 10 seconds.
The status LED will now blink twice every 2 seconds to indicate
that the volume control is locked.
How to unlock the volume control
• Make sure the Multi Mic is turned OFF.
• Press and hold the volume ‘+‘ button and the Power ON button for 1.5 seconds until the status LED turns green (Multi Mic
powering up) and release the Power button.
• Keep pressing the volume ‘+‘ button until a green-orange-red
LED sequence is shown on the status LED after 10 seconds.
The volume can be adjusted independently for Mic and FM mode.
When locked, the volume levels for both Mic mode and FM mode
29
400544000-GB-15.09-Rev.A.indd 29 11-11-2015 16:16:43
Page 30

will be locked at the volume levels last used or set for each of
these modes.
The volume levels for TC mode and Line-in mode can still be
changed as described in the Change Volume section even if the
volume is locked for Mic mode and FM mode.
30
400544000-GB-15.09-Rev.A.indd 30 11-11-2015 16:16:43
Page 31

Test m ode
The Test mode is primarily intended to be used for pediatric transparency measurements. The transparency measurement evaluates if the hearing instrument and wireless (remote) microphones
provide equal outputs when presented with the same 65 dB SPL
input stimulus.
When in Test mode the microphone is set to omnidirectional
mode with 0 dB gain when placed horizontally in the test chamber. Please refer to relevant guidelines for performing transparency measurements.
How to enter Test mode:
• Make sure the Multi Mic is turned OFF.
• Press and hold the Mute button and the Power button for 1.5
seconds until the status LED turns green and then release the
Power button.
• Keep pressing the Mute button until the green-orange-red sequence is shown on status LED after 10 seconds.
• When in Test mode the Status LED (see page 8) will be solid
orange.
• When entering Test mode the default volume is applied. If
needed, volume can be adjusted on the Multi Mic until transparency has been verified.
31
400544000-GB-15.09-Rev.A.indd 31 11-11-2015 16:16:43
Page 32

• To exit Test mode and save settings turn off the Multi Mic and
lock the volume control (see Volume control lock section in the
Special features chapter).
Note: Adjustments to reach transparency can be made on
i
the Multi Mic and/or in the hearing instrument using the fitting
software.
32
400544000-GB-15.09-Rev.A.indd 32 11-11-2015 16:16:43
Page 33

Important Information
Maintenance and Care
• Clean the Multi Mic using a dry cloth. Never use household
cleaning products (washing powder, soap etc…) or alcohol to
clean the device.
• When the Multi Mic is not in use, turn it OFF and store it safely.
• Protect the Multi Mic from excessive moisture (bathing, swimming) and heat (radiator, car dashboard).
• Protect it from excessive shock and vibration.
• Protect the microphone and charger inlets from debris and
dirt. If necessary, use the cleaning brush provided with your
hearing instruments to clean these areas.
33
400544000-GB-15.09-Rev.A.indd 33 11-11-2015 16:16:44
Page 34

General warnings
• Keep this device out of reach of children under 3 years.
• Young children can wrap cords and lanyards/key chains
• The Multi Mic may be inter fered by other equipment.
• Multi Mic uses low-powered digitally coded transmissions in
• When using Multi Mic and the device is affected by electro-
• Avoid exposing your product to rain, moisture or other liquids
• Keep the product and any cords and cables away from oper-
• If the product overheats, if the product is dropped or dam-
34
400544000-GB-15.09-Rev.A.indd 34 11-11-2015 16:16:44
i
around their neck causing the risk of strangulation. Therefore,
always keep cords and lanyards key/chains out of reach of
children.
order to communicate with other wireless devices. Although
unlikely, nearby electronic devices may be affected. In that
case, move the Multi Mic away from the affected electronic
device.
magnetic interference, move away from the source.
to protect against damage to the product or injury to you.
ating machinery.
aged, if the product has a damaged cord or plug, or if the
product is dropped in a liquid, discontinue use and contact
your hearing care professional.
Page 35

• Do not use in areas where there are explosive hazards or
where there is a danger of ignition of flammable gasses.
General precautions
• Do not use this device in locations where it is forbidden to use
• X-ray radiation (e.g. CT scans, MRI scans) may adversely af-
• High-powered electronic equipment, larger electronic instal-
• If the hearing instruments do not respond to the device be-
• Your hearing instruments and this device were given a unique
• Do not make any changes or modifications to this device.
• Opening the Multi Mic may damage it. If problems occur which
400544000-GB-15.09-Rev.A.indd 35 11-11-2015 16:16:44
i
electronic devices.
fect the correct functioning of this device. We recommend
that you switch the device OFF before undergoing X-ray procedures and keep it outside the room.
lations and metallic structures may impair and significantly
reduce the operating range.
cause of an unusual field disturbance, move away from the
disturbing field.
communication code during the fitting. This ensures that the
device will not affect hearing instruments worn by others.
cannot be resolved, consult your hearing care professional.
35
Page 36

• Multi Mic may only be repaired by an authorized service cente r.
• Do not use Multi Mic in areas where RF transmission is prohibited, e.g. air planes etc.
• Do only connect Multi Mic to connections, which it is explicitly
intended for.
Built-in battery care
Please observe the following if the product contains a battery
• Your product is powered by a rechargeable battery.
• The full performance of a new battery is achieved only after
• The battery can be charged and discharged hundreds of
• Unplug the charger from the electrical plug and the product
• If left unused, a fully charged battery will lose its charge over
• Leaving the product in hot places, such as in a closed car
36
400544000-GB-15.09-Rev.A.indd 36 11-11-2015 16:16:44
i
two or three complete charge and discharge cycles.
times, but will eventually wear out.
when not in use.
time.
during hot summer conditions, will reduce the capacity and
lifetime of the battery.
Page 37

• A product with a cold battery may not work temporarily, even
when the battery is fully charged. Battery performance is particularly limited in temperatures well below freezing.
Battery warning
• ”Caution” – The battery used in this product may present a risk
• Do not attempt to open the product or replace the battery.
• The battery in your product can not be removed or replaced
• Only recharge the Multi Mic with a power supply unit that has
• Dispose of batteries according to local regulations. Please re-
• Do not dispose the battery as household waste or in a fire as
• Batteries may explode if damaged.
400544000-GB-15.09-Rev.A.indd 37 11-11-2015 16:16:44
i
of fire or chemical burn if mistreated.
It is built-in and not changeable. Use of other batteries may
present a risk of fire or explosion and the warranty will be terminated.
by the user. Any attempt to do so is risky and may result in
damage of the product.
been supplied together with the product.
cycle when possible.
it may explode.
37
Page 38

Charger care
Please observe the following if the product is supplied with a
charger
• Do not attempt to charge your product with anything other
than the AC adapter provided. The use of any other types
may damage or destroy the product and could be dangerous.
• Use of other chargers may invalidate any approval or warra nty.
• For availability of approved enhancements, please check
with your hearing care professional.
• Charge the product according to the instructions supplied
with the product.
i
Charger warning
Use the device only with the power supply unit that has been
supplied together with the product. The use of any other types
may damage or destroy the product and could be dangerous.
Use of other power supplies may invalidate any approval or
warranty.
38
400544000-GB-15.09-Rev.A.indd 38 11-11-2015 16:16:44
i
Page 39
• When you disconnect the power cord, grasp and pull the plug,
not the cord.
• Never use a power supply that is damaged.
• Do not attempt to disassemble the power supply as it may
expose you to dangerous electric shock.
• Incorrect reassembly can cause electric shock or fire when
the product is subsequently used.
• Avoid charging your product in extremely high or low temperatures and do not use the charger outdoors or in damp areas.
Do not charge the Multi Mic while it is on your body.
39
400544000-GB-15.09-Rev.A.indd 39 11-11-2015 16:16:44
Page 40

Technical specifications
Operating range: Up to 25 meters (Clear line of sight)
Power supply: External wall adapter
Wireless: 2.4 GHz
Operating and
charging temperature: 0 to 45 ºC
Storage temperature: -20 to 45 ºC
Temperature test, transport and storage information
The product is subject to various tests in temperature and damp
heating cycling between -25 ºC and +70 ºC according to internal
and industry standards.
Warranty
The Multi Mic is covered by a limited warranty issued by the manufacturer for a period of 12 months from the day of the original
purchase. Please notice that extended warranties may apply in
your country. Please contact your local Hearing Care Professional
for more information.
40
400544000-GB-15.09-Rev.A.indd 40 11-11-2015 16:16:44
Page 41

What is covered by this warranty?
Any electrical component, that because of workmanship, manufacturing or design defects fails to function properly under normal
use during life of this warranty will be replaced or repaired at no
charge for parts or labor when returned to the point of purchase.
If it is determined that repair is not feasible, the entire unit may be
replaced with an equivalent unit upon mutual agreement of the
Hearing Care Professional and the customer.
What is not covered by this warranty?
Problems arising from improper handling or care, excessive use,
accidents, repairs made by an unauthorized party, exposure to
corrosive conditions or damage due to foreign objects entering
the device are NOT covered by the limited warranty and may void
it. The above warranty does not affect any legal rights that you
might have under applicable national legislation governing sale
of consumer products. Your Hearing Care Professional may have
issued a warranty that goes beyond the clauses of this limited
warranty. Please consult your Hearing Care Professional for further information.
Serial number:
Date of purchase:
41
400544000-GB-15.09-Rev.A.indd 41 11-11-2015 16:16:44
Page 42
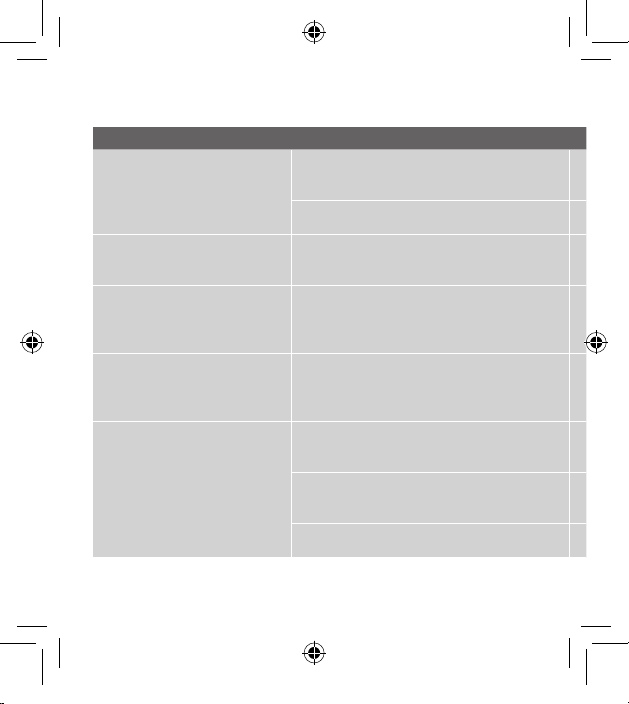
TROUBLESHOOTING GUIDE
Possible Remedy
Press the Power button for a least 1.5 seconds - until the status LED
lights green for 3 seconds
Charge the battery in the Multi Mic
Press the Power button for a least 1.5 seconds - until the status LED
lights green for 3 seconds
Make sure that the mini-jack or FM plug is firmly inserted into the
Multi Mic
Unlock the volume control (see Volume control lock chapter)
Assure that Multi Mic and the hearing instruments are within wireless
range
Power on the Multi Mic and activate streaming again
Charge the battery in the Multi Mic
Symptom Possible cause
The Multi Mic does not
turn ON
The Multi Mic does not turn
OFF
It is not possible to switch
into the line-in and/or the
FM mode
Volume cannot be changed
using the Multi Mic volume
control
There is no sound in the
hearing instruments although switched into in the
streaming program
The Power button is not pressed
long enough
The Multi Mic has run out of power
The Power button is not pressed
long enough
FM and line-in are only available
when a plug has been inserted
The volume control on the Multi Mic
may have been locked to a specific
level
The Multi Mic and the hearing instrument are out of wireless range
The Multi Mic is no longer powered
on
The Multi Mic has run out of power
42
400544000-GB-15.09-Rev.A.indd 42 11-11-2015 16:16:44
Page 43
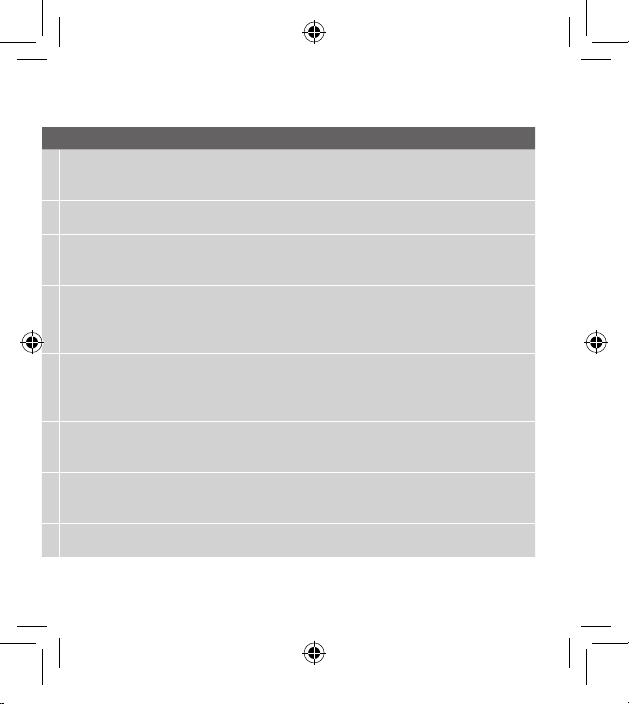
Possible Remedy
Press the Power button for a least 1.5 seconds - until the status LED
lights green for 3 seconds
Charge the battery in the Multi Mic
Press the Power button for a least 1.5 seconds - until the status LED
lights green for 3 seconds
Make sure that the mini-jack or FM plug is firmly inserted into the
Multi Mic
Unlock the volume control (see Volume control lock chapter)
Assure that Multi Mic and the hearing instruments are within wireless
range
Power on the Multi Mic and activate streaming again
Charge the battery in the Multi Mic
400544000-GB-15.09-Rev.A.indd 43 11-11-2015 16:16:44
43
Page 44
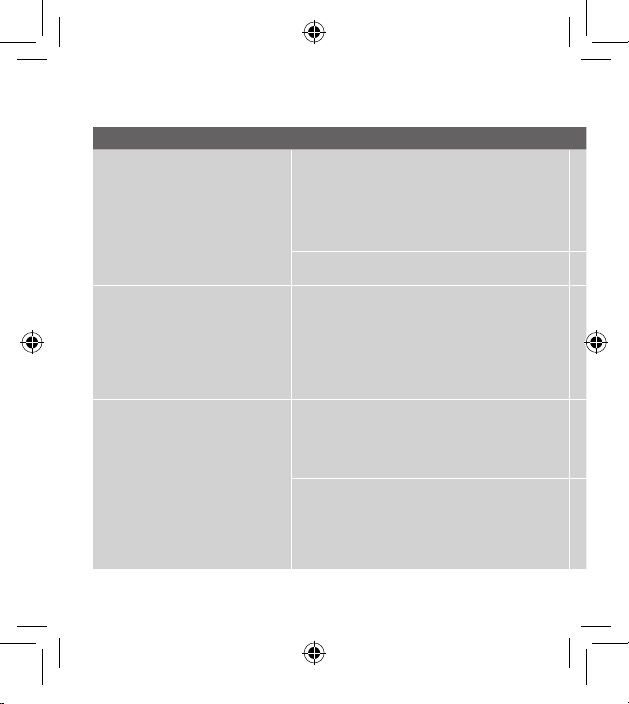
TROUBLESHOOTING GUIDE
Possible Remedy
Power on or unmute the external audio device
Unmute the Multi Mic
Go through the pairing process
Assure that the Multi Mic and hearing instruments are within wireless
range and repeat pairing process
Repeat pairing process and assure that the battery doors on both
hearing instruments are closed within 20 seconds after the pairing
button has been pressed on the Multi Mic
Symptom Cause
44
400544000-GB-15.09-Rev.A.indd 44 11-11-2015 16:16:44
There is no sound in the
hearing instruments although switched into in the
streaming program
The push button on the
hearing instrument is
pressed for more than 3
seconds but with no effect
at all
When the pairing sequence
times out, no pairing
melody is played in the
hearing instrument
An audio device has been connected to the line-in plug but the
device has been powered off or the
output is muted
The Multi Mic is muted
The Multi Mic and hearing instruments have not been paired
The Multi Mic and the hearing
instrument are not within wireless
range
The Multi Mic and the hearing instrument have not been simultaneously in pairing mode
Page 45
Possible Remedy
Power on or unmute the external audio device
Unmute the Multi Mic
Go through the pairing process
Assure that the Multi Mic and hearing instruments are within wireless
range and repeat pairing process
Repeat pairing process and assure that the battery doors on both
hearing instruments are closed within 20 seconds after the pairing
button has been pressed on the Multi Mic
400544000-GB-15.09-Rev.A.indd 45 11-11-2015 16:16:44
45
Page 46
TROUBLESHOOTING GUIDE
Possible Remedy
Replace the battery in the hearing instrument with a fresh one, and
activate streaming again
Adjust the volume using the “+” and “-“ buttons on the Multi Mic, or
adjust the volume on the external audio device, until the best sound
level and quality is obtained.
Clip the Multi Mic on the speaker’s jacket or other clothing or hang
it around the speaker’s neck using the lanyard, placing the device
within 10-40 cm (4-16 inches) from the speaker’s mouth
Increase the volume using the “+” buttons on the Multi Mic
Adjust the volume using the “+” and “-“ buttons on the Multi Mic, or
adjust the volume on the external audio device, until the best sound
level and quality is obtained
Symptom Possible Cause
46
400544000-GB-15.09-Rev.A.indd 46 11-11-2015 16:16:44
One or both hearing instruments drop out of the
streaming program
When using the line-in
the sound is too high or
distorted
The sound level from the
Multi Mic is very low
The battery in one or both hearing
instrument are so depleted that they
no longer supports audio streaming
The audio level of the device connected to the line-in plug is too high
The Multi Mic is not worn correctly
by the speaker
The sound received by the microphone is very low
The audio streamed through the
line-in or FM input is too low
Page 47
Possible Remedy
Replace the battery in the hearing instrument with a fresh one, and
activate streaming again
Adjust the volume using the “+” and “-“ buttons on the Multi Mic, or
adjust the volume on the external audio device, until the best sound
level and quality is obtained.
Clip the Multi Mic on the speaker’s jacket or other clothing or hang
it around the speaker’s neck using the lanyard, placing the device
within 10-40 cm (4-16 inches) from the speaker’s mouth
Increase the volume using the “+” buttons on the Multi Mic
Adjust the volume using the “+” and “-“ buttons on the Multi Mic, or
adjust the volume on the external audio device, until the best sound
level and quality is obtained
400544000-GB-15.09-Rev.A.indd 47 11-11-2015 16:16:44
47
Page 48
Be aware of information marked with the warning symbol
WARNING points out a situation that could lead to se-
i
rious injuries.
CAUTION indicates a situation that could lead to minor
and moderate injuries.
Advice and tips on how to handle your ReSound ac-
i
ces s o r y bet t e r.
48
400544000-GB-15.09-Rev.A.indd 48 11-11-2015 16:16:44
This device includes a RF transmitter that operates in
the range of 2.4 GHz – 2.48 GHz.
Page 49
400544000-GB-15.09-Rev.A.indd 49 11-11-2015 16:16:44
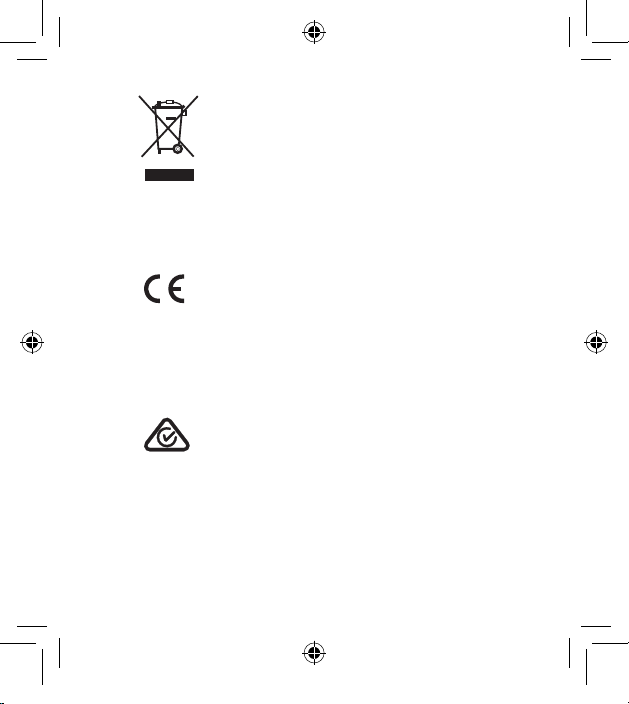
Please ask your local hearing care professiona l
conce rning disposa l of your Multi Mic
Any issues rela ting to the EU M edica l Device D irecti ve 93/42/
EEC, or Council Directive 1999/5/EC on Radi o Equipm ent and
Telecommunications terminal equipment should be directed to
GN Hear ing A/S, Lautr upbjer g 7, DK-2750 Baller up, Denmark
49
Page 50

50
400544000-GB-15.09-Rev.A.indd 50 11-11-2015 16:16:44
Page 51

400544000-GB-15.09-Rev.A.indd 51 11-11-2015 16:16:44
51
Page 52
400544000-GB-15.09-Rev.A
Worldwide Headquarters
ReSound A/S
Lautrupbjerg 7
DK-2750 Ballerup, Denmark
Tel.: +45 45 75 11 11
Fax: +45 45 75 11 19
www.resound.com
CVR no. 55082715
United Kingdom
GN ReSound Ltd.
Kirtlington Business Centre
Portway
Kirtlington
Oxon OX5 3JA
Tel.: +44 1869 352 800
Fax: +44 1869 343 466
www.gnresound.co.uk
Australia
GN ReSound Pty. Ltd.
Unit R1 Regents Park Estate
391 Park Road
Regents Park NSW 2143
Tel.: (free) 1800 658 955
Fax: +61 2 9743 7472
www.gnresound.com.au
New Zealand
GN ReSound (NZ) Ltd.
Ground Floor, North Entrance
4 Fred Thomas Drive
Takapuna
Auckland, 0622
Tel.: (free) 0800 900 126
Fax: (free) 0800 007 695
www.gnresound.co.nz
400544000-GB-15.09-Rev.A.indd 52 11-11-2015 16:16:44
 Loading...