

GN Hearing A S BE60 User Manual

User guide
Behind-The-Ear hearing aids
resound.com

Left Hearing Aid Right Hearing Aid
Serial number Serial number
Model Model
Battery size
312 13
Specific features supported by your hearing system:
Smart Start on page 14
Phone Now on page 24
Telecoil on page 26
Direct Audio Input on page 29
Battery door lock on page 38
Tinnitus Sound Generator on page 32
Open/ standard
fitting:
Programme Beep Description
1
2
3
4
NOTE: Your hearing system might not support four environmental programmes. Ask your hearing care
professional for details.
Small
Medium
Large
Open dome Power dome
Tulip Small
Medium
Large
Earmould
Hearing aid type designations for models included in this user guide are:
BE60, FCC ID: X26BE60, IC: 6941C-BE60; BE70, FCC ID: X26BE70, IC: 6941C-BE70; LO85, FCC ID:
X26LO85, IC: 6941C-LO85. Please see page 11 for a list of models referring to these types.
This device operates in the frequency range of 2.4 GHz - 2.48 GHz. This device includes an RF transmitterthat operates in the range of 2.4 GHz - 2.48 GHz.
2 3

1 Introduction
Congratulations on the purchase of your new hearing aids. ReSound’s innovative sound technology and
design, combined with the customized programming selected by your hearing care professional, will
make hearing a more enjoyable experience.
Please read this manual carefully in order to wholly benefit from the use of your hearing aids. With proper care, maintenance, and usage, your hearing aids will aid you in better communication for many years.
Ask your hearing care professional if you have any questions.
dierent from adjusting to contact lenses. Speak to your hearing care professional, who can design
a schedule tailored just for you.
• As you get more comfortable with them, increase the wearing time and wear your hearing aids in
multiple types of listening environments.
It may take as long as several months for your brain to get used to all the “new” sounds around you. Following these suggestions will give your brain time to learn how to interpret amplification and increase
the benefits you get from using ReSound hearing aids.
4 Statement
2 Intended use
Generic air-conduction hearing aids are wearable sound-amplifying devices intended to compensate for
impaired hearing. The fundamental operating principle of hearing aids is to receive, amplify, and transfer
sound to the eardrum of a hearing-impaired person.
This device complies with part 15 of the FCC rules and ICES-003 of the IC rules.
Operation is subject to the following two conditions:
1. This device may not cause harmful interference.
2. This device must accept any interference received, including interference that may cause unde-
sired operation.
3 Becoming accustomed to amplification
While purchasing hearing aids is a major step, it is only one step in a process toward more comfortable
hearing. Successfully adapting to the amplification your hearing aids provide takes time and consistent
use.
You will enjoy more benefits from your ReSound hearing aids by taking the following actions:
• Wear the hearing aids regularly in order to get comfortable with using them.
• It takes time to get used to hearing aids. It may help to begin by wearing them for short periods
– even as little as 15 minutes – and then gradually increasing your wearing time. In a way, it is no
4 5

• In Canada: these hearing aids are certified under the rules of IC.
NOTE: This equipment has been tested and found to comply with the limits for a Class B digital
i
device, pursuant to part 15 of the FCC rules and ICES-003 of the IC rules. These limits are designed
to provide reasonable protection against harmful interference in a residential installation. This
equipment generates, uses and can radiate radio frequency energy and, if not installed and used in
accordance with the instructions, may cause harmful interference to radio communications. However, there is no guarantee that interference will not occur in a particular installation. If this equipment does cause harmful interference to radio or television reception, which can be determined by
turning the equipment o and on, the user is encouraged to try to correct the interference by one
or more of the following measures:
• Reorient or relocate the receiving antenna.
• Increase the separation between the equipment and receiver.
• Connect the equipment into an outlet on a circuit dierent from the one in which the receiver
is connected.
• Consult the dealer or an experienced radio/TV technician for help.
Changes or modifications can void the user´s authority to operate the equipment.
The products comply with the following regulatory requirements:
• In EU: the device conforms to the Essential Requirements according to Annex I of Council Directive 93/42/EEC for medical devices (MDD) and essential requirements and other relevant provisions of Directive 1999/5/EC (R&TTE).
• The declaration of conformity may be consulted at www.resound.com
• In US: FCC CFR 47 Part 15, subpart C.
• Other identified applicable international regulatory requirements in countries outside the EU and
US. Please refer to local country requirements for these areas.
• Japanese Radio Law and Japanese Telecommunications Business Law Compliance. This device is
granted pursuant to the Japanese Radio Law (電波法) and the Japanese telecommunications Business Law (電気通信事業法 This device should not be modified (otherwise the granted designation
number will become invalid)
Patents: US 7,593,537 US 8,00,849
Behind-the-ear (BTE) hearing aids of type BE60 with FCC ID X26BE60, IC number 6941C-BE60 and size
13 battery are available in the following variants:
LT967-DW, LT767-DW, LT567-DW
Behind-the-ear (BTE) hearing aids of type BE70 with FCC ID X26BE70, IC number 6941C-BE70 and size
13 battery are available in the following variants:
LT977-DW, LT777-DW, LT577-DW
Behind-the-Ear (BTE) hearing aids type LO85 with FCC ID X26LO85, IC number 6941C-LO85 and size 13
battery are available in following variants:
LT988-DW, LT788-DW, LT588-DW
The identification number for the BE60, BE70, and LO85 device models can be found at location “10” as
indicated in the illustrations on the following pages.
6 7

5 Contents
1 Introduction ...........................................................4
2 Intended use ..........................................................4
3 Becoming accustomed to amplification .......... 4
4 Statement ..............................................................5
5 Contents ................................................................8
6 Descriptions ........................................................ 10
6.1 Recognising left and right hearing aid ............10
6.2 Your hearing aid – LiNX 3D 67, 77 and 88 .... 11
7 Getting started .................................................. 14
7.1 On/O function .................................................... 14
7.1.1 Smart Start ............................................................ 14
7.2 Inserting/Replacing the battery ....................... 14
7.3 Low battery indicator .........................................16
7.3.1 Low battery indicator when paired with
wireless accessories only .................................... 16
7.4 Insert/Remove hearing aid ................................ 17
7.4.1 Insert earmould .................................................... 17
7.4.2 Remove earmould ................................................18
7.4.3 Insert thin tube with dome ................................ 19
7.4.4 Remove thin tube with dome ............................ 19
7.5 Operation of the hearing aid ............................. 20
7.5.1 Volume control (optional) ..................................20
7.5.2 Programme button ..............................................21
8 Telephone use .................................................... 22
8.1 Using ReSound Smart Hearing Aids with
8 9
®
, iPad®, and iPod touch® (optional) .... 22
iPhone
8.2 Using ReSound hearing aids with
Smart phone apps ................................................ 22
8.3 Cellular phones .....................................................23
8.4 Phone Now ............................................................24
8.4.1 Placement of Phone Now magnets ................. 24
8.4.2 Phone Now usage ................................................25
8.5 Telecoil (optional) .................................................26
8.5.1 Tele loop systems ................................................ 26
8.5.2 HAC Telephone ..................................................... 27
8.6 FM and Direct Audio Input (optional) .............28
8.6.1 Connecting DAI and integrated FM ................29
8.6.2 Disconnecting audio boot and
integrated FM ........................................................ 29
8.6.3 FM integrated with battery door ..................... 30
8.7 Flight mode (optional) ........................................31
9 Tinnitus Sound Generator (TSG) module ..... 32
9.1 Intended use for the TSG module .................... 32
9.2 User instructions for the TSG module ............ 32
9.2.1 Description of the device ....................................32
9.2.2 Explanation of how the device functions ....... 32
9.2.3 TSG volume control .............................................33
9.3 Using TSG with smart phone apps .................. 34
9.4 The scientific concepts that form the basis
for the device .........................................................34
9.5 Technical Specifications ...................................... 34
9.5.1 Audio signal technology .....................................34
9.5.2 Available sounds ................................................... 35
9.6 Prescription use of a Tinnitus Sound
Generator (TSG) hearing aid ..............................36
9.7 Important notice for prospective sound
generator users .....................................................36
10 Battery door lock for ReSound LiNX 3D
(optional) ............................................................. 38
11 How to apply domes ......................................... 40
11.1 ReSound domes ...................................................40
11.2 ReSound Tulip domes ........................................40
12 Wireless accessories .......................................... 41
13 ReSound Assist (Optional) ............................... 42
14 Care and maintenance ...................................... 43
14.1 Daily maintenance ................................................ 44
14.2 Cleaning earmoulds ............................................. 44
14.3 Cleaning thin tubes and domes ....................... 45
15 General warnings ............................................... 46
16 Using ReSound hearing aids with
ReSound apps for smart phones .................... 48
16.1 Intended use of ReSound apps for smart
phones: ................................................................... 48
16.2 General precautions ............................................48
17 Phone Now warnings ........................................ 49
17.1 Phone Now precautions ..................................... 49
18 Important points for FM ................................... 50
19 Tinnitus Sound Generator (TSG)
warnings .............................................................. 51
19.1 TSG precautions ................................................... 51
19.2 TSG warning to hearing care
professionals ..........................................................51
20 Battery warnings................................................ 53
21 Hearing aid expectations ................................. 53
22 Warning to hearing aid professionals
(US Only) ............................................................. 54
23 Important notice for prospective hearing
aid users (US Only) ............................................ 55
24 Children with hearing loss (US Only) ............. 56
25 Technical Specs Section ................................... 57
25.1 Mini BTE .................................................................. 57
25.2 BTE ...........................................................................58
25.3 Power BTE ..............................................................59
26 Troubleshooting guide ..................................... 61
27 Warranties and repairs ..................................... 64
28 Temperature test, transport and storage
information ......................................................... 65
6 Descriptions
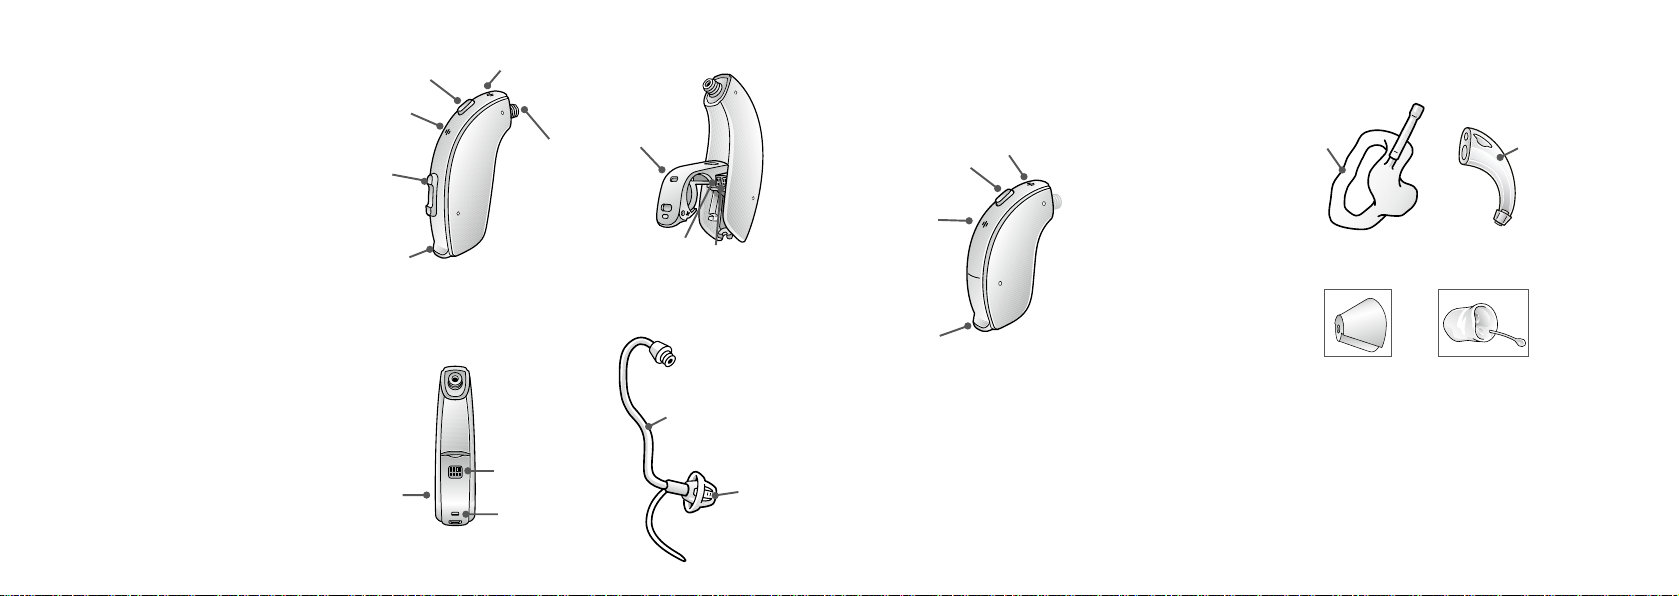
6.1 Your hearing aid - LT 67/LT 77/LT 88
1. Push button
2. Battery door & On/O switch
3. Sound outlet
4. Front microphone inlet
5. Back microphone inlet
6. Volume control
(not for model 67)
7. Direct audio input
(not for model 67)
8. Left/right indicator
(Left = blue, Right = Red)
9. Battery lock (optional)
10. Model (in battery chamber)
11. Manufacturer
12. Serial number (in battery chamber)
13. Earhook
14. Earmould and tubing
15. Thin tube
16. Domes/earmould
a. Open dome
b. Tulip
c. Custom earmould
6
11
LT 77-DW/LT 88-DW LT 67-DW
1
4
(shown without the hook
or thin tube attached)
5
3
8/9
4
1
5
10
2
Open fitting
(Thin Tube and dome)
12
2
15
7
16.a
8/9
Traditional fitting
(earmould and tube)
14
16.b
13
16.c
10 11
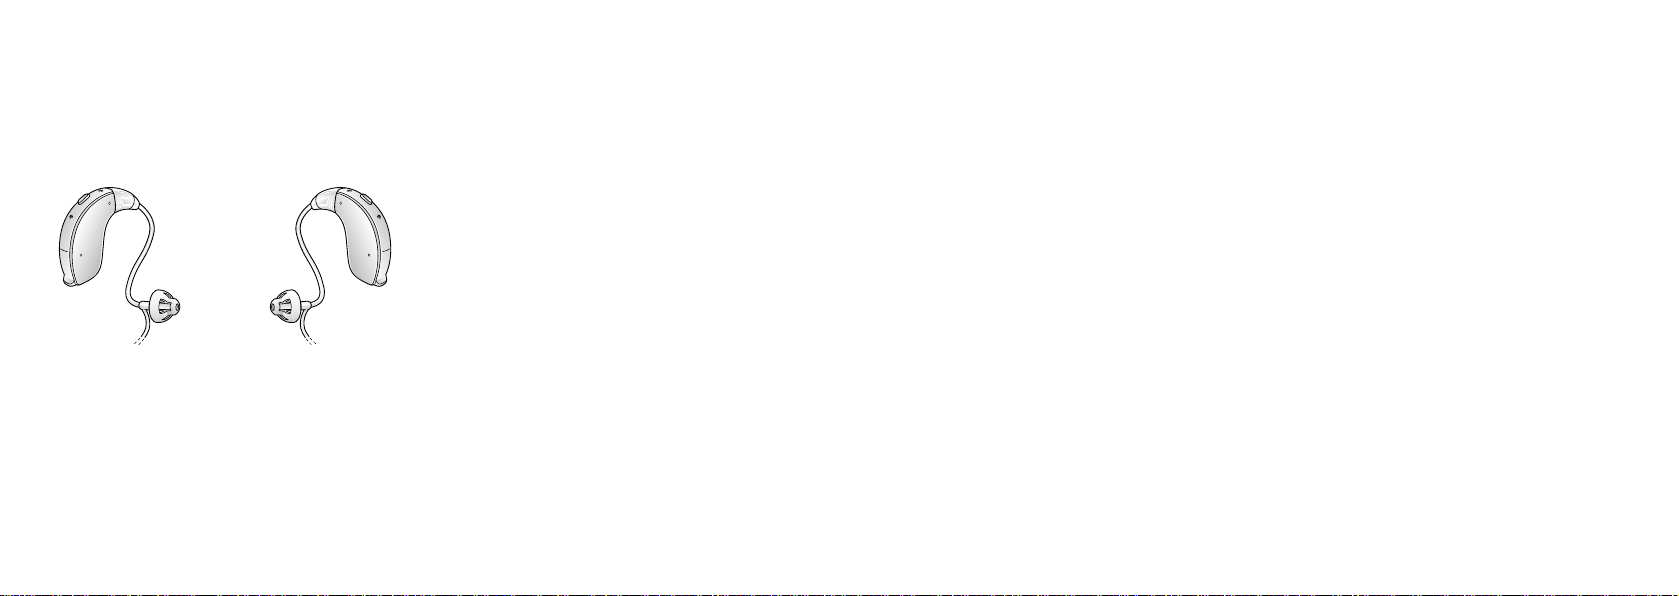
6.2 Recognising left and right hearing aid
If you have two hearing instruments, they may be tuned dierently. One for your left ear, the other for
your right. Do not swap them. Please pay attention to this when cleaning, storing and inserting the
instruments.
Left Right
You might want to ask your hearing care practitioner to mark your instruments with a coloured Left and
Right indication: Left is blue and Right is red.
12 13

7 Getting started
Once you have placed the hearing aids on your ears, you can turn them on.
The hearing aid always starts in programme 1 and with the pre-set volume.
4. Insert the new battery with the positive side in the
correct position. Always insert the battery in the
door: never directly into the hearing aid.
5. Gently close the battery door.
1
2
7.1 On/O function
1. Close the battery door to turn on the hearing aid in programme
1 (one).
2. Open the battery door to turn o the hearing aid. Use your
fingernail to pull it open.
7.1.1 Smart Start
Smart Start delays the time before the hearing aid turns on after you
close the battery door. With Smart Start, you will hear a beep (
for each second of the delay period (5 or 10 seconds delay).
If you do not want to turn on the hearing aids prior to placing them on your ear, ask your hearing care
professional to de-activate Smart Start.
etc.)
On
O
1. Always use new Zinc-Air batteries that have a
i
i
minimum remaining shelf life of 1 year.
2. Whenever the hearing aids are not in use, remember to turn them o to avoid unnecessary
battery consumption.
3. At night, switch o the hearing aid and open the battery door completely to allow moisture to
evaporate and prolong the hearing aid’s lifespan.
4. If the hearing aid is experiencing frequent loss of connection to ReSound wireless accessories
contact your hearing care professional for a list of low impedance batteries.
WARNING: Batteries contain dangerous substances and should be disposed of carefully in the
interest of your safety and for the environment. Also, keep batteries away from pets, children and
mentally disabled persons.
3
7.2 Inserting/Replacing the battery
1. Open the battery door completely by using your fingernail. Remove the used battery if present.
2. Prepare the new battery (please refer to page 2 for information on appropriate battery type/size
for your hearing aid). Remove the protective foil to activate the battery.
3. Wait for 2 minutes before inserting the battery into the hearing aid.
14 15
7.3 Low battery indicator
The hearing aid will reduce amplification and play a melody if battery power gets too low. This signal will
recur every 15 minutes until the hearing aid automatically switches o.
7.4 Insert/Remove hearing aid
For comfort, always turn o your hearing aids before you insert or remove
them.
If you do not want the low battery warning, ask your hearing care professional to de-activate it.
NOTE: Keep spare batteries on hand.
i
7.3.1 Low battery indicator when paired with wireless accessories only
The batteries drain faster when you use wireless functionalities like direct streaming from your iPhone or
streaming sound from your TV with our TV Streamer. When the batteries deplete, the support of some
ReSound wireless accessories shut down. Full functionality returns when you insert a new battery.
The table below shows how the functionality decreases with the depletion of the batteries.
Battery level Signal Hearing aid Remote Control Streaming
Fully charged
Low
Depleted
(change battery)
16 17
P P P
P P O
P O O
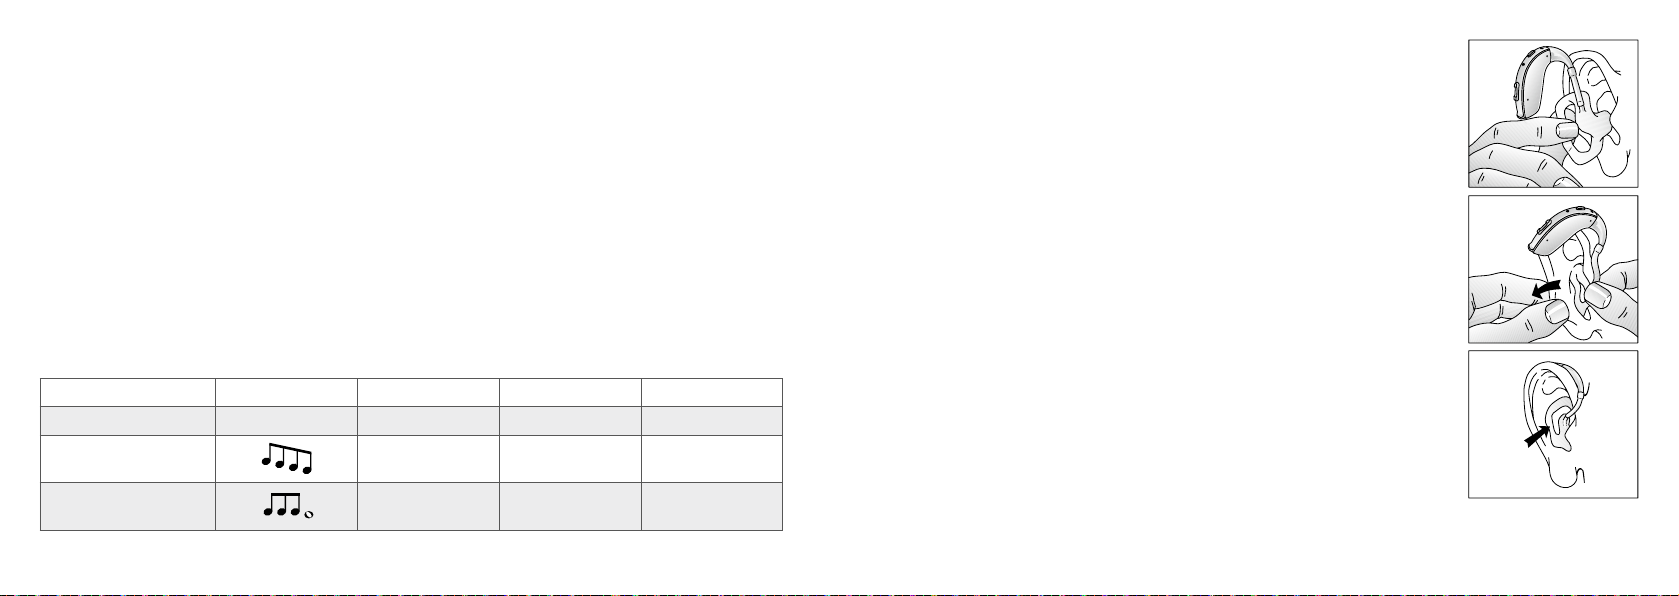
7.4.1 Insert earmould
1. Hold the earmould between your thumb and index finger and position
its sound outlet in your ear canal.
2. Slide the earmould all the way into your ear with a gentle, twisting
movement.
3. Turn the top part of the earmould gently backwards and forwards so
that it tucks behind the fold of skin above your ear canal.
4. Move the earmould up and down and gently press to place it correctly
in the ear. Opening and closing your mouth can ease insertion.
5. Make sure the hearing aid sits firmly behind the ear.
By experimenting, you may discover an easier method. With proper insertion,
hearing aids should fit snugly but comfortably.
NOTE: It may be helpful to pull your ear up and outward with your op-
i
posite hand during insertion.
CAUTION: Never attempt to modify the shape of the hearing aid, ear-
i
moulds, or tubing yourself.
7.4.2 Remove earmould
1. Lift the hearing aid from behind the ear. For a moment, let it hang beside your ear.
2. Using your thumb and index finger, gently pull the earmould (not the instrument or the tubing)
loose from the ear.
3. Remove the earmould completely by gently twisting it.
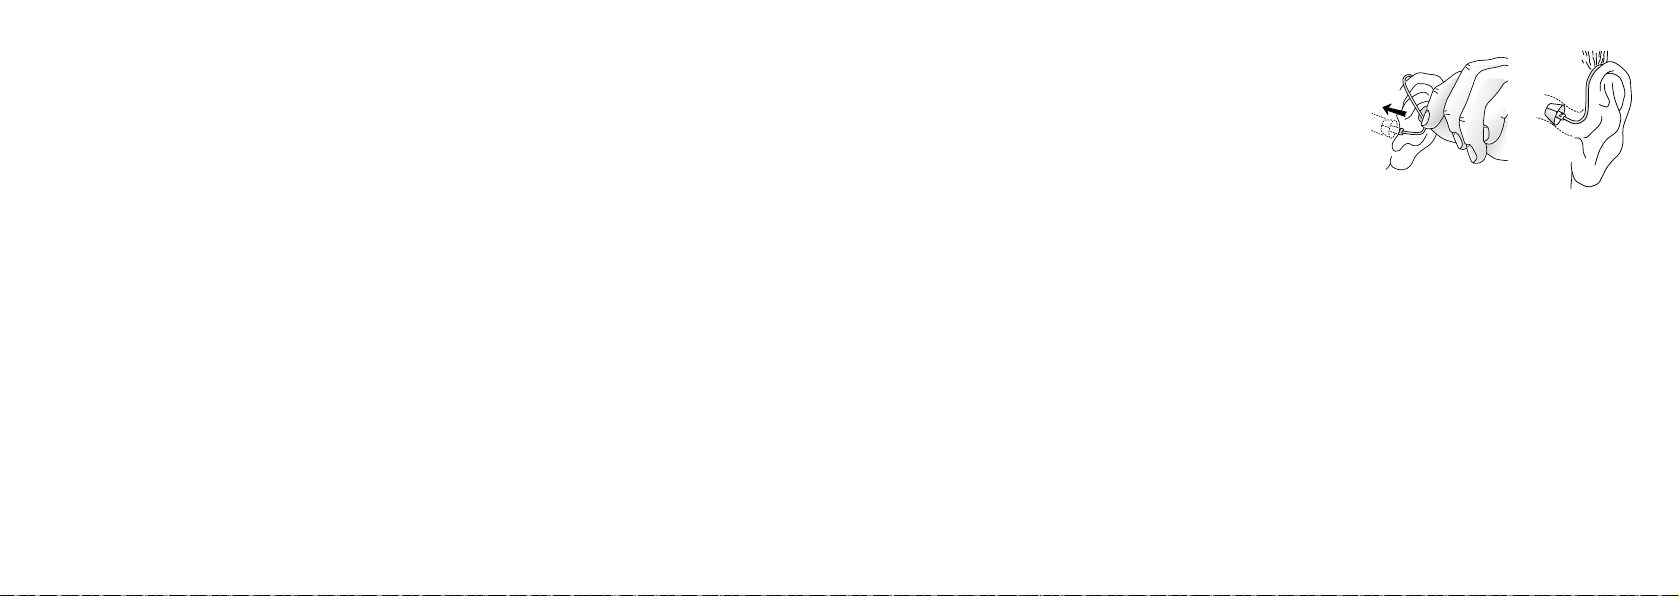
7.4.3 Insert thin tube with dome
1. Hang the hearing aid over the top of the ear.
2. Hold the thin tube where it bends and gently place/push
the dome into the ear canal. Push the dome far enough
into the ear canal so that the thin tube lies flush with the
head (check with a mirror).
NOTE: To avoid whistling, it is important that the tube
i
and the dome fit correctly into your ear. For other possible reasons, check with the Troubleshooting guide.
CAUTION: Never attempt to modify the shape of the hearing aid, earmoulds, or tubing yourself.
i
7.4.4 Remove thin tube with dome
1. Hold the thin tube with your thumb and forefinger and remove the tube.
2. For thin tube custom earmoulds, grasp the removal string and pull the earmould outward.
18 19
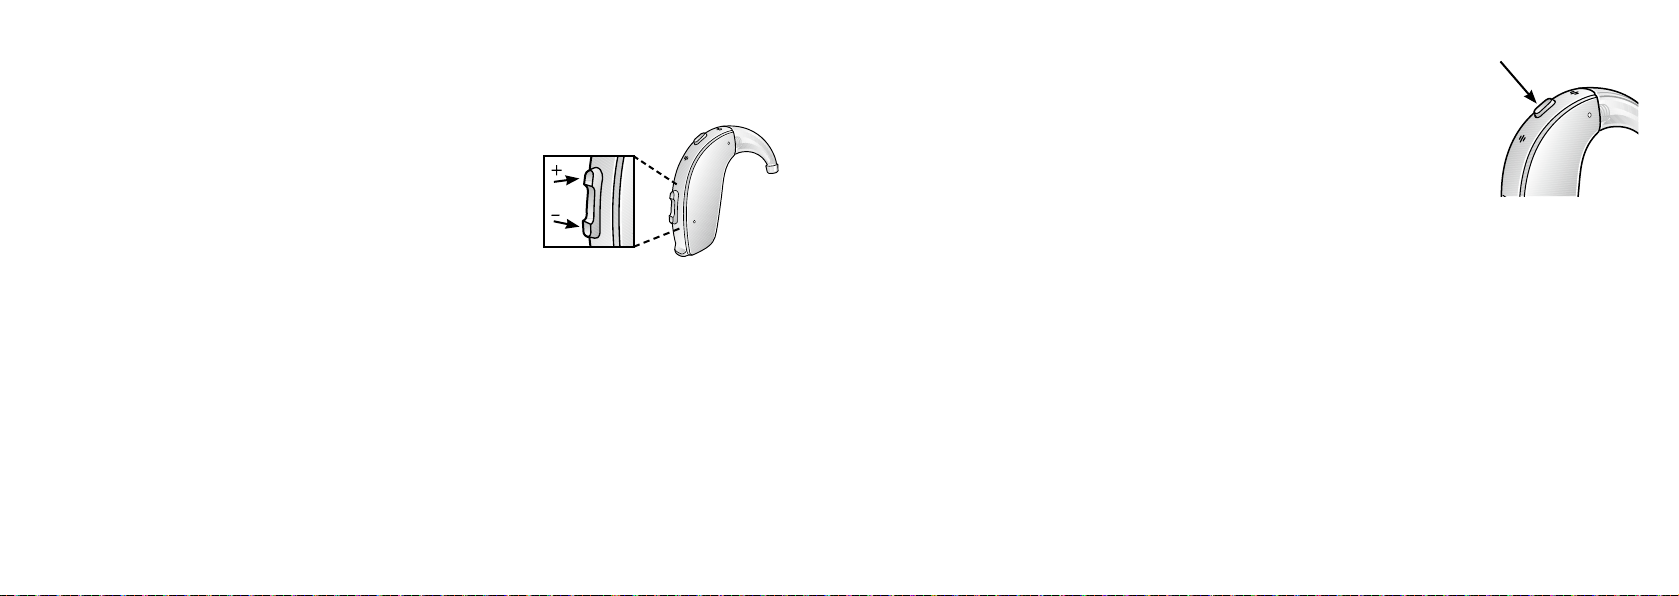
7.5 Operation of the hearing aid
7.5.1 Volume control (not for LT67)
Your hearing aid has automatic volume control, which is individually set during the fitting session.
However, the volume control allows you to adjust the volume of
your hearing aids to your liking.
1. To increase the volume, push the volume control up.
2. To decrease the volume, push the volume control down.
When you change the volume, the hearing aid responds with a beep.
When you reach the upper or lower limits, the hearing aid responds
with a low-pitched beep.
NOTE: Not available for LT67.
i
NOTE: If you have two hearing aids with the Synchronised Push Button function enabled, volume
i
control adjustments to one hearing aid automatically repeats in the second hearing aid. When you
change the volume on one of the hearing aids, it responds with one or more beeps. A beep in the
second aid follows.
NOTE: Your hearing care professional can disable the volume control or replace the volume con-
i
trol with a non-functional cover.
20 21
7.5.2 Push button
Your hearing aid has a push button allowing you to use up to four dierent listening
programmes. The list on page 3 tells which programs have been enabled.
1. Tap the push button to switch between programmes.
2. You will then hear one or more beeps. The number of beeps indicates which
programme you have selected (one beep = programme one, two beeps =
programme two, etc.).
3. When you turn the hearing aids o and then back on, they always return to
the default setting (programme one and pre-set volume).
NOTE: If you have two hearing aids with the Synchronised Push Button enabled, programme
i
changes to one hearing aid automatically repeats in the second hearing aid. When you change a
programme in one hearing aid, it responds with one or more beeps. The same number of confirmation beeps in the second aid follow.
 Loading...