

Page 1
Page 2

CONTENTS
SAFETY INFORMATION.........................2
IMPORTANT INFORMATION
CONCERNING UHF CB RADIO .............. 3
Possible Issues ................................3
Emergency channels .......................4
Telemetry channels ......................... 4
IMPORTANT ADVICE............................. 4
SUPPLIED WITH ....................................4
OPTIONAL ACCESSORIES ...................... 5
FEATURES ............................................ 5
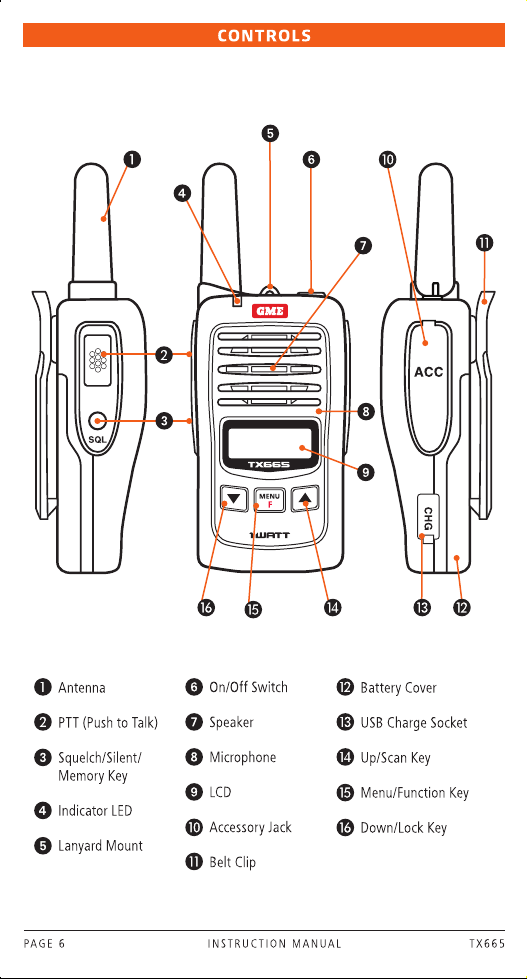
CONTROLS ........................................... 6
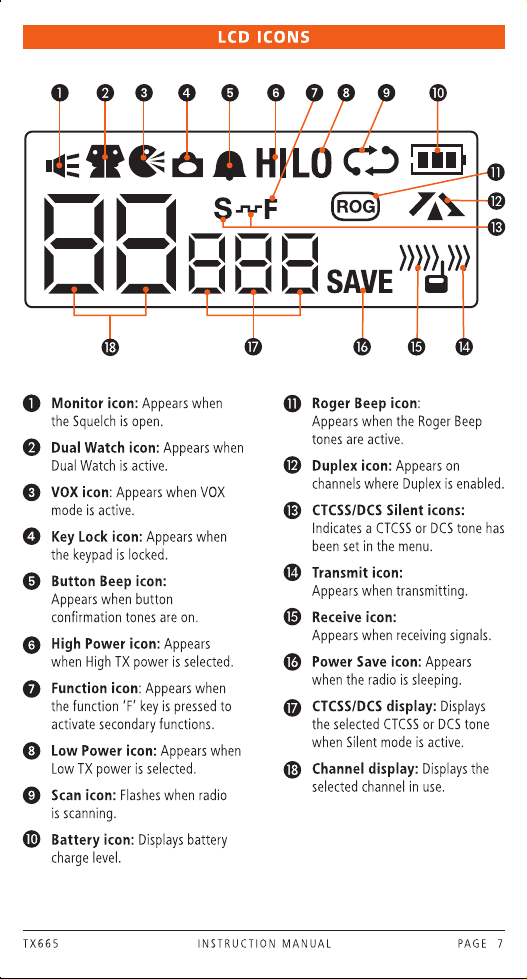
LCD ICONS ......................................... 7
CHARGING THE BATTERY ..................... 8
Charging the TX665 Single Unit ...... 8
Charging the TX665 Twin Pack .......8
In-vehicle charging .........................9
To remove the belt clip .................... 9
To fit the belt clip ............................9
Replacing the battery pack ............. 9
BATTERY USAGE .................................. 10
Battery Low Alert ............................10
Conserving Battery Power .............. 10
Standby Mode ................................ 10
Using CTCSS/DCS ...........................11
Scanning .........................................11
Low Transmit Power Settings .......... 11
GENERAL OPERATION .......................... 11
Power on/off ................................... 11
Adjusting the volume ...................... 11
Selecting channels ..........................11
Display Lighting .............................. 11
Receiving Signals ............................11
Transmitting ................................... 12
Squelch ........................................... 12
Keypad Lock ...................................12
Duplex Operation............................ 13
SCANNING ..........................................13
To add or remove scan channels .....13
To Scan ...........................................14
Scanning Features .......................... 14
CTCSS, DCS AND SILENT MODE ............ 14
MENU .................................................. 15
Using the Menu .............................. 15
Channel selection ...........................15
Duplex mode selection.................... 16
CTCSS and DCS Code Selection ...... 16
Transmitter Power ........................... 17
VOX Settings .................................. 17
Squelch level setting ....................... 17
Roger Beep Tone ............................. 18
Button Beep.................................... 18
Call Alarm Selection .......................18
Dual Watch ..................................... 19
Dual Watch Operation .................... 19
CTCSS TONE FREQUENCIES .................. 20
DSC TONE CHART................................. 20
UHF CB OPERATING FREQUENCIES ......21
SPECIFICATIONS ..................................22
SC CONTRACT WARRANTY AGAINST
DEFECTS .............................................. 23
SAFETY IN FORMATI ON
The TX665 is a radio transmitting device.
• When transmitting, keep the antenna more than 25 mm from any part of the
head or body.
• Do not transmit near electrical blasting equipment or in explosive atmospheres.
• Do not allow children to operate a radio transmitter unsupervised.
PAGE 2 INSTRUCTION MA NUA L T X665
Page 3

IMPOR TANT INFO RMATION CONCERNIN G
UHF CB RADIO
The use of the Citizen Band radio service is licensed in Australia by the ACMA
Radio communications (Citizens Band radio Stations) Class Licence and in
New Zealand by the Ministry of Economic Development New Zealand (MED).
A General User Radio Licence for Citizens Band radio and operation is subject
to conditions contained in those licences.
The class licence for users and equipment operating in the CB/PRS 477 MHz
band has been amended. This radio meets the new 80 channel standard.
In simple terms the same amount of spectrum is available; however, radio
transceivers can now operate in a narrower bandwidth and hence use less
spectrum. These radios are generally referred to as narrowband or 12.5 kHz
radios. By using 12.5 kHz channel spacing instead of 25 kHz, the 40 channels
originally allocated can now be expanded to 80 channels thereby doubling the
channel capacity and relieving congestion in the UHF CB/PRS band.
Original 40 channel wideband radios will continue to operate on the original
40 channels, however they will not be able to converse on the newer channels
41 – 80. The newer narrowband radios will be able to converse with all older
40 channel wideband radios on all channels 1 – 40 as well as the newer channels
allocated from 41 – 80.
The mixing of narrowband and wideband radios in the same spectrum can
cause some possible operating issues of interference and var ying levels of
received volume.
POSSIBLE ISSUES
When a new narrowband radio receives a transmission from an older wideband
radio the speech may sound loud and distorted – simply adjust your radio volume
for best performance.
When an older wideband radio receives a signal from a new narrowband radio,
the speech may sound quiet – simply adjust your radio volume for
best performance.
Depending on how close your receiving radio is to another transmitting radio,
there can be interference from the transmitting radio if it is using a channel
adjacent to the channel you are listening to. Simply try going up or down a few
channels from the currently selected channel.
The above situations are not a fault of the radio but a symptom of operating
wideband and narrowband radios in the same bandwidth. This possible
interference will decrease over time as the population of wideband radios ages
and decreases.
Further information and updates are available from the Australian
Communications and Media Authority (ACMA) at www.acma.gov.au and the
Ministry of Economic Development (MED), Radio Spectrum Management at:
www.rsm.govt.nz
T X665 INSTRUCTION MA NUA L PAGE 3
Page 4

EMERGENCY CHANNELS
The ACMA has allocated channels 5/35 for emergency use only. Channel 5 is the
primary Simplex Emergency Channel. Where a channel 5 repeater is available,
you should select Duplex on channel 5.
NOTE: Channel 35 is the input channel for the channel 5 repeater therefore
channel 35 should also not be used for anything other than emergency
transmissions.
TELEMETRY CHANNELS
ACMA regulations have allocated channels 22 and 23 for telemetry-only
applications and have prohibited the transmission of speech on these channels.
Consequently the radio has a transmit-inhibit applied to channels 22 and 23.
In the event that additional telemetry/telecommand channels are approved by
the ACMA, these channels shall be added to those currently listed where voice
transmission is inhibited. Currently, transmissions on channels 61, 62 and 63 are
also inhibited and these channels are reserved for future allocation.
IMPOR TANT ADVICE
READ ALL INSTRUCTIONS carefully
and completely before operating your
radio and retain this manual for future
reference.
• NEVER connect the radio to a power
source other than the supplied
battery. This may damage your radio.
• DO NOT place your radio in front of a
vehicle airbag.
• DO NOT use your radio with a
damaged antenna.
• DO NOT attempt to modify your
radio in any way.
• ALWAYS charge your radio at normal
room temperature.
• ALWAYS switch off your radio where
notices restrict the use of two–way
radio or mobile telephones.
• ON LY use GME approved
rechargeable battery packs with the
supplied charger.
• AVOID storing or charging your radio
in direct sunlight.
• AVOID storing or using your radio
where temperatures are below -20°C or
above +60°C.
SUPPLI ED W ITH
TX665
• TX665 radio
• Belt clip
• Li-ion battery pack (1000 mAh)
• AC adaptor
• USB/Micro USB lead
• Instruc tion manual
PAGE 4 INSTRUCTION MA NUA L T X665
TX665TP
• 2 x TX665 radios
• 2 x Li-ion battery packs (1000 mAh)
• 2 x belt clips
• Twin desktop charger
• AC adaptor
• USB/Micro USB lead
• Instruc tion manual
Page 5
OPTI ONAL ACCESSORIES
• Twin desktop charger (BCD018)
• USB 12V vehicle charger (BCV010)
• Leather carry case (LC008)
• Ear microphone (HS009)
• Faceplate colours (HA001)
• Speaker microphone (MC007)
• Clear acoustic tube and lapel
microphone (HS010)
FE ATURES
TRANSMIT (TX)
1.0/0.5 watt RF power: Selectable transmitter power allows you to conserve
batter y power when transmitting in close range by using the Low Power setting.
Individually programmable Duplex function: User selectable for only those
individual channels in your area that have repeaters, leaving others free for use as
extra simplex channels.
RECEIVE (RX)
†
channels 477 MHz UHF CB
80
Power Save feature:
Conserves battery power by sleeping during periods of inactivity.
Calling Tone and Roger Beep: Alerts you to incoming calls.
Signal receive indicator
SCANNING AND MEMORY FUNCTIONS
Microprocessor controlled frequency synthesiser:
Allows user programmable control of scanning, channel memories and
selected feature options.
Programmable scan function: Scans up to 80 UHF CB channels.
Dual Watch: Monitors two channels simultaneously.
PRIVACY FUNCTIONS
CTCSS & DCS: A built-in Continuous Tone Coded Squelch System and a Digital
Coded Squelch option provide quiet channel operation.
PHYSICAL PROPERTIES
Rigid, fixed antenna
Rugged construction
USER CONTROLS AND INTERFACE
Keypad Lock: Prevents accidental button presses.
Backlit LCD: For night viewing.
†
Refer to Page 3. Important information concerning UHF CB radio.
T X665 INSTRUCTION MA NUA L PAGE 5
Page 6
Page 7
Page 8
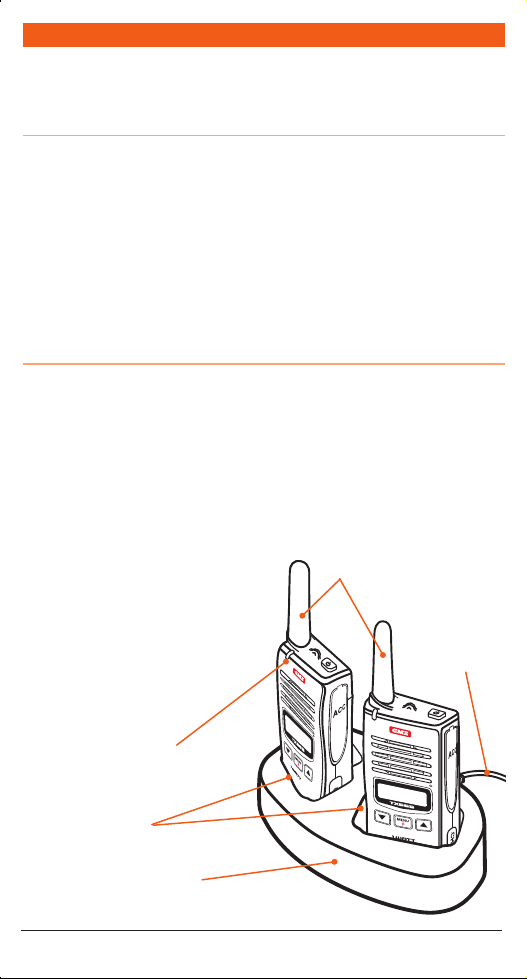
CHARGING T HE BATTERY
The TX665 is powered by a 3.7V 1000mAh Li-ion battery pack. The battery pack
should be fully charged before being used for the first time to ensure maximum
capacity is available.
CHARGING THE TX665 SINGLE UNIT
The TX665 is supplied with a 240V AC adaptor and a USB lead. The AC adaptor will
charge a fully discharged TX665 battery pack to full capacity in around 2 hours.
To charge the radio
1. Plug the AC adaptor into a 240V AC outlet.
2. Plug the USB lead into the USB socket on the AC adaptor and the micro USB
connector into the charging socket on the side of the radio.
While the radio is charging, the indicator LED on the radio will light RED and the
batter y icon on the display will animate. Once the batter y is fully charged, the indicator
LED will change to GREEN and the battery icon will show the fully charged state.
CHARGING THE TX665 TWIN PACK
The TX665 Twin Pack is supplied with a twin desktop charger, 240V AC adaptor and
a USB lead. The twin desktop charger with the AC adaptor connected will charge two
fully discharged TX665 battery pack s to full capacit y in around 3 hours.
To charge the radios
1. Plug the AC adaptor into a 240V AC outlet.
2. Plug the USB lead into the USB socket on the AC adaptor and the micro USB
connector into the socket on the rear of the desktop charger.
3. Place the radios into the twin desktop charger.
While the radios are charging, the
TX665 radios
indicator LEDs on the radios will light
RED and the battery icons on the display
will animate. Once the batteries are fully
charged, the indicator LEDs will change
to GREEN and the battery icons will show
the fully charged state.
USB lead from AC
adaptor (PS003)
or 12V adaptor
(BCV010)
Indicator LED
Cradles
Desktop charger
PAGE 8 INSTRUCTION MA NUA L T X665
Page 9
IN-VEHICLE CHARGING
A 12V vehicle charger (BCV010) is available as an accessory. This will charge a single
fully discharged TX665 battery pack to full capacity in around 4 hours using 12V DC
from your vehicle’s accessory socket.
When connecting the 12V vehicle charger to the twin desktop charger, two fully
discharged TX665 battery packs can be charged to full capacity in around 6* hours
(with radios switched off).
* NOTE: When using the 12V vehicle charger to charge two radios via the twin
desktop charger, we recommend switching both radios off while charging to ensure
the batteries reach their full charge in the allotted period. If one or more radios
remain switched on during the charging cycle the batteries will achieve close to their
full charge in the allotted time but the indicator LED may not switch to GREEN.
This is due to the lower charge current available from the 12V vehicle charger.
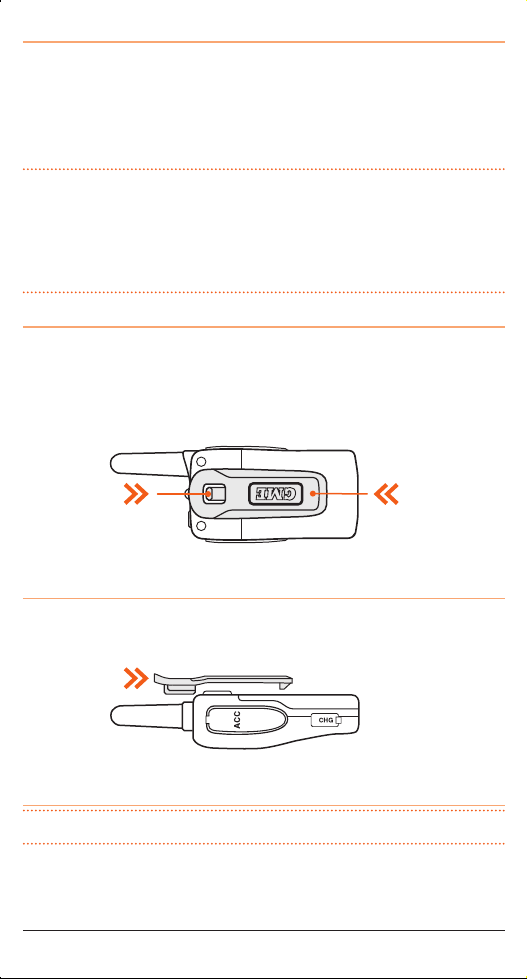
TO REMOVE THE BELT CLIP
1. Hold the radio with the belt clip facing towards you.
2. Push the release clip downwards to release the locking mechanism while sliding
the belt clip upwards.
3. The belt clip will slide off the radio.
Push latch
towards base
to unclip
Slide belt clip
towards top
to release
TO FIT THE BELT CLIP
Slide the belt clip into the catch grooves at the top of the belt clip holder and slide
down all the way until it ‘clicks’.
Slide belt clip
this way until
it ‘clicks'
REPLACING THE BATTERY PACK
TIP: Removing the belt clip first will provide easier access to the battery cover
1. Ensure the radio is switched off.
2. Hold the radio face down in your hand with the battery cover facing upwards.
T X665 INSTRUCTION MA NUA L PAGE 9
Page 10
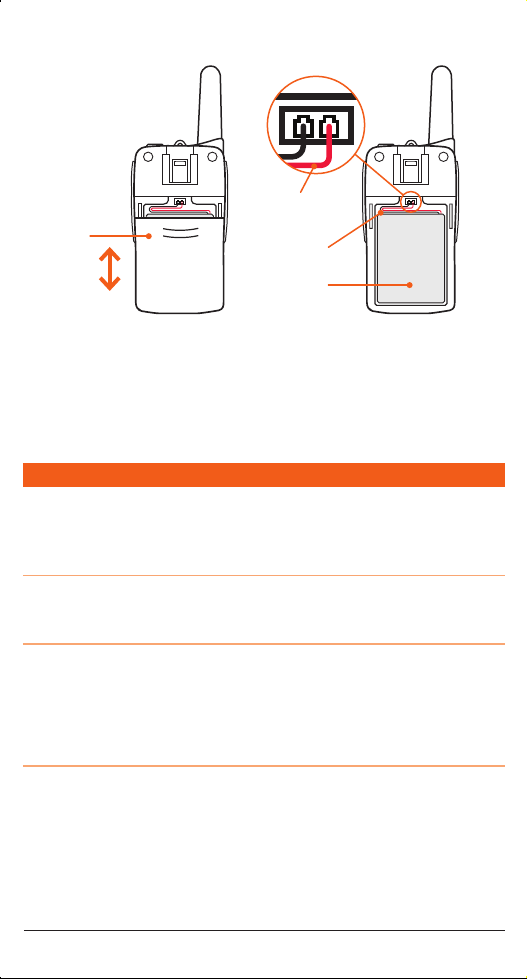
3. Slide the battery cover downwards with your thumb then lift the cover clear to
remove it.
Connector
Slide battery
Red wire
cover to
remove
Wires
Battery
4. Unplug the connector at the top of the battery compartment and remove the battery.
5. Place the new battery in the battery compartment.
6. Plug the connector into the socket ensuring the RED (positive) wire is on the right
(the connector should only fit one way).
7. Reinstall the battery cover ensuring the wires do not become jammed in the cover.
BATTERY USAGE
The time taken to discharge the battery pack will depend on how you use the radio.
The battery pack supplied is powerful enough for up to 17 hours of use under average
conditions using low power.
BATTERY LOW ALERT
When the battery icon blinks on the radio’s display, the battery level is low and the
batter y pack should be recharged.
CONSERVING BAT TERY POWER
The radio has built-in power saving features to help you get the maximum amount of
time between charges from your Li-ion bat tery pack. If you need to operate your radio
in a situation where you require maximum batter y life (e.g. a remote site where there
is no convenient recharging facility nearby) the following hints can greatly reduce the
amount of power drawn from the battery pack.
STANDBY MODE
The radio will automatically enter the ‘Standby’ mode when it is inactive (i.e. not
transmitting or receiving signals).
While in Standby mode it will still check for incoming signals but it will draw
considerably less power from the battery pack. As soon as a signal is heard or the
keys are pressed the radio will ‘wake up’ again. This Standby mode is automatic and
by itself can extend the battery life by many hours.
PAGE 10 INSTRUCTION MA NUA L T X665
Page 11
USING CTCSS/DCS
If you are expecting to receive signals on a busy channel, you can program that
channel for CTCSS/DCS operation and get the other person to call you using the same
CTCSS/DCS tone. Your radio will then remain in Standby and ignore all other signals
until your selected CTCSS/DCS tone is received.
SCANNING
The radio draws more power from the battery pack when scanning than when
monitoring a single channel. This is because it must ‘wake up’ more often to monitor
each channel for activity. In addition, scanning increases the chance of finding a
signal thereby keeping the receiver ‘awake’ and the Squelch open more often.
LOW TRANSMIT POWER SETTINGS
The transmitter has both high and low power settings. If you are only operating over
short distances, are in a reasonably high location or are close to a local repeater, try
using the Low transmitter power setting. This reduces the transmitter power to 0.5
watts which increases the talk time available.
GENERAL OPERATION
POWER ON/OFF
To switch the radio on or off, hold the
ADJUSTING THE VOLUME
Press the
or keys to increase or decrease the volume. ‘VOL’ is displayed along
with a value from 1 (min) to 9 (max).
SELECTING CHANNELS
Hold the MENU key for 2 seconds. The channel number will flash. Press the
step up one channel of the key to step down one channel. Press and hold the or
keys to quickly scroll up or down through the channels.
To exit the channel mode press the PTT or simply wait. The channel mode will
automatically time out after 10 seconds.
DISPLAY LIGHTING
The LCD backlighting activates automatically whenever a key is pressed and turns off
automatically after about 5 seconds.
RECEIVING SIGNALS
While the radio is not receiving signals, it will remain in Standby mode to conserve
batter y power and ‘SAVE’ will be displayed. When a signal is received, the LED
indicator on the upper edge of the radio will light GREEN and the
appear on the display. Adjust the VOLUME control for a comfortable listening level.
If the incoming signal is encoded with a CTCSS or DCS tone matching the one set in
your radio, the LED indicator will light Orange and you will be able to hear the signal
in the speaker. If the LED indicator lights GREEN and the
cannot hear the signal, it is likely that the incoming signal is using a different CTCSS
or DCS tone to that selected in your radio (see Menu options for more details on
setting CTCSS/DCS tones).
If no further signals are received, the unit will return to Standby mode after a
few seconds.
T X665 INSTRUCTION MA NUA L PAGE 11
button for 2 seconds.
key to
icon will
icon appears but you
Page 12
TRANSMITTING
To transmit, press and hold the PTT (Push-To-Talk) switch. The other radio you are
talking to must be set to the same channel. Hold the radio approximately 2 – 5 cm
from your mouth with the antenna vertical and speak into the built-in microphone.
While the PTT switch is pressed, the LED indicator on the upper edge of the radio will
light RED and the
icon will appear on the LCD. When you have finished speaking,
release the PTT switch to receive incoming signals (it is not possible to transmit and
receive at the same time). If no further signals are received, the unit will revert to
Standby mode.
TIP: The PTT switch can also be used to transmit a Call Alarm melody.
When the Call Alarm melody is enabled (see Menu options for more details on
Call Alarm settings), pressing the PTT switch twice quickly will play the Call Alarm
melody in the speaker of other radios on the same channel to alert them to your call.
During this time the
icon is displayed and the LED indicator will light RED for
about 5 seconds. The Call Alarm can only be sent once per minute.
SQUELCH
The Squelch is used to eliminate the background noise when there are no signals
present. When the Squelch is open the receiver’s background noise can be heard.
When the Squelch is closed the receiver remains quiet while there are no signals
present but any incoming signals will override the Squelch and be heard in the speaker.
To open the Squelch, briefly press the SQL key. This will allow you to check the
current channel for activity before transmitting, par ticularly if you have CTCSS
enabled. When the Squelch is open, the LED indicator on the upper edge of the radio
will light Green and the
and icons will appear on the display. During this time
you will hear static or hiss if the channel is clear. Do not transmit if you hear any signals.
To close the Squelch, briefly press the SQL key again.
NOTE: The Squelch sensitivity is preset in the Menu – Squelch Level setting (see
Menu options for more details on setting the Squelch sensitivity).
KEYPAD LOCK
The Keypad Lock disables the keys to prevent accidental key presses from changing
the preferred settings of the radio. When the keys are locked, the
icon is
displayed and all key presses are ignored except for the PTT, SQL and the Keypad
unlock sequence.
To lock the Keypad press the F key (the F icon will appear) then hold the
key.
The icon will appear on the display.
To cancel the Keypad Lock, press the F key then hold the
key. The icon
will disappear.
PAGE 12 INSTRUCTION MA NUA L T X665
Page 13
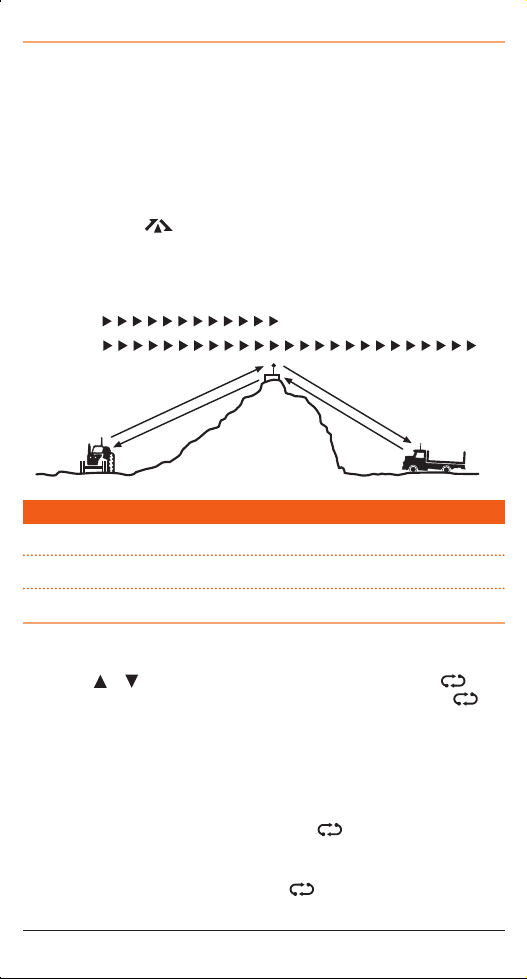
DUPLEX OPER ATION
Duplex operation allows the radio to transmit on a different frequency to that which
it receives. This allows operation through repeater stations in your area. Repeaters
automatically re-transmit your signal over a much wider area, providing greatly
increased range. The Duplex mode only works on designated repeater channels 1 – 8
and 41 – 48. With Duplex selected on one of these channels, your radio actually
transmits 30 channels higher than it receives.
e.g. If Duplex is selected on channel 1, your radio will receive on channel 1 but will
transmit on channel 31.
Duplex can be enabled or disabled on individual channels. When Duplex is enabled on
the selected channel,
is displayed.
The Duplex mode is set through the Menu. Please refe r to th e Menu options further below.
Simplex/Duplex Range Comparison
SIMPLEX
REPEATER
OPERATION
CHANNEL
CHANNEL
31
REPEATER
1
STATION
CHANNEL
CHANNEL
1
31
VEHICLE
VEHICLE
SCANNING
Channel scanning allows you to monitor all channels for incoming signals.
NOTE: While the radio is scanning, the Menu setting key is disabled.
TO ADD OR REMOVE SCAN CHANNELS
To select the required channel
1. Hold the MENU key for 2 seconds until the channel number flashes.
2. Press the
visible are already in the scan memory while those that do not display the icon
are not presently stored in the scan memory.
3. When the desired channel is displayed, press the PTT to exit.
To add or remove the selected channel from the scan memory
1. Press F followed by SQL.
• If the channel is in the scan memory, a low beep will be heard, the channel
• If the channel is not in the scan memory, a high beep will be heard, the channel
T X665 INSTRUCTION MA NUA L PAGE 13
or keys to select the desired channel. Channels with the icon
will be removed from the scan memory and the
icon will disappear on
that channel.
will be added to the scan memory and the
icon will appear on that channel.
Page 14
TO SCAN
Briefly press F followed by
. The icon will flash and the channel numbers will
change as the radio scans through the channels. To change the scan direction while
scanning, briefly press or .
To stop scanning, briefly press F followed by
. The icon will stop flashing and
the radio will return to normal operation.
SCANNING FEATURES
• If a signal is received, the scan is paused allowing you to transmit and receive on
that channel. During this time the
icon will continue to flash to show that the
scan is still active. Once the channel has been inactive for 5 seconds the scan will
automatically resume.
• Pressing the PTT switch while the radio is scanning will jump to the working
channel allowing you to transmit and receive on that channel (the working channel
is the channel the radio was on at the time the scan was activated). During this time
icon will continue to flash to show that the scan is still active. Once the
the
working channel has been inac tive for 5 seconds the scan will automatically resume.
• If the scan is paused on a busy channel that you don’t wish to listen to, press the
or keys to ‘skip’ over the channel and continue scanning.
TIP: The Scan mode will reduce the overall batter y life because the Standby (battery
saver) feature is overridden. If the batter y is running low you should avoid scanning to
conserve power.
CT CSS, DCS AND SILENT MODE
CTCSS (Continuous Tone Coded Squelch System) and DCS (Digital Coded Squelch) are
similar Squelch quieting systems that allow groups of users to share the same channel
without disturbing each other. The CTCSS system uses 1 of 50 low frequency tones
to open and close the Squelch on the radio. The DCS system is similar to CTCSS but
uses 1 of 104 digital codes to control the Squelch. When CTCSS or DCS is enabled on
your radio, only signals that are using the same code as your radio will be heard in the
speaker and the Squelch will remain closed to all other signals.
NOTE: CTCSS and DCS codes do not prevent others from hearing your transmission.
CTCSS/DCS tones are switched off by default. To use CTCSS/DCS you must first enable
a suitable CTCSS/DCS code using the Menu (see Menu options for more details).
Your choice of CTCSS or DCS will largely depend on which is currently being used by
other radios in your group. If neither system is currently in use, you can make your
own choice. There is no difference in performance between the two systems. Once a
CTCSS or DCS code has been enabled, the display will show
(for CTCSS) or
(for DCS). You can now make selected channels ‘quiet’ by enabling Silent mode on
those channels.
To activate or deactivate Silent mode on a channel
1. Select the required channel.
2. Press and hold the SQL key. The selected CTCSS or DCS code will be displayed
on that channel.
PAGE 14 INSTRUCTION MA NUA L T X665
Page 15
Channels that have Silent mode enabled will now remain quiet unless a signal
containing your chosen code is received.
NOTE: Silent mode cannot be activated unless a C TCSS or DCS code has been
selected via the Menu key (See Menu options for more details). If CTCSS/DCS tones
are set to ‘Off’, any attempt to activate the Silent mode will be ignored. When
communicating with other radios using CTCSS or DCS, all radios must be switched to
the same channel and have the same CTCSS or DCS code selected. To receive signals
from radios that are not using CTCSS or DCS you will need to disable Silent mode on
that channel.
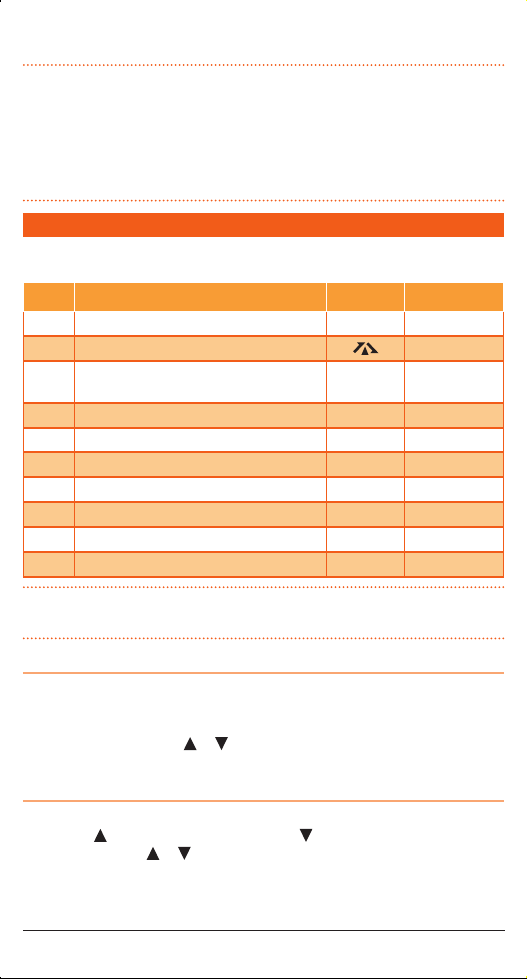
MENU
The Menu key is used to adjust the various feature settings. The following chart
shows the order of these selections.
# Description Symbol Options
1 Channel selector 01 – 80 01 – 80
2 Duplex (channels 1 – 8 and 41 – 48 only)
3 CTCSS and DCS code selection ct/dt
4 Transmitter power Po Hi/Lo
5 VOX settings Vo oF/1 – 3
6 Squelch level setting Sq Aut/1 – 5
7 Roger Beep setting rb oF/on
8 Button Beep selection bP oF/on
9 Call Alarm selection CL oF/1 – 5
10 Dual Watch channel du oF/on 1 – 80
NOTE: CTCSS/DCS and transmit power settings are inhibited on channels 5/35
(emergency channel).
on/oF
oF/01 – 50/
001 – 104
USING THE MENU
To access the Menu, press and hold the MENU key for 2 seconds. Menu options will
appear in the order listed above, depending on the channel selected.
To step to the next Menu item press the MENU key again. To change the options in
the selected Menu press the
or keys. To store your selection and exit the Menu
press the PTT.
CHANNEL SELECTION
1. Hold MENU key for 2 seconds. The channel number will flash.
2. Press the
key to step up one channel of the key to step down one channel.
Press and hold the or keys to quickly scroll up or down through the channels.
3. To exit the channel mode press the PTT or simply wait. The channel mode will
automatically time out after 10 seconds.
T X665 INSTRUCTION MA NUA L PAGE 15
Page 16
DUPLEX MODE SELECTION
The Duplex option only appears in the Menu if a repeater channel (1 – 8 or 41 – 48)
is selected.
To enable duplex on a repeater channel
1. Hold the MENU key for 2 seconds. The channel number will flash.
2. Press the
3. Briefly press the MENU key to advance to the Duplex option. The
4. Press the
the display.
5. Press the PTT to store your setting and exit the Menu.
Whenever Duplex is enabled on a repeater channel, the
that channel.
CTCSS AND DCS CODE SELECTION
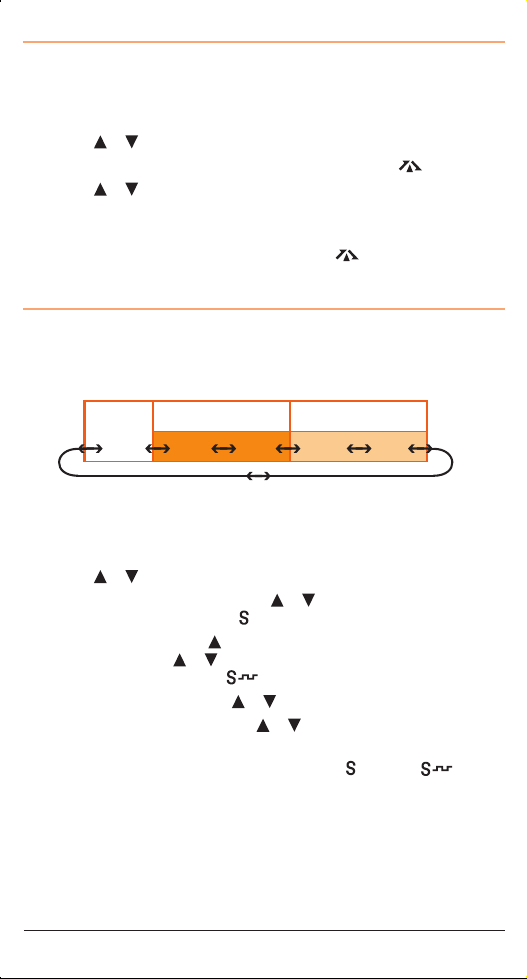
The radio is fitted with both CTCSS and DCS systems. There are 50 CTCSS tones and
104 DCS codes. The DCS codes and the CTCSS tones are accessed through the same
menu (see table below). When CTCSS tones are being selected ‘ct’ is displayed.
To access DCS codes scroll past CTCSS tone 50 until ‘dt’ is displayed.
or keys to select the required repeater channel.
icon will flash.
or keys to select ‘on’ (duplex enabled) or ‘oF’ (duplex disabled) on
icon will be displayed on
CT (CTCSS) DT (DCS)
OFF
To Select a CTCSS or DCS Code
1. Hold the MENU key for 2 seconds. The channel number will flash.
2. Press the MENU key repeatedly until 'ct’ (for CTCSS) or ‘dt’ (for DCS) is displayed.
3. Press the
4. To select CTCSS tones 01 to 50 press the
When a CTCSS code is selected the icon is displayed.
5. To select DCS codes, hold the
displayed. Now use the or keys to select the required DCS code 001 to 104.
When a DCS code is selected the icon is displayed.
6. To return to CTCSS tones hold the
7. To turn CTCSS/DCS tones off, hold the
list until ‘oF’ is displayed.
8. Press the PTT to confirm and store your selection. The
remains on the display to confirm the code system you have selected.
To enable Silent mode on a channel
1. Select the required channel.
2. Press and hold the SQL key for about 2 seconds. The selected code number will be
displayed on that channel.
3. The selected channel will now remain silent unless a signal is received containing
the chosen code.
PAGE 16 INSTRUCTION MA NUA L T X665
or keys to select the required tone/code.
01 50 001 10 4
or keys while ‘ct’ is displayed.
key to scroll past CTCSS tone 50 until ‘dt’ is
or keys until ‘ct’ is displayed again.
or keys to step to the end of the code
(CTCSS) or icon
Page 17
NOTE: Silent mode will only be enabled on channels you select. Other channels will
remain open to all incoming signals.
To Disable Silent mode on a Channel
1. Select the required channel. The CTCSS/DCS Code will be displayed.
2. Press and hold the SQL key for about 2 seconds. The selected code number will
disappear from the display on that channel. The selected channel will now be open
to all incoming signals.
TRANSMITTER POWER
The transmitter power can be set to High or Low on a channel-by-channel basis
(except 5/35).
To Set the Transmit Power
1. Hold the MENU key for 2 seconds. The channel number will flash.
2. Briefly press the MENU key repeatedly until ‘Po’ is displayed. ‘Hi’ or ‘Lo’ will be
flashing.
3. Press the
or keys to select the required power setting. Select ‘Hi’ for high
power or ‘Lo’ for low power.
4. Press the PTT to confirm and store your selection.
The radio should now display the selected channel number along with the HI or LO
icon to indicate the transmit power you have set on that channel.
VOX SETTINGS
The VOX feature allows you to have hands-free conversations. When you speak, the
microphone automatically detects your voice (or other nearby sound) causing the
radio to transmit without the need to press the PTT.
To enable VOX operation
1. Hold the MENU key for 2 seconds. The channel number will flash.
2. Briefly press the MENU key repeatedly until ‘Vo’ is displayed.
3. Press the
or keys to set the VOX sensitivity from 1 (min) to 3 (max).
A minimum setting requires a louder voice to activate the VOX while a maximum
setting will activate the VOX with a much softer voice.
4. To disable the VOX completely, set the VOX sensitivity to ‘oF’.
5. Press the PTT key to confirm and store your selection.
When VOX is enabled, the
icon is visible on the display.
NOTE: Using the radio in a noisy environment with the VOX sensitivity set to
maximum could cause the radio to transmit unexpectedly. If this happens simply
reduce the sensitivity setting.
SQUELCH LEVEL SETTING
The Squelch is designed to keep the radio quiet when there are no signals present.
The Squelch setting adjusts the sensitivity of the Squelch to incoming signals. Higher
Squelch settings require stronger signals to overcome the Squelch and be heard in the
speaker while lower settings allow much weaker signals to be heard.
T X665 INSTRUCTION MA NUA L PAGE 17
Page 18
To set the Squelch
1. Hold the MENU key for 2 seconds. The channel number will flash.
2. Press the MENU key repeatedly until ‘Sq’ is displayed. The current Squelch level
will flash.
3. Press the
or keys to adjust the Squelch level from 1 (most sensitive) to
5 (least sensitive) or select AUT (Auto) for an automatic setting.
4. Press the PTT to confirm and store your selection.
ROGER BEEP TONE
The Roger Beep is a tone that is automatically transmitted whenever the PTT is
released. This tone serves to alert the receiving party that your transmission
has ended.
To Enable or Disable the Roger Beep Tone
1. Hold the MENU key for 2 seconds. The channel number will flash.
2. Press the MENU key repeatedly ‘Rb’ is displayed. The
3. Press the
or keys to select ‘on’ or ‘oF’.
icon will be flashing.
4. Press the PTT to confirm and store your selection.
BUTTON BEEP
The Button Beep allows the radio to sound a confirmation beep whenever the keys are
pressed. It also generates a confirmation tone whenever the radio is switched on.
To Turn the Button Beep On or Off
1. Hold the MENU key for 2 seconds. The channel number will flash.
2. Press the MENU key repeatedly until ‘bP’ is displayed. The
icon will
be flashing.
3. Press the
or keys to select ‘on’ or ‘oF’.
4. Press the PTT to confirm and store your selection.
When the Button Beep is enabled the
icon will be displayed.
CALL ALARM SELECTION
The radio provides 5 user-selectable Call Alarm melodies to alert other users to your
incoming call. When enabled, the melody can be transmitted to another user where it
will be heard in the speaker of the receiving radio.
To Select your Favourite Call Alarm Melody
1. Hold the MENU key for 2 seconds. The channel number will flash.
2. Press the MENU key repeatedly until ‘CL’ is displayed. Call number 1 – 5 or ‘oF’
will be flashing.
3. Press the
or keys to preview (listen to) the 5 available Call Melodies (1 – 5).
NOTE: You will not be able to preview the Call Alarm Melodies unless the Button
Beeps have been enabled.
PAGE 18 INSTRUCTION MA NUA L T X665
Page 19
4. To disable the Call Melodies select ‘oF’.
5. Press the PTT to confirm and store your selection.
To send the Call Alarm Melody
Press the PTT TWICE quickly. The
icon will appear and the LED indicator will light
RED for a few seconds as the melody is sent. The melody will be heard in the speaker
of the receiving radio.
NOTE: The Call Alarm can only be sent once per minute.
DUAL WATCH
The Dual Watch mode lets you to monitor two channels at the same time. While in
Dual Watch mode, the unit will monitor both the selected channel and a second Dual
Watch channel.
To Set the Dual Watch Mode
1. Hold the MENU key for 2 seconds. The channel number will flash.
2. Use the
3. Press the MENU key repeatedly until ‘du’ is displayed. The
or keys to choose the ‘selected’ channel.
icon will
be flashing.
4. Press the
or keys to select the second ‘Dual Watch’ channel or select ‘oF’ to
disable the Dual Watch mode.
5. Press the PTT to confirm and store your selection.
While Dual Watch is active, the
icon is displayed and the LCD will alternate
between the selected channel and the Dual Watch channel.
To Cancel the Dual Watch
Briefly press the MENU key followed by the
key. This is equivalent to selecting ‘oF’
in the Dual Watch menu setting.
DUAL WATCH OPER ATION
• If a signal is received on either channel, the radio will pause on that channel for
as long as it remains busy, then resume the Dual Watch 5 seconds after the last
transmission has ceased.
• To talk on the Dual Watch channel, press the PTT while the radio is paused on that
channel then talk in the usual way.
• To talk on the selected channel, press the PTT while no signals are being
received. The radio will switch to the selected channel. When you have finished
your conversation the radio will resume the Dual Watch 5 seconds after the last
transmission has ceased.
T X665 INSTRUCTION MA NUA L PAGE 19
Page 20
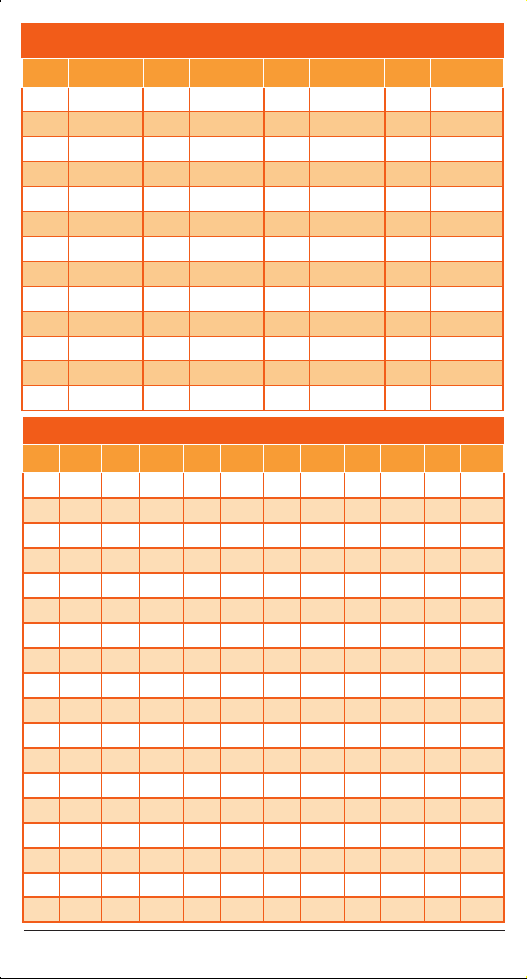
CT CSS TONE FREQUENCIES
NO. FREQUENCY NO. FREQUENCY NO. FREQUENCY NO. FREQUENCY
1 67.0
14 107.2 27 167.9 40 159. 8
2 71.9 15 110.9 28 173.8 41 165.5
3 74.4 16 114.8 29 179.9 42 171.3
4 77.0 17 118. 8 30 186.2 43 177.3
5 79.7 18 123.0 31 192.8 44 183.5
6 82.5 19 12 7.3 32 203.5 45 189.9
7 85.4 20 131.8 33 210.7 46 196.6
8 88.5 21 136.5 34 218.1 47 199.5
9 91.5 22 141. 3 35 225.7 48 206.5
10 94.8 23 146.2 36 233.6 49 2 29.1
11 9 7.4 24 151.4 37 241.8 50 254.1
12 100.0 25 156 .7 38 250.3 – –
13 103.5 26 162.2 39 69.4 – –
DS C TONE CHART
DCS CODE DCS CODE DCS CODE DCS CODE DCS CODE DCS CODE
1 023 19 116 37 225 55 325 73 452 91 627
2 025 20 122 38 226 56 331 74 454 92 631
3 026 21 125 39 243 57 332 75 455 93 632
4 031 22 131 40 244 58 343 76 462 94 654
5 032 23 132 41 245 59 346 77 464 95 662
6 036 24 134 42 246 60 351 78 465 96 664
7 043 25 143 43 251 61 356 79 466 97 703
8 047 26 145 44 252 62 364 80 503 98 712
9 051 27 152 45 255 63 365 81 506 99 723
10 053 28 155 46 261 64 371 82 516 100 731
11 054 29 156 47 263 65 411 83 523 101 732
12 065 30 162 48 265 66 412 84 526 102 734
13 071 31 165 49 266 67 413 85 532 103 743
14 072 32 172 50 271 68 423 86 546 104 754
15 073 33 174 51 274 69 431 87 565 – –
16 074 34 205 52 306 70 432 88 606 – –
17 114 35 212 53 311 71 445 89 612 – –
18 115 36 223 54 315 72 446 90 624 – –
PAGE 20 INSTRUCTION MA NUA L T X665
Page 21
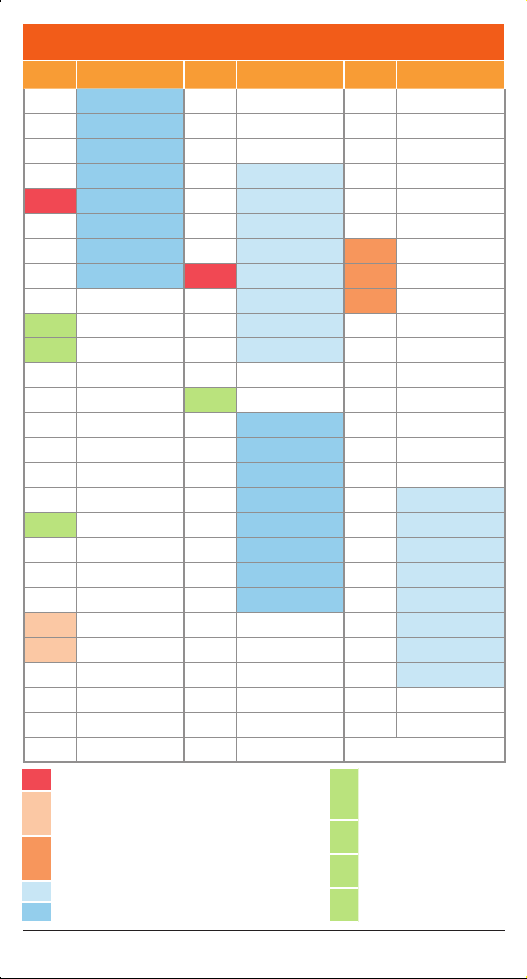
UHF CB OPERATIN G FREQUENCIES
CH Frequency (MHz) CH Frequency (MHz) CH Frequency (MHz)
1 476.425 28 477.100 55 476.7875
2 476.450 29 477.125 56 476.8125
3 476.475 30 477.150 57 476.8375
4 476.500 31 477.175 58 476.8625
5 476.525 32 477.200 59 476.8875
6 476.550 33 477.225 60 476.9125
7 476.575 34 477.250 61 476.9375
8 476.600 35 477.275 62 476.9625
9 476.625 36 477.300 63 476.9875
10 476.650 37 477.325 64 477.0125
11 476.675 38 477.350 65 477.0375
12 476.700 39 477.375 66 477.0625
13 476.725 40 477.400 67 477.0875
14 476.750 41 476.4375 68 477.1125
15 476.775 42 476.4625 69 477.1375
16 476.800 43 476.4875 70 477.1625
17 476.825 44 476.5125 71 477.1875
18 476.850 45 476.5375 72 477.2125
19 476.875 46 476.5625 73 477. 2375
20 476.900 47 476.5875 74 477.2625
21 476.925 48 476.6125 75 477.2875
22 476.950 49 476.6375 76 477.3125
23 476.975 50 476.6625 77 477.3375
24 477.000 51 476.6875 78 477.3625
25 477.025 52 476.7125 79 477.3875
26 477.050 53 476.7375 80 477.4125
27 477.075 54 476.7625
Emergency use only
Telemetry / Selcall use only. Voice transmission
is inhibited as required by AS/NZS 4365.2011
Guard band channel. Transmission is inhibited
as required by AS/NZS 4365.2011
Repeater input channels (Duplex)
Repeater output channels (Duplex)
T X665 INSTRUCTION MA NUA L PAGE 21
Officially designated
11
call channel
40 Road channel
18 Caravan and motor home
10 4WD / Off road
Page 22

SPECIFICATI ONS
GENERAL
Frequency Range: 476.425 – 477.4125 MHz
Channel Spacing: 12 .5 kHz
No of Channels: 80, (75 voice, 2 telemetry RX only, 3 for future use).
CTCSS Codes: 50
DCS Codes: 104
Dimensions: (W x H x D): 52 mm x 89 mm x 29 mm
(without antenna)
Complies with: AS/NZS 4365: 2011
POWER SUPPLY
Power Source: Li-ion rechargeable – 3.7V DC, 1000 mA
Operating Time: 12 Hours (High Power)
17 Hours (Low Power)
(Transmit 5%, Receive 5%, Standby 90%)
RECEIVER
Usable Sensitivity: -121 dBm
Maximum Audio Output: >0.5 watt max. (8 Ohm)
Modulation Distortion: <5% (1 kHz 70%)
TRANSMITTER
Transmit Power: Hi: 1 watt
Lo: 0.5 watt
NOTE: Specifications are typical unless otherwise indicated and may be subject to
change without notice or obligation.
PAGE 22 INSTRUCTION MA NUA L T X665
Page 23

STANDARD COMMUNICATI ONS
CONTRACT WARRANTY AGAINST DEFECTS
This warranty against defects is given by Standard Communications Pty Ltd ACN 000
346 814 (We, us, our or GME). Our contact details are set out in clause 2.7.
1. Consumer guarantees
1.1 Our goods come with guarantees that cannot be excluded under the Australian
Consumer Law. You are entitled to a replacement or refund for a major failure
and for compensation for any other reasonably foreseeable loss or damage.
You are also entitled to have the goods repaired or replaced if the goods fail to
be of acceptable quality and the failure does not amount to a major failure.
1.2 To the extent we are able, we exclude all other conditions, warranties and
obligations which would otherwise be implied.
2. Warranty against defects
2.1 This warranty is in addition to and does not limit, exclude or restrict your
rights under the Competition and Consumer Act 2010 (Australia) or any other
mandator y protection laws that may apply.
2.2 We warrant our goods to be free from defects in materials and workmanship
for the warranty period (see warranty table) from the date of original sale (or
another period we agree to in writing). Subject to our obligations under clause
1.2, we will at our option, either repair or replace goods which we are satisfied
are defective. We warrant any replacement parts for the remainder of the period
of warranty for the goods into which they are incorporated.
2.3 To the extent permitted by law, our sole liability for breach of a condition,
warranty or other obligation implied by law is limited
(a) in the case of goods we supply, to any one of the following as we decide –
(i) the replacement of the goods or the supply of equivalent goods;
(ii) the repair of the goods;
(iii) the cost of repairing the goods or of acquiring equivalent goods;
(b) in the case of services we supply, to any one of the following as we decide –
(i) the supplying of the services again;
(ii) the cost of having the services supplied again.
2.4 For repairs outside the warranty period, we warrant our repairs to be free from
defects in materials and workmanship for three months from the date of the
original repair. We agree to re-repair or replace (at our option) any materials or
workmanship which we are satisfied are defective.
2.5 We warrant that we will perform services with reasonable care and skill and
agree to investigate any complaint regarding our services made in good faith.
If we are satisfied that the complaint is justified, and as our sole liability to you
under this warranty (to the ex tent permitted at law), we agree to supply those
services again at no extra charge to you.
T X665 INSTRUCTION MA NUA L PAGE 23
Page 24
2.6 To make a warranty claim you must before the end of the applicable warranty
period (see warranty table), at your own cost, return the goods you allege are
defective, provide written details of the defect, and give us an original or copy
of the sales invoice or some other evidence showing details of the transaction.
2.7 Send your claim to:
Standard Communications Pty Ltd.
PO Box 96 Winston Hills, NSW 2153, Australia.
Tel: (02) 8867 6000 Fax: (02) 8867 6199
Email: [email protected]
2.8 If we determine that your goods are defective, we will pay for the cost of
returning the repaired or replaced goods to you, and reimburse you for your
reasonable expenses of sending your warranty claim to us.
3. What this warranty does not cover
3.1 This warranty will not apply in relation to:
(a) goods modified or altered in any way;
(b) defects and damage caused by use with non Standard Communications
products;
(c) repairs performed other than by our authorised representative;
(d) defects or damage resulting from misuse, accident, impact or neglect;
(e) goods improperly installed or used in a manner contrary to the relevant
instruction manual; or
(f) goods where the serial number has been removed or made illegal.
4. Warranty period
4.1 We provide the following warranty on GME and Kingray products. No repair
or replacement during the warranty period will renew or extend the warranty
period past the period from original date of purchase.
PRODUCT TYPE WARRANTY PERIOD
477 MHz UHF CB handheld radios
Li-ion battery packs
2 years
1 year
A division of Standard Communications Pty Ltd.
Head Office: PO Box 96, Winston Hills, NSW 2153, Australia.
New Zealand: PO Box 58-446 Botany, Auckland, 2163, NZ. T:(09) 274 0955.
All other international enquires email: [email protected]
Part Number: 310652 Drawing Number: 47551-2
Page 25
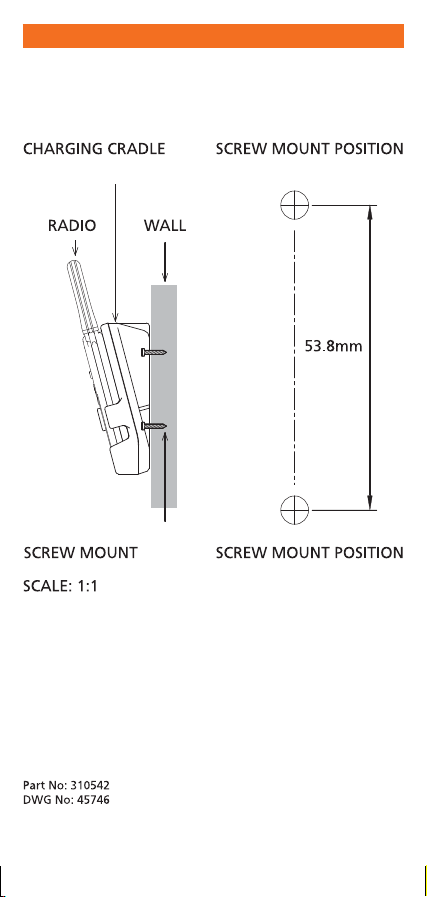
T X655 D ES KT OP CHARG ER MOUNT G UID E
-1
 Loading...