

Page 1
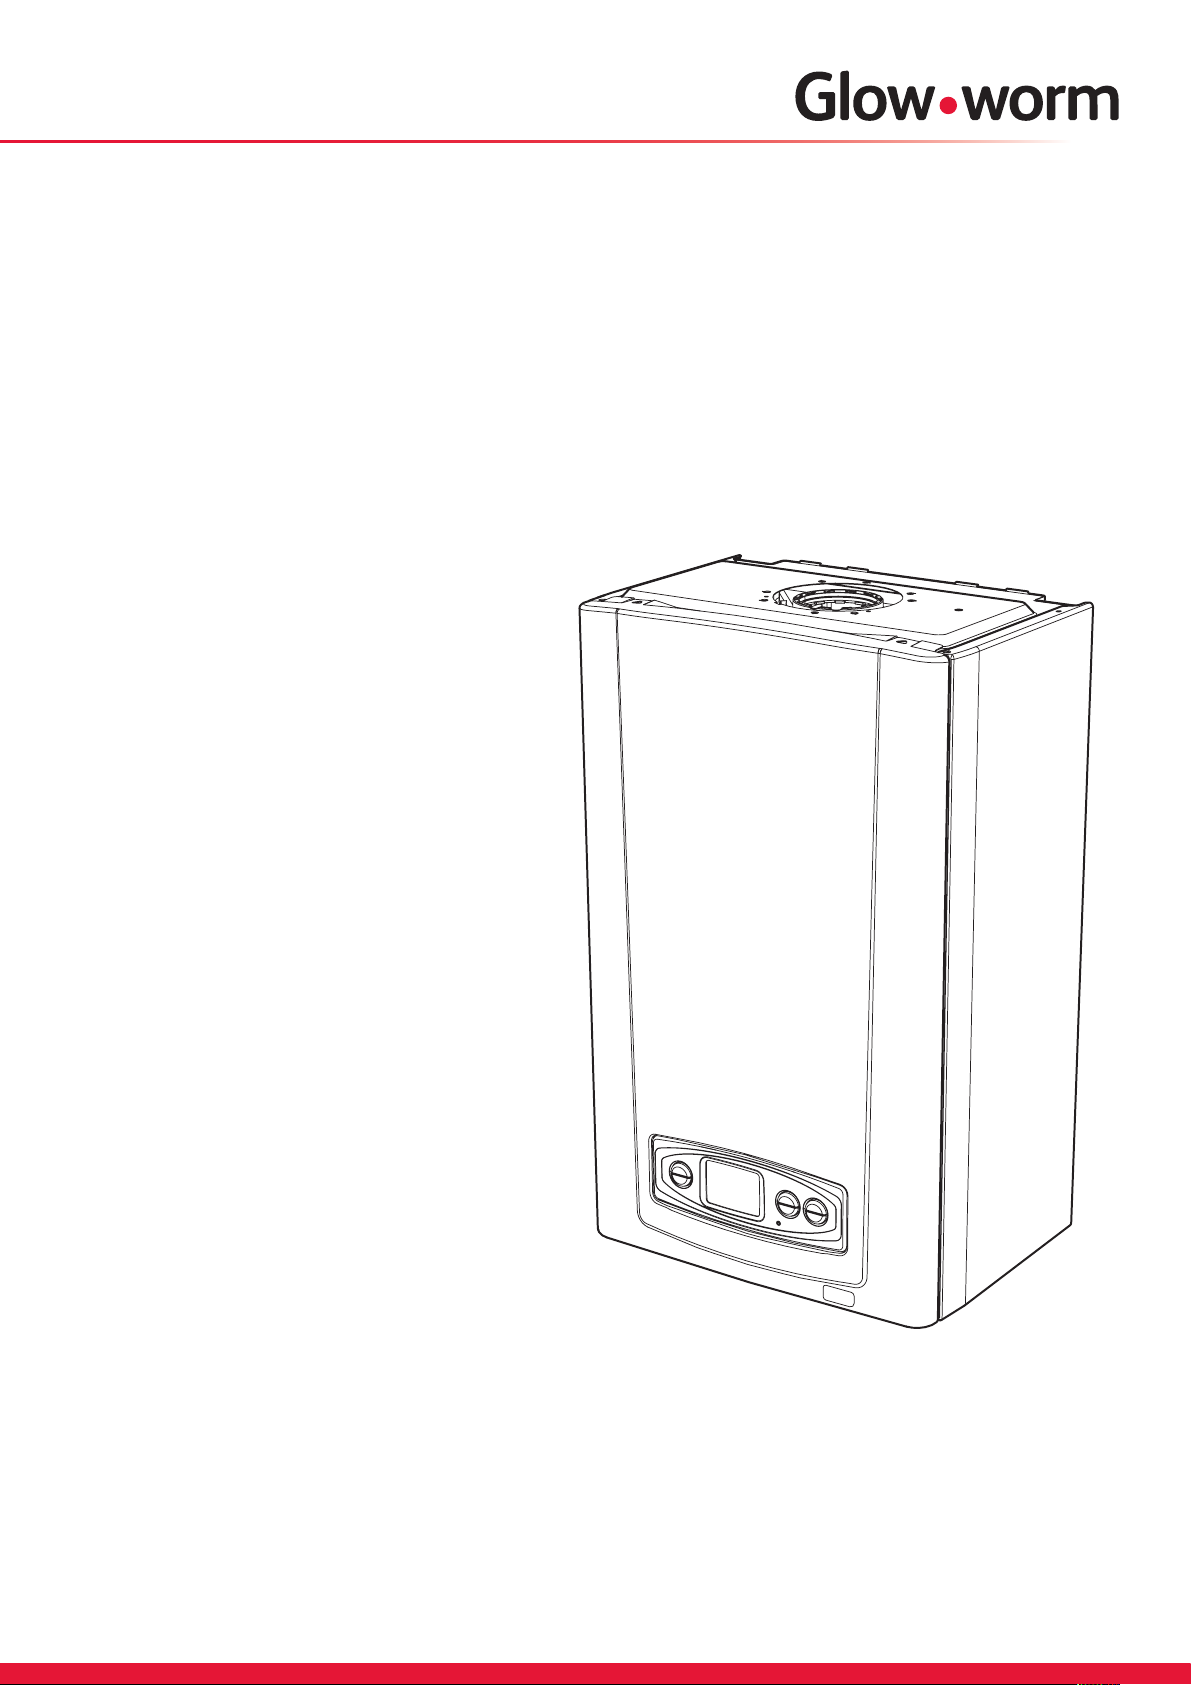
Ultracom
Installation and Servicing
18sxi
G.C. No. 41-019-07
30sxi
G.C. No. 41-019-08
High Efficiency
Condensing System
Boilers
www.glow-worm.co.uk
Page 2

Guarantee Registration
Thank you for installing a new Glow-worm appliance in your home.
Glow-worm appliances are manufactured to the very highest standard so we are pleased to offer
our customers a Comprehensive Guarantee.
This product is guaranteed for 24 months from the date of installation or 30 months from the date
of manufacture, whichever is the shorter, for parts and labour.
The second year of the parts guarantee, from the beginning of the 13th month onwards after
installation or manufacture, is conditional upon the boiler having been serviced by a competent
person approved at the time by the Health and Safety Executive,
in accordance with the manufacturer’s recommendations. We strongly recommend regular
servicing of your gas appliance, but where the condition is not met, any chargeable spare parts or
components issued within the applicable guarantee period still benet from a 12 month warranty
from the date of issue by the manufacturer.
We recommend you complete and return as soon as possible your guarantee registration card.
If your guarantee registration card is missing you can obtain a copy or record your registration by
telephoning the Glow-worm Customer Service number 01773 828100.
Customer Service:
01773 828100
Technical Helpline:
01773 828300
General and Sales enquiries:
Tel. 01773 824639
Fax: 01773 820569
To register your Glow-worm appliance call:
0800 0732142
Benchmark places responsibilities on both manufacturers and installers. The purpose is to ensure that customers are provided
with the correct equipment for their needs, that it is installed, commissioned and serviced in accordance with the manufacturer’s
instructions by competent persons and that it meets the requirements of the appropriate Building Regulations. The Benchmark
Checklist can be used to demonstrate compliance with Building Regulations and should be provided to the customer for future
reference.
Installers are required to carry out installation, commissioning and servicing work in accordance with the Benchmark Code of
Practice which is available from the Heating and Hotwater Industry Council who manage and promote the Scheme.
Visit www.centralheating.co.uk for more information.
2
Page 3
These instructions consist of, Installation, Servicing, Fault Finding, Replacement of Parts
and Spares. The instructions are an integral part of the appliance and must, to comply
with the current issue of the Gas Safety (Installation and Use) Regulations, be handed to
the user on completion of the installation.
CONTENTS DESCRIPTION SECTION PAGE
Warnings 4
Important Information 4
INTRODUCTION
Statutory Requirements 5
Boiler Design 6
Safety Devices 6
Servicing, Maintenance and Spare Parts 6
Boiler Specication 1 7
Boiler Dimensions &
Hydraulic Schematic 2 8
Boiler Location, Clearances
and Ventilation 3 9
Flue Options and Terminal Clearances 4 10
INSTALLATION
Water System 5 12
Installation Preparation 6 14
Boiler Fixing 7 15
Gas/Water Connection 8 16
Safety Discharge Valve and
Condensate Connections 9 17
Flue Length Preparation and Installation 10 19
Electrical Connection 11 35
Commissioning 12 37
MAINTENANCE
Servicing 13 41
Fault Finding 14 45
Replacement of Parts 15 52
Spare Parts 16 60
Manual Handling 17 62
Declaration of Conformity - 63
3
Page 4

WARNINGS
Gas Leak or Fault
Turn off the gas emergency control valve immediately. Eliminate all sources of ignition, i.e.smoking, blowlamps,
hot air guns etc. Do not operate electrical lights or switches either on or off. Open all doors and windows,
ventilate the area.
Metal Parts
This boiler contains metal parts (components) and care should be taken when handling and cleaning,
with particular regard to edges.
Sealed Components
Under no circumstances must the user interfere with or adjust sealed parts.
Important Information
Gas Category
This boiler is for use only on G20 natural gas, but may be
converted for use on G31 gas (Propane L.P.G.).
Gas Safety (Installation and Use) Regulations
In your own interests and that of safety, it is the Law that
ALL gas appliances are installed by a competent person
approved at the time by the Health and Safety Executive in
accordance with the current issue of these regulations.
Control of Substances Hazardous to Health
Under Section 6 of The Health and Safety at Work Act
1974, we are required to provide information on substances
hazardous to health.
The adhesives and sealants used in this appliance are cured
and give no known hazard in this state.
Insulation Pads
These can cause irritation to skin, eyes and the respiratory
tract.
If you have a history of skin complaint you may be susceptible
to irritation. High dust levels are usual only if the material is
broken.
Normal handling should not cause discomfort, but follow
normal good hygiene and wash your hands before eating,
drinking or going to the lavatory.
If you do suffer irritation to the eyes or severe irritation to the
skin seek medical attention.
Manual Handling
With regards to the “Manual Handling Operations, 1992
Regulations”, the appliance exceeds the recommended
weight for a one man lift, refer to section 17 for more
information.
The handling of the boiler may involve lifting, pushing and
pulling, the use of a sack truck may be required.
The following handling techniques and precautions should be
considered:
- Grip the boiler at its base
- Be physically capable
- Use safety clothing where appropriate, e.g. gloves, safety
footwear.
Ensure safe lifting techniques are used
- Keep back straight.
- Avoid twisting at the waist.
- Avoid upper body/top heavy bending.
- Always grip using the palm of the hand.
- Use designated hand holds.
- Keep load as close to body as possible.
- Always use assistance if required.
Electrical Supply
The boiler MUST be earthed.
All system components shall be of an approved type and all
wiring to current I.E.E. wiring regulations.
External wiring must be correctly earthed, polarised and in
accordance with the relevant standards.
In GB, this is BS 7671.
In IE, this is the current edition of ETCI rules.
The boiler MUST be connected to a permanent 230V ac,
50Hz supply.
Connection of the whole electrical system of the boiler,
including any heating controls, to the electrical supply MUST
be through one common isolator and must be fused 3 Amp
maximum.
Isolation should be by a double pole switched fused spur box,
with a minimum gap of 3mm for both poles. The fused spur
box should be readily accessible and preferably adjacent to
the appliance. It should be identied as to its use.
Alternatively connection can be made through an unswitched
shuttered socket and 3A fused 3-pin plug both to the current
issue of BS 1363, provided they are not used in a room
containing a bath or shower.
Wiring to the boiler must be PVC 85
less than 0.75mm2 (24/0.20mm).
O
C insulated cable, not
Testing and Certification
This boiler is tested and certicated for safety and
performance. It is, therefore, important that no alteration is
made to the boiler, without permission, in writing, by Glowworm.
Any alteration not approved by Glow-worm, could invalidate
the certication, boiler warranty and may also infringe the
current issue of the statutory requirements.
4
Page 5

Statutory Requirements
CE Mark
This boiler meets the requirements of Statutory Instrument,
No. 3083 The Boiler (Efciency) Regulations, and therefore is
deemed to meet the requirements of Directive 92/42/EEC on
the efciency requirements for new hot water boilers red with
liquid or gaseous fuels.
Type test for purposes of Regulation 5 certied by: Notied
body 0087.
Product/production certied by: Notied body 0086.
The CE mark on this appliance shows compliance with:
1. Directive 90/396/EEC on the approximation of the laws
of the Member States relating to appliances burning gaseous
fuels.
2. Directive 73/23/EEC on the harmonisation of the Laws of
the Member States relating to electrical equipment designed
for use within certain voltage limits.
3. Directive 89/336/EEC on the approximation of the Laws of
the Member States relating to electromagnetic compatibility.
IMPORTANT
Where no British Standards exists, materials and equipment
should be t for their purpose and of suitable quality and
workmanship.
The installation of this boiler must be carried out by a
competent person approved at the time by the Health and
Safety Executive and in accordance the rules in force in the
countries of destination.
Manufacturer’s instructions must not be taken as overriding
statutory requirements.
Statutory Requirements
In GB, the installation of the boiler must comply with the
requirements of the current issue of BS6798 and be carried
out by a competent person approved at the time by the
Health and Safety Executive and as described in the following
regulations:
The manufacturer’s instructions supplied.
The Gas Safety (Installation and Use) Regulations.
The appropriate Buildings Regulations either The Building
Regulations, The Building Regulations (Scotland),The
Building Regulations (Northern Ireland).
The Water Supply (water fittings) Regulations 1999 and water
byelaws 2000, Scotland.
The Health and Safety at Work Act, Control of Substances
Hazardous to Health (COSHH).
The Current I.E.E. Wiring Regulations.
Where no specic instructions are given, reference should be
made to the relevant British Standard Code of Practice.
In IE, the installation must be carried out by a competent
person approved at the time by the Health and Safety
Executive and installed in accordance with the current edition
of I.S.813 “Domestic Gas Installations”, the current Building
Regulations and reference should be made to the current
ETCI rules for Electrical Installation.
GB: the following Codes of Practice apply:
BS4814, BS6798, BS5440 Part 1 and 2, BS5546 Part 1,
BS5449, BS6891, BS6700, BS7074 Part 1 and 2, BS7593,
BS7671.
IE: I.S.813, BS5546, BS 5449, BS 7074, BS 7593.
NOTE: For further information, see the current issue of the
Building Regulations, approved document L1 ( in the UK) and
the following current issues of:
1) Central heating system specication (CheSS)
and
2) Controls for domestic central heating system and hot water.
BRECSU.
Gas Supply
The gas installation must be in accordance with the relevant
standards.
In GB, this is BS6891.
In IE, this is the current edition of I.S.813 “Domestic Gas
Installations”.
The supply from the governed meter must be of adequate size
to provide a steady inlet working pressure of 20mbar (8in wg)
at the boiler.
On completion, test the gas installation for tightness using the
pressure drop method and suitable leak detection uid, purge
in accordance with the above standard.
Domestic Hot Water
All domestic hot water circuits, connections, ttings must be
in accordance with the relevant standards and water supply
regulations.
GB: Guidance G17 to G24 and recommendation R17 to R24
of the Water Regulations Guide.
IE: The current edition of I.S.813 “Domestic Gas Installations”.
Heating System
In GB, it is necessary to comply with the Water Supply (Water
Fittings) Regulations 1999 (for Scotland, the Water Byelaws
2000, Scotland).
To comply with the Water regulations your attention is drawn
to: The Water Regulations guide published by the Water
Regulations Advisory Service (WRAS) gives full details of the
requirements.
In IE, the requirements given in the current edition of I.S.813
“Domestic Gas Installations” and the current Building
Regulations must be followed.
5
Page 6

Boiler Design
Boiler Design
This boiler is designed to provide central heating from a
sealed water system with a fully indirect cylinder, pumped
circulation. The pump, expansion vessel and associated
safety devices are all tted within the boiler. The integral
programmer is designed for both simple operation and
maximum control. Once the controls are set the boiler will
operate automatically.
Condensate Drain
A plastic drain pipe must be tted to allow discharge of
condensate to a drain.
Safety Devices
Electrical Supply Failure
The boiler will not work without an electrical supply.
Normal operation of the boiler should resume when the
electrical supply is restored.
Reset any external controls, to resume normal operation of
the central heating.
If the boiler does not resume normal operation press the reset
button. If the boiler does not resume normal operation after
this call your Installation/Servicing company or Glow-worm
service.
Overheating Safety
The boiler software is designed to recognise the potential for
an overheat lockout and will shutdown before this happens.
To restart the boiler, press the reset button on the controls
fascia.
If the boiler fails to resume normal operation and all external
controls are calling for heat, then call your Installation/
Servicing company or Glow-worm service.
Safety Discharge Valve
A safety discharge valve and discharge pipe are tted to
the boiler. This valve must not be touched. Should there
be any discharge from the pipe, isolate the boiler electrical
supply and call your installer or Glow-worm’s own service
organisation using the telephone number on the inside front
cover of this booklet.
Condensate should, if possible, be discharged into the internal
household draining system. If this is not practical, discharge
can be made externally into the household drainage system or
a purpose designed soak away, see section 9 for more details.
Pluming from flue terminal
Like all condensing boilers this appliance will produce a plume
of condensation from the ue terminal in cool weather. This is
due to the high efciency and hence low ue gas temperature
of the boiler.
This is normal and not an indication of a fault.
Frost protection
The appliance has a built in frost protection device that
protects the boiler from freezing. With the gas and electric
supplies ON and irrespective of any room thermostat setting,
the frost protection device will operate the pump when the
temperature of the boiler water falls below 8
A timer is used so that the temperature can be checked
periodically. After 10 minutes the pump will be stopped if the
temperature is higher than 10
The burner will activate if the boiler temperature does not
reach 10
drops to 5OC.
The burner will switch off when the temperature reaches
35
O
C after 30 minutes or at any time if the temperature
O
C.
O
C or has already reached 35OC.
O
C.
Condensate Drain Blockage
As a safety feature the boiler will stop working if the
condensate drain becomes blocked. During freezing
conditions this may be due to the forming of ice in the
condense drain external to the house. Release an ice
blockage by the use of warm cloths on the pipe, the boiler
should then restart.
Servicing, Maintenance and Spare Parts
Servicing and Maintenance
To ensure the continued efcient and safe operation of the
boiler it is recommended that it is checked and serviced as
necessary at regular intervals. The frequency of servicing will
depend upon the particular installation conditions and usage.
If this appliance is installed in a rented property there is a duty
of care imposed on the owner of the property by the current
issue of the Gas Safety (Installation and Use) Regulations,
Section 35.
Servicing/maintenance should be carried out by a competent
person approved at the time by the Health and Safety
Executive in accordance with the rules in force in the countries
of destination.
To obtain service, please call your installer or Glow-worm’s
own service organisation using the telephone number on the
inside front cover of this literature.
6
Spare Parts
Remember, when replacing a part on this appliance, use
only spare parts that you can be assured conform to the
safety and performance specication that we require. Do not
use reconditioned or copy parts that have not been clearly
authorised by Glow-worm.
If a part is required contact Glow-worm’s own service
organisation.
Please quote the name of the boiler this information will be on
the name badge on the front of the appliance.
If in doubt seek advice from the local gas company or Glowworm’s own service organisation using the telephone number
on the inside front cover of this booklet.
Page 7
1 Boiler Specication
BOILER SPECIFICATION 18sxi 30sxi
Lift weight 36kg (80Ib) 39kg (86Ib)
Total weight (installed) 41kg (90Ib) 44.5kg (98Ib)
Gas connection 15mm copper 15mm copper
Heating flow & return connection Ø O.D. 22mm. copper 22mm. copper
Condensate connection Ø I.D. 21.5mm. plastic 21.5mm. plastic
2
Safety valve 3 bar (43/5Ibf/in
Safety valve discharge 15mm. copper 15mm. copper
Expansion vessel capacity 8 litres (1.76 gallons) 8 litres (1.76 gallons)
Expansion vessel charge pressure 0.5bar (7,3Ibf/in
Electrical supply 230V~50Hz fused 3A 230V~50Hz fused 3A
Electrical rating 180W fused 3A 180W fused 3A
) 3 bar (43/5Ibf/in2)
2
) 0.5bar (7,3Ibf/in2)
13498
EN60529 IP clasification IPX4D IPX4D
Internal fuse rating on main PCB 2A 2A
Gas supply (governed meter only) II
G20 natural gas II
2H3P
G20 natural gas
2H3P
Inlet gas working pressure 20mbar 20mbar
Burner % CO
Burner % CO
2.0 m
Approximate max. gas rate
after 10 mins. from cold
71 ft
0.53 m
Approximate min. gas rate
after 10 mins. from cold
18.7 ft
Flue type C
case on 9.3 nominal 9.3 nominal
2
case off 9.1 nominal 9.1 nominal
2
3
/h 3.0 m3/h
3
/h 107 ft3/h
3
/h 0.53 m3/h
3
/h 18.7 ft3/h
13, C33, C43, C53 C13, C33, C43, C53
NOx Class 5 Class 5
Heat output condensing mode 20.02kW 30.58kW
Heat input Nett Q = kW max. 18.9 min. 5 max. 28.6 min. 5.3
Heat output P = kW max. 18.57 min. 4.95 max. 28.17 min. 5.25
SEDBUK rating Band A 90.4% Band A 90.6%
Table 1. Flow Rate
MODEL MINIMUM FLOW RATE
18sxi 774 litres/hr.
30sxi 1289 litres/hr.
This is equal to 20
o
C differential at maximum heat input.
7
Page 8
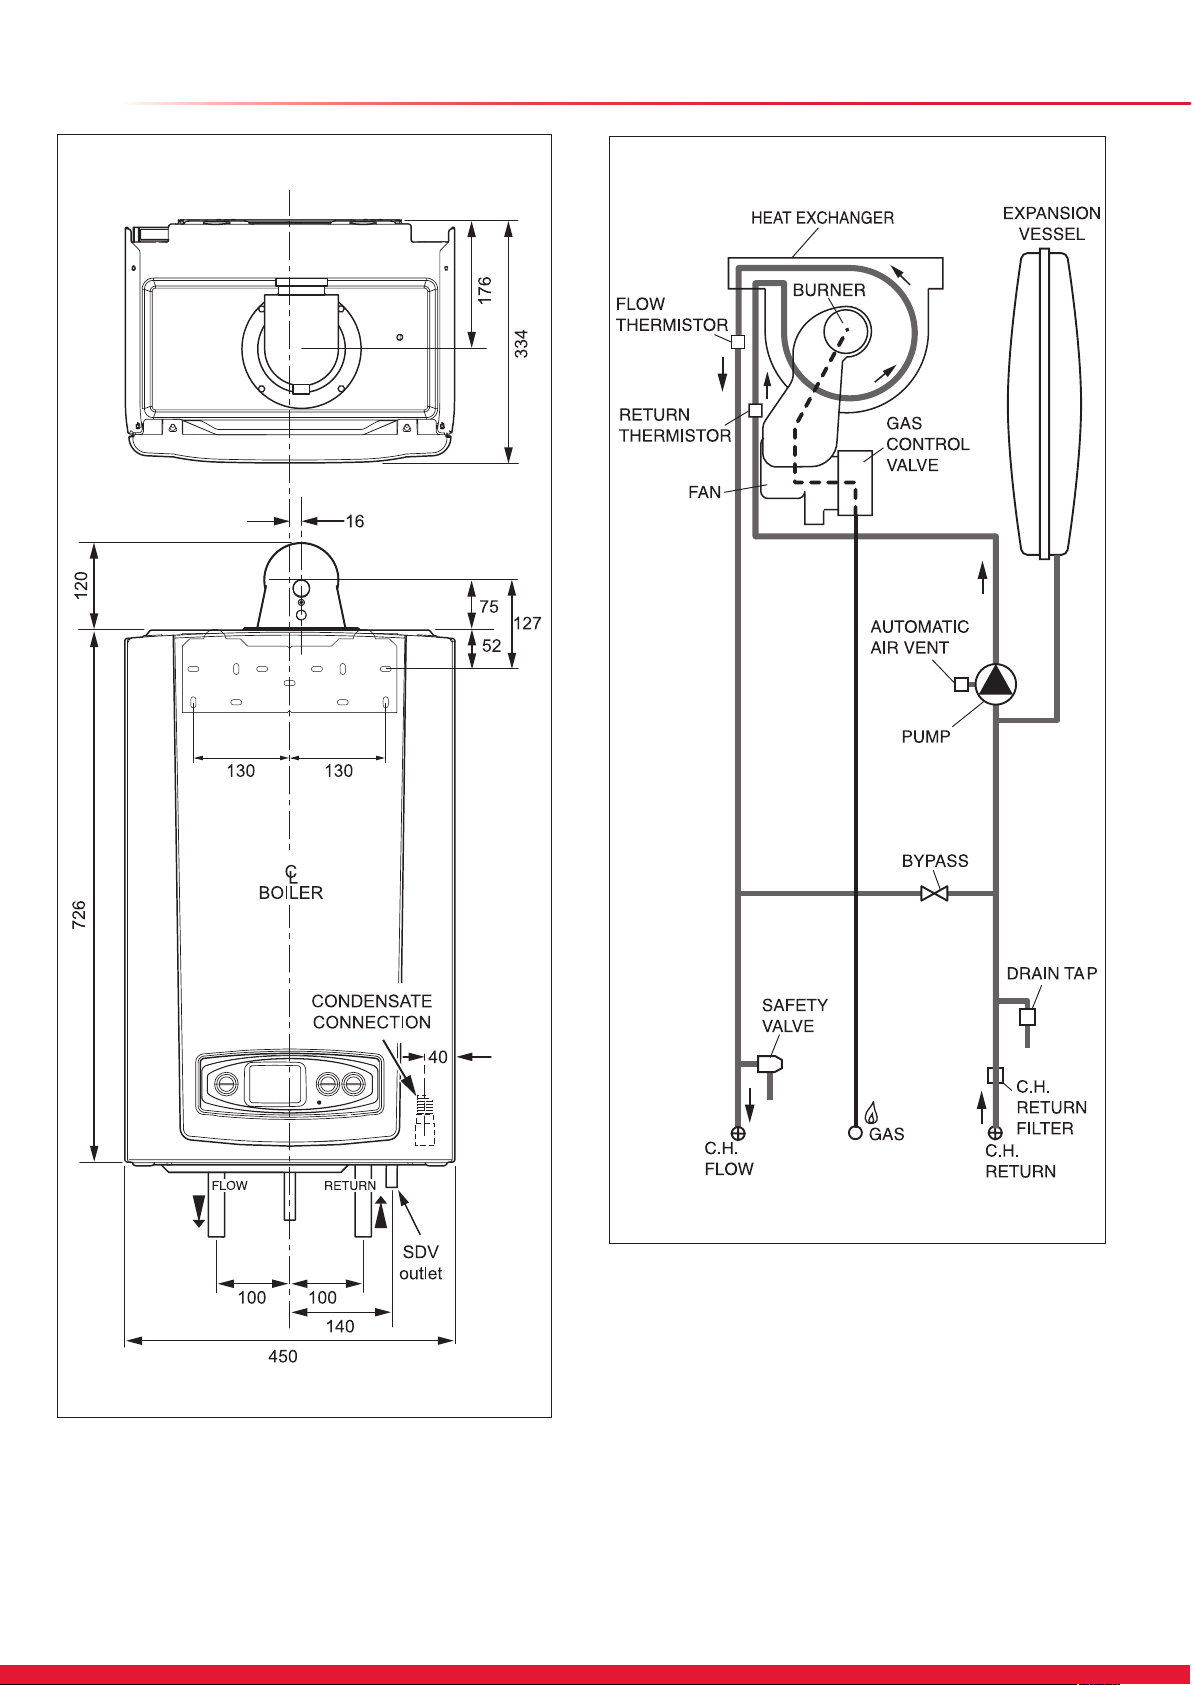
2 Boiler Dimensions and Hydraulic Schematic
13642
13482
Diagram 2.2
2.1 Boiler Dimensions & Hydraulic Schematic
All dimensions are given in millimetres (except as noted).
The general arrangement of the boiler is shown in diagram
2.1. and the hydraulic and gas schematic, diagram 2.2.
Diagram 2.1
The data label is positioned on the front of the inner casing
panel.
8
Page 9
3 Boiler Location, Clearances and Ventilation
3.1 Location
This boiler is not suitable for outdoor installation.
This boiler may be installed in any room, although particular
attention is drawn to the installation of a boiler in a room
containing a bath or shower where reference must be made to
the relevant requirements.
This boiler is suitable for installation in bathroom zones 2 and
3.
In GB, this is the current I.E.E. WIRING REGULATIONS and
BUILDING REGULATIONS.
In IE, reference should be made to the current edition of
I.S.813 “Domestic Gas Installations” and the current ETCI
rules.
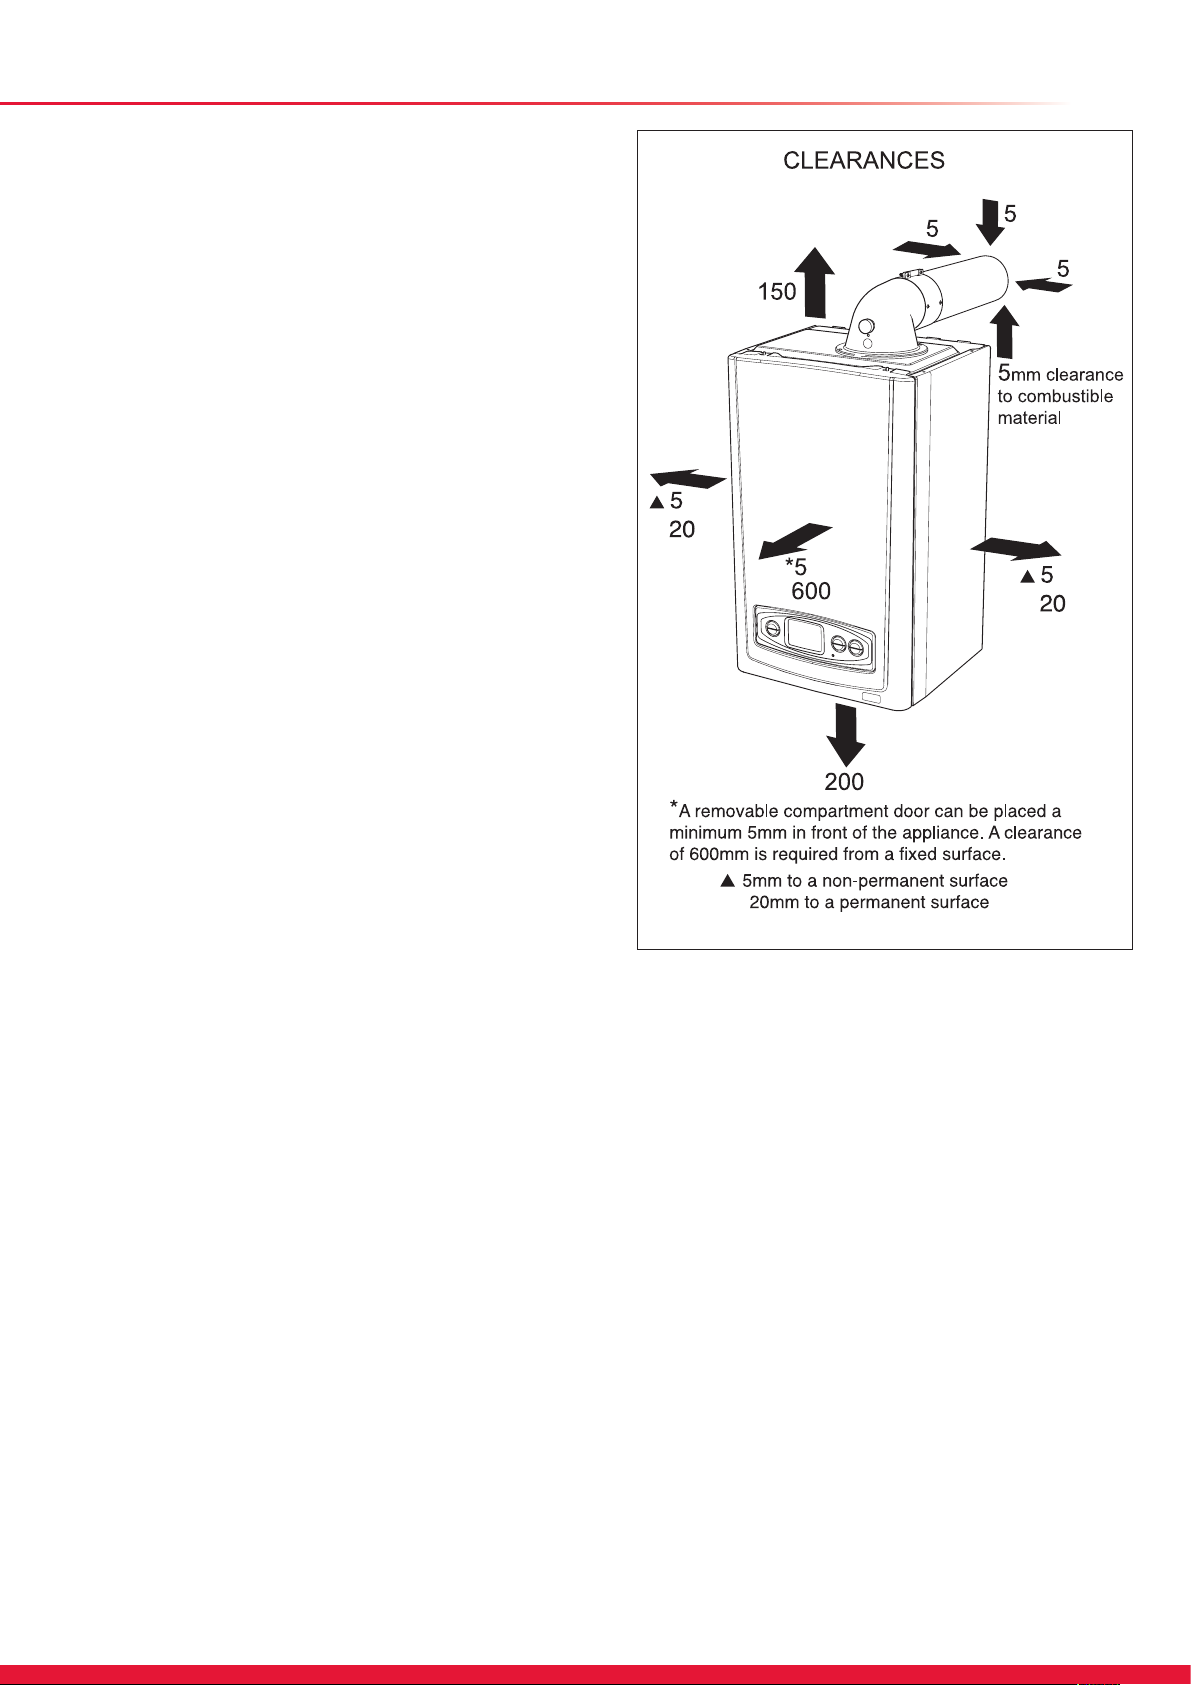
3.2 Clearances
The boiler should be positioned so that at least the minimum
operational and servicing clearances are provided, see
diagram 3.1.
Additional clearances may be benecial around the boiler for
installation and servicing.
For ue installations where external access is not practicable,
consideration should be given for the space required to insert
the ue internally, which may necessitate clearance larger
than those specied in diagram 3.1.
13208
3.3 Timber Frame Buildings
If the boiler is to be installed in a timber frame building it
should be tted in accordance with the Institute of Gas
Engineers document IGE/UP/7/1998. If in doubt seek advice
from local gas undertaking or Glow-worm.
3.4 Combustible Material
The boiler and ue are suitable for installation onto and
through combustible materials provided that:-
1) Minimum 5mm clearance is maintained around the
circumference of the ue (air intake).
2) The combustible surface and xings are suitable for
supporting the load.
3) The minimum clearances from the boiler case are
maintained.
3.5 Room Ventilation
The boiler is room sealed so a permanent air vent is not
required.
3.6 Cupboard or Compartment Ventilation
Due to the high efciency and hence low casing temperature
of this boiler, cupboard or compartment ventilation is not
necessary.
Leave existing air vents.
Diagram 3.1
9
Page 10
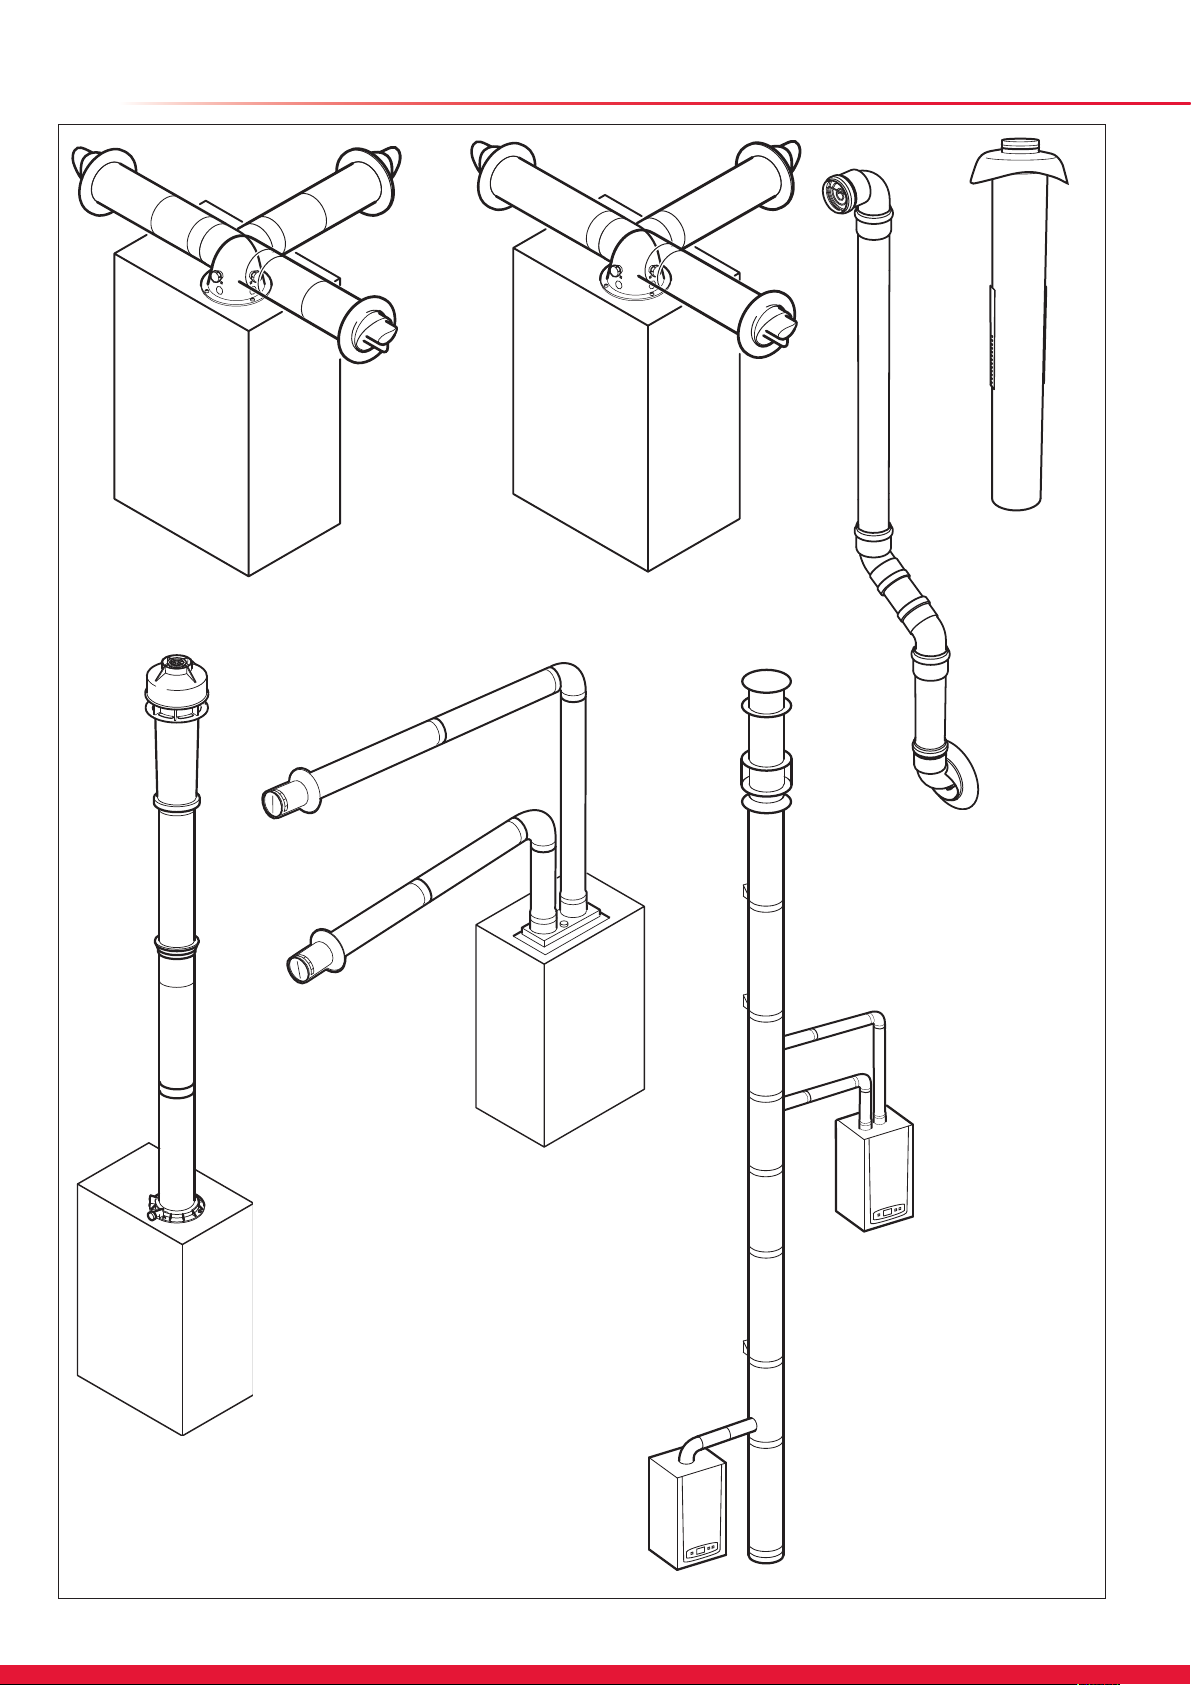
4 Flue Options and Terminal Clearances
Top horizontal telescopic ue (Ø60/100)
Part No. A2043600 - Section 10, page 19
Ridge Tile Terminal
Part No. A2043800 Section 10, page 29
Top horizontal standard ue (Ø60/100)
Part No. A2043400 - Section 10, page 23
Twin Flue
Twin Flue Adapter, concentric ue (Ø80)
Part No. A2011000 - Section 10, page 31
Plume Management Kit
basic set, white, concentric
ue (Ø60/100) - Part No.
A2044100 for use with Part
No. A2043400 and Part No.
A2043600 - Section 10,
page 34
Multiple Boiler Chimney Flue
Vertical concentric stack ue
suitable for use with:-
Top horizontal telescopic ue,
Top standard horizontal ue,
Twin Flue, as specied by the
manufacturer.
Vertical Flue
Vertical Flue Adapter, concentric ue (Ø60/100)
Part. No. A2024600 - Section 10, page 28
Vertical ue terminal kit, concentric ue (Ø60/100)
Part. No. 2000460480 - Section 10, page 27
10
Diagram 4.1
Page 11
4 Flue Options and Terminal Clearances
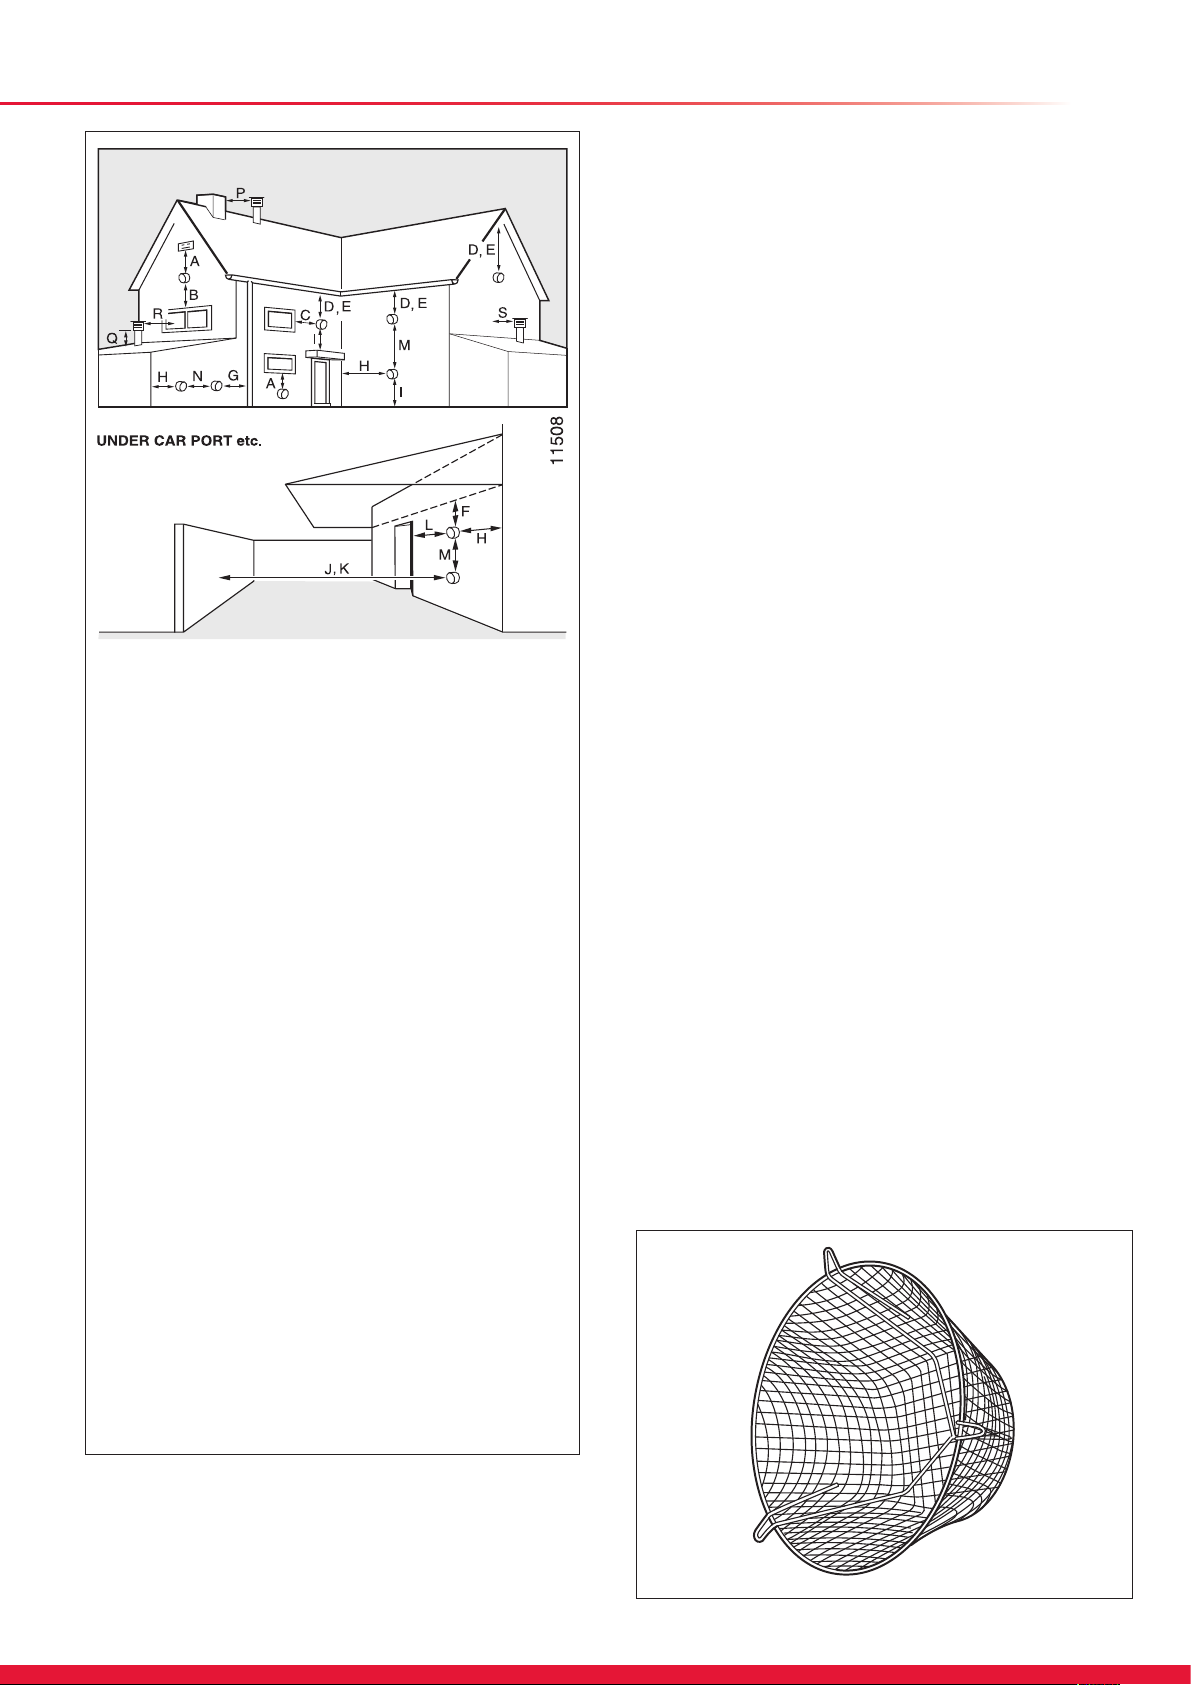
HORIZONTAL FLUES
A DIRECTLY BELOW AN OPENING, AIR BRICK,
OPENING WINDOWS 300
B ABOVE AN OPENING, AIR BRICK,
OPENING WINDOWS 300
C HORIZONTALLY TO AN OPENING,
AIR BRICK, OPENING WINDOWS 300
D BELOW GUTTER, DRAIN/SOIL PIPE 25
E BELOW EAVES 25
F BELOW A BALCONY OR CAR PORT 25
G FROM VERTICAL DRAIN PIPES AND
SOIL PIPES 25
H FROM INTERNAL/EXTERNAL CORNERS 25
* TO A BOUNDARY ALONGSIDE THE
H
TERMINAL 300
I ABOVE ADJACENT GROUND OR
BALCONY LEVEL 300
J
* FROM SURFACE OR A BOUNDARY
FACING THE TERMINAL 600
K FACING TERMINALS 1200
L FROM OPENING (DOOR/WINDOW)
IN CAR PORT INTO DWELLING 1200
M VERTICAL FROM A TERMINAL 1500
N HORIZONTALLY FROM A TERMINAL 300
VERTICAL FLUES
P FROM ANOTHER TERMINAL 600
Q ABOVE ROOF LEVEL 300
R FROM ADJACENT OPENING WINDOW 1000
S FROM ADJACENT WALL TO FLUE 300
4.1 Flue Options
There are various ue options to choose from as illustrated in
diagram 4.1. The ue lengths and installation are described in
section 10.
4.2 Flue Terminal Position
In GB the minimum acceptable siting dimensions for the
terminal from obstructions, other terminals and ventilation
openings are shown in diagram 4.2. In IE the minimum
distances for ue terminal positioning must be those detailed
in I.S.813 “Domestic Gas Installations”.
The terminal must be exposed to the external air, allowing free
passage of air across it at all times.
Being a condensing boiler some pluming may occur from
the ue outlet. This should be taken into consideration when
selecting the position for the terminal.
Carports or similar extensions of a roof only, or a roof and
one wall, require special consideration with respect to any
openings, doors, vents or windows under the roof. Care is
required to protect the roof if made of plastic sheeting. If
the carport comprises of a roof and two or more walls, seek
advice from the local gas supply company before installing the
boiler.
H* and J* See diagram 4.2 . These dimensions comply with
the building regulations, but they may need to be increased to
avoid wall staining and nuisance from pluming depending on
site conditions.
NOTE: If the flue terminal is positioned near a light source
insects may enter the flue system. Where safe and practical
to do so advise the homeowner to check the flue outlet and
clear visible insects from the terminal end.
4.3 Terminal Guard
A terminal guard is required if persons could come into contact
with the terminal or the terminal could be subject to damage.
If a terminal guard is required, it must be positioned to provide
minimum of 50mm clearance from any part of the terminal and
be central over the terminal.
The guard should be similar to that shown in diagram 4.3.
A suitable guard is manufactured by: -
Tower Flue Components
Morley Rd.
Tonbridge
Kent TN9 1RA.
Size: 280mm x 165mm. Part No. CGDK3
15583
Diagram 4.2
Diagram 4.3
11
Page 12

5 Water System
5.1 General
This boiler is designed for use as part of a sealed water
central heating system with fully pumped circulation. The
pump, expansion vessel and associated safety devices are all
tted within the boiler.
An options board accessory is available to link the internal
programmer with a Honeywell S or Y plan system.
5.2 Safety Valve
The safety valve is an integral part of the boiler and it cannot
be adjusted. The pipe from the safety discharge valve must
not discharge above an entrance, window or any type of
public access area.
5.3 Expansion Vessel
The boiler has an integral expansion vessel with a capacity of
8 litres (1.76 gallons), with a charge pressure of 0.5bar.
NOTE: The expansion vessel volume depends on the total
water system volume and the initial system design pressure.
In GB, Guidance on vessel sizing is also given in the current
issue of BS5449 and BS7074 Part 1.
In IE, current edition of I.S.813 “Domestic Gas Installations”.
5.4 Flow Rate
If it is necessary to alter the ow rate, the system can be
tted with a lockable balancing valve in the main ow or
return pipes shown as valve “A” in diagram 5.1. The ow rate
through the boiler must not be allowed to fall below that given
in section 1 - Specication Table.
5.5 Bypass
The boiler is tted with an automatic bypass which can be
adjusted to suit your system requirements.
Ensure that under no circumstances does the ow rate drop
below the gure specied, refer to section 1 - Specication
Table.
5.6 Filling the Sealed System
Provision for lling the system at low level must be made, see
diagram 5.2. There must be no permanent connection to the
mains water supply, even through a non-return valve.
NOTE: It is important that ttings used for connection
to potable water comply with the water undertakings
requirements.
5.7 Draining Points
Draining taps must be provided at all the low points of the
system, which will allow the entire system to be drained.
Draining taps shall be to the current issue of BS2879.
Drain points for the appliance are provided at the positions
shown in diagram 8.1.
13486
Diagram 5.1
5.9 Water Treatment
Existing system- It is ESSENTIAL that prior to installing the
new boiler the system is thoroughly ushed.
New system- For optimum performance after installation, the
boiler and its associated central heating system should also
be ushed.
Flushing should be carried out in accordance with BS7593:
2006 using a cleanser such as Sentinel X300 or X400, Fernox
Restorer or Salamander corrosion guard cleaner.
IMPORTANT: Ensure all cleanser is removed from the whole
system before adding an inhibitor.
For long-term corrosion protection, after ushing, an inhibitor
suitable for stainless steel exchangers should be used, refer
to the current issue of BS 5449 and BS 7593 on the use of
inhibitors in central heating systems. Examples are Sentinel
X100 Fernox Protector or Salamander corrosion guard
inhibitor.
5.8 Domestic Hot Water Cylinder
SINGLE FEED INDIRECT CYLINDERS ARE NOT SUITABLE
AND SHOULD NOT BE USED. The domestic hot water
cylinder must be of the double feed indirect coil type. It must
be suitable for working at a gauge pressure of 0.35bar above
the safety valve setting.
12
Page 13
5 Water System
13801
Diagram 5.2
13
Page 14
6 Installation Preparation
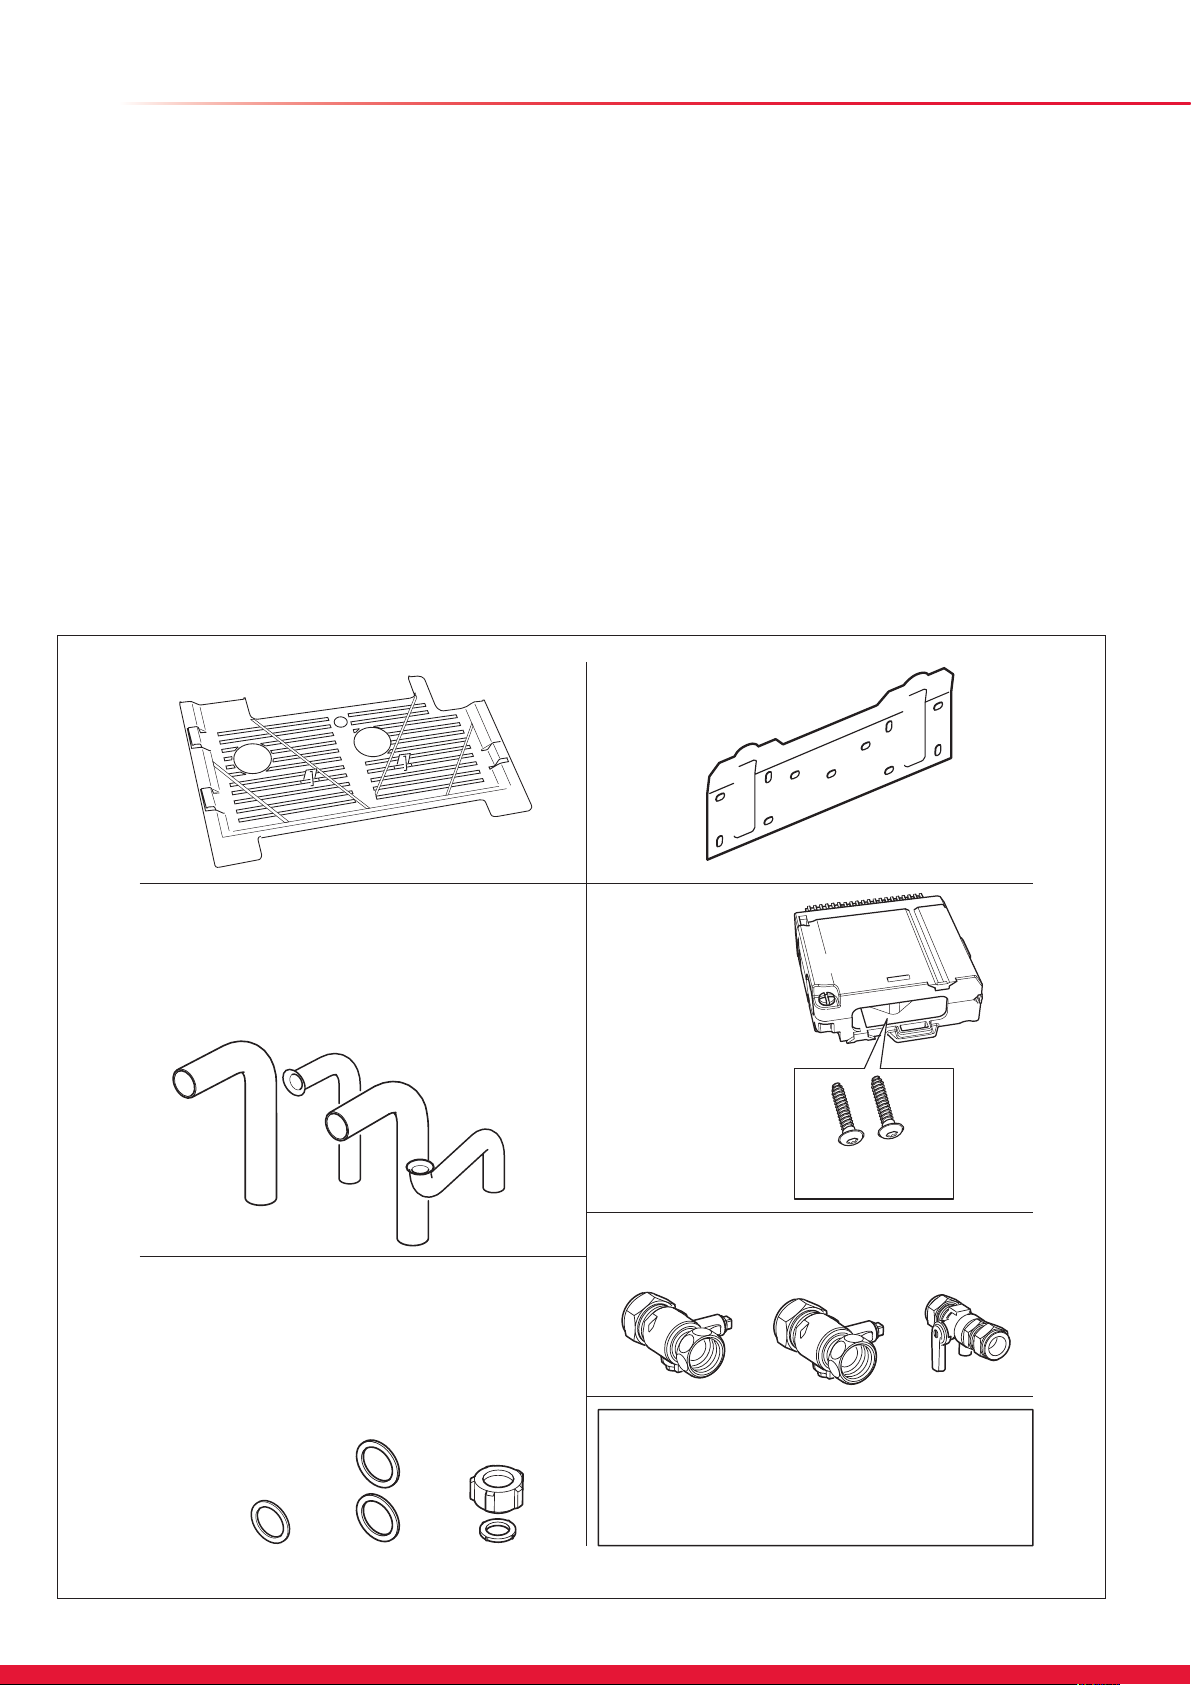
6.1 Appliance Pack
Please check the contents of packs as shown in diagram 6.1.
The packs are located in the top polystyrene packing.
Remove the carton sleeve and top pack then lift the boiler and
its polystyrene base support out of the lower pack.
6.2 Site Requirements
The boiler mounting wall should be suitable for the weight of
the appliance and be true and at.
NOTE: Due to the varied site conditions we do not supply
xings and advise that the installer should supply those which
are suitable.
Base Coverplate
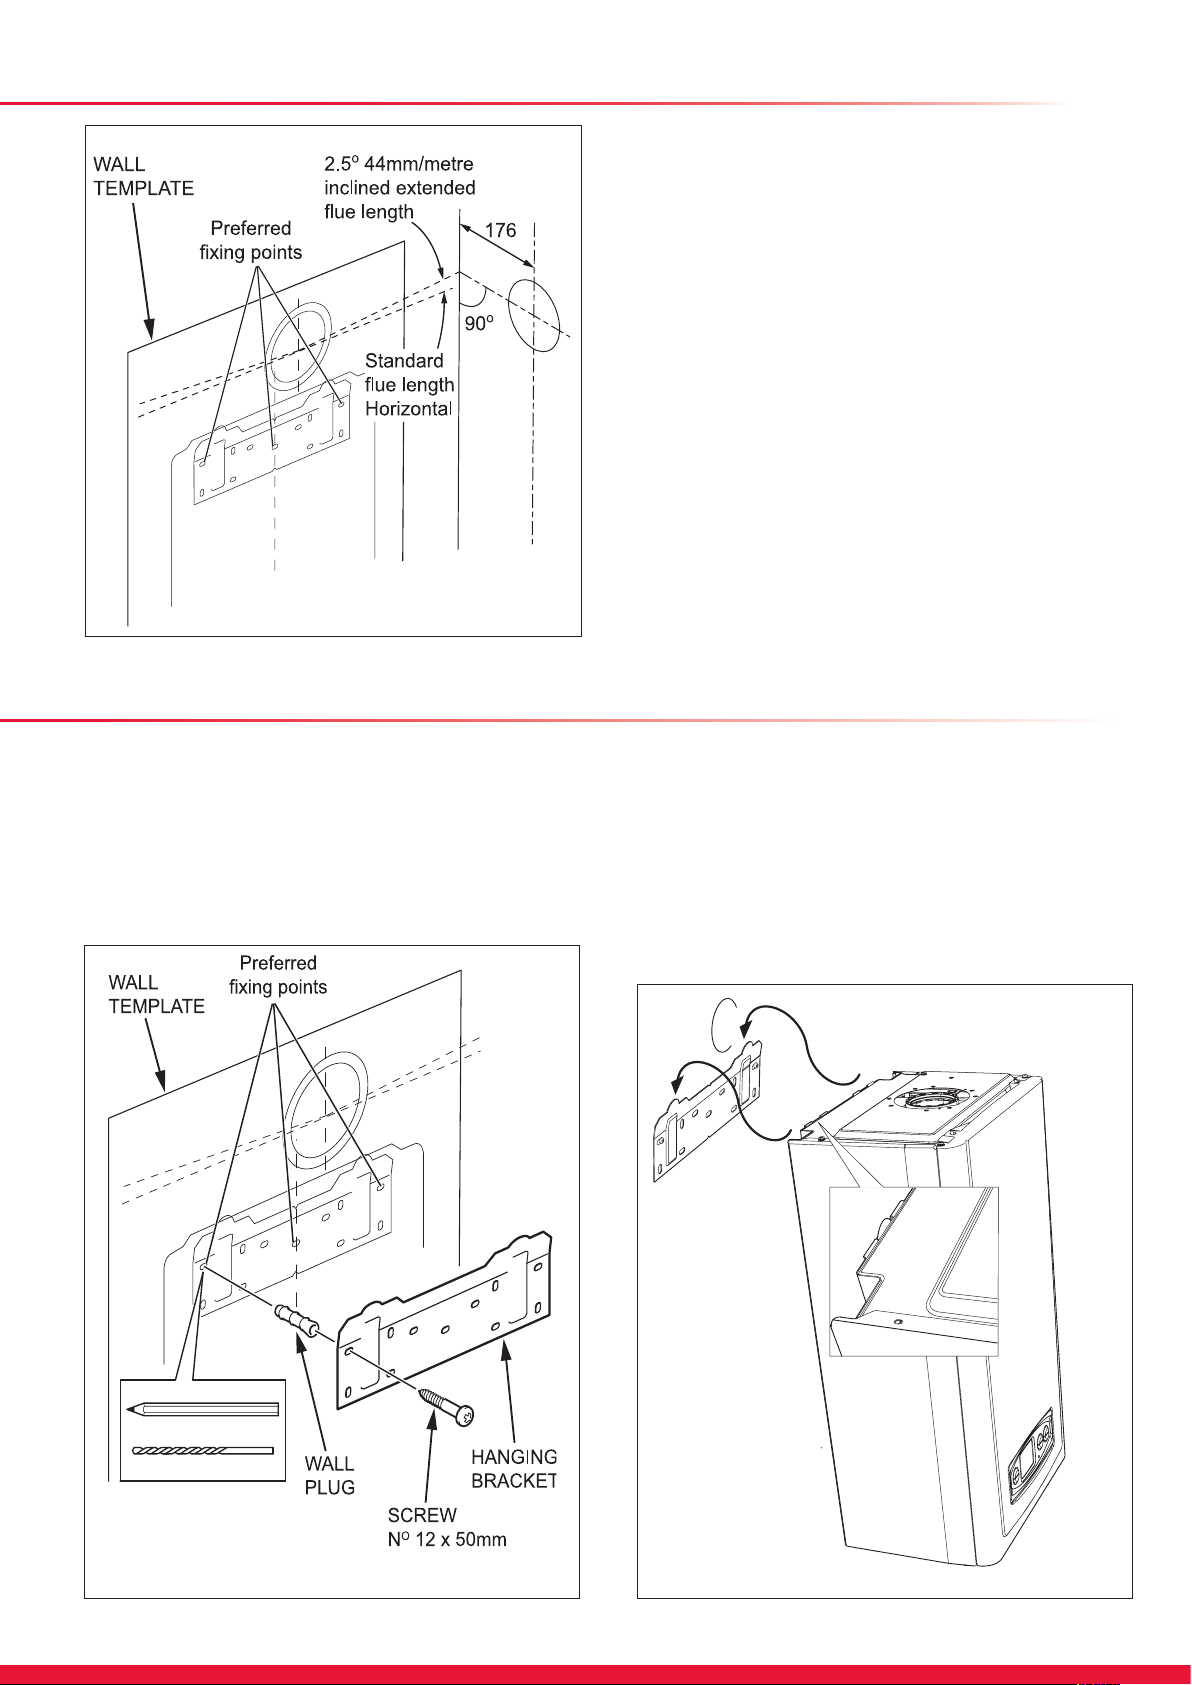
6.3 Wall Template
Take the wall template from the document pack located within
the top polystyrene packing and place in the desired position
on the wall, giving due consideration to the required boiler
clearances, see section 3, and the ue you are tting.
Mark the position of the ue centre, if tting a side ue, extend
the ue centre line into the corner then 176mm along the
adjacent wall, see diagram 6.2.
For extended side ues, the ue hole centre should be
determined by extending the dashed inclined line on the
template to the side wall. This dashed line is drawn at 44mm/
metre (2.5°) rise from the boiler. Where this line reaches the
side wall, a horizontal line should be marked. The vertical
centre line of the ue should then be marked at 156mm from
the back wall.
To allow for the ue passing through the wall at this angle
a 125mm hole should be drilled irrespective of internal or
external installation.
Remove the wall template whilst drilling the ue hole.
Hanging Bracket
13647
Pipe Pack 0020029672
A - Central Heating x 2
B - Gas
C - Saftey Discharge
A
B
A
C
Loose Items Pack
(discard addtional items
within this pack)
A - Large Sealing Washers
B - Union Nut and Sealing Washer
C - Gas
A
C
B
Electrical
Cartridge
Retaining Screws
Stored in cartridge
Gas and Water Isolating Valves
0020036801
Documentation Pack
(not illustrated)
Wall Template, User Instructions,
Installation and Servicing Instructions.
14
Diagram 6.1
Page 15
6 Installation Preparation
13853
6.4 Flue Hole Cutting
External access ue installation can use a 105mm diameter
core drill.
Internal access only ue installation will need a 125mm
diameter core drill.
NOTE: The ue is designed with an internal fall of 44mm/
metre (2.5°), therefore the hole can be drilled horizontally.
If ue extension pipes are to be used then a core drill size of
125mm is required. This will allow the extension pieces to
slope at 44mm/metre (2.5°) towards the boiler.
Diagram 6.2
7 Boiler Fixing
7.1 Hanging Bracket Fixing
The Wall Hanging Bracket is supplied in the main boiler
packaging at the rear of the boiler.
Reposition the wall template over the ue hole and mark
the position of the xing holes for the hanging bracket, see
diagram 7.1.
Drill xing holes and insert suitable wall plugs.
13490
7.2 Boiler Hanging
IMPORTANT: With regards to the Manual Handling
Operations, 1992 Regulations, the following lift operation
exceeds the recommended weight for a one man lift, refer to
section 17 Manual Handling.
Lifting the boiler into position, lean the top of the boiler slightly
to the wall and position just above the hanging bracket. Lower
the boiler slowly and engage onto the hanging bracket, see
diagram 7.2.
13479
Diagram 7.1
Diagram 7.2
15
Page 16

8 Gas / Water Connection
8.1 Systems Connection
Remove the protective caps from the boiler connections.
NOTE: The appliance may contain a small amount of water,
place a water container beneath the boiler connections.
Assemble and secure the pre formed copper tails to their
respective isolation valves making sure of their correct
orientation, see diagram 8.1.
Fit the isolation valves/copper tails with seals to the appliance
as shown in diagram 8.1
There are ats on the body of the valves for locating a
spanner to aid tightening to copper tails.
NOTE: Make sure that the test and drain points are
accessible, refer diagram 8.1.
Plumb the system pipe work to the copper tails.
NOTE: Do not subject the isolation valves to heat.
Flush out the heating system before connecting to the boiler,
refer to section 5.9.
The whole of the gas installation, including the meter, should
be inspected, tested for tightness and purged in accordance
with the current issue of BS6891 and in IE the current edition
of I.S.813 “Domestic Gas Installations”.
DRAIN
POINT
13477
DRAIN
POINT
PIPE
PIPE
WATER
ISOLATION
VALVE (2 OFF)
WASHER
OLIVE
WASHER
OLIVE
NUT
GAS
ISOLATION
VALVE
Diagram 8.1
16
Page 17
SAFETY
DISCHARGE
VALVE
VIEW ON UNDERSIDE OF BOILER
UNION NUT
AND SEAL
9 Safety Discharge Valve and Condensate Connections
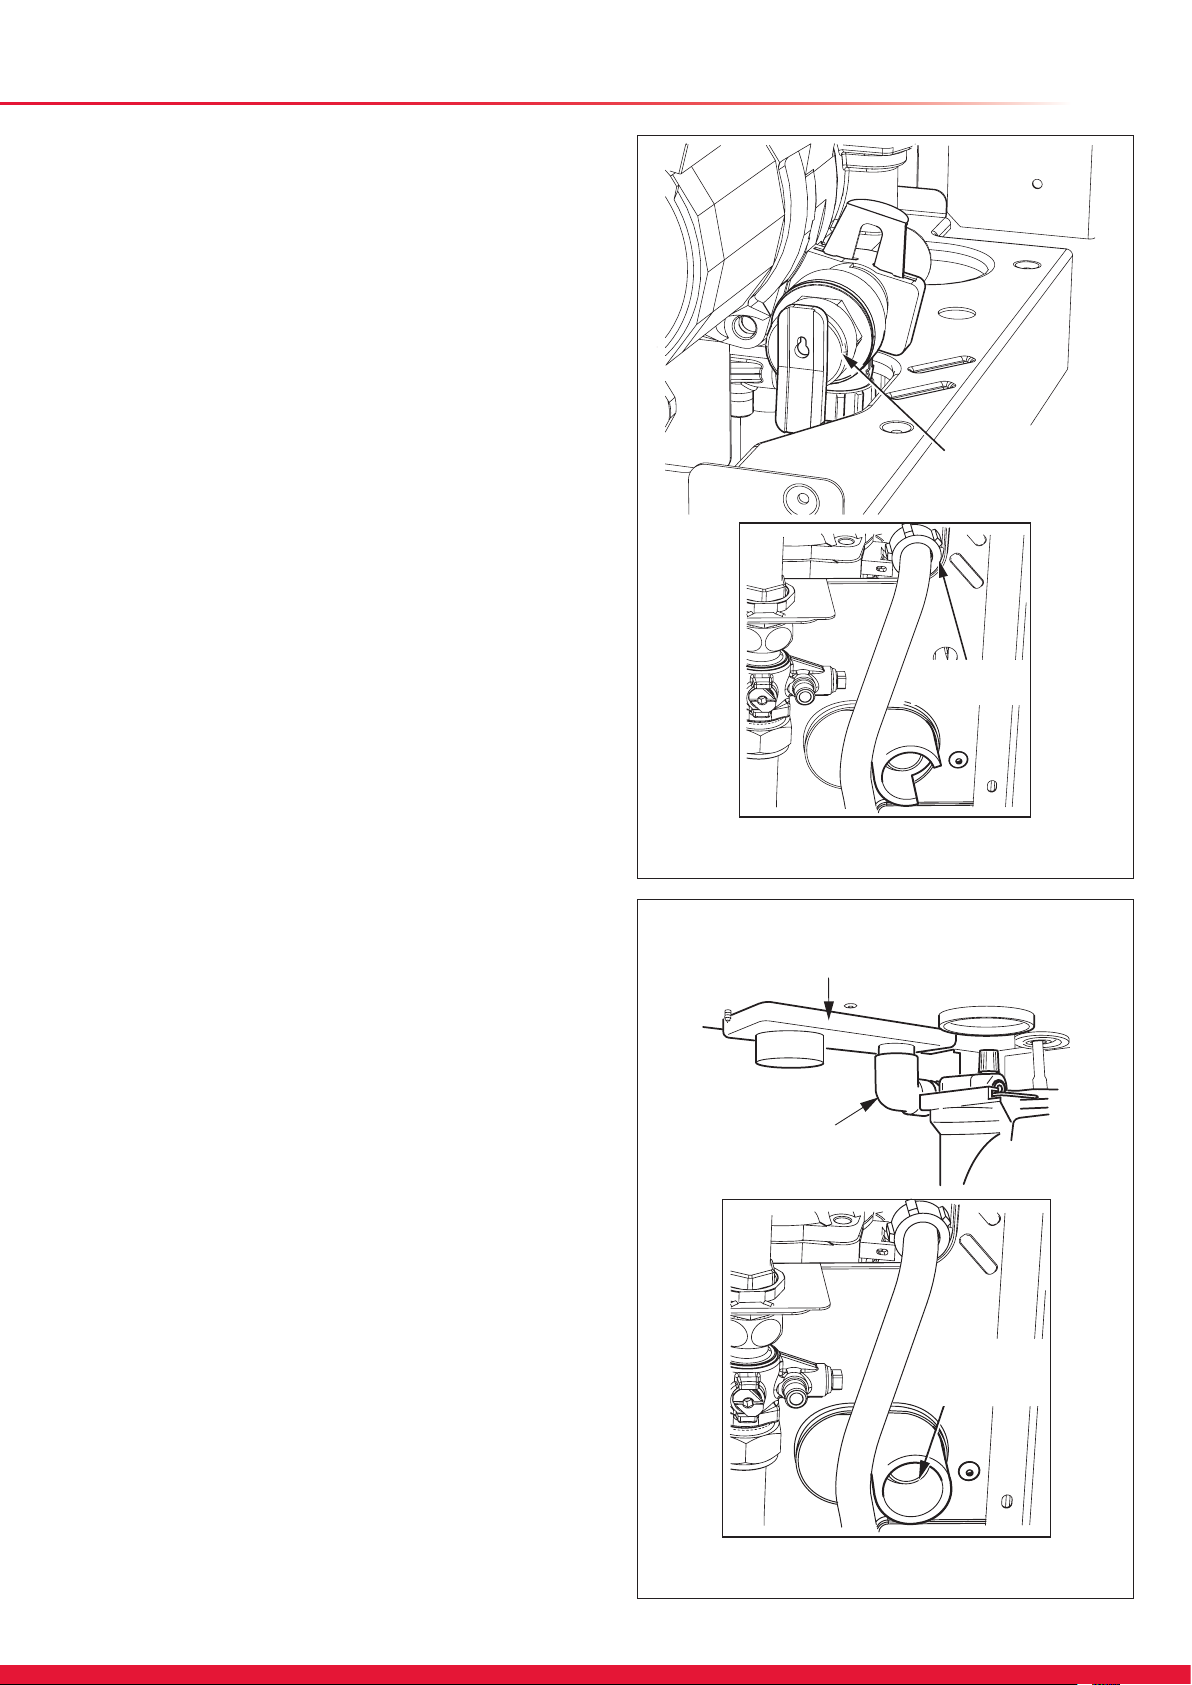
9.1 Safety Discharge Valve
Take the safety discharge pipe, supplied in the pipe pack and
the union nut and seal, supplied in the loose items pack and
t as shown in diagram 9.1.
This must be extended, using not less than 15mm o.d. pipe,
to discharge, in a visible position, outside the building, facing
downwards, preferably over a drain.
The pipe must have a continuous fall and be routed to a
position so that any discharge of water, possibly boiling,
or steam cannot create any danger to persons, damage to
property or external electrical components and wiring.
To ease future servicing it is advisable to use a compression
type tting to extend the safety discharge valve tube.
9.2 Condensate Trap and Siphonic Drain
Connection
The condensate drain connection is behind the pump at the
rear of the boiler, see diagram 9.2. A exible condensate
outlet pipe is tted and should be used to couple the
condensate trap and siphonic drain to a 22mm to 25mm O.D.
non corrosive plastic pipe (overow pipe), see diagram 9.2.
IMPORTANT: Please remove the bung from the exible pipe
before tting to a drain outlet pipe.
NOTE: the pipe should have a fall of a least 2.5
away from the boiler.
Condensate should, if possible be discharged into the
household internal drainage system. If this is not practicable,
discharge can be allowed into the external household drains
or a purpose designed soak away, refer to diagram 9.3.
It is recommended that any external condensate drain pipe is
protected and also preferably of 32mm diameter, to prevent
freezing in adverse weather conditions.
The condensate is discharged periodically in ‘slugs’ by
siphonic action.
It is not necessary to provide air breaks or extra traps in the
discharge pipe as there is already a 75mm high trap inside
the boiler. Fitting an extra trap may cause the boiler siphon to
work incorrectly.
Refer to BS5546 or BS6798 for advice on disposal of boiler
condensate.
o
44mm/metre
13491
Diagram 9.1
13492
CONDENSATE
TRAP AND
SYPHONIC DRAIN
FLEXIBLE
CONDENSATE
OUTLET PIPE
FLEXIBLE
CONDENSATE
OUTLET PIPE
VIEW ON UNDERSIDE OF BOILER
Diagram 9.2
17
Page 18

9 Safety Discharge Valve and Condensate Connections
13000
18
Diagram 9.3
Page 19
10 Telescopic Flue - Length, Preparation and Installation
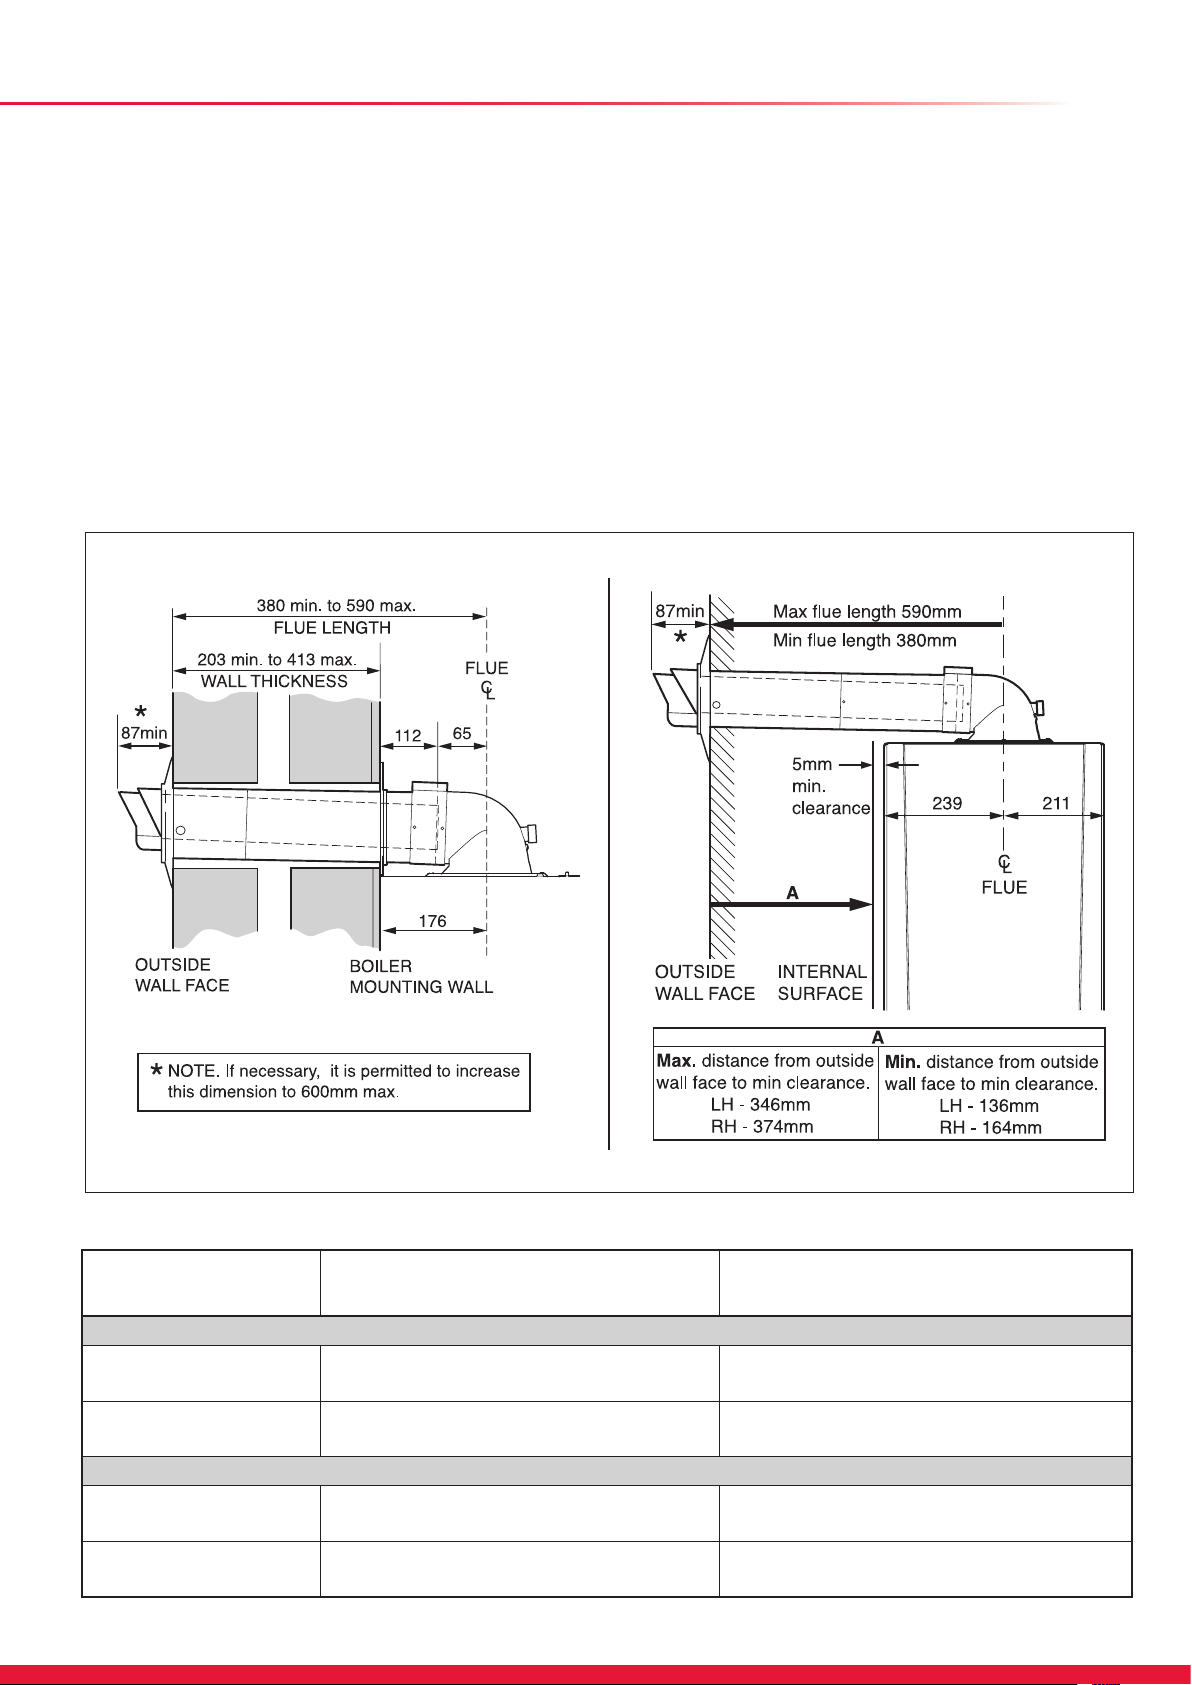
10.1 Flue Length
The maximum permissible horizontal ue length is 10 metres
plus the ue terminal assembly, this can be achieved by use
of the accessories, see diagram 10.3.
However should an additional 90o or 2 x 45o elbows be used
then the length MUST be reduced by 1metre.
The diagram 10.1 shows the length achievable by using the
kit A2043600.
When extension pipes are used the ue system must be
designed to have a continuous fall to the boiler of at least 2.5o
44mm/metre to allow condensate to run back into the boiler
and out via the condensate drain.
The ue can be installed from inside the building, when
access to the outside wall face is not practicable.
Horizontal Telescopic Flue - Rear
Multiple Boiler Chimney Flue Length
The ue length must be calculated and installed according to
the relevant standards EN 13384-1 and 2 (C43 flue systems
only) with reference to the table below and the manufacturers
instructions supplied.
The appliance maximum ue length must be included when
calculating the overall design of the ue system.
Horizontal Telescopic Flue - Side
13558
13559
Exhaust mass rate (g/s)
At Min Thermal
Load (40C°/30°C)
At Max Thermal
Load (80C°/60°C)
Exhaust temperature (ºC)
At Min Thermal
Load (40C°/30°C)
At Max Thermal
Load (80C°/60°C)
Ultracom
Ultracom
18sxi
2.30 2.45
8.75 13.25
56.0 44.0
69.0 57.0
Diagram 10.1
30sxi
19
Page 20
10 Telescopic Flue - Length, Preparation and Installation
14826
Diagram 10.2
15418
20
Diagram 10.3
Page 21

10 Telescopic Flue - Length, Preparation and Installation
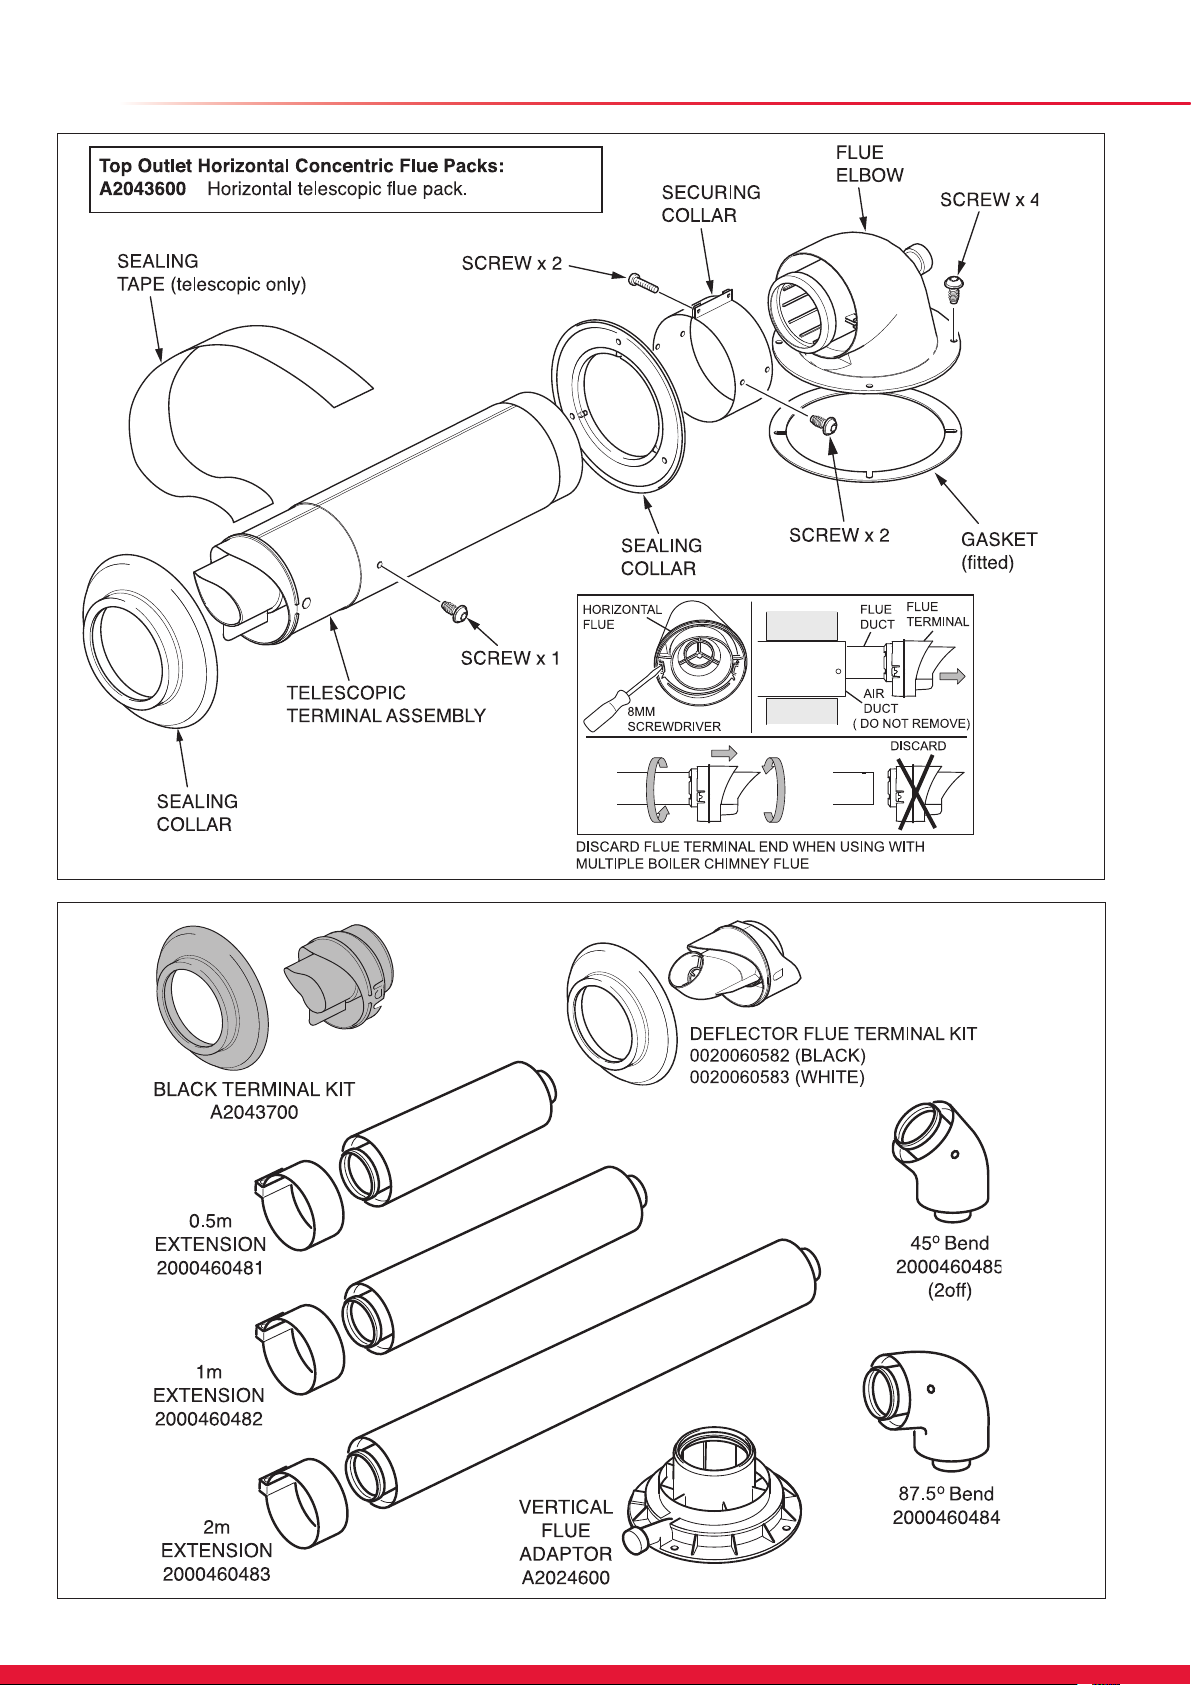
10.2 Horizontal Telescopic Flue - A2043600
Refer to diagram 10.2 for kit contents.
10.3 REAR Flue
If a wall thickness is between 203mm min. to 413mm max.
then the ue can be used without extensions.
With the ue elbow temporarily tted, measure the distance
from the outside wall to the butt joint, see diagram 10.4. If
the measurement ‘Y’ exceeds 525mm, then the appropriate
length of extension pipe is required.
If the dimension is less than 315mm DO NOT cut the ue, it
can project to a maximum of 600mm, see diagram 10.5. If
this is not desirable then a Standard ue MUST be used and
cut to length.
10.4 SIDE Flue
With the ue elbow temporarily tted, measure the distance
from the outside wall to the butt joint, see diagram 10.6. If
the measurement ‘Y’ exceeds 525mm, then the appropriate
length of extension pipe is required.
If the dimension is less than 315mm DO NOT cut the ue, it
can project to a maximum of 600mm, refer to diagram 10.5, if
this is not desirable then a Standard ue MUST be used, and
cut to length.
13223
Diagram 10.4
12979
Diagram 10.5
Diagram 10.6
13224
21
Page 22

10 Telescopic Flue - Length, Preparation and Installation
Diagram 10.7
Diagram 10.8
12929
12977
13254
10.5 Flue Fitting
IMPORTANT:-
The ue seals are sensitive to mineral oil based lubricants. Do
not grease the seals. If the seals do need to be lubricated
use only water.
During the installation of the ue system, ensure that debris
such as mortar, lings or swarf are cleared from the ue
system before completion.
Inspect the ue pipes before tting and do not install damaged
or dented ue components.
When assembling the ue system, ensure that the inner
seals are not damaged, do not install a ue component with a
damaged seal.
When tting ue elbows ensure that they are tted at the
correct angle to avoid strain, this will ensure that the seal ts
correctly preventing leakage.
With the air duct seams aligned and the ue set to the
required length ‘Y’, mark the securing hole position in the air
duct. Drill a 3mm diameter hole at this position, take care not
to pierce the inner ue duct. Secure with screw provided and
tape the joint, see diagram 10.7.
Fit the sealing collar onto the locating ring on the ue terminal,
see diagram 10.8.
With the ue elbow removed, push the ue assembly into
the wall, externally or internally, until the end of the assembly
protrudes a short way from the inside face of the wall. This
will enable the internal trim ring (if required) to be positioned
and allow the ue assembly to be drawn back up to the ue
elbow.
Secure the ue elbow in position on top of the boiler with four
screws supplied.
Draw the ue assembly from wall and engage the ue duct
into the elbow and butt t between the air duct and ue elbow.
Fit the securing collar into position.
Ensuring correct alignment of the ue, mark through two of
the pre drilled holes in the securing collar. Remove securing
collar and drill two 3mm diameter holes one in the elbow and
one in the air duct, take care not to pierce the inner ue duct.
Fit the securing collar and secure with screws provided, see
diagram 10.9.
Slide the internal trim ring back against the wall, securing in
place with a small amount of sealant if required.
Insert the ue duct into the air duct terminal assembly,
remembering to engage the catch within the terminal.
Check that the outer rubber sealing collar makes an
effective seal against the wall face.
22
Diagram 10.9
Page 23

10 Standard Flue - Length, Preparation and Installation
10.6 Flue Length
The maximum permissible horizontal ue length is 10 metres
plus the ue terminal assembly, this can be achieved by use
of the accessories, see diagram 10.12.
However should additional 87.5o or 2 x 45o elbows be used
then the length MUST be reduced by 1metre.
The diagram 10.10 shows the length achievable by using the
kit A2043400.
When extension pipes are used the ue system must be
designed to have a continuous fall to the boiler of at least 2.5o
44mm/metre to allow condensate to run back into the boiler
and out via the condensate drain.
The ue can be installed from inside the building, when
access to the outside wall face is not practicable.
Multiple Boiler Chimney Flue Length
The ue length must be calculated and installed according to
the relevant standards EN 13384-1 and 2 (C43 flue systems
only) with reference to the table below and the manufacturers
instructions supplied.
The appliance maximum ue length must be included when
calculating the overall design of the ue system. NOTE: The
horizontal ue terminal must be removed, see diagram 10.11.
Standard Horizontal Flue
13560
13561
MODEL 18sxi 30sxi
Exhaust mass rate (g/s)
At Min Thermal
Load (40C°/30°C)
At Max Thermal
Load (80C°/60°C)
Exhaust temperature (ºC)
At Min Thermal
Load (40C°/30°C)
At Max Thermal
Load (80C°/60°C)
2.30 2.45
8.75 13.25
56.0 44.0
69.0 57.0
505mm
55mm
220
Diagram 10.10
170
23
Page 24

10 Standard Flue - Length, Preparation and Installation
13222
Diagram 10.11
15418
24
Diagram 10.12
Page 25

10 Standard Flue - Length, Preparation and Installation
10.7 Standard Horizontal Flue - A2043400
Refer to diagram 10.11 for kit contents.
10.8 REAR Flue
With the ue elbow temporarily tted, measure the distance
from the outside wall to the butt joint, see diagram 10.13. If
the measurement ‘Y’ exceeds 665mm, then the appropriate
length of extension pipe is required. The minimum dimension
is 187mm to suit a 75mm min wall thickness. The ue can
project to a maximum of 600mm, if this is desirable, refer to
diagram 10.14.
10.9 SIDE Flue
With the ue elbow temporarily tted, measure the distance
from the outside wall to the butt joint, see diagram 10.15. If
the measurement ‘Y’ exceeds 665mm, then the appropriate
length of extension pipe is required. The minimum dimension
for Lhd is 254 and Rhd 226 to suit a minimum wall thickness
of 75mm. The ue can project to a maximum of 600mm, if
this is desirable, refer to diagram 10.14.
13223
Diagram 10.13
12979
Left Hand illustrated
Diagram 10.14
13224
Diagram 10.15
25
Page 26

10 Standard Flue - Length, Preparation and Installation
Diagram 10.16
Diagram 10.17
12847
13254
10.10 Flue Fitting
IMPORTANT:-
The flue seals are sensitive to mineral oil based lubricants.
Do not grease the seals. If the seals do need to be
lubricated use only water.
During the installation of the flue system, ensure that debris
such as mortar, filings or swarf are cleared from the flue
system before completion.
Long lengths of flues must be secured to the walls or ceilings
they run against. Use at least one fixing bracket for every flue
extension that is used.
After cutting inner flue tubes ensure that you de-burr and
chamfer the male tube end to prevent damage.
Inspect the flue pipes before fitting and do not install
damaged or dented flue components.
When assembling the flue system, ensure that the inner
seals are not damaged, do not install a flue component with a
damaged seal.
When fitting flue elbows ensure that they are fitted at the
correct angle to avoid strain, this will ensure that the seal fits
correctly preventing leakage.
Remove the ue elbow.
Separate the ue duct from the terminal by twisting to release
the terminal catch, then pull out of the retaining seal, refer to
diagram 10.16.
The ue duct cutting length (L + 11mm.) is shown in diagram
10.16.
The air duct should be cut at the opposite end to the terminal
The plastic ue duct MUST be cut at the opposite end to the
terminal catch.
The plastic ue duct extensions MUST be cut at the opposite
end to seal.
Insert the ue duct into the air duct terminal assembly,
remembering to engage the catch within the terminal.
Fit the sealing collar behind the locating lugs on the ue
terminal, see diagram 10.17.
Push the ue assembly into the wall, externally or internally,
initially until the end of the assembly protrudes a short way
from the inside face of the wall. This will enable the internal
trim ring (if required) to be positioned and allow the ue
assembly to be drawn back into the ue elbow.
Secure the ue elbow in position on top of the boiler with four
torque headed screws supplied.
Draw the ue assembly from wall and engage the ue duct
into the elbow and butt t between the air duct and ue elbow.
Fit the securing collar into position.
Ensuring correct alignment of the flue, mark through two of
the pre drilled holes in the securing collar.
Remove securing collar and drill two 3mm diameter holes one
in the elbow and one in the air duct, take care not to pierce the
inner ue duct. Fit the securing collar and secure with screws
provided, see diagram 10.17.
Slide the internal trim ring back against the wall, securing in
place with a small amount of sealant if required.
NOTE: If the air and ue ducts have been correctly cut to the
instructions the sealing collar should t ush with the outside
wall.
26
Page 27

10 Vertical Flue - Length, Preparation and Installation
10.11 Vertical flue
The vertical ue system is available as an option where the
boiler position does not permit the use of the top horizontal
ue system.
The system is made up from accessories. The accessories
include terminal assembly, bends 45º and 87.5º, ue
extensions, xing bracket and appropriate weather collar, see
diagram 10.19.
The maximum permitted straight ue length is 10 metres
plus the terminal. for each 87.5
maximum length must be reduced by 1 metre, see diagram
10.18.
NOTE: 2x45º bends can replace 1x87.5º bend if necessary.
When using 87.5º bends any horizontal extension pipe should
be inclined by a minimum of 44mm/metre (2.5°) towards
the boiler to facilitate condense removal, see (a) in diagram
10.18.
o
or 2x45o bends tted, the
Alternatively use 45º bends to avoid horizontal runs, see (b) in
diagram10.18.
The terminal siting should be as shown in diagram 4.2.
Measure the distance of ue length required for the
installation.
The ue must be designed with a continuous fall towards the
boiler.
14851
Diagram 10.18
27
Page 28

10 Vertical - Flue Length, Preparation and Installation
14849
Flue Installation
IMPORTANT:-
The flue seals are sensitive to mineral oil based lubricants.
Do not grease the seals. If the seals do need to be
lubricated use only water.
During the installation of the flue system, ensure that debris
such as mortar, filings or swarf are cleared from the flue
system before completion.
Long lengths of flues must be secured to the walls or ceilings
they run against. Use at least one fixing bracket for every flue
extension that is used.
After cutting inner flue tubes ensure that you de-burr and
chamfer the male tube end to prevent damage.
Inspect the flue pipes before fitting and do not install
damaged or dented flue components.
When assembling the flue system, ensure that the inner
seals are not damaged, do not install a flue component with a
damaged seal.
When fitting flue elbows ensure that they are fitted at the
correct angle to avoid strain, this will ensure that the seal fits
correctly preventing leakage.
Refer to diagram 10.21 and secure the ue adapter in position
on top of the boiler with four screws supplied, making sure
the nib ts into the locating slot in the boiler casing to ensure
correct orientation.
Secure the rst extension pipe to the ue adapter with the
securing collar supplied by positioning the collar centrally over
the joint, then tighten the two screws on the securing collar,
see diagram 10.22.
Fit more extension pipes as required using the collar and
screws supplied with each extension pipe. To t position the
collar centrally over the joint, tighten the two screws on the
securing collar. Using the holes provided in the securing
collar drill and insert the two self tapping screws supplied, see
diagram 10.23.
Project the rise of the ue pipe to roof level and cut a 150mm
hole in the roof.
Diagram 10.19
Flue Terminal Installation
(a) Pitched Roof
Fit the required pitched roof weather collar over the 150mm
hole in the roof. Make good the tiling or slating around the
collar incorporating the ashing of the weather collar. Position
the angle cap over the weather collar in the correct orientation
to attain the correct angle for your roof.
(b) Flat Roof
Fit the aluminium weather collar over the 150mm hole in the
roof ensuring a weather tight seal.
From above carefully place the ue terminal through the
weather collar.
Flue Terminal to Boiler Connection
Should the clearances above the boiler to roof not allow for
extensions, it is permitted to cut the ue terminal ensuring the
relationship of ue and air duct lengths are retained.
28
Page 29

10 Vertical - Flue Length, Preparation and Installation
Ridge Tile Terminal
A ridge tile terminal is available - part no. A2043800, see
diagram 10.20.
The installation of a ridge tile will be required.
A suitable ridge tile is manufactured by: -
Aspect East Anglia Limited
The Old Mill
East Harling
NORWICH
NR16 2QW
Website: www.aspectroong.co.uk
Contact: Chris Haythorpe
General Manager - Tile Division
Tel: 01953 717777 Fax: 01953 717164
14853
Diagram 10.20
29
Page 30

10 Vertical Flue - Length, Preparation and Installation
Completion of Installation
With the ue terminal positioned in the roof the length of the
nal pipe can be determined. If a telescopic length cannot
be used, then a standard ue length can be cut to make the
correct length. Cut the ue to the desired length measuring
from the ‘O’ ring end and discard the plain end of the tube.
The cuts must be square and made free of burrs to allow
correct assembly.
NOTE: The ue pipe is 10mm longer than the air pipe, see
diagram 10.24.
Carefully push the terminal assembly upwards to allow room
for tting the nal ue piece. Fit a xing bracket to the terminal
assembly. Pull the terminal assembly down and join to the ue
system. Ensure that the terminal is making a weather tight
seal on the weather collar. Secure the xing bracket tted to
the terminal to the roong struts or a purpose made batton.
13242
13243
Diagram 10.22
12982
Diagram 10.23
12983
30
Diagram 10.21
Diagram 10.24
Page 31

10 Twin Flue - Length, Preparation and Installation
Secure long flue lengths (horizontal &
vertical) to walls or ceiling at every joint or
on straight flue runs at every joint and
every metre flue run.
15406
Diagram 10.25
31
Page 32

10 Twin Flue - Length, Preparation and Installation
14869
10.12 Twin flue
The twin ue system is available as an option when the top
horizontal or vertical ue system is not appropriate.
The system can provide an independent horizontal air inlet
and ue outlet, horizontal air inlet and vertical ue outlet or
vertical air inlet and ue outlet via a concentric terminal.
The system is made up from accessories, see diagram 10.26.
NOTE: The air and ue outlets do not have to be equal
lengths. 2x45° bends can replace 1x90° bend if necessary.
The maximum permitted combined (air inlet + ue outlet) ue
length is 40 metres plus terminal assemblies, for each 90°
45° x 2 bends tted, the maximum length must be reduced by
1 metre, see diagram 10.25.
NOTE: When using 90° bends any horizontal run should be
inclined by a minimum of 44mm/metre (2.5°) towards the
boiler to facilitate condense removal.
Alternatively use 45° bends to avoid horizontal runs in the ue
pipe.
or
Multiple Boiler Chimney Flue Length
The ue length must be calculated and installed according to
the relevant standards EN 13384-1 and 2 (C43 flue systems
only) with reference to the table below and the manufacturers
instructions supplied.
The appliance maximum ue length must be included when
calculating the overall design of the ue system.
Terminal Position
The clearances for a ue outlet are given in the "Flue Location
and Ventilation" section.
In addition the horizontal air inlet must not be closer than 300
mm from a ue outlet on the same wall or 1200mm from an
opposing ue outlet.
MODEL 18sxi 30sxi
Exhaust mass rate (g/s)
At Min Thermal
Load (40C°/30°C)
At Max Thermal
Load (80C°/60°C)
Exhaust temperature (ºC)
At Min Thermal
Load (40C°/30°C)
At Max Thermal
Load (80C°/60°C)
2.30 2.45
8.75 13.25
56.0 44.0
69.0 57.0
32
Diagram 10.26
Page 33

10 Twin Flue - Length, Preparation and Installation
Installation Details
The parts available for a twin ue system installation are
shown in diagram 10.26.
Boiler Connection
IMPORTANT: The ue seals are sensitive to mineral oil based
lubricants. Do not grease the seals. If the seals do need to
be lubricated use only water.
Push the twin ue adaptor onto the outlet of the boiler with
the air inlet to the left hand side, see diagram 10.27. Secure
the adaptor to the top panel with the screws provided. Care
should be taken when inserting the screw through the hole in
adaptor top.
Air and Flue Pipe Installation
The air and ue pipes can now be built up from the boiler.
The ue must be designed with a continuous fall towards the
boiler. If using the horizontal ue pipe or 90° bends the pipe
must be inclined at 44mm/metre (2.5°)
10.25.
Alternatively if space allows, use 45° bends in place of 90º
bends.
To avoid rain ingress to the air Inlet terminal, it is good
practice to aim the inlet downwards by approx 2° as rain can
damage the boiler. The Flue outlet pipe must always run at
44mm/metre (2.5°) back to the boiler.
IMPORTANT:-
Long lengths of ues must be secured to the wall or ceiling it
runs against. Use at least one xing bracket on each ue joint
used or on straight ue runs every joint and for every metre
ue run.
Provision must be made in concealed boxing or ductwork that
the ue joints can be inspected during annual servicing.
The ue seals are sensitive to mineral oil based lubricants. Do
not grease the seals. If the seals do need to be lubricated
use only water.
Do not use the ue pipe to attach other pipes or equipment. If
visible, advise the householder not to hang or clip items to ue
pipes.
Do not stress the ue connections during the installation, this
can damage the ue seals.
Horizontal Terminal Installation
NOTE: The air inlet terminal and the ue outlet terminals
must never be installed on the opposite sides of a property.
Termination must only be on the same wall or adjacent walls.
When installed close together separated vertically, the air
inlet must be tted below the ue outlet terminal (see diagram
10.25).
The air terminal must not terminate less than 20mm from an
adjacent wall or structure and the ue outlet terminal less than
100mm from any adjacent wall or structure.
With due consideration to terminal clearances mentioned in
Section 4.2 drill the one or two holes as required with a 90mm
core drill.
Push the horizontal terminal through the wall allowing approx.
100mm to protrude outside.
Push a grey rubber wall seal onto either side of the wall
ensuring that both wall seals are pushed up to the wall
surface, see examples (b) and (c) diagram 10.25.
minimum, see diagram
13240
Diagram 10.27
Vertical Terminal Installation
With due consideration to terminal clearances mentioned in
Section 4.2, project the rise of the ue pipe to roof level and
cut 150mm hole in the roof.
(a) Pitched Roof
Fit the required pitched roof weather collar over the 150mm
hole in the roof. Make good the tiling or slating around the
collar incorporating the ashing of the weather collar. Position
the angle cap over the weather collar in the correct orientation
to attain the correct angle for your roof. One way round gives
a pitch of 25°-38° and the other gives 37°- 50°.
(b) Flat Roof
Fit the aluminium weather collar over the 150mm hole in the
roof ensuring a weather tight seal.
Horizontal Pipes-Completion of Installation
Having built the pipe(s) from the boiler to the terminal(s), the
length of the nal pipe piece can be determined. Cut pipes at
the opposite end to the ‘O’ ring seal making square and free
from burrs. Push the horizontal terminal through the wall to
engage the nal pipe piece and pull back ensuring the grey
wall seals are fully pulled up to the outside and inside wall
faces.
Vertical Pipes-Completion of Installation
Refer to diagram 10.25.
For installation of (a), attach the twin pipe to concentric
ue adaptor, part number A2011600, to the base of vertical
terminal assembly. For installation of (b), attach the single
pipe to concentric adaptor, part number A2011500, to the base
of vertical terminal assembly.
With the vertical terminal assembly positioned in the roof,
the length of the nal pipe can be determined. Cut the ue
to the desired length measuring from the ‘O’ ring seal end
and discard the plain end of the tube. The cut end should
be square and free from burrs. Carefully push the terminal
assembly upwards to allow room for tting the nal ue
piece(s). Fit a 100mm xing bracket to the terminal assembly
Part No 2000460486. Pull the terminal assembly down and
join to the ue system. Ensure that the terminal is making a
weather tight seal on the weather collar. Secure the xing
bracket tted to the terminal to the roong struts or a purpose
made batton.
33
Page 34

10 Plume Management Kit
10.13 Plume Management Kit
12997
The Plume Management Kit: Part No. A2044100 (white) or
A2044000 (black) can be used to overcome many site issues.
The Plume Management Kit will t to the Top Horizontal
Telescopic, Rear Horizontal Telescopic and Standard
Horizontal Flue. This enables the ue products to exhaust
further away from the boiler, thereby reducing the impact of
pluming.
NOTE: The ue air inlet can be sited closer to doors, opening
windows and air bricks, than stated in section 4.2, see
diagram 10.27.
The maximum length of the Plume Management Kit must NOT
exceed 6m with a horizontal concentric ue length of 2m max.
For each 90
Plume Management Kit must be reduced by 1m.
For more information contact Glow-worm, refer to page 2.
The Plume Management Kit is supplied with installation
instructions.
Refer to BS5546 or BS6798 for advice on disposal of boiler
condensate.
o
bend or 2 x 45o bends the maximum length of the
14465
150mm.
MIN.
Diagram 10.27
10 Deector Flue Terminal Kit
10.14 Deector Flue Terminal Kit
The terminal kit ts onto the telescopic and standard
horizontal ue, see diagram 4.1 for kit contents.
The kit is also supplied with installation instructions.
NOTE: The deector ue terminal kit can be tted after the
boiler and ue have been installed.
The deector part of the deector ue terminal can be rotated
45º to allow pluming away from openings, people, cars,
windows etc., see diagram 10.28.
Should the deflector terminal be positioned under a soffit
or horizontal surface, it is allowed to project the flue
600mm from the wall, to allow the discharge of flue gases
produced into free air.
IMPORTANT: Do not t the deector ue terminal with the
deector positioned downwards.
Diagram 10.28
34
Page 35

11 Electrical Connection
WARNING: This appliance must be earthed.
● This appliance must be wired in accordance with these
instructions. Any fault arising from incorrect wiring cannot be put
right under the terms of the Glow-worm guarantee.
● All system components must be of an approved type.
Electrical components have been tested to meet the equivalent
requirements of the BEAB.
● Do not interrupt the mains supply with a time switch or
programmer.
● Connection of the whole electrical system and any heating
system controls to the electrical supply must be through a
common isolator.
● Isolation should preferably be by a double pole switched fused
spur box having a minimum contact separation of 3mm on each
pole. The fused spur box should be readily accessible and
preferably adjacent to the boiler. It should be identied as to its
use.
● A fused three pin plug and shuttered socket outlet may be used
instead of a fused spur box provided that it is not used in a room
containing a xed bath or shower.
● The boiler is suitable for installation in bathroom zones 2 and 3.
11.1 Electrical Wiring
If you are tting the Glow-worm Options Board Kit, please refer to
the instructions supplied with the kit for the system wiring.
Remove the electrical cartridge from the ttings pack.
Remove the securing screw to open the cartridge.
NOTE: There are two screws supplied loose in the electrical
cartridge, these will be required to secure the cartridge into the
electrical interface housing.
Slacken the screws of the cable strain relief in the electrical
cartridge, see diagram 11.1.
Route the mains supply and system cables through the strain
relief and connect to the relevant plug, refer to the appropriate
sections 11.2 or 11.3 .
13368
Diagram 11.2
13369
13302
Diagram 11.1
Diagram 11.3
35
Page 36

11 Electrical Connection
11.2 System Controls 24V
WARNING: UNDER NO CIRCUMSTANCES MUST
ANY MAINS VOLTAGE BE APPLIED TO ANY OF THE
TERMINALS ON THE 24V CONNECTION PLUG.
Connect the mains supply and system heating controls e.g.
room thermostat as diagram 11.2. External controls should be
tted in accordance with the rules in force.
11.3 Mains Voltage System Controls
WARNING: UNDER NO CIRCUMSTANCES MUST
ANY MAINS VOLTAGE BE APPLIED TO ANY OF THE
TERMINALS ON THE 24V CONNECTION PLUG.
Connect mains supply and system controls as diagram 11.3.
External controls should be tted in accordance with the rules
in force.
11.4 Electrical Cartridge Securing
Fit electrical cartridge into the interface housing on completion
of the wiring, see diagram 11.4.
Secure with the two cartridge retaining screws provided in the
cartridge body.
11.5 Electrical Connections - Testing
Carry out preliminary electrical system checks as below:
1. Test insulation resistance to earth of mains cables.
2. Test the earth continuity and short circuit of cables.
3. Test the polarity of the mains.
13488
Diagram 11.4
NOTE: If you require to test the appliance refer to section 14.
12 Commissioning
IMPORTANT: At the time of commissioning, complete all
relevant sections of the Benchmark Checklist located in the
centre pages of this document.
12.1 Preliminaries - All Systems
The commissioning should be carried out by a competent
person approved at the time by the Health and Safety
Executive and in accordance with the current issue of
BS6798.
DO NOT operate the boiler without water.
Make sure that the system has been thoroughly ushed
out with cold water and that all cleanser, if used, has been
removed.
Isolate the boiler from the mains electrical supply.
Test for gas tightness and purge air from the gas supply.
IMPORTANT: Before starting the boiler check that all ue
connections are secure and sealed correctly.
12.2 Filling the Heating Circuit
With the gas isolation valve closed and with no demand from
any external controls switch on the power supply to the boiler.
The boiler should be in “OFF” mode, this will be indicated
on the user interface display, refer to diagram 12.2. If not,
press the “Mode” button repeatedly until the “OFF” symbol is
displayed, then continue as follows:
1. Open the Central Heating Flow and Return isolating
valves marked ‘A’ using a screwdriver or a 4mm allen
key - slot in line with the axis of the valve (shown closed
in diagram).
2. Fill the heating system to a pressure of 1.0bar. The
system pressure will be displayed on the user interface.
3. Vent all air from the system - repeat as necessary
until the system is full and all the air has been vented.
36
Page 37

12 Commissioning
Ext
DRAIN POINTS
PRESSURE
TEST POINT
CENTRAL HEATING ISOLATION VALVES
GAS SERVICE ISOLATION VALVE
ALL SHOWN CLOSED
UNDERSIDE VIEW OF BOILER
MODE
PROG
Ext
Diagram 12.1
13473
13476
No measurement of the combustion is necessary, having
checked :
● the appliance has been installed in accordance with the
instructions.
● the integrity of the ue system and ue seals.
● the integrity of the appliance combustion circuit and
relevant seals.
● that all internal/external controls are calling for heat.
● the gas service isolation valve, diagram 12.1, is open.
As an option, a chargeable boiler only commissioning service
can be provided by Glow-worm Service by calling telephone
No. 01773 828100.
LPG Conversion: See section 12.9.
NOTE: If you have tted a Glow-worm Options Board Kit,
please refer to the instructions supplied with the kit for
completion of commissioning.
Do not operate the boiler without water.
Refer to diagram 12.2
1. With no demand from any external controls, switch on the
electrical supply to the boiler.
Open the gas service isolation valve, see diagram 12.1.
2. Select your required function by pressing “ Mode “, scroll
through your options and select one of the following:-
Central heating.
Boiler functions ALL switched off. “OFF”
3. Turn ON your external controls and select the room
temperature required.
The boiler will operate automatically.
NOTE: The display will indicate the Heating system water
temperature or a fault code if in a fault condition.
TOGGLE BUTTON
MODE and PROG
SYMBOLS DISPLA YED ON THE LCD AND DESCRIPTIONS
Central Heating Function
Appliance OFF
Temperature
Glow-worm control (Optional)
Ext
System pressure - not applicable
LCD
DISPLAY
RESET
BUTTON
Min burner display
Max burner display
CH TEMPERATURE
NOT
USED
ADJUSTMENT
Diagram 12.2
12.3 Gas Supply
The gas valve is factory set for natural gas (G20) and should
need no adjustment. Turn on the gas supply at the isolation
valve, see diagram 12.1. Check the supply pressure at the
pressure test point is 20mbar.
12.4 Initial Lighting
NOTE: The combustion for this appliance has been checked,
adjusted and preset at the factory for operation on natural gas
(G20) as dened on the appliance data label.
Do not adjust the Gas/Air ratio valve.
12.5 Check the Gas Inlet Pressure and
Gas Rate
The supply from the governed meter must be of adequate
size to provide a steady inlet working pressure of 20mbar (8in
wg) at the boiler. On completion, test the gas installation for
tightness using the pressure drop method and suitable leak
detection uid, purge as necessary.
NOTE: Due to the modulating operation of the boiler and
the need to check the gas inlet pressure and measure the
gas rate at maximum rate, it will be necessary to force it to
maximum.
Press the “reset” button on the controls fascia, release
and immediately press and hold in the “+” button. After
approximately 5 seconds “Hi” will be displayed. Pressing
the mode button when “Hi” is selected will force the boiler
to maximum rate, the display will ash between “Hi” and the
“default display” this will indicate the boiler has been forced to
maximum.
Operational Gas Inlet Pressure
With ALL other gas appliances operating, check the
operational supply pressure at the gas service isolation valve
test point, see diagram 12.1.
The nominal supply pressure for Natural Gas (G20) is 20mbar.
The nominal supply pressure for LPG (G31) is 37mbar.
Turn the taps and appliances off, then disconnect the pressure
gauge.
37
Page 38

12 Commissioning
Additionally the safe nominal maximum heat input of the
appliance can be achieved at an inlet pressure down to
15mbar.
NOTE: The BURNER PRESSURE cannot be measured and
is not used to measure the gas rate.
Gas Rate
Make sure that ALL other gas burning appliances and pilot
lights are off.
Check the gas rate using the gas meter test dial and stop
watch, at least 10 minutes after the burner has lit, see table
below for approximate rates.
0.53
0.53
18.7
18.7
sxi
18
sxi
In communal or LPG installations where the gas rate cannot
be measured it is acceptable to measure the combustion rate
as described in the servicing section.
On completion, press the “mode” and “+” buttons
simultaneously, this will reset the boiler.
2.0
2.0
71.0
107.0
0.39
0.41
1.47
2.22
12.6 Heating Systems
Ensure that the external controls are calling for heat.
Fully open all radiator valves, ow control valve, if tted, see
diagram 5.1.
Switch on the appliance and ensure that the central heating is
calling for heat.
Balance the radiators as required and if tted adjust valve to
give the required system differential. Turn off all radiators that
can be shut off by the user and check to see if less than the
maximum differential allowed of 20
ow and return.
NOTE: Should the system require that the appliance has to
be adjusted, the front will need to be removed, as described
in the servicing section 13, and the control box lowered into its
service position.
The appliance pump has two speeds and can be adjusted
depending on the requirements of the system.
The appliance has an inbuilt automatic adjustable bypass
valve. The pressure can be adjusted between approx 1.5
and 3.5mH
The pressure changes by approx 0.1mH
of the bypass screw, see diagram 12.3. Turning clockwise
increases the pressure and turning anti-clockwise decreases
the pressure.
Allow the system to reach maximum temperature then switch
off the boiler by isolating from the electrical supply.
Drain the entire system rapidly whilst hot, using the drain taps
at all the low points of the system. Fill and vent the system as
described previously.
Lock or remove the handle from control valve, if tted.
Adjust the boiler temperature controls and any system
controls to their required settings.
2O but is factory pre-set to approx 2.5mH2O.
o
C can be achieved across
2O for each full turn
13234
13866
Diagram 12.3
12.7 Completion
Fit the base coverplate, see diagram 12.4.
Ensure that the magnetic lighting instruction label is placed on
the surface of the boiler casing.
GB: It is a requirement that the “Benchmark” Installation,
Commissioning and Service Record is completed and left with
the user.
IE: it is necessary to complete a “Declaration of Conformity” to
indicate compliance to I.S.813. An example of this is given in
the current edition of I.S.813.
38
Page 39

12 Commissioning
COVER PLATE
12.8 Instruct the User
● Demonstrate, then instruct the User about the lighting
procedure and heating system controls operation.
● Advise the user on the use and maintenance of any scale
reducer and pass on any relevant instructional documents.
● Advise that to ensure the continued efcient and safe
operation of the boiler it is recommended that it is checked
and serviced at regular intervals. The frequency of servicing
will depend upon the installation conditions and usage, but in
general, once a year should be enough.
● Draw attention, if applicable, to the current issue of the Gas
Safety (Installation and Use) Regulations, Section 35, which
imposes a duty of care on all persons who let out any property
containing a gas appliance in the UK.
● The user shall not interfere with or adjust sealed
components.
● It is the Law that any servicing is carried out by a
competent person approved at the time by the Health and
Safety Executive.
● Advise the user that, like all condensing boilers this
appliance will produce a plume of condensation from the ue
terminal in cool weather. This is due to the high efciency and
hence low ue gas temperature of the boiler.
● Advise the user of the precautions necessary to prevent
damage to the system, boiler and the building, in the event of
the heating system being out of use during frost or freezing
conditions.
● Advise the user that the permanent mains electrical supply
SHOULD NOT be switched off, as the built in frost protection
and pump/valve saver program will not operate.
● Advise the User if the mains electricity and gas are to be
turned off for any long periods during severe weather, it is
recommended that the whole system, including the boiler,
should be drained to avoid the risk of freezing.
NOTE: Contact your installation/servicing company as
draining, relling and pressurising MUST be carried out by a
competent person approved at the time by the Health and
Safety Executive.
● Leave these instructions and the ‘Benchmark’ service
record with the user.
13538
Diagram 12.4
39
Page 40

12 Commissioning - Nat. Gas (G20) to LPG (G31) Conversion
L
12.9 LPG CONVERSION - all models
As an option, a chargeable boiler only commissioning service
can be provided by Glow-worm Service by calling telephone
No. 01773 828100.
NOTE: Steps 12.1 and 12.3 will need to be completed before
the appliance can be converted.
This conversion should only be carried out by a competent
person approved at the time by the Health and Safety
Executive.
During the conversion to Propane use of a suitable ue gas
analyser is necessary.
● The person carrying out a combustion measurement should
have been assessed as competent in the use of a ue gas
analyser and the interpretation of the results.
● The ue gas analyser used should be one meeting the
requirements of BS7927 or BS-EN50379-3 and be calibrated
in accordance with the analyser manufacturers’ requirements.
● Competence can be demonstrated by satisfactory
completion of the CPA1 ACS assessment, which covers
the use of electronic portable combustion gas analysers in
accordance with BS 7967, parts 1 to 4.
As an option a chargeable boiler only commissioning service
can be provided by Glow-worm Service by calling telephone
No. 01773 828100.
Tools required to make the conversion are a 2mm Allen key
and an electricians screwdriver.
Ensure that the appliance supply pressure = 37mbar.
(1) Access the gas valve.
(2) Refer to diagram 12.5 and turn the gas valve throttle
fully clockwise.
(3) Turn the throttle anti-clockwise by the number of turns
shown in the table.
(4) Ensure that the gas analyser is set to the correct
fuel setting - Propane.
(5) Attach combustion analyser to the combustion test point,
refer diagram 13.1.
IMPORTANT: Remember to replace the cap on
completion of the test.
(6) Make sure that the external controls are calling for heat,
then turn the mains electrical supply and gas service
isolation valve on.
(7) Switch the boiler on. The boiler should re automatically.
NOTE: If the appliance does not light and goes to
lockout (F1) turn the throttle anti-clockwise a further turn
and press the reset button. The appliance will (after a
short delay) again attempt to re. Repeat this procedure
(up to a total of 2 extra turns on the throttle screw) until
the appliance lights. Several ignition attempts may be
needed, to purge gas through the appliance, before a
successful ignition is achieved.
(8) Check and adjust the burner %CO2 at maximum rate.
Press the “reset” button on the controls fascia, release
and immediately press and hold in the “+” button. After
approximately 5 seconds “Hi” will be displayed. Pressing
the mode button when “Hi” is selected will force the
boiler to maximum rate, the display will ash between
“Hi” and the “default display” this will indicate the boiler
has been forced to maximum.
(9) If necessary, adjust the burner % CO2 to the value shown
in the “SETTING” column of the table, by turning the
throttle screw (anti- clockwise to increase), see diagram
12.5 no more than 1/8 of a turn, waiting a minute to allow
for the appliance to stabilise before checking or making
further adjustments.
(10) Exit the check sequences press the “mode” and “+”
buttons simultaneously, this will reset the boiler to the
default display.
(11) Check the burner % CO2 , at minimum rate, to the value
shown in the “SETTING” column of the table.
(12) If adjustment is required, press the “reset” button on the
controls fascia, release and immediately press and hold
in the “+” button. After approximately 5 seconds “Hi” will
be displayed. Pressing the “+” or “-” buttons will cycle
between “Hi” and “Lo”. Pressing the mode button when
“Lo” is selected will force the boiler to minimum rate, the
display will ash between “Lo” and the “default display”
this will indicate the boiler has been forced to minimum.
(13) Adjustment of the %CO2 is very coarse so carefully adjust
the %CO2 to the value shown in the “SETTING” column
of the table with the offset adjustment, see diagram 12.5
and %CO2 Table (Rotate clockwise to increase).
(14) To exit the function press the “mode” and “+” buttons
simultaneously, this will reset the boiler to the
default display.
(15) Repeat (8) and check CO2 at maximum rate - adjust if
necessary. Check that the CO/CO2 ratio is less than the
value in the table below.
(16) Remove analyser probe from the test point and replace
the cap. Ret the control panel.
(17) IMPORTANT: Fit the LPG conversion label supplied
in the documentation pack to the inner front panel
alongside the data label. Ret the inner door and outer
door.
(18) Continue commissioning from 12.4.
13870
OFFSET
ADJUSTMENT
SEALING
GROMMET
THROTTLE
ELECTRICA
PLUG
GAS PIPE
RETAINING
CLIP
13553
Diagram 12.5
40
Page 41

13 Servicing
IMPORTANT NOTES:
1. To ensure the continued efcient and safe operation of the boiler it is recommended that it is checked and serviced at
regular intervals. The frequency of servicing will depend upon the particular installation and usage, but in general
once a year should be enough.
2. It is the Law that any servicing is carried out by a competent person approved at the time by the Health and Safety
Executive.
3. Before commencing with a service or replacement of parts the boiler should be isolated from the electrical supply and the
gas supply should be turned off at the gas isolation valve.
4. When replacing a part on this appliance, use only spare parts that you can be assured conform to the safety and
performance specication that we require. Do not use reconditioned or copy parts that have not been clearly authorised
by Glow-worm.
5. If any electrical connections have been disconnected and after their connection, checks to the earth continuity, polarity,
short circuit and resistance to earth must be repeated using a suitable multimeter, as described in section 14.
6. After servicing, complete the relevant Service Interval Record section of the Benchmark Checklist located in the centre
pages of this document.
General Inspection
Prior to, during servicing and after any maintenance or
changed parts, the following must be checked.
● The integrity of the flue system and flue seals.
● The integrity of the appliance combustion circuit and
relevant seals.
● Electrical, gas and water connections.
● System pressure.
● the combustion performance, refer to the following
procedure.
● The operational gas inlet pressure and gas rates, refer to
the commissioning section paragraph 12.5.
Correct any fault before continuing.
COMPETENCY TO CARRY OUT THE
CHECK OF COMBUSTION PERFORMANCE
NOTE: BS 6798: 2009 Specification for installation and
maintenance of gas-fired boilers of rated input not exceeding
70kW net advises that:
● The person carrying out a combustion measurement must
be assessed as competent in the use of a flue gas analyser
and the interpretation of the results.
● The flue gas analyser used should be one meeting the
requirements of BS7927 or BS-EN50379-3 and be calibrated
in accordance with the analyser manufacturers’ requirements.
● Competence can be demonstrated by satisfactory
completion of the CPA1 ACS assessment, which covers
the use of electronic portable combustion gas analysers in
accordance with BS 7967, parts 1 to 4.
● Ensure that the gas analyser is set to the correct fuel
setting.
● Select the “
“Mode” button repeatedly, refer to commissioning section.
The boiler should fire automatically.
NOTE: Safe combustion can only be verified by measuring
CO/CO2 ratio. This must not exceed the value shown in the
table opposite.
”, central heating function by pressing the
COMBUSTION CHECK AND SETTING THE
AIR/GAS RATIO VALVE
● Remove the front casing panel, see diagram 13.2 and
hinge down the control box. Taking care not to touch any
internal components, proceed as follows:
● Connect the CO2 combustion analyser to the relevant test
point, see diagram 13.1.
G31 BURNER % CO2
MODEL
18sxi
30sxi
CHECK
(case on)
9.2 to 10.2
10.0 to 11.0
G20 BURNER % CO2
MODEL
18sxi
30sxi
CHECK
(case on)
8.5 to 9.6
8.5 to 9.6
SETTING
(case off)
+ 0.0
10.1
10.5
- 1.0
+ 0.3
- 0.8
SETTING
(case off)
+ 0.2
9.1
- 0.5
+ 0.2
9.1
- 0.5
Diagram 13.1
CO/CO
ratio
0.004
0.004
CO/CO
ratio
0.004
0.004
13566
15451
2
2
41
Page 42

13 Servicing
1. Maximum Rate Check and Adjustment
NOTE: To verify the maximum gas rate CO2 setting the
appliance must be checked at the maximum rate first.
Press the “reset” button on the controls fascia, release
and immediately press and hold in the “+” button. After
approximately 5 seconds “Hi” will be displayed. Pressing
the mode button when “Hi” is selected will force the boiler
to maximum rate, the display will flash between “Hi” and the
“default display” this will indicate the boiler has been forced to
maximum. Wait until the CO2 value is stable and check that
the value is within the range specified in table in the “check”
column.
If the combustion reading is not within the acceptable
values AND the integrity of the complete flue system and
combustion circuit seals have been verified and the inlet
gas pressure (and gas rate) have been verified, then, it will
necessary to adjust the combustion rate of the appliance.
NOTE: Adjustment is made by turning the gas valve
throttle an ⅛ of a turn, waiting 1 minute to allow the
appliance to stabilise before checking or making further
adjustments.
● Rotate the “throttle”(anti-clockwise to increase), to the
required CO2, refer to diagram 12.5 and the “SETTING”
column in the table.
● Exit the forced rate function, press the “mode” and “+”
buttons simultaneously, this will reset the boiler to the default
display. Now proceed to check the minimum rate adjustment.
2. Minimum Rate Check and Adjustment
● Now check the minimum gas rate CO2 setting: Press
and release the “reset” button on the controls fascia, then
immediately press and hold in either of the “+” buttons. After
approximately 5 seconds “Hi” will be displayed. Pressing the
“+” or “-” buttons will toggle between “Hi” and “Lo”. Press the
mode button when “Lo” is selected, this will force the boiler
to minimum rate and the display will flash “Lo”, indicating the
boiler is operating at minimum.
● Wait until the CO2 value is stable and check that the value
is within the range specified in table in the “check” column.
If adjustment is necessary, proceed as follows:
NOTE: Adjustment of the CO2 at minimum rate is very
coarse and should not be adjusted more than an ⅛ of
a turn at a time. Wait 1 minute to allow the appliance to
stabilise before checking or making further adjustments.
● Gradually rotate the “offset adjustment” (anti-clockwise to
decrease) to the required CO2, refer to diagram 12.5 and the
“SETTING” column in the table.
● Exit the minimum rate function, press the “mode” and “+”
buttons simultaneously, this will reset the boiler to the default
display.
3. Re-Check CO2 and check the CO/CO2
combustion ratio.
● Re-check the maximum and minimum CO2 values to
ensure that they are within the “setting” limits in the table
then check the CO/CO2 combustion ratio does not exceed
the value in the CO/CO2 column of the table. If the CO/CO2
setting exceeds the value in the table, a complete servicing of
the appliance will be necessary, refer to section 13.1.
If the CO2 and the CO/CO2 ratio falls within the tolerances
quoted, exit the function press the “mode” and “+” buttons
simultaneously, this will reset the boiler to the default display.
Remove the analyser probe and replace the cap on the
sampling point, replace the controls fascia, inner and front
casing panels.
IMPORTANT: Remember to replace the sample point cap on
completion of the test.
GAS RATE CHECK
Check the gas rates as described in the commissioning
section.
COMPLETION
If it is not possible to achieve the required results for either
the combustion or gas rates, it will be necessary to complete
a full service of the appliance and then repeat the combustion
check procedure. If after servicing and adjustment of the
appliance the combustion values are still unacceptable
and after further remedial work has been carried out, the
appliance must be disconnected until the CO/CO2 ratio
is acceptable. Advice can be sought from the Glow-worm
Technical Helpline.
13.1 Servicing
NOTE: If the Combustion CO2, CO/CO2 ratio & Gas
rate checks did not require adjustment then it will not be
necessary to complete a full service.
All routine servicing requirements can be achieved by the
removal of the front panel, see diagram 13.2. Position the
control box into the service position, see diagram 13.3.
Before commencing with a service or replacement of parts.
The boiler should be isolated from the electrical and gas
supplies.
13649
Diagram 13.2
13528
RETAINING
STRAP
CONTROL
PANEL
Diagram 13.3
42
Page 43

13 Servicing
SPARK GAP
13.2 Spark Electrode
Disconnect the spark electrode plug and earth lead, see
diagram 13.5. Remove the two securing screws and withdraw
the spark electrode carefully from the combustion chamber,
see diagram 13.4.
Inspect the tips for damage.
Clean away any debris and check the spark gap is 3.5 to 4.5
mm.
Check the electrode gasket for signs of damage and replace
if necessary.
4mm
GASKET
ELECTRODE
13273
13.3 Burner
NOTE:
● The following procedure will require that you replace the
burner door seal and nyloc nuts.
● Removal of the burner is not necessary during a normal
service, but if it is removed it will require a new gasket, see
diagram 13.6.
● When replacing ensure that the sealing grommet, situated
below the gas valve is correctly re-seated.
Remove the gas pipe retaining clip.
Disconnect the gas valve electrical plug at the gas valve, see
diagram 13.5.
Disconnect the electrical plug from the fan.
Disconnect the spark electrode plug and earth lead, refer to
diagram 13.5.
Remove the ve combustion chamber/burner door securing
nuts, see diagram 13.7, these should be discarded and
replaced with the new nylocs nuts supplied in the burner door
seal kit.
Gently remove the fan, gas valve and burner assembly from
the combustion chamber.
Clean the burner with a soft brush taking great care not to
damage the front insulation. DO NOT use wire or sharp
instruments to clean the holes of the burner.
Inspect the burner for any signs of damage.
Remove and discard the burner door seal and replace with
new, see diagram 13.7.
SECURING
SCREW
(2 OFF)
EARTH
LEAD
13266
Diagram 13.4
13518
Diagram 13.5
Diagram 13.6
43
Page 44

13 Servicing
13527
13.4 Combustion Chamber and Heat
Exchanger
Remove loose debris from inside the heat exchanger using a
soft brush and vacuum cleaner.
Carefully ush by spraying water into the heat exchanger, any
remaining debris should pass through the condensate trap
(Ensure the water is kept away from electrical components).
13.5 Inner Casing Panel Seal check
Check the condition of the seal, if worn or damaged remove
the seal and thoroughly clean the casing surface before tting
the new seal, see diagram 13.8.
Ret the inner casing panel.
NOTE: Ensure the seal is tted correctly giving an airtight
joint.
13.6 Service Completion
Re-check the combustion as described at the beginning of this
section.
On completion of the service the “Benchmark” Service Record
should be completed.
Diagram 13.7
10063
Diagram 13.8
44
Page 45

14 Fault Finding
14.1 Preliminary fault finding
The following checks should be performed before proceeding
onto specic diagnostics:
• Check the external electrical supply to the boiler is on
and a supply of 230V is present at the ‘L’ and ‘N’
terminals on the installer interface, refer to section 11.4
for access and diagram 14.4.
• Check the electrical installation and appliance, carry out
tests for earth continuity, polarity, short circuit and
resistance to earth, using a suitable multimeter.
An aid to test
Remove the front casing panel, see diagram 13.2 and the
control panel securing screw then lower into service the
position.
Remove the rear panel by prising the retaining clips, see
diagram 14.1.
Carry out the tests at connector plug X17, see diagram 14.2.
Check chassis earth at a bare metal point on the boiler.
• Check that there is a gas supply to the boiler and the gas
service isolation valve is turned on, see diagram 12.1.
• Check pressure at the gas service isolation valve, refer
to section 12.5.
• Check that the heating system pressure indicates at
least 1mb, if not, ll and vent the system as described in
section 12.6.
• Check that all external controls are on.
• Check the functional ow diagram, 14.5
13535
Diagram 14.1
13845
14.2 Fault Codes
Fault codes take priority over all other display functions in the
event of a fault occurring, refer to diagram 14.6.
If multiple faults occur the codes will be displayed for approx.
2 seconds, alternatively.
14.3 Fault Memory
The Fault memory stores details of the ten most recent faults.
To access this menu, refer to diagram 14.3:
a) Press and hold ‘MODE’ for 5 seconds.
b) When the display shows a ashing ‘0’ press ‘MODE’
button.
c) Press a ‘+’ button to scroll back through the fault memory
(Position 1 is most recent), see fault memory display.
To exit this menu, press the ‘MODE’ button.
14.4 Diagnostic Menu
The Diagnostic Menu provides the ability to view and
change certain parameters.
See diagram 14.7 for available parameters.
14.5 Status Codes
The status codes provide information about the current
operating condition of the boiler and can be accessed through
the diagnostic display, refer to diagram 14.8.
Diagram 14.2
13452
Diagram 14.3
45
Page 46

14 Fault Finding
FAN
13167
HEATING
FLOW
THERMISTOR
r
r
b
bk
HEATING
RETURN
THERMISTOR
bk
b
bk
PRESSURE
SENSOR
WATER
b
y
w
r
gy
w
w
or
p
g/y
GAS
CONTROL
VALVE
IGNITION
ELECTRODE
IGNITER
UNIT
g/y
PUMP
bk
KEY
br BROWN
b BLUE
g/y GREEN/YELLOW
gy GREY
bk BLACK
y YELLOW
r RED
w WHITE
or ORANGE
p PURPLE
CHASSIS
EARTH
br
b
g/y
br
b
g/y
bk
w
b
r
MAIN CONTROL
BOARD
bk
b
g/y
br
r
APPLIANCE
INTERFACE
BOARD
46
Diagram 14.4
Page 47

14 Fault Finding
CENTRAL HEATING
13012
Diagram 14.5
47
Page 48

14 Fault Finding
13860
Fault Codes
If -9OC is displayed, check that the thermistor wires are unconnected, faulty or trapped.
48
Diagram 14.6
Page 49

14 Fault Finding
Fault Codes (continued)
13447
Diagnostic Menu
The Diagnostic Menu provides the ability to view and
change certain parameters.
See Diagram 14.7 for available parameters.
To enter the diagnostic menu:
a) Press and hold the ‘MODE’ button for 5 seconds.
The display will change to ashing ‘0’.
b) Use the ‘+’ or ‘-’ buttons to scroll to 96 (This is the
installer level access password).
c) Press ‘MODE’ to conrm, see diagnostic display 1.
13450
Diagram 14.6
Use the ‘+’ or ‘-’ buttons to view the appropriate
diagnostic number, see diagram 14.7.
If necessary the values can be changed by:
a) Pressing the ‘MODE’ button.
b) The diagnostic value ashes, see diagnostic display 2.
13451
c) Use the ‘+’ and ‘-’ buttons to cycle through
available values.
d) The change is saved by pressing ‘MODE’ once
more.
(NOTE: Only certain parameters can be adjusted)
To exit the diagnostic menu press and hold the ‘MODE’
button for 5 seconds.
49
Page 50

14 Fault Finding
Diagnostic Menu - Level 1 Installer Access
13454
(see State Lists table)
Indicates read and write function - all other diagnostics are read only
50
Diagram 14.7
Page 51

14 Fault Finding
State list - Accessed through Diagnostic Codes - Level 1, Installer Access d.99
STATE LISTS
Central heating mode (Priority 3) Possible Causes
S.00 no heating required
S.01 fan pre-run
S.02 pump pre-run
S.03 ignition
S.04 burner on
S.05 pump / fan overrun
S.06 fan overrun
S.07 pump overrun
S.08 Anti cycling period
Domestic hot water mode (Priority 2)
S.10 domestic hot water demand
S.11 fan pre-run
S.13 ignition
S.14 burner on
S.15 pump / fan overrun
S.16 fan overrun
S.17 pump overrun
13011
Cycling / preheat mode (Priority 1)
S.20 domestic hot water cycling mode active
S.21 fan pre-run
S.22 Pump pre run
S.23 ignition
S.24 burner on
S.25 pump / fan overrun
S.26 fan overrun
S.27 pump overrun
S.28 Anticycling period
Special cases of status messages
S.30 No Heating demand from external controls 230V Check wiring in external controller.
Check wiring at Installer Interface.
S.31 summer mode Check CH setpoint / Check external controls
S.32 Antifreeze active – fan speed variation too high Check fan connection.
– waiting during blocking function
S.34 frost protection active (Priority 4) Temperature below 8
connection if this is not true.
S.36 No Heating demand from external controls 24V Check wiring in external controller.
Check wiring at Installer Interface.
S.42 Accesory Module is blocking burner operation Check accessory module.
S.53 waiting time: temperature difference flow
- return sensor too high (Check thermistor fit)
S.54 waiting time: no water in system, temperature
(gradient error) rise flow / return sensor too high
Check flow & return thermistor connections to pipes.
Check harness connection to thermistor.
Check harness wires are not trapped between any
internal components.
Check flow & return thermistor connections to pipes.
Check harness connection to thermistor.
Check harness wires are not trapped between any
internal components.
O
C - check thermistor
S.76 Waiting period – pressure sensor Check system pressure - default display.
S.96 Return-Sensor check is running, demand Check return thermistor connection to pipe.
(DHW or heating) is blocked Check harness connection to thermistor.
S.97 Water pressure sensor check is running, Check connection to pressure sensor.
demand (DHW or heating) is blocked Check pump has not seized.
S.98 Flow / Return - sensor check is running, demand
(DHW or heating) is blocked
Check flow & return thermistor connections to pipes.
Check harness connection to thermistor.
Check harness wires are not trapped between any
internal components.
Diagram 14.8
51
Page 52

15 Replacement of Parts
15.1 General
IMPORTANT: The replacement parts described in sections
15.5 to 15.9 and section 15.12, will require the removal of the
burner module assembly and the replacement of the burner
door seal and self locking nuts.
Replacement parts that have associated components that
need replacing on removal, i.e. ‘O’ ring, seals, gasket, etc.,
will be supplied and should be tted.
Replacement of parts must be carried out by a competent
person approved at the time by the Health and Safety
Executive.
Before replacing any parts of the boiler it should be isolated
from the mains electric supply and the gas should be turned
off at the gas service isolation valve on the boiler, see
diagram 12.1.
Unless stated otherwise parts are replaced in the reverse
order to removal.
After replacing any parts always test for gas tightness and if
necessary carry out functional test of the controls.
Boiler Access
For replacement of parts the front casing and the inner casing
panel of the boiler will need to be removed. To remove undo
the two screws on the underside of the front casing and lift off.
Undo the two screws on the front of the inner front panel and
lift off.
The side panels can be hinged sideways and removed to aid
replacement of parts.
To hinge a side panel undo and remove the three screws
securing each side panel to the boiler, two at the front and
one at the top.
13274
Diagram 15.1
Draining of Boiler Heating Circuit
Drain down the Heating Circuit of the boiler only, by closing
the heating ow and return isolating valves, see diagram 12.2.
Attach a length of hose to the drain point and open the drain
valve, see diagram 12.1.
After servicing or replacing parts, close the drain valve and
remove the hose. Open the heating ow and return isolating
valves and rell, vent and pressurise the heating circuit. See
section 12.1.
Check for leaks.
15.2 Spark Electrode
For access, refer to section 15.1.
Refer to section 13.2 for removal.
15.3 Igniter Unit
For access, refer to section 15.1.
Remove ignition lead and electrical connections then remove
igniter unit by removing two securing screws, see diagram
15.1.
15.4 Ignition Lead
For access, refer to section 15.1.
Pull the spark plug style connector off the spark electrode,
refer to diagram 13.5 and the spade connector connected to
the igniter unit, see diagram 15.1.
52
Page 53

15 Replacement of Parts
REAR
15.5 Gas Valve
For access, refer to section 15.1.
Refer to section 13.3 for removal of the fan, gas valve and
burner assembly.
Before removing the gas valve note its orientation in
relationship to the fan.
Remove the three securing screws, which also secures the
plastic swirl plate to the venturi on the fan, see diagram 15.2.
Withdraw the gas valve.
After assembly test for gas tightness and purge in accordance
with the current issue of BS6891or in IE, the current edition of
I.S.813 “Domestic Gas Installations”.
Check the combustion CO
section 13.
and adjust if necessary, see
2
15.6 Fan
For access, refer to section 15.1.
Refer to section 13.3 for removal of the fan, gas valve and
burner assembly.
Remove the gas valve as described in section 15.5.
Remove the two securing screws, nuts and washers to
separate the fan from the gas manifold extension tube and
gas manifold, see diagram 15.3.
After assembly test for gas tightness and purge in accordance
with the current issue of BS6891or in IE, the current edition of
I.S.813 “Domestic Gas Installations”.
VENTURI
PLATE
SECURING
SCREW (3)
13276
Diagram 15.2
13238
15.7 Burner
For access, refer to section 15.1.
Refer to section 13.3 for removal of the fan, gas valve and
burner assembly.
Remove the four screws that secure the burner, see diagram
13.6.
NOTE: The burner will require a new gasket.
15.8 Front Insulation
For access, refer to section 15.1.
Refer to section 13.3 for removal of the burner module.
Remove burner as described in section 15.7.
Remove spark electrode, see section 15.2.
NOTE: The burner will require a new gasket when retted.
15.9 Rear Insulation
For access, refer to section 15.1.
Refer to section 13.3 for removal of the burner module.
Remove securing screw and washer in the centre of the
insulation and withdraw insulation, see diagram 15.4.
WASHER
Diagram 15.3
13277
INSULATION
HEAT
EXCHANGER
SECURING SCREW
Diagram 15.4
53
Page 54

15 Replacement of Parts
GLASS
15.10 Viewing Window
For access, refer to section 15.1.
Refer to diagram 15.5.
Remove circlip.
Remove steel washer.
Remove glass.
Remove bre washer.
Replace in reverse order.
15.11 Expansion Vessel
For access, refer to section 15.1.
Refer to section 15.1 and drain the boiler heating circuit.
Undo the coupling at the base of the vessel, see diagram
15.6.
While holding the vessel remove the securing bolt on the top
panel of the boiler. Remove upper support bracket.
Fit a new gasket between the expansion vessel and coupling.
Rell, vent and pressurise the boiler.
Check for leaks.
15.12 Heat Exchanger
Refer to Manual Handling section.
For access, refer to section 15.1.
Refer to section 13.3 for removal of the fan, gas valve and
burner assembly.
Refer to section 15.1 and drain the boiler heating circuit.
Remove the securing clip from the heat exchanger adapter
then disconnect the adapter and exible hose, see diagram
15.7.
Undo the two nuts of the ow and return pipes from the heat
exchanger.
Move the pipes away from the heat exchanger.
Slacken the three heat exchanger securing screws and
clamps (two at the top and one at the bottom) to remove the
heat exchanger, see diagram 15.8.
CAUTION: There will be water in the heat exchanger.
Remove condense pipe connector from bottom of heat
exchanger.
Carefully ease heat exchanger out.
15.13 Flue Hood
For access, refer to section 15.1.
Remove heat exchanger as per section 15.12.
Remove the two securing screws and pull the ue hood down
and away from the ue hood bracket and ue elbow, see
diagram 15.9.
13279
Diagram 15.6
54
CIRCLIP
FIBRE WASHER
STEEL WASHER
Diagram 15.5
13278
13570
Diagram 15.7
Page 55

15 Replacement of Parts
15.14 Heating Flow Thermistor
For access, refer to section 15.1.
Refer to diagram 15.10.
Remove the electrical connections from the thermistor.
Remove the retaining clip from the ow pipe.
NOTE: When reconnecting, the polarity of the wiring to
thermistors is not important.
15.15 Heating Return Thermistor
For access, refer to section 15.1.
Refer to diagram 15.10.
Remove the electrical connections from the thermistor.
Remove the retaining clip from the return pipe.
NOTE: When reconnecting, the polarity of the wiring to
thermistors is not important.
15.16 Condense Trap and Siphonic Drain
For access, refer to section 15.1.
Refer to diagram 15.11.
Remove the igniter unit as described in section 15.3 to
improve accessibility.
Remove the securing clip from the heat exchanger adapter,
then disconnect the adapter and exible hose.
Lift the siphon adapter and hose out of the condensate trap
and siphonic drain, do not disconnect the hose.
Disconnect the drain connection.
Slacken to disengage but do not remove the two securing
screws.
The condense trap will contain water, lift taking care not to
spill the water.
After replacement and before tting the adapter ll the trap
with water.
Cleaning
Remove the condense trap as previously described.
Remove the oat to clean it.
Remove any solids found.
Flush water through the trap to remove any remaining solids.
Check for any debris in the outlet hose of the condensate
drain and clean as necessary.
13316
13522
Diagram 15.8
Diagram 15.9
Diagram 15.10
13544
13281
Diagram 15.11
55
Page 56

15 Replacement of Parts
CAP HEAD
15.17 Pump (head only)
For access, refer to section 15.1.
Drain the boiler heating circuit as described in the appropriate
paragraph of 15.1.
Refer to diagram 15.12.
Remove the four cap head screws.
Carefully remove the pump head together with cable. Do not
strain cable.
Support the pump head, unscrew cable cover at the side of
pump head and take off.
Disconnect wiring from pump head.
Reconnect wiring to new pump head and t cover.
Fit the new pump head with ‘O’ ring.
Complete pump replacement
For access, refer to section 15.1.
Drain the boiler heating circuit as described in the appropriate
section of 15.1.
Refer to diagram 15.12, 15.13.
Remove the pump head as described in section 15.17.
Remove the safety discharge valve as described in section
15.18.
Disconnect the expansion vessel pipe at the coupling, see
diagram 15.6 and at the pump housing by removing the
retaining clip, see diagram 15.12.
Disconnect the central heating ow pipe union connection and
withdraw the pump securing clip.
Spring back the rear location bracket to release the pump
housing and gently rotate backwards and forwards whilst
easing the pump to the right to disengage from the 3 way
valve.
13530
SCREW (4)
CABLE
COVER
PUMP
HEAD
13589
15.18 Safety Discharge Valve
For access, refer to section 15.1.
Drain the boiler heating circuit as described in the appropriate
section of 15.1.
Refer to diagram 15.13.
Undo the safety discharge valve union and remove from the
pipework.
Remove the securing clip and withdraw the safety discharge
valve.
Fit new ‘O’ ring.
Rell, vent and pressurise the boiler.
15.19 Automatic Air Vent
For access, refer to section 15.1.
Drain the boiler heating circuit as described in the appropriate
section of 15.1.
Refer to diagram 15.14 and gain access through the plastic
maintenance cover.
Remove the retaining clip.
Remove the automatic air vent.
Fit the new automatic air vent and ‘O’ ring ensuring the vent
cap is left loose.
Rell, vent and pressurise the boiler.
Diagram 15.12
13256
Diagram 15.13
56
Page 57

15 Replacement of Parts
G
ELECTRICAL
MAINTENANCE
13854
15.20 Low Water Pressure Sensor
For access, refer to section 15.1.
Drain the boiler heating circuit as described in the appropriate
section of 15.1.
Refer to diagram 15.15.
Disconnect the electrical leads.
Remove the retaining clip, remove the low water pressure
sensor.
Fit new ‘O’ ring.
Fit the new low water pressure sensor.
Rell vent and pressurise the boiler.
15.21 Automatic Bypass and Housing
For access, refer to section 15.1.
Drain the boiler heating circuit as described in the appropriate
section of 15.1.
Refer to diagram 15.16.
Remove the retaining clip to remove the automatic bypass.
Remove the retaining clips and three securing screws to
remove the automatic bypass housing. Fit new ‘O’ rings
before replacing the assembly.
Rell, vent and pressurise the boiler.
RETAINING
CLIP
LOW WATER
PRESSURE
SENSOR
COVER
AUTOMATIC
AIR VENT
PUMP
HEAD
LEADS
CABLE
COVER
Diagram 15.14
13532
RETAININ
CLIP
LH
HYDROBLOCK
Diagram 15.15
13526
AUTOMATIC BYPASS
HOUSING
SECURING
SCREW (3)
RETAINING
CLIP
RETAINING
CLIP
Diagram 15.16
57
Page 58

15 Replacement of Parts
BLANKING
15.22 Hydroblock and Bypass Tube
For access, refer to section 15.1.
IMPORTANT: To replace the bypass tube the LH and RH
hydroblocks will need to be removed. The following procedure
must also be used for the replacement of either the LH or RH
hydroblock.
Drain the boiler heating circuit as described in the appropriate
section of 15.1.
Isolate the gas supply at the gas service isolation valve, see
diagram 12.1.
Remove the low water pressure sensor from the LH
hydroblock, refer to section 15.20.
Remove the blanking plate, see diagram 15.17.
Remove clips from the plastic LH hydroblock retaining the
primary ow pipes and CH outlet pipe, see diagram 15.17.
Remove the primary ow pipe from the LH hydroblock.
Remove the CH lter from the primary ow pipe port in the LH
hydroblock. The lter is a push-t in the hydroblock port.
Undo the union nuts on the CH outlet pipe and gas pipe at the
connections between the top and bottom modules.
Undo the locknuts retaining the CH outlet pipe and the gas
pipe to the boiler chassis.
Rotate the gas pipe upwards and clear of the chassis panel.
Remove the 3 screws which retain the automatic bypass
housing, refer to section 15.21.
Grip the LH and RH hydroblocks simultaneously and lift clear
of the spigots on the mounting bracket. The RH hydroblock
should be drawn upwards past the plastic three way valve
body.
NOTE: Before removing the bypass tube from the
hydroblocks, take note of the tube position and orientation.
Fit the new bypass tube with new ‘O’ ring seals and reassemble to hydroblocks.
NOTE: Before lowering the assembly onto the bracket
spigots, ensure that the two port axis in each hydroblock run
parallel to each other and also that the bottom faces of the
hydroblocks are level and aligned.
Lower the assembly onto the bracket ensuring that the brass
washers on the DHW and DCW pipes are not displaced.
Check also that the seals on the front of the RH hydroblock
remain in place as it slides past the automatic bypass
housing. Before retting the plate to plate heat exchanger
ensure that the four rubber seals are in place, two in the LH
and two in the RH hydroblock.
Fit new ‘O’ rings to pipes.
Rell system, vent and pressurise the boiler.
RETAINING
CLIP
PRIMARY
FLOW PIPE
SECURING
SCREW
LH
HYDROBLOCK
MOUNTING
BRACKET
PLATE
RH
HYDROBLOCK
BYPASS
TUBE
RETAINING
CLIP
BLANKING PLATE
RUBBER SEAL
(4 OFF)
13531
SPIGOT (4 OFF)
AUTOMATIC
BYPASS
HOUSING
SEALS
58
CH FILTER
(in Hydroblock)
CH OUTLET
PIPE
Diagram 15.17
Page 59

15 Replacement of Parts
RETAINING
15.23 Access User Interface and Main PCB
For access, refer to section 15.1.
Remove control box retaining screw, see diagram 15.18.
Hinge down the control box.
Release the control box cover by carefully pressing the four
retaining clips, see diagram 15.18.
15.24 Main PCB
IMPORTANT: When replacing the board refer to instructions
supplied with the replacement.
For access, refer to section 15.23.
Remove the electrical connections to the PCB.
Ease back the four PCB retaining clips and withdraw the PCB
from the retaining lugs, see diagram 15.19.
When retting the rear panel ensure the leads are not
trapped.
15.25 User Interface
IMPORTANT: When replacing the board refer to instructions
supplied with the replacement.
Refer to section 15.23 for access.
Remove main PCB, refer to section 15.24.
Remove electrical connection.
Gently ease back the retaining clips, see diagram 15.20.
Withdraw the board.
FUSE
13535
Diagram 15.18
13536
CLIPS (4 OFF)
15.26 Fuse, Main PCB - Control Box
For access, refer to section 15.23.
The fuse is located at top left hand side of the PCB, see
diagram 15.19.
15.27 Control Box
For access, refer to section 15.23.
Remove relevant plugs and connectors, refer to wiring
diagram 14.4.
Withdraw grommets and leads so they are hanging loose.
Unthread the retaining cord and remove the control box. by
drawing it outwards away from its retaining slots, see diagram
15.18.
15.28 Inner Casing Panel Seal
For access, refer to section 15.1.
Refer to diagram 13.8.
Remove the inner casing panel.
To replace remove the old seal, thoroughly clean the casing
surfaces. Fit the new seal, it is supplied to the correct length.
Ret the inner casing panel.
NOTE: Ensure the seal is tted correctly giving an airtight
joint.
MAIN PCB
RETAINING
LUGS
Diagram 15.19
13355
Diagram 15.20
59
Page 60

16 Spare Parts
16.1 Spare Parts
When ordering spare parts, contact Glow-worm’s own service organisation using the telephone number on the inside front cover of
this booklet. Please quote the name of the appliance and serial number, to be found on the data label. If ordering from British Gas
also quote the G.C. number of the part.
Key No. Part No. Description GC Part No.
1 2000802463 Burner - 18sxi E84021
1 2000802662 Burner - 30sxi H36356
2 0020014173 Pressure Relief Valve H42758
3 0020014161 Automatic Air Vent H42758
4 0020014171 Pump H42760
5 801655 Igniter H84015
6 0020038061 User Interface H52596
7 0020023825 Main PCB H42783
8 0020037309 Fan H53083
9 2000802664 Gas Valve E84004
10 0020014169 Bypass H42768
11 0020020781 NTC 720340
12 2000802462 Electrode H53089
13 801635 Burner Door Seal Kit E85008
60
Page 61

12
16 Spare Parts
13861
1
13
2
11
10
3
9
4
5
8
7
6
Diagram 15.21
61
Page 62

17 Manual Handling
IMPORTANT. With regards to the Manual Handling Operations, 1992
Regulations, the following lift operation exceeds the recommended
weight for a one man lift.
General recommendations when handling
Clear the route before attempting the lift.
Ensure safe lifting techniques are used – keep back straight – bend
using legs. Keep load as close to body as possible. Do not twist –
reposition feet instead. If 2 persons performing lift, ensure co-ordinated movements during lift. Avoid upper body/top heavy bending - do
not lean forward/sideways. Recommend wear suitable cut resistant
gloves with good grip to protect against sharp edges and ensure good
grip.
Always use assistance if required.
Removal of carton from delivery van
Recommend 2 person lift or 1 person with use of sack truck. If 1
person is performing lift, straddle the load, tilt and place carton into
position on truck. Recommend secure appliance onto truck with
suitable straps. Ensure safe lifting techniques are used – keep back
straight – bend using legs. Keep load as close to body as possible. If
2 persons performing lift, ensure co-ordinated movements during lift.
Always use assistance if required.
Carriage of carton from point of delivery to point of installation –
ground oor.
Recommend 2 person lift or 1 person with use of sack truck. If 1 person is performing lift, straddle the load, tilt and place carton into position on truck. Recommend secure appliance onto truck with suitable
straps. Ensure safe lifting techniques are used – keep back straight –
bend using legs. Keep load as close to body as possible. If 2 persons
performing lift, ensure co-ordinated movements during lift. Clear the
route before attempting the lift. If removing boiler from truck straddle
the load and tilt forwards to facilitate secure grip. Ensure safe lifting
techniques are used – keep back straight – bend using legs. Do not
twist – reposition feet instead. Take care to avoid trip hazards, slippery or wet surfaces and when climbing steps and stairs. Always use
assistance if required.
Carriage of carton from point of delivery to point of installation –
rst or higher oor, cellar.
Recommend 2-person lift or 1 person with use of sack truck. If 1
person is performing lift, straddle the load, tilt and place carton into
position on truck. Recommend secure appliance onto truck with
suitable straps. Ensure safe lifting techniques are used – keep back
straight – bend using legs. Keep load as close to body as possible. If
2 persons performing lift, ensure co-ordinated movements during lift.
Avoid upper body/top heavy bending - do not lean forward/sideways.
Clear the route before attempting the lift. If removing boiler from truck
straddle the load and tilt forwards to facilitate secure grip. Ensure safe
lifting techniques are used – keep back straight – bend using legs.
Do not twist – reposition feet instead. Take care to avoid trip hazards,
slippery or wet surfaces and when climbing steps and stairs. Always
use assistance if required.
Carriage of carton from point of delivery to point of installation –
roofspace.
Recommend 2-person lift. Ensure co-ordinated movements during lift.
Avoid upper body/top heavy bending - do not lean forward/sideways.
Clear the route before attempting the lift. Take care to avoid trip
hazards, slippery or wet surfaces and when climbing steps and stairs.
When transferring appliance into roofspace, recommend 1 person to
be in roofspace to receive the appliance and other person to be below
to pass up and support appliance. Ensure safe lifting techniques are
used – keep back straight – bend using legs. Keep load as close to
body as possible. Always use assistance if required. It is assumed
safe access, ooring and adequate lighting are provided in the roof
space. It is recommended a risk assessment of the roof space area
be carried out before moving the appliance into the area to take into
account access, stability of ooring, lighting and other factors, and
appropriate measures taken.
Positioning of Appliance for Final Installation – no obstructions.
Recommend 2 persons lift appliance to position into place. Fit bracket
securely onto wall before lifting appliance into position. Obtain rm
grip on front and sides of appliance, lift upwards, ensure stable balance achieved and lift upwards to position in place on bracket. Ensure
safe lifting techniques are used – keep back straight – bend using
legs - when lifting load from oor level. Do not twist – reposition feet
instead. Keep boiler as close as possible to body throughout lift to
minimise strain on back. Ensure co-ordinated movements to ensure
equal spread of weight of load. Always use assistance if required.
Recommend wear suitable cut resistant gloves with good grip to
protect against sharp edges and ensure good grip when handling
appliance.
Positioning of Appliance for Final Installation – above worktop,
foreseeable obstructions etc.
Recommend 2 persons lift appliance to position into place. Fit bracket
securely onto wall before lifting appliance into position. Obtain rm grip
on front and sides of appliance, lift upwards, onto worktop if practicable.
Ensure stable balance achieved and lift upwards to position in place on
bracket. If 2 persons positioning onto bracket obtain rm grip at front
and sides/base of boiler. Ensure co-ordinated movements during 2
person lifts to ensure equal spread of weight of load. Ensure safe lifting
techniques are used – keep back straight – bend using legs - when lifting load from oor level. Do not twist – reposition feet instead. Keep
boiler as close as possible to body throughout lift to minimise strain on
back. Avoid upper body/top heavy bending - do not lean forward/sideways. Always use assistance if required. Recommend wear suitable
cut resistant gloves with good grip to protect against sharp edges and
ensure good grip when handling appliance.
Positioning of Appliance for Final Installation – within compartment etc. restricting installation.
Recommend 2 persons lift appliance to position into place, space permitting. Fit bracket securely onto wall before lifting appliance into position. Obtain rm grip on front and sides of appliance, lift upwards,
onto worktop if practicable. Ensure stable balance achieved and lift
upwards to drop into place onto bracket. If 2 persons positioning onto
bracket obtain rm grip at front and sides/base of boiler. Ensure coordinated movements during 2 person lifts to ensure equal spread of
weight of load. If 1 person positioning onto bracket recommend obtain
rm grip supporting base of boiler. Ensure safe lifting techniques are
used – keep back straight – bend using legs - when lifting load from
oor level. Do not twist – reposition feet instead. Keep boiler as close
as possible to body throughout lift to minimise strain on back. Always
use assistance if required. Recommend wear suitable cut resistant
gloves with good grip to protect against sharp edges and ensure good
grip when handling appliance.
Positioning of Appliance for Final Installation – in roof space restricting installation.
Recommend 2 persons lift appliance to position into place, space permitting. Fit bracket securely onto wall before lifting appliance into position. Obtain rm grip on front and sides of appliance, lift upwards,
ensure stable balance achieved and lift upwards to drop into place onto
bracket. If 2 persons positioning onto bracket obtain rm grip at front
and sides/base of boiler. Ensure co-ordinated movements during 2
person lifts to ensure equal spread of weight of load. If 1 person positioning onto bracket recommend obtain rm grip supporting base of
boiler. Ensure safe lifting techniques are used - keep back straight –
bend using legs - when lifting load from oor level. Do not twist – reposition feet instead. Keep boiler as close as possible to body throughout
lift to minimise strain on back. Always use assistance if required. Recommend wear suitable cut resistant gloves with good grip to protect
against sharp edges and ensure good grip when handling appliance.
It is recommended a risk assessment of the roof space area be carried out before moving the appliance into the area to take into account
access, stability of ooring, lighting and other factors, and appropriate
measures taken.
Unpacking of appliance from carton.
Recommend 2 persons unpack appliance from carton. Always keep
working area clear. Cut the carton straps, lift carton up and slide over
polystyrene end packs. Remove top polystyrene pack with ttings.
62
Page 63

63
Page 64

Because of our constant endeavour for improvement, details may vary slightly from those shown in these instructions.
0020020821-04 09.09
Glow-worm, Nottingham Road, Belper, Derbyshire. DE56 1JT
www.high-efciency.info
 Loading...