

Page 1
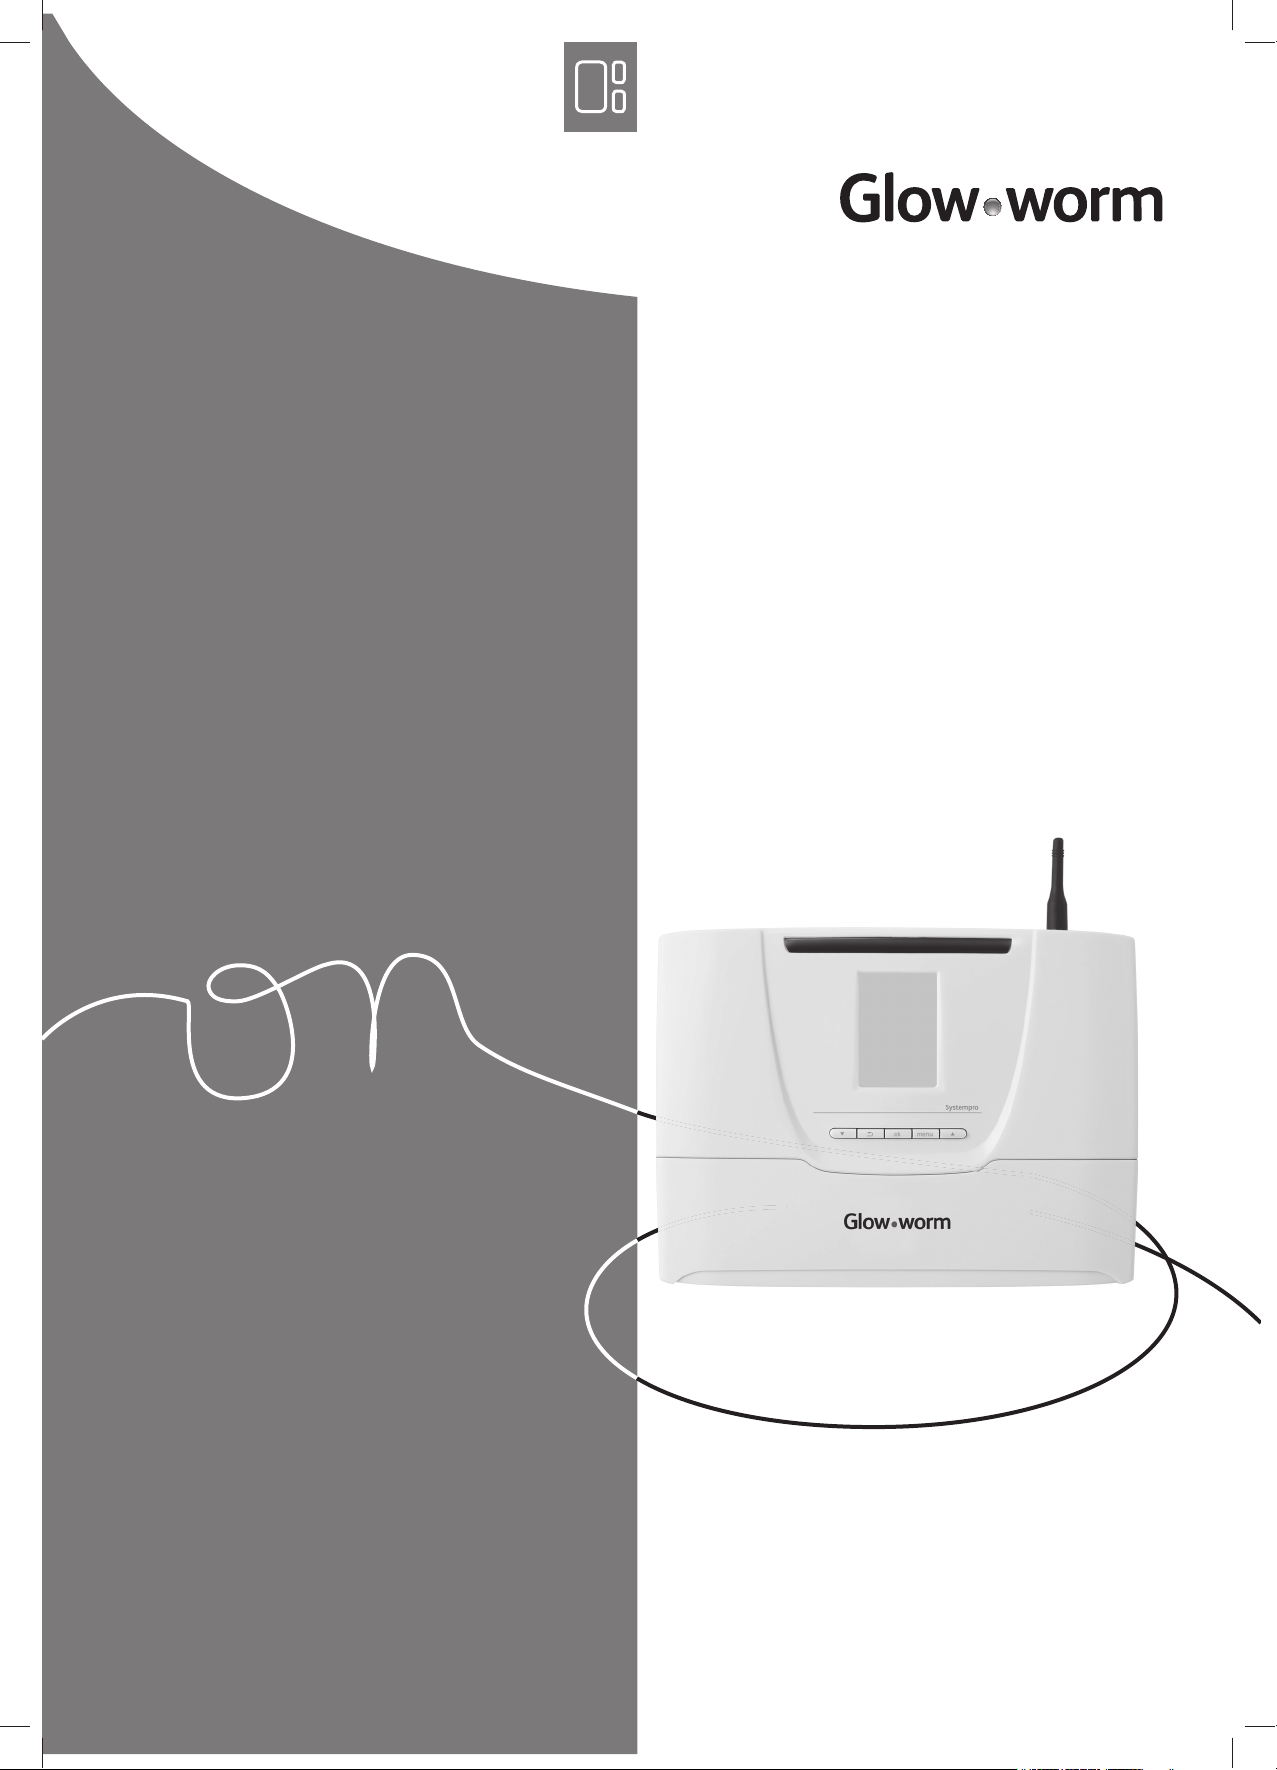
Installation
and Servicing
SYSTEMPRO
Page 2

Page 3

TABLE OF CONTENTS
USER INFORMATION
1 Safety.......................................................................................................................................... 3
2 Guarantee / Responsibility ........................................................................................................... 3
2.1 Detailed guarantee .............................................................................................3
2.2 Equipment use / manufacturer responsibility ........................................................3
INTRODUCTION
3 Instructions guidance ................................................................................................................... 4
3.1 Product documentation .......................................................................................4
3.2 Explanation of symbols .......................................................................................4
4 Product description ...................................................................................................................... 4
4.1 Regulation and statutory requirements .................................................................4
5 Safety instructions and regulations ............................................................................................... 4
5.1 Safety instructions ..............................................................................................4
5.2 Regulations ........................................................................................................4
6 Instructions ................................................................................................................................. 5
6.1 Overview ............................................................................................................5
6.2 Description of buttons .........................................................................................5
6.3 Priority of the diff erent functions ..........................................................................5
7 Recycling ..................................................................................................................................... 5
7.1 The equipment ....................................................................................................5
7.2 Packaging ..........................................................................................................5
INSTALLATION
8 Control unit location ..................................................................................................................... 6
9 Installation .................................................................................................................................. 6
9.1 Scope of delivery ................................................................................................6
9.2 Installation .........................................................................................................6
10 Electrical connections ................................................................................................................... 7
10.1 Connection .........................................................................................................8
10.2 Electrical connections .........................................................................................9
11 Commissioning ............................................................................................................................ 9
12 Installation menu ......................................................................................................................... 9
13 Specifi c adjustment .................................................................................................................... 10
13.1 Wireless connections ........................................................................................10
13.2 Resetting the control unit ..................................................................................11
14 Re-check and restart ................................................................................................................... 11
15 User information ........................................................................................................................ 11
- 1 -
EN
Page 4

TABLE OF CONTENTS
MAINTENANCE
16 Trouble-shooting ........................................................................................................................ 11
16.1 Fault diagnosis .................................................................................................11
16.2 Maintenance menu ...........................................................................................11
16.3 System failure codes .........................................................................................11
16.4 Control unit failures ...........................................................................................12
16.5 Replacing a fuse ...............................................................................................12
16.6 Mains supply cable ...........................................................................................12
TECHNICAL DATA
17 SYSTEMPRO ............................................................................................................................... 12
EN
- 2 -
Page 5
USER INFORMATION
USER INFORMATION
1 Safety
The CE mark shows that this appliance has been
designed according to the safety techniques and rules
in force.
The compliance of this appliance with the relevant
standards has been certifi ed.
You must heed the following recommendations and
a
• Do not attempt to modify the equipment or its immediate
• Never perform any maintenance or repair of the equipment
• Do not allow children to operate the appliance.
Certain home improvements may adversely aff ect the operation
of your appliance – you should consult your installer for advice
before carrying out any work.
safety regulations:
surroundings as this may aff ect the safe use of the appliance.
yourself. Only qualifi ed engineers are allowed to work on the
appliance.
2.2 Equipment use / manufacturer responsibility
b
- The equipment is installed by a qualifi ed engineer in
- The equipment is used for normal domestic purposes
- The equipment is serviced, maintained and repaired only by a
- The repair or replacement of parts during the guarantee period
b
- Any defects or damage resulting from incorrect or poor
- Any defects in the system to which the appliance is connected.
- Any defects caused by inadequate frost protection.
The guarantee is applicable on the condition that:
accordance with installation instructions.
and in accordance with the manufacturer’s operating and
maintenance instructions.
qualifi ed engineer within the guarantee period.
does not have the eff ect of extending the period.
The manufacturer has no responsibility whatsoever for
any damage resulting from:
installation, inadequate servicing, or maladjustment of the gas
or water used.
We recommend that you be careful when adjusting
a
the temperature of hot water, water can be very hot
from the tap.
2 Guarantee / Responsibility
2.1 Detailed guarantee
The control unit that you have chosen has undergone numerous
quality inspections. This apparatus must be installed by a
qualifi ed professional who can verify that all the technical
constraints relating to the connection of the appliance and the
requirements of the installation location have been met. To obtain
the maximum benefi t of your control unit, it must be thoroughly
checked for operation and adjustments specifi c to the installation
it is connected to.
Glow-worm off ers a two year parts and labour guarantee against
defects in manufacture and defective parts.
As a result, we commit to repairing or replacing the parts
recognised as defective at origin.
The repair or replacement of parts during the manufacturer’s
guarantee period does not have the eff ect of prolonging its initial
duration.
- Any deterioration or maladjustment following changes in the
nature or pressure of the gas or the water used, or a change in
the characteristics of the electrical supply voltage.
• For further details, refer to your Terms and Conditions.
This control unit is not designed for use by individuals (including
children) with physical, sensory or mental restrictions, or with a
lack of experience or knowledge. In order to guarantee the safety
of such individuals, the correct usage of this product must be
explained to them by a competent individual.
• Ensure that children do not play with this equipment.
The manufacturer’s parts guarantee is invalidated in the case of
an incorrect installation or inappropriate storage or in the case
of defective operation, damage to the control unit resulting from
abnormal, abusive use or inadequate maintenance.
Servicing/maintenance should be carried out by a competent
person approved at the time by the Health and Safety Executive in
accordance with the rules in force in the countries of destination.
0020128352_01 - 03/11 - Glow-worm
EN
- 3 -
Page 6

INTRODUCTION
INTRODUCTION
3 Instructions guidance
3.1 Product documentation
The instructions are an integral part of the equipment and must
be handed to the user on completion of the installation in order
to comply with the current regulation.
• Carefully read the manual to allow for safe installation, use
and servicing. No liability can be accepted in the event of
damage for not complying with the guidance in this instruction
manual.
3.2 Explanation of symbols
e
b
i
DANGER: Risk of electric shock.
ATTENTION: Risk of damage to the equipment or to its
surroundings.
IMPORTANT: Important information.
5 Safety instructions and regulations
5.1 Safety instructions
Incorrect installation can cause electric shock or
e
All electrical work performed on the equipment must be carried
out by a qualifi ed engineer or Glow-worm Group Service
engineer.
This equipment must only be installed by a qualifi ed engineer, to
ensure that the applicable regulations and rules are adhered to.
Follow the basic safety instructions:
• Stop the control unit.
• Turn off the control unit’s power supply.
• When work on the product is completed, perform an
5.2 Regulations
During the installation and activation of the control unit, the
decrees, directives, technical regulations, standards and clauses
hereafter must be complied with in the versions that are currently
in force.
appliance damage.
operational test and check for safety in accordance with BS EN
7671.
4 Product description
4.1 Regulation and statutory requirements
CE Mark
The CE mark indicates that the equipment described in this
manual are in compliance with the following directives:
- European Directive Num. 2004-108 of the European Parliament
and the Council regarding electromagnetic compatibility
- European Directive Num. 2006-95 of the European Parliament
and the Council regarding low voltage
- Directive regarding telecommunications equipment ( Directive
R & TTE 99/5/EEC of the Council of the European Community)
- Low Voltage Directive 72/23/EEC.
EN
0020128352_01 - 03/11 - Glow-worm
- 4 -
Page 7

INTRODUCTION
6 Instructions
6.1 Overview
1 2 3 4 5
6.3 Priority of the diff erent functions
Priorities are defi ned as follows in the control unit:
Priority levels Function
1 Anti-freeze protection
2 Domestic hot water
3 Central heating
4 Cooling
5 Options
The heating function cannot function simultaneously with the
cooling function. The activation of one function disables the
other, and vice versa.
7 Recycling
7.1 The equipment
This symbol indicates that this equipment must not
be disposed of with household waste, that it should
be selectively collected for energy recovery, reuse or
recycling.
Key
1 «Down» arrow button
2 Back button
3 OK button
4 Menu button
5 “Up” arrow button
6.2 Description of buttons
Buttons Description
Up / down buttons
The buttons allow:
- To browse menus.
- To decrease / increase value to be adjusted.
- To reset the control unit (factory setting by pressing
simultaneously both buttons for 10 seconds).
Back button
The button allows:
- To return to the previous menu.
- To return to the previous setting.
OK button
The button allows
- Confi rmation of the selection or setting.
The button allows the user to display:
- The status of the appliances and the system.
- The description of actions and possible failures of
the appliances.
Menu button
The button allows:
- To access the installation menu.
- To access the maintenance menu.
- To return to the installation and maintenance menus
(at any time).
- To return to the main user screen by pressing for 3
seconds.
• Take the equipment to an appropriate collection point.
By complying with this directive, you will contribute to
i
the preservation of natural resources and the protection
of human health.
7.2 Packaging
The competent person who installed the appliance must:
- sort the waste so as to separate those which can be recycled
(cardboard, plastics...) from those that cannot.
- dispose of the waste in compliance with regulations in force.
EN
0020128352_01 - 03/11 - Glow-worm
- 5 -
Page 8

INSTALLATION
INSTALLATION
All the dimensions shown of the illustrations are
i
8 Control unit location
• Take all necessary precautions.
Install the system:
- in a room protected from frost,
- in a convenient location, accessible for wiring and servicing
Do not install the control unit:
- close to heat sources such as radiators, chimney walls,
- above a cooking device capable of generating steam and
- in a room with a lot of dust or with a corrosive atmosphere.
expressed in millimetres (mm).
allowing for visibility of the screen.
televisions, sun rays,
grease,
9 Installation
9.1 Scope of delivery
3
2
1
Key
1 2 packs with 2 screws with Ø 6 mm plugs
2 2 packs containing 7 anti-tamper connectors
(one anti-tamper connector installed)
3 Control unit
9.2 Installation
• Ensure that the materials used for installation are compatible
with those of the control unit.
• Determine the location of the installation. See the "Control
unit location" chapter.
EN
264
290
45
1500
143,5
3
2
128
1
Key
1 Control unit
2 Lower attachment holes
3 Upper attachment holes
290
145
23
145
126,5
- 6 -
0020128352_01 - 03/11 - Glow-worm
Page 9

INSTALLATION
9.2.1 Wall mounting
8
7
6
5
4
3
E
Step 1
D
A
Key
1 Lower screws
2 Control unit
3 Upper screw
4 Upper attachment holes
5 Plug
6 Holes
• Mount the appliance following the steps from (A) to (B).
5
9.2.2 Mounting on DIN rail
B
2
1
3
A
C
2
1
Key
1 Hatch screw
2 Control unit hatch
3 Lower attachment holes
4 Control unit
5 Upper attachment holes
6 Upper screw
7 Plug
8 Holes
• Mount the appliance following the steps from (A) to (E).
• Remove the control unit (4) by sliding along the wall.
Step 2
4
3
2
4
Key
1 Lower screws
2 Control unit
3 DIN rail (not supplied)
4 DIN mounting (not supplied)
10 Electrical connections
Incorrect installation can cause electric shock or
e
• Ensure system is electrically isolated.
• Protect the electrical installation by following the guidance
e
• The electrical installation in the dwelling must permit the
5
damage to the equipment. The electrical connection
must be made only by a qualifi ed engineer.
indicated in the “Technical data” chapter.
Warning! The length of the power supply cable must
not exceed 10 metres.
power supply to the equipment to be isolated by a double pole
isolation switch and be fused. The double pole isolation switch
must incorporate a gap of 3mm between the contacts.
1
B
0020128352_01 - 03/11 - Glow-worm
A
• Use a power cable suitable for the mains connection, minimum
0.75 mm. If the cable is damaged, it must be replaced by a
qualifi ed engineer.
The external wiring must be earthed. The polarity must be correct
and consistent with current standards.
6
EN
- 7 -
Page 10

INSTALLATION
The manufacturer declines any responsibility for damages to
persons or others caused by the incorrect installation of the
appliance earthing. This includes failure to comply with current
standards.
10.1 Connection
6 7
5
4
230V
3
2
1
Key
1 EBUS connections
2 Input/Output, sensors
3 230 V power supply
4 Control unit
5 Outside wireless temperature sensor
6 Wireless room thermostat
7 Batteries
IN
OUT
NTC
EBUS
The antenna is used for wireless connection with the
Climapro2 RF and the outdoor sensor.
The RJ9 EBUS (4) socket is used for diagnosing the appliance.
The RJ11 EBUS (5) socket is used for connecting the EBUS
extension board.
10.1.2 Internal connection
230V connectors
230V~
REL1
REL2
REL3
REL4
REL5
LN
LN
LN
LN
13
13
13
13
12
LN
Key
1 230 V connector (3-pin: earth / neutral / live)
2 Connectors (3 pins: earth / neutral / live):
REL1, REL2 and REL3
3 Connectors (2 pins: live / neutral):
REL4, REL5 and IN1
Consult the system manual for electrical connections
i
following installation.
The connector (1) is employed to connect the electricity supply.
24V connectors
12
IN1
LN
LN
12
321
10.1.1 External connection
3
2
1
Key
1 Switch On (I) / Off (O)
2 Fuse 1AT 20mm
3 Antenna
4 RJ9 EBUS socket
5 RJ11 EBUS socket
EN
The switch (1) is employed to cut the power supply before making
any changes to the electrical connection.
The electrical circuit of the equipment is protected internally by a
fuse (2).
- 8 -
4
OUT1
12
OUT2
OUT3
IN2
IN3
NTC1
NTC2
NTC3
NTC4
EBUS
EBUS
21
21
21
21
21
21
21
21
12
12
12
12
12
12
12
12
21
12
EBUS
-+
-+
-+
12
12
5
Key
1 Connectors (2 pins)
OUT1, OUT2, OUT3, IN2, IN3, NTC1, NTC2, NTC3 and NTC4
2 EBUS connectors (2 pins)
21
Consult the system manual for electrical connections
i
following installation.
0020128352_01 - 03/11 - Glow-worm
Page 11

INSTALLATION
10.2 Electrical connections
1 32
Key
1 Connector
2 Electrical wires
3 Casing
Warning! When connecting electrical cables to a
e
• Maintain a maximum distance of 20 mm between the
10.2.1 230V power supply
connector in the control unit:
connector (1) and the outer insulation (3).
5
10.2.2 Other connections following the electrical
installation diagram
Warning! Risk of electric shock.
e
• Protect access to live parts, attach all cables to the control unit
i
11 Commissioning
i
i
Break the grommets necessary for passing the cables.
with anti-tamper connectors.
Consult the system manual for electrical connections
following installation.
When connected for the fi rst time, the installation
menu is displayed.
Consult the system manual in order to install and
start-up the system.
12 Installation menu
A
C
4
3
2
1
The installation menu is still accessible after commissioning.
12.2.1 Access to the installation menu
• Press the button for 7 seconds.
• Enter the installer access code 96.
• Press the button
to confi rm.
B
D
Key
1 230 V power cable
2 Break out tab
3 Anti-tamper connection
4 Power connection
5 Control unit
• Connect the control unit following the order (A) to (D).
0020128352_01 - 03/11 - Glow-worm
EN
- 9 -
Page 12

INSTALLATION
12.2.2 Menus and functions
The available settings are diff erent depending on the installation
layout and the options selected.
Menus and functions
Installation
Modifying the installation (*)
This menu allows you to change the diagram number when modifying
the installation’s confi guration.
A diagram number is assigned to each possible installation, with
various options available. The number is indicated in the system
manual.
Modifi cation options (*)
This menu allows you to enable or disable the options available in the
selected installation diagram.
Thermostat/sensor (wireless)
Thermostat connection(s)
Sensor connection
Ext. temperature correction
Automatic test
EBUS inputs
NTC inputs
the RF connection with the Climapro2 room thermostat
the outdoor sensor radio connection
I/O card
Parameters
Heating
Max. heating outlet T°
Auto heating curve
Manual heating curve
Advance heating
Hot water
Max. domestic hot water temperature
Cooling
Cold water outlet temperature setting
Energy management
Resetting parameters
The resetting of factory settings is irreversible. Any customised
confi guration of the control unit will be lost.
Commissioning
This menu allows you to carry out the necessary operations on
the appliances following installation (refi lling, bleeding, fl ow rate
control...).
Component information (**)
This menu enables real-time access to:
- the status of the appliances responding to a demand (ON / OFF)
- the reading the diff erent information available from the appliances
(temperature, pressure, fl ow,)
- the register of last 5 faults recorded for each appliance (date, time,
code and description of faults).
- resetting the fault report.
Options
Date (***)
Time (***)
Automatic winter/summer time change
Languages
Screen (brightness / contrast)
About
This function is used to display the versions of the various electronic
components attached to the management box.
(*) On entry into the menus installation modifi cation
i
and options modifi cation, the management box warns
that “the system is shutting down”. “the system is
currently stopped" No further heating control operations
are eff ected. ... Setting will restart after leaving these
menus.(**) Refer to the system manual to fi nd the
description of the fault code displayed on the screen.
(***) The date and time are set from the room thermostat
in an individual installation.
13 Specifi c adjustment
13.1 Wireless connections
13.1.1 Pairing with the wireless thermostat(s)
This function lets you perform the pairing between the Climapro2
RF and the radio receiver.
In the case of an individual installation which includes a low
and high temperature heating zone. “Zone 1” must imperatively
be allocated to a low temperature heating zone. The room
thermostat in zone 1 has the “main thermostat” status.
Adjustments must be made simultaneously to the control unit and
the room thermostat.
Via the control unit:
• From the installation menu in the control unit > select on the
screen > thermostat/sensor > room stat(s)
Via the room thermostat:
• Via the installer room thermostat menu > select on the screen >
RF > pairing
The control unit and the room thermostat will immediately
indicate recognition on their respective "connection in progress"
screens.
13.1.2 Pairing with wireless outdoor sensor
• Consult the outdoor sensor’s installation manual in order to
carry out the operation.
EN
0020128352_01 - 03/11 - Glow-worm
- 10 -
Page 13

MAINTENANCE
13.2 Resetting the control unit
This function allows you to reset the control unit (factory setting).
The resetting of factory settings is irreversible. Any
b
• Simultaneously press the buttons
• Confi rm by pressing
customised confi guration of the control unit will be
lost.
for 10
seconds.
.
14 Re-check and restart
• Once the control unit is installed, check the operation.
• Switch the control unit on to ensure that any adjustments
operate correctly and check that the appliance operates safely.
15 User information
At the end of the installation:
- explain the operation of the equipment and its safety devices
to the user, if necessary provide a demonstration and answer
any questions;
- give the user all the required documentation,
16.2 Maintenance menu
16.2.1 Access to the maintenance menu
• Press the “menu” button for 7 seconds.
• Enter the installer maintenance access code 35.
• Press the button
The maintenance menu includes the installation menu function,
plus 2 additional functions:
- "System tests", within the maintenance menu,
- "After sales service Info", in the options.
16.2.2 System tests
This menu allows you to test the operation of all the appliances
and the system (boiler, HP, valve,) present in the installation.
to confi rm.
- fi ll in the documents where necessary;
- advise the user of the precautions necessary to prevent
damage to the system, appliance and the building;
- inform the user of the guarantee conditions,
- explain to the user the usage envelope of the appliance and
the limits of the manufacturer’s responsibility,
- remind the user to service the appliance annually.
MAINTENANCE
16 Trouble-shooting
16.1 Fault diagnosis
The following checks should be performed before proceeding
onto specifi c diagnostics:
- Ensure that it has not been disconnected from the electricity
network and that the control unit is connected correctly.
- Ensure that all installation’s appliances are available.
- Check the functioning of external regulatory devices (room
thermostat, remote sensor,).
Each element can be controlled centrally by activating its normal
start-up function or by individual component.
By entering the test menu, the control unit display’s
i
16.2.3 After sales service info
This menu provides access to After sales Service information:
- date of last access to installer menus
- the name of the company which provides the after sales
- the telephone number of the company which provides the after
the following message: “the system is currently
stopped" No further heating control operations are
aff ected. Control is resumed upon exiting the menus.
service, if entered during installation.
sales service , if entered during installation.
16.3 System failure codes
Refer to the system manual. The breakdowns
i
The fault status may be “inactive” (disappeared) "active" (still
aff ects the installation).
The installation can operate partially with a fault “active”. It is not
necessarily “blocking”. An alarm (not supplied) can be added to
the installation to signal certain faults.
described in the system manual must be handled by a
qualifi ed professional and, if necessary, by the after-
sales department.
EN
0020128352_01 - 03/11 - Glow-worm
- 11 -
Page 14

TECHNICAL DATA
16.4 Control unit failures
Faults described in this chapter should be carried
i
Description Cause Solution
No display on
screen
out by a qualifi ed engineer and if needed by the After
Sales Service.
Make sure that the electricity
The power
supply is faulty.
The fuse is
damaged.
supply has not been interrupted.
Check that 230V supply is turned on
and present.
Check the position of the control
unit switch.
Check the control unit’s fuse.
16.5 Replacing a fuse
B
4
3
2
1
Key
1 Fuse
2 Control unit
3 Switch On (I) / Off (O)
4 Fuse holder
• Turn off the control unit (2) with the switch (3) in position (O).
• Turn off the power supply to the control unit (2) at the isolating
switch.
A
D
E
C
F
TECHNICAL DATA
17 SYSTEMPRO
Description Unit Control unit
Transmission / reception
frequency
Transmission / reception
frequency with outdoor sensor
Transmission / reception
frequency with room thermostat
Average radio signal range in
open air (*)
Average radio signal range
indoors (*)
Control unit dimensions:
Height mm 264
Length mm 290
Depth mm 45
(*) Depends on the installation’s conditions and the electromagnetic
environment.
Electricals
Power-supply voltage VAC/Hz 230/50
Power cable gauge mm² 3 x 0.75
EBUS connection cable gauge mm² 2 x 0.75
Current A 4.35
Delay fuse A 1
Electrical protection IP20
Electrical classifi cation I
Surge category II
Pollution rating 2
Contact outputs fed work
Action auto type 1.C
MHz 868
min 15
min 10
m 100
m25
A8
V 230
• Replace the fuse following the order (A) to (F).
• Turn on the power supply to the control unit (2) at the isolating
switch.
• Turn on the control unit (2) with the switch (3) in position (I).
16.6 Mains supply cable
The main supply cable must be replaced by a
e
• If the main supply cable is damaged, replace it refering to the
qualifi ed and competent electrician.
chapter "Electrical connection".
EN
- 12 -
0020128352_01 - 03/11 - Glow-worm
Page 15

Page 16

*2702667_rev2*
GLOW-WORM
Nottingham Road,
Belper, Derbyshire.
DE56 1JT
www.glow-worm.co.uk
0020128352_01 - 03/11 Subject to engineering changes
Because of our constant endeavour for
improvement, details may vary slightly
from those shown in these instructions.
 Loading...