

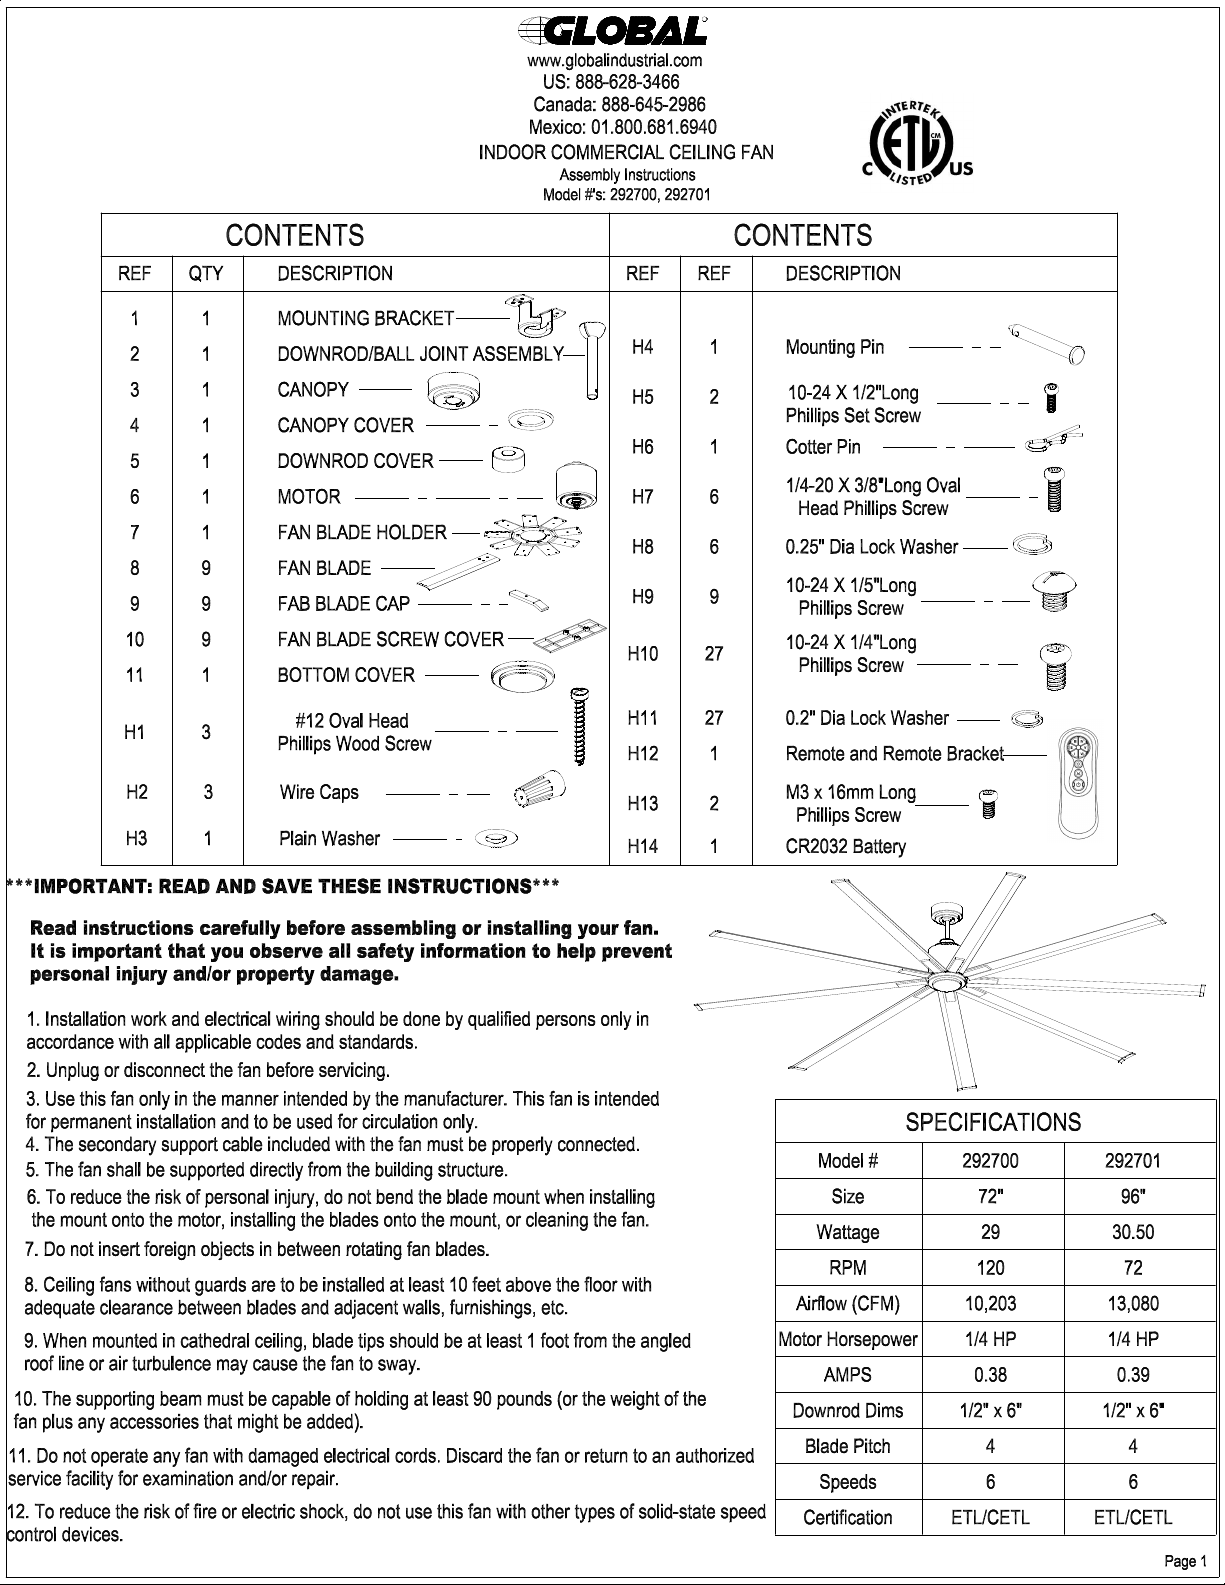
Page 1
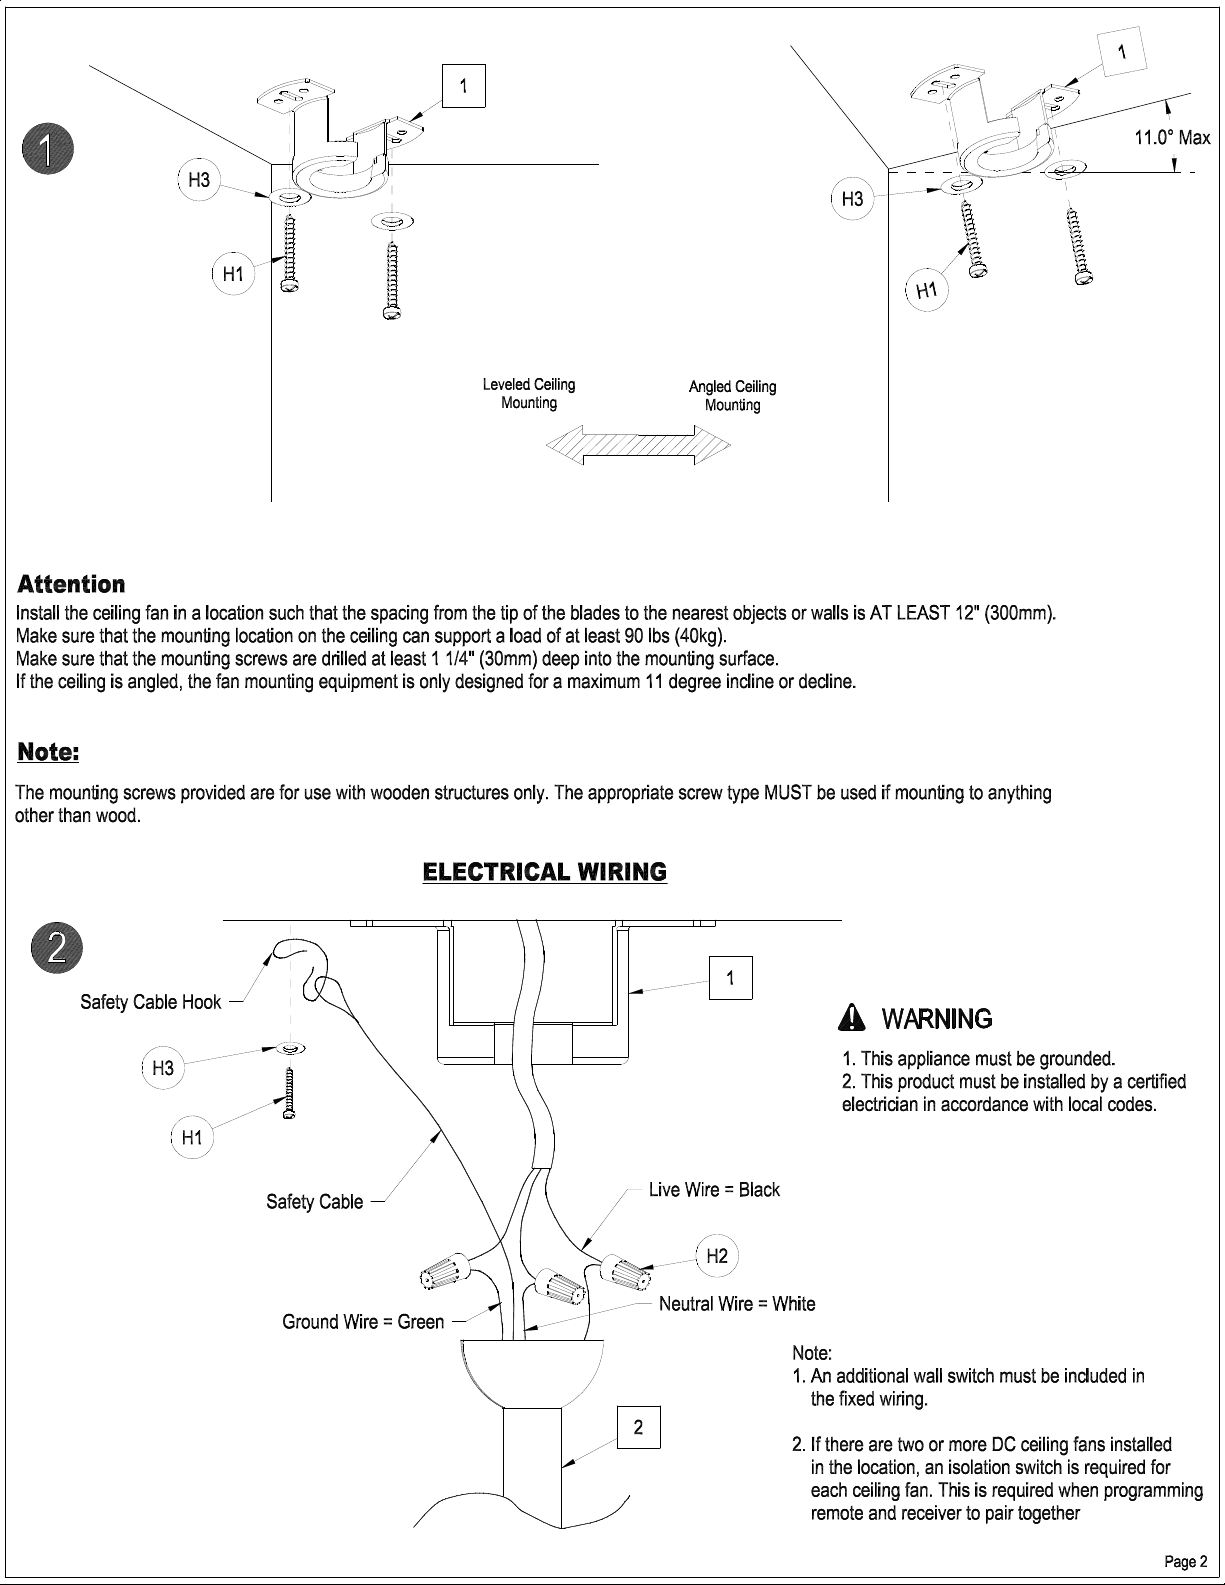
Page 2
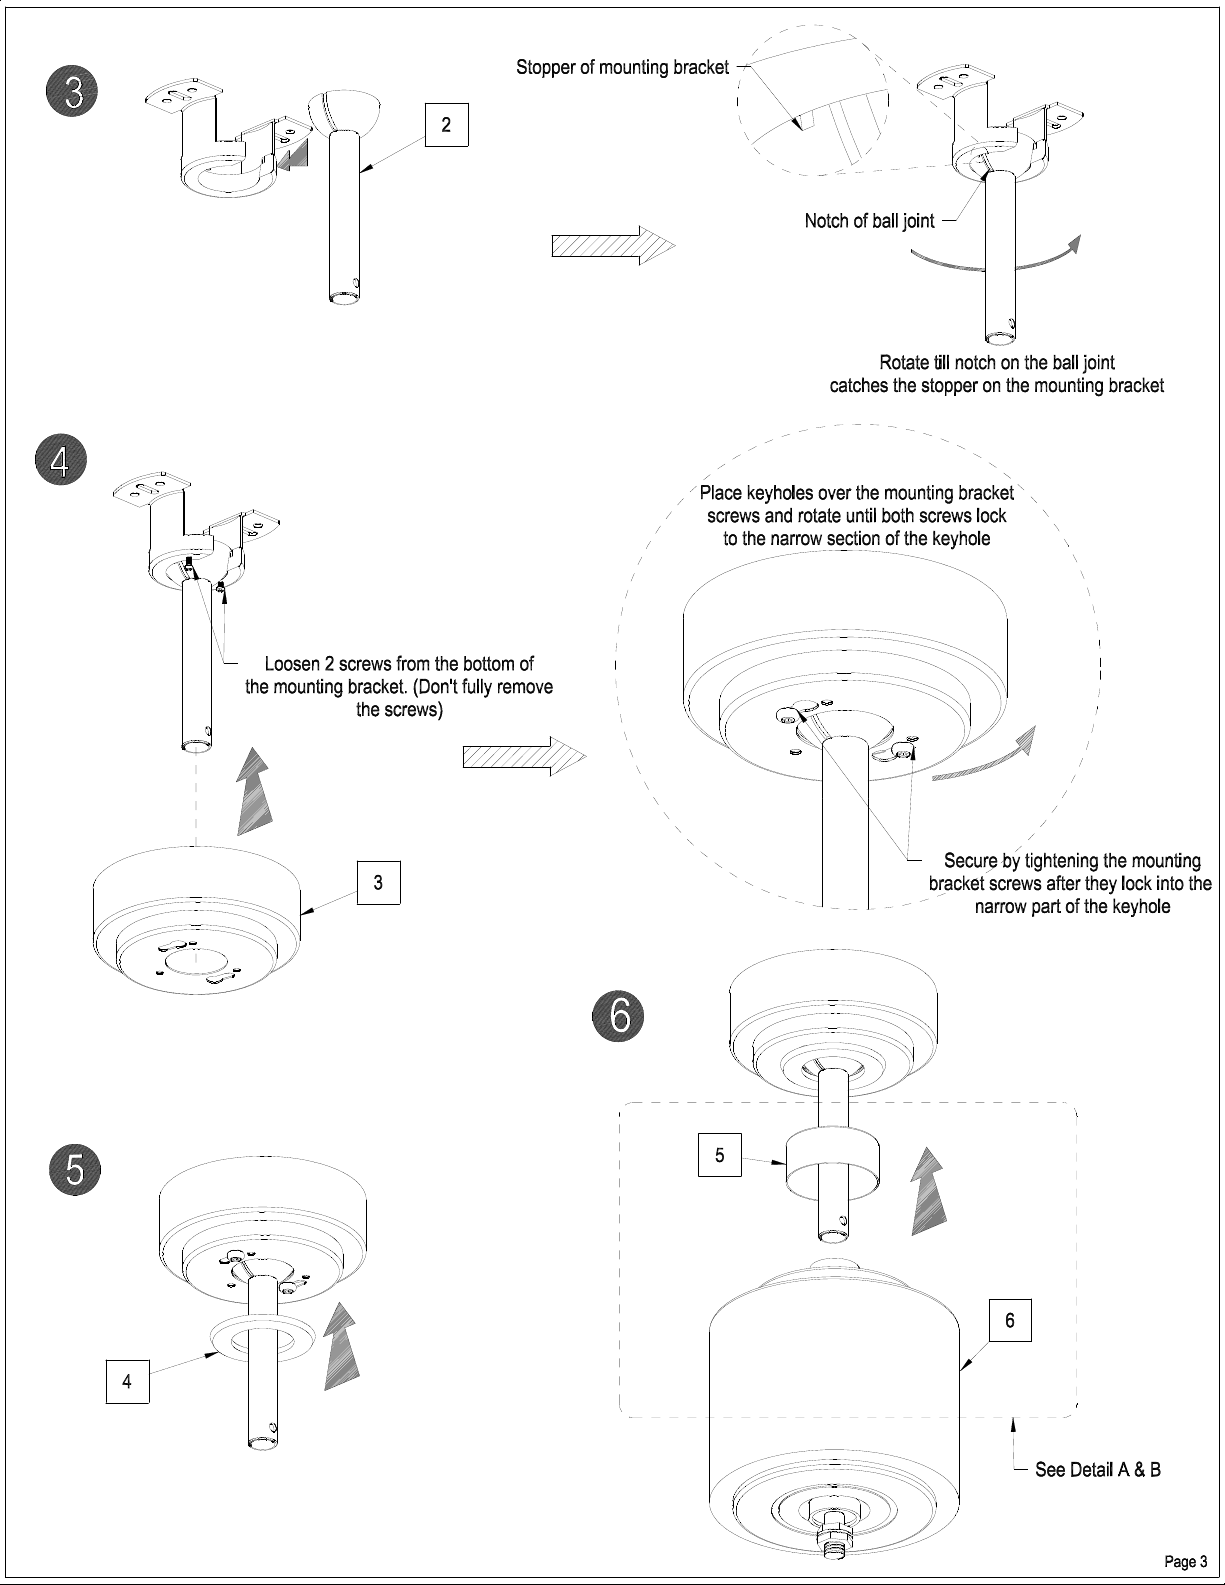
Page 3
Page 4

Page 5

Page 6

REMOTE CONTROL OPERATIONS
INSTRUCTIONS
U
SING YOUR CEILING FAN
NOTE: The pairing of Transmitter and Receiver is not required if only one ceiling fan is installed. When more than
two ceiling fans are installed near each other, please refer to the instruction above.
Pairing Transmitter and Receiver – when 2 or more DC ceiling fans are installed in one location
When two or more fans are located near each other, you may want to have the receiver/transmitter for each fan
set to a different code, so that the operation of one fan does not affect the operation of the other fans.
The DIP switches for the transmitter (remote hand piece) are located in the battery compartment of the
transmitter. Configuring the DIP switches will allow a unique transmission code assigned to each fan ceiling.
NOTE: Ensure that you have installed an all - pole disconnection switch in the fixed wiring for each fan, when
using DIP code function.
NOTE: Ensure power to the Receiver is ON prior to pairing the transmitter with the receiver.
NOTE: The receiver is in the main motor housing , so when power is on or off at the motor it is the same for
receiver.
Transmitter/Receiver pairing for ceiling fan 1:
• Turn off both ceiling fans 1 and 2 via the mains supply to the receiver.
• Slide the cover of the battery compartment of the transmitter to access the DIP switches. This will be
transmitter 1.
•
Change the position of the DIP switches in the remote transmitter 1, so that it will be different to
transmitter 2.
•
Install the 3VDC battery in the compartment. Please make sure the polarity of the battery is correct.
• Turn on the power to receiver 1. Keep the power OFF to receiver 2. (Each ceiling fan must have its own
isolation switch, so that only the ceiling fan that needs to be paired with the transmitter will be ON).
Press and hold the FAN OFF button of transmitter 1 for 6 seconds within 60 seconds of switching the
•
power to the receiver of ceiling fan 1.
• Now the transmitter should be paired with the receiver of ceiling fan 1. Turn ON/OFF or change the
speed of ceiling fan 1 by the transmitter to check the operation.
NOTE: While repairing the DC ceiling fan remote and receiver is in process, the fan operates at highest
speed with REVERSE mode automatically for 90 seconds, and then operates with FORWARD mode for
90 seconds. During the paring process, do not press any key on the remote.
Page 7

Setting DC Ceiling fan 2:
7
Operating Instructions & Parts Manual 36WC93
• Lock position: the receive
r has a built in safety feature to protect against obstruction during operation.
The motor will be locked from operation and will disconnect from power after 30 seconds of
interruption. Please remove obstacles before re-starting. To reset, simply turn off the power supply to
the fan motor and re-start.
• Over 80W protection: When the receiver detects power consumption which is greater than 80W, the
receiver power will be stopped and operation will immediately discontinue. Turn the receiver power on
after 5 seconds to restart the fan.
REPAIRING THE FAN RECEIVER & REMOTE PAIRING
Should the remote and receiver lose control after installation or during use, the pairing of the remote and the
receiver must be repaired. Below are the operating symptoms and method to repair the pairing of the DC ceiling
fan remote and receiver.
Issues:
• Loss of control - Fan is only running at high speed after installation
• Loss of control - No reverse function after installation
• Loss of control - Remote cannot communicate with the receiver
Solution:
If the fan runs at the highest speed continuously, it means the wiring of the installation is correct. When the fan
operates on high speed only, or fails to operate in reverse function or any other command/s, it is recommended
to repair the communication pairing of the remote and receiver. Please follow the steps below:
A. Remove the battery cover on the remote. Making sure the battery is installed correctly and the red LED light
indicator will be flashing. This means the remote function is okay.
B. Turn off the main supply to the receiver for more than 30 seconds and turn on the main supp
ly to receiver
again. Press and hold the SET button on the remote for 6 seconds within 60 seconds of turning the power
on to the receiver.
• Turn off both ceiling fans 1 and 2 via the mains supply to the receiver.
• Slide the cover of the battery compartment of the transmitter to access the DIP switches. This will be
transmitter 2.
•
Change the position of the DIP switches in the remote transmitter 2, so that it will be different to
transmitter 1.
•
Install
• Turn on the power to receiver 2. Keep the power OFF to receiver 1. (Each ceiling fan must have its own
•
• Now the transmitter should be paired with the receiver of ceiling fan 2. Turn ON/OFF or change the
Remote Control Buttons
FAN SPEED CONTROL BUTTON:
the 3VDC battery in the compartment. Please make sure the polarity of the battery is correct.
isolation switch, so that only the ceiling fan that needs to be paired with the transmitter will be ON).
Press and hold the FAN OFF button of transmitter 2 for 6 seconds within 60 seconds of switching the
power to the receiver of ceiling fan 2.
speed of the ceiling fan 2 by the transmitter to check operation.
There are 6 available speeds.Ⅰ button is for the
lowest speed, and Ⅵ button is for the fastest
speed.
NOTE: when you turn on the fan FOR the first time
OR SWITCH THE MAIN POWER TO THE
CONTROLLER, you need TO START THE FAN ON
HIGH “
LOWER SPEED.
Ⅵ ” SPEED FIRST AND THEN CHOOSE A
○
5-10 SECONDS IS REQUIRED TO ALLOW THE DC FAN
TO RESPOND TO THE REMOTE EACH SPEED OR FAN
DIRECTION SELECTIONS, AS DC FANS INCORPORATE
A SENSOR CONTROL WHICH CONTROLS THE POWER
TO THE MOTOR.
NOTE: When the motor is first activated it will start
and turn in CW than CCW direction several times
before continuing in a particular fan direction. This
is a normal start-up as the motor is configuring its
operation.
FAN OFF BUTTON:
Press the button to turn the fan off.
REVERSE FUNCTION BUTTON:
Press this button to switch between SUMMER and WINTER
settings. T
he fan should ideally be set to move blades in counterclockwise direction for downwards airflow during summer
seasons, and to move blades in clockwise direction for upwards
airflow during cooler seasons.
Note: It will take the fan several seconds to settle down on a new speed after each fan direction change
command.
Page 8

LIGHT CONTROL BUTTON:
Press the button to turn on/off the light. By default,
light is ON after power to the fan is turned ON.
Note: This button is only functional on remote for ceiling fans equipped with light.
The button is NOT functional for ceiling fans WITHOUT light.
THE RECEIVER PROVIDES THE FOLLOWING LEVEL OF PROTECTION AGAINST:
Lock position: the receiver has a built in safety feature to protect against obstruction during operation.
The motor will be locked from operation and will disconnect from power after 30 seconds of
•
interruption. Please remove obstacles before re-starting. To reset, simply turn off the power supply to
the fan motor and re-start.
Over 80W protection: When the receiver detects power consumption which is greater than 80W, the
•
receiver power will be stopped and operation will immediately discontinue. Turn the receiver power on
after 5 seconds to restart the fan.
REPAIRING THE FAN RECEIVER & REMOTE PAIRING
Should the remote and receiver lose control after installation or during use, the pairing of the remote and the
receiver must be repaired. Below are the operating symptoms and method to repair the pairing of the DC ceiling
fan remote and receiver.
Issues:
• Loss of control - Fan is only running at high speed after installation
• Loss of control - No reverse function after installation
• Loss of control - Remote cannot communicate with the receiver
Solution:
If the fan runs at the highest speed continuously, it means the wiring of the installation is correct. When the fan
operates on high speed only, or fails to operate in reverse function or any other command/s, it is recommended
to repair the communication pairing of the remote and receiver. Please follow the steps below:
A. Remove the battery cover on the remote. Making sure the battery is installed correctly and the red LED light
indicator will be flashing. This means the remote function is okay.
B. Turn off the main supply to the receiver for more than 30 seconds and turn on the main supply to receiver
again. Press and hold the SET button on the remote for 6 seconds within 60 seconds of turning the power
on to the receiver.
C. Press the buttons on the remote to run the fan. In general, performing point A, B, and C should repair the
remote and receiver and will allow full control of the fan. If not, please do the next step.
D. The DIP switches on the fans are set up at the factory. The DIP switch can be changed to any location in 16
options. (Eg. up-up-down-down).
E. Please repeat the (A)-(C) steps to check the function.
Page 9

 Loading...