

Page 1

Cart Kit For Heater
Models:246736, 246737 & 246739
READ & SAVE THESE
INSTRUCTIONS
Model:246728
Model:246729
Page 2
User’s Manual
2
Cart Kit For Heater
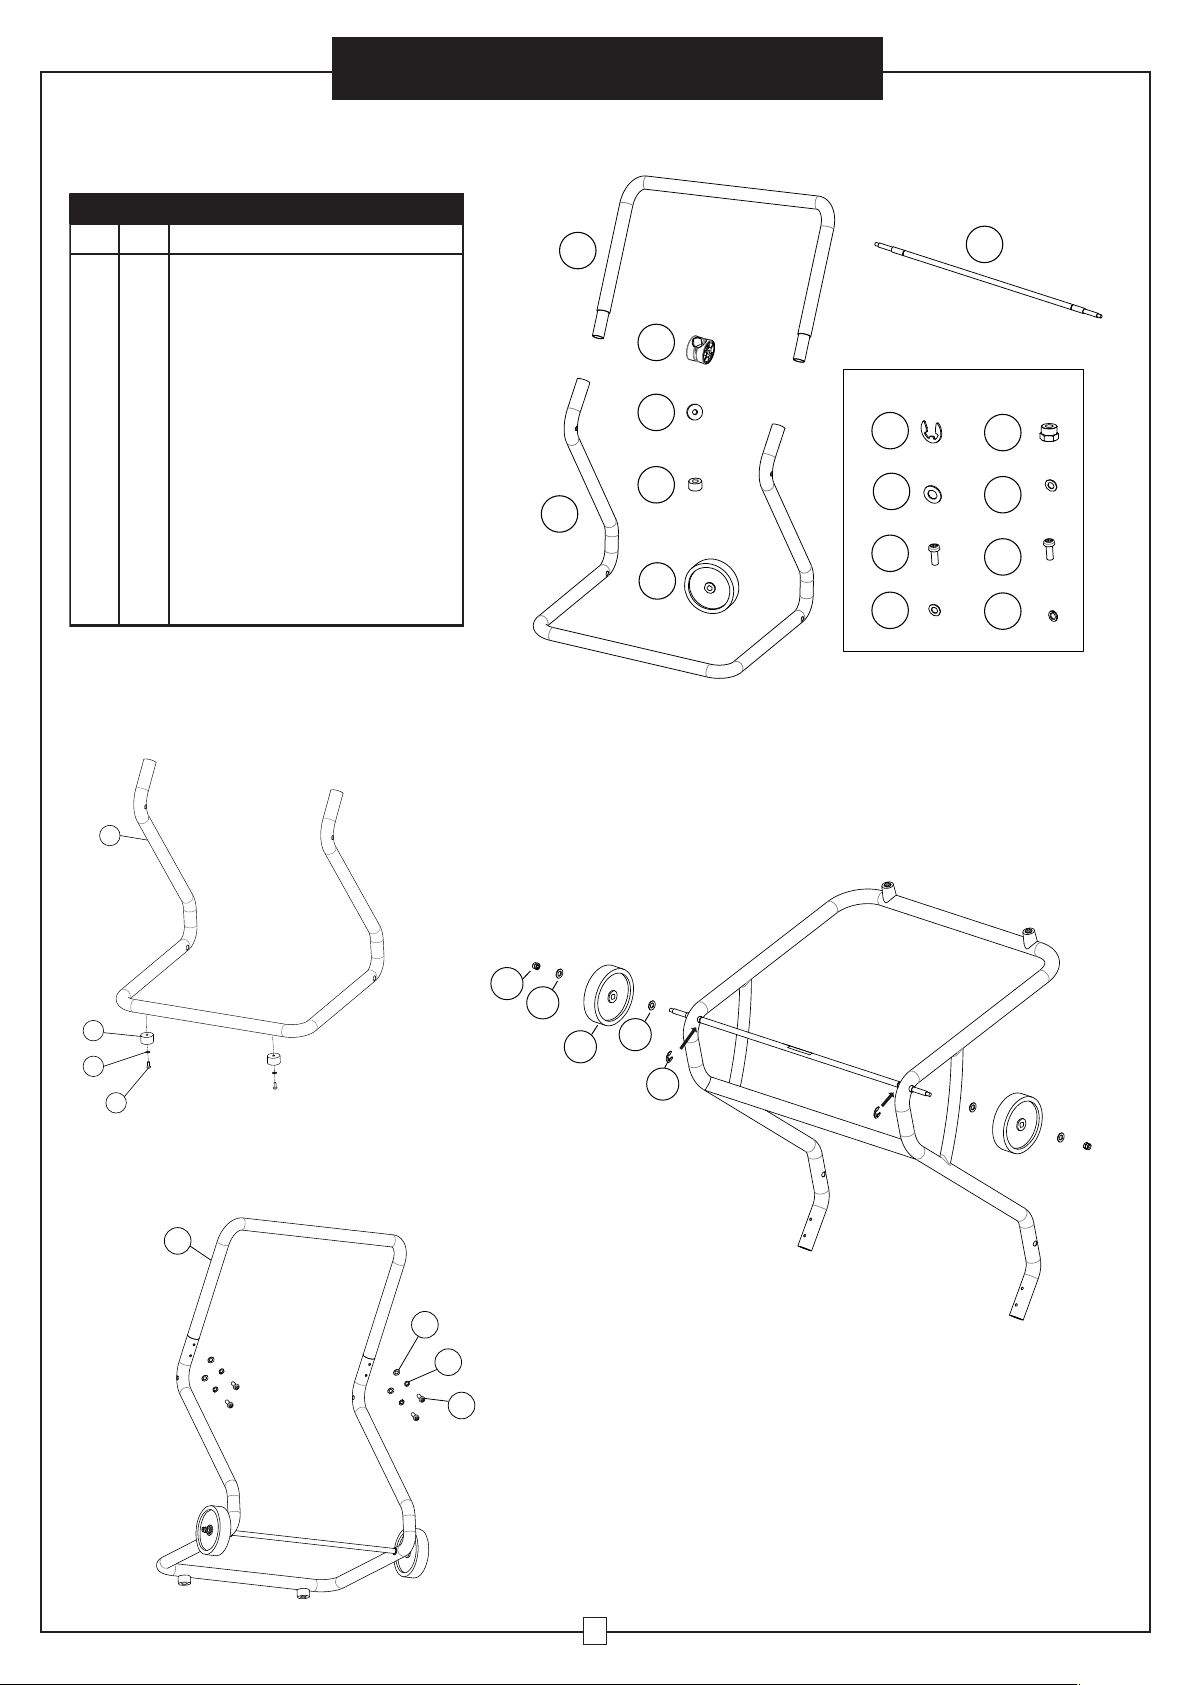
PARTS OF THE CART S Model:246728
(For Heater Model:246736 and 246737)
CONTENTS
Part Qty. Description
1
2
3
4
5
6
7
8
9
10
11
12
13
14
15
1
1
2
2
2
1
2
2
2
4
2
2
4
4
4
Handle
Cart
Plastic Pad
Rubber Pad
Rubber feet
Wheel
Axle
Retaining ring
Nut, M6
Washer Φ8
Washer Φ4 (small)
Screw, M4x12
Screw, M4X10
Washer Φ4 (big)
Spring Washer Φ4
INSTALLING INSTRUCTIONS
1. Install the rubber feet(5) to the cart(2) with rubber foot (5)
washers(11) and screws(12).
2. Turn down the cart,insert the axle(7) through the cart(2), install the retaining ring(8) to
lock the axle(7). Then install the wheel(6) with washers(10) and nuts(9).
3. Insert the handle(1) to the cart assembly, tighten with
washers(14), spring washers(15) and screws(13).
1
3
4
5
2
6
8
10
12
14
7
Hardware
9
11
13
15
2
5
11
12
1
9
10
10
6
8
14
15
13
Page 3
User’s Manual
3
Cart Kit For Heater
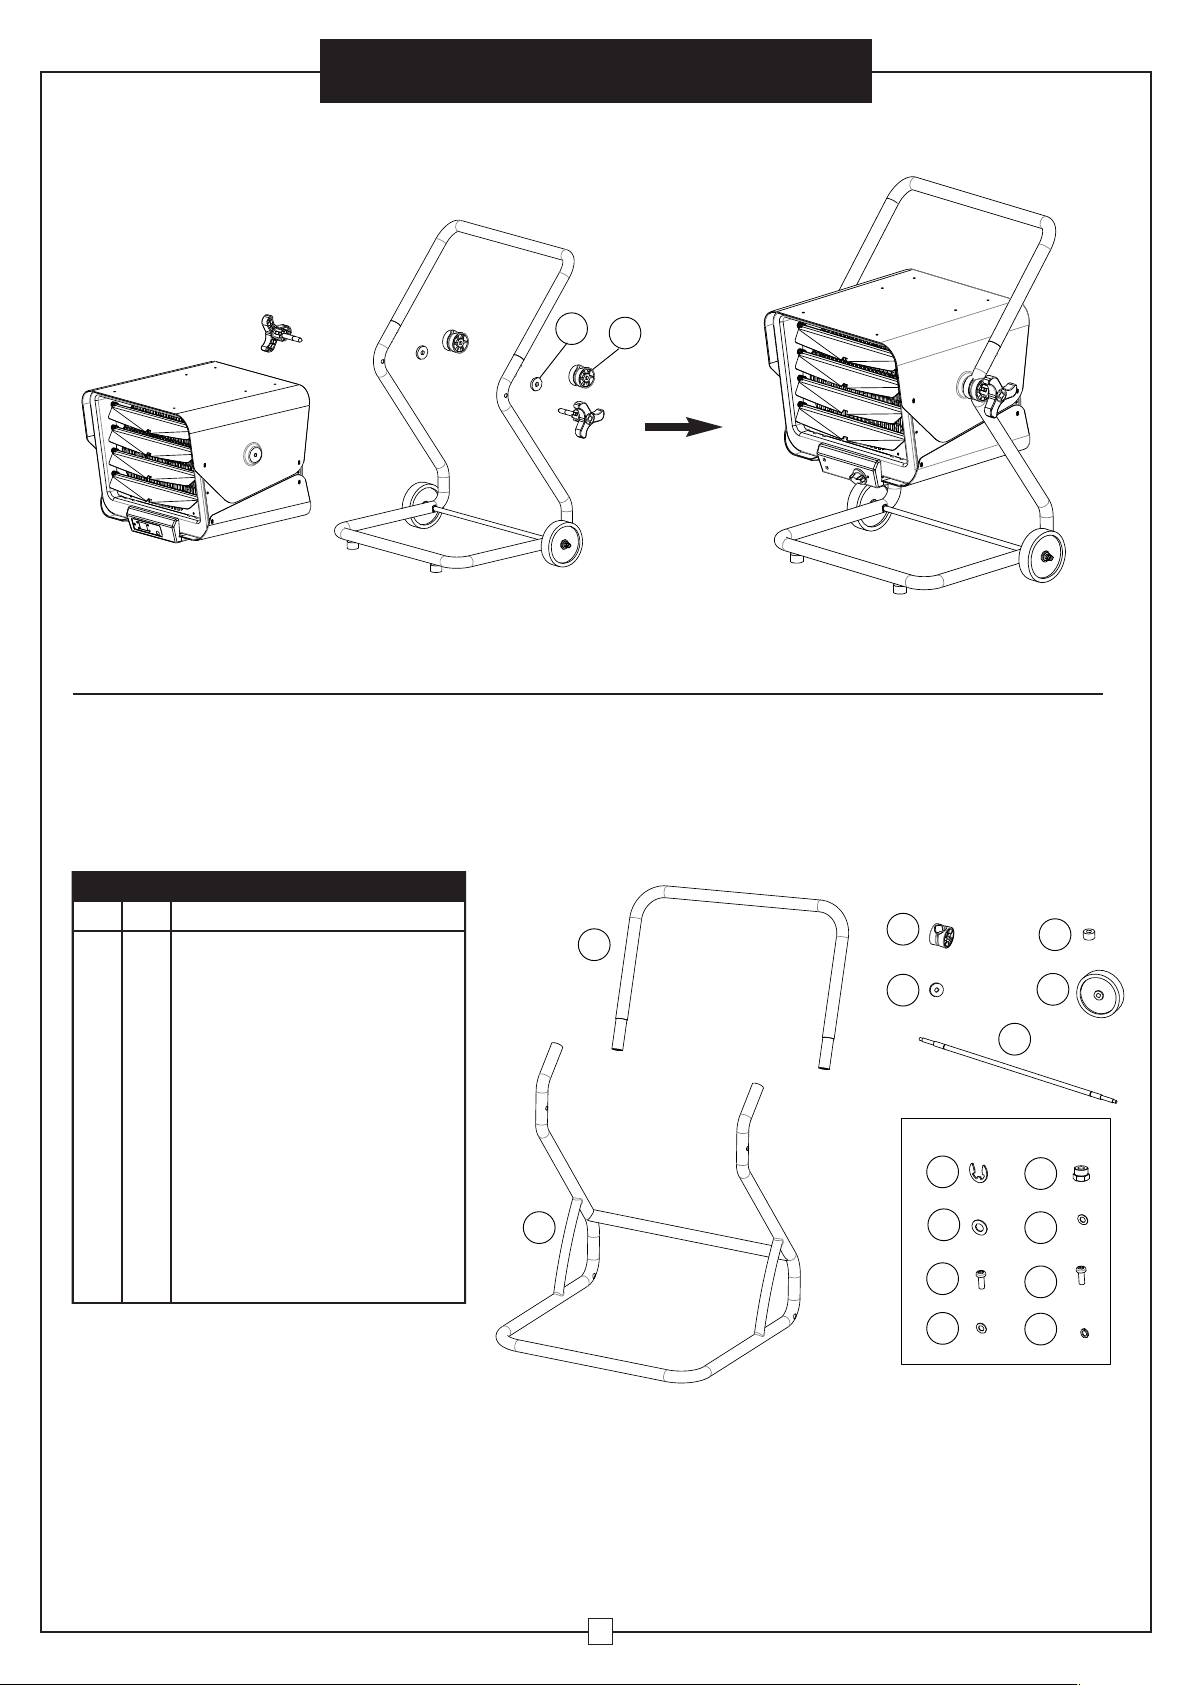
4.Loosen the angle knob from the heater, install the heater
to the cart with plastic pads (3) and rubber pads (4).
PARTS OF THE CART L Model:246729
(For Heater Model:246739
CONTENTS
Part Qty. Description
1
2
3
4
5
6
7
8
9
10
11
12
13
14
15
1
1
2
2
2
1
2
2
2
4
2
2
4
4
4
Handle
Cart
Plastic Pad
Rubber Pad
Rubber feet
Wheel
Axle
Retaining ring
Nut, M6
Washer Φ8
Washer Φ4 (small)
Screw, M4x12
Screw, M4X10
Washer Φ4(big)
Spring Washer Φ4
4
3
1
3
4
5
6
7
Hardware
8
2
10
12
14
9
11
13
15
Page 4
User’s Manual
4
Cart Kit For Heater
INSTALLING INSTRUCTIONS
1. Install the rubber feet(5) to the cart(2) with rubber foot (5)
washers(11) and screws(12).
2. Turn down the cart,insert the axle(7) through the cart(2), install the retaining ring(8) to
lock the axle(7). Then install the wheel(6) with washers(10) and nuts(9).
3. Insert the handle(1) to the cart assembly, tighten with
washers(14), spring washers(15) and screws(13).
4.Loosen the angle knob from the heater, install the heater to the cart
with plastic pads (3) and rubber pads (4).
2
5
11
12
14
15
13
9
10
7
10
6
8
4
3
Page 5

Kit de carro para calentador
Modelos:246736, 246737 y 246739
Lea y guarde estas
instrucciones
Modelo:246728
Modelo:246729
Page 6

2
Kit de carro para calentador
PIEZAS DEL CARRITO S Modelo:246728
(Para El Modelo De Calentador:246736 y 246737)
CONTIENE
Ref Qty. Descripción
1
2
3
4
5
6
7
8
9
10
11
12
13
14
15
1
1
2
2
2
1
2
2
2
4
2
2
4
4
4
Asa
Carro
Almohadilla de plástico
Almohadilla de goma
Patas de goma
Rueda
Eje
Anillo de retención
Nuez, M4
Lavadora Φ8
Lavadora Φ4(pequeño)
Tornillo, M4x12
Tornillo, M4X10
Lavadora Φ4(grande)
Arandela de resorte M4
INSTRUCCIONES DE INSTALACIÓN
1. Instale las patas de goma (5) en el carro (2) con las arandelas de la pata de goma (5) (11) y los tornillos (12).
2. Baje el carro, inserte el eje (7) a través del carro (2), instale el anillo de retención (8)
para bloquear el eje (7). Luego instale la rueda (6) con arandelas (10) y tuercas (9).
3. Inserte el asa (1) en el ensamblaje del carro, apriete con
arandelas (14), arandelas de resorte (15) y tornillos (13).
Manual del usuario
1
7
3
Hardware
4
8
5
10
9
11
2
12
13
6
14
15
2
5
11
12
1
9
10
7
10
6
8
14
15
13
Page 7

3
Kit de carro para calentador
4.Afloje la perilla angular del calentador, instale el calentador
en el carro con almohadillas de plástico (3) y almohadillas de
goma (4).
PIEZAS DEL CARRITO L Modelo:246729
(Para El Modelo De Calentador:246739)
CONTIENE
Ref Qty. Descripción
1
2
3
4
5
6
7
8
9
10
11
12
13
14
15
1
1
2
2
2
1
2
2
2
4
2
2
4
4
4
Asa
Carro
Almohadilla de plástico
Almohadilla de goma
Patas de goma
Rueda
Eje
Anillo de retención
Nuez, M4
Lavadora Φ8
Lavadora Φ4(pequeño)
Tornillo, M4x12
Tornillo, M4X10
Lavadora Φ4(grande)
Arandela de resorte M4
Manual del usuario
4
3
1
3
4
5
6
7
Hardware
8
2
10
12
14
9
11
13
15
Page 8

4
Kit de carro para calentador
INSTRUCCIONES DE INSTALACIÓN
1. Instale las patas de goma (5) en el carro (2) con las arandelas de la pata de goma (5) (11) y los tornillos (12).
2. Baje el carro, inserte el eje (7) a través del carro (2), instale el anillo de retención (8)
para bloquear el eje (7). Luego instale la rueda (6) con arandelas (10) y tuercas (9).
3. Inserte el asa (1) en el ensamblaje del carro, apriete con
arandelas (14), arandelas de resorte (15) y tornillos (13).
4.Afloje la perilla angular del calentador, instale el calentador en el carro
con almohadillas de plástico (3) y almohadillas de goma (4).
Manual del usuario
2
9
5
11
12
10
10
6
8
14
15
13
3
4
Page 9

Kit de chariot pour chauffage
Modèles:246736, 246737 et 246739
LIRE ET CONSERVER CES
INSTRUCTIONS
Modèle:246728
Modèle:246729
Page 10

2
Kit de chariot pour chauffage
PARTIES DU PANIER S Modèle:246728
(pour modèle de chauffage:246736 et 246737)
CONTENU
Réf. Qté. Description
1
2
3
4
5
6
7
8
9
10
11
12
13
14
15
1
1
2
2
2
1
2
2
2
4
2
2
4
4
4
Manipuler
Panier
Tampon en plastique
Coussin en caoutchouc
Pieds en caoutchouc
Roue
Axle
Anneau de retenue
Noix, M4
Laveuse Φ8
Laveuse Φ4(petit)
Vis, M4x12
Vis, M4X10
Laveuse Φ4(gros)
Rondelle de printemps M4
INSTRUCTIONS D'INSTALLATION
1. Installez les pieds en caoutchouc(5) sur le chariot(2) avec
les rondelles(11) et les vis(12) des pieds en caoutchouc(5).
2. Retournez le chariot, insérez l'axe (7) dans le chariot (2), installez la bague de
retenue (8) pour bloquer l'axe (7). Ensuite, installez la roue(6) avec les rondelles(10) et
les écrous(9).
3. Insérez la poignée(1) dans le chariot, serrez avec les rondelles(14), les rondelles élastiques(15) et les vis(13).
Directives d’assemblage
1
7
3
Hardware
4
8
5
10
9
11
2
12
13
6
14
15
2
5
11
12
1
9
10
7
10
6
8
14
15
13
Page 11

3
Kit de chariot pour chauffage
4.Desserrer le bouton d'angle du chauffage, installer le chauffage
sur le chariot avec des tampons en plastique (3) et des tampons
en caoutchouc (4).
PARTIES DU PANIER L Modèle:246729
(Pour modèle de chauffage:246739)
CONTENU
Réf. Qté. Description
1
2
3
4
5
6
7
8
9
10
11
12
13
14
15
1
1
2
2
2
1
2
2
2
4
2
2
4
4
4
Manipuler
Panier
Tampon en plastique
Coussin en caoutchouc
Pieds en caoutchouc
Roue
Axle
Anneau de retenue
Noix, M4
Laveuse Φ8
Laveuse Φ4(petit)
Vis, M4x12
Vis, M4X10
Laveuse Φ4(gros)
Rondelle de printemps M4
Directives d’assemblage
4
3
1
3
4
5
6
7
Hardware
8
2
10
12
14
9
11
13
15
Page 12

4
Kit de chariot pour chauffage
INSTRUCTIONS D'INSTALLATION
1. Installez les pieds en caoutchouc(5) sur le chariot(2) avec les
rondelles(11) et les vis(12) des pieds en caoutchouc(5).
2. Retournez le chariot, insérez l'axe (7) dans le chariot (2), installez la bague de
retenue (8) pour bloquer l'axe (7). Ensuite, installez la roue(6) avec les rondelles(10) et
les écrous(9).
3. Insérez la poignée(1) dans le chariot, serrez avec les rondelles(14), les rondelles élastiques(15) et les vis(13).
4.Desserrer le bouton d'angle du chauffage, installer le chauffage sur le chariot
avec des tampons en plastique (3) et des tampons en caoutchouc (4).
Directives d’assemblage
2
9
5
11
12
10
10
6
8
14
15
13
3
4
 Loading...