

Page 1
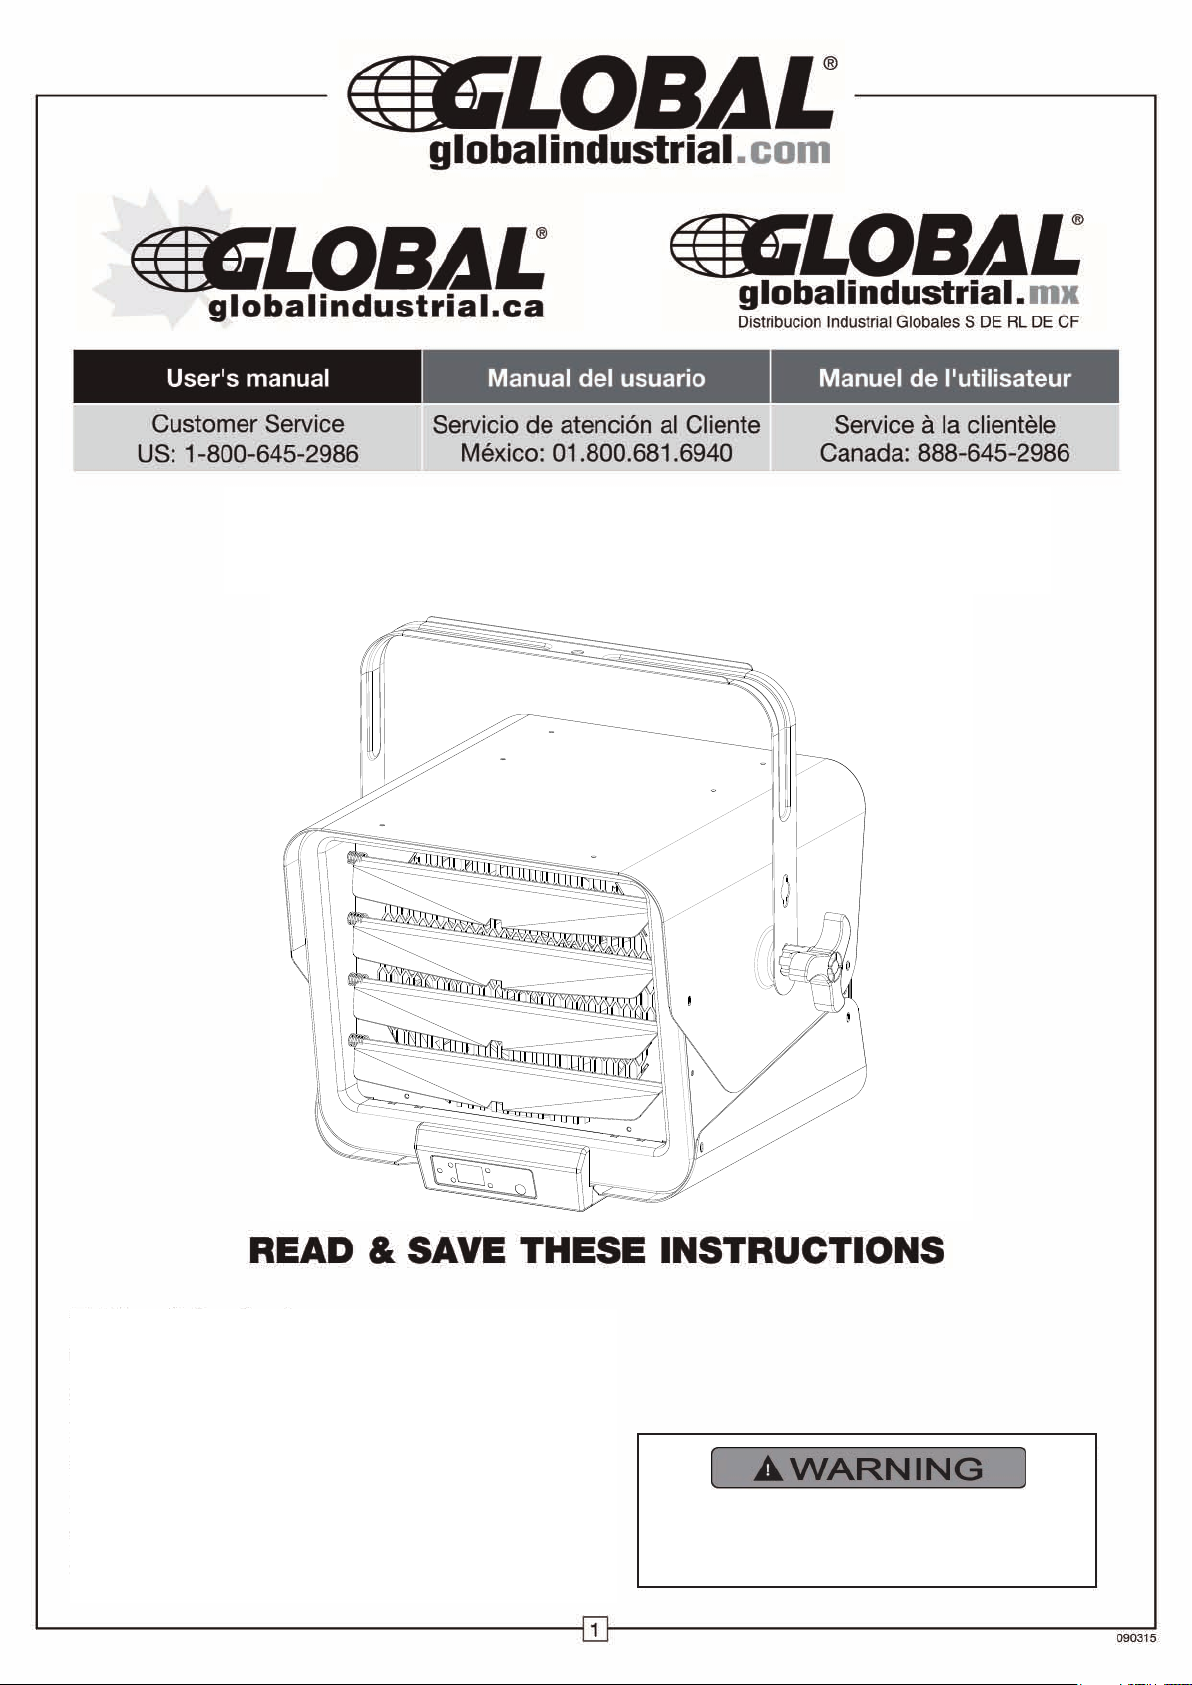
Horizontal Downflow Unit Heater
With Remote Control
Model:246726
PLEASE READ ALL INSTRUCTIONS
BEFORE USING THIS HEATER
Table of Contents
Important Instructions ................................... 2
Parts List ....................................................... 2 - 3
Specifications ................................................ 3
Installing Instructions ..................................... 4 - 5
Operating Instructions ................................... 5 - 6
Maintenance and Cleaning ........................... 7
Troubleshooting ............................................ 7
Page 2
Horizontal Downflow Unit Heater
With Remote Control
User’s Manual
2
IMPORTANT INSTRUCTIONS
1.Read all instructions before using this heater.
2.This heater is hot when in use. To avoid burns, do not let
bare skin touch hot surfaces. Keep combustible materials,
such as furniture, pillows, bedding, papers, clothes and
curtains at least 3 ft. (0.9 meters) from the front and top of the
heater and keep them away from the sides and rear.
3.Extreme caution and reasonable supervision is necessary
when any heater is used by or near children, invalids or pets
and whenever the heater is left operating and unattended.
4. Always switch off the heater when not in use.
5. Do not operate any heater after the heater malfunctions, has
been dropped or damaged in any manner. Disconnect power
at service panel and have heater inspected by a qualified
electrician before reusing.
6. Do not use outdoors.
7. To disconnect heater, turn off power to heater circuit at main
disconnect panel.
8. This heater should be installed at least 8 feet (2.4 m) from the
floor and no closer than 1 foot (0.3 m) from any adjacent
surfaces or walls. Keep at least 4.5 inches (0.12m) from the
back wall, regardless of whether the wall mount bracket is used.
PLEASE READ ALL INSTRUCTIONS
BEFORE USING THIS HEATER
When using electrical appliances, basic precautions should
always be followed to reduce risk of fire, electrical shock and
injury to persons or property, including the following:
9.Do not insert or allow foreign objects to enter any ventilation or
exhaust opening as this may cause an electric shock or fire, or
damage the heater.
10.To prevent a possible fire, do not block air intakes or exhaust
in any manner.
11.A heater has hot and arcing or sparking parts inside. To reduce
the risk of fire, do not use it in areas where gasoline, paint, or
flammable vapors and liquids are used or stored.
12.Use this heater only as described in this manual. Any other use
not recommended by the manufacturer may cause fire, electric
shock, or injury to persons.
13. This product must be installed by a certified electrician, in
accordance with local codes.
14. For supply cables, use 8 AWG (8.3 mm2) copper wires .
15. This heater includes a visual alarm to warn that parts of the
heater are getting excessively hot. If the alarm flashes,
immediately turn the heater OFF and inspect for any objects
on or adjacent to the heater that may have blocked the airflow
or otherwise caused high temperatures to have occurred.
DO NOT OPERATE THE HEATER WITH THE ALARM FLASHING. To reset the heater, switch the CIRCUIT BREAKER
OFF and
wait five to ten minutes for the heater to cool down before turning
the heater on again.
16. This appliance is not intended for use by persons (including
children) with reduced physical, sensory, or mental capabilities,
or lack of experience and knowledge, unless they have been
given supervision or instruction regarding use of the appliance
by a person responsible for their safety. Children should be
supervised to ensure that they do not play with the appliance.
RISK OF FIRE, DO NOT USE AS A
RESIDENTIAL OR HOUSEHOLD
HEATER.
NOTE: There may be a trace of smoke or odor when unit is first
operated. Don’t be alarmed. This indicates that a drop of oil fell on
the heating coil during the manufacturing process. It will quickly
evaporate and should not re-occur.
Make sure that the room in which the appliance is located is well
ventilated during this operation. It is normal for the appliance to
emit small cracking sounds when you turn it on for the first time.
Do not be alarmed.
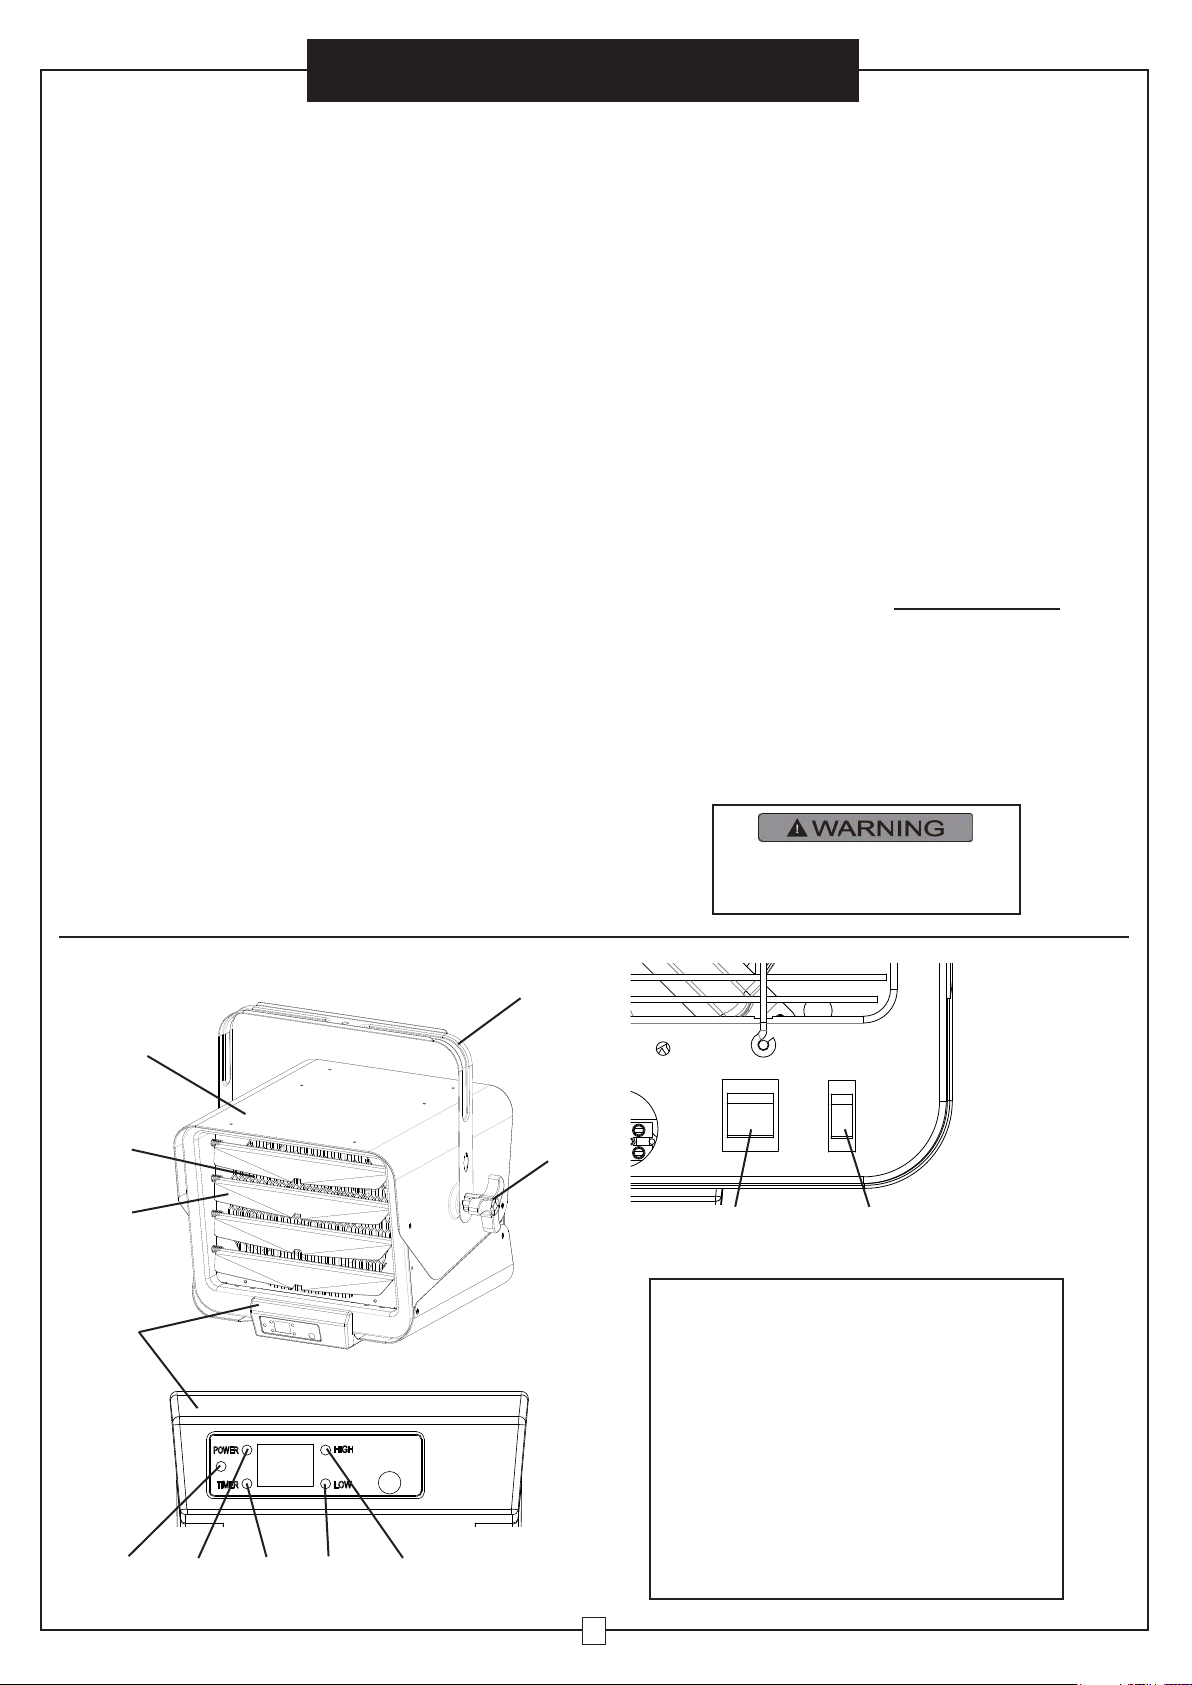
PARTS OF THE HEATER
GH IJ K
F
E
D
C
A
B
L
M
Parts List
A. Wall Mount Bracket
B. Tilt Adjustable Knob
C. Upper Housing
D. Front Exhaust Grill
E. Louver for air direction
F. Control Panel
G. Alarm LED
H. Power Indicator
I. Timer Indicator
J. Low Indicator
K. High Indicator
L. Internal/Wall Thermostat Switch
M.ON/OFF Switch
POWER
TIMER
HIGH
LOW
INSIDE
THERMOSTAT
WALL
THERMOSTAT
OFF
ON
Page 3
User’s Manual
3
Model 246726
Length Inches 19
Width Inches 14-11/16
Height Inches 12-1/2
Wire Size For
Installation
8AWG
Net Weight Lbs 23.9
Construction Cold Rolled Steel
Btu High 25,597
Cfm High 400
Outlet Air
Temperature
140°F @ Ambient
Temp. 77°F
Voltage 240V
Frequency
60Hz
Amps
31A
Watts
7500/4700
Kilowatts
7.5/4.7
Circuit Breaker
Amp rating
40A
Limited Warranty
Years
1
Certification UL,cUL
Product Specification
N
O
P
Q
R
Parts List
N. Increase Temperature button
O. Decrease Temperature button
P. HIGH/LOW Heating Mode button
Q. Timer button
R. Power button
WIRING DIAGRAM
Horizontal Downflow Unit Heater
With Remote Control
Black Red
Main Switch
(R495)
Lamp
Wire
40 AMP Double
Pole Breaker
H1+H2=4700W
H3/2800W
Page 4
User’s Manual
4
INSTALLING INSTRUCTIONS
All Wiring procedures and connections shall be in
accordance with the national and local codes having
jurisdiction.
All wiring must be installed by a certified
electrician according to the local electrical
codes. The ceiling heater must be grounded in
accordance with all national and local building
codes.
To reduce the risk of fire, do not store or use
gasoline or other flammable vapors and
liquids in the vicinity of the heater.
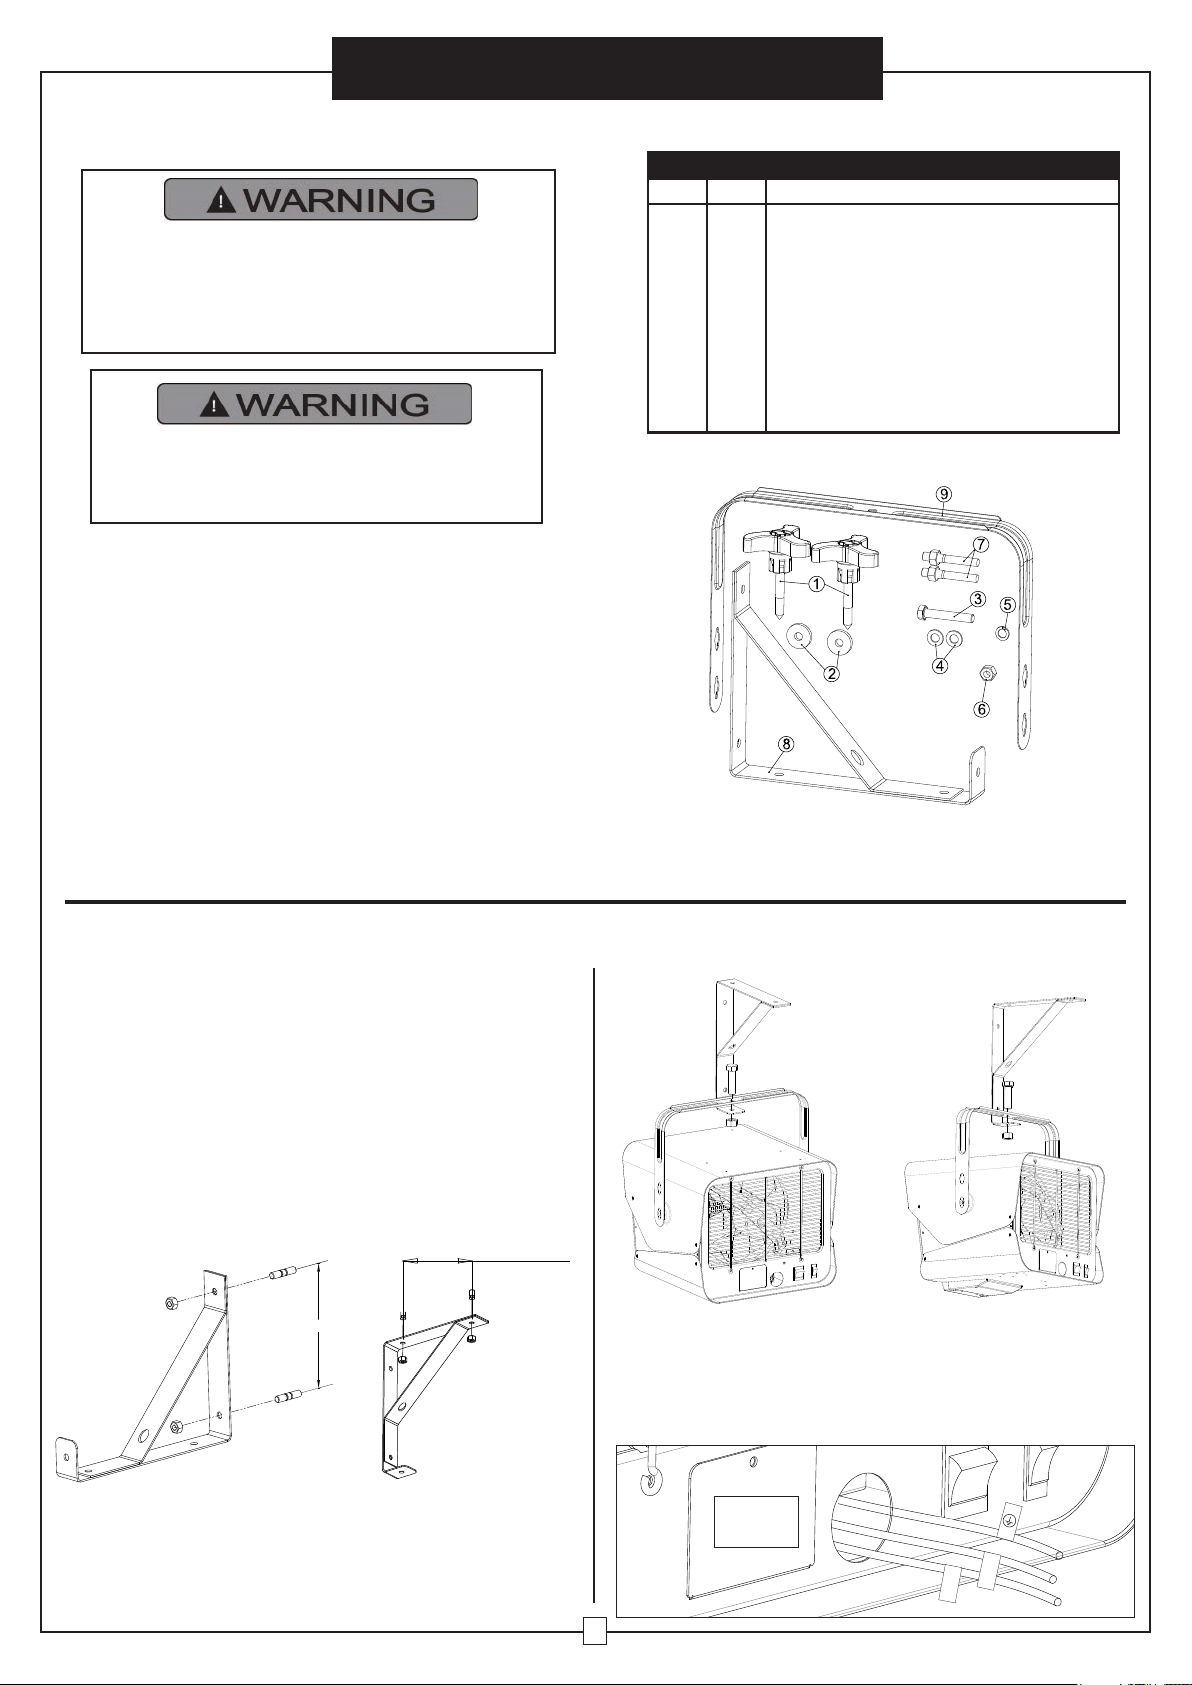
CONTENTS
Part Qty. Description
1
2
3
4
5
6
7
8
9
2
2
1
2
1
1
2
1
1
Tilt adjustment knob
Rubber washer
Hex bolt M10 x 60mm L, zinc plated
Washer, 10mm, zinc plated
Spring washer
Nut
Expansion bolt
Wall hanger
Handle
Prior to installation:
· Disconnect the main supply connection.
· Supply cables shall be 8 AWG (8.3 mm2) copper wires.
· The heater must be connected to individual branch circuit
protected by 40 Amp circuit breaker only.
· Supply cables must be equipped with a dual pole circuit
breaker rating at least 240V 40A/pole as main cutoff
switch of power connection to the heater.
Tools/ Materials Needed (Not Included):
· Regular Screwdriver Set
· Spanner
· Impact Drill with 12mm Drill Bit
Wall Mounted Installation
1.This heater should be installed at least 8 feet (2.4 m) from the
floor and no closer than 1 foot (0.3 m) from any adjacent
surfaces or walls. This minimum distance must be maintained.
2.Keep at least 4.5 inches (0.12m) from the back wall, regardless
of whether the wall mount bracket is used.
3.Mark the drill-hole positions in the wall or ceiling for the
mounting bracket.
4.Drill the required holes with diameter fitted to the anchor
provided for positioning the wall mount bracket.
5.Insert the anchors.
6.Attach the wall mount bracket to the wall or ceiling and secure
with mounting screws.
WALL MOUNT CEILING MOUNT
7.Hook the unit to the wall mount bracket and let the unit hang
from the bracket.
8.Insert the screw through the mounting bracket and the heater handle.
Tighten the nut.
WALL MOUNT CEILING MOUNT
9.Loosen the screw to remove the wiring compartment/connection cover
in the rear of the heater. There are three pigtail leads. Both Black (L1)
and Red one (L2) are for power connection; Green is for grounding
connection.
remove
this cover
Horizontal Downflow Unit Heater
With Remote Control
7.5 in
7.5 in
Red
L2
Green
L1
Black
Page 5
User’s Manual
5
10. Run the electrical power supply cable in flexible conduit and
connect to the wiring compartment via the knock-out at back
side of the unit. The rectangle hole is watch window for wiring.
11. Make the connections properly with connectors which are
suitable for the conductor size, including grounding wiring.
And after making the connections, arrange the pigtail leads of
unit and power supply wires in the wiring compartment.
12. You can use the inside or wall thermostat. If you use the
inside thermostat, press the rocker switch to
INSIDE THERMOSTAT.
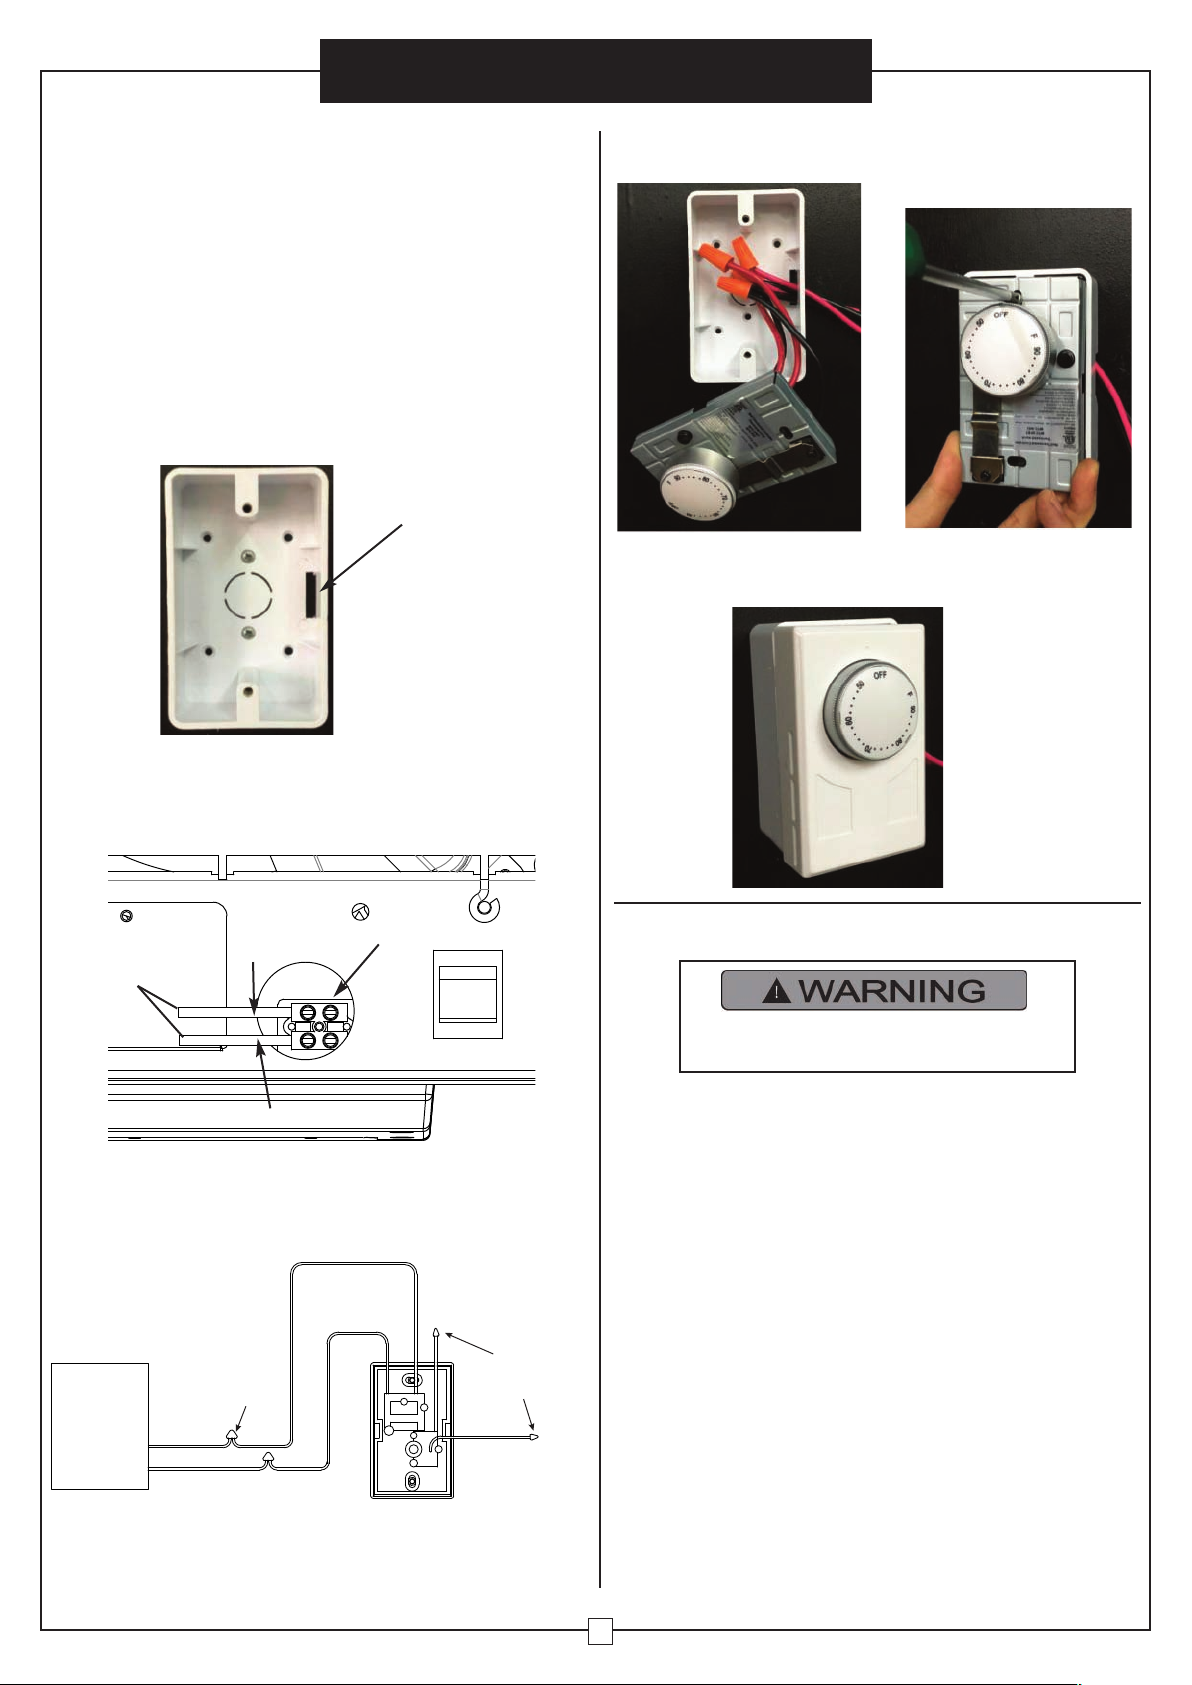
13. How to install Wall Thermostat. (246110 Not Included.)
A.Install Thermostat Outlet Box to the wall. Open the knock-out
on the right. Run line voltage wires to the thermostat location via
the knock-out.
B. Press the rocker switch to WALL THERMOSTAT, insert two
16AWG wires (not included) to Terminal A inside the heater,
make sure to tighten the screws in Terminal A.
Terminal A
16AWG wires
(not included)
Red
Black
C. Connect the other side of the two 16AWG wires to the wall
THERMOSTAT as below image:
)
D.Insert wires into the Thermostat Outlet Box, and screw up the
thermostat.
knock-out here
E.Cover the thermostat.
OPERATING INSTRUCTIONS
HAZARD OF ELECTRIC SHOCK, EXPLOSION, OR
ARC FLASH :
.
Apply appropriate personal protective equipment (PPE) and
follow safe electrical work practices. See NFPA 70.
.
A circuit breaker must be installed and serviced only by
qualified electrical personnel.
.
Always use a properly rated voltage sensing device to
confirm power is off.
The switch on the heater is only for function selection.
Use the circuit breaker as power ON/OFF device. The
circuit breaker is to be installed by certified electrician
and shall be located in line of sight from the heater
location or shall be capable of being locked in open
position. Follow the operating instruction to reduce the
risk of fire, electric shock, injury or death.
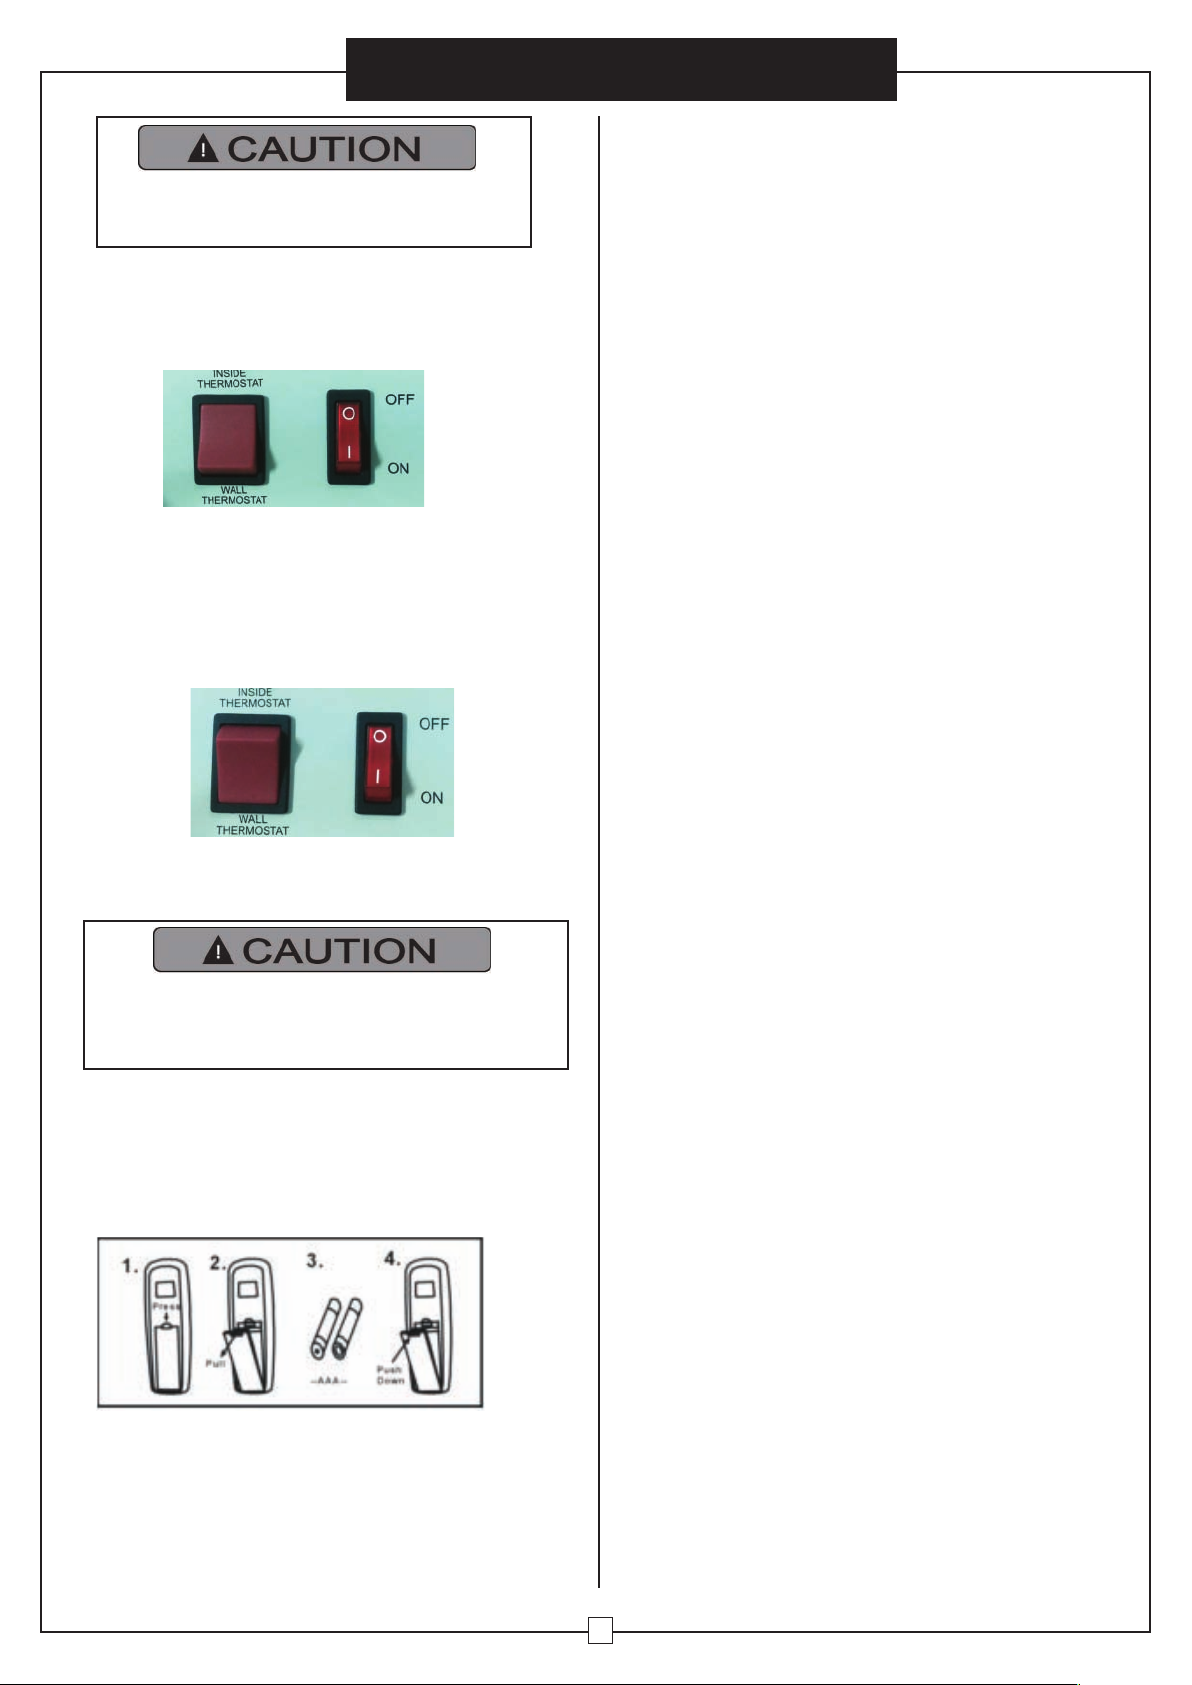
Identify the ON/OFF switch and the thermostat rocker switch
located on the rear of the heater.
You can select Inside or Wall Thermostat to control the heater
temperature by using ON/OFF and thermostat rocker switches.
The heater must be properly installed
before it is used.
How to select INSIDE/WALL thermostat
Horizontal Downflow Unit Heater
With Remote Control
Heater
Red
Black
Wire Connector
Red
Black
Thermostat
INSIDE
THERMOSTAT
WALL
THERMOSTAT
Red
insulating tape
(Wire not for use
Black
Affixed with
Page 6
User’s Manual
6
Selecting Inside Thermostat:
1.Turn the ON/OFF switch to OFF position, and then turn the
thermostat rocker switch to INSIDE THERMOSTAT as
indicated below:
2.Turn the ON/OFF switch to ON position again, the heater will
work on the inside thermostat mode.
Risk of malfunction & Damage: You can not change the
INSIDE/WALL THERMOSTAT when the heater is
running, you must turn the ON/OFF switch to OFF and
then select the INSIDE/WALL thermostat mode.
Selecting Wall Thermostat:
1.Turn the ON/OFF switch to OFF position, and then turn the
thermostat rocker switch to WALL THERMOSTAT as indicated
below:
2.Turn the ON/OFF switch to ON position, the heater will work
on the wall thermostat mode.
Risk of malfunction & Damage: You must turn
the ON/OFF switch to OFF before selecting
INSIDE/WALL thermostat.
Remote Control
Insert the batteries into the remote control as shown below:
NOTE: Remove the batteries if the remote control is not to be
used for a month or more. Batteries left in the remote may
leak and cause damage.
DO NOT MIX OLD AND NEW BATTERIES! DO NOT MIX
ALKALINE, STANDARD (CARBON-ZINC) OR RECHARGEABLE (NICKEL-CADMIUM) BATTERIES!
Turning The Heater On
To turn the heater ON, switch on the circuit breaker, press the
ON/OFF rocker switch to ON position, press the POWER button
on the remote, the power indicator will turn on and display the
room temperature.
Setting The Temperature (with the remote
control)
Note: You need to select the thermostat to INSIDE
THERMOSTAT and then set the desired temperature:
Press the + button until the numeric temperature starts flashing.
Press button again to increase the temperature or the – button
to decrease the temperature.
The heater will run on heating when the room temperature is
equal to or lower than the setting temperature - 2℉, and will
turn off when the room temperature is equal to or greater than
the setting temperature+2℉.
The factory setting temperature is 70℉, if the room temperature
is lower or equal to 68℉, the heater will run out heating and will
turn off when the room temperature is higher or equal to 72℉.
Note: If you set the thermostat switch to WALL
THERMOSTAT, press the + and - button cannot set the
temperature, the heater will run in ON or OFF heating
according the wall thermostat setting temperature.
Setting HIGH/LOW Heating Mode
When the heater is running, press the MODE button to set the
heater to run on HIGH or LOW heating.
HIGH heating: 7500W
LOW heating: 4700W
Note: You can not set the HIGH/LOW mode when the room
temperature is equal to or greater than the set temperature
+2℉, because the heater is OFF.
Setting The Timer (with the remote control)
1.Press the TIMER button until Set Time starts flashing.
The default value is 3 hours.
2.Press the “+” button to increase the set time or the “–” button
to decrease the set time. The timer can be set from 1 to 12
hours. The timer will set and execute after the LED display
stops flashing. The heater will shut OFF automatically when
the set time is reached.
3.To turn the timer OFF, press the TIMER button, and then
pressing the “–” button to set the time to 0. The timer feature
will turn off when the LED stops flashing.
To turn off the heater, switch off the circuit breaker. The circuit
breaker serves as the power source for the heater.
This heater includes a visual alarm to warn that parts of the
heater are getting excessively hot. If the alarm flashes, immediately turn the heater OFF and inspect for any objects on or adjacent to the heater that may cause high temperatures. DO
NOT OPERATE THE HEATER WITH THE ALARM FLASHING.
To reset the heater, switch the circuit breaker OFF. Wait five to
ten minutes for the heater to cool down before turning the
heater on again.
Turning The Heater Off
Horizontal Downflow Unit Heater
With Remote Control
Page 7

User’s Manual
7
No user maintenance on this heater should be undertaken except
regular cleaning as described below. All other servicing or
maintenance should be performed by qualified service personnel.
Before any cleaning, make sure that:
1.Power supply is disconnected at the source. Switch off the
circuit breaker.
2.Wait 60 minutes to ensure the heating element has cooled down.
Your heater is now ready for cleaning.
Regular Cleaning:
1.Do not spray chemicals or other cleaning liquids on the heater.
2.Interior dust can often be removed by using a vacuum cleaner
with a crevice tool attachment.
3.To clean enclosure, use a clean, soft, and lightly damp cloth to
gently wipe off the dirt from the surface of the unit. Make sure
the heating element and the switches do not get wet. Allow the
unit to dry completely before use.
MAINTENANCE AND CLEANING
DO NOT ALLOW WATER TO RUN INTO THE INTERIOR
OF THE HEATER AS THIS COULD CREATE A FIRE OR
ELECTRIC SHOCK HAZARD, DAMAGING THE UNIT.
TROUBLESHOOTING
If your heater fails to operate, please follow these procedures:
This heater is intended to be a ceiling/wall-mounted heater. It has a thermal cut-off protection. If the thermal cut-off protection trips,
switch off the power. Switch off the circuit breaker. The unit should reset automatically after 10 minutes. If the thermal cut-off protection
trips again, consult a certified/licensed electrician to determine the reason for overheating
.
Problem Probable Cause Solution
Unit is not heating.
Overheat protection has temporarily
deactivated the heater.
Turn the heater OFF. Switch off the
circuit breaker. Wait 10-30 minutes
before turning on the heater.
Room temperature is higher than the set
temperature.
Increase thermostat setting to a higher
temperature.
Breaker/Fuse has been tripped. Check your electrical box to confirm the
breaker has not been blown. This may
occur if the receptacle is shared with
other high consumption appliances.
The heater is producing a burning smell.
Check & ensure there are no
combustible materials within 0.9 meters
(3 feet) surrounding the heater.
Remove any combustible items from the
vicinity of the heater.
A drop of oil fell on the heating coil
during the manufacturing process. It will
quickly evaporate and should not occur
again.
Ensure room in which heater is situated
is well ventilated.
Ensure a minimum clearance of 1ft (12
inches) from both sides, and 4.5 inches
from the back.
Reposition the heater so there is enough
space between the heater and any
adjacent surface/wall.
PLEASE DO NOT ATTEMPT TO OPEN OR REPAIR THE HEATER YOURSELF. DOING SO COULD
CAUSE DAMAGE TO THE HEATER OR PERSONAL INJURY.
Horizontal Downflow Unit Heater
With Remote Control
Page 8

Calentador de la unidad de flujo descendente
horizontal con el control remoto
Modelo:246726
Lea todas las instrucciones antes de
utilizar este calentador.
Tabla de conexiones
Instrucciones importantes .............................. 2
Lista de pieza.................................................. 2 - 3
Especificaciones .............................................3
Instrucciones de instalación ........................... 4 - 5
Instrucciones de operación ............................ 5 - 6
Mantenimiento y limpieza .............. ............. 7
Solución de problemas ................................... 7
Lea y guarde estas instrucciones
Page 9

Calentador de la unidad de flujo descendente horizontal
con el control remoto
2
INSTRUCCIONES IMPORTANTES
1. Lea todas las instrucciones antes de usar este calentador.
2. Este calentador está caliente cuando está en uso. Para evitar
quemaduras, no permita que la piel desnuda toque superficies
calientes. Mantenga los materiales combustibles, como muebles,
almohadas, ropa de cama, papeles, ropa y cortinas a una distancia
mínima de 3 pies (0,9 metros) desde el frente y la parte superior del
calentador, y manténgalos alejados de los costados y la parte
posterior.
3. Se requiere extrema precaución y supervisión razonable cuando
cualquier calentador es usado por o cerca de niños, inválidos o
mascotas y cada vez que el calentador se deje funcionando sin
supervisión.
4. Siempre apague el calentador cuando no esté en uso.
5. No opere ningún calentador después de que el calentador no
funcione correctamente, se haya caído o dañado de cualquier
manera. Desconecte la energía en el panel de servicio y haga que
el calentador sea inspeccionado por un electricista calificado
antes de volver a usarlo.
6. No lo use al aire libre.
7. Para desconectar el calentador, desconecte la alimentación en el
panel de desconexión principal.
8. Este calefactor debe instalarse al menos a 2,4 m (8 pies) del suelo y no
más cerca de 0,3 m (1 pie) de cualquier superficie o pared adyacente.
Manténgase al menos a 4,5 pulgadas (0,12 m) de la pared trasera,
independientemente de que se utilice el soporte de montaje en la pared.
POR FAVOR, LEA TODAS LAS INSTRUCCIONES
ANTES DE USAR ESTE CALENTADOR
Al usar aparatos eléctricos, siempre se deben tomar
precauciones básicas para reducir el riesgo de incendio, descarga
eléctrica y daños a personas o propiedades,
incluidos los siguientes:
9. No inserte ni permita la entrada de objetos extraños a ninguna
abertura de ventilación o escape, ya que podría provocar una
descarga eléctrica o un incendio, o daños al calentador.
10. Para evitar un posible incendio, no bloquee las entradas de
aire o el escape de ninguna manera.
11. Un calentador tiene partes calientes y arqueadas o chispas
dentro. Para reducir el riesgo de incendio, no lo use en áreas
donde se usa o almacena gasolina, pintura o vapores y
líquidos inflamables.
12. Utilice este calentador sólo como se describe en este manual.
Cualquier otro uso no recomendado por el fabricante puede
provocar incendios, descargas eléctricas o lesiones a las
personas.
13. Este producto debe ser instalado por un electricista certificado,
de acuerdo con los códigos locales.
14. Para cables de alimentación, use cables de cobre de 8 AWG
(8.3 mm2).
15. Este calentador incluye una alarma visual para advertir que partes
del calentador se están calentando excesivamente. Si la alarma
parpadea, apague inmediatamente el calefactor e inspeccione si
hay algún objeto en el calefactor o adyacente a él que pueda haber
bloqueado el flujo de aire o que haya causado que se produzcan
altas temperaturas.
NO HAGA FUNCIONAR EL CALEFACTOR CON LA ALARMA
PARPADEANDO. Para reiniciar el calentador, APAGUE el INTERRUPTOR DE CIRCUITO y espere de cinco a diez minutos para que el calentador se enfríe antes de volver a encenderlo.
16. Este aparato no está destinado a ser utilizado por personas
(incluyendo niños) con capacidades físicas, sensoriales o mentales
reducidas, o con falta de experiencia y conocimiento, a menos que
se les haya dado supervisión o instrucción sobre el uso del aparato
por una persona responsable de su seguridad. Los niños deben
ser supervisados para asegurarse de que no jueguen con el
aparato.
Riesgo de incendio, no use como
residencial o hogar calentador.
NOTA: Puede haber un rastro de humo u olor cuando la unidad funciona
por primera vez. No se alarmen. Esto indica que una gota de aceite cayó
en la bobina de calentamiento durante el proceso de fabricación. Se evaporará rápidamente y no debería volver a ocurrir.
Asegúrese de que la habitación en la que se encuentra el aparato esté bien
ventilada durante esta operación. Es normal que el aparato emita pequeños sonidos de chasquido cuando se enciende por primera vez.
No se alarme.
PIEZAS DEL CALENTADOR
GH IJ K
F
E
D
C
A
B
L
M
Lista de partes
A. Soporte de montaje en la pared
B. Perilla de inclinación ajustable
C. Vivienda superior
D. Parrilla de escape frontal
E. Persiana para la dirección del aire
F. Panel de control
G. LED de la alarma
H. Indicador de potencia
I. Indicador de tiempo
J. Indicador de baja
K. Indicador alto
L. Interruptor del termostato interno/pared
M. Interruptor M.ON/OFF
Manual del usuario
POWER
TIMER
HIGH
LOW
INSIDE
THERMOSTAT
WALL
THERMOSTAT
OFF
ON
Page 10

3
Modelo
246726
Longitud en
Pulgadas
19
Ancho en
Pulgadas
14-11/16
Alto en pulgadas
12-1/2
Calibre de Cables
Para La
Instalación
8AWG
Peso Neto en Lbs.
23.9
Construcción
Cold Rolled Steel
Capacidad
de BTU
25,597
Capacidad
de CFM
400
Temperatura del
aire de salida
140°F @ Ambient
Temp. 77°F
Voltaje
240V
Fase
60Hz
Amperios
31A
Watts
7500/4700
Kilowatts
7.5/4.7
Amperaje del
Disyuntor/Breaker
40A
Años de Garantía
Limitada
1
Certificación
UL,cUL
Especificaciones del producto
N
O
P
Q
R
Lista de partes
N. Botón de aumento de la temperatura
O. Botón de disminución de la temperatura
P. Botón de modo de calefacción ALTO/BAJO
Q. Botón del temporizador
R. Botón de encendido
Diagrama de Cableado
Manual del usuario
Calentador de la unidad de flujo descendente horizontal
con el control remoto
Black Red
Main Switch
(R495)
Lamp
Wire
40 AMP Double
Pole Breaker
H1+H2=4700W
H3/2800W
Page 11

4
INSTRUCCIONES DE INSTALACIÓN
Todos los procedimientos de cableado y las conexiones se ajustarán a los códigos nacionales y locales
que tengan jurisdicción.
Todo el cableado debe ser instalado por un
electricista certificado de acuerdo con los
códigos eléctricos locales. El calentador de techo
debe estar conectado a tierra de acuerdo con todos
los códigos de construcción
nacionales y locales.
Para reducir el riesgo de incendio, no almacene
ni utilice gasolina u otros vapores y líquidos
inflamables en las proximidades del calentador.
Contiene
Parte Cant. Descripción
1
2
3
4
5
6
7
8
9
2
2
1
2
1
1
2
1
1
Perilla de Ajuste de Inclinación
Arandela de Goma
Tornillo Hex M10 x 60mm L, cromado con zinc
Arandela, 10mm, cromada con Zinc
Arandela Elástica
Tuerca
Perno de Expansión
Soporte de Pared
Agarre
Antes de la instalación:
· Desconecte la conexión de alimentación principal.
· Los cables de alimentación deben ser cables de cobre de 8 AWG
(8.3 mm2).
· El calentador debe estar conectado a un circuito derivado individual
protegido por un interruptor automático de 40 amperios solamente.
· Los cables de alimentación deben estar equipados de interruptor de
circuito de doble polo con una clasificación de al menos 240V 40A /
polo como interruptor de corte principal de la conexión de
alimentación al calentador..
Herramientas/materiales necesarios (no incluidos):
· Juego de destornilladores normales
· Llave inglesa
· Taladro de impacto con una broca de 12mm
Instalación en la pared
1.Este calentador debe instalarse al menos a 2,4 m del suelo y
no más cerca de 0,3 m de cualquier superficie o pared
adyacente. Esta distancia mínima debe mantenerse.
2.Manténgase a una distancia mínima de 4,5 pulgadas (0,12 m)
de la pared trasera, independientemente de que se utilice el
soporte de montaje en la pared.
3.Marque las posiciones de los agujeros de perforación en la
pared o el techo para el soporte de montaje.
4.Perfore los orificios necesarios con el diámetro del anclaje
proporcionado para colocar el soporte de montaje en la pared.
5.Inserte los anclajes.
6.Fije el soporte de montaje en la pared o el techo y asegúrelo
con tornillos de montaje.
MONTAJE EN PARED MONTAJE EN TECHO
7.Enganche la unidad al soporte de montaje en la pared y deje
que la unidad cuelgue del soporte.
8.Inserte el tornillo a través del soporte de montaje y el mango del calentador. Apriete la tuerca.
MONTAJE EN PARED MONTAJE EN TECHO
9.Afloje el tornillo para quitar la tapa del compartimento de
cables/conexión en la parte trasera del calentador. Hay tres cables de
trenzas. Tanto el negro (L1) como el rojo (L2) son para la conexión de
energía; el verde es para la conexión a tierra.
Retire esta
cubierta
Manual del usuario
Calentador de la unidad de flujo descendente horizontal
con el control remoto
7.5 in
7.5 in
Rojo
L2
Verde
L1
Negro
Page 12

5
10. Coloque el cable de alimentación eléctrica en un conducto
flexible y conéctelo al compartimento de cables mediante el
troquelado en la parte posterior de la unidad. El agujero
rectangular es la ventana de vigilancia para el cableado.
11. Realice las conexiones correctamente con conectores que
sean adecuados para el tamaño del conductor, incluyendo el
cableado de conexión a tierra. Y después de hacer las
conexiones, coloque los cables de la unidad y de la fuente de
alimentación en el compartimento de cableado.
12. Puede utilizar el termostato de interior o de pared. Si utiliza el
termostato de interior, pulse el interruptor basculante para el
TERMOSTATO INTERIOR.
13. Cómo instalar el termostato de pared. (246110 No incluido.)
A. Instale la caja de salida del termostato en la pared. Abra el
orificio ciego de la derecha. Lleve los cables de voltaje de línea
a la ubicación del termostato a través del orificio ciego.
B. Presione los interruptores basculantes al TERMOSTATO DE
PARED, inserte dos cables de 16AWG (no incluidos) al
Terminal A dentro del calentador, asegúrese de apretar los
tornillos del Terminal A.
Terminal A
Cable de 16AWG
(no incluido)
Rojo
Negro
C. Conecte el otro lado de los dos cables de 16AWG a la pared
del termostato como se muestra en la siguiente imagen:
D.Inserte los cables en la caja de salida del termostato, y
enrosque el termostato.
Golpee aquí
E.Cubrir el termostato.
INSTRUCCIONES DE OPERACIÓN
PELIGRO DE DESCARGA ELÉCTRICA, EXPLOSIÓN
O RELÁMPAGO DE ARCO :
.
Aplique el equipo de protección personal (PPE) adecuado y
siga las prácticas de trabajo eléctrico seguro. Ver NFPA 70.
.
Un disyuntor de circuito debe ser instalado y reparado
solamente por personal eléctrico calificado.
.
Utilice siempre un dispositivo sensor de tensión nominal
adecuado para confirmar que la alimentación está apagada.
El interruptor del calentador es sólo para la selección de
la función. Use el disyuntor como dispositivo de ON/OFF.
El disyuntor de circuito debe ser instalado por un
electricista certificado y debe estar ubicado en la línea de
visión desde la ubicación del calefactor o debe ser capaz
de ser bloqueado en posición abierta. Siga las
instrucciones de funcionamiento para reducir el riesgo
de incendio, descarga eléctrica, lesiones o muerte.
Identifica el interruptor de ON/OFF y el interruptor basculante
del termostato situado en la parte trasera del calentador.
Puede seleccionar el termostato interior o de pared para
controlar la temperatura del calentador utilizando los
interruptores ON/OFF y el interruptor basculante del termostato.
El calentador debe ser instalado
correctamente antes de ser usado.
Cómo seleccionar el termostato
INTERIOR/PARADO
Manual del usuario
Calentador de la unidad de flujo descendente horizontal
con el control remoto
Calentador
Rojo
Negro
Conector del cable
Rojo
Negro
Termostato
INSIDE
THERMOSTAT
WALL
THERMOSTAT
Rojo
Fijado con
cinta aislante
(el cable no se usa)
Negro
Page 13

6
Seleccionar el termostato interior:
1. Ponga el interruptor de encendido y ON/OFF de OFF, y luego
gire el interruptor basculante del termostato al interior del
termostato como se indica a continuación:
2.Ponga el interruptor de ON/OFF en posición de ON otra vez,
el calentador funcionará en el modo de termostato interior.
Riesgo de mal funcionamiento y daños: No se puede
cambiar el INTERIOR / TERMOSTATO DE PARED cuando el
calentador está funcionando, debe poner el interruptor de
ON/OFF en OFF y luego seleccionar el modo de termostato
INTERIOR/PARED.
Selecting Inside Thermostat:
1.Ponga el interruptor de encendido y ON/OFF de OFF, y luego
ponga el interruptor basculante del termostato en
TERMOSTATO DE PARED como se indica a continuación:
2.Ponga el interruptor de ON/OFF en posición de ON otra vez,
el calentador funcionará en el modo de termostato de pared.
Riesgo de mal funcionamiento y daños: Debe
poner el interruptor ON/OFF en OFF antes de
seleccionar el termostato INTERIOR/PARED.
Mando a distancia
Inserte las pilas en el mando a distancia como se muestra a
continuación:
NOTA: Retire las pilas si no va a utilizar el mando a distancia
durante un mes o más. Las pilas que quedan en el mando a
distancia pueden tener fugas y causar daños.
DO NOT MIX OLD AND NEW BATTERIES! DO NOT MIX
ALKALINE, STANDARD (CARBON-ZINC) OR
RECHARGEABLE (NICKEL-CADMIUM) BATTERIES!
NO MEZCLE LAS PILAS VIEJAS CON LAS NUEVAS! NO
MEZCLE PILAS ALCALINAS, ESTÁNDAR (CARBONO-ZINC) O
RECARGABLES (NÍQUEL-CADMIO)!
Encender el calentador
Para encender el calentador, encienda el disyuntor, presione el
interruptor basculante ON/OFF en la posición ON, presione el
botón POWER del control remoto, el indicador de encendido se
encenderá y mostrará la temperatura ambiente.
Ajuste de la temperatura (con el control
remoto)
Nota: Tienes que seleccionar el termostato para DENTRO DEL
TERMOSTATO y luego fijar la temperatura deseada:
Presione el botón + hasta que la temperatura numérica comience a
parpadear.
Presione el botón de nuevo para aumentar la temperatura o el
botón - para disminuir la temperatura.
El calentador funcionará con la calefacción cuando la temperatura
ambiente sea igual o inferior a la temperatura de ajuste - 2℉, y se
apagará cuando la temperatura ambiente sea igual o superior a la
temperatura de ajuste+2℉.
La temperatura de ajuste de fábrica es 70℉, si la temperatura ambiente es inferior o igual a 68℉, el calentador funcionará con cale-
facción y se apagará cuando la temperatura ambiente sea superior
o igual a 72℉.
Nota: Si coloca el interruptor del termostato en TERMOSTATO
DE PARED, al presionar el botón + y - no puede ajustar la
temperatura, el calentador encenderá o apagará la calefacción
según la temperatura de ajuste del termostato de pared.
Ajuste del modo de calefacción ALTO/BAJO
Cuando el calentador esté funcionando, pulse el botón MODE
para poner el calentador en funcionamiento en ALTA o BAJA
temperatura
Calefacción ALTA: 7500W
Calefacción BAJA: 4700W
Nota: No se puede configurar el modo ALTO/BAJO cuando la
temperatura ambiente es igual o superior a la temperatura
establecida +2℉, porque el calentador está OFF.
Ajuste del temporizador (con el mando a
distancia)
1.Presione el botón TIMER hasta que Set Time empiece a
parpadear.El valor predeterminado es de 3 horas
2.Presione el botón "+" para aumentar el tiempo de ajuste o el
botón "-" para disminuir el tiempo de ajuste. El temporizador
puede ajustarse de 1 a 12 horas. El temporizador se ajustará
y ejecutará después de que la pantalla LED deje de
parpadear. El calentador se apagará automáticamente
cuando se alcance el tiempo establecido.
3.Para apagar el temporizador, pulse el botón TIMER y luego
pulse el botón "-" para poner el tiempo en 0. La función del
temporizador se apagará cuando el LED deje de parpadear.
Para apagar el calentador, apague el interruptor de circuito. El
disyuntor sirve como fuente de energía para el calentador.
Este calentador incluye una alarma visual para advertir que
partes del calentador se están calentando excesivamente. Si la
alarma parpadea, apague inmediatamente el calentador e
inspeccione si hay algún objeto en el calentador o adyacente
que pueda causar altas temperaturas. NO HAGA FUNCIONAR
EL CALEFACTOR CON LA ALARMA PARPADEANDO. Para
reiniciar el calefactor, APAGUE el disyuntor de circuito. Espere
de cinco a diez minutos para que el calentador se enfríe antes
de volver a encenderlo.
Apagar el calentador
Manual del usuario
Calentador de la unidad de flujo descendente horizontal
con el control remoto
Page 14

7
No se debe realizar ningún mantenimiento por parte del usuario en
este calentador, excepto la limpieza periódica que se describe a
continuación. Cualquier otro servicio o mantenimiento debe ser
realizado por personal de servicio calificado
Antes de cualquier limpieza, asegúrese de que:
1.La fuente de alimentación está desconectada en la fuente.
Desconecta el interruptor.
2.Espere 60 minutos para asegurarse de que el elemento
calefactor se ha enfriado.
Su calentador está listo para ser limpiado..
Limpieza regular:
1.No rocíe productos químicos u otros líquidos de limpieza en el
calentador.
2.El polvo interior puede ser removido a menudo usando una
aspiradora con un accesorio para hendiduras.
3.Para limpiar el interior, utilice un paño limpio, suave y
ligeramente humedecido para eliminar suavemente la
suciedad de la superficie de la unidad. Asegúrese de que el
elemento calefactor y los interruptores no se mojen. Deje que
la unidad se seque completamente antes de usarla.
MANTENIMIENTO Y LIMPIEZA
NO PERMITA QUE ENTRE AGUA EN EL INTERIOR DEL
CALENTADOR, YA QUE ESTO PODRÍA CREAR UN
PELIGRO DE INCENDIO O DE DESCARGA ELÉCTRICA,
DAÑANDO LA UNIDAD.
SOLUCIÓN DE PROBLEMAS
Si su calentador no funciona, siga estos procedimientos:
Este calentador está destinado a ser montado en el techo o en la pared. Tiene protección térmica de corte. Si la protección de corte térmico se dispara, apague la alimentación y apague el interruptor de circuito. La unidad debería reiniciarse automáticamente después de 10
minutos. Si el interruptor térmico proyectiva se enciende de nuevo, consulte a un electricista certificado para determinar la razón del sobrecalentamiento.
Problema Posible Causa Solución
La unidad no calienta.
La protección contra sobrecalentamiento ha
desactivado el calentador temporalmente.
Apague el calentador; Apague el
disyuntor/breaker. Espere 10-30 minutos
antes de reiniciar la unidad.
La temperatura ambiente es más alta que la
temperatura establecida.
Aumente el ajuste del termostato a una
temperatura más alta.
El Disyuntor/Breaker se ha bajado.
Revise la caja de fusibles para confirmar que
el disyuntor/breaker no este apagado. Esto
puede suceder si el receptáculo es compartido
con otros aparatos de alto consume.
Consulte con un electricista.
El calentador produce
un olor a quemado.
Verifique que no haya materiales combustibles a
una distancia menor a 3 pies (0.9 metros) del
calentador.
Retire cualquier objeto combustible cerca de la
unidad.
Hay residuos de aceite en el serpentín calentador
debido al proceso de fabricación. Se evaporará
rápidamente y no debería suceder de nuevo.
Asegúrese que la localización del calentador
este bien ventilada.
Asegúrese de que haya una distancia mínima de 1
pie (12 pulgadas) de ambos lados y 4,5 pulgadas
de la parte posterior.
Vuelva a colocar el calentador de manera que
haya suficiente espacio alrededor del calentador
y las paredes adyacentes.
POR FAVOR, NO INTENTE ABRIR O REPARAR EL CALENTADOR
USTED MISMO.
EL HACERLO PODRÍA CAUSAR DAÑOS O LESIONES PERSONALES.
Manual del usuario
Calentador de la unidad de flujo descendente horizontal
con el control remoto
Page 15

Réchauffeur horizontal à flux descendant
avec la télécommande
Modèle:246726
Veuillez lire attentivement les
instructions avant d’utiliser cet
appareil de chauffage.
Tableau des connexions
Instructions importantes ............................... 2
Liste des pièces ............................. ............. 2 - 3
Spécifications ................................................ 3
Instructions d’installation ............................... 4 - 5
Instructions d’utilisateur ................................. 5 - 6
Maintenance et nettoyage
............................. 7
Dépannage .................................................... 7
LIRE ET CONSERVER CES INSTRUCTIONS
Page 16

Réchauffeur horizontal à flux descendant
avec la télécommande
2
INSTRUCTIONS IMPORTANTES
1. Lire toutes les instructions avant d'utiliser le chauffage.
2. Le chauffage devient chaud lorsqu'il est mise en service. Pour
éviter les brûlures, ne pas toucher les surfaces chaudes avec la
peau nue. Garder les matériaux combustibles, tels que les
meubles, les oreillers, la literie, les papiers, les vêtements et les
rideaux, à au moins 3 pieds (0,9 m) de l’avant et du haut de l’ap
pareil et éloigner-les de l’écart des côtés et de l’arrière.
3. Il est nécessaire d’accorder une extrême prudence et une
supervision raisonnable lorsqu'un appareil de chauffage est utilisé
par ou près d'enfants, d'invalides ou d'animaux domestiques et
chaque fois que le chauffage est laissé en fonctionnement et sans
surveillance.
4. Le chauffage doit être toujours éteint lorsqu'il n'est pas utilisé.
5. Ne pas fonctionner le chauffage en cas de dysfonctionnement,
de chute ou d’endommagement quelconque. Avant de le remettre
en service, débrancher l'alimentation du panneau de
maintenance et faire inspecter l’appareil par un électricien
qualifié.
6. Ne pas utiliser en plein air.
7. Couper l'alimentation du circuit de chauffage sur le panneau de
déconnexion principal pour déconnecter le chauffage.
8. Cet appareil doit être installé à au moins 2,4 m du sol et à 0,3 m de
toute surface ou mur adjacent. Gardez au moins 0,12 m du mur
arrière, que vous utilisiez ou non le support mural.
VEUILLEZ LIRE TOUTES LES INSTRUCTIONS
AVANT D'UTILISER CE CHAUFFAGE
Au cours de l'utilisation des appareils électriques, des
précautions de base doivent toujours être suivies pour réduire les
risques d'incendie, d'électrocution et de blessures
corporelles ou dommages des biens, notamment::
9. Ne pas insérer ou laisser des corps étrangers pénétrer dans les
orifices de ventilation ou d'évacuation, sinon cela pourrait
provoquer un choc électrique ou un incendie ou même
endommager le chauffage.
10. Pour éviter un éventuel incendie, ne pas bloquer les prises d'air
ou les gaz d'échappement de quelque manière que ce soit.
11. Le chauffage contient des pièces chaudes et en forme d'arc ou
d'étincelles. Pour réduire les risques d'incendie, il est interdit
d’utiliser dans des endroits où l'essence, la peinture ou les
vapeurs et liquides inflammables sont mises en service ou
entreposés.
12. Le chauffages ne doit être utilisé qu’en suivant les instructions
de ce manuel. Toute autre utilité non recommandée par le
fabricant risque de provoquer un incendie, une électrocution ou
des blessures.
13. Ce produit doit être installé par un électricien agréé,
conformément aux codes locaux.
14. Les câbles d'alimentation prennent des fils de cuivre de 8 AWG
(8.3 mm2).
15. Ce chauffage comprend une alarme visuelle pour avertir que
certaines parties du chauffage deviennent excessivement
chaudes. Si l'alarme clignote, éteignez immédiatement le chauffage
et vérifiez s'il y a des objets sur le chauffage ou à proximité qui
auraient pu bloquer le flux d'air ou provoquer des températures
élevées.
NE FAITES PAS FONCTIONNER LE CHAUFFAGE LORSQUE
L'ALARME CLIGNOTE. Pour réinitialiser le chauffage, éteignez le
disjoncteur de circuit et attendez cinq à dix minutes que le chauffage
refroidisse avant de le remettre en marche.
16. Cet appareil n'est pas destiné à être utilisé par des personnes (y
compris des enfants) dont les capacités physiques, sensorielles ou
mentales sont réduites ou qui manquent d'expérience et de
connaissances, à moins qu'elles n'aient été supervisées ou qu'une
personne responsable de leur sécurité ne leur ait donné des
instructions concernant l'utilisation de l'appareil. Les enfants doivent
être surveillés afin de s'assurer qu'ils ne jouent pas avec l'appareil.
Risque d'incendie, ne pas utiliser comme un
chauffage résidentiels ou des ménages.
REMARQUE: Il peut y avoir une trace de fumée ou d'odeur lors de la
première utilisation de l'appareil. Ne vous inquiétez pas. Cela indique
qu'une goutte d'huile est tombée sur le serpentin de chauffage
pendant le processus de fabrication. Elle s'évaporera rapidement et ne
devrait pas se reproduire.
Veillez à ce que la pièce dans laquelle se trouve l'appareil soit bien
ventilée pendant cette opération. Il est normal que l'appareil émette de
petits craquements lorsque vous le mettez en marche pour la première
fois.Ne vous alarmez pas.
PIÈCES DU CHAUFFAGE
GH IJ K
F
E
D
C
A
B
L
M
Liste des pièces
A. Support mural
B. Bouton de réglage de l'inclinaison
C. Logement supérieur
D. Grille d'échappement avant
E. Persienne pour la direction de l'air
F. Panneau de contrôle
G. LED d'alarme
H. Indicateur de puissance
I. Indicateur de temps
J. Indicateur faible
K. Indicateur élevé
L. Interrupteur du thermostat interne/mural
M.Interrupteur ON/OFF
Directives d’assemblage
POWER
TIMER
HIGH
LOW
INSIDE
THERMOSTAT
WALL
THERMOSTAT
OFF
ON
Page 17

3
Modèle
246726
Longueur en
pouces
19
Largeur en pouces
14-11/16
Hauteur en pouces
12-1/2
Aille du câblage
pour l’installation
8AWG
Poids net en lb
23.9
Construction
Cold Rolled Steel
Valeur élevée BTU
25,597
Valeur élevée PCM
400
Température de
sortie d'air
140°F @ Ambient
Temp. 77°F
Tension
240V
Phase
60Hz
Ampères
31A
Watts
7500/4700
Kilowatts
7.5/4.7
Classification
d’intensité du
disjoncteur
40A
Nombre
d’années de
garantie limitée
1
Certification
UL,cUL
Spécifications du produit
N
O
P
Q
R
Liste des pièces
N. Bouton d'augmentation de la température
O. Bouton de réduction de la température
P. Bouton du mode de chauffage HAUT/BAUCHE
Q. Bouton de la minuterie
R. Bouton d'alimentation
SCHÉMA DE CÂBLAGE
Réchauffeur horizontal à flux descendant
avec la télécommande
Directives d’assemblage
Black Red
Main Switch
(R495)
Lamp
Wire
40 AMP Double
Pole Breaker
H1+H2=4700W
H3/2800W
Page 18

4
INSTRUCTIONS D'INSTALLATION
Toutes les procédures de câblage et les connexions
doivent être conformes aux codes nationaux et locaux
en vigueur.
Tout le câblage doit être installé par un élec-
tricien certifié, conformément aux codes élec-
triques locaux. Le chauffage au plafond doit
être mis à la terre conformément à tous les
codes de construction nationaux et locaux.
Pour réduire le risque d'incendie, ne pas stocker
ou utiliser de l'essence ou d'autres vapeurs et
liquides inflammables à proximité du chauffage.
CONTENTS
Réf. Qté. Description
1
2
3
4
5
6
7
8
9
2
2
1
2
1
1
2
1
1
Bouton de réglage de l’inclinaison
Rondelle de caoutchouc
Boulon hex M10 x 60 mm L, recouvert de zinc
Rondelle, 10 mm, recouverte de zinc
Rondelle à ressort
Écrou
Boulon d’expansion
Étrier mural
Poignée
Avant l'installation:
· Déconnecter la connexion d'alimentation principale.
· Les câbles d'alimentation doivent prendre les fils de
cuivre de 8 AWG (8.3 mm2).
· Le chauffage doit être connecté à un circuit de dérivation
individuel uniquement protégé par un disjoncteur de 40 A.
· Les câbles d'alimentation doivent être équipés d'un
disjoncteur bipolaire d'au moins 240 V 40 A / pôle comme
interrupteur principal de la connexion d'alimentation de
chauffage.
Outils/matériels nécessaires (non inclus):
· Jeu de tournevis ordinaire
· Clé
· Perceuse à percussion avec mèche de 12 mm
Installation murale
1.Ce chauffage doit être installé à au moins 2,4 m du sol et à 0,3
m de toute surface ou mur adjacent. Cette distance minimale
doit être respectée.
2.Garder au moins 0,12 m du mur arrière, que le support mural
soit utilisé ou non.
3.Marquez les positions des trous de perçage dans le mur ou le
plafond pour le support de montage.
4.Percez les trous requis avec un diamètre adapté à l'ancrage
prévu pour le positionnement du support de montage mural.
5.Insérez les ancres.
6.Fixez le support de montage mural au mur ou au plafond et
fixez-le avec des vis de montage.
MONTAGE MURAL MONTAGE AU PLAFOND
7.Accrochez l'appareil au support de montage mural et laissez
l'appareil pendre du support.
8.Insérez la vis dans le support de montage et dans la poignée de l'appareil. Serrez l'écrou.
MONTAGE MURAL MONTAGE AU PLAFOND
9.Desserrer la vis pour retirer le compartiment de câblage / le couvercle
de connexion à l'arrière du chauffage. Il y a trois pistes en queue de
cochon. Le noir (L1) et le rouge (L2) sont destinés à la connexion é
lectrique ; le vert est destiné à la mise à la terre.
Retirez ce
couvercle
Réchauffeur horizontal à flux descendant
avec la télécommande
Directives d’assemblage
7.5 in
7.5 in
ROUGE
L2
VERT
L1
NOIR
Page 19

5
10. Faites passer le câble d'alimentation électrique dans un
conduit flexible et connectez-vous au compartiment de
câblage par l'ouverture située à l'arrière de l'appareil. Le trou
rectangulaire est une fenêtre de surveillance pour le câblage.
11. Effectuez les connexions correctement avec des connecteurs
adaptés à la taille du conducteur, y compris le câblage de
mise à la terr. Après avoir effectué les connexions, disposez
les fils de l'appareil et les fils d'alimentation dans le
compartiment de câblage
12. Vous pouvez utiliser le thermostat intérieur ou mural. Si vous
utilisez le thermostat intérieur, appuyez sur l'interrupteur à
bascule pour le mettre sur le THERMOSTAT INTERIEUR.
13. Comment installer un thermostat mural. (246110 Non inclus.)
A.Installez la boîte de sortie du thermostat sur le mur. Ouvrez
l'ouverture à droite. Faites passer des fils de tension de ligne à
l'emplacement du thermostat par l'ouverture.
B. Appuyez sur les interrupteurs à bascule pour passer au
THERMOSTAT MURAL, insérez deux fils de 16AWG (non
inclus) à la borne A à l'intérieur du chauffage, assurez-vous de
bien serrer les vis de la borne A.
Terminal A
Fil 16AWG
(non inclus)
Rouge
Noir
C. Connectez l'autre côté des deux fils 16AWG au mur
THERMOSTAT comme sur l'image ci-dessous:
D.Insérez les fils dans la boîte de sortie du thermostat et vissez le
thermostat.
Enclenchement ici
E.Couvrez le thermostat.
INSTRUCTIONS D'UTILISATION
RISQUE DE CHOC ÉLECTRIQUE, D'EXPLOSION OU
D'ÉCLAIR D'ARC ÉLECTRIQUE :
.
Appliquer un équipement de protection individuelle (EPI)
approprié et suivre des pratiques de travail électrique sûres.
Voir NFPA 70.
.
Un disjoncteur doit être installé et entretenu uniquement
par un personnel électrique qualifié.
.
Utilisez toujours un dispositif de détection de tension
correctement calibré pour confirmer que le courant est
coupé.
L'interrupteur du chauffage sert uniquement à sélectionner la fonction. Utilisez le disjoncteur comme dispositif de
mise en marche et d'arrêt. Le disjoncteur doit être installé
par un électricien certifié et doit être situé en ligne de vue
depuis l'emplacement du chauffage ou doit pouvoir être
verrouillé en position ouverte. Suivez les instructions d'utilisation afin de réduire les risques d'incendie, de choc
électrique, de blessure ou de mort.
Identifiez l'interrupteur ON/OFF et l'interrupteur à bascule du
thermostat situé à l'arrière du chauffage.
Vous pouvez sélectionner le thermostat intérieur ou mural pour
contrôler la température du chauffage en utilisant l'interrupteur
ON/OFF et l'interrupteur à bascule du thermostat.
Le chauffage doit être correctement
installé avant d'être utilisé.
Comment sélectionner le thermostat INTÉRIEUR/MUR
Réchauffeur horizontal à flux descendant
avec la télécommande
Directives d’assemblage
Chauffage
Rouge
Connecteur de fil
Noir
Rouge
Noir
Thermostat
INSIDE
THERMOSTAT
WALL
THERMOSTAT
Rouge
Noir
Fixé avec du
ruban isolant
(fil non utilisé)
Page 20

6
Sélection du thermostat intérieur :
1.Mettez l'interrupteur MARCHE/ARRÊT en position ARRÊT,
puis mettez l'interrupteur à bascule du thermostat en position
THERMOSTAT INTERIEUR, comme indiqué ci-dessous:
2. Remettez l'interrupteur MARCHE/ARRÊT en position
MARCHE, le chauffage fonctionne en mode thermostat
intérieur.
Risque de dysfonctionnement et de dommages : Vous
ne pouvez pas changer le THERMOSTAT
INTERIEUR/MUR lorsque le chauffage est en marche,
vous devez mettre l'interrupteur MARCHE/ARRÊT sur
ARRÊT et ensuite sélectionner le mode thermostat
INTERIEUR/MUR.
Sélection du thermostat mural:
1. Mettez l'interrupteur MARCHE/ARRÊT en position ARRÊT,
puis mettez l'interrupteur à bascule du thermostat en position
THERMOSTAT MURAL, comme indiqué ci-dessous:
2.Remettez l'interrupteur MARCHE/ARRÊT en position
MARCHE, le chauffage fonctionne en mode thermostat mural.
Risque de dysfonctionnement et de dommages :
Vous devez mettre l'interrupteur MARCHE/ARRÊT
sur ARRÊT avant de sélectionner le thermostat
INTÉRIEUR/MUR.
Télécommande
Insérez les piles dans la télécommande comme indiqué cidessous:
REMARQUE: Retirez les piles si la télécommande ne doit
pas être utilisée pendant un mois ou plus. Les piles laissées
dans la télécommande peuvent fuir et causer des dommages.
NE MÉLANGEZ PAS LES PILES NEUVES ET LES PILES
USAGÉES ! NE PAS MÉLANGER DES PILES ALCALINES,
STANDARD (CARBONE-ZINC) OU RECHARGEABLES
(NICKEL-CADMIUM) !
Mise en marche du chauffage
Pour allumer le chauffage, allumez le disjoncteur, appuyez sur
l'interrupteur à bascule ON/OFF en position ON, appuyez sur le
bouton POWER de la télécommande, l'indicateur de puissance
s'allume et affiche la température ambiante.
Réglage de la température
(avec la télécommande)
Remarque: Vous devez sélectionner le thermostat àINSIDE
THERMOSTAT et ensuite régler la température souhaitée:
Appuyez sur le bouton + jusqu'à ce que la température
numérique commence à clignoter.
Appuyez à nouveau sur le bouton pour augmenter la température ou sur le bouton - pour la diminuer.
Le chauffage fonctionnera en mode chauffage lorsque la température ambiante est égale ou inférieure à la température de
réglage - 2℉, et s'arrêtera lorsque la température ambiante est
égale ou supérieure à la température de réglage +2℉.
La température de réglage d'usine est 70℉. Si la température
ambiante est inférieure ou égale à 68℉, le chauffage s'arrête et
s'éteint lorsque la température ambiante est supérieure ou
égale à 72℉.
Remarque: Si vous réglez l'interrupteur du thermostat sur
WALL THERMOSTAT, appuyez sur les boutons + et - ne peut
pas régler la température, le chauffage fonctionnera en mode
ON ou OFF selon la température de réglage du thermostat
mural.
Réglage du mode de chauffage
HAUT/BAUCHE
Lorsque le chauffage fonctionne, appuyez sur le bouton MODE
pour régler le chauffage sur HAUT ou BAS.
Chauffage HAUT: 7500W
FAIBLE chauffage: 4700W
Note : Vous ne pouvez pas régler le mode HIGH/LOW lorsque
la température ambiante est égale ou supérieure à la
température réglée +2℉, car le chauffage est éteint.
Réglage de la minuterie
(avec la télécommande)
1.Appuyez sur la touche TIMER jusqu'à ce que l'heure
programmée commence à clignoter. La valeur par défaut est
de 3 heures.
2.Appuyez sur le bouton "+" pour augmenter l'heure réglée ou
sur le bouton "-" pour la diminuer. La minuterie peut être
réglée de 1 à 12 heures. La minuterie se règle et s'exécute
lorsque l'affichage LED cesse de clignoter. Le chauffage
s'éteint automatiquement lorsque l'heure programmée est
atteinte.
3.Pour éteindre la minuterie, appuyez sur le bouton "TIMER",
puis sur le bouton "-" pour régler l'heure sur 0. La fonction de
minuterie s'éteint lorsque la LED cesse de clignoter.
Pour éteindre le chauffage, coupez le disjoncteur. Le disjonc-
teur sert de source d'alimentation pour le chauffage.
Ce chauffage comprend une alarme visuelle pour avertir que
certaines parties du chauffage deviennent excessivement
chaudes. Si l'alarme clignote, éteignez immédiatement le
chauffage et vérifiez s'il y a des objets sur le chauffage ou à
proximité qui pourraient provoquer des températures élevées.
NE FAITES PAS FONCTIONNER LE CHAUFFAGE LORSQUE
L'ALARME CLIGNOTE. Pour réinitialiser le chauffage, coupez
le disjoncteur. Attendez cinq à dix minutes pour que le
chauffage refroidisse avant de le remettre en marche.
Éteindre le chauffage
Réchauffeur horizontal à flux descendant
avec la télécommande
Directives d’assemblage
Page 21

7
L'utilisateur ne doit procéder à aucun entretien sur ce chauffage, à
l'exception d'un nettoyage régulier comme décrit ci-dessous. Tout
autre entretien ou maintenance doit être effectué par un personnel
qualifié.
Avant tout nettoyage, assurez-vous que:
1.L'alimentation électrique est coupée à la source.
Coupez le disjoncteur.
2.Attendez 60 minutes pour vous assurer que l'élément chauffant a
refroidi.Votre élément chauffant est maintenant prêt à être
nettoyé.
Nettoyage régulier:
1.Ne vaporisez pas de produits chimiques ou d'autres liquides
de nettoyage sur le chauffage.
2.La poussière intérieure peut souvent être enlevée à l'aide d'un
aspirateur muni d'un outil pour les fissures.
3.Pour nettoyer le boîtier, utilisez un chiffon propre, doux et
légèrement humide pour enlever doucement la saleté de la
surface de l'appareil. Veillez à ce que l'élément chauffant et les
interrupteurs ne soient pas mouillés. Laissez l'appareil sécher
complètement avant de l'utiliser.
ENTRETIEN ET NETTOYAGE
NE LAISSEZ PAS L'EAU S'ÉCOULER À L'INTÉRIEUR
DE L'APPAREIL, CAR CELA POURRAIT CRÉER UN
RISQUE D'INCENDIE OU DE CHOC ÉLECTRIQUE, ET
ENDOMMAGER L'APPAREIL.
DÉPANNAGE
Si votre appareil de chauffage fait défaut, veuillez suivre les procédures suivantes :
Ce chauffage doit être installé au plafond ou sur le mur. Il dispose d'une protection thermique. Si la protection contre la coupure thermique
se déclenche, il est nécessaire de couper l'alimentation et d’éteindre le disjoncteur. Cette unité devrait se réinitialiser automatiquement
après 10 minutes. Si la mise hors fonction de protection thermique se déclenche encore, consultez un électricien certifié pour déterminer la
raison de la surchauffe.
Difficulté Cause probable Solution
L’unité ne chauffe pas.
La protection anti-surchauffe a
temporairement désactivé le chauffage.
Désactivez le chauffeur ; Couper le disjoncteur.
Attendez 10-30 minutes avant de réactiver l’unité.
La température de la pièce est supérieure à
la température réglée.
Augmentez le réglage du thermostat à une
température plus élevée. .
Le disjoncteur/fusible a été déclenché
.
Vérifier la boîte électrique pour confirmer que le
disjoncteur n’est pas ouvert. Cela peut se
produire si la prise est partagée avec d’autres
appareils de consommation élevée
La chaufferette produit
une odeur de brûlé.
Vérifier qu’il n’y a pas de matériaux
combustibles à moins de 0,9 mètre (3 pieds)
de l’élément chauffant.
Supprimer des objets combustibles près de
l’unité
.
Il y a un résidu d’huile sur la bobine de
chauffage, ce qui s’est produit lors du
processus de fabrication. L’huile s’évapore
rapidement et ceci ne devrait pas se
produire
Assurez-vous que l’emplacement du chauffeur est
bien ventilé..
Assurez-vous d'un espace libre minimum de
1 pied (12 pouces) des deux côtés, et de
4,5 pouces à l'arrière.
Repositionnez l’élément chauffant pour
augmenter la distance des murs adjacents.
.
VEUILLEZ NE PAS TENTER D’OUVRIR OU DE REPARRER LE
RECHAUFFEUR VOUS-MEME. CELAPOURRAIT ENTRAINER DOMMAGES OU
DES BLESSURES CORPORELLES.
Réchauffeur horizontal à flux descendant
avec la télécommande
Directives d’assemblage
 Loading...