

Page 1
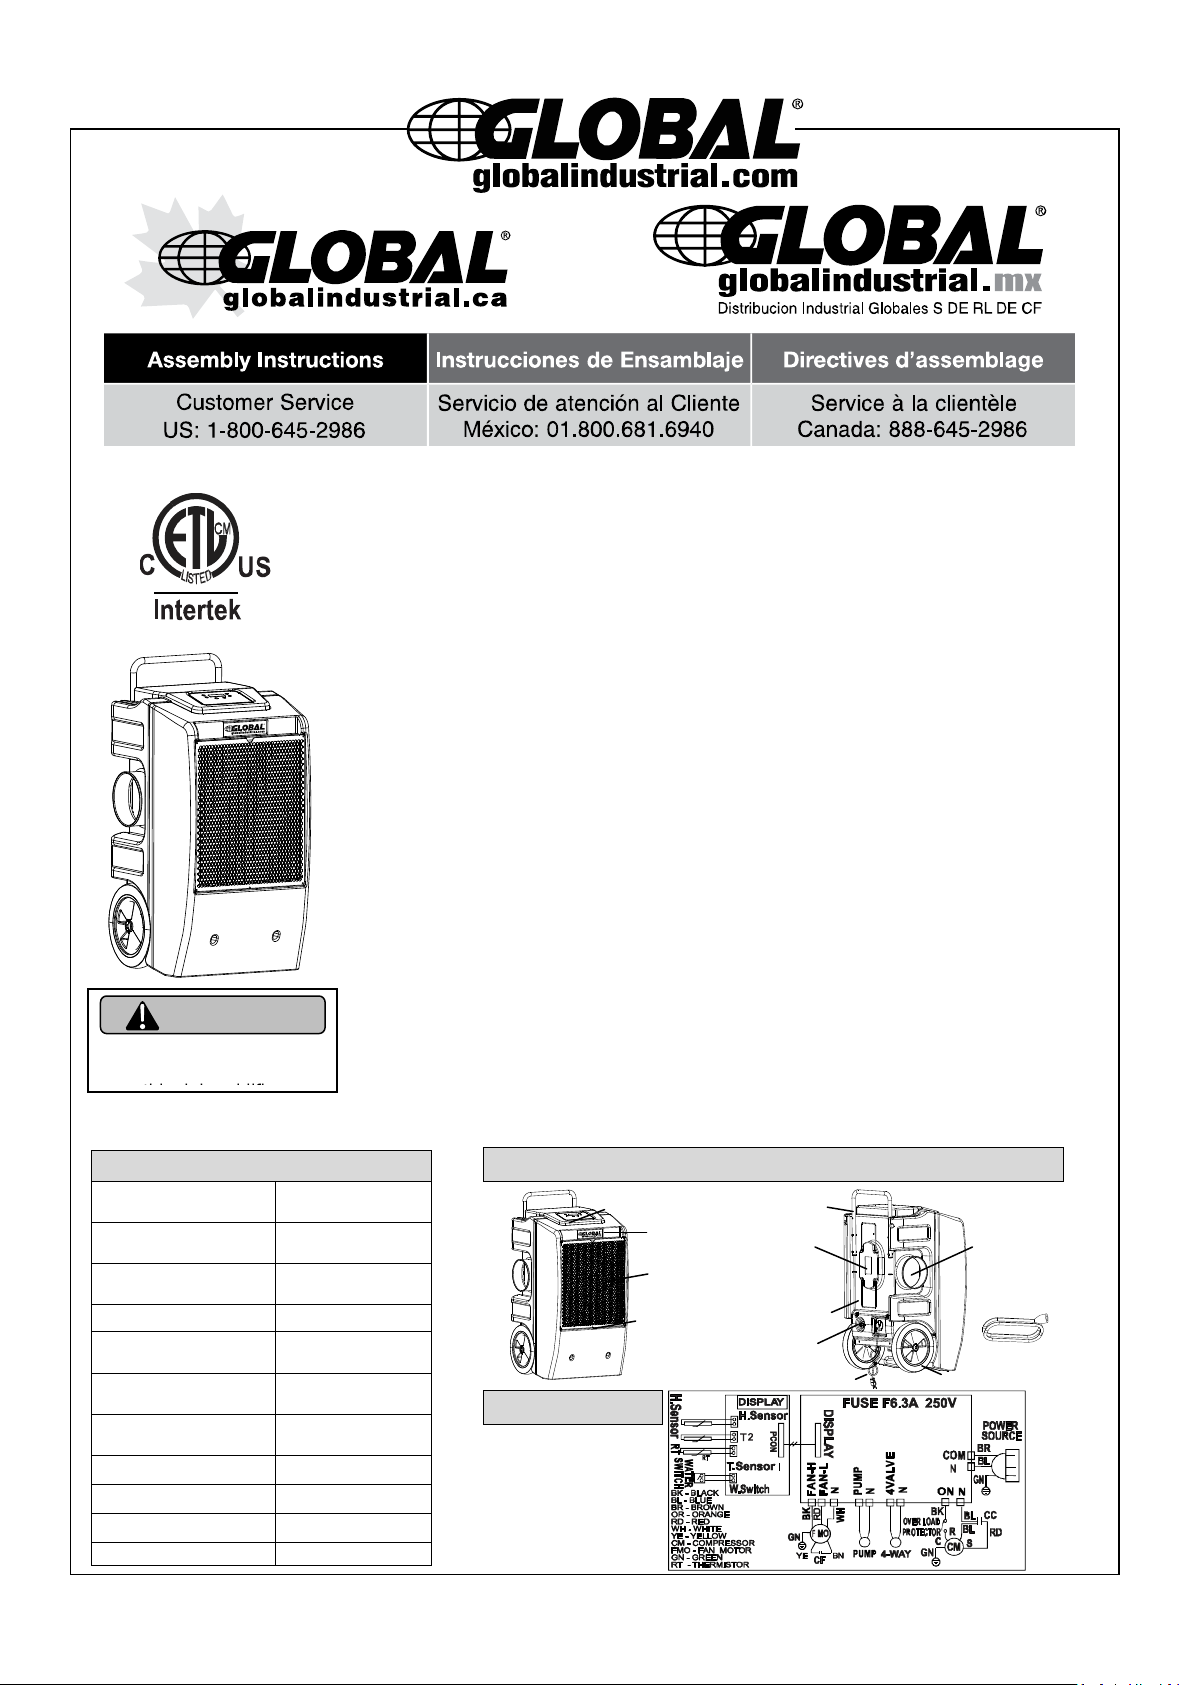
Control Panel
Water Hose
Connector
Handle
Power Cord
and Water
Hose Wrap
Technical Specification
AHAM Rated,
Capacity
130 pints/day
90°F / 90% RH
Capacity
250 pints/day
Power Supply:
115V/60Hz,
1040W/9A
Refrigerant:
R410A/48oz
Working
Temperature:
41°F~95°F
Controls
Electronic
Touchpad
Air Flow
L-430CFM
H-500CFM
Unit Size(inch ):
20.8x22.4x37.8
Packing Size(inch):
22.8x22.8x41.3
Net/Gross Weight
121/134
Stackable
Yes
Logo Label
Please read all
instructions before using
WARNING
Control panel
Filter
Air Intake
Metal Grill
Water Hose
Air Outlet
Wheel
Rating
Label
Part list
Circuit Diagram
Power Cord
SAVE FOR FUTURE
REFERENCE
LGR Dehumidifier Low-Grain Refrigerant
250 Pints Per Day Water Pump Model 246704
IMPORTANT INSTRUCTIONS
Note: When using electrical appliances, please follow these basic precautions to reduce
the risk of fire, electric shock, and/or injury/damage to persons or property.
All refrigeration products contain refrigerants, which under federal law must be
removed prior to disposal. If disposing an old unit, verify with a qualified disposal
company for instructions.
1 Operate the unit from a power source of equal voltage, frequency, and rating as indicated
on the product identification plate.
2 Extreme caution and supervision is necessary when unit is used near children or pets and
when the unit is left operating while unattended.
3 Do not operate the unit if the cord/plug is damaged or has been dropped or damaged in
any manner.
4 Do not obstruct the inlet or outlet openings. Do not operate in close proximity to walls,
curtains, or other objects that can block the inlet or outlet openings.
5 This unit must be plugged into grounded outlet.
6 To reduce the risk of electric shock, do not expose unit or power cord to moisture.
7 Always turn off and unplug the unit prior to performing routine maintenance, or when not in
use.
8 The use of attachments or accessories not recommended or intended for this unit may
cause personal injury and/or property damage.
9 This product is intended for normal commercial use only.
10 Do not attempt to dismantle the appliance.
11 Do not operate unit on a metal surface.
12 Do not clean the appliance with any chemicals.
13 This unit is not intended for hazardous locations.
- 1 -
Page 2
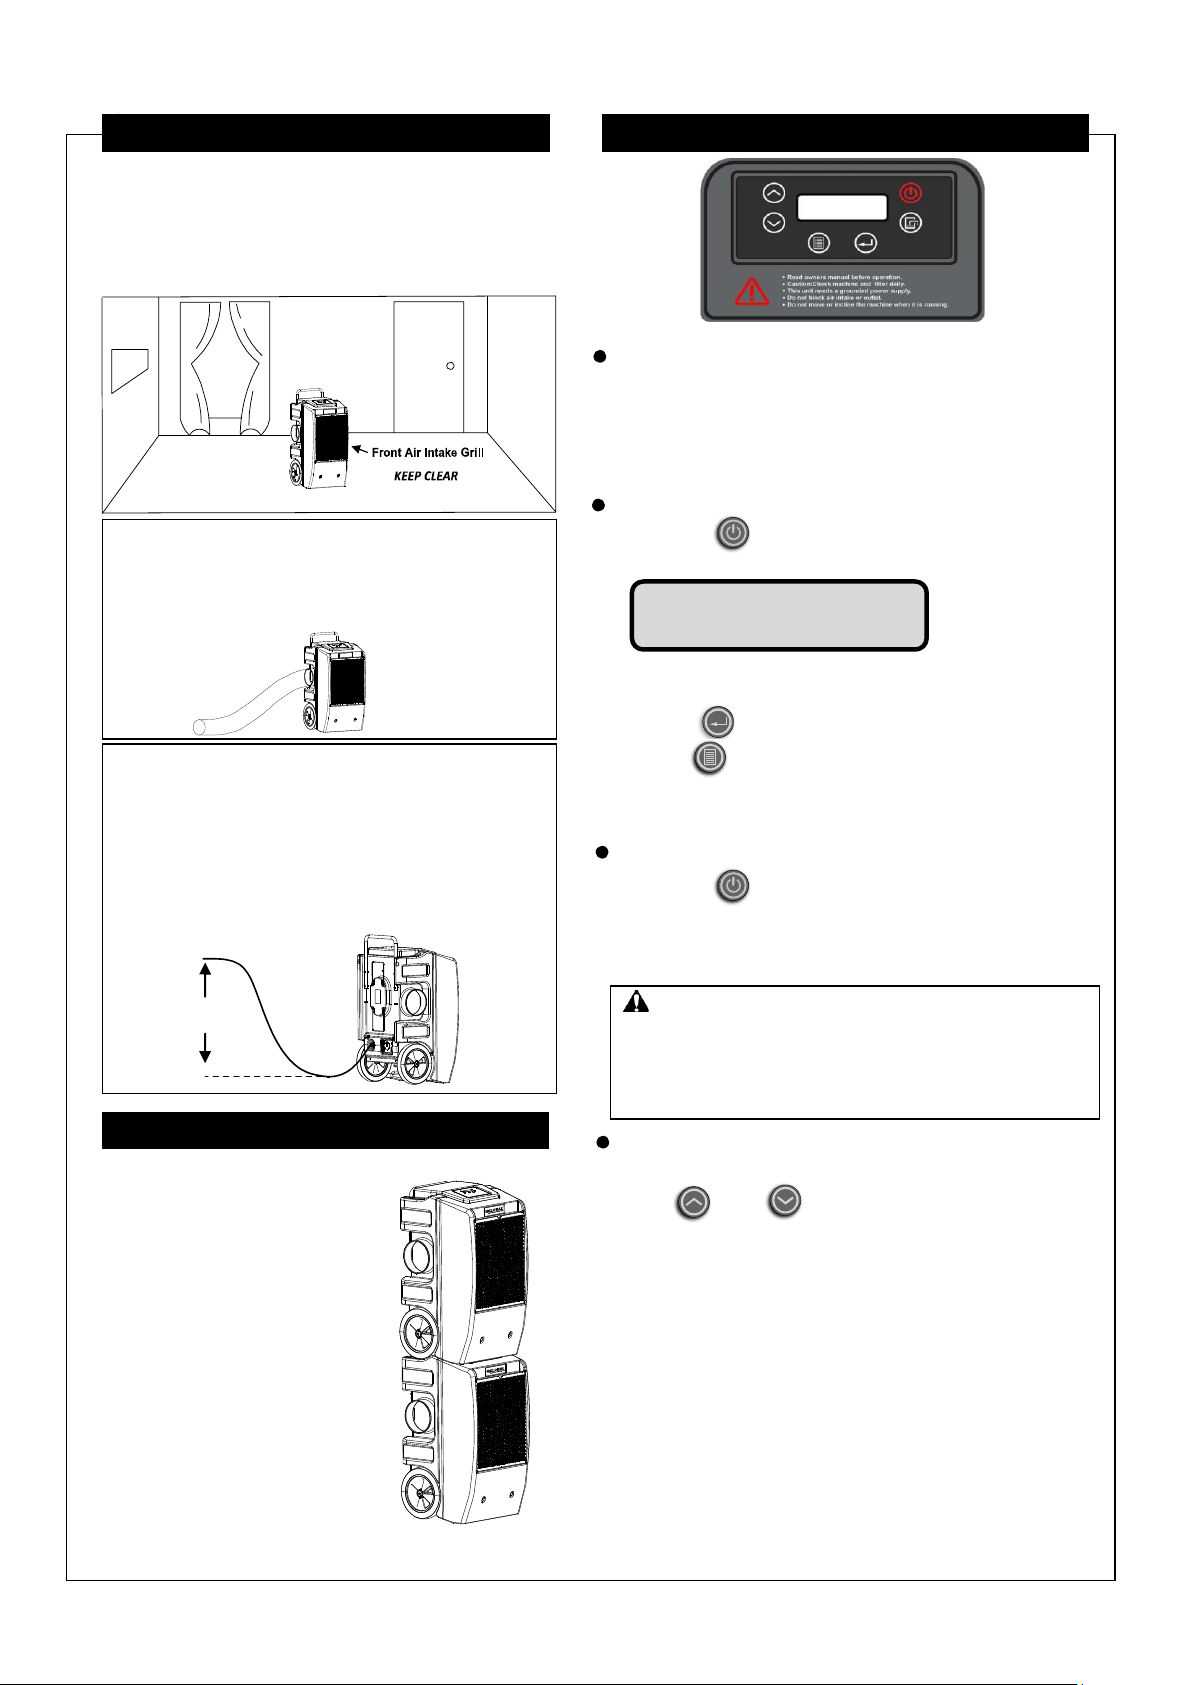
Proper Drainage
This dehumidifier contains a built-in pump that
connects to a draining hose in the back of the unit.
1. Ensure that external water does not create a
slipping hazard.
2. To avoid pump damage or overuse, do not
exceed 10 foot vertical lift between the pump
and drain.
Press the “ON/OFF” keys to turn the
Dehumidifier ON. The screen will display main menu:
SH-setting humidity; AH- ambient humidity
TMP-Temperature; JOB-This running/job time
1.Press to switch the temperature to Fahrenheit.
2.Hold menu keys for 10s, it will lock all button.
The lock icon will show on the main menu.
Hold menu keys again for 10s, it will unlock all buttons.
Press the “ON/OFF” keys to turn the unit OFF.
When the unit turns OFF, the water pump will run for 40
seconds to drain the residual condensate water in the
dehumidifier. The screen will display: Draining……
The factory setting is continuous dehumidifier mode.
Press up or down to set the desired humidity
level.
Increment settings are in increments of 5%.
Humidity setting ranges between CO, 20% - 95%.
1. When the adjusting humidity is between 20% and
95%, the unit will stop working while reaching the
Set humidity. The fan will run every 30 minutes
for 1 minute to sense humidity level. The unit will
resume operation when humidity level is higher
than set humidity level.
2. When the adjust humidity is below 20%, “CO” will
be displayed. The unit will enter continuous
dehumidifying mode .
10 FT. MAXIMUM
DRAIN HEIGHT
IMPORTANT:
To avoid water spillage, do not move the dehumidifier
for at least 3 minutes after turning the power off.
Before transporting, remove the external drain hose,
drain it carefully, and return it to the space on the
back of the unit.
SET UP INSTRUCTIONS OPERATION
Turn the Unit ON
Ductwork Attachment
This dehumidifier can attach ductwork with
diameter of 8 inch to the air outlet.
To avoid airflow restrictions, do not attach duct
that exceed 16.5 feet in length and keep air outlet
clear.
Rear Drain
Hose Outlet
Plug in Electrical Cord
This dehumidifier must be plugged into a grounded
115 VAC/60Hz outlet rated at least 15 amps.
The drain hose must be connected and routed to a
safe location.
SH AH TMP JOB
CO% 50% 000C 00000h
Turn the Unit OFF
Humidity Setting
Place dehumidifier in the upright position.
After transporting the dehumidifier to the desired
location, allow the unit to sit for 30 minutes before
powering ON. This allows the refrigerant system to
stabilize and will avoid damage.
Illustration of correct positioning for best performance:
.
STORING THE UNIT
Follow the guidelines below when
storing the unit:
1. Prior to storing the unit,
clean filters and drain water.
2. Wrap the power cord and
water hose to the back of
the unit.
3. If necessary,
stack machines as shown.
NOTE:
Do not stack more than
2 machines high.
Be sure to secure the
machines to ensure
they do not fall or move.
- 2 -
Page 3
Cleaning Water Pump
NOTE: Clean the water pump once unit reaches a
running time of 1,000 hours.
Ensure the dehumidifier is turned OFF and plug is removed
from the power outlet before performing maintenance.
1. Remove the (4) screws to take apart front housing of
the dehumidifier.
2. Pull connection terminal for water pump.
3. Pull water pipe to take apart water pump.
4. Remove (1) screw to take apart water pump top cover .
5. Remove (4) screws to take apart water bottom cover.
6. Clean the water pump as needed and re-install all parts.
Cleaning or Replacing Filter
NOTE: The working performance of the dehumidifier
will be greatly reduced if the filters are clogged.
Check filter weekly. Clean or replace filter if clogged.
Turn off the unit and unplug it before
performing any maintenance.
1. Remove the filter as shown.
2. Vacuum any debris from the filter.
3. Using lukewarm water and a
mild detergent, wash the filter
and allow it to dry.
4. Once dry, re-install the filter
into the dehumidifier.
OPERATION OPERATION
Defrosting Mode
To ensure that the dehumidifier operates at its
most efficient condition, the unit device will be in
Defrosting Mode when the ambient temperature
falls below 77°F (25°C). The defrost control as
listed below:
Continuous working time is equal
to ambient temperature x2, the
minimum working time is 30
minutes.
If temperature of indoor coil is
≤26.6˚F(-3°C) after continuous
working time is reached
(continuous detection 30s). The
unit will enter Defrost Mode for 5
minutes.
When temperature of
indoor coil is ≥46.4˚F(8°C)
during Defrost Mode.
The unit will also exit
Defrost Mode.
T1 T2 RH TOTAL
00oC 00oC 00% 99999h
TIMER OFF
00h
TIMER ON
00h
Set Target TMP
Set Point = 00oC
Information Query Menu
When the dehumidifier is ON,
Press menu key once, the screen
will display information query menu :
T1- Coil Temperature
T2- Air Outlet Temperature
RH- Air Outlet Humidity
TOTAL- Total Running Hour
The menu will return to main menu if idled for 5 seconds.
Timer OFF
When the dehumidifier is ON,
Press menu key twice to enter
Timer Off function .The screen will display:
MAINTENANCE
Press up or down to set the
desired time between 1-24.
Time settings are in increments of 1 hour.
This is 24 hour simple timer, so the unit can
be set to turn off within next 24 hours.
Timer ON
When the dehumidifier is OFF,
press menu keys once to enter timer on
function. The screen will display:
Press up or down to set
the desired time between 1-24.
Calibration Inlet Sensor
When the dehumidifier is running ON,
Press menu key three times to
enter calibration. The screen will display:
This is only to set/calibrate the inlet sensor.
Use up or down to set the
temperature. To set the humidity,
Press to switch to humidity.
- 3 -
Page 4
TROUBLE SHOOTING TROUBLE SHOOTING
FAULT
CAUSE
SOLUTION
Unit does
not
operate
No power to
machine.
Plug in unit; check
power at outlet and
at base of unit.
Confirm power is
on.
Fan is not
turning
Obstructed air
Outlet.
Remove
obstruction.
Unit
operating,
but room
not dry
1. Insufficient
Dehumidifying
time.
2. Poor air
circulation
in room.
3. Excessive
moisture in room.
1. Allow more time
for drying.
2. Increase air
circulation with fans.
3. Reduce external
air infiltration into
the room.
Unit
collects
minimal
water
1. Room air is dry.
2. Obstructed filter
and coils
3.Room
temperature
is too low.
1. Check humidity
with hygrometer.
2. Check filter and
coils. Clean as
necessary.
3. Increase room
temperature.
WARNING:
DO NOT attempt to rectify issues with unqualified
personnel.
If the problem you are experiencing is not listed
here, contact Global Industrial Customer Service.
CODE
ER1
ER2
ER4
Error
message
Coil sensor
error
Humidity
sensor error
Water pump
fault or
blockage
Display
Reading
Flashes every
one second
Flashes every
one second
Flashes
every one
second
Reason
1. The coil
sensor terminals
are not securely
plugged in.
2. The coil
sensor is
damaged.
3. If unsolved,
there may be a
display panel
PCB issue.
1. The humidity
sensor
terminals are
not securely
plugged in.
2. The humidity
sensor fault.
3. If is unsolved,
It may be
display panel
PCB issue
question.
Water is not
draining from
the pump
reservoir or
there is a
lack of power
to the water
pump.
Remedy
1. Verify coil
sensor terminal
is securely
plugged in.
2. Replace the
coil sensor.
3. Replace
display panel
PCB
1. Verify
humidity sensor
terminal
securely
plugged in.
2. Replace the
humidity sensor.
3.Replace
display panel
PCB
1. Make sure
maximum lift
is not
exceeded.
End of hose
should not
be higher
than 10ft.
above unit.
2. Check
pump for
debris or
blockage.
NOTE:
The table above shows error messages that the system may
detect. If the display shows an “ER” message,
Unplug the unit and reinsert. This may reset the electronics, and
if issue is resolved, no further action is required.
If error message reappears, complete the following
troubleshooting steps under “Explanation.” If this still does not
rectify the issue, contact Global Industrial customer service at
1-800-645-2986.
- 4 -
Page 5

Panneau de contrôle
Tuyau d'eau
connecteur
Manipuler
Cordon
d'alimentation
et de l'eau
enroulement
de tuyau
Deshumidificador LGR Refrigerante de bajo contenido en grano
Spécifications Techniques
AHAM Classé,
Capacité
130pintes/jour
90°F / 90% RH
Capacité
250pintes/jour
Fourniture Voltage :
115V/60Hz,
980W/8.5A
Réfrigérant :
R410A/60oz
La température de
travail :
41°F~95°F
Les contrôles
Touchpad
électronique
Flux d'air
L-430CFM
H-500CFM
Taille (pouces):
20.8x22.4x37.8
Taille d'emballage
(pouces)::
22.8x22.8x41.3
Poids net / brut
121/134
Empilable
Oui
LOGO
Veuillez lire toutes les
instructions avant d'utiliser ce
AVERTISSEMENT
Control panel
Filtre
Prise d'air
grille
métallique
Tuyau d'eau
Sortie d'air
Roue
Évaluation
étiquette
Liste des pièces
Schéma
Cordon d'alimentation
250 pintas por día Bomba de agua Modelo 246704
Remarque: lors de l'utilisation d'appareils électriques, veuillez suivre ces précautions
de base afin de réduire les risques d'incendie, de choc électrique et / ou de blessures /
dommages aux personnes ou aux biens.
Tous les produits de réfrigération contiennent des réfrigérants qui, conformément à la
loi fédérale, doivent être éliminés avant leur élimination. Si vous mettez au rebut une
vieille unité, vérifiez les instructions auprès d’une entreprise d’élimination qualifiée.
1 Utilisez l’appareil à partir d’une source d’alimentation de tension, fréquence et calibre
égaux, comme indiqué sur la plaque signalétique du produit.
2 Une prudence et une surveillance extrêmes sont nécessaires lorsque l'appareil est utilisé à
proximité d'un enfant ou d'un animal domestique et lorsqu'il est laissé en marche sans
surveillance.
3 N'utilisez pas l'appareil si le cordon / la fiche est endommagé ou s'il est tombé ou a été
endommagé de quelque manière que ce soit.
4 Ne pas obstruer les ouvertures d'entrée ou de sortie. Ne pas utiliser à proximité de murs,
rideaux ou autres objets pouvant bloquer l’entrée et la sortie
5 Cet appareil doit être branché sur une prise mise à la terre.
6 Pour réduire le risque de choc électrique, n'exposez pas l'appareil ou le cordon souple à
l'humidité de tout sort.
7 Toujours éteindre et débrancher l’appareil avant de procéder à l’entretien courant ou
lorsqu’il n’est pas utilisé.
8 The use of attachments or accessories not recommended or intended for use with the
product distributor may cause personal injury and/or property damage.
9 Ce produit est destiné à un usage commercial normale seulement.
10 Ne tentez pas de démonter l'appareil.
ÉCONOMISER POUR L'AVENIR RÉFÉRENCE
11 Ne pas faire fonctionner l'appareil sur une surface métallique.
1213 Ne
Cetp aapsp naerettilo ny'ee
INSTRUCTIONS IMPORTANTES
r ls't appapsa dreeilst ainvée ca uuxn esnoldvaron
t o drgaanngieqreueu.x
its
.
- 1 -
Page 6

Bon drainage
Ce déshumidificateur contient une pompe intégrée
qui se connecte à un tuyau d'évacuation situé à
l'arrière de l'appareil.
1. Assurez-vous que l'eau extérieure ne crée pas
de risque de glissade.
2. Pour éviter tout endommagement ou toute
utilisation excessive de la pompe, ne dépassez
pas l'élévation verticale de 10 pieds entre la
pompe et le drain. Le connecteur doit être
complètement installé
Appuyez sur la “ON / OFF” pour allumer le
déshumidificateur. L’écran affichera le menu principal:
SH-réglage de l'humidité; AH- humidité ambiante;
o
C - température ambiante;
JOB- Ce temps de course / travail.
1. Appuyez sur pour régler la température sur
Fahrenheit.
2. Maintenez touche de menu pendant 10
secondes pour verrouiller tous les boutons.
L'icône de verrouillage apparaîtra dans le menu
principal.
Maintenez à nouveau les touches de menu pendant
10 secondes pour déverrouiller tous les boutons
Appuyez sur les touches “ON / OFF” pour
éteindre l'appareil. Lorsque l'appareil s'éteint, la pompe
à eau fonctionnera pendant 40 secondes pour vider
l'eau de condensation restante dans le
déshumidificateur. L'écran affichera Drainage ……
Le réglage d'usine est le mode déshumidificateur
continu.
Appuyez sur haut ou bas pour régler le
niveau d'humidité souhaité. Les paramètres
d'incrément sont incréments de 5%.
Le réglage d'humidité varie entre CO, 20% - 95%.
1. Lorsque le réglage d'humidité se situe entre 20% et
95%, l'appareil cesse de fonctionner tant qu'il a atteint
le niveau d'humidité défini. Le ventilateur fonctionnera
toutes les 30 minutes pendant 1 minute pour détecter le
niveau d'humidité. L'unité reprendra son
fonctionnement lorsque le niveau d'humidité est
supérieur au niveau d'humidité défini.
2. Lorsque le taux d'humidité est inférieur à 20%, “CO”
sera affiché. L'unité entrera en mode de
déshumidification continue.
10 pi. MAXIMUM
Hauteur de vidange
IMPORTANT:
Pour éviter tout déversement d'eau, ne déplacez pas
le déshumidificateur pendant au moins 3 minutes
après la mise hors tension.
Avant le transport, retirez le tuyau de vidange
externe, vidangez-le soigneusement et replacez-le
dans l'espace situé à l'arrière de l'appareil.
INSTRUCTIONS DE CONFIGURATION OPÉRATION
Allumer l'appareil
Attachement de canalisation
Ce déshumidificateur peut attacher des conduits
avec un diamètre de 8 pouces à la sortie d'air.
Pour éviter les restrictions de circulation d'air, ne pas
attachez le conduit qui dépasse 16,5 pieds
longueur et garder la sortie d’air dégagée.
Pour éviter la surcharge de courant.
Quand la température ambiante
est plus de 32.2oC.S'il vous plaît pas
attacher les conduits.
Les conduits ne sont pas inclus
Veuillez contacter le fournisseur
pour acheter séparément.
Drain
arrière
Sortie
de tuyau
Branchez le cordon électrique
Ce déshumidificateur doit être branché sur une prise
de terre.
Prise 115 VCA / 60 Hz d'au moins 15 ampères.
Le tuyau de vidange doit être connecté et acheminé
vers un endroit sûr.
SH AH
0
C JOB
CO% 50% 00 000h
Éteindre l'appareil
Réglage de l'humidité
Placez le déshumidificateur en position verticale.
Après avoir transporté le déshumidificateur sur le site,
laissez l’appareil s’asseoir pendant 30 minutes avant de
le mettre sous tension.
Cela permet au système de réfrigérant de se stabiliser et
d'éviter les dommages.
Illustration du positionnement correct pour de meilleures
performances
.
CONSERVER L'UNITÉ
Suivez les instructions ci-dessous pour stocker l'unité:
1. Avant d'entreposer l'appareil,
nettoyez les filtres et vidangez l'eau.
2. Enroulez le cordon d'alimentation
et le tuyau d'eau à l'arrière
de l'appareil.
3. Si nécessaire, empiler des
machines comme indiqué.
REMARQUE:
N'empilez pas plus de 2 machines.
Assurez-vous de sécuriser les
machines pour vous assurer qu'elles
ne tombent pas ou ne bougent pas.
- 2 -
Page 7

ENTRETIEN
Cleaning Or Replacing Filter
REMARQUE: Le rendement du déshumidificateur
sera considérablement réduit si les filtres sont
encrassés. Vérifiez le filtre chaque semaine.
Nettoyage ou remplacement du filtre s’obstruer.
Éteignez l’appareil et débranchez-le avant de procéder à
toute opération de maintenance.
1. Retirez le filtre comme indiqué.
2. Aspirer les débris du filtre.
3. Nettoyez le filtre avec de l'eau
tiède et un détergent doux,
puis laissez-le sécher.
4. Une fois sec, réinstallez le filtre
dans le déshumidificateur.
Pompe à eau de nettoyage
REMARQUE: Nettoyer la pompe à eau une fois lorsque
la durée de fonctionnement de l'unité atteint 1000
heures.
Assurez-vous que le déshumidificateur est éteint et que la
fiche est retirée de la prise de courant avant de procéder à
la maintenance.
1. Retirez les 4 vis pour séparer le boîtier avant du
déshumidificateur.
2. Tirez sur la borne de connexion de la pompe à eau.
3. Tirer le tuyau d'eau pour démonter la pompe à eau.
4. Retirez les vis 1pc pour séparer le couvercle supérieur
de la pompe à eau.
5. Retirez les 4 vis pour séparer le couvercle inférieur de
l’eau.
6. Nettoyage de la pompe à eau et réinstallation complète.
OPÉRATION OPÉRATION
Mode dégivrage
Pour garantir le fonctionnement optimal du
déshumidificateur, l'appareil sera en mode de
dégivrage lorsque la température ambiante sera
inférieure à 77°F. Le contrôle de dégivrage
comme indiqué ci-dessous:
Le temps de travail continu est de 33
minutes. Puis démarrez la température
de détection de la bobine intérieure
If Si la température de la bobine
intérieure est ≤28.4 oF après
avoir atteint le temps de travail
continu (détection continue 2
minutes)
L'unité entrera en mode
dégivrage pendant 4 minutes.
Lorsque la température de
la bobine intérieure est ≥
46.4oF en mode dégivrage.
L'unité quittera également le
mode dégivrage.
T1 T2 RH2 TOTAL
00 00 00 99999h
TIMER OFF
00h
TIMER ON
00h
Set Target RH
Set Point = 0%
Menu de requête d'information
Lorsque le déshumidificateur est en marche,
appuyez une fois sur la touche du menu,
l’écran affiche le menu de requête d’informations:
T1- Température de la bobine
T2- Température de sortie d'air
RH2-Humidité de l'air
TOTAL- Heure de fonctionnement totale
Le menu reviendra au menu principal s'il est inactif
pendant 5 secondes.
Minuterie OFF
Lorsque le déshumidificateur est allumé,
Appuyez deux fois sur la touche du menu
pour accéder à la fonction de minuterie.
L'écran affichera:
Appuyez sur haut ou bas pour régler la
durée souhaitée entre 1-24.
Les paramètres d’incrément sont définis par
incréments de 1h.
Il s’agit d’une minuterie simple de 24 heures.
L’appareil peut donc être réglé pour s’éteindre
dans les prochaines 24 heures.
Minuterie ON
Lorsque le déshumidificateur est éteint,
Appuyez une fois sur les touches du menu
pour activer la fonction de minuterie.
L'écran affichera:L'écran affichera:
Appuyez sur haut ou bas pour régler
le temps souhaité entre 1-24.
Capteur d'entrée d'étalonnage
Lorsque le déshumidificateur est en marche,
Appuyez trois fois sur les touches du menu
pour entrer dans le calibrage.
L'écran affichera:
Ceci ne sert qu'à configurer / calibrer le capteur
d'entrée.
Utilisez up ou down pour régler l’humidité.
- 3 -
Page 8

DÉPANNAGE DÉPANNAGE
FAUTE
CAUSE
SOLUTION
L'unité ne
fonctionne
pas
Pas de puissance
à usiner.
Branchez l'unité;
vérifiez l'alimentation
à la prise et à la base
de l'appareil.
Confirmez la mise
sous tension.
Le
ventilateur
ne tourne
pas
Sortie d'air
obstruée.
Enlevez l'obstruction.
Unité en
marche,
mais la
pièce
n'est pas
sèche
1. Temps de
déshumidification
insuffisant.
2. Mauvaise
circulation de l'air
dans la pièce.
3. Humidité
excessive dans la
chambre.
1. Prévoyez plus de
temps pour le
séchage.
2. Augmentez la
circulation de l'air
avec les ventilateurs.
3. Réduisez
l'infiltration d'air
externe dans la
pièce.
L'unité
recueille
un
minimum
d'eau
1. L'air de la pièce
est
sec.
2. Filtre et
bobines obstrués
3.La température
ambiante est trop
basse.
1. Vérifier l'humidité
avec un hygromètre.
2. Vérifiez le filtre et
les bobines.
Nettoyez si
nécessaire.
3. Augmenter la
température
ambiante.
ATTENTION:
NE PAS tenter de rectifier les problèmes avec du
personnel non qualifié.
Si le problème que vous rencontrez n'est pas
répertorié ici, contactez le service clientèle de
Global Industrial.
CODE
ER1
ER2
ER4
Message
d'erreur
Erreur du
capteur de
bobine
Erreur du capteur
d'humidité d'entré
d'air
Pompe à
eau
Défaut ou
blocage
Display
Reading
Clignote
toutes les
secondes
Clignote toutes les
secondes
Clignote
toutes les
secondes
Raison
1. les bornes
du capteur
de bobine ne
sont pas
correctement
branchées.
2. Le capteur
de bobine
est
endommagé.
3. Si le
problème
n'est pas
résolu, il
peut s'agir
d'un
problème lié
au circuit
imprimé du
panneau
d'affichage.
1. Les bornes du
capteur d'humidité
ne sont pas
correctement
branchées.
2. Le défaut du
capteur d'humidité.
3. Si le problème
n'est pas résolu, il
peut s'agir d'un
problème lié au
circuit imprimé du
panneau
d'affichage.
L'eau ne
s'écoule pas
du réservoir
de la pompe
ou la pompe
à eau
manque de
puissance.
Remède
1. Vérifiez
que la borne
du capteur
de bobine
est
correctement
branchée.
2.
Remplacez
le capteur de
bobine.
3.
Remplacez
le circuit
imprimé du
panneau
d'affichage
1. Vérifiez que le
terminal du capteur
d'humidité est bien
branché.
2. Remplacez le
capteur d'humidité.
3.Remplacez le
circuit imprimé du
panneau d'affichage
1.Assurez-vo
us que
l'élévation
maximale
n'est pas
dépassée.
L’extrémité
du tuyau ne
doit pas
dépasser 10
pieds
au-dessus
de l’unité.
2. Vérifiez
que la
pompe ne
présente pas
de débris ou
d'obstruction
.
REMARQUE:
Le tableau ci-dessus montre les messages d'erreur que le
système peut détecter. Si l’écran affiche un message “ER”,
Débranchez l'appareil et réinsérez-le. Cela peut réinitialiser
les composants électroniques et si le problème est résolu,
aucune autre action n'est requise.
Si le message d'erreur réapparaît, suivez la procédure de
dépannage suivante dans “Explication”. Si le problème
persiste, contactez le service clientèle de Global Industrial.
- 4 -
Page 9

Panel de control
Conector de la
manguera de
agua
Encargarse
De
Cable de
Alimentación y
manguera de
agua enrollada
Pompe à eau de 250 pintes par jour de réfrigérant à faible grain
Especificación técnica
AHAM Clasificado,
Capacidad
130 pintas/día
90°F / 90% RH
Capacidad
250 pintas/día
Fuente de
alimentación
115V/60Hz,
980W/8.5A
Refrigerante
R410A/60oz
Temperatura de
trabajo
41°F~95°F
Controles
Touchpad
electronico
Flujo de aire
L-430CFM
H-500CFM
Tamaño de la
unidad (pulgadas)
20.8x22.4x37.8
Tamaño del
embalaje(pulgadas)
:
22.8x22.8x41.3
Peso neto / bruto
121/134
Apilable
SÍ
LOGO
ADVERTENCIA
Control panel
Filtrar
Rejilla metálica de
admisión de
aire
Manguera
de
Salida de aire
Rueda
Etiqueta de
clasificación
Lista de
Diagrama de circuito
Cable de alimentación
AHORRA PARA FUTURA REFERENCIA
Veuillez lire toutes les
instructions avant
d'utiliser
de déshumidificateur LGR
Nota: Cuando utilice aparatos eléctricos, siga estas precauciones básicas para reducir
el riesgo de incendio, descarga eléctrica, y / o lesiones / daños a personas o bienes.
Todos los productos de refrigeración contienen refrigerantes que, según la ley federal,
deben eliminarse antes de su eliminación. Si está desechando una unidad vieja,
verifique con una compañía de desecho calificada para obtener instrucciones.
1 Opere la unidad desde una fuente de alimentación de igual voltaje, frecuencia y
clasificación, como se indica en la placa de identificación del producto.
2
Es necesario tener precaución y supervisión extremas cuando la unidad se usa cerca de
niños o mascotas y cuando la unidad se deja en funcionamiento mientras está sin supervisión.
3 No opere la unidad si el cable / enchufe está dañado o se ha caído o dañado de alguna manera
4 No obstruya las aberturas de entrada o salida. No opere cerca de paredes, cortinas u otros
objetos que puedan bloquear la entrada y la salida
5 Esta unidad debe enchufarse a un tomacorriente con conexión a tierra
6 Para reducir el riesgo de descarga eléctrica, no exponga la unidad o el cable de alimentación
a la humedad.
7 Siempre apague y desenchufe la unidad antes de realizar el mantenimiento de rutina o
cuando no esté en uso
8 El uso de accesorios o accesorios no recomendados o destinados a ser utilizados con el
distribuidor del producto puede causar lesiones personales y / o daños a la propiedad.
9 Este producto está destinado únicamente para uso comercial normal.
10 No intente desmontar el aparato.
11 No opere la unidad sobre una superficie metálica.
12 No limpiar el aparato con ningún producto químico.
13 Cet appareil n'est pas conçu pour les zones dangereuses.
INSTRUCCIONES IMPORTANTES
- 1 -
Page 10

Drenaje adecuado
Este deshumidificador contiene una bomba
integrada que se conecta a una manguera de
drenaje en la parte posterior de la unidad.
1. Asegúrese de que el agua externa no cree un
riesgo de resbalones.
2. Para evitar daños o uso excesivo de la bomba,
no exceda la elevación vertical de 10 pies entre la
bomba y el drenaje. El conector debe estar
completamente asentado.
Presione las teclas “ON / OFF” para encender el
deshumidificador. La pantalla mostrará el menú
principal:
SH- ajuste de humedad; AH- humedad ambiental;
0
C - temperatura ambiente;
JOB- Este tiempo de ejecución / trabajo
1. Presione para cambiar la temperatura a
Fahrenheit.
2. Mantenga pulsadas las teclas de menú durante
10 s, bloqueará todos los botones. El icono de candado
aparecerá en el menú principal.
Mantenga las teclas del menú nuevamente durante 10
segundos, se desbloquearán todos los botones.
Presione las teclas “ON / OFF” para apagar la
unidad. Cuando la unidad se apaga, la bomba de agua
funcionará durante 40 segundos para drenar el agua
de condensación residual en el deshumidificador. La
pantalla mostrará Drenaje ...
La configuración de fábrica es el modo
deshumidificador continuo.
Presione hacia arriba o hacia abajo para
establecer el nivel de humedad deseado.
Los ajustes de incremento están en incrementos del 5%.
El ajuste de humedad varía entre CO, 20% - 95%.
1. Cuando la humedad de ajuste está entre el 20% y el
95%, la unidad dejará de funcionar mientras alcanza la
humedad establecida. El ventilador funcionará cada 30
minutos durante 1 minuto para detectar el nivel de
humedad. La unidad reanudará la operación cuando el
nivel de humedad sea más alto que el nivel de humedad
establecido.
2. Cuando la humedad de ajuste está por debajo del 20%,
se mostrará “CO”. La unidad entrará en modo de
deshumidificación continua.
10 PIES. ALTURA
MAXIMA DE
DRENAJE
IMPORTANTE:
Para evitar derrames de agua, no mueva el
deshumidificador durante al menos 3 minutos
después de apagar la unidad.
Antes de transportar, retire la manguera de drenaje
externa, drénela con cuidado y vuelva a colocarla en
el espacio en la parte posterior de la unidad.
INSTRUCCIONES DE CONFIGURACIÓN OPERACIÓN
Encienda la unidad
Acoplamiento de ductos
Este deshumidificador puede conectar
conductos con un diámetro de 8 pulgadas a la
salida de aire. Para evitar restricciones de flujo de
aire, no conecte conductos que excedan los 16.5
pies de largo y mantenga la salida de aire
despejada. Para evitar sobrecargas
de corriente. Cuando la temperatura
ambiente es superior a 32.2°C,
no conecte conductos El conducto
no está incluido. Póngase en
contacto con el proveedor para
comprar por separado.
Salida de la
manguera de
drenaje
posterior
Enchufe el cable eléctrico
Este deshumidificador se debe enchufar en un
tomacorriente de 115 VCA / 60Hz con conexión a
tierra con una capacidad de al menos 15 amperios.
La manguera de drenaje debe estar conectada y
encaminada a un lugar seguro.
SH AH
0
C JOB
CO% 50% 00 000h
Apague la unidad
Humidity setting
Coloque el deshumidificador en posición vertical.
Después de transportar el deshumidificador al sitio,
deje que la unidad se siente por 30 minutos antes de
encenderla. Esto permite que el sistema de refrigerante
se estabilice y evite daños.Ilustración de posicionamiento
correcto para el mejor rendimiento.
.
ALMACENANDO LA UNIDAD
Siga las pautas a continuación cuando almacene
la unidad:
1. Antes de guardar la unidad, limpie los filtros y
drene el agua.
2. Envuelva el cable de alimentación y la manguera
de agua en la parte posterior de la unidad.
3. Si es necesario, apile las máquinas como
se muestra.
NOTA:
No apile más de 2 máquinas
de altura.
Asegúrese de asegurar las
máquinas para asegurar
no se caen ni se mueven.
- 2 -
Page 11

Bomba de agua de limpieza
NOTA: limpiar la bomba de agua una vez cuando el
tiempo de funcionamiento de la unidad llegue a 1000
horas.
Asegúrese de que el deshumidificador esté apagado
y el enchufe se retira de la toma de corriente antes de
realizar el mantenimiento.
1. Quite los 4 tornillos para desmontar la carcasa frontal
del deshumidificador.
2. Tire del terminal de conexión para la bomba de agua.
3. Tire de la tubería de agua para desmontar la bomba de
agua.
4. Quite los tornillos de 1pc para desmontar la tapa
superior de la bomba de agua.
5. Quite los 4 tornillos para desarmar
la tapa inferior del agua.
6. Limpiar la bomba de agua
y reinstalar todo
MANTENIMIENTO
Limpieza o reemplazo del filtro
NOTA: El rendimiento de trabajo del
deshumidificador se reducirá en gran medida si los
filtros están obstruidos. Revise el filtro
semanalmente. Limpiar o reemplazar el filtro si se
obstruye.
Apague la unidad y desenchúfela antes
Realizando cualquier mantenimiento.
1. Retire el filtro como se muestra.
2. Aspire cualquier residuo del filtro.
3. Con agua tibia y un detergente suave,
lave el filtro y deje que se seque.
4. Una vez seco, vuelva a instalar el filtro
en el deshumidificador.
OPERACIÓN OPERACIÓN
Modo de descongelación
Para garantizar que el deshumidificador
funcione en su condición más eficiente, el
dispositivo de la unidad estará en modo de
descongelación cuando la temperatura
ambiente caiga por debajo de 77°F. El control
de descongelación como se indica a continuació
El tiempo de trabajo continuo es
de 33 minutos. A continuación,
iniciar la temperatura de
detección de la bobina de interior
Si la temperatura de la bobina
interior es ≤28.4˚F después de
alcanzar el tiempo de trabajo
continuo (detección continua 2
minutos). La unidad entrará en
el modo de descongelamiento
durante 4 minutos.
Cuando la temperatura
de la bobina interior es
≥46.4˚F durante el modo
de descongelamiento.
La unidad también saldrá
del modo de
descongelamiento.
T1 T2 RH2 TOTAL
00 00 00 99999h
TIMER OFF
00h
TIMER ON
00h
Set Target RH
Set Point = 0%
Menú de consulta de información
Cuando el deshumidificador está encendido,
Presione las teclas de menú una vez,
la pantalla mostrará el menú de consulta de
información:
T1- temperatura de la bobina
T2- Temperatura de salida del aire.
RH2- Humedad de salida del aire.
TOTAL- Total de horas de carrera
El menú volverá al menú principal si está ina
ctivo durante 5 segundos.
Temporizador de apagado
Cuando el deshumidificador está encendido,
presione las teclas de menú dos veces
para ingresar a la función de temporizador
apagado. La pantalla mostrará:
Presione hacia arriba o hacia
abajo para configurar el tiempo deseado entre
1-24. Los ajustes de incremento están en
incrementos de 1h. Este es un temporizador
simple de 24 horas, por lo que la unidad puede
Estará configurado para apagarse dentro de
las próximas 24 horas.
Temporizador de encendido
Cuando el deshumidificador está apagado,
Presione las teclas de menú una vez para
ingresar el temporizador función.
La pantalla mostrará:
Presione hacia arriba o hacia abajo
para configurar el tiempo deseado entre 1-24
Sensor de entrada de calibración
Cuando el deshumidificador se está ejecutando,
Presione las teclas de menú tres veces para
ingresar a la calibración. La pantalla mostrará:
Esto es solo para configurar / calibrar el sensor
de entrada.Use hacia arriba o hacia
abajo para ajustar la humedad.
- 3 -
Page 12

SOLUCIÓN DE PROBLEMAS SOLUCIÓN DE PROBLEMAS
CULPA
PORQUE
SOLUCIÓN
La unidad
no
funciona
No hay poder para
mecanizar.
Enchufe la unidad;
Verifique la potencia
en el tomacorriente y
en la base de la
unidad. Confirmar
que el poder está
encendido
El
ventilador
no está
girando
Salida de aire
obstruida.
Retire la obstrucción.
Unidad
operativa,
pero sala
no seca.
1. Insuficiente
tiempo de
deshumidificación.
2. Mala circulación
del aire.
en habitación.
3. Humedad
excesiva en la
habitación
1. Permitir más
tiempo para el
secado.
2. Aumentar la
circulación de aire
con ventiladores.
3. Reducir la
infiltración de aire
externo en la
habitación.
Unit
collects
minimal
water
1. El aire de la
habitación es
seco.
2. Filtro obstruido
y bobinas.
3. La temperatura
de la habitación
es
demasiado baja.
1. Controlar la
humedad con
higrómetro.
2. Comprobar el filtro
y las bobinas.
Limpiar según sea
necesario.
3. Aumente la
temperatura
ambiente.
ADVERTENCIA:
NO intente rectificar problemas con personal no
calificado.
Si el problema que está experimentando no se
encuentra aquí, póngase en contacto con el
Servicio al cliente de Global Industrial.
CÓDIGO ER1
ER2
ER4
Mensaje
de error
Error sensor
bobina
Air Inlet Humidity
sensor error
Fallo o
bloqueo de
la bomba de
agua
Lectura
de la
pantalla
Parpadea
cada
segundo
Parpadea cada
segundo
Parpadea
cada
segundo
Razón
1. Los
terminales
del sensor
de la bobina
no están
enchufados
de manera
segura.
2. El sensor
de la bobina
está dañado.
3. Si no se
resuelve,
puede ser
una pregunta
sobre el PCB
del panel de
pantalla.
1. Los terminales
del sensor de
humedad no están
enchufados de
manera segura.
2. El fallo del sensor
de humedad.
3. Si no se resuelve,
puede ser una
pregunta sobre el
PCB del panel de
pantalla.
El agua no
drena de la
bomba
depósito o
hay una falta
de poder a la
bomba de
agua.
Remedio
1. Verifique
que el
terminal del
sensor de la
bobina esté
bien
enchufado.
2.
Reemplace
el sensor de
la bobina.
3.
Reemplace
el panel de
pantalla PCB
1. Verifique que el
terminal del sensor
de humedad esté
bien enchufado.
2. Reemplace el
sensor de
humedad.
3. Reemplace el
panel de pantalla
PCB
1. Make sure
maximum lift
is not
exceeded.
End of hose
should not
be higher
than 10 feet
above unit.
2. Check
pump for
debris or
blockage.
NOTA:
La tabla anterior muestra los mensajes de error que el
sistema puede detectar. Si la pantalla muestra un mensaje
de "ER",
Desenchufe la unidad y vuelva a insertarla. Esto puede
reiniciar la electrónica, y si el problema se resuelve, no se
requiere ninguna acción adicional.
Si vuelve a aparecer el mensaje de error, complete los
siguientes pasos de solución de problemas en
"Explicación". Si esto todavía no soluciona el problema,
comuníquese con el servicio al cliente de Global Industrial.
- 4 -
 Loading...