

Page 1
globalindustrial.ca
Distribucion Industrial Globales S DE RL DE CF
User manual Manual del usuario Manuel de l'utilisateur
Customer Service
US: 1-800-645-2986
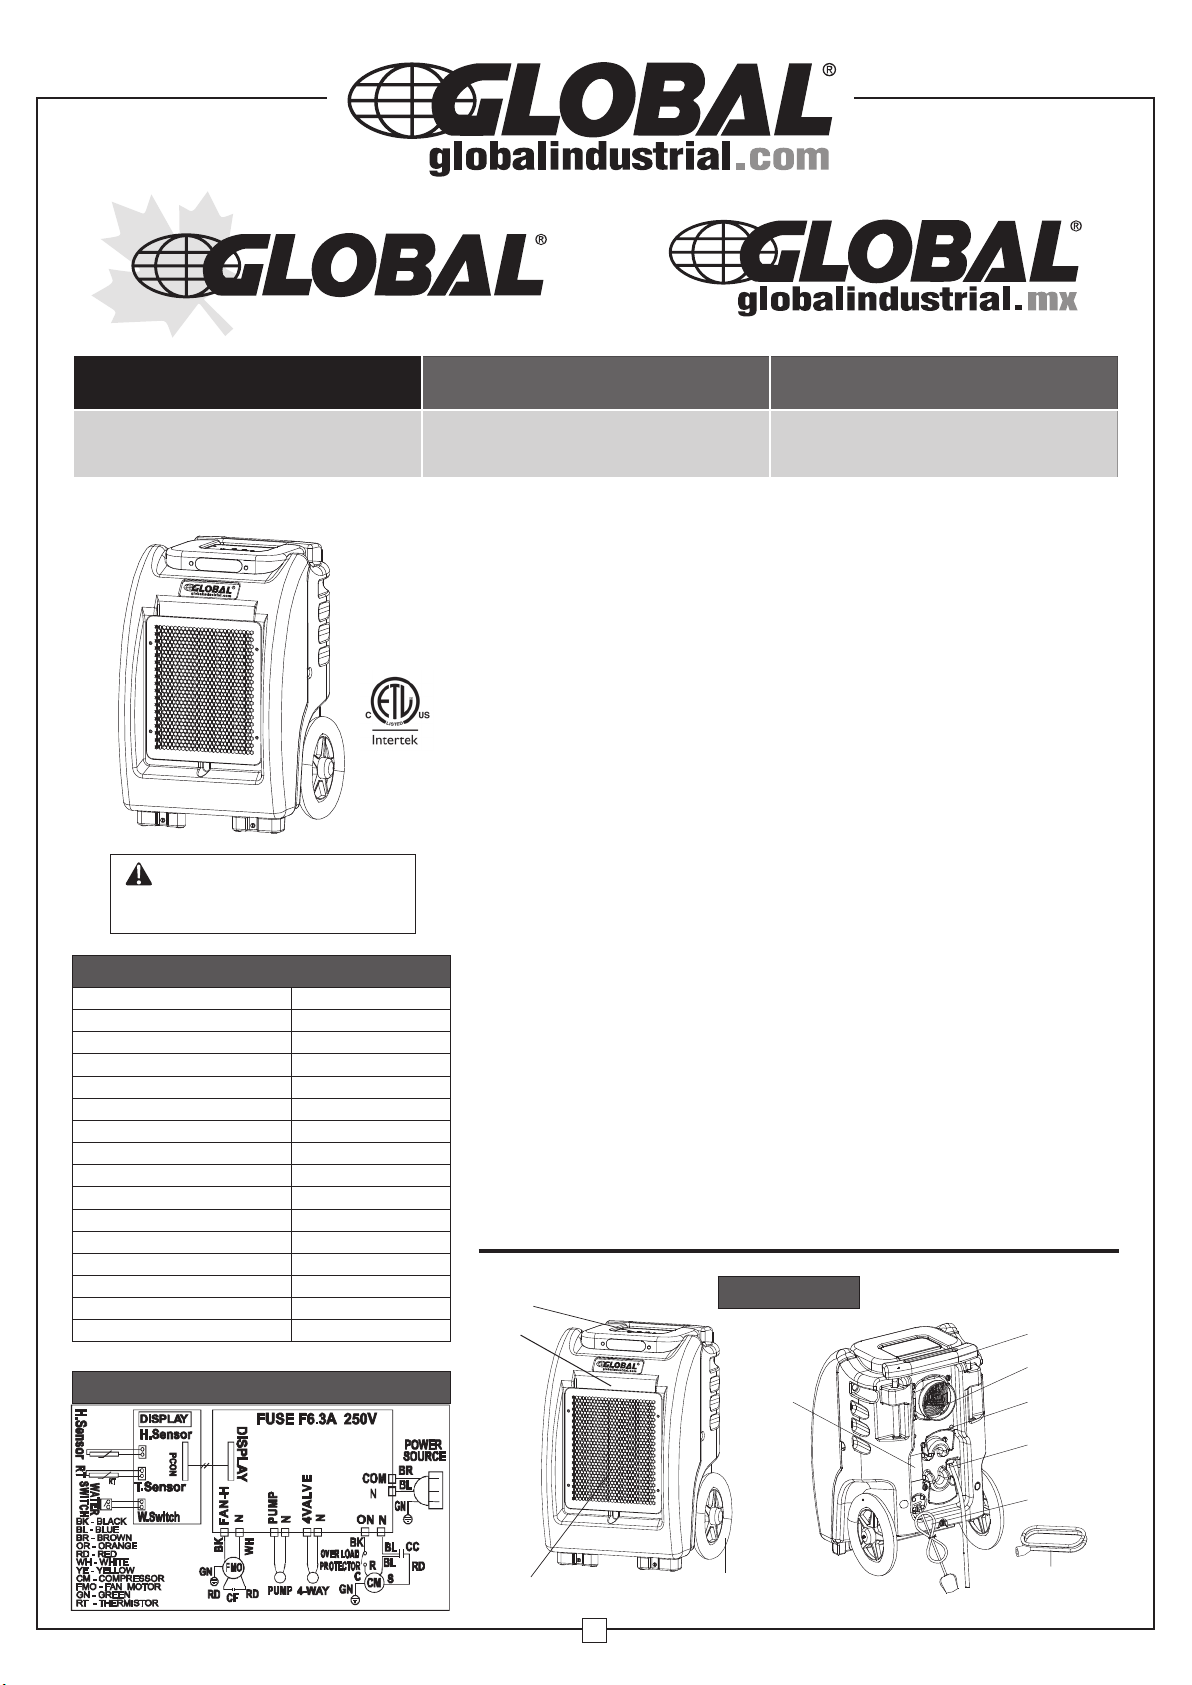
LGR Dehumidifier Low-Grain Refrigerant
WARNING:
Please read all instructions before using
this dehumidifier.
Technical Specifications
Width 21.3in
Depth 21.3in
Height 31.9in
Weight 104lb.
CFM 306
Amp 9.5
AHAM Rated, Capacity 100 Pints/day
90°F / 90% RH Capacity 200 Pints/day
Drain hose length 27 ft.
Cord length 25 ft.
Stackable Yes
Control Digital
Construction Rotomolded PE
Built in pump Yes
Refrigerant R410A
Refrigeration Low-Grain
Circuit Diagram
Servicio de atención al Cliente
México: 01.800.681.6940
Service à la clientèle
Canada: 888-645-2986
200 Pints Per Day Water Pump
IMPORTANT INSTRUCTIONS, SAVE FOR FUTURE REFERENCE
Note: When using electrical appliances, please follow these basic precautions to
reduce the risk of fire, electric shock, and personal injury or property damage.
All refrigeration products contain refrigerants, which under federal law must be
removed prior to disposal.
1. Operate the unit from a power source of equal voltage, frequency, and rating as
indicated on the product identification plate.
2. Extreme caution and supervision is necessary when unit is used near children and
pets or when left operating while unattended.
3. Do not operate unit if cord/plug has been dropped or damaged in any manner.
4. Do not obstruct inlet or outlet openings. Do not operate in close proximity to walls,
curtains, or other objects that may block inlet and outlet.
5. This unit must be plugged into grounded outlet.
6. To reduce the risk of electric shock, do not expose unit or power cord to moisture.
7. Always turn off and unplug unit prior to performing routine maintenance, or when
not in use.
8. The use of attachments or accessories is not recommended or intended
for use with product.
9. This product is intended for normal commercial use only.
10. Do not attempt to dismantle the appliance.
11. Do not operate unit on a metal surface.
12. Do not clean the appliance with any chemicals.
13. This unit is not intended for hazardous locations.
Control panel
Filter
Parts List
Rating
label
Handle
Air outlet
Cord wrap
Drain hose
connector
(male)
Air intake
metal grill
Power cord
Wheel
1
Drain hose
060617
Page 2
LGR Dehumidifier Low-Grain Refrigerant
200 Pints Per Day Water Pump
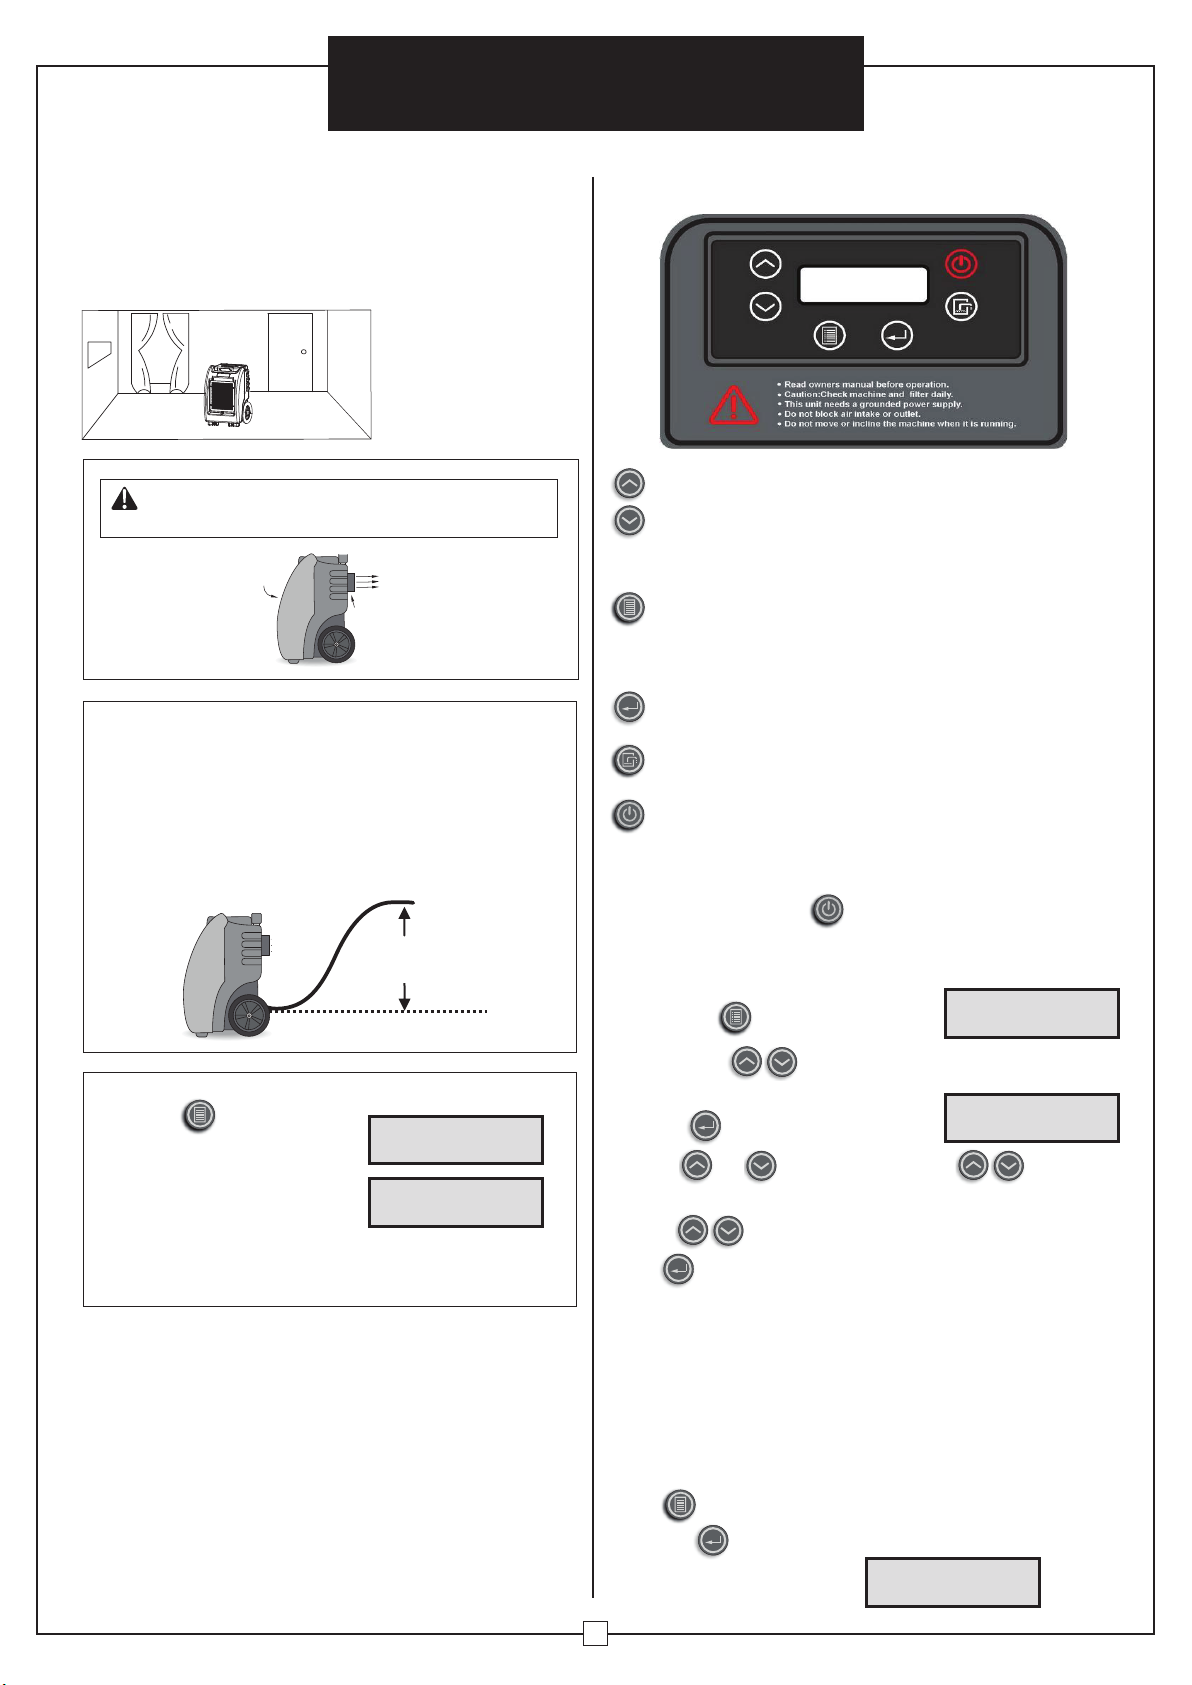
SET UP INSTRUCTIONS DIGITAL CONTROL PANEL
Place dehumidifier in upright position. After transporting
dehumidifier to site, allow unit to sit for 30 minutes before
powering ON. This allows the refrigerant system time to
stabilize and avoid damage.
Illustration of correct
positioning for best
performance
ADJUSTMENT KEYS
WARNING:
Do not block air inlet or outlet. Do not attach ductwork.
AIR INLET
KEEP CLEAR
AIR OUTLET
KEEP CLEAR
PROPER DRAINAGE
This dehumidifier contains a built-in pump that connects
to a draining hose in the back of the unit.
1. Ensure that external water does not create a slipping
hazard.
2. To avoid pump damage or overuse, do not exceed 10
foot vertical lift between pump and drain.
Drain Hose
10 FT. MAXIMUM
DRAIN HEIGHT
These 2 keys allow you to adjust humidity values
and time settings (up or down).
NOTE: To cycle through menu functions, you must
press BOTH adjustment keys at the same time
FUNCTION
Displays menu of unit functions. To cycle through
menu functions you must press BOTH up and
down adjustment keys at the same time
ENTER
Selects and activates a function or setting.
PURGE
Empties the water reservoir.
POWER ON/OFF
Turns the unit ON and OFF.
OPERATION
Starting the unit
1. Turn the power ON
Press the “Power ON/OFF” key once to
turn the power ON.
2. Set TIME and DATE
Press the key once to display:
User Manual
Humidity Setting
Timer Clock
OPTIONAL FUNCTIONS:
When the key is pressed
you will see:
Humidity Setting
Timer Clock
While navigating through
some functions, it may
also display:
Language ID
USB/SD-CARD GSM
Your unit may not contain these functions, which are
OPTIONAL. If not, an error message will be displayed
when access is attempted.
DEFROSTING MODE
To ensure dehumidifier operates at its most efficient
condition, unit will be in defrosting mode when ambient
temperature falls below 77°F (25°C). Defrost controls
are listed below:
• Continuous working time is equal to ambient temperature
x2; minimum working time is 30 minutes.
• If temperature of indoor coil is ≤26.6˚F(-3°C) after
continuous working time is reached (continuous detection
30s), unit will enter defrost mode for 5 minutes.
• When temperature of indoor coil is ≥46.4˚F(8°C) during
defrost mode, unit will exit defrost mode.
2
Press both keys together TWICE
to highlight “Clock.”
Clock 00:00
Press to enter clock settings:
Y0000 M00 D00
Press OR to desired hour, then together
to access minutes.
Repeat together to access year, month, and day.
Press when done to exit clock settings.
NOTE: This unit has an internal battery powered clock, so
you do NOT need to set the time and date every time you
plug it in or turn power ON.
Setting the humidity
Unit is factory set for CONTINUOUS OPERATION
(“CO”), if no humidity adjustments are made or if you set
a humidity level below 26%, see below:
To adjust the relative humidity level from 26% to 90%
press once.
Press the key to select
“Humidity Setting.”
Humidity Setting
Timer Clock
Page 3
LGR Dehumidifier Low-Grain Refrigerant
200 Pints Per Day Water Pump
User Manual
Press or to adjust humidity between
26% and 90%.
Remember, if you select a humidity value BELOW 26% the
unit will display“CO” for continuous operation.
When desired humidity level is reached, press to set.
NOTE:
1. When adjusting humidity between 26% and 90%,
operation halts until the humidity setting has been entered
and set. When set, the screen will display “completed”,
and unit will automatically resume operation.
2. This unit has battery backed up memory to allow for
auto-restart. If power is interrupted, unit, will return to its
previous humidity setting and continue operation once
AC power is restored.
Setting the timer
Ensure clock is correct before setting the timer.
To set the timer, press then together.
Now press for
Timer on
Timer off
To set a time for the unit to start, select “Timer on”, set the
hour (00 to 23), and minute (00 to 59) fields to desired start
time. Once desired start time is reached, select “YES” to
set. To set the time for the unit to stop, select “Timer off”
and set the hour and minute fields to desired stop time.
Select “YES” to set.
To CANCEL the time display, move the cursor to
“ON” and press .
NOTE: Pressing the “Power ON/OFF” key during timer
operation will not cancel timer settings. Also, the unit will
not function if both the “Timer on” and “Timer off” settings
are the same.
Purging the unit
During normal operation the pump purges the condensate
reservoir automatically when full. However, use “PURGE”
before moving the machine to avoid water spillage. The
pump will shut off automatically after 40 seconds of
continuous operation.
Press the key to empty water from the
pump reservoir.
Make sure the drain hose is connected and routed to a
safe location.
Turning the unit OFF
DO NOT turn the power OFF by disconnecting the
power cord from the outlet!
ADDITIONAL LCD DISPLAY DATA
After Power OFF, the LCD may display summary screens
of recent activity and statistics. While not essential for unit
operation, this information may be useful for your records.
Standby CH00%
Ran 00000H
Standby CH00%
Last job 00:00
Standby CH00%
Time 00:00
NOTE: The “RAN” field displays
continuously during operation.
Like a car odometer, this shows
the total number of hours on
the unit and cannot be manually
reset outside of the factory.
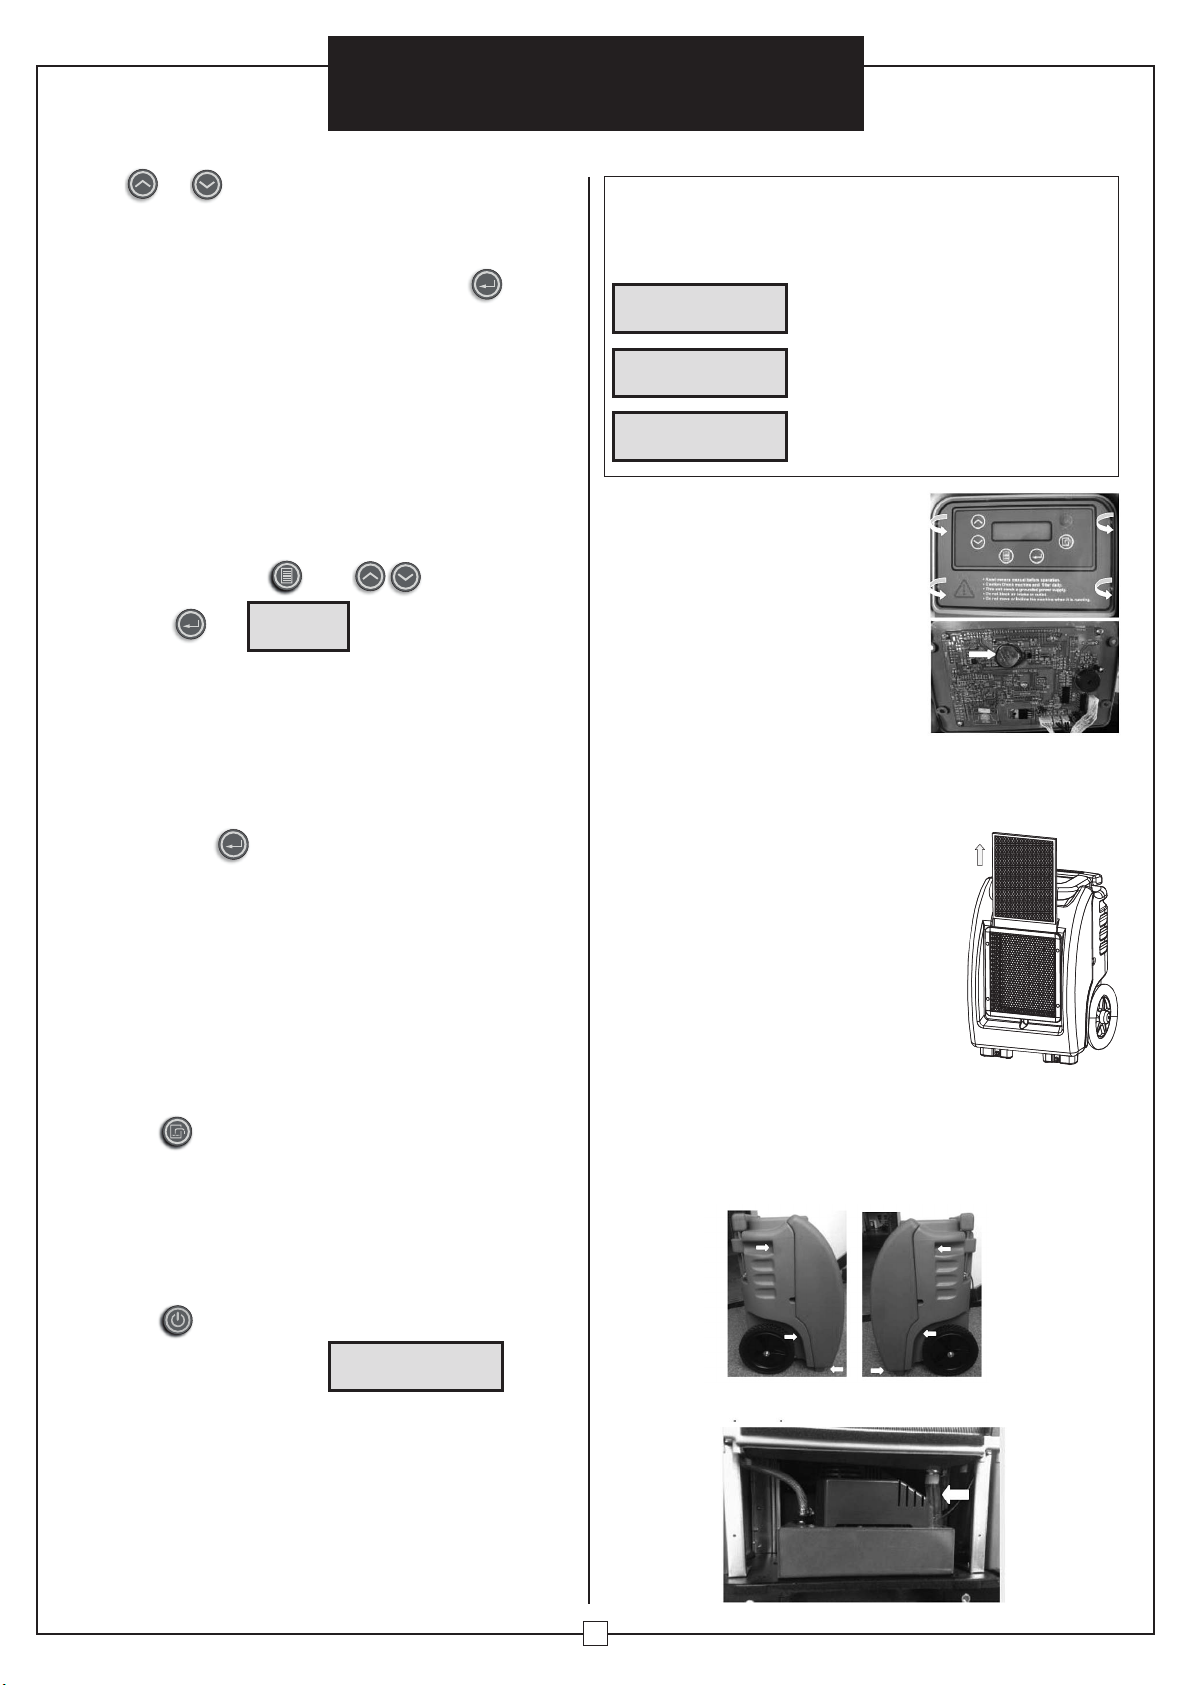
MAINTENANCE
Replacing The Battery
1. Remove control panel label
and four corner screws in the
control panel.
2. Once removed, carefully lift the
control panel to access the PCB.
3. Remove battery and replace it
with CR2032 battery
4. Re-assemble control panel.
Cleaning or Replacing Filter
NOTE: The working performance of the dehumidifier will
be greatly reduced if filter is clogged. Check filter weekly.
Clean or replace filter if clogged or damaged.
Ensure the dehumidifier is turned
OFF and unplugged before
performing maintenance.
1. Remove filter as shown.
2. Vacuum any debris using vacuum
hose and nozzle attachment.
3. Using warm water and mild
detergent, wash filter and allow to dry.
4. Once dry, reinstall filter.
Water Pump Maintenance
NOTE: Water pump maintenance should be completed
once unit reaches 1000 hours of operation.
Turn dehumidifier OFF and unplug from outlet prior to
any maintenance.
1. Remove screws (6pcs) to separate front housing.
Press the key once to turn the power OFF.
The LCD screen will display
the following message:
Dehumidifier off
Draining....
The water pump will turn on automatically and run for 40
seconds to drain the residual condensate water in the
dehumidifier.
To avoid water spillage DO NOT move the dehumidifier for
at least three minutes after turning the power OFF to allow
for drain time.
Before transporting, be sure to remove the external drain
hose, drain carefully, and return to the space provided on
the back of the unit.
2. Remove water hoses to remove water pump.
3
Page 4
LGR Dehumidifier Low-Grain Refrigerant
200 Pints Per Day Water Pump
User Manual
3. Remove screw (1pc) to remove top cover.
4. Remove screws (4pcs) to remove bottom cover then
clean the water pump.
5. Reinstall the water pump.
STORING UNIT
Follow the guidelines below when
storing dehumidifier.
1. Wrap power cord and drainage
hose to the back of unit.
2. Stack units as shown
if necessary.
NOTE: Do not stack more than
two units high. Do not transport
in stacked position.
TROUBLESHOOTING
ISSUE CAUSE SOLUTION
Unit is not operating.
Fan is not operating. Air outlet is obstructed. Remove obstruction.
Unit has no power. Plug in unit. Verify power at outlet.
Confirm power is on.
Unit is operating, but room
is not dry.
Unit collects minimal water. 1. Room air is dry.
WARNING: DO NOT attempt to rectify issues with unqualified personnel. If the problem you are experiencing is not
listed here, call Global Industrial customer service.
CODE ER1 ER2 ER4
Error message Coil sensor error Humidity sensor error Water pump fault or blockage
Display Reading Flashes one time per second Flashes one time per second Flashes one time per second
Cause 1. Coil sensor terminals are not
plugged in securely.
2. Coil sensor is damaged.
3. If issue is unresolved it may
be a display panel PCB issue.
Solution 1. Verify coil sensor terminal is
securely plugged in.
2. Replace coil sensor.
3. Replace display panel PCB.
1. Insufficient dehumidifying time.
2. Poor air circulation in room.
3. Excessive moisture in room.
2. Obstructed filter and coils.
3. Room temperature is too low.
1. Humidity sensor
terminals are not plugged in
securely.
2. Humidity sensor is damaged.
3. If issue is unresolved it may
be a display panel PCB issue.
1. Verify humidity sensor
terminal is securely plugged in.
2. Replace humidity sensor.
3. Replace display panel PCB.
1. Allow more time for drying.
2. Increase air circulation with fans.
3. Reduce external air infiltration into room.
1. Check humidity with hygrometer.
2. Check filter and coils. Clean as necessary.
3. Increase room temperature.
Water is not draining from the
pump reservoir or there is a lack
of power to the water pump.
1. Make sure maximum lift is
not exceeded. End of hose
should not be higher than 10
feet above unit.
2. Check pump for debris
or blockage.
NOTE: The table above shows error messages that the system may detect. If the display shows an “ER” message,
unplug the unit and reinsert. This may reset the electronics, and if issue is resolved, no further action is required. If error
message reappears, complete the following troubleshooting steps under “Explanation.” If this still does not rectify the
issue, contact Global Industrial customer service.
4
Page 5

globalindustrial.ca
Distribucion Industrial Globales S DE RL DE CF
User manual Manual del usuario Manuel de l'utilisateur
Customer Service
US: 1-800-645-2986
Deshumidificador LGR Refrigerante de grano bajo
Bomba de agua de 200 pintas día
ADVERTENCIA:
Por favor, lea todas las instrucciones antes de
comenzar a usar este deshumidificador.
Especificaciones técnicas
Ancho 21.3in
Profundidad 21.3in
Altura 31.9in
Peso 104lb.
CFM 306
Amperes 9.5
Frecuencia, Capacidad AHAM
Capacidad90°F / 90% RH 200 Pintas/día
Longitud de la manguera
de drenaje
Longitud del cable 25 ft.
Apilable Yes
Control Digital
Construcción Rotomoldeado PE
Bomba interna Si
Refrigerante R410A
Refrigeración Grano bajo
Esquema de Conexiones
Pantalla
Negro
Azul
Marrón
Naranja
Rojo
Blanco
Amarillo
Compresor
Ventilador del Motor
Verde
Fusible
Ventilador-H
100 Pintas/día
Pulsor de
Encendido
4 Válvula
Bomba
27 ft.
Fuente de
Servicio de atención al Cliente
México: 01.800.681.6940
INSTRUCCIONES IMPORTANTES, CONSÉRVELE PARA QUE LAS
CONSULTE POSTERIORMENTE
Aviso: Cuando utilice los dispositivos eléctricos, por favor cumpla con las
precauciones básica para reducir los riesgos de incendios, electroshock,
lesiones personales o daños a la propiedad. Todos los productos de
refrigeración contienen refrigerantes, los cuales bajo la ley federal deben ser
removidos, antes de ser desechados.
1. Opere la unidad de una fuente de energía de igual voltaje, frecuencia, y potencia
como se indica en la placa identificadora del producto.
2. Tenga cuidado extremo y necesita ser supervisada, cuando la unidad está siendo
utilizada cerca de niños y mascotas, o cuando está funcionando sin supervisión.
3.
No opere la unidad sí el cable/enchufe se han caído o están dañado de algún modo
4. No obstruya la entrada o la salida de los orificios. No la opere cerca de paredes,
cortinas u otros objetos que podrían bloquear los orificios de salida y entrada.
5. Esta unidad debe ser enchufada a un tomacorriente conectado a tierra.
6. Para reducir los riesgos de electroshocks, no exponga la unidad o el cable de
electricidad a la humedad
7. Siempre apague y desenchufe la unidad antes de realizar los mantenimientos de
rutina, cuando no esté en uso.
8. El uso de accesorios o aditamentos no es recomendable o están destinados para
el uso con el producto.
9. Este producto está destinado solamente para uso comercial.
10. No intente desarmar la unidad.
11. No opere la unidad sobre una superficie metálica.
12. No limpie la unidad con ningún químico.
13. Esta unidad no está destinada para ser utilizada en lugares peligrosos.
Panel de Control
Filtro
Energía
Ventilación de la
reja metálica
1
Lista de partes
Nivel de
Clasificación
Rueda
Service à la clientèle
Canada: 888-645-2986
Modelo 246690
.
Manija
Salida de Aire
Envoltura
del Cable
Conector de la
Manguera de
Vaciado (macho)
Cable
Eléctrico
Manguera
del Vaciado
060617
Page 6

Deshumidificador LGR Refrigerante de grano
bajo Bomba de agua de 200 pintas día
INSTRUCCIONES DE MONTAJE PANEL DE CONTROL DIGITAL
Coloque el deshumidificador en una posición vertical. Después
de transportar el deshumidificador al lugar, permita que la unidad
repose 30 minutos antes de ENCENDERLA. Eso permite que el
sistema de refrigeración se estabilice y así evitar daños .
Ilustración de la
posición correcta para
obtener un mejor
rendimiento
PULSADORES DE AJUSTE
Esas dos teclas, le permiten ajustar los valores de humedad y
ADVERTENCIA: No bloquee orificios de entrada y
salida de aire. No adjunte el conducto.
MANTENGA LA
ENTRADA DE AIRE
DESOBSTRUIDA
SALIDA DE AIRE
DESOBSTRUIDA
ADECUADO DREANAJE
Este deshumidificador contiene una bomba interna que está
conectada a una manguera de drenaje ubicada en la parte trasera
de la unidad.
1. Asegurarse que el agua externa no cree riesgos de resbalones.
2. Evitar dañar la bomba o uso excesivo, no se exceda de 10 pies
de elevación vertical, entre la bomba y el drenaje.
10 PIES DE ALTURA
MÁXIMA DE DESAGUE
Manguera de
drenaje
FUNCIONES OPCIONALES:
Cuando oprima la Tecla ,
usted verá:
Humidity Setting
Timer Clock
Mientras navegue a través
de algunas funciones, también
podría mostrar:
Language ID
USB/SD-CARD GSM
Su unidad no podría contener esas funciones, las cuales
son OPCIONALES. Sí no, un mensaje que dice error
aparecerá en la pantalla cuando se intenta tener acceso
.
MODO DE DESCONGELAMIENTO
Para asegurarse que el deshumidificador opere en la más eficiente
condición, la unidad debe estar en el modo de descongelamiento
cuando la temperatura ambiente es menos de 77 °F(25°C). Los
controles de descongelamiento a continuación aparecen enumerados:
1. Tiempo de trabajo continúo es igual a la temperatura ambiente x2,
mínimo de tiempo de trabajo es 30 minutos.
2. Sí la temperatura del serpentín interior es de ≤26.6˚F(-3°C) después
que se llegue al tiempo de trabajo continuo (detección continua 30s)
3. Cuando la temperatura del serpentín interior es de ≥46.4˚F(8°C)
durante el modo de descongelación, la unidad saldrá del modo
de descongelamiento.
Puesta en marcha de la unidad
1. Encender (ON)
2. Configure la HORA y FECHA
Oprima ambas teclas juntas DOS VECES para
Oprima para entrar la configuración
Repita el proceso de las teclas juntas para tener acceso
al año, mes y día
Oprima cuando haya terminado para salir de la configuración
del reloj.
NOTEAVISO: Esta unidad posee un reloj interno de batería,
por lo que usted NO necesita configurar la y la fecha cada
vez que la enchufe o la encienda.
Configurar la humedad
La unidad se configura en la fábrica para su CONTINÚA
OPERACIÓN (“CO”), sí los ajustes de la humedad son hechos o si
se han ajustado a un nivel por debajo del 26%, véase
a continuación:
Para ajustar el nivel de humedad relativa del 26% al 90%
oprima una vez
Oprima el pulsador para
seleccionar el “Ajustador de Humedad”.
configuraciones del tiempo (hacia arriba o hacia abajo)
AVISO: Para operar las funciones del menú, usted debe
oprimir las teclas de ajuste al mismo tiempo.
FUNCIÓN
Muestra el menú de las funciones de la unidad. Para
desplazarse por el menú de funciones debe oprimir AMBAS
teclas de ajuste hacia arriba y hacia abajo al mismo tiempo.
ENTRAR
Selecciona y activa una función o configuración.
LAVADO
Vaciar el tanque del agua.
ENCENDIDO/ APAGADO
Encender (ON) y apagar (OFF) la unidad.
OPERACIÓN
Oprima el botón Power ON/ OFF una
vez que esté encendida la unidad
Oprima el botón ## una vez para que aparezca en pantalla:
que el “Reloj” aparezca en la pantalla
del reloj:
Oprima O para seleccionar la hora deseada, luego apriete
las teclas juntas y así poder tener acceso a los minutos
Manual del usuario
Humidity Setting
Timer Clock
Clock 00:00
Y0000 M00 D00
Humidity Setting
Timer Clock
2
Page 7

Deshumidificador LGR Refrigerante de grano
bajo Bomba de agua de 200 pintas día
Manual del usuario
Oprima el pulsad or para ajustar la humedad entre
26% y 90 %.
Recuerde, sí selecciona valor de humedad POR DEBAJO
de 26%, la unidad mostrará en pantalla “CO” para el
funcionamiento continuo. Cuando se alcance el nivel de
INFORMACIONES ADICIONALES EN LA PANTALLA LCD
Después de apagar, el LCD podría mostrar un resumen de pantallas
de las recientes actividades y estádisticas. Aunque no es esencial
para el funcionamiento de la unidad, esa información podría ser útil
para conservar en sus registros.
humedad deseado, oprima para configurarlo
AVISO:
1. Cuando ajuste la humedad entre 26% y 90%, el funcionamiento
se detiene hasta, que la configuración haya sido entrada y fijada.
Cuando esté ajustada, la pantalla mostrará “completada” y la
unidad reanudará su funcionamiento.
2. Esta unidad tiene una memoria con batería de reserva para
permitir que se realice el arranque automático. Sí la electricidad
es interrumpida, la unidad, retornará a configuración de
humedad previa y continuará el funcionamiento una vez que la
corriente alterna sea restaurada
Ajustar el temporizador
Asegurar que el reloj tenga la hora correcta antes de ajustar el
temporizador
luego a la vez.
Ahora oprima
Para ajustar el temporizador, oprima
Timer on
Timer off
Para ajustar la hora de cuando la unidad debe encenderse, seleccione
“Timer on”, y así configurar la hora (00 a 23), y minutos (00 a 59) del
tiempo de inicio deseado. Una vez que llegue al tiempo de inicio
deseado, selecciones “YES” para configurarlo. Para configurar
el tiempo que la unidad debe detenerse, seleccione “Timer off” y
configure la hora y minutos del tiempo deseado para que se dentenga.
Seleccione “YES” para configurarlo
.
Para CANCELAR el indicador del tiempo, mueva el curso a
“ON” y oprima .
AVISO: Al oprimir el pulsador “Power ON/OFF” durante el
funcionamiento del temporizador eso no cancelará la configuración
MANTENIMIENTO
Reemplazo de la Batería
1. Remueva la etiqueta del panel
de control, y atornille las cuatro
esquinas del panel de control.
2. Una vez removida, levante
cuidadosamente el panel de
control para tener acceso a la PCB.
3. Remueva la batería y reemplácela
con una batería CR2032.
4. Vuelva armar el panel de control.
Limpie o Reemplace el Filtro
AVISO: El rendimiento del trabajo del deshumidificador se verá
reducido significativamente sí el filtro está tupido. Chequee el
filtro semanalmente. Limpie y reemplace el filtro sí está tupido o
dañado. Asegúrese que el deshumidificador esté apagado antes
de realizar el mantenimiento
1. Remueva el filtro como se indica.
2. Aspire cualquier residuo usando una
del temporizador. También, la unidad no funcionará sí ambas
configuraciones del “Timer on” y “Timer off” son las mismas
Lavado de la unidad
3. Utilice agua tibia y detergente suave,
Durante el funcionamiento normal, la bomba lava el depósito
condensado automáticamente cuando está lleno. Sin embargo, el
uso de “PURGE” antes de mover la máquina para evitar derrame
de agua. La bomba se apagará automáticamente después de 40
segundos de funcionamiento continuo
Oprima el pulsador para vaciar el agua del depósito de la bomba
Asegúrese la manguera de drenaje esté conectada y
transferida a un lugar seguro
Apague la unidad
4. Una vez seco, reinstale el filtro.
Mantenimiento de la Bomba de Agua
AVISO: El mantenimiento de la bomba de agua debe ser
realizado una vez que la unidad llegue a 1000 horas de
funcionamiento.
Turn dehumidifier OFF and unplug from outlet prior to
any maintenance.
1.
¡NO desconecte la electricidad al desconectar el cable
de la electricidad del tomacorriente!
Standby CH00%
Ran 00000H
AVISO: El campo “RAN” aparece
continuamente durante el
funcionamiento. Como un odómetro
Standby CH00%
Last job 00:00
Standby CH00%
Time 00:00
de automóvil, en la pantalla aparece
el número total de horas en unidad,
y no pueda ser manualmente
reiniciado fuera de la fábrica.
manguera de la aspiradora y con una
boquilla adjuntada.
lave el filtro y dele tiempo para que seque.
Apague el deshumidificador y desenchúfelo del
tomacorriente, antes de realizar cualquier mantenimiento.
Oprima el pulsador una vez para apagar la unidad.
La pantalla LCD mostrará
el siguiente mensaje
Dehumidifier off
Draining....
La bomba de agua se encenderá automáticamente, y
funcionará 40 segundos para drenar los residuos del agua
condensada en el deshumidificador.
2. Remueva las mangueras de agua para remover la bomba
Para evitar que el derrame de agua mueva el deshumidificador
por lo menos tres minutos después de ser apagada la unidad,
para que permita que tenga lugar el tiempo de drenaje
Antes de transportar la unidad, asegúrese de sacar la
manguera de drenaje externa con cuidado, y ponerla al
lugar donde va en la parte trasera de la unidad.
3
de agua.
Page 8

Deshumidificador LGR Refrigerante de grano
bajo Bomba de agua de 200 pintas día
Manual del usuario
3. Remueva un tornillo (1pieza) para remover la cobertura superior
4. Remueva los tornillos (4 piezas) para remover la
cobertura inferior y luego limpie la bomba de agua.
5. Vuelva a instalar la bomba de agua.
RESOLUCIÓN DE PROBLEMAS
PROBLEMA CAUSA SOLUCIÓN
La unidad no está
funcionando.
El ventilador no está
funcionando.
La unidad está funcionando,
pero el local no está seco.
La unidad acumula una
cantidad mínima de agua.
La unidad no tiene electricidad.
El orificio donde sale el aire está
obstruido.
1. Tiempo insuficiente para el
deshumedecimiento.
2. Pobre circulación de aire en el lugar.
3. Humedad excesiva en el lugar.
1. El aire ambiente es seco.
2. Filtros y serpentines obstruidos.
3. La temperatura ambiental es
demasiado baja.
UNIDAD DE ALMACENAMIENTO
Cumpla con las pautas que
aparecen más abajo cuando
guarde el deshumidificador.
1. Envuelva el cable de electricidad
y drene la manguera que va en
la parte trasera de la unidad.
2. Apile la unidad como se indican,
sí es necesario
AVISO: No la apile a más de dos
unidades de alto. No lo transporte
si en la posición de apilado.
Enchufe la unidad. Verifique si hay electricidad en el tomacorriente. Confirme que esté encendida.
Elimine la obstrucción.
1. Dele más tiempo para secarse.
2. Aumente la circulación de aire utilizando ventiladores
3. Reduzca la infiltración del aire externo hacia
dentro del cuarto.
1. Chequee la humedad con un higrómetro.
2. Chequee los filtros y serpentines. Límpielos
cuando sea necesario.
3. Aumente la temperatura ambiental.
ADVERTENCIA:
experimentando no aparece aquí, llame al departamento del servicio al cliente de Global Industrial.
CODE ER1 ER2 ER4
Mensaje de Error Error en el sensor del Serpentín Error en el sensor de humedad
La lectura de la
Pantalla
Causa 1. Las terminales de los sensores
Solución 1. Verifique la terminal del sensor del
AVISO: La tabla anterior muestra los mensajes de error que el sistema podría detectar. Sí la pantalla muestra un mensaje “ER”, desenchufe la
unidad y reinsértela. Esto podría reiniciar los componentes electrónicos, y sí el problema es resuelto, no necesita tomar medidas adicionales.
Sí el mensaje de error reaparece, complete los siguientes pasos de resolución de problemas bajo “Explanation” (Explicación). Sí este error no
se rectifica, contacte al departamento del servicio al cliente de Global Industrial.
NO intente darle resolución a ningún problema dependiendo de un personal no calificado. Sí el problema que usted está
Un fallo en la bomba de agua o hay un
bloqueo
Destella una vez por segundo Destella una vez por segundo
1. La terminal del sensor de humedad
del serpentín no están enchufadas
correctamente.
2. El sensor del serpentín está dañado.
3. El problema no se resuelve,
podría ser un problema en el panel
de visualización PBC.
serpentín esté enchufado
correctamente.
2. Reemplace el sensor del Serpentín.
3. Reemplace el panel de
visualización PCBR.
no está enchufado correctamente.
2. El sensor de humedad está dañado.
3. Sí el problema no se resuelve podría
ser un problema en el panel de
visualización PCB.
1. Verifique la terminal del sensor de
humedad esté enchufado
correctamente.
2. Reemplace el sensor de humedad.
3. Reemplace el panel de
visualización PCB.
Destella una vez por segundo
El agua no está drenando del tanque
de la bomba o no hay electricidad en la
bomba de agua.
1. Asegúrese que la elevación máxima
no se exceda. La manguera no debe
estar elevada una altura de más de
10 pies por encima de la unidad.
2. Chequee la bomba para ver si tiene
residuos o algo que la bloquee
4
Page 9

globalindustrial.ca
Distribucion Industrial Globales S DE RL DE CF
User manual Manual del usuario Manuel de l'utilisateur
Customer Service
US: 1-800-645-2986
Réfrigérant à faible grain pour déshumidificateur LGR
Pompe à eau 200 pintes jour
ATTENTION :
Veuillez lire toutes les instructions avant l’utilisation
de ce déshumidificateur.
Spécifications techniques
Largeur 21.3in
Profondeur 21.3in
Hauteur 31.9in
Poids 104lb.
CFM 306
Amp 9,5
Rendement AHAM, capacité 100 pintes/jour
Capacité RH de 90°F / 90 % 200 pintes/jour
Longueur du flexible de vidange
Longueur fil électrique 25 pi.
Empilable Oui
Contrôle Digital
Construction PE Roto moulée
Pompe intégrée Oui
Réfrigérant R410A
Réfrigération Faible grain
Esquema de Conexiones
Affichage
Noir
Bleu
Marron
Orange
Rouge
Blanc
Jaune
Thermistance
Moteur de ventilateur
Vert
Fusible
Ventilateur-H
Pompe
Protecteur de
4 Soupape
27 pi.
surcharge
Source
d'alimentation
Servicio de atención al Cliente
México: 01.800.681.6940
Service à la clientèle
Canada: 888-645-2986
Modèle 246690
CONSERVEZ LES INSTRUCTIONS IMPORTANTES POUR RÉFÉRENCE FUTURE
Remarque : Lorsque vous utilisez un appareil électrique, veuillez suivre ces
précautions de base pour réduire.
1. Faire fonctionner l’appareil à partir d’une source d'alimentation d’égale tension,
fréquence, et rendement comme indiqué sur la plaque d'identification de produit.
2. Une extrême prudence et un contrôle raisonnable est nécessaires lorsque l'unité
est utilisée par ou près des enfants ou des animaux domestiques chaque fois que
l'unité est laissé sans surveillance.
3. Ne pas faire fonctionner l'unité si le cordon ou la prise est endommagé ou a été
échappé ou endommagé de quelque façon.
4. Ne pas obstruer les ouvertures d'entrée ou de sortie. Ne pas utiliser à proximité de
murs, rideaux ou autres objets qui peut bloquer l'entrée et la sortie électrique.
5. Cet appareil doit être branché sur prise mis à la terre
6. Pour réduire le risque de décharge électrique, ne pas exposer l'appareil ou le
cordon d'alimentation à l'humidité.
7. Éteindre et débrancher de la source d'alimentation avant d'exécuter toute
maintenance de routine, ou lorsqu'e l'unité n'est pas utilisée..
8. L'utilisation de raccords ou d'accessoires n'est pas recommandée ou destiné à
être utilisé avec le produit.
9. Ce produit est destiné à une utilisation commerciale normale seulement.
10. Ne pas essayer de démonter l'appareil.
11. Ne pas placer l'unité sur une surface élevée.
12. Ne pas nettoyer l'appareil à l'aide de produits chimiques
13. Cet appareil n'est pas destiné pour être place dans des endroits dangereux.
Panneau de commande
Filtre
Grille en métal
d'admission d'air
1
Liste des pieces
Étiquette de
rendement
Roue
Poignée
Sortie d'air
Enrouleur
le cordon
Connecteur
de tuyau de
vidange (mâle)
Cordon
d’alimentation
Flexible de
vidange
060617
Page 10

Réfrigérant à faible grain pour
Manuel de l'utilisateur
déshumidificateur LGR Pompe à eau
200 pintes jour
INSTRUCTIONS DE CONFIGURATION PANNEAU DE COMMANDE NUMÉRIQUE
Place de déshumidificateur en position verticale. Après avoir
transporté le déshumidificateur vers le site, laissez l'appareil
reposer pendant 30 minutes avant de le mettre sous tension.
Cela permet au système de réfrigération de se stabiliser et
éviter tout dommage.
Illustration du
positionnement correct
pour de meilleures
performances
Attention : Ne pas bloquer l'entrée ou la sortie. Ne
pas attacher les gaines de tuyaux.
ENTRÉE D’AIR,
GARDEZ
DÉGAGÉE
DRAINAGE APPROPRIÉ
Cet appareil contient une pompe qui se connecte au
tuyau de vidange à l'arrière de l'unité.
1. S'assurer que l'eau de l'extérieur ne crée pas un
risque de glissement.
2. Pour éviter d'endommager la pompe ou de l’utiliser
excessivement, ne pas dépasser une élévation de 10
pieds entre la pompe et la vidange.
SORTIE D’AiR,
GARDEZ
DÉGAGÉE
Flexible de
vidange
10, FT. HAUTEUR DE
VIDANGE MAXIMALE
TOUCHES DE RÉGLAGE
Ces 2 touches vous permettent de régler les valeurs
d'humidité et de l'heure (vers le haut ou vers le bas).
REMARQUE : Pour faire défiler les options du menu,
vous devez appuyer sur les deux touches de réglage en
même temps. Affiche les menus de fonctions de l'unité.
FUNCTION
Affiche le menu des fonctions de l'unité. Pour faire
défiler les options du menu, vous devez appuyer sur
la touche à la fois le haut et Les touches de réglage
vers le bas en même temps.
ENTREZ
Sélectionne et active une fonction ou un réglage.
PURGE
Vide le réservoir d'eau.
ALIMENTATION ON/OFF
Tourne ou éteindre l'appareil.
FONCTIONNEMENT
Démarrage de l'unité
1. Met l'appareil sous tension
Appuyer sur la touche "MARCHE/ARRÊT" une fois pour
le mettre sous tension.
2
. Régler l'HEURE et la DATE
Appuyez sur la touche une fois pour afficher :
Humidity Setting
Timer Clock
FONCTIONS EN OPTION :
Lorsque l'on appuie sur la touche
Humidity Setting
Timer Clock
vous verrez :
Tout en naviguant dans certaines
fonctions, il peut également indiquer :
Language ID
USB/SD-CARD GSM
Votre appareil peut ne pas contenir ces fonctions, qui sont
FACULTATIVES. Dans le cas contraire, un message d'erreur
s'affiche lorsque quelqu’un essaie d’y accéder.
MODE DE DÉGIVRAGE
Pour assurer que le déshumidificateur fonctionne à sa
condition la plus efficace, l'unité sera en mode dégivrage
lorsque la température tombe en dessous de 77°F (25°C). Les
commandes de dégivrage sont énumérés ci-dessous :
• Le temps de travail continu est égal à la température
ambiante x2 ; le temps de travail minimum est de 30 minutes.
• Si la température du serpentin intérieur est ≤26,6 °F(-3°C)
après que le temps de travail continu soit atteint (détection
en continu de 30s), L’appareil passe en mode de dégivrage
pendant 5 minutes.
• Lorsque la température du serpentin intérieur est ≥46,4 °F
(8 °C) pendant le mode de dégivrage, l'unité quitte le mode
de dégivrage.
Appuyez sur les touches ensemble
DEUX FOIS pour mettre en surbrillance "Horloge".
Clock 00:00
Y0000 M00 D00
Appuyez sur pour entrer les réglages de l'horloge
Appuyez sur ou pour heure désirée, puis
ensemble pour accéder à quelques minutes
Répétez les pour accéder à l'année, le mois et le jour
Appuyez sur lorsque terminé pour quitter les réglages de l'horloge
REMARQUE : Cette unité a une horloge alimente par une pile
interne, vous n'avez donc pas besoin de définir la date et l'heure à
chaque fois que vous le branchez et mettez sous tension.
Réglage de l'humidité
L'unité est réglé en usine pour un FONCTIONNEMENT EN
CONTINU ("CO"), si aucun des ajustements sont apportés à
l'humidité ou si vous mettez un niveau d'humidité inférieur à
26 %, voir ci-dessous :
Pour régler le niveau d'humidité relative de 26 % à 90 % appuyez
sur une fois
Appuyez sur la touche pour
sélectionner "Réglage de l'humidité. »
Humidity Setting
Timer Clock
2
Page 11

Réfrigérant à faible grain pour
déshumidificateur LGR Pompe à eau
200 pintes jour
Manuel de l'utilisateur
Appuyez sur ou pour régler
l'humidité entre26 % et 90 %..
N'oubliez pas, si vous sélectionnez une valeur d'humidité INFÉRIEURE
à 26 %, l'unité affichera "CO" pour un fonctionnement en continu.
Lorsque le niveau d'humidité est atteint, appuyez sur pour régler.
D'AUTRES DONNÉES DE L’AFFICHAGE LCD
Après mise hors tension, l'écran LCD peut afficher un
résumé d'écrans de l'activité récente et les statistiques.
Non-essentielle pour le fonctionnement de l'unité, cette
information peut être utile pour vos dossiers
REMARQUE :
1.
Lors du réglage de l'humidité entre 26 % et 90 %, l'opération
s'interrompt jusqu'à ce que le paramètre d'humidité a été
saisi et défini. Une fois défini, l'écran affiche "Terminé", et
l'unité reprendra automatiquement son fonctionnement.
2.
Cette unité dispose d'une pile de secours de la mémoire pour
permettre le redémarrage automatique. En cas de perte de
courant, de l'unité revient à son réglage d'humidité précédent
et continue de fonctionner une fois que le courant revient
Réglage de la minuterie
S'assurer que l'horloge est correcte avant le réglage de la minuterie
Pour régler la minuterie, appuyez sur et ensemble
Maintenant, appuyez sur pour
Timer on
Timer off
.
ENTRETIEN
.
Remplacement de la pile
1. Enlever l’étiquette du panneau de
2. Une fois enlevé, soulevez
Pour définir un temps pour le démarrage de la machine,
sélectionnez "Timer on", régler l'heure (00 à 23), et les minutes
(00 à 59) des champs pour l’heure souhaitée. Une fois que l'heure
3. Retirer la pile et la remplacer par
de début souhaitée est atteinte, sélectionnez "Oui" pour initialiser.
Pour régler le temps de l'unité pour arrêter, sélectionnez "Timer
off" et définissez les champs Heure et Minutes pour le temps
d’arrêt désiré. Sélectionnez "OUI" pour initialiser
Pour ANNULER l'affichage de l'heure, placez le curseur
sur "ON" et appuyez sur .
REMARQUE : Une pression de la touche "MARCHE/ARRÊT"
pendant l'opération de la minuterie n’annulera aucunement le
réglage de minuterie. En outre, l'appareil ne fonctionnera pas
si les paramètres "Timer on" et "Timer off" sont les mêmes.
Vidanger l'unité
En fonctionnement normal, la pompe purge automatiquement
4. Remonter le panneau de contrôle.
Nettoyage ou remplacement du filtre
REMARQUE : La performance du rendement du déshumidificateur
est considérablement réduite si le filtre est obstrué. Vérifier le filtre
hebdomadairement. Nettoyer ou remplacer le filtre s'il est obstrué
ou endommagé.
S'assurer que le déshumidificateur
est éteint et débranché avant de
procéder à l'entretien
1. Retirer le filtre comme indiqué.
2. Aspirez tout débris à l'aide d'un
lorsque le réservoir est plein. Cependant, utiliser la fonction
"PURGE" avant de déplacer la machine pour éviter de renverser
3.
de l'eau. La pompe s'arrête automatiquement après 40 secondes.
de fonctionnement continu.
Appuyez sur la touche pour vider l'eau du réservoir
de la pompe.
Assurez-vous que le tuyau de vidange soit connecté et
acheminés vers un endroit sûr.
Éteindre l'appareil
NE PAS mettre l'appareil hors tension en débranchant
4. Une fois sec, réinstaller le filtre.
Entretien de la pompe à eau
REMARQUE : L'entretien de la pompe à eau doit être rempli une
fois que l'unité atteint 1 000 heures de fonctionnement
Mettez le déshumidificateur hors tension et débranchez-le
de la prise secteur avant toute maintenance.
1. Retirer les vis (6pcs) pour séparer le boîtier avant.
le cordon d'alimentation de la prise!
Standby CH00%
Ran 00000H
Standby CH00%
Last job 00:00
Standby CH00%
Time 00:00
REMARQUE : Le champ « RAN »
s’affiche en permanence pendant le
fonctionnement. Tel un odomètre de
voiture, l’affichage montre le nombre
total d'heures et l’affichage ne peut
pas être réinitialisé manuellement à
l'extérieur de l'usine.
commande et les quatre vis dans
le panneau de configuration.
délicatement le panneau de
commande pour accéder à la carte.
une pile CR2032
tuyau d'aspiration et la buse de service
Laver le filtre et laissez-le sécher en
utilisant de l'eau chaude et un détergent doux
.
.
Appuyez sur la touche pour éteindre l'unité.
L'écran LCD affichera
le message suivant :
Dehumidifier off
Draining....
La pompe à eau s'allumera automatiquement et
fonctionnera pendant 40 secondes pour purger l'eau de
condensation résiduelle du déshumidificateur.
Pour éviter de renverser de l'eau, veuilles NE PAS
déplacer l'appareil pendant au moins trois minutes après
la mise hors tension pour permettre de perdre du temps.
Avant le transport, retirez toujours le flexible de vidange
externe, et retournez-le dans l’espace muni à l'avant
de l'unité.
3
2. Retirer le tuyau d'eau pour démonter la pompe à eau.
Page 12

Réfrigérant à faible grain pour
déshumidificateur LGR Pompe à eau
200 pintes jour
Manuel de l'utilisateur
3. Retirer la vis (1 pc) pour enlever le capot supérieur.
4. Retirer les vis (4pcs) pour retirer le couvercle inférieur
puis nettoyer la pompe à eau.
5. Remettre en place la pompe à eau.
ENTREPOSER L’UNITÉ
Suivez les instructions
ci-dessous lors du stockage du
déshumidificateur.
1. Enroulez le cordon
d'alimentation et de drainage
flexible à l'arrière de l’unité.
2. Empilez les machines comme
indiqué si nécessaire.
REMARQUE : Ne pas empiler
plus de deux machines de haut.
Ne pas transporter en position
empilées.
DÉPANNAGE
PROBLÈME CAUSE SOLUTION
L’appareil ne
fonctionne pas.
Le ventilateur ne fonctionne pas. Sortie d'air est obstruée. Enlever l'obstruction.
Aucune tension à l'unité. Branchez l'unité. Vérifiez l'alimentation à la sortie.
Confirmer que l'appareil soit sous tension.
L'unité fonctionne, mais la pièce
n'est pas sèche.
L'unité ne ramasse qu’un
minimum d’eau.
ATTENTION; N'ESSAYEZ PAS de corriger les problèmes avec du personnel non spécialisé. Si le problème que vous rencontrez n'est pas
répertorié ici, contactez le service clientèle international.
CODE ER1 ER2 ER4
Message d'erreur Erreur du capteur de la bobine. Erreur du capteur de la bobine. Panne de la pompe à eau ou un
Lecture de
l'affichage.
Cause 1. Les bornes du capteur de la
Solution 1. Vérifier la borne du capteur de la
Clignote une fois par seconde. Clignote une fois par seconde. Clignote une fois par seconde.
bobine ne sont pas correctement
branchées.
2. Le capteur de la bobine est
endommagé.
3. Si le problème persiste, il peut être
affiché sur le panneau d'affichage
de la PCB.
bobine est correctement branchée.
2. Remplacer la bobine du capteur.
3. Remplacer la PCB du panneau
d'affichage.
1. L'insuffisance du temps de déshumidification.
2. Mauvaise circulation d'air dans la pièce.
3. Humidité excessive dans la pièce.
1. L'air de la pièce est sec.
2. Filtre et de bobines obstrués.
3. La température ambiante est trop faible.
1. Les bornes du capteur d'humidité ne
sont pas correctement branchées.
2. Le capteur d'humidité est
endommagé.
3. Si le problème persiste, il peut être
affiché sur le panneau d'affichage
de la PCB.
1. Vérifier que la borne du capteur
d'humidité soit correctement
branchée.
2. Remplacer le capteur d'humidité.
3. Remplacer la PCB du panneau
d'affichage.
1. Laisser plus de temps pour le séchage.
2. Accroître la circulation d'air avec des ventilateurs.
3. Réduire les infiltrations d'air dans chambre.
1. Vérifier l'humidité avec un hygromètre.
2. Vérifier le filtre et de bobines. Nettoyer au besoin.
3. Augmentation de la température de la pièce.
blocage.
L'eau ne se vidange pas du réservoir
de la pompe ou il y a un manque de
puissance vers la pompe à eau.
1. Assurez-vous de levage maximale
ne soit pas dépassée.v Vérifiea
L'extrémité du flexible ne doit pas
être supérieure à 10 pieds
au-dessus de l'unité.
2. Vérifier la pompe contre tout débris.
REMARQUE : Le tableau ci-dessous montre les messages d'erreur que le système peut détecter. Si l'affichage indique un message
"ER", débranchez l'unité et rebranchez-le. Ceci peut réinitialiser les systèmes électroniques, et si le problème est résolu, aucune action
supplémentaire n'est requise. Si le message d'erreur réapparaît, remplir les étapes de dépannage ci-dessous sous « Explication ». Si cela ne
corrige toujours pas le problème, contactez votre centre de service agréé.
4
 Loading...