

Page 1
globalindustrial.ca
User's manual Manual del usuario Manuel de l'utilisateur
Customer Service
US: 1-800-645-2986
Servicio de atención al Cliente
US: 1-800-645-2986
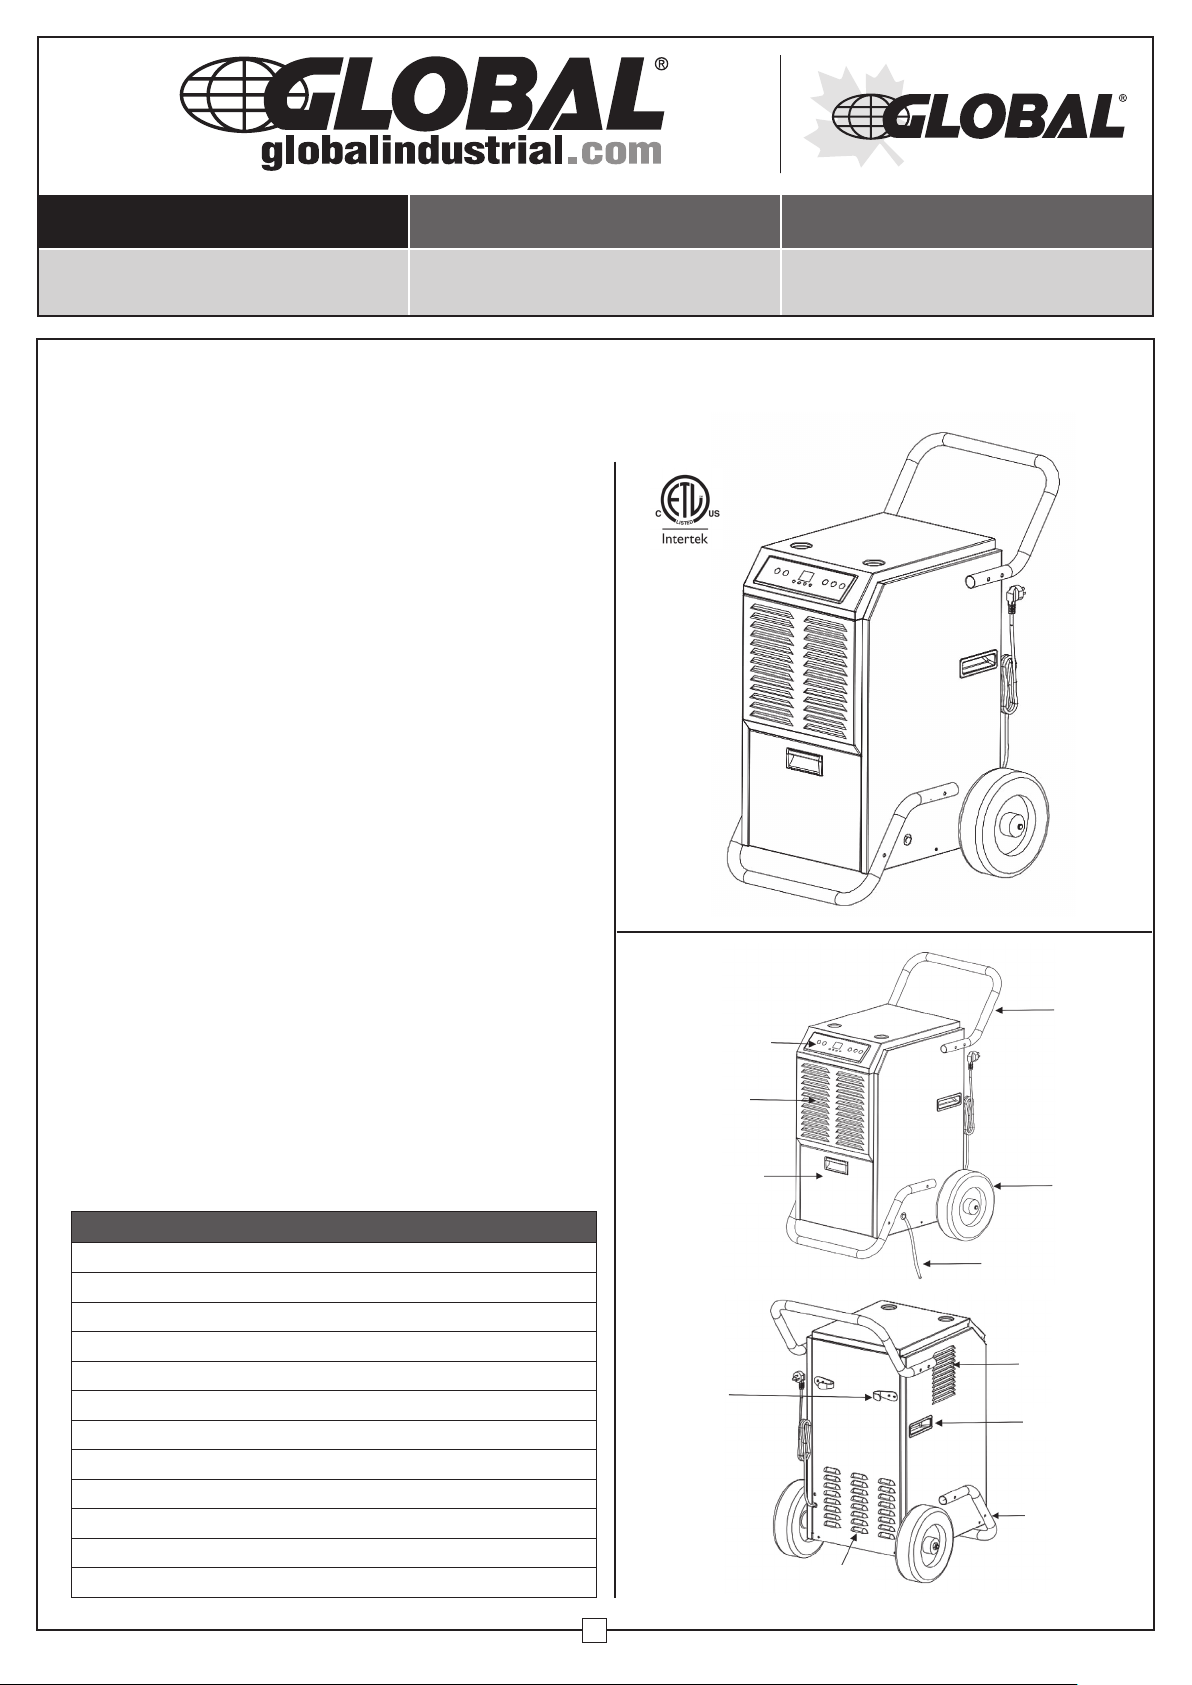
Commercial Grade Dehumidifier 110 Pints/Day
Model 246687
IMPORTANT INSTRUCTIONS,
SAVE FOR FUTURE REFERENCE
Note: When using electrical appliances, please follow these basic
precautions to reduce the risk of fire, electric shock, and personal injury
or property damage. All refrigeration products contain refrigerants,
which under federal law must be removed prior to disposal.
1. Operate the unit from a power source of equal voltage, frequency,
and rating as indicated on the product identification plate.
2. Extreme caution and supervision is necessary when unit is used
near children and pets or when left operating while unattended.
3. Do not operate unit if cord/plug has been dropped or damaged in
any manner.
4. Do not obstruct inlet or outlet openings. Do not operate in close
proximity to walls, curtains, or other objects that may block inlet
and outlet.
5. This unit must be plugged into grounded outlet.
6. To reduce the risk of electric shock, do not expose unit or power
cord to moisture.
7. Always turn off and unplug unit prior to performing routine
maintenance, or when not in use.
8. The use of attachments or accessories is not recommended or
intended for use with product.
9. This product is intended for normal commercial use only.
10. Do not attempt to dismantle the appliance.
11. Do not operate unit on a metal surface.
12. Do not clean the appliance with any chemicals.
13. Unplug the power supply when cleaning or storing the unit.
14. This unit is not intended for hazardous locations.
15. This unit must always be in upright position.
FRONT
Control Panel
Air Inlet
Water Tank
Cover
Service à la clientèle
Canada: 888-645-2986
Handle
Wheel
SPECIFICATIONS
Rated capacity: 110 pints/day @ 86˚F, 80% RH
Power supply: 115V/60Hz
Power consumption & current: 728W/6.75A @ 86˚F, 80% RH
Noise: ≤ 60dB(A)
Air circulation: 264.86 CFM
Freon type & capacity: R410A/ 11.6 Oz: (0.725 lbs.)
Grade of waterproof: IP X0
Water tank capacity: 1.45 Gallons
Net weight: 79.3 lbs.
Gross weight: 87 lbs.
Dimensions: 17" x 20.3" x 32.5"
Cord and plug: 10 ft. 16AWG SJT cord and LDCI NEMA 5-15 plug
Drain Hose
BACK
Air Outlet
Power
Cord
Wrap
Radiator
Grille
1
Built-in
Handle
Support
Frame
011018
Page 2
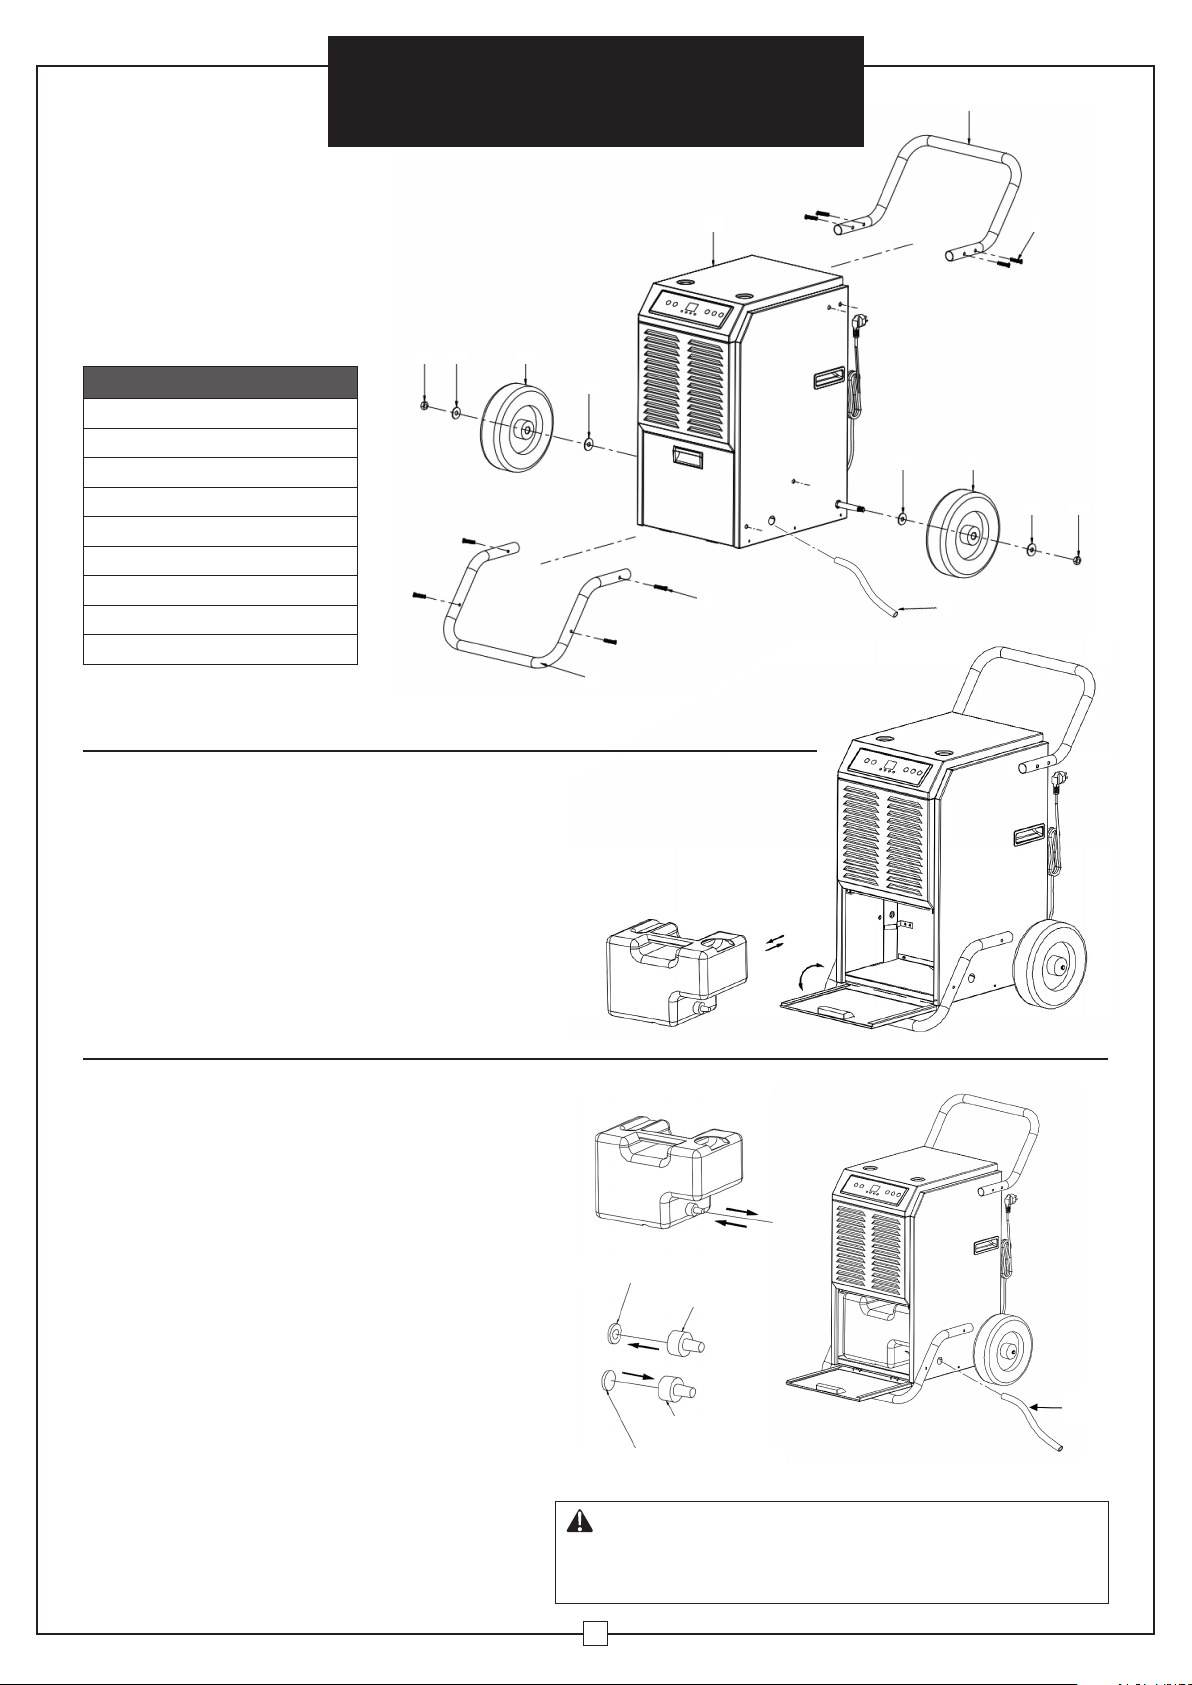
INSTALLATION
HANDLE AND SUPPORT
FRAME INSTALLATION
PARTS LIST
1. Main Body
2. Handle
3. Stainless Steel Bolt
4. Spacer
5. Wheel
6. Spacer
7. Nut
8. Support Frame
9. 20'L Drain Hose
Commercial Grade
Dehumidifier
1
7 6 5
4
3
8
User's Manual
2
3
4 5
6 7
9
DRAINAGE INSTALLATION
1. When the tank is at full capacity, the “FULL” light
will power on.
2. An alarm will then sound to notify user. Press the
power button to shut down the system.
3. To drain the water tank, open the front panel to
access tank.
4. Grab tank handle and remove it horizontally.
5. After disposing of the water, replace tank, and
close the front panel.
CONTINUOUS DRAINAGE
In extremely wet conditions, the tank may require
frequent drainage. It can be set for continuous
drainage by completing the following:
1. Open the front cover, remove tank, and dispose
of water.
2. Rotate the drain pipe connector on the water tank.
Use cutting tools to cut the side outlet, and then
install the drain pipe connector to an outlet.
3. Install the included drain hose to the connector
and direct the pipe to the desired area prior to
operating the machine.
4. Clean the water tank, drain the hose and pipe
connector, and shut the front panel.
5. When continuous drainage is not being used,
switch over to water tank usage by using
the sealing washer, without the hole, to stop the
water outflow.
Sealing washer with hole
Pipe connector
Drain
Pipe connector
Sealing washer without hole
WARNING:
Do not block the drainage hose. The end of the drainage pipe should not be
higher than the outlet hole. If the drainage pipe end is higher than the outlet
hole, water will not drain properly and may damage unit components.
hose
2
Page 3

Commercial Grade
Dehumidifier
User's Manual
MACHINE SETUP AND OPERATION
OPERATION
1. When the water tank is full, a red light will illuminate
BUTTON FUNCTION
1. Press this button while screen light is on and unit
will automatically enter a continuous mode. The
screen will display the environmental humidity and
the compressor will turn on after the fan has run for
3 seconds. Press this button again, and the compressor
will stop with the display screen showing “- -“. The unit
will then enter a standby mode; the fan will run for another
minute and stop.
2. Hold down this button until the light powers
on, then press “MINUS” and “ADD” to set the
start time. When the countdown is over, the fan
and compressor will power on. To power off the
unit, hold down this button until the button light powers
on. Press “MINUS” and “ADD” to set the stop time.
When the countdown is over, the fan and compressor will
power off. Hold down this button for 3 seconds to view
the current temperature. After 10 seconds, the display will
return to the current humidity. Hold this button to show the
current temperature.
3. The humidity can be increased by increments of
5% RH during normal mode. Hold this button for
1 second to increase the humidity.
4. The humidity can be decreased by increments of
5% RH during normal mode. Hold this button for
1 second to decrease the humidity.
2. The compressor will not require the 3 minute self-
3. The system features an auto memory. If all mode
DEFROST FUNCTION
1. The compressor and fan will shut off when the
2. Defrost Operation: Compressor will run for 30 minutes.
Note:
A. The default humidity is 50% RH, with
increase and decrease increments as follows:
20%-25%-30%-35%-40%-45%-50%-55%-60%65%-70%-75%-80%-85%-90%
B. Environmental and machine set humidity will decide the
status of the compressor and fan. If the environmental
humidity is ≥ the machine set humidity + 3%, the
compressor and fan will begin operation. If the
environmental humidity is < the machine set humidity +
3%, the compressor and fan will cease operation. Press
the continue button for continuous mode or switch
to normal dehumidification mode to set the humidity
manually.
5. During continuous mode, the humidity setting
will be unavailable. The continuous mode light
will turn on and the screen will display the current
humidity. Press this button to switch to normal
mode where the humidity setting is available.
ERRORS
1. “E1”: If the temperature sensor fails, an “E1” code will
2. “E2”: If the humidity sensor fails, an “E2” code will appear
3. “CL”: When the room temperature is < 5°C (41°F), a “CL”
4. “CH”: When the room temperature is > 38°C (100.4°F) a
5. “LO”: When the room humidity is < 20% RH, an “LO”
6. “HI”: When the room humidity is ≥ 95% RH, an “HI” code
followed by an alarm. The alarm will sound 15 times
before the compressor and fan power down. After the
water tank is empty, the machine will automatically
switch to its previous mode while the compressor will
remain in a 3 minute self-protection status. The alarm
will stop 3 seconds after the water tank is emptied and
replaced. The fan and compressor will start again after
3 minutes.
protection status if it is the first time being used. Press
“POWER” to power off or power on. Press “POWER”, to
restart compressor.
settings have been completed, if there is sudden power
interruption, or if the power jack is removed, the system
will store the current status and restart at the previous
settings once power has been restored.
environmental temperature goes below 41°F or above
100.4°F.
Once the temperature sensor reaches ≤ 30.2°F (lasts for
10 seconds), the compressor will stop, and defrosting
will begin. The fan will continue operation with the
defrost light on. Once the pipe temperature reaches
41°F or the defrost operates for 15 minutes, defrosting
will end. Note: During defrost, light will remain on
until defrost is complete.
display. The system works in cycles of dehumidification
for 30 minutes and defrosting for 15 minutes. A failed
temperature sensor should be replaced.
and the humidity adjustment button will not function.
The system works in cycles of dehumidification for 30
minutes and defrosting for 15 minutes. A failed humidity
sensor should be replaced.
code will display and the machine will stop running.
“CH” code will appear and the machine will stop running.
code will display and machine will stop running.
will appear and the machine will operate normally.
3
Page 4
Commercial Grade
Dehumidifier
User's Manual
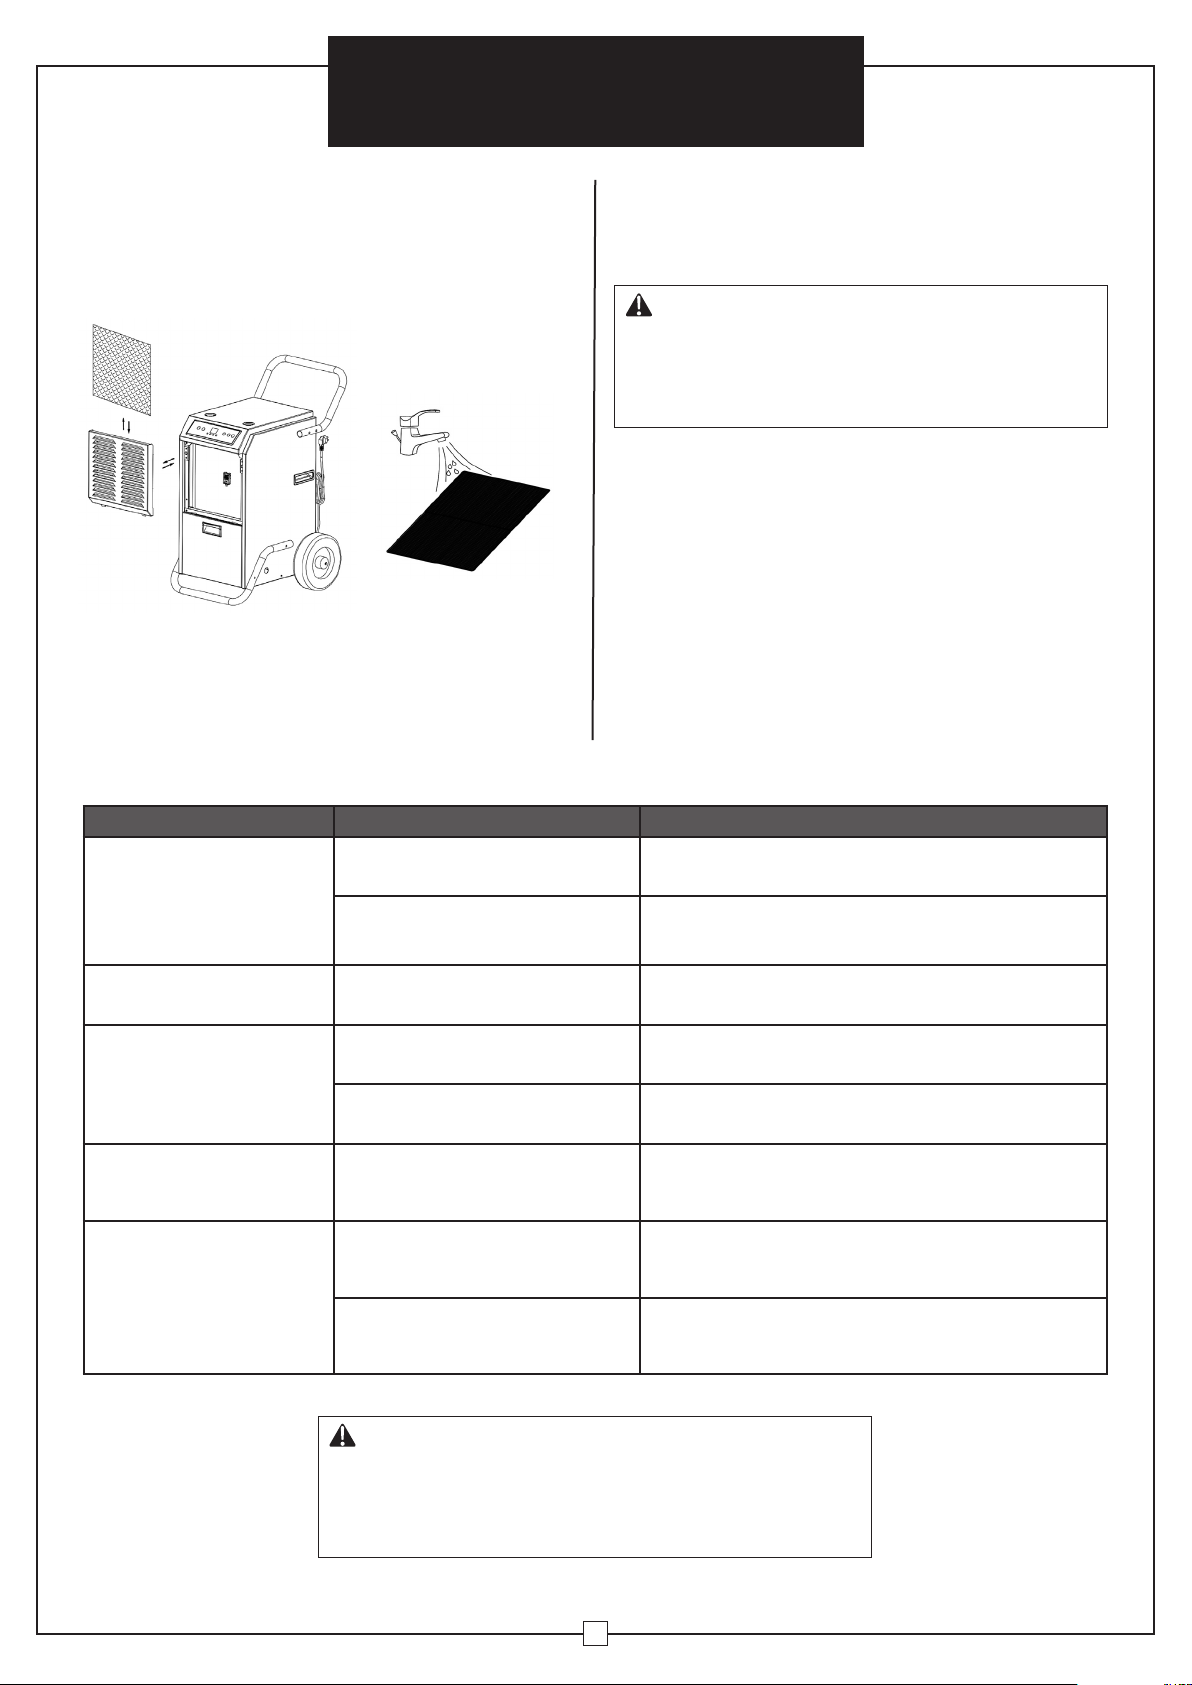
MAINTENANCE
1. Clean the machine with a soft, damp cloth.
2. Remove the louver on the front panel to gain
filter access.
3. Remove filter mesh from unit.
4. Use a clean rag to absorb the surface dust on the filter
mesh. If the filter is extremely dirty, use tap water to flush
it out. Fully dry the filter before replacing it back into the
air inlet fence.
A clean filter will increase the unit’s overall efficiency.
MACHINE STORAGE
If unused for an extended period of time, please store the
unit in the following manner:
1. Clean filter mesh.
ATTENTION:
The internal evaporator must be dry prior to storage to avoid
component damage and mold. Unplug the unit and place it in
a dry, open area. Another drying method is to set the humidity
point 2% higher than the ambient humidity to force the fan to
dry the evaporator.
2. Store the power cord in the back of the unit.
3. Store in a clean, dry environment.
TROUBLESHOOTING
ISSUE CAUSE SOLUTION
Machine is not operating.
Machine is operating, but
does not dehumidify.
Reduced dehumidifier
capacity.
No air inlet.
Loud operation.
Unit is not plugged in. Plug in unit.
Room temperature is under 41
degrees or above 95 degrees F.
When the humidity set point is 2%
higher than the ambient humidity.
Filter mesh is jammed.
Air-in and/or Air-out louvers
are jammed.
Filter mesh or air-in louver
is jammed.
Machine is situated on an incline
or decline slope.
Filter mesh is jammed. Clean filter mesh in accordance with instructions.
For unit safety, use only when ambient temperature
is between 5 and 35 degrees.
Reset humidity levels to a lower set point, or power
off unit once optimal humidity levels have been met.
Clean filter mesh in accordance with
manual, specifications.
Clear blockage from Air-in and/or Air-out louvers.
Clean filter in accordance with instructions or remove
the louver blockage.
Move unit to an even surface.
CAUTION:
Switch off the unit and unplug it immediately if anything abnormal
should occur. Contact a qualified electrician. Do not dispose of
electrical appliances as unsorted municipal waste; use separate
collection facilities. Contact your local government for information
regarding the collection systems available.
4
Page 5

globalindustrial.ca
User's manual Manual del usuario Manuel de l'utilisateur
Customer Service
US: 1-800-645-2986
Servicio de atención al Cliente
US: 1-800-645-2986
Service à la clientèle
Canada: 888-645-2986
Deshumidificador de calidad comercial 110 pintas/día
Modelo 246687
INSTRUCCIONES IMPORTANTES, CONSÉRVELE PARA
QUE LAS CONSULTE POSTERIORMENTE
Aviso: Cuando utilice los dispositivos eléctricos, por favor cumpla
con las precauciones básica para reducir los riesgos de incendios,
electroshock, lesiones personales o daños a la propiedad. Todos
los productos de refrigeración contienen refrigerantes, los cuales
bajo la ley federal deben ser removidos, antes de ser desechados.
1. Opere la unidad de una fuente de energía de igual voltaje, frecuencia, y
potencia como se indica en la placa identificadora del producto.
2. Tenga cuidado extremo y necesita ser supervisada, cuando la unidad está
siendo utilizada cerca de niños y mascotas, o cuando está funcionando sin
supervisión.
3. No opere la unidad sí el cable/enchufe se han caído o están dañado de
algún modo.
4. No obstruya la entrada o la salida de los orificios. No la opere cerca de
paredes, cortinas u otros objetos que podrían bloquear los orificios de salida
y entrada.
5. Esta unidad debe ser enchufada a un tomacorriente conectado a tierra.
6. Para reducir los riesgos de electroshocks, no exponga la unidad o el cable
de electricidad a la humedad
7. Siempre apague y desenchufe la unidad antes de realizar los mantenimientos
de rutina, cuando no esté en uso.
8. El uso de accesorios o aditamentos no es recomendable o están destinados
para el uso con el producto.
9. Este producto está destinado solamente para uso comercial.
10. No intente desarmar la unidad.
11. No opere la unidad sobre una superficie metálica.
12. No limpie la unidad con ningún químico.
13. Desenchufe la fuente de alimentación cuando limpie o almacene la unidad.
14. Esta unidad no está destinada para ser utilizada en lugares peligrosos.Esta
unidad siempre debe estar en posición vertical.
15. Esta unidad siempre debe estar en posición vertical.
Frente
Panel de control
Toma de aire
Tapa del
depósito de
agua
Mango
Rueda
ESPECIFICACIONES
Capacidad nominal: 110 pintas/día a 86°F, 80% de HR
Fuente de poder: 115V/60Hz
Consumo energético y corriente: 728 W/6.75 A a 86°F, 80% de HR
Ruido: ≤ 60dB(A)
Circulación de aire: 264.86 CFM
Tipo y capacidad de freón: R410A/11.6 Oz: (0.725 lbs.)
Grado de impermeabilidad: IP X0
Capacidad del tanque de agua: 1.45 galones
Peso neto: 79.3 lbs.
Peso bruto: 87 lbs.
Dimensiones: 17" x 20.3" x 32.5"
Cable y enchufe: 10 pies Cable 16AWG SJT y conector LDCI NEMA 5-15
Parte
trasera
Almacenamiento
del cable de alime
1
Parrilla del
radiador
Manguera de drenaje
Salida de aire
Mango
incorporado
Marco de
soporte
011018
Page 6

INSTALACIÓN
INSTALACIÓN DEL MANGO
Y MARCO DE SOPORTE
LISTA DE PARTES
1. Cuerpo principal
2. Mango
3. Perno de acero inoxidable
4. Espaciador
5. Rueda
6. Espaciador
7. Tuerca
8. Marco de soporte
9.
20'L Manguera de drenaje
Deshumidificador de
calidad comercial
1
7 6 5
4
3
8
Manual del usuario
2
3
4 5
6 7
9
INSTALACIÓN DEL DRENAJE
1. Cuando el tanque esté a máxima capacidad, se
encenderá la luz "FULL".
2. Una alarma sonará para notificar al usuario.
Presione el botón de encendido para apagar
el sistema.
3. Para drenar el tanque de agua, abra el panel frontal
para acceder al tanque.
4. Tome el mango del tanque y retírelo horizontalmente.
5. Después de tirar el agua, vuelva a colocar el
tanque y cierre el panel frontal.
DRENAJE CONTINUO
En condiciones extremadamente húmedas, el
tanque puede requerir un drenaje frecuente. Se
puede configurar para un drenaje continuo haciendo
lo siguiente:
1. Abra la cubierta frontal, retire el tanque y deseche
el agua.
2. Gire el conector de la tubería de drenaje en el
tanque de agua. Use herramientas de corte para
cortar la salida lateral, y luego instale el conector
de la tubería de drenaje a una salida.
3. Instale la tubería de drenaje incluida en el conector
y dirija la tubería al área deseada antes de operar
la máquina.
4. Limpie el tanque de agua, drene la manguera y el
conector de la tubería, y cierre el panel frontal.
5. Cuando no se usa el drenaje continuo, cambie
al uso del tanque de agua utilizando la arandela
de sellado, sin el orificio, para detener el flujo
de agua.
Arandela de sellado con orificio
Conector de tubería
Manguera
Conector de tubería
Arandela de sellado sin agujero
ADVERTENCIA:
No bloquee la manguera de drenaje. El extremo de la tubería de drenaje
no debe ser más alto que el orificio de salida. Si el extremo del tubo
de drenaje es más alto que el orificio de salida, el agua no se drenará
correctamente y puede dañar los componentes de la unidad.
de drenaje
2
Page 7

Deshumidificador de
calidad comercial
Manual del usuario
CONFIGURACIÓN Y FUNCIONAMIENTO
DE LA MÁQUINA
FUNCIÓN DE BOTÓN
1. Presione este botón mientras la luz de la pantalla
está encendida y la unidad entrará automáticamente
en un modo continuo. La pantalla mostrará la
humedad ambiental y el compresor se encenderá
después de que el ventilador haya funcionado por 3
segundos. Presione este botón nuevamente, el compresor
se detendrá y la pantalla mostrará "- -". La unidad entrará
en modo de espera; el ventilador funcionará por un minuto
más y se detendrá.
2. Mantenga presionado este botón hasta que la
luz se encienda, luego presione "MINUS" y "ADD"
para establecer la hora de inicio. Cuando termine
la cuenta regresiva, el ventilador y el compresor se
encenderán. Para apagar la unidad, mantenga presionado
este botón hasta que se encienda la luz del botón.
Presione "MINUS" y "ADD" para configurar el tiempo de
parada. Cuando termine la cuenta regresiva, el ventilador
y el compresor se encenderán. Mantenga presionado este
botón por 3 segundos para ver la temperatura actual.
Después de 10 segundos, la pantalla volverá a la humedad
actual. Mantenga presionado este botón para mostrar la
temperatura actual.
3. La humedad se puede aumentar en incrementos
de 5% de HR en el modo normal. Mantenga
presionado este botón por 1 segundo para
aumentar la humedad.
4. La humedad puede reducirse en incrementos
del 5% de HR en el modo normal. Mantenga
presionado este botón por 1 segundo para
disminuir la humedad.
Nota:
A. La humedad predeterminada es 50% de HR, con
aumentos y disminuciones de la siguiente manera:
20%-25%-30%-35%-40%-45%-50%-55%-60%-65%70%-75%-80%-85%-90%
B.
La humedad ambiental y de la máquina determinarán
el estado del compresor y del ventilador. Si la humedad
ambiental es ≥ la humedad establecida por la máquina
+3%, el compresor y el ventilador comenzarán a
funcionar. Si la humedad ambiental es < la humedad
establecida por la máquina +3%, el compresor y el
ventilador dejarán de funcionar. Presione el botón
Continue para el modo continuo o cambie al modo
de deshumidificación normal para configurar la
humedad manualmente.
5. En el modo continuo, la configuración de
humedad no estará disponible. La luz del modo
continuo se encenderá y la pantalla mostrará
la humedad actual. Presione este botón para
cambiar al modo normal donde la configuración de
humedad está disponible
OPERACIÓN
1. Cuando el tanque de agua esté lleno, se encenderá
una luz roja seguido de una alarma. La alarma sonará
15 veces antes de que el compresor y el ventilador se
apaguen. Después de que el tanque de agua esté vacío,
la máquina cambiará automáticamente a su modo
anterior, mientras que el compresor permanecerá en
un estado de autoprotección por 3 minutos. La alarma
se detendrá 3 segundos después de que el tanque
de agua se haya vaciado y reemplazado. El ventilador
y el compresor arrancarán nuevamente después de 3
minutos.
2. El compresor no requerirá el estado de autoprotección
de 3 minutos si es la primera vez que se usa. Presione
"POWER" para apagar o encender. Presione "POWER",
para reiniciar el compresor.
3. El sistema tiene memoria automática. Si se han
completado todos los ajustes del modo, si hay una
interrupción de energía repentina, o si se quita el
conector de alimentación, el sistema almacenará el
estado actual y reiniciará en los ajustes anteriores una
vez que se haya restablecido la energía.
FUNCIÓN DE DESCONGELACIÓN
1. El compresor y el ventilador se apagarán cuando la
temperatura ambiental sea inferior a 41°F o superior a
100.4°F.
2. Operación de descongelación: el compresor funcionará
por 30 minutos. Una vez que el sensor de temperatura
alcanza ≤ 30.2°F (dura 10 segundos), el compresor se
detendrá y comenzará la descongelación. El ventilador
continuará funcionando con la luz de descongelación
encendida. Una vez que la temperatura de la tubería
alcance los 41°F o la descongelación funcione por 15
minutos, la descongelación finalizará. Nota: Durante
la descongelación, la luz permanecerá encendida
hasta que se complete la descongelación.
ERRORES
1. "E1": si el sensor de temperatura falla, aparecerá
un código "E1". El sistema funciona en ciclos de
deshumidificación por 30 minutos y de descongelación
por 15 minutos. Un sensor de temperatura
descompuesto debe ser reemplazado.
2. "E2": si el sensor de humedad falla, aparecerá
un código "E2" y el botón de ajuste de humedad
no funcionará. El sistema funciona en ciclos de
deshumidificación por 30 minutos y de descongelación
por 15 minutos. Un sensor de humedad descompuesto
debe ser reemplazado.
3. "CL": cuando la temperatura ambiente es <5°C (41°F),
se mostrará un código "CL" y la máquina dejará de
funcionar.
4. "CH": cuando la temperatura ambiente es > 38°C
(100.4°F) aparecerá un código "CH" y la máquina
dejará de funcionar.
5. "LO": cuando la humedad de la habitación es < 20%
de HR, se mostrará un código "LO" y la máquina dejará
de funcionar.
6. "HI": cuando la humedad de la habitación sea ≥
95% de HR, aparecerá un código "HI" y la máquina
funcionará normalmente.
3
Page 8

Deshumidificador de
calidad comercial
Manual del usuario
MANTENIMIENTO
1. Limpie la máquina con un paño suave y húmedo.
2. Retire la rejilla en el panel frontal para tener acceso al filtro.
3. Retire la malla del filtro de la unidad.
4. Use un trapo limpio para absorber el polvo de la superficie
en la malla del filtro. Si el filtro está extremadamente
sucio, use agua del grifo para enjuagarlo. Seque
completamente el filtro antes de volver a colocarlo en la
cerca de la entrada de aire.
Un filtro limpio aumentará la eficiencia general de la unidad.
ALMACENAMIENTO DE LA MÁQUINA
Si no se utiliza durante un período prolongado de tiempo,
almacene la unidad de la siguiente manera:
1. Limpie la malla del filtro.
ATENCIÓN:
El evaporador interno debe estar seco antes del almacenamiento
para evitar daños y moho en los componentes. Desenchufe la
unidad y colóquela en un área seca y abierta. Otro método de
secado es establecer el punto de humedad un 2% más alto
que la humedad ambiental para forzar al ventilador a secar
el evaporador.
2. Guarde el cable de alimentación en la parte posterior
de la unidad.
3. Almacene en un ambiente limpio y seco.
RESOLUCIÓN DE PROBLEMAS
PROBLEMA CAUSA SOLUCIÓN
La unidad no está enchufada. Enchufe la unidad.
La máquina no
está funcionando.
La máquina está
funcionando, pero no se
deshumidifica.
Capacidad reducida del
deshumidificador
No toma aire.
Funcionamiento ruidoso.
La temperatura ambiente es
inferior a 41 grados o superior
a 95 grados F.
Cuando el punto de ajuste de
humedad es 2% más alto que la
humedad ambiental.
La malla del filtro está atascada.
Las rejillas Air-in y/o Air-out
están atascadas.
La malla del filtro o la rejilla de
entrada de aire están atascadas.
La máquina está situada en una
pendiente inclinada o en una
pendiente.
La malla del filtro está atascada.
Para la seguridad de la unidad, use solo cuando la
temperatura ambiente esté entre 5 y 35 grados.
Restablezca los niveles de humedad a un punto de
ajuste más bajo o apague la unidad una vez que se
hayan alcanzado los niveles óptimos de humedad.
Limpie la malla del filtro según el manual,
especificaciones.
Despeje el bloqueo de las rejillas Air-in y/o Air-out.
Limpie el filtro de acuerdo con las instrucciones o
remueva el bloqueo de la rejilla.
Mueva la unidad a una superficie plana.
Limpie la malla del filtro de acuerdo con
las instrucciones.
PRECAUCIÓN:
Apague la unidad y desenchúfela inmediatamente si ocurre algo
anormal. Contacte a un electricista calificado. No deseche los
aparatos eléctricos como desechos municipales sin clasificar, use
instalaciones de recolección separadas. Póngase en contacto con
el gobierno local para obtener información sobre los sistemas de
recolección disponibles.
4
Page 9

globalindustrial.ca
User's manual Manual del usuario Manuel de l'utilisateur
Customer Service
US: 1-800-645-2986
Servicio de atención al Cliente
US: 1-800-645-2986
Déshumidificateur de qualité commerciale
52 litres (110 pintes)/jour
CONSERVEZ LES INSTRUCTIONS IMPORTANTES
POUR RÉFÉRENCE FUTURE
Remarque: Lorsque vous utilisez des appareils électriques, veuillez
suivre ces précautions de base afin de réduire les risques d'incendie,
d'électrocution, de blessures corporelles ou de dommages matériels. Tous
les produits de réfrigération contiennent des réfrigérants qui, en vertu de
la loi fédérale, doivent être retirés avant leur élimination.
1. Faire fonctionner l’appareil à partir d’une source d'alimentation d’égale
tension, fréquence, et rendement comme indiqué sur la plaque
d'identification de produit.
2. Une extrême prudence et un contrôle raisonnable est nécessaires lorsque
l'unité est utilisée par ou près des enfants ou des animaux domestiques
chaque fois que l'unité est laissé sans surveillance.
3. Ne pas faire fonctionner l'unité si le cordon ou la prise est endommagé ou a
été échappé ou endommagé de quelque façon.
4. Ne pas obstruer les ouvertures d'entrée ou de sortie. Ne pas utiliser à
proximité de murs, rideaux ou autres objets qui peut bloquer l'entrée et la
sortie électrique.
5. Cet appareil doit être branché sur prise mis à la terre
6. Pour réduire le risque de décharge électrique, ne pas exposer l'appareil ou
le cordon d'alimentation à l'humidité.
7. Éteindre et débrancher de la source d'alimentation avant d'exécuter toute
maintenance de routine, ou lorsqu'e l'unité n'est pas utilisée..
8. L'utilisation de raccords ou d'accessoires n'est pas recommandée ou
destiné à être utilisé avec le produit.
9. Ce produit est destiné à une utilisation commerciale normale seulement.
10. Ne pas essayer de démonter l'appareil.
11. Ne pas placer l'unité sur une surface élevée.
12. Ne pas nettoyer l'appareil à l'aide de produits chimiques
13. Débranchez l'alimentation électrique lors du nettoyage ou du rangement
de l'appareil.
14.
Cet appareil n'est pas destiné pour être place dans des endroits dangereux.
15. Cette unité doit toujours être en position verticale.
SPÉCIFICATIONS
Capacité nominale : 52 litres (110 pintes)/jour @ 30 °C (86 °F), 80 % HR
Alimentation : 115 V/60 Hz
Consommation d’énergie & courant : 728 W/6,75 amp @ 30 °C (86 °F), 80 % HR
Bruit : ≤ 60 dB(A)
Circulation de l’air : 264,86 PCM
Type & capacité de fréon : R410A/11,6 Oz : 0,330 g (0,725 lb)
Niveau d’imperméabilité : IP X 0
Capacité du réservoir d’eau : 5,5 L (1,45 gal)
Poids net : 36 kg (79,3 lb)
Poids brut : 40 kg (87 lb)
Dimensions : 43 x 51,6 x 82,6 cm (17 x 20,3 x 32,5 po)
Cordon et fiche : 3 m (10 pi) Cordon 16 AWG SJT et fiche LDCI NEMA 5-15
Avant
Panneau de
contrôle
Entrée
d’air
Couvercle
du réservoir
d’eau
Arrière
Rembobineur
du cordon
d’alimentation
Service à la clientèle
Canada: 888-645-2986
Tuyau de vidange
Grille du
radiateur
Modèle
246687
Poignée
Roue
Sortie d’air
Poignée
intégrée
Cadre
support
1
011018
Page 10

Déshumidificateur de
qualité commerciale
INSTALLATION
INSTALLATION DE LA POIGNÉE
ET DU CADRE SUPPORT
LISTE DES PIÈCES
1. Corps principal
2. Poignée
3. Boulon en acier inoxydable
4. Espaceur
5. Roue
6. Espaceur
7. Écrou
8. Cadre support
9. Tuyau de vidange de 20 pieds de long
7 6 5
Manuel de l'utilisateur
2
1
4
4 5
3
8
9
3
6 7
INSTALLATION DE LA VIDANGE
1. Lorsque le réservoir est entièrement rempli, le
voyant « FULL » s’allumera.
2. Une alarme s’allumera alors pour en aviser
l’utilisateur. Appuyez sur le bouton d’alimentation
pour éteindre le système.
3. Pour vidanger le réservoir d’eau, ouvrez le panneau
d’accès avant.
4. Tirez la poignée à l’horizontale.
5. Après avoir disposé de l’eau, remettez en place le
réservoir et fermez le panneau avant.
VIDANGE EN CONTINU
Dans des conditions extrêmement humides, le
réservoir pourrait nécessiter des vidanges fréquentes.
Il peut être placé en mode de vidange continue en
effectuant ce qui suit :
1. Ouvrez le couvercle avant, retirez le réservoir et
disposez de l’eau.
2. Faites pivoter le raccord du tuyau de drainage
sur le réservoir d’eau. Utilisez des outils de coupe
pour découper la sortie latérale puis installez le
raccord du tuyau à une sortie.
3. Installez le tuyau inclus au raccord et dirigez le tuyau
à la zone désirée avant de faire fonctionner l’appareil.
4. Nettoyez le réservoir d'eau, vidangez le tuyau et le
connecteur du tuyau et fermez le panneau avant.
5. Lorsque le drainage en continu n’est pas utilisé,
passez à l’utilisation du réservoir d’eau en utilisant
la rondelle d’étanchéité sans orifice, pour arrêter
le débit sortant.
Rondelle d’étanchéité
avec orifice
Raccord du tuyau
Tuyau de
Raccord du tuyau
Rondelle d’étanchéité
sans orifice
AVERTISSEMENT:
Ne bloquez pas le tuyau de vidange. L’extrémité du conduit de vidange ne
devrait pas se trouver plus haute que l’orifice de la sortie. Si l’extrémité de
vidange est plus élevée que l’orifice de sortie, l’eau ne se vidangera pas
correctement et pourrait endommager les composants de la sortie.
vidange
2
Page 11

Déshumidificateur de
qualité commerciale
Manuel de l'utilisateur
RÉGLAGE ET FONCTIONNEMENT
DE L’APPAREIL
FONCTION DE BOUTON
1. Appuyez sur ce bouton alors que l’écran est
allumé et que l’unité entre automatiquement
en mode continu. L’écran affichera l’humidité
environnementale et le compresseur se mettra en
marche une fois que le ventilateur a fonctionné pendant
3 secondes. Appuyez sur ce bouton à nouveau et le
compresseur arrêtera, l’écran affichant « - - ». L’unité
entrera en mode d’attente; le ventilateur fonctionnera
pendant une autre minute pour ensuite s’arrêter.
2. Maintenez enfoncé ce bouton jusqu’à ce que
le voyant d’alimentation s’allume, puis appuyez
sur « MINUS » et « ADD » pour régler l’heure
de départ. Une fois le décompte terminé, le
ventilateur et le c
l’unité, maintenez enfoncé ce bouton jusqu’à ce que le
voyant d’alimentation s’allume. Appuyez sur « MINUS » et
« ADD » pour régler l’heure d’arrêt. Une fois le décompte
terminé, le ventilateur et le compresseur s’arrêteront.
Maintenez enfoncé ce bouton pendant 3 secondes pour
voir la température actuelle. Après 10 secondes, l’écran
retournera à l’humidité actuelle. Maintenez ce bouton
pour afficher la température actuelle.
3. L’humidité peut être augmentée par
augmentations de 5 % de l’HR pendant le mode
normal. Maintenez enfoncé ce bouton pendant 1
seconde pour augmenter l’humidité.
4. L’humidité peut être abaissée par augmentations
de 5 % HR pendant le mode normal. Maintenez
enfoncé ce bouton pendant 1 seconde pour
diminuer l’humidité.
Remarque :
A. L’humidité par défaut est de 50 % HR, avec des
augmentations et des diminutions comme suit :
20 % - 25 % - 30 % -35 % - 40 % - 45 % - 50 % - 55 % 60 % - 65 % - 70 % - 75 % - 80 % - 85 % - 90 %
B. L’humidité environnementale et au réglage de l’appareil
décidera du statut du compresseur et du ventilateur.
Si l’humidité environnementale est ≥ que l’humidité
réglée pour l’appareil + 3 %, le compresseur et le
ventilateur commenceront à fonctionner. Si l’humidité
environnementale est < que l’humidité réglée pour
l’appareil + 3 %, le compresseur et le ventilateur cessera de
fonctionner. Appuyez sur le bouton continu pour le mode
continu ou pour passer en mode de déshumidification
normal pour régler l’humidité manuellement.
5. Pendant le mode continu, le réglage de l’humidité
sera indisponible. L’éclairage en mode continu
s’allumera et l’écran affichera l’humidité actuelle.
Appuyez sur ce bouton pour passer en mode
normal où le réglage de l’humidité est disponible.
ompresseur démarreront. Pour allumer
FONCTIONNEMENT
1. Lorsque le réservoir d’eau est plein, un voyant rouge
s’allumera, suivi par une alarme. L’alarme sonnera 15
fois avant que l’alimentation du compresseur et du
ventilateur ne s’éteigne. Une fois que le réservoir est
vide, l’appareil passera automatiquement au mode
précédent alors que le compresseur demeurera pendant
3 minutes en mode d’auto-protection. L’alarme cessera
3 secondes après que le réservoir sera vidé et remis en
place. Le ventilateur et le compresseur s’arrêteront à
nouveau après 3 minutes.
2. Le compresseur ne nécessitera pas l’auto-protection
de 3 minutes s’il a été utilisé pour la première fois.
Appuyez sur « POWER » pour éteindre ou mettre en
marche. Appuyez sur « POWER » pour redémarrer le
compresseur.
3. Le système comporte une mémoire automatique. Si
tous les modes de réglages ont été complétés, s’il y
a une interruption soudaine de l’alimentation, ou si la
prise d’alimentation est retirée, le système enregistrera
le statut actuel et redémarrera au réglage précédent une
fois que l’alimentation aura été rétablie.
FONCTION DE DÉGIVRAGE
1. Le compresseur et le ventilateur s’éteindront lorsque la
température environnementale descendra sous 5 °C (41
°F) ou au-delà de 39 °C (100,4 °F).
2. Fonctionnement du dégivrage : Le compresseur
fonctionnera pendant 30 minutes. Une fois que le
capteur de la température atteint ≤ -1 °C (30,2 °F)
(pendant 10 secondes), le compresseur s’arrêtera et le
dégivrage commencera. Le ventilateur continuera de
fonctionner avec le voyant de dégivrage allumé. Une
fois que la température du tuyau atteindra 5 °C (41
°F) ou si le dégivreur fonctionne pendant 15 minutes,
le dégivrage fonctionnera. Remarque : Pendant le
dégivrage, le voyant demeurera allumé jusqu’à ce
que le dégivrage soit terminé.
ERREURS
1. « E1 » : Si le capteur de température fait défaut, un
code d’erreur « E1 » s’affichera. Le système fonctionne
par cycles de déshumidification de 30 minutes, et de
dégivrage de 15 minutes. Un capteur de température
défaillant devrait être remplacé.
2. « E2 » : Si le capteur d’humidité fait défaut, un code
d’erreur « E2 » apparaitra et le bouton de réglage de
l’humidité ne fonctionnera pas. Le système fonctionne
par cycles de déshumidification de 30 minutes, et
de dégivrage de 15 minutes. Un capteur d’humidité
défaillant devrait être remplacé.
3. « CL » : Lorsque la température de la pièce est de < 5 °C
(41 °F), un code « CL » s’affichera et l’appareil s’arrêtera.
4. « CH » : Lorsque la température de la pièce est de < 38 °C
(100,4 °F), un code « CH » s’affichera et l’appareil s’arrêtera.
5. « LO » : Lorsque l’humidité de la pièce est de < 20 % HR, un
code « LO » s’affichera et l’appareil s’arrêtera.
6. « HI » : Lorsque l’humidité de la pièce est de ≥ 95 %
HR, un code « HI » s’affichera et l’appareil fonctionnera
normalement.
3
Page 12

Déshumidificateur de
qualité commerciale
Manuel de l'utilisateur
ENTRETIEN
1. Nettoyez l’appareil avec un chiffon doux et humide.
2. Retirez la grille d’aération du panneau avant pour obtenir
l’accès au filtre.
3. Retirez le grillage du filtre de l’unité.
4. Utilisez un chiffon de nettoyage pour absorber la
poussière à la surface du grillage du filtre. Si le filtre
est très sale, utilisez l’eau du robinet pour le nettoyer.
Asséchez complètement le filtre avant de remettre son
arrière dans le guide d’arrivée d’air.
Un filtre propre augmentera l’efficacité générale de l’unité.
ENTREPOSAGE DE L’APPAREIL
Si elle est inutilisée pendant une longue période de temps,
veillez à entreposer l’unité de la manière suivante :
1. Nettoyez la grille du filtre.
ATTENTION:
L’évaporateur interne doit être sec avant l’entreposage pour
éviter des dommages et de la moisissure aux composants.
Débranchez l’unité et placez-la dans un endroit sec et ouvert.
Une autre méthode d’assèchement est de régler le point
d’humidité à 2 % ou plus que l’humidité ambiante afin de
forcer le ventilateur à sécher l’évaporateur.
2. Rangez le cordon d’alimentation à l’arrière de l’unité.
3. Rangez dans un environnement propre et sec.
DÉPANNAGE
PROBLÈME CAUSE SOLUTION
L’appareil ne
fonctionne pas.
L’appareil fonctionne, mais
ne déshumidifie pas.
Capacité réduite de la
déshumidification.
Aucune entrée d’air.
Fonctionnement bruyant.
L’unité n’est pas branchée. Branchez l’unité.
La température de la pièce est
sous 5 °C (40 °F) ou au-delà de
35 °C (95 °F).
Lorsque le point d’humidité est
de 2 % plus élevé que l’humidité
ambiante.
Le grillage du filtre est bloqué.
L’entrée et la sortie de la grille
d’aération sont bloquées.
Blocage du grillage du filtre ou de
l’entrée de la grille d’aération.
L’appareil est situé sur une pente
ascendante ou descendante.
Le grillage du filtre est bloqué. Nettoyez le grillage du filtre selon les instructions.
Pour la sécurité de l’unité, n’utilisez que lorsque la
température ambiante se trouve entre 5 °C (40 °F) et
35 °C (95 °F).
Réinitialisez les niveaux d’humidité à un point inférieur, ou éteignez l’unité une fois que les niveaux
d’humidité optimaux sont présents.
Nettoyez le grillage du filtre selon les spécifications
du manuel.
Dégagez l’entrée et la sortie de la grille d’aération.
Nettoyez le filtre selon les instructions ou retirez le
blocage de la grille d’aération.
Déplacez vers une surface à niveau.
MISE EN GARDE :
Éteignez l’unité et débranchez-la immédiatement si quelque chose
d’anormal devait se produire. Contactez un électricien qualifié. Ne jetez
pas les appareils électriques dans les ordures régulières; apportez-les
à un établissement de collecte distinct. Contactez votre gouvernement
local quant à l’information quant au système de collecte disponible.
4
 Loading...