

Page 1
Operation Manual and Parts Directory
BLC-1/3-E, BLC-1/3, BLC-1/3-2, BLC-1/2, BLC-1/2-2, BLC-3/4, BLC-3/4-2
Remote DRaft BeeR Line ChiLLeRs
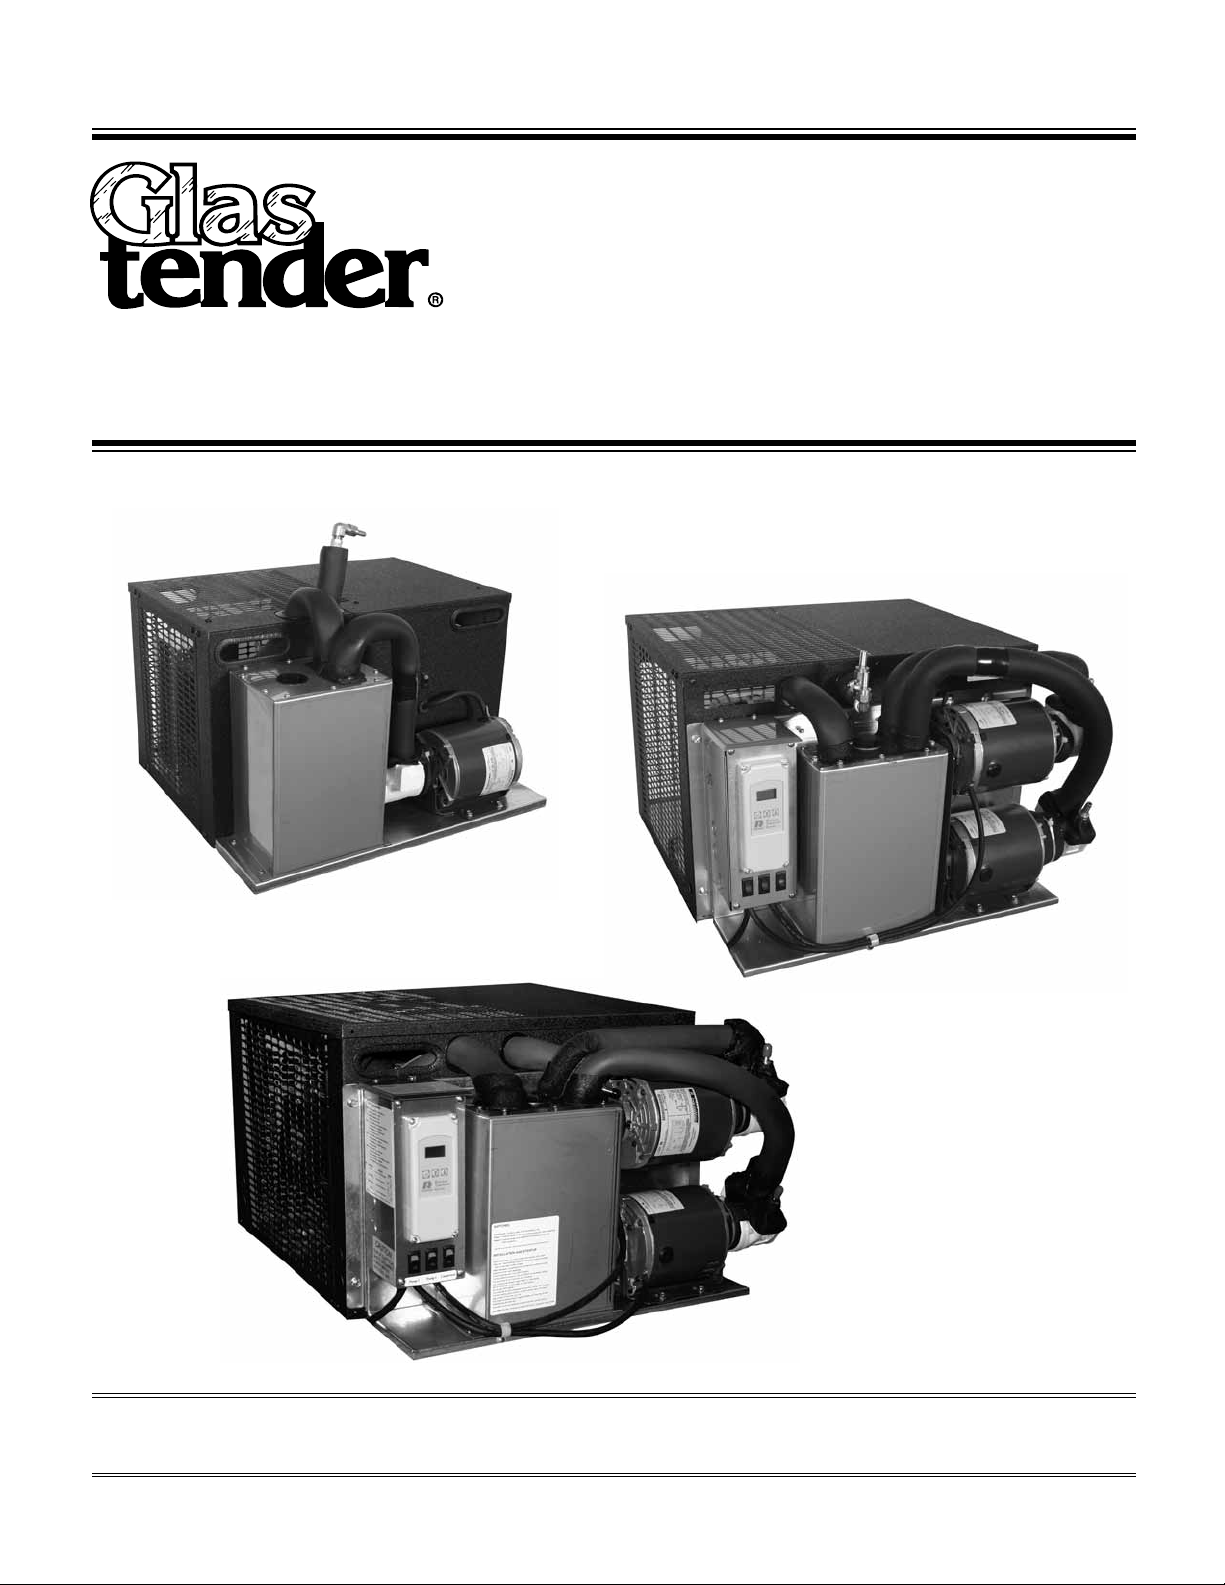
BLC-1/3-E
BLC-3/4-2
Glastender, Inc. · 5400 North Michigan Road · Saginaw, MI · 48604-9780
800.748.0423 · 989.752.4275 · Fax 989.752.4444 · www.glastender.com
BLC-1/3-2
© 2008 Glastender, Inc. Rev. 05-26-11
Page 2

inDex
Beer Line Chiller Specifications ............................................................................... 2
Inspection Upon Arrival ........................................................................................... 3
Set-Up Remote Glycol Line Chiller ......................................................................... 3
Electrical Hook-Up ................................................................................................... 3
Glycol Line Connection ............................................................................................ 3
Glycol Filling ............................................................................................................ 4
Unit Start-Up ............................................................................................................. 4
System Start-Up ........................................................................................................ 4
Electronic Temperature Control Programming ........................................................ 5
Cold Control Adjustment .......................................................................................... 5
Wiring Diagrams .................................................................................................... 6-7
BLC-1/3-E ....................................................................................................... 6
BLC-1/3, BLC-1/3-2 ....................................................................................... 6
BLC-1/2, BLC-1/2-2 ...................................................................................... 7
BLC-3/4, BLC-3/4-2 ....................................................................................... 7
Typical Installation Detail ......................................................................................... 8
Remote Installation Directions ................................................................................. 9
Remote Control Panel Installation Detail ............................................................... 10
Remote Control Panel Installation Photo ............................................................... 11
Remote Beer Line Chiller Accessories ................................................................... 11
Replacement Parts .............................................................................................. 12-16
BLC-1/3-E ..................................................................................................... 12
BLC-1/3, BLC-1/3-2, BLC-1/2, BLC-1/2-2 ...........................................13-14
BLC-3/4, BLC-3/4-2 ................................................................................15-16
Electrical Components ................................................................................... 16
Terms and Conditions ............................................................................................. 17
Warranty .................................................................................................................. 18
Trouble Shooting .................................................................................................... 19
Installation Notes .................................................................................................... 19
Glastender, Inc. • 5400 North Michigan Road • Saginaw, MI • 48604-9780
1
800.748.0423 • 989.752.4275 • Fax 989.752.4444 • www.glastender.com
Page 3

BLC speCifiCations
1/3 HP Beer Line Chiller
Model: BLC-1/3-E
stanDaRD featuRes:
• Glycol connections with flared fittings for easy service access
• Durable black vinyl-clad exterior with 16 gauge galvanized steel base
• Stainless steel, CFC-free, foamed-in-place insulated glycol bath
• High efficiency heat exchanger minimizes glycol bath size to one gallon
• Front located glycol filling port
BLC-1/3-E
1/3, 1/2, and 3/4 HP Beer Line Chillers with Remote Installable Control Panel
Models: BLC-1/3, BLC-1/3-2, BLC-1/2, BLC-1/2-2, BLC-3/4, BLC-3/4-2
stanDaRD featuRes:
• Control panel is removable and includes wall bracket for remote installation
• Glycol connections with flared fittings for easy service access
• Durable black vinyl-clad exterior with 16 gauge galvanized steel base
• Stainless steel, CFC-free, foamed-in-place insulated glycol bath
• High efficiency heat exchanger minimizes glycol bath size to one gallon
• Front located glycol filling port
• Digital temperature control with LCD display
BLC-1/3-2
• Over-sized condenser coil for maximum efficiency
• Clear glycol bath cover for easy visual inspection
• Available with two recirculating pumps (designated by “-2” suffix in model number)
Dimensional and Specication Information
Model No. BLC-1/3-E BLC-1/3 BLC-1/3-2 BLC-1/2 BLC-1/2-2 BLC-3/4 BLC-3/4-2
Dimensions† Length 27" 27" 27" 27" 27" 27" 27"
Width 21-1/4" 25-5/8" 25-5/8" 25-5/8" 25-5/8" 25-5/8" 25-5/8"
Height 14-3/4" 16" 16" 16" 16" 16" 16"
† Note: A minimum six inch clearance should be allowed around the entire unit for proper air ow.
Additional clearance should be considered above and in front of the unit for service access.
Electrical Voltage 120V 120V 120V 120V 120V 230V 230V
Frequency
Phase 1ø 1ø 1ø 1ø 1ø 1ø 1ø
FLA 12.5 12.5 17.5 13.6 18.6 10.1 12.9
Dedicated
Circuit
Electrical
Connection
Refrigerant R134a R134a R134a R134a R134a R134A R134A
Compressor 1/3 HP 1/3 HP 1/3 HP 1/2 HP 1/2 HP 3/4 HP 3/4 HP
Max Distance to Taps 125 ft. 125 ft. 125 ft. 250 ft. 250 ft. 400 ft. 400 ft.
Circulating Pumps 60 gph 60 gph 60 gph 60 gph 60 gph 60 gph 60 gph
Glycol Bath Capacity .94 gal .94 gal .94 gal .94 gal .94 gal .94 gal .94 gal.
Shipping Weight LBS (kg) 128 (58.1) 150 (68.0) 163 (73.9) 153 (69.4) 166 (75.3) 175 (79.5) 193 (87.7)
60 Hz 60 Hz 60 Hz 60 Hz 60 Hz 60 Hz 60 Hz
20A 20A 30A 20A 30A 20A 20A
Cord & Plug Cord & Plug
Hard Wire
Cord & Plug
Hard Wire Cord & Plug Cord & Plug
Glastender, Inc. • 5400 North Michigan Road • Saginaw, MI • 48604-9780
800.748.0423 • 989.752.4275 • Fax 989.752.4444 • www.glastender.com
2
Page 4

inspeCtion anD set-up
1. inspeCtion upon aRRivaL:
Immediately upon arrival, a visual inspection of the carton should be made to determine if there is evidence of damage
in shipment. Following uncrating, make an inspection for any signs of external damage.
2. set-up of Remote GLyCoL Line ChiLLeR:
Once the survey of the location has been completed to determine the positioning of the remote glycol line chiller and the
connecting draft beer dispensing stations (refer to the specification sheet to be certain that the trunk line will be within
the recommended distance), make the necessary provisions to locate the unit and provide for the electrical services.
The ideal set-up is to mount the glycol line chiller on a proper machine stand that is easily accessible for routine main-
tenance and service.
In less-than-ideal circumstances, it may be necessary to locate the unit on top of the walk-in cooler or on the floor.
NOTE: Do not locate the glycol chiller in the walk-in cooler, as the cold ambient temperature will reduce the
cooling performance of the unit.
NOTE: A minimum of six inches of clearance should be allowed around the entire unit for proper perfor-
mance. Additional clearance should be considered for above the unit and in front of the unit for serviceability.
If the unit is located on the floor:
• Ensure the cabinet is sealed to the floor with NSF listed silicon RTV sealant applied around the entire bottom edge
of the cabinet.
• An optional 4" leg set is available as an accessory.
3. eLeCtRiCaL hook-up:
Models BLC-1/3, BLC-1/3-E, BLC-1/2, BLC-3/4, & BLC-3/4-2 are supplied with a 20 Amp grounded cord and plug
that connects at the rear of the unit. Models BLC-1/3-2 & BLC-1/2-2 ship as hard wire units and are supplied with a 30
Amp grounded cord only (no plug) that connects at the rear of the unit. A corresponding 20 Amp or 30 Amp grounded
receptacle or junction box, depending on the line chiller model used, must be installed within reach of the unit.
4. GLyCoL Line ConneCtion:
Typically, glycol recirculating lines are used to transport the glycol in the line chiller to and from the walk-in cooler to be
connected to the glycol lines in the beer line set.
Recirculating Return
Connect your glycol recirculating
line from the beer line set to the
Line Chiller 3/8" barb fitting.
Recirculating Outlet
Connect your glycol recirculating
line from the beer line set to the
Line Chiller 3/8" barb fitting.
Glastender, Inc. • 5400 North Michigan Road • Saginaw, MI • 48604-9780
3
800.748.0423 • 989.752.4275 • Fax 989.752.4444 • www.glastender.com
Page 5

GLyCoL fiLLinG anD staRt-up
5. GLyCoL fiLLinG:
The glycol bath capacity is 1 gallon (US). Glycol supplied by Glastender, Inc. may be diluted to a ratio of (1) part
glycol to (2) parts water for freeze protection down to 0ºF (-18ºC) or a ratio of (1) part glycol and (3) parts water
for freeze protection down to 10ºF (-12ºC). These mix ratios are recommended, since the refrigeration system is not
capable of lowering the temperature of the glycol bath below 15ºF (-9.4ºC)
For glycol not supplied by Glastender, Inc. please consult the glycol manufacturer’s recommended mixing ratio for
the desired operating temperature.
NOTE: Do not place full strength glycol (undiluted) in the bath, as it will reduce the efficiency of the refrig-
eration system and may result in damage to the recirculation pump due to increased viscosity of cold
glycol.
NOTE: Select and use only a propylene glycol product that meets FDA (Food and Drug Administration) regu-
lations as a food grade product. Any substitution of food grade glycol with automotive anti-freeze or
other products will expose people to hazardous chemicals.
Fill the bath with glycol mixture by removing the black plug in the top of the glycol back and placing a funnel in the
fill hole. Pour in the glycol mixture until the level is 2-1/2" from the top.
6. unit staRt-up:
• Connect unit to appropriate electrical circuit. For more information refer to Step 3, Electrical Hook Up.
• Model BLC-1/3-E has one power switch that operates the compressor unit and recirculating pump.
• Models BLC-1/3, BLC-1/3-2, BLC-1/2, BLC-1/2-2, BLC-3/4, and BLC-3/4-2 have a condensing unit power switch.
There are separate power switches to operate the recirculating pumps. The condensing unit power switch will not
operate the compressor unless a pump switch is in the on position.
• Check all glycol circuit line connections for leaks.
• As you are priming the BLC-1/3, BLC-1/2, or BLC-3/4 lines, continue to add the glycol mixture to keep the bath
level 2-1/2" from the top.
7. system staRt-up:
It is a good practice to operate the glycol recirculation system for sixty (60) minutes before running beer through to
the remote dispensing station(s). This enables the glycol circuit to be checked for leaks. Also, recirculating cold glycol
through the lines enables the temperature inside the trunk line to stabilize before beer is introduced.
Once the refrigeration unit and the glycol recirculating pump have operated for sixty (60) minutes or more, the beer
product can be connected and drawn through the trunk line.
• Check the system for leaks.
• Thoroughly insulate all line joints in the trunk line and dispensing station(s).
It is recommended that the glycol lines be insulated inside the walk-in cooler to prevent excessive ice build up. Insulate
the glycol lines all the way up to the sealed chaseway as it exits the walk-in cooler.
Glastender, Inc. • 5400 North Michigan Road • Saginaw, MI • 48604-9780
800.748.0423 • 989.752.4275 • Fax 989.752.4444 • www.glastender.com
4
Page 6
tempeRatuRe ContRoL
8. eLeCtRoniC tempeRatuRe ContRoL pRoGRamminG
BLC-1/3, BLC-1/3-2, BLC-1/2, BLC-1/2-2, BLC-3/4, BLC-3/4-2:
The unit is shipped from the factory set at 26°F, differential set at 5, in C1, cooling mode. If reprogramming or adjusting is necessary follow these steps:
Step 1 Press the SET key to start programming.
Use the up or down arrow to toggle between and select F for degrees Fahrenheit or C for degrees Celsius.
Step 2 Press the SET key again to access the setpoint.
To achieve the desired temperature, press the UP key to increase or the DOWN key to decrease the setpoint.
Step 3 Press the SET key again to access the differential.
To achieve the desired differential, press the UP key to increase or the DOWN key to decrease the setting.
Step 4 Press the SET key again to access the mode.
Use the up or down arrow to toggle between and select C1, cooling or H1, heating mode.
Step 5 Press the SET key again to complete programming.
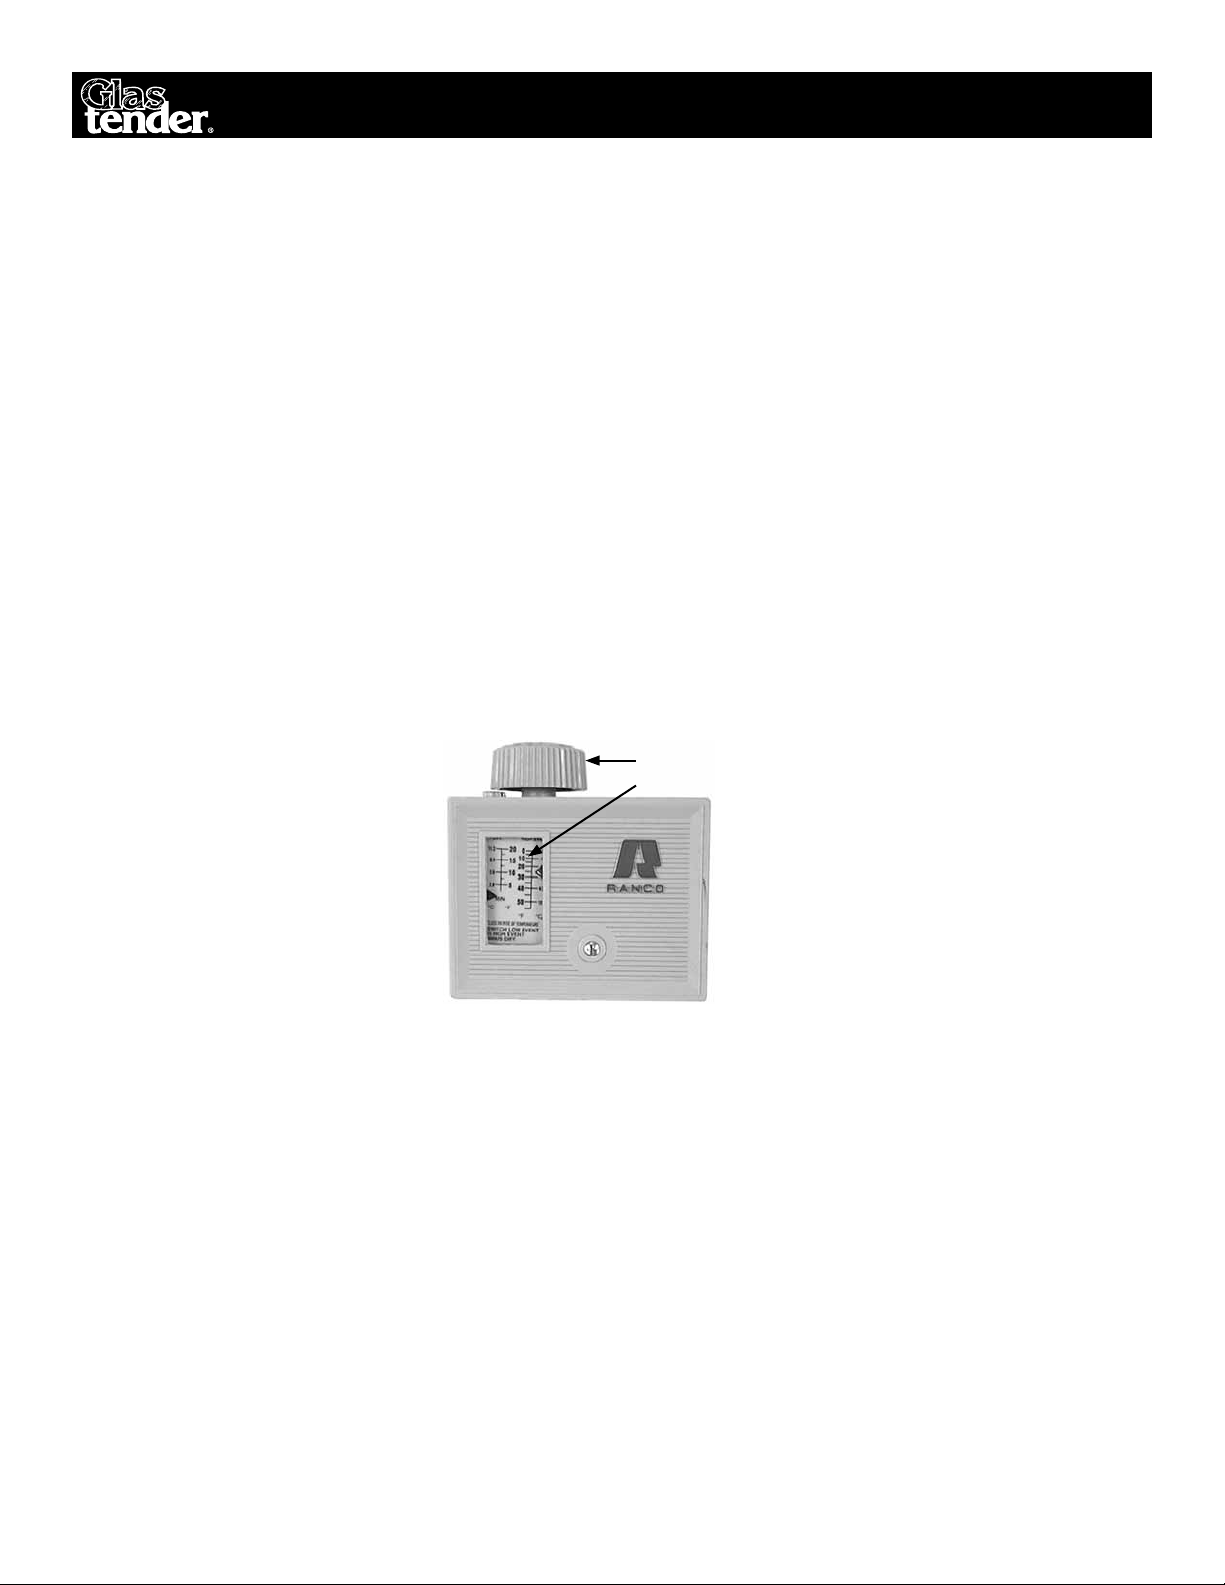
CoLD ContRoL aDjustment, BLC-1/3-e
The unit is shipped from the factory set at 26°F, differential set at 5. To decrease the temperature turn the adjusting knob
clockwise. To increase the temperature turn the adjusting knob counter clockwise.
Adjusting Knob
Scale
Glastender, Inc. • 5400 North Michigan Road • Saginaw, MI • 48604-9780
5
800.748.0423 • 989.752.4275 • Fax 989.752.4444 • www.glastender.com
Page 7

BLC-1/3-e WiRinG DiaGRam
Thermostat
Controller
White
Black
Green
White
Circulating Pump
Black
Black
Pump 1
Switch
Black
White
Green
Switch
Compressor
Black
Overload
Blue
White
Black
C
SR
Extend Wires For Remote
Power Supply
120 VAC 1 PH 60 HZ
Optional
230 VAC 1PH 50 HZ
Start Relay
Start Capacitor
BLC-1/3, BLC-1/3-2 WiRinG DiaGRam
White
NC
C
NO
Cond Fan
White
Optional
Power Supply
120 VAC 1 PH 60 HZ
Optional
230 VAC 1PH 50 HZ
120
Circulating Pump
Black
Green
White
Circulating Pump
Black
Black
Pump 2
Switch
Black
Pump 1
Switch
Black
Switch
Compressor
Black
White
Green
Extend Wires For Remote
Glastender, Inc. • 5400 North Michigan Road • Saginaw, MI • 48604-9780
800.748.0423 • 989.752.4275 • Fax 989.752.4444 • www.glastender.com
COM
230
Overload
Black
White
Start Relay
Blue
C
Cond Fan
SR
White
Start Capacitor
6
Page 8

BLC-1/2, BLC-1/2-2 WiRinG DiaGRam
Controller
C 1 PH 60 HZ
Optional
Controller
wer Supply
Optional
Circulating Pump
Black
Green
White
Black
Circulating Pump
Black
Pump 2
Switch
White
Black
Black
Switch
Pump 1
Green
Compressor
Switch
Black
Extend Wires For Remote
120
NC
C
COM
Black
White
NO
230
Condenser Fan
Power Supply
120 VA
Optional
230 VAC 1PH 50 HZ
Compressor
C
1
M
5
Overload
Protector
SR
2
L
BLC-3/4, BLC-3/4-2 WiRinG DiaGRam
White
Black
Circulating Pump
Black
Pump 2
Switch
Black
Pump 1
Switch
Black
Switch
Compressor
Green
High Pressure Switch
Open On Pressure Rise
250 PSIG
Black
Circulating Pump
Black
Green
White
NC NO
C
COM
120
Condenser Fan
Black
White
230
Compressor
1
5
Po
230 VAC 1 PH
60 HZ
Overload
Protector
C
SR
2
M
L
Extend Wires For Remote
Glastender, Inc. • 5400 North Michigan Road • Saginaw, MI • 48604-9780
7
800.748.0423 • 989.752.4275 • Fax 989.752.4444 • www.glastender.com
Page 9

typiCaL instaLLation DetaiL
Glastender, Inc. • 5400 North Michigan Road • Saginaw, MI • 48604-9780
800.748.0423 • 989.752.4275 • Fax 989.752.4444 • www.glastender.com
8
Page 10

Remote ContRoL paneL instaLLation DetaiL
Glastender, Inc. • 5400 North Michigan Road • Saginaw, MI • 48604-9780
9
800.748.0423 • 989.752.4275 • Fax 989.752.4444 • www.glastender.com
Page 11

instRuCtions foR ContRoL paneL Remote instaLLation
The Glastender exclusive, patent pending beer line chiller design houses the heat exchanger inside the condensing unit
compartment. For models BLC-1/3, BLC-1/3-2, BLC1/2, BLC-1/2-2, BLC-3/4, and BLC-3/4-2, this unique feature allows
the control panel with glycol bath and recirculating pump(s) to be easily installed separately from the condensing unit in a
more conveniently accessible location.
Remove cabinet top and vented
side to get at the power cord.
Disconnect 33" power cord.
Remove control panel installed
with four screws from cabinet. NOTE: Wall rack will be
found behind control panel.
Remove control cover to get
at the power cord. Disconnect
33" power cord.
Mount wall rack for control
panel at new site.
Disconnect glycol line from
heat exchanger.
Clip control panel onto wall
mounting plate. Secure against
wall through four corner holes.
Disconnect glycol line from
bath.
Install power line between
condensing unit and control
panel.
Install and insulate glycol line
from heat exchanger to bath
Connect glycol recirculating
line from pump outlet 3/8" barb
fitting to the beer line set.
Glastender, Inc. • 5400 North Michigan Road • Saginaw, MI • 48604-9780
800.748.0423 • 989.752.4275 • Fax 989.752.4444 • www.glastender.com
Connect glycol recirculating
line from beer line set to the
return 3/8" barb fitting.
10
Page 12

Remote ContRoL paneL instaLLation photo
The Glastender exclusive, patent pending beer line
chiller design houses the heat exchanger inside the
condensing unit compartment. This unique feature
allows the control panel with glycol bath and recirculating pump(s) to be easily installed separately
from the condensing unit in a more conveniently
accessible location. Simply remove the control
panel from the condensing unit cabinet and mount
it in the desired location. Only glycol and electrical lines need to be run between the control panel
and the condensing unit cabinet.
Electrical connection between condensing
unit & control panel by local electrician
Glycol line from heat exchanger to bath
Digital temperature control with LCD display
Power cord for unit
Condensing unit &
heat exchanger cabinet
Glycol return from
beer tower to heat
exchanger
Glycol line from
pump to beer tower
Glycol line from bath
to pump
Recirculating pump
1 gallon glycol bath
Photo shows BLC-1/3 in an installation setting with the control panel installed remotely from the condensing unit cabinet.
Remote BeeR Line ChiLLeR aCCessoRies
All Glastender line chillers may be placed on 6" legs that are adjustable up to 7". The leg set includes 16 gauge galvanized steel that are
mounted to the base plate of the unit.
A line chiller stand is 26-1/2" wide by 39" high by 24" deep and comes
with adjustable feet for leveling. The bottom shelf is at the 8" high
level. The top shelf has holes that correspond to the line chiller mounting holes, so the line chiller can be bolted to the shelf. One size stand
is used for all line chiller models.
A line chiller wall rack is a shelf that is mounted to a structural wall.
The shelf has holes that correspond to the line chiller mounting holes,
so the line chiller can be bolted to the shelf. One size rack is used for
all line chiller models.
stands
Wall Racks
11
Glastender, Inc. • 5400 North Michigan Road • Saginaw, MI • 48604-9780
800.748.0423 • 989.752.4275 • Fax 989.752.4444 • www.glastender.com
Page 13

BLC-1/3-e RepLaCement paRts
paRt no. DesCRiption pRiCe
1. 06001439 Compressor, 1/3 HP, R-134a, 120V $435.00
09000481 Start capacitor for 1/3 HP R-134a compressor 10.00
09000479 Relay for 1/3 HP R-134a compressor 20.00
09000480 Overload protector for 1/3 HP R-134a compressor 11.50
2. 09000292 Condenser coil 170.00
3. 09000336 9W condenser fan motor 80.00
4. 09000300 Fan blade 40 series 13.00
5. 06001385 Filter dryer, 1/4” x 1/4” 20.00
6. 06001384 Accumulator, suction line 40.00
7. 09000523 Evaporator, flat plate housing assembly 515.00
8. 09000331 Pump, glycol, 60 GPH, brass 190.00
9. 09000340 Pump motor, 1/3HP, 120v 325.00
10. 06001595 Insulation, Fluid-O-Tech pump, 2 piece set 9.00
11. 06001412 Rocker switch 5.00
12. 09000303 Thermostat, adjustable 100.00
13. 09000527 Capillary tubing pre-cut .049 at 65” 20.00
14. 09000499 Top, compressor, moly, flat plate chiller, BLC-1/3-E 35.00
15. 09000501 Front, compressor, moly, flat plate chiller 35.00
09000503 Back, compressor, moly, flat plate chiller 35.00
16. 09000505 Side, compressor, black vinyl, flat plate chiller 20.00
09000510 Side, coil, black vinyl, flat plate chiller 12.00
2
3
12
7
13 5
8
14
4
1
16
6
11
10
15
9
Glastender, Inc. • 5400 North Michigan Road • Saginaw, MI • 48604-9780
800.748.0423 • 989.752.4275 • Fax 989.752.4444 • www.glastender.com
12
Page 14

15
BLC-1/3, BLC-1/3-2, BLC-1/2, BLC-1/2-2 RepLaCement paRts
3
7
4
14
5
13
6
1
16
12
2
8
13
10
9
11
Glastender, Inc. • 5400 North Michigan Road • Saginaw, MI • 48604-9780
800.748.0423 • 989.752.4275 • Fax 989.752.4444 • www.glastender.com
Page 15

BLC-1/3, BLC-1/3-2, BLC-1/2, BLC-1/2-2 RepLaCement paRts
paRt no. DesCRiption pRiCe
1. 06001439 Compressor, 1/3 HP, R-134a, 120V $435.00
09000481 Start capacitor for 1/3 HP R-134a compressor 10.00
09000479 Relay for 1/3 HP R-134a compressor 20.00
09000480 Overload protector for 1/3 HP R-134a compressor 11.50
09000334 Compressor, 1/2 HP, R134a, 120V 700.00
09000650 Start capacitor for 1/2 HP R134a compressor 19.00
09000652 Relay for 1/2 HP R134a compressor 30.50
09000651 Overload protector for 1/2 HP 134a compressor 22.00
2. 09000526 Condenser coil, 12.00" x 13.50" 270.00
3. 08000085 Motor, condenser fan 110.00
4. 09000528 Fan blade, 10” 30 degree S Condenser 14.00
5. 06001385 Filter dryer, 1/4" x 1/4" 20.00
6. 06001384 Accumulator, suction line 40.00
7. 09000523 Evaporator, flat plate housing assembly 515.00
8. 09000331 Pump, glycol, 60 GPH, brass 190.00
9. 09000340 Pump motor, 1/3 HP, 120V 325.00
10. 06001595 Insulation, Fluid-O-Tech pump, 2 piece set 9.00
11. 06001412 Rocker switch 5.00
12. 09000616 Electronic temperature control 190.00
13. 09000527 Capillary tubing, pre-cut .049 at 65”, BLC-1/3, BLC-1/3-2 20.00
09000625 Capillary tubing, pre-cut .049 at 42”, BLC-1/2, BLC-1/2-2 20.00
14. 09000496 Top, compressor, black vinyl, flat plate chiller 35.00
15. 09000498 Front, compressor, moly, flat plate chiller 35.00
09000500 Back, compressor, black vinyl, flat plate chiller 35.00
16. 09000502 Side, compressor, black vinyl, flat plate chiller 27.00
09000522 Side, coil, black vinyl, flat plate chiller 15.00
Glastender, Inc. • 5400 North Michigan Road • Saginaw, MI • 48604-9780
800.748.0423 • 989.752.4275 • Fax 989.752.4444 • www.glastender.com
14
Page 16

BLC-3/4 & BLC-3/4-2 RepLaCement paRts
3
2
6 13
5
41
15
7
16
12
8
Glastender, Inc. • 5400 North Michigan Road • Saginaw, MI • 48604-9780
800.748.0423 • 989.752.4275 • Fax 989.752.4444 • www.glastender.com
15
11
14
10
9
Page 17

BLC-3/4 & BLC-3/4-2 RepLaCement paRts
paRt no. DesCRiption pRiCe
1. 09000335 Compressor, 3/4 HP, R-134a, 220V 60hz $880.00
09000668 Start capacitor for 3/4 HP 220V compressor 31.00
09000670 Relay for 3/4 HP 220V compressor 35.00
09000671 Overload protector for 3/4 HP 220V compressor 13.00
2. 09000640 Condenser coil, 15 x 13 x 4 370.00
3. 08000085 Motor, 16 watt Condenser Fan 110.00
4. 09000528 Fan Blade, 10” 14.00
5. 09000285 Filter Dryer, 1/4" x 1/4" 20.00
6. 09000286 Accumulator 100.00
7. 09000523 Evaporator, flat plate housing assembly 500.00
8. 09000331 Pump, glycol, 60 GPH, brass 190.00
9. 09000342 Pump motor 1/3hp, 220v 345.00
10. 06001595 Insulation, Fluid-O-Tech Pump, 2 piece set 9.00
11. 06001412 Rocker Switch 5.00
12. 09000616 Electronic Temperature Control 190.00
13. 09000649 Capillary tubing, set of 2, 60" x .049" ID 20.00
14. 09000496 Top, compressor, black vinyl, flat plate chiller 35.00
15. 09000498 Front, compressor, moly, flat plate chiller 35.00
16. 09000502 Side, compressor, black vinyl, flat plate chiller 27.00
09000500 Back, compressor, black vinyl, flat plate chiller 35.00
eLeCtRiCaL Components
paRt no. DesCRiption pRiCe
06006121 Replacement powercord assembly, includes (06001572 06001314) $40.00
Glastender, Inc. • 5400 North Michigan Road • Saginaw, MI • 48604-9780
800.748.0423 • 989.752.4275 • Fax 989.752.4444 • www.glastender.com
16
Page 18

teRms anD ConDitions
pRiCes:
All prices are LIST. Applicable taxes will be added.
Quotations:
Unless otherwise stated, quotations are effective for 30 days only.
aCCeptanCe:
All orders are subject to acceptance by Glastender, Inc.’s headquarters in
Saginaw, Michigan. Possession of the Product Directory and Price List
is not an offer to sell.
shipments:
F.O.B. factory in Saginaw, Michigan. Freight terms are Third Party or
Collect if shipped directly to you. Prepay and Add to Invoice freight
terms are available upon request. The approximate shipping weights of
all products are listed with the prices. Partial shipments will be made
unless otherwise specified by the customer. Surface freight classifications are:
Glasswashers, Line Chillers - Class 92.5
Cocktail Stations, Underbar Equipment - Class 85
Bar Die/Underbar Equipment – Class 125
Refrigeration Equipment, 48” long or smaller - Class 100
Refrigeration Equipment, greater than 48” long - Class 110
All small items are evaluated to see the most cost effective means for
shipment. Many small items ship via UPS or FedEx; however, when
dimensional weight is excessive DB Schenker, UPS Supply Chain, or
even common LTL carriers are the most cost effective choice. Spare
parts orders received before 1:00 PM EST can usually be shipped the
same day.
DeLiveRy:
The majority of equipment is manufactured to order and typically ships
within three to six weeks after complete order information is received by
the factory. In-stock equipment typically ships within two to three days
of the factory receiving complete order information.
RetuRns:
Items specified as “Manufactured to Order” are NOT returnable.
A Return Material Authorization (RMA) number must be issued by the
factory in advance for any items that are returnable. The RMA number
MUST be noted on the outside of the returned package. Returns must be
received within 90 days of the RMA issue date. Shipping charges must
be prepaid. A minimum 20% restocking charge will be applied to all
authorized returns if received in new, unused condition in the original
packaging.
The above conditions apply to spare part returns, except spare part
returns must be received within 30 days of original shipment for electronic or electrical parts or within 90 days for all other parts.
Loss oR DamaGe:
For customer routed shipments, Glastender, Inc. is not responsible for
any loss, damage, or delay of merchandise during shipment. Such transit
claims must be filed with the carrier. Merchandise must be examined on
arrival. If shortages occur, Glastender, Inc. must be notified in writing
within five (5) days of delivery to honor any shortage claim. Glastender
will assume responsibility for freight claims on Prepay and Add shipments but the customer must inspect freight and note any damage upon
receipt. Failure to do so may result in losses at the customer’s expense.
The order department is happy to assist with routing or shipping questions.
payment teRms:
Cash should be included with all orders unless credit terms have been
arranged. To establish credit, banking and trade references are required.
A convenient credit application is available upon request. Payment via
credit card is not our normal means of receiving payment. Visa and
MasterCard will be accepted, but must be charged at the time of shipment. In addition, a payment via credit card for orders totaling more than
$500 will incur a 3% convenience fee on the total transaction amount.
Custom oRDeRs:
Custom orders must be paid in advance and are not subject to cancellation.
Laminates:
Some products include common, readily available plastic laminates of
the customer’s selection. There may be an additional charge if uncommon varieties are ordered.
05/18/10
17
Glastender, Inc. • 5400 North Michigan Road • Saginaw, MI • 48604-9780
800.748.0423 • 989.752.4275 • Fax 989.752.4444 • www.glastender.com
Page 19

WaRRanty statement
APPLICABLE TO ALL PRODUCTS SOLD WITHIN THE UNITED STATES AND CANADA
LABOR: Glastender, Inc. warrants all products to be free of defects
in material and workmanship. In established areas, a start-up and a
90-day labor warranty are included with glasswasher models GT-24
and GT-30. The GT-18 series glasswashers* and the GW24 glasswasher includes a 1-year labor warranty. *NOTE: One-year labor
warranty applies to GT-18 glasswashers purchased at May 1, 2011
pricing. Self-contained refrigeration models, except beer line chillers, include a 1-year labor warranty, for the duration of one year from
date of installation or up to 18 months from date of factory shipment,
whichever occurs sooner. For warranty labor claims beyond 15 months
from the date of factory shipment, proof of date of installation or occupancy must be provided. Authorization for labor must be obtained from
Glastender within the warranty period and prior to the service being performed. Labor warranty applies to the United States and Canada only.
PARTS: Within one year from date of installation or 18 months from
date of factory shipment, whichever occurs sooner, Glastender, Inc.
will replace any part or assembly found defective under normal use and
service. Field replacement parts include a warranty of 90 days from date
of installation.
FOUR YEAR ADDITIONAL COMPRESSOR WARRANTY: Glastender
will warrant to the original user the compressor for all self-contained
refrigeration models for an additional four years following the regular
one-year warranty period. This plan applies to the compressor only.
A warranty claim form MUST accompany all returned defective
parts or assemblies. This form MUST be completed in full. Failure
to do so may result in delay or denial of credit. Any defective part or
assembly must be returned to Glastender, Inc., Saginaw, Michigan,
with all transportation and delivery charges prepaid. Warranty repairs
or replacements will be shipped FOB factory in Saginaw, Michigan.
Reimbursement for applicable freight charges covers ground service only.
Glastender provides in-warranty repairs during a service company’s
regular working days and hours. There is no provision for payment
of a premium rate during “overtime” hours. When warranty service is
requested during other than normal working hours, the end user will be
charged the premium portion of the overtime rate.
The warranty does not cover equipment subjected to accidents, freight
damage, alterations from the original design, improper power and/or
plumbing hookups, improper chemical use, general misuse, or lack
of routine required maintenance as determined by Glastender, Inc.
Installation, normal control adjustments, general maintenance, correcting an installation error, or service calls that reveal the unit is functioning normally will not be reimbursed under warranty.
Condenser coils on self-contained refrigeration products must be
cleaned regularly. Failure to provide adequate air flow to a refrigeration
unit will void the warranty.
SECOND YEAR EXTENDED PARTS & LABOR WARRANTY:
Glastender’s one-year parts and labor warranty on self-contained refrigeration units, excluding beer line chillers, can be extended to two years
with the purchase of a two year parts and labor warranty. Specify part
number EWR2 ($150 net price) when ordering.
EXPORT WARRANTY - One year parts only.
EXCLUSION OF WARRANTIES
EXCEPT AS PROVIDED ABOVE, GLASTENDER MAKES
NO WARRANTIES, EXPRESS OR IMPLIED, INCLUDING,
BUT NOT LIMITED TO, ANY IMPLIED WARRANTY OF
MERCHANTABILITY, FITNESS FOR A PARTICULAR PURPOSE
OR NON-INFRINGEMENT.
LIMITATION OF REMEDIES AND DAMAGES
If Buyer makes a valid and timely claim as outlined above, Glastender’s
liability and Buyer’s remedies under this agreement will be limited solely
to labor charges authorized and/or replacement or credit, at Glastender’s
option, with respect to Products returned at Buyer’s expense within thirty (30) days after warranty repair. GLASTENDER’S LIABILITY WILL
IN NO EVENT BE GREATER IN AMOUNT THAN THE PURCHASE
PRICE OF THE RETURNED PRODUCTS. GLASTENDER
WILL NOT BE LIABLE UNDER ANY CIRCUMSTANCE FOR
CONSEQUENTIAL OR INCIDENTAL DAMAGES, INCLUDING,
BUT NOT LIMITED TO, LABOR COSTS EXCEPT AS COVERED
UNDER OUR WARRANTY, LOST PROFITS OR THE LOSS OF
PERISHABLE PRODUCTS RESULTING FROM THE USE OF OR
INABILITY TO USE OUR PRODUCTS OR FROM OUR PRODUCTS’
INCORPORATION INTO OR BECOMING A COMPONENT OF
ANY OTHER PRODUCT. NEITHER PARTY WILL HAVE ANY
NEGLIGENCE OR OTHER TORT LIABILITY TO THE OTHER, OR
TO ANY THIRD PARTY, ARISING FROM ANY BREACH OF THIS
AGREEMENT.
GOVERNING LAW - JURISDICTION
The terms and conditions of an order are to be governed and construed
according to the laws of the State of Michigan, without regard to conflict
of laws principles. Buyer hereby consents to the jurisdiction and venue
of the courts located in Saginaw County, Michigan.
No representative, distributor, dealer, or any other person is authorized
to modify this warranty. This warranty replaces all other written or
verbal warranties.
NOTE: Glastender, Inc.’s policy of constant quality improvement
means that prices, specifications, and policies are subject to change
without notice. Questions regarding this warranty should be directed to
Glastender’s Customer Service Representative.
04/04/11
Glastender shall not be liable for loss of use, revenue, or profit, or for any other indirect, incidental, special, or consequential
damage including, but not limited to, product spoilage or loss.
This warranty is conditioned upon Glastender receiving notice of any
defect subject to this warranty within sixty (60) days of its discovery
by the end user or dealer. All products are warranted only for the initial
place of installation. Removal of a product automatically terminates
this warranty.
Glastender, Inc. • 5400 North Michigan Road • Saginaw, MI • 48604-9780
800.748.0423 • 989.752.4275 • Fax 989.752.4444 • www.glastender.com
IMPORTANT!!
Attention Refrigeration Service Companies
Please review the important warranty information on this page. If you
believe a service call should be covered by the factory, please call
the factory for authorization between 8AM and 5PM EST, Monday
through Friday.
18
Page 20

tRouBLe shootinG
Complaints of warm beer...
• Check the temperature of walk-in beer cooler.
• Check the glycol bath temperature.
• Check that recirculating pump is operating.
Refrigeration Compressor Will Not Run...
• Check that the unit is getting electrical power.
• Check that cold control is working.
• Check that all wiring connections are secure.
Refrigeration Compressor Runs But Stops...
• Check for dirt build-up on condenser coil surface.
• Check that there is no obstruction of air flow into the cabinet.
• Ensure that enough voltage is supplied to the unit.
Refrigeration Compressor Runs But Not Cooling...
• Check for refrigerant leaks.
Noisy or Hot Recirculating Pump...
• Ensure that glycol bath is not frozen.
• Ensure that the glycol solution has been properly diluted.
• Check motor and pump coupling for wear.
Recirculation Pump Not Working...
• Ensure that pump and motor coupling has not worn free.
• Check power supply to the motor.
• Replace worn pump.
instaLLation notes
Installation Notes
_________________________________________________________________________________________
_________________________________________________________________________________________
_________________________________________________________________________________________
_________________________________________________________________________________________
_________________________________________________________________________________________
_________________________________________________________________________________________
_________________________________________________________________________________________
_________________________________________________________________________________________
_________________________________________________________________________________________
_________________________________________________________________________________________
_________________________________________________________________________________________
_________________________________________________________________________________________
_________________________________________________________________________________________
_________________________________________________________________________________________
_________________________________________________________________________________________
_________________________________________________________________________________________
Original System Installer
Company: _____________________________________________
Address: _____________________________________________
_____________________________________________
City, State, Zip: _____________________________________________
Phone Number: _____________________________________________
Fax Number: _____________________________________________
Contact: _____________________________________________
Glastender, Inc. • 5400 North Michigan Road • Saginaw, MI • 48604-9780
19
800.748.0423 • 989.752.4275 • Fax 989.752.4444 • www.glastender.com
 Loading...