

Page 1
Digital Picture Frame
User Manual
SP-701P/SP-811P
www.giinii.com
Page 2

Page 3

SHOMI™ Digital Picture Frame
Copyright
© SHOMI™ 2011. All rights reserved. No part of this publication may
be reproduced, transmitted, transcribed, stored in a retrieval system
or translated into any language or computer language, in any form or
by any means, electronic, mechanical, magnetic, optical, chemical,
manual or otherwise, without the prior written permission by
SHOMI™.
Disclaimer
SHOMI™ makes no representations or warranties, either expressed
or implied, with respect to the contents hereof and pacifically
disclaims any warranties, merchantability or fitness for any particular
purpose. Further, SHOMI™ reserves the right to revise this
publication and to make changes from time to time in the contents
hereof without obligation to notify any person of such revision or
changes.
Safety Instructions
Before operating the Picture Frame, carefully read and follow the
instructions below.
Retain this User Manual for future reference.
Read the safety and operating instructions carefully before
using the product. All w
operating instructions should be observed.
Do not place this product under direct sunlight or near heat
sources, such as in a closed c
The outer casing of this product may become deformed and the
sophisticated sensors inside may become damaged due to
excessive heat. Do not use this product near water, in the rain
or allow any liquid to get inside this product. Water and
moisture may cause short circuit to the electronic components
Copyright EN-i
arnings on the product and in the
ar under sunlight or near a stove.
Page 4

SHOMI™ Digital Picture Frame
and lead to malfunctions.
Do not use this product near strong electromagnetic sources,
such as a microwave oven. The electromagnetic interference
may cause this product to malfunction.
Do not drop or apply shock/vibration to this product. Strong
impacts may damage the components inside.
Do not insert objects other than compatible memory cards into
the memory card slots of this product. The metal contacts
inside the slots can easily become damaged by foreign objects.
Do not use an unknown power adapter other than the one
supplied with the Picture Frame. Connecting this product to an
unknown power adapter is very dangerous and may lead to fire
or explosion.
Do not cut, bend, modify, place heavy objects, or step on the
power adapter cord. Otherwise the external insulation may be
damaged and result in short-circuit or fire.
If there are strange odors or heat emitting from this product or
any signs of malfunction, disconnect the Picture Frame from
the power immediately and contact your dealer for inspection or
service.
Use a smooth, soft cloth to clean the surface of the screen. Do
not use liquid cleaners or glass cleaners.
If a foreign substance or water gets in this product, turn the
off immediately and disconnect the power adapter. Next,
power
remove the foreign substance or water, and then send the
product to your nearest service center.
Do not attempt to disassemble or modify this product. There
are no user serviceable parts inside this product, and any
unauthorized modifications will void the warranty.
Although the LCD panel is made with high-precision technology
and has effective pixels of 99.99% or more, black dots or bright
points of light (red, blue or green) may appear constantly on the
LCD panel. This is a structural property of the LCD panel and is
not a malfunction.
EN-ii
Safety Instructions
Page 5

SHOMI™ Digital Picture Frame
Table of contents
Key Features .................................................................................... 1
What's In The Box ............................................................................ 2
Overview ........................................................................................... 3
Right Rear View ............................................................................ 3
Straight On .................................................................................... 4
Operating the Picture Frame .......................................................... 5
Getting Started ................................................................................. 6
Connecting to Power .................................................................... 6
Starting Slideshows Automatically ................................................ 7
Basic Setup ................................................................................... 7
Selecting a language ............................................................... 7
Setting the Date and Time ....................................................... 8
Using the Main Menu ....................................................................... 9
Managing Photos ........................................................................... 10
Sorting photos into a default album ............................................ 10
Creating a new album ................................................................. 11
Modifying an album ..................................................................... 12
Deleting an album ....................................................................... 12
Using other options in the ALBUM mode ................................... 12
Rotating photos ...................................................................... 13
Applying photo effect ............................................................. 13
Table of Contents EN-iii
Page 6

SHOMI™ Digital Picture Frame
Viewing Photos .............................................................................. 14
Using EnerGiiNii™ ......................................................................... 15
Using the CLOCK (G-button) ........................................................ 16
Clock view ................................................................................... 16
Switching between Slideshow view and Clock view ................... 16
Using SETTINGS ............................................................................ 17
Date and Time page .................................................................... 18
General Setting page .................................................................. 18
Information page ......................................................................... 18
Frequently asked questions ......................................................... 19
Regulation & Compliance.............................................................. 20
Appendix ......................................................................................... 21
Specifications .............................................................................. 21
SHOMI 90 DAY LIMITED WARRANTY .......................................... 22
EN-iv
Table of Contents
Page 7

SHOMI™ Digital Picture Frame
Dear Valued Customer:
Thank you for bringing our SHOMI™ Digital Picture Frame into your
home. Now you will be able to view your growing digital picture library
in stunning clarity and share great memories with friends and family.
This new SHOMI™ Picture Frame includes a brand new, easier
operation program that allows you to organize photos that are stored
on your memory card or USB drive right on the device.
It's a totally new and easier way to enjoy seeing your favorite photos.
You can actually create your own photo albums with unique names
using the soft-keyboard built in to your picture frame.
To get the most out of your new SHOMI™ product, please read
through this entire User Manual before use. And, if you have any
questions about our product, please don't return this to the store.
Allow us to help you by calling our customer service team.
Sincerely,
The SHOMI™ Team
Key Features
This Picture Frame is equipped with the following features:
New Easy-To-Use operation using flash-animated menu icons
and a much simplified two-button and scroll w
Display clear and bright photos.
Enables you to play back photo files that are stored in a
memory card or a USB flash drive.
EnerGiiNii™ software to personalize your frame, saving power
when frame is not in use.
Photo Album feature to manage and sort your photo collection.
Clock /Calendar function
Visit us at www.GiiNii.com to register your product and find more
information. If you have any questions, feel free to contact us at
1-866-909-3550.
heel controls.
Key Features EN-1
Page 8
SHOMI™ Digital Picture Frame
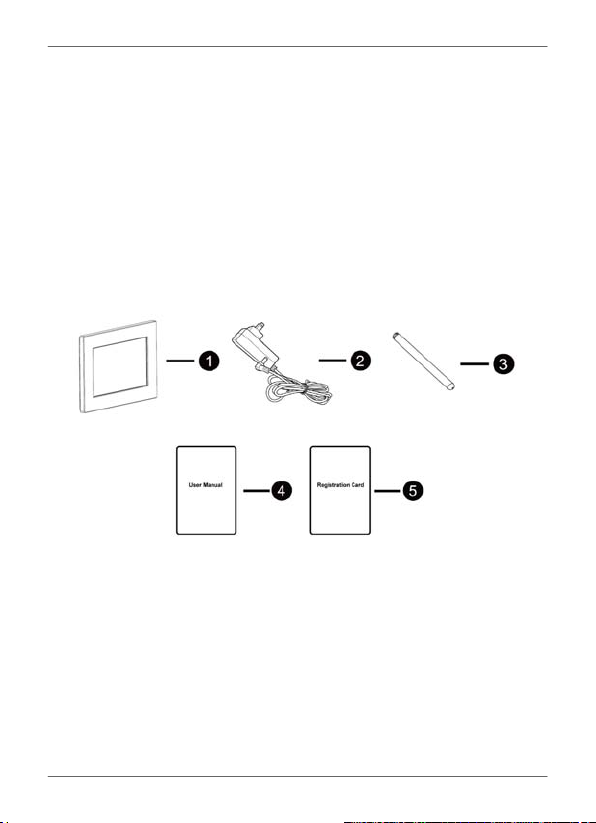
What's In The Box
Carefully open the packing box and ensure that you have the
following items.
1. Digital Picture Frame x 1
2. AC power adapter x 1
3. Detachable Back Stand
4. User Manual x 1
5. Registration Card x 1
Actual product appearance may vary from the illustrations
shown in this User Manual.
Available accessories may vary depending on the area where
you purchased the Picture Frame.
English
EN-2
What's In The Box
Page 9
SHOMI™ Digital Picture Frame
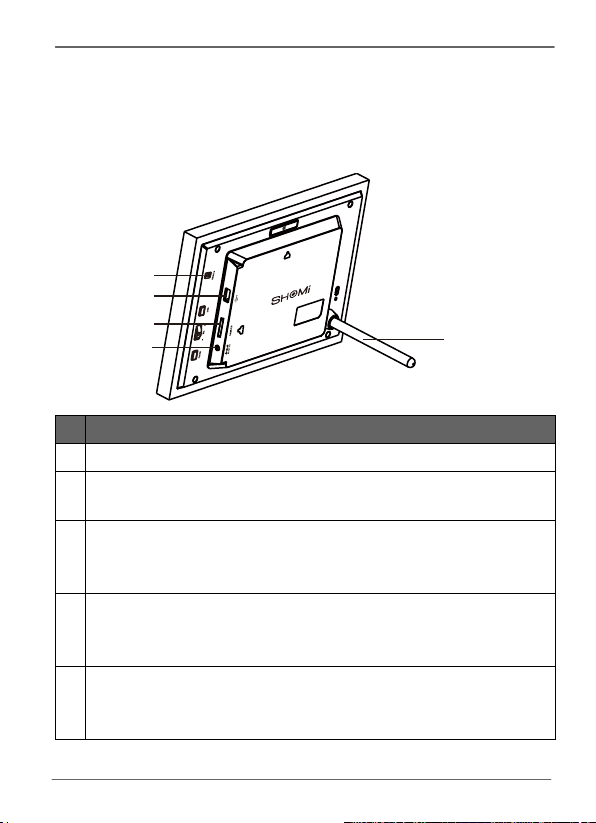
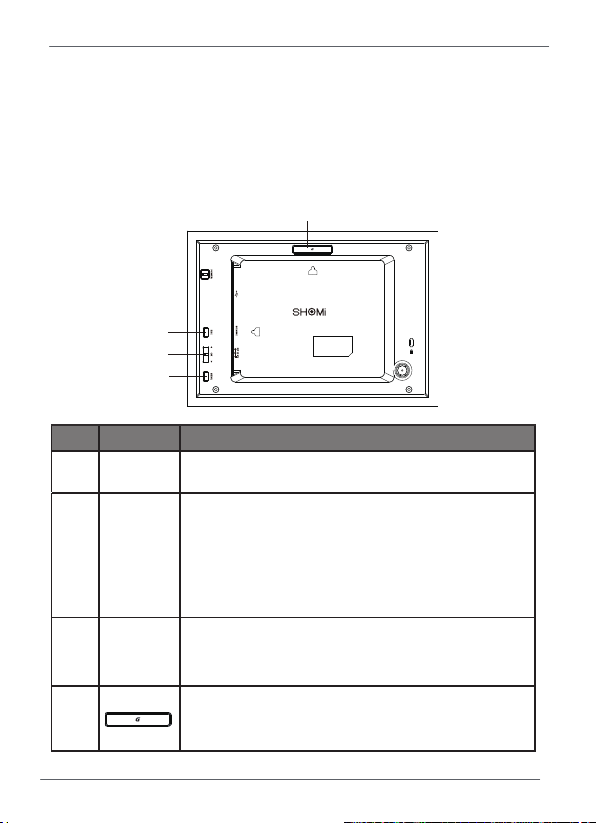
Overview
Right Rear View
2
3
4
5
# Description
1
Back stand
Power button
2
Turn on/off the Picture Frame.
USB port
3
Allows for a USB flash drive.
Playback photos stored in the inserted drive.
Memory card slot
4
Allows for an SD/SDHC, MMC.
Playback photos stored in the inserted card.
Power jack
5
Connect one end of the AC power adapter into the power jack
and the other end into a power outlet.
1
Overview EN-3
Page 10
2
SHOMI™ Digital Picture Frame
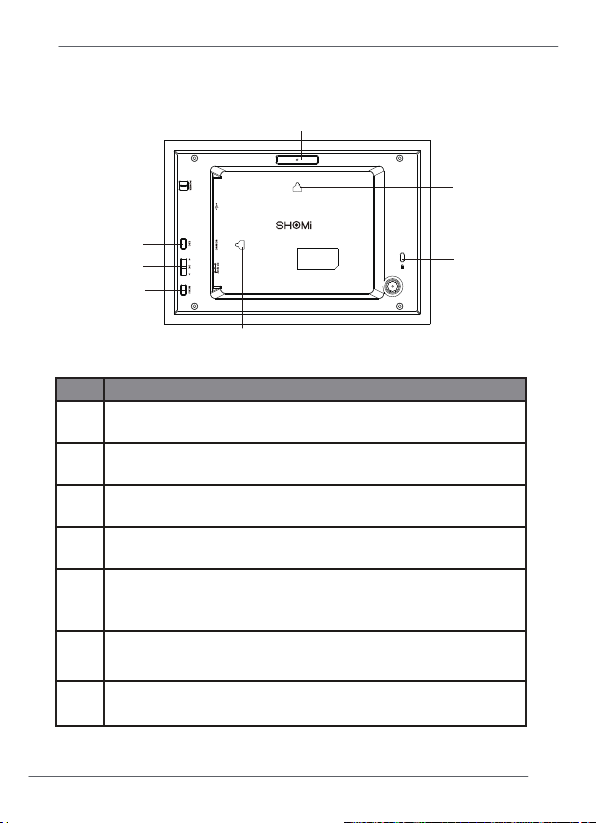
Straight On
6
4
3
1
7
No. Description
MENU Button
1
2
3
4
5
6
7
EN-4
"Operating the Picture Frame" on page 5 for details.
See
G – Button
"Operating the Picture Frame" on page 5 for details.
See
Scroll Wheel Button
Using the control buttons" on page 5 for details.
See "
ESC Button
Operating the Picture Frame" on page 5 for details.
See "
Kensington® Security Slot
You can attach an anti-theft Kensington lock and cable to this
slot to help prevent possible theft.
Wall Mount Hanging Slot (for landscape wall mounting)
Allows you to hang the Picture Frame horizontally on a wall
Wall Mount Hanging Slot (for portrait wall mounting)
Allows you to hang the Picture Frame vertically on a wall
Overview
5
Page 11
SHOMI™ Digital Picture Frame
Operating the Picture Frame
You can use the control buttons on the back to operate the Picture
Frame.
In this User Manual, instructions or examples provided are
based upon operation.
3
2
1
No. Icon Description
1 MENU
2
MENU button
Displays the pop-up menu.
Scroll wheel/OK button
▲
• Scroll up this button to select the previous
OK
item.
▼
• Press this button to enter or confirm your
operation/selection.
• Scroll down this button to select the next item.
ESC button (ESCAPE button)
3 ESC
Cancels current operation and/or returns to the
previous page.
G- button
4
Switches between Clock View & Slideshow
View
4
Operating the Picture Frame EN-5
Page 12

SHOMI™ Digital Picture Frame
Getting Started
Connecting to Power
1. Place the Picture Frame on a flat surface.
2. Connect the power adapter as below (1), and press the power
button to turn on the Picture Frame (2).
Power systems and plug types may vary depending on your
country/region.
To turn off the Picture Frame, press the Power button.
This SHOMI Picture Frame comes with pre-installed photos that you
can instantly start playing without any supplemental Memory Card or
USB drive. To do this, go to the Photo Slide Show icon and click on
the Pre-Installed photo album.
Note: Upon first usage, the Picture Frame starts playing a slideshow
EN-6
Getting Started
Page 13
SHOMI™ Digital Picture Frame
tutorial. To cancel the tutorial, press any button and go through the
sequence on the screen with the flashing green arrow. This tutorial is
automatically disabled after the first usage. You can re-install the
tutorial by going into SETTINGS.
Starting Slideshows Automatically
When the Picture Frame is turned on and then a memory card (or
USB flash drive) is inserted, a slideshow will be started automatically.
Basic Setup
Select a language and set the date and time before using the Picture
Frame for the first time.
Selecting a language
1. In the main menu, press ▲ or ▼ to select SETTINGS, and then
press OK.
2. Press ▼ to General Setting, and then press OK.
3. Press OK to select Language, and then press OK again.
4. Press ▲ or ▼ to select a language you wish to use, and then
press OK to confirm the setting.
5. Press ESC to exit.
Getting Started EN-7
Page 14

SHOMI™ Digital Picture Frame
Setting the Date and Time
1. In the main menu, press ▲ or ▼ to select SETTINGS, and then
press OK.
2. Press ▲ or ▼ to select Date and Time, and then press OK.
3. Press OK and then press ▲or ▼ to toggle among Date, Time,
Mode, On Screen Clock, Current Time Zone and Second Time
Zone.
4. Select Date and then press OK to highlight the Year field.
Press OK again and press ▲ and ▼ to select a year, and then
press OK to confirm the setting.
5. Repeat Step 4 for the remaining fields, including Month, Date,
Hour, Minute, Mode, On Screen Clock, Current Time Zone and
Second Time Zone.
6. Press ESC to escape.
EN-8
Getting Started
Page 15
SHOMI™ Digital Picture Frame
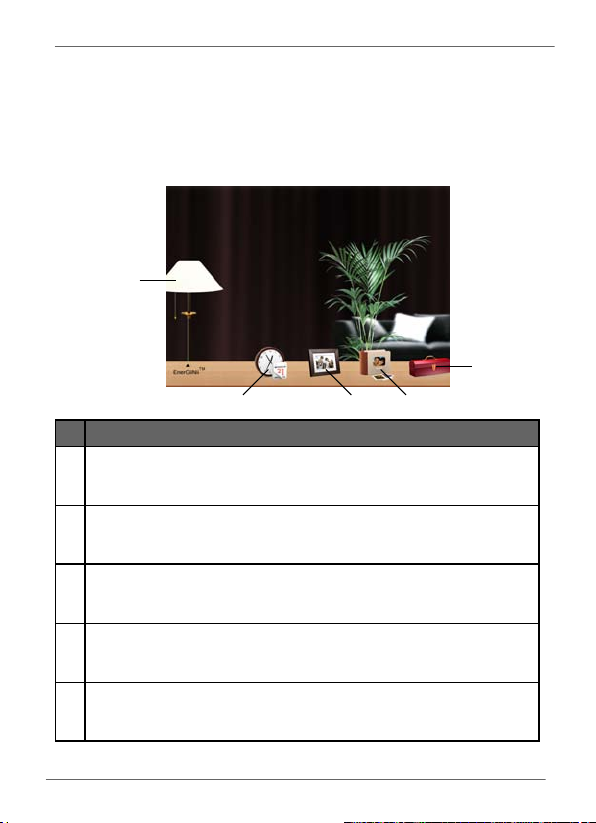
Using the Main Menu
When you turn on the Picture Frame, the main menu below appears.
You can press ▲or ▼ to select the desired mode, and then press OK
to enter the selected mode
1
5
2
# Description
1 EnerGiiNii™
Allows you to select a power-saving option for the Picture Frame.
See "Using EnerGiiNii™" on page 16 for details.
2 CLOCK
Allows you to set your favorite clock skins. See "Using CLOCK (G
button)" on page 17 for details.
3 SLIDESHOW
Allows you to display photos in slideshow. See "Viewing photos"
on page 15 for details
4 ALBUM
Allows you to manage your photos and sort them by using
different albums. See "Managing Photos" on page 11 for details.
5 SETTINGS
Allows you to configure the settings of the the Picture Frame. See
"Using SETTINGS" on page 19 for details.
4
3
Using the Main Menu EN-9
Page 16
SHOMI™ Digital Picture Frame
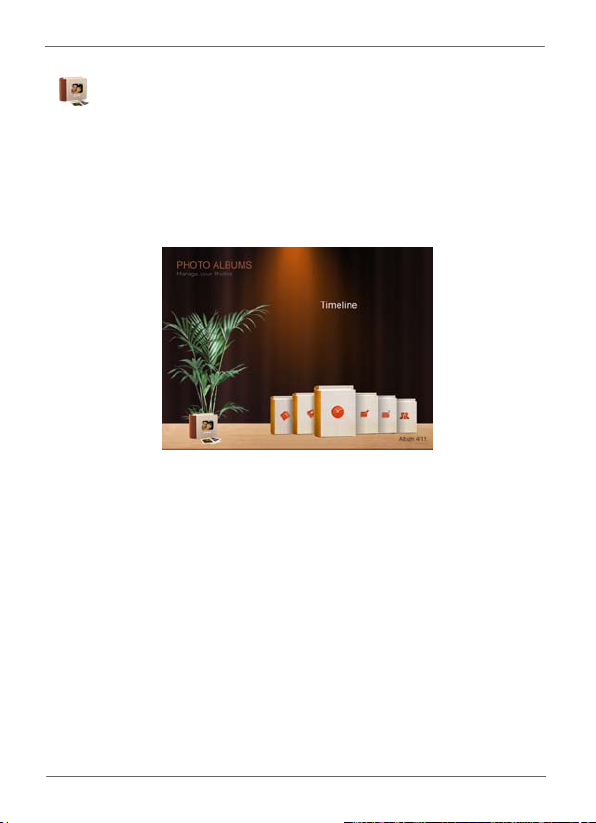
Managing Photos
You can use the ALBUM mode to manage photos in memory card or
USB flash drive.
Sorting photos into a default album
1. In the main menu, press ▲or ▼ to select ALBUM, and then
press OK.
The screen shows the file sources, including USB, Memory Card
and the default albums: Uncategorized, Family, Friends, Vacation,
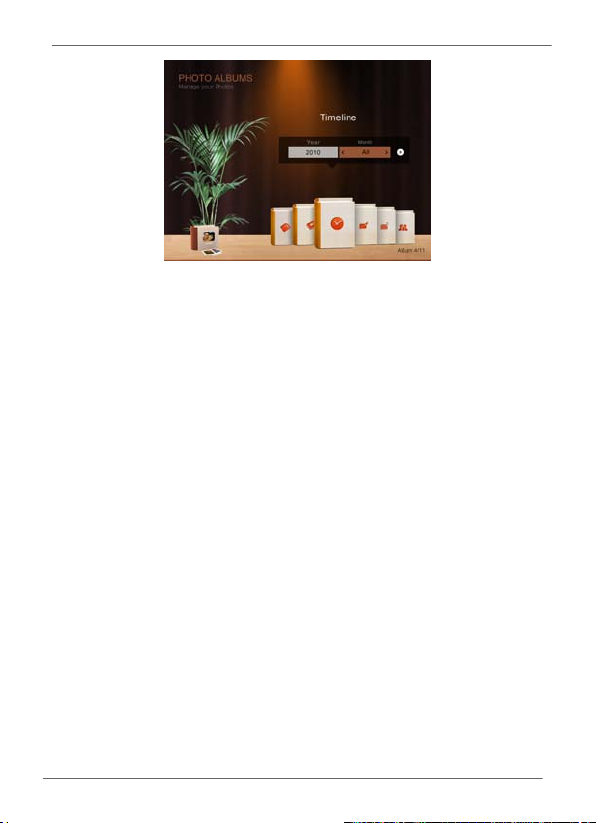
TIMELINE and Pre-Install Library.
The “USB” and “Memory Card” file source will only appear
when a USB flash drive and a memory card have been inserted
to the Picture Frame.
“TIMELINE” allows you to display photos according to the time
span specified. For example, if you specify “2011” in the “Year”
field and “All” in the “Month” field, all photo files that are taken in
year 2011 will be displayed.
You can also search for photos taken in a specific period of time,
under the TIMELINE album by pressing the menu button and
selecting the t
ime frame.
EN-10
Managing Photos
Page 17
SHOMI™ Digital Picture Frame
2. Press ▲ or ▼ to select the source of your photos, such as the
MEMORY CARD album, and then press OK. (You can also
select the USB album, if available.)
The screen shows the thumbnail view of photos in that particular
album.
3. Press OK to enable the selection mark.
4. Press ▲ or ▼ to go to the photo you wish to select, and then
press OK to confirm the selection.
* Repeat Step 4 to select more photos as desired.
5. Press MENU.
If you wish to select all the photos, select “Select All” in the
pop-up menu and press OK. Then continue with Step 5.
6. From the pops up menu, press ▲ or ▼ to select Tag It, and
then press OK.
7. Select a default album and sort the photos into this album
specified.
If photos in “USB” or “Memory Card” are sorted into an album in
the other storage device album, the photos will be copied to the
ated album as well.
design
Creating a new album
1. In the ALBUM mode, press ▼ to go to CREATE NEW ALBUM,
and then press OK.
2. In the Album Name field that appears, use the on-screen
keyboard to enter a desired name.
Managing Photos EN-11
Page 18

SHOMI™ Digital Picture Frame
Press ▲or ▼ to select a letter, and then press to enter the
letter.
Press MENU to toggle between letters and numbers.
To add a space, press ▲ or ▼ to move to Space, and then
press OK.
To delete your last input, press ▲ or ▼ to move to Back, and
then press OK.
To complete your input, press ▲ or ▼ to move to Done, and
then press OK
3. Now the new album is created.
*The picture frame allows you to create up to 12 customized
albums.
Modifying an album
1. In the ALBUM mode, press ▲ or ▼ to select an album for
which you wish to modify the album name, and then press
MENU.
2. Select Modify name, and then press OK
3. In the Album Name field that appears, use the on-screen
keyboard to enter a desired name.
4. Once you have finished modifying the album name, press to
exit.
Deleting an album
1. In the ALBUM mode, press ▲ or ▼ to select an album that you
wish to delete.
2. Select Delete Album, and then press OK.
Default albums including TIMELINE, Pre-installed Library,
uncategorized, Family, Friends and Vacation cannot be
deleted.
Using other options in the ALBUM mode
1. In the ALBUM mode, press ▲ or ▼ to select an album, and
then press OK to enter thumbnail view.
2. Press OK to enable the selection mark.
EN-12
Managing Photos
Page 19

SHOMI™ Digital Picture Frame
3. Press ▲ or ▼ move to the photo you wish to select, and then
press OK to confirm the selection. The selected photo will have
a selection mark.
* Repeat Step 3 to select more photos as desired.
4. Press MENU.
If you wish to select all the photos, select “Select All” in
the pop-up menu and press OK. Then continue with Step 4.
Deleting photos
From the menu that pops up, press ▲ or ▼ to select
Delete, and then press OK.
Rotating photos
From the menu that pops up, press ▲ or ▼ to select Rotate,
and then press OK. The photo will be rotated 90 degrees
clockwise.
Repeat this if you wish to rotate the photo into other
angles.
Applying photo effect
From the menu that pops up, press ▲ or ▼ o select Photo
Effects and then press OK.
Press ▲ or ▼
selected photo, including Sepia, Original and Black & White
and then press OK.
select the effect you wish to apply to the
Managing Photos EN-13
Page 20

SHOMI™ Digital Picture Frame
Viewing Photos
1. In the main menu, press ▲ or ▼ to select PHOTO icon, and
then press OK.
The “USB” and “Memory Card” albums will only appear
when a USB flash drive and a memory card have been
inserted to the Picture Frame.
2. Press ▲ or ▼ to select the album that contains the photos you
wish to display in slideshow, and then press OK.
If you wish to pause the slideshow, press OK. Press OK
again to resume slideshow.
3. To configure slideshow settings, press MENU to display the
pop- up menu. You can adjust the settings below.
Transition Effect: selects the transition effect you wish to
apply to the slideshow.
Slideshow interval: selects the slidesho
photos.
*The default transition effect- Pan & Zoom does not allow
customized interval settings
Play mode: selects sequent or random order of the playback.
Brightness: selects the level of screen brightness.
Contrast: selects the level of contrast.
Saturation: selects the level of saturation.
w interval between
EN-
14 Viewing Photos
Page 21

SHOMI™ Digital Picture Frame
Using EnerGiiNii™
The EnerGiiNii™ mode provides various pre-defined power-saving
options.
1. In the main menu, press ▲ or ▼ to select EnerGiiNii™ and
then press OK.
2. Press ▲ or ▼ to select a desired option, and then press OK
For details about the power-saving options, refer to the table below.
Options Description
OFF Turns off EnerGiiNii™.
Auto 50% Saves 50% on backlight power consumption during
nighttime and automatically resumes normal power
consumption during daytime.
Auto 100% Puts the Picture Frame into sleep mode during
Save 20% Always saves 20% on backlight power consumption.
Save 50% Always saves 50% on backlight power consumption.
Customized Personalize EnerGiiNii™ hours to your preference.
Nighttime is defined as hours from 9:00 p.m. to 7:00 a.m..
Daytime is defined as hours from 7:00 a.m. to 9:00 p.m..
Using EnerGiiNii™ does not affect the photo quality
nighttime and automatically resume normal
backlight power consumption during daytime.
Using EnerGiiNii™ EN-15
Page 22

SHOMI™ Digital Picture Frame
Using the CLOCK (G-button)
Clock view
The Picture Frame provides a special digital clock skin
1. In the main menu, press ▲ or ▼ to select CLOCK, and then press
OK.
2. The digital clock skin will be displayed.
Switching between Slideshow view and
Clock view
You can press to toggle between Slideshow view and
Clock view.
When switching from Clock view to Slideshow view, the Picture
Frame starts the slideshow that was run last.
If the last slideshow was run from a Memory Card or USB and is no
longer available, the Picture Frame wil
Pre-install library.
l start a slideshow from the
EN-16
Using the CLOCK (G-button)
Page 23

SHOMI™ Digital Picture Frame
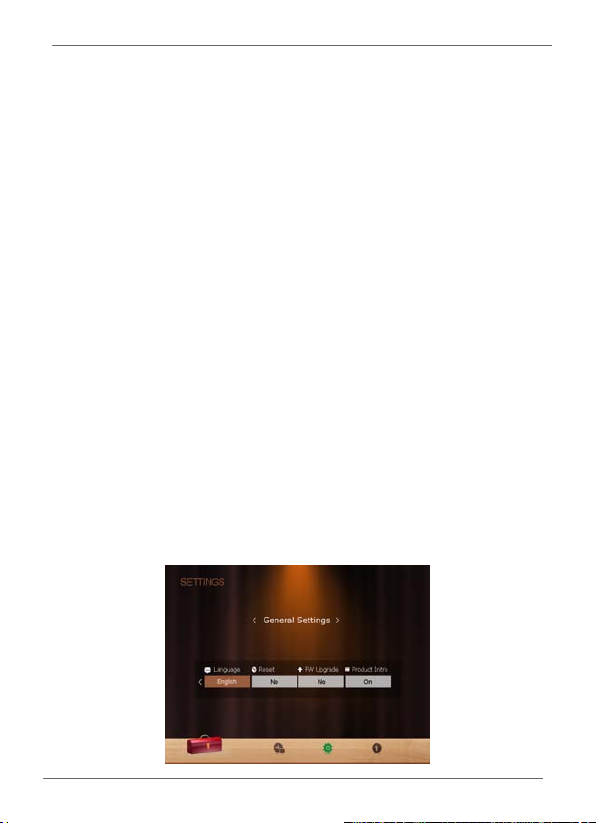
Using SETTINGS
The mode allows you to configure the settings of the Picture Frame.
1. In the main menu, press ▲ or ▼ to select SETTINGS, and then
press OK.
2. Press ▲ or ▼ to toggle among Date and Time, General
Setting Information, and pages, and then press OK.
3. Press OK to enter a page and the first option in that page will be
highlighted.
4. Press ESC again. When the selection marks appear in the field,
press ▲ or ▼ to adjust the settings.
5. Press OK to exit.
Using SETTINGS EN-17
Page 24

SHOMI™ Digital Picture Frame
Date and Time page
Item Option Description
Date - Allows you to set the date.
Time - Allows you to set the time.
Mode
On Screen
Clock
Allows you to select a time format (12-hour
-
clock or 24-hour clock).
On
On screen display of the digit clock during
slideshow mode. Off
General Setting page
Item Option Description
1
2
Brightness
Smart
Cropping
Language
Reset
FW Upgrade Yes
3
4
5
Full-screen
Original
English
Spanish
French
Yes
No
Allows you to select the level of
screen brightness.
Selects to display photos in original
size or full screen.
Sets up the On-Screen Display
(OSD) language.
Returns all the settings back to
system default.
Upgrades the firmware of the Picture
Frame.
Information page
Item Option Description
FW Version - Shows the current firmware version.
EN-
18 Using SETTINGS
Page 25

SHOMI™ Digital Picture Frame
Frequently asked questions
What memory card formats are compatible with the Picture
Frame?
SD/SDHC, MMC memory card formats are compatible with the
Picture Frame.
Why do some photos load faster than others?
Higher resolution photos load slower. Using a lower resolution when
taking photos will speed up loading time.
Can I store photos on to this picture frame?
This SHOMI unit does not come with on-board memory, so you
cannot save photos directly to this unit. Simply insert a memory card
or USB drive to play photos.
Will the tagged photos be reset if I pull out the SD card?
No. The DPF will write information into the MetaData of tagged
photos. So the DPF will remember the photo's album categorization
the next time the SD card is re-inserted to the unit.
The frame slows down significantly on certain photos, what can
I do?
This is mainly due to extra processing time needed to decode very
large size high resolution files. The DPF's Smart Cropping (ON
default) feature will automatically resize the file based
screen resolution and will significantly reduce the size of the photo
and eliminate this issue. However, please keep a copy of the original
photo if you wish to maintain the photo's original resolution.
Why isn't the timeline feature accessible for photos on my USB
drive?
The timeline feature only applies to photos stored in the memory
card from the card reader. Please copy any photos on the USB drive
to the inserted memory card if you wish to access this feature.
Why can't I tag my photos in my SD card to any albums?
Please check that your SD card is not locked because the DPF will
need to be able write information onto the files in order to Tag to
Album.
Frequently asked questions EN-19
on the unit's
by
Page 26

SHOMI™ Digital Picture Frame
Regulation & Compliance
Federal Communication Commission (FCC) Notice
This equipment has been tested and found to comply with the limits
for a Class B digital device, pursuant to Part 15 of the FCC Rules.
These limits are designed to provide reasonable protection against
harmful interference in a residential installation. This equipment
generates, uses, and can radiate radio frequency energy and, if not
installed and used in accordance with the instructions, may cause
harmful interference to radio communications.
However, there is no guarantee that interference will not occur in a
particular installation. If this equipment does cause harmful
interference to radio or television reception, which can be determined
by turning the eq
correct the interference by one or more of the following measures:
Reorient or relocate the receiving antenna.
Increase the separation between the equipment and receiver.
Connect the equipment into an outlet on a circuit different from
that to which the receiver is connected.
Consult the dealer or an experienced radio/TV technician for
help.
Warning: Any changes or modification not expressly approved by
the party responsible for compliance could void the user's authority to
operate the equipment.
This device complies with Part 15 of the FCC Rules. Operation is
subject to the following two conditions: (1) This device may not
cause harmful interference, and (2) This device must accept any
interference received, including interference that may cause
undesired operation.
uipment off and on, the user is encouraged to try to
GiiNii International
7060, Koll Center Parkway,
Suite 340 Pleasanton, CA 94566
1-866-909-355
EN-20
Regulation & Compliance
Page 27

SHOMI™ Digital Picture Frame
Appendix
Specifications
Item SP-701P SP-811P
Screen size 7” 8”
Aspect ratio 16:9 4:3
Panel interface Analog Digital
Screen resolution 480 x 234 800x600
Supported memory
card formats
Supported image
file format
USB port USB Host
Input power AC100-240V AC100-240V
Output power DC5V 1A DC5V 1A
Back stand Detachable Detachable
Language support English, French
SD/SDHC, MMC SD/SDHC, MMC
JPEG, BMP JPEG, BMP
USB Host
(Type-A)
and Spanish
(Type-A)
English, French
and Spanish
Appendix EN-21
Page 28

SHOMI™ Digital Picture Frame
SHOMI 90 DAY LIMITED WARRANTY
WARRANTY COVERAGE:
This warranty obligation is limited to the terms set forth below.
HO IS COVERED:
W
This product is warranted to the original purchaser or the person receiving the
product as a gift against defects in materials and workmanship as based on the date
of original purchase (”Warranty Period”) from an Authorized Dealer. The original
sales receipt showing the product name and the purchase date from an authorized
retailer is considered such proof.
HAT IS COVERED:
W
This warranty covers new products if a defect in material or workmanship occurs and
a valid claim is received within the Warranty Period. At its option, the company will
either (1) repair the product at no charge, using new or refurbished replacement parts,
or (2) exchange the product with a product that is new or which has been
manufactured from new, or serviceable used parts and is at least functionally
equivalent or most comparable to the original product in current inventory, or (3)
refund the original purchase price of the product. The Company warrants
replacement products or parts provided under this warranty against defects in
materials and workmanship from the date of the replacement or repair for the
remaining portion of the original product’s warranty. When a product or part is
exchanged, any replacement item becomes your property and the replaced item
becomes the company’s property. When a refund is given, your product becomes the
company’s property.
eplacement product can only be sent if all warranty requirements are met. Failure to
R
f
ollow all requirements can result in delay.
HAT IS NOT COVERED –
W
XCLUSIONS AND LIMITATIONS:
E
This Limited Warranty applies only to the new products that can be identified by the
trademark, trade name, or logo affixed to it. This Limited Warranty does not apply to
any non-SHOMI hardware product or any software, even if packaged or sold with the
product. Non-SHOMI hardware manufacturers, suppliers, or publishers may provide
a separate warranty for their own products packaged with the bundled product.
The Company is not liable for any damage to or loss of any programs, data, or other
information stored on any media contained within the product, or any non-SHOMI
product or part not covered by this warranty. Recovery or reinstallation of programs,
data or other information is not covered under this Limited Warranty.
This warranty does not apply (a) to damage caused by accident, abuse, misuse,
neglect, misapplication, or non-SHOMI product, (b) to damage caused by service
EN-22
SHOMI 90 DAY LIMITED WARRANTY
Page 29

SHOMI™ Digital Picture Frame
performed by anyone other than an Authorized Service Location, (c) to a product or a
part that has been modified without written permission, or (d) if any serial number has
been removed or defaced, or (e) to a product, accessories or consumables sold “AS
IS” without warranty of any kind by including refurbished SHOMI products sold “As
IS” by some retailers.
HIS LIMITED WARRANTY DOES NOT COVER:
T
• Shipping charges to return defective product.
• Labor charges for installation or setup of the product, adjustment of customer
controls on the product, and installation or repair of any part outside of the product
• Product repair and/or part replacement because of improper installation or
maintenance, connections to improper voltage supply, power line surge, lighting
damage, retained images or screen markings resulting from viewing fixed stationary
content for extended periods, product cosmetic appearance items due to normal wear
and tear, unauthorized repair or other cause not within the control of the company.
• Damage or claims for products not being available for use, or for lost data or lost
software.
• Damage from mishandled shipments or transit accidents when returning product.
• A product that requires modification or adaptation to enable it to operate in any
country other than the country for which it was designed, manufactured, approved
and/or authorized, or repair of products damaged by these modifications.
• A product used for commercial or institutional purposes (including but not l
purposes).
rental
• Product lost in shipment and no signature verification receipt can be provided.
• Failure to operate per Owner’s Manual.
O OBTAIN ASSISTANCE
T
Send an email to c
For technical support call toll free: 1
REPAIR OR REPLACEMENT AS PROVIDED UNDER THIS WARRANTY IS THE
EXCLUSIVE REMEDY FOR THE CONSUMER. SHOMI SHALL NOT BE LIABLE
FOR ANY INCIDENTAL OR CONSEQUENTIAL DAMAGES FOR BREACH OF ANY
EXPRESS OR IMPLIED WARRANTY ON THIS PRODUCT. EXCEPT TO THE
EXTENT PROHIBITED BY APPLICABLE LAW, ANY IMPLIED WARRANTY OR
MERCHANTABILITY OR FITNESS FOR A PARTICULAR PURPOSE ON THIS
PRODUCT IS LIMITED IN DURATION TO THE DURATION OF THIS WARRANTY.
Some states do not allow the exclusions or limitations of incidental or consequential
damages, or allow limitations on how long an implied warranty lasts, so the above
limitations or exclusions may not apply to you.
This warranty gives you specific legal rights. You may have other rights which may
vary from state/province to state/province.
ustomerservice@GiiNii.com.
-866-909-3550
imited to
Appendix EN-23
Page 30

SHOMI™ Digital Picture Frame
Derecho de Copia
© SHOMI™ 2011. Todos los derechos reservados. Ninguna parte de
esta publicación puede ser reproducida, transmitida, transcripta,
almacenada en un sistema de recuperación o traducida a ningún idioma
o lenguaje informático de ninguna forma ni con ningún método, ya sea
éste electrónico, mecánico, magnético, óptico, químico, manual o
cualquier otro, sin el consentimiento previo por escrito de la empresa
SHOMI™.
Limitación de responsabilidad
SHOMI™ no otorga garantía alguna, de manera explícita o implícita, con
respecto al contenido de este documento y renuncia expresamente a
cualquier garantía, comerciabilidad o adecuación para un propósito en
particular. Además, la empresa se reserva el derecho de revisar esta
publicación y realizar modificaciones periódicamente en el contenido de
este documento sin la obligación de notificar a nadie sobre dichos
cambios o revisiones.
Instrucciones de seguridad
Antes de utilizar el marco de foto, lea y siga cuidadosamente las
instrucciones de abajo.
Conserva este manual del Usuario para referencia en el futuro.
Lea las instrucciones de seguridad y operación antes de utilizar el
producto. Todas las advertencias sobre el producto y en las
instrucciones de uso deben ser observadas.
No coloque este producto bajo la luz solar directa o cerca de
fuentes de calor, por ejemplo en un automóvil cerrado ubicado al
sol o en una ubicación cercana a una estufa. La cubierta exterior
del producto podría deformarse y los sofisticados sensores internos
podrían sufrir daños causados por el calor excesivo.
No utilice este producto cerca del agua o bajo la lluvia ni permita
que ingresen líquidos al mismo. El agua y la humedad podrían
causar cortocircuitos de los componentes electrónicos y provocar
un funcionamiento defectuoso.
No utilice este producto cerca de fuentes electromagnéticas
Derecho de Copia ES i
Page 31

SHOMI™ Digital Picture Frame
potentes, tales como un horno a microondas. La interferencia
electromagnética podría causar un funcionamiento defectuoso de
este producto.
No deje caer el producto ni lo someta a impactos/vibraciones. Los
impactos fuertes podrían dañar los componentes internos.
No inserte en las ranuras para tarjetas de memoria de este
producto objetos que no sean las tarjetas de memoria compatibles.
Los objetos extraños podrían dañar fácilmente los contactos
metálicos ubicados en el interior de las ranuras.
No utilice un adaptador de alimentación desconocido o que no sea
el que se suministra con el Marco de Foto. La conexión del
producto a un adaptador de alimentación desconocido es
sumamente peligrosa y podría causar un incendio o explosión.
No corte, doble, modifique, coloque objetos pesados encima ni
pise el cable del adaptador de alimentación. De lo contrario, podría
dañarse el aislamiento externo y ello derivar en un cortocircuito o
incendio.
Si existieran olores extraños o calor provenientes de este producto
u otro signo de funcionamiento defectuoso, desconecte de
inmediato el Marco de Foto de la alimentación y póngase en
contacto con el distribuidor para su inspección o servicio técnico.
Utilice un paño suave para limpiar la superficie de la pantalla. No
utilice limpiadores líquidos o limpiadores para vidrios.
Si ingresara al producto una sustancia extraña o agua, apáguelo
de inmediato y desconecte el adaptador de alimentación. Luego,
extraiga la sustancia extraña o el agua y envíe el producto al
centro de servicio técnico más cercano.
No intente desarmar ni modificar el producto. No existen piezas
dentro del producto que el usuario pueda reparar, y cualquier
modificación no autorizada anulará la garantía. A pesar de que el
panel LCD está fabricado con tecnología de alta precisión y posee
un 99,99% o más de píxeles efectivos, es posible que aparezcan
de manera constante en el panel LCD puntos de luz negros o
brillantes (rojos, azules o verdes). Ésta es una característica
estructural del panel LCD y no representa un funcionamiento
defectuoso.
ES ii Instrucciones de seguridad
Page 32

SHOMI™ Digital Picture Frame
Table of contents
Características principales ............................................................. 1
¿Qué hay en la caja ......................................................................... 2
Visión General ................................................................................. 3
Visión Trasera Derecha ................................................................ 3
Vista de atrás ................................................................................ 4
Funcionamiento del PhotoFrame ................................................... 5
Primeros Pasos ............................................................................... 6
Conexión a la alimentación........................................................... 6
Iniciar Diapositivas Automáticamente ........................................... 7
Configuración básica .................................................................... 7
Selección de un idioma ............................................................ 7
Configuración de la fecha y hora ............................................. 7
Utilización del menú principal ........................................................ 9
Gestión de las fotografías ............................................................ 10
Ordenar fotos en un álbum por defecto ...................................... 10
Creación de un nuevo álbum ...................................................... 11
Modificación de un álbum ........................................................... 12
Eliminación de un álbum ............................................................. 12
Utilización de otras opciones en el menú ÁLBUM DE
FOTOGRAFÍAS .......................................................................... 12
Visualización de fotos ................................................................... 14
Table of contents ES iii
Page 33

SHOMI™ Digital Picture Frame
Uso de EnerGiiNii™ ....................................................................... 15
Utilización de RELOJ (G- botón) .................................................. 16
Selección de un tema del reloj .................................................... 16
El cambio entre la vista del reloj y la vista de diapositivas ......... 16
Utilización de CONFIGURACIÓN .................................................. 17
Preguntas más frecuentes ............................................................ 19
Regulación y Cumplimiento .......................................................... 20
Especificaciones ......................................................................... 21
SHOMI GARANTIA LIMITADA DE 90 DIAS .................................. 22
ES iv Table of contents
Page 34

SHOMI™ Digital Picture Frame
Estimado cliente:
Gracias por comprar nuestro SHOMI™,Marco digital de fotos en su
hogar. Ahora podrá ver sus fotos digitales cada vez mayor colección
en una sorprendente claridad y compartir grandes recuerdos con
amigos y familiares Este nuevo marco de foto SHOMI™ incluye una
nueva marca, más fácil programa de operación que le permite
organizar las fotos que están almacenadas en la tarjeta de memoria
o unidad USB directo en el dispositivo. Es completamente nueva y
más sencilla manera de disfrutar viendo sus fotos favoritas. En
realidad puede crear sus propios álbumes de fotografías con
nombres únicos utilizando el teclado y construido en su marco. Para
sacar el máximo partido de su nuevo producto SHOMI™, por favor
lea este manual por completo antes de utilizarlo. Y, si usted tiene
alguna pregunta acerca de nuestro producto, por favor no devuelva
este a la tienda. Permítanos ayudar a llamar a nuestro equipo de
servicio al cliente.
Atentamente, El equipo de GiiNii
Características principales
Este marco de fotos está equipado con las siguientes características:
Nueva operación Easy-To-Use usando el flash de animación por
iconos de menú y una rueda de control muy simplificado de dos
botones y desplazamiento.
Mostrar fotos claras y brillantes.
Le permite reproducir archivos de fotos que están almacenadas en
una tarjeta de memoria o una unidad flash USB.
Le permite seleccionar una opción preferida de ahorro de energía
para el Marco de fotos con la función EnerGiiNii.
Le permite mostrar fotos en diapositivas utilizando varios tipos de
plantillas disponibles en la función de álbum de recortes.
Función de Reloj / Calendario
Visítenos en www.GiiNii.com
información. Si usted tiene alguna pregunta, no dude en contactar con
nosotros en 1-866-909-3550.
Características principales
para registrar su producto y encontrar más
ES 1
Page 35

SHOMI™ Digital Picture Frame
¿Qué hay en la caja
Abra cuidadosamente la caja de embalaje y asegúrese de que tiene
los siguientes elementos.
1. Marco Digital de fotos x 1
2. Adaptador de corriente CA x 1
3. Soporte posterior desmontable (varilla negro con cierre final)
4. Manual del usuario x 1
5. Tarjeta de Registro x 1
El aspecto del producto real puede diferir de las ilustraciones
que aparecen en este manual de usuario.
Los accesorios disponibles pueden variar dependiendo de la
zona en la que compró el marco de imagen.
ES 2 Qué hay en la caja
Page 36

SHOMI™ Digital Picture Frame
Visión General
Visión Trasera Derecha
2
3
4
5
# Description
1 Soporte posterior
Botón de encendido
2
Encender/apagar el marco de imagen
Puerto USB
Permite una unidad flash USB.
3
Las fotos de reproducción reservan en el disco de introducción
Copian las fotos desde el disco de introducción en el marco de
imagen.
Ranura para tarjetas de memoria
Permite una tarjeta de SD/SDHC ,MMC
4
Las fotos de reproducción reservan en la tarjeta de
introducción.
Puerto de Adaptador de alimentación
Conecte un extremo del adaptador de alimentación de CA en el
5
puerto de alimentación y el otro extremo en una toma de
corriente..
Visión General
1
ES 3
Page 37

SHOMI™ Digital Picture Frame
®
Vista de atrás
2
6
4
3
1
7
# Description
Botón MENÚ
1
consulte "Utilización de los botones de control"en página 5.
G-
Botón
2
consulte "Utilización de los botones de control" en página 5
Botón Rueda de desplazamiento
3
consulte "Utilización de los botones de control" en página 5
ESC Button
4
consulte "Utilización de los botones de control" en página 5
Ranura de seguridad Kensington
5
Puede colocar en esta ranura un cable con un candado
antirrobo Kensington® para evitar posibles robos.
colgador Montaje en pared (para montaje apaisado en pared)
6
Le permite colgar el PhotoFrame horizontalmente en una pared.
colgador Montaje en pared (para montaje vertical en pared)
7
Le permite colgar el PhotoFrame verticalmente en una pared.
ES 4 Visión General
5
Page 38

4
SHOMI™ Digital Picture Frame
Funcionamiento del PhotoFrame
Puede utilizar los botones de control en la parte trasera para operar
el Marco de fotos.
En este manual de usuario, instrucciones o ejemplosse
basan en la operación. Para saber cómo utilizar
losbotones de control, consulte siguiente más detalles.
3
2
1
No. Icono Descripción
1 MENU
2
3 ESC
4
Botón MENÚ
Exhibe el menú emergente.
Botón Rueda de desplazamiento / OK
• Desplace este botón hacia la izquierda para
seleccionar el elemento anterior.
• Presione este botón para ingresar o confirmar su
OK
operación/selección.
• Desplace este botón hacia la derecha para
seleccionar el elemento siguiente.
Botón ESC (botón ESCAPE)
Cancela la operación en curso y/o regresa a la
página anterior
G-botón
Conmuta entre Vista de reloj y Vista de presentación
Funcionamiento del PhotoFrame
ES 5
Page 39

SHOMI™ Digital Picture Frame
Primeros Pasos
Conexión a la alimentación
1.
Coloque el marco de imagen sobre una superficie plana.
2. Conecte el adaptador de alimentación de la siguiente
manera (1), y pulse el botón de encendido para
encender el
marco de fotos (2).
Los sistemas de alimentación y los tipos de enchufe uede variar
en función de su país / región.
Para desactivar el marco de fotos, pulse el botón de encendido.
Este marco de fotos SHOMI™ viene con fotos pre-instalado que
inmediatamente empieza a reproducir sin ningún tipo de Tarjeta
de memoria suplementaria o unidad USB. Para ello, pulse el
icono de Photo Slide Show y haga clic en el álbum de fotos
pre-instalado
Nota: En el uso por la primera vez, el Marco de Fotos comienza a
reproducir diapositivas t
cualquier botón y pasar por la secuencia en la pantalla con la
flecha verde intermitente. Este tutorial se desactiva
automáticamente después del p
instalar el tutorial por entrar en CONFIGURACIÓN.
utorial. Para cancelar el tutorial, pulse
rimer uso. Se puede volver a
ES 6 Primeros Pasos
Page 40

SHOMI™ Digital Picture Frame
Iniciar Diapositivas Automáticamente
Cuando el marco de fotos está activada y, a continuación una
tarjeta de memoria (o una unidad flash USB) se inserta, una
presentación de diapositivas se iniciará automáticamente.
Configuración básica
Seleccione un idioma y ajuste la fecha y hora antes de utilizar el
Marco de fotos por primera vez.
Selección de un idioma
1. En el menú principal, presione o para
seleccionarCONFIGURACIÓN, y luego presione OK.
2. Presione
luego presione OK.
3. Presione OK para pasar a Idioma, y luego presione OK de
nuevo.
4. Presione
pulse Aceptar para confirmar la configuración.
5. Presione ESC para salir.
Aparecerá la página Configuración general., y
o para seleccionar un idioma que desee, y luego
Configuración de la fecha y hora
1. En el menú principal, presione o para seleccionar
Primeros Pasos
ES 7
Page 41

SHOMI™ Digital Picture Frame
CONFIGURACIÓN, y luego presione OK.
2. Presione
pulse Aceptar.
3. Presione Aceptar y luego presione
Fecha, Tiempo y Modo en el reloj de la pantalla, Zona Horaria
Actual, y la Segunda Zona Horaria.
4. Seleccione Fecha y luego pulse Aceptar para marcar el campo
de Año. Presione Aceptar de nuevo y pulse
seleccionar un año, y luego pulse Aceptar para confirmar la
configuración.
5. Repita el Paso 4 para los campos restantes, entre ellos
Fecha,Hora, Minuto, Modo, En el reloj de la pantalla, Zona
horaria actual y Segunda zona horaria.
6. Presione ESC para salir
o para seleccionar Fecha y Tiempo, y luego
o para alternar entre
y para
ES 8 Primeros Pasos
Page 42

SHOMI™ Digital Picture Frame
Utilización del menú principal
Cuando se enciende el PhotoFrame, aparece el siguiente menú
principal. Se puede presionar
deseado, y luego presionar OK para ingresar al menúseleccionado.
1
#
Description
1 EnerGiiNii™
Le permite seleccionar una opción de ahorro de energía para
el ImagenFrame. Para obtener más información, consulte en
página 16 EnerGiiNii™.
2 RELOJ
Le permite configurar sus temas del reloj favoritos.
Consulte en la página 17 para más detalles.
3
PRESENTACIÓN DE DIAPOSITIVAS
Le permite exhibir las fotografías en el modo de presentación
de diapositivas.
Para obtener más información, consulte en página 15.
4 ALBUM
Le permite administrar sus fotografías y ordenarlas utilizando
diversos álbumes.
Para obtener más información, consulte en página 11
5
CONFIGURACIÓN
Le permite configurar los parámetros del PhotoFrame.
Para obtener más información, consulte en página 19.
o para seleccionar elmenú
2
4
3
5
Utilización del menú principal
ES 9
Page 43

SHOMI™ Digital Picture Frame
Gestión de las fotografías
Puede utilizar el modo de album para gestionar las fotos en la tarjeta
de memoria o flash unidad de USB.
Ordenar fotos en un álbum por defecto
1. In el menú principal, pulse o para seleccionar ALBUM, y
luego pulse OK.
La pantalla muestra los origenes de archivo,que incluye USB,la
tarjeta de memoria y los discos de impago:sin categorizar,las
familiares,los amigos, las vacaciones, la línea de tiempo y la
Biblioteca de Pre-instalación.
La fuenta de archivo de USB y " Tarjeta de Memoria " sólo
aparecerá cuando una unidad flash USB y unatarjeta de
memoria se han insertado en el marco de fotos..
“Timeline" le permite mostrar fotos de acuerdo con el lapso de
tiempo especificado. Por ejemplo, si especifica "2011" en el
campo de "Año"., y "Todo" en el campo de "Mes ", todos los
archivos de fotos que se toman en el año 2011 se mostrará.
También puedes buscar las fotos tomadas en un determinado
período de tiempo, bajo el álbum CRONOLOGÍA pulsando el botón
ES 10 Gestión de las fotografías
Page 44

SHOMI™ Digital Picture Frame
de menú y seleccionando el período de tiempo.
2. Pulse o para seleccionar la fuente de las fotos, como el álbum
TARJETA DE MEMORIA, y luego pulse OK. (También puede
seleccionar el disco USB, si está disponible.)
La pantalla muestra una vista en miniatura de las fotos de ese álbum en
particular.
3. Pulse OK para permitir a la marca de selección, que muestra en
color Verde.
4. Pulse
* Repita el paso 4 para seleccionar más fotos como desee.
5. Pulse MENU.
Si desea seleccionar todas las fotos, selecciona "Seleccionar todo" en el
menú que aparece y presione OK. A continuación, continúe con el Paso
5.
6. En el menú que aparece, pulse o para seleccionar
7. Seleccione un álbum por defecto y ordenar las fotos en este álbum
Si las fotos en "USB" o la "Tarjeta de Memoria" se ordenan en un
álbum en el álbum de almacenamiento de otro dispositivo, las fotos
se copiarán en el discodesignado como así.
o para ir a la foto que desea seleccionar y, a
continuación, presione OK para confirmar la selección
etiquetas, a continuación, presione OK.
especificado.
Creación de un nuevo álbum
1. En el menú ALBUM, presione para exhibir el menú emergente, y
luego presione OK para seleccionar CREATE NEW ALBUM
Gestión de las fotografías
ES 11
Page 45

SHOMI™ Digital Picture Frame
2. En el campo Nombre del álbum que aparece, utilice el teclado en
pantalla para ingresar el nombre deseado.
Presione o para seleccionar una letra, y luego la pulse para
entrar la letra.
Para alternar entre letras y números presione MENU.
Para añadir un espacio, presione o para ,pasar a Espacio y
luego presione OK .
Para eliminar su última entrada, presione o para desplazarse
a Atrás, y luego presione OK.
Para completar su entrada, presione o para ,pasar a Hecho, y
luego presione OK
3. Ahora el nuevo álbum está creado.
* El PhotoFrame le permite crear hasta 12 álbumes personalizados.
Modificación de un álbum
1. En el menú ALBUM, presione o para seleccionar un álbum del
cual desea modificar su nombre, y luego presione MENU.
2. Seleccione ¨Modificar el Nombre¨, y luego pulse Aceptar.
3. En el campo de ¨Nombre de Álbum¨ que aparece, utilice el teclado
en pantalla para introducir el nombre que desee.
4. Una vez que haya terminado de modificar el nombre del álbum,
pulse para salir.
Eliminación de un álbum
1. En el modo de Álbum, presione o para seleccionar un album que
desea eliminar.
2. Seleccione ¨Eliminar Álbum¨ y luego pulse Aceptar.
Álbum defecto incluyendo Línea de Tiempo, Pre-instalado
Biblioteca, no categorizada, Familiares, Amigos y de
Vacaciones no se pueden eliminar.
Utilización de otras opciones en el menú
ÁLBUM DE FOTOGRAFÍAS
ES 12 Gestión de las fotografías
Page 46

SHOMI™ Digital Picture Frame
1. En el modo de ÁLBUM, presione o para seleccionar un album,
y luego pulse Aceptar para entrar en la vista en miniatura.
2. Presione OK para habilitar la marca de selección,
3. Presione
luego presione OK para confirmar la selección.La fotografía
seleccionada tendrá una marca de selección azul.
* Repita el paso 3 para seleccionar más fotografías tal como se desee.
4.
Presione
o para pasar a la fotografía que desea seleccionar, y
MENU.
Si desea seleccionar todas las fotografías mostradas en la página
actual, seleccione “Seleccionar todas” en el menú emergente y
presione OK. Luego continúe al paso 4
.
Eliminar Fotos
En el menu que aparece, presione o para seleccionar
Eliminar, y luego pulse Aceptar.
Rotación de fotos
En el menú que aparece, pulse
presione OK.
La foto se gira 90 grados hacia la derecha.
o para seleccionar Rotar y
Repita esto si desea girar la foto en otros ángulos.
Aplicación de efectos de fotos
En el menú que aparece, pulse
de fotoy presione
Presione or para seleccionar el efecto que desea aplicar a la foto
seleccionada, incluyendo
OK.
o
para seleccionar Efectos
Gestión de las fotografías
ES 13
Page 47

SHOMI™ Digital Picture Frame
Visualización de fotos
1.
En el menú principal, pulse
SLIDESHOW,
Los álbumes de USB y "Tarjeta de Memoria" sólo aparecen cuando
una unidad flash USB y una tarjeta de memoria se han insertado en
el marco de fotos.
2.
Pulse
que desea mostrar en diapositivas, y luego pulse
Si desea hacer una pausa el pase de diapositivas, pulse OK. pulse OK de
nuevo para reanudar la presentación de diapositivas.
3. Para configurar los ajustes de diapositivas, pulse
para visualizar el menú emergente. Puede ajustar las
opciones abajo.
Efecto de transición:
aplicar a la presentación.
Presentación intervalo: permite seleccionar el intervalo de diapositiva
entre las fotos. El valor predeterminado de efecto de transición, Pan &
Zoom no permite personalizar la configuración de intervalo .
Modo de reproducción: seleccionar el modo de orden secuencial o al
alzar para la reproducción.
Brillo:
permite seleccionar el nivel de brillo de la pantalla.
Contraste:
Saturación:
y, a continuación, pulse
o
para seleccionar el álbum que contiene la fotos
selecciona el efecto de transición que desea
permite seleccionar el nivel de contraste.
permite seleccionar el nivel de saturación.
o
para seleccionar icono de
OK.
OK.
MENU
ES 14 Visualización de fotos
Page 48

SHOMI™ Digital Picture Frame
A
A
Uso de EnerGiiNii™
El modo de EnerGiiNii™ ofrece varias opciones de ahorro de
energía pre-definidos
1.
En el menú principal, pulse
and, y a continuación, pulse
Pulse
2.
o para seleccionar una opción deseada y presione OK
Para obtener más información acerca de las opciones de ahorro de
energía, consulte la tabla siguiente.
Número
pagado
Auto 50% Ahorra un 50% en el consumo de energía para la luz de
uto 100%
Save 20%
Save 50%
Personalizado Horas personalizadas de EnerGiiNii™ a su preferencia.
La noche se define como hora 21:00-7:00 am.
Durante el día se define como horas 07 a.m.-09:00 pm.
El uso de EnerGiiNii™ no afecta a la calidad de la foto.
.
o
para seleccionar
OK.
EnerGiiNii™
Descripción
Desactiva
fondo durante la noche y se reanuda automáticamente el
consumo normal de energía durante el día.
Pone Auto 100% el marco de fotos en el modo de
dormir durante la noche y se reinician
automáticamente el consumo normal de energía
durante el día.
Siempre ahorra un 20% en consumo de energía.
Siempre ahorra un 50% el consumo de energía.
EnerGiiNii™.
Uso de EnerGiiNii™
ES 15
Page 49

SHOMI™ Digital Picture Frame
Utilización de RELOJ (G- botón)
Selección de un tema del reloj
El marco de fotos ofrece varios relojes de precargados. Para
establecer una esfera de reloj por defecto que se muestra en la vista
del reloj, siga los siguientes pasos.
1. En el menú principal, presione
y luego presione OK.
2. Presione
3. Presione MENU y seleccione Default.
4. Presione OK para establecer como predeterminado el tema
del reloj seleccionado.
La esfera de reloj por defecto se mostrará en la vista del reloj.
o para seleccionar un tema deseado.
El cambio entre la vista del reloj y la vista de
diapositivas
Se puede presionar para alternar entre la vista Reloj y la
vista Presentación de diapositivas.
Cuando se pasa de Vista reloj a Vista de presentación, el
PhotoFrame inicia la presentación de diapositivas que fue
ejecutada previamente.
Si la última presentación de diapositivas fue ejecutada desde la
tarjeta de memoria o la unidad USB y ya no está disponible, el
PhotoFrame comenzará una presentación de diapositivas desde la
memoria interna.
o para seleccionar RELOJ Y
ES 16 Utilización de RELOJ (G- botón)
Page 50

SHOMI™ Digital Picture Frame
Utilización de CONFIGURACIÓN
El menu SETTING le permite configurar los parámetros del
PhotoFrame
1. En el menú principal, presione
SETTING y luego presion OK.
2. Presione
Tiempo, Configuración General y Información, y luego pulse
Aceptar.
3. Presione OK para ingresar una página, y será resaltada la
primera opción presente en esa página.
4. Presione ESC de Nuevo. Cuando los botones
en campo, presione
5. Presione OK para salir.
o para alternar entre las páiginas de Fecha y
o para ajustar la configuración.
o para seleccionar
o aparecen
Utilización de CONFIGURACIÓN
ES 17
Page 51

SHOMI™ Digital Picture Frame
í
Página de Fecha y hora
Elemento Opción Descripción
Fecha
Hora - Le permite configurar la hora .
Mode -
Reloj En
Pantalla
- Le permite configurar la fecha.
Le permite seleccionar un formato de
hora (reloj de 12 horas o de 24horas).
Demostración en la pantalla del reloj
Sí
digital durante el modo de presentación
de diapositivas. No
Página de Configuración Genera
Elemento Opción Descripción
Brillo
Cultivo
Inteligente
Idioma
Restablecer
Actualización
FW
1
2
3
4
5
Encendido
Encendido
English
Francés
Español
Sí
No
S
No
Permite seleccionar el nivel de brillo
de la pantalla
Selecciona para mostrar las fotos en
tamaño original o pantalla
Configura la visualización en
pantalla Idioma(OSD)
Devuelve todas las configuraciones
por defecto del sistema.
Actualiza el firmware del Marco de
fotos.
Página de Informació
Artículo Opción Descripción
Versión - Muestra la versión actual de firmware.
ES 18 Utilización de CONFIGURACIÓN
Page 52

SHOMI™ Digital Picture Frame
Preguntas más frecuentes
Qué formatos de tarjetas de memoria son compatibles con el Marco de
fotos?
Tarjetas de formatos de memoria SD / SDHC, MMC
¿Por qué algunas fotos se cargan más rápido que otras?
Fotografías con resolución mayor carga más lento. Con una resolución inferior
al tomar fotos acelerará el tiempo de carga.
¿Puedo guardar fotos en este marco de fotos?
Esta unidad SHOMI™ no viene con la memoria a bordo, por lo que no puede
guardar las fotos directamente a esta unidad. Basta con insertar una tarjeta de
memoria o unidad USB para reproducir fotos.
¿La fotos etiquetadas se restablecerá si saco la tarjeta SD?
No. El DPF a escribir la información en los metadatos de las fotos etiquetadas.
Así que el DPF recordará categorización del álbum de foto cuando la próxima
vez que la tarjeta SD se vuelva a introducir a la unidad.
El marco se ralentiza en gran medida de ciertas fotos, ¿qué puedo
hacer?
Esto se debe principalmente al tiempo de procesamiento adicional necesario
para decodificar los archivos de tamaño muy grande de alta resolución. El
SmartCropping del DPF (por defecto) automáticamente cambia el tamaño del
archivo de base en la resolución de pantalla de la unidad y reducirá
significativamente el tamaño de la foto y eliminar este problema. Sin embargo,
guarde una copia de la foto original si desea mantener la resolución original de
la foto.
¿Por qué la función de línea de tiempo no es accesible para las fotos en
mi USB?
La función de línea de tiempo sólo se aplica a las fotos almacenadas en la
tarjeta de memoria del lector de tarjetas. Por favor, copie las fotos en el disco
USB a la tarjeta de memoria insertada si desea acceder a esta función.
¿Por qué no puedo etiquetar mis fotos en mi tarjeta SD para ningún
álbum?
Por favor, compruebe que la tarjeta SD no está bloqueada porque el DPF
tendrá que ser capaz de escribir la información en los archivos con el fin de
etiquetar al álbum.
Preguntas más frecuentes
ES 19
Page 53

SHOMI™ Digital Picture Frame
Regulación y Cumplimiento
Comisión Federal de Comunicaciones (FCC)
Este aparato ha sido probado y se ha comprobado que cumple con los
límites establecidos para los dispositivos digitales Clase B, según la
sección 15 de las normas de la FCC. Estos límites se han establecido
para ofrecer una protección razonable contra interferencias cuando el
aparato funciona en un entorno residencial. Este aparato genera, utiliza y
puede irradiar energía de radiofrecuencia y, si no se instala y utiliza de
acuerdo con las instrucciones, puede ocasionar interferencias en las
comunicaciones por radio. Sin embargo, no existe garantía alguna de que
no se produzcan interferencias en una instalación específica. Si este
aparato produce interferencias en la recepción de radio o televisión, lo
que se puede determinar apagando y encendiendo el aparato, se
recomienda al usuario que intente corregir la interferencia realizando una
o varias de las siguientes acciones:
cambie la orientación o ubicación de la antena receptora.
aumente la separación entre el aparato y el receptor.
conecte el aparato a una fuente de alimentación que esté en un
circuito distinto de aquél donde está conectado el receptor.
consulte con el distribuidor o con un técnico especializado en
radio/TV para obtener más sugerencias.
De alerta: Cualquier cambio o modificación no aprobados expresamente
por la parte responsible de la compatibilidad puede anular el derecho del
usuario a utilizar el aparato.
Este dispositivo cumple con la Parte 15 de las Normas de la FCC. La
operación está sujeta a las siguientes dos condiciones: (1) Este
dispositivo no puede causar interferencias perjudic
dispositivo debe aceptar cualquier interferencia recibida, incluyendo
interferencias que puedan causar un funcionamiento no deseado.
GiiNii International
7060, Koll Center Parkway,
Suite 340 Pleasanton, CA 94566
1-877-784-0999
iales y (2) Este
ES 20 Regulación y Cumplimiento
Page 54

SHOMI™ Digital Picture Frame
Apéndice
Especificaciones
Artículo SP-701P SP-811P
Tamaño de la
pantalla
Relación de aspecto
Interfaz de Panel
Resolución de la
pantalla
Formatos apoyados
de tarjeta de memoria
Formato apoyado de
archivo de imagen
Puerto USB
Potencia de entrada
Potencia de salida
Pedestal trasero
Soporte de idiomas
7” 8”
16:9 4:3
Análogo Digital
480 x 234 pixels 800x600 pixels
SD/SDHC, MMC SD/SDHC, MMC
JPEG, BMP JPEG, BMP
USB Host (Type-A) USB Host (Type-A)
AC100-240V AC100-240V
DC5V 1A DC5V 1A
esmostable
English, , Francés y
Español
Detachable
English, French and
Spanish
Apéndice
ES 21
Page 55

SHOMI™ Digital Picture Frame
COBERTURA DE LA GARANTIA:
La obligación de esta garantía esta limitad a los términos establecidos en la parte de
abajo:
QUIEN ESTA CUBIERTO:
Este producto esta garantizado al comprador original o la persona la cual esta
recibiendo este producto como un regalo, contra defectos en los materiales y
manufactura como basados en el día original de compra (Periodo de Garantía) del
distribuidor autorizado. El recibo original mostrando el nombre del producto y el día de
compra del distribuidor autorizado es considerado como dicha prueba.
QUE ESTA CUBIERTO:
Esta garantía cubre los productos nuevos, si hay defecto en los materiales o
manufactura y si un reclamo es recibido durante el periodo de Garantía. A su opción,
la compañía va de cualquier forma (1)
partes nuevas o reconstruidas, o (2) intercambiar el producto con un producto nuevo
u otro que haya sido manufacturado de partes nuevas o usadas en buen estado
servicial y este funcionando equivalentemente o comparablemente al producto
original en el inventario al corriente o (3) reembolsar el precio del producto original. La
compañía garantiza el re emplazamiento de productos o partes provistas bajo esta
garantía contra defectos en materiales o manufactura del día de reemplazo o
reparación de la porción original restante de la garantía original del producto. Cuando
el producto o parte(s) es intercambiado cualquier parte reemplazada es propiedad
usted y la pa
otorgado, su producto pertenece a la compañía. Nota: cualquier producto vendido
e identificado como reconstruido o renovado ileva cosigo una garantía limitada
de (90) dias. Sólo se puede enviar el producto de reemplazo si se cumplen
todos los requisitos de garantía. No seguir todos los requisitos puede producir
retraso.
LO QUE NO CUBRE-EXCLUSIONES Y LIMITACIONES
Esta garantía limitada sólo se aplica a los nuevos productos que puenden ser
identificados por la marca, nombre comercial o logotipo provisto. Esta garantía
limitada no se aplica a cualquier otro producto que no sea SHOMI™. Producto o
cualquier software, incluso
fabricantes no-SHOMI™, proveedores o editores pueden proporcionar una garantía
separada para sus propios productos empaquetan con el producto. La compañía no
es responsable por cualquier Daño a la pérdida de todos los programas, datos u otra
información almacenada en los medios de cualquier contenido en el producto, o
cualquier producto no-SHOMI™ o una parte no cubierto por esta garantía.
Recuperación o la reinstalación de programas, datos u otra información no está
cubierto por esta garantía limitada. Esta garantía no se aplica (a) a los Daños
causados por accidente, abuso, uso incorrecto, negligencia, aplicación incorrecta, o
producto no-SHOMI™, (b) a los Daños causados por el servicio realizado por
cualquier
rte re emplazada es parte de la compañía. Cuando un reembolsó es
si empaquetado o v
pena que una ubricación
de servicio autorizado, (c) a un producto o una
el producto a ningún costo, usando
reparar
endidos con el producto. Los
de
ES 22 SHOMI GARANTIA LIMITADA DE 90 DIAS
Page 56

SHOMI™ Digital Picture Frame
parte que ha sido modificado sin autorización por escrito, o (d) si cualquier número de
serie se ha eliminado o desfigurados, o (e) a un accesorio del producto, o
consumibles vendidos “Tal cual” sin garantía de ningún tipo, incluyendo productos
reformado/ reconstruidos vendidos por SHOMI™ como “Tal cual” por algunos
distribuidores minoristas.
ESTA GARANTIA LIMITADA NO CUBRE:
• Gastos de envío a devolver el producto defectuoso.
• Cargos laborales para la instalacion o configuracion del producto, adjuste de
controles de cliente en el producto y la instalacion o la reparcion de cualquier parte
fuera del producto.
• Reemplazo de reparación o parte de producto causa de la instalación incorrecta o
mantenimiento, las conexiones
línea de alimentación, Daños relampágo, conserva imágenes o marcas en la pantalla
resultantes de visualización de contenido fijo estacionaria durante largos períodos,
elementos de la apariencia estécia de producto debidos al desgaste normal y
desgarro, reparaciones no autorizadas o de otros causan no dentro de
• Daño o reclamaciones para productos de no ser software disponible para su uso, o
para la pérdida de datos o perdido.
• Da o de envíos o accidentes de tránsito al devolver el producto.
• Un producto que requiere la modificación o adaptación para que pueda operar en
cualquier país distinto del país que ha sido diseñado, fabricado, aprobado o
autorizado o reparado por estas modificaciones.
• Un producto que se usa para fines comericales o institucionale
limitarse a fines de alquiler).
• Se puede proporcionar producto perdido en el envío y no recibo de verificación de
firma.
• El hecho de no operar por el manual del propietario
PARA OBTENER ASISTENCIA
Puede enviar un correo electrónico a customerservice@GiiNii.com o llame al
número gratuito: 1-866-909-3550
REPARACIÓN O REEMPLAZO COMO PREVISTOS PARA ESTA GARANTÍA ES EL
REMEDIO EXCLUSIVO PARA EL CONSUMIDOR. SHOMI™ NO SERÁ
RESPONSABLE DE CUALQUIER INCIDENTALES O DAÑOS CONSECUENTES Y
PERJUICIOS POR INCUMPLIMIENTO DE CUALQUIER GARANTÍA EXPRESA O
IMPLÍCITA SOBRE ESTE PRODUCTO. EXCEPTO EN LA MEDIDA DE LO
PROHIBIDO POR UNA LEY APLICABLE, CUALQUIER GARANTÍA IMPLÍCITA O
COMERCIABILIDAD
ESTÁ LIMITADA EN DURACIÓN A LA DURACIÓN DE ESTA GARANTÍA.
Algunos Estados no permiten las exclusiones o limitaciones de Daños incidentales o
consecuentes, o permiten limitaciones sobre cuánto tiempo una garantía implícita
dura, así que las limitaciones o exclusiones anteriores no podrían aplicar a usted.
Esta garantía le otorga derechos legales especificos. Puede que tenga otros
derechos que varían de estado/ provincia a estado/provincia.
PARA UN PROPÓSITO PARTICULAR DE ESTE PRODUCTO
SHOMI GARANTIA LIMITADA DE 90 DIAS
al suministro inadecuado de voltaje, aumento de la
s (incluyendo pero sin
ES 23
Page 57

Page 58

©2011 GiiNii™ International
All rights reserved.
D.17.08.11
 Loading...