


GN-5LS

GiiNii NuLife 2.4-inch LCD
“Full Size” Photo Scanner
User Manual
• Before operating this product, carefully read and follow the
instructions.
• Please retain this user manual for future reference.

CONTENTS
SAFETY INFORMATION................................................3
PACKAGE CONTENT....................................................4
SCANNER PARTS..........................................................5
PRODUCT SETUP..........................................................6
- Connecting to Power...................................................................6
- Inserting a SD/MMC Card.............................................................7
- Turning on the Scanner.................................................................7
SCAN AND PLAYBACK.................................................8
- Scanner Setting...............................................................................8
- Using the Photo Protective Sleeve....................................................9
- Scanning Images.............................................................................9
- Playing back and Scanned Images...............................................10
- Zoom.........................................................................................11
- Playback Setting.............................................................................12
TRANSFERRING THE SCANNED IMAGES TO PC.....13
- Disconnecting the Scanner from PC...............................................13
CLEANING AND CALIBRATING THE SCANNER.......14
SPECIFICATION..........................................................16
HELPFUL HINTS.........................................................16
GiiNii 90 DAY LIMITED WARRANTY............................17
2

SAFETY INFORMATION
• Retain this User Manual for future reference.
• Read the safety and operating instructions carefully before using the product.
All warnings on the product and in the operating instructions should be
observed.
• Do not place this product under direct sunlight or near heat sources, such
as in a closed car under sunlight or near a stove. The outer casing of this
product may become deformed and the sophisticated sensors inside may
become damaged due to excessive heat.
• Do not use this product near water, in the rain or allow any liquid to get inside
this product. Water and moisture may cause short-circuit to the electronic
components and lead to malfunctions.
• Do not use this product near strong electromagnetic sources, such as a
microwave oven. The electromagnetic interference may cause this product to
malfunction.
• Do not insert objects other than compatible memory cards into the memory
card slots of this product. The metal contacts inside the slots can be damaged
by foreign objects.
• Do not use an unknown power adapter other than the one supplied.
Connecting this product to an unknown power adapter is very dangerous and
may lead to fi re or explosion.
3
Thank you
К
а
В
Inserte esta tarjeta en el escáner con la cara BLANC
eAhacia abajo.
A
C
lib
Insert this card with the WHITE side do
the scanner.
ᇚ
Ҿ
ᇛ
ⵣ㕙
(
ⱑ䴶
)
ญ
ޕ
Inisi
BRANCO
.
I
H
E
ﺑ
高냱겢겑꿙
ﺎﻄﺒﻟﺍﻩﻞﺧﺩﺠﻬ
ﺠﺠ
ﺾ
ﻴ
ﺑﻷﻴﻴ
ﺐﻧﺎﺠﻟﺍ
ﻥﻮﻜﻳ
ﺑ
ﺗ
for purchasing this GiiNii NuLife 2.4-inch LCD
“Full Size” Photo Scanner. With this new standalone scan-and-view
technology, scanning is easy! There is no software installation or PC
needed. You can preview the scanned images instantaneously on the
2.4” display screen, and store them directly into a MMC or SD memory
card.
It makes your scanning experience easier and enjoyable. You can also
transfer the scanned images to your PC via mini USB port. Please
follow the following instructions, on page 13, for more details.
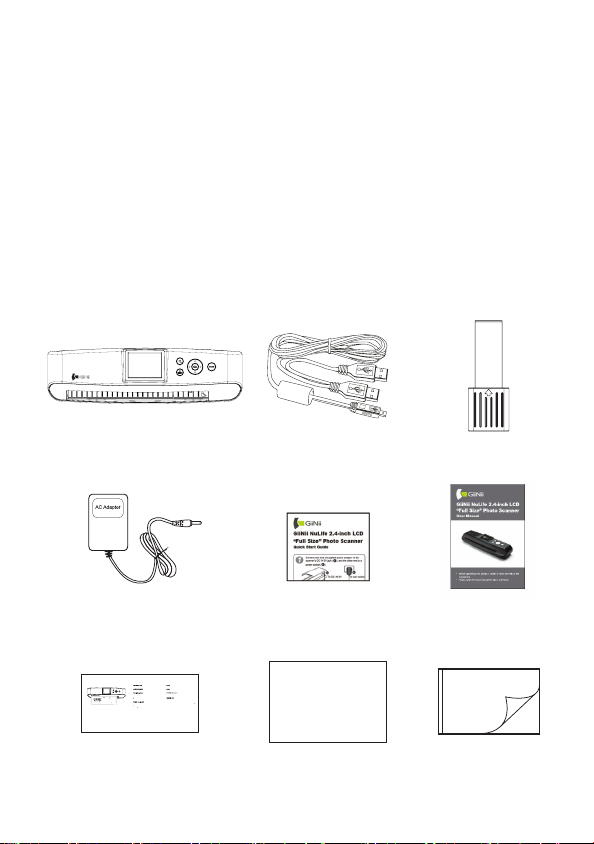
PACKAGE CONTENT
B
Scanner
Power Adapter
wn to
ℸⱑ㡆䴶ᳱϟᦦܹᥗᦣ఼
nsérez cette carte dans le scanner en orientant la face BLANC
ℸⱑ㡆䴶ᳱϟᦦܹᠿᦣ
vers le bas.
ࠞ࠼ߩ
ぎ
ࠍߦะߌߡޔᧄߩᝌ
ߦ᳓ᐔߦࠇߊߛߐ
алибровочная карт
ставьте данную карту в сканер БЕЛОЙ стороной вниз.
섥ꩾꐩ넩껹ꅍꌱ뽚뼍陁뼍꾡넩렩麑ꌱ걙롅骽꾅
ra este cartão com o lado
voltado para baixo
ﺓﺮﻳﺎﻌﻤﻟﺍﺔﻗﺎﻄ
ﺚﻴﺤ
artão de ca
ragem
ﻔﺳ
ﺔﻴﺋﻮﻀﻟﺍﻩﺎﺠ
-
-
Calibration Paper
4
Insert this card with the WHITE side down to the scanner.
Insérez cette carte dans le scanner en orientant la face BLANCHE
vers le bas.
Schieben Sie diese Karte mit der WEISSEN Seite nach unten in den
Scanner
.
Калибровочная карта
Вставьте данную карту в сканер БЕЛОЙ стороной вниз.
Inisira este cartão com o lado BRANCO voltado para baixo.
Cartão de calibragem
Inserte esta tarjeta en el escáner con la cara BLANCA hacia abajo.
CALIBRATIONPAPER,A620
82-329-00071
ᢣүഡማા-U)!ࠔ࡙;1/31/4nn!ሯёתVWᏘ*
ፎ٩ྣჴނຊϪ!
LൂՅӑڇ!2!86ጕа!
ᇛℸⱑ㡆䴶ᳱϟᦦܹᥗᦣ఼
ᇚℸⱑ㡆䴶ᳱϟᦦܹᠿᦣҾ
ࠞ࠼ߩⵣ㕙(ぎⱑ䴶)ࠍߦะߌߡޔᧄߩᝌญ
ߦ᳓ᐔߦࠇߊߛߐޕ
섥ꩾꐩ넩껹ꅍꌱ뽚뼍陁뼍꾡넩렩麑ꌱ걙롅骽꾅
高냱겢겑꿙
mini USB Cable
Quick Guide
ﺓﺮﻳﺎﻌﻤﻟﺍﺔﻗﺎﻄﺑ
ﺎﻄﺒﻟﺍﻩﺬﻩﻞﺧﺩﺃﻣﺘﺠﻬًﺎ ﺾﻴﺑﻷﺍ ﺐﻧﺎﺠﻟﺍﻥﻮﻜﻳﺚﻴﺤﺑ ﺔﻗ
ﻞﻔﺳﻷﺔﻴﺋﻮﻀﻟﺍﺔﺤﺳﺎﻤﻟﺍﻩﺎﺠﺗ.
82-329-00071
Cleaning Paper
Cleaning Stick
User Manual
Photo Protective
Sleeve
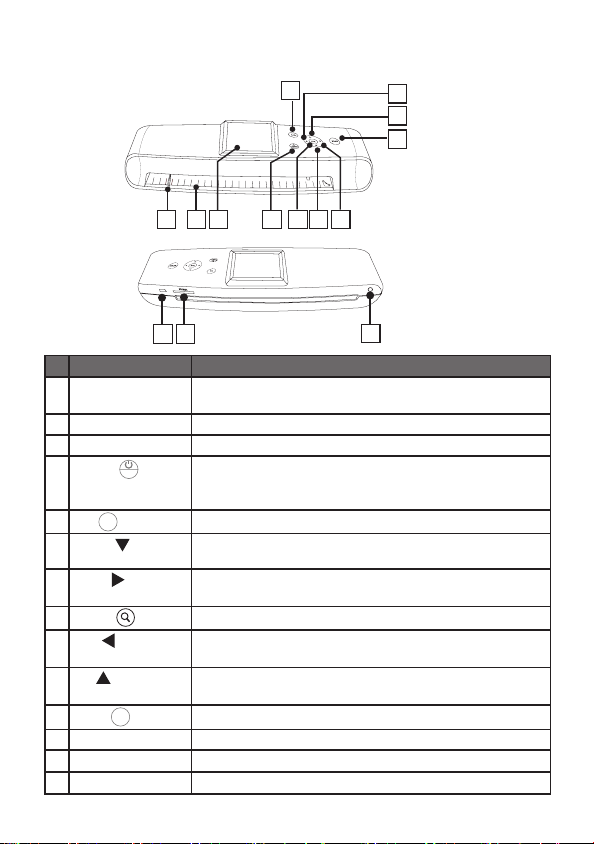
SCANNER PARTS
Top View
1
2 3
Rear View
4
8
5 7
9
10
11
6
14
Names
1312
Descriptions
1 Paper guide • Used to guide the material to be scanned to
improve alignment.
2 Feeding slot
3 2.4” LCD screen
4
Power(
MENU
• Feeds the paper or photo for scanning.
• Views the scanned images.
• Press to turn the power to on or off.
)/Menu
• Long
press for 3~5 seconds to turn off the scanner.
• Press to display the setting menu.
5
OK(
Down(
6
Right(
7
8
Zoom( )
Left(
9
OK
)
)
)
)
• Press to make or confi rm selections in the menus.
• Moves down to select the option below.
•
Moves down in the thumbnail mode.
• Moves right to select the option.
•
Moves to the next scanned image.
• Zoom the scanned image.
• Moves left to select the option .
• Moves to the previous scanned image.
Up( )
10
Scan(
SCAN
)
11
12 Mini USB port
• Moves up to select the option above.
•
Moves up in the thumbnail mode.
• Press to enter the Scan mode.
• Connects to PC to transfer fi les.
13 SD/MMC • Accepts these memory cards: SD/SDHC/MMC.
14 DC-IN 5V jack
• Connects to the supplied AC power adapter.
5
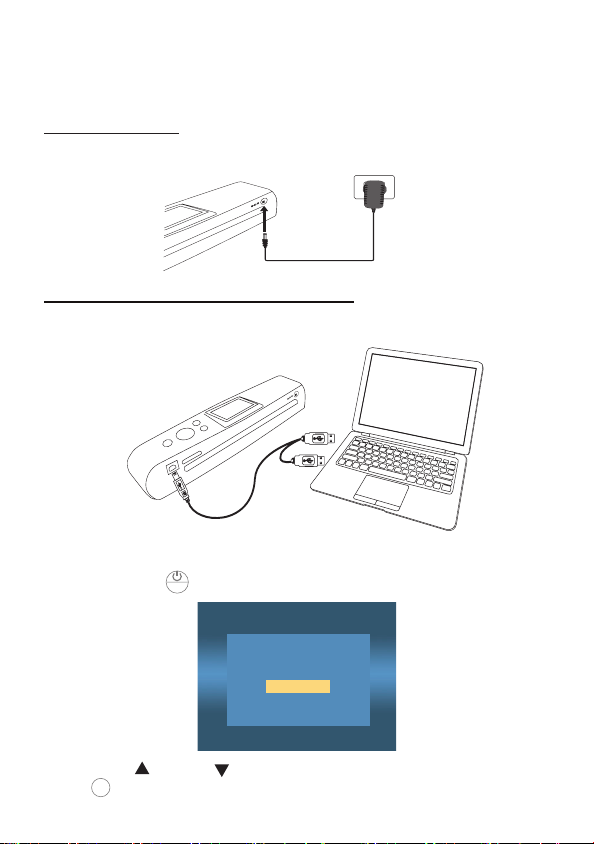
PRODUCT SETUP
Connecting to Power
Using AC adapter
Connect one end to the scanner’s DC IN jack, and the other to wall
socket.
To DC IN 5V
To wall socket
Using mini USB cable as a power source
1. Connect the mini USB connector to the scanner, and the other 2
regular USB connectors to laptop or PC.
mini USB cable
Laptop
(supplied)
2. Press Power (
3. Press UP
OK
)
(
OK
button.
) button to bring up the USB Mode menu.
MENU
USB Mode
USB Power
Mass Storage
Please insert a SD/MMC card!
( )
/DOWN
( )
button to select USB Power, then press
6
 Loading...