

Page 1

GiiNii™ GN-A19-N
Digital Picture Frame
User Manual
Version 1
www.giinii.com
Page 2

Page 3

GiiNii Digital Picture Frame
Copyright
© GiiNii™ 2011. All rights reserved. No part of this publication may
be reproduced, transmitted, transcribed, stored in a retrieval
system or translated into any language or computer language, in
any form or by any means, electronic, mechanical, magnetic,
optical, chemical, manual or otherwise, without the prior written
permission of GiiNii
™
.
Disclaimer
GiiNii™ makes no representations or warranties, either expressed
or implied, with respect to the contents hereof and specifically
disclaims any warranties, merchantability or fitness for any
particular purpose. Further, GiiNii
this publication and to make changes from time to time in the
contents hereof without obligation to notify any person of such
revision or changes.
™
reserves the right to revise
Safety instructions
Before operating the picture frame, carefully read and follow the
instructions below.
■ Retain this User Manual for future reference.
■ Read the safety and operating instructions carefully before
using the product. All warnings on the product and in the
operating instructions should be observed.
■ Do not place this product under direct sunlight or near heat
sources, such as in a closed car under sunlight or near a
stove. The outer casing of this product may become deformed
and the sophisticated sensors inside may become damaged
due to excessive heat.
■ Do not use this product near water, in the rain or allow any
liquid to get inside this product. Water and moisture may
cause short-circuit to the electronic components and lead to
malfunctions.
■ Do not use this product near strong electromagnetic sources,
such as a microwave oven. The electromagnetic interference
may cause this product to malfunction.
Disclaimer EN - i
Page 4

GiiNii Digital Picture Frame
■
Do not drop or apply shock/vibration to this product. Strong
impacts may damage the components inside.
■ Do not insert objects other than compatible memory cards into
the memory card slots of this product. The metal contacts
inside the slots can easily become damaged by foreign
objects.
■ Do not use an unknown power adapter other than the one
supplied with the picture frame. Connecting this product to an
unknown power adapter is very dangerous and may lead to
fire or explosion.
■ Do not cut, bend, modify, place heavy objects, or step on the
power adapter cord. Otherwise the external insulation may be
damaged and result in short-circuit or fire.
■ If there are strange odors or heat emitting from this product or
any signs of malfunction, disconnect the picture frame from
the power immediately and contact your dealer for inspection
or service.
■ Use a smooth, soft cloth to clean the surface of the screen. Do
not use liquid cleaners or glass cleaners.
■ If a foreign substance or water gets in this product, turn the
power off immediately and disconnect the power adapter.
Next, remove the foreign substance or water, and then send
the product to your nearest service center.
■ Do not attempt to disassemble or modify this product. There
are no user serviceable parts inside this product, and any
unauthorized modifications will void the warranty.
■ Although the LCD panel is made with high-precision
technology and has effective pixels of 99.99% or more, black
dots or bright points of light (red, blue or green) may appear
constantly on the LCD panel. This is a structural property of
the LCD panel and is not a malfunction.
EN - ii
Safety instructions
Page 5

GiiNii Digital Picture Frame
Table of contents
Key features . . . . . . . . . . . . . . . . . . . . . . . . . . . . . . . . . . . . . . . 1
What’s in the box . . . . . . . . . . . . . . . . . . . . . . . . . . . . . . . . . . . 2
Identifying the parts . . . . . . . . . . . . . . . . . . . . . . . . . . . . . . . . . 3
Left view . . . . . . . . . . . . . . . . . . . . . . . . . . . . . . . . . . . . . . . . . 3
Rear view . . . . . . . . . . . . . . . . . . . . . . . . . . . . . . . . . . . . . . . . 5
Using the control buttons . . . . . . . . . . . . . . . . . . . . . . . . . . . . 6
Using the remote control . . . . . . . . . . . . . . . . . . . . . . . . . . . . 7
Replacing the remote control battery. . . . . . . . . . . . . . . . 11
Getting started . . . . . . . . . . . . . . . . . . . . . . . . . . . . . . . . . . . . 12
Using the adjustable back stand . . . . . . . . . . . . . . . . . . . . . 12
Connecting to power . . . . . . . . . . . . . . . . . . . . . . . . . . . . . . 13
Playing back preloaded videos. . . . . . . . . . . . . . . . . . . . . . . 13
Inserting a memory card. . . . . . . . . . . . . . . . . . . . . . . . . . . . 14
Compatible memory card formats . . . . . . . . . . . . . . . . . . 15
Copying files to internal memory . . . . . . . . . . . . . . . . . . . 16
Operating the picture frame. . . . . . . . . . . . . . . . . . . . . . . . . . 17
Basic operations. . . . . . . . . . . . . . . . . . . . . . . . . . . . . . . . . . 18
Setting the Date and Time . . . . . . . . . . . . . . . . . . . . . . . . 18
Selecting a mode. . . . . . . . . . . . . . . . . . . . . . . . . . . . . . . 19
Displaying the clock. . . . . . . . . . . . . . . . . . . . . . . . . . . . . 19
Photo mode . . . . . . . . . . . . . . . . . . . . . . . . . . . . . . . . . . . . . . 20
Selecting a photo . . . . . . . . . . . . . . . . . . . . . . . . . . . . . . . . . 21
Zooming the photo . . . . . . . . . . . . . . . . . . . . . . . . . . . . . . . . 21
Playing a slideshow . . . . . . . . . . . . . . . . . . . . . . . . . . . . . . . 22
Rotating a photo automatically. . . . . . . . . . . . . . . . . . . . . . . 22
Music mode . . . . . . . . . . . . . . . . . . . . . . . . . . . . . . . . . . . . . . 23
Video Library mode . . . . . . . . . . . . . . . . . . . . . . . . . . . . . . . . 24
Collage mode . . . . . . . . . . . . . . . . . . . . . . . . . . . . . . . . . . . . . 25
Switching between Collage view and Clock view . . . . . . . . . 26
Calendar mode . . . . . . . . . . . . . . . . . . . . . . . . . . . . . . . . . . . . 26
Table of contents EN - iii
Page 6

GiiNii Digital Picture Frame
Source mode . . . . . . . . . . . . . . . . . . . . . . . . . . . . . . . . . . . . . . 27
File mode . . . . . . . . . . . . . . . . . . . . . . . . . . . . . . . . . . . . . . . . . 28
Copying/Deleting the files. . . . . . . . . . . . . . . . . . . . . . . . . . . 29
Setup mode . . . . . . . . . . . . . . . . . . . . . . . . . . . . . . . . . . . . . . . 30
Options in the Setup mode . . . . . . . . . . . . . . . . . . . . . . . . . . 31
Frequently asked questions . . . . . . . . . . . . . . . . . . . . . . . . . . 33
Regulation and compliance . . . . . . . . . . . . . . . . . . . . . . . . . . 34
Recycling . . . . . . . . . . . . . . . . . . . . . . . . . . . . . . . . . . . . . . . . . 34
Appendix . . . . . . . . . . . . . . . . . . . . . . . . . . . . . . . . . . . . . . . . . 35
Specifications . . . . . . . . . . . . . . . . . . . . . . . . . . . . . . . . . . . . 35
List of compatible memory cards and USB drives . . . . . . . . 37
EN - iv
Table of contents
Page 7

GiiNii Digital Picture Frame
Dear Customer:
Thank you for bringing our GiiNii Digital Picture Frame into your
home. Now you will be able to view your growing digital photo
library in stunning clarity and share great memories with friends
and family.
Also, please check out our video tutorials on HOW TO START
and HOW TO PROGRAM the digital picture frame at
www.giinii.com under Frequently Asked Questions.
Key features
This picture frame is mainly equipped with the following features:
■ Clear and bright photos
■ Enables you to play back photo and music files that are stored
in a memory card or in a USB flash drive.
■ Allows you to select a power-saving mode for your picture
frame using the EnerGiiNii feature.
■ Allows you to play back photos in slideshow with music and
with various themes of Collage effects.
■ Allows you to set auto on/off timer.
■ Multi-language On-Screen Display (OSD) menus
Key features EN - 1
Page 8
GiiNii Digital Picture Frame
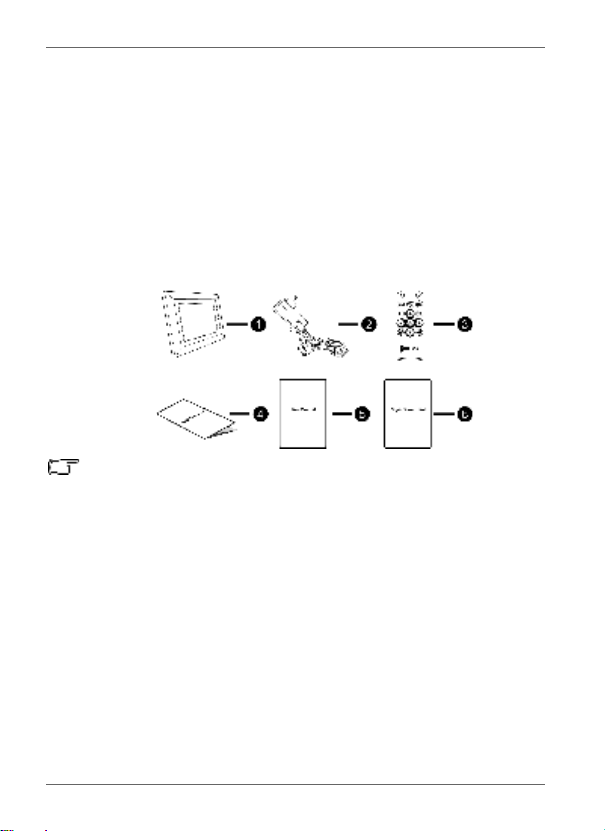
What’s in the box
Carefully open the packing box and ensure that you have the
following items.
1. Digital Picture Frame x 1
2. AC power adapter x 1
3. Magnetic remote control (with CR2025 lithium battery) x 1
4. Quick Start Guide x 1
5. User Manual x 1
6. Registration Card x 1
• Actual product appearance may vary from the illustrations shown in
this User Manual.
• Available accessories may vary depending on the area where you
purchased the picture frame.
EN - 2
What’s in the box
Page 9
GiiNii Digital Picture Frame
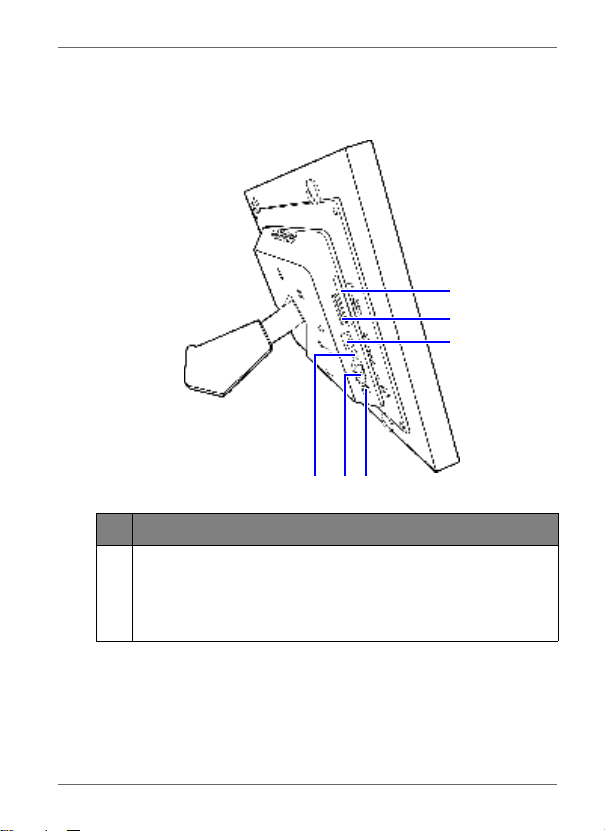
Identifying the parts
Left view
456
No. Description
CF memory card slot
1
Allows for a CompactFlash (CF) card. You can play back
photo/music files stored in the inserted card, or copy photo/
music files from or to the inserted card. See "Inserting a
memory card" on page 14 for details.
1
2
3
Identifying the parts EN - 3
Page 10

GiiNii Digital Picture Frame
No. Description
5-in-1 memory card slot
2
Allows for an SD
Memory Stick
xD-Picture Card
photo/music files stored in the inserted card, or copy photo/
music files from or to the inserted card. See "Inserting a
memory card" on page 14 for details.
USB port
3
Allows for a USB flash drive. You can play back photo/
music files stored in the inserted drive.
Mini USB port
4
Allows you to connect the picture frame to a computer so
the files can be transferred from your computer to the
picture frame.
Power switch
5
Slide the power switch to turn on or turn off the picture
frame. See "Connecting to power" on page 13 for details.
Power jack
6
Connect one end of the AC power adapter into the power
jack and the other end into a power outlet.
™
/ SDHC™, MultiMediaCard™ (MMC),
™
(MS), Memory Stick PRO™ (MS PRO) and
™
(xD) memory card. You can play back
EN - 4
Identifying the parts
Page 11
GiiNii Digital Picture Frame
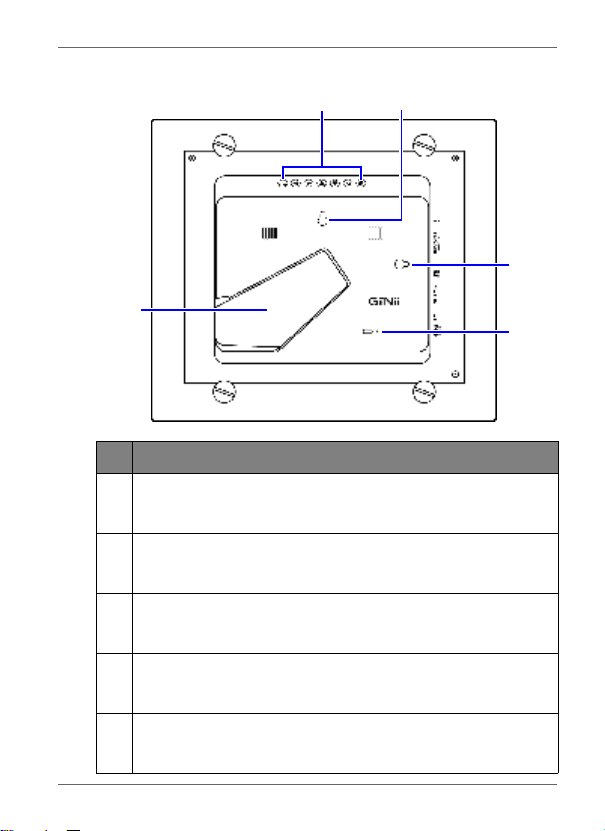
Rear view
4
No. Description
Control buttons
1
Use the control buttons to operate the picture frame. See
"Using the control buttons" on page 6 for details.
Hanging slot (for landscape wall mounting)
2
Allows you to hang the picture frame horizontally on a wall
without extending the adjustable back stand.
Hanging slot (for portrait wall mounting)
3
Allows you to hang the picture frame vertically on a wall
without extending the adjustable back stand.
Adjustable back stand
4
See "Using the adjustable back stand" on page 12 for
details.
Kensington security slot
5
You can attach an anti-theft Kensington lock and cable to
this slot to help prevent possible theft.
1
2
3
5
Identifying the parts EN - 5
Page 12
GiiNii Digital Picture Frame
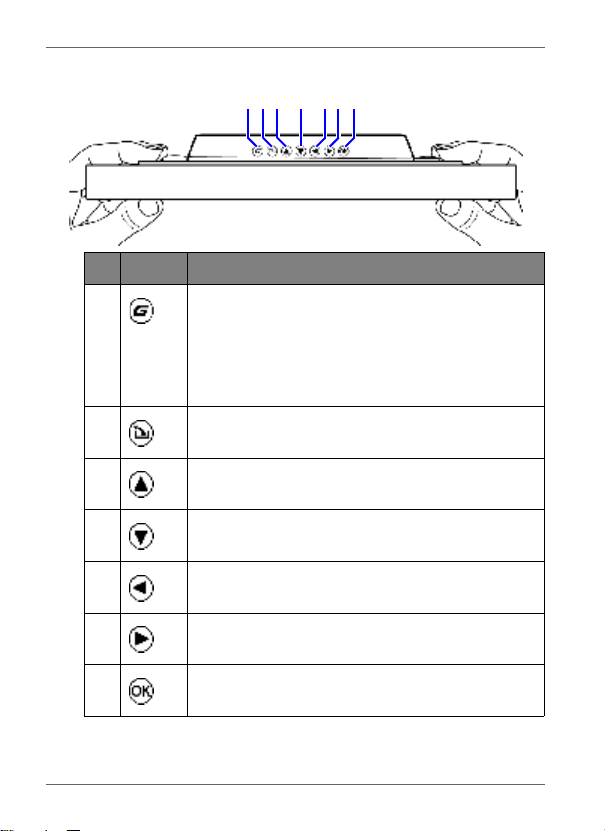
Using the control buttons
123456 7
No. Button Description
1
2
3
4
5
6
7
G button
■ Press this button to switch between
Slideshow view and Clock view.
■ Press this button to switch between Collage
view and Clock view, when a Collage effect
has been selected.
Return button
Returns to the previous page.
Up button
Moves up/volumes up.
Down button
Moves down/volumes down.
Left/Previous button
Moves left/selects the previous item.
Right/Next button
Moves right/selects the next item.
OK button
Confirms the selection.
EN - 6
Identifying the parts
Page 13
GiiNii Digital Picture Frame
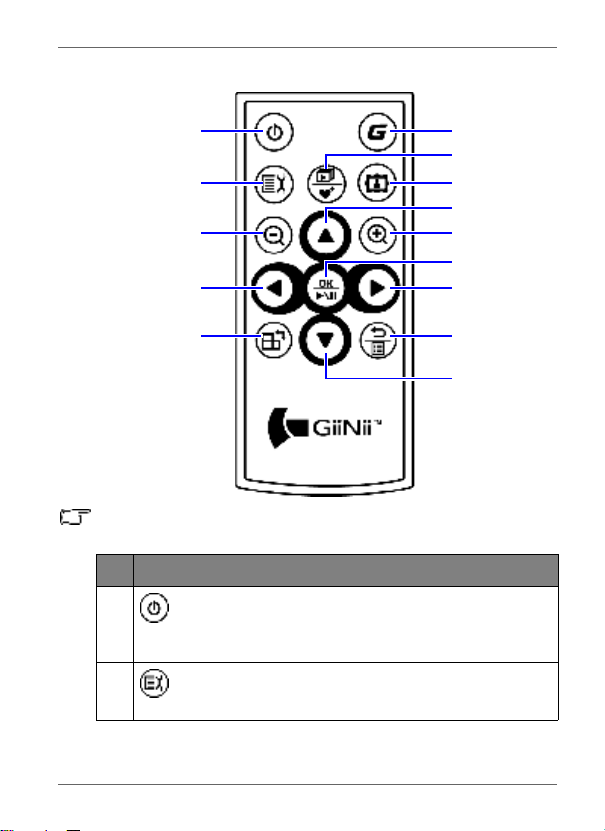
Using the remote control
1
6
7
2
8
9
3
10
11
4
5
12
13
14
Please remove the plastic film under the battery before using the
remote control for the first time.
No. Description
1
2
ON/OFF
Press this button to turn on/off the screen backlight and
music.
SETUP
Press this button to access the Setup mode.
Identifying the parts EN - 7
Page 14
GiiNii Digital Picture Frame
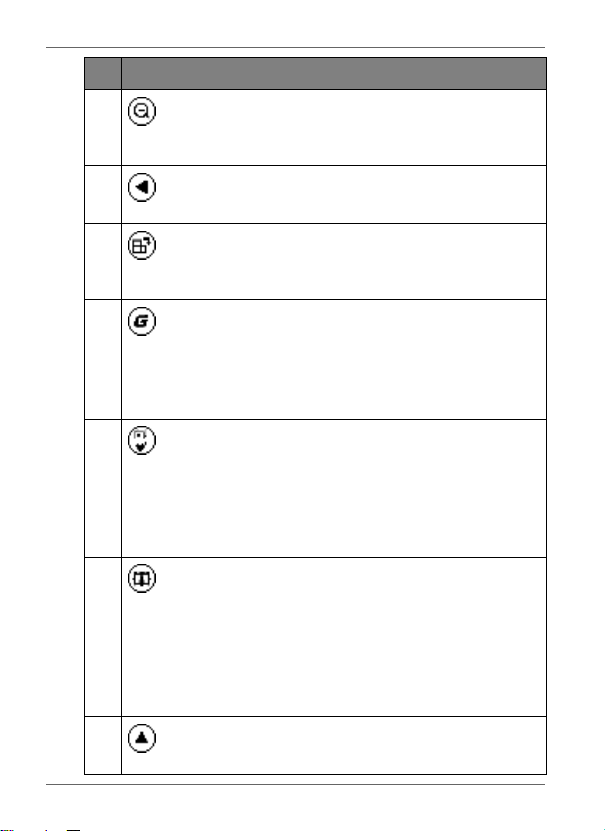
No. Description
EN - 8
3
ZOOM OUT
Press this button to zoom out the selected photo in Single
view.
4
LEFT/PREVIOUS
Moves left/moves to the previous item.
5
ROTATE
Press this button repeatedly to rotate the selected photo
clockwise in Single view each time by 90 degrees.
6
G button
■ Press this button to switch between Slideshow view and
Clock view.
■ Press this button to switch between Collage view and
Clock view, when a Collage effect has been selected.
7
SLIDESHOW/FAVORITE
■ Press this button to start slideshow playback.
■ When the slideshow starts, press this button again to
copy the photo you like to the Favorite disk area in the
internal memory. For details, refer to "Source mode" on
page 27 and "File mode" on page 28.
8
COLLAGE
■ During slideshow, press this button to enter Collage
view (slideshow with the Collage effect).
■ When in Collage view, press this button repeatedly to
toggle through different Collage effects.
See "Switching between Collage view and Clock view" on
page 26 for details.
9
UP
Moves up/volumes up.
Identifying the parts
Page 15
GiiNii Digital Picture Frame
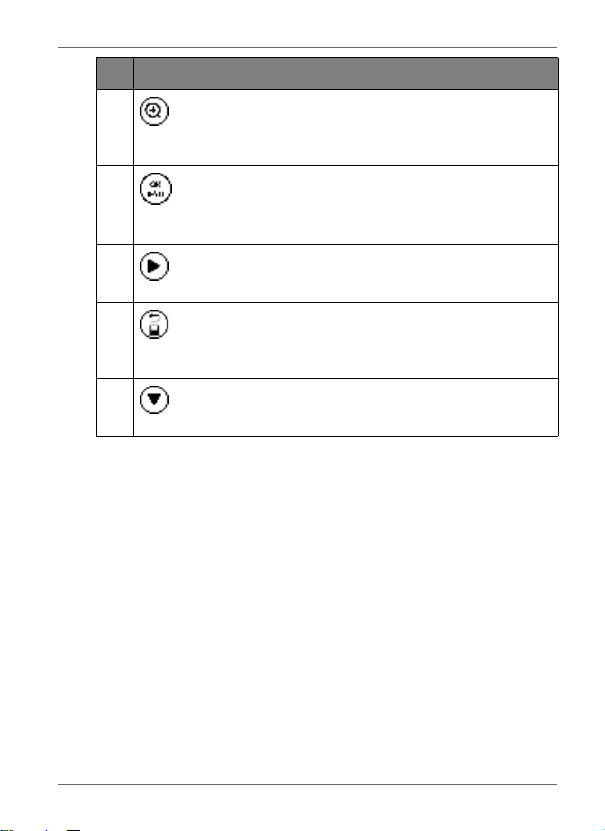
No. Description
10
11
12
13
14
ZOOM IN
Press this button to zoom in the selected photo in Single
view.
OK/PLAY BACK or PAUSE
Press this button to confirm a selection, start or pause
slideshow/music playback.
RIGHT/NEXT
Moves right or moves to the next item.
RETURN
Press this button to cancel current action and/or to go back
to the last page.
DOWN
Moves down/volumes down.
Identifying the parts EN - 9
Page 16

GiiNii Digital Picture Frame
The supplied remote control is magnetic. With its magnetic
backing, you can attach it to the top left area on the back of the
picture frame as illustrated below.
EN - 10
Identifying the parts
Page 17
GiiNii Digital Picture Frame
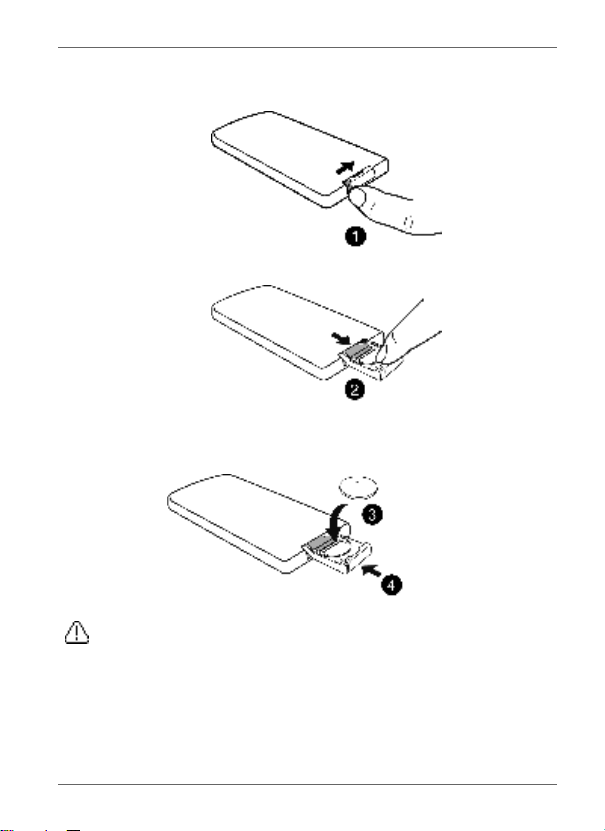
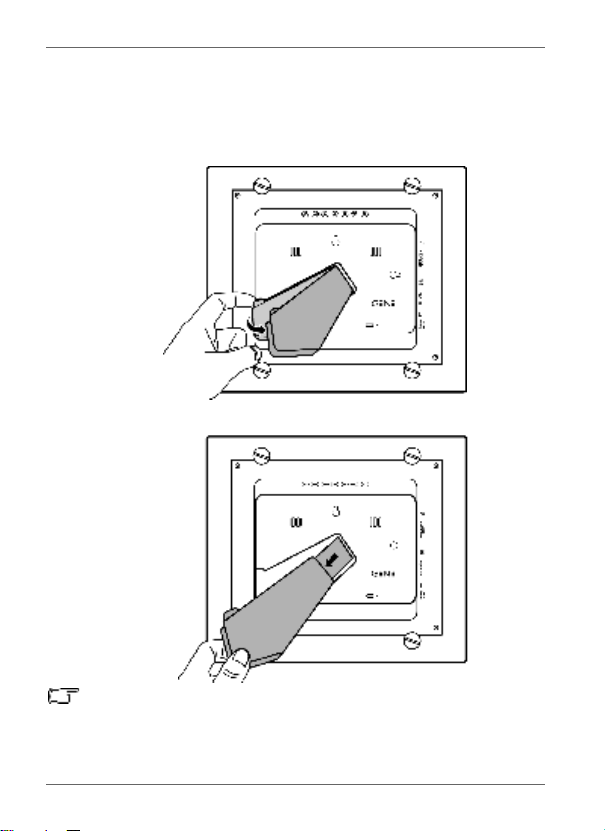
Replacing the remote control battery
1. Press the locking tab to the right.
2. Pull out the battery holder.
3. Insert the new battery into the battery holder. The battery must
be placed with the positive pole facing upwards, as shown in
the illustration below.
Positive
faces
upwards
4. Slide the battery holder into the remote control.
• Protect the battery from overheating or excessive moisture.
• Failure to replace the battery in the correct manner may result in
damage to the battery.
• Use only the approved specified batteries.
• Properly recycle or dispose of used batteries according to local
guidelines and regulations.
• Do not throw batteries into fire. This may result in an explosion.
• If the battery is completely drained or the remote control is not in
use for a long time, remove the battery to prevent leakage.
Identifying the parts EN - 11
Page 18
GiiNii Digital Picture Frame
Getting started
Using the adjustable back stand
Pop out the back stand fully, as shown, for optimal viewing angle.
• It is recommended to place the picture frame horizontally, because
this direction provides the best viewing and operating experience.
• By using the hanging slots, you can hang the picture frame
horizontally or vertically on a wall without extending the adjustable
back stand.
EN - 12
Getting started
Page 19
GiiNii Digital Picture Frame
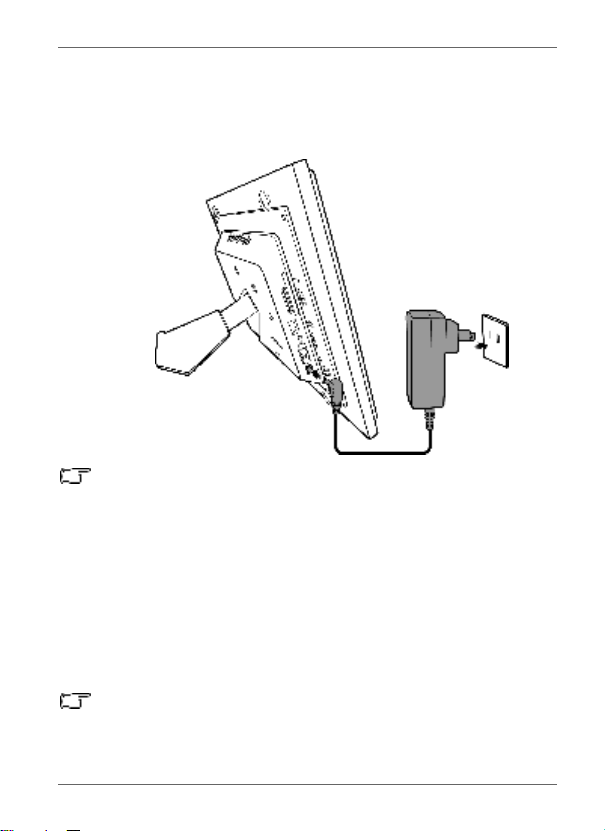
Connecting to power
1. Place your picture frame on a flat surface.
2. Connect the power adapter as below (1) and slide the power
switch to the “ON” position (2).
• Power systems and plug types may vary depending on your
country/region.
• To turn off the picture frame, slide the power switch to the “OFF”
position.
Playing back preloaded videos
Your GiiNii Digital Picture Frame comes with a preloaded Video
Library that has 3 video clips. Upon turning on the picture frame,
playback of the preloaded videos starts with no memory card
inserted. To release more space from the internal memory, you
can delete the video files from the File mode. See "Video Library
mode" on page 24 for more details.
• The preloaded videos have copy protection and cannot be
duplicated to any other device.
• To erase the videos from the picture frame will permanently remove
the videos as well as the Video Library mode from the main menu.
Please consider carefully before doing so because once deleted
Getting started EN - 13
Page 20

GiiNii Digital Picture Frame
there is no way to retrieve the videos. This picture frame only
supports the preloaded videos and does not support any other
video.
Inserting a memory card
To play back your own photo and music files, insert a photo/music
loaded memory card or USB flash drive into the corresponding
slot on the left side of the picture frame.
To insert the memory card:
Insert the memory card into the memory card slot as illustrated
below.
SD / SDHC MultiMediaCard Memory Stick Memory Stick
xD-Picture
Card
EN - 14
Memory Stick
Duo
Memory Stick
PRO Duo
PRO
CompactFlash
Card
Getting started
Page 21
GiiNii Digital Picture Frame
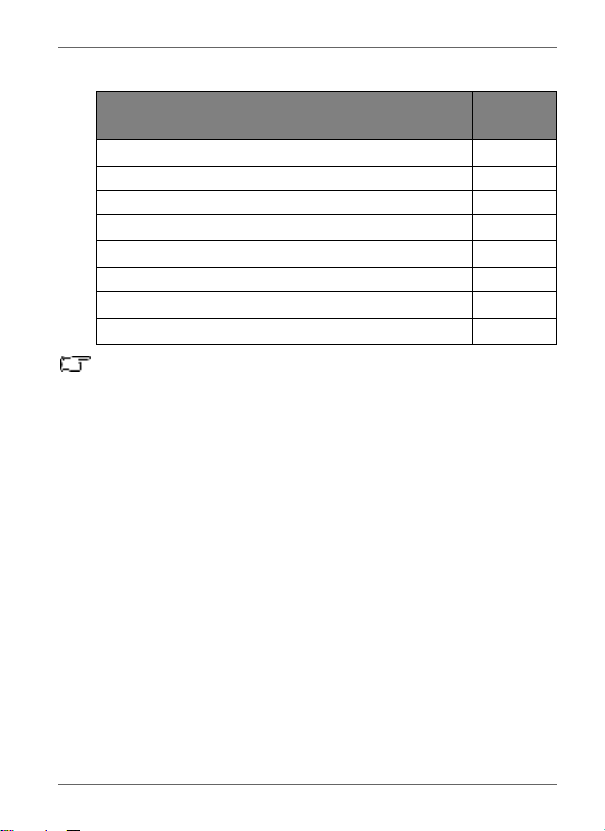
Compatible memory card formats
Memory card formats
Secure Digital (SD
™
/ SDHC™)
Maximum
capacity
32GB
microSD/microSDHC (A card adapter is required.) 8GB
miniSD/miniSDHC (A card adapter is required.) 2GB
MultiMediaCard
Memory Stick
™
(MS)
™
(MMC)
1GB
256MB
MS PRO Duo (A card adapter is required.) 16GB
xD-Picture Card
CompactFlash
• Maximum capacity specifications listed above are subject to
change without prior notice.
• Both 5-in-1 and CF memory card slots support hot-swap function. In
other words, you can change or remove the memory card when the
power of the picture frame is either turned on or turned off.
• The picture frame supports both Windows and MAC operating
systems. However, when formatting your memory cards, use FAT16
and FAT32 file systems in Windows only. Formatting memory cards
with NTFS or MAC is not supported.
™
(xD)
®
Card (CF)
2GB
16GB
Getting started EN - 15
Page 22

GiiNii Digital Picture Frame
Copying files to internal memory
When the picture frame is turned on and a memory card (or USB
flash drive) has been inserted, the following screen appears
automatically.
■ To copy all the photos contained in the inserted memory card
(or USB flash drive), select Ye s and press to proceed.
■ To view your photos without copying them to the picture
frame, select NO and press . The picture frame will start
playing back the photos automatically from your memory card
or USB flash drive.
Do not remove the memory card (or USB flash drive) before the copy
process is completed.
EN - 16
Getting started
Page 23

GiiNii Digital Picture Frame
Operating the picture frame
After turning on the picture frame, you can use the supplied
remote control or use the control buttons to operate the picture
frame.
■ Press any button on the remote control to bring up the On-
Screen Display (OSD) toolbar. Proceed with the function you
want to operate by pressing the corresponding button.
■ Press any control button to bring up the OSD toolbar. When
using the control buttons, press the button corresponding to
the icon shown on the screen as by its function or in its order.
Mapping OSD toolbar
• The OSD toolbar hides automatically when the picture frame is idle.
You can press any button to bring up the toolbar.
• In this User Manual, instructions or examples provided are based
upon operation with the remote control. To know how to use the
control buttons, refer to "Using the control buttons" on page 6 for
details.
Operating the picture frame EN - 17
Buttons on the remote control
Control buttons on the
back of the picture frame
Page 24
GiiNii Digital Picture Frame
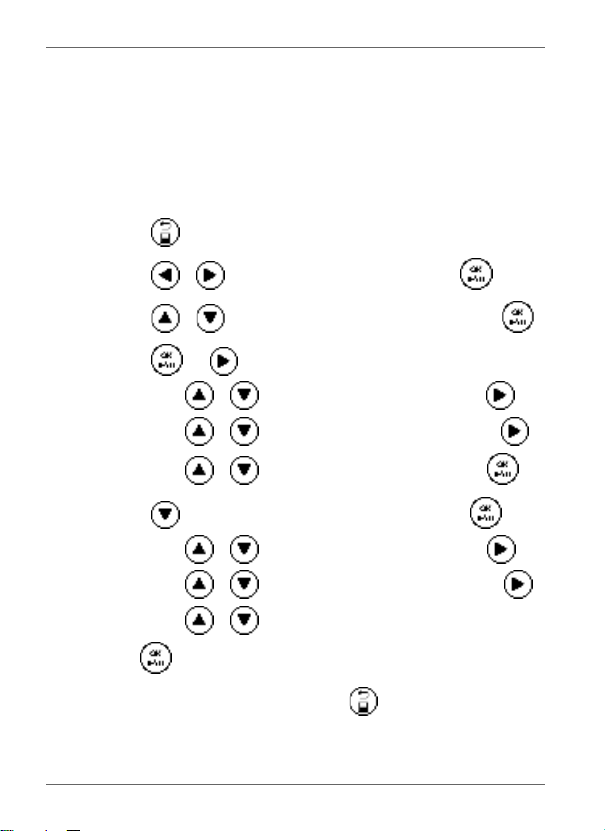
Basic operations
Setting the Date and Time
1. When the picture frame is turned on, playback of the
preloaded videos in the Video Library starts automatically (if
no memory card has been inserted).
2. Press any button to bring up the OSD toolbar.
3. Press repeatedly until you return to the main menu.
4. Press / to select Setup, and then press .
5. Press / to select Time Setup, and then press .
6. Press or to go to Current Date.
a. Press / to set the year, and then press .
b. Press / to set the month, and then press .
c. Press / to set the date, and then press .
7. Press to select Current Time, and then press .
a. Press / to set the hour, and then press .
b. Press / to set the minute, and then press .
c. Press / to select AM or PM, and then press
.
8. To return to the main menu, press repeatedly.
EN - 18
Operating the picture frame
Page 25

GiiNii Digital Picture Frame
Selecting a mode
In the main menu, press / to toggle among the following
modes: Photo, Music, Video Library, Collage, Calendar, File,
Source and Setup.
Displaying the clock
The Clock view provides four skin types of clock display. Press
twice to display the Clock view. When in Clock view, press
/ to select a desired type.
Analog view - A
Digital view - A Digital view - B
Please go to “Time Setup” under the “Setup” mode to set the Time.
Operating the picture frame EN - 19
Analog view - B
Page 26
GiiNii Digital Picture Frame
Photo mode
The Photo mode allows you to view photos that are stored in the
picture frame (including Internal Memory and Favorite), in a
memory card or in the inserted USB flash drive.
The picture frame supports the JPEG (*.jpg) and BMP (*.bmp) file
formats.
Slideshow (or
Collage) view/
OSD
toolbar
Current
mode
Clock view
Move up, down,
Return
left and right
Photo thumbnail list
Confirm selection
Currently
selected
photo
EN - 20
Operating the picture frame
Page 27
GiiNii Digital Picture Frame
Selecting a photo
1. After you enter the Photo mode, you will enter Thumbnail view
with your stored photos displayed in 9 thumbnails per page.
Press / / / to select a photo you want to
see.
2. To view the selected photo in full screen, press to enter
Single view.
3. To rotate the photo clockwise each time by 90 degrees, press
.
Zooming the photo
Zoom inRotate
Slideshow (or
Collage) view/
Clock view
OSD
toolbar
Operating the picture frame EN - 21
Return
Previous/
next file
Slideshow
view
Page 28
GiiNii Digital Picture Frame
1. When in Single view, press to enter Zoom view.
2. Press repeatedly to zoom in the selected photo.
3. When the OSD toolbar disappears, press / / /
to move to a particular area you want to see.
Playing a slideshow
1. When in Single view, press to enter Slideshow view.
2. Slideshow of photos automatically starts.
3. During the slideshow, you can press to copy the photo
shown currently to the Favorite disk area in the internal
memory.
4. To pause the slideshow and enter Single view, press . To
re-start the slideshow, press again.
Rotating a photo automatically
The picture frame has a built-in tilt sensor that allows auto
rotation of photos. Follow the instructions below to enable auto
rotation.
1. When the picture frame is placed in horizontal position, rotate
the picture frame 90 degrees clockwise to enable auto
rotation.
2. When the picture frame is placed in vertical position, rotate the
picture frame 90 degrees counterclockwise to enable auto
rotation.
The auto rotation feature displays photos in a landscape or portrait
view. It does not re-orient photos that were taken sideways.
EN - 22
Operating the picture frame
Page 29
GiiNii Digital Picture Frame
Music mode
The Music mode allows you to listen to music files that are stored
in the picture frame (including Internal Memory and Favorite), in a
memory card or in the inserted USB flash drive.
Slideshow (or
Collage) view/
Clock view
Return
Volu me s
down/up
Previous/
next file
Pause/
resume
playback
Current/
To ta l
track
number
Current
playback
time
Press / to select a track and press to start music
playback. To adjust volume, press / . To go to the
previous/next track, press / . To pause/resume
playback, press .
Music mode EN - 23
Page 30

GiiNii Digital Picture Frame
Video Library mode
The Video Library mode provides 3 preloaded videos stored in
the internal memory. Press / to select a video and
press to start video playback.
If you wish to release more space from the internal memory, you
can delete the video files from the File mode. However, this act
will permanently remove the videos from the picture frame as well
as remove the Video Library mode from the main menu. Please
consider carefully before doing so because once deleted there is
no way to retrieve the video. This picture frame only supports the
preloaded videos and does not support any other video.
To delete the preloaded video files:
1. In Source mode, press / to select Internal Memory,
and then press .
EN - 24
Video Library mode
Page 31

GiiNii Digital Picture Frame
2. In File mode, press / to highlight the unwanted video
and press to select the file. Repeat this step to add more
files.
3. Press to open the file edit menu. Select Delete and press
to delete the selected file(s). To confirm the action, select
OK and press .
Collage mode
The Collage mode allows you to play back photos in slideshow
with various themes of Collage effects. Press / to select
a theme and its Collage effect will be displayed in the preview
window to the right. Press to start playback in your selected
Collage view automatically.
Collage mode EN - 25
Page 32

GiiNii Digital Picture Frame
To pause playback in Collage view, press one time. To
press twice will start playback in normal Slideshow view
(without any Collage effect).
Switching between Collage view and
Clock view
When in Collage view, you can press repeatedly to switch
between Collage view and Clock view. When in Clock view, press
/ to select a desired clock type. See "Displaying the
clock" on page 19 for more details.
If you are not in Collage View, pressing repeatedly will allow you
to switch between normal Slideshow view (without any Collage
effect) and Clock view.
Calendar mode
After you enter the Calendar mode, current time and date will be
shown on the screen. The photos beside the calendar will be
played back as slideshow.
EN - 26
Collage mode
Page 33

GiiNii Digital Picture Frame
Press / to view the previous/next month.
press / to go to the previous/next photo.
Please go to “Time Setup” under the “Setup” mode to set the
Calendar.
Source mode
The Source mode allows you to select the source of the photos
or music to be played back on the picture frame. Press /
/ / to select from the following source options:
■ Card: displays the photo/music files stored in the inserted
SD/SDHC, MMC, MS, MS PRO or xD memory card.
■ USB: displays the photo/music files in the inserted USB
flash drive.
■ CF: displays the photo/music files in the inserted CF card.
■ Internal Memory: displays the photo/music files copied to
the internal memory.
■ Favorite: displays the photo/music files copied to the
Favorite disk area in the internal memory.
Source mode EN - 27
Page 34

GiiNii Digital Picture Frame
File mode
Before using the File mode, select the source of files from the Source
mode first. Refer to "Source mode" on page 27 for details.
The File mode allows you to view the information of the files
stored in the picture frame (including Internal Memory, Favorite
and preloaded Video Library), in the inserted memory card or in
the inserted USB flash drive, such as the file size.
Move up/
down
Select/deselect
a file
Open a file
edit menu
Collage view/
OSD
toolbar
Clock view
Return
File list
After you enter the File mode, press / to select a file
and its thumbnail or detailed information will be seen in the
preview window to the right.
Confirm
selection
File edit
menu
File
information
EN - 28
File mode
Page 35

GiiNii Digital Picture Frame
Copying/Deleting the files
1. Select a file to edit and press to mark the selected file.
Repeat this step to select more files.
2. Press to open the file edit menu.
■ Select Delete to delete the selected file(s). Press to
confirm or cancel the action.
■ Select Copy and then press to choose to copy the
selected file(s) to the internal memory (Copy to Memory),
to the inserted memory card (Copy to Card) or to the
inserted USB flash drive (Copy to USB).
File mode EN - 29
Page 36

GiiNii Digital Picture Frame
Setup mode
The Setup mode allows you to adjust settings on slideshow,
display, time, Collage effect, Clock skin, OSD languages, startup
and factory default settings.
Collage view/
Clock view
OSD
toolbar
Return
Setup options menu
Move up,
down
Return to the last
submenu
Open the
submenu
Confirm
selection
EN - 30
File mode
Page 37

GiiNii Digital Picture Frame
Options in the Setup mode
EnerGiiNii
Selects a power-saving mode for your picture frame:
■ Off: disables the EnerGiiNii feature.
■ Auto Sched 50%: enables the EnerGiiNii feature. When
enabled, the picture frame reduces 50% screen backlight
level automatically during 9:00 p.m and 7:00 a.m.
■ Auto Sched 100%: enables the EnerGiiNii feature. When
enabled, the picture frame turns off 100% screen backlight
automatically during 9:00 p.m and 7:00 a.m.
■ Save 20%: reduces 20% backlight level.
■ Save 50%: reduces 50% backlight level.
Photo quality is not affected by using the EnerGiiNii feature.
Slideshow Setup
■ Interval Time: selects the slideshow interval between
photos.
■ Effect: selects the transition effect.
■ Smart Cropping: selects to display photos in original size
or in full screen.
■ Music: selects to switch the music on/off during slideshow
playback.
Display Setup
■ Saturation: selects the level of saturation.
■ Brightness: selects the level of screen brightness.
■ Contrast: selects the level of contrast.
Collage
Selects the preferred Collage effect for slideshow playback from
a list of preset Collage themes.
File mode EN - 31
Page 38

GiiNii Digital Picture Frame
Time Setup
Sets up current date, time, alarm time and on/off schedule for
alarm and “on/off timer”.
If you enable “on/off timer” when the picture frame is powered on, the
picture frame will power off automatically according to the “off”
schedule, and then restart according to the “on” schedule.
You can also set Birthdays, Wedding date and Holidays to
automatically enable Collage effects on these particular days.
Clock skin
Sets up clock skin to be applied in Clock view.
Language
Sets up the On-Screen Display (OSD) language.
Set to Default
Returns all the settings back to system default.
Startup Setup
Sets up the first mode to enter upon turning on the picture frame.
Property
Views the remaining/total capacity in the internal memory, the
model name and the current software version.
EN - 32
File mode
Page 39

GiiNii Digital Picture Frame
Frequently asked questions
What memory card formats are compatible with the
picture frame?
SD/SDHC, MMC, MS, MS PRO, xD and CF memory
card formats are compatible with the picture frame. For
details, refer to "Compatible memory card formats" on
page 15.
Why do some photos load faster than others?
Higher resolution photos load slower. Using a lower
resolution when taking photos will speed up loading
time.
Frequently asked questions EN - 33
Page 40

GiiNii Digital Picture Frame
Regulation and compliance
Federal Communications Commission (FCC) Notice
This equipment has been tested and found to comply with the
limits for a Class B digital device, pursuant to Part 15 of the FCC
Rules. These limits are designed to provide reasonable
protection against interference in a residential installation. This
equipment can radiate radio frequency energy and, if not installed
and used in accordance with the instructions, may cause
interference to radio communications.
However, there is no guarantee that interference will not occur in
a particular installation. If this equipment does cause interference
to radio or television reception, which can be determined by
turning the equipment off and on, the user is encouraged to try to
correct the interference by one of the following measures:
■ Reorient or relocate the receiving antenna.
■ Increase the separation between the equipment and receiver.
■ Connect the equipment into an outlet on a circuit different from
that to which the receiver is connected.
■ Consult the dealer or an experienced radio/TV technician for
help.
Recycling
■ To minimize harm to the environment, the batteries supplied
with the picture frame do not contain mercury or nickel
cadmium. If possible, when disposing of batteries, use
recycling means available in your area.
■ The picture frame uses materials that can be recycled. To
minimize the amount of waste in the environment, check your
area for companies that will recover used televisions for
dismantling and collection of reusable materials, or contact
your dealer for recycling tips.
■ Please dispose of the carton and packing material through the
proper waste disposal management in your area.
EN - 34
Regulation and compliance
Page 41

GiiNii Digital Picture Frame
Appendix
Specifications
Specifications are subject to change without prior notice.
Item Description
Screen Size 10.4” TFT
Aspect Ratio 4:3
Panel Interface Digital
Supported
Memory Card
Formats
Supported
Flash Drive
Supported
Image File
Format
Supported
Music File
Format
USB Port USB Host (Type-A)
Mini USB Port
USB 1.1/2.0
Compliant
Built-in Internal
Memory (for
data storage)
Memory Card
Slots
Photo Collage
Feature
Clock Feature Yes
SD/SDHC, MMC, MS, MS PRO and xD (using
the 5-in-1 memory card slot)
CF (using the CF memory card slot)
USB flash drive (using the USB port)
JPEG and BMP (up to 20 M pixel)
MP3 and WMA
USB Device (Mini-B)
Yes
512MB
5-in-1 card slot
CF card slot
Yes
Appendix EN - 35
Page 42

GiiNii Digital Picture Frame
Item Description
Calendar
Yes
Feature
EnerGiiNii
Yes
Feature
Back Stand Adjustable
Playback Mode Full Screen browse, Slideshow view,
Thumbnail view, and Zoom-in/Zoom-out
Language
Support
Color
English, French, Spanish, Portuguese,
German, Dutch and Italian.
Yes
Adjustment
(Gamma/Color
Correction)
Brightness
Yes
Adjustment
Contrast
Yes
Adjustment
Auto Rotation
Yes
(with built-in tilt
sensor)
EN - 36
Appendix
Page 43

GiiNii Digital Picture Frame
List of compatible memory cards and
USB drives
Not all supported memory cards are included in the table below. For
technical support, contact your nearest service center for assistance.
Capacity
SD miniSD microSD MM C MS xD
8MB
16MB
32MB
64MB Dick Smith
128MB Olympus
256MB Toshiba SanDisk Sony (MS)
512MB
Panasonic
Toshiba
Panasonic
Pretec
Transcend
80X
Transcend Transcend Transcend
SanDisk Sony (MS) Olympus
Memory card formats
SanDisk
PQI MMC
Plus
Sony
(MS Duo)
Sony (MS)
SanDisk
(MS Duo)
Sony (MS)
Lexar (MS)
SanDisk
(MS PRO)
Olympus
(M type)
Fujifilm (M
type)
Kodak
Olympus
(M type)
Appendix EN - 37
Page 44

GiiNii Digital Picture Frame
Capacity
1GB
2GB
Memory card formats
SD miniSD microSD MMC MS xD
Transcend
SanDisk Kingston
Apacer 60X A-DATA
PhotoFast
Ultra
Panasonic
class 4
Kingston SanDisk
RiDATA
Panasonic
A-DATA Panasonic PQI
SanDisk
Toshiba
Silicon
Power 80X
Panasonic
class 2
Transcend
Apacer 60X
FDC
RiDATA
Panasonic
Stargem
SanDisk
Ultra II
Apacer
Transcend
RiTEK
Transcend
Kingston
Transcend
Transcend
RS MMC
SanDisk
(MS Duo)
SanDisk
(M2)
SanDisk
Ultra II
(MS Duo)
Olympus
(M type)
Fujifilm
(H type)
Fujifilm
(M type)
Fujifilm
(H type)
Olympus
(M type)
Olympus
(M+ type)
EN - 38
Appendix
Page 45

GiiNii Digital Picture Frame
Capacity
SD miniSD microSD MM C MS xD
A-DATA
(SDHC)
Silicon
Power
class 6
Kingston
4GB
8GB
16GB
32GB PNY
RiDATA
SanDisk
Toshiba
(SDHC)
Transcend
Transcend
(SDHC)
Toshiba
(SDHC)
Transcend
(SDHC)
A-DATA
(SDHC)
SanDisk
Apacer
Kingston
Transcend
class 6
Memory card formats
SanDisk
(microSDHC)
SanDisk
Sony
(MS Duo)
SanDisk
(MS Duo)
SanDisk
(M2)
SanDisk
(MS PRO
Duo)
Appendix EN - 39
Page 46

GiiNii Digital Picture Frame
Capacity
CF USB
16MB Nikon
32MB Kodak
64MB Kodak
128MB
256MB Transcend
1GB
2GB
4GB RiDATA 233X Kingston Data Traveler
8GB TOPRAM TDK
16GB Transcend 133X
PQI Hi-Speed
Kodak
Transcend
FDC Transcend JF110
A-DATA 80X
Transcend 133X A-DATA MY FLASH
SanDisk Ultra II Transcend JF V30
Kingsto n Elite Pr o High Speed
FDC
CF memory card/USB flash drive
A-DATA MY FLASH
Transcend JF130
A-DATA
aigo L8202
Apacer AH321
Transcend JFV10
EN - 40
Appendix
Page 47

Cadre de photos numériques GiiNii
Droits d’auteur
© GiiNii™ 2011. Tous droits réservés. Il est interdit de reproduire,
de transmettre, de retranscrire, de mémoriser dans un système
de recherche documentaire ou de traduire toute partie de cette
publication dans une autre langue ou dans un autre langage
informatique, que ce soit par moyen électronique, mécanique,
magnétique, optique, chimique, manuel ou autre sans
autorisation écrite préalable de GiiNii
™
.
Clause de non-responsabilité
GiiNii™ ne fait aucune représentation ou garantie, qu’elle soit
expresse ou implicite, à l'égard du contenu de la présente
publication et nie explicitement toute garantie, de qualité
marchande ou de convenance pour un motif particulier. De plus,
™
se réserve le droit de réviser la présente publication et
GiiNii
d'effectuer des changements de temps à autre du contenu de la
présente publication sans l'obligation d'aviser qui que ce soit
d'une telle révision ou modification.
Consignes de sécurité
Avant d'utiliser le cadre de photos, lisez et respectez
soigneusement les consignes ci-dessous.
■ Conservez le présent mode d'emploi pour référence future.
■ Lisez les consignes de sécurité et d'utilisation avec attention
avant d'utiliser l'appareil. Tous les avertissements sur
l'appareil et dans le mode d'emploi doivent être respectés.
■ Ne placez pas cet appareil sous les rayons directs du soleil ou
près de sources de chaleur, comme dans une auto fermée
sous les rayons du soleil ou près d'un poêle. Le boîtier
externe de cet appareil peut se déformé et les capteurs
sophistiqués à l'intérieur peuvent s'endommager lorsque
exposés à une chaleur excessive.
■ N'utilisez pas cet appareil près de l'eau, sous la pluie ou ne
permettez pas à un liquide de s'infiltrer à l'intérieur de cet
appareil. L'eau et l'humidité peuvent causer un court-circuit
aux composants électroniques et provoquer un mauvais
fonctionnement.
■ N'utilisez pas cet appareil près de fortes sources
électromagnétiques, comme un four à micro-ondes.
Clause de non-responsabilité FR - i
Page 48

Cadre de photos numériques GiiNii
L'interférence électromagnétique peut causer un mauvais
fonctionnement de cet appareil.
■ N'échappez pas ou n'appliquez pas de chocs ou de vibrations
à cet appareil. Les impacts vigoureux peuvent endommager
l'intérieur des composants.
■ N'insérez pas d'objets autres que les cartes mémoires
compatibles dans les fentes de carte mémoire de cet appareil.
Les surfaces de contact métalliques à l'intérieur des fentes
peuvent facilement être endommagées par les corps
étrangers.
■ N'utilisez pas un adaptateur de courant inconnu autre que
celui fourni avec le cadre de photos. Le branchement de cet
appareil à un adaptateur de courant inconnu est très
dangereux et peut provoquer une incendie ou une explosion.
■ Évitez de couper, plier ou modifier le cordon et ne placez pas
d'objets lourds ou ne marchez pas sur le cordon de
l'adaptateur de courant. Sinon l'isolation externe peut être
endommagé et entraîner un court-circuit ou une incendie.
■ S'il y a une odeur étrange ou de la chaleur émise depuis cet
appareil ou des signes de mauvais fonctionnement,
débranchez le cadre de photos de l'alimentation
immédiatement et communiquez avec votre revendeur pour
inspection ou service.
■ Utilisez un chiffon lisse et doux pour nettoyer la surface de
l'écran. N'utilisez pas de nettoyants liquides ou de nettoyants
pour vitres.
■ Si une substance étrangère ou de l'eau s'infiltre dans cet
appareil, désactivez immédiatement et débranchez
l'adaptateur de courant. Ensuite, éliminez la substance
étrangère ou l'eau, puis expédiez l'appareil chez votre centre
de service le plus près.
■ Ne tentez pas de démonter ou modifier cet appareil. Il n'y a
pas de pièces qui peuvent être entretenues à l'intérieur de cet
appareil et les modifications non autorisées annuleront la
garantie.
■ Même si la tablette à cristaux liquides est fabriquée à partir
d'une technologie de haute précision et ont des pixels
efficaces à 99,99 % ou plus, les points noirs ou les points
brilliants de lumière (rouge, bleu ou vert) peuvent apparaître
constamment à la tablette à cristaux liquides. C'est une
propriété structurale de la tablette à cristaux liquides et n'est
pas un mauvais fonctionnement.
FR - ii
Consignes de sécurité
Page 49

GiiNii Digital Picture Frame
Table des matières
Caractéristiques principales . . . . . . . . . . . . . . . . . . . . . . . . . . 1
Contenu de l'emballage . . . . . . . . . . . . . . . . . . . . . . . . . . . . . . 2
Identification . . . . . . . . . . . . . . . . . . . . . . . . . . . . . . . . . . . . . . . 3
Vue gauche . . . . . . . . . . . . . . . . . . . . . . . . . . . . . . . . . . . . . . 3
Vue arrière . . . . . . . . . . . . . . . . . . . . . . . . . . . . . . . . . . . . . . . 5
Utilisation des boutons de commande . . . . . . . . . . . . . . . . . . 6
Utilisation de la télécommande . . . . . . . . . . . . . . . . . . . . . . . 7
Remplacement de la pile de télécommande . . . . . . . . . . 11
Préparation . . . . . . . . . . . . . . . . . . . . . . . . . . . . . . . . . . . . . . . 12
Utilisation du support arrière réglable. . . . . . . . . . . . . . . . . . 12
Branchement à l'alimentation . . . . . . . . . . . . . . . . . . . . . . . . 13
Lecture des vidéos préchargées . . . . . . . . . . . . . . . . . . . . . 13
Insérez une carte mémoire. . . . . . . . . . . . . . . . . . . . . . . . . . 14
Formats de carte mémoire compatibles . . . . . . . . . . . . . 15
Copie de fichiers à la mémoire interne . . . . . . . . . . . . . . 16
Utilisation du cadre de photos . . . . . . . . . . . . . . . . . . . . . . . 17
Fonctionnement de base . . . . . . . . . . . . . . . . . . . . . . . . . . . 18
Réglage de la date et de l’heure . . . . . . . . . . . . . . . . . . . 18
Sélection d'un mode . . . . . . . . . . . . . . . . . . . . . . . . . . . . 20
Affichage de l'horloge . . . . . . . . . . . . . . . . . . . . . . . . . . . 20
Mode Photo . . . . . . . . . . . . . . . . . . . . . . . . . . . . . . . . . . . . . . 21
Selection d'une photo. . . . . . . . . . . . . . . . . . . . . . . . . . . . . . 22
Zoomer avant la photo . . . . . . . . . . . . . . . . . . . . . . . . . . . . . 22
Lecture d'un diaporama . . . . . . . . . . . . . . . . . . . . . . . . . . . . 23
Rotation d'une photo automatiquement . . . . . . . . . . . . . . . . 23
Mode Musique . . . . . . . . . . . . . . . . . . . . . . . . . . . . . . . . . . . . 24
Mode Library vidéo . . . . . . . . . . . . . . . . . . . . . . . . . . . . . . . . 25
Mode Collage . . . . . . . . . . . . . . . . . . . . . . . . . . . . . . . . . . . . . 26
Basculement entre la vue de collage et la vue d'horloge. . . 27
Mode calendrier . . . . . . . . . . . . . . . . . . . . . . . . . . . . . . . . . . . 27
Table des matières FR - iii
Page 50

GiiNii Digital Picture Frame
Mode Source . . . . . . . . . . . . . . . . . . . . . . . . . . . . . . . . . . . . . . 28
Mode Fichier . . . . . . . . . . . . . . . . . . . . . . . . . . . . . . . . . . . . . . 29
Copie/Suppression de fichiers . . . . . . . . . . . . . . . . . . . . . . . 30
Mode Configuration . . . . . . . . . . . . . . . . . . . . . . . . . . . . . . . .31
Options dans le mode Configuration. . . . . . . . . . . . . . . . . . . 32
Foire aux questions . . . . . . . . . . . . . . . . . . . . . . . . . . . . . . . .34
Réglementation et conformité . . . . . . . . . . . . . . . . . . . . . . . . 35
Recyclage. . . . . . . . . . . . . . . . . . . . . . . . . . . . . . . . . . . . . . . . . 35
Annexe . . . . . . . . . . . . . . . . . . . . . . . . . . . . . . . . . . . . . . . . . . .36
Spécifications techniques . . . . . . . . . . . . . . . . . . . . . . . . . . . 36
Liste des cartes mémoires et lecteurs USB compatibles . . . 38
FR - iv
Table des matières
Page 51

Cadre de photos numériques GiiNii
Cher client :
Merci d'avoir intégré notre cadre de photos numériques GiiNii
dans votre maison. Maintenant vous serez capable d'afficher
votre Library de photos numériques en croissance rapide avec
une clarté sensationnelle et de partager des souvenirs
formidables avec les amis et la famille.
De plus, veuillez vérifier les vidéos didactiques sur COMMENT
DÉMARRER et COMMENT PROGRAMMER le cadre de photos
numériques à www.giinii.com sous la foire aux questions.
Caractéristiques principales
Le cadre de photos numériques est principalement équipé des
caractéristiques suivantes :
■ Photos claires et brillantes
■ Vous permet de lire les fichiers d'images et de musique qui
sont enregistrés sur la carte mémoire ou dans un lecteur flash
USB.
■ Vous permet de sélectionner un mode d'économie d!¦énergie
pour votre cadre de photos à l'aide de la fonction EnerGiiNii.
■ Vous permet d'afficher les images dans le diaporama avec
musique et divers thèmes d'effets de collage.
■ Vous permet de régler l'activation ou la désactivation de la
minuterie automatiquement.
■ Menus d'affichage à l'écran (OSD) multilingues
Caractéristiques principales FR - 1
Page 52

Cadre de photos numériques GiiNii
Contenu de l'emballage
Ouvrez soigneusement l'emballage et assurez-vous que vous
ayez les articles suivants :
1. Cadre de photos numériques x 1
2. Adaptateur de courant CA x 1
3. Télécommande magnétique (pile de lithium CR2025
comprise) x 1
4. Guide de démarrage rapide x 1
5. Mode d'emploi x 1
6. Carte d'enregistrement x 1
• L'apparence réelle de l'appareil peut varier des illustrations
trouvées dans le présent mode d'emploi.
• Les accessoires disponibles peuvent varier selon la région où vous
avez acheté le cadre de photos.
FR - 2
Contenu de l'emballage
Page 53

Cadre de photos numériques GiiNii
Identification
Vue gauche
Nº Description
Fente de carte CF
1
Compatible avec la carte CompactFlash (CF). Vous
pouvez afficher les fichiers image/musique enregistrées
dans la carte insérée, ou copier les fichiers image/musique
depuis la carte insérée. Voir « Insérez une carte mémoire »
à la page 14 pour plus de détails.
1
2
3
456
Identification FR - 3
Page 54

Cadre de photos numériques GiiNii
Nº Description
fente de carte mémoire 5-en-1
2
Compatible avec les cartes mémoires SD
MultiMediaCard
Stick PRO
™
(MMC), Memory Stick™ (MS), Memory
™
(MS PRO) et xD-Picture Card™ (xD). Vous
pouvez afficher les fichiers image/musique enregistrées
dans la carte insérée, ou copier les fichiers image/musique
depuis la carte insérée. Voir « Insérez une carte mémoire »
à la page 14 pour plus de détails.
Port USB
3
Compatible avec le lecteur flash USB. Vous pouvez
afficher les fichiers image/musique enregistrés sur le
lecteur inséré.
Mini port USB
4
Vous permet de raccorder le cadre de photos à un
ordinateur pour pouvoir transférer les fichiers de votre
ordinateur vers le cadre de photos.
Interrupteur
5
Glissez l'interrupteur pour activer ou désactiver le cadre de
photos. Voir « Branchement à l'alimentation » à la page 13
pour plus de détails.
Connecteur femelle
6
Raccordez une extrémité de l'adaptateur de courant CA
dans le connecteur femelle et l'autre extrémité dans une
prise murale.
™
/ SDHC™,
FR - 4
Identification
Page 55

Cadre de photos numériques GiiNii
Vue arrière
4
Nº Description
Boutons de commande
1
Utilisez les boutons de commande pour utiliser le cadre de
photos. Voir « Utilisation des boutons de commande » à la
page 6 pour plus de détails.
Fente suspendue (pour fixation murale à orientation
2
paysage)
Vous permet de suspendre le cadre de photos
horizontalement au mur sans étendre le support arrière
réglable.
Fente suspendue (pour fixation murale à orientation
3
portrait)
Vous permet de suspendre le cadre de photos verticalement
au mur sans étendre le support arrière réglable.
Support arrière réglable
4
Voir « Utilisation du support arrière réglable » à la page 12
pour plus de détails.
1
2
3
5
Identification FR - 5
Page 56

Cadre de photos numériques GiiNii
Fente de sécurité Kensington
5
Vous pouvez fixer un câble et un verrou Kensington antivol à
la fente pour aider à prévenir un vol possible.
Utilisation des boutons de commande
123456 7
Nº Bouton Description
1
2
3
4
5
6
7
Bouton G
■ Appuyez sur ce bouton pour basculer entre la
vue de diaporama et la vue d'horloge.
■ Appuyez sur ce bouton pour basculer entre la
vue de collage et la vue d'horloge, lorsqu'un
effet de collage a été sélectionné.
Bouton Retour
Retourne à la page précédente.
Bouton Vers le haut
Déplace vers le haut/augmente le volume.
Bouton Vers le bas
Déplace vers le bas/baisse volume.
Bouton Vers la gauche/Précédent
Déplace vers la gauche ou sélectionne l'élément
précédent.
Bouton Vers la droite/Suivant
Déplace vers la droite ou sélectionne l'élément
suivant.
Bouton OK
Confirme la sélection.
FR - 6
Identification
Page 57

Cadre de photos numériques GiiNii
Utilisation de la télécommande
1
6
7
2
8
9
3
10
11
4
5
12
13
14
Veuillez retirer le film de plastique sous la pile avant d'utiliser la
télécommande pour la première fois.
Nº Description
1
2
ACTIVÉ/DÉSACTIVÉ
Appuyez sur ce bouton pour activer ou désactiver le
rétroéclairage de l'écran et musique.
CONFIGURATION
Appuyez sur ce bouton pour accéder au mode Config..
Identification FR - 7
Page 58

Cadre de photos numériques GiiNii
Nº Description
3
ZOOMER ARRIÈRE
Appuyez sur ce bouton pour zoomer arrière la photo
sélectionnée dans la vue simple.
4
VERS LA GAUCHE/PRÉCÉDENT
Déplace vers la gauche ou passe à l'élément précédent.
5
PIVOTER
Appuyez sur ce bouton à maintes reprises pour pivoter
l'image sélectionnée dans la vue simple de 90 degrés
selon le sens horaire à chaque pression.
6
Bouton G
■ Appuyez sur ce bouton pour basculer entre la vue de
diaporama et la vue d'horloge.
■ Appuyez sur ce bouton pour basculer entre la vue de
collage et la vue d'horloge, lorsqu'un effet de collage a
été sélectionné.
7
DIAPORAMA/LES FAVORIS
■ Appuyez sur ce bouton pour démarrer la lecture du
diaporama.
■ Lorsque le diaporama commence, appuyez sur ce
bouton à nouveau pour copier la photo sur la zone de
disque Favoris dans la mémoire interne. Pour en
savoir plus, reportez-vous à « Mode Source » à la page
28 et « Mode Fichier » à la page 29.
FR - 8
Identification
Page 59

Cadre de photos numériques GiiNii
Nº Description
8
9
10
11
12
13
14
COLLAGE
■ Au cours du diaporama, appuyez sur ce bouton pour
entrer dans la vue Collage (diaporama avec effet de
collage).
■ Lorsque dans la vue Collage, appuyez sur ce bouton à
maintes reprises pour basculer parmi les différents
effets de collage.
Voir « Basculement entre la vue de collage et la vue
d'horloge » à la page 27 pour plus de détails.
HAUT
Déplace vers le haut/augmente le volume.
ZOOMER AVANT
Appuyez sur ce bouton pour zoomer avant la photo
sélectionnée dans la vue simple.
OK/LECTURE ou PAUSE
Appuyez sur ce bouton pour confirmer une sélection,
démarrer ou arrêter la lecture de diaporama/musique.
VERS LA DROITE/SUIVANT
Déplace vers la droite ou passe à l'élément suivant.
RETOUR
Appuyez sur ce bouton pour annuler une action en cours
ou revenir à la dernière page.
POSITION ABAISSÉE
Déplace vers le bas/baisse volume.
Identification FR - 9
Page 60

Cadre de photos numériques GiiNii
La télécommande fournie est magnétique. Grâce à sa plaque
d'appui magnétique, vous pouvez la fixer à la zone supérieure
gauche à l'arrière du cadre de photos comme illustré ci-dessous.
FR - 10
Identification
Page 61

Cadre de photos numériques GiiNii
Remplacement de la pile de
télécommande
1. Appuyez sur la languette de blocage à la droite.
2. Extrayez le support de pile.
3. Insérez la nouvelle pile dans le support de pile. La pile doit
être placée avec la pôle positive orientée vers le haut, comme
indiquée dans l'illustration ci-dessous.
4. Glissez le support de pile dans la télécommande.
• Protégez la pile de surchauffe ou d'humidité excessive.
• L'omission de remplacer la pile de la manière appropriée peut
entraîner des dommages à la pile.
• Utilisez uniquement les piles approuvées indiquées.
• Recyclez ou éliminez adéquatement les piles usées selon les
directives et les régles locales.
• Ne jetez pas de piles dans le feu. Cela peut entraîner une explosion.
• Si la pile est complètement vidée ou la télécommande n'est pas en
cours d'utilisation pendant une longue période, retirez la pile pour
prévenir les fuites.
Positif orienté
vers le haut
Identification FR - 11
Page 62

Cadre de photos numériques GiiNii
Préparation
Utilisation du support arrière réglable
Extrayez complètement le support arrière, tel qu’illustré, pour
obtenir un angle d'affichage optimal.
• Il est recommandé de placer le cadre de photos horizontalement,
étant donné que la direction offre la meilleure expérience de
visionnement et d'utilisation.
• À l'aide des fentes suspendues, vous pouvez suspendre le cadre de
photos horizontalement ou verticalement sur un mur sans étendre
le support arrière réglable.
FR - 12
Préparation
Page 63

Cadre de photos numériques GiiNii
Branchement à l'alimentation
1. Placez votre cadre de photos sur une surface plane.
2. Branchez l'adaptateur de courant selon l'illustration ci-dessous
(1) et glissez l'interrupteur à la position « ON (activé) » (2).
• Les systèmes d'alimentation et les types de fiche peuvent varier
selon votre pays ou région.
• Pour désactiver le cadre de photos, glissez l'interrupteur à la
position « DÉSACTIVÉ ».
Lecture des vidéos préchargées
Votre cadre de photos numériques GiiNii est livré avec une
Library vidéo préchargée qui a 3 vidéoclips. La mise sous tension
du cadre de photos sans carte mémoire insérée démarre la
lecture des vidéos préchargés. Pour libérer plus d'espace de la
mémoire interne, vous pouvez supprimer les fichiers vidéo
depuis le mode Fichier. Voir « Mode Library vidéo » à la page 25
pour plus de détails.
• Les vidéos préchargés sont protégés contre la copie et ne peuvent
pas être reproduits vers un autre appareil.
• Effacer les vidéos du cadre de photos éliminera définitivement les
vidéos aussi bien que le mode Library vidéo du menu principal.
Préparation FR - 13
Page 64

Cadre de photos numériques GiiNii
Veuillez y penser soigneusement avant de le faire étant donné
qu'une fois supprimées, les vidéos sont perdues. Le cadre de
photos prend uniquement en charge les vidéos préchargées et ne
supporte aucune autre vidéo.
Insérez une carte mémoire
Pour lire vos propres fichiers d'image et de musique, insérez une
carte mémoire chargée d'images ou un lecteur flash USB dans la
fente correspondante du côté gauche du cadre de photos.
Pour insérer la carte mémoire :
Insérez la carte mémoire dans la fente de carte mémoire comme
illustrée ci-dessous.
SD / SDHC MultiMediaCard Memory Stick Memory Stick
xD-Picture
Card
FR - 14
Memory Stick
Duo
Memory Stick
PRO Duo
PRO
CompactFlash
Card
Préparation
Page 65

Cadre de photos numériques GiiNii
Formats de carte mémoire compatibles
Formats de carte mémoire
Secure Digital (SD
™
/ SDHC™)
microSD/microSDHC
(Un adaptateur de carte est nécessaire.)
miniSD/miniSDHC
(Un adaptateur de carte est nécessaire.)
™
™
(MS)
(MMC)
MultiMediaCard
Memory Stick
MS PRO Duo
(Un adaptateur de carte est nécessaire.)
™
xD-Picture Card
CompactFlash
• Les spécifications de capacité maximum énumérées ci-dessus sont
sujettes à changement sans préavis.
• Les fentes de carte mémoire 5-en-1 et CF supporte la fonction de
remplacement à chaud. En d'autres mots, vous pouvez modifier ou
retirer la carte mémoire lorsque l'alimentation du cadre de photos
est soit activée soit désactivée.
• Le cadre de photos prend en charge les systèmes d'exploitation
Windows et MAC. Cependant, lors du formatage de vos cartes
mémoires, utilisez les systèmes de fichier FAT16 et FAT32 dans
Windows uniquement. Le formatage des cartes mémoires avec
NTFS ou MAC n'est pas pris en charge.
(xD)
®
Card (CF)
Capacité
maximum
32 Gb
8 Gb
2 Gb
1 Gb
256 Mb
16 Gb
2 Gb
16 Gb
Préparation FR - 15
Page 66

Cadre de photos numériques GiiNii
Copie de fichiers à la mémoire interne
Lorsque le cadre de photos est activé et une carte mémoire (ou
un lecteur flash USB) a été insérée, l'écran suivant s'affiche
automatiquement.
■ Pour copier toutes les photos contenues dans la carte
mémoire insérée (ou le lecteur flash USB), sélectionnez Oui
et appuyez sur pour procéder.
■ Pour afficher vos photos sans les copier vers le cadre de
photos, surlignez Non et appuyez sur . Le cadre de
photos démarrera la lecture des images automatiquement à
partir de votre carte mémoire ou du lecteur flash USB.
Ne retirez pas la carte mémoire (ou le lecteur flash USB) avant que le
processus de copie soit terminé.
FR - 16
Préparation
Page 67

Cadre de photos numériques GiiNii
Utilisation du cadre de photos
Après avoir activé le cadre de photos, vous pouvez utiliser la
télécommande fournie ou utiliser les boutons de commande pour
faire fonctionner le cadre de photos.
■ Appuyez sur n'importe quel bouton sur la télécommande pour
faire apparaître la palette d'outils sur l'affichage à l'écran
(OSD). Procéder avec la fonction que vous souhaitez utilisez
en appuyant sur le bouton correspondant.
■ Appuyez sur n'importe quel bouton de commande pour faire
apparaître la palette d'outils sur l'affichage à l'écran. Lors de
l'utilisation des boutons de commande, appuyez sur le bouton
correspondant à l'icône indiqué à l'écran selon la fonction ou
l'ordre.
Palette d'outils sur l'affichage à l'écran de
mappage
Boutons de la télécommande
Les boutons de commande à l'arrière du cadre de photos
• La palette d'outils de l'affichage à l'écran se cache
automatiquement lorsque le cadre de photos est inactif. Vous
pouvez appuyez sur n'importe quel bouton pour faire apparaître la
palette d'outils.
• Dans le présent mode d'emploi, les consignes ou les exemples
fournis sont basés sur l'utilisation à l'aide de la télécommande.
Pour savoir comment utiliser les boutons de commande, reportezvous à « Utilisation des boutons de commande » à la page 6 pour
en savoir plus.
Utilisation du cadre de photos FR - 17
Page 68

Cadre de photos numériques GiiNii
Fonctionnement de base
Réglage de la date et de l’heure
1. La mise sous tension du cadre de photos démarre la lecture
des vidéos préchargés dans la Library vidéo. (si aucune carte
mémoire a été insérée).
2. Appuyez sur n'importe quel bouton pour faire apparaître la
palette d'outils sur l'affichage à l'écran.
3. Appuyez sur à maintes reprises jusqu'à ce que vous
reveniez au menu principal.
4. Appuyez sur / pour sélectionner Config., puis
appuyer sur .
5. Appuyez sur / pour sélectionner Config. Heure,
puis appuyer sur .
6. Appuyez sur ou pour passer à la Date actuelle.
a. Appuyez sur / pour définir l'année, puis
appuyer sur .
b. Appuyez sur / pour définir le mois, puis appuyer
sur .
FR - 18
c. Appuyez sur / pour définir la date, puis appuyer
sur .
Utilisation du cadre de photos
Page 69

Cadre de photos numériques GiiNii
7. Appuyez sur pour sélectionner Heure actuelle, puis
appuyer sur .
a. Appuyez sur / pour définir la date, puis appuyer
sur .
b. Appuyez sur / pour définir la minute, puis
appuyer sur .
c. Appuyez sur / pour sélectionner AM ou PM,
puis appuyer sur .
8. Pour revenir au menu principal, appuyez sur à maintes
reprises.
Utilisation du cadre de photos FR - 19
Page 70

Cadre de photos numériques GiiNii
Sélection d'un mode
Dans le menu principal, appuyez sur / pour basculer
parmi les modes suivants : Photo, Musique, Library vidéo,
Collage, Calendrier, Fichier, Source et Réglage.
Affichage de l'horloge
La vue de l'horloge offre quatre types de skin de l'affichage
d'horloge. Appuyez sur à deux reprises pour afficher la vue
de l'horloge. Sous la vue horloge, appuyez sur / pour
sélectionner un type souhaité.
Vue analogique - A
Vue numérique - A Vue numérique - B
Veuillez passer à « Configuration de l'heure » sous le mode «
Configuration » pour définir l'heure.
FR - 20
Vue analogique - B
Utilisation du cadre de photos
Page 71

Cadre de photos numériques GiiNii
Mode Photo
Le mode Photo vous permet d'afficher les images qui sont
enregistrées dans le cadre de photos (y compris la mémoire
interne et les favoris), dans une carte mémoire ou le lecteur flash
USB inséré.
Le cadre de photos prend en charge les formats de fichier JPEG
(*.jpg) et BMP (*.bmp).
Vue de diaporama
ou (de collage)/vue
d'horloge
Palette d'outils
sur l'affichage à
l'écran
Mode
en
cours
Déplacer vers le haut, le bas, la
gauche et la droite
Retour
Confirmer sélection
Photo
sélectionnée
actuellement
Liste de miniatures de photo
Utilisation du cadre de photos FR - 21
Page 72

Cadre de photos numériques GiiNii
Selection d'une photo
1. Après avoir entré le mode Photo, vous entrerez la vue
Miniatures avec vos photos enregistrées affichées dans 9
miniatures par page. Appuyez sur / / /
pour sélectionner une photo que vous souhaitez voir.
2. Pour afficher la photo sélectionnée en plein écran, appuyez
sur pour entrer dans la vue unique.
3. Pour pivoter la photo selon le sens horaire de 90 degrés à
chaque fois, appuyez sur .
Zoomer avant la photo
Vue de diaporama
ou (de collage)/
vue d'horloge
Palette d'outils sur
l'affichage à l'écran
Zoomer avant
Retour
Fichier précédent/suivant
Pivoter
Vue diaporama
FR - 22
Utilisation du cadre de photos
Page 73

Cadre de photos numériques GiiNii
1. Lorsqu'en vue unique, appuyez sur pour entrer dans la
vue Zoom.
2. Appuyez sur à maintes reprises pour zoomer avant la
photo sélectionnée.
3. Lorsque la palette d'outils sur l'affichage à l'écran disparaît,
appuyez sur / / / pour passer à une zone
particulière que vous souhaitez voir.
Lecture d'un diaporama
1. Lorsqu'en vue unique, appuyez sur pour entrer dans la
vue Diaporama.
2. Le diaporama des photos démarre automatiquement.
3. Au cours du diaporama, vous pouvez appuyer sur pour
copier la photo affichée actuellement vers la zone de disque
Favoris dans la mémoire interne.
4. Pour arrêter le diaporama et entrer dans une vue unique,
appuyez sur . Pour redémarrer le diaporama, appuyez
sur à nouveau.
Rotation d'une photo
automatiquement
Le cadre de photos comporte un capteur d'inclinaison intégré qui
permet la rotation automatique des photos. Repectez les
consignes ci-dessous pour activer la rotation automatique.
1. Lorsque le cadre de photos est placé en position horizontale,
pivoter le cadre de photos de 90 degrés selon le sens horaire
pour activer la rotation automatique.
Utilisation du cadre de photos FR - 23
Page 74

Cadre de photos numériques GiiNii
2. Lorsque le cadre de photos est placé en position verticale,
pivoter le cadre de photos de 90 degrés selon le sens
antihoraire pour activer la rotation automatique.
La fonction de rotation automatique affiche les photos selon une
orientation paysage ou portrait. Il ne réaligne pas les photos qui ont
été prises de côté.
Mode Musique
Le mode Musique vous permet d'écouter les fichiers de musique
qui sont enregistrés dans le cadre de photos (y compris la
mémoire interne et les favoris), dans une carte mémoire ou le
lecteur flash USB inséré.
Vue de diaporama
ou (de collage)/
vue d'horloge
Baisse/augmente le volume
Retour
Fichier précédent/suivant
Pause/reprendre lecture
Numéro de
piste
actuel/total
Temps de
lecture
actuel
Appuyez sur / pour sélectionner une piste et appuyez
sur pour démarrer la lecture de musique. Pour régler le
volume, appuyez sur / . Pour passer à la piste
précédente/suivante, appuyez sur / . Pour interrompre/
reprendre la lecture, appuyez sur .
FR - 24
Mode Musique
Page 75

Cadre de photos numériques GiiNii
Mode Library vidéo
Le mode Library Vidéo offre 3 vidéos préchargées enregistrées
dans la mémoire interne. Appuyez sur / pour
sélectionner une vidéo et appuyez sur pour démarrer la
lecture du vidéo.
Si vous souhaitez libérer plus d'espace de la mémoire interne,
vous pouvez supprimer les fichiers vidéo depuis le mode Fichier.
Cependant, cette action retire définitivement les vidéos du cadre
de photos et retire également le mode Library Vidéo depuis le
menu principal. Veuillez y penser soigneusement avant de le
faire étant donné qu'une fois supprimées, les vidéos sont
perdues. Le cadre de photos prend uniquement en charge les
vidéos préchargées et ne supporte aucune autre vidéo.
Pour supprimer les fichiers vidéo préchargés :
1. En mode Source, appuyez sur / pour sélectionner la
Mémoire Interne, puis appuyer sur .
Mode Library vidéo FR - 25
Page 76

Cadre de photos numériques GiiNii
2. En mode Fichier, appuyez sur / pour mettre en
évidence la vidéo non voulue et appuyez sur pour
sélectionner le fichier. Répétez cette étape pour ajouter plus
de fichiers.
3. Appuyez sur pour ouvrir le menu Édition du fichier.
Sélectionnez Supprimer et appuyez sur pour supprimer
les fichiers sélectionnés. Pour confirmer l'action, sélectionnez
OK et appuyez sur .
Mode Collage
Le mode Collage permet d'afficher les photos dans le diaporama
avec divers thèmes d'effets de collage. Appuyez sur /
pour sélectionner un thème et son effet de collage s'affichera
dans la fenêtre d’aperçu à la droite. Appuyez sur pour
démarrer la lecture dans votre vue Collage automatiquement.
FR - 26
Mode Collage
Page 77

Cadre de photos numériques GiiNii
Pour interrompre la lecture dans la vue Collage, appuyez sur
une fois. Appuyer sur à deux reprises démarre la
lecture en vue Diaporama normale (sans aucun effet de collage).
Basculement entre la vue de collage
et la vue d'horloge
Lorsque en vue Collage, vous pouvez appuyer sur à maintes
reprises pour basculer entre la vue Collage et la vue Horloge.
Lorsqu'en vue horloge, appuyez sur / pour sélectionner
le type d'horloge souhaité. Voir « Affichage de l'horloge » à la
page 20 pour plus de détails.
Si vous n'êtes pas en vue Collage, appuyez sur à maintes
reprises pour basculer entre la vue diaporama (sans aucun effet de
collage) et la vue horloge.
Mode calendrier
Après avoir entrer en mode Calendrier, l'heure et la date seront
illustrées à l'écran. Les images près du calendrier seront
affichées en diaporama.
Mode Collage FR - 27
Page 78

Cadre de photos numériques GiiNii
Appuyez sur / pour afficher le mois précédent/suivant.
Appuyez sur / pour passer à la photo précédente/
suivante.
Veuillez passer à « Configuration de l'heure » sous le mode
« Configuration » pour définir le calendrier.
Mode Source
Le mode Source vous permet de sélectionner la source d'images
ou de musique à afficher sur le cadre de photos. Appuyez sur
/ / / pour sélectionner parmi les options de
source suivantes :
■ Carte : affiche les fichiers image/musique enregistrés sur la
carte mémoire SD/SDHC, MMC, MS, MS PRO ou xD
insérée.
■ USB : affiche les fichiers image/musique sur le lecteur flash
USB inséré.
■ CF : affiche les fichiers image/musique sur la carte CF
insérée.
■ Mémoire Interne : affiche les fichiers image/musique
copiés sur la mémoire interne.
■ Les Favoris : affiche les fichiers image/musique copiés sur
la zone de disque des favoris dans la mémoire interne.
FR - 28
Mode Source
Page 79

Cadre de photos numériques GiiNii
Mode Fichier
Avant d'utiliser le mode Fichier, sélectionnez la source des fichiers à
partir de la mode Source d'abord. Reportez-vous « Mode Source » à
la page 28 pour plus de détails.
Le mode Fichier vous permet d'afficher les données sur les
fichiers qui sont enregistrées dans le cadre de photos (y compris
la mémoire interne, les favoris et la Library préchargée), dans la
carte mémoire ou le lecteur flash USB inséré, comme la taille de
fichier.
Vue de collage/
vue d'horloge
Palette d'outils sur
l'affichage à l'écran
Déplace vers
le haut/bas
Retour
Liste de fichiers
Sélectionner/
déselectionner
un fichier
Ouvrez un fichier
du menu Édition
Confirmer
sélection
Menu
Édition de
fichier
Données
sur le
fichier
Après avoir entrer en mode Fichier, appuyez sur / pour
sélectionner un fichier et son miniature ou ses données
apparaîtront dans la fenêtre d'aperçu à la droite.
Mode Fichier FR - 29
Page 80

Cadre de photos numériques GiiNii
Copie/Suppression de fichiers
1. Sélectionnez un fichier à modifier et appuyez sur pour
marquer le fichier sélectionné. Répétez cette étape pour
sélectionner plus de fichiers.
2. Appuyez sur pour ouvrir le menu Édition du fichier.
■ Sélectionnez Supprimer pour supprimer les fichiers
sélectionnés. Appuyez sur pour confirmer ou annuler
l'action.
■ Sélectionnez Copier puis appuyer sur pour choisir de
copier les fichiers sélectionnés vers la mémoire interne
(Copier vers la mémoire), vers la carte mémoire insérée
(Copier vers carte) ou vers le lecteur flash USB inséré
(Copier vers USB).
FR - 30
Mode Fichier
Page 81

Cadre de photos numériques GiiNii
Mode Configuration
Le mode Config. vous permet de régler les paramètres du
diaporama, de l'affichage, de l'heure, de l'effet de collage, du skin
horloge, les langues de l'affichage à l'écran, du démarrage et des
valeurs d'usine par défaut.
Vue de collage/
vue d'horloge
Palette d'outils sur
l'affichage à l'écran
Menu des options de Configuration
Déplace vers le haut, vers le bas
Retour
Retour au dernier sous-menu
Ouvrez le sous-menu
Confirmer
sélection
Mode Fichier FR - 31
Page 82

Cadre de photos numériques GiiNii
Options dans le mode Configuration
EnerGiiNii
Sélectionne un mode d'économie d'énergie pour votre cadre de
photos :
■ Désactivé : désactive la fonction EnerGiiNii.
■ Sur 50% : active la fonction EnerGiiNii. Lorsque activé, le
cadre de photos réduit automatiquement de 50% le niveau
de rétroéclairage de l'écran entre 21h00 et 7h00.
■ Sur 100% : active la fonction EnerGiiNii. Lorsque activé, le
cadre de photos désactive de 100% le niveau de
rétroéclairage de l'écran entre 21h00 et 7h00.
■ Économisez 20% : réduit le niveau de rétroéclairage de
20%.
■ Économisez 50% : réduit le niveau de rétroéclairage de
50%.
La qualité de la photo n'est pas affectée par l'utilisation de la fonction
EnerGiiNii.
Config. diapo
■ Durée intervalle : sélectionne la durée d'intervalle entre les
photos du diaporama.
■ Effet : sélectionne l'effet de transition.
■ Léger recadrage : sélectionne pour afficher les photos
sous format d'origine ou le plein écran.
■ Musique : sélectionne pour basculer la musique activée/
désactivée au cours de la lecture du diaporama.
Config. affichage
■ Saturation : sélectionne le niveau de saturation.
■ Luminosité : sélectionne le niveau de luminosité de
l'écran.
■ Contraste : sélectionne le niveau de contraste.
Collage
Sélectionne l'effet de collage privilégié pour la lecture du
diaporama parmi une liste de thèmes de collage préréglés.
FR - 32
Mode Fichier
Page 83

Cadre de photos numériques GiiNii
Config. Heure
Configure la date, l'heure actuelle et de l'alarme, le programme
activé/désactivé pour l'alarme « minuterie activée/désactivée » et
la « minuterie activée/désactivée ».
Si vous activez « Minuterie act/désact. » lorsque le cadre de photos
est mis en tension, le cadre de photos se met hors tension
automatiquement selon le programme « désactivé », puis redémarrer
selon le programme « activé ».
Vous pouvez également définir les anniversaires, la date de
mariage et les vacances pour activer automatiquement les effets
de collage sur ces jours indiqués.
Skin horloge
Définit le Skin horloge à appliquer dans la vue Horloge.
Langue
Définit la langue la palette d'outils sur l'affichage à l'écran.
Déf. par défaut
Renvoie tous les paramètres aux valeurs par défaut du système.
Config. démarrage
Définit le premier mode ouvert lors de la mise sous tension du
cadre de photos.
Propriété
Affiche la capacité restante ou totale dans la mémoire interne, le
nom de modèle et la version actuelle du logiciel.
Mode Fichier FR - 33
Page 84

Cadre de photos numériques GiiNii
Foire aux questions
Quels formats de carte mémoire sont compatibles
avec le cadre de photos?
Les formats de carte mémoire SD/SDHC, MMC, MS,
MS PRO, xD et CF sont compatibles avec le cadre de
photos. Pour en savoir plus, reportez-vous à «Formats
de carte mémoire compatibles » à la page 15.
Pourquoi certaines photos se chargent plus
rapidement que d'autres?
Les photos haute résolution chargent plus lentement.
L'utilisation d'une résolution inférieure lors de la prise de
photos accélérera la durée de charge.
FR - 34
Foire aux questions
Page 85

Cadre de photos numériques GiiNii
Réglementation et conformité
Avis de la Commission fédérale des communications (FCC)
Cet équipement a été testé et déclaré conforme selon les limites
pour un appareil numérique de Classe B en vertu de la section 15
des règlements de la FCC. Ces limites sont conçues pour fournir
une protection raisonnable contre l'interférence préjudiciable
dans une résidence. Cet équipement génère, utilise et rayonne
de l’énergie de radiofréquences et peut causer du brouillage
nuisible aux communications radio si non installé et utilisé selon
les instructions.
Cependant, la possibilité d'interférence d'une installation
particulière n'est pas entièrement exclue. Si cet appareil cause
de l'interférence à la réception radio ou télévisée, laquelle peut
être déterminée en éteignant et en allumant l’appareil, l'utilisateur
devrait essayer de corriger l'interférence en utilisant une des
mesures suivantes :
■ Réorienter ou repositionner l’antenne de réception.
■ Augmenter la distance entre l’appareil et le récepteur.
■ Brancher l’appareil dans une prise dont le circuit diffère de
celui dans lequel le récepteur est branché.
■ Se référer à un centre de service ou un technicien qualifié en
radio ou en télévision afin d’obtenir de l’aide.
Recyclage
■ Pour minimiser l'impact sur l'environnement, les piles fournies
avec le cadre de photos ne ne contiennent pas de mercure ou
de nickel-cadmium. Si possible, utilisez les méthodes de
recyclage disponible dans votre région lorsque vous vous
débarrassez des piles.
■ Le cadre de photos utilise des matériaux qui peuvent être
recyclés. Pour minimiser la quantité de rebut dans
l'environnement, informez-vous au sujet des compagnies qui
recyclent les télévisions, pour démanteler et collectionner le
matériel réutilisable, ou contactez votre détaillant pour des
conseils sur le recyclage.
■ Veuillez jetez le carton et le matériel d'emballage en utilisant
les systèmes de recyclage de votre région.
Réglementation et conformité FR - 35
Page 86

Cadre de photos numériques GiiNii
Annexe
Spécifications techniques
Ces spécifications sont sujettes à changement sans préavis.
Élément Description
Taille de l'écran Matrice active de 10,4 po (264 mm)
Format d'image 4:3
Interface de
panneau
Formats de
carte mémoire
compatibles
Lecteur flash
compatible
Format de
fichier image
compatible
Format de
fichier musique
compatible
Port USB Hôte USB (type-A)
Mini port USB
Compatibilité
USB 1.1/2.0
Mémoire interne
intégrée (pour
stockage de
données)
Fentes de carte
mémoire
Numérique
SD/SDHC, MMC, MS, MS PRO et xD (à l'aide
de la fente de carte mémoire 5-en-1)
CF (utilisation de la fente de carte mémoire
CF)
Lecteur flash USB (utilisation du port USB)
JPEG et BMP (jusqu'à 20 M pixels)
MP3 et WMA
Périphérique USB (mini-B)
Oui
512 Mb
Fente de carte mémoire 5-en-1
Fente de carte CF
FR - 36
Annexe
Page 87

Cadre de photos numériques GiiNii
Élément Description
Fonction
Oui
Collage de
photo
Fonction
Oui
Horloge
Fonction
Oui
Calendrier
Fonction
Oui
EnerGiiNii
Support arrière Réglable
Mode Lecture Naviguer plein écran, vue diaporama, vue
miniature et zoomer avant ou arrière
Langue de
soutien
Réglage
Anglais, français, espagnol, portuguais,
allemand, néérlandais et italien.
Oui
couleur
(correction
couleur ou
gamma)
Réglage de
Oui
luminosité
Réglage de
Oui
contraste
Rotation
Oui
automatique
(comportant un
capteur
d'inclinaison
intégré)
Annexe FR - 37
Page 88

Cadre de photos numériques GiiNii
Liste des cartes mémoires et lecteurs
USB compatibles
Ce ne sont pas toutes les cartes mémoires compatibles qui sont
indiquées dans le tableau ci-dessous. Pour le soutien technique,
communiquez avec votre centre de service le plus près pour
assistance.
Capacité
8 Mb
16 Mb
32 Mb
64 Mb Dick Smith
128 Mb Olympus
256 Mb Toshiba SanDisk Sony (MS)
512 Mb
SD miniSD microSD MMC MS xD
Panasonic
Toshiba
Panasonic
Pretec
Transcend
80X
Transcend Transcend Transcend
SanDisk Sony (MS) Olympus
FR - 38
Formats de carte mémoire
SanDisk
PQI MMC
Plus
Sony
(MS Duo)
Sony (MS)
SanDisk
(MS Duo)
Sony (MS)
Lexar (MS)
SanDisk
(MS PRO)
Olympus
(M type)
Fujifilm (M
type)
Kodak
Olympus
(M type)
Annexe
Page 89

Cadre de photos numériques GiiNii
Capacité
1GB
2 Gb
Formats de carte mémoire
SD miniSD microSD MMC MS xD
Transcend
SanDisk Kingston
Apacer 60X A-DATA
PhotoFast
Ultra
Panasonic
class 4
Kingston SanDisk
RiDATA
Panasonic
A-DATA Panasonic PQI
SanDisk
Toshiba
Silicon
Power 80X
Panasonic
class 2
Transcend
Apacer 60X
FDC
RiDATA
Panasonic
Stargem
SanDisk
Ultra II
Apacer
Transcend
RiTEK
Transcend
Kingston
Transcend
Transcend
RS MMC
SanDisk
(MS Duo)
SanDisk
(M2)
SanDisk
Ultra II
(MS Duo)
Olympus
(M type)
Fujifilm
(H type)
Fujifilm
(M type)
Fujifilm
(H type)
Olympus
(M type)
Olympus
(M+ type)
Annexe FR - 39
Page 90

Cadre de photos numériques GiiNii
Capacité
4 Gb
8 Gb
16 Gb
32 Gb PNY
SD miniSD microSD MMC MS xD
A-DATA
(SDHC)
Silicon
Power
class 6
Kingston
RiDATA
SanDisk
Toshiba
(SDHC)
Transcend
Transcend
(SDHC)
Toshiba
(SDHC)
Transcend
(SDHC)
A-DATA
(SDHC)
SanDisk
Apacer
Kingston
Transcend
class 6
Formats de carte mémoire
SanDisk
(microSDHC)
SanDisk
Sony
(MS Duo)
SanDisk
(MS Duo)
SanDisk
(M2)
SanDisk
(MS PRO
Duo)
FR - 40
Annexe
Page 91

Cadre de photos numériques GiiNii
Capacité
CF USB
16 Mb Nikon
32 Mb Kodak
64 Mb Kodak
PQI Hi-Speed
128 Mb
Kodak
Transcend
256 Mb Transcend
FDC Transcend JF110
1 Gb
A-DATA 80X
Transcend 133X A-DATA MY FLASH
SanDisk Ultra II Transcend JF V30
2 Gb
Kingston Elite Pro High Speed
FDC
4 Gb RiDATA 233X Kingston Data Traveler
8 Gb TOPRAM TDK
16 Gb Transcend 133X
Carte mémoire CF/lecteur flash USB
A-DATA MY FLASH
Transcend JF130
A-DATA
aigo L8202
Apacer AH321
Transcend JFV10
Annexe FR - 41
Page 92

Cadre de photos numériques GiiNii
<MEMO>
FR - 42
Annexe
Page 93

Portarretratos digital GiiNii
Derechos de autor
© GiiNii™ 2011. Todos los derechos reservados. Ninguna parte
de esta publicación puede ser reproducida, transmitida,
transcrita, almacenada en un sistema de recuperación o
traducida a ningún idioma o lenguaje informático de ninguna
forma o con ningún método, ya sea electrónico, mecánico,
magnético, óptico, químico, manual o cualquier otro, sin el
consentimiento previo por escrito de GiiNii
™
.
Renuncia de responsabilidad
GiiNii™ no otorga garantía alguna, de manera explícita o
implícita, con respecto al contenido de este documento y
renuncia expresamente a cualquier garantía, comerciabilidad o
adecuación para un propósito en particular. Además, GiiNii
reserva el derecho de revisar esta publicación y realizar
modificaciones periódicamente en el contenido de este
documento sin la obligación de notificar a ninguna persona sobre
dichos cambios o revisiones.
Instrucciones de seguridad
Antes de utilizar el portarretratos, lea detenidamente y siga las
instrucciones que aparecen a continuación.
■ Conserve este manual de usuario para consulta futura.
■ Antes de utilizar el producto, lea detenidamente las
instrucciones de seguridad y funcionamiento. Se deberán
tener en cuenta todas las instrucciones que aparecen en el
producto y en las instrucciones de funcionamiento.
■ No coloque este producto bajo la luz solar directa o cerca de
fuentes de calor, por ejemplo, en un automóvil cerrado
ubicado al sol o en una ubicación cercana a una estufa. La
cubierta exterior del producto podría deformarse y los
sensores sofisticados internos podrían sufrir daños causados
por el calor excesivo.
■ No utilice este producto cerca de agua o bajo la lluvia ni
permita que líquidos ingresen en el producto. El agua y la
humedad podrían causar cortocircuitos de los componentes
electrónicos y provocar un funcionamiento defectuoso.
™
se
Renuncia de responsabilidad ES - i
Page 94

Portarretratos digital GiiNii
■
No utilice este producto cerca de fuentes electromagnéticas
potentes, tales como un horno microondas. La interferencia
electromagnética podría causar un funcionamiento
defectuoso de este producto.
■ No deje caer ni someta el producto a impactos/vibraciones.
Los impactos fuertes podrían dañar los componentes
internos.
■ No inserte en las ranuras de tarjetas de memoria de este
producto objetos que no sean las tarjetas de memoria
compatibles. Los objetos extraños podrían dañar fácilmente
los contactos metálicos ubicados en el interior de las ranuras.
■ No utilice un adaptador de alimentación desconocido que no
sea el que se suministra con el portarretratos. La conexión del
producto a un adaptador de alimentación desconocido es
sumamente peligrosa y podría causar un incendio o
explosión.
■ No corte, doble, modifique, coloque objetos pesados ni pise el
cable del adaptador de alimentación. De lo contrario, podría
dañarse la aislación externa y derivar en un cortocircuito o
incendio.
■ Si existen olores extraños o calor provenientes de este
producto u otro signo de funcionamiento defectuoso,
desconecte de inmediato el portarretratos de la alimentación y
póngase en contacto con el distribuidor para su inspección o
servicio técnico.
■ Utilice un paño suave para limpiar la superficie de la pantalla.
No utilice limpiadores líquidos o limpiadores para vidrios.
■ Si una sustancia extraña o agua ingresa en el producto,
apáguelo de inmediato y desconecte el adaptador de
alimentación. Luego, extraiga la sustancia extraña o el agua y
envíe el producto al centro de servicio técnico más cercano.
■ No intente desarmar ni modificar el producto. No existen
piezas dentro del producto que el usuario pueda reparar.
Cualquier modificación no autorizada anulará la garantía.
■ A pesar de que el panel LCD está fabricado con tecnología de
alta precisión y posee un 99,99% o más de píxeles efectivos,
es posible que aparezcan de manera constante en el panel
LCD puntos de luz negros o brillosos (rojos, azules o verdes).
Ésta es una característica estructural del panel LCD y no
representa un funcionamiento defectuoso.
ES - ii
Instrucciones de seguridad
Page 95

GiiNii Digital Picture Frame
Tabla de contenido
Características principales . . . . . . . . . . . . . . . . . . . . . . . . . . . 1
Elementos incluidos en la caja . . . . . . . . . . . . . . . . . . . . . . . . 2
Identificación de las partes . . . . . . . . . . . . . . . . . . . . . . . . . . . 3
Vista izquierda . . . . . . . . . . . . . . . . . . . . . . . . . . . . . . . . . . . . 3
Vista posterior . . . . . . . . . . . . . . . . . . . . . . . . . . . . . . . . . . . . 5
Utilización de los botones de control . . . . . . . . . . . . . . . . . . . 6
Utilización del control remoto. . . . . . . . . . . . . . . . . . . . . . . . . 7
Reemplazo de la pila del control remoto . . . . . . . . . . . . . 11
Comienzo. . . . . . . . . . . . . . . . . . . . . . . . . . . . . . . . . . . . . . . . . 12
Utilización de la base posterior ajustable. . . . . . . . . . . . . . . 12
Conexión de la alimentación . . . . . . . . . . . . . . . . . . . . . . . . 13
Reproducción de los videos precargados . . . . . . . . . . . . . . 13
Inserción de una tarjeta de memoria . . . . . . . . . . . . . . . . . . 14
Formatos de tarjetas de memoria compatibles . . . . . . . . 15
Copiado de archivos a la memoria interna . . . . . . . . . . . 16
Utilización del portarretratos. . . . . . . . . . . . . . . . . . . . . . . . . 17
Operaciones básicas . . . . . . . . . . . . . . . . . . . . . . . . . . . . . . 18
Configuración de la fecha y hora. . . . . . . . . . . . . . . . . . . 18
Selección de un modo . . . . . . . . . . . . . . . . . . . . . . . . . . . 20
Visualización del reloj . . . . . . . . . . . . . . . . . . . . . . . . . . . 20
Modo Fotogr. . . . . . . . . . . . . . . . . . . . . . . . . . . . . . . . . . . . . . 21
Selección de una fotografía . . . . . . . . . . . . . . . . . . . . . . . . . 22
Cómo agrandar una fotografía . . . . . . . . . . . . . . . . . . . . . . . 22
Reproducción de una presentación . . . . . . . . . . . . . . . . . . . 23
Giro automático de las fotografías . . . . . . . . . . . . . . . . . . . . 23
Modo Música . . . . . . . . . . . . . . . . . . . . . . . . . . . . . . . . . . . . . 24
Modo Biblioteca de videos . . . . . . . . . . . . . . . . . . . . . . . . . . 25
Modo Collage . . . . . . . . . . . . . . . . . . . . . . . . . . . . . . . . . . . . . 26
Cómo cambiar entre la vista de collage y la vista de reloj . . 27
Modo Calendario. . . . . . . . . . . . . . . . . . . . . . . . . . . . . . . . . . . 27
Tabla de contenido ES - iii
Page 96

GiiNii Digital Picture Frame
Modo Fuente . . . . . . . . . . . . . . . . . . . . . . . . . . . . . . . . . . . . . . 28
Modo Archivo . . . . . . . . . . . . . . . . . . . . . . . . . . . . . . . . . . . . . 29
Copiado/eliminación de archivos . . . . . . . . . . . . . . . . . . . . . 30
Modo Config. . . . . . . . . . . . . . . . . . . . . . . . . . . . . . . . . . . . . . 31
Opciones del modo Config.. . . . . . . . . . . . . . . . . . . . . . . . . . 32
Preguntas frecuentes . . . . . . . . . . . . . . . . . . . . . . . . . . . . . . . 34
Regulación y cumplimiento . . . . . . . . . . . . . . . . . . . . . . . . . . 35
Reciclaje. . . . . . . . . . . . . . . . . . . . . . . . . . . . . . . . . . . . . . . . . .35
Apéndice . . . . . . . . . . . . . . . . . . . . . . . . . . . . . . . . . . . . . . . . .36
Especificaciones . . . . . . . . . . . . . . . . . . . . . . . . . . . . . . . . . . 36
Lista de tarjetas de memoria y unidades USB compatibles . 38
ES - iv
Tabla de contenido
Page 97

Portarretratos digital GiiNii
Estimado cliente:
Gracias por adquirir nuestro portarretratos digital GiiNii para su
hogar. Este producto le permitirá visualizar su biblioteca de
fotografías digitales en crecimiento con una calidad asombrosa y
además compartir grandes recuerdos con amigos y familiares.
También, no se olvide de ver nuestros videos de instrucción
sobre CÓMO ACTIVAR y CÓMO PROGRAMAR el
Portarretratos digital en www.giinii.com bajo las Preguntas
frecuentes.
Características principales
El portarretratos posee las siguientes características:
■ Fotografías nítidas y con brillo.
■ Permite reproducir archivos de imágenes y música
almacenados en una tarjeta de memoria o unidad flash USB.
■ A través de la función EnerGiiNii, permite seleccionar un
modo de ahorro de energía para el portarretratos.
■ Permite reproducir imágenes en un modo de presentación
con música y diferentes efectos de collage.
■ Permite establecer el temporizador automático de encendido/
apagado.
■ Incluye menús de visualización en pantalla (OSD, por sus
siglas en inglés) en varios idiomas
Características principales ES - 1
Page 98

Portarretratos digital GiiNii
Elementos incluidos en la caja
Abra con cuidado la caja y asegúrese de que contenga los
siguientes elementos.
1. Portarretratos digital x 1
2. Adaptador de alimentación CA x 1
3. Control remoto magnético (incluye pila de litio CR2025) x 1
4. Guía de inicio rápido x 1
5. Manual de usuario x 1
6. Tarjeta de registro x 1
• La apariencia real del producto puede variar de aquella que aparece
en las ilustraciones de este manual de usuario.
• Los accesorios disponibles podrían variar en función del área en la
que se adquiera el portarretratos.
ES - 2
Elementos incluidos en la caja
Page 99

Portarretratos digital GiiNii
Identificación de las partes
Vista izquierda
456
Núm. Descripción
Ranura para tarjetas de memoria CF
1
Permite insertar una tarjeta de memoria CompactFlash
(CF). Puede reproducir los archivos de música/fotos
almacenados en la tarjeta de memoria insertada o
copiar archivos de música/fotos desde o hacia la tarjeta
de memoria insertada. Consulte "Inserción de una
tarjeta de memoria" en la página 14 para más detalles.
1
2
3
Identificación de las partes ES - 3
Page 100

Portarretratos digital GiiNii
Núm. Descripción
Ranura para tarjetas de memoria 5 en 1
2
Permite usar tarjetas de memoria SD
MultiMediaCard
Stick PRO
reproducir los archivos de música/fotos almacenados en
la tarjeta de memoria insertada o copiar archivos de
música/fotos desde o hacia la tarjeta de memoria
insertada. Consulte "Inserción de una tarjeta de
memoria" en la página 14 para más detalles.
Puerto USB
3
Permite insertar una unidad flash USB. Puede
reproducir los archivos de música/fotos almacenados en
la unidad insertada.
Puerto mini USB
4
Permite conectar el portarretratos a una computadora
con el fin de transferir los archivos de la computadora al
portarretratos.
Interruptor de encendido/apagado
5
Deslice el interruptor de encendido/apagado para
encender o apagar el portarretratos. Consulte
"Conexión de la alimentación" en la página 13 para más
detalles.
Conector de alimentación
6
Conecte un extremo del adaptador de alimentación CA
al conector de alimentación y enchufe el otro extremo a
un tomacorriente.
™
™
(MMC), Memory Stick™ (MS), Memory
™
(MS PRO) y xD-Picture Card™ (xD). Puede
/ SDHC™,
ES - 4
Identificación de las partes
 Loading...