

Page 1

GiiNii GN-818 Digital Picture Frame
Cadre photo numérique GiiNii GN-818
Marco de fotos digital GiiNii GN-818
User Manual
Manuel d'utilisation
Manual de usuario
Version 1.0
www.giinii.com
© 2009 GiiNii International
Page 2

Page 3

Table of Content
Chapter 1: How to Get Started! .....................................................3
Connecting to Power and Turn on to play .................................... 3
Functional Buttons........................................................................ 3
Zoom in / Zoom out / Pan Function in slideshow mode ............... 6
Playing Pictures............................................................................ 6
Chapter 2: Menu Options ...............................................................7
1. Calendar ...................................................................................7
In this main menu, select Calendar, press OK to enter, then ... 7
2. Clock ........................................................................................ 8
In main menu, select Clock, press OK to enter, then ............... 8
3. Photo ........................................................................................ 8
In main menu, select Photo, press OK to enter, then ............... 8
4. Memory Source ...................................................................... 10
In main menu, select Memory Source, press OK to enter, then ...10
5. Setting ....................................................................................10
Chapter 3: Frequently Asked Questions ...................................14
Chapter 4: Product Specication ...............................................15
Chapter 5: Regulatory Issues & Warranty .................................16
Regulation & Compliance ........................................................... 16
GiiNii 90-Day Limited Warranty .................................................. 16
Replacement Parts ..................................................................... 19
Page 4

Table des matières
Chapitre 1 : Comment démarrer ! .................................................3
Alimentation et activation de la lecture ......................................... 3
Boutons fonction........................................................................... 3
Zoom avant / Zoom arrière / fonction panoramique en mode
diaporama .................................................................................... 6
Lectures des photos ..................................................................... 6
Chapitre 2 : Options du menu .......................................................7
1. Calendrier ................................................................................. 7
Dans ce menu principal, sélectionnez Calendrier, puis appuyez
OK pour y accéder. ...................................................................7
2. Horloge ..................................................................................... 8
Dans ce menu principal, sélectionnez Horloge, puis appuyez
OK pour y accéder ...................................................................8
3. Photo ........................................................................................ 8
Dans ce menu principal, sélectionnez Photo, puis appuyez OK
pour y accéder. ......................................................................... 8
4. Source mémoire ..................................................................... 10
Dans ce menu principal, sélectionnez Source mémoire, puis
appuyez OK pour y accéder. ..................................................10
5. Conguration .......................................................................... 10
Chapitre 3 : Foire Aux Questions ................................................14
Chapitre 4 : Caractéristiques produit .........................................15
Chapitre 5 : Réglementations et Garantie ..................................16
Conformité aux réglementations ................................................ 16
Garantie limitée de 90 jours GiiNii .............................................. 16
Pièces de rechange.................................................................... 19
Page 5

Índice
Capítulo 1: Primeros pasos ........................................................... 3
Conexión de la alimentación y encendido del dispositivo para
iniciar la reproducción .................................................................. 3
Botones de uso ............................................................................ 3
Función Acercar / Alejar / Desplazar en el modo de presentación .....6
Reproducción de imágenes.......................................................... 6
Capítulo 2: Opciones del menú ..................................................... 7
1. Calendario ................................................................................ 7
Seleccione la opción Calendario en el menú principal, pulse el
botón OK para acceder a ella y, a continuación ....................... 7
2. Reloj .........................................................................................8
Seleccione la opción Reloj en el menú principal, pulse el
botón OK para acceder a ella y, a continuación ....................... 8
3. Fotografías ...............................................................................8
Seleccione la opción Fotografías en el menú principal, pulse
el botón OK para acceder a ella y, a continuación ................... 8
4. Fuente memoria .....................................................................10
Seleccione la opción Fuente memoria en el menú principal,
pulse el botón OK para acceder a ella y, a continuación .......... 10
5. Conguración .........................................................................10
Capítulo 3: Preguntas más frecuentes ...................................... 14
Capítulo 4: Especicaciones del producto ............................... 15
Capítulo 5: Aspectos administrativos y garantía .....................16
Normativa y conformidad ........................................................... 16
Garantía limitada de 90 días ofrecida por GiiNii......................... 16
Piezas de repuesto..................................................................... 19
Page 6

Dear Customer,
Thank you for bringing our GiiNii digital picture frame into your home.
Now you can view your growing digital picture library in stunning
clarity and share great memories with friends and family.
To get the most out of your new GiiNii product, please read through
this entire Owner’s Manual before using. Chapter 1: How to Get
Started. Chapter 2: Menu Options. Chapter 3: Frequently Asked
Questions.
Also, please check out our online video tutorials on HOW TO START
and HOW TO PROGRAM your new picture frame at www.giinii.com
under PRODUCTS and scroll down to TUTORIALS.
For 24/7 GiiNii Customer Service, please call: 1-866-909-3550.
Sincerely,
The GiiNii Team
1
Page 7

English
Key Features
• EnerGiiNii provides four intelligent ways of power consumption
management
• Play photo with collage mode (Single-Photo, Multi-Photo,
Valentine’s Day , Mother’s Day, Father’s Day, Christmas, Wedding
and Birthday)
• Built-in 512MB memory to store your pictures, available storage
capacity will be less
• Support the most popular memory cards: SD, MS, MS Pro, MMC,
XD
• Thumbnail view and slideshow effect
• Collage display
• Auto Picture Rotation (Angle switch)
• 2 Way Wall Mount Capability
What’s in the Box
• GiiNii 8” Digital Picture Frame with twelve pre-installed photos of
National Parks Library
• One Power Adapter (5V/1.5A)
• User Guide and Quick Start Guide
• Registration Card
• Warranty Card
2
Page 8

English
Chapter 1: How to Get Started!
Connecting to Power and Turn on to play
The power connector is on the back middle left side of the GiiNii
Digital Photo Frame. Insert the DC jack into the device, and plug the
AC cord into an electrical outlet.
Slide the power button on the back upper left side to turn on the photo
frame and the slideshow of National Parks will start automatically.
Functional Buttons
The buttons used for operating your device are located on the back
of the photo frame. The buttons can be used to drive all functions of
the on-screen menu.
3
Page 9
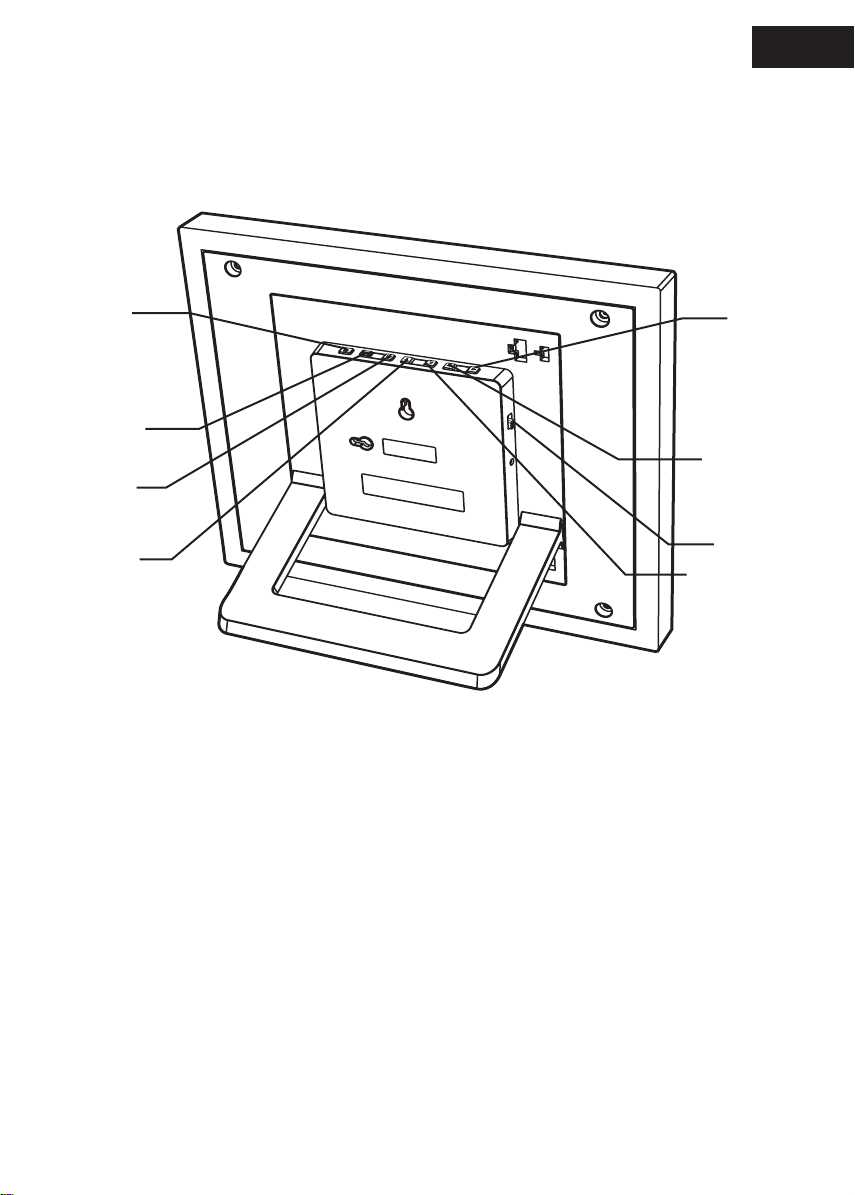
Rear View
English
G
Exit
OK
Down
Left
SD/xD/ MS/MMC/MMC+
OFF ON
DC IN5V
Right
Power
Up
4
Page 10
English
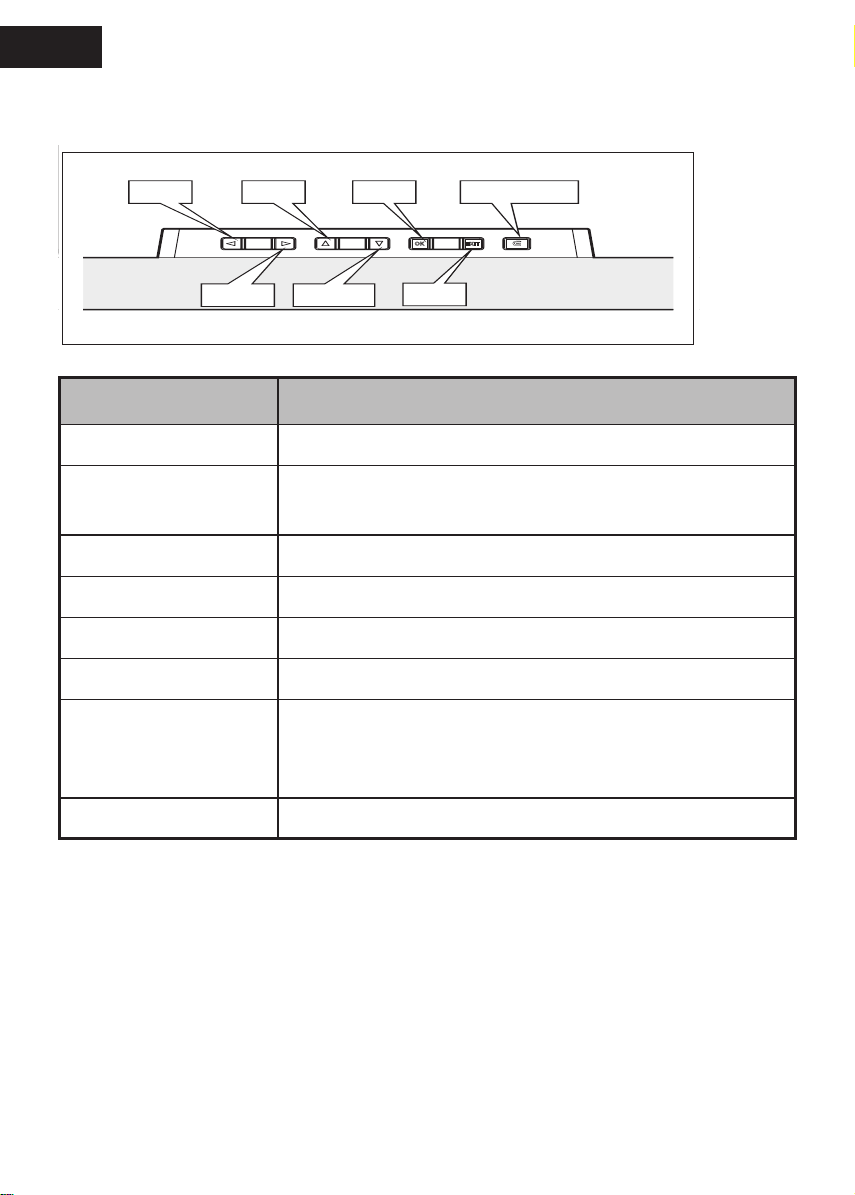
Vertical View
Left
Left UP OK -G button
Up OK G-button
Down
Rihgt
Right
Down
Buttons Description
Power Slide to Power on/off
OK
EXIT
Exit
EXIT
G-button
Press to play slideshow in any mode
Change between photo and clock
Up Previous menu item
Down Next menu item
Left Short Press: Previous item
Right Short Press: Next item
1. Short Press: Validate process/enter/play/
OK
pause
2. Long Press: Full screen
Exit Go back to previous menu
5
Page 11

English
Zoom in / Zoom out / Pan Function in slideshow mode
Press OK key to main menu. Press G button to slideshow. Press left/
right key to change slideshow photo, and enter photo view (photo in
pause state). Pause icon will disappear after 3s if there’s no action.
Press Up or Down key to Zoom in/out.
Press OK key to pan and use Pan Function to move up/ down/ left/
right key.
Press OK or Exit key to photo slideshow again.
Playing Pictures
Your picture frame is equipped with 512MB internal memory and
twelve pre-loaded photos of National Parks Library. The photos will
automatically start playing when there is no memory card inserted
and no supported les in internal memory.
To play your own content, insert a memory card containing photos
into the card slot on the right side of your picture frame and your
pictures will start to play automatically.
Helpful Tips
• This device supports following memory cards: SD, MS, MS
Pro, MMC, XD.
• For further information on supported memory card types
and le formats, please refer to the Product Specications.
6
Page 12

English
Chapter 2: Menu Options
The menu options are: Calendar, Clock, Photo, Memory Source and
Setting. To set the date, go to Date and Time in Setting.
2.1 Calendar
In main menu, select Calendar, press OK to enter, then
• Press Left or Right to view month. It will automatically advance or
go this month to next when you press and hold Left or Right.
• Press OK to view your selection in full screen.
• In current month, press OK to go back to Calendar menu.
• To set the Date, please go into the Setting menu and then in the
submenu of Date and Time.
7
Page 13

English
2.2 Clock
In main menu, select Clock, press OK to enter, then
• There are three different skins or clock display, use Left or Right
to select, and press OK to display clock in full screen.
• In full screen mode, press Left or Right to switch in different skins
for clock display. Press OK to go back to Clock menu.
• To set the Time, please go into the Setting menu and then in the
submenu of Date and Time.
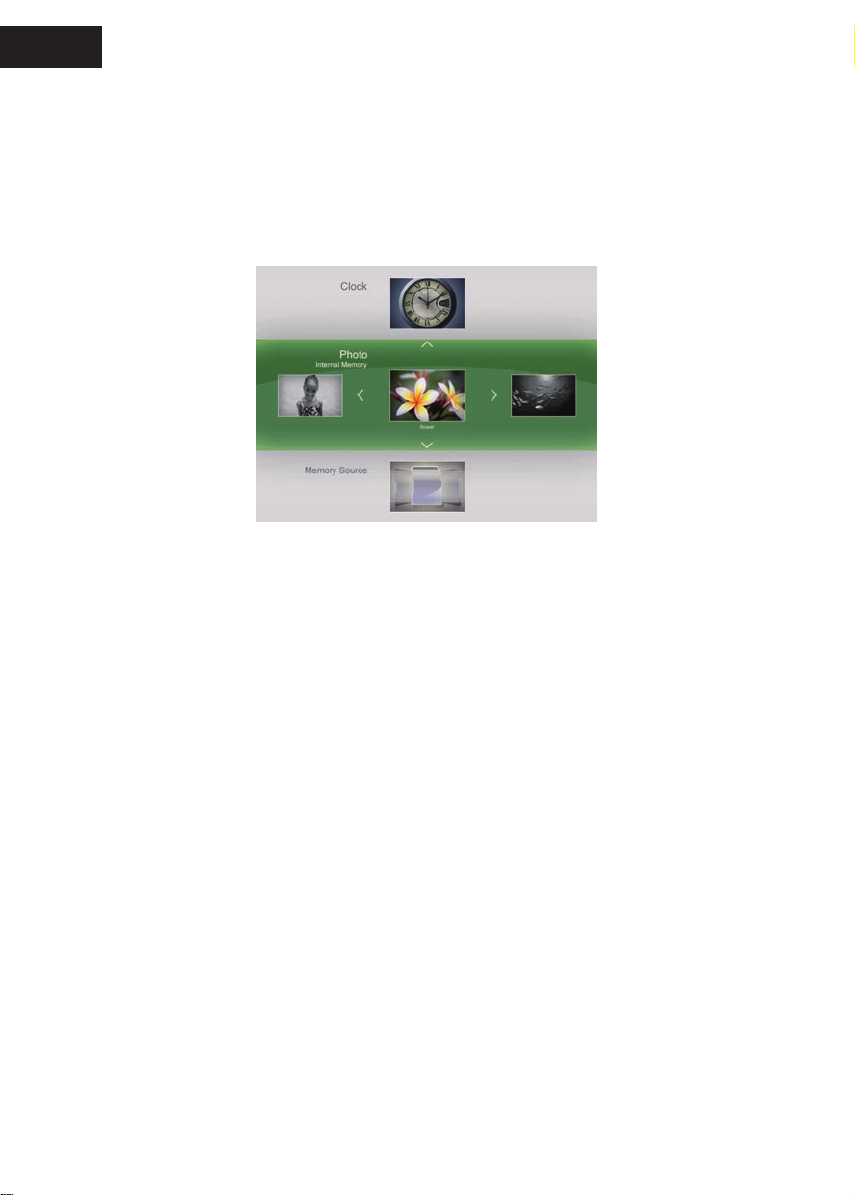
2.3 Photo
In main menu, select Photo, press OK to enter, then
• Press Left or Right to select a photo.
• Photos will automatically slide one by one when Left or Right is
pressed and held. Long press OK to play slideshow.
8
Page 14
English
• There are seven items for you to edit photos: Color effects,
Contrast, Brightness, Delete, Rotate, Ratio, and Copy. Photos in
National parks library can not be edited. Once a memory card is
inserted or there are photos in internal memory, these features can
be seen in the Photo sub-menu.
Color Effects: Sepia, Normal, Black and White
Contrast: Contrast-2, Contrast-1, Normal, Contrast+1, Contrast+2
Brightness: Brightness-2, Brightness-1, Normal, Brightness+1,
Brightness+2
Delete: Yes or No
Rotate: Rotation-90, Normal, Rotation+90, Rotation+180
Ratio: Full screen and Actual size
Copy: To Internal Memory, to Favorite, to a USB drive, to a
Memory card.
• With Up or Down to select, OK to conrm, photos can be easily
edited to your satisfaction.
9
Page 15

English
2.4 Memory Source
In main menu, select Memory Source, press OK to enter, then
• Press Left or Right to select photo source. Press OK to slideshow
the photos in the corresponding memory source.
• There are ve items for you to choose: Internal Memory, the 5 IN 1
memory card reader, National Parks Library, Favorite, USB drive.
• The photos in the National Parks Library will automatically start
playing when there is no memory card inserted or no supported
les in internal memory.
2.5 Setting
In this menu, you may access the following: Date and Time,
Slideshow Setting, General Setting, Collage Setting, Information
and Upgrade All.
2.5.1 Date and Time
Use Left or Right to adjust date and time: Minute, Hour, AM/PM,
Day, Month and Year.
10
Page 16
English
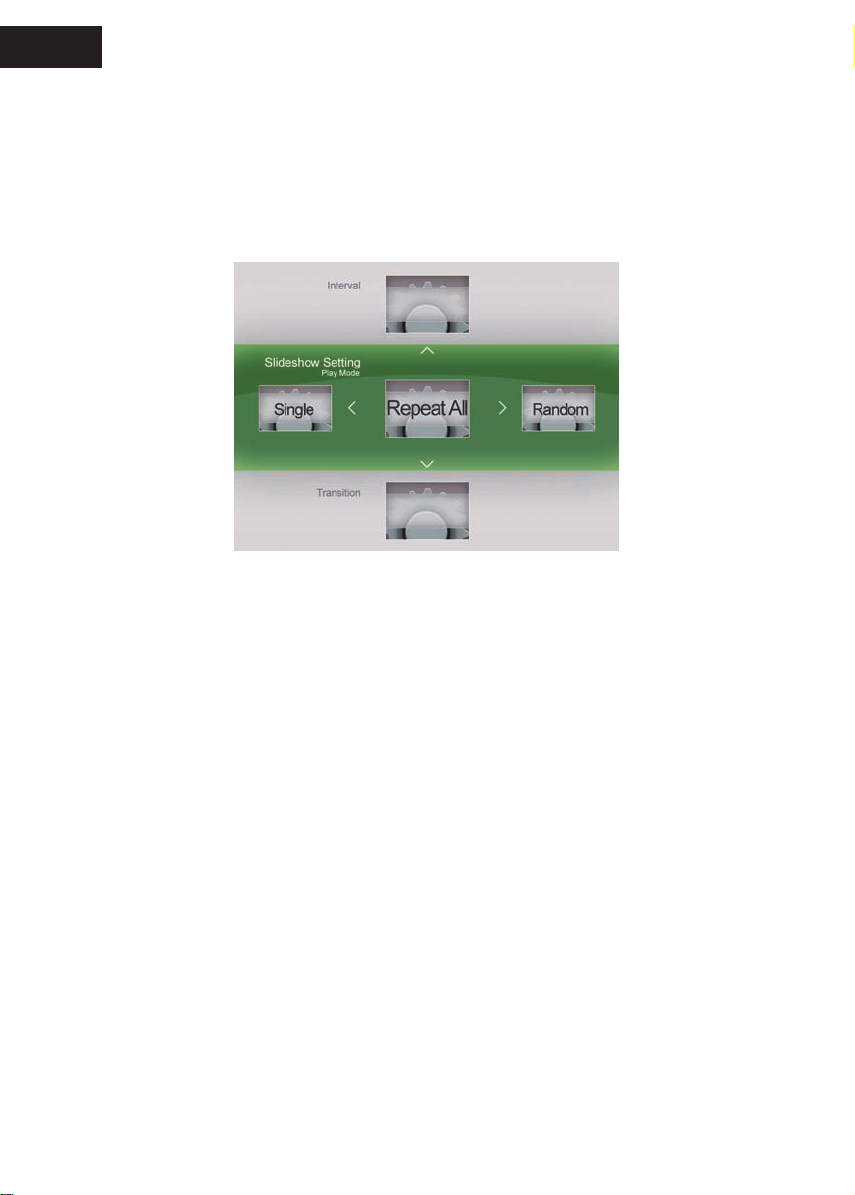
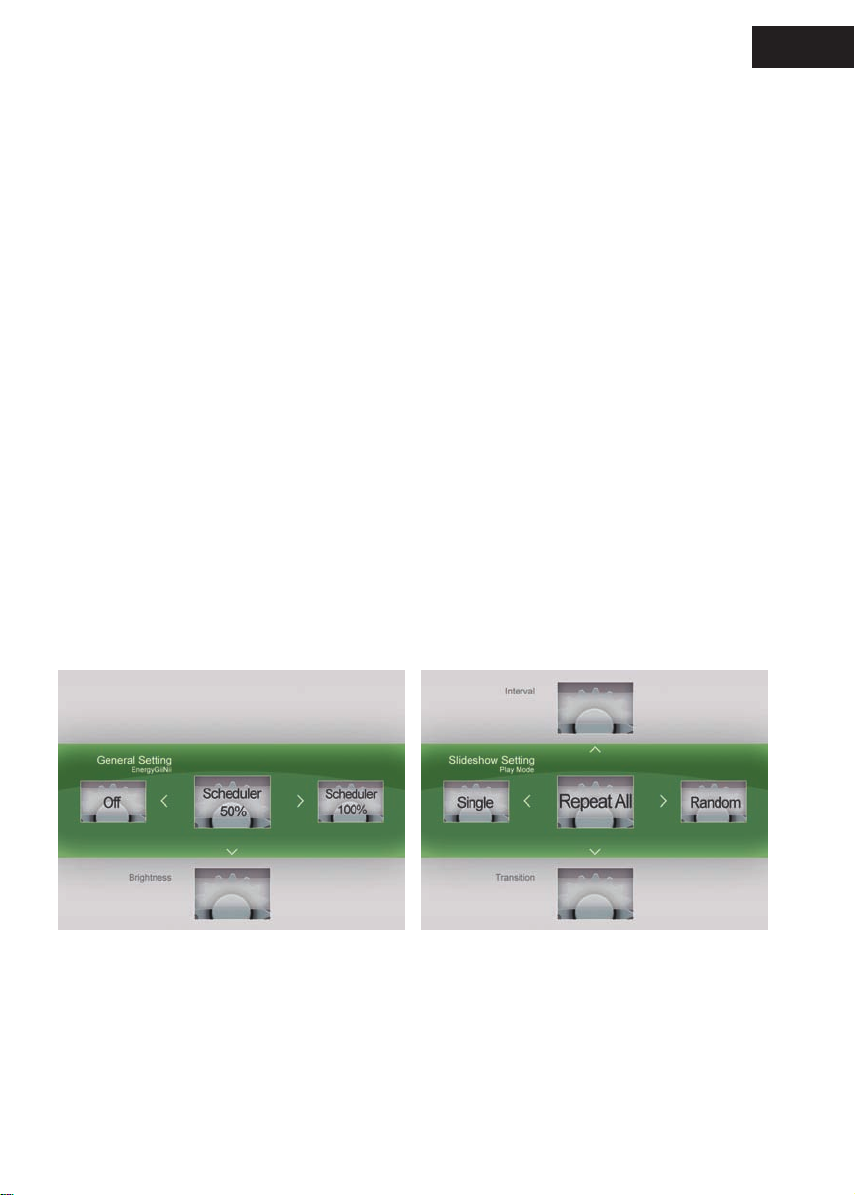
2.5.2 Slideshow Setting
In Slideshow Setting, Interval, Play Mode, Transition can be edited.
Interval: 3 Seconds, 10 Seconds, 30 Seconds, 1 Minute
Play Mode: Single, Repeat All or Random
Transition: Random, 3D circle, 3D Float, Shutter, Insert, Leave,
News, Plus Sign, Cross Comb, Fade, Reel, Wave, Blockip
2.5.3 General Setting
There are six items for General Setting: EnerGiiNii, Brightness,
Language, Reset, Delete all and Smart Copy.
EnerGiiNii: Off / Scheduler 50% / Scheduler 100% / Save 20% /
Save 50%
When EnerGiiNii Off is enabled, this unit will operate at full power
consumption full-time.
11
Page 17
English
When you select Scheduler 50% or Scheduler 100%, this unit will
automatically operate at low power consumption during nighttime
(21:00PM~7:00AM), and will resume normal during daytime (7:00AM ~
21:00PM);
When you select Save 20% or Save 50%, it will operate at that
indicated power consumption rate full-time.
When EnerGiiNii is enabled, slideshow photos quality is not affected.
Brightness: Darker, Normal, Brighter
Language: English / Français / Deutsch / Español / Nederlands/
Português / Italiano
Reset: Yes or No
Delete all: Internal, Favorite
Smart Copy: Original, Album (Resize)
2.5.4 Collage Setting
Play photo with collage mode (Single-Photo, Multi-Photo, Valentine’s
Day, Mother’s Day, Father’s Day, Christmas, Wedding and Birthday).
12
Page 18

English
Use Left or Right to choose your favorite selections.
Press OK to save the setting and go to the slideshow in
corresponding collage.
If you do not want to select a collage, please select the Single-Photo.
2.5.5 Information
You can view software version, memory total, and memory free
details in this menu.
2.5.6 Upgrade All
If there is an upgrade to your Digital picture frame software, you can
contact the GiiNii customer service center and you will be guided on
where to download the upgrade and how to install it. You must use
a SD card with the upgrade software to upgrade the digital picture
frame. If you hit OK when there is no SD card inserted the unit will
have no response and wait for your next action.
13
Page 19

English
Chapter 3: Frequently Asked Questions
This product has been set to its standard mode of operations before
shipping. If you encounter any problems, please refer to the following
Q&A for solutions.
Q: Device will not power on.
A: 1. Slide the power button to power on.
2. If no response, make sure the power adapter is connected
properly to the device and outlet.
3. If still no response, make sure local voltage supports your
power adapter.
Q: Nothing happens when I insert a Memory Card.
A: 1. This device supports following memory cards: SD, MS, MS
Pro, MMC, XD.
2. Make sure Photo le formats are in the supported le formats.
3. If item 1 & 2 are both supported, try to backup card les, format
the card, copy the backup les to the memory card again to
play.
14
Page 20

English
Chapter 4: Product Specication
Aspect Ratio 4:3
Resolution 800 × 600 pixels
Display
Brightness 250 cd/m
Contrast Ratio 500:1
2
Viewing angle
Horizontal: -60° ~ 65° (Left to Right)
Vertical: -70° ~ 70° (Down to Up)
Card reader 5 in 1 card reader *1 (SD, MS, MS Pro, MMC, XD)
Photo
Baseline JPEG, photo format supported up to 20 M
pixel.
Connectivity USB Host (Type-A), USB 1.2/2.0 Compliant.
Features
Auto Picture Rotation (Angle switch)
Photo Playback
15
Page 21

English
Chapter 5: Regulatory Issues & Warranty
Regulation & Compliance
This equipment has been tested and found to comply with the limits for a
Class B digital device, pursuant to Part 15 of the FCC Rules. These limits
are designed to provide reasonable protection against interference in a
residential installation. This equipment can radiate radio frequency energy
and, if not installed and used in accordance with the instructions, may
cause interference to radio communications.
However, there is no guarantee that interference will not occur in a
particular installation. If this equipment does cause interference to radio or
television reception, which can be determined by turning the equipment off
and on, the user is encouraged to try to correct the interference by one of
the following measures:
• Reorient or relocate the receiving antenna.
• Increase the separation between the radio or television and Digital
Picture Frame.
• Connect the Digital Picture Frame into an outlet on a circuit different from
that to which the radio or television is connected.
• Consult the dealer or an experienced radio/TV technician for help.
GiiNii 90-Day Limited Warranty
Please read this Limited Warranty carefully. The limited warranty set forth
below is given by GiiNii, the maker of your new digital picture frame, when
purchased in the United States of America through an authorized retailer
and used for non-commercial purposes. We warranty this product against
manufacturing and material defects for a period of 90 days from the date of
purchase. Do not return your product to the retailer for warranty claims.
16
Page 22

English
1. Please maintain the Warranty Statement in a safe place along with your
dated sales receipt. Please retain the original box in the event you need
to make a warranty claim. Returning your product for a warranty claim
in best done in the original box or an alternative package that ensure its
safe return to GiiNii. Please contact our Customer Service team about
the appropriate return-shipping package.
2. GiiNii Customer Service and Technical Support: 1-866-909-3550. On
line at: www.giinii.com or e-mail: customersupport@giinii.com.
3. Parts and Labor Coverage. During the rst 90 days of ownership, GiiNii
will repair or replace the product, at its option, at no charge if the product
is found to be defective due to material or manufacturing defects. GiiNii
will provide a new product of similar or greater value at its discretion.
Or, provide new or rebuilt replacement parts at its sole discretion.
Replacement or repair of one part of the product does not constitute
replacement or repair of other parts of the product. The customer
bears the responsibility to ship the product back to GiiNii, at their cost.
Pending review of the product, that shipping cost will be refunded
to the customer. To make a warranty claim, you must first contact
Customer Service and receive a Return Authorization Code. No repairs
or replacements can be made without a Return Authorization Code or
a copy of a receipt indicating date of purchase after the rst 90 days of
ownership, repair costs are the responsibility of the owner.
4. Excluded Items Not Covered by the Warranty
• Cosmetic damage or damages due to accident, misuse, abuse or
negligence;
• Commercial use of the product;
• Damage due to improper operation, improper maintenance,
improper power supply;
• Customer inability to read, understand the provided instructions on
how to properly use the product;
17
Page 23

• Modications of any part of the product in any way;
• Damage resulting from unauthorized attempted repair of the product;
• Damage resulting from acts of nature or God.
To make a Warranty Claim please have the following items
• Your original dated proof of purchase from an authorized retailer in
the United States or territories.
• Your original package that your product was sold in. Your warranty
claim will not be honored without the original purchase receipt. If you
do not have the original package, please consult with our Customer
Service team to determine the best way to return your product to
us. GiiNii cannot be responsible for damages incurred during return
shipping; insurance is highly recommended.
• Please provide written statement (typed or printed in block letters)
that describes why your product is defective. On this document,
English
you will need to include the Return Authorization Code provided
by Customer Service, as well as your Name, return address, and
a daytime phone number. Return shipments to GiiNii should be
insured and sent via Registered Mail with proof of delivery.
Warranty Disclaimers
GiiNii and its parent company, afliates or subsidiaries shall not be liable
for any incidental or consequential damages for breach of any expressed
or implied warranty on this product. Except to the extent prohibited by
applicable law, any implied warranty of merchantability or tness for a
particular purpose on this product is limited in duration to the duration of this
warranty. Application of this warranty may vary by state; this warranty gives
you specic legal rights and you may have others based on the state you
live in.
18
Page 24

English
Replacement Parts
If you need a replacement part for your GiiNii Digital Picture Frame, call us
at 1-866-909-3550 or write to us at: customerservice@giinii.com.
Warning
Changes or modications to this unit not expressly approved by GiiNii
voids this warranty and may result in personal injury and/or property.
19
Page 25

Français
Cher client,
Merci d'accepter le cadre photo numérique de GiiNii dans votre foyer.
Vous pouvez désormais afcher la bibliothèque grandissante de vos
photos numériques en bénéciant d’une étonnante clarté, et partager
ainsi vos plus beaux souvenirs avec vos amis et votre famille.
Pour proter de toutes les qualités de votre nouveau produit GiiNii,
veuillez lire attentivement l’ensemble du Manuel du propriétaire avant
de l’utiliser. Chapitre 1 : Comment démarrer. Chapitre 2 : Options du
menu. Chapitre 3 : Foire Aux Questions.
Consultez également notre tutoriel vidéo en ligne COMMENT
DÉMARRER et COMMENT PROGRAMMER votre nouveau cadre
photo sur, sous la rubrique PRODUITS, dans le menu déroulant
TUTORIELS.
Pour joindre le Service Client GiiNii 24h/24, 7j/7, veuillez appeler le
1-866-909-3550.
Respectueusement,
L’équipe GiiNii
1
Page 26

Français
Principales caractéristiques
• EnerGiiNii offre quatre moyens intelligents de gestion de la
consommation d'énergie
• Lecture photo en mode collage (Solo-Photo, Multi-Photo, Saint
Valentin, Fête des mères, Fête des pères, Noël, Mariage et
Anniversaire)
• Memoria integrada de 512 MB para almacenar sus imágenes. La
capacité de stockage disponible sera inférieure
• Prend en charge la plupart des cartes mémoires les plus
répandues: SD, MS, MS Pro, MMC, XD
• Afchage en miniatures et effet diaporama
• Afchage collage
• Rotation automatique de l’image (changement d’angle)
• Montage mural double
Que contient la boîte
• Cadre photo numérique 8" GiiNii avec douze photos préinstallées
de la bibliothèque des Parcs Nationaux
• Un adaptateur secteur (5 V/1,5 A)
• Guide d’utilisation et guide de démarrage rapide
• Carte d'enregistrement
• Carte de garantie
2
Page 27

Français
Chapitre 1 : Comment démarrer!
Alimentation et activation de la lecture
Le connecteur d’alimentation se trouve derrière, au milieu côté
gauche, du cadre photo numérique GiiNii. Insérez la che CC dans
l'appareil, puis branchez le cordon d'alimentation CA dans une prise
secteur.
Faites glisser le bouton d’alimentation à l’arrière, en haut côté
gauche, du cadre photo le diaporama d’images des Parcs nationaux
se lance automatiquement.
Boutons fonction
Les boutons utilisés pour l'exploitation de votre appareil sont situés
à l’arrière du cadre photo. Les boutons peuvent servir à commander
toutes les fonctions fournies du menu sur écran.
3
Page 28

Français
Vue arrière
G
Quitter
OK
Bas
Gauche
SD/xD/ MS/MMC/MMC+
OFF ON
DC IN5V
Droit
Alimentation
Haut
4
Page 29

Vue à la verticale
Français
Gauche
Left UP OK -G button
Droit
Rihgt
Haut
Bas
Down
OK
OK
Quitter
EXIT
Bouton G
EXIT
Boutons Descriptif
Alimentation
Faites glisser l’interrupteur pour mettre sous
tension (on) ou hors tension (off)
Appuyez sur ce bouton pour lancer en
Bouton G
diaporama, quelle que soit le mode
Utilisez ce bouton pour passer du mode photo,
à l’afchage de l’horloge
Haut Permet d’accéder à l’item précédent du menu
Bas Permet d’accéder à l’item suivant du menu
Gauche Pression courte : item précédent
Droit Pression courte : item suivant
1. Pression courte : permet de valider un
OK
processus/entrée/lecture/pause
2. Pression longue : plein écran
Quitter Permet d’accéder au menu précédent
5
Page 30

Français
Zoom avant / Zoom arrière / fonction panoramique en mode
diaporama
Appuyez sur la touche OK pour accéder au menu principal. Appuyez
sur le bouton G pour lancer un diaporama. Appuyez sur la touche
gauche/droite pour modifier la photo du diaporama et accéder à l’
afchage de la photo (photo, en statut pause) L’icône Pause disparaît
après 3 secondes si aucune action n’est réalisée.
Appuyez sur la touche Haut ou Bas pour effectuer un Zoom avant/
arrière.
Appuyez sur la touche OK pour effectuer un panoramique. Utilisez la
Fonction Panorama et déplacez-vous en utilisant les touche haut/
bas/gauche/droit.
Appuyez sur OK ou sur la touche Quitter pour relancer le diaporama.
Lectures des photos
Votre cadre photo est équipé d’une mémoire interne de 512Mo et de
douze photos préchargées de la bibliothèque des Parcs Nationaux.
Ces photos s’afchent automatiquement lorsqu’aucune carte
mémoire n’est insérée et qu’aucun chier pris en charge n’est présent
dans la mémoire interne.
Pour lire votre propre contenu, insérez une carte mémoire contenant
des photos dans la fente pour carte, du côté droit du cadre photo : la
lecture de vos photos démarre automatiquement.
Conseils utiles
• Cet appareil prend en charge les cartes mémoire suivantes :
SD, MS, MS Pro,MMC ,XD.
• Pour plus d'informations sur les types de cartes mémoire et
les formats de chiers pris en charge, veuillez vous référer à
la section Caractéristiques du produit.
6
Page 31

Français
Chapitre 2 : Options du menu
Les options du menu sont les suivantes : Calendrier, Horloge, Photo,
Source mémoire et Réglage. Pour régler la date, accédez à l’item
Date et Heure dans Réglage.
2.1 Calendrier
Dans ce menu principal, sélectionnez Calendrier, puis appuyez
OK pour y accéder.
• Appuyez sur le bouton Gauche ou Droit pour afcher le mois.
Pour afcher le mois précédent ou suivant, restez appuyé sur le
bouton Gauche ou Droit.
• Appuyez sur OK pour afcher votre sélection en plein écran.
• Une fois dans le mois actuel, appuyez sur OK pour retourner au
menu du Calendrier.
• Pour régler la Date, accédez au menu Réglage, puis dans le sous-
menu Date et Heure.
7
Page 32

Français
2.2 Horloge
Dans ce menu principal, sélectionnez Horloge, puis appuyez OK
pour y accéder
• Il existe trois différents habillages ou afchages d’horloge. Utilisez
le bouton Gauche ou Droit pour effectuer votre sélection, puis
appuyez sur OK pour afcher l’horloge en plein écran.
• En mode plein écran, appuyez sur le bouton Gauche ou Droit
pour passer d’un habillage à un autre de l’afchage de l’horloge.
Appuyez sur OK pour retourner au menu Horloge.
• Pour régler l’heure, accédez au menu Réglage, puis dans le sous-
menu Date et Heure.
2.3 Photo
Dans ce menu principal, sélectionnez Photo, puis appuyez OK
pour y accéder
• Appuyez sur le bouton Gauche ou Droit pour sélectionner une
photo.
• Les photos délent automatiquement les unes après les autres
lorsque vous restez appuyé sur le bouton Gauche ou Droit.
Appuyez longuement sur OK pour les lire en diaporama.
8
Page 33

Français
• Il existe sept options vous permettant d’éditer vos photos : Effets
de couleur, Contraste, Luminosité, Supprimer, Tourner, Taille et
Copier. Les photos de la bibliothèque des Parcs Nationaux ne
peuvent pas être éditées. Lorsqu’une carte mémoire est insérée,
ou lorsque des photos se trouvent dans la mémoire interne, ces
options sont visibles dans le sous-menu Photo.
Effets de couleur : Sépia, Normal, Noir et Blanc.
Contraste : Contraste-2, Contraste-1, Normal, Contraste+1,
Contraste+2
Luminosité : Luminosité-2, Luminosité-1, Normal, Luminosité+1,
Luminosité+2
Supprimer : Oui ou Non
Tourner : Rotation-90, Normal, Rotation+90, Rotation+180
Taille : Plein écran et Taille actuelle
Copier : Sur la mémoire interne, Dans mes favoris, Sur la USB
drive, Sur une carte mémoire.
• Avec les touches Haut et Bas pour effectuer votre sélection, et la
touche OK pour conrmer, il devient facile d’éditer à votre gré vos
photos.
9
Page 34

Français
2.4 Source mémoire
Dans ce menu principal, sélectionnez Source mémoire, puis
appuyez OK pour y accéder.
• Appuyez sur le bouton Gauche ou Droit pour sélectionner une
source photo. Appuyez sur OK pour lancer un diaporama des
photos de la source mémoire correspondante.
• Choisissez parmi cinq sources : Mémoire interne, Lecteur de carte
mémoire 5 EN 1, Bibliothèque des Parcs Nationaux, Favoris, USB
drive.
• Les photos de la bibliothèque des Parcs Nationaux s’afchent
automatiquement lorsqu’aucune carte mémoire n’est insérée et
qu’aucun chier pris en charge n’est présent dans la mémoire
interne.
2.5 Conguration
Dans ce menu, vous pouvez accéder à ce qui suit : Date et
heure, Mise en diaporama, Mise en général, Mise en Collage,
Informations et Tout mettre à niveau.
2.5.1 Date et heure
Utilisez les touches Gauche et Droit pour ajuster la date et l’heure :
Minute, Heure, AM/PM, Jour, Mois et Année.
10
Page 35

2.5.2 Mise en diaporama
Dans la section Mise en diaporama, vous pouvez modier les
éléments Intervalle, Mode de lecture et Transition.
Intervalle : 3 secondes, 10 secondes, 30 secondes, 1 minute
Mode de lecture : Simple, Répéter tout ou Aléatoire
Français
Transition : Aléatoire, Cercle en 3D, Suspension en 3D, Volet,
Insertion, Feuille, Actualités, Opérateur plus, Peigne croisé, Fondu,
Bobine, Vague, Ouverture d’un bloc
2.5.3 Conguration générale
Six éléments sont disponibles pour la Conguration générale :
EnerGiiNii, Luminosité, Langue, Réinitialiser, Supprimer tout et Smart
copie.
EnerGiiNii : Désactivé / Programmateur 50% / Programmateur 100% /
Économie 20% / Économie 50%
Lorsque EnerGiiNii Désactivé est choisi, cet appareil fonctionne à
pleine puissance tout le temps.
11
Page 36

Français
Lorsque Programmateur 50% est choisi, ou Programmateur 100%,
cet appareil fonctionne automatiquement à faible consommation
d'énergie pendant la nuit (21:00~7:00), et reprend automatiquement
un fonctionnement normal le jour (7:00 ~21:00);
Lorsque vous sélectionnez Économie 20% ou Économie 50%, il
fonctionne au taux de consommation d’énergie indiqué tout le temps.
Lorsque EnerGiiNii est activé, la qualité des photos du diaporama n’
est pas affectée.
Luminosité : Plus sombre, Normal, Plus brillant
Langue : English / Français / Deutsch / Español / Nederlands/
Português / Italiano
Réinitialiser : Oui ou Non
Supprimer tout : Interne, Favoris
Smart Copie : Original, Album (redimensionner)
2.5.4 Mise en collage
Lecture photo en mode collage (Solo-Photo, Multi-Photo, Saint
Valentin, Fête des mères, Fête des pères, Noël, Mariage et
Anniversaire).
Utilisez le bouton Gauche ou Droit pour choisir vos sélections
favorites.
12
Page 37

Français
Appuyez sur OK pour enregistrer le réglage et accéder au diaporama
du collage correspondant.
Si vous ne voulez pas sélectionner un collage, choisissez SoloPhoto.
2.5.5 Information
Ce menu afche la version du logiciel, la quantité de mémoire totale
et de mémoire libre.
2.5.6 Tout mettre à niveau
Si une mise à niveau du logiciel de votre cadre photo numérique
existe, contactez le centre de Service client GiiNii. On vous indiquera
alors où télécharger la mise à jour et comment l’installer. Pour mettre
à niveau votre cadre photo numérique, il faut utiliser une carte SD
contenant le logiciel mis à niveau. Si vous choisissez OK alors qu’
aucune carte SD n’est insérée, l’appareil considérera cela comme
une absence de réponse et attendra la prochaine action.
13
Page 38

Français
Chapitre 3 : Foire Aux Questions
Ce produit a été réglé sur son mode de fonctionnement standard
avant envoi. Si vous rencontrez un problème, consultez la Foire aux
questions pour y trouver une solution.
Q : L'appareil ne se met pas en marche.
R : 1. Faites glisser le bouton d’alimentation pour le mettre sous
tension (on).
2. En cas d’absence de réponse, vérifier le branchement de l’
adaptateur d’alimentation au niveau de l’appareil et de la
prise.
3. Si l’appareil ne répond toujours pas, vérifiez la compatibilité
tension locale /adaptateur d’alimentation.
Q : Rien ne se passe lorsque j'insère une carte mémoire.
R : 1. Cet appareil prend en charge les cartes mémoire suivantes :
SD, MS, MS Pro,MMC ,XD.
2. Assurez-vous que les formats des chiers sont pris en charge.
3. Si le point 1 et 2 sont remplis, essayez de sauvegarder les
chiers de la carte, formatez la carte, puis copiez à nouveau
les chiers de sauvegarde sur la carte. Relancez la lecture.
14
Page 39

Chapitre 4 : Caractéristiques produit
Format 4:3
Résolution 800 × 600 pixels
Luminosité 250 cd/m
2
Français
Afchage
Taux de
contraste
500:1
Horizontal : -60° ~ 65° (de gauche
Angle de vue
à droite)
Vertical : -70° ~ 70 ° (de bas en
haut)
Lecteur de
carte
Photo
Lecteur de cartes 5 en 1 * 1 (SD, MS, MS Pro,
MMC, XD)
JPEG Baseline, format photo pris en charge
jusqu’à 20 M pixels.
Connectivité Hôte USB (type A), compatible USB1.2/2.0.
Rotation automatique de l’image (changement d’
Fonctions
angle)
Lecture de Photos
15
Page 40

Français
Chapitre 5 : Réglementations et Garantie
Conformité aux réglementations
Cet appareil a été testé et déclaré conforme aux limites pour un appareil
numérique de classe B, selon la section 15 de la réglementation FCC.
Ces limites sont conçues pour offrir une protection raisonnable contre les
interférences dans le cadre d'une installation résidentielle. Cet appareil peut
émettre de l'énergie de radiofréquence et, s'il n'est pas installé et utilisé en
conformité avec les instructions, peut causer des interférences avec les
communications radio.
Il n'y a cependant aucune garantie qu'aucune interférence ne surviendra
dans une installation particulière. Si et appareil génère des interférences
à la réception de la radio ou de la télévision, ce qui peut se déterminer en
l'éteignant et en le rallumant, l'utilisateur est invité à essayer de corriger les
interférences par l'une des mesures suivantes :
• Réorienter ou repositionner l'antenne de réception.
• Éloigner la radio ou le téléviseur du cadre photo numérique.
• Brancher le cadre photo numérique sur une prise d’un circuit électrique
différent de celui sur lequel la radio ou le téléviseur est branché.
• Consulter le revendeur ou un technicien radio/TV expérimenté pour
obtenir de l'aide.
Garantie limitée de 90 jours GiiNii
Veuillez lire soigneusement cette garantie limitée. La garantie limitée
déterminée ci-dessous est donnée par GiiNii, le fabricant de votre nouveau
cadre photo numérique, lorsqu'il est acheté aux États-Unis d'Amérique
via un détaillant autorisé, et utilisé pour des buts non-commerciaux. Nous
garantissons ce produit contre les défauts de pièces et de main d'œuvre
pendant une période de 90 jours à compter de la date de l'achat. Ne
16
Page 41

Français
renvoyez pas votre produit au détaillant pour les réclamations de garantie.
1. Veuillez conserver la Déclaration de garantie dans un endroit sûr avec
votre reçu daté d'achat. Veuillez conserver le carton d'origine, vous
pourriez en avoir besoin pour effectuer une réclamation sous garantie.
Pour renvoyer votre produit en cas de réclamation sous garantie, utilisez
l’emballage d'origine ou tout autre emballage garantissant un retour sûr
chez GiiNii. Veuillez contacter notre équipe de service client au sujet de
l'emballage adapté pour l'expédition en retour.
2. Service client et support technique de GiiNii: 1-866-909-3550. En ligne
sur: www.giinii.com ou par e-mail: customersupport@giinii.com.
3. Couvertures pièces et main d'œuvre. Pendant les 90 premiers jours de
possession, GiiNii va réparer ou remplacer le produit, à sa discrétion, sans
frais si le produit s’avère défectueux en raison de défaut matériel ou de
défaut de fabrication. GiiNii va alors fournir un nouveau produit de valeur
semblable ou supérieure, à sa discrétion. Ou fournira des pièces de
rechange neuves ou refabriquées, à sa seule discrétion. Le remplacement
ou la réparation d’une pièce du produit ne constitue pas le remplacement
ou la réparation d’autres pièces du produit. Le client est responsable
de l’expédition du produit à GiiNii, à ses frais. En attendant l’examen
du produit, ces frais de transport seront remboursés. Pour déposer une
réclamation sous garantie, contactez d’abord le service client. Vous
obtiendrez alors un code d’autorisation de retour. Aucune réparation ou
remplacement ne peut s’effecteur sans code d’autorisation de retour, ou la
copie d’un reçu indiquant la date d’achat. Après les premiers 90 jours de
possession, les coûts de réparation sont à la charge du propriétaire.
4. Éléments exclus, non couverts par la garantie
• Dommages ou dégâts cosmétiques dus à un accident, à un abus, à
une mauvaise utilisation ou à une négligence ;
• Une utilisation commerciale du produit ;
17
Page 42

Français
Les dommages dus à une mauvaise utilisation, une mauvaise
•
maintenance, ou une alimentation électrique incorrecte;
• L'incapacité du client de lire ou à comprendre les instructions fournies
sur la façon d'utiliser correctement le produit ;
• Les modications de toute partie du produit de quelque façon que ce
soit;
• Les dommages liés à une tentative de réparation non autorisée du
produit ;
• Les dommages résultant de catastrophes naturelles.
Pour faire une réclamation sous garantie, veuillez avoir les éléments
suivants
• Votre preuve d'achat initial datée auprès d'un détaillant autorisé aux
États-Unis ou dans d’autres pays.
• Votre emballage d'origine dans lequel le produit vous a été vendu.
Votre réclamation sous garantie ne sera pas honorée sans le reçu
initial d'achat. Si vous n'avez pas l'emballage d'origine, veuillez
consulter notre équipe du service client pour déterminer la meilleure
façon de nous renvoyer votre produit. GiiNii ne peut pas être tenu
responsable des dommages encourus pendant la réexpédition ; une
assurance est fortement recommandée.
• Veuillez fournir une déclaration écrite (tapée ou imprimée en lettres
capitales) qui décrit pourquoi votre produit est défectueux. Sur ce
document, vous devez inclure le code d'autorisation de retour fourni
par le service client, ainsi que vos nom et adresse de retour, et un
numéro de téléphone aux heures de bureau. La réexpédition à GiiNii
doit être assurée et faite par courrier recommandé avec accusé de
livraison.
18
Page 43

Français Français
Clause de non garantie
GiiNii et sa maison mère, ses liales et ses partenaires ne sont
responsables d'aucun dégât fortuit ou consécutif résultant d'une quelconque
infraction à une garantie exprimée ou implicite sur ce produit. Dans les
limites permises par la loi applicable, toute garantie implicite de valeur
marchande ou d'aptitude pour un but particulier sur ce produit est limitée
dans la durée à la durée de cette garantie. L'application de cette garantie
peut varier selon l'état ; cette garantie vous donne des droits légaux
spéciques et vous pouvez en avoir d'autres selon l'état dans lequel vous
résidez.
Pièces de rechange
Si vous avez besoin d'une pièce de rechange pour votre cadre photo
numérique GiiNii, appelez-nous au 1-866-909-3550 ou écrivez-nous à:
customerservice@giinii.com.
Avertissement
Les modications ou les altérations apportées à cette unité et non
expressément approuvées par GiiNii annulent cette garantie et peut
avoir comme conséquence des dommages aux personnes et/ou aux
biens.
19
Page 44

Español
Estimado cliente:
Gracias por introducir en su hogar un marco de fotos digital GiiNii.
A partir de ahora podrá contemplar su creciente biblioteca de
fotografías digitales con una impresionante claridad y compartir
fantásticos recuerdos con su familia y sus amigos.
Si desea sacar el máximo partido de su nuevo producto GiiNii, lea
íntegramente este manual de usuario antes de comenzar a usarlo.
Capítulo 1: Primeros pasos. Capítulo 2: Opciones del menú. Capítulo
3: Preguntas más frecuentes.
Consulte también nuestros vídeos de aprendizaje acerca de CÓMO
COMENZAR y CÓMO PROGRAMAR su nuevo marco de fotos,
que encontrará en nuestro sitio web: www.giinii.com, sección
PRODUCTOS, apartado TUTORIALES.
Si desea ponerse en contacto con el Servicio de atención al cliente
24/7 de GiiNii, llame al número de teléfono: 1-866-909-3550.
Atentamente,
El equipo de GiiNii
1
Page 45

Español
Características principales
• EnerGiiNii pone a su disposición cuatro formas inteligentes de
administrar el consumo de energía
• Reproducción de fotografías a modo de collage (Una foto, Multi-
Foto, Día de San Valentín, Día de la Madre, Día del Padre,
Navidad, Enlace y Cumpleaños)
• Mémoire intégrée de 512 Mo pour stocker vos images, la
capacidad de almacenamiento disponible será menor
• Admite las tarjetas de memoria más populares: SD, MS, MS Pro,
MMC, XD
• Vista de miniaturas y efectos de presentación
• Presentación a modo de collage
• Rotación automática de imágenes (conmutador de Ángulo)
• Posibilidad de montaje en pared en 2 posiciones
Qué hay en la caja
• Un Marco de fotos digital GiiNii de 8” con doce fotografías
preinstaladas pertenecientes a la Biblioteca de Parques
Nacionales
• Un adaptador de alimentación (5 V/1,5 A)
• Un manual de usuario y una guía de inicio rápido
• Una tarjeta de registro
• Tarjeta de garantia
2
Page 46

Español
Capítulo 1: Primeros pasos
Conexión de la Alimentación y Encendido del dispositivo para
iniciar la reproducción
El conector de alimentación se encuentra situado en el centro del
lateral izquierdo por la parte posterior del Marco de fotos digital
GiiNii. Inserte el conector DC en el dispositivo y, a continuación,
enchufe el cable AC a una toma de suministro eléctrico.
Deslice el botón de encendido, situado en la esquina superior
izquierda por la parte posterior, para encender el marco de fotos e
iniciar automáticamente la presentación de imágenes de Parques
Nacionales.
Botones de Uso
Los botones que permiten usar el dispositivo se encuentran ubicados
en la parte posterior del marco de fotos. Dichos botones se pueden
usar para controlar todas las funciones que aparecen en el menú en
pantalla.
3
Page 47

Español
Vista posterior
G
Salir
OK
Abajo
Izquierda
SD/xD/ MS/MMC/MMC+
OFF ON
DC IN5V
Derecha
Encendido
Arriba
4
Page 48

Vista vertical
Español
Izquierda
Left UP OK -G button
Derecha
Rihgt
Arriba
Abajo
Down
OK
OK
EXIT
Salir
EXIT
Botones Descripción
Encendido
Deslice este botón para encender / apagar el
dispositivo.
Pulse este botón para reproducir una
Botón G
presentación desde cualquier modo.
También permite cambiar entre los modos
Fotografías y Reloj.
Arriba
Abajo
Pulse este botón para marcar el elemento
anterior del menú.
Pulse este botón para marcar el elemento
siguiente del menú.
Botón G
Izquierda Pulsación breve: Elemento anterior.
Derecha Pulsación breve: Elemento siguiente.
1. Pulsación breve: Validar un proceso / entrar /
OK
reproducir / pausa.
2. Pulsación prolongada: Pantalla completa.
Salir
Pulse este botón para retroceder al menú
anterior.
5
Page 49

Español
Función Acercar / Alejar / Desplazar en el modo de presentación
Pulse el botón OK en el menú principal. Pulse el botón G para
iniciar la presentación. Pulse el botón izquierda / derecha para
detener la presentación en una fotografía y pasar a la vista de
fotografía(fotografía en pausa). El icono de pausa desaparecerá
después de 3 seg. si no se realiza ninguna acción.
Pulse los botones Arriba o Abajo para Acercar / Alejar la
fotografía.
Pulse el botón OK para activar la Función Desplazar y desplace la
fotografía utilizando los botones arriba / abajo / izquierda / derecha.
Pulse el botón OK o Salir para volver a la presentación de
fotografías.
Reproducción de imágenes
Su marco de fotos está equipado con una memoria interna de 512
MB y doce fotografías preinstaladas pertenecientes a la Biblioteca de
Parques Nacionales. Dichas fotografías comenzarán a reproducirse
automáticamente si no se inserta ninguna tarjeta de memoria y la
memoria interna no contiene archivos compatibles.
Si desea reproducir su propio contenido, inserte una tarjeta de
memoria que contenga fotografías en la ranura para tarjetas
situada en el lateral derecho de su marco de fotos. Sus fotografías
comenzarán a reproducirse automáticamente.
Sugerencias útiles
• Este dispositivo es compatible con las siguientes tarjetas de
memoria: SD, MS, MS Pro, MMC, XD.
• Si desea obtener más información acerca de los tipos de
tarjetas de memoria y formatos de archivo compatibles,
consulte la sección Especicaciones del producto.
6
Page 50

Español
Capítulo 2: Opciones del menú
Las opciones del menú son las siguientes: Calendario, Reloj,
Fotografías, Fuente memoria y Conguración. Si desea congurar
la hora, acceda a la opción Fecha y hora desde la sección de
Conguración.
2.1 Calendario
Seleccione la opción Calendario en el menú principal, pulse el
botón OK para acceder a ella y, a continuación
• Pulse el botón Izquierda o Derecha para ver el mes. El
dispositivo avanzará o pasará automáticamente de este mes al
siguiente al mantener pulsado el botón Izquierda o Derecha.
• Pulse el botón OK si desea ver su selección a pantalla completa.
• En el mes actual, pulse el botón OK para retroceder al menú
Calendario.
• Si desea congurar la Fecha, acceda al menú Conguración y, a
continuación, al submenú Fecha y hora.
7
Page 51

Español
2.2 Reloj
Seleccione la opción Reloj en el menú principal, pulse el botón
OK para acceder a ella y, a continuación
• Existen tres aspectos diferentes que pueden aplicarse al reloj.
Utilice los botones Izquierda o Derecha para seleccionar y pulse
el botón OK para mostrar el reloj a pantalla completa.
• En el modo de pantalla completa, pulse los botones Izquierda o
Derecha para alternar entre los distintos aspectos del reloj. Pulse
el botón OK para retroceder al menú Reloj.
• Si desea congurar la Hora, acceda al menú Conguración y, a
continuación, al submenú Fecha y hora.
2.3 Fotografías
Seleccione la opción Fotografías en el menú principal, pulse el
botón OK para acceder a ella y, a continuación
• Pulse los botones Izquierda o Derecha para seleccionar una
fotografía.
• Las fotografías pasarán automáticamente una a una al mantener
pulsados los botones Izquierda o Derecha. Mantenga pulsado el
botón OK para iniciar la reproducción de la presentación.
8
Page 52

• Existen siete funciones que le permitirán editar sus fotografías:
Efectos de color, Contraste, Brillo, Eliminar, Girar, Relación y
Copiar. Las fotografías pertenecientes a la Biblioteca de Parques
Nacionales no se pueden editar. Si se ha insertado una tarjeta
de memoria o existen fotografías almacenadas en la memoria
interna, las opciones anteriores aparecerán en el submenú
Fotografías.
Español
Efectos de color: Sepia, Normal y Blanco y negro
Contraste: Contraste -2, Contraste -1, normal, Contraste +1,
Contraste +2
Brillo: Brillo -2, Brillo -1, Normal, Brillo +1, Brillo +2
Eliminar: Sí o No
Girar: Rotación -90, Normal, Rotación +90, Rotación +180
Relación: Pantalla completa y Tamaño real
Copiar: A la Memoria interna, A Favoritos, A la unidad USB, A la
tarjeta de memoria.
• Utilice los botones Arriba o Abajo para seleccionar una opción y
el botón OK para sus acciones. Encontrará muy sencillo editar las
fotografías a su gusto.
9
Page 53

Español
2.4 Fuente memoria
Seleccione la opción Fuente memoria en el menú principal,
pulse el botón OK para acceder a ella y, a continuación
• Pulse los botones Izquierda o Derecha para seleccionar una
fuente de fotografías. Pulse el botón OK para reproducir una
presentación utilizando las fotografías almacenadas en la fuente
de memoria correspondientes.
• Existen cinco opciones entre las que puede elegir: Memoria
interna, el lector de tarjetas de memoria “5 en 1”, Los parques
nacionales de biblioteca, Favoritos y Unidad USB.
• Las fotografías de la Biblioteca de Parques
Nacionalescomenzarán a reproducirse automáticamente si no
se inserta ninguna tarjeta de memoria o la memoria interna no
contiene archivos compatibles.
2.5 Conguración
Este menú le permite acceder a las siguienes opciones: Fecha
y hora, Conguración de presentación, Conguración general,
Conguración de collage, Información y Mejorar todo.
2.5.1 Fecha y hora
Utilice los botones Izquierda o Derecha para ajustar la fecha y la
hora: Minuto, Hora, AM / PM, Día, Mes y Año.
10
Page 54

2.5.2 Conguración de presentación
El menú de Conguración de presentación le permitirá editar los
parámetros Intervalo, Modo de reproducción y Transición.
Intervalo: 3 Segundos, 10 Segundos, 30 Segundos y 1 Minuto
Modo de reproducción: Simple, Repetir todo o Aleatorio
Transición: Aleatorio, Círculo 3D, Fotar 3D, obturador, Encarte,
Español
Partir, Noticias, Registrarse más, Cruz Peine, Desvanecimiento,
Rollo, Ondular y Deslizar
2.5.3 Conguración general
El menú de Conguración general le permitirá congurar los
siguientes parámetros: EnerGiiNii, Brillo, Idioma, Restablecer, Borrar
Todos y Smart copia.
EnerGiiNii: Desactivado / Programador de 50% / Programador de
100% / Ahorrar un 20% / Ahorrar un 50%
Si activa la opción EnerGiiNii Desactivado, el dispositivo funcionará
al máximo de consumo en todo momento.
11
Page 55

Español
Si selecciona las opciones Programador de 50% o Programador de
100%, el dispositivo funcionará automáticamente a bajo consumo
durante el horario nocturno (21:00 PM ~ 7:00 AM) y continuará
funcionando normalmente de forma automática durante el horario
diurno (7:00 AM ~ 21:00 PM).
Si selecciona la opción Ahorrar un 20% o Ahorrar un 50%, el
dispositivo funcionará al consumo de potencia indicado durante todo
el tiempo.
El uso de la función EnerGiiNii no afecta a la calidad de las
fotografías pertenecientes a la presentación.
Brillo: Más oscuro, Normal, Más brillante
Idioma: English / Français / Deutsch / Español / Nederlands/
Português / Italiano
Restablecer: Sí o No
Borrar todos: Interna, Favoritos
Smart copia: Original, Tamaño (cambiar tamaño)
2.5.4 Conguración de collage
Reproducción de fotografías a modo de collage (Una foto, MultiFoto, Día de San Valentín , Día de la Madre, Día del Padre, Navidad,
Enlace y Cumpleaños).
12
Page 56

Español
Utilice los botones Izquierda o Derecha para elegir sus opciones
favoritas.
Pulse el botón OK para guardar la conguración y pasar a la
presentación del collage correspondiente.
Si no desea seleccionar un collage, seleccione la opción Una foto.
2.5.5 Información
Este menú le permitirá consultar información acerca de la versión del
software, la memoria total y la memoria libre.
2.5.6 Mejorar todo
Si existe una actualización disponible para el software de su Marco
de fotos digital, póngase en contacto con el centro de atención al
cliente de GiiNii para recibir instrucciones acerca del lugar desde
donde descargar la actualización y cómo instalarla. Deberá usar
una tarjeta SD con el software de actualización almacenado para
actualizar el marco de fotos digital. Si pulsa OK sin haber insertado
antes ninguna tarjeta SD, la unidad no responderá y esperará a su
próxima acción.
13
Page 57

Español
Capítulo 3: Preguntas más frecuentes
Este producto ha sido a congurado en el modo de funcionamiento
estándar antes de su envío. Si experimental algún problema,
consulte la siguiente lista de Preguntas más frecuentes para
buscar una solución.
P: El dispositivo no se enciende.
R: 1. Deslice el botón de encendido para encenderlo.
2. Si el dispositivo no responde, asegúrese de que el adaptador
de alimentación se encuentre conectado correctamente al
dispositivo y a la toma de suministro.
3. Si aún así no responde, asegúrese de que el nivel de voltaje
local sea apto para su adaptador de alimentación.
P: No ocurre nada al insertar una tarjeta de memoria.
R: 1. Este dispositivo es compatible con las siguientes tarjetas de
memoria: SD, MS, MS Pro, MMC, XD.
2. Asegúrese de que los archivos de fotografía se encuentren en
formatos de archivo compatibles.
3. Si ha comprobado los puntos 1 y 2, intente hacer una copia
de seguridad de los archivos de la tarjeta, formatee la tarjeta,
copie los archivos incluidos en la copia de seguridad de nuevo
a la tarjeta e intente reproducirlos.
14
Page 58

Capítulo 4: Especicaciones del producto
Español
Relación de
aspecto
4:3
Resolución 800 × 600 píxeles
2
Pantalla
Brillo 250 cd/m
Relación de
contraste
500:1
Horizontal: -60° ~ 65° (de
Ángulo de
visión
izquierda a derecha)
Vertical: -70° ~ 70° (de arriba
abajo)
Lector de tarjetas
Fotografías
Lector de tarjetas “5 en 1” *1 (SD, MS, MS Pro,
MMC, XD)
JPEG de línea base, compatible con formato
fotográco de hasta 20 Mpíxeles.
Conectividad Host USB (tipo A), compatible con USB 1.2 / 2.0.
Rotación automática de imágenes (conmutador
Características
de Ángulo)
Reproducción de Fotografías
15
Page 59

Español
Capítulo 5: Aspectos administrativos y garantía
Normativa y conformidad
Este equipo ha sido probado, hallándose que satisface los límites de un
dispositivo digital de Clase B según la Sección 15 del Reglamento FCC.
Dichos límites han sido diseñados con el n de proporcionar una protección
razonable frente a interferencias perjudiciales en una instalación residencial.
Este equipo puede irradiar energía en radiofrecuencia y, si no se instala y
utiliza según sus instrucciones, podría provocar interferencias perjudiciales
en comunicaciones de radio.
Sin embargo, no es posible garantizar que no se produzcan interferencias
en una instalación en particular. Si este equipo provoca interferencias
en la recepción de ondas de radio o televisión, lo cual podrá determinar
encendiendo y apagando el equipo, se recomienda al usuario intentar
corregir la interferencia llevando a cabo una o más de las siguientes
medidas:
• Reorientar o colocar en otro lugar la antena receptora.
• Aumentar la separación entre el receptor de radio o televisión y el Marco
de fotos digital.
• Conectar el Marco de fotos digital a una toma perteneciente a un circuito
diferente de aquel al que pertenece la toma a la que está conectado el
receptor de radio o televisión.
• Consultar con su proveedor o con un técnico con experiencia en radio /
TV para obtener ayuda.
16
Page 60

Español
Garantía limitada de 90 días ofrecida por GiiNii
Lea detenidamente esta garantía limitada. La garantía limitada siguiente es
ofrecida por GiiNii, el fabricante de su nuevo marco de fotos digital, al adquirir
el producto en los Estados Unidos de América por medio de un distribuidor
autorizado y utilizarlo sin ánimo de lucro. Garantizamos este producto contra
defectos de materiales y mano de obra durante un periodo de 90 días a
partir de la fecha de compra. No devuelva el producto al distribuidor si desea
realizar una reclamación en garantía.
1. Mantenga la declaración de garantía en lugar seguro, junto a su recibo de
venta. Conserve la caja original por si tuviera que realizar una reclamación
de garantía. Si es preciso devolver el producto y realizar una reclamación
en garantía es mejor hacerlo utilizando la caja original o un embalaje
alternativo que garantice la devolución segura a GiiNii. Póngase en contacto
con nuestro equipo de atención al cliente si desea obtener más información
acerca de los embalajes de devolución apropiados.
2. Servicio al cliente y soporte técnico de GiiNii: 1-866-909-3550. A través
de internet, en la dirección: www.giinii.com o por correo electrónico,
dirigiéndose a: customersupport@giinii.com.
3. Cobertura de componentes y mano de obra. Durante los primeros 90 días
de propiedad, GiiNii reparará o reemplazará el producto, a su decisión,
sin cargo alguno en caso de que el producto se encuentre defectuoso
debido a algún defecto de material o mano de obra. GiiNii entregará un
producto de valor similar o superior, a su decisión También podría utilizar
componentes nuevos o reconstruidos a su decisión. Sustituir o reemplazar
una parte del producto no constituye una sustitución o reemplazo de los
demás componentes del producto. El cliente asumirá la responsabilidad de
devolver el producto a GiiNii por su cuenta. Tras la revisión del producto,
los costes de transporte serán reembolsados al cliente. Para realizar una
reclamación en garantía, deberá ponerse en contacto con el departamento
de atención al cliente en primer lugar y obtener un código de autorización
de devolución. No podrán realizarse reparaciones o sustituciones sin un
código de autorización de devolución o una copia de un recibo en el que
17
Page 61

Español
aparezca la fecha de compra; si ya hubiesen transcurrido los primeros 90
días de propiedad, el propietario deberá hacerse responsable de los gastos
de reparación.
4. Artículos excluidos de la garantía y no cubiertos por la misma
• Daños estéticos o derivados de accidentes, mal uso, abuso o
negligencia;
• Uso comercial del producto;
• Daños debidos a usos indebidos, mantenimiento inadecuado o
alimentación incorrecta;
• Incapacidad por parte del cliente de leer y comprender las instrucciones
suministradas acerca de cómo utilizar correctamente el producto;
• Modicaciones de cualquier tipo sobre cualquier pieza del producto;
• Daños resultantes de intentos de reparación del producto sin
autorización;
• Daños resultantes de actos de fuerza mayor.
Para realizar una reclamación en garantía, asegúrese de disponer de los
siguientes artículos
• Una prueba de compra original emitida por un distribuidor autorizado en
los Estados Unidos u otros territorios nacionales.
• La caja original en la que se vendió el producto. Su reclamación en
garantía no será atendida si no dispone del recibo de compra original.
Si no dispone de la caja original, consulte con el equipo de atención al
cliente para determinar la mejor forma de devolvernos el producto. GiiNii
no se hace responsable de los daños derivados del transporte para la
devolución del producto; se recomienda encarecidamente al usuario
asegurar el transporte.
18
Page 62

Español Español
• Incluya una declaración escrita (escrita a máquina o a mano con
letras de imprenta) que describa la avería que provoca el defecto en el
producto. Deberá incluir en este documento el código de autorización de
devolución entregado por el servicio de atención al cliente, así como su
nombre, dirección de retorno y número de teléfono diurno. Los artículos
enviados a GiiNii para su devolución deberán asegurarse y enviarse a
través de correo certicado con prueba de entrega.
Exención de garantía:
GiiNii y la empresa de la que es lial, sus aliados y subsidiarias, no se hacen
responsables de ningún daño accidental o derivado del incumplimiento de
cualquier garantía implícita o expresa asociada a este producto. A menos que así
lo prohíba la legislación vigente, cualquier garantía implícita de comerciabilidad
o adaptación a una nalidad particular asociada a este producto se limitará a la
duración de esta garantía. La aplicación de esta garantía podría variar según
el estado. Esta garantía le otorga derechos legales especícos; es posible que
disponga de otros derechos según el estado en el que resida.
Piezas de repuesto
Si necesita una pieza de repuesto para su Marco de fotos digital GiiNii,
llámenos al número de teléfono 1-866-909-3550 o escríbanos a la
dirección: customerservice@giinii.com.
Advertencia
Los cambios o modicaciones realizados sobre esta unidad que
no hayan sido autorizados expresamente por GiiNii invalidarán
esta garantía y podrían provocar lesiones a personas o daños a la
propiedad.
19
Page 63

Page 64

Page 65

www.giinii.com
© 2009 GiiNii International
Printed in China
 Loading...