

Page 1

GiiNii International Model GN-811
GiiNii 8” Ultra-Thin Digital Picture Frame
Model GN-811
User Guide
www.giinii.com
© 2008 GiiNii International
Edition V.3
1
Page 2

GiiNii International Model GN-811
Table of Content
What’s in the Box...............................................................................4
Chapter 1: LET’S GET STARTED!.....................................................5
Attaching the Back Stand...................................................................5
Connecting to Power..........................................................................5
Buttons and Menu Operation.............................................................6
On Screen Navigation:.......................................................................7
Using the Remote Control..................................................................7
Turn On the Digital Picture Frame......................................................8
Inserting the memory card or USB Flash Drive..................................9
Chapter 2: Advanced Menu Option:.................................................10
Chapter 3: Common Task...............................................................13
Chapter 4: Programming.................................................................15
Chapter 5: Frequently Asked Questions.........................................18
Chapter 6: Other Features..............................................................20
Connecting to a PC..........................................................................20
Product Specifications......................................................................20
Chapter 7: Regulatory Issues & Warranty.......................................21
Regulation & Compliance ................................................................21
GiiNii 90-Day Limited Warranty........................................................21
2
Page 3

GiiNii International Model GN-811
Dear Customer:
Thank you for bringing our GiiNii digital picture frame into your home. Now you
will be able to view your growing digital picture library in stunning clarity and
share great memories with friends and family.
To get the most out of your new GiiNii product, please read through this entire
Owner’s Manual before using. Chapter 1 shows how to get started. Chapter 2
discusses Common Tasks. Chapter 3 shows how to program your new product.
Also, please check out our video tutorials on HOW TO START and HOW TO
PROGRAM your new player at www.giinii.com under PRODUCTS and scroll
down to TUTORIALS.
For 24/7 GiiNii Customer Service, please call: 1-866-909-3550.
Sincerely,
The GiiNii Team
3
Page 4

GiiNii International Model GN-811
What’s in the Box
Included in your new picture frame box:
1. GiiNii 8” Digital Picture Frame with 3 pre-installed pictures
2. One Back Stand
3. One Back Stand screw
4. One IR remote control
5. One Power Adapter (5V / 2A)
6. User Guide and Quick Start Guide
7. Detachable Bonus Wooden Frame
4
Page 5
GiiNii International Model GN-811
Chapter 1: LET’S GET STARTED!
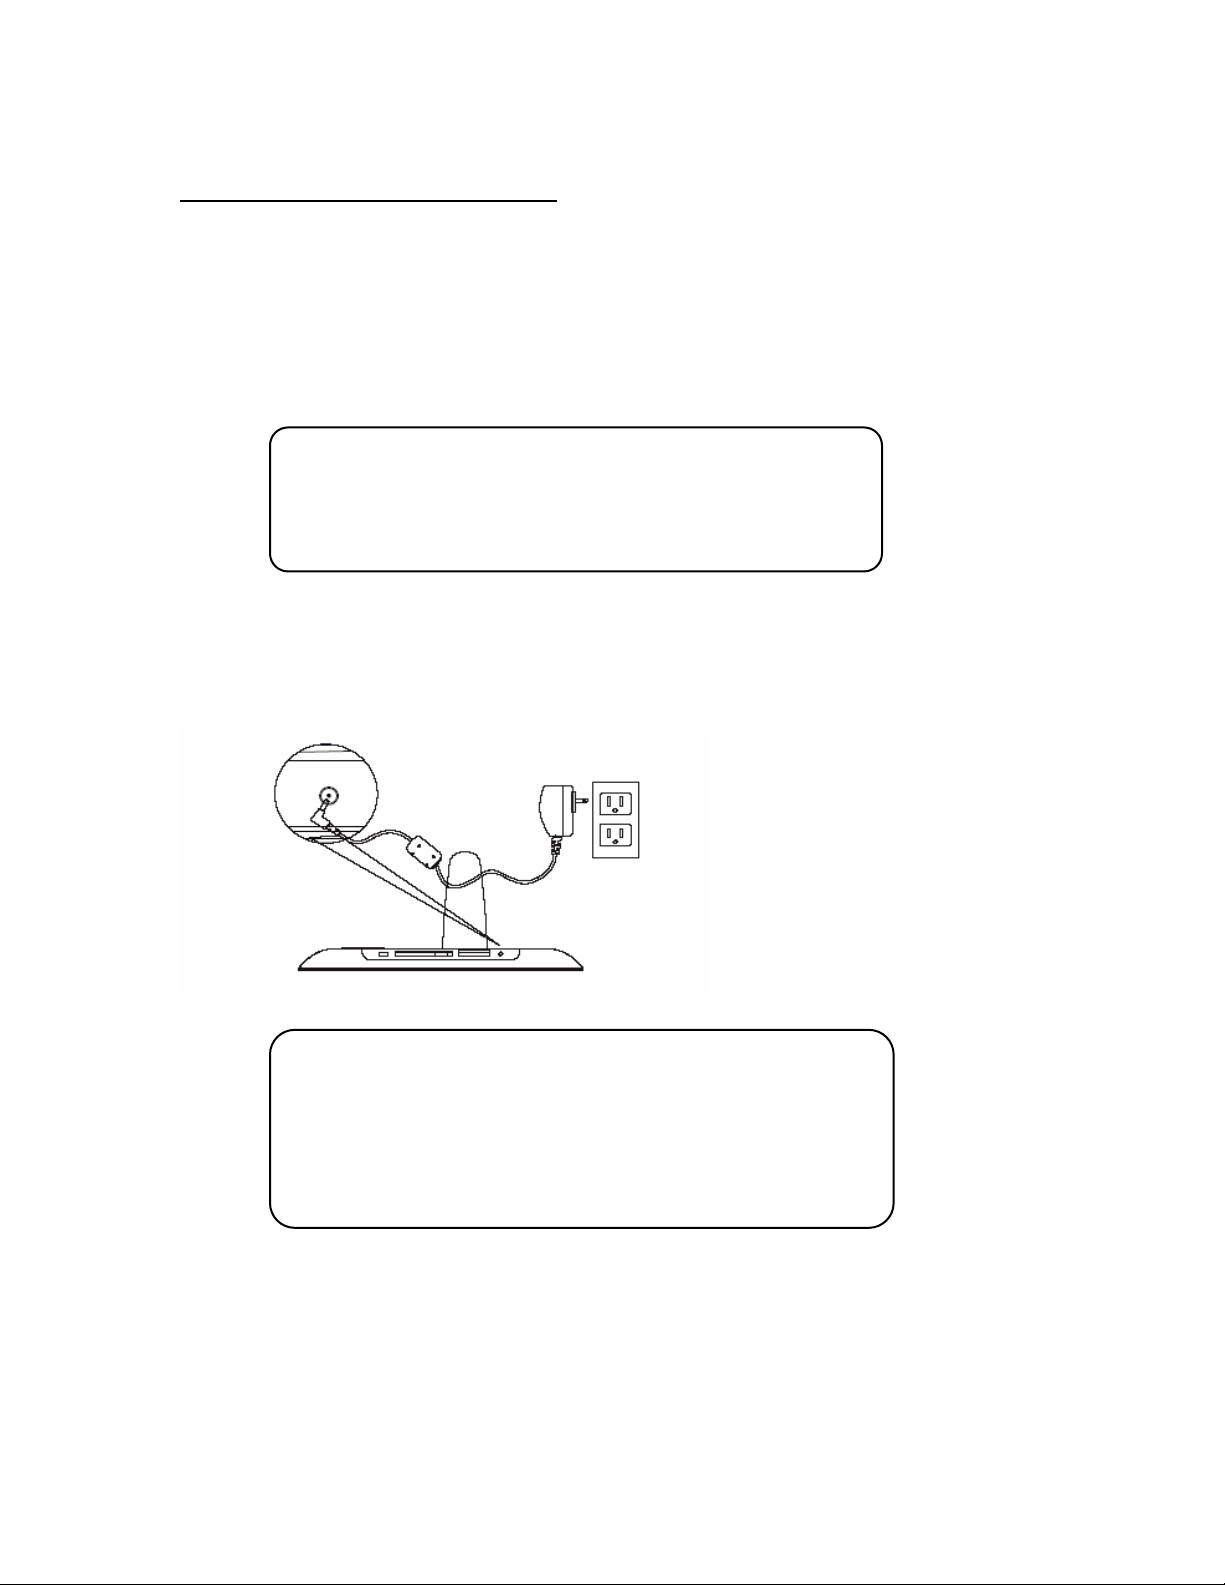
Attaching the Back Stand
The back stand is nested in the box. Place your digital picture frame on a flat surface
1. Align the hole on the back stand with the matching hole on the back of the player.
2. Secure the provided back stand screw by gently turning the screw clockwise until the back
stand is secured to the frame. Be careful to not over-tighten as ball-bearings in the back stand
allow it to pivot.
3. You can adjust the viewing angle of your player by rotating the back stand.
Connecting to Power
Place your digital picture frame on a flat surface. Insert the small jack into the picture frame (as
shown below), then plug the AC cord into an electrical outlet. In some cases, you may need to
slip on the double-plug attachment that goes into the wall socket before using.
Helpful Tips
• The mounting screw can be found either in a separate
bag or it might come attached in the back stand
Helpful Tips
• Press the Orange power button to turn on the product
while it is placed on a stable and level surface in its
horizontal (landscape) position
• If the device cannot start up, check wall outlet for proper
functionality and see if the power adaptor is plugged in
properly in the back.
5
Page 6
GiiNii International Model GN-811
p
Buttons and Menu Operation
The buttons used for operating your picture frame are located on the back. The buttons can be
used to drive all functions of the on-screen menu
Press the “Exit” button to bring up the Mode Menu (See Chapter 2 : Advanced Menu Options).
The options in the Mode Menu are: Favorite, Photo, Music, Movie, Clock, and Setup. To escape
the Mode Menu, press “Exit” again to return to your pictures, or music, or movies. The “Exit”
button is the primary control button you will use for programming your picture frame.
Press the “Menu” button to view function menu for a specific operation you would like to perform.
For example, while viewing a photo, select “Menu” to see choices of Copy, Delete, Play Mode,
Collage, etc. Use the “Exit” button to go back to what was previously being seen on the picture
frame.
As you navigate the various options on the menu, press the “OK” button to select an option.
Surrounding the “OK” button are toggle switches that allow you to go right, left, up and down on
the menu options. Your player also comes with a remote control which allows you to control the
player and its menu remotely. Please see the “Using the Remote control” section.
Menu
OK
Exit
Power
Left
U
Right
Down
6
Page 7
GiiNii International Model GN-811
On Screen Navigation:
Another unique feature of the GiiNii digital picture frames is the “on screen navigation”. This pops
up on the screen when you select the “Exit” or “Menu” button. You do not have to look at the back
of the frame to see which button you need to push. Simply follow the on-screen icons.
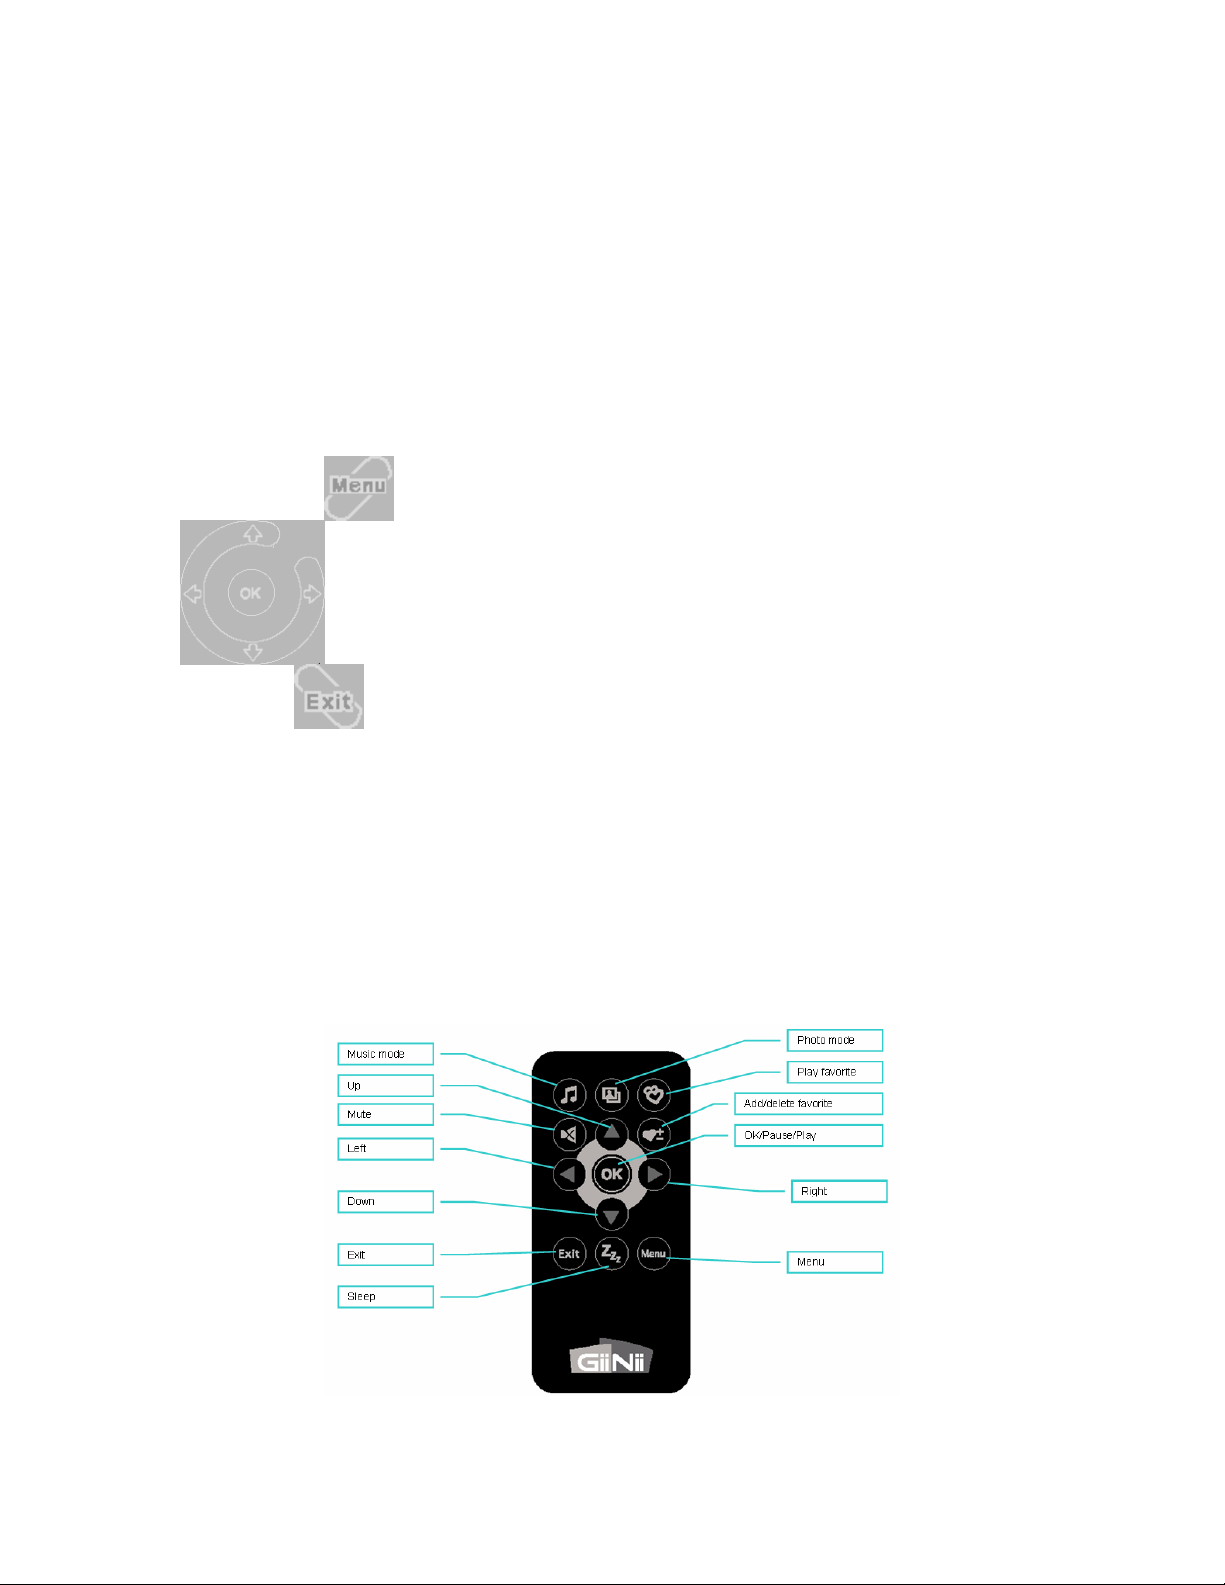
Using the Remote Control
The remote control contains all the functions on the digital photo frame. The figure below shows
all the buttons along with their functions.
To perform battery replacement
1. Press and hold the ridged area of the battery cover while pulling out the tray
2. Replace with a new “CR2025” Lithium battery into the tray and close the tray.
7
Page 8

GiiNii International Model GN-811
Turn On the Digital Picture Frame
The orange power button is located at the back of the player. Press the power button to turn on
the player. The initial image suggests that you insert a memory card or USB flash drive for
viewing your own photos. This image will disappear in a few seconds if you don’t have a memory
device to insert. Your player comes with 3 preinstalled pictures, and will automatically begin a
slideshow if there is no memory card or supported media found. If you insert a memory card or
other supported media, the picture frame will automatically begin playing your own photos. See
the next section on how to display images; video and music from your memory card.
Helpful Tips
• Press the orange power button to turn on the product
while it is placed on stable and level surface in its
horizontal (landscape) position.
• If the device cannot start up, check wall outlet for proper
functionality and see if the power adaptor is plugged in.
properly in the back
8
Page 9

GiiNii International Model GN-811
Inserting the memory card or USB Flash Drive
Your player is equipped with internal memory and pre-loaded photos. The pre-loaded photos will
automatically start playing when there is no memory card inserted. To play your own content,
insert a memory card containing photos, music, or movie clips into the car d slot shown here on
the bottom side of your Player. GiiNii recommends that you backup all the content on your
memory media before inserting it into any memory read/write device.
.
Helpful Tips
• This device supports following memory cards: SD, MMC, xD,
MS, MMC+, MS Duo, Compact Flash. Mini SD, Micro SD and
MS Duo can be played with an adaptor (not provided).
• Make sure you only use supported memory media. GiiNii
cannot be held responsible to damages to unsupported
memory media or damages incurred to the Digital Picture
Frame as a result of usage of unsupported memory media
• You may also use a USB Flash Drive in this device.
• This player supports MP3 and WMV music formats
• This player supports up to VGA (320x240) video format
• For further information on supported memory card types and
file formats, please refer the Product Specifications.
9
Page 10

GiiNii International Model GN-811
Chapter 2: Advanced Menu Option:
Press the “Exit” button during slideshow to bring up the Mode Menu (see Figure 1).
Mode Menu
Figure 1
The Mode Menu displayed on the screen includes: Favorites (images, movies or music stored in
the internal memory), Photos, Music, Movie, Clock and Setup. While in the Mode Menu, scroll
up or down to select the desired option, press “OK” to enter.
EXAMPLE: Press Exit during slideshow to view the function menu. Simply scroll up/down and
press “OK” to select. As you go into the sub-menus (shown below Figure 2), the main menu
selection will appear on the Left. You may scroll up/down on the Right-hand field for more
options and press “OK” to select. The image below shows the Photo icon option as the Mode
item (upper left corner), screen Ratio as the specific function and two options of Actual Size and
Fit Image (the highlighted option). Press “OK” to select Fit Image.
Left Area:
Subject/Feature
(Main Menu)
Figure 2
Right Area:
Options
(Sub Menu)
Press the “Ok” or “Exit” buttons to switch between main menu and sub-menu.
Press the “Menu” button to see what choices you have for a particular menu option.
10
Page 11

GiiNii International Model GN-811
As you navigate through the menus, level by level, the main menu subject or feature will always
be shown on the left and the corresponding sub-menu options will be shown on the right. Some
menu options have lower levels (more choices). In these cases, the higher-level menu option
goes to the left and lower-level options appear on the right. Figure 3 shows Photos in the mode
menu and Play Mode in the sub-menu. By pressing “Play Mode”, new options appear in the submenu and “Play Mode” is shown in the main menu as seen in Figure 4.
Press the “Exit” button to return back to the higher level of the main menu or return to what was
previously showing on your picture frame.
Figure 3 Figure 4
11
Page 12

GiiNii International Model GN-811
Menu Options and Symbols
Menu Mode Symbol
Favorite
Photo
Music
Movie
Clock
Setup
12
Page 13

GiiNii International Model GN-811
Chapter 3: Common Task
Setting the Clock, Date & Time
Press the “Exit” key and go to “Clock”, press the “OK” button then scroll to and select “Date and
Time”. Select “Date” to set the date and “Time” to set the time using the toggle button:
up/down/right/left.
Playing the Pre-Installed Pictures
Your GiiNii digital picture frame comes ready-to-use with three pre-installed photographs; you
don’t need to have your own digital pictures to start using this product. (For the initial use, it will
play the pre-installed pictures.) To play these pre-installed pictures, simply turn on the picture
frame and make sure there is no memory card inserted in to the unit. If a memory card or USB
flash drive is inserted, then the unit will automatically start playing content on the card or USB
flash drive.
There is also a pre-installed sound track included with your pre-installed photos. The sound track
will automatically play during the slide presentation unless you program the device to turn-off
sound. You can turn off the sound by going to the program Menu, select “Photo Menu”, scroll
down to “Slideshow with music” and select “no” to turn off the sound.
Playing Your Own Pictures
You will need to insert a memory card or USB flash drive containing your pictures in to the digital
picture frame. This unit accepts the most common memory cards in the narrow card-sl ot, as well
as USB flash drives in the USB port. This unit also has internal memory so you can copy your
photos, music and video clips and store them on your digital picture frame. Most cameras allow
you to connect them directly to a digital picture frame using a USB cable; check with your
camera’s manufacturer to see if that’s possible.
Playing Music with Your Slideshow
A nice feature of this GiiNii digital picture frame is the ability to play background music (.MP3 or
.WMA formats) during slideshows. To do this, go to the program Menu, select “Photo Menu”,
scroll down to “Slideshow with music” and select “yes” (choice of “yes” or “no”) to turn the sound
on.
Playing Your Own Videos
Another nice feature of the GiiNii digital picture frame is the capability to display videos of an AVI
or MOV format at a specification of JPEG 320x240@30 fps
Using the Collage Function
Your GiiNii digital picture frame has a feature that allows you to show multiple photographs at the
same time. Depending on the background template you choose, you can have up to three
different photos on the screen at one time, rotating in a slideshow format. To use this feature, go
to Photos in the main menu and select Collage in the sub-menu. Then, select the background
option you prefer: Mother’s Day, Baseball, Golf, and Fishing. Press “OK” to start the Collage
function. Below, see the “Golf” background and the two photos that rotate in slideshow function.
13
Page 14

GiiNii International Model GN-811
Example collage:
Golf collage
Deleting Pictures on Your Memory Card
You don’t need a PC to edit or delete pictures on the memory card or USB flash drive in your
picture frame. With the memory card or USB flash drive inserted, press the “Menu” key and scroll
to and select “Delete”. You will have a choice of deleting the current picture showing or delete all
photos. A word of caution: Once you’ve deleted the content on your card, you can not restore it.
GiiNii recommends that you always have a back-up copy of your pictures.
Adjusting the Brightness and Contrast of Pictures
The GiiNii picture frame automatically presents your photos the way they were taken. However,
depending on the room’s lighting, you may want to manually adjust the brightness and contrast
for optimal viewing. Do this by pressing the “Exit” key and under “Setup” scroll to and select
“Brightness” to adjust brightness. Scroll to and select “Contrast” to adjust contrast.
area
Photo area I
Photo area II
14
Page 15

GiiNii International Model GN-811
Changing the Size of the Picture Shown on the Screen
You can program your digital picture frame to automatically adjust the size of the pictures shown
on your screen to show the entire photo or to fit the entire screen. Showing the entire photo may
mean that some of your screen is left blank because the dimension of the photo may not be the
same as the screen dimension; there may be some un-used parts of the screen during this type
of viewing. If you prefer to have your photo completely fill the screen, your photo may be cropped,
so some parts of it won’t be shown (such as the top/bottom or the sides). To make this
adjustment, press the “Menu” button and scroll to and select “Ratio”. “Actual Size” means you will
see 100% of the photo, even if that means that parts of the screen are left un-used. “Fit Image”
means that the photo will be shown using 100% of the screen, even if that means parts of the
photo will be cropped.
Checking Your Available Memory Card Capacity
Most memory cards and USB flash drives indicate the size of memory on the outside of the card.
Your GiiNii digital picture frame will tell you how much remaining space is available to add more
pictures to your memory card or USB flash drive. To find this out, press the “Exit” key and under
“Setup” scroll to and select “System”. You memory card capacity information will be shown.
Using the Auto Rotation function for Landscape or Portrait mode
You can use your GiiNii picture frame in either landscape mode (where the frame is wider than
tall) or in portrait mode (where the frame is taller than wide). The GiiNii picture frame
automatically changes how the pictures are displayed. First in a landscape mode when placed
sideways; or portrait mode by rotating the digital photo frame clockwise Please be sure to adjust
the position of the changeable back-stand, depending on the way you use your picture frame.
Note: The auto rotation feature displays pictures in a landscape or portrait view. It does not reorient pictures that were taken sideways
Replacement Parts
If you need a replacement part for your GiiNii Digital Photo Frame, call us at 1-866-909-3550 or
write to us at: customerservice@giinii.com.
Chapter 4: Programming
Here is a list of the different Menu Options on your GiiNii digital picture frame. Yes, it’s a long list
but the more you play with these functions, the more you’ll be able to get the most out of your
new picture frame. In this section, you’ll see the bold heading of the menu item (example: Photo)
and a short description of what that selection/feature is about, and the Sub-Menu options (listed
here in italics) that are part of this Menu selection. Press the “Exit” button to bring up the Menu
and then press the “Menu” button to get into the following modes:
Photo
This menu mainly focuses on the display effect and interval time of photos
Copy
Delete
Play Mode
Copy One: to copy current photo image
Copy All: to copy all the photo images.
Delete One: to delete current photo image.
Delete All: to delete all the photo images.
Single or Repeat All or Random
Collage
Off, Mother’s day, Baseball, Golf and Fishing
Slideshow
Yes (default) or No
15
Page 16

GiiNii International Model GN-811
with Music
Ratio
Actual Size, Fit Image ( fits image to screen)
Slideshow
Fast (5 sec), Medium (10 sec), Slow (20 sec), Half Hour or Hourly
Interval
Transition
Effect
Random
Blinds
Fade
Wipe
Lines
Split
Box
Melt
Off
Pictures are displayed in a random manner
Horizontal blinds: flips to the next picture like opening curtain blinds
Vertical blinds: flips to next picture like French blinds open
Images slowly disappears and a new image slowly comes in
Present image slowly wipes away displaying the next image. Wipes are
options in the following direction
Up
Down
Left
Right
Horizontal Lines: Transition to the next picture happens with a series of
horizontal lines running over the screen
Vertical lines: Transition to the next picture happens with a series of lines
running vertical across the screen
Lines appear and transition to a certain direction to reveal a new pict ure. The
transitions happen in the following formats :
Up
Down
Left
Right
IN: Image shrinks down in a square from outside the center while
displaying the next image
OUT: Image expands in a square from inside the center of the present
picture to full size
Blending out of the present image and blending in of the next image
No Transition effect selected
Favorite
You can store pictures in this digital picture frame, thanks to its built-in internal memory.
These photos are stored in the “My Favorite” menu option.
Music
This menu focuses on play-effect settings of music.
Copy
Copy One: Copy current music file
Delete
Copy All: Copy all music files
Delete One: Delete current music file.
Delete All: Delete all music files.
16
Page 17

GiiNii International Model GN-811
)
Play Mode
Single: Play a single music file
Repeat All: Continuously play all music files in order
Random: Play music files in a random fashion
Video
This menu focuses on play-effect settings of video.
Copy
Delete
Play Mode
Copy One: Copy current video file
Copy All: Copy all video files
Delete One: Delete current video file.
Delete All: Delete all video files.
Single: Play a single video file
Repeat All: Continuously play all video files in order
Random: Play video files in a random fashion
Clock
This menu focuses on three option settings, Clock, Alarm and Smart Sleep.
Clock Style
Date
Time
Time Format
Set one of the following: Clock, Calendar, Off
Set date: Year – Month – Day format
Set Time: Hour: Minute
Set time format: 12-hour, 24-hour
Alarm
Active
Time
Snooze
Sound
Frequency:
Volume
Helpful Tips
• When the alarm Bell rings, press [Exit] or [Menu] button to
end it, or you can press the five position buttons to select
“Snooze”. (Snooze will ring out again at the set time
interval
, till you press [Exit]or [Menu]to end it.
Turn alarm on or off
Set Time: Hour: Minute
Set Snooze for : 5 minutes, 10 minutes, 15 minutes
Set sound for alarm: Melody 1, Melody 2, Melody 3
When will the alarm go off: Once, Every Day, Week Day,
Except Sunday
Set volume of alarm: Loud, Medium, Low, Mute
Setup
Language
Set player to one of the following languages:
English (Default)
French
German
Spanish
Dutch
Portuguese
17
Page 18

GiiNii International Model GN-811
Italian
Storage
Contrast
Brightness
Smart Sleep
System
Reset
Wall Mount
Set default memory storage location:
Internal Memory
Favorite
Memory Card
Set contrast to:
Sharp
Normal
Soft
Set brightness of display to:
Brighter
Normal
Darker
You can program your Player to go to sleep at a given
time with the Smart Sleep function. Simply set the time
you want your Player to go into sleep mode. The screen
light will dim, the volume will turn lower, the background
will display an evening base image (in dark red) and
show a big clock; if clock function is not open, then the
screen will turn off.
In addition to setting the timer, enable the light sensor
will also activate the Smart Sleep function by selecting
the Sensor item in Active menu.
Active
Sleep
Wake Up
Frequency
System information
Memory Size
Memory Used
Free Memory
Product version
Reset the player to default settings:
Yes
No
Is the player being wall mounted:
Yes
No
Set Smart Sleep to:
Timer
Sensor
Off
Set sleep timer
Select time for wake up
Once, Every Day, Weekday, Except Sunday
Chapter 5: Frequently Asked Questions
This product has been set to its standard mode of operations before shipping. If you encountered
problems while using the Digital picture frame, please refer to the following table for problems and
solutions.
Problem Solution
1. Hold the power button down for 3 seconds
Frame will not power
on
2. Make sure the power adapter is connected properly on the frame
and at the electrical wall socket.
3. Unplug the power adapter from the frame, wait 5 seconds and
18
Page 19

GiiNii International Model GN-811
press the power button
1. This device supports following memory cards: SD, MMC, xD, MS,
MMC+, MS Duo, and Compact Flash. Mini SD, USB flash drive,
Micro SD and MS Duo can be played with an adaptor (not
Nothing happens
when I insert a
memory Card
Images appear
upside down
Music or Video will
not play
provided).
2. After formatting the card, copy the backup files to the memory
card again
3. If the problem still persists, try a new memory card or a different
brand of memory card
The Digital Photo Frame is upside down. Rotate the frame to the
correct side.
The Music must be MP3 or a WMA format
The Video must be of a AVI or MOV format (320x240) video format
19
Page 20

GiiNii International Model GN-811
V
V
Chapter 6: Other Features
Connecting to a PC
You can transfer photo, music, and movies to the photo frame from your PC. You may either use
the internal memory or insert an external memory card. Turn off the photo frame’s power and
connect the photo frame to your PC using a mini-USB cable. Turn the photo frame back on and
wait for the below figure to display on the photo frame. Auto detection will occur for Windows
2000/ME/XP and MAC OS.
Your PC can now access the external memory card inserted in the photo frame and the internal
memory. They will be displayed at “Devices with removable storage” under My Computer. You
may now move photo and music files onto them just like you would with any external USB drive
or normal hard drive.
In this mode, the external memory includes xD, SD, MMC, MS, MMC+, Compact Flash card and
MS Duo can be access with an adaptor (not provided).
Product Specifications
162.0mm(W) x 121.5mm(H)
8” Diagonal
Horizontal:140° (Left to Right)
ertical: 120° (Up to Down)
LCD Screen
Shell Material
Buttons
Supported Cards
Photo Format
Effective
display
Dot Pitch 0.2025mm(W) x 0.2025mm(H)
Resolution 800 x 600 Image Pixels
Brightness 250 cd/m2
iewing Angle
(CR≥10)
ABS (Color may be vary)
Function Buttons x 7, Power Button x 1
SD (4GB), XD (2GB), MS (2GB), MMC (1GB), MMC+
(1GB), SDHC, CF-I
JPEG (baseline, up to 20M pixels image resolution),
TIFF (baseline; “II” (4949.H): Little-endian; Chunky
format: RGBRGB; No compression; MultiStrip),
GIF file format (still GIF only)
Music Format
Movie clip
Format
Supports MP3 (MPEG-1 Audio Layer 3) and WMA music
file format.
Supports AVI/MOV file format (Motion-JPEG with PCM
audio encoding up to Up to VGA, 2.8Mbps)
20
Page 21

GiiNii International Model GN-811
USB Port
USB 2.0 (Host) full speed
Chapter 7: Regulatory Issues & Warranty
Regulation & Compliance
This equipment has been tested and found to comply with the limits for a Class B digital device,
pursuant to Part 15 of the FCC Rules. These limits are designed to provide reasonable protection
against harmful interference in a residential installation. This equipment can radiate radio
frequency energy and, if not installed and used in accordance with the instructions, may cause
interference to radio communications.
However, there is no guarantee that interference will not occur in a particular installation. If this
equipment does cause harmful interference to radio or television reception, which can be
determined by turning the equipment off and on, the user is encouraged to try to correct the
interference by one of the following measures:
-Reorient or relocate the receiving antenna.
-Increase the separation between the equipment and receiver.
-Connect the equipment into an outlet on a circuit different from that to which the receiver is
connected.
-Consult the dealer or an experienced radio/TV technician for help.
GiiNii 90-Day Limited Warranty
Please read this Limited Warranty carefully. The limited warranty set forth below is given by
GiiNii, the maker of your new Digital picture frame, when purchased in the United States of
America, it’s territories, Canada or Mexico through an authorized retailer and used for noncommercial purposes. We warranty this product against manufacturing and material defects for a
period of 90 days from the date of purchase. Do not return your product to the retailer for
warranty claims.
1. Please maintain the Warranty Statement in a safe place along with your dated sales
receipt. Please retain the original box in the event
Returning your product for a warranty claim in best done in the original box or an
alternative package that ensure its safe return to GiiNii. Please contact our Customer
Service team about the appropriate return-shipping package.
GiiNii Customer Service and Technical Support: 1-866-909-3550, on line at:
www.giinii.com or via e-mail: customer service@giinii.com.
2. Parts and Labor Coverage. During the first 90 days of ownership, GiiNii will repair or
replace the product, at its option, at no charge if the product is found to be defective due
to material or manufacturing defects. GiiNii will provide a new product of similar or
greater value at its discretion. Or, provide new or rebuilt replacement parts at its sole
discretion. Replacement or repair of one part of the product does not constitute
replacement or repair of other parts of the product. The customer bears the
responsibility to ship the product back to GiiNii, at their cost. Pending review of the
product, that shipping cost will be refunded to the customer. To make a warranty claim,
you must first contact Customer Service and receive a Return Authorization Code. No
repairs or replacements can be made without a Return Authorization Code. After the
first 90 days of ownership, repair costs are the responsibility of the owner.
3. Excluded Items Not Covered by the Warranty:
a Cosmetic damage or damages due to accident, misuse, abuse or negligence;
b Commercial use of the product;
c Damage due to improper operation, improper maintenance, improper power
supply;
you need to make a warranty claim.
21
Page 22

GiiNii International Model GN-811
d Damage rendered to unsupported memory media or damages incurred to the
digital frame due to usage of unsupported memory media.
e Customer inability to read, understand the provided instructions on how to properly
use the product.
f Modifications of any part of the product in any way;
g Damage resulting from unauthorized attempted repair of the product;
h Damage resulting from acts of nature or God.
To make a Warranty Claim please have the following items:
a Your original dated proof of purchase from an authorized retailer in the United
States;
b Your original package that your product was sold in. Your warranty claim will not be
honored without the original purchase receipt. If you do not have the original package,
please consult with our Customer Service team to determine the best way to return
your product to us. GiiNii cannot be responsible for damages incurred during return
shipping; insurance is highly recommended.
c Please provide written statement (typed or printed in block letters) that describes
why your product is defective. On this document, you will need to include the Return
Authorization Code provided by Customer Service, as well as your Name, return
address, and a daytime phone number. Return shipments to GiiNii should be insured
and sent via Registered Mail with proof of delivery.
Warranty Disclaimers
GiiNii and its parent company, affiliates or subsidiaries shall not be liable for any
incidental or consequential damages for breach of any expressed or implied warranty
on this product. Except to the extent prohibited by applicable law, any implied warranty
of merchantability or fitness for a particular purpose on this product is limited in duration
to the duration of this warranty. Application of this warranty may vary by state; this
warranty gives you specific legal rights and you may have others based on the state you
live in.
22
 Loading...