

Page 1

GiiNii GH-7AWP/GH-8DNP/GH-ADNP
Digital Picture Frame
User Manual
Mode d'emploi
Manual del usuario
www.giinii.com
Page 2

Page 3

Digital Picture Frame
Copyright
No part of this publication may be reproduced, transmitted,
transcribed, stored in a retrieval system or translated into any
language or computer language, in any form or by any means,
electronic, mechanical, magnetic, optical, chemical, manual or
otherwise, without the prior written permission of the company.
Disclaimer
GiiNii makes no representations or warranties, either
expressed or implied, with respect to the contents hereof and
specifically disclaims any warranties, merchantability or fitness
for any particular purpose. Further, the company reserves the
right to revise this publication and to make changes from time to
time in the contents hereof without obligation to notify any person
of such revision or changes.
Safety instructions
Before operating the Picture Frame carefully read and follow the
instructions below.
•
Retain this User Manual for future reference.
Read the safety and operating instructions carefully before
•
using the product. All warnings on the product and in the
operating instructions should be observed.
Do not place this product under direct sunlight or near heat
•
sources, such as in a closed car under sunlight or near a
stove. The outer casing of this product may become deformed
and the sophisticated sensors inside may become damaged
due to excessive heat.
Do not use this product near water, in the rain or allow any
•
liquid to get inside this product. W ater and moisture may cause
short-circuit to the electronic components and lead to
malfunctions.
English
Copyright EN - i
Page 4

Digital Picture Frame
•
E
nglish
•
•
•
•
•
•
•
•
•
Do not use this product near strong electromagnetic sources,
such as a microwave oven. The electromagnetic interference
may cause this product to malfunction.
Do not drop or apply shock/vibration to this product. Strong
impacts may damage the components inside.
Do not insert objects other than compatible memory cards into
the memory card slots of this product. The metal contacts
inside the slots can easily become damaged by foreign
objects.
Do not use an unknown power adapter other than the one
supplied with the PictureFrame. Connecting this product to an
unknown power adapter is very dangerous and may lead to
fire or explosion.
Do not cut, bend, modify, place heavy objects, or step on the
power adapter cord. Otherwise the external insulation may be
damaged and result in short-circuit or fire.
If there are strange odors or heat emitting from this product or
any signs of malfunction, disconnect the PictureFrame from the
power immediately and contact your dealer for inspection or
service.
Use a smooth, soft cloth to clean the surface of the screen. Do
not use liquid cleaners or glass cleaners.
If a foreign substance or water gets in this product, turn the
power off immediately and disconnect the power adapter.
Next, remove the foreign substance or water, and then send
the product to your nearest service center.
Do not attempt to disassemble or modify this product. There
are no user serviceable parts inside this product, and any
unauthorized modifications will void the warranty.
Although the LCD panel is made with high-precision
technology and has effective pixels of 99.99% or more, black
dots or bright points of light (red, blue or green) may appear
constantly on the LCD panel. This is a structural property of
the LCD panel and is not a malfunction.
Safety instructionsEN - ii
Page 5

Digital Picture Frame
Table of contents
Key features . . . . . . . . . . . . . . . . . . . . . . . . . . . . . . . . . . . . . . . 1
What’s in the box . . . . . . . . . . . . . . . . . . . . . . . . . . . . . . . . . . . 2
Overview . . . . . . . . . . . . . . . . . . . . . . . . . . . . . . . . . . . . . . . . . . 3
Right view. . . . . . . . . . . . . . . . . . . . . . . . . . . . . . . . . . . . . . . . 3
Rear view . . . . . . . . . . . . . . . . . . . . . . . . . . . . . . . . . . . . . . . . 5
Operating the PictureFrame . . . . . . . . . . . . . . . . . . . . . . . . . . 6
Using the control buttons . . . . . . . . . . . . . . . . . . . . . . . . . . . . 7
Using the remote control (GH-ANDP only)
Replacing the remote cont rol battery . . . . . . . . . . . . . . . . 10. .
Getting started . . . . . . . . . . . . . . . . . . . . . . . . . . . . . . . . . . . . 11
Step 1: Using the adjustable back stand . . . . . . . . . . . . . . . 11
Step 2: Connecting to power . . . . . . . . . . . . . . . . . . . . . . . . 13
Step 3: First usage. . . . . . . . . . . . . . . . . . . . . . . . . . . . . . . . 14
Step 4: Basic setup . . . . . . . . . . . . . . . . . . . . . . . . . . . . . . . 14
Selecting a language . . . . . . . . . . . . . . . . . . . . . . . . . . . . 14
Setting the date and time. . . . . . . . . . . . . . . . . . . . . . . . . 15
Step 5: Inserting a memory card/USB flash drive . . . . . . . . 16
Compatible memory card format s . . . . . . . . . . . . . . . . . . 17
Step 6: Copying photos to internal memory . . . . . . . . . . . . . 18
Step 7: Connecting the Picture Frame to a computer . . . . . 19
Step 8: Replacing the paper mat . . . . . . . . . . . . . . . . . . . . . 20
Using the main menu . . . . . . . . . . . . . . . . . . . . . . . . . . . . . . . 22
Managing photos . . . . . . . . . . . . . . . . . . . . . . . . . . . . . . . . . . 24
Manually copying photos to the internal memory . . . . . . . . . 24
Tagging photos to an album. . . . . . . . . . . . . . . . . . . . . . . . . 26
Removing photos from an album. . . . . . . . . . . . . . . . . . . 29
Managing photos by using the TIMELINE album. . . . . . . 30
Creating a new album . . . . . . . . . . . . . . . . . . . . . . . . . . . . . 31
. . . . . . . . . . . . . 8.
English
Table of contents EN - iii
Page 6

Digital Picture Frame
E
nglish
Viewing photos . . . . . . . . . . . . . . . . . . . . . . . . . . . . . . . . . . . . 36
Using EnerGiiNii™ . . . . . . . . . . . . . . . . . . . . . . . . . 39. . . . . . .
Using CLOCK (G-button) . . . . . . . . . . . 41. . . . . . . . . .. . . . . ..
Using SETTINGS . . . . . . . . . . . . . . . . . . . . . . . . 44. . . . . . . . . . .
Frequently asked questions . . . . . . . . . . . . . . . . . . . . . . . . . 48
Regulation and compliance . . . . . . . . . . . . . . . . . . . . . . . . . .50
Appendix . . . . . . . . . . . . . . . . . . . . . . . . . . . . . . . . . . . . . . . . . 51
Modifying an album . . . . . . . . . . . . . . . . . . . . . . . . . . . . . . . 32
Deleting an album. . . . . . . . . . . . . . . . . . . . . . . . . . . . . . . . . 33
Using other options in the PHOTO ALB U MS men u. . . . . . . 33
Deleting photos . . . . . . . . . . . . . . . . . . . . . . . . . . . . . . . . 33
Rotating photos . . . . . . . . . . . . . . . . . . . . . . . . . . . . . . . . 34
Applying photo effects . . . . . . . . . . . . . . . . . . . . . . . . . . . 35
Running a slideshow by using the TIMELINE album . . . . . . 38
Selecting a clock skin. . . . . . . . . . . . . . . . . . . . . . . . . . . . . . 41
Switching between Clock view and Slideshow view. . . . . . . 42
. . . . . . . . . . 43 . .
DIGITAL SCRAPBOOK Using
Date and Time page. . . . . . . . . . . . . . . . . . . . . . . . . . . . . . . 45
General Settings page . . . . . . . . . . . . . . . . . . . . . . . . . . . . . 46
Information page. . . . . . . . . . . . . . . . . . . . . . . . . . . . . . . . . . 47
Recycling . . . . . . . . . . . . . . . . . . . . . . . . . . . . . . . . . . . . . . . 50
Specifications. . . . . . . . . . . . . . . . . . . . . . . . . . . . . . . . . . . . 51
List of compatible memory cards . . . . . . . . . . . . . . . . . . . . . 55
. . . . . . . . . . . .
Table of contentsEN - iv
Page 7

Digital Picture Frame
Dear Customer:
Thank you for bringing our GiiNii Digital Picture Frame into your
home. Now you will be able to view your growing digital picture
library in stunning clarity and share great memories with friends
and family.
To get the most out of your new GiiNii product, please read
through this entire User Manual before use.
Key features
This Picture Frame is equipped with the following features:
•
Clear and bright display.
•
Enables you to display photos that are stored in the internal
memory, a memory card or a USB flash drive.
•
Allows you to select a preferred power-saving option for the
Picture Frame using the
Allows you to use albums to manage and sort your photos
•
EnerGiiNii
easily.
•
Allows you to display photos in slideshow using various kinds
of templates available in SCRAPBOOK.
•
Multi-language On-Screen Display (OSD) menus.
Clock and Calendar functions.
•
™
feature.
English
Key features EN - 1
Page 8

Digital Picture Frame
What’s in the box
E
nglish
Carefully open the packing box and ensure that you have the
following items.
1. Digital Picture Frame x 1
2. AC power adapter x 1
3. Magnetic remote control (with CR2025 lithium battery) x 1
GH-ADNP Only)
4. Quick Start Guide x 1
5. User Manual x 1
6. Registration Card x 1
7. Warranty Card x 1
• Actual product appearance may vary from the illustrations shown in
this User Manual.
• Available accessories may vary depending on the area where you
purchased the Picture Frame.
•
The remote control is not included in the GH-7AWP and
models.
What’s in the boxEN - 2
GH-8DNP
Page 9

Digital Picture Frame
2
3
4
5
6
1
7
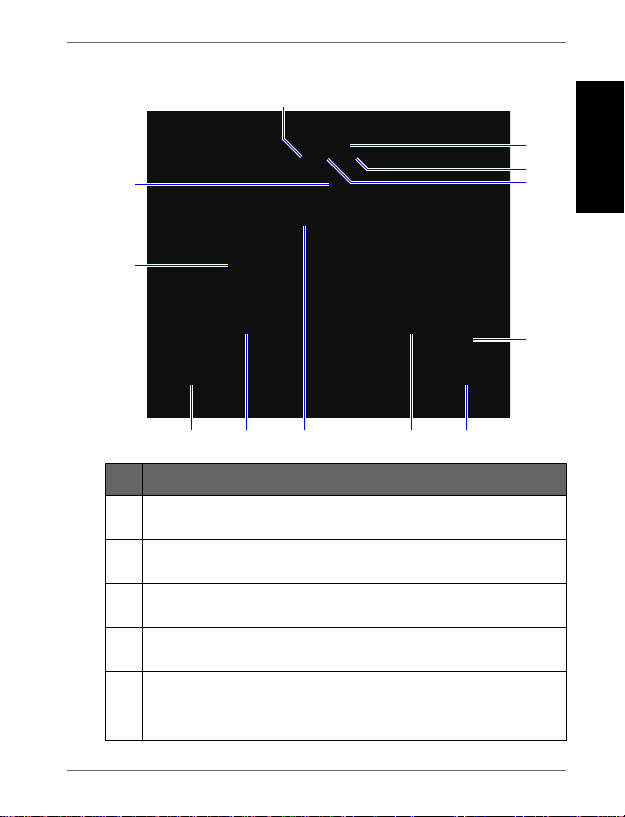
Overview
Right view
No. Description
1
Adjustable back stand
See "Step 1: Using the adjustable back stand" on page 11
for details.
2
Power button
Press the Power button to turn on/off the PictureFrame. See
"Step 2: Connecting to power" on page 13 for details.
English
Overview EN - 3
Page 10

Digital Picture Frame
No. Description
E
nglish
3
4
5
6
7
USB port
Allows for a USB flash drive.
•
Play back photos stored in the inserted drive.
Copy photos from the inserted drive to the PictureFrame.
•
See "Step 6: Copying photos to internal memory" on
page 18 for details.
Mini USB port
Allows you to connect the PictureFrame to a computer to
manage the files in the internal memory of the
PictureFrame. See
PictureFrame to "Step 7: Connecting the
a computer" on page 19 for details.
Memory card slot
™
Allows for an SD
Memory Stick
Memory Stick Duo
/SDHC™, MultiMediaCard™ (MMC),
™
(MS), Memory Stick PRO™ (MS PRO),
™
(MS Duo) and xD-Picture Card™ (xD)
memory card.
Play back photos stored in the inserted card.
•
Copy photos from the inserted card to the PictureFrame.
•
See "Step 6: Copying photos to internal memory" on
page 18 for details.
Power jack
Connect one end of the AC power adapter into the power
jack and the other end into a power outlet.
Remote control storage (GH-ADNP Only)
for
placing remote control.
Magnetic area
OverviewEN - 4
Page 11
Digital Picture Frame
1
2
3
4
5
6677
8
9
10
Rear view
No. Description
1
MENU button
See "Using the control buttons" on page 7 for details.
2
G-button
See "Using the control buttons" on page 7 for details.
3
ESC button (ESCAPE b utton)
See "Using the control buttons" on page 7 for details.
4
Scroll wheel/OK button
See "Using the control buttons" on page 7 for details.
5
Kensington
You can attach an anti-theft Kensington
this slot to help prevent possible theft.
®
security slot
®
lock and cable to
English
Overview EN - 5
Page 12

Digital Picture Frame
No. Description
6
E
nglish
EZ Lock System
You can use the EZ Lock Screws to lock or unlock the
wooden frame.
7
Wall mount hole (for landscape wall mounting)
Allows you to hang the PictureFra
8
Wall mount hole (for portrait wall mounting)
Allows you to hang the Picture F
9
Remote control storage (GH-ADNP only)
Magnetic area for placing remote control.
me horizontally on a wall.
rame vertically on a wall.
Operating the PictureFrame
You can use the control buttons on the back or the supplied
remote control to operate the PictureFrame.
• In this User Manual, instructions or examples provided are based
upon operation with the remote control. To know how to use the
control buttons, refer to "Using the control buttons" on page 7 for
details.
•
The remote control is supplied with the GH-ADNP only
EN - 6
Operating the PictureFrame
Page 13
1
2
3
4
Digital Picture Frame
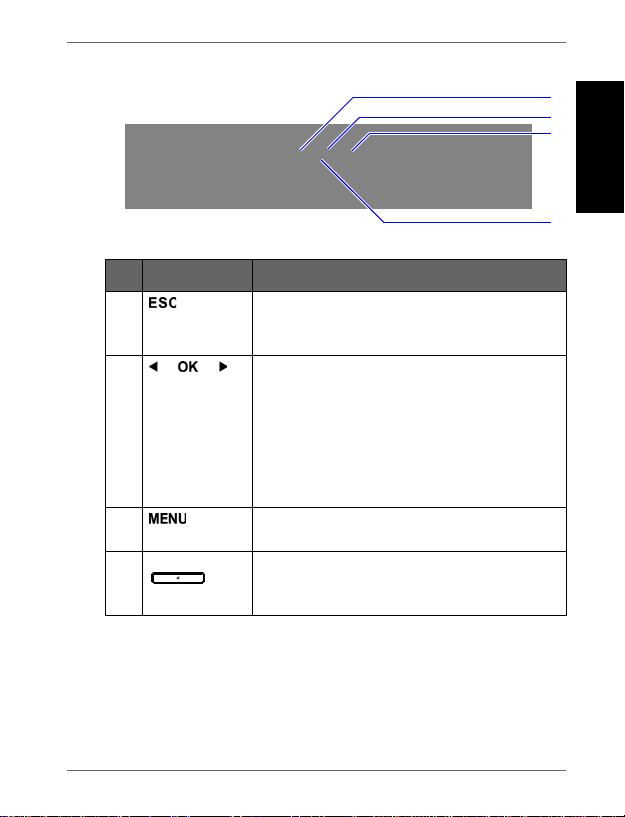
Using the control buttons
No. Icon Description
1
2
3
4
ESC button (ESCAPE button)
Cancels current operation and/or returns to
the previous page.
Scroll wheel/OK button
•
Press this button to enter or confirm
your operation/selection.
•
Scroll this button to the left to select the
previous item.
Scroll this button to the right to select
•
the next item.
MENU button
Displays the pop-up menu.
G- button
Switches between Clock view and
Slideshow view.
English
Operating the PictureFrame
EN - 7
Page 14

Maximum vertical and horizontal
angle approximately 30 degrees
Approximately 1.4 m (4.6 ft.) or less
Digital Picture Frame
Using the remote cont rol (GH-ADNP only)
E
nglish
The supplied remote control is magnetic. With its magnetic
backing, you can stow away the remote securely in the
designated area shown below.
The Picture Frame has a built-in remote control sensor behind the
paper matting.
EN - 8
Operating the Picture Frame
Page 15

Digital Picture Frame
1
2
ESC
6
7
OK
MEN U
3
4
5
TM
• Please remove the plastic strip under the battery before using the
remote control for the first time.
• The remote control is supplied with the GH-ADNP Only
No. Icon Description
1
ON/OFF
Turns unit on/off.
2
G-button
Switches between Clock view and Slideshow view.
3
ESC (Escape)
Returns to the previous page and/or access menu page.
4
RIGHT
Moves right or moves to the next item.
5
MENU
Displays the pop-up menu.
6
LEFT
Moves to the left or moves to the previous item.
7
OK
Confirms your selection.
English
Operating the Picture Frame
EN - 9
Page 16

Positive charge
faces upwards
Digital Picture Frame
Replacing the remote control battery
E
nglish
1. On the back of the remote control, press the locking tab to the
right.
2. Pull out the battery holder.
3. Insert the new battery into the holder. The battery must be
placed with the positive charge facing upwards, as shown in
the illustration below.
4. Slide the battery holder into the remote control.
• Failure to replace the battery in the correct manner may damage the
battery.
• Use only the specified battery type.
• Recycle or dispose used batteries properly according to local
guidelines and regulation s.
• The batteries are highly flammable, keep away from excessive heat
or moisture.
• If the battery is completely drained or not in use for extended period
of time, remove the battery to preven t lea kag e.
EN - 10
Operating the Picture Frame
Page 17

Digital Picture Frame
Getting started
Step 1: Using the adjustable back
stand
1. Gently pop out the back stand as shown below.
English
Getting started EN - 11
Page 18

Digital Picture Frame
1
2
2. To place the Picture Frame horizontally or vertically, you can
E
nglish
3. Pull out the back stand and adjust accordingly to the preferred
rotate the back stand by aligning the triangle mark with the
rounded points (1 or 2).
viewing angle.
• It is recommended to place the Picture Frame horizontally, because
this direction provides the best viewing and operating experience.
Getting startedEN - 12
Page 19

Digital Picture Frame
• By using the wall mount holes, you can hang the Picture Frame
horizontally or vertically on the wall.
Step 2: Connecting to power
1. Place the PictureFrame on a flat surface.
2. Connect the power adapter as below (1), and press the Power
button to turn on the PictureFrame (
• Power systems and plug types may vary depending on your
country/region.
• To turn off the Picture Frame, press the Power button.
2).
English
Getting started EN - 13
Page 20

Digital Picture Frame
Step 3: First usage
E
nglish
To help you get the most out of your PictureFrame, we installed a
video tutorial that automatically starts playing when you first turn
on your unit. To cancel the looping video and start playing your
own photos, press any of the buttons on the back. Follow the fivestep process to familiarize yourself with how the control buttons
work. This simple process is automatically disabled after the first
use. You can turn on the tutorial by going into SETTINGS.
Step 4: Basic setup
Select a language and set the date and time during the first use
of the Picture Frame.
Selecting a language
1. In the main menu, press or to select SETTINGS
, and then press .
2. Press .
The General Settings page appears.
Getting startedEN - 14
Page 21
Digital Picture Frame
3. Press , press to go to Language, and then press
again.
4. Press or to select a language you wish to use, and
then press .
5. Press to exit.
Setting the date and time
1. In the main menu, press or to select SETTINGS
, and then press .
The Date and Time page appears.
2. Press to highlight the Year field, press or to
select a year, and then press to confirm the setting.
3. Press to move to the Month field, press to highlight
the Month field, press or to select a month, and then
press to confirm the setting.
4. Repeat Step 3 for the remaining fields, including Date, Hour,
Minute, Mode, Current Time Zone and Second Time Zone.
5. Press to exit.
English
Getting started EN - 15
Page 22

SD/SDHC MultiMediaCard Memory Stick Memory Stick
PRO
xD-Picture
Card
Memory S tick
Duo
USB flash drive
Digital Picture Frame
Step 5: Inserting a memory card/
USB flash drive
E
nglish
You can turn on the PictureFrame and play back the pre-installed
photos in the internal memory with no memory card/USB flash
drive inserted.
To play back your own files, insert a compatible memory card or
USB flash drive that contains supported files into the
corresponding slot on the PictureFrame as illustrated below.
For more information about the supported file formats, refer to
"Specifications" on page 51.
Getting startedEN - 16
Page 23

Digital Picture Frame
Compatible memory card formats
Memory card formats Maximum capacity
SD/SDHC 32GB
MultiMediaCard (MMC) 1GB
Memory Stick (MS) 4GB
Memory Stick PRO (MS PRO) 2GB
Memory Stick Duo (MS Duo) 2GB
xD-Picture Card (xD) 2GB
USB flash drive 16GB
• Maximum capacity specifications listed above are subject to
change without prior notice.
• The memory card slot supports hot-swap function. In other words,
you can change or remove the memory card when the power of the
Picture Frame is either turned on or turned off.
• The Picture Frame supports both Windows and MAC operating
systems. Howev er, when formatting y ou r me mory ca rds, use FAT16
and FAT32 file systems in Windows only. Formatting memory cards
with NTFS or MAC is not supported.
• To use a microSD, a miniSD or a Memory Stick Micro (M2) card, a
card adapter is required.
English
Getting started EN - 17
Page 24

Digital Picture Frame
Step 6: Copying photos to internal
memory
E
nglish
When inserting a memory card or a USB flash drive, you will be
asked to copy all photos to the internal memory.
If “Smart Copy” is set to “Resize” under “General Settings”, photos
will be resized to the screen resolution when copied to the internal
memory to optimize the storage capacity. Please keep a copy of the
original photos on your memory card or USB flash drive.
■
To copy all photos contained in the inserted memory card (or
USB flash drive), select the check mark ✓ and press to
proceed.
To view photos without copying them to the Picture Frame,
■
select the cross mark ✕
start playing back the photos automatically from the inserted
memory card or USB flash drive.
• Do not remove the memory card/USB flash drive before the copy
process is completed.
• If the files you wish to copy from the memory card/USB flash drive
already exists in the internal memory of the Picture Frame, the files
will be overwritten when you select
and press . The PictureFrame will
to proceed.
✓
Getting startedEN - 18
Page 25

Digital Picture Frame
Step 7: Connecting thePictureFrame
to a computer
You can connect the PictureFrame to a computer using a mini
USB cable (to be purchased separately) to easily manage the
files in the internal memory of the Picture F ram e.
1. Start the computer and turn on the PictureFrame.
2. Connect the smaller end of the USB cable to the mini USB port
of the PictureFrame.
3. Connect the other end of the USB cable to a USB port on the
computer, making sure the connectors are fully inserted.
4. Once connected, the PhotoFrame will enter PC transfer mode
automatically.
5. When the computer has detected the PictureFram e, the
Picture Frame will appear in “My Computer” as “removable
disk”.
Now you can freely transfer the files in the Picture Frame as you
would on other disk drive.
English
• You can copy photos from the computer to the Picture Frame, and
vice versa.
• The files in the memory cards and USB flash drive cannot be
viewed/edited via USB connection.
Getting started EN - 19
Page 26

Digital Picture Frame
Step 8: Replacing the paper mat
E
nglish
Y our PictureFrame may come with one or more bonus paper mats
depending on your purchased model. You can replace the
existing paper mat with the one supplied (if available). Follow the
instructions below to replace the supplied paper mat.
1. On a flat table, place the PictureFrame facing down on top of a
soft towel. Be careful not to scratch the unit.
2. Twist the EZ Lock Screws on the back of the PictureFrame to
the “UNLOCK” position, then carefully lift up the core unit from
the wood frame.
3. Remove the existing paper mat.
Getting startedEN - 20
Page 27

Digital Picture Frame
4. Install the supplied bonus paper mat.
5. Install the PictureFrame to the wooden frame, and secure the
PictureFrame by tightening the EZ Lock Screws to the “LOCK”
position.
English
Getting started EN - 21
Page 28

1
23 45
6
Digital Picture Frame
Using the main menu
E
nglish
When you turn on the PictureFrame, the main menu below
appears. You can press or to select the desired menu,
and then press to enter the selected menu.
No. Description
1
EnerGiiNii
Allows you to select a power-saving option for the
PictureFrame.
See for details.
2
CLOCK & CALENDAR
Allows you to set your favorite clock skins.
See for
™
EnerGiiNii™" on page 39"Using
"Using CLOCK (G-button)" on page 41
details.
3
DIGITAL SCRAPBOOK
Allows you to display photos in slideshow with various
preloaded templates.
See for details.
"Using DIGITAL SCRAPBOOK" on page 43
Using the main menuEN - 22
Page 29

Digital Picture Frame
No. Description
4
SLIDESHOW
Allows you to display photos in slideshow.
See "Viewing photos" on page 36 for details.
5
PHOTO ALBUMS
Allows you to manage your photos and sort them by using
different albums.
See "Managing photos" on page 24 for details.
6
SETTINGS
Allows you to configure the settings of the Picture Frame.
See "Using SETTINGS" on page 44 for details.
English
Using the main menu EN - 23
Page 30

Digital Picture Frame
E
Managing photos
nglish
You can use the PHOTO ALBUMS menu to manage photos in
the internal memory, memory card or USB flash drive.
Manually copying photos to the
internal memory
In addition to the automatic “Smart Copy” feature (see page 18),
you can manually copy photos from ext ernal storage devices to
the internal memory and tag photos to an album.
The example below demonstrates how to copy photos from a
memory card to the internal memory and tag photos into an
album.
1. Insert a compatible memory card to the memory card slot.
2. In the main menu, press or to select PHOTO
ALBUMS, and then press .
3. Select Memory Card, and then press .
Managing photosEN - 24
Page 31

Digital Picture Frame
The screen shows the photos contained in your memory card.
4. If there are more than one page, you can press or to
go to the previous or next page to browse photos. (If not, skip
this step.)
5. Press to enable the selection mark, showing in orange.
6. Press or to move to the photo you wish to select,
and then press to confirm the selection.
The selected photo will have a blue selection mark.
Repeat Step 6 to select more photos as desired.
If you wish to select all the photos shown on the current page, select
“Select All” in the pop-up menu and press , then continue with
Step 7.
7. Press .
8. From the pop-up menu, press or to select Tag It ,
and then press .
English
Managing photos EN - 25
Page 32

Digital Picture Frame
9. Select a default target album to copy and sort the photos into
this specified album.
E
nglish
Tagging photos to an album
1. In the main menu, press or to select PHOTO
ALBUMS, and then press .
The screen shows:
the file source, including USB, Memory Card and
•
Internal Memory.
the default albums in the internal memory, including
•
TIMELINE, Pre-installed Library, Uncategorize,
Family, Friends and Vacation.
• The “USB” and “Memory Card” file sources will only appear when a
USB flash drive and a memory card have been inserted to the
Picture Frame.
• For details about the “TIMELINE” album, see "Managing photos by
using the TIMELI NE album" on page 30.
Managing photosEN - 26
Page 33

Digital Picture Frame
2. Press or to select the source of your photos, such
as the Internal Memory album, and then press . (Y ou can
also select USB or Memory Card, if available.)
The screen shows all the photos that are available in the
internal memory.
3. If there are more than one page, you can press or to
go to the previous or next page to browse photos. (If not, skip
this step.)
4. Press to enable the selection mark, showing in orange.
5. Press or to move to the photo you wish to select,
and then press to confirm the selection.
The selected photo will have a blue selection mark.
Repeat Step 5 to select more photos as desired.
6. Press .
If you wish to select all the photos shown on the current page, select
“Select All” in the pop-up menu and press . Then proceed to
Step 7.
English
Managing photos EN - 27
Page 34

Digital Picture Frame
7. From the pop-up menu, press or to select Tag It,
E
nglish
then press .
8. Select the destination album for the photos to be stored.
Managing photosEN - 28
Page 35

Digital Picture Frame
Removing photos from an album
1. In the PHOTO ALBUMS menu, press or to select an
album from which you want to remove the photos, and then
press .
The screen shows the photos in the album.
2. Press to enable the selection mark, showing in orange.
3. Press or to move to the photo you wish to select,
and then press to confirm the selection.
The selected photo will have a blue selection mark.
Repeat Step 3 to select more photos as desired.
4. Press .
If you wish to select all the photos shown on the current page, select
“Select All” in the pop-up menu and press . Then proceed to
Step 5.
5. From the pop-up menu, press or to select
Uncategorize, and then press .
The photos will be removed from the album, but will not be
deleted from the internal memory.
English
Managing photos EN - 29
Page 36

Digital Picture Frame
Managing photos by using the TIMELINE
album
E
nglish
In PHOTO ALBUMS, you can use the TIMELINE album to
search for photos in the internal memory according to the time
span specified.
1. In the PHOTO ALBUMS menu, press or to select
TIMELINE, and then press .
2. Press . When the < > marks appear, press or to
adjust the settings in the Year field, and then press again.
In this step, you can also search for photos taken in a specific
period of time under the TIMELINE album by pressing
and selecting the time frame.
3. Press to move to the Month field, and repeat Step 2 to
adjust the settings.
Managing photosEN - 30
Page 37

Digital Picture Frame
4. Press to move to , and then press to start
playback.
The photos taken in the time span you specified above will
appear on the screen.
Creating a new album
1. In the PHOTO ALBUMS menu, press display the pop-up
menu, and then press to select Create Album.
2. In the Album Name field that appears, use the on-screen
keyboard to enter a desired name.
English
Managing photos EN - 31
Page 38

Digital Picture Frame
•
Press or to select a letter, and then press
E
nglish
3. Now the new album is created.
The Picture Frame allows you to create up to 12 custom albums.
to enter the letter.
Press to toggle between letters and numbers.
•
To add a space, press or to move to Space,
•
and then press .
T o delete your last input, press or to move to
•
Back, and then press .
To complete your input, press or to move to
•
Done, and then press .
Modifying an album
1. In the PHOTO ALBUMS menu, press or to select an
album for which you wish to modify the album name, and then
press .
2. Select Edit Name, and then press .
3. In the Album Name field that appears, use the on-screen
keyboard to enter a desired name.
4. Once you have finished editing the album name, press to
exit.
Managing photosEN - 32
Page 39

Digital Picture Frame
Deleting an album
1. In the PHOTO ALBUMS menu, press or to select an
album that you wish to delete, then press .
2. Select Delete Album, and then press .
Default albums including TIMELINE, Pre-installed Library,
Uncategorize, Family, Friends and Vacation cannot be deleted.
Using other options in the PHOTO
ALBUMS menu
Deleting photos
1. In the PHOTO ALBUMS menu, press or to select an
album, and then press .
2. Press to enable the selection mark, showing in orange.
3. Press or to move to the photo you wish to select,
and then press to confirm the selection.
The selected photo will have a blue selection mark.
Repeat Step 3 to select more photos as desired.
4. Press .
If you wish to select all the photos shown on the current page, select
“Select All” in the pop-up menu and press . Then proceed to
Step 5.
English
Managing photos EN - 33
Page 40

Digital Picture Frame
5. From the pop-up menu, press or to select Delete,
E
nglish
and then press .
Rotating photos
1. In the PHOTO ALBUMS menu, press or to select an
album, and then press .
2. Press to enable the selection mark, showing in orange.
3. Press or to move to the photo you wish to select,
and then press to confirm the selection.
The selected photo will have a blue selection mark.
Repeat Step 3 to select more photos as desired.
4. Press .
If you wish to select all the photos shown on the current page, select
“Select All” in the pop-up menu and press . Then proceed to
Step 5.
5. From the pop-up menu, press or to select Rotate,
and then press .
The photo will be rotated 90 degrees clockwise.
6. Repeat Step 5 if you wish to rotate the photo into other angles.
Managing photosEN - 34
Page 41

Digital Picture Frame
Applying photo effects
1. In the PHOTO ALBUMS menu, press or to select an
album, and then press .
2. Press to enable the selection mark, showing in orange.
3. Press or to move to the photo you wish to select,
and then press to confirm the selection.
The selected photo will have a blue selection mark.
Repeat Step 3 to select more photos as desired.
4. Press .
If you wish to select all the photos shown on the current page, select
“Select All” in the pop-up menu and press . Then proceed to
Step 5.
5. From the pop-up menu, press or to select Photo
Effects, and then press .
6. Press or to select the effect you wish to apply to the
selected photo, including SEPIA, ORIGINAL and BLACK &
WHITE, and then press .
English
Managing photos EN - 35
Page 42

Digital Picture Frame
E
Viewing photos
nglish
1. In the main menu, press or to select SLIDESHOW,
and then press .
The “USB” and “Memory Card” albums only appear when a USB flash
drive and a memory card have been inserted to the Picture Frame.
2. Press or to select the album that contains the
photos you wish to display in slideshow, and then press .
If you wish to pause the slideshow, press .
Viewing photosEN - 36
Page 43

Digital Picture Frame
3. To configure slideshow settings, press to display the popup menu. You can adjust the settings below.
•
Transition Effect: selects the transition effect you
wish to apply to the slideshow.
•
Slideshow Interval: selects the slideshow interval
between photos.
The default transition effect “Pan & Zoom” does not allow
customized interval settings.
Brightness: selects the level of screen brightness.
•
•
Contrast: selects the level of contrast.
Saturation: selects the level of saturation.
•
English
Viewing photos EN - 37
Page 44

Digital Picture Frame
Running a slideshow by using the
TIMELINE album
E
nglish
1. In the SLIDESHOW menu, press or to select
TIMELINE, and then press .
2. In the pop-up screen, specify a time span to include the photos
you wish to display in slideshow.
In this step, you can also search for photos taken in a specific
period of time under the TIMELINE album by pressing
and selecting the time frame.
3. Select , and then press to start playback.
The TIMELINE feature only applies to photos stored in the memory
card from the card reader. Please copy any photos on the USB drive
to the inserted memory card if you wish to access this feature.
Viewing photosEN - 38
Page 45

Digital Picture Frame
Using EnerGiiNii
™
Using EnerGiiNii
The
power-saving options.
1. In the main menu, press or to select
and then press .
2. Press or to select a desired option, and confirm with
.
For details about the power-saving options, refer to the table
below.
Option Description
Off
Auto 50% Saves 50% on power consumption during
menu provides various pre-defined
Turns off
nighttime and automatically resumes normal
power consumption during daytime.
EnerGiiNii
™
EnerGiiNii
™
.
™
English
Using
EnerGiiNii ™
EN - 39
Page 46

Digital Picture Frame
Option Description
E
nglish
Auto 100% Puts the PictureFrame into sleep mode during
Save 20% Always saves 20% on power consumption.
Save 50% Always saves 50% on power consumption.
• Nighttime is defined as hours from 9:00 p.m. to 7:00 a.m..
• Daytime is defined as hours from 7:00 a.m. to 9:00 p.m..
• Using EnerGiiNii
nighttime and automatically resume normal
power consumption during daytime.
™
does not affect the photo quality.
EN - 40
Using EnerGiiNii™
Page 47

Digital Picture Frame
Using CLOCK (G - button)
Selecting a clock skin
The PictureFrame provides various preloaded clock and calendar
skins. To set a default clock skin to be displayed in Clock view,
follow the steps below.
More designer clock ski ns are avai lab l e fo r download at
www.GiiNii.com. Please visit our website to download more skins.
1. In the main menu, press or to select CLOCK &
CALENDAR, and then press .
2. Press or to select a desired skin.
English
Using CLOCK (G-Button)
EN - 41
Page 48

Digital Picture Frame
3. Press and select Default.
E
nglish
4. Press to set the selected clock skin as default.
The default clock skin will be displayed when
(or ) is pressed.
Switching between Clock view and
Slideshow view
You can press to toggle between Clock view and
Slideshow view.
• When switching from Clock view to Slideshow view, the
PictureFrame starts the slideshow that was running previously.
• If the last slideshow was playing from memory card or USB and is
no longer available, the Picture Frame will start a slideshow from the
Internal Memory.
EN - 42
Using CLOCK (G-Button)
Page 49

Digital Picture Frame
Using DIGITAL SCRAPBOOK
GiiNii SCRAPBOOK feature
experience in enjoying photo slideshows.
Log on to www.GiiNii.com and make your own personal scrapbook.
1. In the main menu, press or to select SCRAPBOOK,
and then press .
2. Press or to select a template, and then press .
3. Select an album that contains the photos you wish to display in
slideshow, and then press .
provides a brand new user
English
ThePicture Frame will start to display the photos in slideshow
using the selected template.
Using SCRAPBOOK EN - 43
Page 50

Digital Picture Frame
E
nglish
The SETTINGS menu allows you to configure the settings of the
PictureFrame.
1. In the main menu, press or to select SETTINGS,
2. Press or to toggle among Date and Time, General
Using SETTINGS
and then press .
The Date and Time page appears.
Settings and Information pages.
3. Press to enter a page, and the first option in that page will
be highlighted.
Using SETTINGSEN - 44
Page 51

Digital Picture Frame
4. Press again. When the < > marks appear in the field,
press or to adjust the settings.
5. Press to exit.
Date and Time page
Item Option Description
Date - Allows you to set the date.
Time - Allows you to set the time.
Mode -
Current Time
Zone
Second Time
Zone
Allows you to select a time format
(12-hour clock or 24-hour clock).
Allows you to select the time zone
-
that matches your current
geographic location.
Allows you to set a second time
zone additionally.
English
Using SETTINGS EN - 45
Page 52

Digital Picture Frame
General Settings page
E
nglish
Item Option Description
1
Brightness
Smart Copy
Smart
Cropping
Language
Reset
FW Upgrade
Product Intro
2
3
4
5
Determines how photos are copied from the
external storage devices to the internal memory
when using the Smart Copy feature.
Resize
Normal Keeps the original file size.
Full-screen
Original
English
French
Spanish
Yes
No
Yes
No
On
Off
Allows you to select the level of
screen brightness.
Resizes the photos to save
memory space.
Selects to display photos in
original size or full screen.
Sets up the On-Screen Display
(OSD) language.
Returns all the settings back to
system default.
Upgrades the firmware of the
PictureFrame.
The start-up video tutorial for
major features and functions.
Using SETTINGSEN - 46
Page 53

Digital Picture Frame
Information page
Item Option Description
Version -
Tota l Mem ory -
Free Memory -
Shows the current firmware
version.
Shows the total capacity of the
internal memory.
Shows the remaining capacity of
the internal memory.
English
Using SETTINGS EN - 47
Page 54

Digital Picture Frame
Frequently asked questions
E
nglish
What memory card formats are compatible with the
PictureFrame?
SD/SDHC, MMC, MS, MS PRO, MS Duo and xD are
compatible with the Picture Frame. For details, refer to
"Compatible memory card formats" on page 17.
Why do some photos load faster than others?
Higher resolution photos load slower. Using a lower resolution
when taking photos will speed up loading time. Smart Copy
can be used to resize selected images to decrease loading
time.
How does auto rotation work?
The PictureFrame will display in a landscape mode if placed on
its long side (as shown on your product box). To display your
photos in a portrait mode, rotate the PictureFrame on it right
side.
Why are my photos appearing upside down?
The PictureFrame is placed upside down. Please rotate the
frame.
What types of image files can I view on my PictureFrame?
The Picture Frame supports playback of JPEG, BMP, JPEG
Progressive and EXIF images.
Can I connect my Picture Frame directly to my computer?
You can connect the PictureFrame directly to your computer via
a mini USB cable.
™
Frequently asked questionsEN - 48
Page 55

Digital Picture Frame
Will the tagged photos be reset if I pull out the SD card?
No. The Digital Picture Frame (DP F) will write information into
the MetaData of tagged photos. So the DPF will remember the
photo's album categorization the next time the SD card is reinserted to the unit.
The frame slows down signific antly on certain photos.
What can I do?
This is mainly due to extra processing time needed to decode
very large size high resolution files. The DPF's Smart Cropping
(ON by default) feature will automatically resize the file based
on the unit's screen resolution and will significantly reduce the
size of the photo and eliminate this issue. However, please
always keep a copy of the original photos on the computer.
The frame froze and will not re s pond, what can I do?
If the frame freezes, it is easy t o restart by unplugging from
power, then press power button again.
Why isn't the TIMELINE feature accessible for photos on
my USB drive?
The TIMELINE feature only applies to photos stored in the
memory card from the card reader. Please copy any photos on
the USB drive to the inserted mem ory card if you wish to
access this feature.
Why can't I tag my photos in my SD card to any albums?
Please check that your SD card is not locked because the DPF
will need to be able write information onto the files in order to
tag to Album.
English
Frequently asked questions EN - 49
Page 56

Digital Picture Frame
Regulation and compliance
E
nglish
Federal Communications Commission (FCC) Notice
This equipment has been tested and found to comply with the
limits for a Class B digital device, pursuant to Part 15 of the FCC
Rules. These limits are designed to provide reasonable
protection against interference in a residential installation. This
equipment can radiate radio frequency energy and, if not installed
and used in accordance with the instructions, may cause
interference to radio communications.
However, there is no guarantee that interference will not occur in
a particular installation. If this equipment does cause interference
to radio or television reception, which can be determined by
turning the equipment off and on, the user is encouraged to try to
correct the interference by one of the following measures:
•
Reorient or relocate the receiving antenna.
•
Increase the separation between the equipment and receiver.
•
Connect the equipment into an outlet on a circuit different from
that to which the receiver is connected.
Consult the dealer or an experienced radio/TV technician for
•
help.
Recycling
•
To minimize harm to the environment, the batteries supplied
with the PictureFrame do not contain mercury or nickel
cadmium. If possible, when disposing of batteries, use
recycling means available in your area.
•
The Picture Frame uses materials that can be recycled. To
minimize the amount of waste in the environment, check your
area for companies that will recover used televisions for
dismantling and collection of reusable materials, or contact
your dealer for recycling tips.
• Please dispose of the carton and packing material through the
proper waste disposal management in your area.
Regulation and complianceEN - 50
Page 57

GiiNii Digital PictureFrame
Appendix
Specifications
Specifications are subject to change without prior notice.
Model
LCD type
Backlight type LED
Aspect ratio 16:9
Screen
resolution
Brightness
Built-in internal
memory( for data
storage)
Supported
memory card
formats
Supported flash
drive
Supported
image file format
GH-7AWP GH-8DNP GH-ADNP
7” Analogue
LCD
480 x 234 pixels 800 x 600 pixels 800 x 600 pixels
150 cd/m
Approximately.
128 MB
SD, MMC, MS,
MS
Duo
USB flash drive
(using the USB
port)
JPEG, BMP,
JPEG
Progressive
and EXIF
2
PRO, MS
and xD
8” Digital LCD 10” Digital LCD
LED
4:3
250 cd/m
Approximately.
128 MB
SD, MMC, MS,
MS
PRO, MS
and xD
Duo
USB flash drive
(using the USB
port)
JPEG, BMP,
JPEG
Progressive
and EXIF
2
LED
4:3
300 cd/m2
Approximately.
128 MB
SD, MMC, MS,
MS
PRO, MS
and xD
Duo
USB flash drive
(using the USB
port)
JPEG, BMP,
JPEG
Progressive
and EXIF
English
Appendix
EN - 51
Page 58

GiiNii Digital PictureFrame
del
Mo
USB port
E
nglish
Mini port USB USB Host
Memory card
slots
2,0
2,0
GH-7AWP
USB Host
(Type-A) x 1,
HS
(Mini-B) x 1,
HS
6 in 1 card slot
GH-8DNP GH-ADNP
USB Host
(Type-A) x 1,
HS
USB Host
(Mini-B) x 1,
HS
6 in 1 card slot 6 in 1 card slot
2,0
2,0
USB Host
(Type-A) x 1,
HS
USB Host
(Mini-B) x 1,
HS
2,0
2,0
IR receiver
Input Power AC 100-220 V AC 100-220 V AC 100-220 V
Output Power DC 5 V 1 A
Auto picture
rotation/angle
switch
Clock/Calendar Yes
Back Stand
Language
supported
No
Yes
Yes,
foldable Yes,
English, French
and Spanish
No
DC 5 V 1 A
Yes
Yes
English, French
and Spanish
foldable Yes,
Yes
DC 5 V 2 A
Yes
Yes
foldable
English, French
and Spanish
Plug & Play
compatibility
Remote control No
EN - 52
Windows 7/XP/
Vista/2000, Mac
X
OS
Windows 7/XP/
Vista/2000, Mac
X
OS
No
Windows 7/XP/
Vista/2000, Mac
X
OS
Yes
Appendix
Page 59

GiiNii Digital PictureFrame
del
Mo
Interchangeable
Frame
Capability
Frame
Paper mat
GH-7AWP GH-8DNP
Yes
1
wooden frame1 wooden frame1 wooden frame
Yes
GH-ADNP
Yes
Yes
English
Yes
Yes
Appendix
EN - 53
Page 60

Digital Picture Frame
List of comp atible memory cards
Not all supported memory cards are included in the table below. For
technical support, contact your nearest service center for assistance.
Capacity
8MB TOSHIBA
32MB
64MB
128MB Panasonic
256MB SanDisk RIDATA
512MB
1GB
SD miniSD microSD MMC MS xD
Kodak
Canon
TwinMOS SanDisk
TOSHIBA
PQI
Kingston
SanDisk
Transcend Transcend
A-DATA
(80X)
RIDATA
(66X)
APACER
(60X)
Panasonic
(SDHC
Class 4)
Panasonic
Memory card formats
LEXAR
SanDisk
(MS Pro
Duo)
SONY (MS
Pro Duo)
SanDisk
(M2)
Transcend Kodak (H)
SanDisk
SanDisk
(Ultra II)
TOSHIBA
A-DATA
Kingston
Adapter
Transcend
Transcend FUJIFILM
OLYMPUS
(M)
FUJIFILM
English
Appendix EN - 54
Page 61

Digital Picture Frame
Capacity
E
nglish
2GB
4GB
Memory card formats
SD miniSD microSD MMC MS xD
Panasonic
(SDHC
Class 4)
Panasonic
(SDHC
Class 2)
SanDisk Transcend
Transcend A-DATA
TOSHIBA PQI
A-DATA
APACER
(60X)
SanDisk
Silicon
Power
(Ultima II
80X)
Kingston
(SDHC
Class 6)
A-DATA
(SDHC
Class 6)
Silicon
Power
(SDHC
Class 6)
TOSHIBA
(SDHC
Class 4)
RIDATA
(SDHC
Class 6)
Stargem
Panasonic
Transcend SanDisk
Silicon
Power
Kingston
SanDisk
SanDisk
(MS Pro HG
Duo)
SONY (MS
Pro Duo)
SanDisk
(MS Pro
Duo)
OLYMPUS
(M+)
OLYMPUS
(M)
FUJIFILM
(H)
AppendixEN - 55
Page 62

Digital Picture Frame
Capacity
8GB
16GB
32GB
SD miniSD microSD MMC MS xD
A-DATA
(SDHC
Class 6)
Transcend
(SDHC
Class 6)
Kingston
(SDHC
Class 6)
Transcend
(SDHC
Class 6)
Memory card formats
Kingston
SanDisk
TOSHIBA
SanDisk
(MS Pro
Duo)
SONY (MS
Pro Duo
Mark2)
SONY (MS
Pro Duo)
English
Appendix EN - 56
Page 63

Digital Picture Frame
E
nglish
<Memo>
AppendixEN - 57
Page 64

Cadre photo numérique Picture Frame
Droits d’auteur
Tous droits réservés. Il est interdit de reproduire, de transmettre,
de retranscrire, de mémoriser dans un système de recherche
documentaire ou de traduire toute partie de cette publication
dans une autre langue ou dans un autre langage informatique,
que ce soit par moyen électronique, mécanique, magnétique,
optique, chimique, manuel ou autre sans autorisation écrite
préalable de la société.
Clause de non-responsabilité
La société ne fait aucune représentation ou garantie, qu’elle soit
expresse ou implicite, à l'égard du contenu de la présente
publication et nie explicitement toute garantie, de qualité
marchande ou de convenance pour un motif particulier. De plus,
la société se réserve le droit de réviser la présente publication et
d'effectuer des changements de temps à autre du contenu de la
présente publication sans l'obligation d'aviser qui que ce soit
d'une telle révision ou modification.
Consignes de sécurité
Avant d'utiliser le PictureFrame, lisez et respectez soigneusement
les consignes ci-dessous.
Conservez le présent mode d'emploi pour référence future.
•
•
Lisez soigneusement les consignes de sécurité et d'utilisation
avant d'utiliser ce produit. Tous les avertissements sur
l'appareil et dans le mode d'emploi doivent être respectés.
Ne placez pas cet appareil sous les rayons directs du soleil ou
•
près de sources de chaleur, comme dans une voiture fermée
sous les rayons du soleil, ou encore près d'un poêle. Le boîtier
externe de cet appareil pourraient se déformer et les capteurs
sensibles à l'intérieur pourraient s'endommager lorsque
exposés à une chaleur excessive.
Français
Droits d’auteur FR - i
Page 65

Cadre photo numérique Picture Frame
N'utilisez pas ce produit près de l'eau, sous la pluie ou ne
•
permettez pas à un liquide de s'infiltrer à l'intérieur de cet
appareil. L'eau et l'humidité peuvent causer un court-circuit
aux composants électroniques et provoquer un mauvais
fonctionnement.
•
N'utilisez pas cet appareil près de fortes sources
électromagnétiques, comme un four à micro-ondes.
L'interférence électromagnétique peut causer un mauvais
fonctionnement de cet appareil.
•
F
rançais
N'échappez pas ou n'appliquez pas de chocs ou de vibrations
à cet appareil. Les impacts forts peuvent endommager les
composants intérieurs de ce produit.
N'insérez pas d'objets autres que les cartes mémoires
•
compatibles dans les logements de carte mémoire de cet
appareil. Les surfaces de contact métalliques à l'intérieur des
logements peuvent facilement être endommagées par des
corps étrangers.
N'utilisez pas d'adaptateur de courant inconnu autre que celui
•
fourni avec le PictureFrame. Le branchement de cet appareil à
un adaptateur de courant inconnu est très dangereux et peut
provoquer une incendie ou une explosion.
• Évitez de couper, plier ou modifier le cordon et ne placez pas
d'objets lourds ou ne marchez pas sur le cordon de
l'adaptateur de courant. Sinon l'isolation externe pourrait être
endommagée, ce qui risquerait d'entraîner un court-circuit ou
un incendie.
S'il y a une odeur étrange ou de la chaleur émise depuis cet
•
appareil ou des signes de mauvais fonctionnement,
débranchez immédiatement
alimentation électrique et communiquez avec votre revendeur
pour inspection ou service.
Utilisez un chiffon lisse et doux pour nettoyer la surface de
•
l'écran. N'utilisez pas de nettoyants liquides ou de nettoyants
pour vitres.
le PictureFrame de son
Consignes de sécuritéFR - ii
Page 66

Cadre photo numérique Picture Frame
Si une substance étrangère ou de l'eau s'infiltre dans cet
•
appareil, éteignez-le immédiatement et débranchez
l'adaptateur de courant. Ensuite, éliminez la substance
étrangère ou l'eau, puis expédiez l'appareil chez votre centre
de service le plus près.
•
Ne tentez pas de démonter ou modifier cet appareil. L'intérieur
de cet appareil ne comprend aucune pièce pouvant être
entretenue par l'utilisateur et toute modification non autorisée
annulera la garantie.
•
Même si l'écran à cristaux liquides est fabriqué grâce à une
technologie de haute précision et est composée de pixels
efficaces à 99,99 % ou plus, des points noirs ou des points
brilliants de lumière (rouge, bleu ou vert) peuvent apparaître
constamment sur l'écran à cristaux liquides. Ce phénomène
tient à une propriété structurale des écrans à cristaux liquides
et ne représente pas un mauvais fonctionnement.
Français
Consignes de sécurité FR - iii
Page 67

Cadre photo numérique Picture Frame
F
rançais
<Note de service>
Consignes de sécuritéFR - iv
Page 68

Cadre photo numérique Picture Frame
Table des matières
Caractér is t i ques princip a les . . . . . . . . . . . . . . . . . . . . . . . . . . 1
Contenu de l'emballage . . . . . . . . . . . . . . . . . . . . . . . . . . . . . . 2
Vue d'ensemble. . . . . . . . . . . . . . . . . . . . . . . . . . . . . . . . . . . . . 3
Vue de droite . . . . . . . . . . . . . . . . . . . . . . . . . . . . . . . . . . . . . 3
Vue arrière . . . . . . . . . . . . . . . . . . . . . . . . . . . . . . . . . . . . . . . 5
Fonctionnement du Picture Frame . . . . . . . . . . . . . . . . . . . . . 6
Utilisation des boutons de commande . . . . . . . . . . . . . . . . . . 7
Utilisation de la télécommande (Uniquement GH-ANDP)
Remplacement de la pile de la télécommande . . . . . . . . 10. .
Démarrage du PictureFrame . . . . . . . . . . . . . . . . . . . . . . . . 12
Étape 1: Utilisation du pied arrière réglable . . . . . . . . . . . . . 12
Étape 2: Branchement de l'alimentation. . . . . . . . . . . . . . . . 14
Étape 3: Première utilisation . . . . . . . . . . . . . . . . . . . . . . . . 15
Étape 4: Configuration de base . . . . . . . . . . . . . . . . . . . . . . 15
Sélection de la langue d'affichage . . . . . . . . . . . . . . . . . . 15
Réglage de la date et de l’heure . . . . . . . . . . . . . . . . . . . 16
Étape 5: Insertion d'une carte mémoire ou d'une clé USB
dans le PictureFrame . . . . . . . . . . . . . . . . . . . . . . . . . . . . . 17
Formats de carte mémoire compa tib le s. . . . . . . . . . . . . . 18
Étape 6: Copier des photos vers la mémoire interne . . . . . . 19
Étape 7: Connexion du PictureFrame à un ordinateur . . . . 20
Étape 8: Remplacement du passe-partout en papier. . . . . . 21
Utilisation du menu principal. . . . . . . . . . . . . . . . . . . . . . . . . 23
Gestion des photos . . . . . . . . . . . . . . . . . . . . . . . . . . . . . . . . 25
Copier des photos vers la mémoire interne . . . . . . . . . . . . . 25
Assignation de photos à un album . . . . . . . . . . . . . . . . . . . . 28
Retirer des photos d'un album. . . . . . . . . . . . . . . . . . . . . 30
Gestion de vos photos à l'aide de l'album
Français
. . . 8
Table des matières FR - v
Page 69

Cadre photo numérique Picture Frame
CHRONOLOGIE . . . . . . . . . . . . . . . . . . . . . . . . . . . . . . . 31
Création d'un nouvel album . . . . . . . . . . . . . . . . . . . . . . . . . 33
Modification d'un album existant. . . . . . . . . . . . . . . . . . . . . . 34
Suppression d'un album. . . . . . . . . . . . . . . . . . . . . . . . . . . . 35
Utilisation des autres options du menu ALBUM . . . . . . . . . . 35
Suppression de photos . . . . . . . . . . . . . . . . . . . . . . . . . . 35
Changement de l'orientation d'une photo. . . . . . . . . . . . . 36
Ajouter des effets photo. . . . . . . . . . . . . . . . . . . . . . . . . . 37
F
rançais
Affichage des photos . . . . . . . . . . . . . . . . . . . . . . . . . . . . . . . 38
Lancement d'un diaporama avec l'album TIMELINE . . . . . . 40
Planificateur auto intelligent pour économie d'énergie . . . 41
Utilisation du menu HORLOGE (G-button) . . . . . . 43. . . . . . .
Sélection d'une apparence d'affichage de l'horloge . . . . . . . 43
Basculement entre les modes horloge et diaporama. . . . . . 44
Utilisation de l'album personnalisé numérique . . . . . . . . . . 45
Utilisation du menu CONFIGURATION . . . . . . . . . . . . . . . . . 46
Menu Date et heure . . . . . . . . . . . . . . . . . . . . . . . . . . . . . . . 47
Menu Réglage général . . . . . . . . . . . . . . . . . . . . . . . . . . . . . 48
Menu Information . . . . . . . . . . . . . . . . . . . . . . . . . . . . . . . . . 49
Foire aux questions . . . . . . . . . . . . . . . . . . . . . . . . . . . . . . . . 49
Réglementation et conformité . . . . . . . . . . . . . . . . . . . . . . . . 52
Recyclage. . . . . . . . . . . . . . . . . . . . . . . . . . . . . . . . . . . . . . . 52
Annexe. . . . . . . . . . . . . . . . . . . . . . . . . . . . . . . . . . . . . . . . . . . 53
Spécifications techniques. . . . . . . . . . . . . . . . . . . . . . . . . . . 53
Liste des cartes mémoire compatibles . . . . . . . . . . . . . . . . . 55
Table des matièresFR - vi
Page 70

Cadre photo numérique Picture Frame
Cher client:
Merci d'avoir intégré le cadre photo numérique PictureFrame à
votre espace intérieur. Vous serez maintenant capable d'afficher
votre photothèque numérique avec une clarté sensationnelle et
de partager des souvenirs formidables avec vos amis et votre
famille.
Pour retirer le maximum de votre nouvel appareil GiiNii , veuillez
lire le présent mode d'emploi en entier avant utilisation.
Caractéristiques principales
Ce cadre photo numérique PictureFrame présente les
caractéristiques suivantes:
•
Affichage clair et brillant.
Vous permet d'afficher des photos stockées dans une
•
mémoire interne, sur une carte mémoire ou une clé USB.
•
Vous offre un choix d'options d'économie d'énergie grâce à la
fonction Planificateur auto intelligent.
Vous permet de gérer et classer facilement vos photos par
•
albums.
•
Vous permet d'afficher des photos en diaporamas selon
différents modèles disponibles dans votre Album personnalisé
numérique.
Menus d'affichage à l'écran (OSD) multilingues.
•
•
Fonctions d'horloge et de calendrier.
Français
Caractéristiques principales FR - 1
Page 71

Cadre photo numérique Picture Frame
Contenu de l'emballage
Ouvrez soigneusement l'emballage et assurez-vous d'avoir les
articles suivants :
1. Cadre de photos numériques x 1
2. Adaptateur de courant CA x 1
3. Télécommande magnétique (avec pile au lithium CR2025) x 1
Uniquement GH-ANDP
F
rançais
4. Guide de démarrage rapide x 1
5. Mode d'emploi x 1
6. Carte d'enregistrement x 1
7. Carte de garantie x 1
• L'apparence réelle de l'appareil peut différer des illustrations
trouvées dans le présent mode d'emploi.
• Les accessoires disponibles peuvent varier selon la région où vous
avez acheté le cadre de photos.
La télécommande n’est pas incluse dans les modèles GH-7AWP et
•
GH-8DNP.
Contenu de l'emballageFR - 2
Page 72

2
3
4
5
6
1
7
Cadre photo numérique Picture Frame
Vue d'ensemble
Vue de droite
Nº Description
1
Pied ajustable
Voir «Étape 1: Utilisation du pied arrière réglable» à la
page 12 pour plus de détails.
2
Bouton d'alimentation
Appuyez sur le bouton d'alimentation pour allumer/
éteindre le Picture Frame. Voir
l'alimentation» à la page 14 pour plus de détails.
Français
«Étape 2: Branchement de
Vue d'ensemble FR - 3
Page 73

Cadre photo numérique Picture Frame
Nº Description
3
Port USB
Compatible avec le lecteur flash USB.
Vous pouvez afficher les photos enregistrées sur le
•
lecteur inséré.
•
Vous pouvez copier des photos à partir d'une mémoire
insérée vers le PictureFrame. Voir
photos vers la mémoire interne» à la page 19 pour plus
F
rançais
4
Mini port USB
de détails.
Vous permet de connecter le PictureFrame à un ordinateur
pour gérer les fichiers dans la mémoire interne du
PictureFrame. Voir
un ordinateur» à la page 20 pour plus de détails.
5
Logements pour cartes mémoire
Le Picture Frame prend en charge les périphériques de
stockage suivants: SD
(MMC), Memory Stick
PRO), Memory Stick Duo
(xD).
•
Vous pouvez afficher les photos enregistrées sur la
carte mémoire insérée dans le PictureFrame.
Vous pouvez copier des photos vers le PictureFrame à
•
partir d'une carte mémoire. Voir «Étape 6: Copier des
photos vers la mémoire interne» à la page 19 pour plus
de détails.
6
Prise d'alimentation
Branchez une extrémité de l'adaptateur de courant CA
dans la prise d'alimentation du PictureFrame et l'autre
extrémité dans une prise de courant murale.
7
Rangement de la télécommande (uniquement GH-ADNP)
magnétique pour plac
Zone
«Étape 6: Copier des
PictureFrame à «Étape 7: Connexion du
™
/SDHC™, MultiMediaCard™
™
(MS), Memory Stick PRO™ (MS
™
(MS Duo) et xD-Picture Card™
ement de télécommande.
Vue d'ensembleFR - 4
Page 74

1
2
3
4
5
6677
8
9
10
Cadre photo numérique Picture Frame
Vue arrière
Nº Description
1
Bouton MENU
Voir «Utilisation des boutons de commande» à la page 7
pour plus de détails.
2
Bouton G
Voir «Utilisation des boutons de commande» à la page 7
pour plus de détails.
3
Bouton ÉCHAP
Voir «Utilisation des boutons de commande» à la page 7
pour plus de détails.
4
Bouton de la ro ulette de défi le ment
Voir «Utilisation des boutons de commande» à la page 7
pour plus de détails.
Français
Vue d'ensemble FR - 5
Page 75

Cadre photo numérique Picture Frame
Nº Description
5
Emplacement pour verrou antivol Kensington
Vous pouvez fixez un verrou et un câble antivols
Kensington
®
à cet emplacement afin d'aider à protéger
®
votre Picture Frame contre le vol.
6
Verrou EZ
Vous pouvez vous servir des vis de blocage EZ pour
verrouiller ou déverrouiller le cadre en bois.
F
rançais
7
Fente de suspension (pour fixation murale à l'italienne)
Vous permet de suspendre horizontalement le
PictureFrame à un mur.
8
Fente de suspension (pour fixation murale à la frança ise)
Vous permet de suspendre verticalement le PictureFrame à
un mur.
Fonctionnement du PictureFrame
Vous pouvez contrôler le PictureFrame à l'aide des boutons de
commande se trouvant à l'arrière du cadre, ou encore en vous
servant de la télécommande fournie avec l'appareil.
• Dans le présent mode d'emploi, les consignes ou les exemples
fournis sont basé s sur l' util is atio n de la t éléc omm ande . Pour sav oir
comment utiliser les boutons de commande, reportez-vous à la
section «Utilisation des bo uton s de co mmand e» à l a p ag e 7 pour en
savoir plus.
La télécommande est fournie uni quement avec le GH-ADNP.
•
FR - 6
Fonctionnement du PictureFrame
Page 76

1
2
3
4
Cadre photo numérique Picture Frame
Utilisation des boutons de
commande
Nº Icône Description
1
2
3
4
Bouton ÉCHAP
Annule l'opération en cours et/ou retourne
à l'écran précédent.
Bouton de la roulette de déf ilement
• Appu yez sur ce bouton pour entrer ou
confirmer une opération/sélection.
•
Faites tourner la roulette vers la gauche
pour déplacer le champ de sélection
vers la gauche ou le haut, ou encore
pour sélectionner l'élément précédent.
•
Faites tourner la roulette vers la droite
pour déplacer le champ de sélection
vers la droite ou le bas, ou encore pour
sélectionner l'élément suivant.
Bouton MENU
Fait apparaître le menu contextuel.
Bouton G
Permet de basculer entre les modes
horloge et diaporama.
Français
Fonctionnement du PictureFrame
FR - 7
Page 77

Angle vertical et horizontal
maximum approx. 30 degrés
Approx. 1,4 m (4,6 pi) ou moi ns
Cadre photo numérique Picture Frame
Utilisation de la télécommande
(Uniquement GH-ANDP)
La télécommande fournie est magnétique. Grâce à sa plaque
d'appui magnétique, vous pouvez la fixer à la zone supérieure
gauche du Picture]Frame tel qu'illustré ci-dessous.
F
rançais
Le PictureFrame est muni d'un capteur de télécommande situé
sous le cadre passe-partout en papier . Orientez la t élécommande
vers l'écran du PictureFrame tel qu'illustré ci-dessous.
FR - 8
Fonctionnement du PictureFrame
Page 78

Cadre photo numérique Picture Frame
1
2
ESC
6
7
OK
MEN U
3
4
5
TM
• Veuillez retirer le film plastique sous la pile avant d'utiliser la
télécommande pour la première fois.
• La télécommande est incluse uniquement avec les modèles
(Uniquement GH-ANDP)
Nº Icône Description
1
ON/OFF (activé/désactivé)
Allume/éteint le PictureFrame.
2
Bouton G
Permet de basculer entre les modes horloge et
diaporama.
3
ÉCHAP
Annule l'opération en cours et/ou retourne à l'écran
précédent.
4
DROITE/BAS
Déplace le champ de sélection vers la droite ou le
bas, ou sélectionne l'élément suivant.
5
MENU
Fait apparaître le menu contextuel.
6
GAUCHE/HAUT
Déplace le champ de sélection vers la gauche ou le
haut, ou sélectionne l'élément précédent.
Français
Fonctionnement du PictureFrame
FR - 9
Page 79

Cadre photo numérique Picture Frame
Nº Icône Description
7
OK
Entre ou confirme une opération/sélection.
Remplacement de la pile de la
télécommande
1. Trouvez la languette de verrouillage située à l'arrière de la
F
rançais
télécommande et poussez-la vers la droite.
2. Tirez le logement de la pile.
FR - 10
Fonctionnement du PictureFrame
Page 80

Borne positive
orientée vers le
haut
Cadre photo numérique Picture Frame
3. Insérez la nouvelle pile dans son logement. La pile doit être
placée avec la borne positive orientée vers le haut, tel
qu'indiqué sur l'illustration ci-dessous.
4. Repoussez le logement de la pile à l'intérieur de la
télécommande.
• Évitez de placer la pile dans des environnements surchauffés ou
excessivement humides.
• Ne pas remplacer la pile de la manière appropriée pourrait
endommager celle-ci.
• Utilisez uniquement des piles approuvées indiquées dans ce mode
d'emploi.
• Recyclez ou éliminez les piles usées de manière adéquate en
respectant les directives et réglementations locales.
• Ne jetez pas de piles dans le feu. Cela pourrait entraîner une
explosion.
• Si la pile est complètement vide ou si vous n'utilisez pas la
télécommande pendant une longue période, prenez soin de retirer
la pile afin de prévenir les fuites.
Fonctionnement du PictureFrame
Français
FR - 11
Page 81

Cadre photo numérique Picture Frame
Démarrage du Picture Frame
Étape 1: Utilis ation du pied arrière
réglable
1. Tirez doucement le pied arrière tel qu'illustré ci-dessous.
F
rançais
FR - 12
Démarrage du Picture Frame
Page 82

1
2
Cadre photo numérique Picture Frame
2. Pour placer le Picture Frame à
l'horizontale ou à la verticale,
vous pouvez faire pivoter le pied arrière en alignant la flèche
sur les points (1 ou 2).
3. Tirez le pied arrière et réglez-le en fonction de l'angle de vue
que vous préférez.
Français
• Il est recommandé de placer le cadre photo à l'horizontale, car cette
orientation offre une meilleur vue tout en facilitant le contrôle du
Picture Frame.
• Vous pouvez suspendre le Picture Frame horizontalement ou
verticalement à un mur en vous servant des fentes de suspension.
Démarrage du Picture Frame
FR - 13
Page 83

Cadre photo numérique Picture Frame
Étape 2: Branchement de
l'alimentation
1. Placez le Picture Frame sur une surface plane.
2. Branchez l'adaptateur de courant tel qu'illustré ci-dessous (1),
puis appuyez sur le bouton d'alimentation pour allumer le
PictureFrame (
F
rançais
• Les systèmes d'alimentation et les types de fiche peuvent varier
selon votre pays ou région.
• Pour éteindre le Picture Frame, appuyez à nouveau sur le bouton
d'alimentation.
2).
FR - 14
Démarrage du Picture Frame
Page 84

Cadre photo numérique Picture Frame
Étape 3: Première utilisation
Afin de vous aider à tirer le maximum de votre PictureFrame, nous
avons enregistré un tutoriel vidéo qui se lance automatiquement
la première fois que vous allumer l'appareil. Pour interrompre la
lecture en boucle du vidéo et commencer à afficher vos propres
photos, appuyez sur l'un des boutons situés à l'arrière du cadre.
Suivez la procédure en cinq étapes pour vous familiariser avec le
fonctionnement des boutons de commande. L'affichage de cette
procédure sera automatiquement désactivé après la première
utilisation du PictureFrame. Vous
tutoriel en accédant au menu CONFIGURATION.
pouvez réactiver l'affichage du
Étape 4: Configuration de base
Sélectionnez la langue d'affichage et réglez la date et l'heure lors
de votre première utilisation du PictureFrame.
Sélection de la langue d'affichage
1. Dans le menu principal, appuyez sur ou sur pour
sélectionner l'option CONFIGURATION , puis appuyez
Français
sur .
2. Appuyez sur .
Le menu Réglage général apparaît.
Démarrage du Picture Frame
FR - 15
Page 85

Cadre photo numérique Picture Frame
3. Appuyez sur , puis sur pour accéder à l'option
Langue, puis appuyez à nouveau sur .
4. Appuyez sur ou sur pour sélectionner la langue
d'affichage que vous désirez, puis appuyez sur .
5. Appuyez sur pour quitter.
F
rançais
Réglage de la date et de l’heure
1. Dans le menu principal, appuyez sur ou sur pour
sélectionner l'option CONFIGURATION , puis appuyez
sur .
Le menu Date et heure apparaît.
2. Appuyez sur pour mettre en surbrillance le champ
Année, appuyez sur ou pour sélectionner l'année,
puis appuyez à nouveau sur pour confirmer le réglage.
3. Appuyez sur pour déplacer le champ de sélection
jusqu'au champ Mois, appuyez sur pour mettre en
surbrillance le champ Mois, appuyez sur ou pour
sélectionner un mois, puis appuyez à nouveau sur pour
confirmer le réglage.
4. Répétez l'étape 3 pour les autres champs: Date, Heure,
Minutes, Mode, Fuseau horaire actuel et Fuseau horaire
secondaire.
5. Appuyez sur pour quitter.
FR - 16
Démarrage du Picture Frame
Page 86

SD/SDHC MultiMediaCard Memory Stick Memory Stick
PRO
xD-Picture
Card
Memory S tick
Duo
Clé USB Memory Stick
PRO Duo
Cadre photo numérique Picture Frame
Étape 5: Insertion d'une carte
mémoire ou d'une clé USB dans le
Picture Frame
Vous pouvez allumer le PictureFrame et afficher les photos
préalablement enregistrées dans la mémoire interne de l'appareil
sans qu'aucune carte mémoire ou clé USB ne soit insérée.
Pour afficher vos propres fichiers, insérez une carte mémoire ou
une clé USB compatible contenant des fichiers pris en charge par
l'appareil dans le logement pour carte mémoire correspondant du
Picture Frame, tel qu'illustré ci-dessous.
Français
Pour plus d'informations sur les formats de fichier pris en charge par
le Picture Frame, reportez-vous à la section
techniques» à la page 53.
Démarrage du Picture Frame
«Spécifications
FR - 17
Page 87

Cadre photo numérique Picture Frame
Formats de carte mémoire compatibles
Formats de carte
mémoire
Capacité maximum
SD 16 GB
microSD 16 GB
miniSD 4 GB
F
rançais
MMC 1 GB
MS 32 GB
xD 2 GB
• Les spécifications de capacités maximums énumérées ci-dessus
sont sujettes à changement sans préavis.
• Les cartes mémoire peuvent être insérées ou retirées « à chaud ».
Autrement dit, vous pouvez insérer ou retirer une carte mémoire
lorsque le PictureFrame est allumé au ss i bi en que l ors q u'i l es t éte i nt .
• Le cadre de photo s pr en d en ch ar ge les syst èm es d' ex pl oitatio n
Windows et MAC. Toutefois, lors du formatage de vos cartes
mémoire, assurez-vous de n'utiliser que les systèmes de fichiers
FAT16 et FAT32 sous Windows. Le formatage des cartes mémoire
avec NTFS ou MAC n'est pas pris en charge.
• Il est nécessaire d'utiliser un adaptateur pour carte mémoire pour
pouvoir insérer une carte microSD, une miniSD ou une carte
Memory Stick Micro (M2) dans le Picture Frame.
FR - 18
Démarrage du Picture Frame
Page 88

Cadre photo numérique Picture Frame
Étape 6: Copier des photos vers la
mémoire interne
Lorsque vous insérez une carte mémoire ou une clé USB dans le
PictureFrame, il vous sera demandé si vous souhaitez copier
toutes les photos vers la mémoire interne.
Si l'option “Copie intelligente” sous “R églage général” est réglée sur
“Redimensionner”, les photos seront automatiquement
redimensionnées en fonction de la résolution d'écran lorsque copiées
vers la mémoire interne, et ce afin d'optimiser la capaci té de stockage
de cette dernière. Veuillez vous assurer de conserver des copies des
photos originales sur votre carte mémoire ou votre clé USB.
Pour copier toutes les photos enregistrées sur la carte
■
mémoire insérée (ou la clé USB), sélectionnez la coche ✓,
puis appuyez sur pour confirmer.
■
Pour afficher des photos sans les copier vers la mémoire
interne du PictureFrame, sélectionnez la croix
sur . Le PictureFrame commencera automatiquement à
afficher les photos enregistrées sur la carte mémoire ou la clé
USB que vous avez insérée.
• Ne retirez pas la carte mémoire ou la clé USB avant que le
processus de copie ne soit terminé.
• Si les fichiers que vous souhaitez copier depuis la carte mémoire
ou clé USB existent déjà dans la mémoire interne du PictureFrame,
ces fichiers seront remplacés une fois que vous sélectionnerez
pour confirmer.
Démarrage du Picture Frame
✕, puis appuyez
✓
FR - 19
Français
Page 89

Cadre photo numérique Picture Frame
Étape 7: Connexion du PictureFrame
à un ordinateur
Vous pouvez connecter le PictureF
d'un câble mini USB (que vous devez acheter séparément) ce qui
vous permettra de gérer facilement les fichiers dans la mémoire
interne de votre PictureFrame.
1. Démarrez l'ordinateur et allumez le PictureFrame.
F
rançais
2. Branchez la petite extrémité du câble USB au port mini USB
du PictureFrame.
3. Branchez l'autre extrémité du câble à un port USB de
l'ordinateur en vous assurant que les connecteurs sont
complètement insérés dans leur port respectif.
4. Une fois connecté, le PictureFrame basculera
automatiquement en mode transfert PC.
5. Lorsque l'ordinateur détectera le Picture Frame, ce dernier
apparaîtra dans le « Poste de travail » ("My Computer”) sous
la forme d'un disque amovible.
Vous pouvez maintenant transférer librement les fichiers
enregistrés dans le PictureFrame de la même façon que vous
le feriez avec d'autres types de périphériques de stockage.
rame à un ordinateur à l'aide
• Vous pouvez copier des photos depuis votre ordinateur vers le
Picture Frame et vice versa.
• Les fichiers enregistrés sur les cartes mémoire et la clé USB ne
peuvent être vus ni modifiés via la connexion USB.
FR - 20
Démarrage du Picture Frame
Page 90

Cadre photo numérique Picture Frame
Étape 8: Remplacement du
passe-partout en papier
Il se peut que votre PictureFrame vienne avec un ou plusieurs
passe-partout supplémentaires selon le modèle que vous avez
acheté. Vous pouvez remplacer le passe-partout déjà en place
par l'un de ceux fournis avec le cadre photo (si disponible).
Suivez les instructions ci-dessous pour remplacer le
passe-partout en papier.
1. Placez une serviette propre ou un autre tissu doux sur une
surface plane, telle une table, et posez le PictureFrame sur le
tissu avec le côté face vers le bas. Prenez bien soin de ne pas
égratigner le PictureFrame.
2. Tournez les vis de blocage EZ à l'arrière du PictureFrame en
position “DÉVERROUILLER”, puis retirez le Picture Frame du
cadre.
Français
Démarrage du Picture Frame
FR - 21
Page 91

Cadre photo numérique Picture Frame
3. Retirez le passe-partout actuel.
F
rançais
4. Placez le passe-partout de remplacement dans le cadre.
5. Replacez le PictureFrame dans le cadre en bois et fixez-le en
place en tournant les vis de blocage EZ en position
“VERROUILLER”.
FR - 22
Démarrage du Picture Frame
Page 92

1
23 45
6
Cadre photo numérique Picture Frame
Utilisation du menu principal
Lorsque vous allumez le Picture Frame, l'écran principal
ci-dessous apparaît. Vous pouvez appuyer sur ou pour
sélectionner le menu souhaité, puis appuyez sur pour
accéder au menu que vous avez sélectionné.
Français
Nº Description
1
Planificateur auto intelligent pour économie d'énergie
Vous permet de sélectionner une option d'économie
d'énergie pour le PictureFrame.
Voir «Planificateur auto intelligent pour économie
d'énergie» à la page 41 pour plus de détails.
2
HORLOGE
Vous permet de choisir vos apparences d'affichage de
l'horloge préférées.
Voir
«Utilisation du menu HORLOGE (G-button)
à la page 43 pour plus de détails.
Utilisation du menu principal FR - 23
Page 93

Cadre photo numérique Picture Frame
Nº Description
3
Album personnalisé numérique
Vous permet d'afficher des photos en mode diaporama
selon différents modèles préenregistrés.
Voir «Utilisation de l'album personnalisé numérique» à la
page 45 pour plus de détails.
4
DIAPORAMA PHOTO
Vous permet d'afficher des photos en mode diaporama.
F
rançais
Voir «Affichage des photos» à la page 38 pour plus de
détails.
5
ALBUM
Vous permet de gérer vos photos et de les classer en
différents albums.
Voir «Gestion des photos» à la page 25 pour plus de
détails.
6
CONFIGURATION
Vous permet de régler les différents paramètres de
configuration du PictureFrame.
Voir «Utilisation du menu CONFIGURATION» à la page 46
pour plus de détails.
Utilisation du menu principalFR - 24
Page 94

Cadre photo numérique Picture Frame
Gestion des photos
Vous pouvez utiliser les options du menu ALBUM pour gérer les
photos enregistrées dans la mémoire interne, sur une carte
mémoire ou une clé USB.
Copier des photos vers la mémoire
interne
En plus de la fonction automatique de “Copie intelligente” (voir
page 19), vous pouvez copier manuellement des photos depuis
un périphérique de stockage externe vers la mémoire interne et
étiqueter des photos pour les assigner à un album.
L'exemple ci-dessous indique comment copier des photos depuis
une carte mémoire vers la mémoire interne du PictureFrame, et
comment étiqueter des photos pour les assigner à un album.
1. Insérez une carte mémoire compatible dans le logement pour
carte mémoire approprié.
2. Dans le menu principal, appuyez sur ou sur pour
sélectionner l'option ALBUM, puis appuyez sur .
Gestion des photos FR - 25
Français
Page 95

Cadre photo numérique Picture Frame
3. Sélectionnez Carte mémoire, puis appuyez sur .
L'écran affiche les photos enregistrées sur votre carte
mémoire.
F
rançais
4. S'il y a plus d'une page de photos, vous pouvez appuyer sur
ou pour accéder à la page précédente ou suivante
et en parcourir les photos. (Sinon, omettez cette étape.)
5. Appuyez sur pour activer le champ de sélection, affiché
en orangé.
6. Appuyez sur ou pour déplacer le champ de
sélection jusqu'à la photo que vous voulez sélectionner, puis
appuyez sur pour confirmer.
La photo sélectionnée sera marquée d'un cadre bleu.
Répétez l'étape 6 pour sélectionner les autres photos que vous
souhaitez sélectionner.
7. Appuyez sur .
Si vous voulez sélectionner toutes les photos affichées sur la page
actuelle, sélectionnez “Tout sélectionner” dans le menu contextuel et
appuyez sur . Passez ensuite à l'étape 7.
Gestion des photosFR - 26
Page 96

Cadre photo numérique Picture Frame
8. Depuis le menu qui apparaîtra, appuyez sur ou pour
sélectionner Étiqueter ceci, puis appuyez sur .
9. Sélectionnez un album de destination par défaut pour que les
photos y soient copiées et classées.
Français
Gestion des photos FR - 27
Page 97

Cadre photo numérique Picture Frame
Assignation de photos à un album
1. Dans le menu principal, appuyez sur ou sur pour
sélectionner l'option ALBUM, puis appuyez sur .
L'écran affichera:
la source du fichier, incluant USB, Carte mémoire et
•
Mémoire in t e r n e .
F
rançais
• Les sources “USB” et “Carte mémoire” n'apparaîtront que l orsqu'une
clé USB et une carte mémoire ont été insérées dans le Picture Frame.
• Pour plus de détails concernant l'album “CHRONOLOGIE”, voir la
section «Gestion de vos photos à l'aide de l'album CHRONOLOGIE»
à la page 31.
2. Appuyez sur ou pour sélectionner la source de vos
les albums par défaut se trouvant dans la mémoire
•
interne, incluant Chronologie, Photothèque
préinstallée, Non classifié, Famille, Amis et
Vacances.
photos, telle que l'album Mémoire interne, puis appuyez sur
. (Le cas échéant, vous pouvez également sélectionner
USB ou Carte mémoire.)
L'écran affiche toutes les photos enregistrées dans la mémoire
interne.
Gestion des photosFR - 28
Page 98

Cadre photo numérique Picture Frame
3. S'il y a plus d'une page de photos, vous pouvez appuyer sur
ou pour accéder à la page précédente ou suivante
et en parcourir les photos. (Sinon, omettez cette étape.)
4. Appuyez sur pour activer le champ de sélection, affiché
en orangé.
5. Appuyez sur ou pour déplacer le champ de
sélection jusqu'à la photo que vous voulez sélectionner, puis
appuyez sur pour confirmer.
La photo sélectionnée sera marquée d'un cadre bleu.
Répétez l'étape 5 pour sélectionner les autres photos que vous
souhaitez sélectionner.
6. Appuyez sur .
Si vous voulez sélectionner toutes les photos affichées sur la page
actuelle, sélectionnez “Tout sélectionner” dans le menu contextuel et
appuyez sur . Passez ensuite à l'étape 7.
7. Depuis le menu qui apparaîtra, appuyez sur ou pour
sélectionner Étiqueter ceci, puis appuyez sur .
Français
Gestion des photos FR - 29
Page 99

Cadre photo numérique Picture Frame
8. Sélectionnez un album de destination par défaut pour que les
photos y soient copiées et classées.
F
rançais
Retirer des photos d'un album
1. Dans le menu ALBUM, appuyez sur ou pour
sélectionner un album dont vous souhaitez retirer des photos,
puis appuyez sur .
L'écran affichera les photos contenues dans l'album.
2. Appuyez sur pour activer le champ de sélection, affiché
en orangé.
3. Appuyez sur ou pour déplacer le champ de
sélection jusqu'à la photo que vous voulez sélectionner, puis
appuyez sur pour confirmer.
La photo sélectionnée sera marquée d'un cadre bleu.
Répétez l'étape 3 pour sélectionner les autres photos que vous
souhaitez sélectionner.
4. Appuyez sur .
Si vous voulez sélectionner toutes les photos affichées sur la page
actuelle, sélectionnez “Tout sélectionner” dans le menu contextuel et
appuyez sur . Passez ensuite à l'étape 5.
Gestion des photosFR - 30
Page 100

Cadre photo numérique Picture Frame
5. Depuis le menu qui apparaîtra, appuyez sur ou pour
sélectionner Étiqueter ceci, puis appuyez sur .
Les photos seront retirées de l'album mais ne seront pas
supprimées de la mémoire interne.
Gestion de vos photos à l'ai de de l'album
CHRONOLOGIE
Dans le menu ALBUM, vous pouvez utiliser l'album
CHRONOLOGIE pour rechercher des photos dans la mémoire
interne selon le laps de temps spécifié.
1. Dans le menu ALBUM, appuyez sur ou sur pour
sélectionner l'option CHRONOLOGIE, puis appuyez sur .
2. Appuyez sur . Lorsque les symboles < > apparaissent,
appuyez sur ou pour régler les paramètres du
champ Année, puis appuyez à nouveau sur .
Français
Gestion des photos FR - 31
 Loading...