

Page 1

Page 2

Page 3

™
Digital Picture Frame
GiiNii
Copyright
© GiiNii™ 2010. All rights reserved. No part of this publication may
be reproduced, transmitted, transcribed, stored in a retrieval
system or translated into any language or computer language, in
any form or by any means, electronic, mechanical, magnetic,
optical, chemical, manual or otherwise, without the prior written
permission of GiiNii
™
.
Disclaimer
GiiNii™ makes no representations or warranties, either expressed
or implied, with respect to the contents hereof and specifically
disclaims any warranties, merchantability or fitness for any
particular purpose. Further, GiiNii
this publication and to make changes from time to time in the
contents hereof without obligation to notify any person of such
revision or changes.
™
reserves the right to revise
Safety instructions
Before operating the picture frame, carefully read and follow the
instructions below.
• Retain this User Manual for future reference.
• Read the safety and operating instructions carefully before
using the product. All warnings on the product and in the
operating instructions should be observed.
• Do not place this product under direct sunlight or near heat
sources, such as in a closed car under sunlight or near a
stove. The outer casing of this product may become deformed
and the sophisticated sensors inside may become damaged
due to excessive heat.
• Do not use this product near water, in the rain or allow any
liquid to get inside this product. W ater and moisture may cause
short-circuit to the electronic components and lead to
malfunctions.
English
Copyright EN - i
Page 4

GiiNii™ Digital Picture Frame
• Do not use this product near strong electromagnetic sources,
such as a microwave oven. The electromagnetic interference
English
may cause this product to malfunction.
• Do not drop or apply shock/vibration to this product. Strong
impacts may damage the components inside.
• Do not insert objects other than compatible memory cards into
the memory card slots of this product. The metal contacts
inside the slots can easily become damaged by foreign
objects.
• Do not use an unknown power adapter other than the one
supplied with the picture frame. Connecting this product to an
unknown power adapter is very dangerous and may lead to
fire or explosion.
• Do not cut, bend, modify, place heavy objects, or step on the
power adapter cord. Otherwise the external insulation may be
damaged and result in short-circuit or fire.
• If there are strange odors or heat emitting from this product or
any signs of malfunction, disconnect the picture frame from the
power immediately and contact your dealer for inspection or
service.
• Use a smooth, soft cloth to clean the surface of the screen. Do
not use liquid cleaners or glass cleaners.
• If a foreign substance or water gets in this product, turn the
power off immediately and disconnect the power adapter.
Next, remove the foreign substance or water, and then send
the product to your nearest service center.
• Do not attempt to disassemble or modify this product. There
are no user serviceable parts inside this product, and any
unauthorized modifications will void the warranty.
• Although the LCD panel is made with high-precision
technology and has effective pixels of 99.99% or more, black
dots or bright points of light (red, blue or green) may appear
constantly on the LCD panel. This is a structural property of
the LCD panel and is not a malfunction.
EN - ii
Safety instructions
Page 5

™
Digital Picture Frame
GiiNii
Table of contents
Key features . . . . . . . . . . . . . . . . . . . . . . . . . . . . . . . . . . . . . . . 1
What’s in the box . . . . . . . . . . . . . . . . . . . . . . . . . . . . . . . . . . . 2
Overview . . . . . . . . . . . . . . . . . . . . . . . . . . . . . . . . . . . . . . . . . . 3
Right view. . . . . . . . . . . . . . . . . . . . . . . . . . . . . . . . . . . . . . . . 3
Rear view . . . . . . . . . . . . . . . . . . . . . . . . . . . . . . . . . . . . . . . . 5
Operating the picture frame. . . . . . . . . . . . . . . . . . . . . . . . . . . 6
Using the control buttons . . . . . . . . . . . . . . . . . . . . . . . . . . . . 7
Using the remote control . . . . . . . . . . . . . . . . . . . . . . . . . . . . 8
Replacing the remote cont rol battery. . . . . . . . . . . . . . . . 10
Getting started . . . . . . . . . . . . . . . . . . . . . . . . . . . . . . . . . . . . 12
Step 1: Using the adjustable back stand . . . . . . . . . . . . . . . 12
Step 2: Connecting to power . . . . . . . . . . . . . . . . . . . . . . . . 14
Step 3: First usage. . . . . . . . . . . . . . . . . . . . . . . . . . . . . . . . 15
Step 4: Basic setup . . . . . . . . . . . . . . . . . . . . . . . . . . . . . . . 15
Selecting a language . . . . . . . . . . . . . . . . . . . . . . . . . . . . 15
Setting the date and time. . . . . . . . . . . . . . . . . . . . . . . . . 16
Step 5: Inserting a memory card/USB flash drive . . . . . . . . 17
Compatible memory card format s . . . . . . . . . . . . . . . . . . 18
Step 6: Copying photos and/or music to the internal
memory . . . . . . . . . . . . . . . . . . . . . . . . . . . . . . . . . . . . . . . . 19
Step 7: Connecting the picture frame to a computer . . . . . . 20
Step 8: Replacing the paper mat . . . . . . . . . . . . . . . . . . . . . 21
Using the main menu . . . . . . . . . . . . . . . . . . . . . . . . . . . . . . . 23
Managing photos . . . . . . . . . . . . . . . . . . . . . . . . . . . . . . . . . . 25
Manually copying photos to the internal memory . . . . . . . . . 25
Tagging photos to an album. . . . . . . . . . . . . . . . . . . . . . . . . 28
Removing photos from an album. . . . . . . . . . . . . . . . . . . 30
Managing photos by using the TIMELINE album. . . . . . . 31
Creating a new album . . . . . . . . . . . . . . . . . . . . . . . . . . . . . 33
Modifying an album . . . . . . . . . . . . . . . . . . . . . . . . . . . . . . . 34
English
Table of contents EN - iii
Page 6

GiiNii™ Digital Picture Frame
Deleting an album. . . . . . . . . . . . . . . . . . . . . . . . . . . . . . . . . 35
Using other options in the ALBUM menu. . . . . . . . . . . . . . . 35
English
Deleting photos . . . . . . . . . . . . . . . . . . . . . . . . . . . . . . . . 35
Rotating photos . . . . . . . . . . . . . . . . . . . . . . . . . . . . . . . . 36
Applying photo effects . . . . . . . . . . . . . . . . . . . . . . . . . . . 37
Viewing photos . . . . . . . . . . . . . . . . . . . . . . . . . . . . . . . . . . . . 38
Running a slideshow by using the TIMELINE album . . . . . . 40
Using EnerGiiNii Auto Scheduler . . . . . . . . . . . . . . . . . . . . .41
Using CLOCK (G-button) . . . . . . . . . . . . . . . . . . . . . . . . . . . . 43
Selecting a clock skin. . . . . . . . . . . . . . . . . . . . . . . . . . . . . . 43
Switching between Clock view and Slideshow view. . . . . . . 44
Setting an alarm. . . . . . . . . . . . . . . . . . . . . . . . . . . . . . . . . . 45
Using Digital Scrapbook . . . . . . . . . . . . . . . . . . . . . . . . . . . . 47
Using MEDIA CENTER . . . . . . . . . . . . . . . . . . . . . . . . . . . . . . 48
Watching videos . . . . . . . . . . . . . . . . . . . . . . . . . . . . . . . . . . 48
Playing music. . . . . . . . . . . . . . . . . . . . . . . . . . . . . . . . . . . . 50
Using SETTINGS. . . . . . . . . . . . . . . . . . . . . . . . . . . . . . . . . . . 52
Date and Time page. . . . . . . . . . . . . . . . . . . . . . . . . . . . . . . 53
General Settings page . . . . . . . . . . . . . . . . . . . . . . . . . . . . . 54
Information page. . . . . . . . . . . . . . . . . . . . . . . . . . . . . . . . . . 55
Frequently asked questions . . . . . . . . . . . . . . . . . . . . . . . . . 56
Regulation and compliance. . . . . . . . . . . . . . . . . . . . . . . . . . 58
Recycling . . . . . . . . . . . . . . . . . . . . . . . . . . . . . . . . . . . . . . . 58
Appendix . . . . . . . . . . . . . . . . . . . . . . . . . . . . . . . . . . . . . . . . . 59
Specifications. . . . . . . . . . . . . . . . . . . . . . . . . . . . . . . . . . . . 59
List of compatible memory cards . . . . . . . . . . . . . . . . . . . . .61
EN - iv
Table of contents
Page 7

™
Digital Picture Frame
GiiNii
Dear Customer:
™
Thank you for bringing our GiiNii
Digital Picture Frame into your
home. Now you will be able to view your growing digital picture
library in stunning clarity and share great memories with friends
and family.
™
To get the most out of your new GiiNii
product, please read
through this entire User Manual before use.
Key features
This picture frame is equipped with the following features:
• Clear and bright display.
• Enables you to display photos that are stored in the internal
memory, a memory card or a USB flash drive.
• Enables you to play back music and videos that are stored in
the internal memory, a memory card or a USB flash drive.
• Instant video playback from your handheld USB camcorder.
Simply plug in the device and go to ME DIA CENTER and
choose USB as playback source.
• Allows you to select a preferred power-saving option for the
picture frame using the EnerGiiNii Auto Scheduler feature.
• Allows you to use albums to manage and sort your photos
easily.
• Allows you to display photos in slideshow using various kinds
of templates available in DIGITAL SCRAPBOOK.
• Multi-language On-Screen Display (OSD) menus.
• Clock, Alarm and Calendar functions.
Our GiiNii picture frame is compatible with most USB camcorders for
plug n’ play playback. Transfer the video files to a SD card or USB
drive as an alternative if your camcorder is not compatible.
English
Key features EN - 1
Page 8

GiiNii™ Digital Picture Frame
What’s in the box
English
Carefully open the packing box and ensure that you have the
following items.
1. Digital Picture Frame x 1
2. AC power adapter x 1
3. Magnetic remote control (with CR2025 lithium battery) x 1
4. USB cable x 1
5. Quick Start Guide x 1
6. User Manual x 1
7. Registration Card x 1
8. Warranty Card x 1
• Actual product appearance may vary from the illustrations shown in
this User Manual.
• Available accessories may vary depending on the area where you
purchased the picture frame.
EN - 2
What’s in the box
Page 9
™
2
3
4
5
6
1
7
Digital Picture Frame
GiiNii
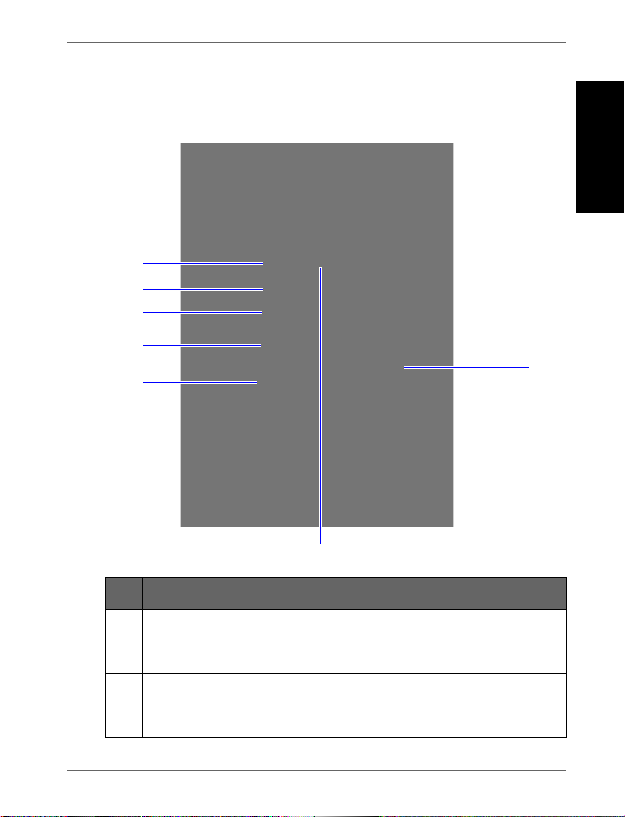
Overview
Right view
No. Description
1
Adjustable back stand
See "Step 1: Using the adjustable back stand" on page 12
for details.
2
Power button
Press the Power button to turn on/off the picture frame.
See "Step 2: Connecting to power" on page 14 for details.
English
Overview EN - 3
Page 10

GiiNii™ Digital Picture Frame
No. Description
3
English
USB port
Allows for a USB flash drive.
• Play back photos, music or videos stored in the inserted
drive.
• Copy photos or music from the inserted drive to the
picture frame. See "Step 6: Copying photos and/or
music to the internal memory" on page 19 for details.
4
Mini USB port
Allows you to connect the picture frame to a computer to
manage the files in the internal memory of the picture
frame. See "Step 7: Connecting the picture frame to a
computer" on page 20 for details.
5
Memory card slot
Allows for an SD
Memory Stick
Memory Stick Duo
memory card.
• Play back photos, music or videos stored in the inserted
card.
• Copy photos or music from the inserted card to the
picture frame. See "Step 6: Copying photos and/or
music to the internal memory" on page 19 for details.
6
Power jack
Connect one end of the AC power adapter into the power
jack and the other end into a power outlet.
7
Remote control storage
Magnetic area for placing remote control.
™
/SDHC™, MultiMediaCard™ (MMC),
™
(MS), Memory Stick PRO™ (MS PRO),
™
(MS Duo) and xD-Picture Card™ (xD)
EN - 4
Overview
Page 11

™
1
2
3
4
5
6677
8
9
10
Digital Picture Frame
GiiNii
Rear view
English
No. Description
1
MENU button
See "Using the control buttons" on page 7 for details.
2
G-button
See "Using the control buttons" on page 7 for details.
3
ESC button (ESCAPE b utton)
See "Using the control buttons" on page 7 for details.
4
Scroll wheel/OK button
See "Using the control buttons" on page 7 for details.
5
Kensington
®
security slot
You can attach an anti-theft Kensington
this slot to help prevent possible theft.
®
lock and cable to
Overview EN - 5
Page 12

GiiNii™ Digital Picture Frame
No. Description
6
English
EZ Lock System
You can use the EZ Lock Screws to lock or unlock the
wooden frame.
7
Speakers
Plays back the sound.
8
Wall mount hole (for landscape wall mounting)
Allows you to hang the picture frame horizontally on a wall.
9
Wall mount hole (for portrait wall mounting)
Allows you to hang the picture frame vertically on a wall.
10
Remote control storage
Magnetic area for placing remote control.
Operating the picture frame
You can use the control buttons on the back or the supplied
remote control to operate the picture frame.
In this User Manual, instructions or examples provided are based
upon operation with the remote control. To know how to use the
control button s, re fer to "Using the control buttons" on page 7 for
details.
EN - 6
Operating the picture frame
Page 13
™
1
2
3
4
Digital Picture Frame
GiiNii
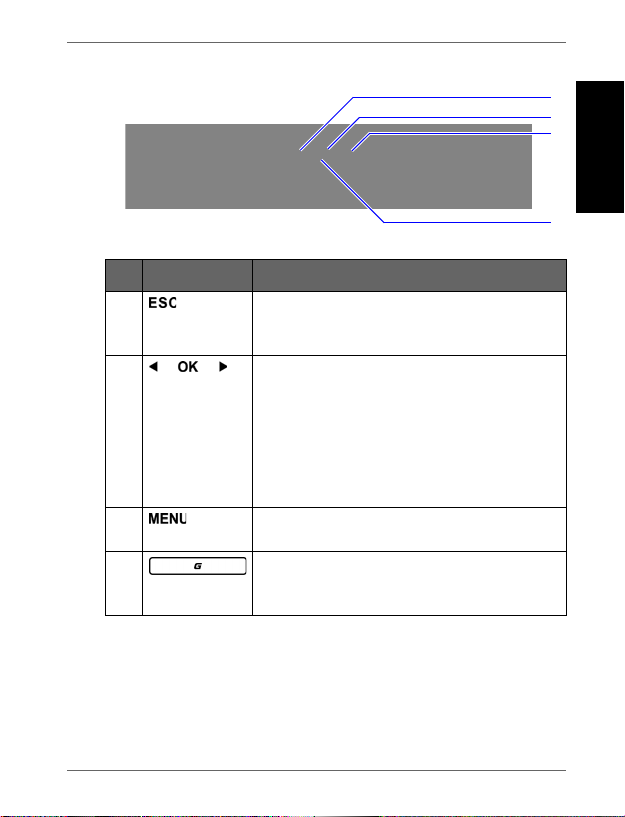
Using the control buttons
No. Icon Description
1
2
3
4
ESC button (ESCAPE button)
Cancels current operation and/or returns to
the previous page.
Scroll wheel/OK button
• Press this button to enter or confirm
your operation/selection.
• Scroll this button to the left to move left/
up, or select the previous item.
• Scroll this button to the right to move
right/down, or select the next item.
MENU button
Displays the pop-up menu.
G-button
Switches between Clock view and
Slideshow view.
English
Operating the picture frame EN - 7
Page 14

GiiNii™ Digital Picture Frame
Maximum vertical and horizontal
angle approximately 30 degrees
Approximately 1.4 m (4.6 ft.) or less
Using the remote control
English
The supplied remote control is magnetic. With its magnetic
backing, you can stow away the remote securely in the
designated area shown below.
The picture frame has a built-in remote control sensor behind the
paper matting.
EN - 8
Operating the picture frame
Page 15
12
3
4
5
6
7
8
9
10
™
Digital Picture Frame
GiiNii
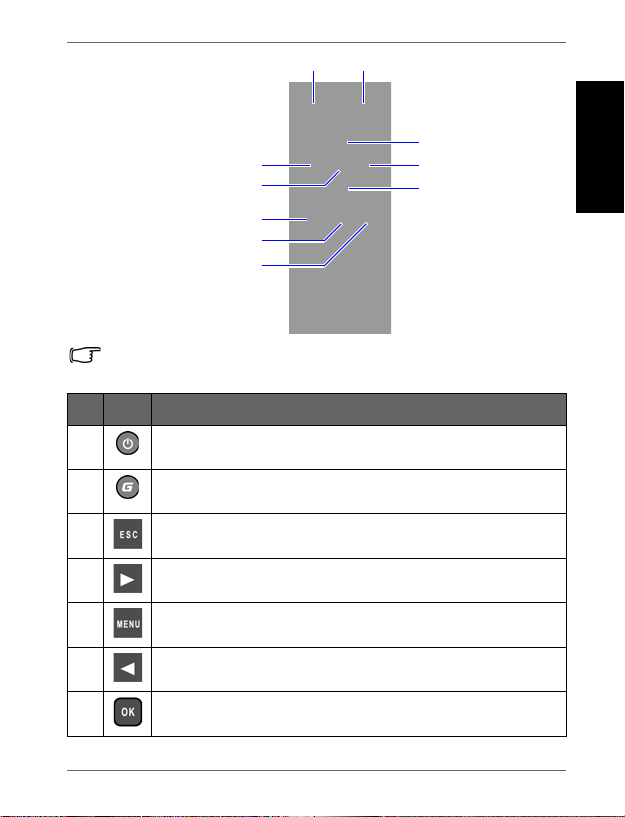
Please remove the plastic strip under the battery before using the
remote control for the first time.
No. Icon Description
1
ON/OFF
Turns unit on/off.
2
G-button
Switches between Clock view and Slideshow view.
3
4
ESC (ESCAPE)
Returns to the previous page and/or access menu page.
RIGHT/DOWN
Moves right/down, or moves to the next item.
5
6
7
MENU
Displays the pop-up menu.
LEFT/UP
Moves left/up, or moves to the previous item.
OK
Confirms your selection.
English
Operating the picture frame EN - 9
Page 16

GiiNii™ Digital Picture Frame
Positive charge
faces upwards
No. Icon Description
8
English
9
10
MUTE
Activates/deactivates the Mute mode.
VOLUME DOWN
Deceases the volume.
VOLUME UP
Increases the volume.
Replacing the remote control battery
1. On the back of the remote control, press the locking tab to the
right.
2. Pull out the battery holder.
3. Insert the new battery into the holder. The battery must be
placed with the positive charge facing upwards, as shown in
the illustration below.
EN - 10
Operating the picture frame
Page 17

™
Digital Picture Frame
GiiNii
4. Slide the battery holder into the remote control.
• Failure to replace the battery in the correct manner may damage the
battery.
• Use only the specified battery type.
• Recycle or dispose used batteries properly according to local
guidelines and regulations.
• The batteries are highly flammable, keep away from excessive heat
or moisture.
• If the battery is completely drained or not in use for extended period
of time, remove the battery to prevent leakage.
English
Operating the picture frame EN - 11
Page 18

GiiNii™ Digital Picture Frame
Getting started
English
Step 1: Using the adjustable back
stand
1. Gently pop out the back stand as shown below.
EN - 12
Getting started
Page 19

™
1
2
Digital Picture Frame
GiiNii
2. To place the picture frame horizontally or vertically, you can
rotate the back stand by aligning the triangle mark with the
rounded points (1 or 2).
3. Pull out the back stand and adjust accordingly to the preferred
viewing angle.
English
• It is recommended to place the picture frame horizontally, because
this direction provides the best viewing and operating experience.
• By using the wall mount holes, you can hang the picture frame
horizontally or vertically on the wall.
Getting started EN - 13
Page 20

GiiNii™ Digital Picture Frame
Step 2: Connecting to power
English
1. Place the picture frame on a flat surface.
2. Connect the power adapter as below (1), and press the Power
button to turn on the picture frame (2).
• Power systems and plug types may vary depending on your
country/region.
• To turn off the picture frame, press the Power button.
EN - 14
Getting started
Page 21

™
Digital Picture Frame
GiiNii
Step 3: First usage
To help you get the most out of your picture frame, we installed a
video tutorial that automatically starts playing when you first turn
on your unit. To cancel the looping video and start playing your
own photos, press any of the buttons on the back. Follow the fivestep process to familiarize yourself with how the control buttons
work. This simple process is automatically disabled after the first
use. You can turn on the tutorial by going into SETTINGS.
Step 4: Basic setup
Select a language and set the date and time during the first use
of the picture frame.
Selecting a language
1. In the main menu, press or to select SETTINGS
English
, and then press .
2. Press .
The General Settings page appears.
Getting started EN - 15
Page 22

GiiNii™ Digital Picture Frame
3. Press , press to go to Language, and then press
English
again.
4. Press or to select a language you wish to use, and
then press .
5. Press to exit.
Setting the date and time
1. In the main menu, press or to select SETTINGS
, and then press .
The Date and Time page appears.
2. Press to highlight the Year field, press or to
select a year, and then press to confirm the setting.
3. Press to move to the Month field, press to highlight
the Month field, press or to select a month, and then
press to confirm the setting.
4. Repeat Step 3 for the remaining fields, including Date, Hour,
Minute, Mode, Current Time Zone and Second Time Zone.
5. Press to exit.
EN - 16
Getting started
Page 23

™
SD/SDHC MultiMediaCard Memory Stick Memory Stick
PRO
xD-Picture
Card
Memory S tick
Duo
USB flash drive
Digital Picture Frame
GiiNii
Step 5: Inserting a memory card/
USB flash drive
You can turn on the picture frame and play back the pre-installed
photos in the internal memory with no memory card/USB flash
drive inserted.
To play back your own files, insert a compatible memory card or
USB flash drive that contains supported files into the
corresponding slot on the picture frame as illustrated below.
English
For more information about the supported file formats, refer to
"Specifications" on page 59.
Getting started EN - 17
Page 24

GiiNii™ Digital Picture Frame
Compatible memory card formats
English
Memory card formats Maximum capacity
SD/SDHC 32GB
MultiMediaCard (MMC) 1GB
Memory Stick (MS) 4GB
Memory Stick PRO (MS PRO) 2GB
Memory Stick Duo (MS Duo) 2GB
xD-Picture Card (xD) 2GB
USB flash drive 16GB
• Maximum capacity specifications listed above are subject to
change without prior notice.
• The memory card slot supports hot-swap function. In other words,
you can change or remove the memory card when the power of the
picture frame is either turned on or turned off.
• The picture frame supports both Windows and MAC operating
systems. However, when formatting your memory cards, use FAT16
and FAT32 file systems in Windows only. Formatting memory cards
with NTFS or MAC is not supported.
• To use a microSD, a miniSD or a Memory Stick Micro (M2) card, a
card adapter is required.
EN - 18
Getting started
Page 25

™
Digital Picture Frame
GiiNii
Step 6: Copying photos and/or
music to the inte r n a l me mory
When inserting a memory card or a USB flash drive, you will be
asked to copy all photos and/or music to the internal memory.
If “Smart Copy” is set to “Resize” under “General Settings”, photos
will be resized to the screen resolution when copied to the internal
memory to optimize the storage capacity. Please keep a copy of the
original photos on your memory card or USB flash drive.
To copy all photos and/or music contained in the inserted
■
memory card (or USB flash drive), select the check mark ✓
and press to proceed.
■ To view photos without copying them to the picture frame,
select the cross mark ✕ and press . The picture frame will
start playing back the photos automatically from the inserted
memory card or USB flash drive.
• Do not remove the memory card/USB flash drive before the copy
process is completed.
• If the files you wish to copy from the memory card/USB flash drive
already exists in the internal memory of the picture frame, the files
will be overwritten when you select
• To copy videos, connect your picture frame directly to PC with mini
USB cable (included). See next page for details.
✓ to proceed.
English
Getting started EN - 19
Page 26

GiiNii™ Digital Picture Frame
Step 7: Connecting the picture
frame to a computer
English
You can connect the picture frame to a computer using the mini
USB cable (included) to easily manage the files in the internal
memory of the picture frame.
1. Start the computer and turn on the picture frame.
2. Connect the smaller end of the USB cable to the mini USB port
of the picture frame.
3. Connect the other end of the USB cable to a USB port on the
computer, making sure the connectors are fully inserted.
4. Once connected, the picture frame will enter PC transfer mode
automatically.
5. When the computer has detected the picture frame, the picture
frame will appear in “My Computer” as “removable disk”.
Now you can freely transfer the files in the picture frame as
you would on other disk drive.
• You can copy photos, music or videos from the computer to the
picture frame, and vice versa.
• The files in the memory cards and USB flash drive cannot be
viewed/edited via USB connection.
• To copy videos onto the internal memory, you must transfer via
connection to PC.
EN - 20
Getting started
Page 27

™
Digital Picture Frame
GiiNii
Step 8: Replacing the paper mat
Your pi cture frame may come with one or more bonus paper mats
depending on your purchased model. You can replace the
existing paper mat with the one supplied (if available). Follow the
instructions below to replace the supplied paper mat.
1. On a flat surface, carefully place the frame facing down on top
of a soft towel. Be careful not to scratch the unit.
2. Twist the EZ Lock Screws on back of the frame to the "unlock"
position, then carefully lift up the core unit from the wood
frame.
3. Remove the existing paper mat.
English
Getting started EN - 21
Page 28

GiiNii™ Digital Picture Frame
4. Install the supplied bonus paper mat.
English
5. Install the picture frame to the wooden frame, and secure the
picture frame by tightening the EZ Lock Screws to the “LOCK”
position.
EN - 22
Getting started
Page 29

™
1
2
34 56
7
Digital Picture Frame
GiiNii
Using the main menu
When you turn on the picture frame, the main menu below
appears. You can press or to select the desired menu,
and then press to enter the selected menu.
No. Description
1
EnerGiiNii Auto Scheduler
Allows you to select a power-saving option for the picture
frame.
See "Using EnerGiiNii Auto Scheduler" on page 41 for
details.
2
CLOCK
• Allows you to set your favorite clock skins.
• Allows you to set an alarm.
See "Using CLOCK (G-button)" on page 43 for details.
English
Using the main menu EN - 23
Page 30

GiiNii™ Digital Picture Frame
No. Description
3
English
Digital Scrapbook
Allows you to display photos in slideshow with various
preloaded templates.
See "Using Digital Scrapbook" on page 47 for details.
4
PHOTO SLIDESHOW
Allows you to display photos in slideshow.
See "Viewing photos" on page 38 for details.
5
ALBUM
Allows you to manage and sort your photos by tagging
them to different albums.
See "Managing photos" on page 25 for details.
6
MEDIA CENTER
Allows you to play back videos and music.
See "Using MEDIA CENTER" on page 48 for details.
7
SETTINGS
Allows you to configure the settings of the picture frame.
See "Using SETTINGS" on page 52 for details.
EN - 24
Using the main menu
Page 31

™
Digital Picture Frame
GiiNii
Managing photos
You can use the ALBUM menu to manage photos in the internal
memory, memory card or USB flash drive.
Manually copying photos to the
internal memory
In addition to the automatic “Smart Copy” feature (see page 19),
you can manually copy photos from external storage devices to
the internal memory and tag photos to an album.
The example below demonstrates how to copy photos from a
memory card to the internal memory and tag photos into an
album.
1. Insert a compatible memory card to the memory card slot.
2. In the main menu, press or to select ALBUM, and
then press .
English
Managing photos EN - 25
Page 32

GiiNii™ Digital Picture Frame
3. Select Memory Card, and then press .
English
The screen shows the photos contained in your memory card.
4. If there are more than one page, you can press or to
go to the previous or next page to browse photos. (If not, skip
this step.)
5. Press to enable the selection mark, showing in orange.
6. Press or to move to the photo you wish to select,
and then press to confirm the selection.
The selected photo will have a green selection mark.
Repeat Step 6 to select more photos as desired.
7. Press .
If you wish to select all the photos shown on the current page, select
“Select All” in the pop-up menu and press . Then continue with
Step 7.
EN - 26
Managing photos
Page 33

™
Digital Picture Frame
GiiNii
8. From the pop-up menu, press or to select Tag I t,
and then press .
9. Select a default target album to copy and sort the photos into
this specified album.
English
Managing photos EN - 27
Page 34

GiiNii™ Digital Picture Frame
Tagging pho tos to an album
English
1. In the main menu, press or to select ALBUM, and
then press .
The screen shows:
• the file source, including USB, Memory Card and
Internal Memory.
• the default albums in the internal memory, including
TIMELINE, Pre-installed Library, Uncategorize,
Family, Friends and Vacation.
• The “USB” and “Memory Card” file sources will only appear when a
USB flash drive and a memory card have been inserted to the
picture frame.
• For details about the “TIMELINE” album, see "Managing photos by
using the TIMELI NE album" on page 31.
2. Press or to select the source of your photos, such
as the Internal Memory album, and then press . (Y ou can
also select USB or Memory Card, if available.)
The screen shows all the photos that are available in the
internal memory.
EN - 28
Managing photos
Page 35

™
Digital Picture Frame
GiiNii
3. If there are more than one page, you can press or to
go to the previous or next page to browse photos. (If not, skip
this step.)
4. Press to enable the selection mark, showing in orange.
5. Press or to move to the photo you wish to select,
and then press to confirm the selection.
The selected photo will have a green selection mark.
Repeat Step 5 to select more photos as desired.
6. Press .
If you wish to select all the photos shown on the current page, select
“Select All” in the pop-up menu and press . Then proceed to
Step 7.
7. From the pop-up menu, press or to select Tag I t,
then press .
English
Managing photos EN - 29
Page 36

GiiNii™ Digital Picture Frame
8. Select the destination album for the photos to be sorted.
English
Removing photos from an album
1. In the ALBUM menu, press or to select an album
from which you want to remove the photos, and then press
.
The screen shows the photos in the album.
2. Press to enable the selection mark, showing in orange.
3. Press or to move to the photo you wish to select,
and then press to confirm the selection.
The selected photo will have a green selection mark.
Repeat Step 3 to select more photos as desired.
4. Press .
If you wish to select all the photos shown on the current page, select
“Select All” in the pop-up menu and press . Then proceed to
Step 5.
EN - 30
Managing photos
Page 37

™
Digital Picture Frame
GiiNii
5. From the pop-up menu, press or to select
Uncategorize, and then press .
The photos will be removed from the album, but will not be
deleted from the internal memory.
Managing photos by using the TIMELINE
album
In ALBUM, you can use the TIMELINE album to search for
photos in the internal memory according to the time span
specified.
1. In the ALBUM menu, press or to select TIMELINE,
and then press .
2. Press . When the < > marks appear, press or to
adjust the settings in the Year field, and then press again.
English
Managing photos EN - 31
Page 38

GiiNii™ Digital Picture Frame
In this step, you can also search for photos taken in a specific
period of time under the TIMELINE album by pressing
English
and selecting the time frame.
3. Press to move to the Month field, and repeat Step 2 to
adjust the settings.
4. Press to move to , and then press to start
playback.
The photos taken in the time span you specified above will
appear on the screen.
EN - 32
Managing photos
Page 39

™
Digital Picture Frame
GiiNii
Creating a new album
1. In the ALBUM menu, press display the pop-up menu,
and then press to select Create Album.
2. In the Album Name field that appears, use the on-screen
keyboard to enter a desired name.
• Press or to select a letter, and then press
to enter the letter.
English
• Press to toggle between letters and numbers.
Managing photos EN - 33
Page 40

GiiNii™ Digital Picture Frame
• To add a space, press or to move to Space,
English
3. Now the new album is created.
The picture frame allows you to create up to 12 custom albums.
and then press .
• T o delete your last input, press or to move to
Back, and then press .
• To complete your input, press or to move to
Done, and then press .
Modifying an album
1. In the ALBUM menu, press or to select an album for
which you wish to modify the album name, and then press
.
2. Select Modify Name, and then press .
3. In the Album Name field that appears, use the on-screen
keyboard to enter a desired name.
4. Once you have finished modifying the album name, press
to exit.
EN - 34
Managing photos
Page 41

™
Digital Picture Frame
GiiNii
Deleting an album
1. In the ALBUM menu, press or to select an album
that you wish to delete, then press .
2. Select Delete Album, and then press .
Default albums including TIMELINE, Pre-installed Libr ary,
Uncategorize, Family, Friends and Vacation cannot be deleted.
Using other options in the ALBUM
menu
Deleting photos
1. In the ALBUM menu, press or to select an album,
and then press .
2. Press to enable the selection mark, showing in orange.
3. Press or to move to the photo you wish to select,
and then press to confirm the selection.
The selected photo will have a green selection mark.
Repeat Step 3 to select more photos as desired.
4. Press .
If you wish to select all the photos shown on the current page, select
“Select All” in the pop-up menu and press . Then proceed to
Step 5.
English
Managing photos EN - 35
Page 42

GiiNii™ Digital Picture Frame
5. From the pop-up menu, press or to select Delete,
English
and then press .
Rotating photos
1. In the ALBUM menu, press or to select an album,
and then press .
2. Press to enable the selection mark, showing in orange.
3. Press or to move to the photo you wish to select,
and then press to confirm the selection.
The selected photo will have a green selection mark.
Repeat Step 3 to select more photos as desired.
4. Press .
If you wish to select all the photos shown on the current page, select
“Select All” in the pop-up menu and press . Then proceed to
Step 5.
5. From the pop-up menu, press or to select Rotate,
and then press .
The photo will be rotated 90 degrees clockwise.
6. Repeat Step 5 if you wish to rotate the photo into other angles.
EN - 36
Managing photos
Page 43

™
Digital Picture Frame
GiiNii
Applying photo effects
1. In the ALBUM menu, press or to select an album,
and then press .
2. Press to enable the selection mark, showing in orange.
3. Press or to move to the photo you wish to select,
and then press to confirm the selection.
The selected photo will have a green selection mark.
Repeat Step 3 to select more photos as desired.
4. Press .
If you wish to select all the photos shown on the current page, select
“Select All” in the pop-up menu and press . Then proceed to
Step 5.
5. From the pop-up menu, press or to select Photo
Effects, and then press .
6. Press or to select the effect you wish to apply to the
selected photo, including SEPIA, ORIGINAL and BLACK &
WHITE, and then press .
English
Managing photos EN - 37
Page 44

GiiNii™ Digital Picture Frame
English
Viewing photos
1. In the main menu, press or to select PHOTO
SLIDESHOW, and then press .
The “USB” and “Memory Card” albums only appear when a USB flash
drive and a memory card have been inserted to the picture frame.
2. Press or to select the album that contains the
photos you wish to display in slideshow, and then press .
If you wish to pause the slideshow, press .
EN - 38
Viewing photos
Page 45

™
Digital Picture Frame
GiiNii
3. To configure slideshow settings, press to display the popup menu. You can adjust the settings below.
• Transition Effect: selects the transition effect you
wish to apply to the slideshow.
• Slideshow Interval: selects the slideshow interval
between photos.
The default transition ef fect “Pan & Zoom ” does not allow
customized interval settings.
•
Brightness: selects the level of screen brightness.
• Contrast: selects the level of contrast.
• Saturation: selects the level of saturation.
• MUSIC: selects the volume level of background music.
English
Viewing photos EN - 39
Page 46

GiiNii™ Digital Picture Frame
Running a slideshow by using the
TIMELINE album
English
1. In the PHOTO SLIDESHOW menu, press or to
select TIMELINE, and then press .
2. In the pop-up screen, specify a time span to include the photos
you wish to display in slideshow.
In this step, you can also search for photos taken in a specific
period of time under the TIMELINE album by pressing
and selecting the time frame.
3. Select , and then press to start playback.
The TIMELINE feature only applies to photos stored in the memory
card from the card reader. Please copy any photos on the USB drive
to the inserted memory card if you wish to access this feature.
EN - 40
Viewing photos
Page 47

™
Digital Picture Frame
GiiNii
Using EnerGiiNii Auto
Scheduler
The EnerGiiNii Auto Scheduler menu provides various predefined power-saving options.
1. In the main menu, press or to select EnerGiiNii
Auto Scheduler, and then press .
2. Press or to select a desired option, and confirm with
.
For details about the power-saving options, refer to the table
below.
English
Option Description
Off Turns off EnerGiiNii Auto Scheduler.
Auto 50% Saves 50% on power consumption during
Using EnerGiiNii Auto Scheduler EN - 41
nighttime and automatically resumes normal
power consumption during daytime.
Page 48

GiiNii™ Digital Picture Frame
Option Description
English
Auto 100% Puts the picture frame into sleep mode during
Save 20% Always saves 20% on power consumption.
Save 50% Always saves 50% on power consumption.
• Nighttime is defined as hours from 9:00 p.m. to 7:00 a.m..
• Daytime is defined as hours from 7:00 a.m. to 9:00 p.m..
• Using EnerGiiNii Auto Scheduler does not affect the photo quality.
nighttime and automatically resume normal
power consumption during daytime.
EN - 42
Using EnerGiiNii Auto Scheduler
Page 49

™
Digital Picture Frame
GiiNii
Using CLOCK (G-button)
Selecting a clock skin
The picture frame provides various preloaded clock and calendar
skins. To set a default clock skin to be displayed in Clock view,
follow the steps below.
More designer clock ski ns are avai lab l e fo r download at
www.GiiNii.com. Please visit our website to download more skins.
1. In the main menu, press or to select CLOCK &
CALENDAR, and then press .
2. Press or to select a desired skin.
English
Using CLOCK (G-button) EN - 43
Page 50

GiiNii™ Digital Picture Frame
3. Press and select Default.
English
4. Press to set the selected clock skin as default.
The default clock skin will be displayed when
(or ) is pressed.
Switching between Clock view and
Slideshow view
You can press to toggle between Clock view and
Slideshow view.
• When switching from Clock view to Slideshow view, the picture
frame starts the slideshow that was running previously.
• If the last slideshow was playing from memory card or USB and is
no longer available, the picture frame will start a slideshow from the
Internal Memory or Pre-installed Library.
EN - 44
Using CLOCK (G-button)
Page 51

™
Digital Picture Frame
GiiNii
Setting an alarm
Set the date and time for the picture frame first before setting an
alarm. See "Setting the date and time" on page 16 for details.
1. In the main menu, press or to select CLOCK, and
then press .
2. Press , and then press or to select Alarm.
3. Press .
4. In the ALARM SETTING screen that appears, press to
highlight the Hour field.
5. Press or to adjust the value in the Hour field, and
English
then press to confirm the setting and move to the next
field.
6. Press or to adjust the value in the Min field, and
then press to confirm the setting and move to the next
field.
Using CLOCK (G-button) EN - 45
Page 52

GiiNii™ Digital Picture Frame
7. Press or to select a desired alarm ring tone, and
English
then press to confirm the setting and move to the next
field.
8. Press or to select ✓, and then press to
complete the setup.
Repeat the steps above if you want to set more alarms.
EN - 46
Using CLOCK (G-button)
Page 53

™
Digital Picture Frame
GiiNii
Using Digital Scrapbook
GiiNii Digital Scrapbook feature provides a brand new user
experience in enjoying photo slideshows.
Log on to www.GiiNii.com and make your own personal scrapbook.
1. In the main menu, press or to select Digital
Scrapbook, and then press .
2. Press or to select a template, and then press .
3. Select an album that contains the photos you wish to display in
slideshow, and then press .
English
The picture frame will start to display the photos in slideshow
using the selected template.
Using Digital Scrapbook EN - 47
Page 54

GiiNii™ Digital Picture Frame
English
Using MEDIA CENTER
Watching videos
1. In the main menu, press or to select MEDIA
CENTER, and then press .
2. Select Video, and then press .
3. Press or to select a source (Internal Memory, SD or
USB), and then press .
To p l ay v i de os fr om yo ur ha nd he ld v i de o ca mco rd er, select “USB” as
the source after you have plugged in the device.
4. Press or to select a video from the file list (if
available), and then press to start playback of the video.
EN - 48
Using MEDIA CENTER
Page 55

™
Digital Picture Frame
GiiNii
5. You can control video playback as follows.
• To pause playback, press . To resume playback,
press again.
• To rewind the video, scroll the “Scroll wheel/OK
button” to the left and hold the button.
• To fast-forward the video, scroll the “Scroll wheel/OK
button” to the right and hold the button.
• To go to the previous video, press .
• To go to the next video, press .
• To control the volume, press twice, and then
press to increase the volume or press to
decrease the volume.
English
• To stop playback, press .
• Videos can only be copied in PC tr an sfe r mod e. Se e "Step 7:
Connecting the picture frame to a computer" on page 20 for
details.
• You can only activate the rewind/fast-forward functions by using
the “Scroll wheel/OK button”. These controls are not available on
the remote control.
Using MEDIA CENTER EN - 49
Page 56

GiiNii™ Digital Picture Frame
Playing music
English
1. In the main menu, press or to select MEDIA
CENTER, and then press .
2. Select Music, and then press .
3. Press or to select a source (Internal Memory, SD or
USB), and then press .
4. Press or to select a track from the file list (if
available), and then press to start playback of the music.
5. You can control music playback as follows.
• To pause playback, pres s . To res ume pla yback ,
press again.
• To play back the previous track, press , and then
EN - 50
press .
Using MEDIA CENTER
Page 57

™
Digital Picture Frame
GiiNii
• To play back the next track, press , and then
press .
• To control the volume, press twice, and then
press to increase the volume or press to
decrease the volume.
• To stop playback, press .
6. To set more music playback options, press while music
plays. Select a desired option and then press .
Options below are available.
• Shuffle: plays back the tracks randomly.
• Repeat One Song: repeats the track that is currently
playing.
• Repeat All Songs: repeats all the tracks that are
available in the file list.
• Delete Title: deletes the track that is selected.
English
Using MEDIA CENTER EN - 51
Page 58

GiiNii™ Digital Picture Frame
Using SETTINGS
English
The SETTINGS menu allows you to configure the settings of the
picture frame.
1. In the main menu, press or to select SETTINGS,
and then press .
The Date and Time page appears.
2. Press or to toggle among Date and Time, General
Settings and Information pages.
3. Press to enter a page, and the first option in that page will
be highlighted.
EN - 52
Using SETTINGS
Page 59

™
Digital Picture Frame
GiiNii
4. Press again. When the < > marks appear in the field,
press or to adjust the settings.
5. Press to exit.
Date and Time page
Item Option Description
Date - Allows you to set the date.
Time - Allows you to set the time.
Mode -
Current Time
Zone
Second Time
Zone
Allows you to select a time format
(12-hour clock or 24-hour clock).
Allows you to select the time zone
-
that matches your current
geographic location.
Allows you to set a second time
zone additionally.
English
Using SETTINGS EN - 53
Page 60

GiiNii™ Digital Picture Frame
General Settings page
English
Item Option Description
1
Brightness
Smart Copy
Smart
Cropping
Language
Reset
FW Upgrade
Product Intro
2
3
4
5
Determines how photos are copied from the
external storage devices to the internal memory
when using the Smart Copy feature.
Resize
Normal Keeps the original file size.
Full-Screen
Original
English
French
Spanish
Yes
No
Yes
No
On
Off
Allows you to select the level of
screen brightness.
Resizes the photos to save
memory space.
Selects to display photos in
original size or full screen.
Sets up the On-Screen Display
(OSD) language.
Returns all the settings back to
system default.
Upgrades the firmware of the
picture frame.
The start-up video tutorial for
major features and functions.
EN - 54
Using SETTINGS
Page 61

™
Digital Picture Frame
GiiNii
Information page
Item Option Description
Version -
Tota l Mem ory -
Free Memory -
Shows the current firmware
version.
Shows the total capacity of the
internal memory.
Shows the remaining capacity of
the internal memory.
English
Using SETTINGS EN - 55
Page 62

GiiNii™ Digital Picture Frame
Frequently asked questions
English
What memory card formats are compatible with the picture
frame?
SD/SDHC, MMC, MS, MS PRO, MS Duo and xD memory card
formats are compatible with the picture frame. For details, see
"Compatible memory card formats" on page 18.
Why do some photos load faster than others?
Higher resolution photos load slower. Using a lower resolution
when taking photos will speed up loading time.
How does auto rotation work?
The picture frame will display in a landscape mode if placed on
its long side (as shown on your product box). To display your
photos in a portrait mode, rotate the picture frame on it right
side.
Why are my photos appearing upside down?
The picture frame is placed on the wrong side. Please rotate
the opposite side.
What types of image files can I view on my picture frame?
The picture frame supports playback of JPEG, BMP, JPEG
Progressive and EXIF images.
What types of audio files can I play back on my picture
frame?
The picture frame supports playback of MP3, WMA, AAC and
WAV audios.
What types of video files can I play back on my picture
frame?
The picture frame supports playback of Motion JPEG (MJPEG), MPEG-4 and H.264 (D1) videos.
EN - 56
Frequently asked questions
Page 63

™
Digital Picture Frame
GiiNii
Can I connect my picture frame directly to my computer?
You can connect the picture frame directly to your computer via
a mini USB cable and copy image/audio/video files between
the picture frame and your computer.
Will the tagged photos be reset if I pull out the SD card?
No. The Digital PhotoFrame (DPF) will write information into
the MetaData of tagged photos. So the DPF will remember the
photo's album categorization the next time the SD card is reinserted to the unit.
The frame slows down signific antly on certain photos.
What can I do?
This is mainly due to extra processing time needed to decode
very large size high resolution files. The DPF's Smart Cropping
(ON by default) feature will automatically resize the file based
on the unit's screen resolution and will significantly reduce the
size of the photo and eliminate this issue. However, please
always keep a copy of the original photos on the computer.
The frame froze and will not re s pond, what can I do?
If the frame freezes, it is easy t o restart by unplugging from
power, then press power button again.
Why isn't the TIMELINE feature accessible for photos on
my USB drive?
The TIMELINE feature only applies to photos stored in the
memory card from the card reader. Please copy any photos on
the USB drive to the inserted mem ory card if you wish to
access this feature.
Why can't I tag my photos in my SD card to any albums?
English
Please check that your SD card is not locked because the DPF
will need to be able write information onto the files in order to
tag to Album.
Frequently asked questions EN - 57
Page 64

GiiNii™ Digital Picture Frame
Regulation and compliance
English
Federal Communications Commission (FCC) Notice
This equipment has been tested and found to comply with the
limits for a Class B digital device, pursuant to Part 15 of the FCC
Rules. These limits are designed to provide reasonable
protection against interference in a residential installation. This
equipment can radiate radio frequency energy and, if not installed
and used in accordance with the instructions, may cause
interference to radio communications.
However, there is no guarantee that interference will not occur in
a particular installation. If this equipment does cause interference
to radio or television reception, which can be determined by
turning the equipment off and on, the user is encouraged to try to
correct the interference by one of the following measures:
• Reorient or relocate the receiving antenna.
• Increase the separation between the equipment and receiver.
• Connect the equipment into an outlet on a circuit different from
that to which the receiver is connected.
• Consult the dealer or an experienced radio/TV technician for
help.
Recycling
• To minimize harm to the environment, the batteries supplied
with the picture frame do not contain mercury or nickel
cadmium. If possible, when disposing of batteries, use
recycling means available in your area.
• The picture frame uses materials that can be recycled. To
minimize the amount of waste in the environment, check your
area for companies that will recover used televisions for
dismantling and collection of reusable materials, or contact
your dealer for recycling tips.
• Please dispose of the carton and packing material through the
proper waste disposal management in your area.
EN - 58
Regulation and compliance
Page 65

™
Digital Picture Frame
GiiNii
Appendix
Specifications
Specifications are subject to change without prior notice.
Model GH-8DNM GH-ADNM
LCD type 8” Digital LCD 10.4” Digital LCD
Backlight type LED LED
Aspect ratio 4:3 4:3
Screen
resolution
Brightness 250nits 300nits
Built-in internal
memory (for data
storage)
Supported
memory card
formats
Supported flash
drive
Supported
image file format
Supported audio
file format
Supported video
file format
USB port USB Host (Type-A) x
800 x 600 pixels 800 x 600 pixels
Approximately 2GB Approximat ely 2GB
SD, MMC, MS, MS
PRO, MS Duo and
xD
USB flash drive
(using the USB port)
JPEG, BMP, JPEG
Progressive and
EXIF
MP3, WMA, AAC and
WAV
Motion JPEG
(M-JPEG)/MPEG4/
H.264 (D1)
1, HS 2.0
SD, MMC, MS, MS
PRO, MS Duo and
xD
USB flash drive
(using the USB port)
JPEG, BMP, JPEG
Progressive and
EXIF
MP3, WMA, AAC and
WAV
Motion JPEG
(M-JPEG)/MPEG4/
H.264 (D1)
USB Host (Type-A) x
1, HS 2.0
English
Appendix EN - 59
Page 66

GiiNii™ Digital Picture Frame
Model GH-8DNM GH-ADNM
English
Mini USB port USB Device (Mini-B)
Memory card
slots
Speaker 0.5W x 2 0.5W x 2
IR receiver Yes Yes
Input power AC100-220V AC100-220V
Output power DC5V 2A DC5V 2A
Auto picture
rotation/angle
switch
Clock/Calendar Yes Yes
Back stand Yes, foldable Yes, foldable
Language
support
Plug & Play
compatibility
Remote control
(IR)
Interchangeable
Frame Capability
Frame Wooden frame x 1 Wooden frame x 1
Paper mat Yes Yes
Bonus mat Double mat x 1 Double mat x 1, Color
x 1, HS 2.0
x 1, HS 2.0
6-in-1 card slot 6-in-1 card slot
Yes Yes
USB Device (Mini-B)
English, French and
Spanish
Windows 7/XP/Vista/
2000, Mac OS X
English, French and
Spanish
Windows 7/XP/Vista/
2000, Mac OS X
Yes Yes
Yes Yes
mat x 1
EN - 60
Appendix
Page 67

™
Digital Picture Frame
GiiNii
List of comp atible memory cards
Not all supported memory cards are included in the table below. For
technical support, contact your nearest service center for assistance.
Capacity
SD miniSD microSD MMC MS xD
8MB TOSHIBA
Kodak
32MB
Canon
64MB
128MB Panasonic
256MB SanDisk RIDATA
TwinMOS SanDisk
512MB
TOSHIBA
PQI
Kingston
SanDisk
Transcend Transcend
A-DATA
(80X)
1GB
RIDATA
(66X)
APACER
(60X)
Panasonic
(SDHC
Class 4)
Panasonic
Memory card formats
LEXAR
SanDisk
(MS Pro
Duo)
SONY (MS
Pro Duo)
SanDisk
(M2)
Transcend Kodak (H)
SanDisk
SanDisk
(Ultra II)
TOSHIBA
A-DATA
Kingston
Adapter
Transcend
Transcend FUJIFILM
OLYMPUS
(M)
FUJIFILM
English
Appendix EN - 61
Page 68

GiiNii™ Digital Picture Frame
Capacity
SD miniSD microSD MMC MS xD
English
Panasonic
(SDHC
Class 4)
Panasonic
(SDHC
Class 2)
SanDisk Transcend
Transcend A-DATA
2GB
TOSHIBA PQI
A-DATA
APACER
(60X)
SanDisk
Silicon
Power
(Ultima II
80X)
Kingston
(SDHC
Class 6)
A-DATA
(SDHC
Class 6)
Silicon
Power
4GB
(SDHC
Class 6)
TOSHIBA
(SDHC
Class 4)
RIDATA
(SDHC
Class 6)
Memory card formats
Stargem
Panasonic
Transcend SanDisk
Silicon
Power
Kingston
SanDisk
SanDisk
(MS Pro HG
Duo)
SONY (MS
Pro Duo)
ScanDisk
(MS Pro
Duo)
OLYMPUS
(M+)
OLYMPUS
(M)
FUJIFILM
(H)
EN - 62
Appendix
Page 69

™
Digital Picture Frame
GiiNii
Capacity
SD miniSD microSD MMC MS xD
A-DATA
(SDHC
Class 6)
Transcend
8GB
(SDHC
Class 6)
Kingston
(SDHC
Class 6)
Transcend
16GB
(SDHC
Class 6)
32GB
Memory card formats
Kingston
SanDisk
TOSHIBA
SanDisk
(MS Pro
Duo)
SONY (MS
Pro Duo
Mark2)
SONY (MS
Pro Duo)
English
Appendix EN - 63
Page 70

GiiNii™ Digital Picture Frame
English
<Memo>
EN - 64
Appendix
Page 71

Page 72

A GiiNii, Inc . Company
© GiiNii. 2010
Version 1
P/N: TY.4J580.007 D.05.08.10
 Loading...