

Page 1
"Ma de f or i Po d" a nd " Made for iPhone" mean that an electronic accessory has been designed to connect specifically to iPod or iPhone,
respe ct iv el y, a nd h as b ee n ce rt if ie d by t he d ev el op er t o me et A pp le p er fo rm an ce s ta nd ar ds . Ap pl e is n ot r es po ns ib le f or t he o pe ra ti on
of th is d ev ic e or i ts c om pl ia nc e wi th s af et y an d re gu la to ry s ta nd ar ds . Pl ea se n ot e th at t he u se o f th is a cc es so ry w it h iP od , iP ho ne m ay
aff ec t wi re le ss p er fo rm an ce . Ma de f or i Po d na no ( 3r d, 4 th , 5t h, a nd 6 th g en er at io n) , iPod touch ( 1st, 2nd, 3rd, and 4th generation) , iPod
with Vi de o, i Po d cl as si c, i Ph on e, i Ph on e 3G , iP ho ne 3 GS , iP ho ne 4 .
«Fabriq ué pour iPod» et « Fabr iqué pour iPhon e» sig nifie nt qu 'un access oire électroniq ue a ét é con çu pour se connec ter expliciteme nt
et respe ctivemen t à iPo d ou iP hone et a ét é cer tifié par le déve loppe ur po ur atteind re les stand ards de perform ance de Pomm e( App le).
Veuille z not er qu e l' uti lisation d e cet accessoir e avec iPod, iPhon e peu t affect er les perfo rmanc es sa ns fi l. Fabriqué pour iPod Nano (l es
généra tions 3 , 4 , 5 et 6 ), tou che iPod (le s générati ons 1 , 2 , 3 et 4 ), iPo d ave c vidéo, iPo d cla ssiqu e, iP hone, iPhone 3G,
iPhone 3 GS, iPhone 4.
¨Hec ha p ar a iPod¨ y ¨He ch a pa ra iPhone¨ sig ni fi ca que un acc es or io electrónic o ha s ido diseñado es pe ci ficamente p ar a co nectarse
al iP od o iPhone, resp ec ti vamente, y ha s id o certificado p or e l desarrollad or p ar a cumplir con l os e stándares de re nd imiento de App le .
App le n o es responsa bl e de l funcionamie nt o de este dispo si ti vo o el cumplim ie nt o de segurida d y la s normas regl am en ta rias. Por
fav or t enga en cuent a qu e el uso de este ac ce so rio con el iP od , el i Phone puede a fe ct ar el rendimi en to i nalámbric o.
Hec ha p ara iPod Nano ( 3ª, 4ª, 5ª y 6ª generac ió n) , iPod Touc h (1ª, 2ª, 3ª y 4ª ge ne ra ci ón), iPod con v id eo,
iPo d Cl assic, iPhone , iP ho ne 3G, iPho ne 3 GS y iPhone 4.
e e e e ère e e e
AB-S10
WIRELES S LIGHT BULB MUSI C SYSTEM
SYS TÈ ME DE M US IQU E D' AMP OU LE LUMI NE USE SAN S FI L
SIST EM A DE MÚ SI CA DE B OMBIL LA IN AL Á MB RIC A
Ow ner’s Ma nual
Man u el de Po s ses seu r
Man u al de l Usu a rio
Page 2
SAFETY FIRS T: IMPORTANT INSTRUCTIONS................ ........ ............................. ........ ...2
MEET AUDIOBULB................ ........ ............................. ........ ........ ..................... ........ ......4
WHAT'S IN THE BOX........ ........ ........ ..................... ........ ........ ..................... ........ ........ ...5
EASY SETUP:
...... ........ ............................. ........ ............................. ........ ......................
1. AudioBulb Instal lation.. ........ ............................. ........ ............................. ........ ............6
2. AudioBulb Ba se La yout.... ............................. ........ ............................. ........ ........ ........7
3. Using the Remote......... ........ ............................. ........ ............................. ........ ...........9
4. Pairing............. ........ ............................. ........ ............................. ........ ........ .............12
TECHNICAL SPECIFIC ATIONS............. ........ ............................. ........ ..........................15
HELP.... ................... ................... ................... ................... ........ ........... ........ ...............16
GIINII PROTECTI ON: WA RRANTY INFORMATION......... ........ ........ ..................... ........ .17
REGULATION AND COMPLIANCE............... ........ ............................. ........ ...................19
SAFETY FIRST: IMPORTANT INSTRUCTIONS
exit light fi xtures.
9. Only use in an i ndoor or pro tected out door envir onment.
AudioBulb with
English English
1
2
Page 3
SAFETY FIRST: IMPORTANT INSTRUCTIONS
MEET AUDIOBULB
While using t he AudioBulb:
CAUTION: To reduce the risk of el ectric sho ck, do not dis semble pro duct.
Refer to the us er manual: D uring the in stallati on process , please refer to the
instructi onal guide f or useful ti ps.
AudioBulb combines light, sound, and wireless technology to create a multi-room music system.
Installation is simple and easy, no additional wiring needed.
Brilliant LED Light
AudioBulb LEDs will last up to 30,000 operating hours. Each 5 watt LED bulb is suitable to replace
up to a 60 watt incandescent light bulb.
Full-Range Sound Performance
Engineered for maximum performance, each speaker is equipped with 10 watts of power providing
rich, full sound. With 2.4Ghz low-distortion wireless transmission, having stereo sound in a room
has never been easier.
Multi-Room, Wireless Music
Each AudioBulb docking station can support two music zones and up to eight AudioBulb speakers,
providing flexibility to customize your own music zones and enjoy your favorite music wirelessly with
just a touch of a button. The proprietary 2.4Ghz wireless technology offers transmission distance of
50 to 100 feet (depending on environment) in any direction, allowing you to personalize listening
zones by room or other environments.
Installation is EASY
AudioBulb speakers can be easily installed just like a light bulb and fits in any standard light sockets.
English English
3
4
Page 4

WHAT'S IN THE BOX
EASY SETUP
1. AudioBulb Installation
1. Make sure yo ur wall ligh t power swit ch is in the“off”position before starting the instal lation
process.
1.AudioBu lb docking s tation
4. Remote con trol
2. Two AudioBulbs
5. AC/DC adapter
9. Docking du st cap8. Pouch7. Harp
3. Instruct ion manual
6. 3.5mm AUX IN ca ble(1.5M )
10 iPhone/iP od adapter s(3x).
English English
2. Check your c onnector t ype: the Audi oBulb spea ker is desig ned to fit int o a
connector.
3. With the lig ht switch in O FF positio n, install t he AudioBul bs into the li ght socket a nd make sure
it is snugly in p lace. If the Au dioBulb do es not fit in yo ur lamp shad e, install t he harp acce ssory
(included ).
4. Once the bul bs are insta lled secur ely, turn on the power switch and wait for fe w seconds
for the AudioB ulbs to ligh t up
5
6
.
standard li ght socket
Page 5
EASY SETUP EASY SETUP
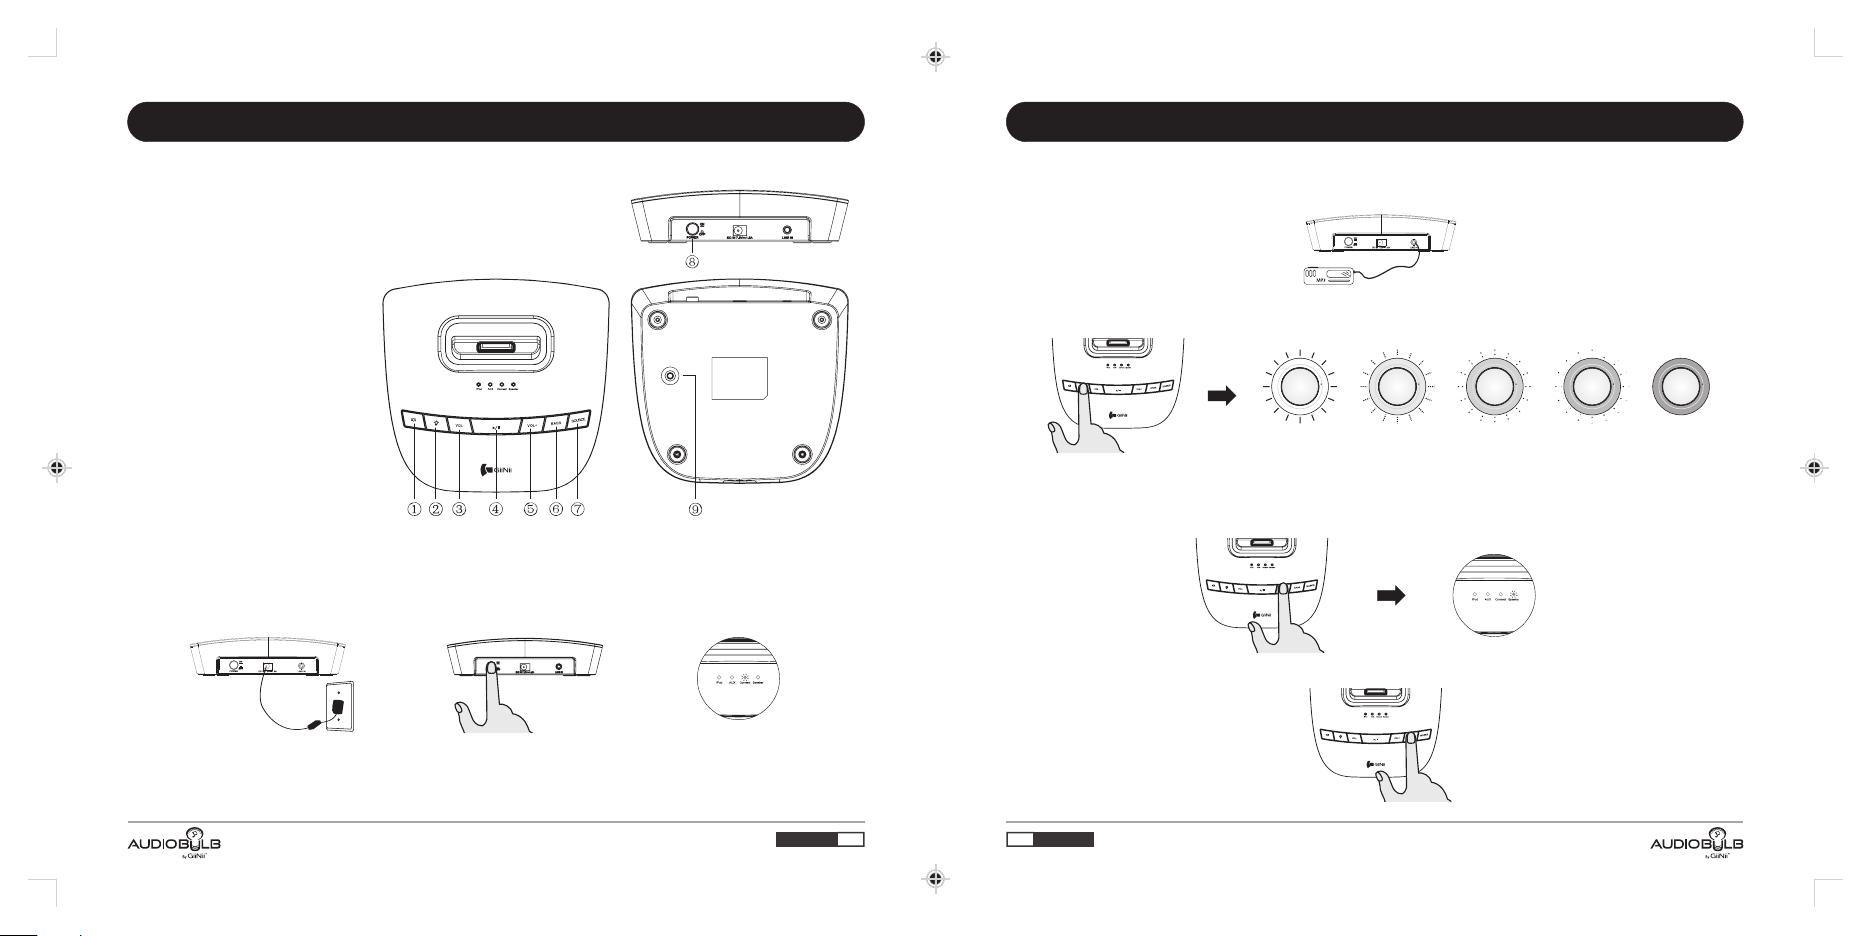
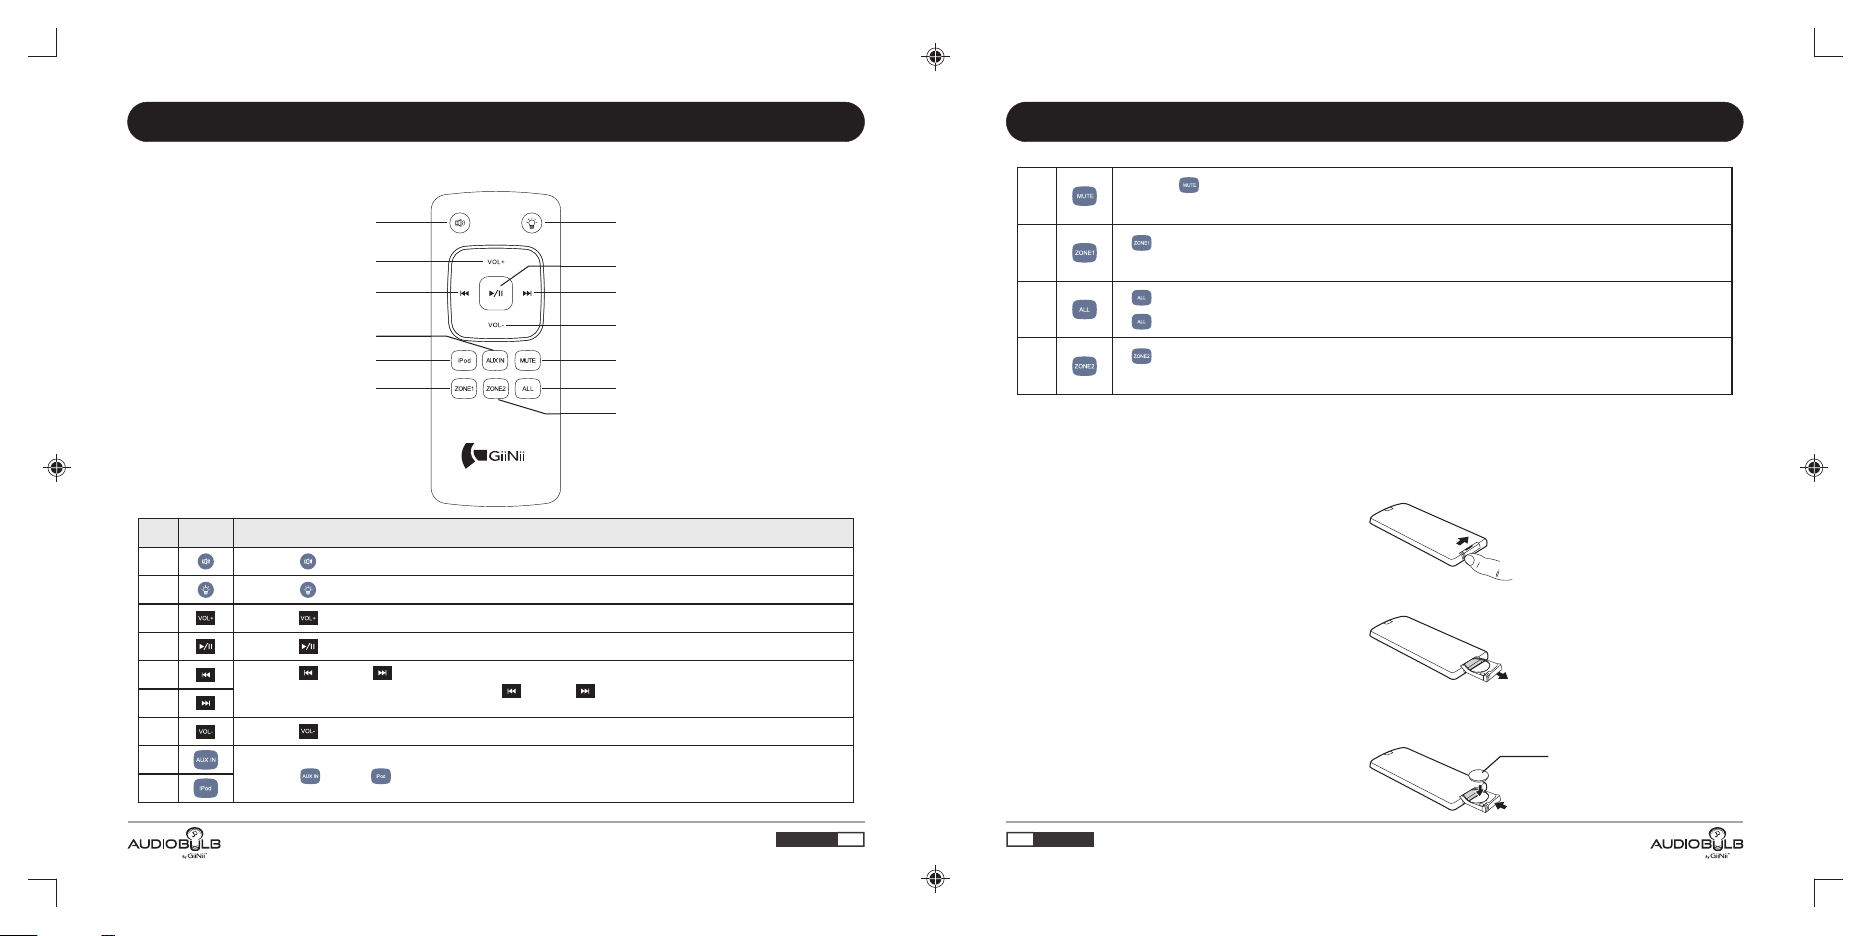
2. AudioBulb Base Layout
①. Speaker pow er on / off
②. Light power o n /dim/ off
③. Volume down
④. Play/Paus e
⑤. Volume Up
⑥. Bass Boost
⑦. Source
⑧. Power
⑨. Pair
1. Connect th e AC adaptor to “ DC IN" and the o ther end to a wa ll outlet, t hen press th e power butt on
to turn on the ba se. The “Con nect" LED in dicator wi ll blink whi le connect ing and stay l it once the
connectio n between th e bulbs and th e base is esta blished. B y default, y our AudioBu lbs are set
to Zone 1.
PAIR
To connect other types of audio devices or laptops, use the 3.5m m Aux-in po rt locate d on back
of the dock ing stati on. Once c onnected , press th e SOURCE b utton to highlight AUX.
3. To change brightness of AudioBulb LED lights, press the light bulb botton. This will control all
bulbs in the sam e zone.
100% 50% 25% 5%
off
4. Press th e VOLUME + /- button s to contr ol audio o utput fro m the bulbs. When volume is being
adjusted, the “Spea ker” LED i ndicator on dockin g station will blin k until mi nimum or m aximum
volume set ting is re ached.
5. Use BASS BOO ST for enhanced audio experience.
2. Dock your iP hone/iPo d to the docki ng station . When iPhon e/iPod is do cked, the do cking stat ion
will establ ish connec tion to your i Phone/iP od in 1~2 seco nds and begi n music play back
automatic ally. Your d evice will b e charged si multaneo usly.
English English
7
8
Page 6
EASY SETUP EASY SETUP
3.Using the Remote
No. Icon Description
1
2
3
4
5
6
7
8
9
Press “ ” icon to t urn on/off speaker sound.
Press “ ” to cont rol AudioBu lb lightin g level: 100 %→50%→25%→5%→off.
Press “ ” butto n to increas e the music vo lume.
Press “ ” butto n to play and pa use when pla ying music f rom docked i Phone/iP od.
Press “ ” or “ ” butt on to select p revious or n ext track fr om docked
iPhone/iP od. Also, pre ss and hold “ ” or “ ” b utton to rew ind or fast- forward
current pla ying track o n iPhone or iP od.
Press “ ” butto n to lower the m usic volum e.
Press “ ”or“ ”butt on to select a udio sourc e.
1
3
5
8
9
2
4
6
7
10
11 12
13
10
11
12
13
Press “ ” butto n to mute the sp eakers, th e Speaker LE D indicato r on
docking will blink duri ng mute.
“ ” button: all ows you to con trol all Audi oBulbs des ignated to Z one 1.
(Factory de fault sett ing at Zone 1) .
button: When both Zone 1 and Zone 2 are set up and present,
“ ” press
“ ” button to control all AudioBulbs in range.
“ ” button: You can b uy additio nal AudioBu lbs to creat e Zone 2 (See Pa iring,
page 12)
Useful tip: F or maximum p erforman ce, we recom mend placi ng the Audio Bulb docki ng station i n the
center of all b ulbs, allo wing maximum transmi tting perf ormance.
·Replacing the remote control battery
1. On the back of t he remote co ntrol, pre ss the locki ng tab to the ri ght.
2. Pull out the b attery hol der.
3. Insert the n ew battery i nto the hold er. The battery must be placed with the positive char ge facing
upwards, as s hown in the il lustrati on below.
Posit iv e ch ar ge
fac es u pw ar ds
English English
9 10
Page 7
EASY SETUP EASY SETUP
4. Slide the battery holder into the remote control.
• Failure to replace the battery in the correct manner may damage the battery and the remote.
• Use only the specified battery type .
• Recycle or dispose used batteries properly according to local guidelines and regulations.
• The batteries are highly flammable, keep away from excessive heat or moisture.
• If the battery is completely drained or not in use for extended period of time, remove the
battery to prevent leakage.
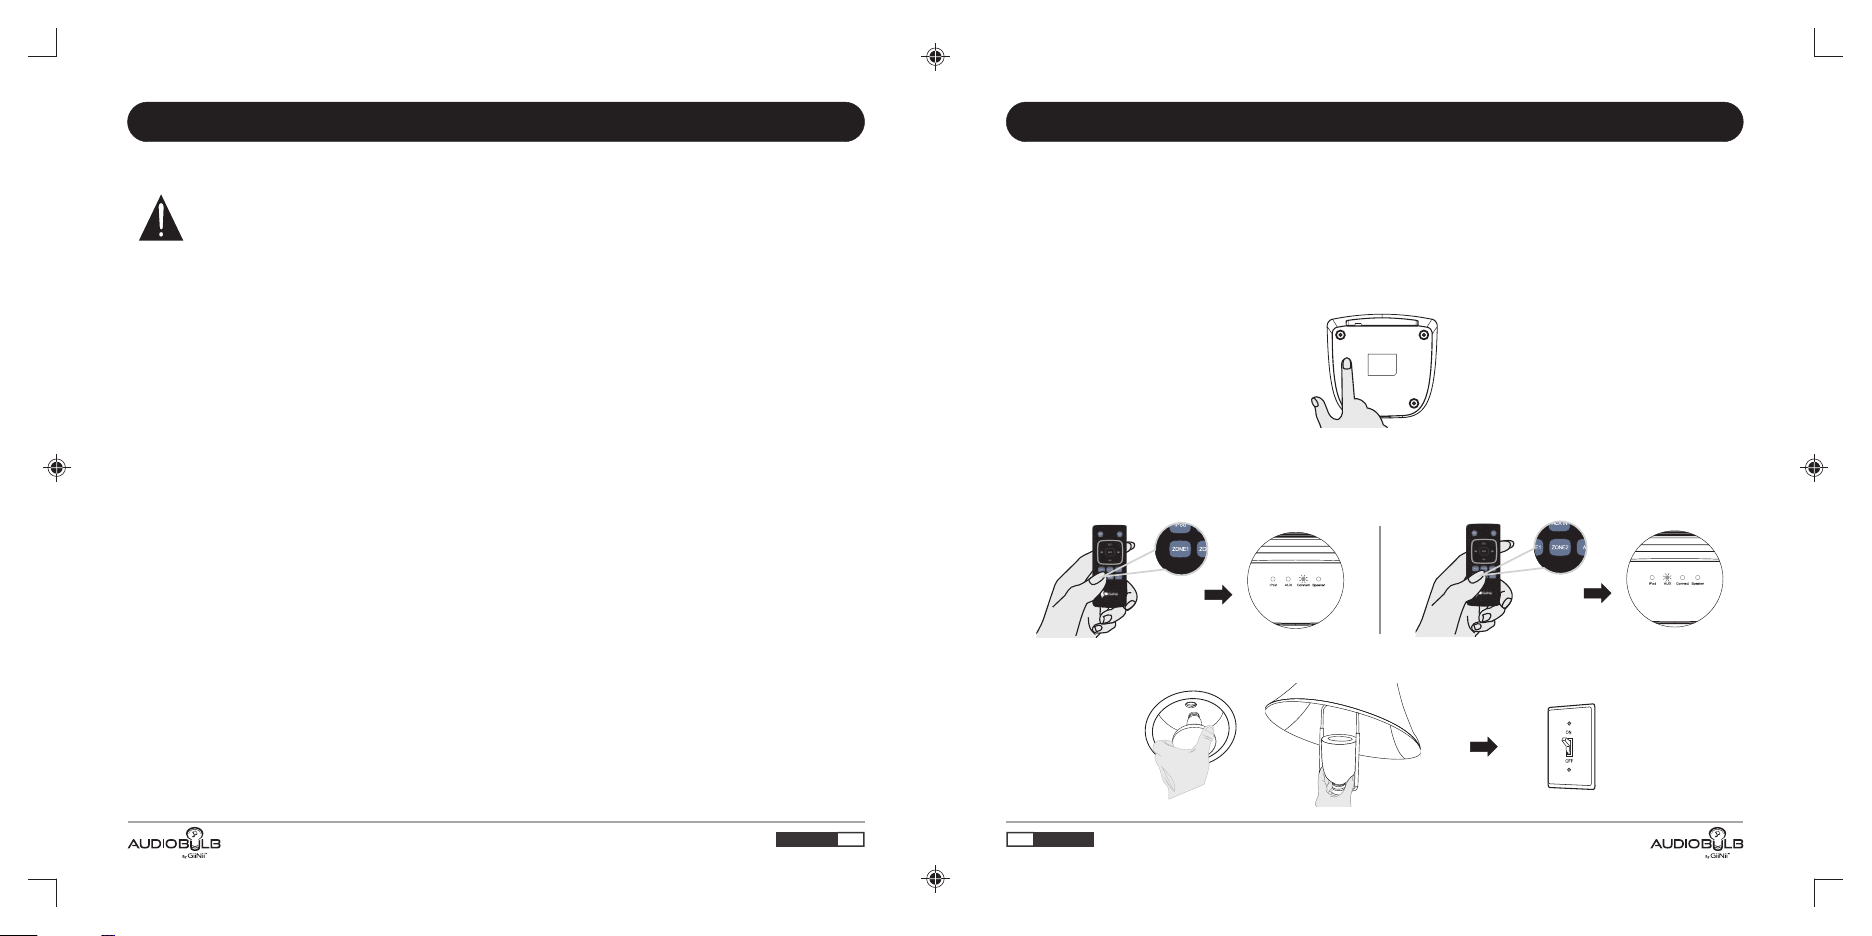
4. Pairing
The AudioBulbs are preco nfigured t o Zone 1 for con venience . In some rare o ccasions , you may
need to re-es tablish th e wireless c onnectio n. Please ma ke sure all de vices are co nnected to p ower
and follow below simple steps.
To set up/add Aud ioBulbs to : either zone
a) Press the PAIR located at the bottom of the docking sta tion.
b) Point remo te control a t the dockin g station an d press down o n Zone 1 or Zone 2 b utton, and t he
connect ind icator lig ht on dockin g station wi ll flash rap idly.(AUX indicator will flash when p airing
Zone 2).
c) Make sure th e AudioBulb i s securely i nstalled s ecurely in a n light sock et and power ed on.
Pai ring Zo ne 1 Pai ring Zo ne 2
English English
11 12
Page 8
EASY SETUP EASY SETUP
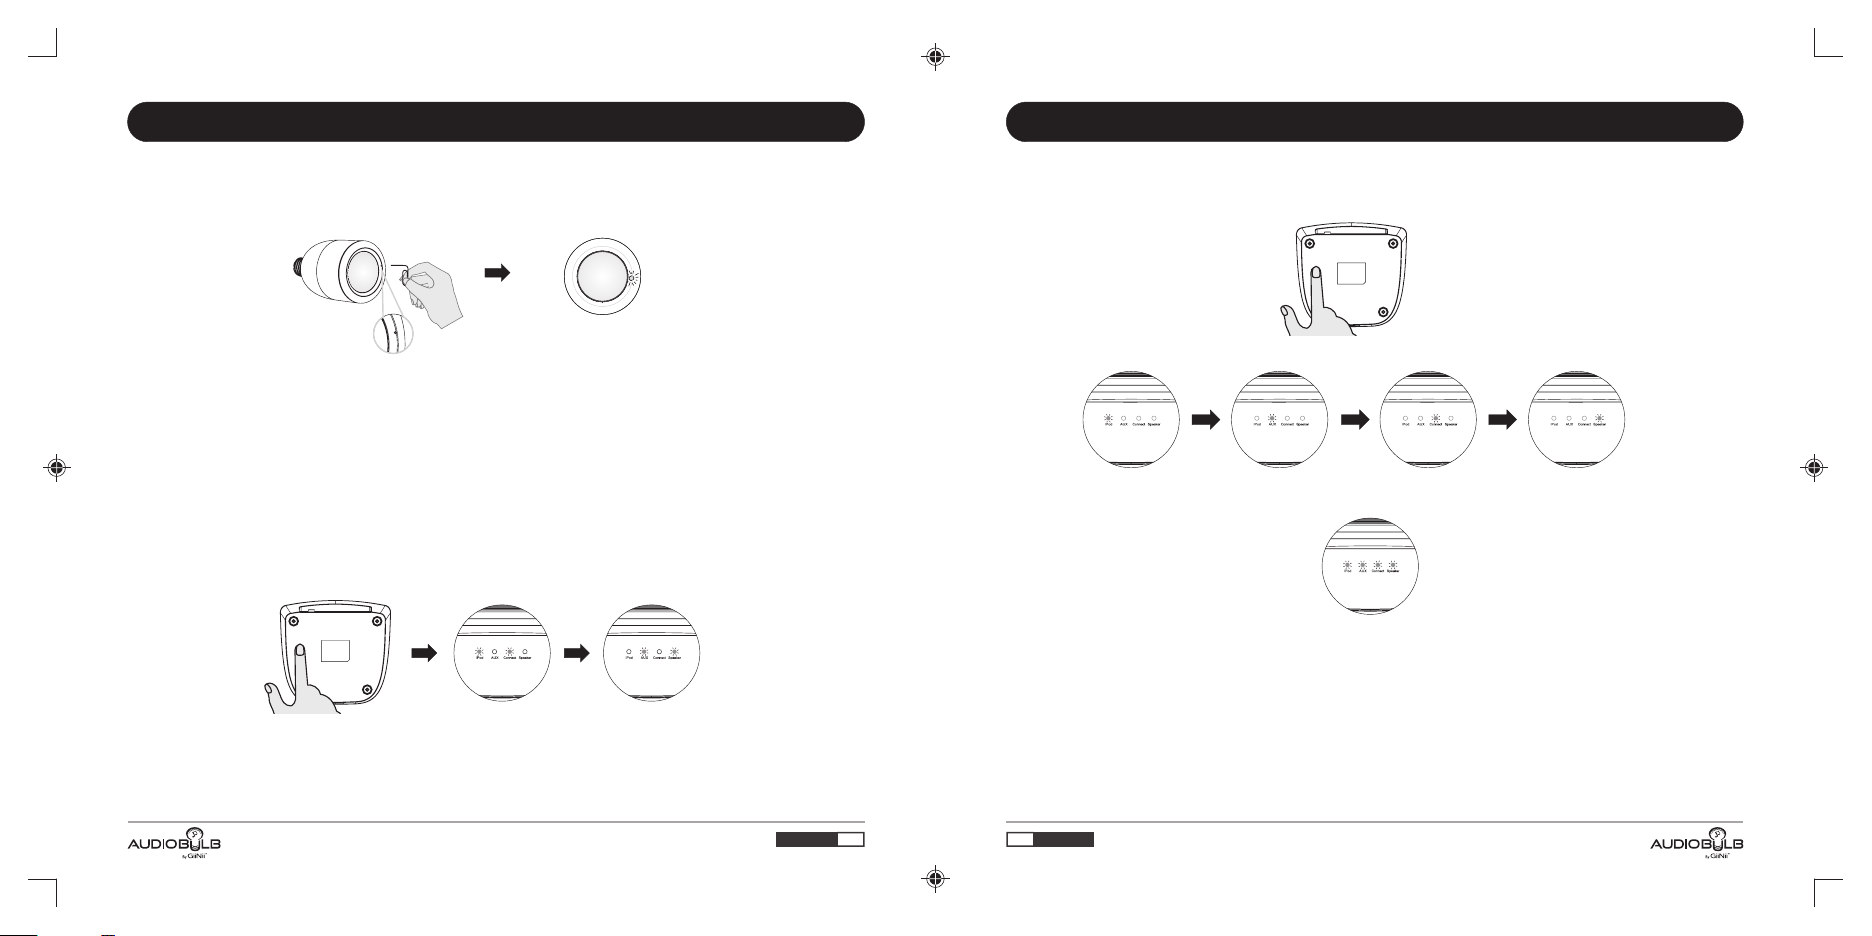
d) Find the pai ring hole lo cated on the e dge of speak er grill. In sert a small p aperclip t hrough the
pairing hol e and press th e pairing bu tton locat ed inside th e speaker. Re peat this st ep for all
speakers to b e paired to th e desired zo ne.
EXAMPLE: If y ou' d like to u se two AudioB ulbs in Zone 1 , please rep eat the abov e step on both
AudioBulbs b efore proc eeding to st ep e (pressi ng the PAIR button on the docking station ).
Stereo Chan nel Settin g: The first p aired Audio Bulb is auto maticall y configur ed to the Left
channel. The second paired AudioBulb is automatically configured to the Right channel. If two
AudioBulbs a re paired at t he same time , the channe ls will auto maticall y set to Left fo r the first
paired AudioBulb and Right for the se cond paired AudioBulb.
e) Press the PAIR button on the docking station again to complete setup. The indicator lights will
blink as show n below to ind icate succ essful pai ring.
To set second zone, repeat all steps but select diff erent zone in step b to pair.
Mono Sound Se tting: To set an Au dioBulb to M ONO sound ou tput, plea se go thru the entire
process of st eps a-e for ea ch AudioBul b individu ally. This i s helpful wh en you are only installing
one AudioBul b in a room and wa nt the entir e sound trac k to play out of t hat AudioBu lb.
To reset paired channels and re-design ate AudioBulbs:
a) Press and ho ld the pairi ng button on b ottom of doc king stati on for 4-6 sec onds erase a ll prior
set pairs.
b) All 4 LED indicators on doc king stati on will blin k in sequenc e.
c) All 4 LED indicators on doc king stati on will fast -blink at th e same time (a ll pairing e rased at thi s
point).
Note:
·If you wish to ad d more AudioB ulbs to pred efined Zon e 1, repeat st eps above an d choose Zon e 1
on the remote .
st nd
·1 and 2 paired Audio Bulbs are automatically set to Left and Right channels respectively.
·In case pairi ng is not succ essful, pr ess and hold p air button s on docking s tation for 4 ~6 seconds
to reset the sy stem then re peat above i nstructi ons.
·If you have a wir eless rout er in your hom e, it is recom mended tha t the dockin g station an d the
wireless ro uter are at le ast 10 feet ap art to avoid a ny potenti al signal in terferen ce.
English English
13
14
Page 9
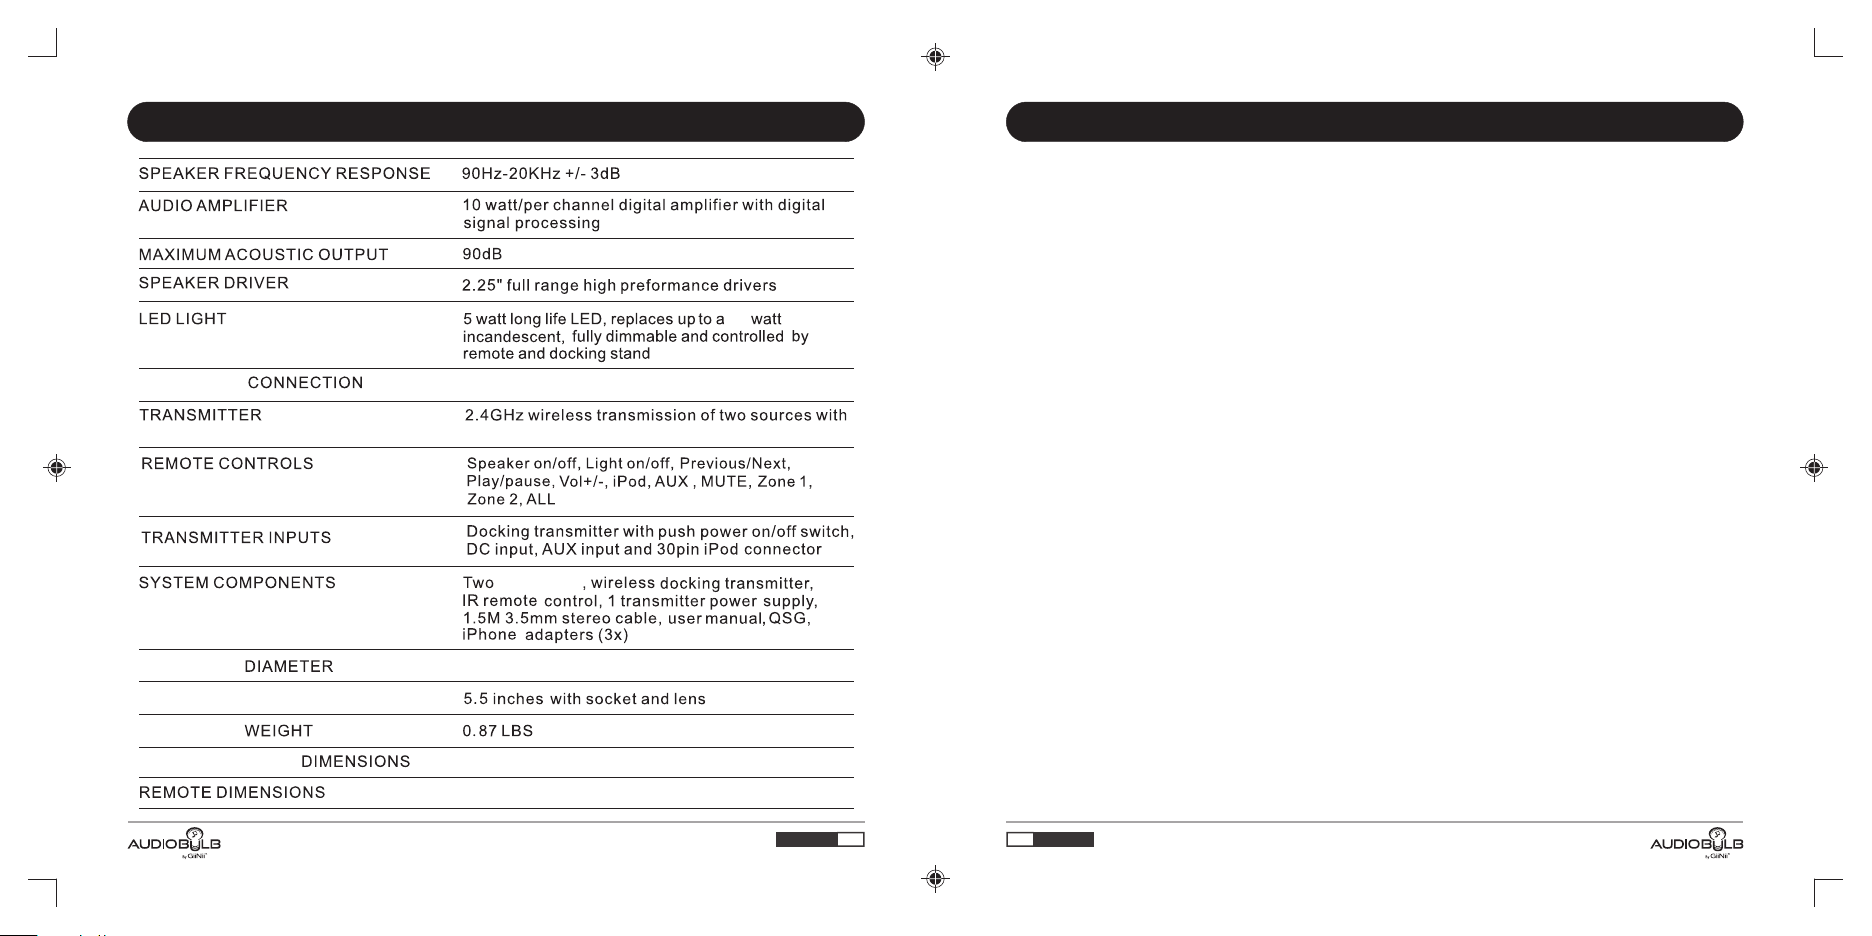
TECHNICAL SPECIFICATIONS
60
HELP
Frequently Asked Questions
1. There is no mu sic coming o ut of the Bulb , what should I do
a. Verify that t here is elec tricity to t he Bulbs.
b. Double che ck to see that t he correct m usic sourc e is selecte d.
c. Try re-pa iring the bu lbs with doc king station, please r efer to the Pairing Guide on page 14.
d. Do not insta ll these bul bs on a socket w ith dimmer s witch.
e. Make sure iP hone is UNLO CKED befor e docking fo r full compa tability.
?
AUDI OBULB
AUDI OBULB
AUDI OBULB HEIGHT
AUDI OBULB
DOCK ING STATION
Any standard light socket
iPhone, iPod , and AU X in
AudioBulbs
3.35 inches
W6.2xD5.8 xH1.53 inc hes
W3.54xD1. 46xH0.4 in ches
2. There is buzzing comin g from the spe akers, how c an I elimina te it?
The maximum distance between the base and the bulb should not exceed 50 to 100ft depending
if there is int erferenc e, clear the a ir space tha t may be block ing the sign al. It is also
recommend ed to have cle ar space bet ween other w ireless pr oducts, su ch as wirele ss phones or
internet ro uters.
3. My questio n is not answe red, where c an I get more support on this?
Please call u s, toll free , at 1-866-9 09-3550 fo r troubles hooting an d warranty s ervices. P lease
have the rece ipt inform ation hand y.
English English
15 1 6
Page 10

GIINII PROTECTION: WARRANTY INFORMATION
GIINII PROTECTION: WARRANTY INFORMATION
WARRANTY COVERAGE:
This warran ty obligat ion is limit ed to the term s set forth be low.
WHO IS COVERE D:
This produc t is warrant ed to the orig inal purch aser or the pe rson recei ving the pro duct as a gift
against def ects in mate rials and wo rkmanshi p as based on th e date of orig inal purch ase (”Warranty
Period”) fr om an Authori zed Dealer. The original sales receipt showing the product name and the
purchase da te from an aut horized re tailer is co nsidered s uch proof.
WHAT IS COVERED:
This warran ty covers ne w products i f a defect in ma terial or wo rkmanshi p occurs and a v alid claim i s
received wi thin the Wa rranty Per iod. GiiNii warrants this product to be free from defects in materials
and workman ship (subj ect to the ter ms set forth b elow) for a pe riod of thre e(3)year s from the dat e of
purchase fo r the LED ligh t and one (1) ye ar from the da te of purcha se for the res t of the compo nents.
At its option , the compan y will eithe r (1) repair t he product a t no charge, u sing new or re furbishe d
replaceme nt parts, or ( 2) exchang e the produc t with a produ ct that is new o r which has be en
manufactu red from new, o r servicea ble used par ts and is at lea st functio nally equi valent or mo st
comparable to the origi nal produc t in current i nventory, or (3) refund the original purchase price of
the product . The Company warrants replacement products or parts provided under this warrant y
against def ects in mate rials and wo rkmanshi p from the dat e of the repla cement or re pair for the
remaining portion of th e original p roduct's w arranty. When a product or part is exchanged, any
replaceme nt item beco mes your pro perty and th e replaced i tem become s the compan y's proper ty.
When a refund i s given, you r product be comes the co mpany's pr operty. Replacement pro duct can
only be sent if a ll warrant y requirem ents are met . Failure to f ollow all re quiremen ts can resul t in
delay.
WHAT IS NOT COVERED
EXCLUSION S AND LIMITATIONS:
This Limite d Warrant y applies on ly to the new pr oducts that can be identified by the trademark, trade
name, or logo a ffixed to it. This Limi ted Warranty does not apply to any non-GiiNii hardware product
or any softwa re, even if pa ckaged or so ld with the pr oduct. Non -GiiNii ha rdware man ufacture rs,
suppliers, or publish ers may prov ide a separa te warrant y for their ow n products p ackaged wi th the
bundled product. The Company is not liable for any damage to or loss of any programs, data, or
other infor mation sto red on any med ia contain ed within th e product, o r any non-Gi iNii produ ct or
part not cove red by this wa rranty. Recovery or reinstallation of programs, data or oth er informa tion
is not covere d under this L imited Wa rranty. This warranty does not apply (a) to d amage caus ed by
accident, a buse, misu se, neglec t, misappl ication, o r non-GiiN ii product , (b) to damag e caused by
service per formed by an yone other t han an Author ized Servi ce Locatio n, (c) to a prod uct or a part
that has been m odified wi thout writ ten permis sion, or (d) i f any serial n umber has be en removed o r
defaced, or ( e) to a produc t, accesso ries or cons umables so ld “AS IS” wit hout warra nty of any kin d
by including refurbis hed GiiNii p roducts so ld “As IS” by so me retaile rs.
THIS LIMITE D WARRANTY DOES NOT COVER:
Shipping ch arges to ret urn defect ive produc t.
Labor charg es for insta llation or s etup of the pr oduct, adj ustment of c ustomer co ntrols on th e
product, an d installa tion or repa ir of any part o utside of th e product
Product rep air and/or p art replac ement beca use of impro per instal lation or ma intenanc e,
connectio ns to improp er voltage s upply, power line surge, lighting damage, retained images or
screen mark ings resul ting from vi ewing fixe d stationa ry content f or extende d periods, p roduct
cosmetic ap pearance i tems due to no rmal wear an d tear, unaut horized re pair or othe r cause not
within the co ntrol of the c ompany.
Damage or cla ims for prod ucts not bei ng availab le for use, or f or lost data o r lost softw are.
Damage from m ishandle d shipment s or transit a ccidents w hen return ing produc t.
A product tha t requires m odificat ion or adapt ation to ena ble it to oper ate in any cou ntry other t han
the country f or which it wa s designed , manufact ured, appr oved and/o r authoriz ed, or repai r of
products da maged by the se modific ations.
A product use d for commer cial or inst itutiona l purposes ( includin g but not limi ted to renta l
purposes) .
Product los t in shipmen t and no signa ture verif ication re ceipt can be p rovided.
Failure to op erate per Us er Manual.
TO OBTAIN ASSISTANCE
For technic al support g o to www.giin ii.com and s elect your p roduct or ca ll toll free 1-866-90 9-3550
REPAIR OR REPLACEMENT AS PROVIDED UN DER THIS WARRANTY IS THE EXCLUSIVE
REMEDY FOR THE CONSUME R. GiiNii SH ALL NOT BE LIABLE FOR ANY INCIDE NTAL OR
CONSEQUEN TIAL DAMA GES FOR BREACH OF ANY EXPRESS O R IMPLIED WARRANTY ON
THIS PRODUC T. EXCEPT TO THE EXTENT PROH IBITED BY APPLI CABLE LAW, ANY IM PLIED
WARRANTY OR ME RCHANTABILITY OR FITNESS FOR A PARTICULAR PURPOSE ON THIS
PRODUCT IS LIMITED IN DURATION TO THE DU RATION OF THIS WAR RANTY.
Some states d o not allow th e exclusio ns or limita tions of inc idental or c onsequen tial damag es, or
allowlimitations on h ow long an imp lied warra nty lasts, s o the above li mitation s or exclusi ons may
not apply to yo u. This warranty gives you specific legal rights. You may have other rights which may
vary from sta te/provi nce to state /provinc e.
©2011 GiiNii
English English
17
18
Page 11

REGULATION AND COMPLIANCE
English
19
Page 12

TABLE DES MATIÈRES
SÉCURITÉ PREMIÈRE: INS TRUCTIONS IMP ORTANTES..................... ........ .................2
CONNAÎTRE L' AMPOULE- AUDIO................ ........ ........ ..................... ........ ........ .........4
CONTENU DU COFFR ET............................. ........ ........ ..................... ........ ........ ............5
SETUP FACI LE:
1. Installa tion Ampoul e-Audio. ........ ........ ..................... ........ ........ ..................... ........ .....6
2. P lan de Base d' Ampo ule-Audi o....... ............................. ........ ............................. ........ 7
3. Util iser l a Télécommande.......... ........ ........ ..................... ........ ........ ...........................9
4. Branchement............. ........ ............................. ........ ............................. ........ ...........12
SPÉCIFICATIONS TECHNIQUES................... ........ ............................. ........ ................15
AIDE ........... ........... ........... ........... ........... ........... ........... ........... ........... ........... ........... 16
......... ........ ............................. ........ ............................. ........ ................
SÉCURITÉ PREMIÈRE: INSTRUCTIONS IMPORTANTES
1. Veuillez lire et suivre attentive ment ces ins truction s. Gardez ce l ivret d'in structio n dans un
endroit sûr p our des réfé rences fut ures.
2. Ne pas emplo yez l'Ampo ule-Audi o près de l'ea u, parce que l 'humidité peut provoquer un court circuit dan s les compos ants élect roniques q ui peurra ap porter des d éfaillan ces.
3. Faites le ne ttoyage av ec un seul chi ffon sec.
4. Ne pas bloqu ez toute ouv erture de ve ntilatio n. Install ez-la en con formité av ec ces instr uctions.
5. Ne pas insta llez-la pr ès d' une sou rce de chale ur.
6. N'utilis ez que les att aches / acce ssoires sp écifique s à Ampoule- Audio.
7. Ne tentez pa s de démonte r ou de modifi er ce produi t. Dans ce pro duit, il n'y a a ucune pièc e
réparable p ar utilisa teur, et tout e modifica tion non-a utorisée pourra annuler la garantie.
8. Cet appare il ne peut pas s ervir aux ac cessorie s-lumina ires de sort ie urgente .
9. Cet appare il ne peut êtr e mis en servi ces que dans u n environn ement prot égé au grand a ir.
10. Ne pas l'ut ilisez dan s les access ories-lu minaires e ncastrés fermés.
11. Ne pas utilisez un adaptateur d'alim entation é lectriqu e inconnu au trement qu e celui four ni.
Connectez c e produit à un adaptateu r d'alimen tation éle ctrique in connu, c'est très dangereux,
parce que ça po urra occas ionner un in cendie ou un e explosio n.
12.Il n'est pa s recomman dé d' utili ser cet Ampou le-Audio s ur un commutateur de luminaire à moins
que la pleine puissance ne sois en utilisation. Le parleur a besoin d'un fl ux constan t d'électr icité
pour foncti onner corr ectement .
13.Soyez pru dent. Veuil lez adopte r des méthod es sures & app ropriées e t être accom pagné avec
un partenai re lors d'in staller su r une échell e ou des haute s position s.
Fra nç ai s Fra nç ai s
1
2
Page 13

SÉCURITÉ PREMIÈRE: INSTRUCTIONS IMPORTANTES
CONNAÎTRE L' AMPOULE-AUDIO
En utilisan t l' Am poule-Au dio:
ATTENTION: Pour réduire le risque de choc électrique, il ne faut pas dissimu ler le
produit.
Référez-v ous au manue l d'utilis ation:
référer au gu ide d'ense ignement p our des cons eils utile s.
Pendant le pr ocessus d' installa tion, veui llez vous
Ayant combiné la lumière, le son et la technologie sans fil, Ampoule-Audio peut établir un systèmemusique de mu lti-pièc es. L'inst allation e st simple et f acile, pas b esoin de mon tage suppl émentair e.
Lumière LED B rillante
Les LEDs Ampo ule-Audi o pourront d urer jusqu 'à 30 000 heures d e fonction nement. Ch aque LED
ampoule de 5 watts est conv enable à rem placer au pl us l' ampoul e lumineus e incandes cente de 60
watts.
Performan ce de Son de Por tée Pleine
Conçus pour la performa nce maxima le, chaque p arleur est é quipé de 1 0 Watts de puis sance en
fournissa nt un son rich e et plein. Avec la transmission sans fil à distorsion faible de 2,4 GHz , un son
stéréo disp onible d'intérieur n'es t jamais plu s facile.
Multi-Piè ces, Musiq ue sans fil
Chaque stat ion d'arri mage Ampoul e-Audio pe ut souteni r deux zones d e musique et a u plus huit
parleurs d' Ampoule-Audio en offrant un e flexibil ité pour per sonnalis er vos propr es zones de
musique et jo uir de votre m usique fav orie sans fi l par un simpl e contact d' un bouton. L a technolo gie
sans fil du pro priétair e 2,4 GHz offre une distance de transmission de 50 à 1 00 pied s anglais (e n
fonction de l 'environnement) dans toute direction. Alors vous pouvez personnaliser les zones
d'écoute dans chambre ou dans autre environnement.
L'install ation est fa cile
Les parleurs Ampoule-Audio peuve nt être faci lement ins tallés tou t comme une am poule lumi neuse
which peut s' intègrer d ans toute do uille de lum inaire sta ndard.
Fra nç ai s Fra nç ai s
3
4
Page 14

1. station d' arrimage
Ampoule-Audio
4. Télécommande
CONTENU DU COFFRET
2. Deux Ampoules-audios
5. CA/ CC adaptat eur
3. Manuel d'u tilisati on
6. 3.5mm AUX IN c âble (1.5M )
SETUP FACILE
1. Installation Ampoule-Audio
1. Assurez-v ous que le com mutateur g énéral de vo tre appliq ue est en posi tion "off" avant de
commencer l e processu s d'instal lation.
2. Vérifiez l e type de votr e connecte ur: Le parle ur d' Ampoule-Audio est conçu pour s'insérer dans
un connecte ur- douille de luminaire standard.
3. Avec le commutateur en position OFF, installez les ampoules-audios dans la douille de luminaire
et assurez- vous qu' il est bien en place. Si l'ampoul e-audio ne r entre pas da ns votre luminaire,
installez l 'accessoire-harpe (co mpris).
4. Une fois que l es bulbes so nt install ées san inqu iétude, al lumez le com mutateur g énéral et
attendez qu elques sec ondes pour é clairer le s Ampoules- Audios.
8. Pouch7. Harp
9. Couvercl e de poussiè res
d'arrimage
10.iPhone/iPod
adaptateu r (3x)
Fra nç ai s Fra nç ai s
5
6
Page 15

SETUP FACILE SETUP FACILE
2. Plan de Base d'Ampoule-Audio
Puissance d e parleur ou verture/ fermetur e
①.
Puissance d e luminair e ouvertur e/faible / fer meture
②.
Volume en bas
③.
Jouer/Arr êter
④.
Volume en haut
⑤.
Relèvement de Basse
⑥.
Source
⑦.
Puissance
⑧.
Paire
⑨.
1. Branchez l 'adaptat eur A C à "DC IN" et l'autre bout à une sortie murale, et puis appuyez sur le
bouton d' alimentation pour allumer la base .. Le " Co nnect" LED i ndicateu r clignote ra lors du
brancheme nt et il reste a llumé une fo is que le bran chement es t établi ent re les ampou les et la
base. Par déf aut, vos Ampo ules-Aud ios sont mis es à Zone1 .
PAIR
Pour brancher d'autres types de dispositifs-audios ou d'ordinateurs portables, il faut utiliser le
port Aux-in 3.5mm situé à l'arrière de la station d' arrimage. Une fois connecté, appuyez sur le
bouton SOURCE à clairs AUX.
3. Changez la luminosité des LED luminaires d'Ampoule-Audio. Appuyez sur le boutton d'ampoule
de luminaire pour contrôler toutes les ampoules dans la même zone.
100% 50% 25% 5%
fer me tu re
4. Appuyez sur le bouton VOLUME +/- pour contrôler la sortie-audio à partir des ampoules. Lorsque
le volume est en train d'être ajusté, le LED indicateur de "Parleur" sur la station d'arrimage
clignote jusqu'à ce que l'ajustage du volume minimum ou maximum est atteint.
5. Utilisez le Relèvement de Basse pour relever des expériences audios.
2. Retranch ez votre iPh one/iPod à l a station d' arrimage. Lorsque l'iPhone/iPod est retr anché, la
station d'arrimage établira une connexion à votre iPhone/iPod dans 1-2 s econdes et
commencer a l'émission de musique automatically. Votre dispos itif sera chargé simultané-men t.
Fra nç ai s Fra nç ai s
7
8
Page 16

SETUP FACILE SETUP FACILE
3. Utiliser la Télécommande
1
3
5
8
9
11 12
No. Description
Icône
1
2
3
4
5
6
7
8
9
Appuyez sur “ ” p our ouvrir /fermer le s on du parleu r.
Appuyez sur “ ” p our contrô ler le nivea u lumineux d 'Ampoule -Audio:
100%→50%→25%→5%→off.
Appuyez sur l e bouton “ ” pou r augmente r le volume de m usique.
Appuyez sur l e bouton “ ” pou r jouer et arr êter lors de j ouer la musi que du
iPhone/iP od retranc hé.
Appuyez sur l e bouton “ ” ou “ ” po ur choisir l e tract préc édent ou sui vant du
iPhone/iP od retranc hé. Aussi ap puyez sur et r etenez le bo uton “ ” ou “ ”
pour renverser ou avanc er rapidem ent le tract j oué actuel lement sur i Pone ou iPod .
Appuyez sur l e bouton “ ” pou r baisser le v olume de mus ique.
Appuyez sur l e bouton “ ” ou “ ” po ur choisir l a source- audio .
2
4
6
7
10
13
10
11
12
13
Appuyez sur l e bouton “ ” pou r mettre une s ourdine au p arleurs, a lors le LED
indicateu r du parleur s ur arrimag e clignote ra pendant s on muet.
Le bouton “ ” : vou s permet de co ntrôler to utes les Ampo ules-Aud ios désign ées
à la Zone 1. (ajustage par défaut par usine à la Zone 1)
Le bouton : quand toute s les deux Zon es 1 et 2 sont cré ées et prése ntes,
appuyez sur l e bouton pour contrô ler toutes l es Ampoules -Audios en c haÎne.
Le bouton : vous peut ach eter des Ampo ules-Aud ios supplé mentaire s et
“ ”
“ ”
“ ”
créer Zone 2(Voir branchem ent, page1 2)
NOTA: Pour les performances maximales, nous vous recommandons de placer la station d'arrimage
d'Ampoule-Audio dans le centre de toutes les ampoules en présentant une performance maximale
de transmis sion.
·
Remplacement de la batterie de télécommande
1. Sur le derri ère de la télé commande , appuyez su r la languet te de verrou illage ver s la droite.
2. Retirez le s upport de ba tterie.
3. Insérez la n ouvelle ba tterie dan s le détente ur. Il faut imp érativem ent placer l a batterie a vec la
charge posi tive vers le h aut, comme l 'illustration ci-dessous.
Charge posi ti ve
vers le h au t
Fra nç ai s Fra nç ai s
9 10
Page 17

SETUP FACILE SETUP FACILE
4. Glissez le d étenteur d e batterie d ans la téléc ommande.
• Une défaill ance au cour s de remplac er la batter ie de la façon c orrecte pe ut endomma ger
la batterie e t la télécom mande.
• Utilisez se ulement le t ype de batte rie spécif iée.
• Recyclez ou é liminez co rrecteme nt les batte rries util isées selo n les directives et
règlement s locaux.
• Les batterr ies sont hau tement inf lammable s, il faut les é loigner de l a chaleur excessive
ou de l'humid ité excess ive.
• Si la batteri e est complè tement déc hargée ou no n en utilisa tion pour le t emps de péri ode
prolongée , il faut reti rer la batte rie pour évi ter toute fuite).
4.Branchement
Les Ampoules-Audios so nt préconf igurés à l a Zone pour convenience. D ans des cas ra res vous
pouvez avoi r besoin de ré tablir le br anchemen t sans fil. Veu illez vous a ssurer que t ous les
dispositi fs sont bran chés à l'alimentation électrique. Suivez les étapes simples ci-dessous.
Pour config urer/ajouter Ampo ules-Aud ios à chaque Zone:
a) Appuyez sur le bouton PAIR au fond de la station d' arrimage .
b) Indiquez l a télécomm ande dans la s tation d'arrimage et appuyez sur le bouton de Zone 1 ou de
Zone 2, et puis l e voyant d'indication de branchement sur la station d' arrimage clignotera
rapidemen t. (AUX Indi cateur cli gnote pend ant le branc hement de Zo ne 2).
Pai ring Zo ne 1 Pai ring Zo ne 2
c) Assurez-v ous que l'Am poule-Au dio est soli dement ins tallée dan s une douill e de luminai re et
qu'elle est allumée.
1 ,
Fra nç ai s Fra nç ai s
11 12
Page 18

SETUP FACILE SETUP FACILE
d) Trouvez le tr ou de branch ement situ é sur le bord de g rille- parleur. Insérez unpetit trombone à
travers le br anchemen t et appuyez s ur le bouton d e branchem ent situé à l' intérieu r du parleur.
Répétez cet te étape pou r tous les par leurs à la zon e de désir.
Exemple: Si v ous souhai tez utilis er deux Ampou les-Audi os dans la zon e 1, veuille z répéter le s
étapes ci-d essus sur le s deux Ampoul es-Audio s avant de pro céder à l' étape a). (appuyez sur le
bouton PAIR sur la station d'accueil).
Ajustage de C haîne Stér éo: La premi ère Ampoule -Audio bra nchée est au tomatiqu ement
configuré e à la gauche ch aîne. La deu xième Ampou le-Audio b ranchée es t automati quement
configuré e à la droite ch aîne. Si deu x Ampoules- audios sont branchées à la fois, les c haînes
seront auto matiquem ent mises à Ga uche pour la p remière Amp oule-Aud io branché e et à Droit
pour la deuxi ème Ampoule -Audio bra nchée.
e) Appuyez sur le bouton PAIR sur la station d'arr image à nouv eau pour terminer la configuration.
Les voyants d 'indication clignoteront comme indiqué ci-dessous pour indiquer que ça fait un
brancheme nt réussi.
Pour défini r la seconde z one, répét ez toutes le s étapes, ma is la zone Cho isir différentes dans
l'étape b pou r la paire.
Réglage du so n Mono: Pour d éfinir une a mpoule-a udio à la sort ie audio MON O, veuille z passer
par le proces sus comple t d'étapes ae versez chaque ampoule-audio individuellement. Ceci est
utile lorsq ue Vous êtes se ule instal lation d'u ne ampoule -audio dan s une chambr e et que vous
voulez la pis te sonore d' ensemble J ouer hors de c e Ampoule-a udio.
Pour réinit ialiser le s canaux app ariés et red ésigner Ampoules-audios:
a) appuyez su r et mainten ez le bouton d e Branchem ent le sur le ba s de la statio n arrimage v ersez
4-6 seconde s efface toutes les paires mis en avant.
b) Tous les 4 Indicators LED sur la station arrimage clignotera en séquence.
c) Tous les 4 Indicators LED sur la station arrimage sera rapide clin dans le même temps (tous
Brancheme nt effacés à ce point.
NOTA:
·
Si Vous désirez ajouter pl us Ampoules -audios Zo ne1 prédéf inis, répé tez les étap es ci-dess us et
ch oisissez Zone1 sur la télécommande.
·
1er et 2ème pai re Ampoules-audios so nt automat iquement m is à canaux L et R r espectiv ement.
·
Dans le cas Bra nchement n 'est pas réu ssie, appu yez sur et mai ntenez pai re Le Bouton d e s sur la
station arrimage versez 4-6 secondes pour réinitialiser le système, puis répétez indications
ci -dessus.
·
Si Vous avez un ro uteur Sans F il de Votre mai son, il est re commandé q ue la statio n arrimage e t le
ro uteur Sans Fil sont au moins 10 pieds de d istance po ur éviter toute interférence du signal
po tentiel.
Fra nç ai s Fra nç ai s
13
14
Page 19

SPÉCIFICATIONS TECHNIQUES
AIDE
RÉSPONSE DE FRÉQUENCE DE PARLEUR
AMPLIFICATEUR AUDIO
SORTIE ACOUSTIQUE MAXIMALE
ACTIONNEU R DE PARLEUR
LED VOYANT
BRANCHEME NT D'AMPOULE -AUDIO
TRANSMETT EUR 2.4GHz tr ansmissi on de deux sou rces sans fi l avec
TÉLÉCOMMA NDES
ENTRÉE DE TRANSMETTEUR
COMPOSANT S DU SYSTÈME
DIAMÈTRE AMP OULE-AUD IO
HAUTEUR AMPO ULE-AUDI O
POIDS AMPOUL E-AUDIO
DIMENSION S DE STATION D' ARRIMAGE
DIMENSION S À DISTANCE
90Hz-20KH z+/- 3dB
amplifica teur numér ique avec tr aitement d e signal
numérique 10 watt / par cha îne
90dB
2.25" haut de pleine gamme, preformance d'actionneur
5 watt longue v ie LED, remp lacable ju squ'à 60 watts
à incandescence, régl able et cont rôlable pl einement
par télécom mande et pos ition d' arrimage.
Toute douille de luminaire standard
iPhone,iP od et AUX in.
Parleur ouv erture/f ermeture , l uminaire o uverture /
fermeture , précéden t/suivan t, jouer/a rrêter, Vol+ /-,
ipod, AUX, MUE T, Zone1, Zone 2, ALL
Transmet teur d'arr image avec c ommutate ur général
ouverture /fermetu re Commuta teur, DC entr ée, AUX
entrée et iPo d 30pin bran chement.
Deux Ampoules-Audios, transmetteur d'arrimage sans
fil, IR Télécommande,1 transmetteur de l'alimentation
en électricité, 0.5M 3.5mm câble stéréo, manuel
d'utilisation, QSG, adaptateurs iPhone (3x)
3.35 pouces
5.5 pouces av ec douille e t lentille
W6.2xD5.8 xH1.53 pou ces
W3.54xD1. 46xH0.4 po uces
Questionnaire Fréquent
1. Il y a de la musiq ue venant de l 'ampoule , que dois-je faire?
a.Vérifie r qu'il y a l'él ectricit é à l'Ampoule.
b.Double ve rifier à voi r que la SOURC E correcte e st sélecti onnée.
c.Essayer d e réparer le s ampoules a vec la stati on d'accue il, veuill ez vous réfé rer au Guide d e
Jume lage.
d.Ne pas inst aller ces am poules sur u ne douille a vec un commu tateur plu s obscur.
2. Il y a des bourd onnement s venant des p arleurs, comment peux-je l'éliminer?
La distance m aximale en tre la base et l 'ampoule ne doit pas dépasser 100ft. S' il y a des
interfére nces, déga ger l'espa ce d'air qui p eut bloque r le signal. I l est égalem ent recomm andé
d'avoir un espace clair entre autres produits sans fil, tels que les télé phones san s fil ou les
routeurs d' I nternet.
3. Ma questio n n'est pas ré pondue, où puis-je obt enir davantage de soutien sur ça?
Veuillez nou s appeler gr atuiteme nt au 1-866- 909-3550 p our le dépan nage et les se rvices de
garantie. Ve uillez ten ir les infor mations re çues à la main .
Fra nç ai s Fra nç ai s
15 1 6
Page 20

TABLA DE CONTENIDO
SEGURIDAD PRIMERA: INSTRUCCIONES IM PORTANTES 2
CONOZCA AUDIOBU LB .4
QUÉ HAY EN LA CAJA 5
ASAMBLEA SIMPLE :
1. Insta lación de Au diBulb 6
2. AudioBulb Disp osición de B ase 7
3. Uso del M ando a dis tancia 9
4. Empareja miento 12
ESPECIFIC ACIONES DE TECNOL OGÍA 15
.... .............. .............. .............. .............. ... ........... ... .............. .............. ............
AYUDA 16
......... ........ ............................. ........ ............................. ........ ...
......... ........ ............................. ........ ............................. ........ ......
......... ........ ............................. ........ ............................. ........ .........
......... ........ ............................. ........ ............................. ........ .
......... ........ ............................. ........ ...........................
......... ........ ............................. ........ ............................. .....
......... ........ ............................. ........ ............................. ........ ..........
......... ........ ............................. ........ ...............
......... ........ ..........................
SEGURIDAD PRIMERA: INSTRUCCIONES IMPORTANTES
1. Por favor, le a y siga cuida dosament e estas inst ruccione s. Manteng a este manua l de
instrucci ones en un lug ar seguro pa ra futuras r eferenci as.
2. No utilice Au dioBulb ce rca del agua . La humedad p uede causa r un cortoci rcuito en lo s
component es electró nicos, dan do lugar a un ma lfuncion amiento.
3. Limpiarl o solament e con un paño se co.
4. No obstruy a las rejill as de ventil ación. Ins tale de acue rdo con esta s instrucc iones.
5. No lo instal e cerca de Fue ntes de calo r.
6. Use únicam ente los dis positivo s / accesori os específ icos para Aud ioBulb.
7. No intente d esmontar o m odificar e ste produc tos. No hay pi ezas manej ables de usu ario en el
interior de e ste produc to, y cualqu ier modifi cación no au torizada s e anulará la g arantía.
8. Este apara to no está dis eñado para e l uso con acce sorios de sa lidad de eme rgencia.
9. Solament e se usa en un ent orno al aire l ibre prote gido.
10. No lo use en es pacios cer rados de lám paras empo tradas.
11. No utilice un adaptador de corriente desconocido sino que lo suministrado. Conexión a un
adaptador d e corrient e desconoc ido es muy pel igrosa y pue de provoca r un incendi o o explosió n.
12. No se recom ienda el uso d e AudioBulb e n regulado r de intensi dad, a menos q ue se utiliz e la
potencia pl ena. El habl ante requi ere un flujo c onstante d e electric idad para fu ncionar
correctam ente.
13. Por favor s e use en preca ución y méto dos apropi ados de segu ridad, y con u n compañer o,
cuando se ins tala en una es calera o lug ares de alto .
Esp añol Esp añ ol
1
2
Page 21

SEGURIDAD PRIMERA: INSTRUCCIONES IMPORTANTES
CONOZCA AUDIOBULB
Cuando se usa la AudioBulb:
PRECAUCIÓ N: Para redu cir el riesg o de descarg a eléctric a, no disimu le el produc to.
Consulte el m anual de usuario: Durante el proceso de instalación, por favor consulte la
guía de instr ucción par a los consej os.
AudioBulb combina luz, sonido y tec nología in alámbric a para crear u n sistema de m úsica de mul tihabitació n. La instal ación es sim ple y fácil, s in cablead o adiciona l.
Lámpara bri llante de LE D
LEDs de Audio Buld tendr án una durac ión hasta 30 .000 horas d e operació n. Cada bomb illa de LED
de 5 watts es ade cuado para s ustituir h asta 60 watt s de luz incan descente .
Rendimien to de Rango Co mpleto de So nido
Diseñado para un rendimiento máxi mo, cada alt avoz está eq uipado con 1 0 watts de pot encia
proporcio nando un son ido rico y com pleto. Con l a transmis ión inalám brica de 2,4 G Hz de baja
distorsió n, tener un so nido estér eo en una habi tación nun ca ha sido tan f ácil.
Multi-Hab itación, M úsica Inal ámbirca
Cada estaci ón de acopla miento de Aud ioBulb pue de admitir d os zonas de mú sica y hasta c on ocho
altavocez d e AudioBulb, proporci onando la fl exibilid ad para pers onalizar s u propia zon as de música
y disfrutar d e su música in alámbric a con solame nte un toque c on botón. La t ecnologí a patentad a
inalámbrica de 2,4 GHz of rece una dis tancia de tr ansmisió n de 50 a 1 00 pies (dep endiento d el
entorno) en c ualquier d irección , lo que le perm ite person alizar zon as de escuch a por habita ción o
en otros ento rnos.
Instalaci ón es SIMPLE
Altavocez d e AudioBulb s e puede inst alar fácil mente como u na bombill a y se adapta a cu alquier
conector óp tico están dar.
Esp añol Esp añ ol
3
4
Page 22

1. AudioBulb estación de
acoplamiento
4. Mando a dist ancia
QuÉ HAY EN LA CAJA
2. Dos AudioBulbs 3. Manual de instrucció n
5. AC/DC adaptador
6. 3.5mm cabl e de Entrada
Auxiliar (1. 5M)
ASAMBLEA SIMPLE
1. Instalación de AudiBulb
1. Antes de inic iar el proce so de instal ación, ase gúrese de qu e el interru ptor de lámp ara de pared
está en la posi ción de ¨öff¨.
2. Comproba r su tipo de con ector: el al tavoz de Audi oBulb está d iseñado pa ra encajar e n un
conector de l uz de enchuf e estánder .
3. Con el inter ruptor de la l uz en posici ón OFF, se insta la las bombi llas de Audio Bulb en el enc hufe
de la luz y se aseg ure de que est á perfecta mente en su lu gar. Si el Aud ioBulb no ca be en la
pantalla de l a lámpara, s e instala el a ccesorio d e arpa (incl uido).
4. Una vez que la s bombilla s se instala n de forma seg ura, se enci ende el inte rruptor de p otencia y
se espere uno s segundos p ara que el Audi oBulbs iluminen.
7. Arpa
8. Saco
9. Tapa de polvo de
acoplamiento
10. iPhone/ iPod
adaptador (3x)
Esp añ ol E sp añ ol
5
6
Page 23

ASAMBLEA SIMPLE
ASAMBLEA SIMPLE
2. AudioBulb Disposición de Base
Potencia de a ltavoz enc endido / apa gado
①.
Potencia de l uz encendi do / tenue / apa gado
②.
Bajar el volu men
③.
Reproducir / Pausar
④.
Subir volumen
⑤.
Refuerzo de B ass
⑥.
Fuente
⑦.
Poder
⑧.
Par
⑨.
1. Se conecta e l adaptado r de AC a ¨DC IN¨ y el otro e xtremo a una t oma de corri ente y luego
pulse el botó n para encen dir la base. E l LED indica dor de ¨Conec tar¨ parpad eará mient ras se
conecta y per manece enc endida una v ez que la cone xión entre l as bombill as y la base se ha
estableci do. De forma p redeterm inada, Aubi oBulbs se es tablecen e n la Zona 1.
2. Conecta su i Phone/iP od a la estaci ón de acopla miento. Cu ando el iPho ne / iPod esté a coplado,
la estación d e acoplami ento se esta blecerá la c onexión co n su iPhone / iP od en 1 – 2 segund os
y comenzará l a reproduc ción de músi ca automát icamente . Su disposi tivo se carg ará de forma
simultáne amente.
PAIR
Para conect ar otros tip os de dispos itivos de au dio o comput adores por tátiles, s e use la entra da
auxiliary d e AUX-in de 3,5 m m, en la parte p osterior d e la estació n de acoplam iento. Una v ez
conectado , pulse el bot ón FUENTE pa ra selecci ónar AUX.
3. Cambia el br illo de las LED lámparas d e AudioBulb. Pulse el bot ón de la bombi lla. Esto va a
controlar t odas las bom billas en la m isma zona.
100% 50% 25% 5%
apagado
4. Pulse el bot ón VOLUMEN + /- para controlar la salida de audio desde las bombillas. Cuando el
volumen est á adjustan do, el ¨Altav oz¨ LED indic ador de la est ación de aco plamient o parpadea
hasta el volu men mínimo o m áximo se alc ance.
5. Use REFUER ZO DE BASS par a una experi encia de aud io mejorad a.
Esp añol Esp añ ol
7
8
Page 24

ASAMBLEA SIMPLE ASAMBLEA SIMPLE
3. Uso del Mando a distancia
1
3
5
8
9
11 12
Número
Icono
1
2
3
4
5
6
7
8
9
Descripción
Pulse ¨ ¨ icono p ara encend ir / apagar el s onido de alt avoz.
Pulse ¨ ¨ para co ntrolar ni vel de ilumi nación de Aud ioBulb 100 %→50%→25%→
5%→apagado.
Pulse ¨ ¨ botón para au mentar el vo lumen de la mú sica.
Pulse ¨ ¨ botó n para repro ducer y paus ar cuando se r eproduci endo la músi ca
desde iPhone / iPod conec tado.
Pulse ¨ ¨ o ¨ ¨ botón para seleccionar tracto anterior o siguiente desde
iPhone / iPod . También, pulse y mantiene ¨ ¨ o ¨ ¨ botón p ara rebobi nar o
avanzar ráp idamente d e la tracto ac tual repro duciendo e n el iPhone o iP od.
Pulse ¨ ¨ botón para ba jar el volum en de la músic a.
Pulse ¨ ¨ o ¨ ¨ botón para seleccionar el fuente de audio.
2
4
6
7
10
13
Pulse ¨ ¨ botón para si lenciar el a ltavoz, el a ltavoz LED i ndicador e n
10
11
12
13
acopliamiento va a parp adear dura nte el silen cio.
¨ ¨ botón le permite a controlar todas AudioBulbs designadas a Zona 1.
(Configuración de defecto de fábrica está en Zona 1) .
¨ ¨ botón: cuando ambas zonas 1 y 2 está asambleadas, pulse ¨ ¨ botón para
controlar t adas las Audi oBulbs en ra ngo.
¨ ¨ botón: puede comprar AudioBulbs adicionales y crea Zona 2 (ver el
emparejamiento, pág ina 12).
Consejo úti l: para un máx imo rendim iento, rec omendamo s colocar la e stación de a coplamie nto de
AudioBulb en el centro de t odas las bom billas, lo q ue permite o btener el má ximo rendi miento de
transmisi ón.
Sustituci ón de la bater ía del mando a d istancia
1. En la parte po sterior de l mando a dist ancia, pul se la pestañ a de bloqueo h acia la drec ha.
2. Saque el sop orte de la bat ería.
3. Inserte la b atería nue va en el sopor te. La bater ía debe ser co locado con l a carga posi tiva hacia
arriba, com o se muestra e n la ilumina ción de abaj o.
Carga positiv e ha ci a
arrib a
Esp añol Esp añ ol
9 10
Page 25

ASAMBLEA SIMPLE ASAMBLEA SIMPLE
4. Deslice el s oporte de la b atería en el m ando a dista ncia.
•
control rem oto.
•
•
regulacio nes locale s.
•
•
prolongad o, se retire l a batería pa ra evitar fu gas.
Fracaso de re emplazar l a batería de l a manera cor recta pued e dañar la bat ería y el
Use solamente el tipo de batería espe cificado .
Recicle o deseche bater ías usadas c orrectam ente de acue rdo a las dire ctrices y
Las batería s son muy infl ammables ; se mantien en lejos del c alor exces ivo o la humed ad.
Si la batería e stá comple tamente ag otada o no est á en uso por un pe ríodo de tie mpo
4. Emparejamiento
La AudioBulb está precon figurada p ara la Zona 1 pa ra conveni encia. En al gunas ocas iones, pue de
que tenga que volver a esta blecer la co nexión ina lámbrica . Por favor, as egúrese de q ue todos los
dispositi vos están co nectados c on el poder y si ga los pasos s iguiente s.
Para config urar / agreg ar AudioBulbs a cualquiera de la zona:
a) Pulse el bot ón PAR, localizado en la parte inferior de la estación de acoplaliento.
b) Pone el cont rol remoto h acia la esta ción de acop lamiento y p resione ha cia abajo en Z one 1 o
Zone 2, y el indi cador lámp ara de conex ión en la esta ción va a parp adear rápi damente. ( Indicador
de ENTRADA AU XILIAR par padeará cu ando hay emp arejamie nto Zona 2 ).
Pai ring Zo ne 1 Pai ring Zo ne 2
c) Asegúrese d e que la AudioBulb está fir memente in stalada de f orma segur a en un enchuf e de luz
y se enciende .
Esp añol Esp añ ol
11 12
Page 26

ASAMBLEA SIMPLE ASAMBLEA SIMPLE
d) Encuentr a el agujero e mparejam iento situ ado en el bord e de la rejill a del altavo z. Inserte u n clip
pequeño a tra vés del aguj ero de vincu lación y pul se el botón de e mparejam iento enco ntrado en
el interior d el altavoz . Repita est e paso para to dos los alta voces a la zon a deseada.
Ejemplo: si d esea utili zar dos Audio Bulbs en la Zo na 1, por faov r repita el pa so anterio r en
ambos Audio Bulbs ante s de procede r al Paso a (presionando el botón de PAR en la estación de
acoplamie nto).
Canal Estér eo Configu ración: la p rimera Audi oBulb empa rejada se co nfigura au tomática mente
para canal ca nal Izquie rdo. La segu nda AudioBu lb emparej ada se confi gura autom áticamen te
para el canal d erecho. Si d os AudioBul bs están vin culados al m ismo tiemp o, los canal es se
ajusta auto máticame nte al Izqui erdo canal p ara la AudioB ulb empare jada prime ramente y el
Derechao pa ra el segund amente Aud ioBulb emp arejada.
e) Pulse el bot ón de pareja e n la estació n de acoplam iento de nue vo para comp letar la
configura ción. El ind icador lám para parpa deará como s e muestra a co ntinuaci ón para indi car el
emparejam iento con éx ito.
Para establ ecer la segu nda zona, re pita todos l os pasos per o seleccio ne otra zona e n el paso b)
para empare jar.
Configura ción de Soni do Mono: para establecer una AudioBulb a la salida de sonido Mono, por
favor vaya a tr avés de todo e l proceso de l os pasos a – e par a cada AudioB ulb indivi dual. Esto e s
útil cuando s olamente s e instala un a AudioBulb e n una habita ción y desea q ue el tracto d e sonido
se reproduz ca desde aqu ella AubioB ulb.
Para restablecer los canales y re-desinar AudioBulbs:
a) presione y mantenga presionado el botón de emparejamiento en la parte inferior de la estación
de acoplamiento de 4 – 6 segundos para borrar todos los pares establecidos anteriormente.
b) todos los 4 LED indicadores en la es tación de acoplamiento van a parpadear en secuencia.
c) todos los 4 LED indicadores en la es tación de acoplamiento va a parpadear rápidamente al
mismo tiempo (todos los emparejamien tos se borran en es te punto).
Nota:
·
Si desea añadir más AudioBulbs a la Zona 1 predefinida, repita pasos anteriores y seleccione
Zona 1 en el remoto.
·
AudioBulbs primeramente y segundamente emparejadas se ajustan automáticamente a los
canales Izquierdo y Derecho respectivamente.
·
En el caso de que el emparejamiento no es exitoso, presione y mantenga presi onados los botones
de PAR en la estación de acoplamiento de 4 – 6 segundos para reiniciar el sistema y luego repita
las instrucciones de arriba.
·
Si tiene un router inalámbrico en su casa, se recomienda que entre la estaci ón de acoplamiento y
el router inalámbrica hay por lo menos 10 pies de distancia para evitar cualquier interferencia
potencial de la señal.
Esp añol Esp añ ol
13
14
Page 27

ESPECIFICACIONES DE TECNOLOGÍA
AYUDA
FRECUENCIA DE RESPUESTA DE ALTAVOZ
AMPLIFICA DOR DE AUDIO
SALIDA ACÚS TICA MÁXIMA
CONTROLAD OR DEL ALTAVOZ
LED LÁMPARA
CONEXIÓN DE AU DIOBULB
TRANSMISO R
CONTROLES R EMOTO
ENTRADAS DE L TRANSMISO R
COMPONENT ES DEL SISTEMA
AUDIOBULB D IÁMETRO
AUDIOBULB ALTURA
AUDIOBULB P ESO
DIMENSIONES DE ESTACIÓN DE ACOPLAMIENTO
DIMENSION ES DE REMOTO
90Hz-20KH z+/- 3dB
10 watt / canal a mplifica dor digita l con
procesami ento de seña l digital
90dB
2.25'' controladores de rendimiento alto de gama
completa
5 watt LED de lar ga vida, se pu ede reempl azar hasta
60 watt Incan descente s, totalme nte regula ble, y
controlad as por el cont rol remoto y s oporte de
acoplamiento
Cualquier enchufe de la l uz estánda r
2.4 GHz trans misión ina lámbrica d e dos fuente s con
iPhone, iPo d, y Entrada a uxiliar
Altavoz enc endido / apa gado, lámp ara encend ido /
apagado, anterior / pró ximo, repr oducir / pau sar,
Vol+/-, iPod , ENTRADA AUXI LIAR, SILE NCIO,
Zona 1, Zona 2, TODO
Se conecta el t ransmiso r empujand o la potenci a
encendido / agapado Int erruptor , entrada de D C,
entrada AUX ILIAR, y con ector de iPo d de 30 pins
Dos AudioBulbs, transm isor inalá mbrica de ac oplamiento, IR con trol remot o, 1 fuente de a limentac ión del
transmiso r, 0.5M 3.5mm c able estér eo, manual d el
usuario, QS G, adaptad or de iPhone ( 3x)
3.35 pulgadas
5.5 pulgadas con enchuf e y lentes
0.87 LIBRA
W6.2 x D5.8 x H1. 53 pulgada s
W3.54 x D1.46 x H 0.4 pulgad as
Preguntas Más Frecuentes
1. No hay músic a que sale de la b ombilla, ¿q ué debo hacer?
a. Comprueb e que haya ele ctricida d para los bul bos.
b. Comprueb e para ver que l a fuente cor recta está s eleccion ada.
c. Para trata r de re-acop lar las bomb illas con es tación de ac oplamien to, por favo r consulte l a Guía
de Empareja miento.
d. No instale e stas bombi llas en una to ma de corrie nte con regu lador de int ensidad.
2. Hay zumbid o proceden te de los alta voces, ¿cóm o puedo eliminarlo?
La distanci a máxima ent re la base y la bo mbilla no de be exceder 1 00 pies. Si ha y interfer encia,
limpia el esp acio de aire q ue puede est ar bloquea ndo la señal . También se recomienda tener un
espacio lib re entre otr os product os inalámb ricos, com o teléfono s inalámbr icos o route rs de
Internet.
3. Mi pregunt a no está cont estada, ¿dó nde puedo obtener más apoyo en esto?
Por favor llá menos al núm ero gratui to 1-866-9 09-3550 pa ra la soluci ón de proble mas y servic ios
de garantía . Por favor te nga la infor mación de la r ecepción a m ano.
Esp añol Esp añ ol
15 1 6
 Loading...