

Page 1
Gigaset AL415A
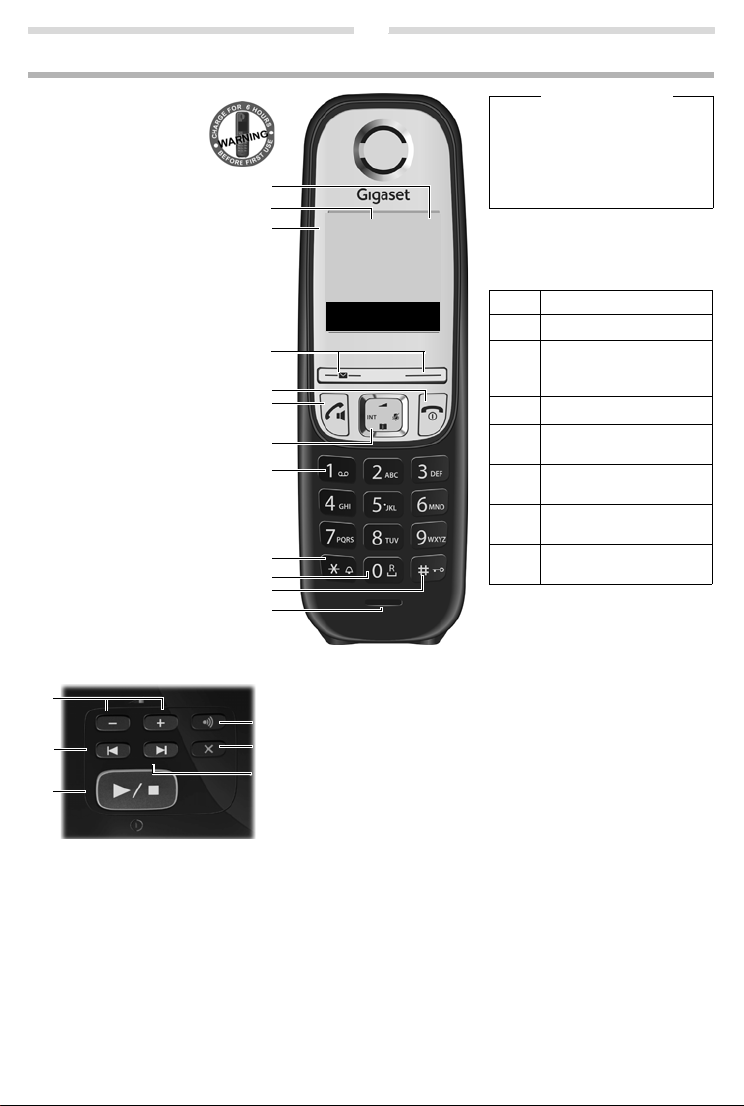
The handset at a glance
1Charge status of the
batteries
2Answering machine
icon
3 Signal strength
4Display keys
5 End call key and On/Off key
6 Talk key/Handsfree key
7 Control key (
p)
ª Audio settings
INT Internal call
â
Directory
|
Muting during a call
8 Key 1
Open answering machine/net-
work mailbox
9 Star key
Ringers on/off (press and hold);
with an open connection:
switch from pulse dialling to
tone dialling (press briefly)
10 Key 0/recall key
Consultation call (flash): press
and hold
11 Hash key
Keypad lock on/off (press and
hold); toggles between upper/
lower case and digits; inserts a
dialling pause (press and hold)
12 Microphone
Handset display keys:
Pressing a key launches the function
that appears above that key in the display.
Please note
New messages in the calls list/
answering machine list/network
mailbox list are indicated in the display by the message New mes-
sages, the left display key flashe s (if
set
page 8).
Display Function when pressed
’
Open calls list ( page 8).
§Menu§
Open main/submenu
(see menu overview
page 21).
”
Go back one menu level.
Y
Scroll up/down or adjust volume with
q
.
X
Move cursor to left/right
with
r.
Ü
Backspace deletes one
character at a time.
§OK§
Confirm menu function or
save entry.
Ð
Ã
U
INT 1
23.04. 10:53
‘
Menu
1
2
3
4
5
6
7
8
9
10
11
12
The base station at a glance
1
6
2
3
5
4
1 Registration/Paging key:
Search for handsets (press briefly, paging
page 11).
Register handsets (press and hold
page 12).
2 Volume ke ys: (– = quieter; + = louder)
During message playback: adjust the speaking volume.
While the phone is ringing: adjust the ringer melody volume.
3 Play/Stop key:
Switch answering machine on and off (press and hold);
play back new messages from answering machine (press briefly);
during message playback: cancel playback (press briefly).
Lights up: answering machine is activated.
Flashes: at least one new message is present or message is played
back or being recorded.
Flashes very quickly : memory is full.
During message playback:
4 Skip to the start of the current message (press once) or go to the pre-
vious message (press twice).
5Go to the next message.
6 Delete current message.
Gigaset service contact numbers:
For personal advice on our range of products and for repairs or guarantee/warranty claims call:
Service Centre UK: 020 369 53111 (local call cost charge)
Service Centre IE: 0818 200 033
Please have your proof of purchase ready when calling.
1
Page 2
2
ECO DECT
During a call, the transmission power is automatically adjusted to the distance between handset and base station,
the smaller the distance, the lower the transmission power (radiation). In idle status the transmission power of the
handset is switched off. Only the base station ensures contact with the handset using low radio signals.
Your phone offers you the opportunity to further reduce the transmission power:
1) Reducing transmission power (eco mode)
If the setting Max. Range is switched to off (menu tree
during a call is reduced up to 80% at half range.
2) Deactivating transmission power (eco mode+)
With the setting No Radiation (menu tree
standby mode completely. Please note:
page 22), you turn off the transmission power of the base station in
page 22), the transmission power in standby mode and
◆ All registered handsets must support this feature.
◆ For quick connection of incoming calls the handset repeatedly switches to reception mode for short periods.
This increases energy consumption and therefore reduces the standby and talk times.
Safety precautions
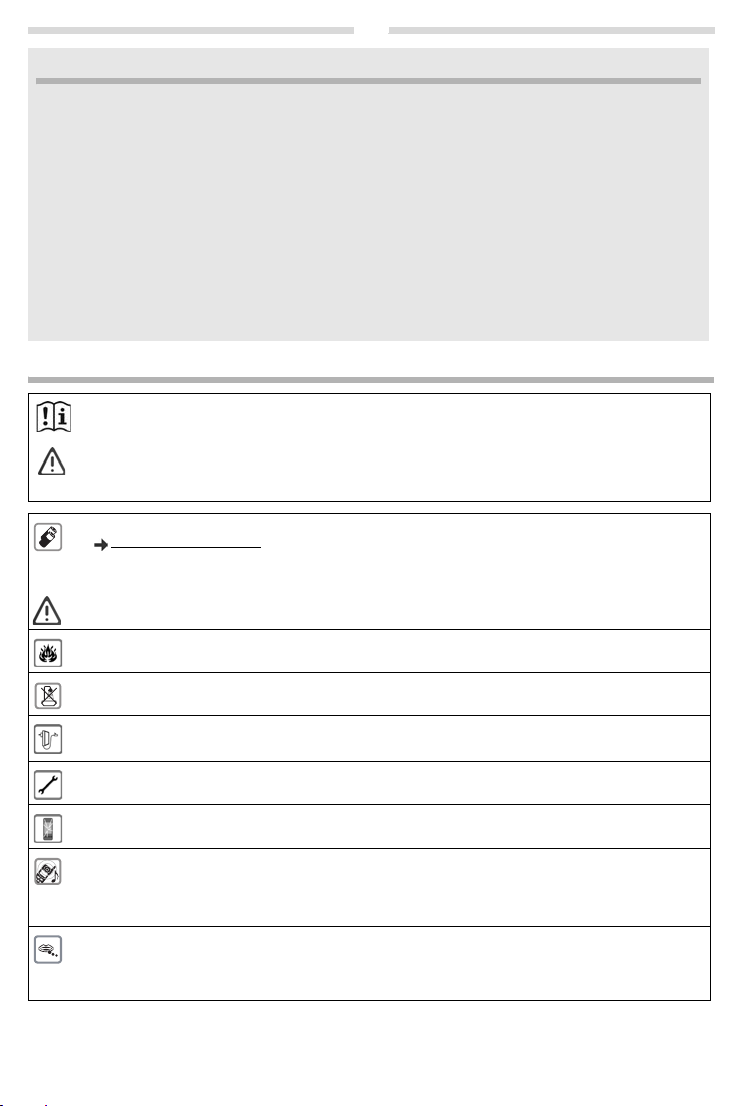
Read the safety precautions and the user guide before use.
The device cannot be used in the event of a power failure. In case of a power failure it is also not possible
to make emergency calls.
Emergency numbers cannot be dialled if the keypad/display lock is activated!
Use only rechargeable batteries that correspond to the specification (see list of permitted batteries
www.gigaset.com/service
as this could result in significant health risks and personal injury. Rechargeable batteries, which are noticeably damaged, must be replaced.
The handset must not be operated if the battery cover is open.
Do not use the devices in environments with a potential explosion hazard (e.g. paint shops).
The devices are not splashproof. For this reason do not install them in a damp environment such as bathrooms or shower rooms.
Use only the power adapter indicated on the device.
Whilst charging, the power socket must be easily accessible.
Remove faulty devices from use or have them repaired by our Service team, as these could interfere with
other wireless services.
Do not use the device if the display is cracked or broken. Broken glass or plastic can cause injury to hands
and face. Send the device to our Service department to be repaired.
Do not hold the rear of the handset to your ear when it is ringing or when speaker mode is activated. Otherwise you risk serious and permanent damage to your hearing.
The phone may cause interference in analogue hearing aids (humming or whistling) or cause them to overload. If you require assistance, please contact the hearing aid supplier.
Keep small cells and batteries, which can be swallowed, out of the reach of children.
Swallowing a battery can lead to burns, perforation of soft tissue and death. Severe burns can occur within
2 hours of swallowing.
In the case of a swallowed cell or battery, seek medical care immediately.
). Never use a conventional (non-rechargeable) battery or other battery types
Page 3
3
1
2
1
1
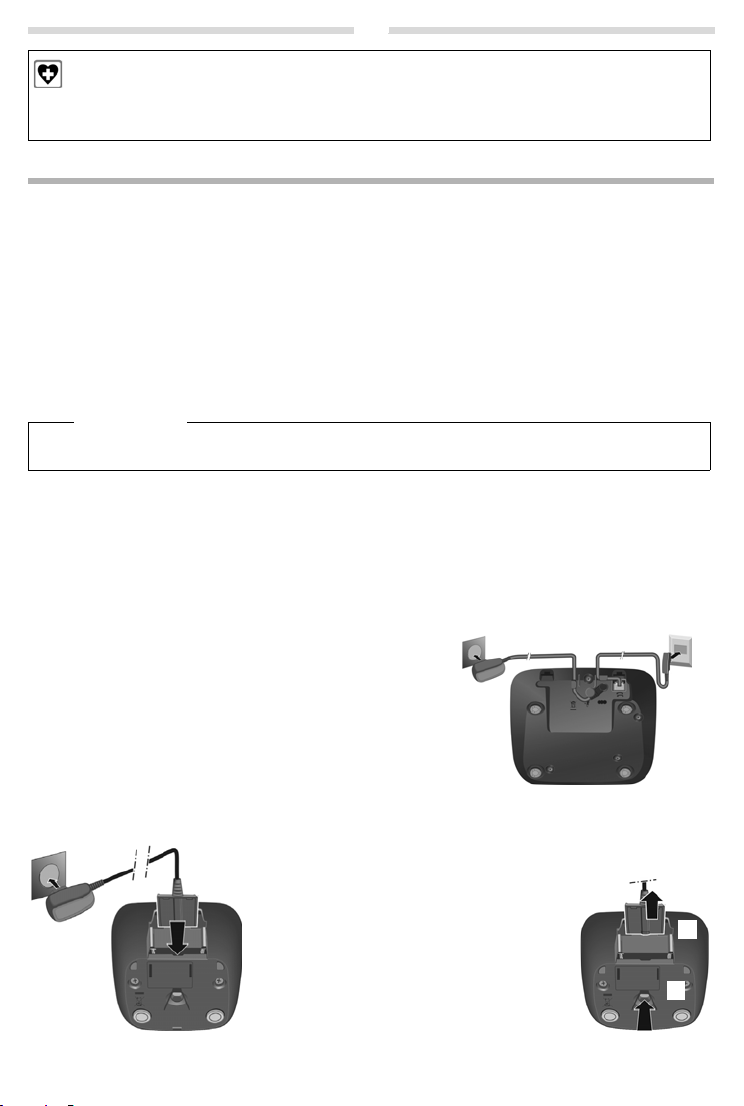
Connect the flat plug from the power
supply
1.
Plug the mains adapter into the plug
socket
2.
If you need to disconnect the plug from the
charging cradle, press the release button
3
and disconnect the plug
4.
1
2
3
4
Using your telephone may affect nearby medical equipment. Be aware of the technical conditions in your
particular environment, e.g. doctor's surgery. If you use a medical device (e.g. a pacemaker), please contac t
the device manufacturer. They will be able to advise you regarding the susceptibility of the device to
external sources of high frequency energy (for the specifications of your Gigaset product see "Technical
data").
First steps
Check the package contents
Base station and handset package: One Gigaset handset, one Gigaset AL415A base station, one mains adapter, one
phone cord, two batteries, one battery cover, one user guide.
Handset and charging cradle package: One Gi
one battery cover, one user guide.
If you have purchased a model with multiple ha
a charging cradle with mains adapter for each additional handset.
gaset handset, one charging cradle with mains adapter, two batteries,
ndsets, the package should contain two batteries, a battery cover and
Setting up the base station and charging cradle (if included)
The base station and charging cradle are designed for use in enclosed dry rooms with a temperature range of +5 °C to
+45 °C.
Set up the base station at a central location on a flat, non-slip surface in your house or apartment. You can also
mount the base station and charging cradle on the wall.
Please note
Pay attention to the range of the base station. This is up to 300 m in unobstructed outdoor areas and up to 50 m
inside buildings.
The phone's feet do not usually leave any marks on surfaces. However, due to the multitude of different varnishes and
lishes used on today's furnishings, the occurrence of marks on the surfaces cannot be completely ruled out.
po
Wipe down the base station, the charging cradle and the handset with a damp cloth (no solvents) or an antistatic
Care:
cloth. Never use a dry cloth. This can cause static.
Please note:
◆ Never expose the telephone to the influence of heat sources, direct sunlight or other electrical devices.
◆ Protect your Gigaset from moisture, dust, corrosive liquids and vapours.
Connecting the base station
Fir st connect the mains adapter 1.
Then connect the telephone jack 2 and insert the
cables into the cable ducts.
Please note:
◆ The mains adapter must always be connected, as the
phone will not operate without mains connection.
◆ Only use the mains adapter and phone cord supplied.
Pin connections on telephone cables can vary.
◆ The answering machine is ready for use approx. 30 sec-
onds after the base stati
Connecting the charging cradle (if included)
on has been connected.
Page 4
4
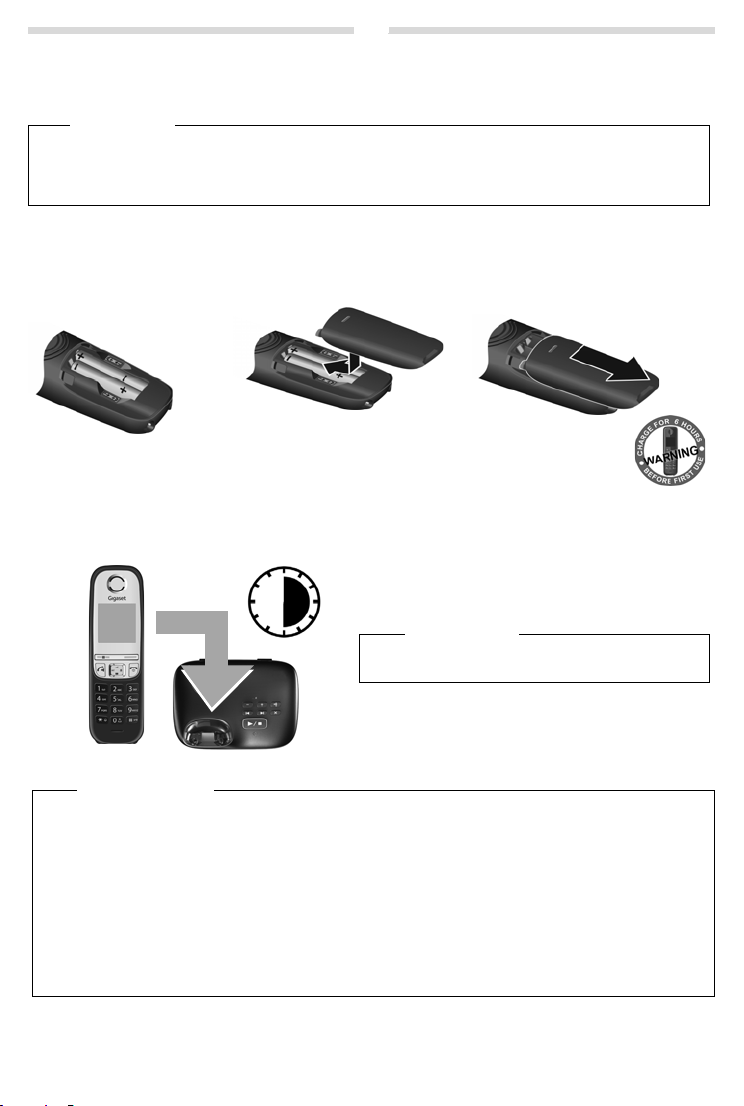
Insert the batteries
with the polarity in the
correct direction.
The polarity is indicated in
the battery compartment.
Insert the battery cover from
the top.
Then slide the cover upwards
until it clicks into place.
To ope n the batt ery c over, f or in stan ce to
replace the batteries:
Reach into the notch at the top of the
cover and slide the cover downwards.
6 h
Charge the handset in the base station/charging cradle
for 6 hours.
After charging, remove the handset from the base sta-
tion/charging cradle and only replace it when the batteries are fully discharged.
Please note
The handset must only be placed in the designated
Gigaset base station or charging cradle.
Setting up the handset for use
The display is protected by a plastic film. Please remove the protective film!
Inserting the batteries and closing the battery cover
Warn ing
Use only the rechargeable bat
conventional (non-rechargeable) batteries as this could resul
example, the batteries could explode. The phone could also malfunction or be damaged as a result of using batteries that are not of the recommended type.
teries recommended by Gigaset Communications GmbH ( page 16), i.e., never use
t in significant health risks and personal injury. For
Initial charging and discha
The correct charge status can only be displayed if the batteries are first fully charged and discharged.
Please note
◆ Base station and handset package: The handset is pre-registered with the base station. I f you have purchased
a model with multiple handsets, all handsets will already be registered with the base station. You do not need
to register the handset again.
However, if a handset is not registered with the base st ation (Re
register the handset manually (
Handset and charging cradle package: pl
◆ After the first battery charge and discharge, you may place your handset in the charger after every call.
◆ Always repeat the charging and discharging procedure if you remove the batteries from the handset and rein-
sert them.
◆ The batteries may warm up during charging. This is not dangerous.
◆ After a while, the charge capacity of the batteries will decrease for technical reasons.
rging of the batteries
page 12).
ease register the handset manually ( page 12).
gister HS or Put into base is displayed), please
Page 5
5
973 SET: [0
]
973 SET:
[2]
Ð
Ã
U
INT 1
23.04. 10:53
‘
Menu
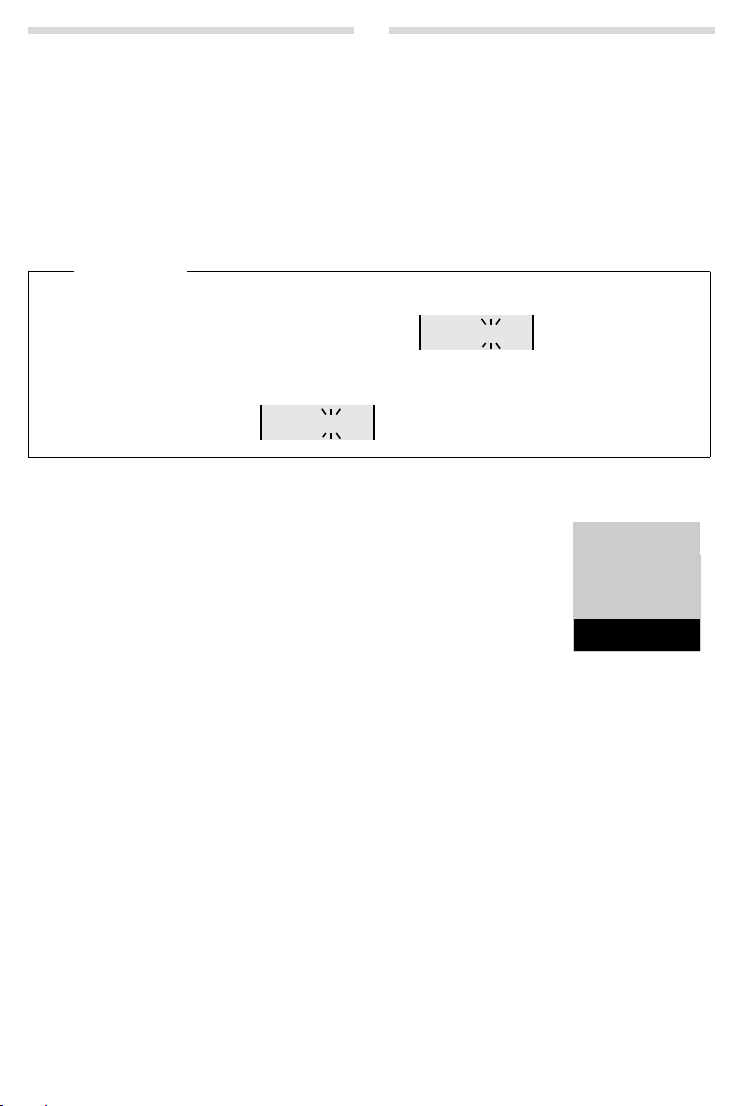
Changing the display language
Change the display language if you do not understand the language currently set:
§Menu§
421
Press and hold the end call key a to return to idle status.
Setting the date and time
Set the date and time so that the correct date and time can be assigned to incoming calls, and so that the alarm can be
used.
§Menu§ q Settings §OK§ Date/Time §OK§ Date ~ (enter the day, month and year in 6-digit format)
§OK§ Time ~ (enter hours and minutes in 4-digit format) §OK§ (display message: Saved)
a (press and hold to return to idle status).
You can move the position of an entry to the left or
Please note
If your phone receives the date and time during calling lin
PABXs), you can specify whether this data should be copied to your phone:
(press the keys one after the other) q (select language) §OK§ (‰ = current language)
right by pressing the control key left or right r.
e display (e.g., via your network provider, a router or
Press the key sequence: §Menu§ P#Q5#MI
The following is displayed; the current setting flashes:
Press one of the following keys to specify, when this data should be copied to your phone:
Q Never
or
1 Once, in case the date/time is not set on your phone
2 Always
or
Your selection is displayed (e.g., 2):
Press the display key §OK§.
Display in idle status
Once the phone is registered and the time set, the idle status is shown as in this example.
Screen display
◆ Reception between the base station and the handset:
- Good to poor:
- No reception:
◆ Activating the answering machine:
- ±
◆ Battery charge status:
If No Radia
Your answering machine is activated.
-
U Charged over 66%
-
V Charged between 34% and 66%
-
e Charged between 11% and 33%
-
= Charged less than 11%
-
= Flashes: batteries almost empty (less than 10 minutes talktime)
-
= e V U Batteries are charging
tion mode ( page 22) is activated, the ½ icon is displayed in the top left.
Ð ¨ § ¦
¥
Activating/deactivating the handset
Press and hold the a key to activate or deactivate the handset. If you place a deactivated handset in the base station
or charging cradle, it will automatically activate after approx. 30 seconds.
Your phone is now
If you have any questions about using your phone, please r
ready for use.
ead the tips on troubleshooting ("Questions and answers",
page 18) or contact our Customer Care team page 19.
Menu guidance
Your telephone's functions are accessed via a menu consisting of several levels (menu overview page 21).
Main menu (first menu level)
When the han dset is in idle status, press the display key §Menu§ or right on the control key v to open the main menu.
The functions in the main menu are shown by means of an icon and th
Selecting a function:
You can scroll between functions using the control key q. The function is shown in the display.
Press the display key §OK§ or the right control key vto select the displayed function. This opens the corresponding
If you press the display key
submenu and the first entry is displayed.
” or briefly the end call key a, the display returns to idle status.
e function's name.
Page 6

6
Submenus
The functions in the submenu are indicated by name.
Selecting a function:
You can scroll between functions using the control key q. The function is shown in the display.
Press the display key §OK§ to select the displayed function. This opens the corresponding submenu and the first entry
is displayed.
If you press the display key
the operation.
Any settings you have not confirmed by pressing the display key
” or briefly the end call key a, the display returns to the previous menu level or you cancel
§OK§ are lost.
Reverting to idle status
From any point in the menu:
Press and hold the end call key a or
Do not press any key: after 2 minutes, the display will automatically revert to idle status.
Making calls
Making external calls and ending calls
External calls are calls using the public telephone network.
~
(Enter the phone number) c.
The phone number is dialled. (Or you can firs
the call you can adjust the earpiece volume using
End the call/cancel dialling: P
You can automatically insert a network provider dialling code before any phone number (
ress the end call key a.
Accepting a call
The handset indicates an incoming call by ringing and by a display on the screen.
Press the talk key
When Au
charging cradle.
c to accept the call.
to Answer is activated (see menu overview page 22), simply remove the handset from the base station/
Calling Line Identification
When you get a call, the caller's number will be displayed on your handset; the caller's name will be displayed if it is
stored in the directory.
Prerequisites:
1 You have asked your network provider for the caller's number (CLIP) to be displayed on your handset screen.
2 The caller has asked the network provider for his number to be identified (CLI).
External Call appears in the display if you have not requested CLIP, Wi
Unavailable appears if CLI has not been requested.
Handsfree operation
In handsfree mode, you activate the loudspeaker so that you can hear the caller without having to hold the handset to
your ear. During a call and when listening to the answering machine you can activate or deactivate handsfree mode by
pressing the handsfree key
During the call in handsfree mode you can adju
d.
Muting
You can deactivate your handset's microphone during a call. Press the right control key v to mute the handset. Press
the control key
v again to reactivate the microphone.
Automatic network provider preselection
You can store a call-by-call number (preselection number), which is automatically placed in front of numbers when you
dial them. If, for example, you wish to make international calls via special network providers, you can save the relevant
dialling code here.
ith Preselect" list, specify the dialling codes or th e first digits of the dialling codes that you wish to assign to the
In the "W
preselection number.
t press and hold talk key c [dial tone] and then enter the number.) During
t and set the volume with q.
page 6).
thhe ld appears if the caller has withheld CLI, and
st the handsfree volume by pressing t and set the volume with q.
Page 7
7
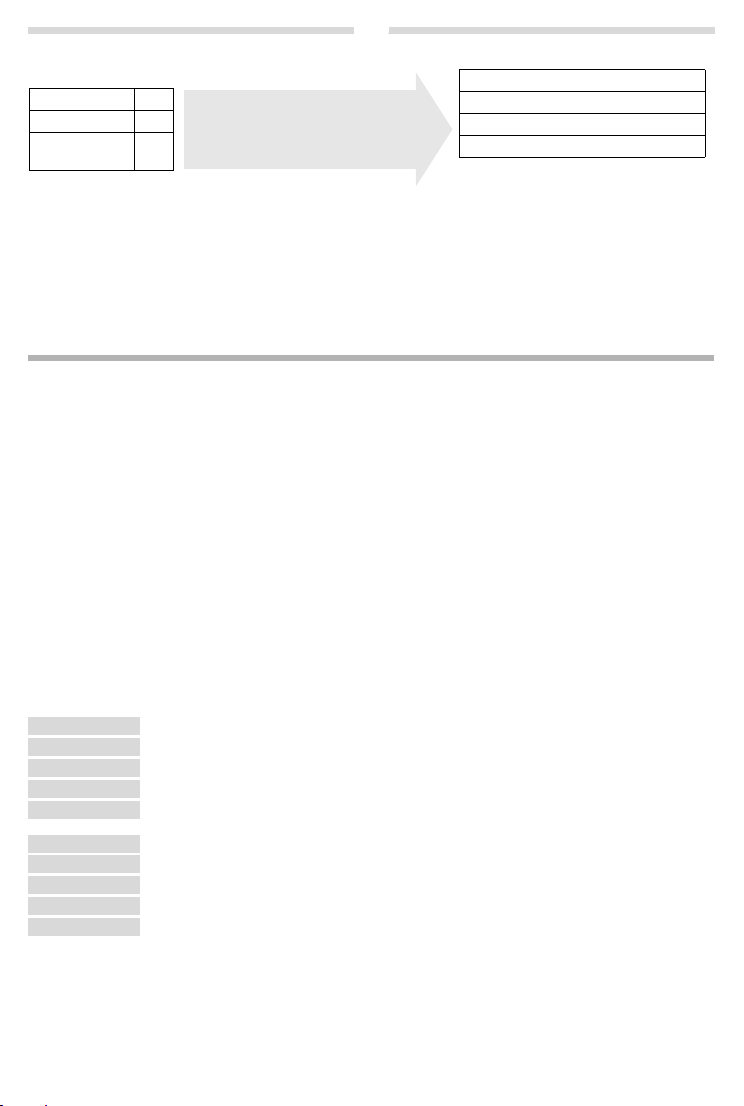
Example:
Presel. Number 0999
With Preselect 08
Without Presel. 081
084
All numbers that start with 08, except
for 081 and 084, are dialled with the
preselection number 0999.
Phone number Dialled number
07112345678
07112345678
08912345678
0999 08912345678
08412345678
08412345678
c
In the "Without Presel." list, enter any exceptions to the "With Preselect" list.
Enter preselection number via menu (
Permanently deactivating preselection: D
Temporarily cancelling preselection:
(press and hold)
The
number is dialled without Preselection.
§Menu§ q Preselect off §OK§ ~ (enter number) or s (use number from directory)
page 22).
elete the preselection number with Ü.
Using the directory and lists
Directory
To open the directory: press control key s.
You can sav e up to 10
Enter letters/characters
Storing the first number in the directory
s
New Entry? §OK§ ~ (enter number) §OK§ ~ (enter name) §OK§
Storing further numbers in the directory
§Menu§ New Entry §OK§ ~ (enter number) §OK§ ~ (enter name) §OK§
s
Selecting a directory entry
Open the directory with s. You have the following options:
◆ Use q to scroll through the entries until the required name is selected.
◆ Enter the first character of the name and scroll to the entry with q, if required.
Dialling with the directory
q (select entry) c
s
Using other functions
s q (select entry) §Menu§
The following functions can be selected with q:
New Entry Save new phone number.
Show Number Display the phone number.
Show Name Display the name.
Edit Entry Edit selected entry.
Use Number Edit the number or open the directory by pressing the control key s to insert a number from the
Delete Entry Delete selected entry.
Send Entry Send a single entry to another handset ( page 8).
Delete List Delete all directory entries.
Send List Send the complete list to another handset ( page 8).
Shortcut For shortcuts, assign the current entry to a key.
Using shortcut keys
You can assign directory entries to the keys 2–9:
s q (select entry) §Menu§ q Shortcut §OK§
q (select key) §OK§ or ~ (press the key you want to assign the entry to)
ess and hold the required shortcut key.
To d ial , pr
0 phone numbers (max. 22 digits) with corresponding names (max. 16 characters).
page 16.
directory at the current position. Then dial or use other functions with
§Menu§.
Page 8
8
97
975 SET: [0
]
975 SET: [1
]
Sending the directory to another handset
Prerequisites:
◆ The sending and receiving handsets must both be registered to the same base station.
◆ The other handset and the base station can send and receive directory entries.
s q (select entry) §Menu§ q Send Entry / Send List §OK§
q (Select the internal party) §OK§ or ~ (enter the internal number of the receiving handset)
Last number redial list
This list contains the ten last dialled numbers.
Dialling from the last number redial list
(press briefly) q (select entry) c
c
Managing entries in the last number redial list
c
(press briefly) q (select entry) §Menu§
You can select the following settings:
Use Number Edit the number or open the directory by pressing the control key s t o ins ert a numb er fr om the
Copy to Dir. Copy an entry to the director y.
Delete Entry Delete selected entry.
Delete List Delete all entries.
directory at the current position. Then dial or use other functions with
§Menu§.
Calls list/answering machine list/network mailbox list
Press the display key ’ , to op en the lis t overvie w. If you hav e new mess ages, onl y lists wi th new me ssages are displayed. Scroll through the lists by pressing
An advisory tone sounds as soon
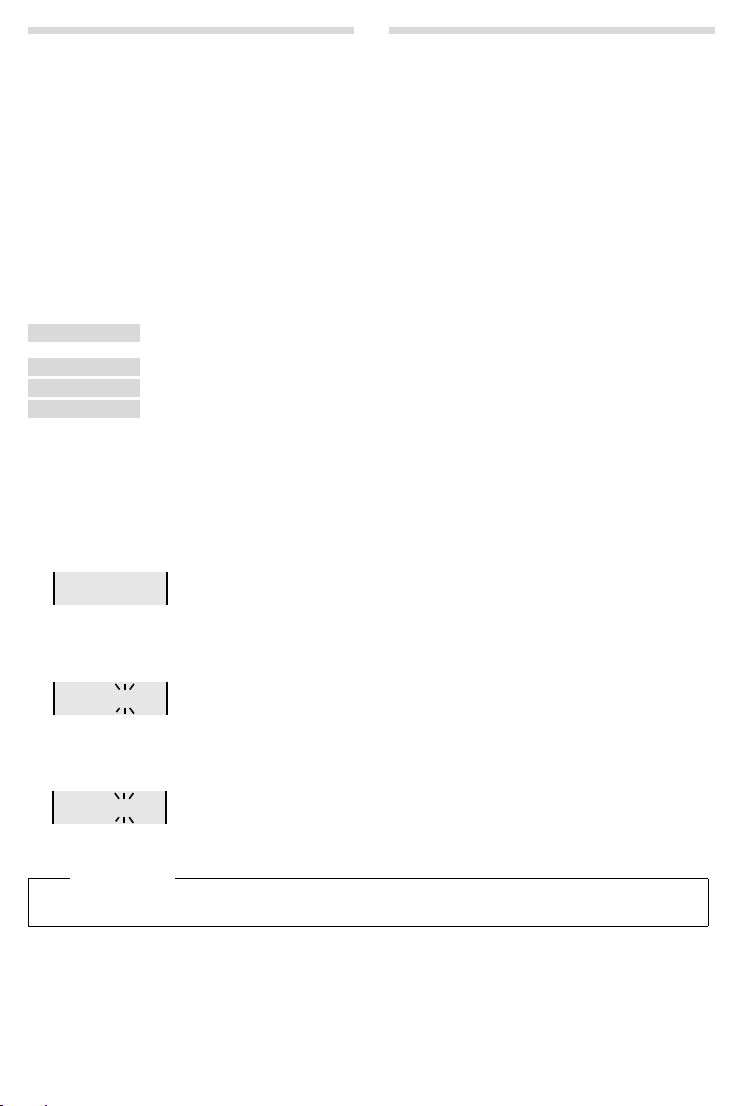
By default the left display key flashes and the message New messages appears on the display. You can change this
behaviour by using the following procedures:
q.
as a new entry appears in the calls list/answering machine list/network mailbox list.
Press the key sequence: §Menu§ P#Q5#M
The following is displayed:
Press one of the following keys to select the message type:
5 for missed calls
M for messages on the answering machine/network mailbox
or
Your selection is displayed (e.g., 5 f
Press key
Q or 1, to set the behaviour for new messages:
or missed calls); the current setting flashes:
Q The presence of new messages is displayed (default setting).
or
1 The presence of new messages is not displayed.
Your selection is displayed (e.g., 1):
Press the display key §OK§.
Settings will only be changed once a new message has been received.
Please note
When calls are saved in the network mailbox, you will receive a message if the appropriate settin gs have been made
depending on your network provider).
(
Calls list
Prerequisite: CLIP ( page 6)
Depending on the type of list set,
◆ Answered calls
◆ Missed calls
◆ Calls recorded from the answering machine
Depending on the type of list set, all numbe
the calls list contains ( page 22):
rs of the last 25 incoming calls are saved or just the missed calls are saved.
Page 9

9
CallsList 01+02
Open the calls list
’ q CallsList
The calls list is displayed as follows:
Number of new entries + number
§OK§ to open the list.
Press
The last incoming call is displayed. If necessary, use
Using other functions
of old, read entries
q to select another entry.
q (select entry) §Menu§
The following functions can be selected with q:
Delete Entry Delete current entry.
Copy to Dir. Copy an entry to the directory.
Date/Time Call date and time (if set).
Status New Call: new missed call. Old Call: entry already read.
Delete List War ning! All old and new entries will be deleted.
Copy to Blacklist Copy numbers to the Blacklist ( page 14).
Calling back a caller from the calls list
’ q CallsList 01+02 §OK§ q (select entry) c
Answering machine list/Network mailbox list
You can use these lists to listen to messages on the answering machine (see "Playing back/deleting messages"
page 10) or network mailbox ( page 11).
Operating the answering machine
The answering machine is operated via the handset or via the keys on the base station. Information on operating the
answering machine via the keys on the base station (
handset.
You can record your own announcement messages using the hand
personal announcement is available.
If the memory is full, A
It activates again automatically when you delete old messages.
The answering machine has already been preset at the factory. Make individual settings using the handset.
How to set a dela
and activate call screening during the recording, see menu overview (
nswer M.full! appears in the display and the answering machine switch es itself off automatically.
y time, after which the answering machine is to answer a call, as well as how to set the recording lengt h
Activating/deactivating the answering machine
§Menu§ q Answer Machine §OK§ q Answ. Mach. §OK§ (
When you switch on the answering machine, the
Recording your own announcement
§Menu§ q Answer Machine §OK§ q Announcements §OK§ Rec announce. §OK§ Start recording? §OK§
You hear the ready tone (short tone). Now speak your announcement (at least 3 sec.). Press §OK§ to confirm or press a
or
” to reject your recording. After recording, the announcement is played back for you to check.
Please note:
Recording ends automatically when the max. rec ording time of 170 seconds is reached or if there is a break in speaking
e than 2 seconds.
of mor
Playing back or deleting announcements
See menu overview page 21.
page 1). The following sections describe operation via the
set. The pre-recorded announcement is used, if no
page 21).
‰
= on)
± icon appears in the display.
Page 10

10
Answer M. 01+02
Playing back/deleting messages
There are three ways to start playing back messages on the answering machine.
◆ Start message playback via the Answer Machine menu:
§Menu§ q Answer Machine §OK§ q Play Messages §OK§
If you have entered a number for the network mailbox you still need to select the answering machine:
q Answ. Mach. §OK§
◆ Start message playback via the answering machine list:
’ q Answer M.
The list is displayed as follows:
Number of new messages + number of old, played back messages
§OK§ to open the list.
Press
Fast access to the answering machine:
To access the answering machine, simply press and hold the
been preset at the factory. However, if you have set the network mailbox for fast access, you can change this setting
page 21).
(
If you have new messages, playback will start with the
The loudspeaker on the handset switche
Messages consist of
s on automatically. To switch it off, press the handsfree key d.
◆ the message header (number/date/time) and
◆ the message body (recorded text).
The header is played back first, then the body. The phone number or the name is displayed.
Stopping and controlling playback
Controlling playback depends on the point in time at which the corresponding key is pressed.
During message playback:
2
t or 1
s or I
L
Pause playback. Press 2 again to resume.
During playback of message header: Go to the start of the previous message. Skipping back from
the first message jumps to the last message.
During playback of message body: G
Go to the start of the next message. Skipping forward from the last message jumps to the first message.
During playback of message header: Skip header.
During playback of message body: G
last message jumps to the first message.
Additional functions during message playback
Press the display key §Menu§. Playback stops.
Select the relevant function using
Dial Number Dial number.
Contin ue Continue message playback.
Volu me Setting volume.
Copy to Dir. Copy the caller's number to the directory.
Delete all old Delete all old messages.
Copy to Blacklist Copy numbers to the Blacklist ( page 14).
Deleting an individual message
During playback: Press key
New messages can
Deleting all old messages
During playback or when paused:
§Menu§ q Delete all old §OK§ (Confirm the security prompt)
only be deleted during playback of message body.
q:
Q or the display key Ü .
1 key. The integrated answering machine has already
first new message, otherwise with the first old message.
o to the start of the current message.
o to the b ody o f the next mess age. Skip ping forw ard fr om th e
Page 11

11
Accepting a call from the answering machine
You can accept a call while the answering machine is recording it:
§Menu§ Accept §OK§
You can also accept the call by:
◆ Pressing the talk key c
◆ Removing the handset from the base station/charger (if Auto Answer is activated page 22)
Please note
When C
all Screening is activated on the handset and the call can already be heard on the handset, you can only
accept the call via
handsfree mode.
Recording stops and you can speak to the caller.
Operating when on the move (remote operation)
You can check your answering machine from any other telephone (hotel, pay phone etc.).
Prerequisites:
◆ You have set a system PIN other than 0000 ( page 22).
◆ The phone you are using for remote operation has tone dialling (DTMF) i. e., you hear different tones when you press
the keys.
Calling the answering machine and playing messages
~ (Dial your own number.) When you hear your announcement, press 9 and enter the system PIN.
The following keys are used for operation:
During the number/date/time announcement: Skip to the start of the previous message.
A
During the message playback: Sk
Stop playback. Press again to resume.
B
Go to the next message.
3
Delete current message.
0
Activating the answering machine
~ (Enter your own number and allow the phone to ring until you hear the message, "Please enter your PIN code.")
Enter system PIN
~
Your answering machine is activated. It tells you how much memory time is left. The messages are now played back. The
a
nswering machine cannot be deactivated remotely.
§Menu§ Accept §OK§. Pressing the talk key/handsfree key c only activates or deactivates the
ip to the start of the current message.
Network mailbox
The network mailbox is the answering machine in your provider's telephone network. More information is available from
your provider. You cannot use the network mailbox unless you have requested it from your provider.
In order to use the network mailbox quickly and easily via the network mailbox list (
and to use fast access (
§Menu§ q Answer Machine §OK§ q Net Mailbox ~ (enter number) §OK§
page 1), you will need to enter the number in your phone:
page 8), the menu ( page 21)
Locating a handset (paging)
You can locate your handset using the base station.
Briefly press the registration/paging key on the base station ( page 1).
All handsets will ring at the same time (paging
Ending paging: Brie
end call key
fly press the registration/paging key on the base station ( page 1) or press the talk key c or the
a on the handset.
), even if the ringers are switched off.
Page 12

12
Registering handsets manually
You can register up to four handsets on your base station. Each additional handset must be registered on the base station in order for it to work properly!
1) On the handset
§Menu§ q Settings §OK§ q Handset §OK§ q Register HS Enter the base station system PIN (default
setting: 0000)
2) On the base station
Wi thi n 60 sec on ds, pre ss and hold th
There is a tone played if the registration mode is activated.
Registration takes approx. 1 minute. Once the regi
shows HS registered and returns to idle status. Handsets
internal numbers 1–4 are already assigned to other devices, the number 4 will be overwritten.
§OK§ Registering is displayed.
e registration/p aging key on the base station ( page 1) for approx . 3 seconds.
stration process has been completed su ccessfully, the display briefly
are assigned the lowest available internal number (1-4). If the
De-registering handsets
You can de-register all other registered handsets from each of the registered Gigaset handsets.
§Menu§ q Settings §OK§ q Handset §OK§ q De-register HS q Select the internal par ty you wish to
de-register. The handset you are currently using is indicated by <.
setting: 0000)
§OK§
§OK§ Enter the base station system PIN (default
Using multiple handsets
Making internal calls
Internal calls are free calls to other handsets that are registered to the same base station.
2 handsets are registered
Press the control key u, the other handset is called.
More than 2 handsets are registered
Calling a specific handset
~
u
(1...4, enter internal number of the handset) or
u q (Select the internal party) §OK§ or c the handset is called.
Calling all handsets (group call)
Press and ho
When a participant answers you can speak to him. To end the call, press
Internal consultation call/connecting a call
You are in conversation with an external participant. Press the control key u and call one or all handsets. The external
participant hears the hold music. When the internal participant answers: Announce the external call, if necessary.
Either
press the end call key
or
press the display key
When transferring a call you can also press the end call key
Listening in to an external call
You are conducting an external call. An internal participant can listen in on this call and take part in the conversation
(conference). Prerequisite: The Listening in function must be activated.
Activating/deactivating listening in
§Menu§ q Settings §OK§ q Base §OK§ q Listening in §OK§ (‰ = on)
Internal listening in (conference)
You want to listen in to an existing external call. Press and hold the c key. You can listen in to the call. All participants
hear a signal tone.
To e nd:
If the fi
external participant.
ld u or u P or u q Call all §OK§ or c all handsets are called.
a.
a. The call is transferred to the internal participant,
” . You are reconnected with the external participant.
a before the internal participant answers.
press the end call key a. All participants hear a signal tone.
rst internal participant presses the end call key a, the handset that has "listened in" remains connected to the
Page 13

13
Setting the alarm clock
Activating/deactivating the alarm clock
§Menu§ q Alarm Clock §OK§ Activation §OK§ (‰ = on)
When activated:
When the alarm clock rings, press any key to switch it off for 24 hours. If the alarm clock is set, the wake-up icon l will
appear on the screen and the wake-up time will be displayed instead of the date.
~ (Set the wake-up time) §OK§
Setting the wake-up time
§Menu§ q Alarm Clock §OK§ q Wak e-upTi me §OK§
Enter the wake-up time in hours and minutes, then press §OK§.
Phone settings
For details on activating/deactivating advisory tones and battery low tones, see menu tree ( page 21).
For details on setting th
For details on how to set the sy
Changing the display language
§Menu§ q Settings §OK§ q Handset §OK§ q Language §OK§ q (select language) §OK§
The current language is indicated by
If you accidentally choose a language you do not understand:
§Menu§
421
Changing the handsfree/earpiece volume
In idle status:
t Handset Volume §OK§ q Earpiece/Speaker §OK§ q (set the volume level 1 to 5)
§OK§ (‰ = selected)
During a conversation via the earpiec
t q (set the volume level 1 to 5)
The setting will automatically be sa
You can also set the handsfree/earpiece volume using the menu A
Setting the sound of the earpiece
Adapt the sound of the earpiece to your needs.
◆ Low: Standard setting.
◆ High: High frequencies are emphasized.
In idle status:
t q Handset Sound §OK§ q Low/High §OK§ (‰ = selected)
You can also set the sound of the earpiece using the menu Au
Setting ring tones of the handset
Setting the ringer volume
In idle status:
t q Ringer Volume §OK§ q (set the volume level 1 to 5 or "Crescendo") §OK§ (‰ = selected)
You can also set the call volume using the menu Au
Setting the ringer melody
Set different ringer melodies for External Calls, Internal Calls and the Alarm Clock.
In idle status:
t q Ringer Melody §OK§ q External Calls / Internal Calls / Alarm Clock §OK§ q (select melody)
§OK§ (‰ = selected)
You can also set the call volume using the menu Au
e display contrast and large dialling numbers, see menu tree ( page 22).
stem PIN on the base station, see the menu overview ( page 22).
‰.
(press the keys one after the other) q (select language) §OK§
e or in handsfree mode:
ved after approximately 3 seconds or press the display key §OK§.
udio Settings ( page 21).
dio Settings ( page 21).
dio Settings ( page 21).
dio Settings ( page 21).
Page 14

14
Time Control (day/night mode)
You can specify a time period when you do not want the telephone to signal external calls e.g., during the night.
Activating Time Control:
§Menu§ q Settings §OK§ q Handset §OK§ q Time Control §OK§ Activation §OK§ (‰ = activated)
Setting time period:
§Menu§ q Settings §OK§ q Handset §OK§ q Time Control §OK§ q Settings §OK§
Off from: ~ (Enter time in 4-digit format) §OK§ Off until: ~ (Enter time in 4-digit format) §OK§
Anonymous calls silent
You ca n se t y our handset so that it doesn't ring for calls where Calling Line Identification has been withheld. The call will
only be signalled on the display.
§Menu§ q Settings §OK§ q Handset §OK§ q An.Call Silent §OK§ (‰ = activated)
Activating/deactivating the ringer
Deactivating/reactivating the ringer permanently
In idle status, press and ho
Deactivating the ringer for the current call
§Menu§ Silent §OK§
ld the star key P. If the ringer is deactivated, the Ú icon appears in the display.
Setting ring tones of the base station
Set the Ringer Volume, Ringer Melody and the Time Co ntrol for the base station:
§Menu§ q Settings §OK§ q Base §OK§ Audio Settings §OK§
q Ringer Volume/Ringer Melody/Time Control
Perform the setting analogously to the descripti
on in "Setting ring tones of the handset".
Call protection with Blacklist
When activated, calls from numbers in the Blacklist are shown in the display only. Your phone does not ring. You can
store up to 15 numbers. The blocked calls are stored in the calls list and recorded on the answer machine.
The setting applies to all regist
Activating/deactivating the Blacklist
§Menu§ q Settings §OK§ q Base §OK§ qAdditional §OK§ q Call Protection §OK§ Activation
§OK§ (‰ = activated)
Editing the Blacklist
§Menu§ q Settings §OK§ q Base §OK§ qAdditional §OK§ q Call Protection §OK§ q Black List
ered handsets and the base.
§OK§
◆ Enter new number: §Menu§ New Entry ~ enter number. §OK§
◆ Delete number: q select number. Ü
◆ Close Blacklist: press End call key a.
Copying a number to the Blacklist from the calls list or while playing back a message
From the calls list: open calls list q (select entry) §Menu§ Copy to Blacklist §OK§
While playing back a message: §Menu§ Copy to Blacklist §OK§
Activating/deactivating music on hold
You can set that your external participant hears music in case of internal recall and during call transfer.
§Menu§
P#Q5#1M
§OK§.
Repeater mode
With a repeater, you can increase the range of your base station. You will need to activate repeater mode ( page 22).
Repeater mode and No Radia
Resetting the handset
You can reset individual settings and changes that you have made. Entries in the directory, the calls list and the handset's
registration to the base station will be retained.
§Menu§ q Settings §§OK§§ q Handset §§OK§§ q Reset Handset §§OK§§ Reset? §§OK§§
The number for the current setting flashes: 0 = off; 1 = on enter number
tion mode ( page 22) cancel each other out.
Page 15

15
Restoring the base station
When restoring factory settings:
◆ Individual settings are reset.
◆ All lists are deleted.
◆ The No Radiation mode is deactivated.
The date and time are retained. The answering machine is r
been reset.
Resetting the base station via the menu
When resetting via the menu
◆ Handsets are still registered.
◆ The system PIN is not reset.
§Menu§ q Settings §OK§ q Base §OK§ q Base Reset §OK§ Reset? §OK§
Resetting the base station using the key on the base station
When resetting the base station using the key on the base station
◆ All handsets are de-registered and
◆ The system PIN is reset to the original code 0000.
Carry out the following steps:
on the base station (
for at least 5 seconds.
page 1) and reconnect the power cable to the base station at the same time. Hold the key down
Remove the mains cable from the base station. Hold down the regist ration/paging key
eady for use approx. 15 seconds after the base station has
Operating the base station on the PABX/router
Operating on the router
When operating the Gigaset on an analogue port of a router, you can reduce problems with echoing by activating the
XES Mode (
page 22). If you have no problems with echoing, this function should be deactivated.
Operating on the PABX
The following settings are only necessary when your PABX requires them, see the user guide for your PABX.
When entering the digits, enter them slowly one af
Changing the dialling mode
§Menu§
P#Q5#1N
1 = pulse dialling (DP)
Setting recall
§Menu§
P#Q5#1Q
3 = 400 ms; 4 = 250 ms; 5 = 300 ms; 6 = 600 ms; 7 = 800 ms
Changing pause after line seizure
You can set the length of the pause inserted between pressing the talk key
§Menu§
P#Q5#1L
enter number §OK§.
The number for the set dialling mode flashes: 0 = tone dialling (DTMF);
The number for the current recall flashes: 0 = 80 ms; 1 = 100 ms; 2 = 120 ms;
The number for the current pause length flashes: 1 = 1 sec.; 2 = 3 sec.; 3 = 7 sec.
ter the other.
enter number §OK§.
c and sending the phone number.
enter number §OK§.
Changing the pause after the recall key
§Menu§
P#Q5#12
3 = 3200 ms
enter number §OK§.
The number for the current pause length flashes: 1 = 800 ms; 2 = 1600 ms;
Page 16
16
1) Space
1x 2x 3x 4x 5x 6x 7x 8x 9x 10x 11x 12x 13x 14x 15x
1 1£$¥¤
2 abc2дбавгз
I def 3ëéèê
4 gh i4ïíìî
5 jkl5
L mno6цсутфх
M pqr s 7ß
N tuv8üúùû
O wxy z 9яэжше
Q . ,?!0+- :¿¡"’ ;_
P
* / ( ) <=>%
#
#@\ &§
1)
Appendix
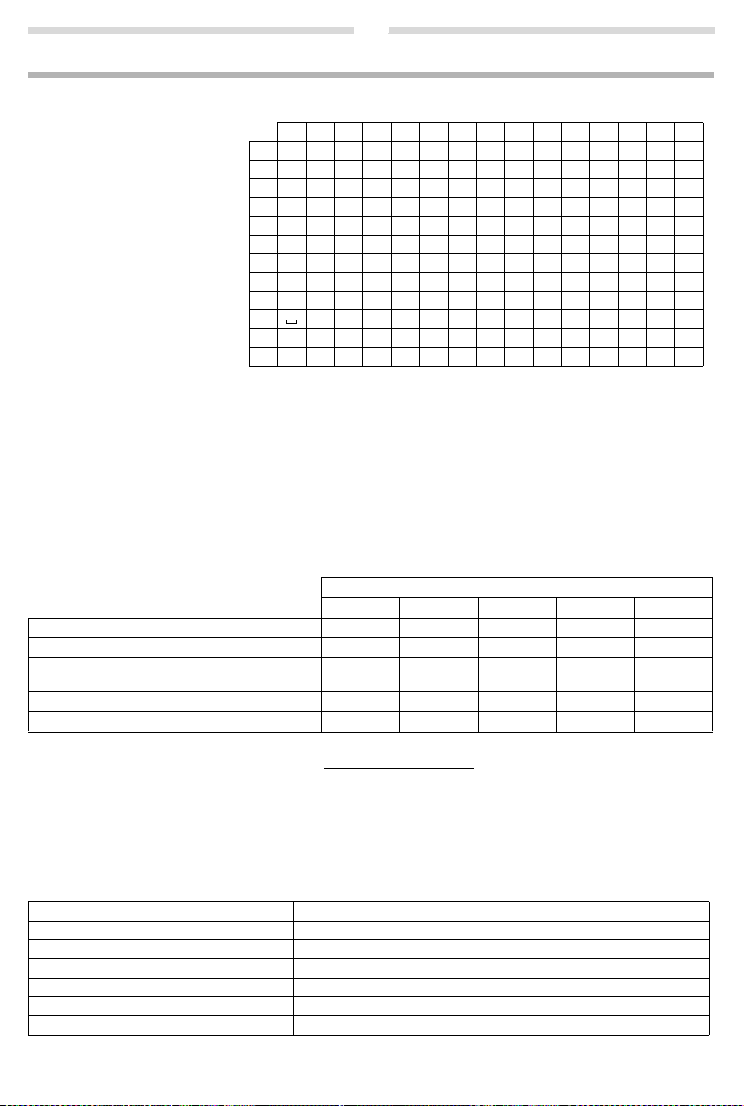
Entering letters/characters
Standard characters
Press the relevant key the number of
times indicated.
ess the hash key # to
Briefly pr
switch from "Abc" to "123" mode,
from "123" to "abc" mode and from
"abc" to "Abc" mode.
Technical Data
Batteries
Technology: Nickel-metal-hydride (NiMH); Size: AAA (Micro, HR03); Voltage: 1,2 V; Capacity: 450 - 1000 mAh
Handset operating times/charging times
Your handset can charge batteries up to a capacity of 1000 mAh. The use of special high-performance batteries or batteries with high capacities is not r
The operating time of your Gigaset depends on the capacity and age of the batteries and the way it is used. (Standby
time
/talk time/operating time are maximum possible values, charging times are typical values.)
Standby time (hours) 180 250 285 330 405
Talktime (hours) 14 19 22 25 31
Operating time for 1.5 hrs of calls per day (hours),
No Radiation mode switched
Charging time in base station (hours) 5.0 6.5 7.5 8.5 10.5
Charging time in charger (hours) 4.5 6.0 7.0 8.0 10.0
Due to the constant progression in battery development, the list of recommended batteries in the FAQ section of the
G
igaset Customer Care pages is regularly updated:
Base station power consumption
In standby mode
– Handset in base station
– Handset outside base station
During a call approx. 0.75 W
General specifications
DECT standard is supported
GAP standard is supported
Range up to 300 m outdoors, up to 50 m indoors
Base station power supply 230 V ~/50 Hz
Environmental conditions in operation +5 °C to +45 °C, 20% to 75% relative humidity
Radio frequency range 1880-1900 MHz
Transmission power 10 mW average power per channel, 250 mW pulse power
ecommended for cordless phones.
Capacity (mAh) approx.
450 550 700 800 1000
off/on 95/70 130/95 150/110 175/125 215/155
www.gigaset.com/service
approx. 0.7 W
approx. 0.65 W
Page 17
17
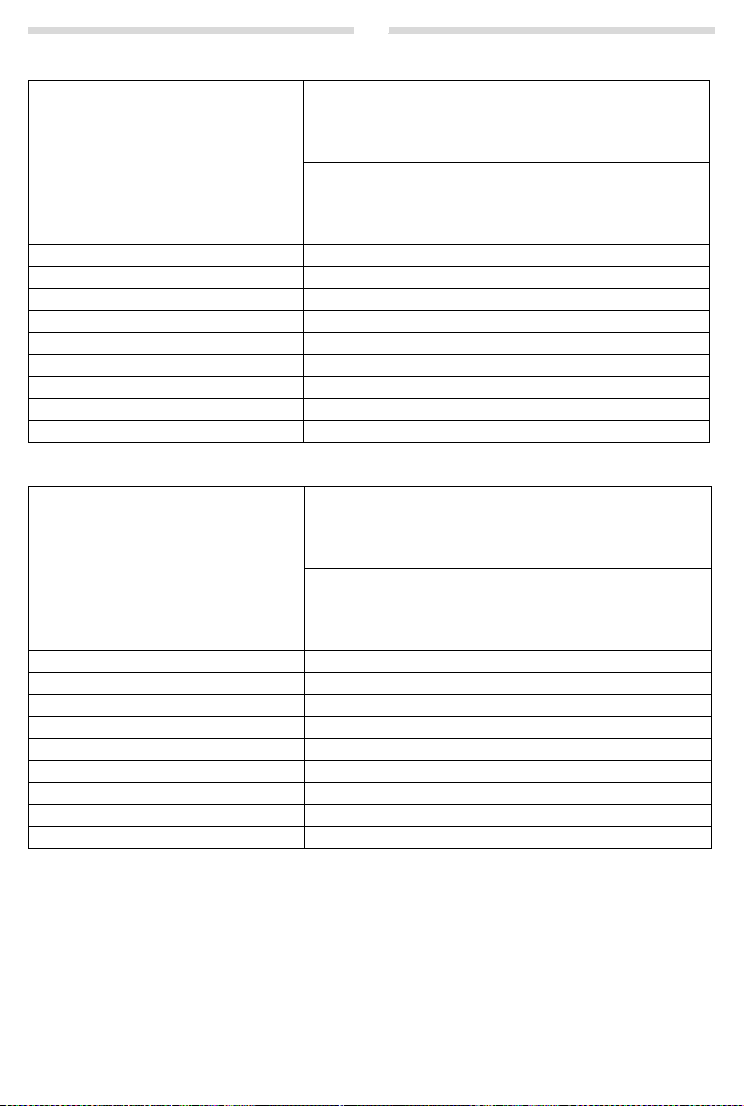
Power adapter for the base
Manufacturer Salom Electric (Xiamen) Co. Ltd.
Commercial registration number: 91350200612003878C
31 Building, Huli Industrial District,
Xiamen, Fujian 361006, P.R. China
Salcomp (Shenzen) Co. Ltd.
Commercial registration number: 91440300618932635P
Salcomp Road, Furond Industrial Area,
Xinqiao, Shajing, Baoan District, Shenzen 518125 China
Model identifier C707/C769 / C771/C785
Input voltage 230 V
Input AC frequency 50 Hz
Output voltage 6.5 V
Output current 0.3 A
Output power 1.95 W
Average active efficiency > 71.5 %
Efficiency at low load (10%) not relevant – only at output power > 10 W
No-load power consumption < 0.10 W
Power adapter for the handset
Manufacturer Salom Electric (Xiamen) Co. Ltd.
Commercial registration number: 91350200612003878C
31 Building, Huli Industrial District,
Xiamen, Fujian 361006, P.R. China
Salcomp (Shenzen) Co. Ltd.
Commercial registration number: 91440300618932635P
Salcomp Road, Furond Industrial Area,
Xinqiao, Shajing, Baoan District, Shenzen 518125 China
Model identifier C705 / C710
Input voltage 230 V
Input AC frequency 50 Hz
Output voltage 4 V
Output current 0.15 A
Output power 0.6 W
Average active efficiency > 46%
Efficiency at low load (10%) not relevant – only at output power > 10 W
No-load power consumption < 0.10 W
Page 18
18
Questions and answers
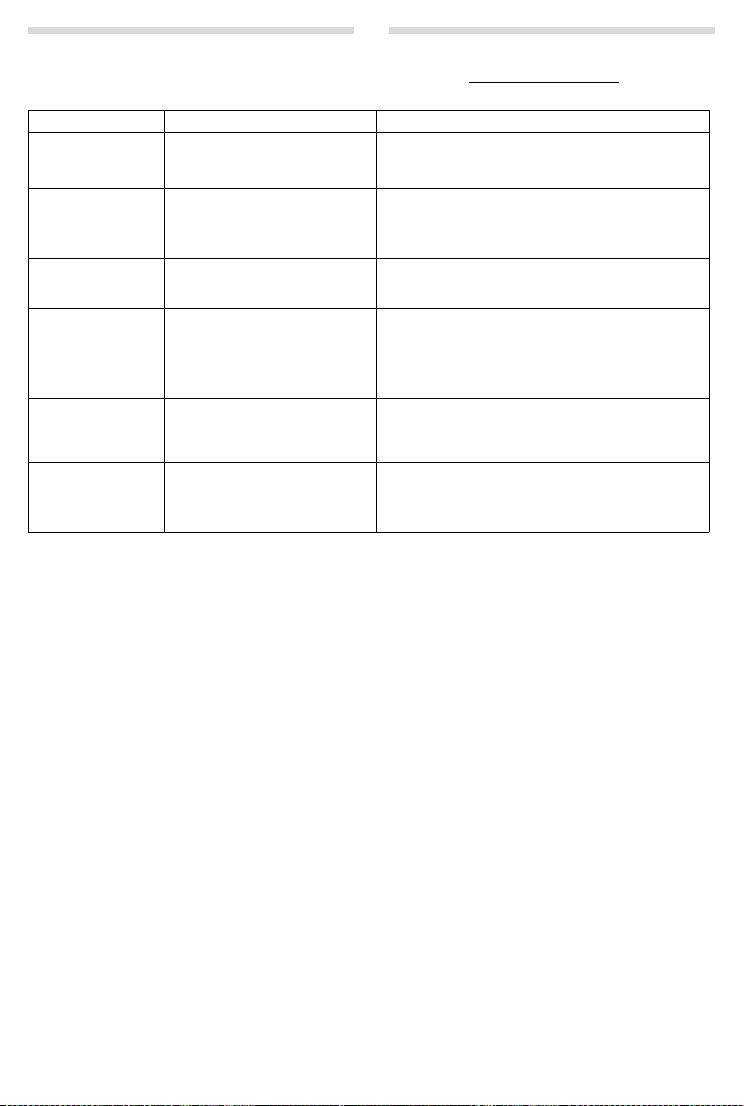
If you have any queries about the use of your telephone, visit our website at www.gigaset.com/service
for 24-hour support. The table below contains a list of
Problem Cause Solution
Nothing appears on
th
e display.
No wireless connection to the base sta-
se flashes in
tion, Ba
the display.
The display shows
Re
gister HS or Put
into base.
Handset does not
ri
ng.
You cannot hear a
nger/dialling tone
ri
from the fixed line
network.
Error tone sounds
fter system PIN
a
prompt.
PIN forgotten.
The handset is not switched on.
The batteries are flat.
The handset is outside the range of
se station.
the ba
The base station is not turned on.
Handset has not been registered
with the base station or has been
de-registered.
The ring tone is deactivated.
The phone only rings if the phone
er has been transferred.
numb
The phone does not ring in a spe-
cific time period.
The phone cord supplied has not
n used or has been replaced by
bee
a new cord with the wrong jack
connections.
The system PIN you have entered is
correct.
in
common problems and possible solutions.
Press the end call key a for approx. 5 seconds or place
the handset in the base station.
Charge or replace the batteries.
Move the handset closer to the base station.
Check the mains connector on the base station
page 3.
Register the handset page 12.
Activate the ring tone
Activate the ring tone for anonymous calls
Deactivate the "Time Control" or change the time period
page 14.
Please always use the phone cord supplied or ensure
at the pin connections are correct when purchasing
th
om a retailer: 3-4 assignment of telephone leads/
fr
EURO CTR37.
Reset the system PIN to the default 0000 page 15.
All handsets are de-registered. All settings are reset.
A
ll lists are deleted.
page 14.
page 14.
Page 19

19
Service (Customer Care)
Step by step towards your solution with Gigaset Customer Care
www.gigaset.com/service.
Visit our Customer Care pages
Here you will find:
•Frequently asked questions
•
Free software and user manual downloads
• Compatibility checks
Contact our Customer Care team
Couldn't find a solution in the FAQs section?
We are happy to help...
... online:
via our contact form on the customer service page
... by telephone:
United Kingdom
Service Hotline: 020 36953111
(local call cost charge)
Ireland
Service Hotline: 0818 200 033
(6.6561 Ct./Call)
Please have your proof of purchase ready when calling.
Please note that if the Gigaset product is not sold by authorised dealers in the national territory the product may not be
lly compatible with the national telephone network. It is clearly specified on the box near the CE mark for which
fu
country/countries the equipment has been developed. If the equipment is used in a manner inconsistent with this
advice or with the instructions of the manual and on the product itself, this may have implications on the conditions for
warranty or guarantee claims (repair or exchange of product).
In order to make use of the warranty, the product purchaser is ask
chase (date from which the warranty period starts) and
the type of goods that have been purchased.
ed to submit a receipt which proves the date of pur-
Authorisation
This device is intended for analogue phone lines in the UK and on the Irish network.
Country-specific requirements have
Hereby, Gigaset Communications GmbH declares t
compliance with Directive 2014/53/EU and the UK Radio Equipment Regulations 2017.
The full text of the EU declaration of conformity i
www.gigaset.com/docs.
This declaration could also be available in the "International
Conformity" files.
Therefore please check all of these files.
been taken into consideration.
hat the radio equipment type Gigaset AL415A / Gigaset AL415H is in
s available at the following internet address:
Declarations of Conformity" or "European Declarations of
Page 20

20
Guarantee Certificate - United Kingdom and Ireland
Without prejudice to any claim the user (customer) may have in relation to the dealer or retailer, the customer shall be
granted a manufacturer’s Guarantee under the conditions set out below:
• In the case of new devices and their components exhibiting def
faults within 24 months of purchase, Gigaset Communications shall, at its own option and free of charge, either
replace the device with another device reflecting the current state of the art, or repair the said device. In respect of
parts subject to wear and tear (including but not limited to, batteries, keypads, casing), this warranty shall be valid
for six months from the date of purchase.
• This Guarantee shall be invalid if the device defect is attributable to improper care or use and/or failure to comply
with information contained in the user manuals. In particular claims under the Guarantee cannot be made if:
• The device is opened (this is classed as third party intervention)
• Repairs or other work done by persons not authorised by Gigaset Communications.
• Components on the printed circuit board are manipulated
• The software is manipulated
• Defects or damage caused by dropping, breaking, lightning or ingress of moisture. This also applies if defects or
damage was caused by mechanical, chemical, radio interference or thermal factors (e.g.: microwave, sauna etc.)
• Devices fitted with accessories not authorised by Gigaset Communications
• This Guarantee shall not apply to or extend to services per formed by the authorised dealer or the customer themselves (e.g. installation, configuration, software downloads). User manuals and any software supplied on a separate
data medium shall be excluded from the Guarantee.
• The purchase receipt, together with the date of purchase, shall be required as evidence for invoking the Guarantee.
Claims under the Guarantee must be submitted within two months of the Guarantee default becoming evident.
• Ownership of devices or components replaced by and returned to Gigaset Communications shall vest in Gigaset
Communications.
• This Guarantee shall apply to new devices purchased in the European Union. For Products sold in the United
Kingdom and in the Republic of Ireland the Guarantee is issued by: Gigaset Communications UK Limited, 2 White
Friars, Chester, CH1 1NZ.
• Any other claims resulting out of or in con nection with the device shall be excluded from this Guarantee. Nothing in
this Guarantee shall attempt to limit or exclude a Customers Statutory Rights, nor the manufacturer’s liability for
death or personal injury resulting from its negligence.
• The duration of the Guarantee shall not be extended by services rendered under the terms of the Guarantee.
• Insofar as no Guarantee default exists, Gigaset Communications reserves the right to charge the customer for
replacement or repair.
• The above provisions do not imply a change in the burden of proof to the detriment of the customer.
To invoke this Guarantee, please contact the Gigaset Communications helpdesk. This number is also to be found in the
companying user guide.
ac
ects resulting from manufacturing and/or material
Environment
Environmental management system
Disposal
Batteries should not be disposed of in general household waste. Observe the local waste disposal regulations, details of
which can be obtained from your local authority.
All electrical and electronic products should be disposed of separately from the muni cipal waste stream via designated
co
consequences for the environment and human health. It is a precondition for reuse and recycling of used electrical and
electronic equipment.
For more detailed information about disposal of your old applia
the original supplier of the product.
Gigaset Communications GmbH is certified pursuant to the international standards ISO 14001 and ISO 9001.
ISO 14001 (Environment):
ISO 9001 (Quality): C
llection facilities appointed by the government or the local authorities.
This crossed-out wheeled bin symbol on the product m
tive 2012/19/EU.
UK: The Waste Electrical and Electronic Equipment Regulations 2013 (as amended).
The correct disposal and separate collection of your
Certified since September 2007 by TÜV SÜD Management Service GmbH.
ertified since 17/02/1994 by TÜV SÜD Management Service GmbH.
eans the product is covered by the European Direc-
old appliance will help prevent potential negative
nce, please contact your local council refuse centre or
Page 21
21
Menu overview
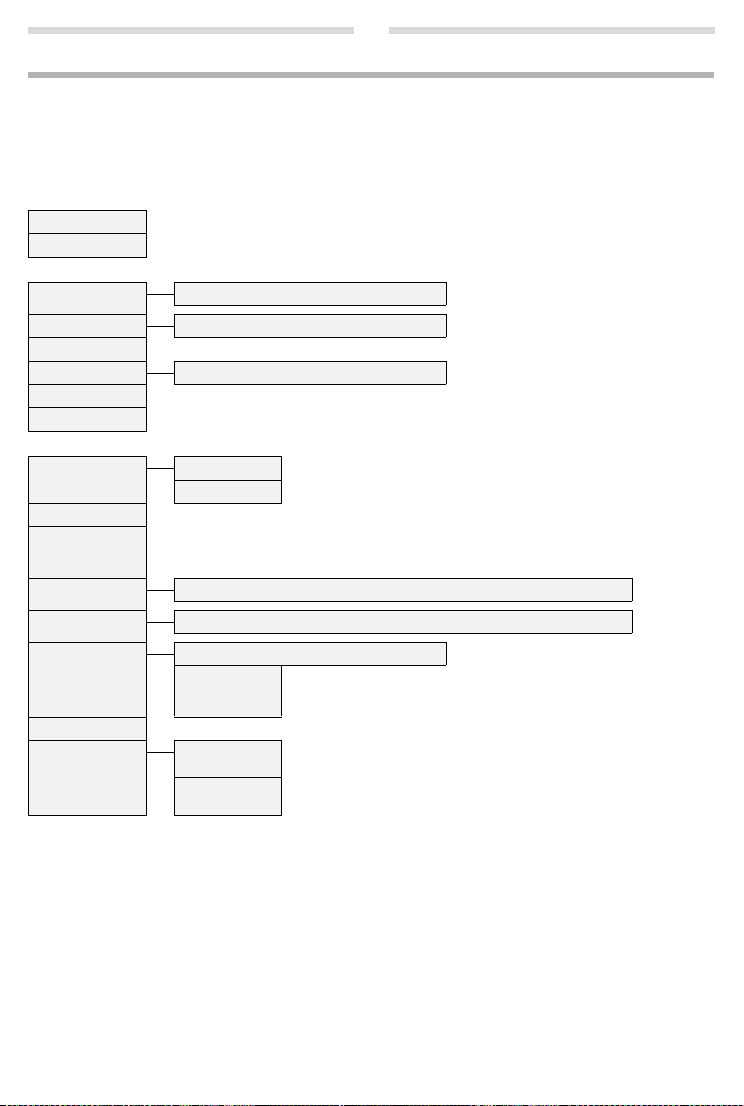
Your phone has an extensive range of features. These are offered in the form of menus.
To select a function while the phone is in idle s
function you require and press
To return to idle status:
Not all of the functions described in this user guide are available in all countries.
§OK§ to confirm.
press and hold the a key.
é Alarm Clock
Activation page 13
Wake -upTi me page 13
è Audio Settings
Handset Volume Earpiece/Speaker page 13
Handset Sound Low/High page 13
Ringer Volume page 13
Ringer Melody External Calls/Internal Calls/Alarm Clock page 13
Advis.Tones On/off
Battery Low On/off
Answer Machine
ê
Play Messages Net Mailbox * Playing back messages on the network mailbox page 11.
Answ. Mach. * Playing back messages on the answering machine page 10.
Answ. Mach. Activating/deactivating the answering machine page 9.
Call Screening Screening of a message on the handset (handsfree mode) that is being recorded on/off.
Announcements Rec announce./Play announce./Del announce. page 9
Message Length Maximum/1 Minute/2 Minutes/3 Minutes
Ring Delay Immediately/10 sec/18 sec/30 sec
Net Mailbox Enter number of the network mailbox page 11.
Set Key 1 Net Mailbox Assign key 1 with network mailbox.
* number of network mailbox entered
Deactivate screening for the actual recording only: press end call key a.
(Prerequisite: at least 1 handset with handsfree capability is registered.)
Auto If there are no new messages, the answering machine answers a call after
Answ. Mach. Assign key 1 with answering machine.
tatus, press §Menu§ (open menu), use the control key q to scroll to the
18 seconds. If new messages are present, the answering machine answers
a call after just 10 seconds.
(In idle status, press and hold ke
(In idle status, press and hold key 1 to dial.)
y 1 to dial.)
Page 22
22
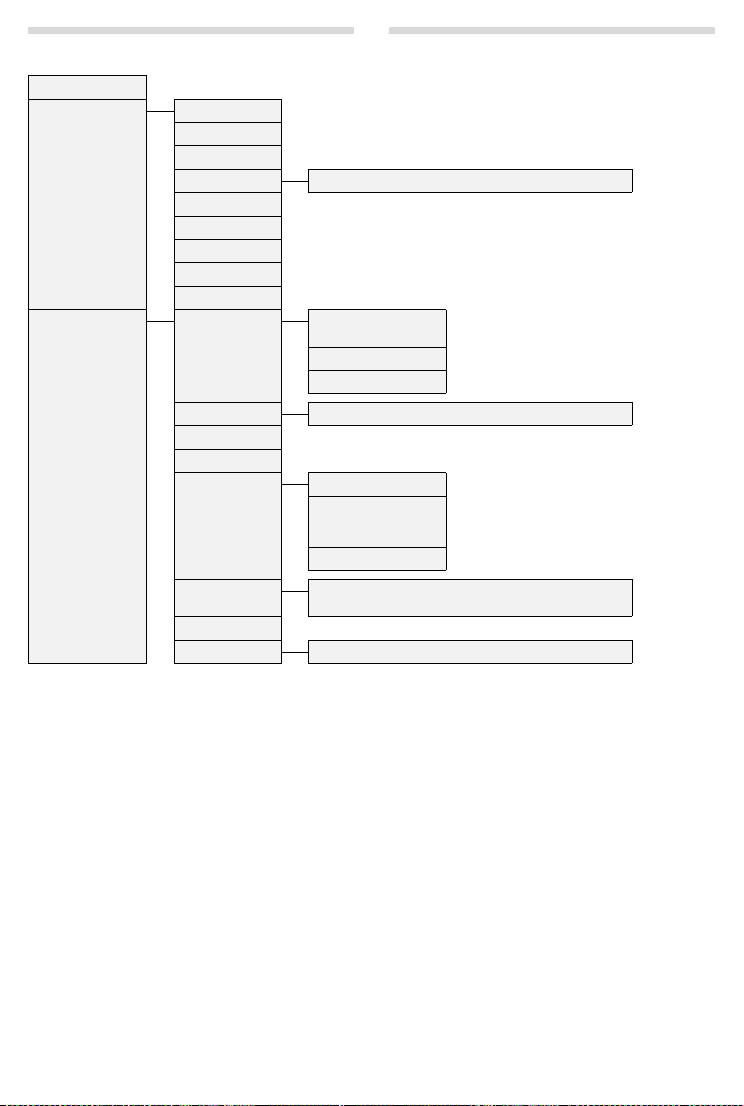
ç Settings
Date/Time page 5
Handset Language page 13
Big Dial Font Set bigger digits for dialling.
Contrast Set the display contrast to 9 levels.
Time Control Activation/Settings page 14
An.Call Silent page 14
Auto Answer Activate/deactivate auto answer page 6.
Register HS page 12
De-register HS page 12
Reset Handset page 14
Base Audio Settings Ringer Volume page 14
Ringer Melody page 14
Time Control page 14
Call list type Missed Calls/All Calls page 8
System PIN Change system PIN (default is 0000).
Base Reset page 15
Additional Repeater page 14
XES Mode Activating/deactivating
Call Protection page 14
ECO DECT
page 2
Listening in page 12
Preselection Presel. Number/With Preselect/Without Presel. page 6
No Radiation/Max. Range page 2
(Activate in case of problems with echos on
an analogue port of a router.)
Page 23

23
All rights reserved. Rights of modification reserved.
Page 24

24
Version: 15.05.2021
*A31008-M2501-L121-1-7619*
A31008-M2501-L121-1-7619
Issued by
Gigaset Communications GmbH
Frankenstr. 2a, D-46395 Bocholt
© Gigaset Communications GmbH 2021
Subject to availability.
All rights reserved. Rights of modification reserved.
www.gigaset.com
This user guide is printed on 100 % recycled paper which is certified by the Blue Angel eco label.
 Loading...