

Page 1
s
BITTE HIER SCHNBEIDEN!!!!
Be inspired
Bedienungsanleitung
Operating Instructions
BITTE HIER SCHNBEIDEN!!!!
Mode d’emploi
Istruzioni d’uso
Instrucciones de manejo
Manual de instruções
Gebruiksaanwijzing
A31008- G4000-B001- 2- 6Z19
Issued by
Information and Communication mobile
Haidenauplatz 1
D-81667 München
© Siemens AG 2001
All rights reserved. Subject to availability.
Right of modification reserved.
Printed in Germany. (06/2001)
Siemens Aktiengesellschaft
http://www.my-siemens.com
Best.-Nr.: A31008-G4000-B001-2-6Z19
Page 2

s
Be inspired
Bedienungsanleitung
und Sicherheitshinweise
!
DEUTSCH
Page 3
Gigaset 4000 Classic, IM1 dt, A31008-G4000-B001-2-
Kurzübersicht
Das Display ist durch eine Folie geschützt.
Bitte Schutzfolie abziehen!
4000ClaU.fm
30.05.01
Status-LED (Leuchtdiode)
Leuchtet im Gespräch;
blinkt bei:
– ankommendem Ruf
– neuen Nachrichten
– Weckruf
Telefonbuch-Taste
Telefonbuch aufrufen
Abheben-Taste
– Gespräch
annehmen
– Rufnummer
wählen
Ta s t e 1
– Lang drücken, um
den Anrufbeantworter/die T-NetBox auszuwählen
Rufton Ein/Aus
lang drücken, um den
Rufton ein-/auszuschalten
R-Taste
– Wahlpause:
lang drücken!
– R-Tasten-Funktion
Mikrofon
Ladezustand
leer 1/3
blinkt: Warnung
2
5
8
0
H
,17
0
0(1
(18
8
DEF
3
ABC
MNOGHI
JKL
6
WXYZ
9
TUV
Netzanbieter-Taste
Liste mit Netzanbietern aufrufen
1
4
PQRS
7
R
voll
Aktuelle Funktionen und DisplayTa s t e n
Mit den DisplayTasten haben Sie
Zugriff auf die aktuellen Funktionen.
Auflegen- und
Ein-/Aus-Taste
– Gespräch been-
den
– Funktion abbre-
chen
– Eine Menüebe-
ne zurück (kurz
drücken)
– In den Ruhezu-
stand zurück
(lang drücken)
– Im Ruhezu-
stand ein/aus
(lang drücken)
Ta s t e ns p e r r e
Ein/Aus
lang drücken
2/3
Display-Symbole
Wahlwiederholung
INT
MENU
OK
2
Nachrichtentaste
Intern-Taste
Menü-Taste Weckersignal
Bestätigen
I
Nach links,
rechts blättern
Nach oben,unten blättern
Löschtaste
Ladezustand
Page 4
Gigaset 4000 Classic, IM1-dt, A31008-G4000-B001-2-
Wichtige Menüs
4000ClaU.fm
30.05.01
MENU
T-NET-LM
WECKER
AUDIO
KOSTEN
BASIS-EINST
ANRUFBEANTW
MT ANMELDEN
HOERER
RUFLAUTST
MELODIE
MENU
OK
-Taste
ANNA
BARBARA
CLAUS
OK
Hauptmenü aufrufen
Blättern in Menüs,Telefonbuch
Funktion/Eingabe bestätigen
Funktionen abbrechen/beenden
VERWENDEN
NEUEINTRAG
NUMMER
LOESCHEN
MENU
3
Page 5
Gigaset 4000 Classic, IM1 dt, A31008-G4000-B001-2-
4000ClaU.fm
30.05.01
Sicherheitshinweise
+
,
Verwenden Sie
ckernetzgerät
Gerätes gekennzeichnet.
Legen Sie nur
Akkus des gleichen Typs
mals herkömmliche (nicht-aufladbare) Batterien, da sie zu Gesundheits- und Personenschäden führen können.
Wiederaufladbare Akkus richtig gepolt einlegen (dieses Hinweisschild befindet sich
im Akkufach).
Akkutyp gemäß dieser Bedienungsanlei-
tung verwenden (dieses Hinweisschild befindet sich im Akkufach).
Medizinische Geräte können in ihrer Funkti-
on beeeinflusst werden. Beachten Sie die
technischen Bedingungen des jeweiligen
Umfeldes (z. B. Arztpraxis).
Das Mobilteil kann in Hörgeräten einen unangenehmen Brummton verursachen.
Nutzen Sie das Telefon nicht in explosionsgefährdeten Umgebungen (z. B. Lackierereien).
Das Mobilteil ist nicht spritzwassergeschützt.
nur das mitgelieferte Ste-
, wie auf der Unterseite des
zugelassene, aufladbare
!
ein! D. h. nie-
)
Nicht alle in dieser Bedienungsanleitung beschriebenen Funktionen sind in allen Ländern verfügbar.
4
Geben Sie Ihr Gigaset nur mit der Bedienungsanleitung an Dritte weiter.
Entsorgen Sie Akkus und Telefon umweltgerecht.
Page 6

Gigaset 4000 Classic, IM1 dt, A31008-G4000-B001-2-6Z19
4000ClaIVZ.fm
Inhaltsverzeichnis
Kurzübersicht . . . . . . . . . . . . . . . . . . . . . . . . . . . . . 2
Display-Symbole . . . . . . . . . . . . . . . . . . . . . . . . . 2
Wichtige Menüs . . . . . . . . . . . . . . . . . . . . . . . . . . . 3
Sicherheitshinweise. . . . . . . . . . . . . . . . . . . . . . . . 4
Mobilteil vorbereiten . . . . . . . . . . . . . . . . . . . . . . . 6
Verpackungsinhalt. . . . . . . . . . . . . . . . . . . . . . . . . 6
Akkus einlegen . . . . . . . . . . . . . . . . . . . . . . . . . . . 6
Akkus laden . . . . . . . . . . . . . . . . . . . . . . . . . . . . . 6
Gürtelclip befestigen. . . . . . . . . . . . . . . . . . . . . . . 7
Mobilteil ein-/ausschalten . . . . . . . . . . . . . . . . . . . 7
Tastensperre ein-/ausschalten . . . . . . . . . . . . . . . 7
Display-Sprache ändern . . . . . . . . . . . . . . . . . . . . 8
Mobilteil anmelden . . . . . . . . . . . . . . . . . . . . . . . . 9
Telefonieren . . . . . . . . . . . . . . . . . . . . . . . . . . . . . 10
Extern anrufen . . . . . . . . . . . . . . . . . . . . . . . . . . 10
Intern anrufen . . . . . . . . . . . . . . . . . . . . . . . . . . . 10
Anruf annehmen . . . . . . . . . . . . . . . . . . . . . . . . . 11
Externes Gespräch verbinden, Rückfrage. . . . . . 11
Wahlwiederholung . . . . . . . . . . . . . . . . . . . . . . . . 12
Telefonbuch und Netzanbieterliste . . . . . . . . . . 13
Einstellungen . . . . . . . . . . . . . . . . . . . . . . . . . . . . 17
Wecker einstellen . . . . . . . . . . . . . . . . . . . . . . . . 17
Hörer-Lautstärke . . . . . . . . . . . . . . . . . . . . . . . . . 18
Rufton-Lautstärke („Klingelton“). . . . . . . . . . . . . 18
Rufton-Melodie . . . . . . . . . . . . . . . . . . . . . . . . . . 18
Akkuwarnton ein-/ausschalten . . . . . . . . . . . . . . 19
Automatische Rufannahme ein-/aus . . . . . . . . . . 19
In den Lieferzustand zurücksetzen . . . . . . . . . . . 19
Anhang . . . . . . . . . . . . . . . . . . . . . . . . . . . . . . . . . 20
Pflege . . . . . . . . . . . . . . . . . . . . . . . . . . . . . . . . . 20
Reichweite . . . . . . . . . . . . . . . . . . . . . . . . . . . . . 20
Garantie. . . . . . . . . . . . . . . . . . . . . . . . . . . . . . . . 21
Service: . . . . . . . . . . . . . . . . . . . . . . . . . . . . . . . . 21
30.05.01
5
Page 7
Gigaset 4000 Classic, IM1 dt, A31008-G4000-B001-2-6Z19
4000Cla.fm
Mobilteil vorbereiten
Verpackungsinhalt
Mobilteil Gigaset 4000 Classic, zwei Akkus, Ladeschale, Gürtelclip, Bedienungsanleitung.
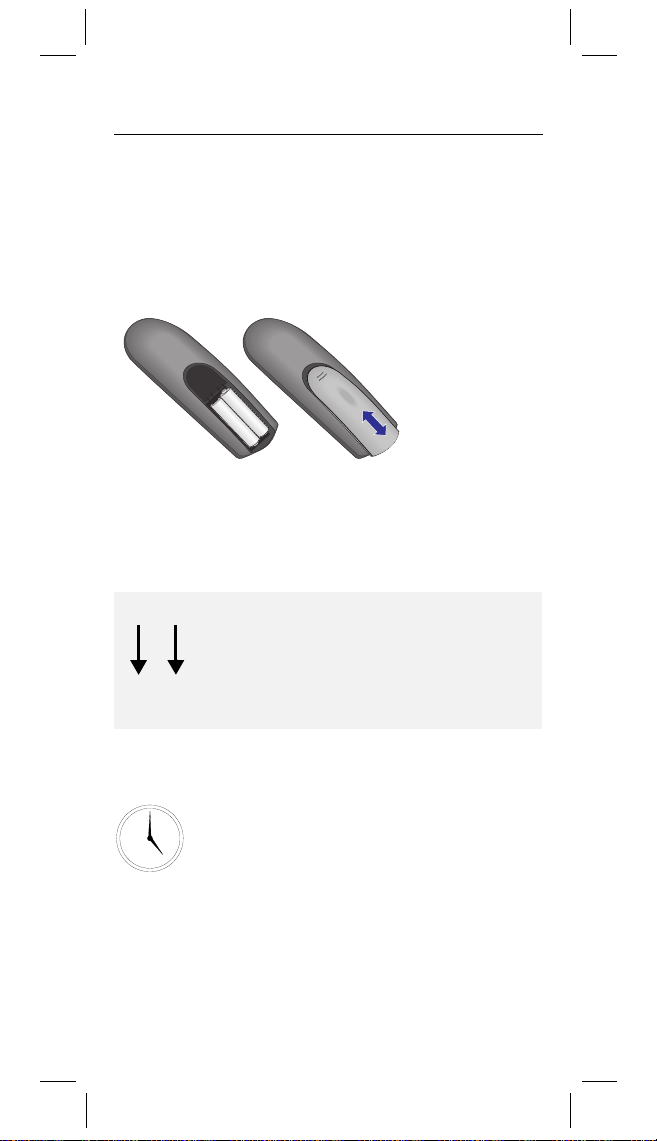
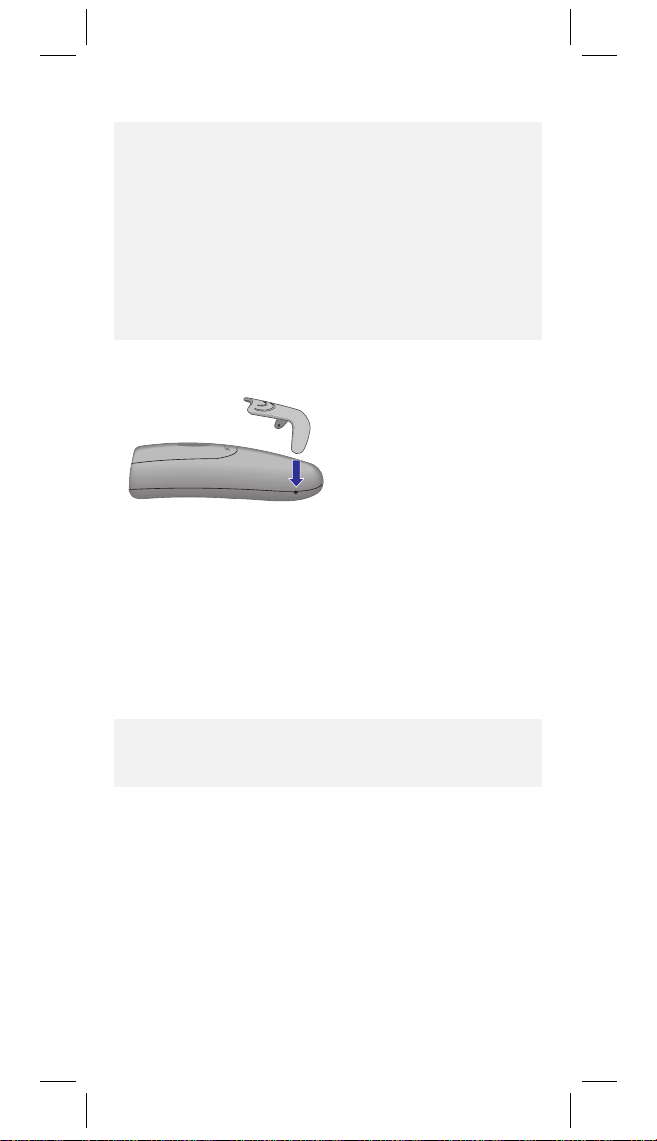
Akkus einlegen
–
+
–
+
–
+
30.05.01
Akkus
●
●
●
;
richtig gepolt
Deckel auflegen und nach
einrastet.
Zum Öffnen
unten
auf die Riffelung drücken und nach
schieben.
Bevor Sie Ihr Mobilteil nutzen, legen
Sie es
oben
Classic
die interne Nummer des Mobilteils auf
dem Display angezeigt (z. B. „2“).
einlegen – siehe linkes Bild.
schieben, bis er
oben
mit dem Display sichtbar nach
in die Basis
. Nach etwa einer Minute wird
Gigaset 4010/4015
Akkus laden
Lassen Sie das Mobilteil zum Laden der Akkus ca. fünf Stunden in der Basis/Ladescha-
5 h
le liegen, denn die Akkus sind im Lieferzustand nicht geladen. Das Aufladen der
Akkus wird am Mobilteil durch Blinken der
Ladezustandsanzeige angezeigt:
Akkus leer (Akkusymbol blinkt)
Akkus 1/3 geladen
Eine Übersicht der empfohlenen Akkutypen finden Sie
im Anhang Seite 20.
6
Akkus 2/3 geladen
Akkus voll
Page 8

Gigaset 4000 Classic, IM1 dt, A31008-G4000-B001-2-6Z19
Nach dem ersten Ladevorgang können Sie Ihr Mo-
●
bilteil nach jedem Gespräch wieder in die Basis/
Ladeschale zurücklegen. Das Laden wird elektronisch gesteuert. Dadurch wird ein schonendes Laden der Akkus gewährleistet.
Die Akkus erwärmen sich während des Aufladens;
●
das ist ein normaler Vorgang und ungefährlich.
Damit der Ladezustand richtig angezeigt wird,
●
sollten Sie das Akkufach nicht unnötig öffnen.
4000Cla.fm
30.05.01
Gürtelclip befestigen
Gürtelclip auf der Rückseite des Mobilteils andrücken,
bis seitliche „Nasen“ in die Aussparungen einrasten.
Mobilteil ein-/ausschalten
Das Mobilteil schaltet sich nach Einlegen der Akkus
und mit dem Einlegen in die Basis/Ladeschale automatisch ein.
Zum Ein-/Ausschalten die Auflegen-Taste
hören einen Bestätigungston
(Tonfolge aufsteigend).
drücken. Sie
lang
Tastensperre ein-/ausschalten
Sie können die Tastatur des Mobilteils „sperren“, da-
mit unbeabsichtigte Tastenbetätigungen ohne Auswirkung bleiben. Bei einem Anruf wird die Tastatursperre automatisch ausgeschaltet und nach
Gesprächsende wieder eingeschaltet.
4
Anruf annehmen: Abheben-Taste
Zum Ein-/Ausschalten Taste
drücken. Sie hören einen Bestäti-
gungston (Tonfolge aufsteigend).
drücken.
lang
7
Page 9
Gigaset 4000 Classic, IM1 dt, A31008-G4000-B001-2-6Z19
Display-Sprache ändern
4000Cla.fm
30.05.01
MENU
6-
L
LL
L/
L0
L1
L2
L3
L6
L
/
Menü öffnen.
Erst 9, dann 2 drücken und
anschließend:
Deutsch
Englisch
Französisch
Italienisch
Spanisch
Portugiesisch
Niederländisch
Dänisch
Norwegisch
Schwedisch
Finnisch
Tschechisch
Polnisch
Türkisch
8
Page 10
Gigaset 4000 Classic, IM1 dt, A31008-G4000-B001-2-6Z19
(LQVWHOOXQJHQ
6\VWHP(LQVWHOO
*HU¦WDQPHOGHQ
4000Cla.fm
30.05.01
Mobilteil anmelden
Damit Sie mit Ihrem Mobilteil telefonieren können,
müssen Sie dieses mit seiner Basis „bekannt machen“ (anmelden).
Wenn Ihr Mobilteil bereits an einer
●
angemeldet war (Schritt
wenn Ihr Mobilteil an einer
●
gängerserie
neu angemeldet werden soll (Schritt 1
1, 2
Gigaset-Basis der Vor-
und 3).
Schritt 1:
An der
Basis
bzw. am
Gigaset Vorbereitung an Basis/-telefon
4010/4015
Taste an der Basisunterseite lang drü-
cken.
3010/3015
Die Paging-Taste# der Basis so lange
(etwa 10 Sekunden) drücken, bis Sie Signaltöne hören.
3020/25
3030/35
4030/35
Im Menü des Basistelefons
,
auswählen und mit 2.
bestätigen.
3070/75
4070/75
Basen
anderer
Hersteller
Die Anzeige (LED) drücken – sie blinkt
während der Anmeldung.
Zur Anmeldung an „GAP-Basen“ folgen
Sie der jeweiligen Bedienungsanleitung
(Schritt2 und 3).
anderen Basis
und 3),
Basistelefon
und
Schritt 2:
MENU
MT ANMELDEN
Schritt 3:
OK
Nach Eingabe der System-PIN sucht das Mobilteil nach
einer Basis mit dieser PIN. Während des Suchens
blinkt im Display . Nach erfolgreichem Anmelden kehrt das Mobilteil in den Ruhezustand zurück.
Geben Sie Folgendes
am Mobilteil
Menü öffnen.
Auswählen und bestätigen.
OK
PIN
wird angezeigt.
Geben Sie Folgendes
am Mobilteil
Die 4-stellige System-PIN eingeben und bestätigen.
MT ANMELDEN
Ihr Mobilteil ist jetzt einsatzbereit!
ein:
ein:
9
Page 11

Gigaset 4000 Classic, IM1 dt, A31008-G4000-B001-2-6Z19
4000Cla.fm
30.05.01
Telefonieren
Extern anrufen
Externe Anrufe sind Anrufe ins öffentliche Telefonnetz.
Rufnummer eingeben
Ggf. mit der Display-Taste
einzelne Zeichen korrigieren.
Abheben-Taste drücken.
Sie können auch
●
drücken und dann die Rufnummer eingeben – jede
Ziffer wird sofort gewählt.
Mit der Auflegen-Taste können Sie das Wählen
●
abbrechen.
Mit der -Taste können Sie eine Wahlpause ein-
●
geben (lang drücken). Beisp.: Auslandsverbindung.
Auflegen-Taste drücken, um das
Gespräch zu beenden.
die Abheben-Taste
zuerst
Intern anrufen
Interne Anrufe sind Anrufe zu anderen angemeldeten
Mobilteilen. Interne Anrufe sind kostenlos (z. B. innerhalb Ihrer Wohnung vom Hobbyraum in die Küche.
INT
z. B.
oder
INT
oder INT
oder
AN ALLE
-
<
Interne Rufnummer des
Mobilteils eingeben.
Gewünschten Teilnehmer auswählen und Abheben-Taste drü-
cken.
Drücken.
Es werden alle Mobilteile angerufen.
Auflegen-Taste drücken, um das
Gespräch zu beenden.
10
Page 12

Gigaset 4000 Classic, IM1 dt, A31008-G4000-B001-2-6Z19
4000Cla.fm
30.05.01
Anruf annehmen
Ihr Telefon klingelt (Rufton) und die Status-LED blinkt.
oder
F
Abheben-Taste drücken.
das Mobilteil nur aus der Basis/
Ladeschale nehmen
(Lieferzustand: „Automatische
Rufannahme“).
Externes Gespräch verbinden, Rückfrage
Sie können ein externes Gespräch an ein anderes Mobilteil verbinden oder intern eine Rückfrage halten.
INT
-
z. B.
Wenn sich der interne Teilnehmer meldet:
●
Gespräch verbinden:
Ggf. Gespräch ankündigen und Auflegen-Taste
drücken
oder
●
Rückfrage beenden:
Zum wartenden Teilnehmer zurückschalten.
MENU
ZURUECK
Display-Taste drücken – der
externe Teilnehmer hört eine
Wartemelodie.
Interne Rufnummer des Mobilteils eingeben. Sie sind jetzt mit
dem zweiten Mobilteil verbunden.
Menü öffnen.
Bestätigen.
OK
Sie sind wieder mit dem wartenden externen Teilnehmer verbunden.
11
Page 13

Gigaset 4000 Classic, IM1 dt, A31008-G4000-B001-2-6Z19
4000Cla.fm
30.05.01
Wahlwiederholung
Ihr Mobilteil speichert automatisch die fünf zuletzt gewählten Rufnummern oder Namen.
$
Wahlwiederholungsliste löschen
$
MENU
1
Rufnummer ins Telefonbuch übernehmen
$
OK
LOESCHEN?
MENU
NR INS TB
Rufnummer/Namen anzeigen.
Gewünschte Rufnummer/Namen
auswählen.
Abheben-Taste drücken – die Rufnummer wird gewählt.
Wahlwiederholungsliste öffnen.
Menü öffnen.
Ziffer 6 drücken und die Sicher-
OK
heitsabfrage bestätigen.
Rufnummer anzeigen.
Rufnummer auswählen und
Menü öffnen.
Das Eingabefeld des Telefon-
OK
buchs öffnet sich.
Die Rufnummer ist bereits eingetragen.
Ggf. die Rufnummer ändern,
Namen eingeben. (Eingabe von
Buchstaben und Zeichen s. Zeichentabelle.
Eingabe bestätigen
12
Page 14

Gigaset 4000 Classic, IM1 dt, A31008-G4000-B001-2-6Z19
4000Cla.fm
30.05.01
Telefonbuch und Netzanbieterliste
Das
Telefonbuch
von 20 Rufnummern.
In der
Netzanbieterliste
nummern (Call-by-Call) von Telefongesellschaften speichern, um kostenbewusst zu telefonieren.
erleichtert Ihnen das Wählen
können Sie die Vorwahl-
Eintrag speichern
/
MENU
NEUEINTRAG
OK
OK
Telefonbuch/Netzanbieterliste öffnen.
Menü öffnen.
Auswählen und bestätigen.
OK
Rufnummer
bestätigen.
Namen
Eingabe von Buchstaben und
Zeichen siehe Zeichentabelle.
Eingabe bestätigen.
eingeben und
eingeben.
Mit Telefonbuch wählen
z. B.
D
Telefonbuch öffnen.
Anfangsbuchstaben des Namens
eingeben (z. B. für den Namen
Emma – Anfangsbuchstabe „E“):
die Taste
und mit der Taste
Die Namen sind alphabetisch
sortiert.
Abheben-Taste drücken. Die Rufnummer wird gewählt.
zwei mal drücken
blättern.
Nach Auswahl der Nummer können Sie auch das
Menü öffnen, auswählen, die Nummer ergänzen/ändern und mit der Abheben-Taste
len.
VERWENDEN
wäh-
13
Page 15

Gigaset 4000 Classic, IM1 dt, A31008-G4000-B001-2-6Z19
4000Cla.fm
30.05.01
Mit Netzanbieterliste wählen (Call-by-Call)
Mit dieser Funktion wird die Vorwahl eines Netzanbieters der Rufnummer vorangestellt („Ver ketten “).
OK
Netzanbieterliste aufrufen.
Call-by-Call-Nummer auswählen
und bestätigen.
P
Rufnummer zum „Verketten “
eingeben.
oder
J
OK
Rufnummer zum „Verketten “
auswählen und bestätigen.
D
Drücken.
Schnellwahl aus der Netzanbieterliste
Sie können sich aus der Netzanbieterliste acht Nummern für die Schnellwahl speichern. Dafür geben Sie
dem Netzanbieternamen die Nummer (2–9) für
vor
die Schnellwahl ein.
Speichern Sie einen neuen Eintrag und geben Sie die
Nummer für die Schnellwahl einfach als erstes Zeichen des Netzanbieternamens ein.
Beispiel
Netzanbieternamen
: Schnellwahlnummer 2 und danach den
.
MENU
NUMMER
OK
z. B. 4 x
14
-
OK
Netzanbieterliste aufrufen.
Netzanbieter auswählen und
Menü öffnen.
Auswählen und bestätigen.
OK
Rufnummer bestätigen.
Die Schreibmarke an die erste
Position im Namensfeld setzen.
Schnellwahlnummer 2 eingeben
und bestätigen.
Page 16
Gigaset 4000 Classic, IM1 dt, A31008-G4000-B001-2-6Z19
4000Cla.fm
Mit der Schnellwahl wählen
z. B.
-
Ta st e
Die gespeicherte Netzanbieternummer wird angezeigt.
z. B.
Rufnummer zum „Verketten “
eingeben
oder
OK
Eintrag aus dem Telefonbuch
auswählen und bestätigen.
Drücken.
Zeichentabelle
Entsprechende Taste mehrmals bzw. lang drücken:
1 x 2 x 3 x 4 x 5 x 6 x
T
/
0
1
2
3
6
L
5
4
1
A B C 2
DEF 3
G H I 4
JKL5
M N O 6
PQRS7
T U V 8
WXYZ9
+ 0 – | ? _
/(),
*
lange
drücken:
30.05.01
Schreibmarke steuern mit
mit
. Das Einfügen von Zeichen erfolgt immer links
. Zeichen löschen
von der Schreibmarke (Cursor).
Reihenfolge der Sortierung
1. Leerzeichen (
Ziffern (0–9)
2.
)
T
Buchstaben (alphabetisch)
3.
Restliche Zeichen
4.
Mit einem voreingestellten Leerzeichen Trutscht ein
Eintrag an die erste Stelle (Beispiel: „
Karla“).
T
15
Page 17

Gigaset 4000 Classic, IM1 dt, A31008-G4000-B001-2-6Z19
4000Cla.fm
Telefonbucheintrag anzeigen und ändern
z. B.
MENU
P
OK
P
OK
NUMMER
Telefonbuch öffnen.
Anfangsbuchstaben des Namens
eingeben.
Menü öffnen.
Auswählen und bestätigen.
OK
Der Eintrag wird angezeigt.
Ggf. Rufnummer überschreiben.
Eingabe von Buchstaben und Zeichen s. Zeichentabelle.
Eingaben bestätigen.
Namen überschreiben.
Eingaben bestätigen.
Einzelnen Eintrag aus Telefonbuch löschen
z. B.
MENU
LOESCHEN
Telefonbuch öffnen.
Anfangsbuchstaben des Namens
eingeben.
Menü öffnen.
Auswählen und bestätigen.
OK
30.05.01
Einzelnen Eintrag aus Netzanbieterliste löschen
MENU
LOESCHEN
Netzanbieterliste öffnen.
Rufnummer auswählen und
Menü öffnen.
Auswählen und bestätigen.
OK
Alle Einträge löschen
MENU
1
16
/
LOESCHEN?
Telefonbuch/Netzanbieterliste
öffnen.
Menü öffnen.
Ziffer 6 drücken und die Sicher-
OK
heitsabfrage bestätigen.
Page 18

Gigaset 4000 Classic, IM1 dt, A31008-G4000-B001-2-6Z19
4000Cla.fm
30.05.01
Einstellungen
Wecker einstellen
Sie können Ihr Mobilteil als Wecker nutzen.
Wecker aktivieren
Ist an Ihrem Mobilteil eine Weckzeit eingestellt (Sternchen-Symbol), klingelt es täglich zur gleichen Uhrzeit.
Das Mobilteil befindet sich im Ruhezustand.
MENU
WECKER
L10
OK
Im Ruhezustand des Mobilteils wird vor der Zeitangabe ein Sternchen angezeigt. Daran erkennen Sie, dass
der Wecker gestellt ist.
Menü öffnen.
Auswählen und bestätigen.
OK
Stunden/Minuten eingeben.
Beispiel hier: 6.15 Uhr.
Ggf. zu anderer Ziffer springen,
z. B. zum Korrigieren.
Speichern und beenden.
Wecker deaktivieren
Der Wecker ist aktiviert, soll aber
MENU
WECKER
Menü öffnen.
Auswählen und bestätigen.
OK
Die Weckzeit ist deaktiviert, das
Sternchen vor der Uhrzeitangabe
wird nicht mehr angezeigt.
nicht
klingeln.
Weckruf ausschalten
Ein Weckruf wird wie ein ankommender Anruf signalisiert. Das Mobilteil klingelt und es blinkt die StatusLED (ca. 30 Sek.).
Drücken Sie eine beliebige Taste, um den Weckruf
auszuschalten.
17
Page 19

Gigaset 4000 Classic, IM1 dt, A31008-G4000-B001-2-6Z19
4000Cla.fm
30.05.01
Hörer-Lautstärke
Sie können die Hörer-Lautstärke in drei Stufen
einstellen –
MENU
AUDIO
HOERER
OK
auch während eines Gesprächs
Menü öffnen.
Auswählen und bestätigen.
OK
Bestätigen.
OK
Die aktuelle Lautstärke ertönt
.
und die zugehörige Nummer wird
angezeigt. Gewünschte Stufe
auswählen und bestätigen.
Rufton-Lautstärke („Klingelton“)
Sie können zwischen sieben Möglichkeiten wählen:
Fünf Rufton-Lautstärken (1–5),
●
„Crescendo“-Ruf (Lautstärke wird lauter; 6),
●
Kein Rufton (Rufton aus; 0).
●
MENU
AUDIO
RUFLAUTST
OK
Menü öffnen.
Auswählen und bestätigen.
OK
Auswählen und bestätigen.
OK
Die aktuelle Lautstärke ertönt
und die zugehörige Stufe wird
angezeigt. Gewünschte Stufe
auswählen und bestätigen.
Rufton-Melodie
Sie können zwischen zehn Melodien (1–10) wählen.
MENU
18
AUDIO
MELODIE
OK
Menü öffnen.
Auswählen und bestätigen.
OK
Auswählen und bestätigen.
OK
Die aktuelle Melodie ertönt und
die zugehörige Melodie-Nummer
wird angezeigt. Gewünschte
Melodie einstellen und bestäti-
gen.
Page 20

Gigaset 4000 Classic, IM1 dt, A31008-G4000-B001-2-6Z19
4000Cla.fm
30.05.01
Akkuwarnton ein-/ausschalten
Bei eingeschalteter Funktion (Lieferzustand) werden
Sie akustisch darauf hingewiesen, dass der Akku fast
leer ist.
MENU
6/
Menü öffnen.
Funktion einschalten.
oder
6/L
Funktion ausschalten.
Automatische Rufannahme ein-/aus
Bei eingeschalteter Funktion nehmen Sie das Mobilteil zum Annehmen eines Anrufs aus der Ladeschale, ohne auf die Hörer-Taste
drücken zu müssen
D
(Lieferzustand).
MENU
6
6L
oder
Menü öffnen.
Funktion einschalten.
Funktion ausschalten.
In den Lieferzustand zurücksetzen
Das Telefonbuch, die Netzanbieterliste und die Anruferliste werden beim Zurücksetzen nicht gelöscht. Die
Anmeldung an der Basis bleibt erhalten.
MENU
Menü öffnen.
6
Mit 9 und dann 3 die Prozedur
aufrufen.
Sicherheitsabfrage bestätigen.
RESET?
OK
Funktion Lieferzustand
Hörer-Lautstärke 1
Rufton-Lautstärke („Klingelton“, ) 5
Rufton-Melodie 1
Automatische Rufannahme ein
Akkuwarnton ein
Display-Sprache deutsch
Wahlwiederholungsliste gelöscht
19
Page 21
Gigaset 4000 Classic, IM1 dt, A31008-G4000-B001-2-6Z19
4000Cla.fm
30.05.01
Anhang
Pflege
Wischen Sie Basis und Mobilteil mit einem
oder einem Antistatiktuch ab. Benutzen Sie
Tu c h
ein trockenes Tuch! Es besteht die Gefahr der statischen Aufladung!
Empfohlene Akkus:
Nickel-Cadmium (NiCd) Nickel-Metall-Hydrid (NiMH)
Sanyo N-3U (700 mAh) Saft VHAAH 1300 (1300 mAh)
Mobile Power 700
(700 mAh)
Panasonic P-60AA DT
(600 mAh)
Emmerich 700 (700mAh) GP GP130 AA HC (1300 mAh)
Immer beide Akkus austauschen und nur Akkus vom
gleichen Typ/Hersteller einlegen.
YDT 1200 (1200 mAh)
Panasonic HHR-110 AA
(1100 mAh)
Sanyo HR-3U (1600 mAh)
Emmerich 1300 (1300 mAh)
feuchten
nie
Betriebszeiten/Ladezeiten des Mobilteils:
Kapazität
(mAh)
700 bis zu 200 (8 Tage) über 10 etwa 5,5
1200 bis zu 320 (13 Tage) über 17 etwa 9
1600 bis zu 400 (18 Tage) über 23 etwa 12
Die Ladekapazität der Akkus reduziert sich technisch
bedingt nach einigen Jahren.
Bereitschaftszeit
in Stunden
(Tage)
Gesprächs-
zeit
(Stunden)
Ladezeit
(Stunden)
Reichweite
Die Reichweite beträgt im freien Gelände ca. 300 m.
In Gebäuden werden Reichweiten bis 50 m erreicht.
20
Page 22

Gigaset 4000 Classic, IM1 dt, A31008-G4000-B001-2-6Z19
4000Cla.fm
30.05.01
Garantie
Ab Kaufdatum und innerhalb der Garantiezeit beim
Händler beseitigt die Siemens AG alle material- oder
herstellungsbedingte Mängel durch Reparatur oder
Austausch.
In Europa gilt ab dem 1. Januar 2002 eine Garantiezeit
von mindestens 24 Monaten.
Von der Garantie ausgenommen sind Schäden aufgrund von unsachgemäßem Gebrauch, Verschleiß
oder Eingriffen Dritter. Die Gerantie umfasst keine Verbrauchsmaterialien oder Mängel, die den Wert oder
die Gebrauchstauglichkeit nur unerheblich beeinträch-
tigen.
Service:
www.siemens.com/troubleshooting
Deutschland:
Österreich:
Schweiz:
Der Siemens-Service steht Ihnen bei Störungen am
Gerät zur Verfügung. Bei Fragen zur Bedienung hilft
Ihnen Ihr Fachhändler weiter. Fragen zum Telefonanschluss richten Sie bitte an Ihren Netzanbieter.
Die Übereinstimmung des Gerätes mit den grundlegenden Anforderungen der R&TTE-Directive ist durch
das CE-Kennzeichen bestätigt.
Siemens-Hotline 0180/5 33 32 22
Siemens-Hotline 05/17 07 - 50 04
Siemens-Hotline 012/12 00 - 90
Das Mobilteil Gigaset 4000 Classic ist innerhalb der
EU und in der Schweiz zugelassen.
21
Page 23

Gigaset 4000 Classic, IM1 dt, A31008-G4000-B001-2-6Z19
Stichwortverzeichnis
A
Akkus
Betriebszeit
einlegen
empfohlene Akkus
laden
Ladezeit
Akkuwarnton
Anhang
Anmelden (Mobilteil)
Anruf annehmen
Anrufen
Automat. Rufannahme
20
6
6
20
19
20
11
10
C
Call-by-Call
14
D
Display-Sprache
8
E
Einstellungen
Eintrag speichern
17
13
G
Garantie
Gespräch verbinden
Gürtelclip
21
7
H
Hörer-Lautstärke
18
K
Klingelton
18
L
Ladezeit der Akkus
Ladezustandsanzeige
Lautstärke
Lieferzustand
18
20
19
M
Mobilteil
anmelden
Betriebszeit
9
20
11
20
9
ein-/ausschalten
in Lieferzustand
Ladezeit
N
Netzanbieterliste
Eintrag löschen
mit N. wählen
P
Pflege
20
R
Reichweite
19
R-Taste
Rückfrage
Rufnummer
Rufton
S
Schnellwahl
Schreibmarke
Service
Sprache einstellen
T
Tastensperre
Telefonbuch
Eintrag löschen
mit T. wählen
Telefonbucheintrag
Telefonieren
V
Verbinden (Gespräch)
Verpackungsinhalt
W
6
Wahlpause
Wahlwiederholung
Wecker
Weitergeben (Gespr.)
Z
Zeichentabelle
4000ClaSIX.fm
20
20
10
11
18
21
10
17
12
14
13
10
30.05.01
7
19
13
16
14
15
8
7
16
13
16
11
6
12
11
15
22
Page 24

s
Be inspired
Operating instructions
and safety precautions
!
English
Page 25

Gigaset 4000 Classic, IM1 eng, A31008-G4000-B001-2-
Brief overview
The display is protected by a plastic film.
Remove the plastic film.
4000ClaU.fm
23.05.010
Status LED
Lights up during
a call
and flashes for:
– incoming calls
– new messages
– alarm calls
Directory key
Open the directory
Ta l k ke y
– Accept
a call
– Dial
a number
Key 1
–Hold down to
select the
answering
machine/mailbox
Ringer on/off
Hold down to switch
the ringer on/off
Recall key
–Pause:
– Recall key function
Hold down
,17
1
ABC
2
4
JKL
5
PQRS
7
TUV
8
0
R
Microphone
Charging status
flat
full
flashes: Caution
Current functions and display
keys
The display keys
give you access to
the functions
shown in the dis-
H
0
0(1
9
play.
(18
8
End call and On/
Off key
– End call
– Cancel function
– Back one menu
level (press
DEF
3
MNOGHI
6
WXYZ
briefly)
– Return to idle
state (hold
down)
– On/off in idle
status (hold
down)
Keypad
protection
on/off
Hold down
Sel Services key
Open network access
list
1/3
2/3
Display symbols
Automatic redial
INT
MENU
OK
2
Mailbox icon
INT key
Menu key Alarm clock
Confirm
I
Scroll left, right
Scroll up, down
Delete key
signal
Charging status
Page 26
Gigaset 4000 Classic, IM1 eng, A31008-G4000-B001-2-
Important menus
4000ClaU.fm
23.05.01
MENU
SEL SERVICES
ALARM CLOCK
AUDIO SET
CALL CHARGES
BASE SET
ANS MACHINE
REGISTER HS
H/SET VOL
RINGER
MELODY
MENU
OK
key
ANNE
BARBARA
CHRIS
OK
Open main menu
Scroll through the menus, directory
Confirm function/entry
Cancel/end functions
EDIT ENTRY
NEW ENTRY
SHOW ENTRY
DEL ENTRY
MENU
3
Page 27
Gigaset 4000 Classic, IM1 eng, A31008-G4000-B001-2-
!
Safety precautions
Only use the power supply unit sup-
as indicated on the underside of the
+
,
plied
device.
Only insert
teries of the same type.
nary (non-rechargeable) batteries as they
may pose a health hazard or cause injury.
Make sure the rechargeable batteries are
inserted the right way round (as indicated in
the battery compartment).
Use the batteries specified in these operating instructions (as indicated in the battery
compartment).
The phone may affect medical equipment
so always switch your phone off before entering hospitals or doctors’ practices.
The handset may cause an unpleasant
humming noise in hearing aids.
approved rechargeable bat-
4000ClaU.fm
Never use ordi-
23.05.010
Do not operate the phone in places where
there is a risk of explosion (such as paint
workshops).
The handset is not splash-proof.
If you give your Gigaset to someone else
)
Not all the functions described in these operating instructions are available in all countries.
4
you should also give them the operating instructions.
Dispose of batteries and the phone carefully. Do not pollute the environment.
Page 28

Gigaset 4000 Classic, IM1 eng, A31008-G4000-B001-2-
4000claivz.fm
Contents
Brief overview . . . . . . . . . . . . . . . . . . . . . . . . . . . . . 2
Display symbols . . . . . . . . . . . . . . . . . . . . . . . . . . 2
Important menus . . . . . . . . . . . . . . . . . . . . . . . . . . 3
Safety precautions . . . . . . . . . . . . . . . . . . . . . . . . . 4
Preparing the handset . . . . . . . . . . . . . . . . . . . . . . 6
Delivery package. . . . . . . . . . . . . . . . . . . . . . . . . . 6
Inserting the batteries. . . . . . . . . . . . . . . . . . . . . . 6
Charging the batteries. . . . . . . . . . . . . . . . . . . . . . 6
Attaching the belt clip . . . . . . . . . . . . . . . . . . . . . . 7
Switching the handset on and off . . . . . . . . . . . . . 7
Activating/deactivating the keypad lock . . . . . . . . 7
Changing the display language . . . . . . . . . . . . . . . 8
Registering the handset. . . . . . . . . . . . . . . . . . . . . 9
Making calls . . . . . . . . . . . . . . . . . . . . . . . . . . . . . 10
Making an external call . . . . . . . . . . . . . . . . . . . . 10
Making internal calls . . . . . . . . . . . . . . . . . . . . . . 10
Answering a call . . . . . . . . . . . . . . . . . . . . . . . . . 11
Forwarding an external call, enquiry call . . . . . . . 11
Automatic redial . . . . . . . . . . . . . . . . . . . . . . . . . . 12
Directory and network access list. . . . . . . . . . . . 13
Settings . . . . . . . . . . . . . . . . . . . . . . . . . . . . . . . . . 17
Setting the alarm clock . . . . . . . . . . . . . . . . . . . . 17
Handset volume . . . . . . . . . . . . . . . . . . . . . . . . . 18
Ringer volume (“ring tone”) . . . . . . . . . . . . . . . . 18
Ringer melody. . . . . . . . . . . . . . . . . . . . . . . . . . . 18
Activating/deactivating battery low beep . . . . . . 19
Auto talk feature on/off . . . . . . . . . . . . . . . . . . . . 19
Resetting to the factory defaults . . . . . . . . . . . . 19
Appendix . . . . . . . . . . . . . . . . . . . . . . . . . . . . . . . . 20
Looking after your phone . . . . . . . . . . . . . . . . . . 20
Range . . . . . . . . . . . . . . . . . . . . . . . . . . . . . . . . . 20
Guarantee . . . . . . . . . . . . . . . . . . . . . . . . . . . . . . 21
Service: . . . . . . . . . . . . . . . . . . . . . . . . . . . . . . . . 21
23.05.01
5
Page 29
Gigaset 4000 Classic, IM1 eng, A31008-G4000-B001-2-6Z19
4000Cla.fm
17.11.0 0
Preparing the handset
Delivery package
Gigaset 4000 Classic handset, two batteries, charging
unit, belt clip, operating instructions.
Inserting the batteries
–
+
–
+
–
+
Make sure to insert the batteries
●
– see diagram on the left.
round
Replace the cover and push gently
●
clicks into place.
●
To o p e n ,
;
press the grooved area and slide
Before activating your handset, place it
in the
Gigaset 4010/4015 Classic
station
with the display facing up-
. After about one minute the
wards
handset's internal number will be displayed (e.g. “2”).
the right way
upwards
until it
back
base
.
Charging the batteries
Leave the handset for approx. five hours in
the base station/charging unit to charge the
5 h
batteries, as they are not charged when
they leave the factory. The charging status
icon flashes on the handset to indicate that
the batteries are being charged:
Batt. flat
(battery symbol flashes)
Batteries 1/3 charged
See the appendix for a list of recommended batteries.
6
Battery 2/3 charged
Batteries full
Page 30
Gigaset 4000 Classic, IM1 eng, A31008-G4000-B001-2-6Z19
Once the initial charging process is completed you
●
can replace your handset into the base station/
charging unit after each call. Charging is controlled
electronically. This ensures optimum charging and
prolongs battery life.
The batteries heat up during charging. This is nor-
●
mal and not dangerous.
Opening the battery compartment unnecessarily
●
may cause the wrong charging status to be displayed.
4000Cla.fm
17.11.0 0
Attaching the belt clip
Push the belt clip onto the back of the handset until
the lugs at the side click into place.
Switching the handset on and off
The handset is switched on as soon as you insert the
batteries and place the handset in the base station/
charging unit.
To switch the handset on and off,
hold
you hear a confirmation beep (rising tone sequence).
the end call key until
down
Activating/deactivating the keypad lock
You can disable the handset keypad to protect the keypad against inadvertent use. If there is an incoming
call, the key lock is automatically deactivated and reactivated after the call has ended.
4
Accepting a call: Press the talk key
To activate/deactivate, hold
key. You will hear a beep
down
(rising tone sequence).
.
7
Page 31

Gigaset 4000 Classic, IM1 eng, A31008-G4000-B001-2-6Z19
4000Cla.fm
Changing the display language
17.11.0 0
MENU
6-
L
LL
L/
L0
L1
L2
L3
L6
L
/
Open the menu.
First press 9, then 2 and then:
German
English
French
Italian
Spanish
Portuguese
Dutch
Danish
Norwegian
Swedish
Finnish
Czech
Polis h
Tu rk i sh
8
Page 32

Gigaset 4000 Classic, IM1 eng, A31008-G4000-B001-2-6Z19
VHWWLQJV
V\VWHPVHWWLQJV
UHJLVWHUKDQGVHW
2.
4000Cla.fm
17.11.0 0
Registering the handset
To make calls with your handset, you must “intro-
duce” it to its base station (registering)
if your handset has already been registered at a
●
ferent base station (steps 1, 2
if you want to register the handset as a new hand-
●
set at a
range (steps 1
Step 1:
Gigaset base station of an older Gigaset
and 3).
On the
base station
and 3),
or
base telephone
Gigaset On the base station/base telephone
4010/4015
Hold down the key on the underside
of the base station.
3010/3015
Hold down the paging-key# of the
base station (for about 10 seconds) un-
3020/25
3030/35
4030/35
3070/75
4070/75
Non-Siemens base
stations
til you hear
Select
signal tones
,
and
the base station telephone and confirm with
.
Press the LED – it will flash during
registration.
To register at “GAP base stations”, fol-
low the relevant operating instructions
(step 2 and 3).
.
in the menu at
dif-
Step 2: On the handset
MENU
REGISTER HS
Step 3: On the handset
OK
Once you have entered the system PIN the handset
will search for a base station with this PIN. During the
search, will flashes on the display. When
it has been registered successfully, the handset will
revert to its idle status.
for operation.
OK
REGISTER HS
:
Open the menu.
Select the menu item and confirm.
The PIN is
displayed.
:
Enter the 4-digit system PIN and
confirm.
Your handset is now ready
9
Page 33

Gigaset 4000 Classic, IM1 eng, A31008-G4000-B001-2-6Z19
4000Cla.fm
Making calls
Making an external call
External calls are calls to the public telephone network.
Enter the telephone number
If you make a mistake use the
display keyto correct individ-
ual digits.
Press the talk key.
17.11.0 0
You can also press the talk key
●
enter the telephone number – each digit will be dialled immediately.
You can cancel the dialling operation by pressing
●
the end call key
You can insert a pause with the recall key (hold
●
down). Pauses may be required to make international calls.
Press the end call key to end the
call.
and then
first
.
Making internal calls
Internal calls are calls to other registered handsets. Internal calls are free of charge (from your living room to
your kitchen for example).
INT
INT
or
or
INT
or
CALL ALL
e. g.
-
<
Enter the internal number of the
handset.
Select the handset you want and
press the talk key.
Press.
All handsets are called.
Press the end call key to end the
call.
10
Page 34

Gigaset 4000 Classic, IM1 eng, A31008-G4000-B001-2-6Z19
4000Cla.fm
17.11.0 0
Answering a call
Your telephone will ring (ringer) and the status LED will
flash.
or
F
Press the talk key.
Simply remove the handset from
the base station/charging unit
(factory setting: “Auto talk”).
Forwarding an external call, enquiry call
You can forward an external call to another handset or
make an internal enquiry call.
INT
-
e. g.
If the internal user answers:
●
Connect the call:
Announce the call and then press the end call
key
or
●
End the enquiry call:
Reconnect to the waiting user.
MENU
GO BACK
Press the display key – the external user will hear music on hold.
Enter the internal number of the
handset. You are now connected
to the second handset.
Open menu.
Confirm.
OK
You are reconnected to the waiting external user.
11
Page 35

Gigaset 4000 Classic, IM1 eng, A31008-G4000-B001-2-6Z19
4000Cla.fm
Automatic redial
Your handset automatically saves the last five telephone numbers or names dialled.
$
Deleting the redialling list
$
MENU
1
Copying a telephone number to the directory
$
OK
DEL ENTRY?
MENU
COPY TO DIR
Display the telephone number/
name.
Select the telephone number/
name you want.
Press the talk key – the telephone number will be dialled.
Open the redialling list.
Open the menu.
Press digit 6 and confirm.
OK
Displays the telephone number.
Select the telephone number and
open the menu.
The input field of the directory
OK
opens.
The telephone number is already
entered.
You can change the telephone
number or enter a name if you
want. (For information on entering letters and characters, see
the character map).
Confirm input
17.11.0 0
12
Page 36

Gigaset 4000 Classic, IM1 eng, A31008-G4000-B001-2-6Z19
4000Cla.fm
17.11.0 0
Directory and network access list
With the
phone numbers and then dial them at the push of a
button.
To reduce call charges you can save the prefixes (Callby-Call) of telephone companies in the
cess list
directory
.
you can store up to 20 tele-
network ac-
Storing an entry
MENU
OK
/
NEW ENTRY
OK
Open the directory/network
access list.
Open the menu.
Select the menu item and con-
OK
firm.
Enter the
and confirm.
Enter the
For information on entering letters and characters see the character map.
Confirm input.
telephone number
.
name
Dialling with the directory
e. g.
D
Open the directory.
Enter the first letter of the name
(“E” for Emma for example):
Press the
scroll with the
names are listed in alphabetical
order.
Press the talk key. The telephone
number is dialled.
keytwice and
key. The
After selecting the number, you can also open the
menu, select , extend/change the number
and dial with the talk key
EDIT ENTRY
.
13
Page 37

Gigaset 4000 Classic, IM1 eng, A31008-G4000-B001-2-6Z19
4000Cla.fm
17.11.0 0
Dialling with the network access list
(Call-by-Call)
You can use this function to put a network provider's
prefix in front of the telephone number (“linking”).
OK
Open the network access list.
Select call-by-call number and
confirm.
P
Enter the telephone number for
“linking”.
or
J
OK
Select the telephone number for
“linking” and confirm.
D
Press.
Speed dialling from the network access
list
You can store eight numbers for speed dialling from
the network access list. To do so, you must enter the
number (2–9) for speed dialling
before
provider's name.
Store a new entry and simply enter the number for
speed dialling as the first character of the network
provider's name.
Example
the
: Press speed dial number 2 and then enter
network provider's name
.
the network
MENU
SHOW ENTRY
OK
e. g. 4 x
14
-
OK
Open the network access list.
Select the network provider and
open the menu.
Select the menu item and con-
OK
firm.
Confirm the telephone number.
Move the cursor to the first position of the name.
Enter the speed dial key 2 and
confirm.
Page 38

Gigaset 4000 Classic, IM1 eng, A31008-G4000-B001-2-6Z19
4000Cla.fm
Speed Dialling
e. g.
-
Hold
The stored network provider prefix is displayed.
e. g.
Enter the telephone number for
“linking”
or
OK
Select an entry in the
directory and confirm.
Press.
Character map
Press the relevant key repeatedly or hold down:
1 x 2 x 3 x 4 x 5 x 6 x
T
/
0
1
2
3
6
L
5
4
1
A B C 2
DEF 3
G H I 4
JKL5
M N O 6
PQRS7
T U V 8
WXYZ9
+ 0 – | ? _
/(),
*
down
the key:
17.11.0 0
Control the cursor with
with
. Letters are always inserted to the left of the
. Delete characters
cursor.
Sort sequence
1. Blank (
Digits (0–9)
2.
)
T
Letters (alphabetical)
3.
Other characters
4.
Inserting a blank Tbefore a name takes that name to
the top of the directory (for example: “
Karla ”).
T
15
Page 39

Gigaset 4000 Classic, IM1 eng, A31008-G4000-B001-2-6Z19
4000Cla.fm
Displaying and changing an entry
e. g.
MENU
SHOW ENTRY
P
OK
P
OK
Open the directory.
Enter the first letter of the name.
Open the menu.
Select the menu item and con-
OK
firm. The entry is displayed.
You can change the telephone
number. For information on entering letters and characters see the
character map.
Confirm input.
Change the name.
Confirm input.
Deleting a single entry from the directory
e. g.
MENU
DEL ENTRY
Open the directory.
Enter the first letter of the name.
Open the menu.
Select the menu item and
OK
5confirm.
17.11.0 0
Deleting a single entry from the network access
list
MENU
DEL ENTRY
Open the network access list.
Select the telephone number and
open the menu.
Select the menu item and
OK
confirm.
Deleting all entries
MENU
1
16
/
DEL ENTRY?
Open the directory/network
access list.
Open the menu.
Press digit 6 and confirm.
OK
Page 40

Gigaset 4000 Classic, IM1 eng, A31008-G4000-B001-2-6Z19
4000Cla.fm
17.11.0 0
Settings
Setting the alarm clock
You can use your handset as an alarm clock.
Activating the alarm clock
If activated, the alarm clock (asterisk icon) on your
handset will ring every day at the time entered.
With the handset idle.
MENU
ALARM CLOCK
L10
OK
When the handset is idle an asterisk is displayed before the time. This indicates that the alarm clock is set.
Open the menu.
Select the menu item and con-
OK
firm.
Enter the hours/minutes.
The example here is: 6.15.
If you make a mistake, go to the
mistake and correct it.
Save the setting and terminate
the function.
Deactivating the alarm clock
The alarm clock is set but you do
MENU
ALARM CLOCK
Open the menu.
Select the menu item and
OK
confirm.
The alarm call is deactivated and
there is no longer an asterisk in
front of the time.
want it to ring.
not
Turning off the alarm call
An alarm call is signalled like an incoming call.
The handset will ring and the status LED will flash
(for about 30 seconds). Press any key to turn it off.
17
Page 41

Gigaset 4000 Classic, IM1 eng, A31008-G4000-B001-2-6Z19
4000Cla.fm
Handset volume
You can set the handset volume to one of three
levels –
MENU
AUDIO SET
even during a call
OK
.
Open the menu.
Select the menu item and
confirm.
Confirm.
OK
You will hear the current volume
H/SET VOL
OK
and its level will be displayed.
Select the required level and
confirm.
Ringer volume (“ring tone”)
You can choose from
Five ringer volumes (1–5)
●
“Crescendo” ring (increasing volume; 6)
●
No ringer (ringer off; 0).
●
MENU
AUDIO SET
seven
Open the menu.
Select the menu item and
OK
confirm.
Select the menu item and
RINGER
OK
confirm.
OK
You will hear the current volume
and its level will be displayed.
Select the required level and
confirm.
options:
17.11.0 0
Ringer melody
You can choose from ten melodies (1–10) .
MENU
18
AUDIO SET
MELODY
OK
Open the menu.
Select the menu item and
OK
confirm.
Select the menu item and
OK
confirm.
You will hear the current melody
and its number will be displayed.
Set the required melody and
confirm.
Page 42

Gigaset 4000 Classic, IM1 eng, A31008-G4000-B001-2-6Z19
4000Cla.fm
17.11.0 0
Activating/deactivating battery low beep
If this function is activated (factory setting) a beep will
sound to tell you that the battery is almost flat.
MENU
6/
or
6/L
Open the menu.
Activate the function.
Deactivate the function.
Auto talk feature on/off
If this function is activated you can remove the handset from the charging unit without pressing the handset key
MENU
6
6L
or
to accept a call (factory setting).
D
Open the menu.
Activate the function.
Deactivate the function.
Resetting to the factory defaults
The directory, the network access list and the caller
list are not deleted when you reset the handset. Registration at the base station is not affected.
MENU
Open the menu.
6
RESET?
Function Factory setting
Handset volume 1
Ringer volume (“ring tone”,) 5
Ringer melody 1
Auto talk On
Battery low beep On
Display language english
First press 9 and then 3 to activate the procedure.
Confirm.
OK
19
Page 43

Gigaset 4000 Classic, IM1 eng, A31008-G4000-B001-2-6Z19
4000Cla.fm
17.11.0 0
Appendix
Looking after your phone
Wipe the base station and handset with a
or an antistatic wipe.
use a dry cloth as this can
Never
cause static discharge.
Recommended batteries:
Nickel cadmium (NiCd) Nickel metal hydride (NiMH)
Sanyo N-3U (700 mAh) Saft VHAAH 1300 (1300 mAh)
Mobile Power 700
(700 mAh)
Panasonic P-60AA DT (600
mAh)
Emmerich 700 (700 mAh) GP GP130 AA HC (1300 mAh)
Always replace both batteries at the same time and
only use batteries of the same type/manufacturer.
YDT 1200 (1200 mAh)
Panasonic HHR-110 AA
(1100 mAh)
Sanyo HR-3U (1600 mAh)
Emmerich 1300 (1300 mAh)
damp cloth
Operating times/charging time of the handset:
Capacity
(mAh)
700 up to 200 (8 days) more than 10 about 5.5
1200 up to 320 (13 days) more than 17 about 9
1600 up to 400 (18 days) more than 23 about 12
The charge capacity of the battery reduces after a
number of years. This is quite normal.
Standby time in
hours
(days)
Ta l k ti me
(hours)
Charging
time
(hours)
Range
The handset will operate away from the base station
up to about 300 m outdoors and up to 50 m indoors.
20
Page 44

Gigaset 4000 Classic, IM1 eng, A31008-G4000-B001-2-6Z19
4000Cla.fm
17.11.0 0
Guarantee
If the telephone fails during the guarantee period because of poor workmanship or faulty materials Siemens AG will repair or replace it.
The guarantee period for Europe is at least 24 months
(12 months up to 31.12.2001).
The guarantee does not cover damage caused by improper use, wear and tear or unauthorised repairs. The
guarantee does not cover consumables or defects
that have only a negligible effect on the value or operation of the telephone.
Service:
Siemens Service should be contacted if problems
arise with the unit. Your specialist dealer will be happy
to answer any questions on unit operation. Contact
your network provider for questions concerning telephone connections.
The CE symbol indicates that the telephone complies
with the essential requirements of the R&TTE directive.
Service telephone number
see back cover.
The 4000 Classic handset is approved for use in
Switzerland and throughout the EU.
21
Page 45

Gigaset 4000 Classic, IM1 eng, A31008-G4000-B001-2-
Index
A
Alarm clock
Answering a call
Appendix
Auto talk
Automatic redial
17
11
20
19
12
B
Batteries
charging
charging time
inserting
operating times
recommended batter-
ies
Battery low beep
Belt clip
6
20
6
20
20
19
7
C
Call-by-Call
Changing the display language
Character map
Charging status icon
Charging time of the batteries
Connecting
(external call)
Cursor
14
8
15
6
20
11
15
D
Delivery package
Directory
13
6
deleting an entry
dialling with the Dir.
Display language
E
Enquiry call
Entry (directory)
F
Factory setting
Forwarding (external call)
11
G
Guarantee
H
Handset
activating/deactivating
7
charging time
master reset
operating times
registering
Handset volume
K
Keypad protection
L
Looking
M
Making calls
4000clasix.fm
11
21
20
10
23.05.01
16
13
8
16
19
20
19
20
9
18
7
22
Page 46

Gigaset 4000 Classic, IM1 eng, A31008-G4000-B001-2-
Index
N
Network access list
deleting an entry
dialling with
14
P
Pause (when dialling)
R
Range
20
Recall key
Registering (handset)
Ring tone
10
18
16
Ringer volume
13
S
Service
Settings
Speed dialling
Storing an entry
10
T
Telephone number
Transferring
(external call.)
9
4000clasix.fm
21
17
23.05.01
18
14
13
12
11
23
Page 47

s
Be inspired
Mode d’emploi
et consignes de sécurité
!
FRANÇAIS
Page 48

Gigaset 4000 Classic, IM1 frz,A31008-G4000-B001-2-
Présentation
L’écran est protégé par un film.
Retirez le film !
4000ClaU.fm
30.05.01
LED état (DEL)
Fixe
:
en communication ;
Clignotante
– appels entrants
Sonnerie
– Nouveaux
messages
– Réveil
Touche Annuaire
Sélectionner
annuaire
To u c h e " Décrocher"
– Accepter
la communication
– Composer
le numéro
To u c h e 1
– Appui prolongé pour
sélectionner
répondeur/messa-
gerie ext.
To u c h e étoile
Appui prolongé pour
activer / désactiver
la sonnerie
To u c h e " R"
– Pause interchiffre :
appui prolongé
– Fonction "R"
(Flashing)
:
1
4
PQRS
7
R
Microphone
2
5
8
0
Niveau de charge
vide 1/3
pleine 2/3
Clignotante : alarme
Touches écran
En relation avec les
symboles affichés
les touches écran
donnent accès aux
fonctions correspondantes.
H
Touche "Raccro-
,17
0
0(1
ABC
JKL
9
TUV
cher" et "Marche/
(18
8
Arrêt"
– Fin de la commu-
– Annuler la fonc-
– Retour au menu
DEF
– Retour au mode
3
MNOGHI
6
– Marche/Arrêt
WXYZ
Touche dièse
Verrouillage clavier:
(appui prolongé
pour activer/desactiver)
Touche Annuaire spécial
spécial (ex.: liste opérateurs)
nication
tion en cours
précédent (appui
bref)
veille (appui prolongé)
(appui prolongé
depuis l’état de
veille)
Ecran et touches écran
INT
MENU
OK
2
Répétition de la .numérotation (Bis)
Boîte aux lettres
Touche Interne
Touche Menu Signal réveil
Valider
I
Vers la gauche,
vers la droite
Vers le haut, vers
le bas
Touche Effacer
Etat de charge
Page 49

Gigaset 4000 Classic, IM1 frz,A31008-G4000-B001-2-
Menus importants
4000ClaU.fm
30.05.01
MENU
SVC RESEAU
REVEIL
AUDIO > SONS
COUTS
REGL BASE
REPONDEUR
INSCR COMBI
COMBINE
SONNERIE
MELODIE
MENU
OK
Touche
ANNA
BARBARA
Claus
OK
Sélectionner le menu principal
Rechercher dans les menus, l’annuaire
Valider la fonction/l’entrée
Annuler/quitter la fonction
UTILISER
NOUV
ENTREE
AFFICHER
EFFACER
MENU
Attention!: Selon les pays et la station de base utilisée pour
la déclaration du combiné, la liste des menus proposée
peut être différente.
3
Page 50

Gigaset 4000 Classic, IM1 frz,A31008-G4000-B001-2-
!
Consignes de sécurité
4000ClaU.fm
30.05.01
+
,
Utiliser exclusivement le bloc-secteur fourni
comme indiqué sous la base par le symbole.
Utiliser uniquement des batteries homologuées
et de même modèle (rechargeables)! Ne jamais
utiliser des piles normales (non rechargeables)
qui peuvent endommager l'appareil, représenter
un risque pour la santé et provoquer des blessures.
Placer les batteries en respectant la polarité (cette étiquette se trouve dans le logement de la batterie ).
Utiliser les types de batterie indiqués dans le
Mode d’emploi (cette étiquette se trouve dans le
logement de la batterie).
Le combiné peut perturber le fonctionnement de
certains équipements médicaux. Tenir compte
des recommandations émises à ce sujet.
Le combiné peut provoquer un bourdonnement
désagréable dans les aides auditives. De façon
générale ne pas placer d'appareil électronique à
proximité immédiate du téléphone.
Ne pas utiliser le téléphone dans un environne-
ment présentant un risque d’explosion (p. ex.
ateliers industriels de peinture).
Le combiné n’est pas protégé contre les projections d’eau.
)
Toutes les fonctions décrites dans ce mode d’emploi ne
sont pas nécessairement disponibles dans tous les pays ni
avec toutes les stations de base utilisées (Compatibilité
GAP).
4
Lorsque vous confiez votre Gigaset à un tiers,
toujours joindre le mode d’emploi.
Bien respecter les règles concernant la protection de l’environnement lorsque vous mettez au
rebut la batterie et le téléphone.
Page 51

Gigaset 4000 Classic, IM1 frz, A31008-G4000-B001-2-6Z19
4000ClaIVZ.fm
Sommaire
Présentation . . . . . . . . . . . . . . . . . . . . . . . . . . . . . . 2
Ecran et touches écran . . . . . . . . . . . . . . . . . . . . 2
Menus importants . . . . . . . . . . . . . . . . . . . . . . . . . 3
Consignes de sécurité . . . . . . . . . . . . . . . . . . . . . . 4
Préparer le combiné . . . . . . . . . . . . . . . . . . . . . . . . 6
Contenu de l’emballage . . . . . . . . . . . . . . . . . . . . 6
Insérer les batteries . . . . . . . . . . . . . . . . . . . . . . . 6
Charger les batteries. . . . . . . . . . . . . . . . . . . . . . . 6
Fixer le clip ceinture . . . . . . . . . . . . . . . . . . . . . . . 7
Activer/désactiver le combiné. . . . . . . . . . . . . . . . 7
Activer/désactiver le verrouillage du clavier . . . . . 7
Paramétrer la langue d’affichage . . . . . . . . . . . . . 8
Déclarer le combiné . . . . . . . . . . . . . . . . . . . . . . . . 9
Téléphoner . . . . . . . . . . . . . . . . . . . . . . . . . . . . . . 11
Appel externe . . . . . . . . . . . . . . . . . . . . . . . . . . . 11
Appeler en interne . . . . . . . . . . . . . . . . . . . . . . . 11
Accepter un appel entrant . . . . . . . . . . . . . . . . . 12
Etablir un double appel / Transfert interne . . . . . 12
Répétition de la numérotation (Bis) . . . . . . . . . . 13
Annuaire et Annuaire spécial . . . . . . . . . . . . . . . 14
Réglages . . . . . . . . . . . . . . . . . . . . . . . . . . . . . . . . 18
Régler le réveil . . . . . . . . . . . . . . . . . . . . . . . . . . 18
Volume du combiné . . . . . . . . . . . . . . . . . . . . . . 19
Régler le volume de la sonnerie . . . . . . . . . . . . . 19
Régler la mélodie de la sonnerie. . . . . . . . . . . . . 19
Activer/désactiver l’alarme batterie. . . . . . . . . . . 20
Activer/désactiver le décroché automatique. . . . 20
Rétablir la configuration usine. . . . . . . . . . . . . . . 20
Annexe. . . . . . . . . . . . . . . . . . . . . . . . . . . . . . . . . . 21
Entretien . . . . . . . . . . . . . . . . . . . . . . . . . . . . . . . 21
Garantie. . . . . . . . . . . . . . . . . . . . . . . . . . . . . . . . 22
Service clients: . . . . . . . . . . . . . . . . . . . . . . . . . . 22
30.05.01
5
Page 52

Gigaset 4000 Classic, IM1 frz, A31008-G4000-B001-2-6Z19
4000Cla.fm
30.05.01
Préparer le combiné
Contenu de l’emballage
Combiné Gigaset 4000 Classic, deux batteries, chargeur, clip ceinture, mode d’emploi.
Insérer les batteries
–
+
–
+
–
+
Insérer les batteries
●
voir figure à gauche.
Positionner le couvercle en le décalant vers le
●
jusqu’à ce qu’il s’enclipse.
●
Pour ouvrir,
glisser
vers le bas
Avant de mettre en marche votre com-
;
biné, placez-le dans la base
4010/4015 Classic, écran tourné vers
l’avant
le numéro interne du combiné s’affiche
à l’écran (p. ex. "2").
en respectant la polarité
appuyer sur la partie striée et faire
.
. Au bout de 1 minute environ,
–
haut
Gigaset
Charger les batteries
Pour charger la batterie, laisser le combiné
sur la base durant environ cinq heures ; à la
5 H
livraison, la batterie n’est pas chargée. Le
chargement de la batterie est signalé sur le
combiné par le clignotement du témoin de
charge :
Batterie vide (témoin clignote)
Batterie 1/3 chargée
Une liste des batteries préconisées figure en annexe,
page21.
Batterie 2/3 chargée
Batterie entièrement
chargée
6
Page 53

Gigaset 4000 Classic, IM1 frz ,A31008-G4000-B001-2-6Z19
Une fois la première charge effectuée, vous pou-
●
vez reposer votre combiné sur la base/le chargeur
après chaque communication. La charge est gé-
rée électroniquement. Cela garantit une charge
optimale et préserve la durée de vie des batteries.
Les batteries s’échauffent durant la charge ; il s’agit
●
d’un phénomène normal et sans danger.
Afin que le niveau de charge de la batterie s’affiche
●
correctement, vous devez éviter d’ouvrir inutilement le logement de la batterie.
4000Cla.fm
30.05.01
Fixer le clip ceinture
Placer le clip ceinture à l’arrière du combiné et appuyer
jusqu’à ce que les "ergots" disposés latéralement s’enclipsent dans les trous.
Activer/désactiver le combiné
Une fois les batteries insérées, le combiné se met
automatiquement en marche lorsque vous le placez
sur la base/le chargeur.
Pour activer/désactiver, appuyer
de manière prolongée
touche "Raccrocher". Vous entendez une tonalité de confirmation
(séquence de tonalités ascendante).
sur la
Activer/désactiver le verrouillage du
clavier
Vous pouvez "verrouiller" le clavier du combiné afin
d’éviter les manipulations involontaires. En cas
d’appel entrant, le verrouillage du clavier est automatiquement désactivé puis réactivé après la fin de la
communication.
4
Accepter un appel :
Appuyer sur la touche "Décrocher"
Pour activer/désactiver, appuyer
de manière prolongée
touche. Vous entendez une tonalité de confirmation (séquence de
tonalités ascendante).
sur la
.
7
Page 54

Gigaset 4000 Classic, IM1 frz, A31008-G4000-B001-2-6Z19
4000Cla.fm
Paramétrer la langue d’affichage
30.05.01
MENU
6-
L
LL
L/
L0
L1
L2
L3
L6
L
/
Ouvrir le menu.
Appuyer sur 9, puis sur 2 et
ensuite :
Allemand
Anglais
Français
Italien
Espagnol
Por tugais
Néerlandais
Danois
Norvégien
Suédois
Finnois
Tchèque
Polonais
Tu rc
8
Page 55

Gigaset 4000 Classic, IM1 frz ,A31008-G4000-B001-2-6Z19
5«JODJHV
5«JOV\VWªPH
'«FODUHUDSSDUHLO
4000Cla.fm
30.05.01
Déclarer le combiné
Pour pouvoir téléphoner avec un combiné, il faut préa-
lablement "l’inscrire" sur la base (déclaration).
Base Gigaset 4010/4015
Combiné neuf (sortie usine) à déclarer pour la première fois:
La procédure est automatique et s'effectue simplement en posant le nouveau combiné sur la base, après
environ 1 minute le premier N° interne disponible est
alors affecté au nouveau combiné et affiché à l'écran.
Combiné déjà déclaré au préalable sur une autre
base:
La procédure est manuelle (étapes 1 à 4 ci-dessous)
Autres bases
La procédure est dans tous les cas manuelle (étapes
1 à 4 ci-dessous)
Procédure manuelle:
Etape 1 :
sur la
Gigaset Préparation sur la base ou sur le
téléphone
4010/4015
3010/3015
Appuyer sur la touche située sous la base.
Maintenir appuyée la touche "paging"
située sur la base (environ 10 secondes)
jusqu’à ce que vous entendiez
sonore
3020/25
3030/35
Dans le menu du téléphone de base, sé-
lectionner
4030/35
3070/75
4070/75
Appuyer sur le voyant vert allumé (LED).
Celui-ci clignote alors durant toute la pha-
se de déclaration
Bases
d’autres
construc-
Pour d éclarer le combiné sur d’autres "ba-
ses GAP", conformez-vous au Mode d’em-
ploi correspondant (étapes2 et 3).
teurs
base
ou sur le
.
poste de base
le signal
,
puis valider avec 2..
#
et
9
Page 56

Gigaset 4000 Classic, IM1 frz, A31008-G4000-B001-2-6Z19
4000Cla.fm
30.05.01
Etape 2 :
effectuez les opérations suivantes
MENU
INSCR COMBI
Ouvrir le menu.
Sélectionner et valider.
OK
Entrer PIN
s’affiche.
sur le combiné
:
Etape 3 :
Effectuez les opérations suivantes sur le combiné
:
OK
Entrer le PIN système à 4 chiffres
et valider (0000 sortie usine).
Etape 4 :
Une fois le PIN système entré, le combiné recherche
la base, [INSCR COMBI] clignote à l'écran, une fois la
base trouvée s'affiche et le voyant (LED)
INSCR COMBI
clignote durant environ 1 minute, puis le combiné revient à l'état de veille. Le premier numéro interne disponible a été affecté automatiquement au
combiné
qui est dès lors prêt à fonctionner.
Remarque: il est possible d'entrer un numéro interne
souhaité sans attendre la fin de la procédure.
Attention!: Un combiné Gigaset 4000Classic ne peut
être déclaré que sur une seule base. Une nouvelle inscription sur une autre base se substitue à la première.
10
Page 57

Gigaset 4000 Classic, IM1 frz ,A31008-G4000-B001-2-6Z19
4000Cla.fm
30.05.01
Téléphoner
Appel externe
Les appels externes sont des appels vers le réseau té-
léphonique.
Entrer le numéro
Si nécessaire, corriger certains
caractères avec la touche
écran
Appuyer sur la touche
"Décrocher".
Pour mettre fin à la communication, appuyer sur la touche
"Raccrocher".
.
Vous pouvez aussi appuyer
●
che "Décrocher" puis composer le numéro –
chaque chiffre est numéroté directement.
Appuyez sur la touche "Raccrocher" pour annu-
●
ler
la numérotation
La touche permet d’insérer une pause inter-
●
chiffre (appui prolongé). Exemple : communication
avec l’étranger.
tout d’abord
.
sur la tou-
Appeler en interne
Les appels internes sont des appels en direction
d’autres combinés déclarés sur la même base. Les appels internes sont gratuits (p. ex. appel à l’intérieur
d’un logement, entre l’atelier de bricolage et le séjour).
INT
p. ex.
ou
INT
ou
INT
ou
APP GENERAL
-
<
Entrer le numéro interne du
combiné.
Sélectionner l’abonné souhaité
et appuyer sur la touche
"Décrocher".
Appuyer sur la touche.
Tous les combinés sonnent.
Pour mettre fin à la communication, appuyer sur la touche
"Raccrocher".
11
Page 58

Gigaset 4000 Classic, IM1 frz, A31008-G4000-B001-2-6Z19
4000Cla.fm
30.05.01
Accepter un appel entrant
Vot re téléphone sonne et la LED d’état clignote.
ou
F
Appuyer sur la touche
"Décrocher".
Soulever simplement le combiné
de la base/du chargeur
(configuration usine :
"Décroché automatique").
Etablir un double appel / Transfert interne
En cours de communication externe vous pouvez éta-
blir un double appel vers un autre usager interne et si
nécessaire transférer la communication.
INT
-
p. ex.
Lorsque l’usager interne répond :
●
Tr a n s f érer la communication :
Si nécessaire, annoncer la communication et
appuyer sur la touche "Raccrocher"
ou
●
Fin du double appel :
Reprendre le correspondant placé en attente.
MENU
RETOUR
Appuyer sur la touche écran – le
correspondant externe entend la
musique d’attente.
Entrer le numéro interne du combiné. Vous êtes maintenant relié
au second combiné.
Ouvrir le menu.
Valider
OK
ou appuyer sur la touche
Vous êtes de nouveau relié à
l’abonné externe en attente.
12
Page 59

Gigaset 4000 Classic, IM1 frz ,A31008-G4000-B001-2-6Z19
4000Cla.fm
30.05.01
Répétition de la numérotation
(Bis)
Votre combiné enregistre automatiquement les cinq
derniers numéros composés ou les noms correspondants de l'annuaire.
$
Effacer la liste des numéros Bis
$
MENU
1
EFFACER?
Enregistrer un numéro dans l’annuaire
$
MENU
OK
VERS REPERT
Afficher le numéro/nom.
Sélectionner le numéro/nom
souhaité.
Appuyer sur la touche "Décro-
cher" – le numéro est composé.
Ouvrir la liste des numéros Bis.
Ouvrir le menu.
Appuyer sur 6 et confirmer.
OK
Afficher les numéros.
Sélectionner un numéro et ouvrir
le menu.
La zone de saisie de l’annuaire
OK
s’ouvre.
Le numéro est déjà inscrit.
Si nécessaire, modifier le
numéro, entrer le nom (Saisie
des lettres et des chiffres, voir
Tableau des caractères).
Valider l’entrée.
13
Page 60

Gigaset 4000 Classic, IM1 frz, A31008-G4000-B001-2-6Z19
4000Cla.fm
Annuaire et Annuaire spécial
30.05.01
L’
annuaire
20 numéros enregistrés avec le nom du correspondant associé.
Dans l’
Annuaire spécial
jusqu'à 10 numéros spéciaux récurrents (indicatifs,
préfixes, services opérateurs) que vous pouvez sélec-
tionner et chaîner à chaque appel.
vous permet de composer rapidement
vous pouvez enregistrer
Enregistrer un numéro
/
MENU
NOUV ENTREE
OK
OK
Ouvrir l’Annuaire/l’Annuaire spé-
cial.
Ouvrir le menu.
Sélectionner et valider.
OK
Entrer et valider le
Entrer un
Saisie des lettres et
des chiffres, voir Tableau des
caractères.
Valider l’entrée.
nom
numéro
.
.
Numéroter à partir de l’annuaire
p. ex.
D
Ouvrir l’annuaire.
Entrer les premières lettres du
nom (p. ex. pour le nom Emma la première lettre "E") : appuyer
deux fois sur la touche
sélectionner à l’aide de la touche
. Les noms sont classés
alphabétiquement.
Appuyer sur la touche "Décro-
cher". Le numéro est composé.
et
Une fois le numéro sélectionné, vous pouvez aussi
ouvrir le menu, sélectionner , compléter/
modifier le numéro si nécessaire, puis numéroter à
l’aide de la touche "Décrocher"
14
UTILISER
.
Page 61

Gigaset 4000 Classic, IM1 frz ,A31008-G4000-B001-2-6Z19
4000Cla.fm
30.05.01
Numéroter à partir de l’Annuaire spécial
(Appel par appel)
Cette fonction permet d'insérer appel par appel un numéro spécial, par exemple un préfixe ou un indicatif,
avant le numéro à appeler ("chaînage").
OK
Sélectionner l’Annuaire spécial.
Sélectionner et valider le numéro
spécial (Call-by-Call).
P
Enchaîner en entrant le numéro
de votre correspondant.
ou
J
OK
Sélectionner le numéro dans l'annuaire pour créer un "chaînage" et
valider.
D
Appuyer sur la touche.
Numérotation rapide à partir de
l’Annuaire spécial
Dans l’Annuaire spécial, vous pouvez enregistrer huit
des dix numéros possibles pour la numérotation rapide à partir de raccourcis (Touches 2 à 9). Pour cela,
vous devez entrer, devant le nom associé au numéro
spécial (ex: nom de l'opérateur correspondant à un
préfixe), le chiffre de la touche de raccourci choisi
(2-9).
Enregistrez une nouvelle entrée et inscrivez le chiffre
de la touche de raccourci comme premier caractère
du nom associé.
MENU
Ouvrir l’Annuaire spécial.
Sélectionner une entrée et ouvrir
le menu.
Sélectionner et valider.
OK
AFFICHER
OK
Confirmer le numéro. Le nom
enregistré est affiché.
Placer le curseur sur la première
position du champ de nom.
p. ex. 4 x
-
OK
Entrer le numéro de la touche de
raccourci pour la numérotation
rapide (ex: touche 2) et valider.
15
Page 62

Gigaset 4000 Classic, IM1 frz, A31008-G4000-B001-2-6Z19
4000Cla.fm
30.05.01
Composer à l'aide des touches de
raccourci
p. ex.
-
Appuyer
sur la touche :
Le numéro spécial (ex: préfixe
opérateur) enrgistré s'affiche.
p. ex.
Enchaîner en entrant le numéro
d'un correspondant.
ou
OK
Sélectionner une entrée de
l’annuaire et valider.
Appuyer sur la touche.
Tableau des caractères
Appuyer sur la touche correspondante plusieurs fois
ou de manière prolongée:
1 x 2 x 3 x 4 x 5 x 6 x
T
/
0
1
2
3
6
L
5
4
:
Gérer le curseur avec
avec
pointeur (curseur).
1
a B c 2
DEF 3
G h I 4
Jkl 5
M N o 6
PQRs7
T U V 8
Wx Y z 9
+ 0 – | ? _
/(),
*
. Le caractère est toujours inséré à gauche du
de manière prolongée
. Effacer un caractère
Ordre de classement
1. Espacement (
Chiffres (0–9)
2.
)
T
Lettres (alphabétique)
3.
Autres symboles
4.
Placez un espace Tavant une entrée pour la classer
en tête de la liste (p. ex: "
16
Carla").
T
Page 63

Gigaset 4000 Classic, IM1 frz ,A31008-G4000-B001-2-6Z19
4000Cla.fm
Afficher et modifier l’entrée de l’annuaire
p. ex.
MENU
P
OK
P
OK
AFFICHER
Ouvrir l’annuaire.
Entrer les premières lettres du
nom recherché puis affiner avec
le curseur.
Ouvrir le menu.
Sélectionner et valider.
OK
L’entrée s’affiche.
Si nécessaire, modifier le
numéro. Saisie des lettres et des
chiffres, voir Tableau des caractè-
res.
Valider les entrées.
Modifier le nom.
Valider les entrées.
Effacer une entrée de l’annuaire
p. ex.
MENU
EFFACER
Ouvrir l’annuaire.
Entrer les premières lettres
du nom recherché puis affiner
aver le curseur.
Ouvrir le menu.
Sélectionner et valider.
OK
30.05.01
Effacer une entrée de l’annuaire spécial
MENU
EFFACER
Ouvrir l’Annuaire spécial.
Sélectionner un numéro et ouvrir
le menu.
Sélectionner et valider.
OK
Effacer toutes les entrées
MENU
1
/
EFFACER?
Ouvrir l’Annuaire/Annuaire spécial.
Ouvrir le menu.
Appuyer sur 6 puis confirmer.
OK
17
Page 64

Gigaset 4000 Classic, IM1 frz, A31008-G4000-B001-2-6Z19
4000Cla.fm
Réglages
Régler le réveil
Vous pouvez utiliser votre combiné comme réveil.
Activer le réveil
Si une heure de réveil est programmée sur votre
combiné (symbole Etoile), celui-ci sonne tous les
jours à la même heure.
Le téléphone est à l’état de veille.
MENU
REVEIL
L10
OK
Lorsque le combiné est en veille, une étoile est
placéedevant l’heure. L’étoile indique que le réveil
est paramétré.
Ouvrir le menu.
Sélectionner et valider.
OK
Entrer Heures/Minutes.
Exemple ici : 6 h 15.
Si nécessaire, sélectionner un
autre chiffre, p. ex. pour corriger.
Enregistrer et fin.
30.05.01
Désactiver le réveil
Le réveil est paramétré, mais
MENU
REVEIL
Ouvrir le menu.
Sélectionner et valider.
OK
L’heure de réveil est désactivée,
l’étoile à côté de l’heure n’est
plus visible.
il ne doit pas
sonner.
Arrêter la sonnerie du réveil
La sonnerie du réveil est la même que la sonnerie
d’un appel entrant. Le combiné sonne et la LED d’état
clignote (env. 30 s).
Appuyer sur une touche quelconque pour arrêter la
sonnerie du réveil.
Attention!: cette fonction n'est disponible que lorsque
le combiné Gigaset 4000Classic est déclaré sur une
bas e Gigase t 4010/4015.
18
Page 65

Gigaset 4000 Classic, IM1 frz ,A31008-G4000-B001-2-6Z19
4000Cla.fm
30.05.01
Volume du combiné
Vous pouvez régler le volume de l’écouteur sur trois niveaux –
MENU
y compris en cours de communication
AUDIO > SONSOK
COMBINE
OK
Ouvrir le menu.
Sélectionner et valider.
Valider.
OK
Une tonalité est émise pour con-
.
trôle et le niveau réglé s'affiche.
Sélectionner le niveau souhaité
et valider.
Régler le volume de la sonnerie
Vous avez le choix entre sept possibilités :
cinq volumes de sonnerie (1–5),
●
sonnerie "CRESCENDO" (augmentation progressive
●
du volume ; 6),
sans sonnerie (sonnerie désactivée ; 0).
●
MENU
AUDIO > SONS
SONNERIE
OK
Ouvrir le menu.
Sélectionner et valider.
OK
Sélectionner et valider.
OK
La sonnerie se fait entendre et le
niveau réglé s’affiche. Sélection-
ner le niveau souhaité et valider.
Régler la mélodie de la sonnerie
Vous avez le choix entre dix mélodies (1-10).
MENU
AUDIO > SONSOK
MELODIE
OK
Ouvrir le menu.
Sélectionner et valider.
Sélectionner et valider.
OK
La mélodie actuelle se fait entendre et le numéro correspondant
s'affiche (marqué [V]). Sélection-
ner la mélodie souhaitée et valider.
19
Page 66

Gigaset 4000 Classic, IM1 frz, A31008-G4000-B001-2-6Z19
4000Cla.fm
30.05.01
Activer/désactiver l’alarme batterie
Lorsque la fonction est activée (configuration usine),
un signal sonore vous indique que la batterie est
presque vide.
MENU
6/
ou
6/L
Ouvrir le menu.
Valider la fonction.
Désactiver la fonction.
Activer/désactiver le décroché
automatique
Lorsque cette fonction est activée, il suffit de soulever
le combiné de la base pour prendre l’appel, sans avoir
à appuyer sur la touche du combiné
usine).
MENU
6
6L
ou
Ouvrir le menu.
Activer la fonction.
Désactiver la fonction.
(configuration
D
Rétablir la configuration usine
L’annuaire, l’annuaire spécial et la liste des appelants
ne sont pas effacés lors de la réinitialisation. Les décla-
rations effectuées sur la base sont conservées.
MENU
6
CONFG USINE?
Fonction Configur. usine
Volume du combiné 1
Volume de la sonnerie ("sonnerie") 5
Mélodie de la sonnerie 1
Décroché automatique activé
Alarme batterie activée
Langue d’affichage anglais
Liste des numéros Bis effacée
20
Ouvrir le menu.
Activer la procédure en appuyant
sur 9 puis sur 3.
Confirmer pour valider.
OK
Page 67

Gigaset 4000 Classic, IM1 frz ,A31008-G4000-B001-2-6Z19
4000Cla.fm
30.05.01
Annexe
Entretien
Essuyer la base et le combiné avec un
ou un chiffon antistatique. Ne
de
chiffon sec ! Risque de charge statique !
Batteries recommandées :
Nickel-Cadmium (NiCd) Nickel Metal Hydrure (NiMH)
Sanyo N-3U (700 mAh) Saft VHAAH 1300 (1300 mAh)
Mobile Power 700
(700 mAh)
Panasonic P-60AA DT
(600 mAh)
Emmerich 700 (700 mAh) GP GP130 AA HC (1300 mAh)
Toujours remplacer les deux batterie à la fois et n’utili-
ser que des batteries de même type/constructeur.
YDT 1200 (1200 mAh)
Panasonic HHR-110 AA
(1100 mAh)
Sanyo N-3U (1600 mAh)
Emmerich 1300 (1300 mAh)
chiffon humi-
jamais
utiliser de
Durée d’utilisation/temps de charge du
combiné :
Capacité
(mAh)
700 200 maxi. (8 jours) plus de 10 5,5 environ
1200 320 maxi. (13 jours) plus de 17 9 environ
1600 400 maxi. (18 jours) plus de 23 12 environ
Pour des raisons techniques, la capacité de charge des
batteries se réduit au bout de quelques années.
Autonomie en
heures (jours)
Autonomie
en commu-
nication
(heures)
Te m p s d e
charge
(heures)
Por tée
La portée varie selon l'environnement, d'environ 50
mètres en intérieur jusqu'à 300 mètres en champ libre.
21
Page 68

Gigaset 4000 Classic, IM1 frz, A31008-G4000-B001-2-6Z19
4000Cla.fm
30.05.01
Garantie
Durant la période de garantie, à compter de la date
d’achat au revendeur, Siemens AG élimine tous les dé-
fauts inhérents aux matériaux ou à la fabrication en effectuant une réparation ou un échange standard, selon
les cas.
La durée de garantie est la durée légale en vigueur au
moment de l'achat dans le pays d'acquisition.
Durant cette période, le bénéfice de la garantie est accordée, sauf exclusions ci-après, uniquement sur pré-
sentation d'un justificatif d'achat explicite,daté et à entête du point de vente.
Sont exclus de la garantie les pièces d'usure, les matières consommables et les dommages résultant:
- d'une usure normale
- d'une utilisation non conforme
- de l'intervention technique d'un tiers non autorisé
- de bris, casses, oxydations
- des effets de la foudre, d'une surtension, de
l'humidité
- d'un dégât des eaux....
.....et plus généralement tout dommage résultant de
sinistre naturel ou accidentel
Service clients:
France :
Belgique :
Suisse :
Le service clients Siemens traite principalement les
cas de dysfonctionnement. Pour toutes les questions
concernant l'utilisation adressez-vous en priorité au
revendeur après avoir consulté la notice d'utilisation.
Pour les problèmes de raccordement téléphonique ou
d'accès à certains services consulter votre opérateur
de réseau.
La conformité de l’appareil avec les exigences fondamen-
tales de la directive européenne R&TTE (99/05/CEE) relative aux terminaux, est confirmée par le label CE.
Le combiné 4000 Classic est homologué dans toute
l’Union européenne et en Suisse.
22
Service clients 01 56 38 42 00
Service clients
Service clients 012/12 00 - 90
Page 69

Gigaset 4000 Classic, IM1 frz, A31008-G4000-B001-2-6Z19
Index
A
Accepter un appel
Alarme batterie
Annexe
Annuaire
Annuaire spécial
Appeler
21
14
effacer une entrée
numéroter à partir de
effacer l’entrée
11
12
20
14
17
B
Batterie
autonomie
batteries recommandées
charger
insérer
temps de charge
21
21
6
6
21
C
Clip ceinture
Combiné
activer/désactiver
configuration usine
déclarer
durée d’utilisation
temps de charge
Communication
établir
Configuration usine
Contenu de l’emballage
Curseur
7
9
21
12
16
D
Déclarer (combiné)
Décroché automatique
Double appel
9
12
E
Enregistrer un numéro
Entrée de l’annuaire
Entretien
Etablir (communication
établir)
G
Garantie
17
L
14
Langue d’affichage
N
Numéro
Numérotation rapide
P
Paramétrer la langue
Pause interchiffre
Portée
Protection du clavier
R
Réglages
Régler le volume de la
sonnerie
Répétition de la numéro-
7
tation (Bis)
20
Réveil
18
S
21
Service client
Sonnerie
T
20
Tableau des caractères
6
Téléphoner
Témoin de charge
Temps de charge de la
batterie
Touche Flashing
20
Transférer (communication)
12
V
14
Volume du combiné
17
4000ClaSIX.fm
21
12
22
13
21
18
19
13
19
11
21
30.05.01
8
15
8
11
7
22
16
6
11
19
23
Page 70

s
Be inspired
Istruzioni d’uso
ed istruzioni di sicurezza
!
ITALIANO
Page 71

Gigaset 4000 Classic, IM1-it, A31008-G4000-B001-2-6Z19
4000ClaU.fm
Breve descrizione
Il display è protetto da una pellicola.
To g l i e r l a !
LED di stato
acceso in conversaz;
lampeggia in caso di:
– chiamate in entrata
– nuovi messaggi
– sveglia
Tasto della rubrica
aprire la rubrica
Impegno linea
– rispondere
– selezionare
numeri
Ta s t o 1 *
– premere a lungo
per chiamare la se-
greteria telefonica
Suoneria
premere a lungo per
accendere/spegnere
la suoneria
Ta s t o R
– pausa di selezione:
premere a lungo
– Tasto R (Flash)
Microfono
,1700(1
1
ABC
2
4
JKL
5
PQRS
7
TUV
8
0
R
* La segreteria telefonica può essere quella del gestore della
rete o integrata ( se previsto nel vostro terminale)
Livello di carica
scarica 1/3
carica 2/3
lampeggia: avviso
Funzioni e tasti
del display
i tasti del display
consentono di accedere alle funzioni visualizzate so-
H
pra di essi.
(18
8
Ta s t o fi n e c h ia mata e On/Off
– terminare le
chiamate
– annullare le fun-
zioni
– tornare al menu
DEF
3
MNOGHI
6
WXYZ
9
precedente
(premere brevemente)
–tornare in stand
by (premere a
lungo)
– accendere/spe-
gnere da stand
by (premere a
lungo)
Bloccare/sbloccare la tastier
(premere a lungo)
Tasto rubrica speciale
aprire la lista degli operatori di rete
30.05.01
a
Simboli del display
Ripetizione dei numeri
selezionati
INT
MENU
OK
2
Tasto messaggi
Tasto Interno
Tasto del menu Simbolo della
Confermare
I
Scorrere a sinistra e a destra
Scorrere in alto
e in basso
Tasto di cancellazione
sveglia
Livello di carica
Page 72

Gigaset 4000 Classic, IM1-it, A31008-G4000-B001-2-6Z19
Menu importanti
4000ClaU.fm
30.05.01
MENU
SERV DI RETE
SVEGLIA*
AUDIO
ADDEBITI**
IMPOST BASE
SEGR TELEF
REG PORTATIL
AURICOL
SUONERIA
MELODIA
MENU
OK
Tasto
ANNA
BARBARA
CLAUS
OK
Aprire il menu principale
Scorrere i menu, la rubrica
Confermare la funzione/i dati in-
seriti
Annullare/uscire dalla funzione
UTILIZZA NR
NUOVA VOCE
NUMERO
CANCELLA
MENU
* Affinchè compaia nel menú è necessario che siano state
impostate data ed ora
**non previsto in Italia
3
Page 73

Gigaset 4000 Classic, IM1-it, A31008-G4000-B001-2-6Z19
4000ClaU.fm
30.05.01
Istruzioni di sicurezza
+
,
Utilizzare
zione
dell’apparecchio.
Utilizzare soltanto le
ricaricabili dello stesso tipo
non utilizzare in nessun caso batterie comuni (non ricaricabili), poiché possono causare
danni alla salute e alle persone.
Inserire le batterie verificando l’esatta polarità (questa targhetta si trova nello scomparto delle batterie).
Utilizzare solo i tipi di batteria riportati nelle
presenti istruzioni d’uso (questa targhetta
si trova nello scomparto delle batterie).
L’apparecchio può creare interferenze ad
apparecchiature medicali. Osservare quindi
le indicazioni presenti nell’ambiente in cui ci
si trova (per esempio ospedali ecc.).
Con apparecchi di ausilio all’udito, il portatile può causare dei fruscii molto fastidiosi.
Non utilizzare il telefono in ambienti dove
sussistono pericoli di esplosione (per
esempio luoghi di verniciatura).
Il portatile non è impermeabile.
soltanto l’alimentatore in dota-
, come indicato sul lato inferiore
batterie consigliate
!
. Ciò significa,
)
Le funzioni descritte nelle presenti istruzioni d’uso
non sono disponibili in tutti i Paesi.
4
Se cedete il Gigaset a terze persone, fornite
anche le istruzioni d’uso.
Smaltire le batterie e il telefono secondo
quanto prescritto dalle norme sulla tutela
dell’ambiente.
Page 74

Gigaset 4000 Classic, IM1-it, A31008-G4000-B001-2-6Z19
4000ClaIVZ.fm
Indice
Breve descrizione . . . . . . . . . . . . . . . . . . . . . . . . . . 2
Simboli del display . . . . . . . . . . . . . . . . . . . . . . . . 2
Menu importanti. . . . . . . . . . . . . . . . . . . . . . . . . . . 3
Istruzioni di sicurezza. . . . . . . . . . . . . . . . . . . . . . . 4
Preparare il portatile . . . . . . . . . . . . . . . . . . . . . . . 6
Contenuto della confezione . . . . . . . . . . . . . . . . . 6
Inserire le batterie . . . . . . . . . . . . . . . . . . . . . . . . . 6
Caricare le batterie . . . . . . . . . . . . . . . . . . . . . . . . 6
Applicare la clip da cintura . . . . . . . . . . . . . . . . . . 7
Accendere/spegnere il portatile . . . . . . . . . . . . . . 7
Bloccare/sbloccare la tastiera . . . . . . . . . . . . . . . . 7
Cambiare la lingua del display. . . . . . . . . . . . . . . . 8
Registrare il portatile . . . . . . . . . . . . . . . . . . . . . . . 9
Telefonare . . . . . . . . . . . . . . . . . . . . . . . . . . . . . . . 10
Telefonare sulla linea esterna . . . . . . . . . . . . . . . 10
Telefonare sulla linea interna . . . . . . . . . . . . . . . 10
Rispondere alle chiamate . . . . . . . . . . . . . . . . . . 11
Trasferire le chiamate esterne, consultazione. . . 11
Ripetizione della selezione . . . . . . . . . . . . . . . . . 12
Rubrica e rubrica speciale . . . . . . . . . . . . . . . . . . 13
Impostazioni . . . . . . . . . . . . . . . . . . . . . . . . . . . . . 17
Impostare la sveglia . . . . . . . . . . . . . . . . . . . . . . 17
Volume dell’auricolare . . . . . . . . . . . . . . . . . . . . 18
Volume della suoneria. . . . . . . . . . . . . . . . . . . . . 18
Melodia della suoneria . . . . . . . . . . . . . . . . . . . . 18
Attivare/disattivare il tono di avviso delle batterie
scariche. . . . . . . . . . . . . . . . . . . . . . . . . . . . . . . . 19
Attivare/disattivare la risposta automatica . . . . . 19
Ripristinare i parametri iniziali . . . . . . . . . . . . . . . 19
Appendice . . . . . . . . . . . . . . . . . . . . . . . . . . . . . . . 20
Cura . . . . . . . . . . . . . . . . . . . . . . . . . . . . . . . . . . 20
Portata. . . . . . . . . . . . . . . . . . . . . . . . . . . . . . . . . 20
Garanzia (per i paesi della CEE). . . . . . . . . . . . . . 21
Servizio clienti: . . . . . . . . . . . . . . . . . . . . . . . . . . 21
30.05.01
5
Page 75

Gigaset 4000 Classic, IM1-it, A31008-G4000-B001-2-6Z19
4000Cla.fm
30.05.01
Preparare il portatile
Contenuto della confezione
Portatile Gigaset 4000 Classic, due batterie, caricabatterie, clip da cintura, istruzioni d’uso.
Inserire le batterie
–
+
–
+
–
+
Inserire le batterie
●
figura a sinistra.
Appoggiare il coperchio e farlo scorrere
●
fino ad incastrarlo.
●
Per aprire
basso
premere sulla zigrinatura e spingere
.
;
strare il portatile” a pag 9.
con la polarità indicata
Prima di utilizzare il portatile, riporlo
con il display in alto e in vista
base
Gi gas et 4 010/4 015 Cl ass ic
circa un minuto, sul display viene visualizzato il numero interno (per esempio“2“).In caso di problemi procedere
con la registrazione „manuale“„Regi-
– vedi
verso l’alto
in
nella
. Dopo
Caricare le batterie
Per caricare le batterie, lasciare il portatile
per circa 5 ore nella base/caricabatterie. La
5 h
fase di carica viene indicata dal lampeggiamento del simbolo del livello di carica:
Scariche (lampeggia)
Cariche per 1/
La tabella dei tipi di batterie raccomandati è riportata
nell’appendice a pag. 20.
6
3
Cariche per 2/
Cariche
3
Page 76

Gigaset 4000 Classic, IM1-it, A31008-G4000-B001-2-6Z19
Una volta eseguita la prima carica, potete riporre il
●
portatile nella base/caricabatterie dopo ogni chiamata. La carica è controllata elettronicamente. Ciò
garantisce una gestione ottimale delle batterie.
Durante la carica, le batterie si riscaldano; ciò è nor-
●
male e non comporta pericoli.
Affinché venga indicato l’esatto livello di carica,
●
evitare di aprire inutilmente lo scomparto delle
batterie.
4000Cla.fm
30.05.01
Applicare la clip da cintura
Appoggiare la clip sul lato posteriore del portatile e incastrare i gancetti laterali negli appositi fori.
Accendere/spegnere il portatile
Il portatile si accende automaticamente dopo aver inserito le batterie e quando viene riposto nella base.
Per accendere/spegnere il portatile premere
fine chiamata. Viene emesso un
tono di conferma (sequenza crescente).
a lungo
il tasto di
Bloccare/sbloccare la tastiera
Per evitare azionamenti accidentali dei tasti è possibile
“bloccare“ la tastiera del portatile. Quando giunge una
chiamata la tastiera si sblocca automaticamente e una
volta terminata la conversazione si blocca di nuovo.
4
Per rispondere alle chiamate premere il tasto
Per bloccare/sbloccare la tastiera
premere
letto. Viene emesso un tono di
conferma (sequenza crescente).
a lungo
il tasto cancel-
.
7
Page 77

Gigaset 4000 Classic, IM1-it, A31008-G4000-B001-2-6Z19
4000Cla.fm
Cambiare la lingua del display
30.05.01
MENU
6-
L
LL
L/
L0
L1
L2
L3
L6
L
/
Aprire il menu.
Premere il 9, poi il 2 e infine:
tedesco
inglese
francese
italiano
spagnolo
portoghese
olandese
danese
norvegese
svedese
finlandese
ceco
polacco
turco
8
Page 78

Gigaset 4000 Classic, IM1-it, A31008-G4000-B001-2-6Z19
,PSRVWD]LRQL
,PSRVWD]6LVWHPD
5HJ3RUWDWLOH
4000Cla.fm
30.05.01
Registrare il portatile
Per poter telefonare con il portatile, esso va dapprima
“reso noto“ alla sua stazione base (registrato).
Se il vostro portatile era già registrato su
●
(seguire i passi
base
se il vostro portatile deve essere registrato su una
●
1, 2
e 3),
base Gigaset della serie precedente
passi 1 e 3).
Passo 1:
sulla
base
Gigaset Preparazione sulla base/telefono base
4010/4015
Premere a lungo l’apposito tasto sul lato
inferiore della base.
3010/3015
Premere il tasto paging# della base (circa 10 secondi) fino a che non vengono
emessi dei toni di segnalazione.
3020/25
3030/35
4030/35
3070/75
4070/75
Basi di
altri
produttori
Nel menu della base, scegliere
,
. Confermare con 2..
Premere l’indicatore LED – durante la registrazione lampeggia.
Per registrare il portatilie su “basi GAP“
consultare le rispettive istruzioni d’uso
(passo2 e 3).
un’altra
(seguire i
e
Passo 2:
MENU
REG PORTATIL
Passo 3:
OK
Dopo aver inserito il PIN di sistema, il portatile cerca
una base con questo PIN. Durante la ricerca, sul display lampeggia . Una volta effettuata la
registrazione, il portatile torna in stand by.
chio è pronto per l’uso!
eseguire
inserire
dal portatile
quanto segue
Aprire il menu.
Scegliere e confermare. Viene
OK
chiesto il
dal portatile
PIN
.
il
PIN di sistema a 4 cifre e confermare.
REG PORTATIL
L’apparec-
9
Page 79

Gigaset 4000 Classic, IM1-it, A31008-G4000-B001-2-6Z19
4000Cla.fm
30.05.01
Te le fo na re
Telefonare sulla linea esterna
Le chiamate esterne sono quelle che si svolgono sulla
rete pubblica.
Comporre il numero di telefono.
Se necessario correggere con il
tasto del display
Premere il tasto di impegno linea.
.
Potete anche premere
●
gno linea e comporre poi il numero di telefono
– le cifre vengono selezionate immediatamente.
Con il tasto di fine chiamata potete interrompe-
●
re la selezione.
Con il tasto potete inserire una pausa di sele-
●
zione (premere e lungo) per esempio per le chiamate internazionali (Sul display compare la lettera P, se
compare la lettera R concellarla con
R a lungo
Per terminare la conversazione,
premere il tasto di fine chiamata.
dapprima
.
il tasto di impe-
e premere
Telefonare sulla linea interna
Per chiamate interne si intendono quelle effettuate tra
portatili registrati. Esse non comportano addebiti (per
esempio all’interno della vostra abitazione).
Inserire il numero interno del por-
<
-
tatile da chiamare.
Scegliere il numero interno da
chiamare e premere il tasto di
impegno linea.
Premere.
Vengono chiamati tutti i portatili.
INT
per esempio
opp.
INT
INT
opp.
opp.
INT
CHIAM COLL
10
Per terminare la conversazione,
premere il tasto di fine chiamata.
Page 80

Gigaset 4000 Classic, IM1-it, A31008-G4000-B001-2-6Z19
4000Cla.fm
30.05.01
Rispondere alle chiamate
Il vostro telefono squilla e il LED di stato lampeggia.
oppure
F
Premere il tasto di impegno linea.
Sollevare il portatile dalla base/
caricabatterie (impostazione
all’acquisto: “Risposta automatica“).
Trasferire le chiamate esterne,
consultazione
Il telefono consente di trasferite le chiamate esterne
ad un altro portatile o di effettuare consultazioni interne.
INT
per esempio
Quando l’utente interno risponde
●
Tr a s f e r i re l a c h i a m at a
Annunciare eventualmente la chiamata e premere il
tasto di fine chiamata
tatili compare „linea occup“.
oppure
●
Terminare la consultazione
Tornare all’utente in attesa.
MENU
-
INDIETRO
Premere il tasto del display –
l’utente esterno sente un motivo
musicale.
Inserire il numero interno del portatile da chiamare. Siete collegati
con il secondo utente.
. Sul display degli altri por-
Aprire il menu.
Confermare.
OK
Siete di nuovo collegati con
l’utente in attesa (esterno).
11
Page 81

Gigaset 4000 Classic, IM1-it, A31008-G4000-B001-2-6Z19
4000Cla.fm
30.05.01
Ripetizione della selezione
Il portatile memorizza automaticamente gli ultimi cinque numeri o nomi selezionati.
$
Cancellare la lista dei numeri selezionati
$
MENU
1
CANCELLA?
Registrare un numero nella rubrica
$
MENU
COPIA IN RUB
Visualizzare i numeri di telefono/
nomi.
Scegliere il numero/nome desiderato.
Premere il tasto di impegno linea
– viene selezionato il numero.
Aprire la lista dei numeri selezionati.
Aprire il menu.
Premere 6 per confermare la
OK
richiesta di cancellazione.
Aprire la lista dei numeri selezionati.
Scegliere il numero e aprire il
menu.
Si apre la sezione di trasferi-
OK
mento del numero nella rubrica.
OK
12
Se necessario modificare il
numero. Poi premere OK, inserire
il nome (per inserire lettere e
segni vedi la tabella dei caratteri).
Confermare, sul display appare
„salvato“.
Page 82

Gigaset 4000 Classic, IM1-it, A31008-G4000-B001-2-6Z19
4000Cla.fm
Rubrica e rubrica speciale
30.05.01
La
rubrica
di 20 numeri di telefono.
Nella
rubrica speciale
(Call-by-Call) degli operatori di rete e telefonare così a
tariffe più convenienti.
vi facilita e rende più rapida la selezione
potete registrare i prefissi
Registrare un numero in rubrica
/
MENU
NUOVA VOCE
OK
OK
Aprire la rubrica/rubrica speciale.
Aprire il menu.
Scegliere e confermare.
OK
Inserire il
confermare.
Inserire il
Per inserire lettere e segni vedi la
tabella dei caratteri.
Confermare.
numero di telefono
.
nome
e
Selezionare numeri dalla rubrica
p. e.
D
Aprire la rubrica.
Inserire la prima lettera del nome
(per esempio per il nome Emma
– la lettera “E“): premere due
volte il tasto
diversi nomi che iniziano con la
lettera „e“ scorrere con
nomi sono in ordine alfabetico
Per selezionare il numero di telefono premere il tasto di impegno
linea.
Se ci sono
. I
Dopo aver scelto il numero di telefonocon il tasto
menu potete accedere anche a , completare/modificare il numero e selezionarlo con il tasto
UTILIZZA NR
13
.
Page 83

Gigaset 4000 Classic, IM1-it, A31008-G4000-B001-2-6Z19
4000Cla.fm
30.05.01
Selezionare i prefissi dalla rubrica speciale
(Call-by-Call)
Questa funzione consente di selezionare il prefisso di
un operatore di rete prima del numero di telefono
(“congiungere“).
MENU
UTILIZZA NR
OK
Aprire la rubrica speciale.
Scegliere e confermare il numero
Call-by-Call dell’operatore.
P
Comporre il numero di telefono
da “congiungere“.
oppure
UTILIZZA NR
J
OK
MENU
Scegliere e confermare il numero
di telefono da “congiungere“.
D
Premere il tasto di impegno linea.
Selezione rapida dalla rubrica speciale
Nella rubrica speciale possono essere registrati fino ad
otto prefissi per la selezione rapida. A tale riguardo
del nome dell’operatore va inserito il numero (2–9)
ma
di selezione rapida.
Memorizzare una nuova voce e inserire il numero di
selezione rapida prima del nome dell’operatore.
Esempio
dell’operatore di rete
: il numero di selezione rapida 2 e il
.
pri-
nome
MENU
NUMERO
OK
per esempio
-
OK
4 x
14
Aprire la rubrica speciale.
Scegliere l’operatore e aprire il
menu.
Scegliere e confermare.
OK
Confermare il numero.
Spostare il cursore all’inizio del
campo del nome.
Premere 4 volte il tasto 2 per
inserire il numero di selezione
rapida 2 e confermare.
Page 84

Gigaset 4000 Classic, IM1-it, A31008-G4000-B001-2-6Z19
4000Cla.fm
30.05.01
Uso della selezione rapida
per esempio
-
Premere
a lungo
viene visualizzato il prefisso
dell’operatore corrispondente.
per esempio
Comporre il numero di telefono
da “congiungere“.
oppure
Per prelevare il numero da „con-
OK
giungere“ al prefisso dell’operatore dalla rubrica.
Premere per selezionare prefisso
e numero.
Tabella dei caratteri
Premere più volte o a lungo il tasto corrispondente:
1 x 2 x 3 x 4 x 5 x 6 x
T
/
0
1
2
3
6
L
5
4
1
A B C 2
DEF 3
G H I 4
JKL5
M N O 6
PQRS7
T U V 8
WXYZ9
+ 0 – | ? _
/(),
*
il tasto:
Spostare il cursore con
.Cancellare con .
I caratteri vengono inseriti a sinistra del cursore.
Le voci vengono ordinate nel modo seguente
1. s p a zi o (
cifre (0–9)
2.
)
T
lettere (in ord. alfabetico)
3.
segni restanti
4.
Inserendo uno spazio Tprima del nome, la voce viene
inserita all’inizio della rubrica (esempio: “
Carla“).
T
15
Page 85

Gigaset 4000 Classic, IM1-it, A31008-G4000-B001-2-6Z19
4000Cla.fm
30.05.01
Visualizzare e modificare i numeri della rubrica
per esempio
MENU
NUMERO
P
OK
P
OK
Aprire la rubrica.
Inserire la prima lettera del nome.
Aprire il menu.
Scegliere e confermare.
OK
Viene visualizzato il numero.
Modificare il numero.
Confermare.
Modificare il nome. Per inserire
lettere e segni vedi la tabella dei
caratteri.
Confermare.
Cancellare numeri dalla rubrica
per esempio
MENU
CANCELLA
Aprire la rubrica.
Inserire la prima lettera del nome.
Aprire il menu.
Scegliere e confermare.
OK
Cancellare numeri dalla rubrica speciale
MENU
CANCELLA
Aprire la rubrica speciale.
Scegliere il prefisso e aprire il
menu.
Scegliere e confermare.
OK
Cancellare tutte le voci
MENU
1
16
/
CANCELLA?
Aprire la rubrica/rubrica speciale
Aprire il menu.
Premere 6 e confermare la richie-
OK
sta di cancellazione.
Page 86

Gigaset 4000 Classic, IM1-it, A31008-G4000-B001-2-6Z19
4000Cla.fm
30.05.01
Impostazioni
Impostare la sveglia
Il portatile è dotato anche della funzione di sveglia.
Attivare la sveglia
Se impostata (asterisco sul display), la sveglia suona
ogni giorno alla stessa ora. Il portatile è in stand by.
MENU
SVEGLIA
L10
OK
In stand by quando la sveglia è impostata, davanti
all’ora e alla data, compare un asterisco.
Disattivare la sveglia
La sveglia è attivata ma
MENU
SVEGLIA
Aprire il menu.
Scegliere e confermare.
OK
Inserire ore/minuti.
Nell’esempio: ore 6.15.
Se è necessario correggere, le
frecce spostano il cursore.
Salvare e uscire.
volete che suoni.
non
Aprire il menu.
Scegliere, confermare e uscire .
OK
La sveglia è disattivata e l’asteri-
sco non viene più visualizzato sul
display.
Spegnere la sveglia
La sveglia viene segnalata come una chiamata in entrata. Il portatile squilla e il LED di stato lampeggia (per
ca. 30 sec.).
Per spegnere la sveglia premere un tasto qualsiasi.
17
Page 87

Gigaset 4000 Classic, IM1-it, A31008-G4000-B001-2-6Z19
4000Cla.fm
30.05.01
Volume dell’auricolare
Il volume dell’auricolare può essere impostato su uno
dei tre livelli disponibili –
sazione
MENU
.
AUDIO
AURICOL
OK
OK
OK
anche durante una conver-
Aprire il menu.
Scegliere e confermare.
Confermare.
Si attiva il volume impostato e
indicato il livello attuale. Scegliere
e confermare il livello desiderato.
Volume della suoneria
Potete scegliere uno dei sette livelli disponibili:
Cinque volumi della suoneria (1–5),
●
“Crescendo“ (aumento progressivo del volume: 6),
●
Suoneria disattivata (spenta: 0).
●
MENU
AUDIO
SUONERIA
OK
Aprire il menu.
Scegliere e confermare.
OK
Scegliere e confermare.
OK
La suoneria si attiva sul volume
impostato e viene visualizzata
l’impostazione attuale. Scegliere
e confermare il livello desiderato.
Melodia della suoneria
Potete scegliere tre dieci melodie (1–10) .
MENU
18
AUDIO
MELODIA
OK
Aprire il menu.
Scegliere e confermare.
OK
Scegliere e confermare.
OK
Si attiva la melodia impostata e
appare il numero scelto. Confermare la melodia scelta.
Page 88

Gigaset 4000 Classic, IM1-it, A31008-G4000-B001-2-6Z19
4000Cla.fm
30.05.01
Attivare/disattivare il tono di avviso
delle batterie scariche
Se la funzione è attivata (impostazione all’acquisto),
quando la carica delle batterie sta per esaurirsi viene
emesso un segnale acustico.
MENU
6/
oppure
6/L
Aprire il menu.
Attivare la funzione.
Disattivare la funzione.
Attivare/disattivare la risposta automatica
Se la funzione è attivata, per rispondere alle chiamate,
basta sollevare il telefono dal caricabatterie senza dover premere il tasto di impegno linea
ne all’acquisto). Se il portatile non è posizionato sulla
base o sul caricabatterie all’arrivo della chiamata è comunque sempre necessario premere
MENU
6
oppure
6L
Aprire il menu.
Attivare la funzione.
Disattivare la funzione.
(impostazio-
D
D
Ripristinare i parametri iniziali
La rubrica, la rubrica speciale e la lista delle chiamate
non vengono cancellate. Il portatile resta registrato.
MENU
6
RESET?
Funzione Parametri iniziali
Volume del l’auricolare 1
Volume della suoneria 5
Melodia della suoneria 1
Risposta automatica attivata
Tono di avviso batterie scariche attivato
Lingua del display Italiano
Aprire il menu.
Richiamare la procedura con 9 e 3.
Confermare la richiesta.
OK
19
Page 89

Gigaset 4000 Classic, IM1-it, A31008-G4000-B001-2-6Z19
4000Cla.fm
30.05.01
Appendice
Cura
Pulire la base e il portatile con un
tistatico.
utilizzare in nessun caso un panno
Non
panno umido
asciutto che creando cariche elettrostatiche potrebbe
danneggiare l’apparato.
Batterie raccomandate:
Nichel-Cadmio (NiCd) Nichel-Metal-Idrato (NiMH)
Sanyo N-3U (700 mAh) Saft VHAAH 1300 (1300 mAh)
Mobile Power 700
(700 mAh)
Panasonic P-60AA DT
(600 mAh)
Emmerich 700 (700 mAh) GP GP130 AA HC (1300 mAh)
Sostituire sempre entrambe le batterie e utilizzare
quelle dello stesso tipo/produttore.
YDT 1200 (1200 mAh)
Panasonic HHR-110 AA
(1100 mAh)
Sanyo HR-3U (1600 mAh)
Emmerich 1300 (1300 mAh)
o an-
Autonomia/tempi di ricarica del portatile*:
Capacità
(mAh)
700 fino a 200 (8 gg.) oltre 10 circa 5,5
1200 fino a 320 (13 gg.) oltre 17 circa 9
1600 fino a 400 (18 gg.) oltre 23 circa 12
* Dopo alcuni anni la capacità di ricarica della batteria
e quindi l’autonomia del portatile si riducono a causa
dell’usura della batteria stessa.
Autonomia in
stand by in ore/
(giorni)
Autonomia
in conversa-
zione (ore)
Te m p i d i
ricarica
(ore)
Portata
All’aperto la portata è di circa 300 metri. In ambienti
chiusi può arrivare fino a 50 metri. Tuttavia in questo
caso la distanza raggiungibile è influenzata moltissimo
dall’ambiente d’uso (Esempio: Presenza di cemento
armato).
20
Page 90

Gigaset 4000 Classic, IM1-it, A31008-G4000-B001-2-6Z19
4000Cla.fm
30.05.01
Garanzia (per i paesi della CEE)
A partire dalla data d’acquisto ed entro il periodo di garanzia, Siemens provvede all’eliminazione di difetti riguardanti il materiale o la fabbricazione. Siemens presta la garanzia a propria discrezione riparando o
sostituendo l’apparecchio guasto.
Nella comunità Europea, dal primo gennaio 2002, è valido un periodo di garanzia di 24 mesi.
La garanzia non copre i danni provocati da incuria, uso
non conforme, usura o danni causati da interventi di
persone non autorizzate. La garanzia non concerne i
materiali soggetti ad usura e neanche quelle anomalie
che pregiudicano il valore o l’utilizzabilità dell’apparec-
chio solo in modo trascurabile.
Servizio clienti:
Italia:
Svizzera:
L’assistenza Siemens è a vostra disposizione per
quanto riguarda guasti o anomalie dell’apparecchio.
Per quanto riguarda le funzioni e l’uso, rivolgersi al rivenditore specializzato. Per domande sulla linea rivolgersi all’operatore di rete.
Il terminale portatile 4000 Classic, gode di approvazioni per la Svizzera i tutti i paesi della UE.
La conformità dell’apparecchio alla Direttiva R&TTE
(1999/05/CEE) è confermata dalla presenza del marchio CE.
È possibile richiedere copia integrale della dichiarazione di conformità alla Direttiva R&TTE (1999/05/CEE) al
servizio clienti.
Numero dedicato 02.6676.4400
Numero dedicato 012/12 00 - 90
21
Page 91

Gigaset 4000 Classic, IM1-it, A31008-G4000-B001-2-6Z19
Indice alfabetico
A
Appendice
20
B
Batterie
autonomia
caricare
inserirle
raccomandate
tempi di ricarica
Blocco della tastiera
20
6
6
20
20
7
C
Call-by-Call
Clip da cintura
Consultazione
Contenuto della confezione d’acquisto
Cura dell’apparecchio
Cursore
14
7
11
6
15
G
Garanzia
21
I
Impostare la lingua
Impostazioni
Indicazione del livello di
carica
6
8
17
L
Lingua del display
8
N
Numeri della rubrica
Numeri telefononici (cancellare/registrare)
16
12
P
Parametri iniziali
Pausa di selezione
Portata
Portatile
20
accendere/spegnere
19
10
autonomia
registrare
ripristinare i parametri
iniziali
tempi di ricarica
R
Registrare (il portatile)
Registrare un numero
Ripetizione dei numeri selezionati
Rispondere
alle chiamate
Risposta automatica
Rubrica
cancellare singole
voci
selezionare numeri
20
Rubrica speciale
cancellare i numeri
selezionare prefissi
S
Selezione rapida
Servizio clienti
Suoneria
Sveglia
T
Tabella dei caratteri
Tasto R
Telefonare
Tempi di ricarica delle batterie
20
Tono di avviso batterie
scariche
Trasferire le chiamate
V
Volume dell’auricolare
Volume della suoneria
7
4000ClaSIX.fm
19
12
13
16
18
17
10
19
10
30.05.01
20
9
20
9
13
11
19
13
13
16
14
14
21
15
11
18
18
22
Page 92

s
Be inspired
Instrucciones de manejo
e indicaciones de seguridad
!
ESPAÑOL
Page 93

Gigaset 4000 Classic, IM1-spa, A31008-G4000-B001-2-
LED de estado (diodo lum.)
Esquema general
Iluminado en llamada;
intermitente en caso
de:
– llamada entrante
– mensajes nuevos
– llamada de alarma
Tecla Listín telef.
Abrir listín telefónico
Tecla de descolgar
– Aceptar
llamada
– Marcar
n° de teléfono
Te c l a 1
– Pulsación prolong.
para seleccionar
contestador/
contestador Automático de Red
Act./desact. timbre
pulsar prolongadamente para activar/
desactivar timbre
Tecla señalización
– Pausa marcación:
puls. prolongada
– Funci ón tecla seña-
lización
4000ClaU.fm
23.05.01
El display está protegido con una lámina de
plástico. Retire la lámina de protección.
Estado de carga
vacía 1/3
llena 2/3
Intermitente: aviso
Funciones actuales y teclas de
display
Mediante las te-
,17
1
ABC
2
4
JKL
5
PQRS
7
TUV
8
0
R
Micrófono
0
0(1
9
clas del display
puede acceder a
las funciones ac-
H
tuales.
(18
8
Tecla de colgar y
tecla act./desact.
– Finalizar
llamada
– Cancelar
función
– Retroceder un
DEF
3
MNOGHI
6
WXYZ
nivel de menú
(puls. breve)
– Volver al est. re-
poso (puls. prolong.)
– Act./desact. en
est. reposo
(puls. prolong.)
Bloqueo teclado
act./desact.
pulsar prolong.
Tecla de proveedores
abrir lista de
proveedores de red
Símbolos del display
Rellamada
INT
MENU
OK
2
Tecla de mensajes
Tecla Interno
Tecla de menú Señal despert.
Confirmar
I
Hojear a izquierda/
derecha.
Hojear hacia
arriba/abajo
Tecla de borrar
Estado de carga
Page 94

Gigaset 4000 Classic, IM1-spa, A31008-G4000-B001-2-
Menús importantes
MENU
Te cl a
4000ClaU.fm
23.05.01
SERV RED
DESPERTADOR
AUDIO
TASAS
AJUSTES BASE
BUZON DE VOZ
REGIS TEL
MICROT
TIMBRE
MELODIA
MENU
OK
ANA
BARBARA
CLAUS
OK
Abrir menú principal
Hojear en menús, listín telefónico
Confirmar función/entrada
Cancelar/terminar funciones
UTILIZAR NUM
NUEVO REGIST
MOSTRAR NUM
BORRAR
MENU
3
Page 95

Gigaset 4000 Classic, IM1-spa, A31008-G4000-B001-2-
4000ClaU.fm
23.05.01
Indicaciones de seguridad
Utilice
exclusivamente el alimentador
+
,
enchufable incluido en el suministro,
como indica la parte inferior del equipo.
Utilice sólo
gadas y del mismo tipo
ce en ningún caso pilas normales (no recargables), ya que estas podrían dañar la salud
y causar daños personales.
Coloque las baterías con la polaridad correcta (rótulo de aviso en el compartimento
de baterías).
Utilice los tipos de batería indicados en estas instrucciones de manejo (rótulo de aviso en el compartimento de baterías).
Pueden surgir anomalías en el funcionamiento de equipos médicos. Tenga en
cuenta las condiciones técnicas del entorno
de aplicación (p. ej. consultas médicas).
El terminal inalámbrico puede ocasionar un
zumbido muy molesto en equipos auditivos.
No utilice el teléfono en entornos expuestos a peligro de explosión (p. ej. talleres de
pintura).
baterías recargables homolo-
. Es decir, no utili-
!
El terminal inalámbrico no es resistente a
las salpicaduras.
Si transfiere su Gigaset a terceros,
)
Algunas funciones descritas en estas instrucciones
de manejo no están disponibles en todos los países.
4
entréguelo siempre junto con estas
instrucciones de manejo.
Elimine las baterías y el teléfono respetando el medio ambiente.
Page 96

Gigaset 4000 Classic, IM1-spa, A31008-G4000-B001-2-
4000ClaIVZ.fm
Indice
Esquema general . . . . . . . . . . . . . . . . . . . . . . . . . . 2
Símbolos del display . . . . . . . . . . . . . . . . . . . . . . 2
Menús importantes . . . . . . . . . . . . . . . . . . . . . . . . 3
Indicaciones de seguridad . . . . . . . . . . . . . . . . . . . 4
Preparar el terminal . . . . . . . . . . . . . . . . . . . . . . . . 6
Contenido del embalaje . . . . . . . . . . . . . . . . . . . . 6
Colocar las baterías. . . . . . . . . . . . . . . . . . . . . . . . 6
Cargar las baterías. . . . . . . . . . . . . . . . . . . . . . . . . 6
Sujeción del clip para el cinturón. . . . . . . . . . . . . . 7
Encender/apagar el terminal . . . . . . . . . . . . . . . . . 7
Activar/desactivar bloqueo del teclado . . . . . . . . . 7
Modificar el idioma del display . . . . . . . . . . . . . . . 8
Dar de alta el terminal . . . . . . . . . . . . . . . . . . . . . . 9
Realizar llamadas . . . . . . . . . . . . . . . . . . . . . . . . . 10
Llamadas externas . . . . . . . . . . . . . . . . . . . . . . . 10
Llamadas internas. . . . . . . . . . . . . . . . . . . . . . . . 10
Contestar llamadas . . . . . . . . . . . . . . . . . . . . . . . 11
Transferir una llamada externa, consulta . . . . . . 11
Rellamada . . . . . . . . . . . . . . . . . . . . . . . . . . . . . . . 12
Listín telefónico y lista de
proveedores de red . . . . . . . . . . . . . . . . . . . . . . . 13
Ajustes . . . . . . . . . . . . . . . . . . . . . . . . . . . . . . . . . . 17
Ajustar alarma . . . . . . . . . . . . . . . . . . . . . . . . . . . 17
Volumen del microteléfono . . . . . . . . . . . . . . . . 18
Volumen del timbre ("tono del timbre“) . . . . . . . 18
Melodía del timbre . . . . . . . . . . . . . . . . . . . . . . . 18
Activar/desactivar tono de aviso de batería. . . . . 19
Activar/desactivar aceptación automática de llama-
das . . . . . . . . . . . . . . . . . . . . . . . . . . . . . . . . . . . 19
Reposición al estado de suministro . . . . . . . . . . 19
Anexo. . . . . . . . . . . . . . . . . . . . . . . . . . . . . . . . . . . 20
Cuidados . . . . . . . . . . . . . . . . . . . . . . . . . . . . . . . 20
Alcance . . . . . . . . . . . . . . . . . . . . . . . . . . . . . . . . 20
Garantía. . . . . . . . . . . . . . . . . . . . . . . . . . . . . . . . 21
Servicio técnico: . . . . . . . . . . . . . . . . . . . . . . . . . 21
23.05.01
5
Page 97

Gigaset 4000 Classic, IM1-spa, A31008-G4000-B001-2-6Z19
4000Cla.fm
30.05.01
Preparar el terminal
Contenido del embalaje
Terminal inalámbrico Gigaset 4000 Classic, dos baterías, soporte cargador, clip para el cinturón, instrucciones de manejo.
Colocar las baterías
–
+
–
+
–
+
Coloque las baterías
●
véase el gráfico izquierdo.
Encaje la tapa empujando hacia
●
●
Para abrir
je hacia
;
, pulse sobre la superficie rayada y empu-
abajo
Antes de encender el terminal inalám-
brico,
ble hacia arriba
Gigaset 4010/4015 Classic
un minuto se muestra el número interno del terminal en el display (p. ej. "2").
con la polaridad correcta
.
colóquelo con el display visi-
.
arriba
en la estación base
. Tras aprox.
–
Cargar las baterías
Las baterías no se suministran cargadas.
Para cargarlas, mantenga el terminal ina-
5 h
lámbrico aprox. cinco horas en la estación
base/soporte cargador. El proceso de carga
se indica en el terminal mediante el parpadeo de la indicación del estado de carga:
Descargadas
(símbolo de batería intermitente)
Carga 1/
3
En el anexo se ofrece una relación de los tipos de batería recomendados pág. 20.
6
Carga 2/
Carga completa
3
Page 98

Gigaset 4000 Classic, IM1-spa, A31008-G4000-B001-2-6Z19
Tras el primer proceso de carga, puede volver a co-
●
locar el terminal inalámbrico en la estación base/
soporte cargador después de cada comunicación.
La carga se controla de forma electrónica. De este
modo, queda garantizada una carga óptima y duradera de las baterías.
Las baterías se calientan durante el proceso de
●
carga; esta alteración es normal y no representa
ningún peligro.
Para una correcta indicación del estado de carga,
●
evite abrir el compartimento de baterías innecesariamente.
4000Cla.fm
30.05.01
Sujeción del clip para el cinturón
Empuje el clip para el cinturón sobre la parte posterior
del terminal hasta que los "resaltes" laterales encajen
en las perforaciones.
Encender/apagar el terminal
El terminal inalámbrico se enciende automáticamente
al insertar las baterías y al colocarlo en la estación
base/soporte cargador.
Para encender/apagar, pulse
longadamente
Se oye un tono de confirmación
(secuencia de tonos ascendente).
la tecla de colgar.
pro-
Activar/desactivar bloqueo del teclado
Para evitar pulsaciones involuntarias en el terminal se
puede "bloquear" el teclado. Al entrar una llamada, el
bloqueo del teclado se desactiva automáticamente,
activándose de nuevo al terminar la comunicación.
Pulsar
4
Contestar llamada: Pulse la tecla de descolgar
prolongadamente
activar/desactivar. Se oye un tono
de confirmación (secuencia de
tonos ascendente).
para
.
7
Page 99

Gigaset 4000 Classic, IM1-spa, A31008-G4000-B001-2-6Z19
4000Cla.fm
Modificar el idioma del display
30.05.01
MENU
6-
L
LL
L/
L0
L1
L2
L3
L6
L
/
Abrir el menú.
Pulsar primero 9, luego 2 y
seguidamente:
Alemán
Inglés
Francés
Italiano
Español
Portugués
Holandés
Danés
Noruego
Sueco
Finlandés
Checo
Polaco
Tu rc o
8
Page 100

Gigaset 4000 Classic, IM1-spa, A31008-G4000-B001-2-6Z19
$MXVWHV
$MXVWHVVLVWHPD
5HJLVWUDUHTXLSR
4000Cla.fm
30.05.01
Dar de alta el terminal
Para poder realizar llamadas con su terminal inalámbri-
co debe "identificarlo“ (darlo de alta) en la estación
base.
Si el terminal inalámbrico ya está dado de alta en
●
otra estación base
si desea dar de alta el terminal inalámbrico en
●
(paso
estación base Gigaset de un modelo más
antiguo
Paso 1:
(paso 1 y 3).
En la
estación base
Gigaset Preparación en la estación base/
teléfono
4010/4015
Pulsar prolongadamente la tecla de la
parte inferior de la estación base.
3010/3015
Pulsar la tecla "paging"#de la estación
base (aprox. 10 segundos) hasta que se
escuchen unas señales acústicas.
3020/25
3030/35
Seleccionar en el menú del teléfono
base
4030/35
3070/75
4070/75
Bases de
otros fabricantes
Pulsar la indicación (LED) que parpadea
durante el proceso de registro.
Para el registro en "estaciones base GAP",
siga las instrucciones de manejo correspondientes (paso2 y 3).
y 3),
1, 2
o el
teléfono base
,
y confirmar con 2..
una
y
Paso 2:
MENU
REGIS TEL
Paso 3:
Realice las siguientes entradas
OK
Tras introducir el PIN del sistema, el terminal busca una
estación base con este PIN. Durante la búsqueda parpadea en el display . Tras concluir el registro correctamente, el terminal inalámbrico vuelve al
estado de reposo.
do para funcionar.
Realice la siguientes entradas
Abrir el menú.
Seleccionar y confirmar.
OK
Se muestra el
PIN
en el terminal
Introducir el PIN del sistema de 4
dígitos y confirmar.
REGIS TEL
El terminal está ahora prepara-
en el terminal
.
:
:
9
 Loading...