

Page 1

© Copyright Dec., 2006
This publication, including all photographs, illustrations and software, is
protected under international copyright laws, with all rights reserved. Neither
this manual, nor any of the material contained herein, may be reproduced
without written consent of Giga-byte Technology Co., Ltd.
The information in this document is subject to change without notice. The
manufacturer makes no representations or warranties with respect to
the contents hereof and specifically disclaims any implied warranties of
merchantability or fitness for any particular purpose. The manufacturer
reserves the right to revise this publication and to make changes from time
to time in the content hereof without obligation of the manufacturer to notify
any person of such revision or changes.
Trademark Recognition
Gigabyte and Giga-byte are trademarks of Giga-byte Technology Co., Ltd.
Microsoft and Windows XP are trademarks of Microsoft Corporation.
All other product names used in this manual are the properties of their
respective owners and are acknowledged.
Page 2

H971-RH User’s Manual -Page i
Notices ..................................................................................................... ii
Safty Information ...................................................................................... iii
Package Contents .................................................................................... v
Chapter 1: System Introduction
1.1 Front Panel ......................................................................................... 1
1.2 Rear Panel ......................................................................................... 2
1.3 VFD (Vacuum Fluorescent Display) Message ....................................
3
Using Windows XP Media Center Edition
............................................... 3
Using Windows Vista Media Center ...................................................
8
1.4 Remote Control Functions .................................................................. 13
1.5 Keyboard Fuctions (option) ................................................................ 15
Chapter 2: Basic Installation
2.1 Connecting External Devices ............................................................. 16
2.2 Inserting Remote Control and Keyboard Batteries ............................. 17
2.3 Set Up Keybord Linkage .................................................................... 18
Chapter 3: Starting Up
3.1 Powring Up ......................................................................................... 19
3.2 Support CD Information ...................................................................... 20
Chapter 4: Maintenance
4.1 Cleaning H971-RH .............................................................................. 21
4.2 Troubleshooting ..................................................................................
21
Appendix A: Speciificaton ......................................................................... 23
Appendix B: Service Center ..................................................................... 24
Table of Contents
Page 3

H971-RH User’s Manual -Page ii
Notices
Federal Communications Commission (FCC) Statement
Note: This equipment has been tested and found to comply with the limits for a
Class B digital device, pursuant to Part 15 of the FCC Rules. These limits are
designed to provide reasonable protection against harmful interference when the
equipment is operated in a commercial environment. This equipment generates,
uses, and can radiate radio frequency energy and, if not installed and used in
accordance with the instruction manual, may cause harmful interference to radio
communications. Operation of this equipment in a residential area is likely to
cause harmful interference in which case the user will be required to correct the
interference at his own expense.
Properly shielded and grounded cables and connectors must be used in order
to meet FCC emission limits. Neither the provider nor the manufacturer are
responsible for any radio or television interference caused by using other than
recommended cables and connectors or by unauthorized changes or modifications
to this equipment. Unauthorized changes or modifications could void the user’s
authority to operate the equipment.
This device complies with Part 15 of the FCC Rules. Operation is subject to the
following two conditions:
(1) this device may not cause harmful interference, and
(2) this device must accept any interference received, including interference that
may cause undesired operation.
This equipment generates, uses, and can radiate radio frequency energy and, if not
inst alled and used in ac cordance wi th the instruc tions, may cause harm ful
interfere nce to radi o c ommunications. Howeve r, there is no guar antee th at
interference will not occur in a particular installation. If this equipment does cause
harmful interference to radio or television reception, which can be determined
by turning the equipment off and on, the user is encouraged to try to correct the
interference by one or more of the following measures:
• Reorient or relocate the receiving antenna.
• Increase the separation between the equipment and receiver.
• Connect the equipment into an outlet on a circuit different from that to which the
receiver is connected.
• Consult a dealer or experienced TV/radio technician for help.
Properly shielded and grounded cables and connectors must be used in order to
meet FCC emission limits. Neither the Dealer nor the Manufacturer are responsible
for any radio or television interference caused by using other than recommended
cables and con nectors or by unauthorized changes or modifications to this
equipment. Unauthorized changes or modifications could void the user’s authority to
operate the equipment.
Page 4

H971-RH User’s Manual -Page iii
Safety Informations
We recommend that you read this section carefully before using the H971RH. These safety and usage instructions will ensure that you enjoy many
years safe use of the H971-RH. Keep this manual for future reference.
Warning Symbols on the H971-RH Case
Be sure to read the power rating label on the bottom of
the H971-RH before operation.
Caution: Before connecting power to the H971-RH,
make sure the power source is within the range of AC
100~240V, 50~60 Hz. Do not attempt to service the
H971-RH yourself. If the unit gets wet or you think it is
damaged, have the unit serviced. Do not open the unit
case for any reason.
Gernal Safety Information
• Do not place heavy objects such as books or bags on the
unit.
• Avoid placing objects with strong magnets built in too close to
the unit. If you suspect stereo speakers may interfere with the
unit, try moving the speakers away from the unit.
• Avoid using the system in direct sunlight, or near a heating
device.
• To prevent the unit from overheating, do not cover the air
ventilation openings on the top, sides, or the rear.
• Do not open the unit case. Do not attempt to service the
H971-RH yourself. For servicing, contact qualified service
personnel.
Page 5
H971-RH User’s Manual -Page iv
• Do not place the unit on an unstable surface, cart, or stand.
• Avoid exposing the H971-RH to moisture or excessive humidity.
• Follow all warnings and cautions in this manual and on the unit case.
• If an outside antenna or cable system is to be connected to your AV PC, make
sure that the antenna or cable system is electrically grounded to provide some
protection against voltage surges and static charges.
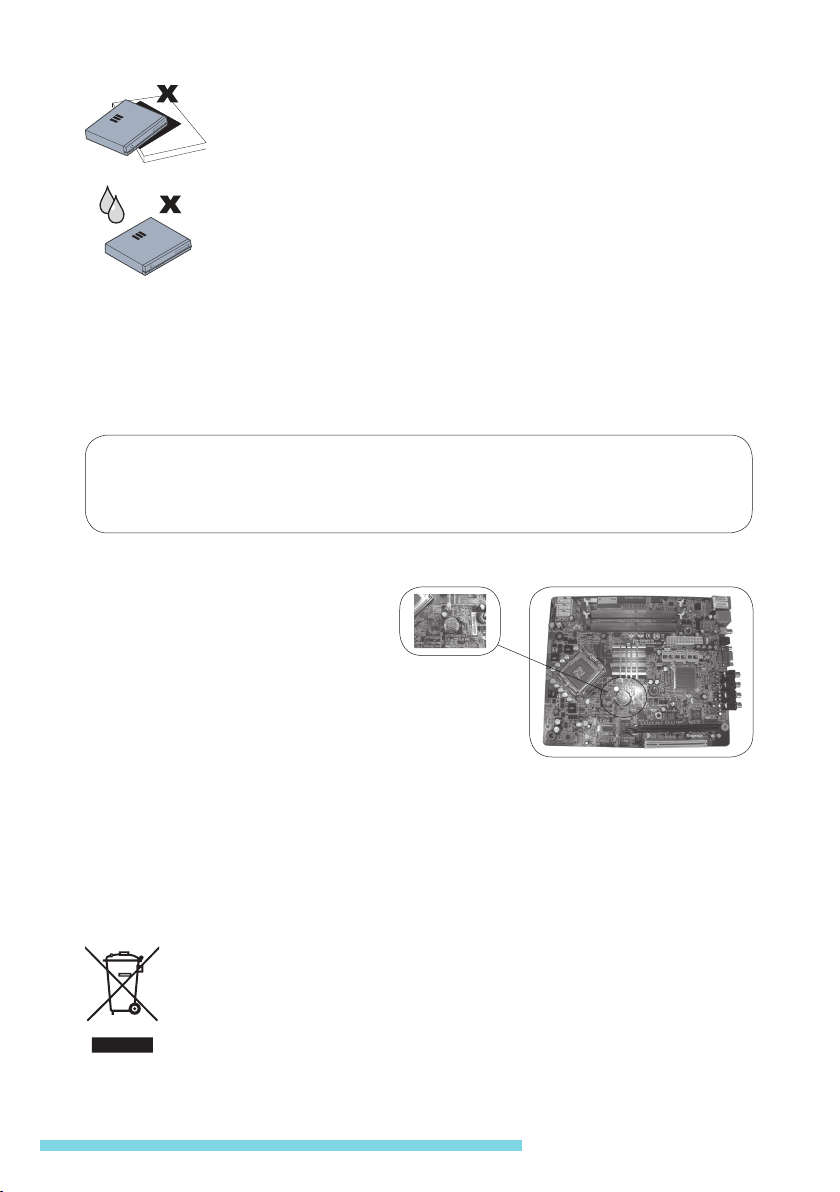
CAUTION
RISK OF EXPLOSION IF BATTERY IS REPLACED BY AN INCORRECT TYPE.
DISPOSE OF USED BATTERY ACCORDING TO THE INSTRUCTIONS.
Change Battery on the Motherboard:
1. Turn off Computer and unplug
the power cord.
2. Gently take out the old battery.
3. Re-install the new battery.
4. Plug the power cord in and turn
on the computer.
*Danger of explosion if battery
is incorrectly replaced.
*Replace only with the same or equivalent type recommended by the
manufacture.
*Dispose of used batteries according to the manufacturer’s instructions.
WEEE-Consumer Notice: The GIGABYTE product you have purchased is subject
to Directive 2002/96/EC of the European Parliament and the Council
of the European Union on waste electrical and electronic equipment
(WEEE) and, in jurisdictions adopting that Directive, is marked as being
put on the market after August 13, 2005, and should not be disposed of
as unsorted municipal waste. Please utilize your local WEEE collection
facilities in the disposition of this product and otherwise observe all
applicable requirements.
Page 6
H971-RH User’s Manual -Page v
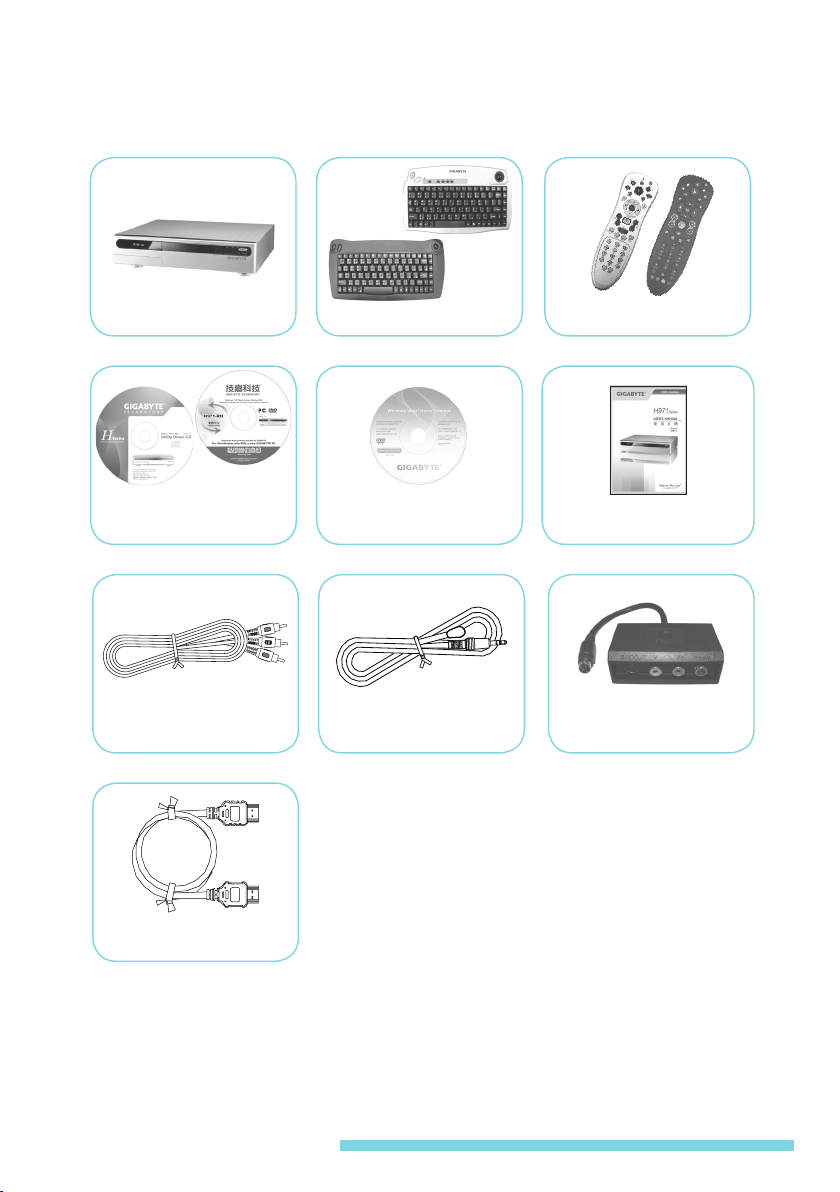
Package Contents
Carefullly unpack the H971-RH and check the following items are included:
Contact your dealer immediately if any items are missing, appear damaged, or if the
unit does not work.
Remote Control (Option)
3.5 RCA Cable (Option)
Utility Driver CD &
Recovery CD (Option)
RF Keyboard (Option)H971-RH
Windows Vista
Installation Disk
IR Cable for
Set Top Box (Option)
HDMI cable (Option)
User’s Manual
Component Video
Extension Box (Option)
Page 7
H971-RH User’s Manual -Page 1
Chapter
System Introduction
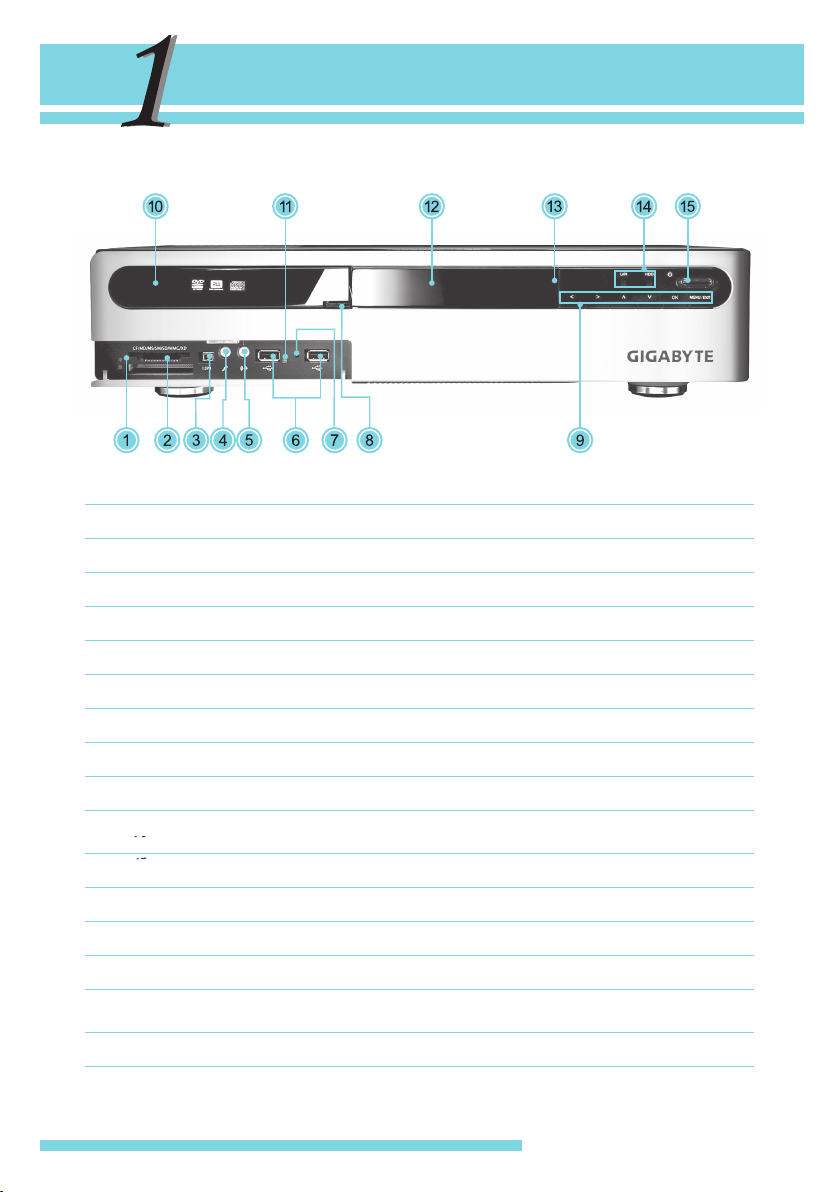
►Front Panel◄
Item Description
1. Card Slot Activity (W/R) LED Lights up when a storage card was placed in the slot.
2. Card Reader 7-in-1 card reader.
3. IEEE 1394 Port (4 pin) Connect IEEE 1394-enabled devices.
4. MIC-In Connect a microphone here.
5. Line-Out Connect to spakers or an amplifier with stereo mini-plug.
6. USB Port Connect USB-enabled devices.
7. RF Reciver Switch RF Keyboard learning button.
8. Stop / Eject Button Push to eject a disc from the DVD drive.
9. Front Function Buttons
Function buttons and Arrow buttons help to navigate in
the MCE menu.
10. Optical Drive This is a Super Multi DVD.
11. Status LED Indicator RF Keyboard LED status indicator.
12. VFD VFD (Vacuum Fluorescent Display).
13. IR Window Interfaces with infrared devices ( for MCE RC only).
14. Status LED Indicator
These LEDs indicates the status of hard disk activity
and LAN activity.
15. Power Button Push this power button to turn the H971-RH on.
Page 8
H971-RH User’s Manual -Page 2
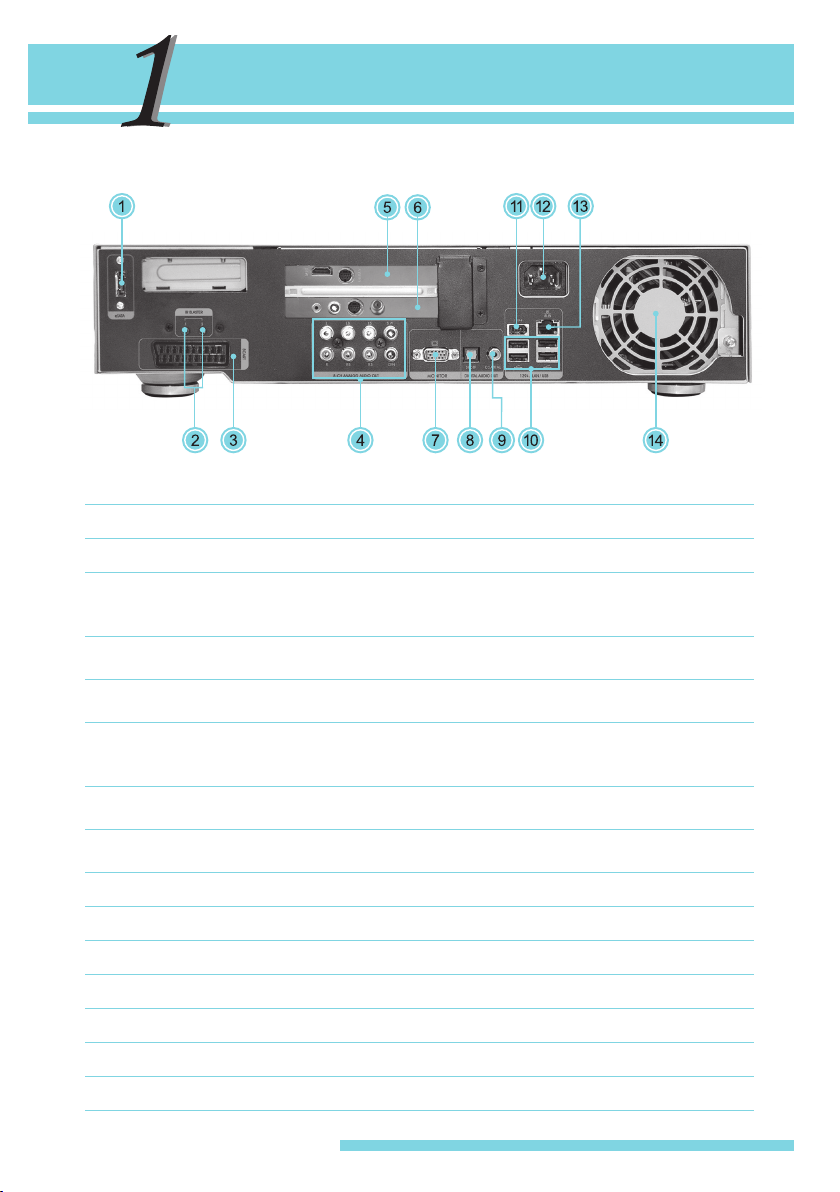
►Rear Panel◄
Item Description
1. eSATA Connect an external eSATA device.
2. IR Blaster
This IR blaster can be taught the remote control codes
for anyset-top box and provides control of a wide range
of other PC applications.
3. SCART (Optional)
21-pins connector for connecting audio-visual equipment
together. (For EU market only)
4. 7.1 Channels Audio Jack
(RCA)
Integrated with 7.1 High Definition Audio support.
5. PCI-E*16X Expansion
Slot Cover
Remove this cover to install PCI-E*16 Card, eg., VGA
card. (Space limitation: 195(L)x120(W)x20(H)mm,eg.,
GV-NX73T256P-RH)
6. PCI-E*1X Expansion
Slot Cover
Remove this cover to install PCI-E*1X Card, eg., TV
capture card.
7. VGA Port
Connect to a display device (e.g., external monitor, LCD
projector).
8. S/PDIF (Optical / Toslink) Digital audio output connector.
9. S/PDIF (Coaxial) Digital audio output connector.
10. USB Port Connect USB-enabled devices.
11. IEEE 1394 Port (6-pin)
Connect IEEE 1394-enabled devices.
12. Power Jack Connect power cord AC Jack here.
13. LAN Port Connect to an RJ-45 connector (Ethernet cable).
14. Power Supply Unit Fan Provide ventilation inside the power supply unit.
Chapter
System Introduction
Page 9
H971-RH User’s Manual -Page 3
Chapter
System Introduction
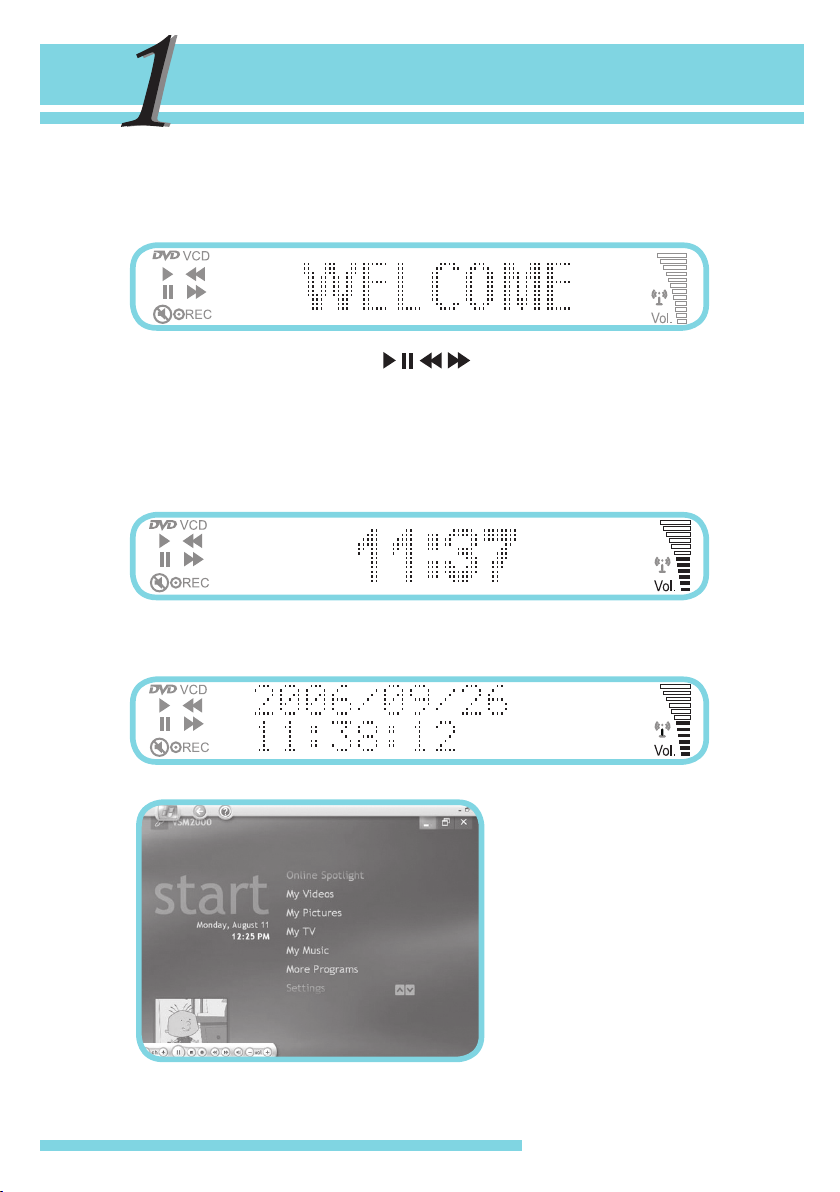
►VFD (Vacuum Fluorescent Display) Message◄
The H971-RH display different system information depending on the system mode.
When H971-RH is turn on in normal Windows mode, “WELCOME” is shown.
Media play mode status (DVD/VCD/
), mute, and recording is shown on
the left side. Volume level and radio signal are shown on the right side.
►Using Windows XP Media Center Edition◄
● If the system is turn on in Normal Mode (Media Center Applications are not run)
or in the sleep mode, the screen will display time and volumes of the audio.
● If the system is in the Media Center Home frame (see Figure 1), the screen will
display date and time.
Figure 1: The Media Center
Start menu.
Page 10

H971-RH User’s Manual -Page 4
My Video Mode
● If “My Video” is selected (see Figure 2), “My Videos” and volumes of audio are
shown.
● Play Video
● Next
● Previous
Chapter
System Introduction
Figure 2: The Media
Center My Video menu.
Page 11

H971-RH User’s Manual -Page 5
Chapter
System Introduction
My Picture Mode
● If “My Pictures” is selected (see Figure 3), “My Pictures” is shown.
● If the photo slide show starts, “Slide Show” is shown.
● You can watch pictures in a slide show and play music using Windows Media
Center. When the music starts, the screen will display “PLAY” and the track time.
My Music Mode
● If “My Music” is selected (see Figure 4), “My Music” is shown on the panel.
Figure 3: The Media
Center My Pictuers
menu.
Page 12

H971-RH User’s Manual -Page 6
Chapter
System Introduction
When play individual songs, entire albums, or your favorite playlists, “My Music”
and track time are shown on the panel.
● Play Music
● Shuffle/Repeat
● Forward
Figure 4: The Media
Center My Music menu.
Page 13

H971-RH User’s Manual -Page 7
My TV Mode
● When “My TV” is selected (see Figure 5), “My TV” is shown.
● When you watch Live TV, “PLAY” and the track time are shown.
Chapter
System Introduction
Figure 5: The Media
Center My TV menu.
Figure 6: My TV always
records what you’ve
been watching onto hard
drive, so at any time you
can control live TV by
using the Pause, Play,
FWD, and REW buttons
on the remote.
Page 14

H971-RH User’s Manual -Page 8
►Using Windows Vista Window Media Center◄
The H971-RH display different system information depending on the system mode.
When H971-RH is turn on in normal Windows mode, “WELCOME” is shown.
Media play mode status (DVD/VCD/
), mute, and recording is shown on
the left side. Volume level and radio signal are shown on the right side.
►Using Windows Vista Media Center◄
● If the system is turn on in Normal Mode (Media Center Applications are not run)
or in the sleep mode, the screen will display time and volumes of the audio.
● If the system is in the Media Center Home frame (see Figure 1), the screen will
display date and time.
TV + Movies
● When you watch Live TV, Channel, “PLAY” and the track time are shown. When
you record TV program, Channel, “REC” and track time are shown.
Chapter
System Introduction
Figure 1: The Vista Media Center Start
menu.
Page 15

H971-RH User’s Manual -Page 9
Chapter
System Introduction
Figure 2: The Vista Media Center
TV + Movies menu. Access to your
Recorded TV Programs. Use remote
or keyboard to choose from the list of
recorded TV programs.
Figure 3: The TV Programs are
always recorded onto hard drive, so
at any time you can control live TV
by using the Pause, Play, FWD, and
REW buttons on the remote.
Figure 4: Play movies from DVDs
and Video CDs.
Page 16

H971-RH User’s Manual -Page 10
Chapter
System Introduction
● Play DVD
● Next / Previous
● Forward / Backward
Music
Figure 5: The Vista Media Center Music menu. Music Libriay helps to orgnaize
digital music.
Page 17

H971-RH User’s Manual -Page 11
Chapter
System Introduction
Windows Media Center menu in Windows Vista provides a better way to organize
and listen to your music. You can access all your digital musice by using the remote
control or keyboard.
When play individual songs, entire albums, or your favorite playlists, “My Music” and
track time are shown on the panel.
● Play Music
● Shuffle/Repeat
● Forward
Picture + Video
● If “Picture Library” is selected (see Figure 6), “My Pictures” is shown.
Page 18

H971-RH User’s Manual -Page 12
Chapter
System Introduction
● If “Video Library” is selected (see Figure 7), “My Video” is shown.
● Play Video
● Next / Previous
Figure 6: The Vista Media Center
Picture Library.
Figure 7: The Vista Media Center Video
Library.
Page 19

H971-RH User’s Manual -Page 13
Chapter
System Introduction
►Remote Control Functions◄
Item Description
Power on/off
Stop
Recording button
Play
Pause
Fast rewind / Fast forward
Previous track / Next track
Back
More information
Direction buttons: Up/ Down
Direction buttons: Left/ Right
Enter button: OK
Next / Previous (TV) Channel
Volume up/ Volume down
Active MCE
Mute button
Recording TV program
Opens TV program guide
Shortcut to full-screen view of live TV
Open Play DVD main page in MCE
~
Enter alphanumerical letters
Clear input
Confirm input
Page 20

H971-RH User’s Manual -Page 14
Chapter
System Introduction
Item Description
Power on/off
Stop
Recording button
Play
Pause
Fast rewind / Fast forward
Previous track / Next track
Back
More information
Direction buttons: Up/ Down
Enter button: OK
Direction buttons: Left/ Right
Next / Previous (TV) Channel
Active MCE
VOL
Volume up/ Volume down
Mute button
Recording TV program
Opens TV program guide
Shortcut to full-screen view of live TV
Open Play DVD main page in MCE
~
Enter alphanumerical letters
Clear input
Confirm input
Page 21

H971-RH User’s Manual -Page 15
Chapter
System Introduction
►Keyboard Functions (Option)◄
1. Left Button: Function likes
the left mouse button.
2. Right Button: Function likes
the right mouse button.
3. Trackball: Control the
position of cursor.
1. Left Button: Function likes
the left mouse button.
2. Right Button: Function likes
the right mouse button.
3. Shortcut Buttons:
Power button
MCE/PCM start up
Back to PC screen
Internet
E-mail button
4. Trackball: Control the
position of cursor.
Page 22

H971-RH User’s Manual -Page 16
Chapter
Basic Installation
►Connecting External Devices◄
To the front panel
To the rear panel
VGA Monitor
Audio Devices
USB Compliant Devices
Home Theatre 7.1 Channel
LAN1394 Compliant DevicesTVLCD TVExternal e-SATA Devices
Mic Headphone1394 Compliant Devices USB Compliant Devices
Set-top Box
Page 23

H971-RH User’s Manual -Page 17
Chapter
Basic Installation
►Inserting Remote Control and Keyboard Batteries◄
The battery compartment is on the back of the underside of the remote control.
Please remove the batteries when not using for a longer period.
1. Pull and open the battery compartment cover.
2. Insert 2 AA batteries taking note of the correct polarity (+/-).
3. Close the cover.
The battery compartment is on the underside of the keyboard. Please remove the
batteries when not using for a longer period.
1. Pull upward to remove the cover.
2. Insert 2 AA batteries taking note of the correct polarity (+/-).
3. Close the cover.
Page 24

H971-RH User’s Manual -Page 18
Chapter
Basic Installation
►Set Up Keyboard Linkage◄
1. Check if keyboard batteries have been installed. (Please follow instructions on P.17
to insert batteries).
2. Open the stealth cover. Press connect button. After pressing the button, its
indicator will light (slowly) and waiting for the match signal from the RF Keyboard.
3. Open the battery compartment. Then press this learning button on RF Keyboard
to let receiver recognize signal. As soon as the linkage is completed, the indicator
turns to quick flash.
Remote Control and Keyboard Operating Range:
It is necessary to point the remote directly at the H971-RH. Provided
you are facing the H971-RH, the remote will function well within a
radius of about 3 meters (10 feet) and 30 degrees above or below
the H971-RH level. If the H971-RH does not response to the remote
control, move a little closer or replace the batteries.
The keyboard uses RF to control, so it is not necessary to point the
keyboard directly at H971-RH. Provided you are facing the H971RH, the keyboard will function well within a radius of about 10 meters
without interference.
Open the stealth cover.
Press this button.
LED is bricking slowly.
Press this button.
Page 25

H971-RH User’s Manual -Page 19
Chapter
Basic Installation
►Power Up◄
Press the system power button ( ) to turn H971-RH on.
When you turn H971-RH on, “WELCOME” is shown on the VFD (see diagram
below).
If your RF keyboard linkage has not been set, please follow the steps shown below:
1. Check if the batteries have been installed.
2. Press connect button on the front. Then press the learning button on the back of
the keyboard to let receiver recognize signal. (Please refer to Page18)
3. Please check keyboard operating within a radius of about 10 meters without
interference.
Page 26

H971-RH User’s Manual -Page 20
Chapter
Starting Up
►Support CD Information◄
The Support CD that came with H971-RH contains useful software and utility driver
that enhance the features.
The contents of the CD are subject to change at any time without
notice. Visit the GIGABYTE Website for updates.
It is best to install the needed device drivers for using the built-in devices of your
H971-RH. Before installing the drivers, check with your dealer first if they have
already installed all the drivers. If not, follow the procedures below:
1. You can find one bundled driver CD shown as follow.
2. Put the CD into the optical drive. Please install the application step by step.
Page 27

H971-RH User’s Manual -Page 21
Chapter
Maintenance
►Cleaning H971-RH◄
Cleaning the H971-RH
Refer to the following to clean the H971-RH case.
1. Wipe off dust with a clean dampened cloth.
2. Moisten the cloth with warm water and wring the cloth out well, then wipe the
case.
Warning:
1. Be sure to turn off and unplug the H971-RH at least an hour before
cleaning.
2. If a little water gets into the H971-RH interior while cleaning, leave
un-plugged in a well ventilated room for several hours before using.
3. To prevent discoloration or fading of the case, do not use any
chemical or abrasive alcohol-based cleaners.
►Troubleshooting◄
Common Problems and Solutions:
These guidelines provide tips to deal with problems you may encounter while using
the H971-RH. If the problem remains unsolved, contact your dealer for assistance.
Check the following before proceeding to the problem-specific solutions.
• Use some other electrical device to confirm that the electrical outlet is working.
• Ensure the H971-RH is turned on.
• Ensure all connections are securely attached.
• Ensure the attached device is turned on.
Tips for Troubleshooting:
In each problem-specific section, try the steps in the order suggested.
This may help you to solve the problem more quickly.
Try to pin point the problem and thus avoid replacing non-defective
parts. For example, if you replace batteries and the problem remains,
put the original batteries back and go to the next step.
Keep a record of the steps you take when troubleshooting. The
information may be useful when calling for technical support or for
passing on to service personnel.
Page 28

H971-RH User’s Manual -Page 22
Chapter
Starting Up
Remote Control or Keyboard Problems:
Problem: The H971-RH does not respond to the remote control or the keyboard.
1. Direct the remote control or keyboard towards the remote sensor on H971-RH.
2. Ensure the path between the remote and sensor is not obstructed.
3. Check the battery polarity.
4. Replace the batteries.
5. Have the remote control or keyboard serviced.
Audio Problems
Problem: There is no sound.
1. Adjust the volume on the remote control.
2. Adjust the volume of the audio source.
3. Check the audio cable connection.
4. Test the source audio output with other speakers.
5. Have the H971-RH serviced.
Problem: The sound is distorted.
1. Check the audio cable connection.
2. Test the source audio output with other speakers.
3. Have the H971-RH serviced.
Video Problems
Problem: Picture is distorted.
1. Check the video cable connections.
2. Check the TV system of disc matches that of your TV set (NTSC/PAL).
3. Have the H971-RH serviced.
Page 29

H971-RH User’s Manual -Page 23
Appendix
Specification
Board GA - 8IBGNBX-RH
CPU
Pentium D 820 / 830 / 920 / 930 / 950 /
Core 2 Duo E4200 / E6300 / E6400 / E6600 / E6700(option)
DRAM DDRII 512 MB up to 2GB (option)
HDD SATAI / SATAII 160GB or 250GB above (option)
Dimensions 438.2 (W) x 325.8 (D) x 60.8 (H) mm
Power Rating 300W (AC 100 - 240V; 47 - 63 Hz)
Chipset G965 / ICH8DH / ALC 888 RealTEK / Intel Gigabit 82566DC
Front I/O
USB 2.0 Port x2 / IEEE 1394 Port (4-pin) /
Card Reader / IrDA / Audio Jack
Peripherals MCE Remote Control (option) / RF Keyboard + Trackball (option)
Add-on Cards
Riser Card / ADD card (option) / Tuner card (option) /
FIO board / PCI-E16X VGA Card (option) /
Card Reader / VFD module
Operating
System
Windows XP MCE / Windows Vista Home Premium (option)
A/P GBT driver disk / Application Software Disk (option)
Rear I/O
USB 2.0 Port x4 / HDMI (option) / Video-Out (option) /
7.1 Channels Audio RCA Jack / e-SATA /
VGA Port / SPDIF / Coaxial Port /
IEEE 1394 Port (6-pin) / Gigabit LAN Port
Certification
Windows Logo / EMI / Safety
Windows Vista Capable Logo / Intel VIIV Logo
Page 30

H971-RH User’s Manual -Page 24
Appendix
Service Center
In order to serve you better, we have reorganized our Technical Support
Zone Please Visit our web site GIGABYTE Technical Service Zone for further
technical support.
Taiwan (Headquarters) GIGA-BYTE TECHNOLOGY CO., LTD.
Address: No.6, Bau Chiang Road, Hsin-Tien, Taipei 231, Taiwan
TEL: +886 (2) 8912-4888
FAX: +886 (2) 8912-4004
WEB Address (English): http://www.gigabyte.com.tw/
WEB Address (Traditional Chinese): http://www.gigabyte.tw/
 Loading...