

Page 1

© Copyright Feb, 2006
This publication, including all photographs, illustrations and software, is protected
under international copyright laws, with all rights reserved. Neither this manual,
nor any of the material contained herein, may be reproduced without written
consent of Giga-byte Technology Co., Ltd.
The information in this document is subject to change without notice. The
manufacturer makes no representations or warranties with respect to the contents
hereof and specifically disclaims any implied warranties of merchantability or
fitness for any particular purpose. The manufacturer reserves the right to revise
this publication and to make changes from time to time in the content hereof
without obligation of the manufacturer to notify any person of such revision or
changes.
Trademark Recognition
Gigabyte and Giga-byte are trademarks of Giga-byte Technology Co., Ltd.
Microsoft and Windows XP are trademarks of Microsoft Corporation.
All other product names used in this manual are the properties of their respective
owners and are acknowledged.
Page 2
I
FCC Warning
This equipment has been tested and found to comply with the limits for a Class B digital
device pursuant to Part 15 of the FCC Rules. These limits are designed to provide
reasonable protection against harmful interference when the equipment is operated in a
commercial environment.
This equipment generates, uses, and can radiate radio frequency energy and, if not
installed and used in accordance with the instruction manual, may cause harmful
interference to radio communications. Operation of this equipment in a residential area is
likely to cause harmful interference in which case the user will be required to correct the
interference at his own expense.
Changes or modifications not expressly approved by the parties responsible for compliance
could void the user’s authority to operate the equipment.
Important Safety Information
We recommend that you read this section carefully before using the H663 / H663-RH.
These safety and usage instructions will ensure that you enjoy many years safe use of the
H663 / H663-RH. Keep this manual for future reference.
Warning Symbols on the H663 / H663-RH Case
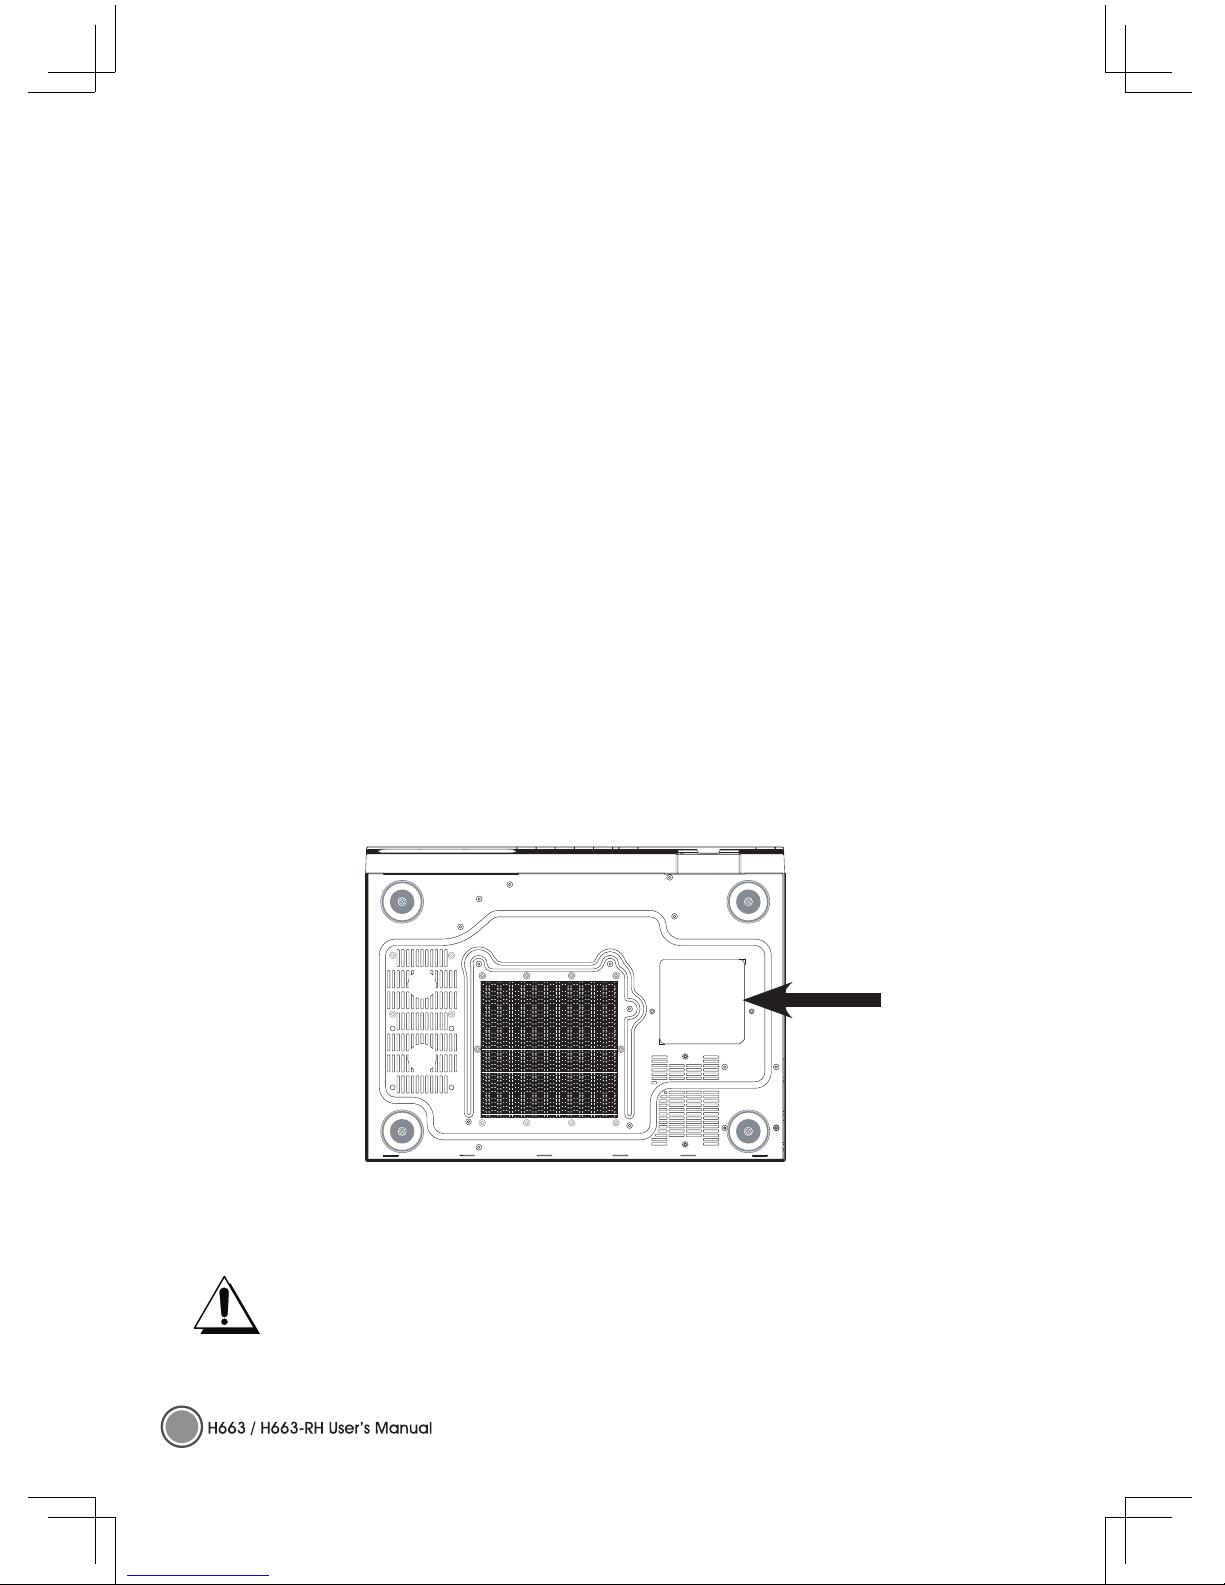
Be sure to read the power rating label on the bottom of the H663 / H663-RH before
operation.
Caution:
Before connecting power to the H663 / H663-RH, make sure the power source is
within the range of AC 100~240V, 50~60 Hz.
Do not attempt to service the H663 / H663-RH yourself. If the unit gets wet or
you think it is damaged, have the unit serviced. Do not open the unit case for any
reason.
RATING
LABEL
Page 3
II
General Safety Information
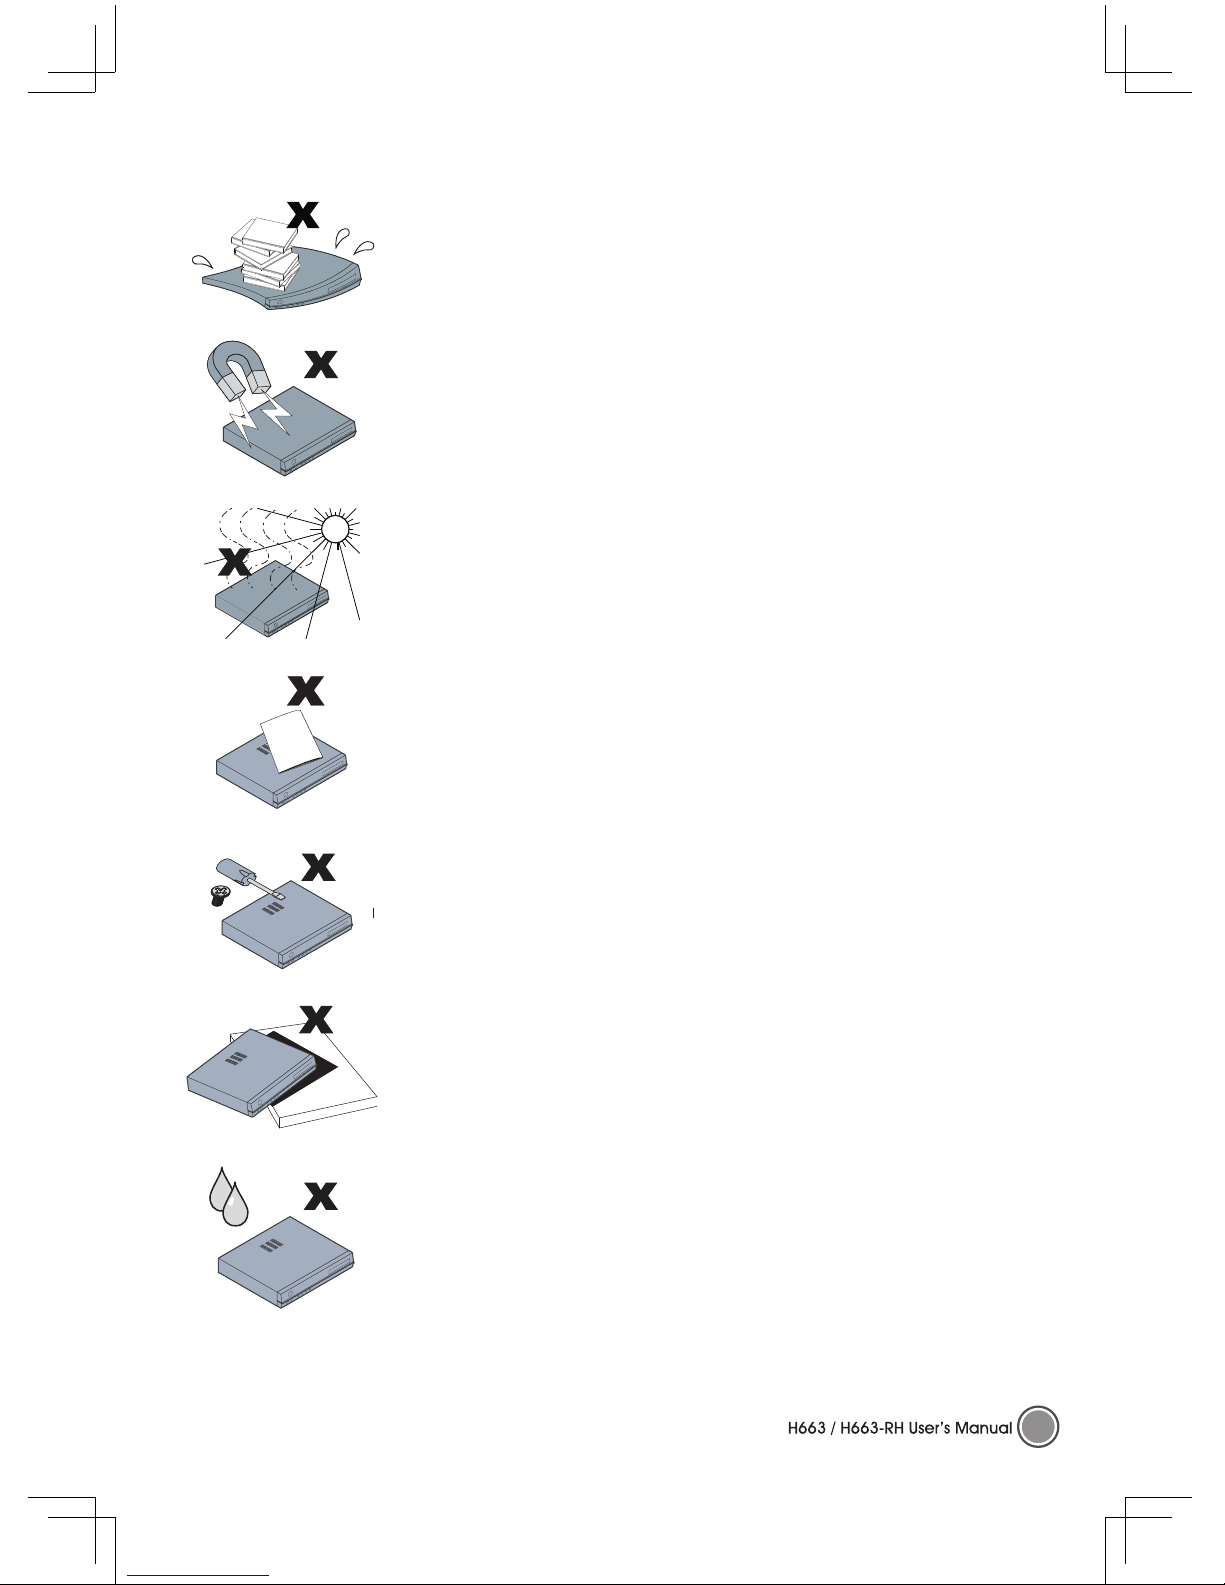
• Do not place heavy objects such as books or bags on the unit.
• Avoid placing objects with strong magnets built in too close to the
unit. If you suspect stereo speakers may interfere with the unit, try
moving the speakers away from the unit.
• Avoid using the system in direct sunlight, or near a heating device.
• To prevent the unit from overheating, do not cover the air
ventilation openings on the top, sides, or the rear.
• Do not open the unit case. Do not attempt to service the H663
/ H663-RH yourself. For servicing, contact qualified service
personnel.
• Do not place the unit on an unstable surface, cart, or stand.
• Avoid exposing the H663 / H663-RH to moisture or excessive
humidity.
• Follow all warnings and cautions in this manual and on the unit case.
Page 4
III
Power Safety
• Only use the supplied power cord.
• Do not place anything on the power cord. Place the power cord where it will not be in the
way of foot traffic.
• Remove the batteries from the remote control when storing or not in use for a prolonged
period.
• Before connecting power to the H663 / H663-RH, make sure the power source is within
the range of AC 100~240V, 50~60 Hz.
HDD Partition:
It is strongly recommend not to partitioning the hard disk.
Manual Styles
The following styles are used in this manual to alert you to important information.
Note Style
Provides additional information on the topic at hand.
Provides information that should not be overlooked.
Alerts you to situations that may damage the unit or cause personal injury.
Provides helpful information on the topic at hand.
CAUTION
RISK OF EXPLOSION IF BATTERY IS REPLACED BY AN INCORRECT TYPE.
DISPOSE OF USED BATTERIES ACCORDING TO THE INSTRUCTIONS.
Page 5

IV
CONTENTS
Chapter One Getting Started
1.1 Packing Checklist .................................................................................. 1
1.2 Features at a Glance ........................................................................... 2
Front View .............................................................................................. 2
Rear View ............................................................................................... 3
1.3 VFD (Vacuum Fluorescent Display) Message .................................... 4
1.4 Remote Control Functions ................................................................... 8
1.5 Inserting the Remote Control Batteries ............................................... 9
1.6 Keyboard Functions .............................................................................. 9
Using the Trackball and Buttons .......................................................... 10
Shortcut Buttons .................................................................................... 10
1.7 Inserting the Keyboard Batteries ......................................................... 10
1.8 Set Up for Keyboard Linkage ............................................................... 11
1.9 Remote Control and Kayboard Operating Range .......................... 11
Chapter Two Connecting Input Devices
2.1 Basic Connections for the H663 / H663-RH ........................................12
Chapter Three Maintenance
3.1 Cleaning the H663 / H663-RH ...............................................................13
3.2 Troubleshooting ......................................................................................13
Appendix A Specifications .........................................................................15
Page 6

1
Packing Checklist
Carefully unpack the H663 / H663-RH and check that besides this User Manual the following items
are included:
Contact your dealer immediately if any items are missing, appear damaged, or if the unit does not
work.
Getting Started
Two AA for RF keyboard &
two AA for remote controller
(MCE) (Option)
Adapter
3.5 RCA Cable
H663 / H663-RH
RF Keyboard (Option)
Utility Driver CDRecovery CD (Option)
3.5 x 2 Audio Cable
IR Cable for
Set Top Box (Option)
S Cable (RCA Cable)
(4 pin)
Remote Control (Option)
Page 7
2
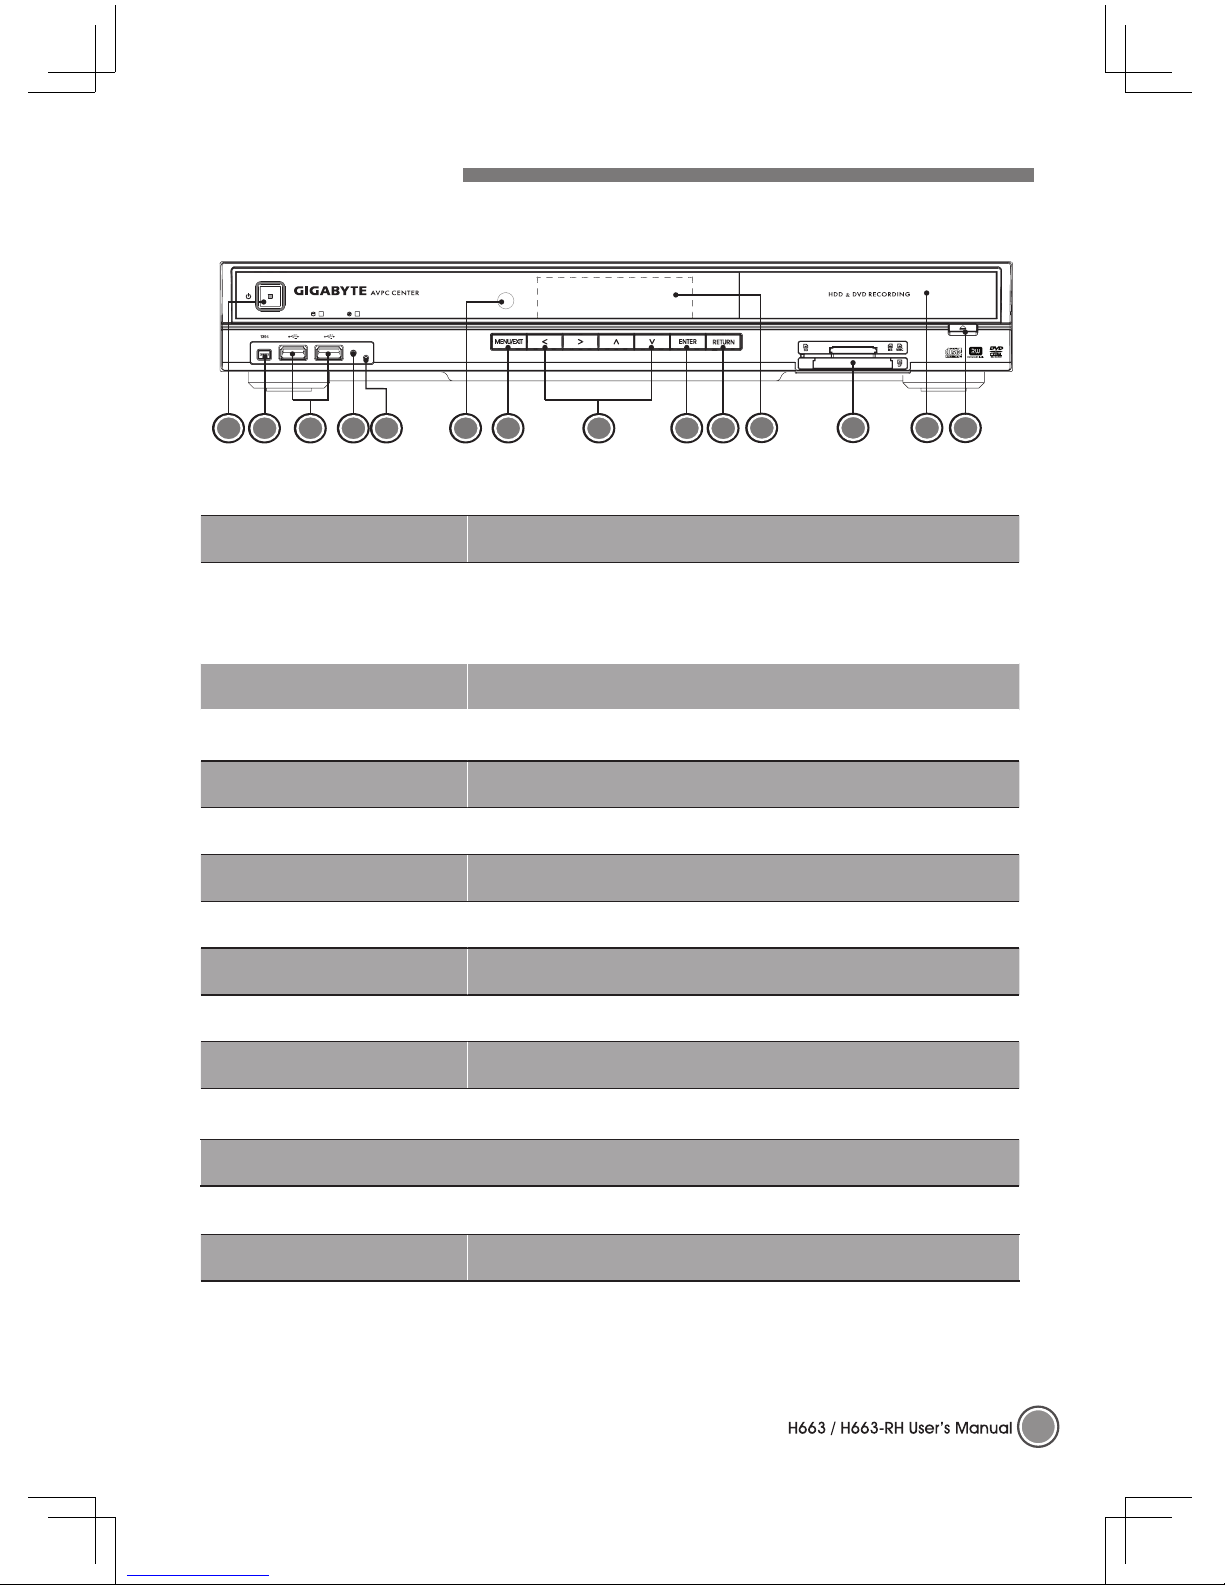
►Front View
Item Description
1. Power Button
Press the power button to turn the H663 / H663-RH on. Press
the pwer button again to set H663 / H663-RH in Suspend
mode. Press and hold the power button few seconds to turn
the H663 / H663-RH off.
2. IEEE 1394 (4-pin) Connects IEEE 1394-enabled devices.
3. USB 2.0 Port(s)
Two USB ports allows user to connect USB devices such as
external game pads, pointing devices, and keyboard.
4. RF Receiver Switch RF Keyboard learning button.
5. LED Indicator RF Keyboard LED status indicator.
6. IR Window Interfaces with infrared devices ( for MCE RC only).
7. Menu / Exit Button Invoke main menu or exit current screen.
8. Arrow Buttons
Navigated in the menu.
9. Enter Button Confirm selected items.
10. Return Button Backward to the previous screen.
11. VFD
VFD (Vacuum Fluorescent Display).
See page 4 for more detailed information.
12. Card Reader 6-in-1 card reader.
13. DVD Super Multi DVD-Multi Recoder.
14. DVD Eject Push to enject a disc from the DVD drive.
Features at a Glance
1 2 4 5 7 8
12
3
14
9 106
11
13
Page 8

3
►Rear View
Item Description
1. Power Jack Connects the power cord DC Jack here.
2. MIC-In Accepts microphone line-in devices
3. Line-Out
Connects to audio line-out devices
(e.g., speakers, headphones, an amplifier).
4. Line-In
Accepts audio line-in devices
(e.g., audio CD players).
5. S/PDIF decoder Digital audio output connector.
6. VGA Port (15-pin)
Connects to a display device
(e.g., external monitor, LCD projector).
7. USB 2.0 Port(s)
Two USB ports allows user to connect USB devices such as
external game pads, pointing devices, and keyboard.
8. IEEE 1394 Port (6-pin) Connects to IEEE 1394 devices.
9. Network Jack Connects to an Ethernet 10/100/1000-based network.
*10. S-Video Port S-Video input.
*11. CATV
Cable-TV input.
12. Video Out
Connector for video output.
13. DVI-I Port Connects to digital monitor.
14. IR Blaster(s) (Option)
This IR blaster can be taught the remote control codes for any
set-top box and provides control of a wide range of other PC
applications.
* The position of port may be varied by models.
1 2 4 53 6 7 9
8
12
IR BLASTER
1 2
10
11
13
14
Page 9
4
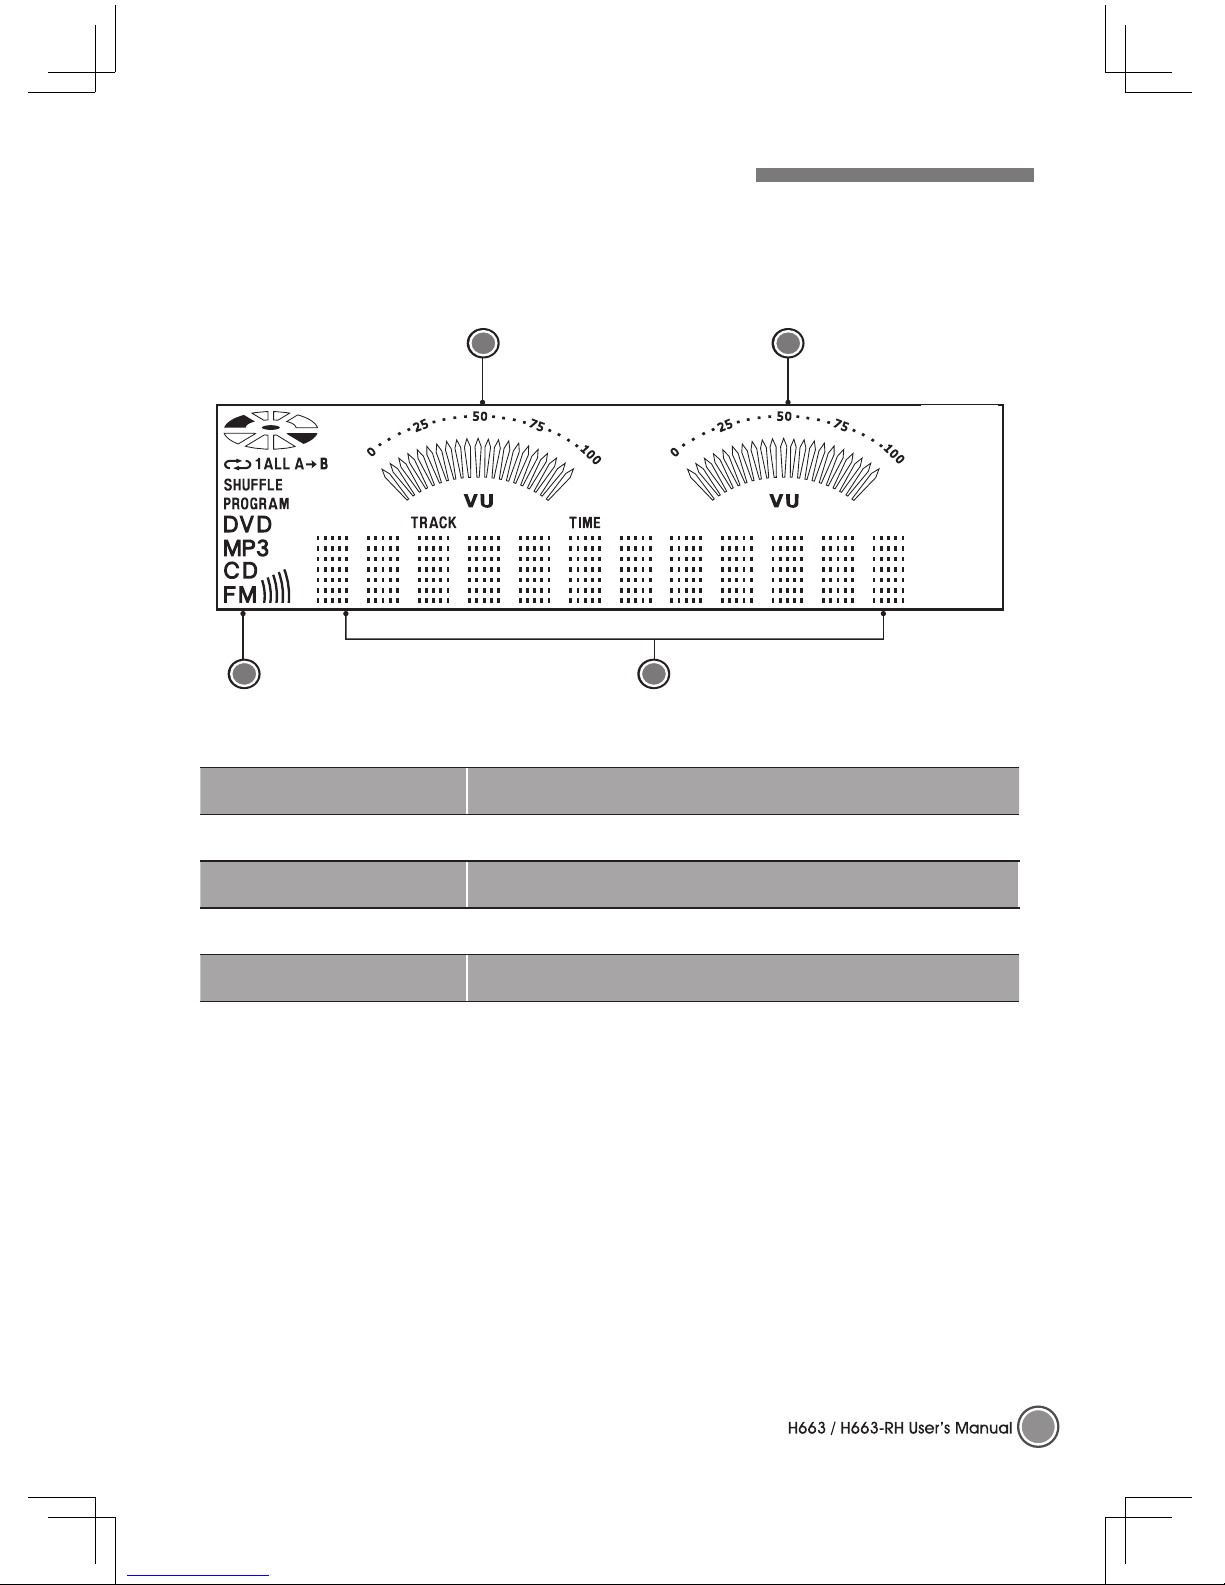
VFD (Vacuum Fluorescent Display) Message
The LED display on the front of the H663 / H663-RH displays status information. As well
as disc
information, the following messages display in the LED display:
Item Description
1. Volume Level Displays the volume level.
2. Volume Level
Displays the volume level.
3. Mode Displays the current mode.
4. Status Bar Display time information, media play time, and mode status.
3
2
4
1
Page 10
5
►Normal Windows Mode (Media Center Applications are not run) / Sleep Mode
Status:
1. The system is turn on in normal Windows mode. Media Center applications are not run.
2. System is sleeping.
Description:
1. Time is shown. The clock control by VFD MCU.
2. Volumes of audio in left and right are shown.
3. Run Disk is stop.
►Start to run Media Center Applications / On Meida Center Home Frame
Status:
1. Press “Start” button to run Media Center applications
and the system is in Media Center Home frame.
2. User can use ▲ and ▼ to choose the wanted multimedia in MCE.
Description:
1. No display information
shown.
2. Run Disk is stop.
►My Video Mode
Status:
When “My Videos” is selected, the screen is on video frame and stop mode.
Description:
1. “VIDEO” is shown
2. Run Disk is stop till the
media is played.
Page 11
6
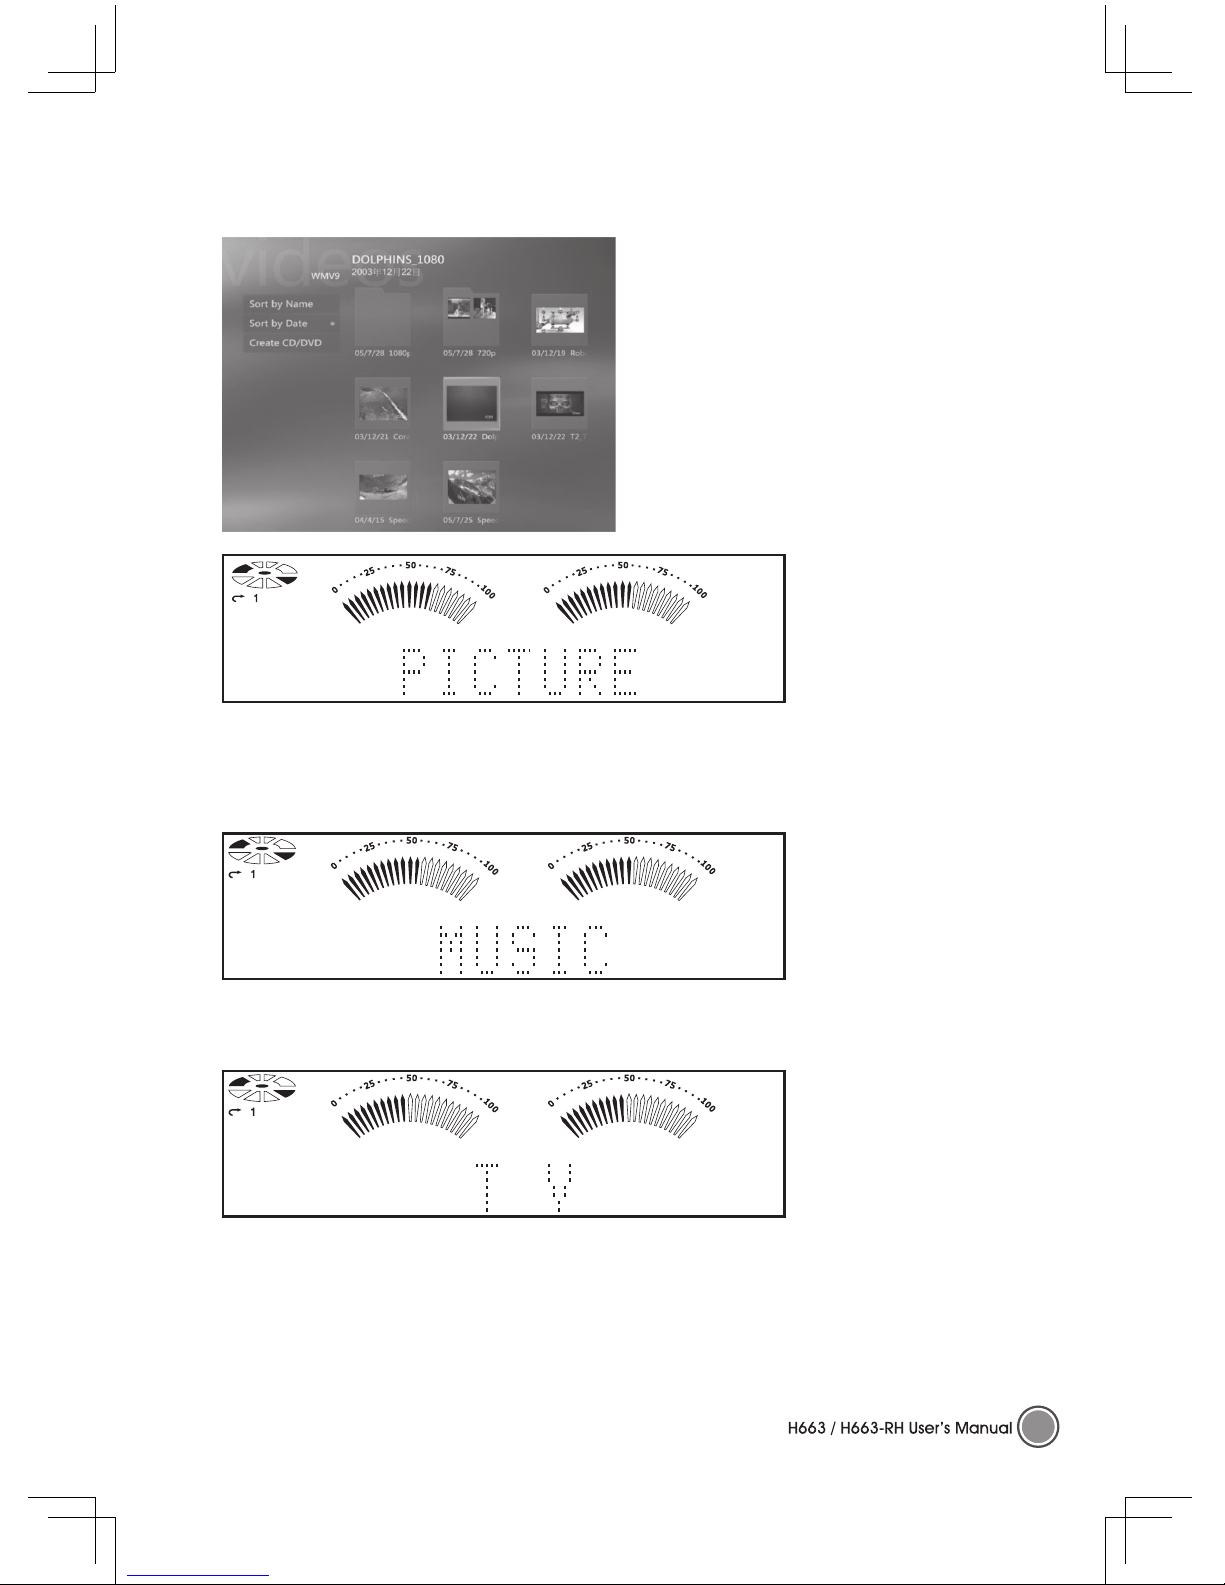
►My Picture Mode
Status:
On “My Pictures” frame and stop mode.
Description:
1. “PICTURE” is shown.
2. Run Disk is stop.
* Run Disk can be rotating when the previous selected media is keep playing.
►My Music Mode
Status: On “My Music” frame and stop mode.
Description:
1. “MUSIC” is shown.
2. Run Disk is stop till the
media is played.
►TV Mode
Status:On “My TV” frame and stop mode.
Description:
1. “TV” is shown.
2. Run Disk is stop till the
media is played.
Page 12
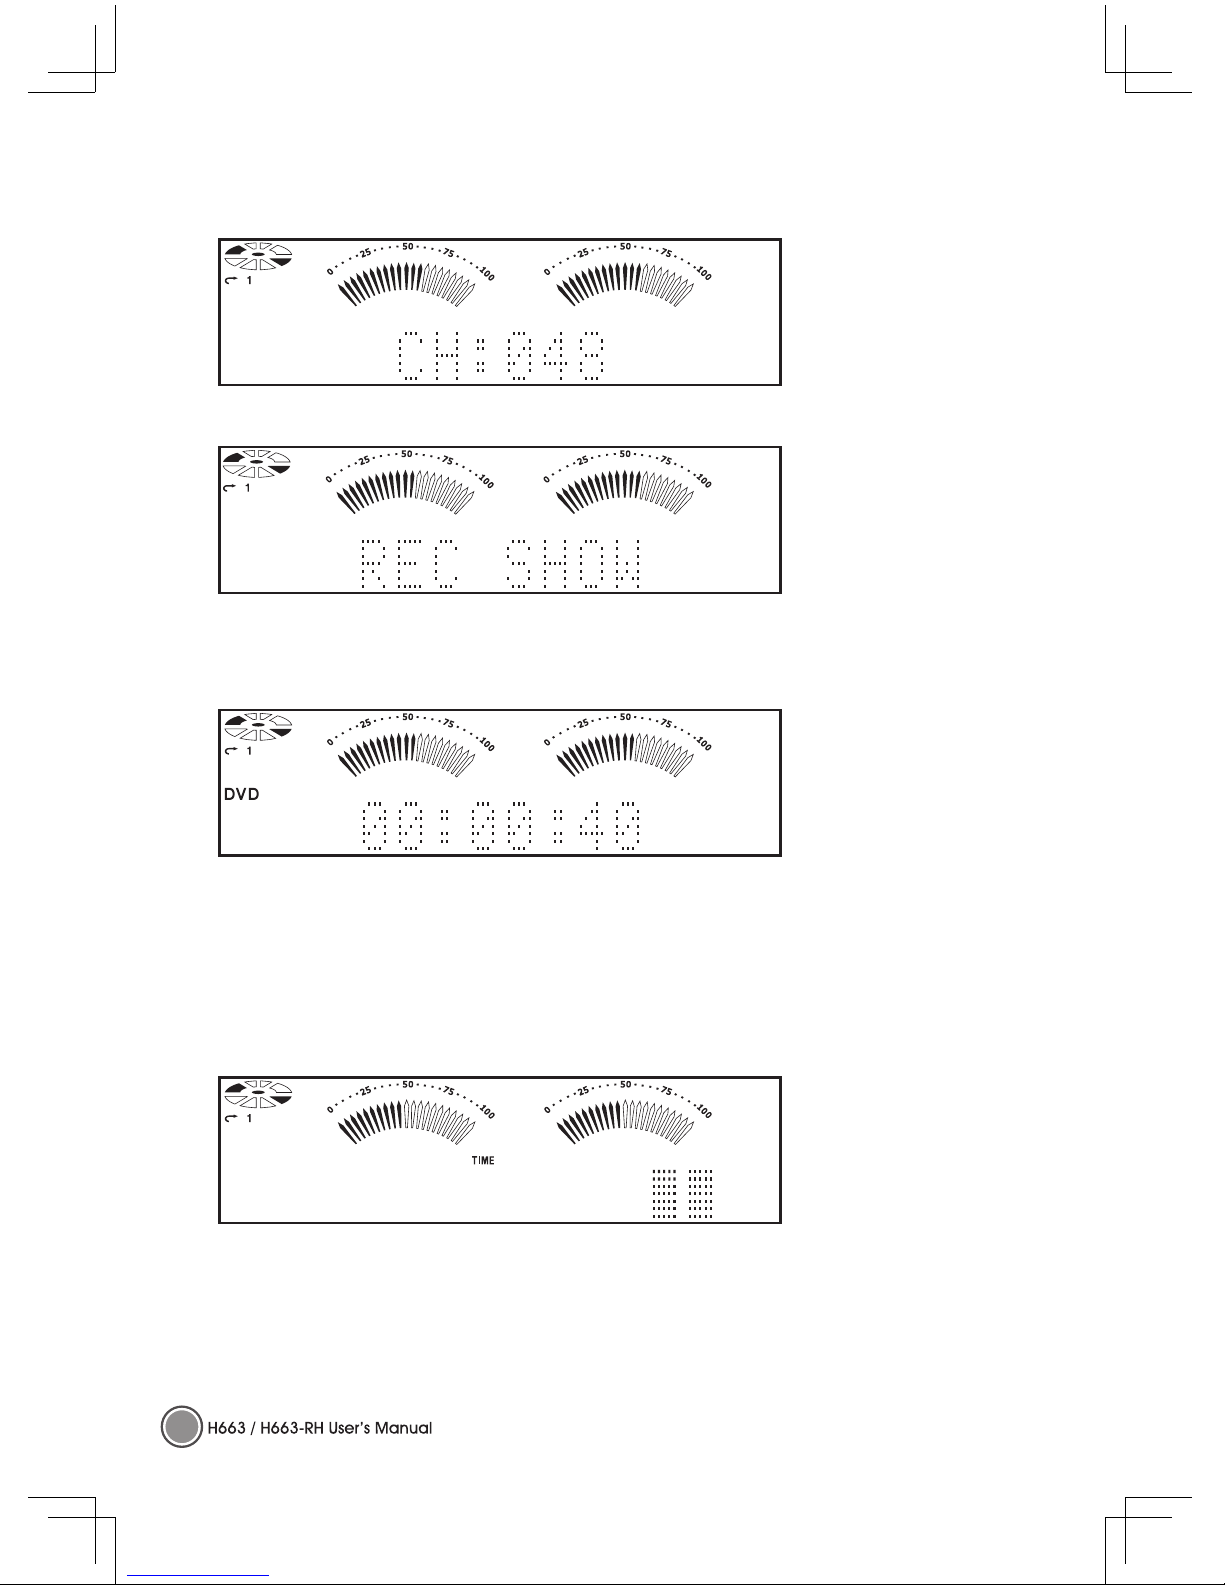
7
Status: On TV frame and go to live TV.
Description:
1. It will show the channel
number once press the
button of “CH_PG”.
2. Run Disk is running.
Status: On TV frame and go to record TV.
Description:
1. “REC SHOW” is shown.
►Music / DVD / Video / Play Mode
Status: On music, DVD, video frame and play mode.
Description:
1. When playing the music, it will show the track time on Music frame or Home frame.
2. Run Disk is running.
3. If you go to “My Pictures” on picture frame, then “PICTURE” is shown on the display.
►CD Burning Progress
Status: CD burning progress….
Description:
1. When the dot-block is full, means the CD burring progress is complete.
2. This example shown is 100% in the last 2 dot-block.
Page 13

8
Remote Control Functions
Item Function
Power on/off
Stop
Recording Button
Play
Pause
Fast Rewind
Fast Forward
Previous Track
Next Track
Back
More Information
Direction Keys: Up/ Down
Enter Key: OK
Direction Keys: Left/ Right
Next Channel (TV)
Previous Channel (TV)
“START” Menu
Mute
VOL
Volume Up
VOL
Volume Down
ENTERCLEAR
GUIDE LIVE TV
DVD
MENU
RECORDED
TV
MUTE
VOL
CH
PG
START
BACK MORE
SKIPREPLAY
FWDREW
R
E
C
O
R
D
S
T
O
P
P
A
U
S
E
Page 14

9
The battery compartment is on the underside of the remote control. Remove the batteries when not
using the H663 / H663-RH for a longer period.
Inserting the Remote Control Batteries
1. Pull the latch upward and open the battery compartment cover.
2. Insert 2 AA batteries taking note of the correct polarity (+/-).
3. Close the cover.
1. Only use AA batteries.
2. Dispose of us ed batteries according to local ordinance
regulations.
3. Remove the batteries when not using the H663 / H663-RH for
prolonged periods.
Keyboard Functions
Left Button
Right Button
Shortcut Buttons
Trackball
Page 15

10
►Using the Trackball and Buttons
The trackball and buttons have the same functions as a PC mouse. Roll the trackball to move the
cursor on the screen, use the left and right buttons as you do a standard mouse.
►Shortcut Buttons
In addition to the normal keys found on standard keyboards, the H663 / H663-RH keyboard
features a number of shortcut buttons, whose functions are outlined below.
Button Function
Power Power button.
AV
MCE/PCM start up.
PC
Back to PC screen.
IE Internet.
E-MAIL
Shortcut button to your e-mail manager.
The battery compartment is on the underside of the keyboard. Remove the batteries when not using
the H663 / H663-RH for a longer period.
1. Only use AA batteries.
2. Dispose of used batteries according to local ordinance regulations.
3. Remove the batteries when not using the H663 / H663-RH for prolonged periods.
Inserting the Keyboard Batteries
1. Lift as shown to remove the
cover.
2. Inse rt two AA b att eri es
taking note of the correct
polarity (+/-).
3. Replace the cover.
Page 16

11
Set Up for Keyboard Linkage
Press this button
LED is bricking slowly
1. Remove the cover and check if the batteries have been installed. (You can follow instructions on
P.10 Inserting the Keyboard Batteries).
2. Press connect button on the front panel. After pressing the button, its indicator will light (slowly)
and waiting for the match signal from RF Keyboard.
3. Then press this learning button on RF Keyboard to let receiver recognize signal. As soon as the
linkage is completed, the indicator turns to quick flash.
The remote control uses infrared transmission to control the H663 / H663-RH. It is necessary to
point the remote directly at the H663 / H663-RH. Provided you are facing the H663 / H663-RH, the
remote will function well within a radius of about 3 meters (10 feet) and 30 degrees above or below
the H663 / H663-RH level. If the H663 / H663-RH does not respond to the remote control, move a
little closer or replace the batteries. The keyboard uses RF to control the H663 / H663-RH. It is not
necessary to point the keyboard directly at the H663 / H663-RH. Provided you are facing the H663
/ H663-RH, the keyboard will function well within a radius of about 10 meters without interference.
If the H663 / H663-RH does not respond to the remote control, move a little closer or replace the
batteries.
Press this button
Remote Control and Keyboard Operating Range
Page 17

12
Basic Connections for the H663 / H663-RHs
Many of the connectors on the H663 / H663-RH support the connection of more than one kind of
device. For example, USB printers, keyboards, or scanners can be connected to any of the USB
ports.
Connecting Input Devices
1394 Compliant Device USB Compliant Device
Memory Cards
(MMC/SM/SD/MS/CF/MD)
IR BLASTER
1 2
CD Player
Amplifier / Speakers
or Headphone
Microphone
S/PDIF decoder
USB Compliant Device
1394 Compliant DeviceRGB Port
ADSL Modern or
Router
DVI-I IR Emitter
Antenna
TV
DVD Player / Set Top Box In
Page 18

13
Maintenance
Cleaning the H663 / H663-RH
Refer to the following to clean the H663 / H663-RH case.
1. Wipe off dust with a clean dampened cloth.
2. Moisten the cloth with warm water and wring the cloth out well, then wipe the case.
Warning:
1. Be sure to turn off and unplug the H663 / H663-RH at least an hour before clean-ing.
2. If a little water gets into the H663 / H663-RH interior while cleaning, leave un-plugged in a wellventilated room for several hours before using.
3. To prevent discoloration or fading of the case, do not use any chemical or abrasive alcohol-based
cleaners.
Troubleshooting
►Common Problems and Solutions
These guidelines provide tips to deal with problems you may encounter while us-ing the H663
/ H663-RH. If the problem remains unsolved, contact your dealer for assistance. Check the
following before proceeding to the problem-specific solutions.
• Use some other electrical device to confirm that the electrical outlet is working.
• Ensure the H663 / H663-RH is turned on.
• Ensure all connections are securely attached.
• Ensure the attached device is turned on.
►Tips for Troubleshooting
In each problem-specific section, try the steps in the order suggested. This may help you to solve
the problem more quickly.
Try to pin point the problem and thus avoid replacing non-defective parts. For example, if you
replace batteries and the problem remains, put the original batteries back and go to the next step.
Keep a record of the steps you take when troubleshooting. The information may be useful when
calling for technical support or for passing on to service person-nel.
►Remote Control or Keyboard Problems
Problem: The H663 / H663-RH does not respond to the remote control or the keyboard.
1. Direct the remote control or keyboard towards the remote sensor on the H663 / H663-RH.
2. Ensure the path between the remote and sensor is not obstructed.
3. Check the battery polarity.
4. Replace the batteries.
5. Have the remote control or keyboard serviced.
Page 19

14
►Audio Problems
Problem: There is no sound.
1. Adjust the volume on the remote control.
2. Adjust the volume of the audio source.
3. Check the audio cable connection.
4. Test the source audio output with other speakers.
5. Have the H663 / H663-RH serviced.
Problem: The sound is distorted.
1. Check the audio cable connection.
2. Test the source audio output with other speakers.
3. Have the H663 / H663-RH serviced.
►Video Problems
Problem: Picture is distorted.
1. Check the video cable connections.
2. Check the TV system of disc matches that of your TV set (NTSC/PAL).
3. Have the H663 / H663-RH serviced.
Page 20

15
Board GA - 8I945EF
CPU Pentium D 820 / 830 / 920 / 930 (option)
DRAM DDRII 512 MB (option)
HDD SATAI / SATAII 160GB or 250GB above (option)
Dimensions 438.2 (W) x 325.8 (D) x 60.8 (H) mm
Power Rating 220W Adaptor (100 - 240V; 50 / 60 Hz)
Chipset 945G / ICH7DH / ALC 880 RealTEK / Intel LAN 82562GZ
Front I/O USB 2.0 Port x2 / IEEE 1394 Port (4-pin) / Card Reader / IrDA
Peripherals MCE Remote Control (option) / Keyboard + Trackball (option)
Add-on Cards
Riser Card / ADD card / Tuner card / FIO board /
Card Reader / VFD module
Operating System MCE (option)
A/P GBT driver disk
Rear I/O
USB 2.0 Port / D-Sub / DVI-I / TV-Out / Audio /
LAN (RJ 45) / SPDIF / IEEE 1394 Port / S-Video I/O
Certification
Windows Logo / EMI / Safety
Appendix A Specifications
Page 21

© 2006年02月版權所有
本份文件受到國際版權法的保護,版權為本公司所有,包括所有的照片、圖片及軟
體等。未經Giga-byte Technology股份有限公司書面許可,不得複製本手冊的任何內
容。
本文件若有任何內容修改,恕不另行通知。製造商不對文件內容代表陳述或提供保
證,更未有任何銷售或適合特殊目的暗示保證。製造商保留修訂與隨時更改本文件
內容的權利,不需要通知任何人。
商標識別
Gigabyte與Giga-byte是Giga-byte Technology股份有限公司的商標。
Microsoft和Windows XP是微軟公司的商標。
本手冊所使用的所有其他產品名稱,皆為其所屬公司的財產,並獲授權使用。
Page 22

I
FCC Warning
This equipment has been tested and found to comply with the limits for a Class B digital
device pursuant to Part 15 of the FCC Rules. These limits are designed to provide
reasonable protection against harmful interference when the equipment is operated in a
commercial environment.
This equipment generates, uses, and can radiate radio frequency energy and, if not
installed and used in accordance with the instruction manual, may cause harmful
interference to radio communications. Operation of this equipment in a residential area is
likely to cause harmful interference in which case the user will be required to correct the
interference at his own expense.
Changes or modifications not expressly approved by the parties responsible for compliance
could void the user’s authority to operate the equipment.
重要的安全資訊
建議您在使用H663 / H663-RH之前,先詳細閱讀本節內容。這些安全與使用指示將確保您
安全地使用H663 / H663-RH長達數年之久。請妥善本存本手冊以供未來參考之用。
H663 / H663-RH外殼上的警告標誌
開始操作前,務必先查看H663 / H663-RH底部的電源功率標籤。
注意: 將H663 / H663-RH接上電源之前,請確定電源的電壓在AC 100~240V,
50~60 Hz的範圍之內。請勿嘗試自行維修H663 / H663-RH。如果設備受潮或可能
受損,請將設備送修。無論在任何情況下,都不要自行打開設備外殼。
RATING
LABEL
Page 23

II
一般安全資訊
‧ 請勿在設備上放置書本或袋子等重物。
‧ 避免將具有強烈磁性的物品放在本設備周圍。如果您懷疑立體聲
喇叭可能會干擾設備的運作,請讓喇叭遠離本設備。
‧ 避免在日光直射處或靠近熱源的地方使用本設備。請將其放在通
風良好的地方,以免導致設備過熱。
‧ 為免設備過熱,請勿擋住設備上方、側邊或背部的通風孔。
‧ 請勿打開設備外殼。請勿嘗試自行維修H663 / H663-RH。如果
設備要送修,請連絡合格的服務人員。
‧ 請勿將本設備放在不穩定的表面、台車或架子上。
‧ 避免讓H663 / H663-RH暴露在潮濕或濕氣很重的地方。
請遵循本手冊與設備外殼的所有警告標誌與注意事項。
Page 24

III
用電安全
‧ 本設備只能使用隨附的電源線。
‧ 請勿在電源線上放置任何物品,也不要將電源線放在走道上。
‧ 將設備收藏保存或長期不用時,請取出遙控器的電池。
‧ 將H663 / H663-RH接上電源之前,請確定電源的電壓在AC 100~240V,50~60 Hz範圍
之內。
硬碟分割
強烈建議您不要分割硬碟。
本手冊使用標誌
本手冊使用下列標誌提醒您注意重要資訊。
備註標誌
提供該主題的額外資訊。
提供不應忽略的資訊。
警告您可能損壞設備或導致身體受傷的狀況。
提供該主題的有用資訊。
警告
本電池如果更換不正確會有爆炸的危險
請依照製造商說明書處理用過之電池
Page 25

IV
目錄
第一章 開始使用
1.1 包裝清單 ..........................................................................................................................1
1.2 功能特性導覽 .................................................................................................................2
正視圖 ...............................................................................................................................2
背面視圖 ..........................................................................................................................3
1.3 VFD (真空螢光顯示器) 訊息 .....................................................................................4
1.4 遙控器的功能 .................................................................................................................8
1.5 安裝遙控器電池 .............................................................................................................9
1.6 鍵盤的功能 ......................................................................................................................9
使用軌跡球與按鍵 ........................................................................................................10
快捷鍵 ...............................................................................................................................10
1.7 安裝鍵盤電池 .................................................................................................................10
1.8 設定鍵盤連結 .................................................................................................................11
1.9 遙控器與鍵盤的操作範圍 ...........................................................................................11
第二章 連接輸入裝置
2.1 H663 / H663-RH的基本連接線路 ......................................................................... 12
第三章 基本維護
3.1 H663 / H663-RH的清潔與維護 .............................................................................. 13
3.2 疑難排解 .......................................................................................................................... 13
附錄 A 系統規格 ................................................................................................................... 15
Page 26

1
開始使用
包裝清單
小心拆開H663 / H663-RH的包裝。包裝中除了本使用手冊外,還包含下列項目:
如果有任何項目遺失、損壞或設備無法運作,請立刻連絡您的經銷商。
供無線鍵盤用的兩個3號電
池,以及供搖控器 (MCE)
用的兩個3號電池 (選配)
變壓器
3.5 RCA 訊號線
H663 / H663-RH
無線鍵盤 (選配)
驅動光碟
遙控器 (選配)
回復光碟 (選配)
3.5 x 2 聲音訊號線
機上盒 IR 訊號線 (選配)
S 訊號線
(RCA 訊號線) (4 pin)
Page 27

2
►正視圖
項目 說明
1. 電源鍵
按下電源鍵來啟動H663 / H663-RH
再按一下電源鍵主機則進入待機模式
按住電源鍵幾秒即可將H663 / H663-RH關閉
2. IEEE 1394 (4-pin)
連接使用符合 IEEE 1394 規格的裝置
3. USB 2.0 埠
兩個 USB埠讓使用者可以連接 USB裝置
例如: 外接式遊戲搖桿、滑鼠、鍵盤
4. 無線接收器操縱開關
無線鍵盤學習鍵開關 (讓接收器辨認訊號)
5. LED 顯示器
無線鍵盤的 LED 狀態指示燈
6. 紅外線視窗
此紅外線視窗僅接收遙控器控制的功能
7. 主選單 / 退出按鍵
進入主選單或是離開目前的畫面
8. 方向按鍵
導覽選單和項目
9. 輸入按鍵
確認選擇的項目
10. 回復按鈕
返回到上一個畫面
11. VFD
VFD (真空螢光顯示器)
更多的相關資料請參閱本使用手冊第4頁
12. 讀卡機
六合一讀卡機
13. DVD Super Multi DVD-Multi 燒錄機
14. DVD 退片按鍵
按下此鍵讓 DVD 光碟機退出碟片
功能特性導覽
1 2 4 5 7 8
12
3
14
9 106
11
13
Page 28

3
►背面視圖
項目 說明
1. 電源輸入插孔
連接電源線的DC插孔
2. 麥克風輸入端子
接受麥克風輸入裝置
3. 音訊輸出端子
連接音訊輸出裝置
(例如: 揚聲器、耳機、擴音器)
4. 音訊輸入端子
接受音訊輸入裝置
(例如: 音樂CD播放器)
5. S/PDIF 解碼器
數位音訊輸出接頭
6. VGA
埠 (15-pin)
連接平面螢幕
(例如: 外接式螢幕, LCD 液晶投影機)
7. USB 2.0 埠
兩個 USB埠讓使用者可以連接 USB裝置
例如: 外接式遊戲搖桿、滑鼠、鍵盤
8. IEEE 1394 Port (6-pin)
連接使用符合 IEEE 1394規格的裝置
9. 網路埠
連接乙太網路(10/100/1000-based).
*10. S-Video 埠
S-Video 輸入
*11. CATV
有線電視輸入
12. Video
輸出接孔
影像訊號輸出孔
13. DVI-I 埠
連接數位螢幕
14. 外部紅外線 增強器連接孔
(選配)
外部紅外線增強器連接孔可用來取代任何機上盒的遙控器
可遠端控制廣泛範圍PC的應用
* 埠的位置可能會因不同機型而有所不同。
1 2 4 53 6 7 9
8
12
IR BLASTER
1 2
10
11
13
14
Page 29

4
VFD(真空螢光顯示器) 訊息
H663 / H663-RH正面的LED顯示幕會顯示目前的狀態資訊。除了碟片資訊以外,LED顯示
幕還會顯示下列訊息:
項目 說明
1. 音量比例
顯示音量
2. 音量比例
顯示音量
3. 模式
顯示目前的模式
4. 狀態欄
顯示時間資訊、媒體播放時間及模式狀態
未使用
3
2
4
1
Page 30

5
►正常的Windows模式(未執行Media Center應用程式) / 睡眠模式
狀態:
1. 系統已啟動為正常的Windows模式。尚未執行Media Center應用程式。
2. 系統正處於睡眠狀態。
說明:
1. 顯示時間,時鐘由VFD MCU控管。
2. 顯示左右邊的音量。
3. 執行碟片的動作已經停止。
►啟動Media Center應用程式/在Media Center主畫面
狀態:
1. 按“開始"鍵執行Media Center應用程式,系統處於
Media Center主畫面。
2. 使用者可以利用 ▲ 和 ▼ 選擇MCE中的多媒體。
說明:
1. 無顯示資訊。
2. 執行碟片的動作已經停
止。
►My Video 模式
狀態:
當選擇“My Videos"時,螢幕會出現視訊畫面並處於停止模式。
說明:
1. “顯示“VIDEO"字樣。
2. 執行碟片的動作呈停止狀
態,直到開始播放媒體為
止。
Page 31

6
►My Picture 模式
狀態:
在“My Pictures"畫面中並處於停止模式。
說明:
1. 顯示“PICTURE"字樣。
2. 執行碟片的動作已經停
止。
* 當之前選擇的媒體仍然繼續播放時,執行碟片的動作可以循環進行。
►My Music模式
狀態: 在“My Music"畫面中並處於停止模式。
說明:
1. 顯示“MUSIC"字樣。
2. 執行碟片的動作呈停止狀
態,直到開始播放媒體為
止。
►TV模式
狀態:在“My TV"畫面中並處於停止模式。
說明:
1. 顯示“TV"字樣。
2. 執行碟片的動作呈停止狀
態,直到開始播放媒體為
止。
Page 32

7
狀態:在TV畫面中播放當前的節目。
說明:
1. 按一下“CH_PG"鍵就會
顯示頻道編號。
2. 執行碟片的動作正在進
行。
狀態:在TV畫面中播放TV錄影節目。
說明:
顯示“REC SHOW"字樣。
►音樂 / DVD / 視訊 / 播放模式
狀態:在音樂、DVD、視訊及播放模式
說明:
1. 播放音樂時,會在音樂畫面或主畫面中顯示樂曲時間。
2. 執行碟片的動作正在進行。
3. 如果在圖片畫面中進入“My Pictures",則顯示幕就會出現“PICTURE"字樣。
►光碟燒錄進度
狀態:光碟燒錄進度
說明:
1. 當點狀區塊填滿時,就表示燒錄完成了。
2. 本範例顯示剩下最後2個點就達到100%。
Page 33

8
遙控器的功能
項目 功能
開機/關機
停止
錄影鍵
播放
暫停
倒轉
快轉
上一首
下一首
返回
更多資訊
方向鍵:上/下
輸入鍵:OK
方向鍵:左/右
下個頻道(TV)
上個頻道(TV)
“START"選單
靜音
VOL
提高音量
VOL
降低音量
Page 34

9
電池室在遙控器的底面。如長時間不使用H663 / H663-RH,請取出電池。
安裝遙控器電池
1. 將扣閂往上拉,打開電池蓋。
2. 依正確的正負極方向(+/-)放入2個3號電池。
3. 蓋上電池蓋。
1. 只能使用三號電池。
2. 請依當地法規丟棄使用完畢的電池。
3. 如長時間不使用H663 / H663-RH,請取出電池。
鍵盤的功能
左鍵
左鍵
快速鍵
軌跡球
Page 35

10
►使用軌跡球與按鍵
軌跡球和按鍵的作用與PC滑鼠一樣。滾動軌跡球可以移動螢幕上的游標,左鍵與右鍵的使用
方法則和標準滑鼠相同。
►快捷鍵
除了和標準鍵盤一樣的一般按鍵之外,H663 / H663-RH鍵盤還有一些快捷鍵,其功能簡述如下:
按鍵 功能
電源
電源鍵
AV
MCE/PCM啟動
PC
返回PC螢幕
IE
網際網路
E-MAIL
電子郵件管理員的快捷鍵
電池室在鍵盤的底面。如長時間不使用H663 / H663-RH,請取出電池。
1. 只能使用三號電池。
2. 請依當地法規丟棄使用完畢的電池。
3. 如長時間不使用H663 / H663-RH,請取出電池。
安裝鍵盤電池
1. 如 圖所示抬起 並 取下電池蓋。2. 依正確的正負極方向(+/-)放
入2個3號電池。
3. 裝回電池蓋。
Page 36

11
設定鍵盤連結
按一下此鍵
LED緩慢閃動
1. 取下蓋子檢查是否已經裝妥電池。(請參閱P.12安裝鍵盤電池的操作指示)。
2. 按一下面板上的無線接收器操縱開關。按下此鍵後,其指示燈會亮起(緩慢地),等待來自無線鍵盤
的訊號。
3. 接著按一下無線鍵盤上的學習鍵,讓接收器辨認訊號。一旦連結成功後,指示燈就會快速閃動。
遙控器使用紅外線傳輸來控制H663 / H663-RH。使用時需要將遙控器直接對準H663 / H663-RH。假
設您正面對H663 / H663-RH,則在半徑3公尺(10呎)和H663 / H663-RH上下30度角的範圍內,遙控
器都能正常運作。如果H663 / H663-RH沒有回應遙控器的動作,請稍微靠近一點或更換電池。
鍵盤使用RF傳輸來控制H663 / H663-RH。使用時不需要將鍵盤直接對準H663 / H663-RH。假設您
正面對H663 / H663-RH,則在半徑10公尺(無干擾狀況下),鍵盤都能正常運作。如果H663 / H663RH沒有回應鍵盤的動作,請稍微靠近一點或更換電池。
按一下此鍵
遙控器與鍵盤的操作範圍
Page 37

12
H663 / H663-RH的基本連接線路
H663 / H663-RH的許多接頭都支援多種輸入裝置。例如,USB埠可以連接USB印表機、鍵盤或掃描
器等。
連接輸入裝置
1394 相容裝置 USB 相容裝置
記憶卡
(MMC/SM/SD/MS/CF/MD)
IR BLASTER
1 2
CD 播放器
麥擴音器 / 揚聲器
或耳機
麥克風
S/PDIF
USB 相容裝置
1394 相容裝置RGB 顯示器
ADSL Modern or
路由器(Router)
DVI-I IR 訊號線
天線
TV
DVD 播放器 / 桌上機
Page 38

13
基本維護
H663 / H663-RH的清潔與維護
請依照以下步驟來清潔H663 / H663-RH的外殼
1. 使用乾淨的軟布來擦拭機殼灰塵。
2. 再用溫水沾溼軟布並擰出多餘的水後再擦拭機殼。
注意:
1. 在清潔前,請確認H663 / H663-RH已經關閉並且拔去H663 / H663-RH的電源插頭至少一小時以
上。
2. 如果在清潔的過程不小心有一點水滴進了H663 / H663-RH機殼內,請保持電源關閉並不插上電源
插頭數小時以上,使這些水可以自然蒸發。
3. 若要防止機殼變色產生污點或退色,請不要使用有揮發性的清潔劑。
疑難排解
►常見的問題與解答
以下列出使用H663 / H663-RH時,可能會發生的問題;並且,提供了簡單的解決方法。如果此章
節無法解決您的問題時,請與經銷商或授權服務中心連繫。
請先依下列逐項檢查,再開始查詢解決方法。
‧ 使用其他電氣裝置時,請確認電源已正確連接到主機和電源插座上。
‧ 請確認H663 / H663-RH電源已開啟。
‧ 請確認所有連接已分別正確的連接。
‧ 請確認所有連結裝置已經開啟。
►建議解決方法
請依照每個問答集所提供建議的先後次序步驟來做。這樣可以幫助您更快速的解決您的問題。
準確的找出問題所在,避免將沒有缺陷的元件換掉。例如,當你換電池後問題仍存在,請將原來的
電池換回並繼續下個步驟。
請保留您解決方式的步驟。這個資訊將在您打電話尋求技術支援時非常有幫助。
►遙控器或鍵盤問題
問題: H663 / H663-RH對遙控器或鍵盤指令沒有回應
1. 將遙控器或鍵盤指向H663 / H663-RH的遙控感應器。
2. 請確認遙控器或鍵盤與感應器之間沒有障礙物。
3. 請確認電池的兩極性是否正確。
4. 請替換電池。
5. 請將遙控器或鍵盤送維修。
Page 39

14
►音效問題
問題: 音效沒有作用
1. 使用遙控器調整音量。
2. 請調整audio source的音量。
3. 請檢查音訊訊號線是否已正確連接。
4. 請用其他揚聲器來測試音訊輸出。
5. 請將H663 / H663-RH送維修。
問題: 音效是扭曲的
1. 請檢查音訊訊號線是否已正確連接。
2. 請用其他揚聲器來測試音訊輸出。
3. 請將H663 / H663-RH送維修。
►影像問題
問題: 照片/影像扭曲
1. 請檢查訊號線是否已正確連接。
2. 請檢查電視系統是否與您的電視設定(NTSC/PAL)相同。
3. 請將H663 / H663-RH送維修。
Page 40

15
主機板
GA - 8I945EF
CPU Pentium D 820 / 830 / 920 / 930 (選配)
DRAM DDRII 512 MB (選配)
硬碟
SATAI / SATAII 160GB
或 250GB以上 (選配)
尺寸
438.2 (寬) x 325.8 (深) x 60.8 (高) mm
電源功率
220W 變壓器 (100 - 240V; 50 / 60 Hz)
晶片組
945G / ICH7DH / ALC 880 RealTEK / Intel LAN 82562GZ
前端輸入/輸出
USB 2.0 埠 x2 / IEEE 1394 埠 (4 pin) / 讀卡機 / IrDA
周邊裝置
MCE 搖控器 (選配) / 鍵盤 + 軌跡球 (選配)
附加卡 擴充卡 / ADD卡 / 調頻卡 / FIO卡 / 讀卡機 / VFD模組
作業系統
MCE (選配)
A/P GBT 驅動程式磁片
後端輸入/輸出
USB 2.0 Port / D-Sub / DVI-I / TV-Out / Audio /
LAN (RJ 45) / SPDIF / IEEE 1394 Port / S-Video I/O
認證
Windows Logo / EMI / Safety
附錄 A 系統規格
 Loading...