

Page 1

Ausschlager Weg 41, 1F, 20537 Hamburg, Germany
( description of the apparatus, system, installation to which it refers)
(reference to the specification under which conformity is declared)
in accordance with 89/336 EEC-EMC Directive
EN 55011 Limits and methods of measurement
EN 55013
EN 55014 Limits and methods of measurement
EN 55015 Limits and methods of measurement
EN 55020
77
7 EN 55022 Limits and methods of measurement
77
DIN VDE 0855
part 10
part 12
77
7 CE marking
77
EN 60065
EN 60335
of radio disturbance characteristics of
industrial,scientific and medical (ISM
high frequency equipment
Limits and methods of measurement
of radio disturbance characteristics of
broadcast receivers and associated
equipment
of radio disturbance characteristics of
household electrical appliances,
portable tools and similar electrical
apparatus
of radio disturbance characteristics of
fluorescent lamps and luminaries
Immunity from radio interference of
broadcast receivers and associated
equipment
of radio disturbance characteristics of
information technology equipment
Cabled distribution systems; Equipment
for receiving and/or distribution from
sound and television signals
The manufacturer also declares the conformity of above mentioned product
with the actual required safety standards in accordance with LVD 73/23 EEC
Safety requirements for mains operated
electronic and related apparatus for
household and similar general use
Safety of household and similar
electrical appliances
(Stamp)
Declaration of Conformity
We, Manufacturer/Importer
(full address)
G.B.T. Technology Träding GMbH
declare that the product
VGA Card
GV-N4464TE
is in conformity with
EN 61000-3-2*
77
7 EN 60555-2
77
EN 61000-3-3* Disturbances in supply systems cause
77
7 EN 60555-3
77
77
7 EN 50081-1
77
77
7 EN 50082-1
77
EN 55081-2
EN 55082-2
ENV 55104
EN50091-2
(EC conformity marking)
EN 60950
EN 50091-1
Manufacturer/Importer
Date : Dec. 17, 2003
Disturbances in supply systems cause
by household appliances and similar
electrical equipment "Harmonics"
by household appliances and similar
electrical equipment "Voltage fluctuations"
Generic emission standard Part 1:
Residual commercial and light industry
Generic immunity standard Part 1:
Residual commercial and light industry
Generic emission standard Part 2:
Industrial environment
Generic emission standard Part 2:
Industrial environment
lmmunity requirements for household
appliances tools and similar apparatus
EMC requirements for uninterruptible
power systems (UPS)
Safety for information technology equipment
including electrical bussiness equipment
General and Safety requirements for
uninterruptible power systems (UPS)
Signature:
Name:
Timmy Huang
Timmy Huang
Page 2

DECLARATION OF CONFORMITY
Per FCC Part 2 Section 2.1077(a)
Responsible Party Name:
Address:
Phone/Fax No:
hereby declares that the product
Product Na me:
Model Number:
Conforms to the following specifications:
FCC Part 15, Subpart B, Section 15.107(a) and Section 15.109
(a),Class B Digital Device
Supplementary Information:
This device complies with part 15 of the FCC Rules. Operation is
subject to the following two conditions: (1) This device may not
cause harmful and (2) this device must accept any inference received,
including that may cause undesired operation.
Representative Person’s Name:
Signature:
G.B.T. INC. (U.S.A.)
17358 Railroad Street
City of Industry, CA 91748
(818) 854-9338/ (818) 854-9339
VGA Card
GV-N4464TE
ERIC LU
Eric Lu
Date:
Dec. 17, 2003
Page 3

GV-N4464TE
GeForce™ 4 MX440-8X Graphics Accelerator
User's Manual
Rev. 101
12MD-N4464TE-101
Copyright
© 2003 GIGABYTE TECHNOLOGY CO., LTD
Copyright by GIGA-BYTE TECHNOLOGY CO., LTD. ("GBT"). No part of this manual may be reproduced or transmitted in
any from without the expressed, written permission of GBT.
Trademarks
Third-party brands and names are the property of their respective owners.
Notice
Please do not remove any labels on VGA card, this may void the warranty of this VGA card.
Due to rapid change in technology, some of the specifications might be out of date before publication of this booklet.
The author assumes no responsibility for any errors or omissions that may appear in this document nor does the author make
a commitment to update the information contained herein.
Page 4

Table of Contents
English
1. Introduction ......................................................................................... 3
2. Hardware Installation...........................................................................4
3. Software Installation ............................................................................8
1.1. Features ..................................................................................................... 3
1.2. Minimum system requirement .................................................................... 3
2.1. Unpacking .................................................................................................. 4
2.2. Board layout ............................................................................................... 5
2.3. Hardware installation .................................................................................. 6
3.1. Win® XP driver and utilities installation ....................................................... 8
3.1.1. Operating system requirement ...................................................................... 8
3.1.2. DirectX installation ......................................................................................... 9
3.1.3. Driver installation ......................................................................................... 11
3.1.4. Utilities on driver CD .................................................................................... 13
3.1.5. Taskbar icon ................................................................................................. 15
3.1.6. Display properties pages ............................................................................. 18
3.1.7. nView properties pages ............................................................................... 23
3.2. Win® 98/98SE / Win® 2000 / Win® ME driver installation ........................... 28
3.3. BIOS flash utility ....................................................................................... 28
4. Troubleshooting Tips .........................................................................29
5. Appendix ...........................................................................................30
5.1. How to reflash the BIOS ........................................................................... 30
5.2. Resolutions and color depth table (In Windows® XP) ............................... 31
GV-N4464TE Graphics Accelerator - 2 -
Page 5

1. Introduction
1.1. Features
• Powered by NVIDIA® GeForce™ 4 MX440-8X Graphics Processing Unit (GPU)
• Supports AGP 8X/ 4X/ 2X/ 1X
• 64MB DDR memory accelerates the latest 3D games
• 64-bit memory interface
• 2-pixel pipeline architecture
• Supports DirectX 8.1
• Supports D-SUB, TV-Out connector
1.2. Minimum system requirement
• IBM® or 100% PC compatible with Pentium® III 650MHz or AMD Athlon 650MHz
class processor or higher
• One available AGP3.0 compliant slot or better
• Operating Systems Win® 98/98SE / Win® 2000 / Win® ME / Win® XP
• 64MB system memory
• 50MB of available disk space for full installation
• CD-ROM or DVD-ROM drive
English
Introduction- 3 -
Page 6
2. Hardware Installation
English
2.1. Unpacking
The GV-N4464TE package contains the following:
The GV-N4464TE graphics accelerator
GV-N4464TE user's manual
NVIDIA Series driver and utility CD
PowerDVD CD
TV-Out cable x 1
Expansion cards contain very delicate Integrated Circuit (IC) chips. To protect
them against damage from static electricity, you should follow some precautions
whenever you work on your computer.
1. Turn off your computer and unplug power supply.
2. Use a grounded wrist strap before handling computer components. If you do not have one,
touch both of your hands to a safely grounded object or to a metal object, such as the power
supply case.
3. Place components on a grounded antistatic pad or on the bag that came with the
components whenever the components are separated from the system.
The card contains sensitive electric components, which can be easily damaged by static
electricity, so the card should be left in its original packing until it is installed.
Unpacking and installation should be done on a grounded anti-static mat. The operator should
be wearing an anti-static wristband, grounded at the same point as the anti-static mat.
Inspect the card carton for obvious damage. Shipping and handling may cause damage to
your card. Be sure there are no shipping and handling damages on the card before proceeding.
DO NOT APPLY POWER TO YOUR SYSTEM IF IT HAS BEEN DAMAGED ON THE CARD.
In order to ensure your graphics card working correctly, please use official Gigabyte
BIOS only. Use none official gigabyte BIOS might cause problem on the graphics
card.
GV-N4464TE Graphics Accelerator - 4 -
Page 7
2.2. Board layout
GV-N4464TE
RCA
S-Video
VGA Monitor
Connector
(15pin)
NTSC / PAL TV
English
AV Output
AV Output
NTSC / PAL TV
S-Video Output
Projector
OR
Analog LCD Monitor Analog Monitor
RCA
S-Video
VGA Monitor
Connector
(15pin)
VGA Output
Hardware Installation- 5 -
Page 8

2.3. Hardware installation
Installing Your graphics card.
English
Now that you have prepared your computer, you are ready to install your graphics
accelerator card.
To install your graphics accelerator card:
1. Power off the computer and monitor, then
2. Remove the computer cover. If necessary,
disconnect the display cable from the back
of your computer.
consult your computer's manual for help
in removing the cover.
3. Remove any existing graphics card from
your computer.
Or, if your computer has any on-board
graphics capability, you may need to
disable it on the motherboard. For more
information, see you computer
documentation.
GV-N4464TE Graphics Accelerator - 6 -
Page 9
4. Locate the AGP slot. If necessary, remove
the metal cover from this slot; then align
your graphics card with the AGP slot, and
press it in firmly until the card is fully eated.
5. Replace the screw to fasten the card in
place, and replace the computer cover.
6. Plug the display cable into your card; then
turn on the computer and monitor. If your
graphics card came with a DVI connector,
you can connect a flat panel display to the
appropriate connector, as shown below...
English
To TV or VCR
To VGA Monitor
To TV or VCR
You are now ready to proceed with the installation of the graphics card driver. For detailed
instructions, select your operating system from the list below.
Hardware Installation- 7 -
Page 10

3. Software Installation
English
In this manual, we assume that your CD-ROM Drive letter to be Drive D:
The installation of Win® 98/98SE / Win® 2000 / Win® ME / Win® XP drivers is very simple.
When you insert the driver CD into your CD-ROM drive, you can see the AUTORUN
window (if it does not show up, run "D:\setup.exe"). Then you can follow the guides to
setup your graphics card driver. (Please follow the subsection 3.1.3 "Driver installation"
to install the driver for your graphics accelerator.)
3.1. Win® XP driver and utilities installation
3.1.1. Operating system requirement
• When loading the graphics card drivers for the system, please make sure your
system has installed DirectX 8 or later version.
• If you install the graphics card drivers for the motherboard, which consist of SIS,
ALI or VIA chipsets, please install the appropriate driver program for that
motherboard. Or please contact your motherboard nearest dealer for motherboard
driver.
GV-N4464TE Graphics Accelerator - 8 -
Page 11
3.1.2. DirectX installation
Install Microsoft DirectX to enable 3D hardware acceleration support for Windows® 98/
98SE / Windows® 2000 / Windows® ME or Windows® XP to achieve better 3D performence.
English
0 Note: For software MPEG support in Windows® 98/ 98SE/ Windows® 2000 / Windows
ME or Windows® XP, you must install DirectX first.
Step 1. When autorun window show up,
click Install DirectX 9 item.
Click "Install DirectX 9" item.
Step 2. Choose I accept the agreement and
Click "Next" button.
®
Step 3. Click "Next" button.
Software Installation- 9 -
Page 12
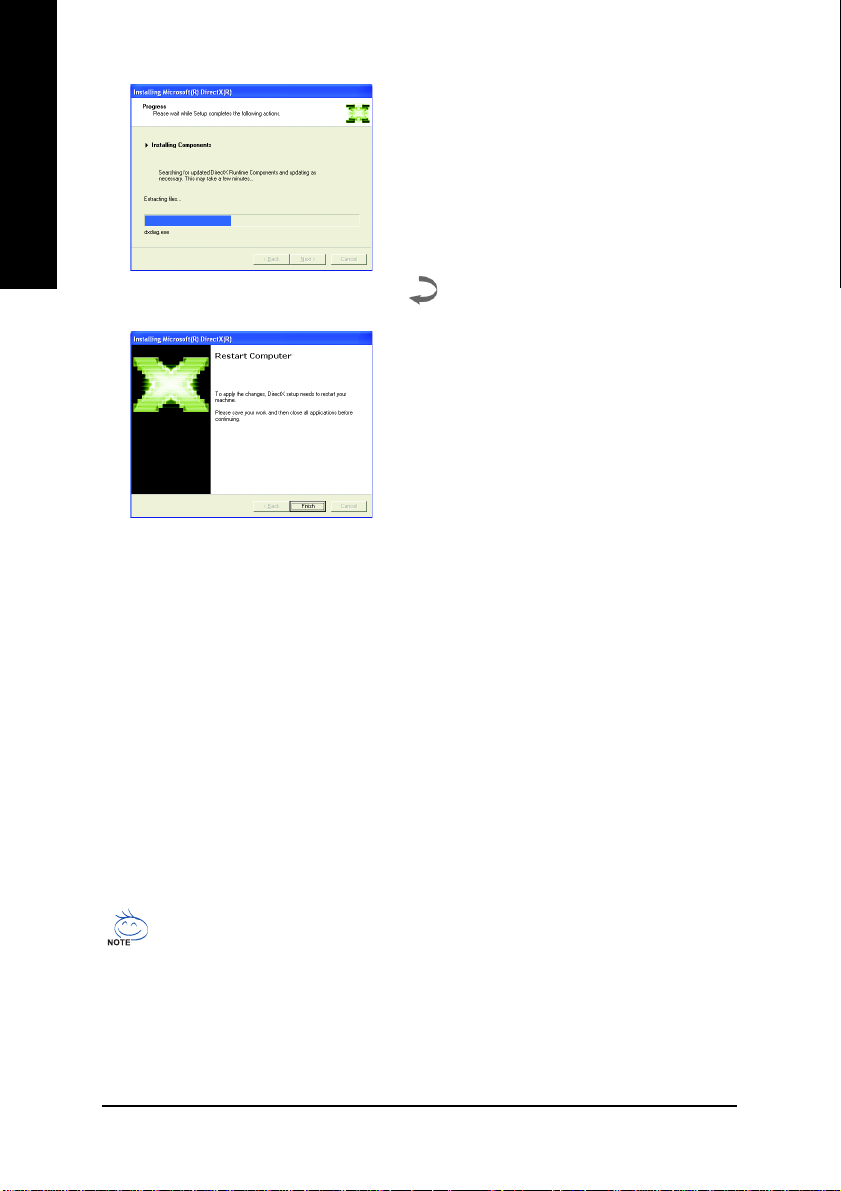
English
Installing the components.
Step 4. Click "Finish" to restart computer.
Then the DirectX 9 installation is completed.
DirectX 9.0 is the up-to-date runtime library for all Windows operating system. This version
is capable of updating your DirectX of your operating system to what is required for your
graphics accelerator hardware to run to its best performance.
For example, if your graphics accelerator can support DirectX 8.1, updating with DirectX
9.0 can upgrade your operating system to the fullset of DirectX 8.1.
GV-N4464TE Graphics Accelerator - 10 -
Page 13

3.1.3. Driver installation
A. New hardware found
After the graphics card is inserted into your computer at the first time, the windows will
automatically detect a new hardware in the system and pop out a "New Hardware Found"
message. The following is the step-by-step installation guide.
Step 1: Found new hardware wizard: Video controller (VGA Compatible)
Click "Next" button to install the driver. (There
is a driver CD disk that came with your graph-
ics accelerator, please insert it now.)
Or click the "Cancel" button to install the driver
from AUTORUN window.
Step 2: Found new hardware wizard: Searching and installing
The wizard will search for the driver and install it automatically.
English
Step 3: Found new hardware wizard: Finish
Click the "Finish" button to finish the installation.
Software Installation- 11 -
Page 14

B. Driver installation (Autorun Window)
Insert the driver CD disk into your CD-ROM, and then you can see the AUTORUN window.
If it does not show up, please run "D:\setup.exe".
English
Step 1. When autorun window show up,
click Install Display Driver item.
Click "Install Display Driver" item.
Step 2. Click "Next" button.
Windows installings the components.
Step 3. Click "Finish" button to restart computer.
Then the driver installation is completed.
GV-N4464TE Graphics Accelerator - 12 -
Page 15

3.1.4. Utilities on driver CD
Insert the driver CD disk into your CD-ROM, and then you can see the AUTORUN window.
If it does not show up, please run "D:\setup.exe".
• Install V-Tuner:
Step 1. When autorun window show up,
click V-Tuner item.
Click "V-Tuner" item.
Step 2. Click "Next" button.
English
Step 3. Enter your name and company.
Step 4. Click "Finish" button to restart computer.
Then the V-Tuner installation is completed.
Software Installation- 13 -
Page 16

V-Tuner (Overclock Utility)
V-Tuner lets you adjust the working frequency of the graphic engine and video memory
English
(Core Clock and Memory Clock).
Display & Adjust
Core Clock
Display Core Clock
Link to the Website of Gigabyte
Min. V-Tuner
Help Description
Close V-Tuner
Display Memory Clock
Display & Adjust
Memory Clock
Close V-Tuner to
System Tray
GV-N4464TE Graphics Accelerator - 14 -
Page 17

3.1.5. Taskbar icon
After installation of the display drivers, you will find a GBT icon on the taskbar's
status area. Right-clicking this icon opens the GBT control panel, showing a menu
composed of shortcut of the graphics card's enhanced and other functions.
You may click the "Display Properties" item, and then click Settings. Click "Advanced"
after clickng Settings. Click the appropriate tab to change your display settings.
Right click the icon.
English
Click "VGA Information" item
into the "VGA Info" and "Color
Adjust"tabs.
You can link to GBT website for updated information about the
graphics accelerator, latest drivers, and other information.
Software Installation- 15 -
Page 18

VGA Information
VGA Info lists the relevant information about your card.
English
Color Adjust
Color Adjust allows you to make color adjustments, such as brightness, contrast and
gamma values for each or all of RGB colors.
GV-N4464TE Graphics Accelerator - 16 -
Page 19

After installation of the display drivers, you will find a NVIDIA icon on the taskbar's
status area. Clicking this icon open the control panel.
Right click the icon.
You can adjust the properties of the
graphics accelertaor from here.
English
You can enable the nView function.
Software Installation- 17 -
Page 20

3.1.6. Display properties pages
The screen shows the information of display adapter, color, the range of display area
and the refresh rate.
English
Settings (Resolutions and Color depth for windows)
The Setting properties page allows you to adjust the screen resolution and color quality
settings.
Click "Advanced", into details settings:
You can move the slider to change
the resolution.
You can click the item to change
the color depth.
Click "Advanced" icon for adapter and setting.
GeForce4 MX 440 with AGP8X properties
This page shows the Adapter, System and
Driver version information.
You can select other properties from the pop-out menu.
GV-N4464TE Graphics Accelerator - 18 -
Page 21

Screen Adjustment properties
Display Timing properties
English
Click the icons on the desktop image to adjust the screen to
the desired position.
Note: On certain monitors, the screen may go blank momentarily
during adjustment.
Select the proper timing mode for your display.
• Auto-Detect (Windows determines the proper mode.)
• General Timing Formula (GTF)
• Discrete Monitor Timings (DMT)
• Fixed Aspect Ratio Timings
Color Correction properties
The Color Correction Properties is used to adjust the color
settings. It also allows gamma control for video playing of
the Video Overlay. The color settings affect all display
devices mapped to the view. You can change red, green,
and blue display colors. Set Desktop and Video Overlay
brightness (gamma) levels can also be changed.
Software Installation- 19 -
Page 22

Performance and Quality Settings properties
English
Direct3D Settings properties
The sliders lets to decide whether your application should
use qulity or high performance texture.
• Image Settings: Moving the slider to the left will maximize
application performance, while moving the slider to the
right will provide excellent 3D image quality.
• Antialiasing: Improves image quality by removing jagged
edges from 3D images.
• Anisotropic Filtering: Use a texture filtering technique that
blends multiple texture samples together. It will result in
high quality textures, with a negligible reduction in the
application's performance.
Performance and Compatibility options.
• Mipmap detail level
• Maximum system memory for PCI mode textures
• Enable fog table emulation
• Custom Direct3D settings
More Direct3D button
Texel Alignment
The slider lets you position the texel origin between the
upper-left corner and the center of the texel.
GV-N4464TE Graphics Accelerator - 20 -
Page 23

OpenGL Settings properties
Overlay Controls properties
English
Performance and Compatibility options.
• Disable support for enhanced CPU instruction sets.
• Multi-Display Hardware Acceleration
• Default Color Depth (for textures)
• Buffer-Flipping Mode
• Vertical Sync
• Custom OpenGL settings
The Overlay Controls Properties can adjust Overlay zoom
contorls and Overlay color controls. There is only one video
overlay, which is only available on the Primary display. The
video overlay controls are automatically activated during
playback of any video file type that supports overlay
adjustments. The "Adjust Colors" button will access "Color
Correction" properties page.
Troubleshooting properties
The NVIDIA settings taskbar utility lets you conveniently
access various features and presets you've configured in
the Display Properties directly from the Windows taskbar.
• Display the NVIDIA Settings icon in the taskbar
The Desktop Manager provides enhanced nView multi-
display functionality and helps you organize your
applications for use with multiple displays and desktops.
• My connected TV does not appear in this list.
Software Installation- 21 -
Page 24

NV Rotate properties
English
Refresh Rate Overrides properties
The NV Rotate Properties is used to rotate the screen. If
your monitor is capable of operating in either Landscape or
Portrait mode, you can adjust the screen by this properties.
• Landscape (0 degree rotation)
• Portrait (90 degree rotation)
• Inverted Landscape (180 degree rotation)
• Inverted Portrait (270 degree rotation)
Click "Override refresh rates" to select refresh rate overrides
to be used in applications.
Change Resolutions properties
The Change Resolutions Properties allows you to adjust
the screen resolution, color quality and monitor settings
(screen rdfresh rates). Or you can customize resolutions
and refresh rates.
GV-N4464TE Graphics Accelerator - 22 -
Page 25

Screen Menus properties
The Screen Menus Properties can remove infrequently
used screens by dragging them from the screen menu to
the list below. Restore screens to the menu by dragging
them individually, or click Restore Defaults.
To begin, check the Enable screen menu editing check
box. To return to normal navigation mode, uncheck the check
box.
3.1.7. nView properties pages
nView is a set of desktop tools designed to help you be more productive when using your
graphics card. Using nView you can set up multiple desktops to work with your
applications. Multiple desktops give you extra desktop areas on which to run your
applications so you won't have to crowd several open application windows on one desktop.
You can click on the NVIDIA icon on the taskbar's to enable the nView or choose the
Display Properties\Advanced\Desktop Management.
Access nView properties page:
A: right click icon\nView Desktop Manager\
nView Properties
B: Choose Display Properties\Advanced\
GeForce tab\Desktop Management
English
Click the item to start nView Properties.
Software Installation- 23 -
Page 26

nView Desktop Management properties
English
nView Profile properties
This tab contains information about the nView Desktop
Manager. The setup wizard can also be accessed from this
tab.
This tab contains a record all nView display settings for easy
software setup. You can either select a profile from the list
below or create your own custom profile.
nView Windows properties
This tab allows you to control of window and dialog box
placement when using multiple monitors.
GV-N4464TE Graphics Accelerator - 24 -
Page 27

nView Applications properties
nView Desktops properties
English
This tab allows you to control nView settings on a per
application basis.
This tab allows you to create up to 32 unique desktops.
nView User Interface properties
This tab allows customization of the nView user interface.
Software Installation- 25 -
Page 28

nView Effects properties
English
nView Zoom properties
This tab provides special windows effects that you can apply
to your applications.
This tab provides dynamic zoom functionality on the desktop.
Also enables full screen video playback via the video
mirroring control button.
nView Hot Keys properties
This tab lets you perform various actions with shortcut keys
or key combinations.
GV-N4464TE Graphics Accelerator - 26 -
Page 29

nView Mouse properties
nView Tools properties
English
This tab can modify and extend mouse behavior with
kinematic actions.
This tab can improve nView functionality for mobile and
desktop users.
Software Installation- 27 -
Page 30

3.2. Win® 98/98SE / Win® 2000 / Win® ME driver installation
Please make sure the Windows have installed Windows Service Pack version 2 (or later)
English
before installing the graphics accelerator driver.
With Windows running on your computer, you need to install the graphics card driver to
take advantage of the higher performance, resolutions, and special graphics features of
the graphics card. To ensure you install the latest driver, insert the Installation CD that
shipped with your graphics card.
To install the graphics card driver for Win® 98/98SE / Win® 2000 / Win® ME, please insert
the Installation CD. Then the AUTORUN window will show up. Click Install Display Driver
item, and follow the wizard to install the driver.
If Windows® does not show the CD automatically, please run following steps:
1. Click the Start button on the control bar.
2. Select Run.
3. Type the following: D:\SETUP.exe
(If D is not your CD-ROM drive, substitute D with the correct drive letter.)
4. Click "OK".
5. Click on "Install Display Drivers" to begin the Installation Wizard.
6. Click "Next".
7. Click "Yes" to the license agreement.
8. Follow the Wizard's on-screen instructions to complete the installation.
3.3. BIOS flash utility
BIOS update procedure:
0Note: Please download the newest BIOS from our website (www.gigabyte.com.tw)
or contact your local dealer for the file.
0If you want to realize the BIOS flash information, please refer to detail on subsection
5.1. "How to reflash the BIOS".
GV-N4464TE Graphics Accelerator - 28 -
Page 31

4. Troubleshooting Tips
The following troubleshooting tips may help if you experience problems. Contact your
dealer or GBT for more advanced troubleshooting information.
Check that the card is seated properly in the AGP slot.
Ensure that the display cable is securely fastened to the card's display connector.
Make sure that the monitor and computer are plugged in and receiving power.
If necessary, disable any built-in graphics capabilities on your motherboard. For
more information, consult your computer's manual or manufacturer.
(NOTE: Some manufacturers do not allow the built-in graphics to be disabled or to
become the secondary display.)
Make sure you selected the appropriate display device and graphics card when
you installed the graphics driver.
If you have problems during bootup, start your computer in Safe Mode. In Win-
dows® 98 SE and Windows® Me, press and hold the CTRL key until the Microsoft
Windows® Startup Menu appears on the screen. Then select the number for Safe
Mode, and press Enter. (You can also use F8 to bring up the Microsoft Windows
Startup Menu.) In Safe Mode, bring up the Device Manager and check for dupli-
cate display adapter and monitor entries if you are only using one graphics card.
English
®
®
For more assistance, use the Troubleshooting Guide located in the Windows® Help
or contact your computer manufacturer.
If necessary, adjust your monitor's setting by monitor's adjust panel to make the
screen looks focused, crisp, and sharp. (Please refer to the monitor’s manual.)
Troubleshooting Tips- 29 -
Page 32

5. Appendix
English
5.1. How to reflash the BIOS
How to reflash the BIOS for your graphics card?
1. Extract the Zip file to the drive C: or A:
2. Restart your PC in MS-DOS mode.
3. Change the command path to the file location C:\> or A:\>
We use GV-N4464D VGA card and NVFLASH BIOS flash utility as example.
(This function only for Windows 98/98SE, If your OS is Windows 2000/ Windows ME/
Windows XP. Please use the bootable disk to MS-DOS mode.)
4. Backup BIOS command : C:\> nvflash -b <filename>
5. Reflash BIOS command as below : C:\> nvflash -f <filename>
5. Reboot your PC when it's done.
GV-N4464TE Graphics Accelerator - 30 -
Page 33

5.2. Resolutions and color depth table (In Windows® XP)
GV-N4464TE Single Display Stardard Modes
Display Refresh Color Depth (bpp)
Screen Rate 8bpp(256 color) 16bpp(65K color) 32bpp(16.7M)
Resolution (Hz) Standard mode High mode True mode
320 x 200 60 333
70 333
72 333
75 333
320 x 240 60 333
70 333
72 333
75 333
400 x 300 60 333
70 333
72 333
75 333
480 x 360 60 333
70 333
72 333
75 333
512 x 384 60 333
70 333
72 333
75 333
640 x 400 60 333
70 333
72 333
75 333
640 x 480 60 333
70 333
72 333
75 333
85 333
100 333
120 333
140 333
144 333
150 333
170 333
200 333
240 333
To be continued...
- 31 -
Appendix
English
Page 34

Display Refresh Color Depth (bpp)
Screen Rate 8bpp(256 color) 16bpp(65K color) 32bpp(16.7M)
Resolution (Hz) Standard mode High mode True mode
720 x 480 60 333
English
720 x 576 60 333
800 x 600 60 333
848 x 480 60 333
1024 x 768 60 333
70 333
72 333
75 333
85 333
100 333
120 333
140 333
144 333
170 333
200 333
240 333
70 333
72 333
75 333
85 333
100 333
120 333
140 333
144 333
170 333
200 333
240 333
70 333
72 333
75 333
85 333
100 333
120 333
140 333
144 333
150 333
170 333
200 333
240 33X
To be continued...
GV-N4464TE Graphics Accelerator - 32 -
Page 35

Display Refresh Color Depth (bpp)
Screen Rate 8bpp(256 color) 16bpp(65K color) 32bpp(16.7M)
Resolution (Hz) Standard mode High mode True mode
1152 x 864 60 333
70 333
72 333
75 333
85 333
100 333
120 333
140 333
144 33X
150 333
170 333
200 33X
1280 x 720 60 333
70 333
72 333
75 333
85 333
100 333
120 333
140 333
144 33X
150 333
170 33X
1280 x 768 60 333
70 333
72 333
75 333
85 333
100 333
120 333
140 333
144 33X
150 333
170 33X
To be continued...
English
- 33 -
Appendix
Page 36

Display Refresh Color Depth (bpp)
Screen Rate 8bpp(256 color) 16bpp(65K color) 32bpp(16.7M)
Resolution (Hz) Standard mode High mode True mode
1280 x 960 60 333
English
1280 x 1024 60 333
1360 x 768 60 333
70 333
72 333
75 333
85 333
100 333
120 333
140 333
144 33X
150 333
170 33X
70 333
72 333
75 333
85 333
100 333
120 333
140 333
144 33X
150 333
170 33X
70 333
72 333
75 333
85 333
100 333
120 333
140 333
144 33X
150 333
170 33X
To be continued...
GV-N4464TE Graphics Accelerator - 34 -
Page 37

Display Refresh Color Depth (bpp)
Screen Rate 8bpp(256 color) 16bpp(65K color) 32bpp(16.7M)
Resolution (Hz) Standard mode High mode True mode
1600 x 900 60 333
70 333
72 333
75 333
85 333
100 333
120 333
140 33X
144 33X
150 33X
1600 x 1024 60 333
70 333
72 333
75 333
85 333
100 333
120 33X
1600 x 1200 52 333
60 333
70 333
72 333
75 333
85 333
100 333
120 33X
1920 x 1080 30 333
60 333
70 333
72 333
75 333
85 333
100 33X
To be continued...
English
- 35 -
Appendix
Page 38

Display Refresh Color Depth (bpp)
Screen Rate 8bpp(256 color) 16bpp(65K color) 32bpp(16.7M)
Resolution (Hz) Standard mode High mode True mode
1920 x 1440 60 333
English
2048 x 1536 60 333
70 333
72 33X
75 333
85 33X
70 33X
72 33X
75 33X
* Lower maximum refresh rates at some resolutions when using lower bandwidth memory configuration.
GV-N4464TE Graphics Accelerator - 36 -
Page 39

English
- 37 -
Appendix
Page 40

English
GV-N4464TE Graphics Accelerator - 38 -
 Loading...