

Page 1
Getting familiar with your unitSpecification
Hardware
Processor : Intel D2550 1.86GHz Dual-Core processor
Memory : DDR3 4GB
Internal HDD : 3.5” SATA II x 4 Hot-swappable
I/O Interface : 2 x RJ45, 2 x USB 2.0, 2 x USB 3.0,
1 x D-Sub VGA
LAN : 2 x 10/ 100/ 1000Mbps
Size (HxWxD) : 220 x 183.5 x 146.5 (mm)
Weight : 3.5kg excluded HDD
Max Internal Capacity : 16TB (4 x 4TB)
Front LED : 1 x PWR, 1 x SYS, 1 x EXT, 4 x HDDs, 2 x LANs
Power : External 90W power adapter
PC Operating System Support
File sharing for computers running on: Microsoft Windows 7 32 & 64-bit
Microsoft Windows Vista 32 & 64 -bit
Microsoft Windows XP Home SP2
Microsoft Windows XP Professional SP3
Mac OS X or later
Remote access & system backup to computers running on: Microsoft Windows 7 32 & 64-bit
Microsoft Windows Vista 32 & 64 -bit
Microsoft Windows XP Home SP2
Microsoft Windows XP Professional SP3
VDI (virtual desktop infrastructure) is enabled to let users connect to system by their notebook or tablet devices,
sharing applications on GR-EZI14H.
Warranty
1 year limited hardware warranty and software technical support.
To extend warranty, please contact GIGABYTE sales team.
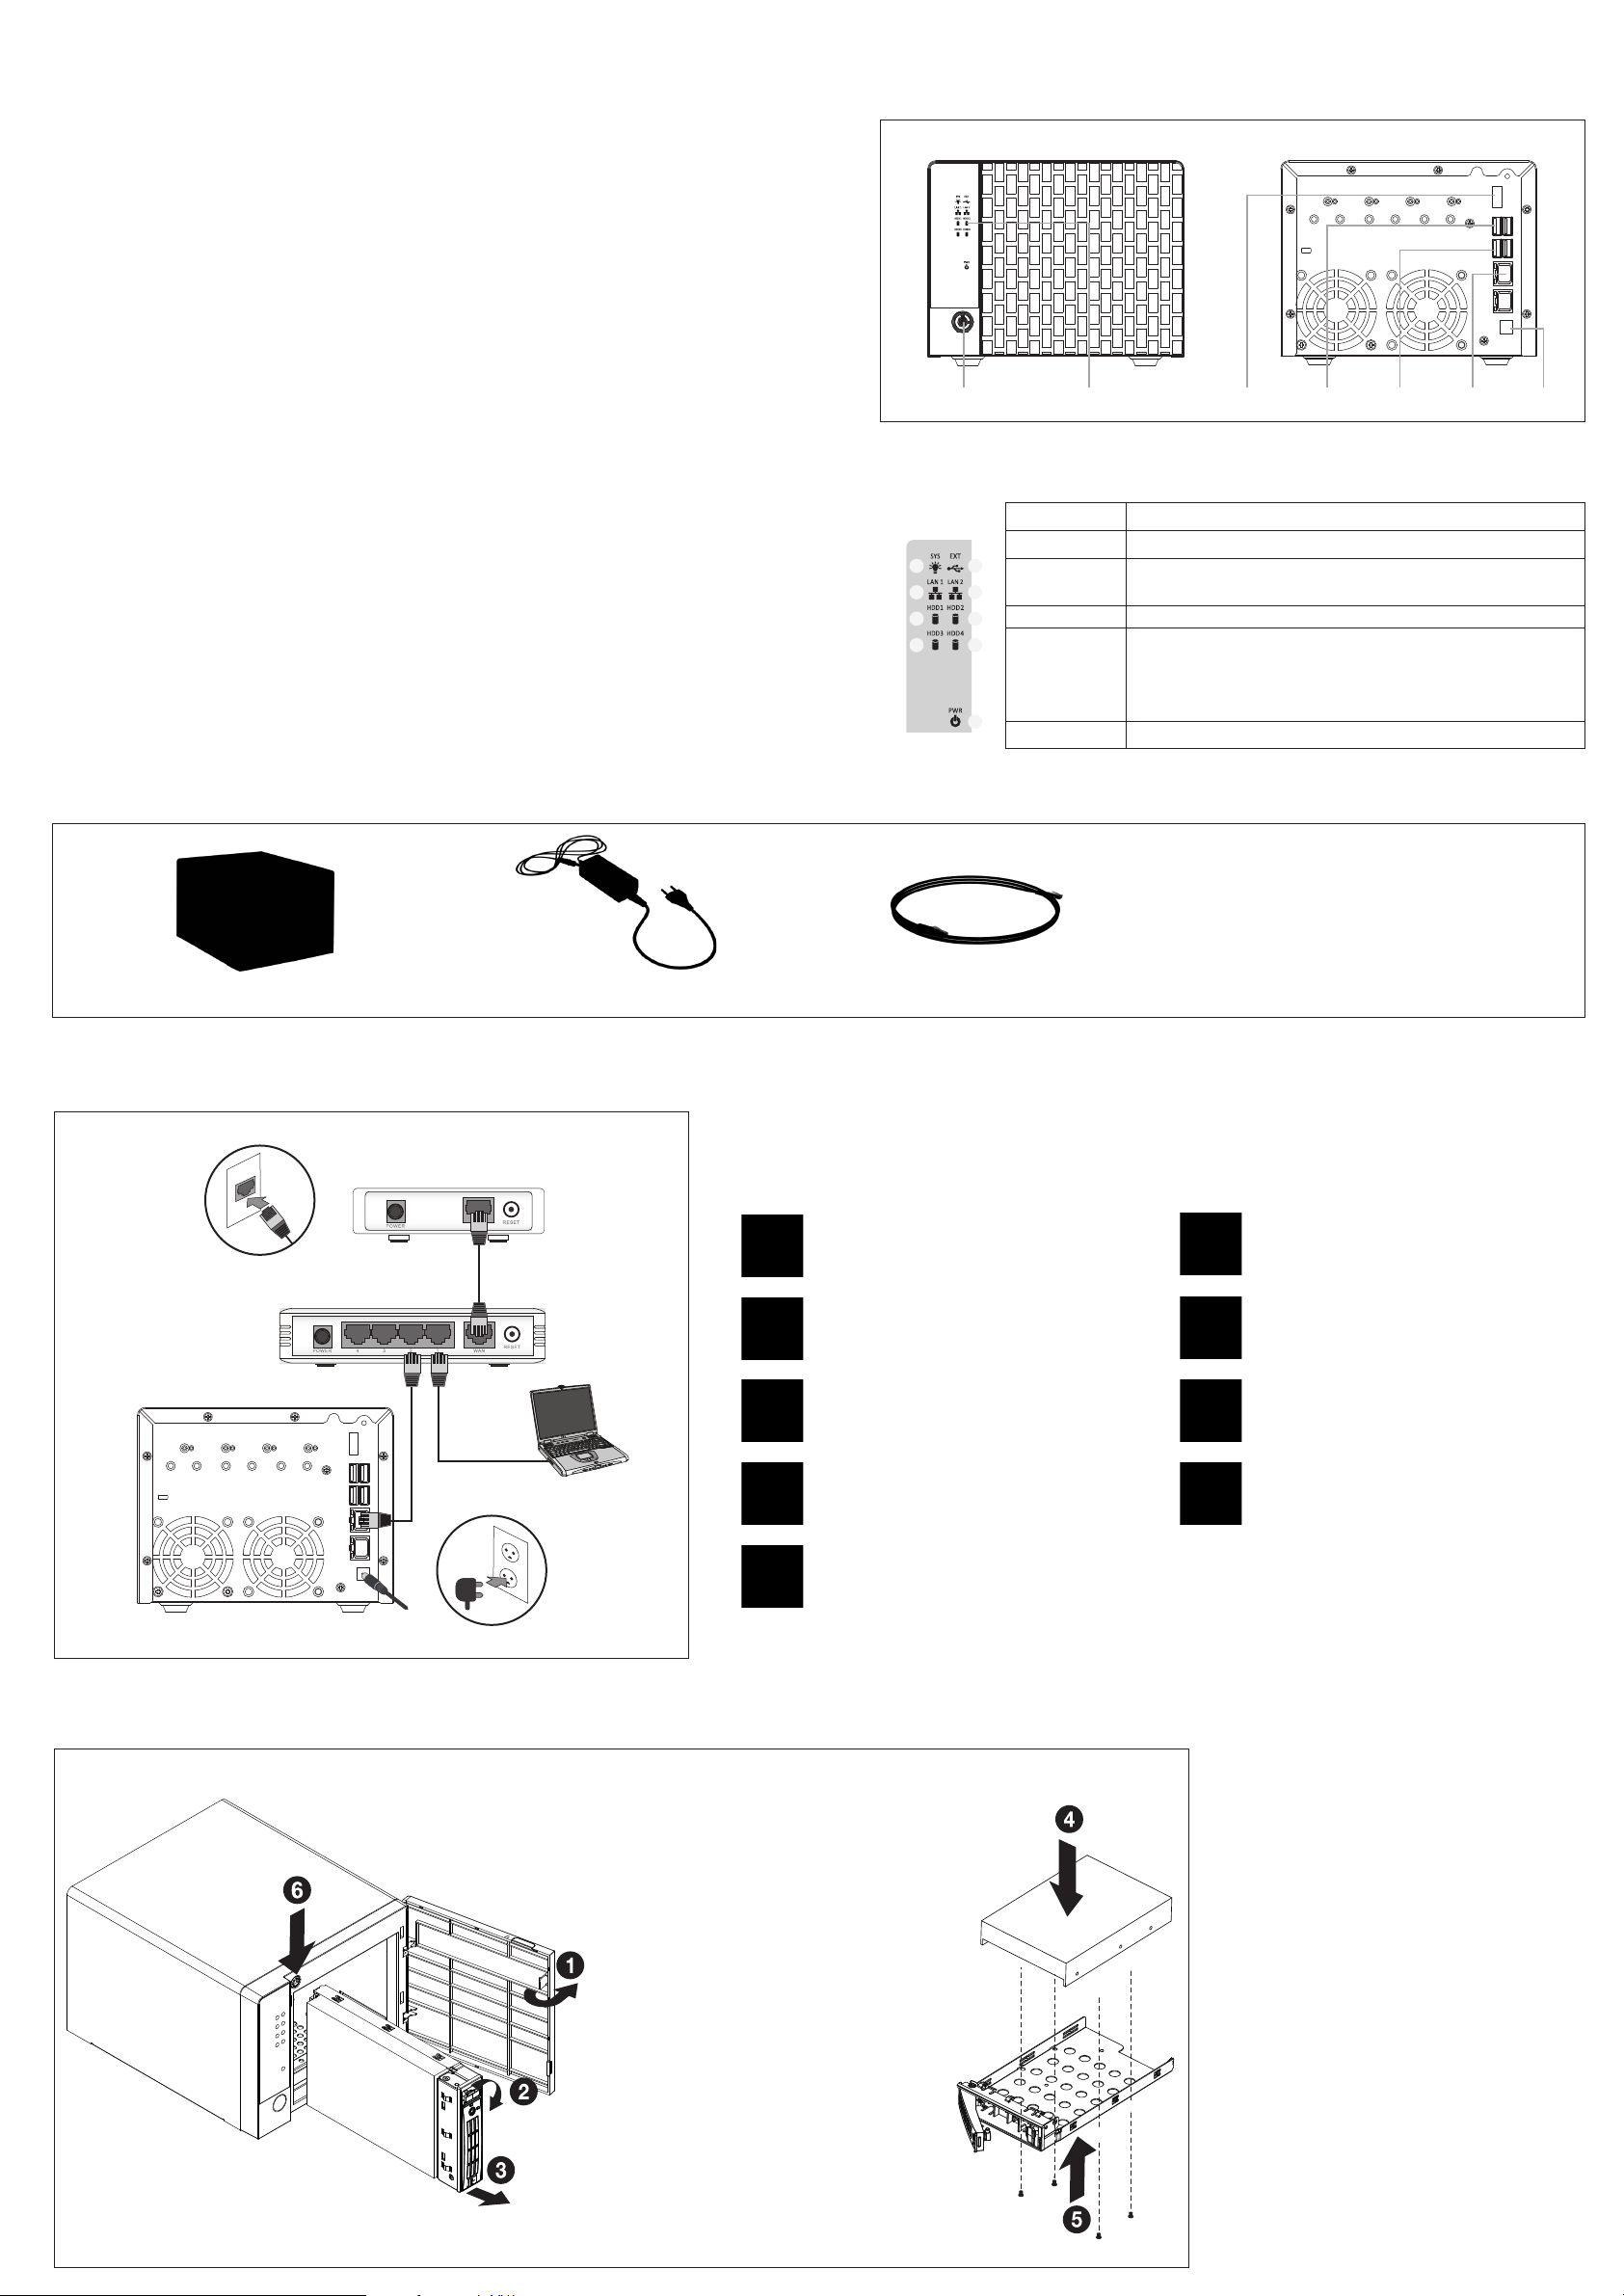
GR-EZI04H Front View GR-EZI04H Rear View
Key Lock Front Panel LED VGA D-Sub USB 3.0 USB 2.0 DC- InLAN Por t
Front LED
Description
1) System LED
1
3
5
7
2
4
6
8
9
2) External LED
3~4) LAN LED
5~8) Disk LED
9) Power LED
Solid Blue: System is power-on
When device is plugged in USB 3.0 port
Solid Blue: Network link / Blinking Blue: Network activity
Solid Blue: Disk detected
Blinking Blue: Disk activity
Solid Blue: System power ON
Package Contents
Adapter & Power cord x 1 RJ-45 LAN cable x 2Main unit x 1 (screws, key & Disk label in HDD tray)
Power & NetworkConnections
Cable / ADSL / VDSL modem
Internet
Cable port on the wall
or
IP Router
Cautions & Checklist
Back up your system periodically to avoid any potential data loss. GIGABYTE disclaims any responsibility of all sorts of data loss or
recovery. Should you return any components of GR-EZI04H package for refund or maintenance, make sure they are carefully
packed for shipping. Any form of damages due to improper packaging will not be compensated.
Do’s and Don’ts
GR-EZI04H can operate normally in the temperature
℃~35℃ and relative humidity of 0%~90%.
of 5
Please make sure the environment is well-ventilated.
The power cord and devices connected to
GR-EZI04H must provide correct supply voltage.
Use the at head screws in the product package to
secure the hard disks into the GR-EZI04H.
Do not place GR-EZI04H in direct sunlight or near
chemicals. Make sure the temperature and
humidity of the environment are in optimized level.
PC or Notebook
Power cable
Installing an Internal Hard Disk
Please refer to the following figure how to install an internal hard disk of GR-EZI04H.
01.
02.
03.
Do not place any objects on top of the GR-EZI04H as
this may cause overheating and interfere it’s normal
operation.
Do not place GR-EZI04H near any liquids. Do not
place GR-EZI04H on any uneven surfaces as to avoid
it falling o and getting damaged.
Do not attempt to repair your GR-EZI04H under any
conditions. Improper disassembly or the product
may expose you to electric or other risks.
Open the bezel door.
Press the release button.
Pull the locking lever and remove the
HDD tray.
Risk of explosion if battery is replaced by an
incorrect type. Dispose of used batteries according
to the instructions.
Unplug the power cord and all connected cables
before cleaning. Wipe GR-EZI04H with a damp
towel. Do not use chemical or aerosol to clean
GR-EZI04H.
For any enquiries, please contact the distributor.
Slide hard disk into blank.
04.
Secure the hard drive to the tray with
4 screws as shown. Do not over tighten
05.
the screws. Slide the blank into the bay
until it locks into place.
Press power button to boot up.
06.
(Warning) If you install a hard disk that contains data, please back it up before installation just in case.
Page 2
OS Installation Steps
1. Regarding USB recorder installation, please connect USB signal cable in
USB 2.0 port, USB power cable in USB 3.0 port. (Blue color)
2. Connect USB keyboard in USB 3.0 port (Blue color) and USB mouse in USB
2.0 port, please refer to below picture.
USB Keyboard
USB Recorder
Signal Cable
3. Leave one hard disk drive in HDD tray 1 and remove hard disk drives in
other HDD tray.
4. If you have changed BIOS item “SATA Conguration”, please power-on
the GR-EZI14H, then press F2 to enter BIOS setup utility menu.
5. Switch to “Advanced” screen and view “SATA Conguration” item.
6. The setting of “SATA Mode” should be “AHCI Mode”, this is factory default
value, showed as following. If the setting is dierent, change it to “AHCI
Mode”, and then save to exit.
USB Recorder
Power Cable
USB Mouse
10. Select your USB DVD-ROM or USB DVD recorder with prex “UEFI: ” as
boot device, example as following
11. The installation screen would display af ter you pressed enter key.
12. Click “Start WHS2011 Recovery” button to start, and click “OK” to conrm.
14. Remove DVD-ROM and click “OK” to reboot machine after installation.
15. It will enter the setup phase and please wait to completion.
16. DO NOT login while setup, and it will power-o itself after completion.
13. Replace “Windows Home Server 2011 Disc 2” to continue.
7. Power-o the GR-EZI14H.
8. Put “Windows Home Server 2011 Disc 1” into USB DVD-ROM, and connect
it to GR-EZI14H.
9. Power-on the GR-EZI14H again, then press F10 to open boot menu.
Create Windows Home Server 2011 Software RAID
1. To use RAID mode, after recovery setup, install hard disk drives in other
HDD tray, and then press power button to boot up the GR-EZI14H.
2. Click on “Start” menu and select “Computer”.
3. Click on USB mouse right button to open “Manage” item.
6. Such as New RAID-5 Volume, click on “Next” as below screenshot.
7. Click on “Add” to add Disk 2 and Disk 3 in “Selected:”
17. Windows Home Server 2011 OS username and password both “password”.
18. You can read detailed user’s manual les in the Recovery disc #2 “USER’S
MANUAL” folder.
19. Regarding Windows Home Server 2011 operation system product key and
OVD software activation code, please check the NAS chassis bottom side’s
label.
10. Click on “Next ”.
11. Click on “Finish”.
4. Open “Disk Management” item.
5. Select “Disk 1” to create RAID mode
8. Click on “Next”.
9. Click on “Next”.
Recovery Steps
We could restore “Windows Home Server 2011” as factory default without installation disc.
1. Connect keyboard and mouse to GR-EZI14H via USB.
2. Leave one HDD in tray 1 and remove HDDs in other tray.
3. Power-on the GR-EZI14H.
4. After the booting screen appearing, keep to press F1 until vanish.
5. Following steps are the same from step 11 of operation system installation.
12. After you conrmed below information, click on “Yes”.
13. You can see Disk 1, Disk 2 and Disk 3 resynching.
PN: ooxx-ooo-xxxx
 Loading...