

Page 1

GB-AEGT-SI
GB-AEGTN-SI
24" AIO System
User's Manual
Rev. 2.0
Page 2

Table of Contents
Overview Of Your Documentation ...................................................................................4
Document Type ........................................................................................................... 4
Document Type ......................................................................................................................4
Non-printed documentation ....................................................................................................4
Servicing .................................................................................................................................4
Typographics ............................................................................................................... 4
Box Contents ...................................................................................................................5
Standard Items ............................................................................................................ 5
Getting Started With Your PC ..........................................................................................6
Touring Your PC .......................................................................................................... 6
Front View ..............................................................................................................................6
Rear View ...............................................................................................................................8
Right-side View .....................................................................................................................10
Left-side View .......................................................................................................................12
Setting Up Your PC ........................................................................................................13
Preparing To Setup Your PC ..................................................................................... 13
Connecting the power ............................................................................................... 15
Turning On Your PC .................................................................................................. 16
Turning Off Your PC .................................................................................................. 16
Conguring the display .............................................................................................. 17
Input control .............................................................................................................. 17
OSD (On Screen Display) Menu control ................................................................... 17
Brightness control ..................................................................................................... 19
Volume control ..........................................................................................................19
Using Your PC ............................................................................................................... 20
Connecting To The Internet ....................................................................................... 20
Using The Webcam ................................................................................................... 21
Using The Optical Disc Drive .................................................................................... 22
CD-Writable Drives ...............................................................................................................22
DVD-Writable Drives ............................................................................................................22
Inserting a disc .......................................................................................................... 22
Using the touch screen (for select models) ............................................................... 24
Using the Peripheral Devices ........................................................................................25
Quick Start Guide (QSG) of Monitor Mode for GB-AEGT-SI/GBAEGTN-SI .............25
Functionalities ........................................................................................................... 25
2GB-AEGT-SI/GB-AEGTN-SI
Page 3

Discrete Graphic Card support .................................................................................. 27
Performance .............................................................................................................. 27
Expandability ............................................................................................................. 27
System/Graphic Power Adaptor: ............................................................................... 29
Upgrading Your PC ........................................................................................................ 31
Safety Measures ....................................................................................................... 31
Caution For Battery ................................................................................................... 31
Removing PC Cover ................................................................................................. 32
Removing VGA Metal Cover ..................................................................................... 34
Removing Motherboard Metal Cover ........................................................................ 35
Replacing Hard Disk Drive ........................................................................................ 37
Installing CPU .......................................................................................................... 38
Installing Memory ...................................................................................................... 39
Installing WiFi Module ............................................................................................... 40
Installing Heat Sink ................................................................................................... 41
Installing a Second disk drive module ....................................................................... 42
Installing a Wall Mount .............................................................................................. 43
Installing a VGA card .................................................................................................45
Troubleshooting .............................................................................................................46
Frequently Asked Questions (FAQ) ........................................................................... 46
Power problems ....................................................................................................................46
Internet access problems .....................................................................................................47
Display problems ..................................................................................................................48
Keyboard and mouse problems ............................................................................................49
Sound and microphone problems .........................................................................................50
Miscellaneous problems .......................................................................................................51
Specications ................................................................................................................53
3GB-AEGT-SI/GB-AEGTN-SI
Page 4

Overview Of Your Documentation
Document Type
Your documentation contains printed information and PDF user manuals to help you perform vari-
ous tasks.
Document Type
• Quick Start Guide provides information about setting up your computer.
Non-printed documentation
• Manual CD (containing this manual) provides information about using your computer,
cleaning and maintaining the monitor and the accessories, and the common solutions to the
problems you may encounter while using your computer.
Servicing
• Do not attempt to service this product yourself, as opening or removing covers may expose
you to the risk of electric shock and other hazards. If any of the above mentioned misuse or
other accident such as dropping or mishandling occurs, contact qualied service personnel
for servicing.
Typographics
Special tips, notes, and cautions that appear throughout this manual are designed to ensure that
you perform specic tasks properly, preventing unnecessary errors.
CAUTION: Indicates important information to prevent potential damage to the unit and data, or
personal injury caused by improper use.
NOTE: Indicates additional information for a particular situation.
TIP: Indicates useful information for completing a task.
4GB-AEGT-SI/GB-AEGTN-SI
Page 5
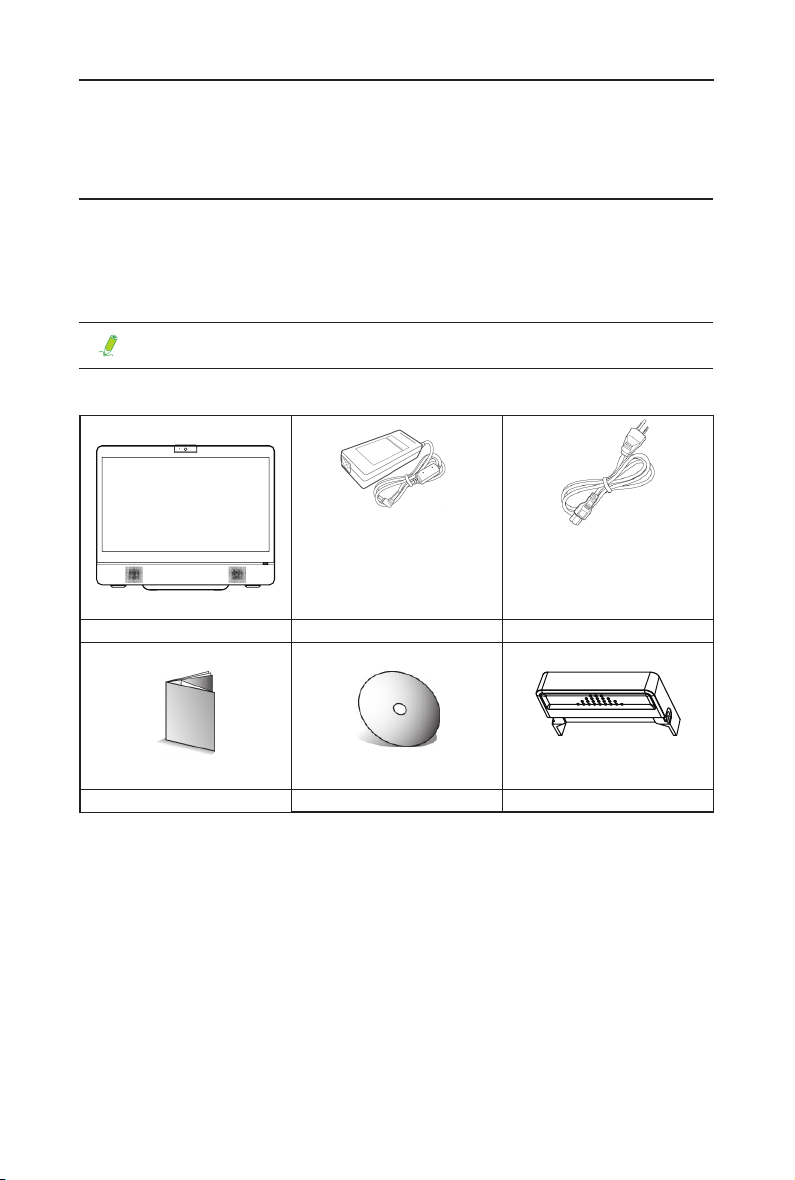
Box Contents
Carefully unpack the system and check that the following items were included. If any are
missing or damaged, please contact your vendor. Retain the box and packing in case you need
to transport your personal computer in the future. The tted foam packaging is ideal for protect-
ing the device during transport.
The appearance and contents of your package may be different from those illustrated be-
low due to regional variations.
Standard Items
All-in-One PC Power Adapter Power Cord
Quick Start Guide Driver and Manual CD 2.5" Holder and Screws
• The box contents above are for reference only and the actual items shall depend on the product package you obtain.
The box contents are subject to change without notice.
• The motherboard image is for reference only.
5GB-AEGT-SI/GB-AEGTN-SI
Page 6
Getting Started With Your PC
Touring Your PC
This section describes the views and the features of the controls, ports, buttons, components,
and connectors of your computer.
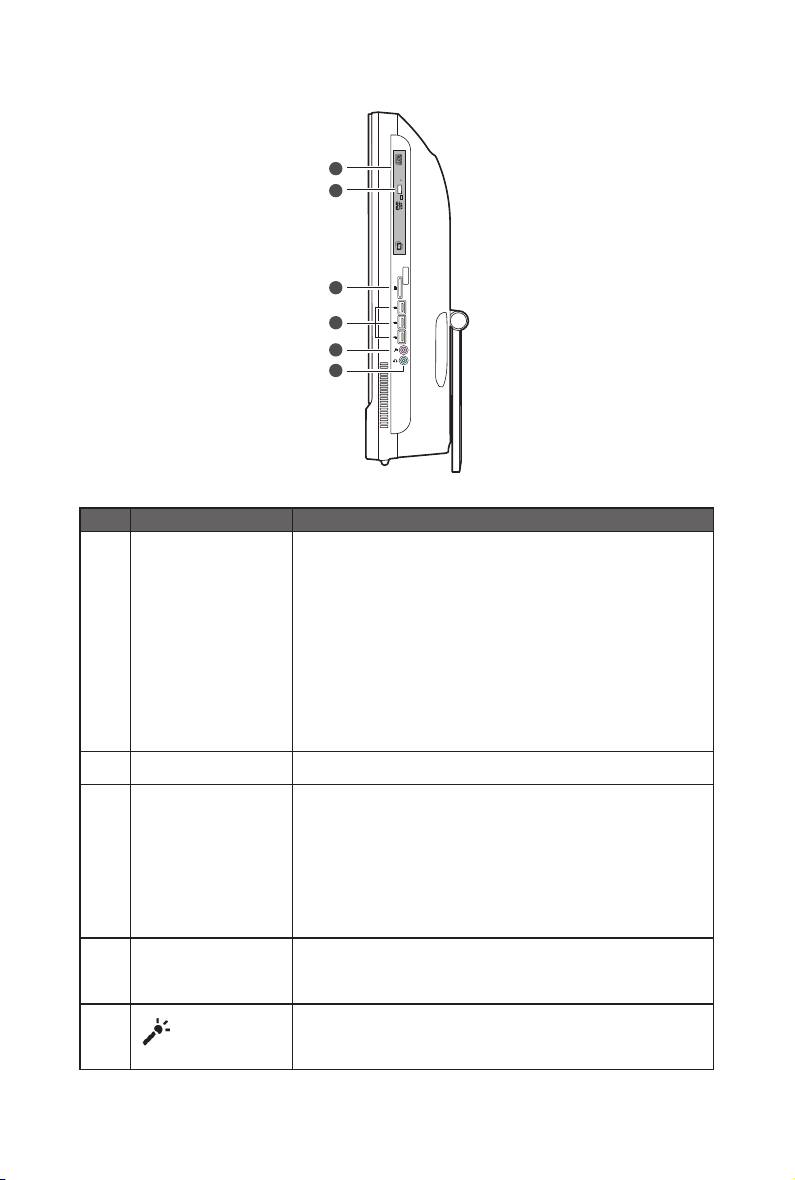
Front View
21
3
9 8 7 6 5 4
No Item Description
Built-in microphone The built-in microphone receives sound and voices when used with the
1
Webcam The built-in camera allows you to capture still images, record videos,
2
Touch-enabled widescreen
3
(for select models)
built-in webcam.
and have video chats.
The monitor is equipped with a touch screen. You may make adjustments to your work eld at your ngertips. The touch screen will responsively react with your ngertip commands.
6GB-AEGT-SI/GB-AEGTN-SI
Page 7
No Item Description
4
5
6
For details about the OSD menu options, see "OSD (On Screen Display) Menu
control".
/
7
/
8
Speakers The internal speakers deliver high-quality audio while
9
Power button. Press the power button to turn on your computer.
Input. Hotkey for Source control.
Menu. Press to activate OSD main menu and make
selections or enter the submenus.
Brightness/Increase. Hotkey for LCD Brightness
control. Press to make increase adjustment.
When OSD is activated, press this button to move
between the different menu options.
Volume/Decrease. Hotkey for Volume control. Press to
make decrease adjustment.
The Volume function is only available for the VGA
or HDMI input signal.
When OSD is activated, press this button to move
between the different menu options.
listening to music or watching your home videos and DVD
discs.
7GB-AEGT-SI/GB-AEGTN-SI
Page 8
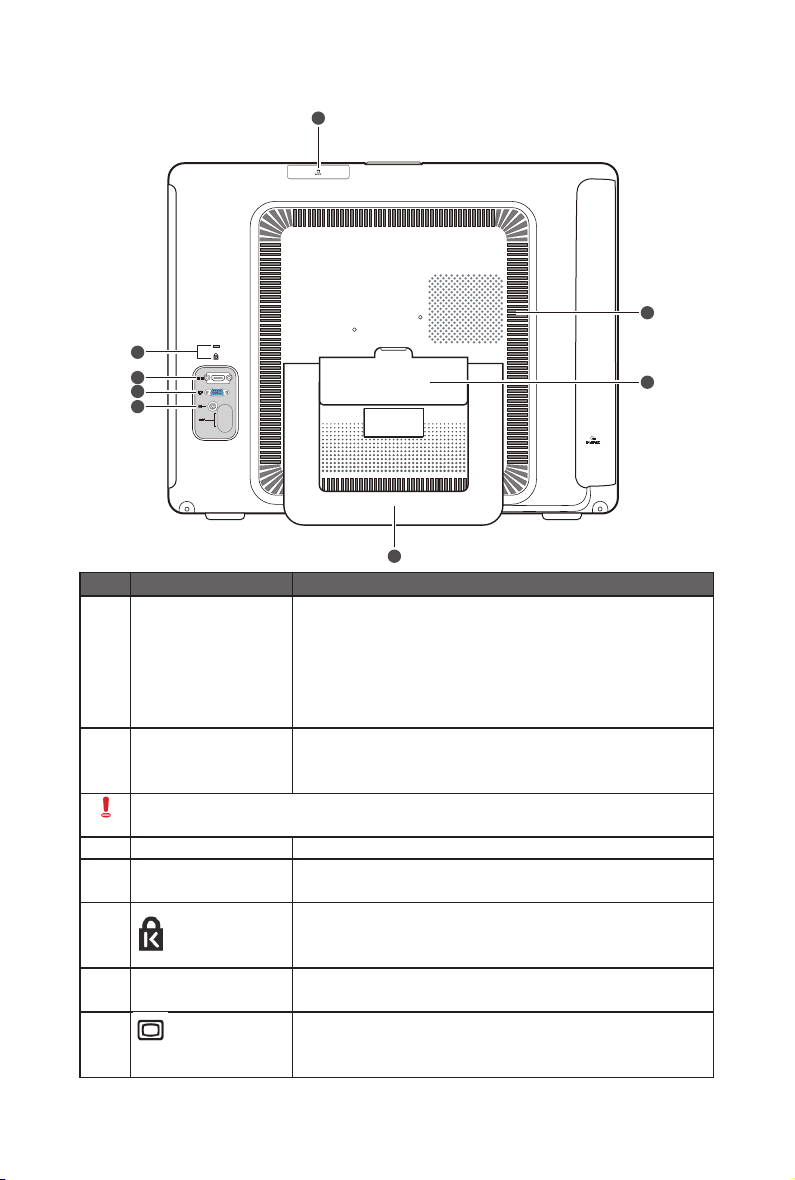
Rear View
1
5
6
7
8
4
No Item Description
HDD module cover Hard Disk Drive Module Cover. Under the cover, there is an
open hard disk drive module bay, and you may install an
1
Vents The design of the vents is to prevent the computer from overheating.
2
Keep the vents clean and free of dirt and dust, as blocking it may cause serious thermal
problems.
3 Hinge cover The cover protects the exposed surface of the hinge.
Computer Stand You can adjust the computer stand for the best viewing angle
4
5
HDMI HDMI output port. Use an HDMI cable to connect an external
6
7
external 2.5-Inch SATA hard disk drive module on the system
to increase the amount of storage space.
The purpose of this cover is to prevent dust from entering
into the drive case when the modular bay is empt
The internal fans blow hot air away from heat-sensitive components in
the computer.
from 10° to 50° (leaning back).
Security lock slot. We recommend you to attach a security
lock (sold separately) and cable (sold separately) to the slot
to help prevent possible theft.
display device with HDMI input ports, such as an HDTV.
15-pin D-Sub input jack. Use a 15-pin D-Sub cable to connect an device with D-Sub output ports, such as a notebook, or a game console,
etc.
2
3
8GB-AEGT-SI/GB-AEGTN-SI
Page 9

Audio input jack. Connect to an audio in jack on external
8
audio equipment for audio sound.
9GB-AEGT-SI/GB-AEGTN-SI
Page 10
Right-side View
1
2
3
4
5
6
No Item Description
CD/DVD drive Press the Eject button and insert a CD/DVD into this drive to play your
CD’s collections, DVD movies, or access the data
burned onto the discs.
1
To record a CD or DVD, press the Eject button to insert a recordable
CD or DVD into this drive and burn the data with CD/
DVD recording applications installed on your system.
• When the CD/DVD drive is in use, the LED indicator ashes green.
• When the CD/DVD drive is not in use, the LED indicator goes off.
Eject button Press to open the disc tray.
2
Media card
reader
Insert your memory card into this media card reader to access photos,
audio and video les, or other data stored in the memory cards. This
reader supports the following card types:
3
• Secure Digital (SD)
• Memory Stick (MS)
• Extreme Digital (xD)
• MultiMedia Card (MMC)
USB ports Connect the USB plugs into the USB ports to connect your USB de-
4
vices, such as MP3 players, digital cameras, keyboard and mouse, or
external hard disk drives, etc.
Connect your microphone to this jack to record sound or voice.
5
10GB-AEGT-SI/GB-AEGTN-SI
Page 11

Audio/Headphone Output
6
Jack
Audio/Headphone output jack. Connect your headphones or speakers
to this jack to listen to the sound from your PC when watching videos
and DVDs, listening to music, and playing games.
11GB-AEGT-SI/GB-AEGTN-SI
Page 12
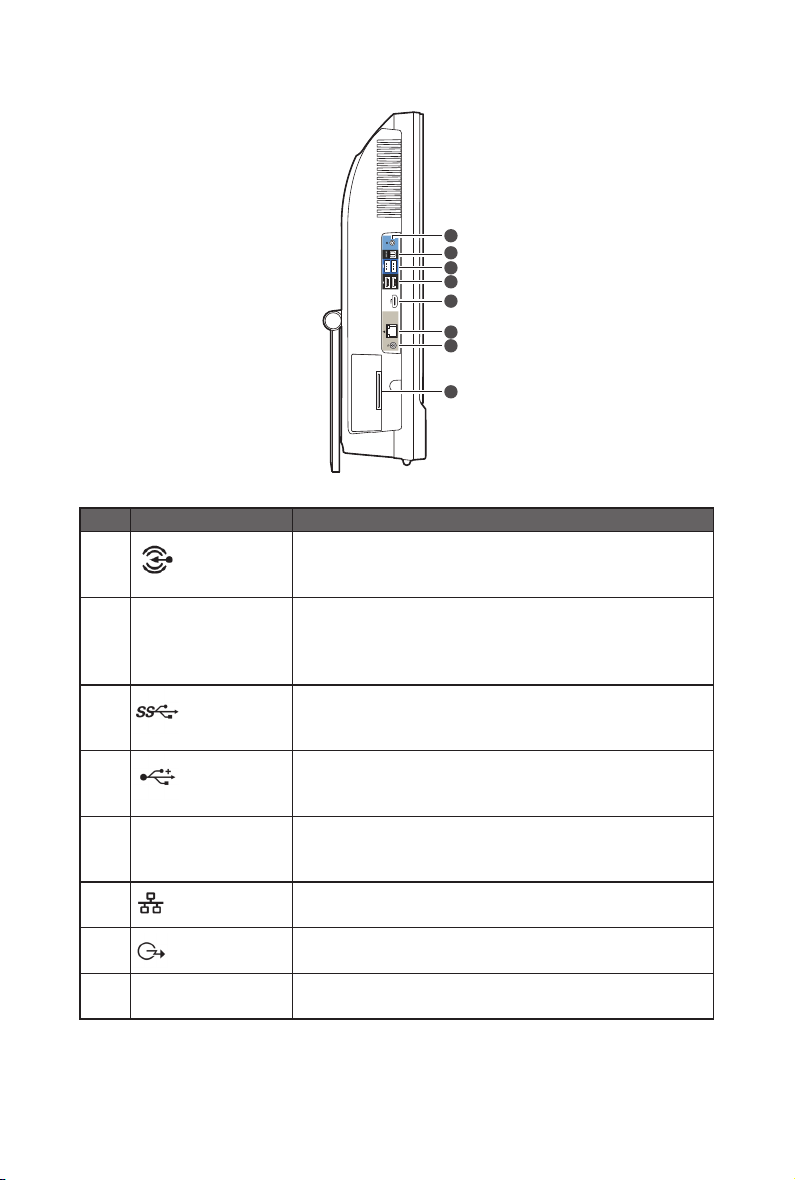
Left-side View
1
2
3
4
5
6
7
8
No Item Description
Audio input jack. Connect to an audio in jack on external audio equip-
1
S/PDIF-out S/PDIF-out (SONY-PHILIPS Digital Interface) port. Use an optical S/
2
3
4
HDMI HDMI input port. Use an HDMI cable to connect an external device
5
6
7
Graphics card cover Under the medal plates is where the hidden graphics card connectors
8
ment for audio sound.
PDIF cable to connect the computer with external
home theater audio systems. It transfers digital audio without converting to analog format for keeping the best signal quality.
USB 3.0 Ports. Connect a Universal Serial Bus device. It supports V3.0
of the USB standard, which allows data exchange
rates as high as 5.0 Gb/s.
USB Ports. Connect a Universal Serial Bus device. It supports V2.0
of the USB standard, which allows data exchange rates as high as 3.0
Gb/s.
with HDMI output ports, such as a DVD player, or a game
console, etc.
LAN (Local Area Network) port. Use an Ethernet (RJ45) cable to con-
nect your computer with a network or broadband device.
DC IN port. Connect the DC power to this port to power the computer.
locate.
12GB-AEGT-SI/GB-AEGTN-SI
Page 13
Setting Up Your PC
This section describes how to set up your computer and make adjustments to the monitor.
Preparing To Setup Your PC
To protect the computer and monitor, before setting up your computer you should:
• Find a at open area on your desk to position your computer.
• Place a soft item like the computer packaging bag on the desk for padding.
It is suggested to install your computer in a space that allows for airow as restricting
the airow may cause overheating which could impact the performance of your com-
puter.
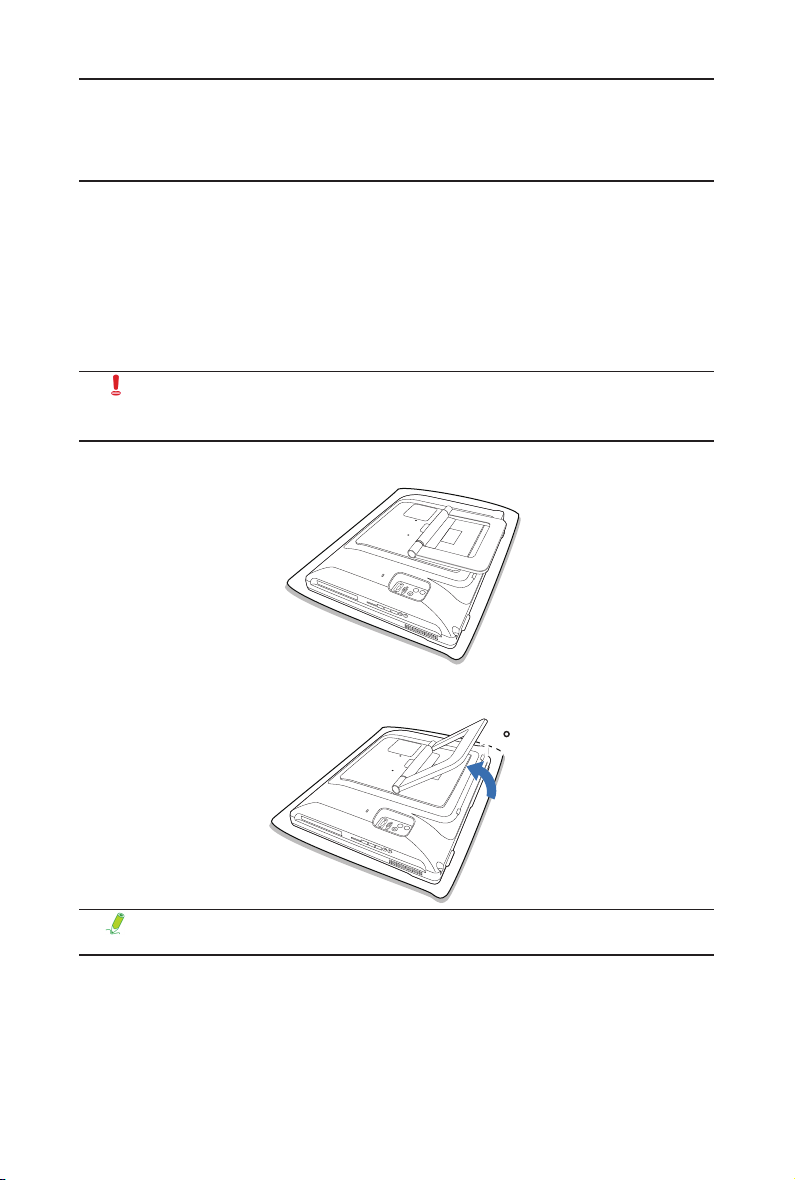
1. Gently lay the screen face down on a at clean padded surface.
2. Pull the computer stand till it reaches the rst detent stop. (approximately 10° apart from the rear of the
computer).
10 10
Please ensure the computer stand has been pulled up to the rst detent position, so that
your computer may stand rm and upright.
13GB-AEGT-SI/GB-AEGTN-SI
Page 14
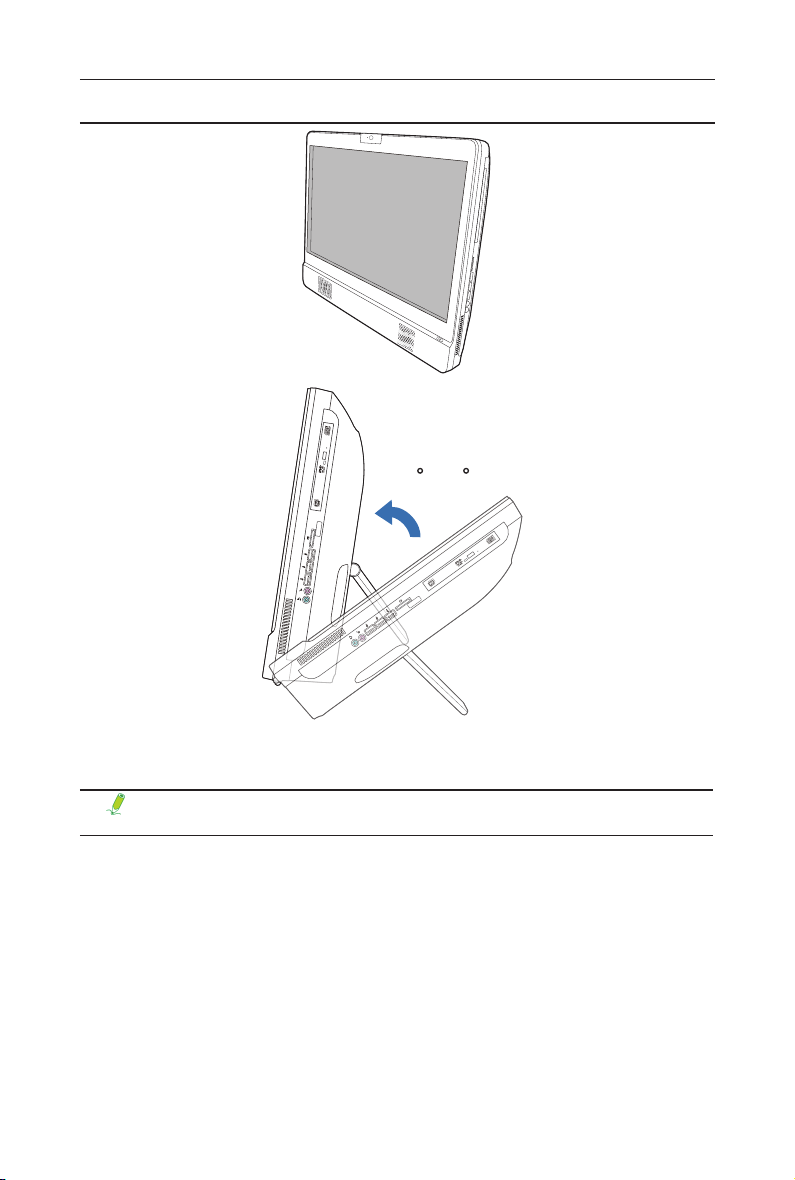
3. Carefully hold both sides of the computer with some strength to lift it upright. Then you may adjust the
angle of the screen to meet your needs.
10 ~50
Please ensure the computer stand has been pulled up to the rst detent position, so that
your computer may stand rm and upright.
Now you are ready to access some ports on the side panel of the computer to make cable connections.
14GB-AEGT-SI/GB-AEGTN-SI
Page 15
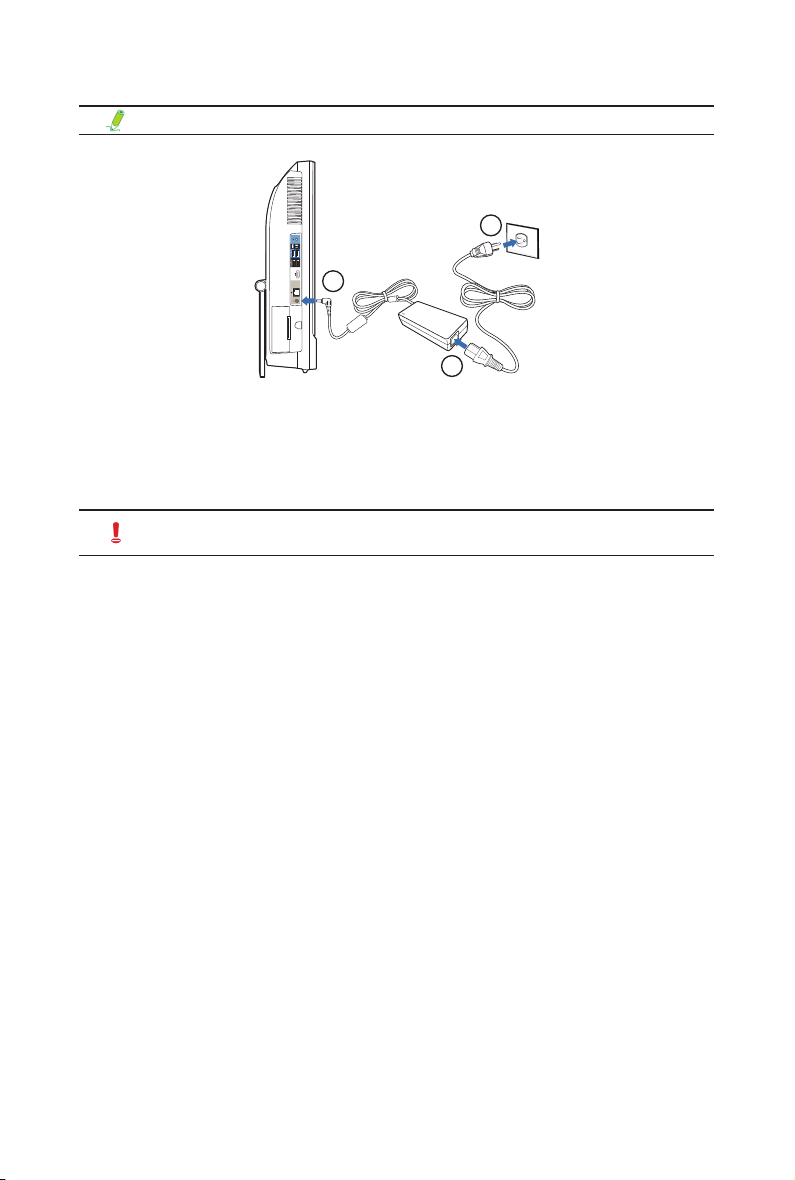
Connecting the power
The illustrations may differ from product supplied for your region.
3
2
1
1. Connect the power cable to the supplied power adapter.
2. Connect the power plug to the power jack on the left side of the computer.
3. Connect the power adapter to a nearby power outlet.
Do not plug in or turn on the power to the computer until instructed to do so.
15GB-AEGT-SI/GB-AEGTN-SI
Page 16

Turning On Your PC
After you nish the installation of your computer, press the Power button on the front panel of the
computer to turn it on. Then follow the on-screen instructions to complete the initial setup.
You may need to set up a mouse (sold separately) and a keyboard (sold separately) to
complete the initial setup. Follow the manual of your mouse/keyboard to nish the instal-
lation.
Turning Off Your PC
To turn off the system, close all the active windows, and then click the Start menu at the bottom
left corner of your screen, and then click Shut Down on the right side of the open tab.
Start
Shut
down
16GB-AEGT-SI/GB-AEGTN-SI
Page 17
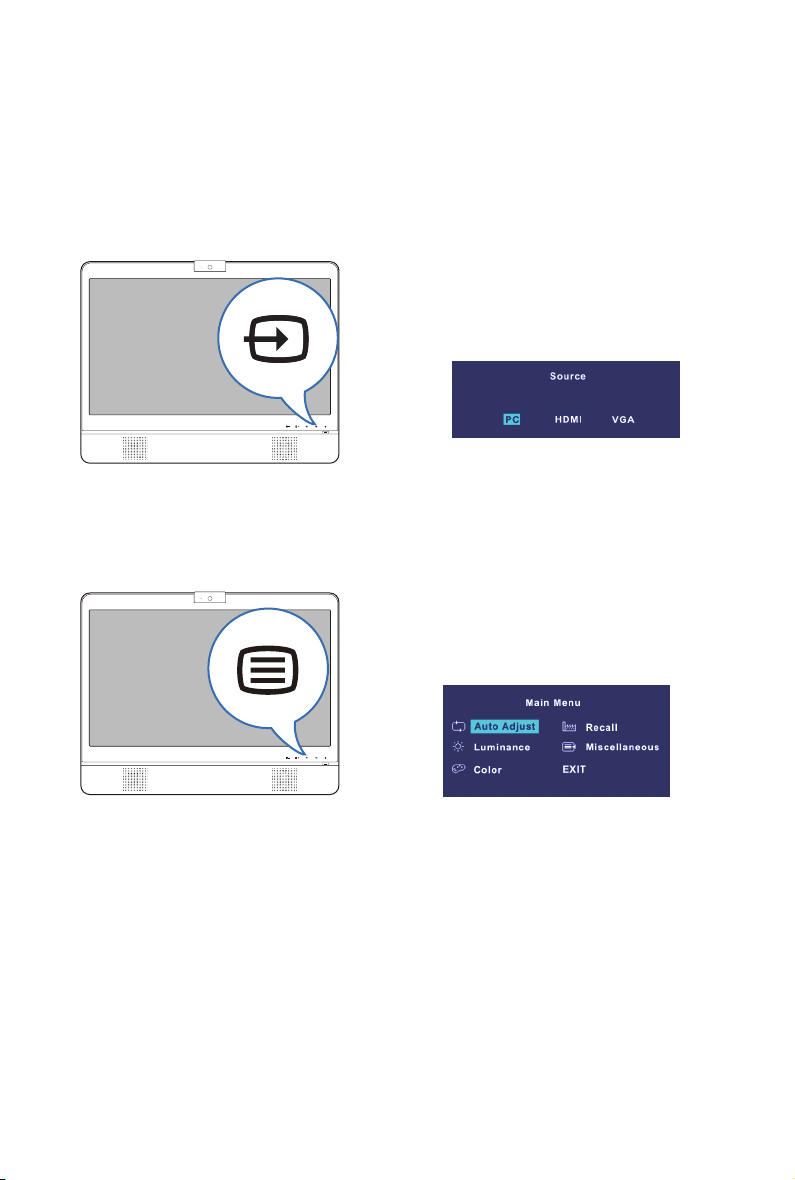
Conguring the display
Input control
To switch between different video input sources that have been connected to your computer,
press the Input button on the front panel of the computer to display the Source menu.
Further use the Brightness/Increase or Volume/Decrease buttons to highlight a desired item,
and press the MENU button to make selections. The setting will take effect immediately.
OSD (On Screen Display) Menu control
Press the MENU button on the front panel of the computer to display the main OSD menu,
which offers 5 menu options to allow you to make adjustments to the display.
• To move between option items shown on the OSD, use the Brightness/Increase or Volume/
Decrease buttons.
• To make selections or enter the submenus, press the MENU button.
• To return to the previous menu or exit OSD, press the Input button.
17GB-AEGT-SI/GB-AEGTN-SI
Page 18

Menu Options Descriptions
Auto Adjust Optimizes and adjusts the screen settings automatically.
When you connect a digital video output using a DVI or HDMI cable to
your monitor, the Auto Adjust function will be disabled.
Luminance There are two submenus available.
• Brightness Adjusts the balance between light and dark shades.
• Contrast Adjusts the degree of difference between darkness and light-
ness.
Press the Brightness/Increase or Volume/Decrease buttons on the front panel to
adjust the degree from 0 to 100.
Color Adjusts the level of Red, Green, and Blue primary colors to change the Adjusts the
level of Red, Green, and Blue primary colors to change the color tint of the image.
The default start setting is 50.
Press the Brightness/Increase or Volume/Decrease color tint of the image. The
default start setting is 50.
Press the Brightness/Increase or Volume/Decrease
Recall Resets all settings to the factory default values.
Miscellaneous There are three submenus available.
• Display
Information
• Display
Mode
• Over Scan Slightly enlarges the input image. Activates this feature to hide
Select Exit to return to the previous menu.
Exit Selects to exit OSD.
Displays the current monitor property settings.
This feature is provided to allow aspect ratios other than 16:9 to
be displayed without geometric distortion.
• Aspect: Scales the input image to ll the screen. Ideal for
16:9 aspect images.
• Full: The input image is displayed without geometric
distortion.
The function is available only when the input source is
D-Sub.
annoying edge noise if present around your image.
The function is available only when the input source is
HDMI.
18GB-AEGT-SI/GB-AEGTN-SI
Page 19

Brightness control
To adjust the brightness level of the monitor, press the Brightness/Increase button on the front
panel of the computer to display the Brightness indicator, and then press the same button to
increase the level or press the Volume/Decrease button to decrease the level.
Volume control
To adjust the sound level, press the Volume/Decrease button on the front panel of the computer
to display the Volume indicator, and then press the Brightness/Increase button to increase the
level or press the Volume/Decrease button to decrease the level.
19GB-AEGT-SI/GB-AEGTN-SI
Page 20

Using Your PC
This section describes more tasks your computer can perform, including connecting to the Inter-
net, using the Webcam to communicate with your family and friends, enjoying your digital enter-
tainment from CD and DVD, reading and writing to your memory cards, and taking control of your
computer via the touchscreen technology.
Connecting To The Internet
With the access to the Internet you can browse the Web, send e-mail or exchange instant
messages with friends and family. Before attempting to build the Internet connection with either
a wired or wireless local area network, you need to purchase high-speed Internet service from an
Internet service provider (ISP). Your ISP will offer various Internet connection options, and assist
you in setting up the Internet access through them. To set up your computer to access the
Internet, the following items are needed:
• Broadband modem (DSL or cable) purchased from your Internet service provider (ISP).
• An Ethernet cable (sold separately)
• to connect your computer and the broadband modem, or
• to connect the broadband modem and a wireless router or access point which
serves as an access point station to make transmission possible. (for a wireless
network)
• For a wireless network connection, a wireless LAN (Local Area Network) card is required for
your computer to connect with the router or access point. (sold separately; a built-in wireless
LAN card is supplied with select models only.)
For details about installing the wireless LAN card, router, or access point, please refer to
the manuals that shipped with the product you purchased or contact the manufacturer.
1. Choose a network you intend to join from the list.
20GB-AEGT-SI/GB-AEGTN-SI
Page 21

If the selected network requires security authentication, please enter a user name and
password.
2. If you are able to successfully connect to a wireless network, you will receive a message
indicating that the connection has been established.
3. Open the Web browser and access any Web site to test the network connection.
If the selected network requires security authentication, please enter a user name and
password.
Using The Webcam
Your computer comes with a built-in 2.0 megapixel webcam at the top center of the bezel. With
this webcam, you can capture still images or record videos via the pre-installed image capture
software, or you can chat online in real time via instant message programs.
Check the ambient light conditions around the webcam to avoid getting images that
appear too dark or too light.
21GB-AEGT-SI/GB-AEGTN-SI
Page 22

Using The Optical Disc Drive
Your computer comes with an optical disc drive, which supports music CDs, video CDs and
DVDs.
You can also use it to burn CD-R/CD-RW or DVD±R/DVD+RW/DVD-RW/DVD-RAM
discs.
The following tables show which formats are supported by the optical disc drive.
CD-Writable Drives
Media Type Read Write Rewritable
CD-R Yes Yes No
CD-RW Yes Yes Ye s
DVD-Writable Drives
Media Type Read Write Rewritable
CD-R Yes Yes No
CD-RW Yes Yes Ye s
DVD+R Yes Ye s No
DVD-R Yes Yes No
DVD+RW Yes Yes Ye s
DVD-RW Yes Yes Ye s
DVD-RAM Yes Yes Ye s
Inserting a disc
When the optical disc drive is in use, the indicator lights up and ashes.
When the indicator light is ashing, do not move the computer.
1. Press the Eject button on the drive, as shown below.
22GB-AEGT-SI/GB-AEGTN-SI
Page 23

2. Gently pull out the disc tray.
3. With the label side facing forward, place the disc in the center of the disc tray.
4. Gently push the disc tray back into the disc slot.
5. The optical disc drive indicator is on and your computer will start to read the disc you just
inserted.
23GB-AEGT-SI/GB-AEGTN-SI
Page 24

Using the touch screen (for select models)
Your computer is equipped with a touch screen which has a high sensitivity level. You can control
your PC with the touch of your nger or by using a stylus pen. Your ngertips and stylus pen work
as the hand-held mouse pointer. When you control the computer with your ngertips on the
screen, the hand-held mouse can work concurrently.
When you press LCD display switch button to turn off the LCD monitor, the touch screen
is still active. To avoid accidental or unintentional activation and inactivation of the func-
tions or programs while the monitor is turned off,
do not touch on the screen surface while the system is still running.
Do not apply pressure on the front of the display or around the screen borders to avoid
damaging the touch screen. For more details about maintaining and cleaning the LCD
screen, please see Cleaning the screen
and computer.
Selecting items with your touch screen
• Use the touch screen as follows:
• Tap once for a single mouse click.
• Tap twice for a double mouse click
• Press and hold an item to open the item's menu, then move your nger to the appropriate
menu item. When your remove your nger, the item is selected.
24GB-AEGT-SI/GB-AEGTN-SI
Page 25

Using the Peripheral Devices
Quick Start Guide (QSG) of Monitor Mode for GB-AEGT-SI/
GB-AEGTN-SI
• GB-AEGT-SI/GB-AEGTN-SI is the rst AIO computer that allows user to plug in any kind of off-
the-shelf discrete graphic card (except for dimension/power limitation).
• GB-AEGT-SI/GB-AEGTN-SI provides 2 external power adaptors for graphic card and up to
360W power support (180W x 2).
• GB-AEGT-SI/GB-AEGTN-SI also has monitor function that provides big-screen output for A/V
sources like PS3, XBOX 360, BD player or others.
Functionalities
25GB-AEGT-SI/GB-AEGTN-SI
Page 26

• PC mode : This mode is on when AIO has worked.
• HDMI mode : This mode is on when user has connected HDMI cable to back-cover's HDMI
connector.
• D-SUB mode : This mode is on when user has connected D-SUB and audio cables to back
cover's D-SUB connector.
All modes can work at same time but only one can be displayed on screen.
26GB-AEGT-SI/GB-AEGTN-SI
Page 27

Discrete Graphic Card support
Performance
Once use plugged nVidia graphic card and installed nVidia Synergy driver, user can experience
nVidia graphic performance in PC mode.
Expandability
1.
27GB-AEGT-SI/GB-AEGTN-SI
Page 28

2.
3.
28GB-AEGT-SI/GB-AEGTN-SI
Page 29

System/Graphic Power Adaptor:
1. System power adaptor only.
2. System power adaptor with one Graphic power adaptor.
29GB-AEGT-SI/GB-AEGTN-SI
Page 30

3. System power adaptor with two Graphic power adaptors.
If your graphics card receives power supply from the motherboard, keep the jumper cap
on the location as shown in the following illustration (red line).
If you are installing a graphics card that requires external power, move the jumper cap to
the location as shown in the following illustration (red line).
30GB-AEGT-SI/GB-AEGTN-SI
Page 31

Upgrading Your PC
Safety Measures
Computer components and electronic circuit boards can be damaged by discharges of static
electricity. Working on computers that are still connected to a power supply can be extremely
dangerous. Follow the simple guidelines below to avoid damage to your computer or injury to
yourself.
• Always disconnect the computer from the power outlet whenever you are working inside the
computer case.
• If possible, wear a grounded wrist strap when you are working inside the computer case.
Alternatively, discharge any static electricity by touching the bare metal system of the computer
case, or the bare metal body of any other grounded appliance.
• Hold electronic circuit boards by the edges only. Do not touch the components on the board
unless it is necessary to do so. Do not ex or stress the circuit board.
• Leave all components inside the static-proof packaging until you are ready to use the
component for the installation.
Caution For Battery
• Risk of explosion if battery is replaced by an incorrect type.
• Dispose of used batteries according to the instructions.
31GB-AEGT-SI/GB-AEGTN-SI
Page 32

Removing PC Cover
Before you remove or install the PC cover:
• Make sure the computer is not turned on or connected to an AC adapter.
Follow these instructions to remove the system cover:
1. Detach the hinge protective cover.
2. Loosen and remove the eight screws securing the back cover.
1
32GB-AEGT-SI/GB-AEGTN-SI
Page 33

3. Use screwdrive to remove the back cover.
2
1
33GB-AEGT-SI/GB-AEGTN-SI
Page 34

Removing VGA Metal Cover
Follow these instructions to remove the VGA metal cover:
1. Loosen and remove the screws securing the VGA metal cover.
2. Slide the metal cover away from the I/O ports then lift up.
1
2
34GB-AEGT-SI/GB-AEGTN-SI
Page 35

Removing Motherboard Metal Cover
Follow these instructions to remove the motherboard metal cover:
1. Loosen and remove the screws securing the riser card.
2. Loosen and remove the screws securing the motherboard metal cover.
35GB-AEGT-SI/GB-AEGTN-SI
Page 36

3. Slide the metal cover away from the I/O ports then lift up.
36GB-AEGT-SI/GB-AEGTN-SI
Page 37

Replacing Hard Disk Drive
Before installing or removing the HDD, adhere to the following cautions:
• Take note of the drive tray orientation before sliding it out.
• The tray will not t back into the bay if inserted incorrectly.
Follow these instructions to install the hard disk drive:
1. Loosen and remove the screws securing the HDD bracket.
1
1
2
2
2. Loosen the four screws. Please secure the screws on the location numbered 1.
1
37GB-AEGT-SI/GB-AEGTN-SI
Page 38

Installing CPU
Before installing the processor, adhere to the following cautions:
• The processor will overheat without the heatsink and/or fan, resulting in permanent
irreparable damage.
• Never force the processor into the socket.
• Apply thermal compound evenly on the top of the processor before installing the
heat sink.
• Please make sure the CPU type is supported by the motherboard.
• If the CPU does not match the socket's Pin 1 and the socket's edge well, it will
cause improper installation. Please change the insert orientation.
Follow these instructions to install the CPU:
1. Raise the metal locking lever on the socket. Remove the plastic covering on the CPU
socket.
Insert the CPU with the correct orientation, it will only t in one direction.
2. Replace the metal cover.
3. Push the metal lever back into locked position.
38GB-AEGT-SI/GB-AEGTN-SI
Page 39

Installing Memory
Before installing a memory module, make sure to turn off the computer and unplug the
power cord from the power outlet to prevent damage to the memory module.
Follow these instructions to install the memory:
1. Align the memory with the SODIMM module and insert the SODIMM memory module into the
SODIMM slot.
Please note that the memory module has a foolproof insertion design. A memory module can
be installed In only one direction.
2. Push down the memory and seat it rmly.
1
2
3. Reverse the installation steps when you wish to remove the SODIMM module.
39GB-AEGT-SI/GB-AEGTN-SI
Page 40

Installing WiFi Module
Before installing a WiFi module, make sure to turn off the computer and unplug the
power cord from the power outlet to prevent damage to the WiFi module.
Follow these instructions to install the WiFi module:
1. Align the WiFi card with the Mini Card Slot and insert the card into the slot.
Please note that WiFi module has a foolproof insertion design. A WiFi module can be installed
in only one direction.
2. Push down the WiFi card and seat it rmly.
1
2
40GB-AEGT-SI/GB-AEGTN-SI
Page 41

Installing Heat Sink
Before installing the heat sink, adhere to the following cautions:
• Apply thermal compound evenly on the top of the processor before installing the
heat sink.
Follow these instructions to install the heat sink:
1. Apply an even and thin layer of thermal paste on the surface of the heat sink.
2. Seat the heat sink in the retention modules and secure with the four screws.
2
1
41GB-AEGT-SI/GB-AEGTN-SI
Page 42

Installing a Second disk drive module
If you need more space than your computer offers or you intend to access the data you have
stored in your portable hard drive disk module, you may install a second disk drive module
on your computer without using any tools.
Before installing remove or install the HDD, adhere to the following cautions:
• To avoid possible damage to your hard disk drive module and the system, carefully
handle the hard disk drive module by its edge and avoid touching the metal con-
tacts or the spindle.
• Take note of the drive tray orientation before sliding it out.
Follow these instructions to install a second disk drive module:
1. Hold two edges of the hard drive disk module carefully and keep away from touching its
spindle.
2. Insert your portable hard drive disk module with correct orientation as shown, and rmly push
the hard disk module into the modular bay under the HDD cover until the latch clicks into
place. If you don’t hear the click, try it again.
42GB-AEGT-SI/GB-AEGTN-SI
Page 43

Installing a Wall Mount
Follow these instructions to install a wall mount:
1. Detach the hinge protective cover.
2. Remove the 4 screws fastening the computer stand.
3. Detach the computer stand.
43GB-AEGT-SI/GB-AEGTN-SI
Page 44

4. Secure the wall mount pad (128.5 x 120.5 mm) to the rear panel with the 4 screws you just
removed in the previous step.
5. Follow the manual came with the wall mount kit (VESA 100) you purchased to install it to the
wall mount pad.
44GB-AEGT-SI/GB-AEGTN-SI
Page 45

Installing a VGA card
Follow these instructions to install a VGA card:
1. Attach the expansion slot card on the riser bracket and secure it with screws.
2. Insert the card into the system. Make sure that the card is properly seated.
45GB-AEGT-SI/GB-AEGTN-SI
Page 46

Troubleshooting
The section describes situations that you may encounter while using the computer and provides
troubleshooting steps.
Before you begin troubleshooting, verify the following items:
• If you have added or removed a program or a hardware before the problem appeared,
make sure that your computer has met all the pre-installation requirements, review if
the installation procedures are correct, and check if the program or hardware is properly
installed.
• If an error message appears while the program or hardware is in use, write down the message
and follow the on-screen instruction if any. For further details, refer to the docu-mentation or
user manual of the program or hardware.
Frequently Asked Questions (FAQ)
Power problems
Symptom Possible Solution
I have pressed the
Power button, but my
computer cannot start
up.
• Make sure the power cable and power adapter are connected.
• Check the Power button indicator.
• If the indicator does not light up, your computer is not being supplied
power from an external power source via the power adapter. Check the
connection between your computer, the power adapter, and the nearby
outlet.
• If the indicator ashes in white, your computer has entered Sleep mode.
Move your mouse or press any button on the keyboard to wake the system.
• If the Power button indicator lights up in white, the computer is being supplied with power normally. Reconnect the power adapter and restart the
system.
• Certain operating system les may be damaged or missing. If so, you have
to back up all your data rst, and then recover your system. Check the sup-
plied driver disc for details.
46GB-AEGT-SI/GB-AEGTN-SI
Page 47

Internet access problems
Symptom Possible Solution
My computer cannot
access a modem or a
wireless router or access
point.
The wireless Internet
connection is unstable.
• Verify that you have performed a correct pre-installation for your Internet con-
nection type.
• If you are using a wireless Internet connection, make sure that your com-
puter has an installed wireless LAN card in order to connect with a wireless
router or access point. For details about setting up your wireless router or
access point, refer to the documentation or user manual of the unit. For
details about setting up your modem, contact your ISP (Internet service
provider) for assistance.
• If you are using a wired Internet connection, make sure that your computer
is using an Ethernet cable, instead of a telephone cable, to connect with
the broadband modem which is purchased from your ISP. For assistance
setting up your modem, contact your ISP.
• Check the wireless interference.
• Reset your wireless router or access point to factory defaults and recong-
ure the settings. For details about resetting your wireless router or access
point, refer to the documentation or user manual for the unit.
• Update the rmware of your wireless router or access point to the latest
version available on the manufacturer's site. Try moving the wireless router
or access point to a central position. A couple of feet will sometimes make
a big difference in signal strength.
• If you are using an access point, try changing the channel, as another
access point may be interfering.
• Contact your ISP to ensure they are not experiencing technical problems.
47GB-AEGT-SI/GB-AEGTN-SI
Page 48

Display problems
Symptom Possible Solution
There is nothing visible
on the screen.
The images on the
screen are too large or
too small, or the images
are blurred.
The images on the
screen are too bright or
too dark.
• Make sure the power cable and power adapter are well connected.
• Check the Power button indicator.
• If the indicator does not light up, your computer is not being supplied
power from an external power source via the power adapter. Check the
connection between your computer, the power adapter, and the nearby
outlet.
• If the indicator ashes in white, your computer has entered Sleep mode.
Move your mouse or press any button on the keyboard to wake the
system.
• If the Power button indicator lights up in white, the computer is being
supplied power normally. Reconnect the power adapter and restart the
system.
• Check if the brightness level of the display is adjusted correctly, and is not set
too low or too high. Use the Brightness control by pressing the Brightness
Increase/Decrease buttons on the top of the unit to adjust the brightness
level.
• Check if the monitor is running at its native resolution.
• Right-click the desktop, and then select Screen Resolution. In the
prompted window, set the Resolution to 1920 x 1080, and then click Apply
and OK to complete the settings.
• Check if the brightness level of the display is adjusted correctly, and is not set
too low or too high. Use the Brightness control by pressing the Brightness
Increase/Decrease buttons on the top of the unit to adjust the brightness
level.
48GB-AEGT-SI/GB-AEGTN-SI
Page 49

Keyboard and mouse problems
Symptom Possible Solution
Keyboard or mouse
commands are not
recognized by the computer.
I cannot type numbers
using the numeric keypad.
The cursor moves slowly
and does not respond
to the movement of the
mouse.
The cursor moves too
fast or too slow.
• If you are using a wired keyboard or mouse, check the cable connection
between the unit and your computer.
• If you are using a wireless keyboard or mouse, check the following items.
• Ensure the USB receiver is properly connected to the computer, and the
keyboard or mouse is within range.
• If your keyboard or mouse has a power button, turn it on.
• Press the Connect button on the keyboard or mouse to rebuild the con-
nection between the unit and your computer.
• Try replacing the batteries in the wireless keyboard or mouse.
• Restarting the system to detect the wireless connection again
• Check if the Num Lock indicator on your keyboard is on.
• If the Num Lock indicator is off, that means the numeric keypad is not
activated. Press the <Num Lock> key to activate the numeric keypad.
• If you are using a traditional mouse, check the following items:
• Use a mouse pad or other rough surface under the mouse.
• Clean the mouse. Remove the mouse compartment cover and ball from
the mouse and carefully wipe the mouse ball with a moistened cloth or
scrap the rollers to remove any dirt. Then leave the mouse ball for a while
to dry out before reassembling the mouse.
• If you are using an optical mouse (either wired or wireless), refer the following
items.
• Use a mouse pad or white sheet of paper under the mouse.
• Clean the mouse by gently wiping the light sensor lens on the bottom of
the mouse with a lint-free cloth.
• You may congure the cursor speed to meet your personal preferences.
• Click Start > Control Panel > Mouse to open the Mouse Properties dialog
box.
Click Pointer Options tab and drag the Motion slider toward Slow or
Fast to adjust the speed at which the cursor responds to mouse
movement.
When done, click OK to nish the conguration.
49GB-AEGT-SI/GB-AEGTN-SI
Page 50

Sound and microphone problems
Symptom Possible Solution
I hear noise when connecting a headphone to
the computer.
I do not hear sound from
the built-in speakers.
The external micro-
phone does not work.
Certain audio les can-
not be played, and the
Codec error messages
appear.
• Check if the earphone works on another device.
• Connect the earphone to other devices, such as a radio, to see if you can
still hear that noise. If the noise persists, the earphone may be out of order.
• If you hear the noise only while inserting the earphone to the computer, it is
resulted from high instantaneous current. This is a normal phenomenon.
• Check if the speaker volume is set too low or is muted.
• Click the volume icon,
ume controls.
• If you are using a program which has its own volume control, ensure the
volume level is properly set.
• Unplug your headphone and external microphone if they have been connected to your computer.
• Check if the external microphone is properly connected into the microphone
jack on your computer.
• Check if Windows Media Player is set to automatically download codecs.
• Right-click on the menu bar, select Tools from the opened menu, and then
click Options.
On the Player tab, in the Automatic updates area, select Once a day,
and then click Apply and OK to complete the settings.
Then try playing the le again. If the audio le still cannot be played, it
might require a codec that is not supported by Windows Media Player. For
more information about available codecs, see the documentation for
Windows Media Player at the Microsoft web site.
, in the system tray to check the Windows vol-
50GB-AEGT-SI/GB-AEGTN-SI
Page 51

Miscellaneous problems
Symptom Possible Solution
When a CD or DVD is
inserted into the optical
disc drive, there is no
response.
The inserted disc doesn’t
slide out when I press
the Eject button.
There is no response
from the disc drive or
the contents of the disc
cannot be read.
• Check to see if the optical disc drive indicator is on.
• Check to see if the inserted disc is not dirty, bent, or damaged. It is possible
that the disc may need to be cleaned.
• Check if the disc is properly inserted into the optical drive, with the label side
facing toward you and the disc is centered in the tray.
• Try another CD or DVD (preferably an unused one) to test if the optical disc
drive works well.
• If you are inserting a DVD, check the region of the disc. It may not comply
with the region set for your optical disc drive. Check the DVD package to
learn if the region code is compatible with your optical disc drive.
• Try using other programs to read the data on your CD or DVD
• Ensure the computer is on.
• Ensure the optical disc drive indicator is on while you press the Eject button
on the optical disc drive.
• Click Start > Computer, right-click the disc drive icon, and then select Eject
from the menu to eject the tray.
• Try restarting your computer and then try pressing the Eject button on the
optical disc drive again.
• If the Eject button does not work, open the tray by inserting a sharp, pointed
object into the hole next to the Eject button.
• Check if the disc is properly inserted into the optical drive, with the label side
facing toward you and the disc is centered in the tray.
• Check the inserted disc is not dirty, bent, or damaged. If recording stops during a recording session, the disc probably is damaged. Please remove it and
insert a different disc.
• Ensure that the inserted disc is writable, and it must be blank or appendable
(with space to add more data les).
• Try writing the disc with other recording programs as some programs cannot
write certain disc types. - If you intend to write data to DVD, make sure that
you are recording the data with a DVD burning program.
• Select a slower write speed if you are not under a time constraint.
• Check if the added data les exceed the available space on the inserted writ-
able disc.
• Ensure that there is enough space available on the hard disk drive to store
the temporary les that are created during the writing process.
• Click Start > Computer to check the space available on your hard disk
drive.
51GB-AEGT-SI/GB-AEGTN-SI
Page 52

Certain video les can-
not be played, and the
Codec error messages
appear.
The media card reader
cannot read my memory card.
USB devices working
unexpectedly.
• Check if Windows Media Player is set to automatically download codecs.
• Right-click on the menu bar, select Tools from the opened menu, and then
click Options.
• On the Player tab, in the Automatic updates area, select Once a day,
and then click Apply and OK to complete the settings.
• Then try playing the le again. If the video le still cannot be played, it
might require a codec that is not supported by Windows Media Player. For
more information about available codecs, see the documentation for Windows Media Player at the Microsoft web site.
• Ensure that the memory card is fully inserted into the card reader slot.
• Ensure that the memory card is one of the supported types.
• Try restarting your computer.
• When the computer is turned on, insert the card again.
• Never insert or remove your memory cards when they are still in use, as
this can cause loss of data or permanent damage to the card.
• Check if your USB devices are turned on.
• Some USB devices are designed to conserve battery power by turning off
automatically after a few minutes of inactivity. For example, your digital
camera. Check if the connected USB device is turned on.
• Check if the USB port is working.
• Try using another USB port to connect your USB device and see if the
device is detected.
• Try connecting a low-powered USB device, such as a wired mouse, to the
USB port to check if the port is working.
• If you are using a USB hub, the power requirements of the USB port may be
exceeded.
• Try connecting your USB device directly to the USB port on your computer.
• Check if you need to pre-install software before connecting your USB device.
Read the documentation or user manual of the product.
52GB-AEGT-SI/GB-AEGTN-SI
Page 53

Specications
Specication
Processor • Intel® Core i7, Core i5, Core i3, Sandy Bridge Processors
• Support up to 95W
Chipset • Intel
Power • AC 100~240V, 50~60Hz (universal)
Display • 24W TFT LCD (1920 x 1080 pixels) , Anti-glared type
Operating System • Windows
Memory • Dual channel SODIMM DDR3 1333/1066 MHz
Hard Drive • 3.5" SATA II HDD support
Graphics • Intel
Audio • 5W x 2 speakers
Webcam+MIC • 2M Pixel + Digital MIC
Function Keys • System Power
IO Ports and Connectors
(PC System)
IO Ports and Connectors
(Monitor)
Media Card Reader • Built-in 4-in-1 card reader(MS/MS-Pro/SD/MMC)
Optical Drive • Slim tray type DVD Super Multi Optical Drive (Optional)
Network • Built-in Gigabit Ethernet LAN
Expansion Slot • 1 x full size & 1 x half size mini-card slots, PCI-E interface
2.5" HDD Slot • 2.5" SATA II HDD support (Optional)
®
Cougar Point H61Chipset
• External 180W ADP
®
7
• Windows® XP
• Expandable to 8GB, based on 1GB/2GB/4GB SODIMM
integrated Graphics Processor
• Input
• Menu
• Brightness/Up
• Volume/Down
• 5 x USB 2.0
• 2 x USB 3.0
• 1 x HDMI out
• 1 x Optical S/PDIF out
• 1 x Headphone output jack
• 1 x Microphone input jack
• 1 x Audio-in jack
• 1 x RJ-45 jack for LAN
• 1 x DC-in jack
• 1 x or 2x F-type Antenna (Optional)
• 1 x HDMI-in
• 1 x VGA-in
• 1 x Audio-in jack
53GB-AEGT-SI/GB-AEGTN-SI
Page 54

Environment
Requirement
Dimensions • 570 mm (W) x 463 mm (H) x 128 mm (D)
Net Weight • 10.52 KG
• Operating Temperature: 0 °C - 35 °C
• Storage Temperature: -20 °C - 60 °C
• Operating Relative Humidity: 10% ~ 85% Non-condensing
• Storage Relative Humidity: 10% ~ 85% Non-condensing
Monitor Specication
Brightness • 250 nits (Typ.)
Contrast • 1000:1 (Typ.)
Response Time • 5ms (Typ.)
Viewing Angle • 170/160 (Typical : H/V)
Support Color • 16.7M Colors (RGB 6-bit + Hi_FRC)
Video interface Panel • LVDS
OSD Language • Iconic & English
Adjustment Tilt • 10~50 degree
Adapters • 180W
Cables Power Cord • 1.8m
54GB-AEGT-SI/GB-AEGTN-SI
 Loading...