

Page 1
Your Phone
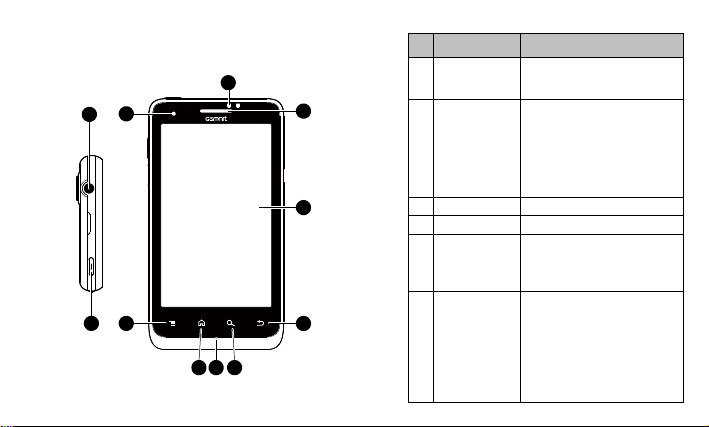
This section introduces you to the hardware of the device.
5
1
2
7
6
8 109
3
4
11
G1355│ 1
No. Items Functions
1 Earphone jack
2 Power
3 Receiver
4 Touch screen
5
P-sensor /
6
Light sensor
Use a headset for hands-free
conversation or listening to
music.
• Press and hold for several
seconds to turn the phone
on or off.
• To set your phone to the
sleep mode, press the
power button briefly. Press
again to turn on the display.
The source of voice.
Display screen.
• Power status notification.
• Other notification. (New
LED
message / New email /
Missed call).
• P-Sensor: The screen will
turn off automatically when
the device is close to the
face during a phone call.
• Light Sensor: Adjust the
brightness of the screen
according to the
environment.
Page 2

No. Items Functions
with PC / USB mass
7
Menu
8
Home
9
MIC
10 Search
11 Return
12 Volume
13 Micro USB port
14 Flash LED
Press to view the options of
the menu.
• Go back to Home Screen.
• Press and hold to bring up
recent activities.
Sound Receiver.
Connect to the website or find
features in the phone.
Return to the previous page.
Press upward or downward to
turn louder or down volume.
Press down key fully to enter
vibrate mode.
• Connect USB cable to PC,
share your phone's mobile
network
storage.
• Connect USB cable and
the AC adapter to charge
the battery.
Help photo shooting.
G1355│ 2
12
Page 3
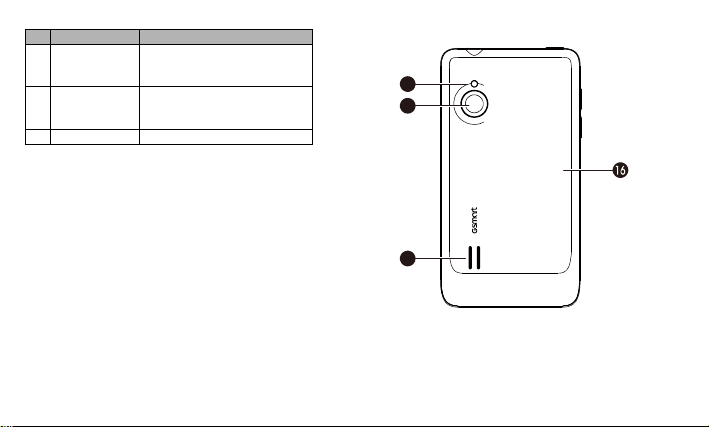
No. Items Functions
15
5 Megapixels
17 Speaker
Camera
16 Back cover
NOTE:
The battery can also be charged while connecting to
a computer.
The camera on the back of the
device supports 5-mega-pixel
photo and high-quality video.
You need to open the cover to
install or uninstall the battery
and the SIM card.
The source of music and voice.
G1355│ 3
s
u
14
15
c
o
F
o
t
u
A
/
S
L
E
X
I
P
A
G
E
M
0
.
5
17
Page 4
Installing or uninstalling SIM Card,
Battery, and Memory Card
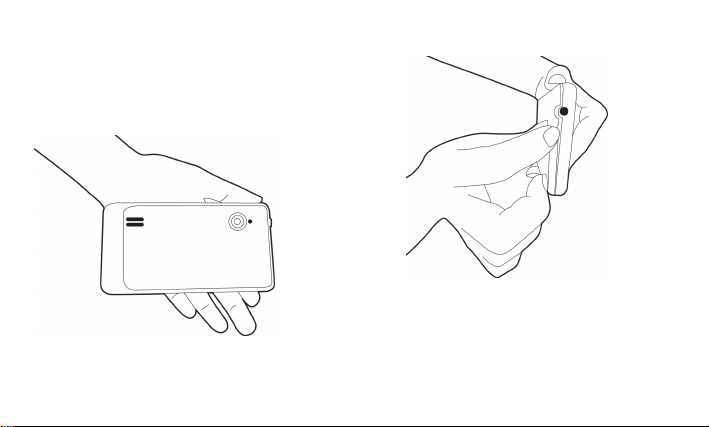
To remove the back cover
1. Please turn over your phone with the back cover facing
up.
2. Please remove the back cover from the top.
G1355│ 4
Page 5
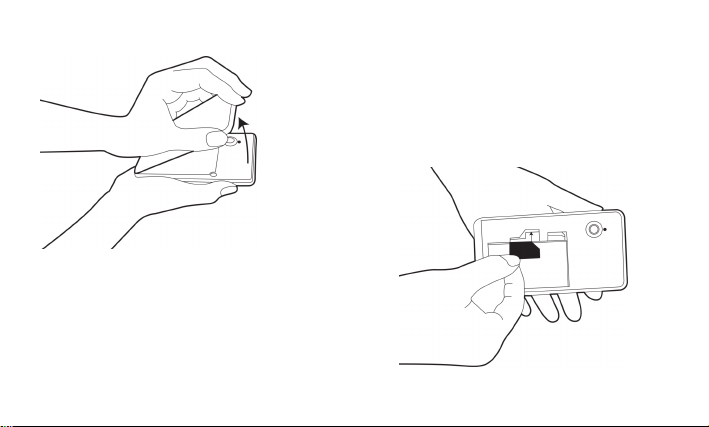
3. Pull the back cover with your fingertip and remove it.
SIM card
The SIM card contains your phone number, memory
storage, and details of network service.
To install the SIM card
Make sure the gold contacts are facing down and the
cut-off corner is facing toward the SIM card slot. There
are two slots for SIM cards. Upper slot is for SIM2, and
SIM1 slot is on the underside.
G1355│ 5
Page 6

To remove the SIM card
1. First, remove battery.
2. Use your finger to slide the SIM card out of card slot.
Battery
Your phone comes with a rechargeable battery. Battery
life varies depending on the network, used applications,
and the type of connections attached to your phone.
To install the battery
Make sure the contact of the battery is close to
connectors in the battery slot.
To remove the battery
Use your fingertip to lift the battery, then remove it.
NOTE:
To ensure battery performance and avoid risk from
fire:
• Use only the original battery designated for the
phone.
• Do not store the battery in temperature lower than
-10ºC or higher than 45ºC
G1355│ 6
Page 7

To replace the back cover
1. Please insert the hook on the bottom of back cover into
the slot.
2. Then, press four points of back cover fully until hear
clicks.
G1355│ 7
Page 8

Memory card
You may need a microSD card to store photos, music,
videos and other data.
To install the memory card
1. Insert the memory card with the gold contact facing
down.
2. Push the memory card until it clicks into slot.
To remove the memory card
1. For safe removal, tap Application Drawer >
Settings > Storage > Unmount SD card.
2. Push the memory card to eject it from the slot.
Charging the Battery
When you take your phone out of box for the first time,
the battery isn’t at full of power. Please charge the battery
fully before using.
1. Connect the USB cable to the AC adapter, and then,
connect to the device via the USB cable.
2. Plug the AC adapter to a socket start to charge.
G1355│ 8
Page 9

NOTE:
Types Descriptions
Flashing
blue light
• The battery can also be charged when you connect
your phone to a computer.
• To ensure safety, do not remove the battery from
the phone while the AC adapter is connected or
while it is being charged.
Turning the Phone On or Off
After installing the SIM card and charging the battery, you
are now ready to turn your phone on.
To turn on your phone
Press and hold the power button until the phone shortly
vibrates.
To turn off your phone
1. Press and hold the power button for several seconds.
2. A pop-up window appears, and then tap Power off.
3. Select OK to confirm.
To set your phone to the sleep mode
To set your phone to sleep mode, press the power button
briefly. It will turn the display off. To turn the display on,
press the power button briefly again.
Notification LED
Solid red light
Solid green light
Flashing red light
Flashing green light
once
Battery is charging.
Battery is full.
Battery is low.
Notification ( New
message / Missed call
/ New email)
Turning the device on
while charging.
Using Headset
For hands-free conversation or listening to music, plug a
headset into the headset jack.
NOTE:
• When using a headset, your ability to hear outsides
sounds may be limited. Do not use the headset if it
will endanger you.
• Do not set the volume to its maximum with a
headset as it may damage your hearing.
G1355│ 9
Page 10

The following instructions are only provided with the
Types Descriptions
original headset of the original manufacturer:
• When you receive an incoming
call, press the button to answer
the call. If you are having a call
conversation, press the button
Press the button
on the headset
Press and hold
the button on the
headset
to mute, and press again to
un-mute.
• In music mode, press the
button to play, and press again
to pause music.
• When you are listening to
music, press twice quickly,
forward to next music.
• If you are having a call, press
and hold the button to end the
call.
• If there is an incoming call,
press and hold the button to
end the call.
• Press and hold the button to
launch music player.
• When you are listening to
music, press and hold the
button back to Playlist.
The Home Screen
On Home screen, you can quickly access common
features and view notifications of missed calls,
received messages, battery, and the status of the
connection.
Status Bar Icons
The icons of the status bar indicate different types of
information. Tap the status bar and scroll down to view
notifications or view system information.
Types Icons Descriptions
Mute the call.
Vibration is on.
Volume
G1355│ 10
Wired headset
connected.
Wired microphone
headset
connected.
Speaker is on.
Page 11

Battery
Network
and
Connection
Battery is full.
Battery is low.
Battery is very low.
Battery is charging.
No network signal /
No SIM card
inserted.
Maximum signal
strength. Fewer
bars indicate lower
signal strength.
Wi-Fi is connected.
Wi-Fi Network is
activated.
GPRS is in
progress.
EDGE is in
progress.
G1355│ 11
3G is in progress.
HSDPA is in
progress.
Airplane mode.
Call is in progress.
Your call is on
hold.
Portable Wi-Fi
hotspot is
activated.
USB tethering is
activated.
Both USB tethering
and Portable
hotspot are
activated.
GPS is on.
Bluetooth is on.
Page 12

Notification
New text message.
The device is
connected to PC
via the USB cable.
New e-mail.
Alarm.
Event notification.
Missed call.
USB debugging is
connected.
Data is Syncing.
General
notification.
FM radio is on.
Playing a song.
Downloading an
application.
Android Manager
You can use Android Manager on your PC to synchronize
data in your device. Please download Android Manager
from GSmart’s official website and install it in your PC.
NOTE:
Only Windows XP, Windows Vista, and Windows 7
(32/64 bit) support the function.
Synchronization Procedure
1. Connec t your device to your PC with the USB cable.
2. After you connect your device to your PC with a USB
cable, USB Manager will pop up. Tap PC Sync on your
phone.
3. Androi d Manager will synchronize with your phone
automatically.
4. Androi d Manager’s connection status:
: Connection between PC and your device has
been established.
: Connection between PC and your device is
being established.
G1355│ 12
Page 13

: Connection between PC and your device is
disconnected.
Use Android Manager on your PC
Contacts: Allows you to back up contacts, as well as
organize your contacts.
Messages: Allows you to edit and send messages.
Photos: Allows you to import photos from PC or the
device and to organize them in different albums.
Videos: Allows you to add and to play videos.
Music: Allows you to add, to delete, to edit and to play
music.
Application: Allows you to manage the downloaded
applications.
Files: Allows you to organize and to manage files in both
of your PC and your device.
Sync: Allows you to synchronize the following items:
Contacts, Calendar, Camera, Camcorder, and Folders.
Conflict resolutions include Skip this item, Computer will
overwrite handset, and Handset overwrite computer.
Finally, tap to synchronize the selected items
between your PC and your device.
USB Manager
There are 4 modes of USB Manager after your device
connects to PC with the USB cable:
1. Data Storage: Insert the memory card, and then, tap
Data Storage on your phone. Your PC will pop-up a
message to ask if you want to use data storage. It can
help you save the files.
2. PC Sync: Tap PC Sync on your phone, your device will
connect and access Android Manager. Android
Manager on your PC will synchronize with your device.
3. Internet Sharing: Share your phone's mobile network
with PC.
4. Charge Only: Tap Charge Only on your phone to start
charging.
Install USB Driver
1. Connec t your device to the PC with the USB cable,
and then, your PC will pop-up a message. Select
“Open folder to view files.”
2. Tap the "Setup.exe" in the USB Driver Installer folder
in your PC.
3. Pop up the installing windows of GSmart Driver. Wait
for a few seconds for the process, then tap “Done” to
have the process completed.
G1355│ 13
Page 14

NOTE:
System Information
Display
Size
Power
Radio Band & Standard
Connec
tivity
Digital Camera
Only Windows XP Service Pack 3 and higher versions
support the installation.
Specifications
Platform Android 2.3
Processor
Memory
Size 4.3”
Resolutions 800 x 480 WVGA
Dimensions
(L x W x H)
Weight 163 grams with battery
Battery
Rechargeable
Power Adapter AC
input
DC output 5V, 1A
Qualcomm
7227-T at 800 MHz
ROM 1 GB
RAM 512MB
129.8 x 69.8 x 11.5 mm
Li-ion pack 1500 mAh
100-240V, 50 / 60Hz,
0.3A max.
Standby time
Talk time
GSM/GPRS/EDGE
WCDMA/HSDPA 900 / 2100 MHz
GPS GPS
Wi-Fi IEEE 802.11 b/g/n
Bluetooth Bluetooth 2.1 + EDR
USB Micro USB
Audio Jack
Digital Camera
G1355│ 14
Up to 105 hours (It may
vary depending on the
availability of local
networks and the
individual usage.)
Up to 6 hours (It may
vary depending on the
availability of local
networks and the
individual usage.)
850 / 900 / 1800 / 1900
MHz
3.5 mm stereo audio
jack
5.0 Megapixel Color
Camera with AF and
Video Recording
Page 15

External Memory
Memory Card
Temperature
SIM Card Slot
www.gigabytecm.com
Operating -15°C to 55°C
Dual SIM card slot.
NOTE:
Specifications are subject to change without the prior
notice. They may vary in some regions also.
NOTE: Network supporting:
(a). SIM 1: 3G/2G(WCDMA/GSM)
(b). SIM 2: 2G (GSM)
microSD supports up to
32GB
If this document is modified, please download the latest
version on GSmart’s official website. You can download
the user manual on GSmart’s official website also.
GIGA-BYTE COMMUNICATIONS INC.
B2, No.207, Sec.3, Pai-Hsin Road,
Hsin-Tien Dist., New Taipei City 231, Taiwan
+886-2-89132220
G1355│ 15
 Loading...