

Page 1
1
* Im ages Us ed for R eference Only
D1325
V1.0
Quick Installation Guide
Page 2
1
Docking Station & Optical Disc Drive
The system does NOT feature an Optical Disc Drive. The Optical Disc Drive is an optional
accessory that will be required when needing to use any type of CD or DVD. There are
two options avaible for this - Option One will be an External USB DVD Drive, Option Two
will be a Docking Station with a built-in DVD Writer. Both of these are optional accessories
and are available from the system Supplier at an additional cost.
Docking Station
The docking station provides extension to the Input/Output capabilities of the system
Notebook. The notebook clips into the docking station which will then activate the extra
ports and connectors. Please see below for the list of ports. The ODD Drive depends on
the model. Either DVD or Blu-Ray is possible.
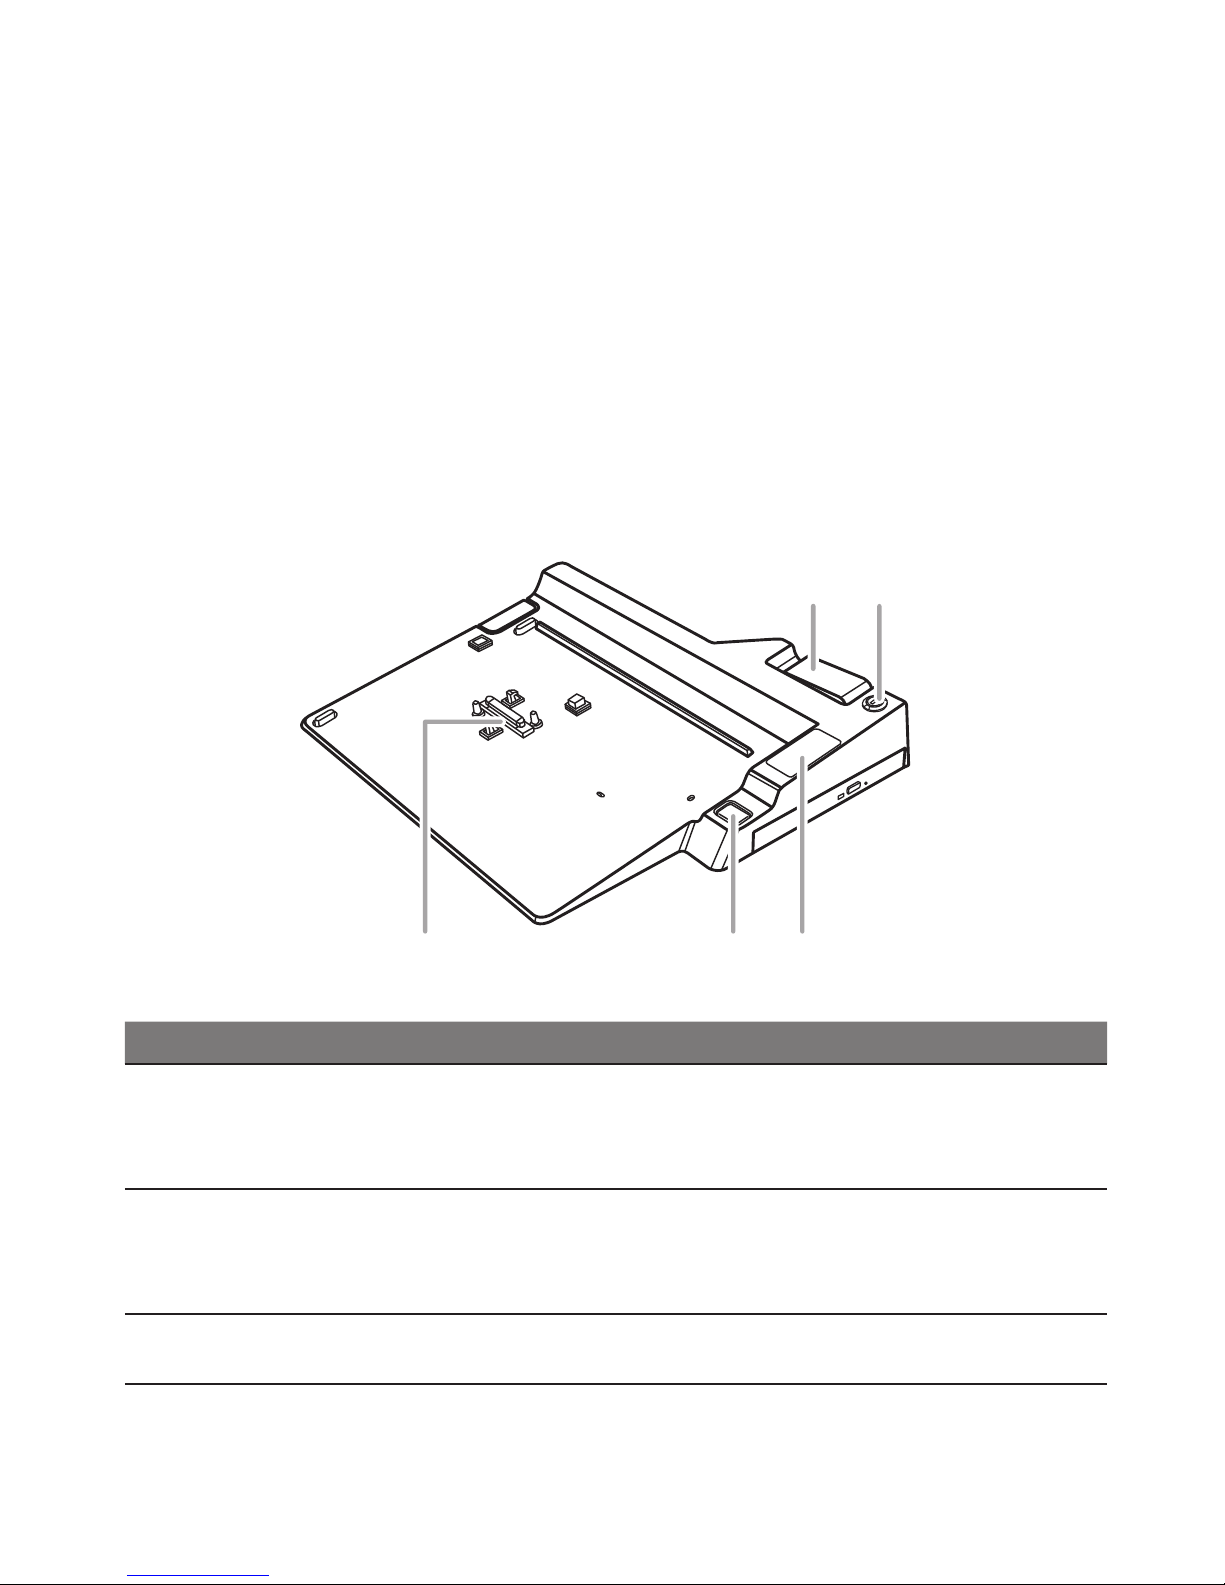
Top View
Dock Connector Undock Button
Release Latch Keylock
Status LED
Panel
Item Description
Docking Port
Connector
The docking port is used to interface between the notebook
and the station itself allowing control and connectivity. This
port is very fragile. Care must be taken when connecting and
disconnecting.
Undock Button
This button is used to close the link between the system and
the Docking Station. It must be pressed before releasing
the notebook to prevent damage and to close all links and
connections.
LED Status Panel
The panel shows the status of the docking stations power and
link status for the notebook and the ports on the docking station.
Page 3

2
Rear View
Headphone Jack
Microphone Jack
USB Ports
DC-In Jack
Kensington Lock*
Slim-Line 12.7mm
SATA Optical Drive
For DVD or Blu-Ray
D-Sub Port
DVI Port
Display Port
USB Ports
LAN Port
Item Description
RJ-45 LAN Port
The LAN Port is used to connect the Docking Station and docked
notebook to a wired network. The port is capable of speeds up to
1Gbps.
DisplayPort
This connector is used for the new displayport type connector for
Digital Displays. Here you will connect external displayport devices.
USB Ports
The Docking Station has a total of 4 available ports for peripheral
connections and the ports are USB 2 Compliant (USB 2.0).
VGA D-Sub Port
The VGA D-Sub port is used to connect an external analogue
monitor to the docking station. These can be CRT, LCD or TV
Displays.
DVI-Port
The DVI Port is used to connect an external digital LCD or LCD TV
display to the docking station.
Kensignton Lock
The small port is used to secure the notebook to a desk or
workstation and prevent theft. The lock for the notebook is optional
and is a seperate purchase.
SATA Optical Drive
The ODD Port will have either a DVD Writer Drive or a Blu-Ray
ROM / DVD-RW Combo or a full Blu-Ray Writer / DVD-RW drive
installed that will depend on the conguration purchased as well as
the available options.
USB Optical Disc Drive
The system does NOT feature an Optical Disc Drive. Th is will breiy cover an external
USB Optical Disc Drive. Please see below for details. Plase note that the USB Drive is
NOT Included with the system and needs to be sourced and purchased from a 3rd Party
store or supplier.
The Example below assumes that a USB Powered ODD has been purchased
and if for guideline purposes only and may not indicate the exact drive that a
user may have purchased.
Page 4

3
USB Optical - Front
Activiity LED Emergency
Release
Eject Button
1. Press the drive eject button to open the drive. Pull gently once it pops open.
2. Place the disc into the center of the drive and click into place onto the round spinner
section to secure the disc.
3. Close the drive to initiate reading of the disc.
USB Optical - Rear
Mini USB Port
The mini USB Port acts as both the interface to the PC as well as the port for power.
The drive will power through USB unless a drive that requires its own power source is
purchased. Please see Page Section 3.6 for a guide to connecting USB devices.
Emergency Release
In the event that the drive will not open, an emergency release will need to be performed.
Take a thin long item, such as a paper clip and put it gently into the small hole on the front
of the drive and press inwards until the tray of the drive clicks out. This should only be performed if the drive has stalled and will not open at all using the release button or the eject
command in windows.
Page 5

4
Docking the computer
1. Align the arrow guides on the computer and expansion base. (as shown in the circle 1 & 2)
2. Make sure the computer is docked to the expansion base by pressing down the
computer. (as shown in the circle 3)
2
3
1
Undocking the computer
1. Lift up the lever to separate the computer and expansion base. (as shown in the circle 1)
2. Withdraw the computer upwards. (as shown in the circle 2)
1
2
 Loading...