

Page 1
Page 2

Copyright © 2010 GIGABYTE TECHNOLOGY CO., LTD.
All Rights Reserved
GIGABYTE E1425 Series Notebooks User’s Manual
Date Issued: 2010/07
This manual takes you, step by step, through setting up and using your new Notebook PC. Information in this manual has been carefully
checked for accuracy and is subject to change without prior notice.
No part or parts of this manual may be reproduced, stored in a retrieval system, or transmitted, in any form or by any means, electronic,
mechanical, by photocopy, recording, or otherwise, without prior written consent.
Trademarks
Product names used herein are for identication purposes only and may be the trademarks of their respective companies.
Microsoft® , MS-DOS, Windows® , and Windows® Sound System are trademarks of the Microsoft Corporation.
Intel® & Core™. are registered trademarks of Intel Corporation.
Sound Blaster & Sound Blaster Pro are trademarks of Creative Technology.
All other brands or product names mentioned in this manual are trademarks or registered trademarks of their respective companies.
Page 3
General Safety Precautions
In order to ensure your safety and the safety of you notebook, we ask
that your carefully follow these safety precautions.
English
I
CAUTION: Using your notebook for long periods of time, with
the base resting directly on exposed skin, can cause injury,
burns or discomfort from the heat buildup that is generated from
the base of your portable computer.
● After removing the notebook from the box, please ensure that all
packaging materials are kept out of the reach of small children as
they can cause a potential choking hazard. The packaging
materials should be safely stored away in the event that it may be
used again for safe transportation of the notebook.
● Ensure that the AC Adapter and power cable are placed in a safe
area where it cannot be tripped over or stepped on. The AC
Adapter should be situated in a well ventilated area and should
have nothing resting on or covering it.
● Before turning on the notebook, ensure that it is placed on a level
surface with at least 10 cm of clearance around the air vents, which
will aid in proper cooling.
● Do not obstruct the air vents of the notebook and do not insert any
foreign objects into this space. Doing this may cause a short circuit or
may cause the CPU fan to malfunction, resulting in the risk of a re or
electric shock. This may eventually render permanent damage to the
notebook.
● Do note press or touch the display panel.
● Only use the AC Adapter that is provided with the notebook or
that which is recommended by the manufacturer. Using non-
recommended or non-approved parts may cause damage or increase
the risk of a re or explosion. In the event that another AC Adapter is
required, advice should be sought from a GIGABYTE service agent,
in order to make sure that the correct part is recommended.
● Please follow the battery installation guidelines. Incorrect
installation of batteries may increase the risk of a re or explosion.
● Only replace old batteries with the same or an alternative
compatible battery that is recommended by GIGABYTE or an
authorized GIGABYTE Service Centre.
● Before connecting the notebook to the power outlet, make sure
that the voltage rating of the AC Adapter is compatible with the
power specication in the country where you are located. A
detailed list of the power specication for different countries can
be found on page 21.
● When using an extension cord, please make sure that the total
sum of ampere ratings for all connected devices does not exceed
the total ampere capacity for the circuit.
● Before removing the battery from the notebook, make sure rstly
that the notebook is switched off and secondly that the AC
Adapter is disconnected from the electrical wall socket. Once this
is done, it would be safe to remove the battery.
Do not carry the notebook battery, loose, in your handbag,
backpack or pocket where loose metal objects (money, keys,
chains, pens, etc) may be present. The metal objects can short
circuit the terminals of the battery resulting in overheating
that could cause a re hazard. In the event that you need to
transport the battery separately from the notebook, please place
it inside an anti-static bag.
Page 4

E1425 SERIES USER’S MANUAL
● Discard old worn out batteries according to the instructions on
Page VI. Never throw batteries into a re as this can cause an
explosion.
● Never attempt to repair or service the notebook yourself. Please
refer all repairs and servicing to qualied service personnel at a
GIGABYTE Authorized Service Centre.
Travel Tips
Although notebooks are designed to be as robust as possible to cater
for a mobile lifestyle, extreme care and caution should be taken when
travelling. When travelling by land, sea or air, every precaution should
be taken to make sure that the notebook is well secured when it is not in
use.
● The most essential accessory you should have when travelling is a
good carry case for your notebook. The case should be well
padded to protect your notebook from drops and bumps, etc and
should be big enough to hold the size of notebook.
● Make sure there is enough room to carry your AC Adapter and
spare battery etc. Only carry the necessary items in your carry
case, as the weight can become tedious especially when walking
long distances or waiting in long queue’s.
● When travelling by air, never book your notebook in with checked
baggage. Always declare it as hand baggage so that you can carry
it into the airplane cabin with you. Most airlines allow two pieces of
hand baggage with one of them being a bag or carry case with a
portable notebook. Please consult your local airline for more details.
● When placing your notebook on an X-Ray, make sure that you keep
a close eye on it when it is one the conveyor belt. Hold on to your
notebook until the last minute before placing it on the conveyor.
In some airports it could be stolen while you are stuck in a queue
waiting to pass through the metal detector.
● Notebooks and hard drives can pass through X-Ray machines but
never allow these to pass through a metal detector. This can cause
data loss to the hard drive.
● Never place your notebook in the overhead storage compartment as
this can make it susceptible to damage caused by turbulence that
may be experienced during the ight or in other case theft. You can
store your notebook under your seat, where it is always in sight.
● You should take every precaution to protect your notebook from dust,
dirt, liquid spillage, food droppings, extreme weather conditions and
direct exposure to sunlight.
● When travelling between different climates, from one extreme to
another, condensation may occur inside the notebook. If this does
happen, please allow sufcient time for the moisture to evaporate
completely, before attempting to switch on.
● When travelling from extremely colder to extremely warmer climates
in a short space of time, and vice versa, please allow the notebook
some time to adapt to the change in environment.
Usage Tips
●
When unplugging the power connector from the notebook,
please hold and pull on the connector or the strain relief loop to
disconnect. Do not pull the power cord itself as this can cause
damage to the cable or the notebook.
●
In the event of an electrical storm, please disconnect the
notebook from the power source and unplug any network or
telephone cables that may be connected to the notebook.
English
II
Page 5
●
Do not use the notebook near water sources, like bathtubs,
washing basins, kitchen or laundry sinks or swimming pools.
Liquid that can spill onto the notebook by accident can cause
electric shock to you and damage to the notebook.
English
Cleaning Tips
When cleaning the notebook, please make sure that the notebook
is switched off and disconnected from the power source and that the
battery is removed.
III
Notebook Cover:
Use a microber or lint free soft cotton cloth and kitchen detergent (mix 5
parts water to 1 part detergent).
● Wet the cloth and wring out all excess liquid and wipe the surfaces
clean.
● Take extra care to make sure that the cloth is damp and not very wet,
especially when cleaning around the air vents and other openings as
too much liquid in the cloth could drip onto the external components
causing damage to the notebook.
● Do not clean the keyboard with this liquid.
Keyboard:
● It is advisable to use a can of compressed air to clean debris that
maybe caught underneath the keys.
● Isopropyl alcohol can be used to clean the keys by dipping a lint-
free soft cloth into it, wringing out the excess liquid and wiping the
keys.
● Allow to dry for at least 5 minutes.
LCD:
● It is best to use a microber cloth to clean the surface of the LCD.
● If there are any marks or stains present, it would be wise to use
commercially available LCD cleaning kit. When using a commercially
available LCD cleaning kit, never spray the liquid directly onto the
screen. You must spray it onto the cleaning cloth and then wipe the
screen clean.
● If this is not available then you can mix 50% isopropyl alcohol and
50% distilled water to clean the surface of the LCD screen.
● Dip the lint free soft cotton cloth into the solution, wringing out excess
liquid.
● The cloth must be damp but not dripping with liquid.
● Take care not to let any excess liquid drip into the notebook.
● Start from the top of the LCD surface and wipe from side to side.
● Continue with this until the entire LCD surface has been cleaned.
● Wipe the display with a clean, dry lint free soft cotton or microber
cloth.
● Wait for the LCD surface to dry completely and then close the lid.
Be careful when using Isopropyl Alcohol as this is a
ammable liquid. Please keep away from children,
naked ames or a notebook that is switched on.
Page 6

E1425 SERIES USER’S MANUAL
Warranty Guidelines
All warranty repairs and service must be carried out by a GIGABYTE
Authorized Repair Centre.
GIGABYTE Limited Warranty
GIGABYTE warrants, that the GIGABYTE branded Notebook/Netbook
is free of any defects in materials and workmanship under normal use
during the warranty period.
● All GIGABYTE supplied AC adapters and batteries carry a 1 year
limited warranty.
● The warranty is effective from date of purchase.
● If proof of purchase cannot be shown, then the warranty will be
determined based on the date of manufacture.
● The limited warranty is only valid for GIGABYTE branded or supplied
hardware.
● In the event that a defect arises in materials or workmanship and
proof is shown of this defect, GIGABYTE will, through its authorized
service provider or partner, repair the product at no extra charge,
using new or refurbished replacement parts in order to fulll the
warranty obligations.
● If, during the warranty period, GIGABYTE or its service provider is
unable to repair the product, the product will be replaced with a
comparable product that is new or refurbished.
Warranty Limitations
The GIGABYTE Limited Warranty does not cover the following…
● Software, including the operating system and applications supplied
with the product. This also includes third party software that may be
installed after purchase.
● Third party hardware, products and accessories not supplied by
GIGABYTE. This also includes third party hardware that may be
bundled with the notebook or netbook.
● Products with missing or defaced labels and/or serial numbers
● Products damaged by environmental factors, which include oxidation
● Products damaged by natural disasters or acts of God.
● Physical Damages which include, but not limited to, the following:
►
Unauthorized modications, repairs or servicing
►
Misuse, abuse, neglect or failure to follow instructions in the user
manual.
►
Improper assembly
►
Damages caused by transport due to improper packaging or
mishandling by the courier company unless transport is part
of the warranty conditions in certain countries.
►
Electric damage resulting from faulty or failed electric power
or power surges.
►
Damaged or cracked components
►
Liquid damage
English
IV
Page 7
Regulatory Notices
Federal Communications Commission Notice
This equipment has been tested and found to comply with the limits for
English
a Class B digital service, pursuant to Part 15 of the FCC rules. These
limits are designed to provide reasonable protection against harmful
interference in a residential installation.
RF Exposure
This equipment must be installed and operated in accordance with
provided instructions and must not be co-located or operating in
conjunction with any other antenna or transmitter. End-users and
installers must be provide with antenna installation instructions
and transmitter operating conditions for satisfying RF exposure
compliance.
Any changes or modications made to this equipment may void the
V
user’s authority to operate this equipment. This equipment generates,
uses, and can radiate radio frequency energy. If not installed and used
in accordance with the instructions, may cause harmful interference to
radio communications. However, there is no guarantee that interference
will not occur in a particular installation. If this
equipment does cause harmful interference to radio or television
reception, which can be determined by turning the equipment off and
on, the user is encouraged to try to correct the interference by one or
more of the following measures:
● Reorient or relocate the receiving antenna.
● Increase the separation between the equipment and receiver.
● Connect the equipment into an outlet on a circuit different from that
towhich the receiver is connected.
● Consult the dealer or an experienced radio/TV technician for help.
● All external cables connecting to this basic unit must be shielded.
For cables connecting to PCMCIA cards, see the option manual
or nstallation instructions.
CE Notice (European Union)
This symbol indicates this Booktop E1425 notebook complies with
the EMC Directive and the European Union’s Low Voltage Directive. This
symbol also indicates that E1425 meets the following technical standards:
● EN 55022 — “Limitations and Methods of Measurement for the Radio
Interferences of Information Technology Equipment.”
● EN 55024 — “Information technology equipment - Immunity character-
istics - Limits and methods of measurement.”
● EN 61000-3-2 — “Electromagnetic compatibility (EMC) - Chapter 3:
Limits - Section 2: Limits on the harmonic current emissions (Equip-
ment input current up to and including 16 A per phase).”
● EN 61000-3-3 — “Electromagnetic compatibility (EMC) - Chapter 3:
Limits - Section 3: Limits on the voltage uctuations and icker in low-
voltage power supply systems for equipment with rate current up to
and including 16 A.”
Page 8
E1425 SERIES USER’S MANUAL
NOTE: EN 55022 emissions requirements provide for two clas-
sications
● Class A governs commercial use
● Class B is governs residential use
For CB:
● Only use batteries designed for this computer. The wrong battery type
may explode, leak or damage the computer
●
Do not remove any batteries from the computer while it is powered on
●
Do not continue to use a battery that has been dropped, or that appears
damaged (e.g. bent or twisted) in any way. Even if the computer continues
to work with a damaged battery in place, it may cause circuit damage, which
may possibly result in re.
●
Recharge the batteries using the notebook’s system. Incorrect recharg-
ing may make the battery explode.
●
Do not try to repair a battery pack. Refer any battery pack repair or
replacement to your service representative or qualied service personnel.
●
Keep children away from, and promptly dispose of a damaged battery.
Always dispose of batteries carefully. Batteries may explode or leak if
exposed to re, or improperly handled or discarded.
●
Keep the battery away from metal appliances.
●
Afx tape to the battery contacts before disposing of the battery.
●
Do not touch the battery contacts with your hands or metal objects.
Battery Disposal & Caution
The product that you have purchased contains a rechargeable battery. The battery is recyclable. At the end of its useful life, under
various state and local laws. It may be illegal to dispose of this battery into the municipal waste stream. Check with your local solid
waste officials for details in your area for recycling options or proper
disposal.
Danger of explosion if battery is incorrectly replaced. Replace only
with the same or equivalent type recommended by the manufacturer.
Discard used battery according to the manufacturer’s instructions.
English
VI
Page 9
BSMI Notice (Taiwan Only)
Most E1425 computers are classied by the Bureau of Standards,
Meteorology and Inspection (BSMI) as Class B information
English
technology equipment (ITE).
The symbol above must be attached to the product indicating
VII
compliance with the BSMI standard.
Replaceable Batteries
If any equipment is provided with a replaceable battery, and if
replacement by an incorrect type could result in an explosion (for
example, with some lithium batteries), the following applies:
● if the battery is placed in an operator access area, there shall be
a marking close to the battery or a statement in boththe operating
and the servicing instructions;
● if the battery is placed elsewhere in the equipment, there shall
be a marking close to the battery or a statement in the servicing
instructions.
This marking or statement shall include the following or similar text:
CAUTION
RISK OF EXPLOSION IF BATTERY IS REPLACED
WITH AN INCOMPATIBLE BATTERY TYPE.
DISPOSE OF USED BATTERIES
ACCORDING TO THE INSTRUCTIONS
Page 10
Introduction
E1425 SERIES USER’S MANUAL
English
Con gra tul ati ons and thank you for purchasing the GIGABYTE
notebook computer. This portable notebook computer provides
excellent multimedia functionality and is designed to provide you
reliable, no fuss computing.
This manual will explain to you, step by step, how to setup and
begin using your E1425. It provides basic configuring,operation,
care and troubleshooting guidelines.
VIII
Page 11

Content
General Safety Precautions...............................................................I
English
Warranty Guidelines ........................................................................IV
Regulatory Notices & Certications ..................................................V
Introduction ....................................................................................VIII
IX
Chapter 1 Before You Start
1.1 Make Sure You Have Everything ............................................. 2
1.2 Familiarize Yourself with the Computer ................................... 2
1.3 Front View ................................................................................3
1.4 Left View .................................................................................. 4
1.5 Right View ................................................................................4
1.6 Back View ................................................................................ 5
1.7 Bottom View .............................................................................6
Chapter 2 Getting Started
2.1 Power Sources .........................................................................8
2.2 Recharging the Battery ............................................................ 9
2.3 Starting Your Notebook ..........................................................10
2.4 Status Indicators .................................................................... 11
2.5 Using Function Keys .............................................................. 12
2.6 Using the Touch Pad .............................................................13
Chapter 3 GIGABYTE Smart Recovery
3.1 GIGABYTE Smart Recovery .................................................. 16
Chapter 4 Troubleshooting
4.1 Identifying the Problem .......................................................... 18
4.2 GIGABYTE Service Information .............................................18
Appendix
E1425 Specications .............................................................20
International Country Voltage ................................................22
Plug Type ...............................................................................26
Page 12
E1425 SERIES USER’S MANUAL
English
Chapter 1 Before You Start
This chapter provides basic information to help you get started and
to use the E1425 notebook.
Some of the features described herein may not function properly
or at all unless used in conjunction with the pre-installed operating
system. Any change to the operating system may cause improper
function.
1
Page 13
1.1 Make Sure You Have Everything
When you receive your noteb ook PC , unpa ck it careful ly and
check to make sure you have all the items listed below. For a precongured model you should have the following:
English
● GIGABYTE Notebook Computer
● Lithium-Ion Battery
● AC Adapter with Power Cord
● Driver Disc
● Quick Start Guide
2
Once you have checked and conrmed that your notebook system
is complete, read through the following pages to learn about all of
your notebook components.
NOTE: Depending on the model you purchased, the actual
appearance of your notebook may vary from that shown in
this manual.These images are for illustration purposes.
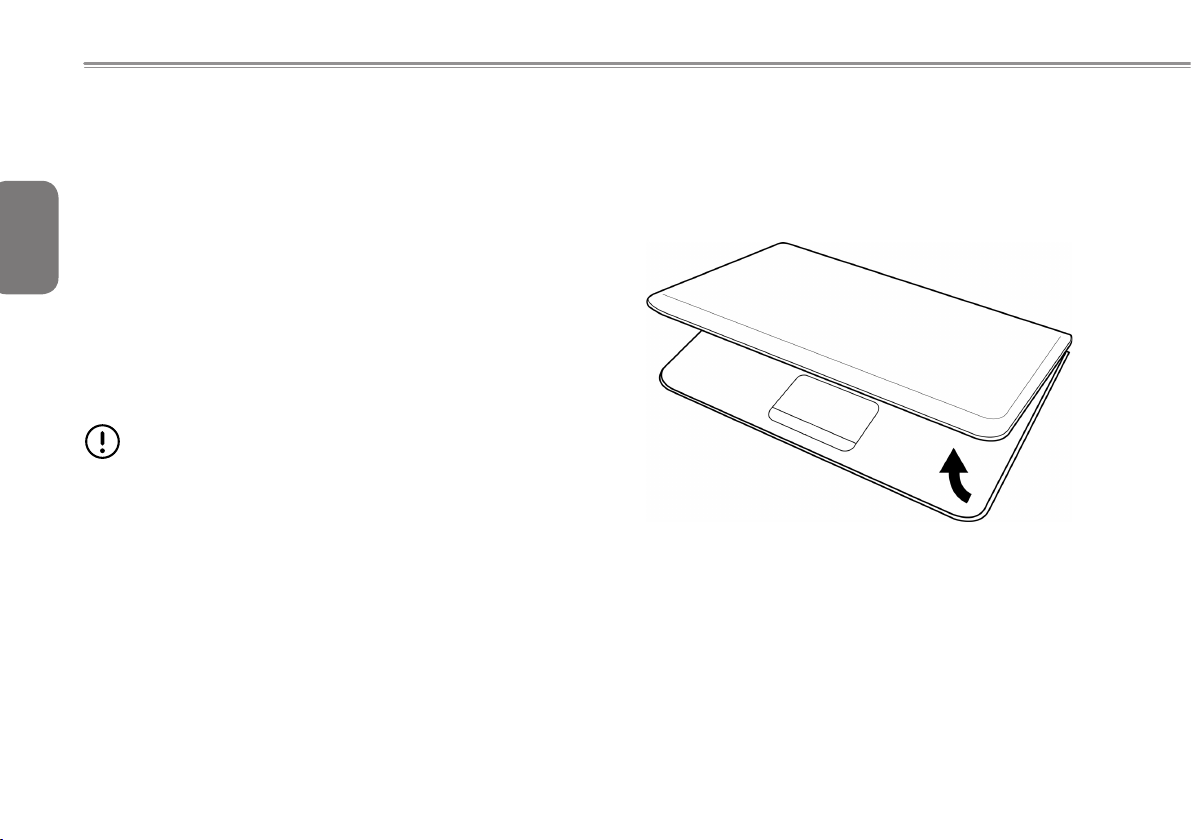
1.2 Familiarize Yourself with the Computer
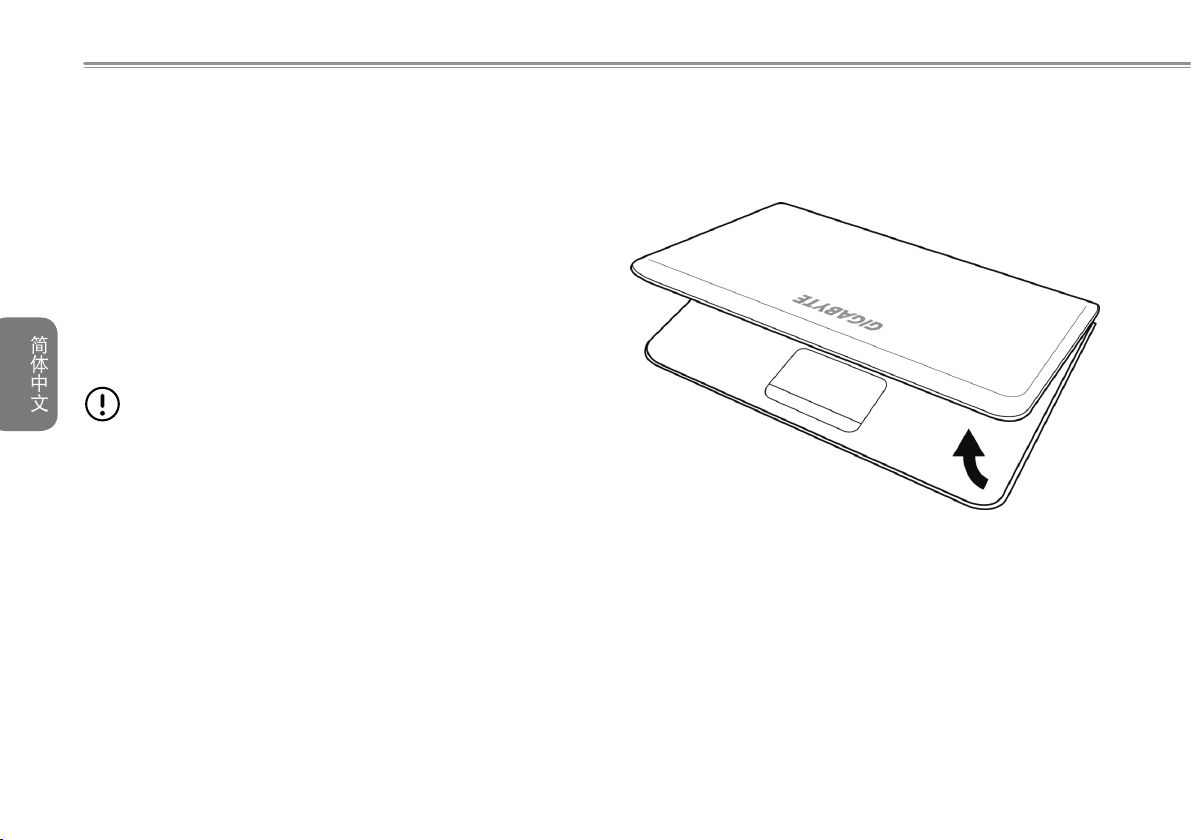
Opening The Display Panel
To open the display panel, simply lift the lid up. Use your one hand
to hold the machine and use the other to open the display panel.
When closing the lid, be sure not to slam it closed.
Page 14
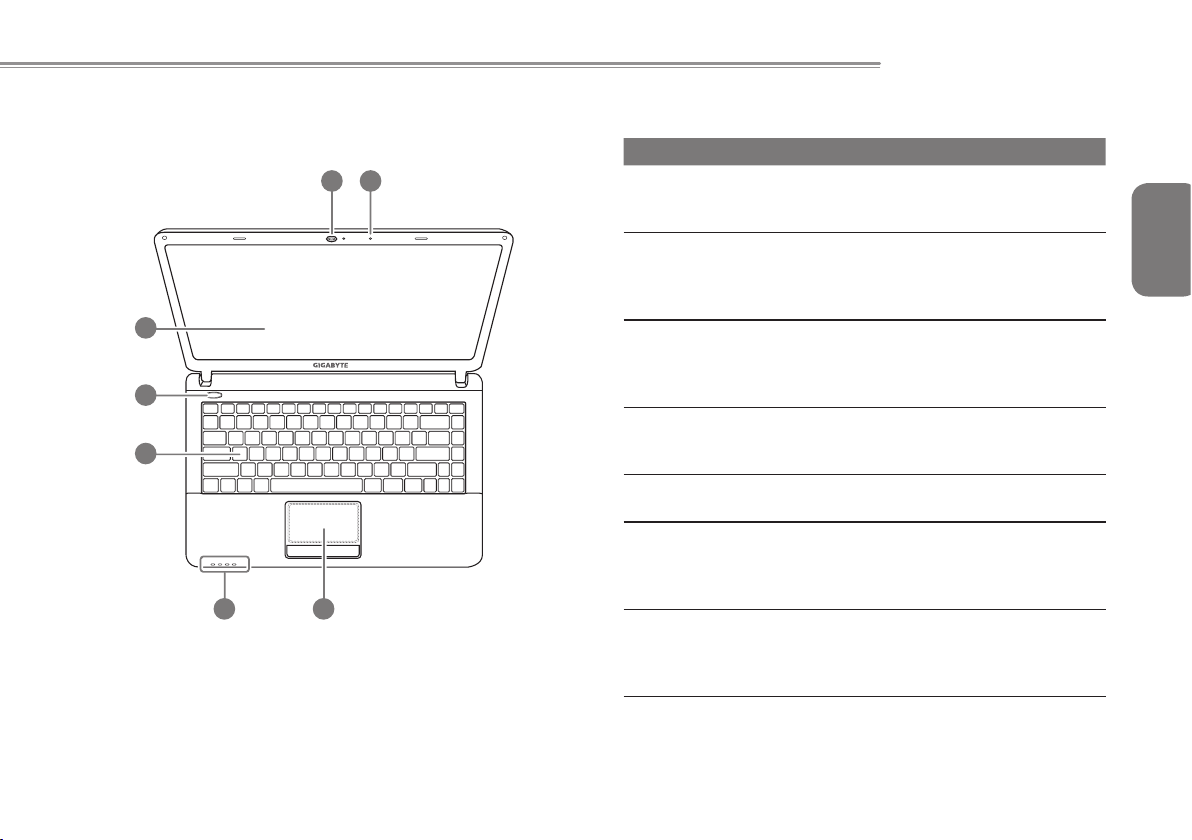
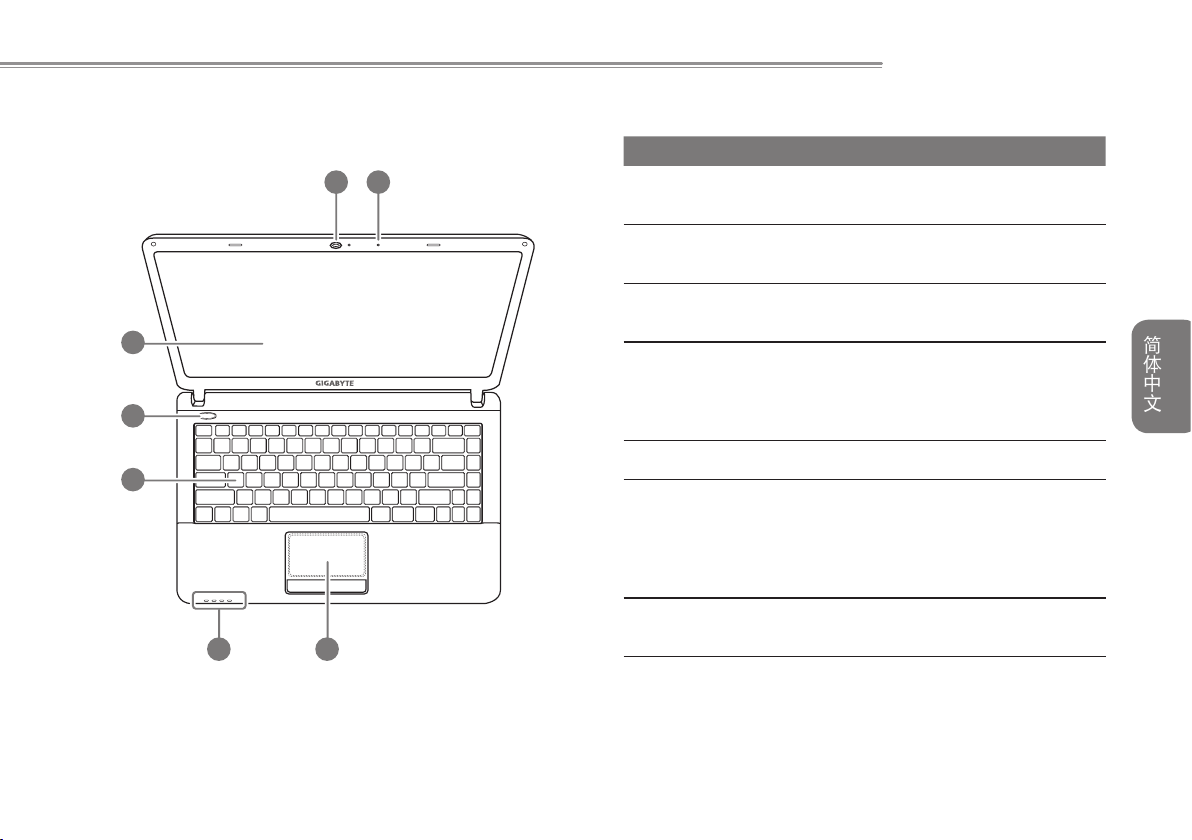
1.3 Top View
The following is an overview of the front of the notebook.
2
1
3
4
5
6
7
NO. Item Function
The microphones are built into the LCD Panel
1 Microphone
2 Webcam
3 LCD Display
4 Power Button
5 Keyboard
Status
6
Indicators
7 TouchPad
and work like standard microphones and are
used to speak during video chat session etc.
The built-in webcam is housed here. The
resolution depends on the conguration
purchased. The cam is perfeect for online chat
and video streaming.
The display type and size depends on
the model of notebook purchased. The
supported resolution will also depend on the
display type and size.
The power button is used to switch the
notebook on and off, and for emergency
shutdown or restart.
A full-size keyboard with dedicated
Windows keys.
These status indicatorsare used to show
specic information on the E1425 such as if
the Wireless LAN or Bluetooth is On or Off
and if the Battery Pack is charging or not.
This is the pointer device controller for the
system and mimics mouse movement on
the screen. It has the standard Left/Right
button arrangement.
E1425 SERIES USER’S MANUAL
English
3
Page 15
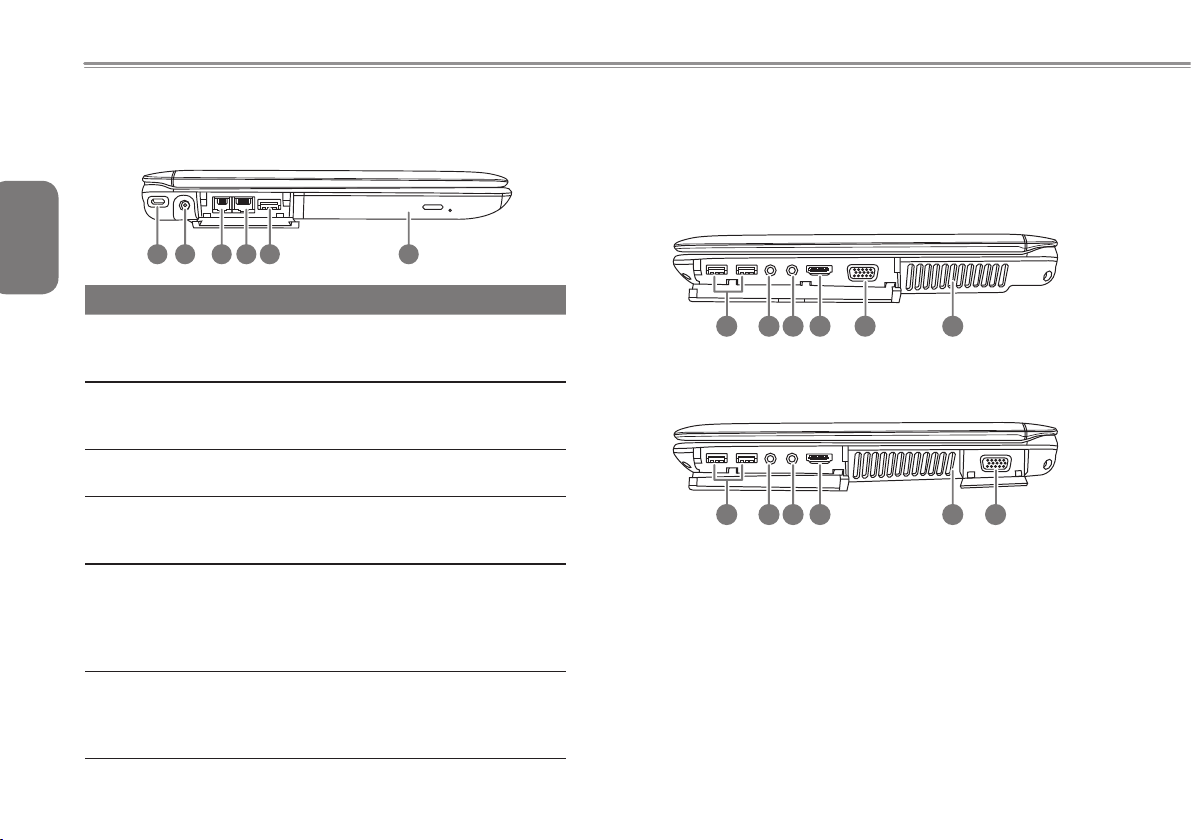
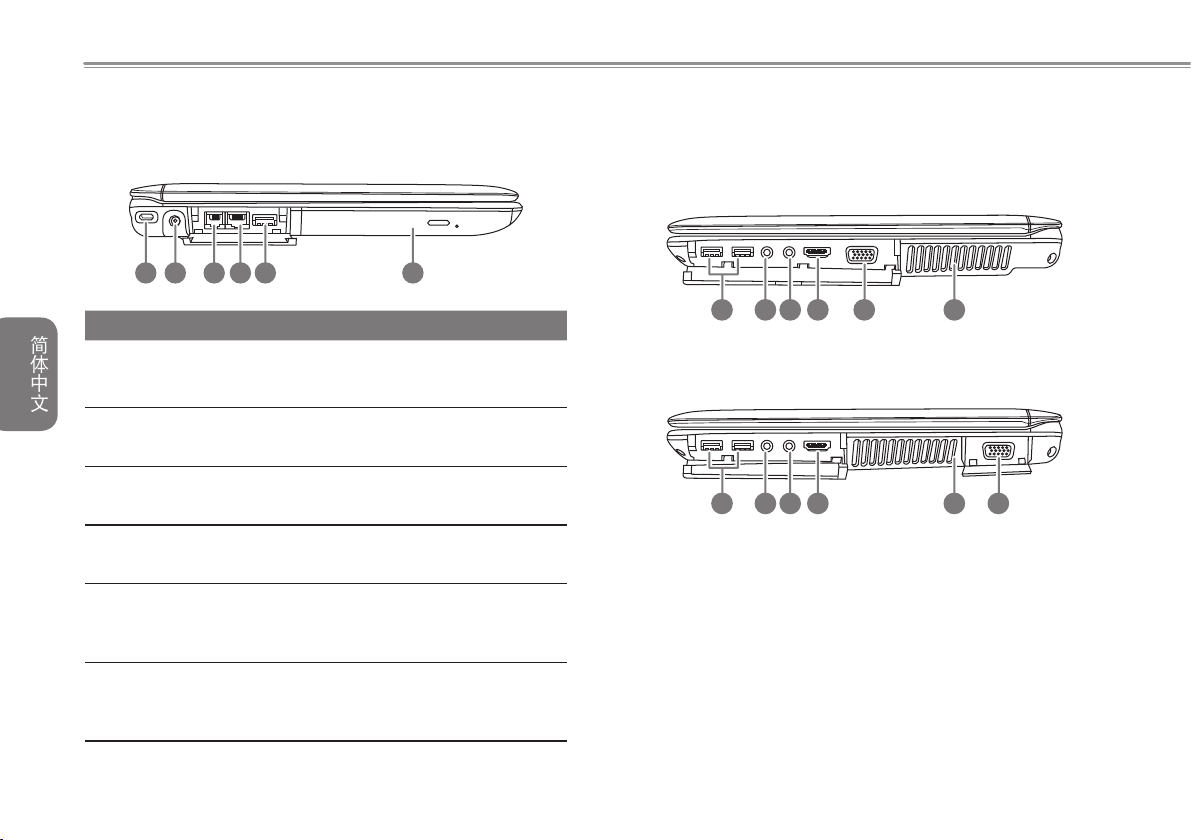
1.4 Left View
The following is a brief description of the left side of the notebook.
1.5 Right View
The following is a brief description of the right side of the notebook.
English
1 2
NO. Item Function
4
Kensington
1
Lock Slot
2 DC-in Jack
Modem (RJ-11)
3
Port
LAN (RJ-45)
4
Port
5 USB 2.0 Port
Optical Disc
6
Drive
3
4 5 6
The small port is used to secure the
notebook to desks or workstations and
prevent theft. The notebook lock is optional
This port is used to connect the notebooks
external AC Adaptor when charging or
continuous power is needed.
The modem (RJ-11) port is used to attach a
telephone line to the internal 56k modem.
These ports are used to connect a standard
RJ-45 LAN Cable for networking or RJ-11
Modem Cable for dial-up internet access.
These ports are used for connecting
external USB Peripherals and Storage to
the Notebook. Devices such as Printers,
Keyboards, Mice and Drives are supported
and the ports are Plug And Play.
TheOptical Disc Drive is used to read and
write to and from optical media. The drive,
depending on conguration, could be either
a DVD Comb.
E1425A
1 2 3 4 5 6
E1425M
1 2 3 4 56
Page 16
NO. Item Function
These ports are used for connecting external
USB Peripherals and Storage to the Notebook.
1 USB 2.0 Port
Headphone
2
Jack
Microphone
3
Jack
4 HDMI Port
External Moniter
5
(VGA) Port
6 Cooling Vents
Devices such as Printers, Keyboards, Mice and
Drives are supported and the ports are Plug
And Play.
This port is used to connect external audio
output devices such as speakers and
headphones to the notebook to enhance the
sound capabilities.
This port is used to connect an external
amplied microphone to the notebook to
enhance the voice recording and recognition
of the notebook. Typical scenarios include
online chat such as Skype.
The HDMI port allows outputing a video signal
in full High Denition to an HD compatible
display as well as na HD sound signal.
This port is used to connect an external
analog vga display to the notebook for output
to a larger screen or projector.
These are open ports for the fan to dissipate
heat from the computer’s internal components.
Do not block or place the computer in such
a position that you inadvertently allow the
outlets to become blocked.
E1425 SERIES USER’S MANUAL
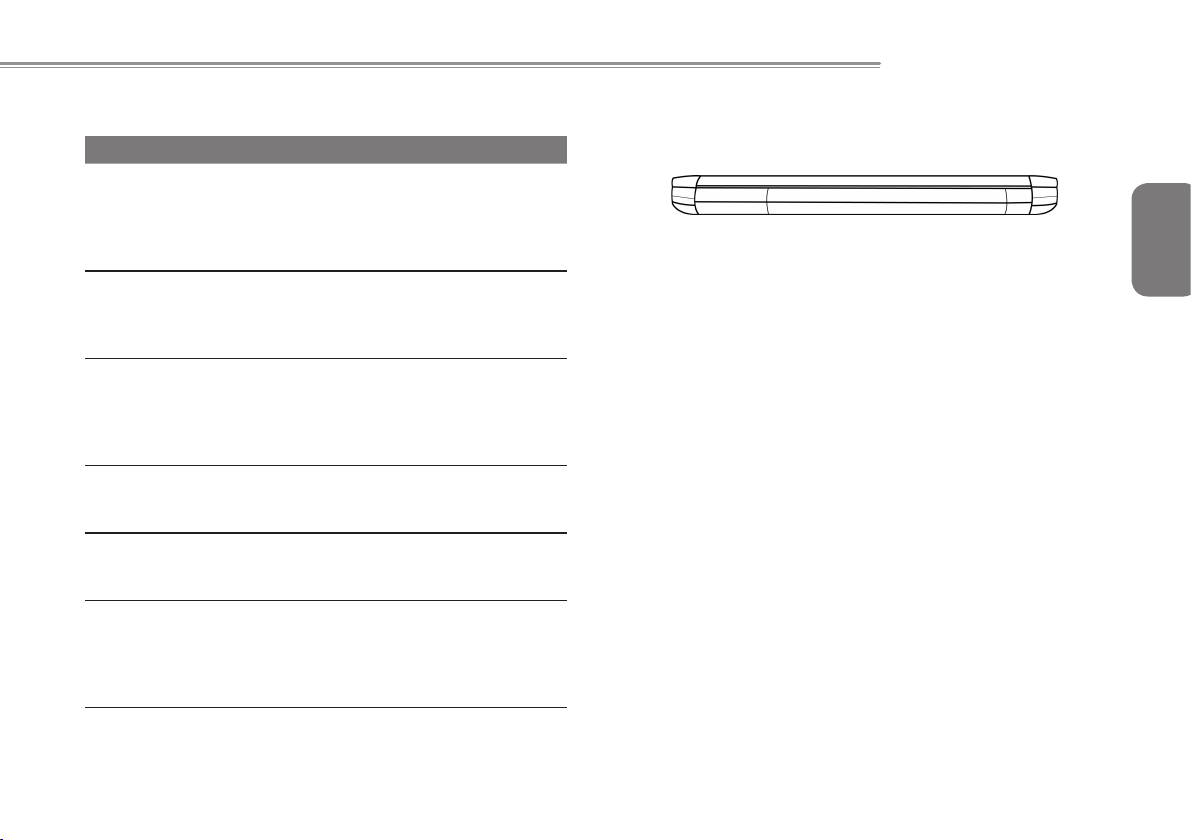
1.6 Back View
The following is an overview of the back of the notebook.
English
The battery pack is inserted from the back of the notebook.
5
Page 17
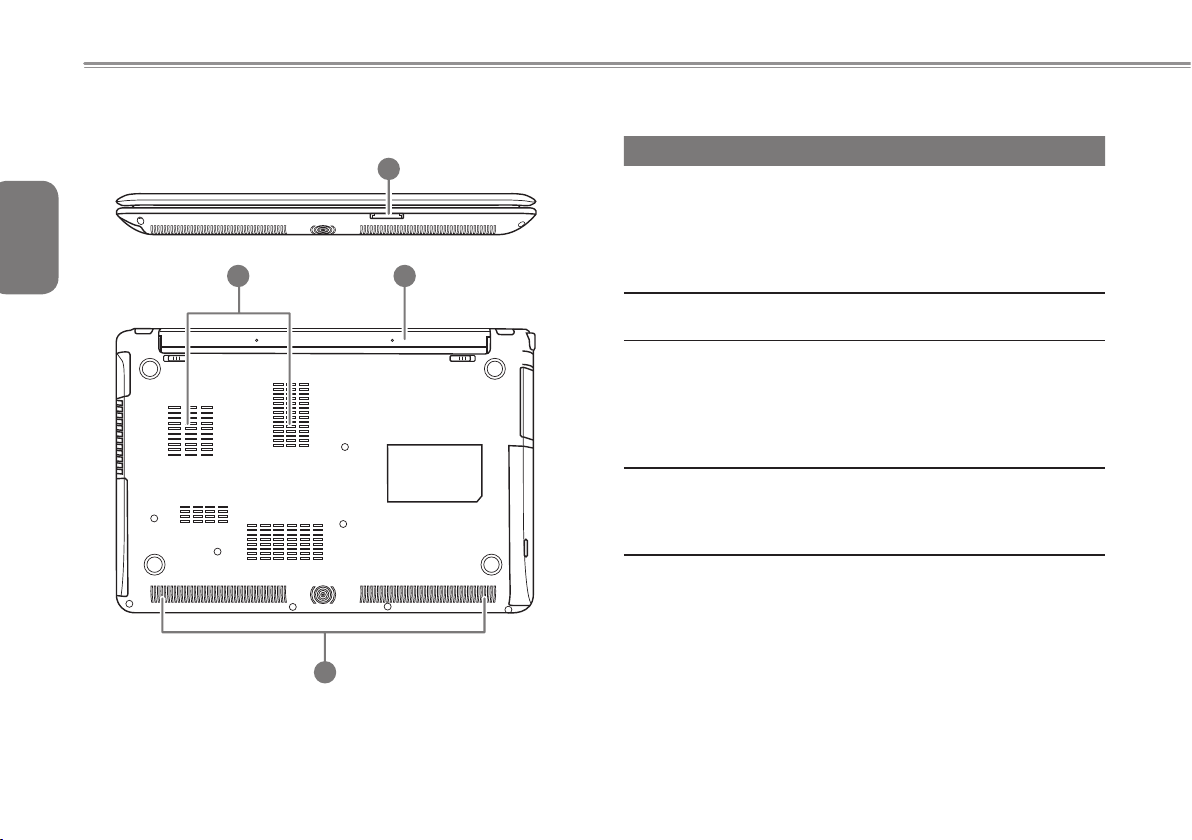
1.7 Bottom View
The following is an overview of the bottom of the notebook.
English
3 2
6
4
1
NO. Item Function
The memory card reader offers the fastest
and most convenient method to transfer
Multi Card
1
Reader
2 Battery Bay
3 Cooling Vents
Stereo
4
Speakers
pictures, music and data between your
notebook and ash compatible devices
such as digital cameras, MP3 players,
mobile phones, and PDAs.
The battery bay contains the internal
Lithium-Ion battery.
These are open ports for the fan to
dissipate heat from the computer’s internal
components. Do not block or place the
computer in such a position that you
inadvertently allow the outlets to become
blocked.
The multimedia speakers outtput sound from
the PC in stereo mode that is generated
from Windows or any application installed on
the PC.
Page 18
E1425 SERIES USER’S MANUAL
Chapter 2 Getting Started
This chapter will show you the various ports and components of the
E1425 and familiarizes you with the notebook. Certain parts of the
notebook can be user upgraded while others are xed and cannot
be changed.
English
7
Page 19
2.1 Power Sources
Your computer has two types of power source s: a Lithium-Ion
battery and an AC adapter.
Connecting the Power Adapters
English
The AC adapter provides power for operating your notebook PC as
well as charging the battery.
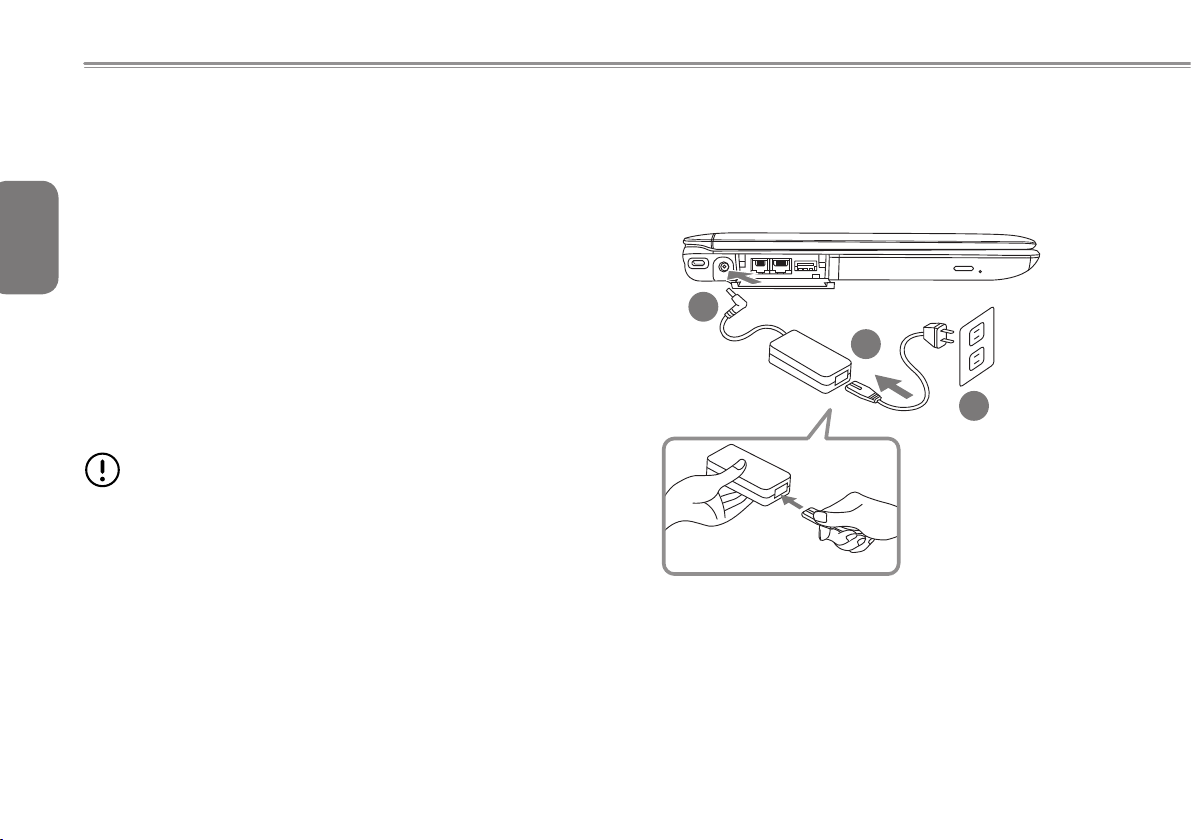
Connecting the AC Adapter
1. Plug the DC output cable into the DC power jack of your.
8
2. Plug the AC adapter into an AC electrical outlet.
Switching from AC Adapter Power to Battery Power
1. Be sure that you have at least one charged battery installed.
2. Remove the AC adapter. Your notebook will automatically switch
from DC power to battery power.
CAUTION: The Lithium-Ion battery does not ship with a precharge initially. You will need to connect the AC adapter to
useyour notebook PC the rst time.
It is recommended that only the AC adapter supplied with the E1425
is used. Any other adapter could cause damage or malfunction and
might result in injury.
2
1
3
1. Connect the power cord to the AC adapter.
2. Connect the AC adapter to the DC power port of your computer.
3. Connect the AC adapter power cord to an AC outlet.
Page 20
2.2 Recharging the Battery
The Lithium-Ion battery is recharged internally using the AC adapter.
To recharge the battery, make sure the battery is installed and the
computer is connected to the AC adapter.
There is no “memory effect” in Lithium-Ion batteries; therefore you
do not need to discharge the battery completely before recharging.
The charge times will be signicantly longer if your notebook PC is
in use while the battery is charging. If you want to charge the battery
more quickly, put your computer into Suspend mode or turn it off
while the adapter is charging the battery.
Low Battery State
When the battery charge is low, a notification message appears.
If you do not res pond to the low battery message, the battery
continues to discharge until it is too low to operate. When this
happens, your notebook PC goes into Suspend mode. There is no
guarantee your data will be saved once the notebook reaches this
point.
CAUTION:To protect your notebook from damage, use only
the power adapter that came with it because each power
adapter has its own power output rating.
Once your notebook PC goes into suspend mode as a result of
a dead battery, you will be unable to resume operation until you
provide a source of power either from an adapter or a charged
battery. Once you have provided power, you can press the Suspend/
Resume button to resume operation. In Suspend mode, your data
is maintained for some time, but if a power source is not provided
promptly, the power indicator stops ashing and then goes out, in
which case you have lost the data that was not saved. Once you
E1425 SERIES USER’S MANUAL
provide power, you can continue to use your computer while an
adapter charges the battery.
Battery Replacement
There is danger of explosion if an incorrect battery type is used for
replacement. For computers equipped with a replaceable LithiumIon battery pack, the following applies:
● If the battery is placed in an OPERATOR ACCESS AREA, there
shall be a marking close to the battery, or a statement in both the
operating and the servicing instructions;
● If the battery is placed elsewhere in the computer, there shall
be a marking close to the battery or a statement in the servicing
instructions.
The marking or statement shall include the following or similar text:
CAUTION: Risk of explosion if battery is replaced with an
incorrect type. Dispose of used batteries according to the
instructions.
English
9
Page 21
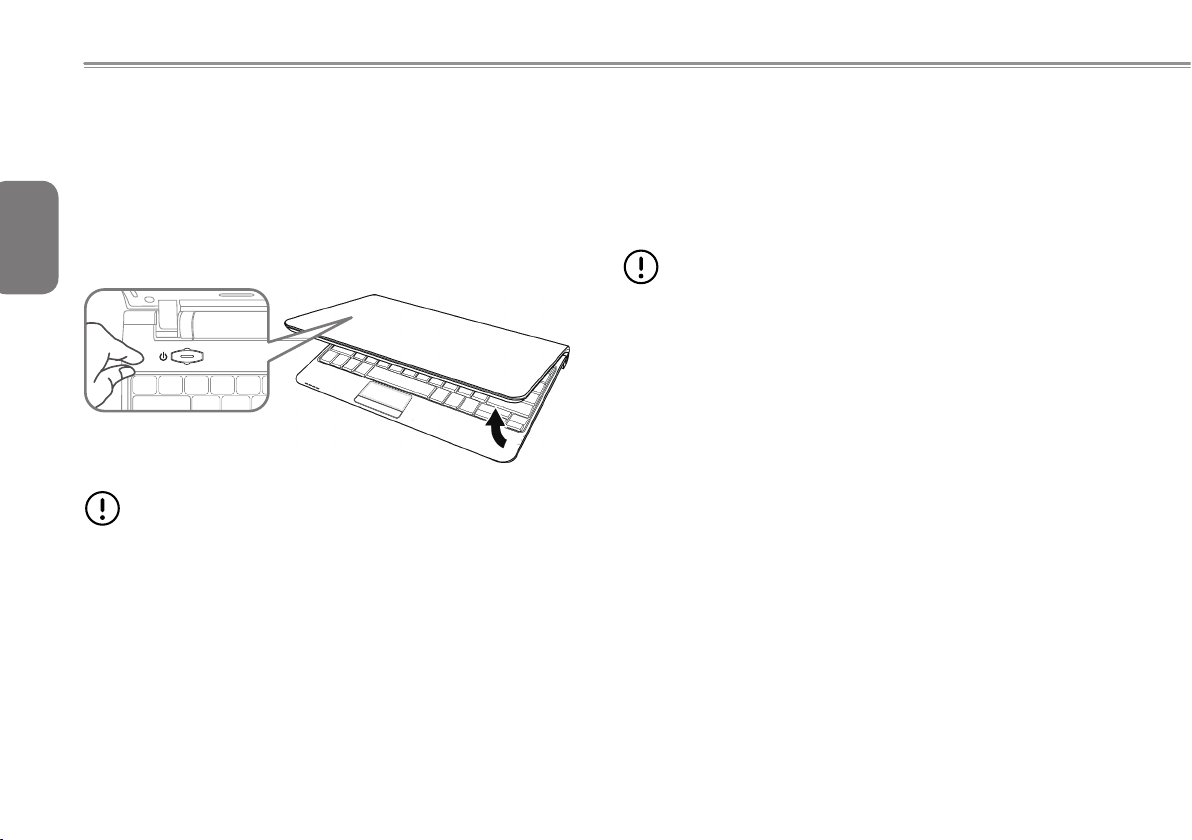
2.3 Starting Your Notebook
Suspend / Power on Button
The suspend/power on switch is used to turn on your notebook from
its off state. Once you have connected your AC adapter or charged
the internal Lithium-Ion battery, you can power on your notebook by
English
pressing the suspend/power on button located above the keyboard.
If you need to take an extended break, press the button again to
turn it off.
10
CAUTION: Do not carry your notebook around with the power
on or subject it to shocks or vibration, as you risk damaging
the hard disk.
When you power on your notebook, it will perform a Power On
Self Test (POST) to check the internal parts and confguration for
correct functionality. If a fault is found, your computer emits an audio
warning and/or displays an error message.
Depending on the nature of the problem, you may be ab le to
continue by starting the operating system or by entering the BIOS
setup utility and revising the settings. After satisfactory completion
of the Power On Self Test (POST), your notebook loads the installed
operating system.
CAUTION Never turn off your notebook during the Power On
Self Test (POST), or an unrecoverable error may occur.
Page 22
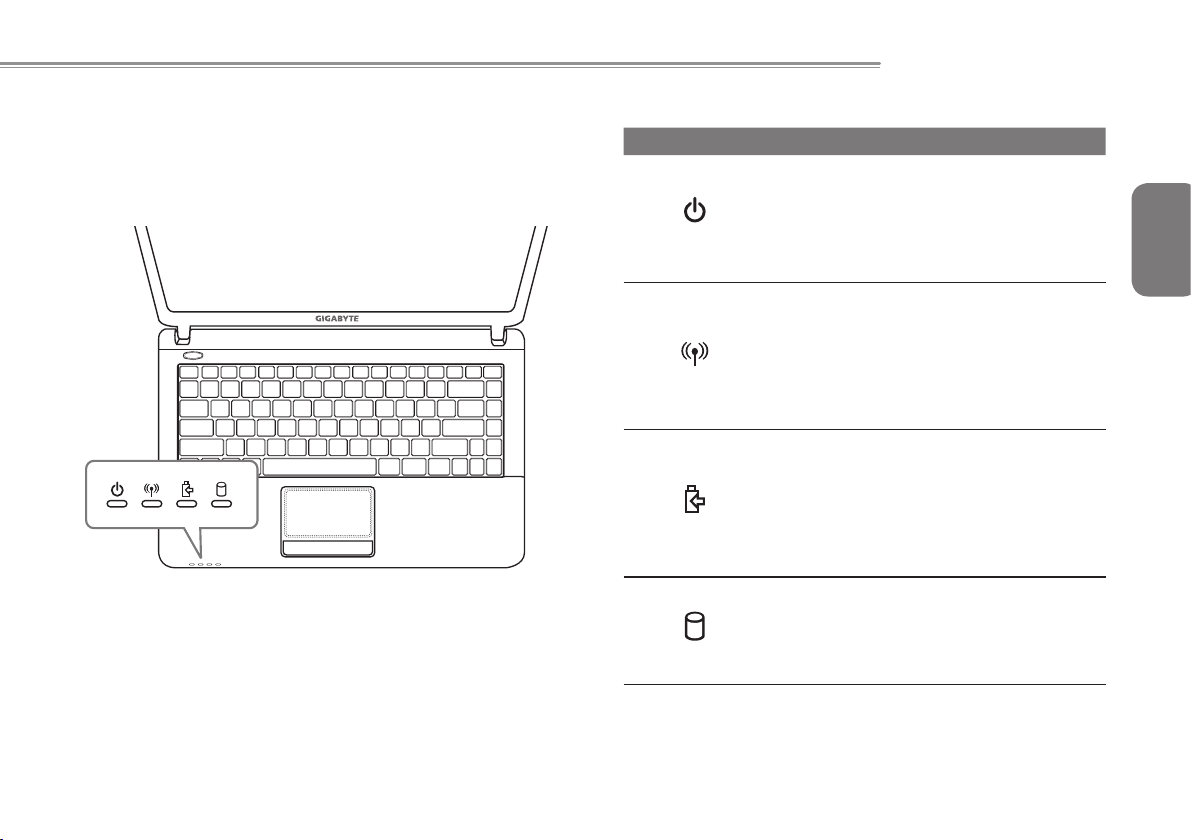
2.4 Status Indicators
The status indicator lights correspond to specic operating modes.
These modes are: Power on/ Suspend status, Battery/AC Adapter
status, hard drive activ ity (HDD), Num Lock, Caps Lock, and
wireless transmission activity.
LED status indicators
These status indicatorsare used to show specic information on the
E1425 such as if the Wireless LAN or Bluetooth is On or Off and if
the Battery Pack is charging or not. From Left to Right they are:
NO. Symbol Item Function
This LED shows whether the Notebook is
power on or in sleep mode. A continuous
1 Power LED
Wireless
2
3
4
Connection
LED
Battery
Status LED
Hard Disk
Activity
Status LED
blue LED indicates power, while a blinking
blue LED indicates suspend/sleep mode.
If this LED is off then the notebook is not
powered at all.
This LED indicates whether the builtin Wireless LAN Module is active and
connected. If the LED is on, there is
connection and the adaptor is switched
on. No LED means that there is no
connection and the adaptor is switched
off.
This LED is used to show if the battery
pack of the notebook is charging or not, or
if there is a battery fault. It will illuminate
if the battery is charging and switch off
when charged, but it will ash on and off if
there is no battery present or the battery
is no longer working
This LED indicates Hard Disk Activity and
will show if the HDD is in use or idle. It will
ash on and off rapidly when the drive is
active and remain off when the hard drive
is not being used.
E1425 SERIES USER’S MANUAL
English
11
Page 23
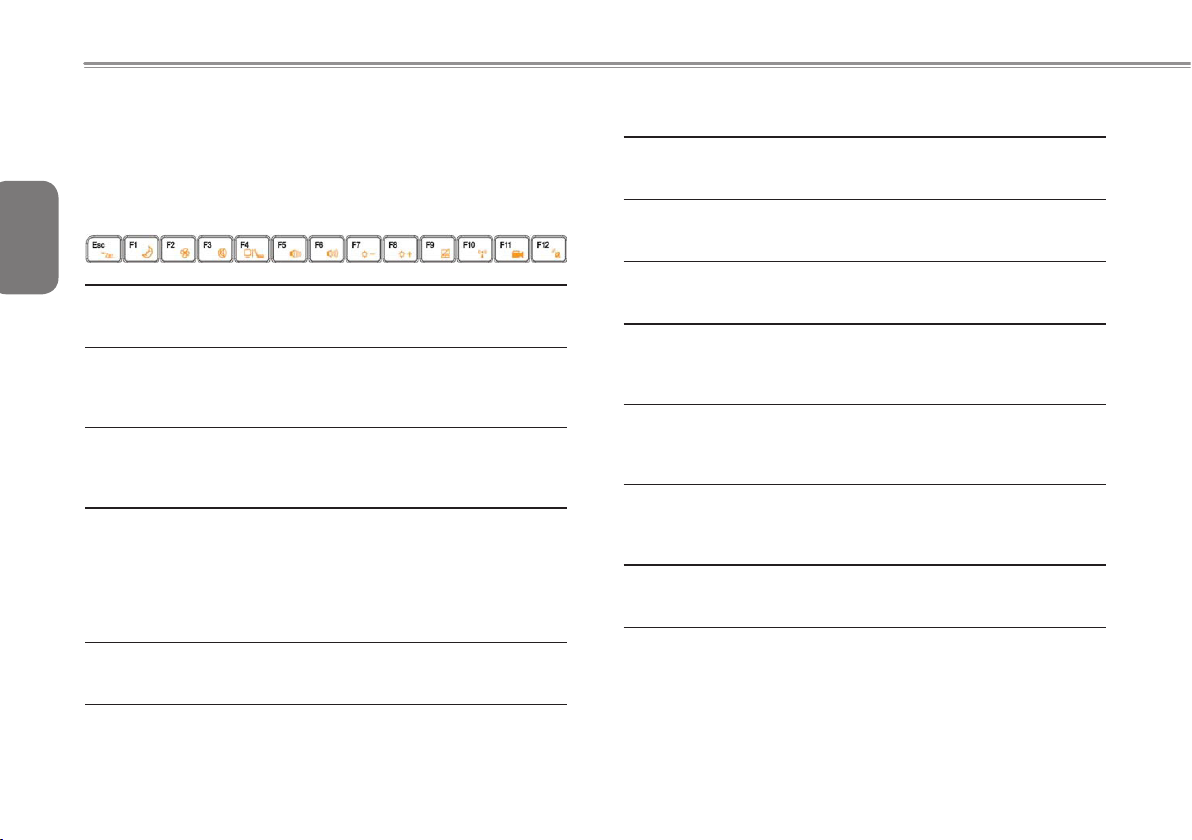
2.5 Using Function Keys
Your computer has 12 function keys, F1 through F12. The functions
assigned to these keys differ for each application. You should refer to
your software documentation to nd out how these keys are used.
The [FN] key provides extended functions for the notebook and is always
English
used in conjunction with another key.
12
Fn+F1
Fn+F2
Fn+F3
Fn+F4
Fn+F5
Sleep
This function will put the E1425 Notebook into sleep mode. The
LCD will switch off and devices will switch to lower power mode.
Fan Control
This function will enable or disable the Silent Fan function. This
will enable the user to put the fan into quiet mode if the user
needs the notebook to be quieter.
Mute Volume
This function will mute the volume control in Windows and
all sound output from the speakers will stop. Pressing this
combination again will enable sound output.
LCD / Display-Out Switch
This function will switch the display conguration for the E1425
- It will cycle between 3 modes depending on operating system
settings. These 3 Modes are:
LCD Only - Image on the E1425 LCD
Display Only - Image on external monitor
LCD+Display - Image on LCD and external monitor
Decrease System Volume
This function will gradually and incrementally decrease the
volume of the sound output from the E1425 speakers.
Fn+F6
Fn+F7
Fn+F8
Fn+F9
Fn+F10
Fn+F11
Fn+F12
Increase System Volume
This function will gradually and incrementally increase the
volume of the sound output from the E1425 speakers.
Decrease LCD Brightness
This function will gradually and incrementally decrease the
brightness of the built in LCD panel.
Increase LCD Brightness
This function will gradually and incrementally increase the
brightness of the built in LCD panel.
Disable Touchpad
This function will disable the built-in touchpad of the E1425
notebook. This function can be used if typing on the built-in
keyboard so that the mouse pointer does not move.
Wireless LAN On/Off
This function will enable or disable the embedded Wireless LAN
Connection. The LED Status indicator will be on when this is
enabled and off when disabled.
Webcam On/Off
This function will enable or disable the built-in Webcam. This
can be used when the webcam is not needed to save battery
life or to disable images in conferencing software.
3.5G On/Off
This function will enable or disable the built-in 3.5G Card
(The 3.5G card is optional and isn’t available on E1425M & E1425A)
Page 24
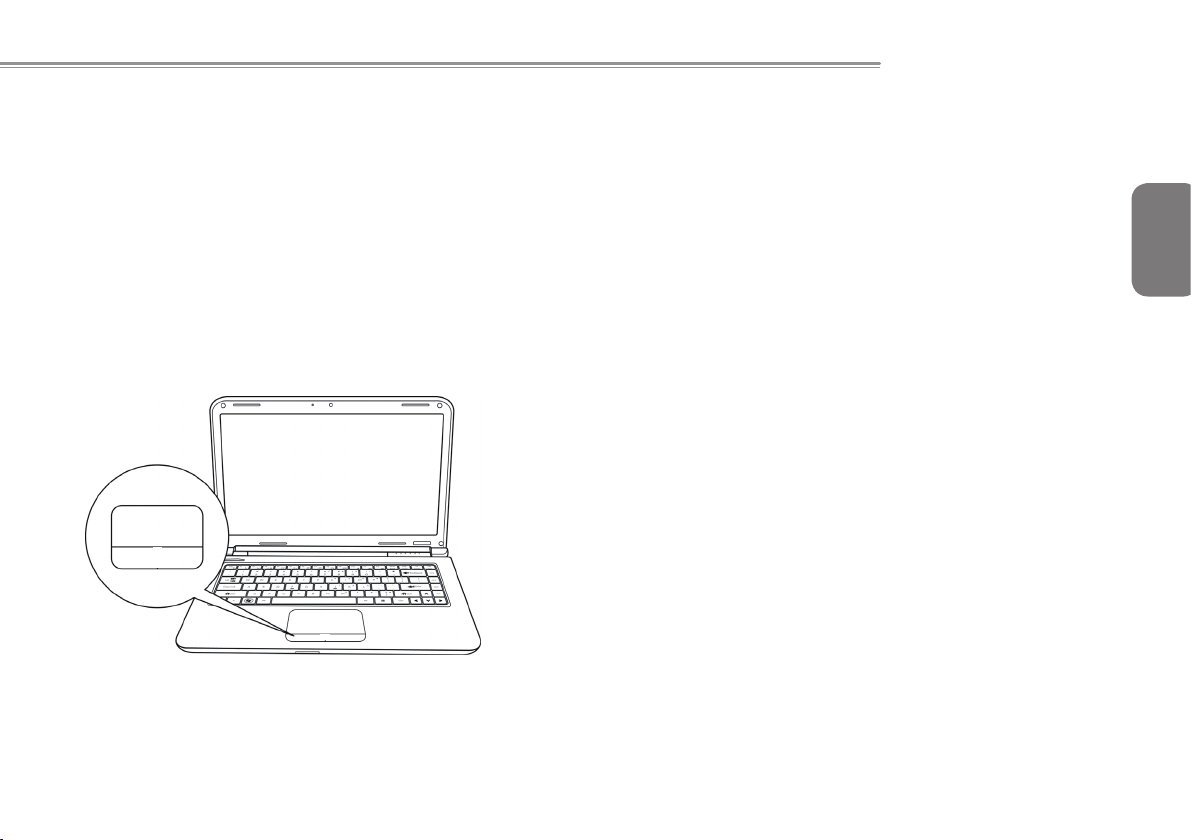
2.6 Using the Touchpad
A touchpad pointing device comes built into your computer. It is
used to control the movement of the pointer to select items on your
desktop and use applications on the notebook.
The touchpad consists of a cursor control, a left and right button,
and a scroll bar. The cursor control works the same way a mouse
does, and moves the cursor around the display. It only requires
light pressure from the tip of your nger. The left and right buttons
function the same as mouse buttons. The actual functionality of the
buttons may vary depending on the application that is being used.
The scroll bar allow you to navigate quickly through pages, without
having to use the on-screen cursor to manipulate the up and down
scroll bars.
E1425 SERIES USER’S MANUAL
Clicking
Clicking means pushing and releasing a button. To left-click, move
the cursor to the item you wish to select, press the left button once,
and then immediately release it. To right click, move the mouse
cursor to the item you wish to select, press the right button once,
and then immediately release it. You also have the option to perform
the clicking operation by tapping lightly on the touchpad once.
Double-Clicking
Double-clicking means pushing and releasing the left button twice
in rapid succession. This procedure does not function with the right
button. To double-click, move the cursor to the item you wish to
select, press the left button twice, and then immediately release it.
You also have the option to perform the double-click operation by
tapping lightly on the touchpad twice.
Dragging
Dragging means pressing and holding the left button while moving
the cursor. To drag, move the cursor to the item you wish to move.
Press and hold the left button while moving the item to its new
location and then release it. Dragging can also be done using the
touchpad. First, tap the touchpad twice over the item you wish to
move, making sure to leave your finger on the pad after the final
tap. Next, move the object to its new location by moving your nger
across the touchpad, and then release your nger. Using the Scroll
bar allows you to navigate through a document quickly without using
the window's scroll bars. This is particularly useful when you are
navigat-ing through on-line pages.
English
13
Page 25

English
14
Page 26
E1425 SERIES USER’S MANUAL
Chapter 3 GIGABYTE
Smart Recovery
English
15
Page 27
3.1 GIGABYTE Smart Recovery
System Recovery - Restore your E1425 operating system.
The hard drive of the E1425 has a hidden partition that contains
a full backup image of the operating system that can be used to
recover the system in the event that something happens to the
English
operating system.
If the hard drive is removed or the partition deleted, the
recover options will no longer be available and a recovery
16
service will be needed.
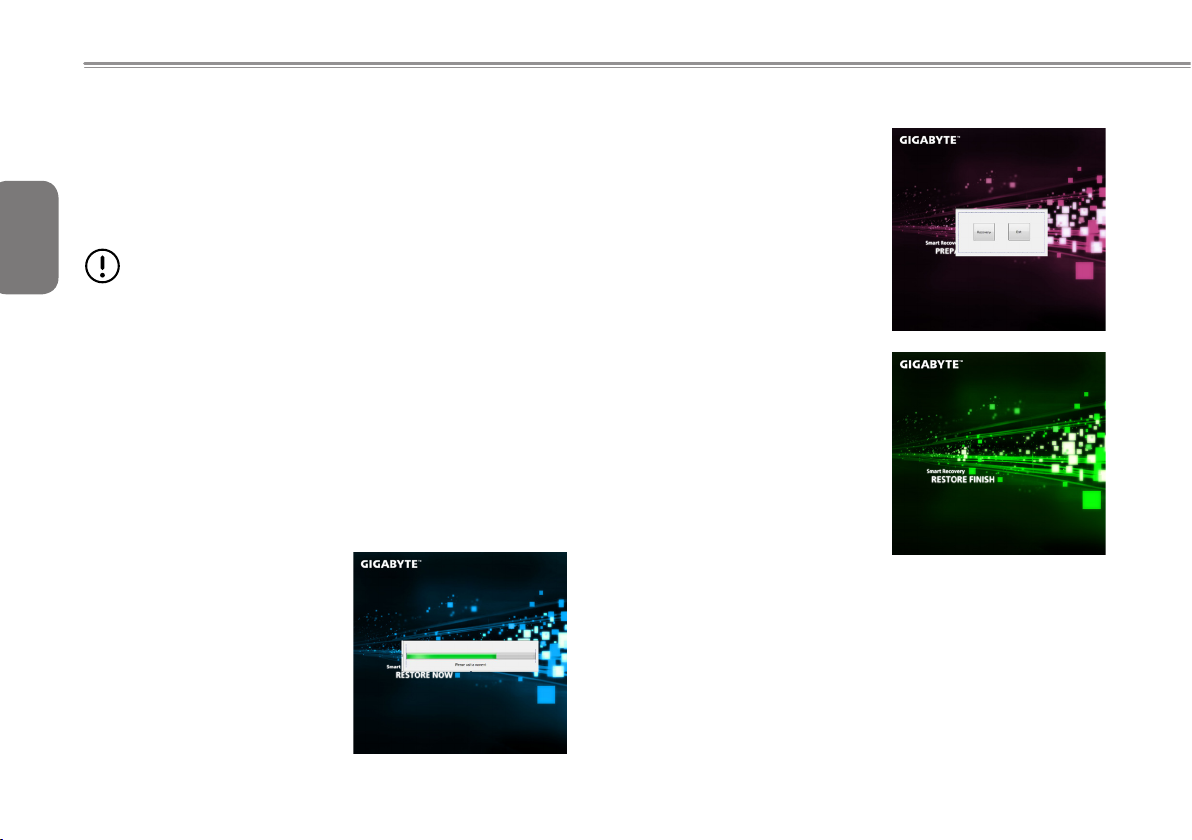
Launch System Recovery
The system recover feature is part of the netbook installation and
it ships preset from the factory. The options menu allows you to
launch the Windows recovery tool to reinstall the operating system
to factory defaults.
Below will briey describe how to launch the recovery tool and to
get the recovery started.
1. Turn off or restart the netbook.
2. Turn the netbook on and press and hold the F9 key to launch the
tool.
3. The recovery window will open
a n d gi v e you t h e o p t i o n to
"Recovery" in the toolbar. You
will be prompted if you want to
recovery. Click on "Recovery" to
begin the repair if you do.
4. The "Recovering" window will
open and begin the recovery.
5. Once it is complete you will be
prompted to reboot the netbook.
Page 28
E1425 SERIES USER’S MANUAL
Chapter 4 Troubleshooting
This section will briey cover some frequently encountered problems
and questions and provide a quick guide to assist with solve these
problems. Most problems can be resol ved quickl y, simply and
easily and are not always a system problem. Should you encounter
a problem that is not yet or differently listed, please consult the
GIGABYTE website or call your unit supplier for assistance.
For website assistance go to the Support section of www.gigabyte.
com.tw for telephonic assistance please call the supplier of your unit
or take the unit to the supplier directly for assistance.
English
17
Page 29

Troubleshooting
Your notebook PC is sturdy and subject to few problems in the eld.
However, you may encoun-ter simple setup or operating problems
that you can solve on the spot, or problems with periph-eral devices,
that you can solve by replacing the device. The information in this
English
section helps you isolate and resolve some of these straightforward
problems and identify failures that require service.
4.1 Identifying The Problem
18
If you encounter a problem, go through the following procedure
before pursuing complex troubleshooting:
1. Turn off your notebook.
2. Make sure the AC adapter is plugged into your notebook and to
an active AC power source.
3. Make sure that any card installed in the PC card slot is seated
properly. You can also remove the card from the slot, thus
eliminating it as a possible cause of failure.
4. Make sure that any devices connected to the external connectors
are plugged in properly. You can also disconnect such devices,
thus eliminating them as possible causes of failure.
5. Turn on your notebook. Make sure it has been off at least 10
seconds before you turn it on.
6. Go through the boot sequence.
7. If the problem has not been resolved, contact your support
representative.
Before you place the call, you should have the following information
ready so that the customer support representative can provide you
with the fastest possible solution:
● Product name
● Product conguration number
● Product serial number
● Purchase date
● Conditions under which the problem occurred
● Any error messages that have occurred
● Hardware conguration
● Type of device connected, if any
See the configuration label on the bottom of your notebook for
conguration and serial numbers.
Copyright-protected technology This product incorporates copyright
pr otection techno lo gy that is p ro te ct ed by U .S . pat en ts and
other intellectual property rights. Use of this copyright protection
technology must be autho-rized by Macrovision, and is intended
for home and other limited viewing uses only unless otherwise
authorized by Macrovision. Reverse engineering or disassembly is
prohibited.
4.2 GIGABYTE Service Information
More service information please link to GIGABYTE ofcial website:
www.gigabyte.com.tw
Page 30
E1425 SERIES USER’S MANUAL
English
Appendix
19
Page 31
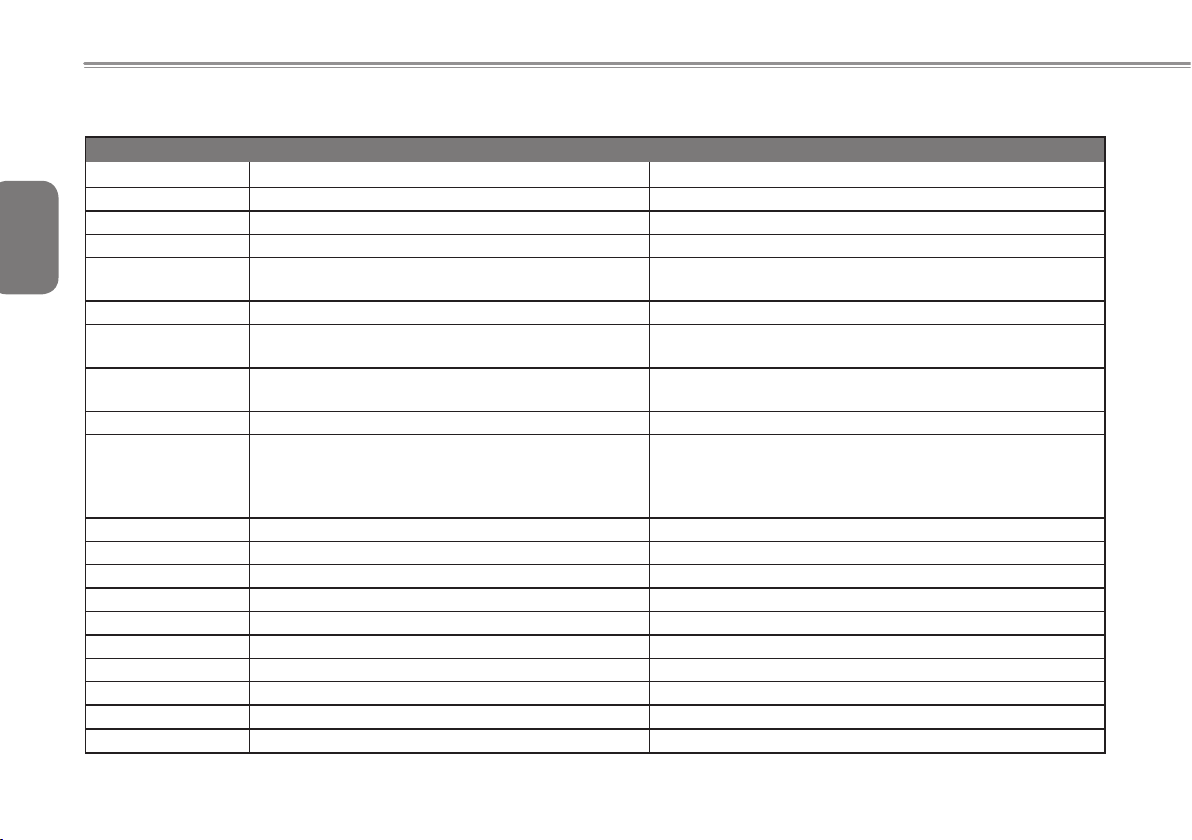
E1425 Specications
English
20
CPU Intel arrandale CPU(Calpella) Intel arrandale CPU(Calpella)
OS Windows® 7 Compliant Windows® 7 Compliant
Chipsets Intel® HM55 Express Chipset ntel® HM55 Express Chipset
System Memory
Video Interface ATI Mobility Radeon HD5470 Intel® HD Graphics with dynamic frequency
LCD
Hard Disk Drive
Optical Drive 12.7mm DVD- Super Multi Drive 12.7mm DVD- Super Multi Drive
I/O Port
Audio 2 channels/SRS Sound Preminum support 2 channels/SRS Sound Preminum support
Bluetooth Bluetooth 2.1+EDR (Optional) Bluetooth 2.1+EDR(optional)
Webcam Built-in 1.3M pixels webcam Built-in 1.3M pixels webcam
LAN Ethernet 10/100/1G Base T Ethernet 10/100/1G Base T
Wireless LAN 802.11 b/g/n 802.11 b/g/n
AC Adaptor "65w (90w optoional)" 65w
Battery Li-ion, 8-Cell,4400 mAh Li-ion, 4-Cell,2200 mAh
Dimension 342 (W) x 235 (D) x 32.4 (H) mm 342 (W) x 235 (D) x 32.4 (H) mm
Net Weight ~2.34kg (including battery) ~2.34kg (including battery)
Warranty 1 year 1 year
Specications
E1425A E1425M
"DDRIII 1066/ 1333Hz 2 slots
Up to 4GB"
"14.0"" TFT-LCD WXGA, 1366 x 768 HD
Glare type"
"2.5"" 9.5mm SATA HDD 5400rpm
(Supports capacities of 250/320/500 GB)"
3x USB 2.0, D-SUBx1, 1x HDMI, 1x D-sub, 1x
RJ45,1x RJ11(optional) Mic-in, Earphone-out, 4-in1 Card Reader(SD/MMC/MS/MS Pro), DC-in Jack, 1x
kegsington lock
"DDRIII 1066/ 1333Hz 2 slots
Up to 4GB"
"14.0"" TFT-LCD WXGA, 1366 x 768 HD
Glare type"
"2.5"" 9.5mm SATA HDD 5400rpm
(Supports capacities of 250/320/500 GB)"
3x USB 2.0, D-SUBx1, 1x HDMI, 1x D-sub, 1x RJ45,
1XRJ11(optional), Mic-in, Earphone-out, 4-in-1 Card
Reader(SD/MMC/MS/MS Pro), DC-in Jack, 1x kegsington
lock
Page 32
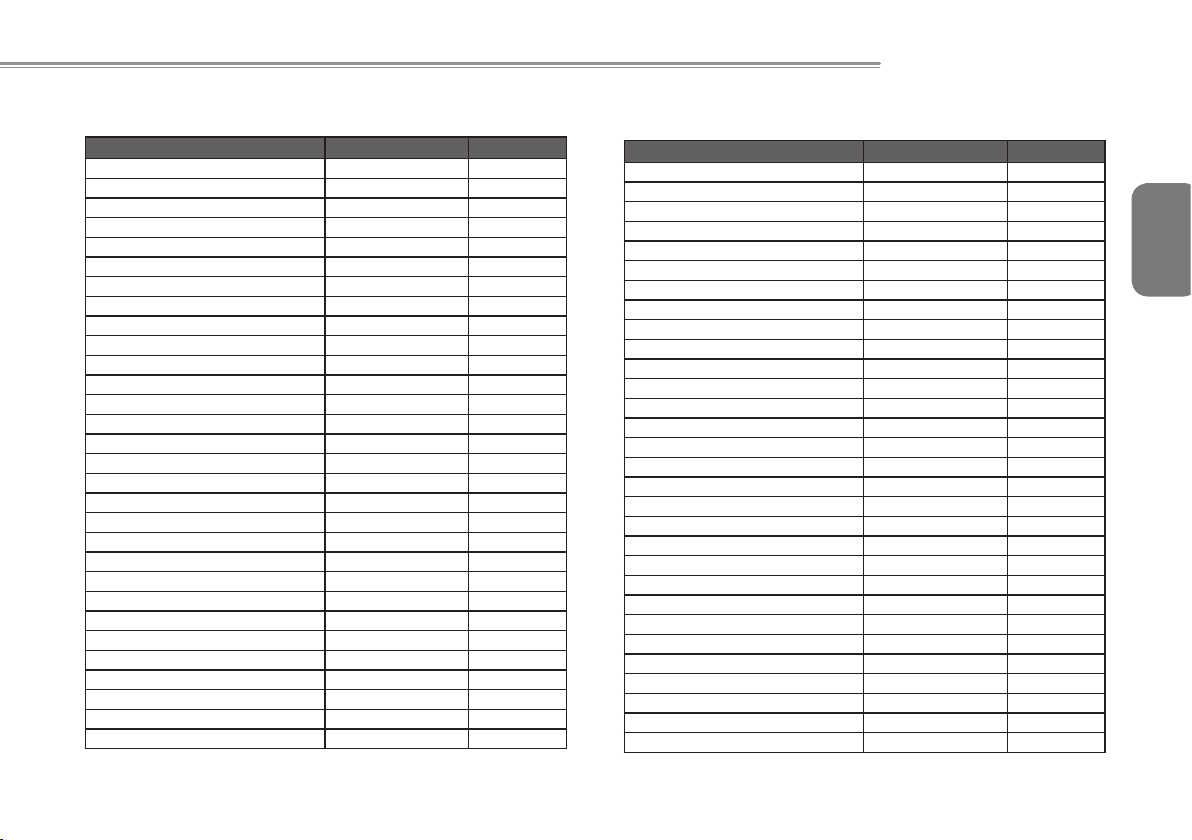
International Country Voltage
E1425 SERIES USER’S MANUAL
Region Voltage Frequency
Afghanistan 240V 50 Hz
Albania 220V 50 Hz
Algeria 230V 50 Hz
American Samoa 120V 60 Hz
Andorra 230V 50 Hz
Angola 220V 50 Hz
Anguilla 110V 60 Hz
Antigua 230V 60 Hz
Argentina 220V 50 Hz
Armenia 230V 50 Hz
Aruba 127V 60 Hz
Australia 230V 50 Hz
Austria 230V 50 Hz
Azerbaijan 220V 50 Hz
Azores 220V 50 Hz
Bahamas 120V 60 Hz
Bahrain 230V 50 Hz
Balearic Islands 220V 50 Hz
Bangladesh 220V 50 Hz
Barbados 115V 50 Hz
Belarus 220V 50 Hz
Belgium 230V 50 Hz
Belize 110V / 220V 60 Hz
Benin 220V 50 Hz
Bermuda 120V 60 Hz
Bhutan 230V 50 Hz
Bolivia 220V 50 Hz
Bonaire 127V 50 Hz
Bosnia 220V 50 Hz
Botswana 231 V 50 Hz
Region Voltage Frequency
Brazil 127V / 220 V 60 Hz
Brunei 240V 50 Hz
Bulgaria 230V 50 Hz
Burkina Faso 220V 50 Hz
Burundi 220V 50 Hz
Cambodia 230V 50 Hz
Cameroon 220V 50 Hz
Canada 120V 60 Hz
Canary Islands 220V 50 Hz
Cape Verde 220V 50 Hz
Cayman Islands 120V 60 Hz
Central African Republic 220V 50 Hz
Chad 220V 50 Hz
Channel Islands 230V 50 Hz
Chile 220V 50 Hz
China (mainland only) 220V 50 Hz
Colombia 120V 60 Hz
Comoros 220V 50 Hz
Congo-Brazzaville 230V 50 Hz
Congo-Kinshasa 220V 50 Hz
Cook Islands 240V 50 Hz
Costa Rica 120V 60 Hz
Côte d'Ivoire 230V 50 Hz
Croatia 230V 50 Hz
Cuba 110V 60 Hz
Cyprus 240V 50 Hz
Czech Republic 230V 50 Hz
Denmark 230V 50 Hz
Djibouti 220V 50 Hz
Dominica 230V 50 Hz
English
21
Page 33
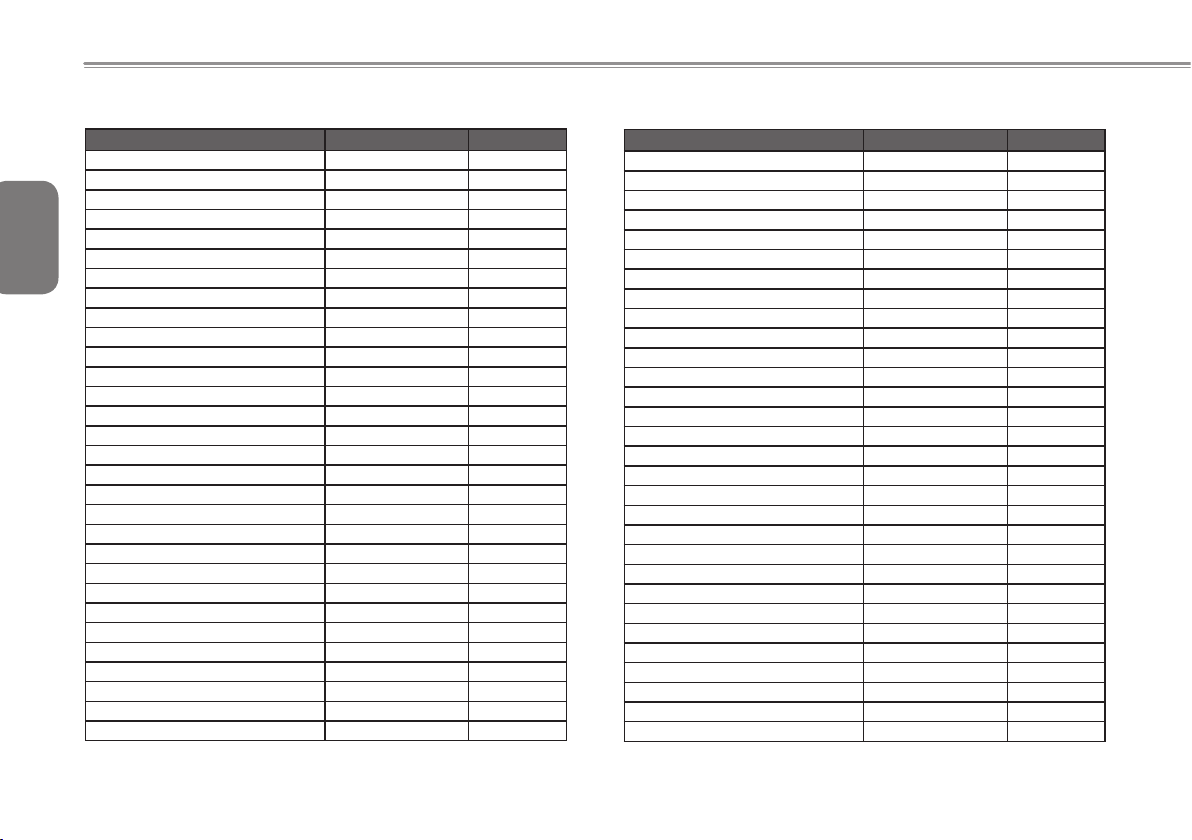
Region Voltage Frequency
Dominican Republic 110V 60 Hz
East Timor 220V 50 Hz
Ecuador 120V 60 Hz
English
Egypt 220V 50 Hz
El Salvador 115V 60 Hz
Equatorial Guinea 220V 50 Hz
Eritrea 230V 50 Hz
Estonia 230V 50 Hz
22
Ethiopia 220V 50 Hz
Faroe Islands 220V 50 Hz
Falkland Islands 240V 50 Hz
Fiji 240V 50 Hz
Finland 230V 50 Hz
France 230V (formerly 220V) 50 Hz
French Guiana 220V 50 Hz
Gaza Strip 230V 50 Hz
Gabon 220V 50 Hz
Gambia 230V 50 Hz
Georgia 220V 50 Hz
Germany 230V (formerly 220V) 50 Hz
Ghana 230V 50 Hz
Gibraltar 240V 50 Hz
Greece 230V (formerly 220V) 50 Hz
Greenland 220V 50 Hz
Grenada 230V 50 Hz
Guadeloupe 230V 50 Hz
Guam 110V 60 Hz
Guatemala 120V 60 Hz
Guinea 220V 50 Hz
Guinea-Bissau 220V 50 Hz
Region Voltage Frequency
Guyana 240V 60 Hz
Haiti 110V 60 Hz
Honduras 110V 60 Hz
Hong Kong 220V 50 Hz
Hungary 230V (formerly 220V) 50 Hz
Iceland 230V 50 Hz
India 220V 50 Hz
Indonesia 127V / 230V 50 Hz
Iran 220V 50 Hz
Iraq 230V 50 Hz
Ireland 230V (formerly 220V) 50 Hz
Isle of Man 240V 50 Hz
Israel 230V 50 Hz
Italy 230V (formerly 220V) 50 Hz
Jamaica 110V and 220V 50 Hz
Japan 100 V 50 Hz / 60Hz
Jordan 230V 50 Hz
Kazakhstan 220V 50 Hz
Kenya 240V 50 Hz
Kiribati 240V 50 Hz
Kuwait 240V 50 Hz
Kyrgyzstan 220V 50 Hz
Laos 230V 50 Hz
Latvia 220V 50 Hz
Lebanon 240V 50 Hz
Lesotho 220V 50 Hz
Liberia 120V / 240V 50 Hz
Libya 127V 50 Hz
Lithuania 230V (formerly 220V) 50 Hz
Liechtenstein 230V 50 Hz
Page 34
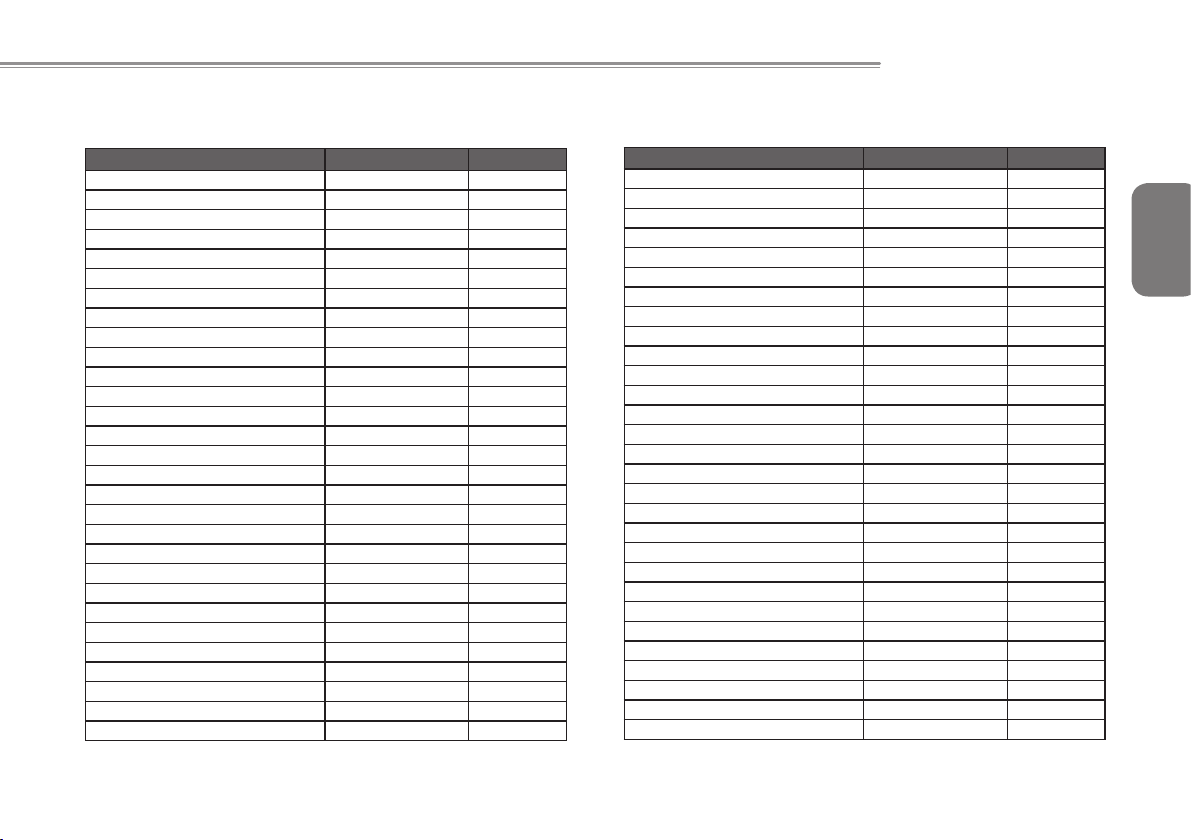
E1425 SERIES USER’S MANUAL
Region Voltage Frequency
Luxembourg 230V (formerly 220V) 50 Hz
Macau S.A.R. of China 220V 50 Hz
Macedonia 220V 50 Hz
Madagascar 127V / 220 V 50 Hz
Madeira 220V 50 Hz
Malawi 230V 50 Hz
Malaysia 240V 50 Hz
Maldives 230V 50 Hz
Mali 220V 50 Hz
Malta 230V 50 Hz
Martinique 220V 50 Hz
Mauritania 220V 50 Hz
Mauritius 230V 50 Hz
Mexico 127V 60 Hz
Micronesia 120V 60 Hz
Moldova 220-230V 50 Hz
Monaco 127V / 220 V 50 Hz
Mongolia 230 V 50 Hz
Montenegro 220V 50 Hz
Montserrat (Leeward Is.) 230V 60 Hz
Morocco 127V / 220 V 50 Hz
Mozambique 220V 50 Hz
Myanmar/Burma 230V 50 Hz
Namibia 220V 50 Hz
Nauru 240V 50 Hz
Nepal 230V 50 Hz
Netherlands 230V (formerly 220V) 50 Hz
Netherlands Antilles 127V / 220V 50 Hz
New Caledonia 220V 50 Hz
Region Voltage Frequency
New Zealand 230V 50 Hz
Nicaragua 120V 60 Hz
Niger 220V 50 Hz
Nigeria 240V 50 Hz
North Korea 220V 50 Hz
Norway 230V 50 Hz
Okinawa 100 V 60 Hz
Oman 240V 50 Hz
Pakistan 230V 50 Hz
Panama 110V 60 Hz
Papua New Guinea 240V 50 Hz
Paraguay 220V 50 Hz
Peru 220V 60 Hz
Philippines 220V 60 Hz
Poland 230V 50 Hz
Portugal 220V 50 Hz
Puerto Rico 120V 60 Hz
Qatar 240V 50 Hz
Réunion 220V 50 Hz
Romania 230V (formerly 220V) 50 Hz
Russian Federation 220V 50 Hz
Rwanda 230V 50 Hz
St. Kitts and Nevis 110V / 230V 60 Hz
St. Lucia (Winward Is.) 240V 50 Hz
St. Vincent (Winward Is.) 230V 50 Hz
São Tomé and Príncipe 220V 50 Hz
Saudi Arabia 127V / 220V 60 Hz
Senegal 230V 50 Hz
Serbia 220V 50 Hz
English
23
Page 35
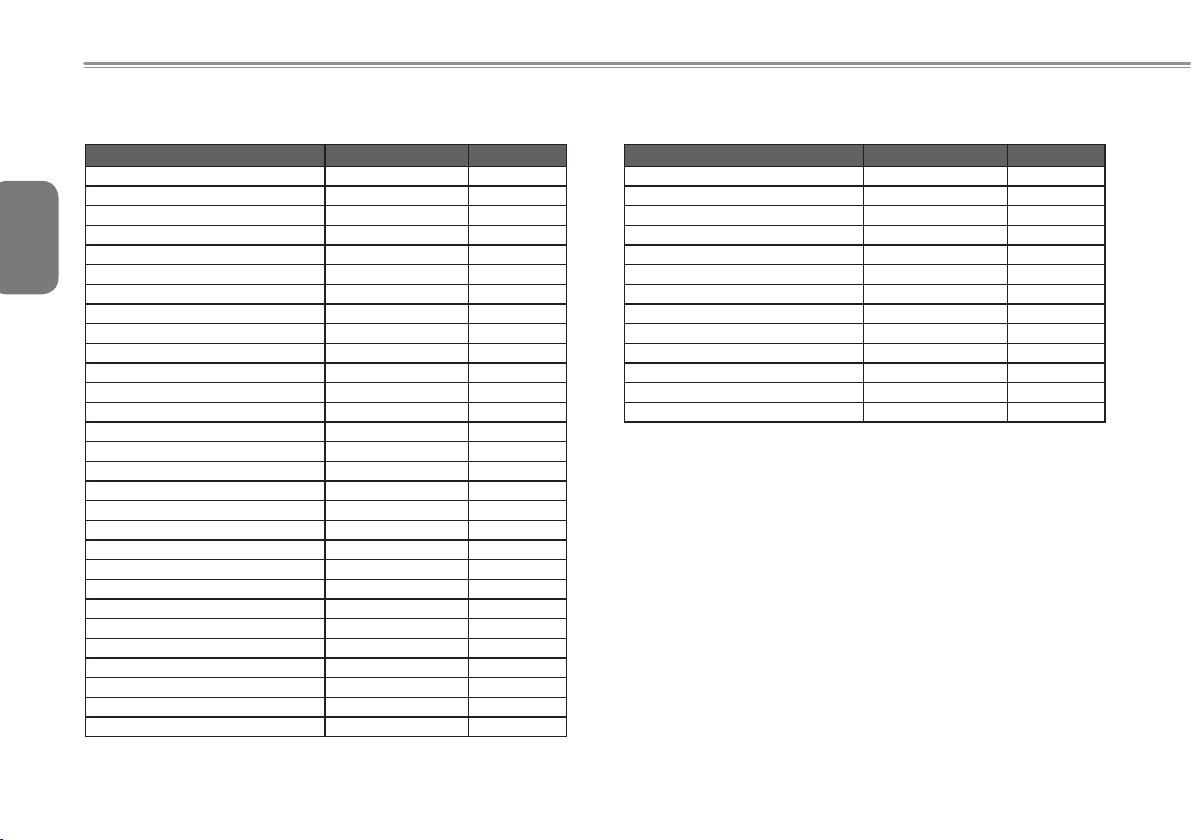
Region Voltage Frequency
Seychelles 240V 50 Hz
Sierra Leone 230V 50 Hz
English
Singapore 230V 50 Hz
Slovakia 230V 50 Hz
Slovenia 230V 50 Hz
Somalia 220V 50 Hz
South Africa 220V 50 Hz
24
South Korea 220V 60 Hz
Spain 230V (formerly 220V) 50 Hz
Sri Lanka 230V 50 Hz
Sudan 230V 50 Hz
Suriname 127V 60 Hz
Swaziland 230V 50 Hz
Sweden 230V 50 Hz
Switzerland 230V 50 Hz
Syria 220V 50 Hz
Tahiti 110V / 220V 60 Hz / 50 Hz
Taiwan 110V 60 Hz
Tajikistan 220V 50 Hz
Tanzania 230V 50 Hz
Thailand 220V 50 Hz
Togo 220V 50 Hz
Tonga 240V 50 Hz
Trinidad & Tobago 115V 60 Hz
Tunisia 230V 50 Hz
Turkey 230V 50 Hz
Turkmenistan 220V 50 Hz
Uganda 240V 50 Hz
Ukraine 220V 50 Hz
Region Voltage Frequency
United Arab Emirates 220V 50 Hz
United Kingdom 230V (formerly 240V) 50 Hz
United States of America 120V 60 Hz
Uruguay 230V (formerly 220V) 50 Hz
Uzbekistan 220V 50 Hz
Vanuatu 230V 50 Hz
Venezuela 120V 60 Hz
Vietnam 220V 50 Hz
Virgin Islands 110V 60 Hz
Western Samoa 230V 50 Hz
Yemen 230V 50 Hz
Zambia 230V 50 Hz
Zimbabwe 220V 50 Hz
Page 36
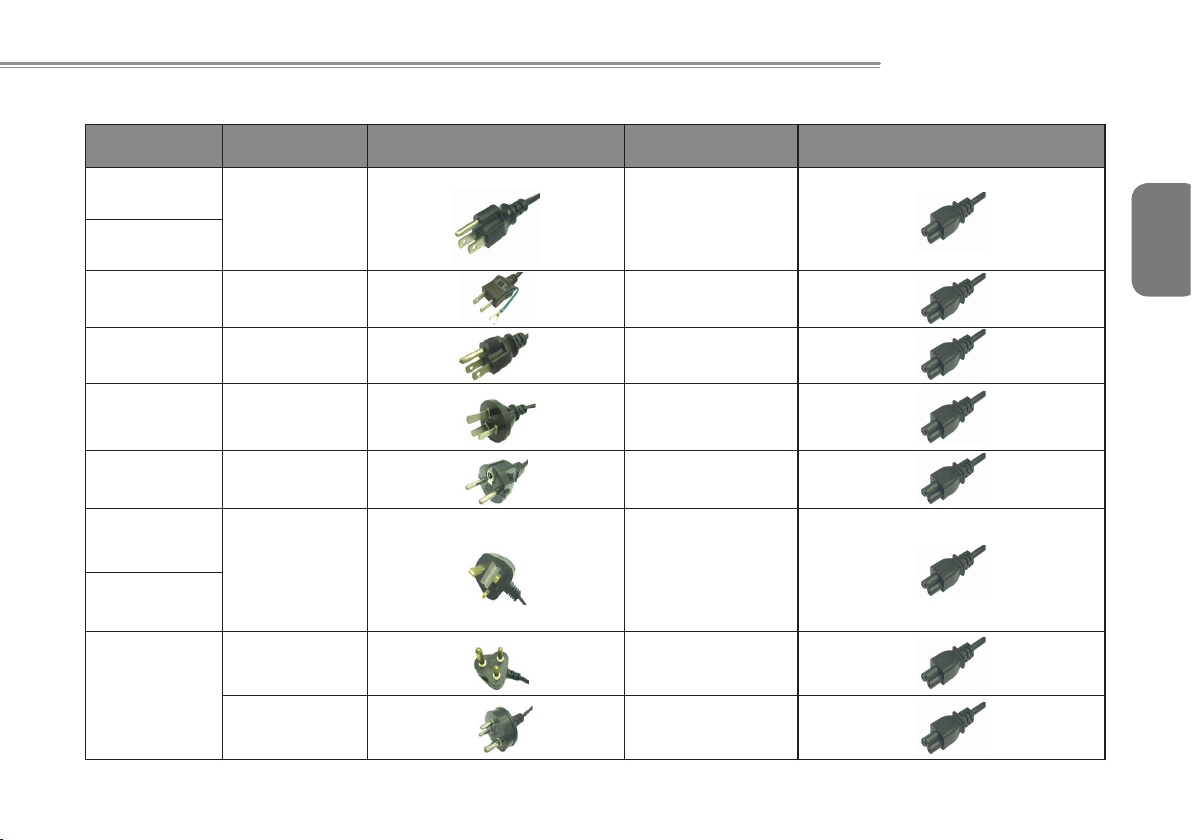
E1425 SERIES USER’S MANUAL
Plug Type
Country Plug Type Plug Picture Connector Type Connector Picture
USA
LP-30B LS15
Canada
Japan LP-54 LS15
Taiwan LP-53 LS15
China PC-323 LS15
Korea LP-E04 LS15
England
LP-60L LS15
Singapore
PE-364 LS15
South Africa
PE-361 LS15
English
25
Page 37
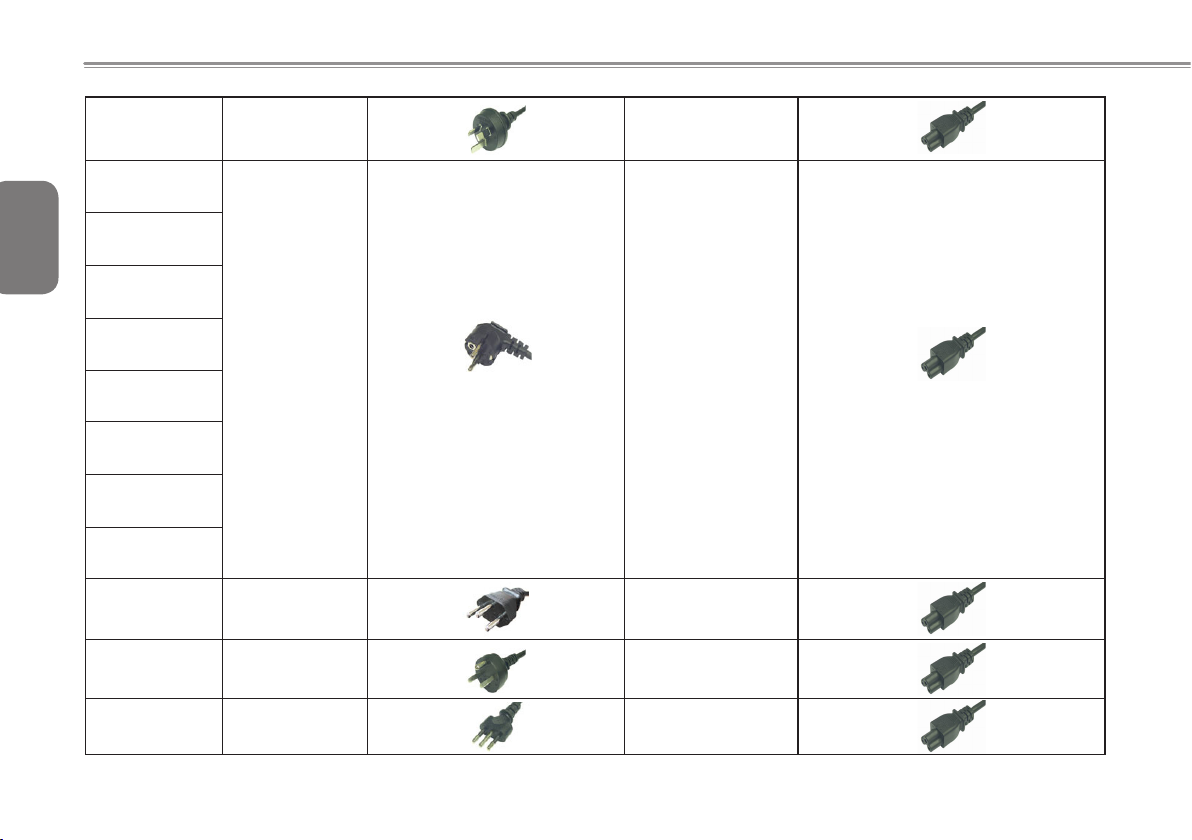
Australia LP-23A LS15
English
26
Germany
France
Sweden
Finland
Norway
Belgium
Netherlands
Austria
Switzerland LP-37 LS15
Denmark LP-38 LS15
Italy PE-336 LS15
LP-33
LS15
Page 38

版權所有
本手冊可引導您設定和使用全新
如果事先未獲得書面許可,不得以任何形式或電子、機械、照相、記錄等任何方式重製本手冊、儲存於檢索系統中或加以傳播。
E1425
© 2010
屬於技嘉科技股份有限公司
保留所有權利
E1425
系列筆記本電腦使用手冊
筆記本電腦。本手冊資訊之正確性皆經過查核,如有變更恕不另行通知。
初版:
2010/07
GIGABYTE™
本手冊提及之所有其他品牌或產品名稱皆為其所屬公司之商標或註冊商標。
為技嘉科技股份有限公司之註冊商標。
商標
Page 39
安全說明
在使用您的
請遵守以下安全準則以保護您自己和您的筆記本電腦。
小心:使用筆記本電腦時,請勿長時間將電腦的底部直接接
• 當您將筆記本電腦從外箱取出後,請將包裝組件放置於幼童不易取
得之處,以免誤食造成窒息。
簡體中文
• 請勿將物品壓在適配器的電源線上,此外請將電源線置於安全處以
避免將人絆倒或遭人踩踏。使用電腦或為電池充電時,請將適配器
放置於通風處,如桌面或地板上。請勿以紙張或其他物品覆蓋適配
器以免阻礙通風。使用筆記本電腦時,務必保持散熱孔周邊至少10
公分距離暢通。
I
• 請勿將任何物品插入筆記本電腦的散熱孔。否則會造成短路,進而
導致火災或觸電。
• 請勿用手觸摸或按壓液晶屏幕。
• 限使用筆記本電腦製造商隨附的適配器和電池。使用其他類型的電
池或適配器可能會讓發生火災或爆炸的風險提高。
• 限使用E1425筆記本電腦製造商隨附的適配器和電池。使用其他類
型的電池或適配器可能會讓發生火災或爆炸的風險提高。
• 電池的裝入方式不正確可能會導致爆炸。
• 若需更換電池時,限定使用製造商建議的相同或相容電池。
• 連接筆記本電腦與電源之前,請確認適配器的額定電壓符合可用電
源的電壓。各國電壓列表請參考第27頁。
E1425
系列筆記本電腦時
觸皮膚。長時間使用後,熱量會累積在電腦底部。若與皮膚
持續接觸會造成不適感或灼傷。
• 使用延長線連接適配器時,請確認所有連接裝置的電流總量是否超
出延長線的電流總容量。
• 從筆記本電腦取出電池時,請先關機並從插座拔下適配器,然後取
出電池。
小心:攜帶電池時 ,請勿將電池放在口 袋、皮包或其他容器
中,否則金屬物體(如車鑰匙)可能會讓電池的電極短路。若
需要單獨寄送電池時,請放置在防靜電袋子裡寄送。
• 請依照製造商指示回收廢棄電池。勿將電池投入火中,否則會產生
爆炸。
• 請勿自行維修筆記本電腦。維修服務請洽技嘉各地服務據點。
Page 40

E1425
系列筆記本電腦使用手冊
商務旅行須知
雖然筆記本電腦設計很堅固以符合行動生活的需求,但在旅行時還是
需要特別注意以下幾件事:
• 最重要的旅行配件是電腦保護袋,好的電腦保護袋必須具備防碰撞
的緩衝襯墊且尺寸要夠大才能完整包覆筆記本電腦。
• 確保電腦保護袋有足夠的空間擺放適配器。請勿放置過多物品,以
避免壓壞筆記本電腦的液晶屏幕。
• 勿將筆記本電腦放在行李箱託運,筆記本電腦需視為手提行李。每
家航空公司規定的手提行李件數不同,搭機前請先向當地航空公司
詢問規定細節。
• 您可 讓筆 記本電腦接 受X 光機的安全檢查 ,當 把電腦放入 輸送 帶
時,請留意筆記本電腦以免被竊取。
• 切勿讓筆記本電腦接受金屬探測器的檢查,因為金屬探測器會造成
硬盤數據遺失。
• 勿將筆記本電腦置於機艙內頭頂置物箱,因途中若遇亂流時容易四
處滑動造成筆記本電腦損壞,請置於座椅下方可視之處。
• 請避免筆記本電腦、 電池 和硬盤承受環境中的危險 ,如 塵土、灰
塵、食物、液體高低溫以及陽光直接照射。
• 當筆記本電腦移往溫度或濕度差異極大的環境時,筆記本電腦的內
外可能會發生凝結現象。為了避免電腦受損,繼續使用前請等候一
段時間,直到濕氣蒸發為止。
• 由低/高溫環境將筆記本電腦移至高/低溫環境時,開啟電源前請等
候一段時間,直到電腦適應新環境為止。
使用須知
• 拔下電源線時,請務必拉拔電源線的接頭或鬆脫裝置,請勿拉拔電
源線本體。拔下接頭時,請垂直拉出以免接腳彎曲。連接電源線之
前,請另外注意接頭的方向是否正確與對齊。
• 為了避免觸電的風險,請勿在打雷時插拔任何纜線。
• 勿在周遭有水的地方使用筆記本電腦,如浴缸、洗手台、廚房、洗
衣間的水槽、潮濕的地下室或游泳池。液體滴落在筆記本電腦內會
造成觸電或是腐蝕電子線路。
簡體中文
II
Page 41

清潔電腦須知
保固服務
清潔筆記本電腦之前,請先關機,接著拔下電源線並取出電池。
筆記本電腦外殼:
將廚房清潔劑和清水以1:5比例稀釋後再用軟質擦拭布蘸取擦拭。
• 將軟質擦拭布擰乾擦拭表面及底部機殼。
鍵盤:
簡體中文
• 利用吹塵器具噴出的高壓氣體吹出鍵盤下方的灰塵與髒污。
• 可用軟質擦拭布沾幾滴異丙醇清潔鍵盤。
• 擦拭完請留5分鐘讓鍵盤自然乾燥。
面板:
III
• 建議使用奈米清潔擦拭布清潔面板。
• 如面板表面有髒汙,請使用市面上液晶屏幕專用清潔產品清除。當
使用清潔產品時,請將清潔液噴在擦拭布上,再用擦拭布擦拭面
板,千萬不可將清潔液直接噴在屏幕上。
• 如果沒有液晶屏幕專用清潔液也可用異丙醇與水以1:1的比例稀釋
後,再用擦拭布沾稀釋液擰乾後清潔屏幕。
產品維修及服務都需透過技嘉授權的服務中心。
技嘉保固
技嘉保證所有技嘉品牌的筆記本電腦及筆記本電腦出廠前均受到嚴
密的
品質控管。若在正常使用的情況下故障且產品尚在保固期限內,技嘉
將提供您免費的保固維修服務。
• 本產品隨機所附的電池及適配器,自購買日起提供一年全球保固。
• 維修時若未出具購買憑證,則保固期自本公司製造日算起。
• 隨機所附贈的軟體光盤、電腦保護袋及其他附件贈品恕不在保固範
圍內。
• 假如產品經證實原料或組裝有瑕疵,技嘉服務中心將用新的或整修
後的料件免費維修,完成保固義務。
• 若在保固期內,技嘉服務中心無法提供相同料件修復,將會以類似
的新料件或修復過後的料件取代。
保固限制
技嘉保固範圍不包含以下
• 軟體:包含作業系統、產品隨附軟體及使用者自行安裝之軟體恕不在
保固範圍內。驅動程序及軟體光盤因涉及版權問題,使用者若因故
遺失或毀損時本公司恕無法提供保固服務及接受付費購買。
• 其他廠商提供之硬體、產品或配件。
• 產品貼附的貼紙。
• 產品因受環境因素而損壞,如氧化。
Page 42

法規須知
E1425
系列筆記本電腦使用手冊
• 因天災或遇不可抗力造成之損壞。
• 人為損壞
‧自行拆裝、任意變更規格。
‧未遵照使用手冊指示不當使用。
‧購買後因搬遷、移動摔落而導致故障損壞時。
‧使用非本公司原廠之配件所引起之故障或損壞。
‧損毀的零件。
‧受液體潑灑造成的損壞。
聯邦通訊委員會須知
本設備係依照美國聯邦委員會規範第15條之規定測試,結果符合B級
數位化服務之各項限制。這些限制之用意旨在規定住宅安裝時應提供
適當之保護,以防範不良干擾。
擅自對本設備進行變更或修改將導致使用者喪失操作本設備之權利。
本設備產生、使用並發出無線電頻率能量。若未遵守說明進行安裝與
使用時,恐干擾無線電通訊。然而,對於特定之安裝並不保證不會造
成干擾。如本設備確對收音機或電視機接收造成不良干擾(可藉由開
關設備之方式確認),則用戶可透過下述方法試著解除干擾:
• 重新調整接收天線之方向。
• 拉開設備與接收器之間距。
• 將設備接至不同插座上,讓設備與接收器各自使用不同的電路。
• 洽詢經銷商或具相關經驗的無線電/電視技術人員尋求協助。
• 所有連接至本機的外部纜線均應使用屏蔽纜線。若是連接至PC-
MCIA卡的纜線,請參照配件手冊或安裝說明。
簡體中文
IV
Page 43
射頻曝露值
本設備必須依據所提供的指示安裝及操作,且不得與任何其他天線或
發射機並置或共同操作。必須對一般使用者及安裝人員提供天線安裝
指示及發射機操作條件,以滿足射頻曝露值的法規要求。
CE須知(歐盟)
此標誌 代表本E1425 系列筆記本電腦符合EMC規範及歐盟的低
電壓規範。 此標誌同時代表本E1425 系列符合以下技術標準:
簡體中文
• EN 55022—「資訊技術設備之無線電干擾的測量方法與限制。」
• EN55024—
• EN 61000-3-2—「電磁相容性(EMC)-第3章:限制-第2節:諧
V
波放射限制(每相位輸入電流最高且包括16A的設備)。」
• EN 61000-3-3—「電磁相容性(EMC)—第3章:限制—第3節:額
定電流最高且包括16A之設備,其低電壓供電系統之電壓變動限
制。」
注意:EN 55022放射要求提供兩種分類
針對CB:
• 請僅使用專為本電腦所設計的電池。不正確的電池類型可能會造
成爆炸、漏電或損壞電腦
「資訊技術設備-電磁耐受特性-測量方法與限制。」
• A級適用於商業用途
• B級適用於住宅用途
• 請勿在開啟電源時取出電腦的電池
• 請勿繼續使用已掉落的電池,或是出現任何損壞狀況(例如彎曲或
扭曲)的電池。即使電腦能夠以受損的電池繼續運作,也可能造成
電路損壞,並造成火災。
• 請使用筆記本電腦的系統為電池充電。不正確的充電方式可能會
導致電池爆炸。
• 請勿嘗試自行修理電池。請交由維修代表或合格維修人員進行任
何電池修理或更換。
• 請勿讓兒童接觸受損的電池,並立即加以丟棄。請務必謹慎處理
電池。若曝露在火焰中、不當處理或棄置,可能會造成電池爆炸
或漏電。
• 請將電池遠離金屬設備。
• 在棄置電池之前,請在電池接觸點上黏貼膠帶。
• 請勿以雙手或金屬物體碰觸電池接觸點。
電池棄置及注意事項
您所購買的產品含有可充電電池。這種電池可回收。依美國許多州及
各地法律,在電池使用壽命結束時,若將本電池棄置在都市廢棄物流
中,有可能構成違法。請洽詢您當地固體廢棄物主管單位,以瞭解您
所在區域的回收方案或適當的處理方式。如果電池更換不當,可能會
有爆炸的危險。只能以相同或廠商建議之同類型電池進行更換。請依
照製造商指示說明回收廢棄電池。
Page 44
BSMI須知(限台灣)
經濟部標準檢驗局(BSMI)將大部分的筆記本電腦歸類為B級資訊技術
設備(ITE)。
產品必須貼上以上標誌,代表符合BSMI標準的規定。
E1425
系列筆記本電腦使用手冊
電池安全使用指南
本筆記本電腦使用的是鋰電池。請勿在潮濕或腐蝕性的環境中使用電
池。請勿將產品放置、存放或靠近熱源、至於高溫位置、放在強烈日
照下、放在微波爐或加壓容器中,並且請勿暴露於60度C(140度F)
以上的溫度中。違反這些指南將可能導致電池漏液、鏽蝕、過熱、爆
炸或起火,並可能導致人身傷害或物品損傷。請勿穿刺、打開或拆解
電池。如果電池發生漏液且您不小心碰觸到漏出的液體,請立即以大
量清水沖洗並尋求醫療協助。基於安全理由,且為延長電池的使用壽
命,在0度C(32度F)以下或40度C(104度F)以上的溫度中將無法進
行充電。環境操作溫度0度C到35度C。
新購買的電池需經過二至三次的完整充放電週期才能達到最高效能。
此電池可進行數百次的充電和放電,但最終仍會達到使用壽命。當開
機時間異常短於正常時間時,請購買新的電池。您只能使用技嘉核准
的電池,並使用技嘉專為此裝置核准的專用充電器位電池進行充電。
電池指能針對其設計目的使用。請勿使用任何已損壞的充電器或電
池。請勿將電池短路。以錢幣、金屬片或筆之類的金屬物品直接連接
電池的正極(+)和負極(-)終端(外觀類似像電池上的金屬條)
時,可能會不小心引發短路。例如,當您將備用電池放置在口袋或皮
包內舊可能發生這種情況。將終端短路可能會損壞電池或連接的物
品。
如果您將電池放置在過熱或熱冷的環境中(例如夏天或冬天的密閉車
廂內),可能會導致電池容量和使用壽命縮短。請務必將電池保持介
於15度C至25度C(59度F至77度F)的環境中。過熱或過冷的電池會
讓裝置在短期內無法運作,即使電池已充滿電亦然。在極度過低的溫
度下更會使得電池效能受到限制。
簡體中文
VI
Page 45
請勿將電池丟置火焰中,這樣可能會導致爆炸。電池如果受損也可能
爆炸。廢棄電池的處理應符合當地法規。請盡量將電池回收處理。切
勿當成一般家庭廢棄物處理。無線裝置可能會受到電池干擾,並因而
影響效能。
可能引發爆炸的環境
當處於可能引發爆炸的環境時,請關閉您的裝置並遵守所有的指示和
說明。可能引發爆炸的環境包括一般建議關閉汽車引擎的區域。此類
區域的火花可能引發爆炸或火災,進而導致人身傷害或甚至死亡。靠
簡體中文
近加油站的加油槍時請關閉筆記本電腦。在燃料補給站、儲存區和配
送區、化學工廠或進行爆破作業的區域使用無線設備時,請遵守其相
關限制。可能引發爆炸的環境一般(但不見得全部)都會加以標示,
包括:船甲板下方、輸送或儲存化學物質的設備、使用液態石油氣
(如丙烷或丁烷)的車輛,以及空氣中含有化學物質或石粒、灰塵或
VII
金屬粉塵等粒子的區域。請勿在禁用行動電話或可能造成干擾或危險
的區域啟動筆記本電腦。
Page 46
E1425
系列筆記本電腦使用手冊
前言
感謝您選擇技嘉科技E1425系列筆記本電腦。
這台可攜式筆記本電腦提供最佳的多媒體性能,讓您可放心地使用。
這本操作手冊包含了安裝步驟和使用的必備資訊,提供基本功能配置、
操作、保養及疑難排解。
簡體中文
VIII
Page 47

目錄
安全說明................................................... I
商務旅行須知...............................................II
使用須知...................................................II
清潔電腦須知.............................................. III
保固服務.................................................. III
法規須知.................................................. IV
電池安全使用指南.......................................... VI
前言.....................................................VIII
簡體中文
第一章 開始使用前
1.1
確認應有品項
1.2
IX
熟悉您的電腦
1.3
前視圖
1.4
左視圖
1.5
右視圖
1.6
後視圖
1.7
底視圖
第二章 開始使用筆記本電腦
2.1
2.2
2.3
2.4
2.5
2.6 使用觸控板 ............................................................................. 12
.........................................................................................8
電源
電池重新充電
開啟您的筆記本電腦
狀態指示燈
使用功能鍵
........................................................................... 2
........................................................................... 2
...................................................................................... 3
...................................................................................... 4
...................................................................................... 5
...................................................................................... 6
...................................................................................... 6
........................................................................... 9
.............................................................. 10
............................................................................. 10
............................................................................. 11
GIGABYTE Smart Recovery
第三章
3.1 GIGABYTE Smart Recovery .................................................16
第四章 疑難排解
4.1
疑難排解
4.2
技嘉服務資訊
附錄
E1425規格 ...................................................................................... 20
各國電壓列表
各國轉接頭
................................................................................ 18
......................................................................... 18
.................................................................................. 22
...................................................................................... 26
Page 48
第一章 開始使用前
E1425
系列筆記本電腦使用手冊
本章介紹開始使用E1425筆記本電腦的基本操作資訊。
一些本文所述的功能可能工作異常或根本無法工作,除非與預先安裝的
作業系統搭配。對作業系統所做的任何更改可能會導致不正確的運作。
簡體中文
1
Page 49
1.1 確認應有品項
收到您的筆記本電腦時,請小心打開包裝,並確認有下列各品項。預
先裝配好的筆記本電腦應有下列品項:
●
筆記本電腦
●
鋰電池
●
交流適配器及電源線
●
驅動程序
●
快速使用指引
檢查並確認電腦系統完備之後,請閱讀以下的說明,以瞭解您的筆記
簡體中文
本電腦各組件。
依據您購買的機型,您的筆記本電腦外觀可能會與本手
注意:
冊中所顯示的圖片不同。
2
1.2 熟悉您的電腦
打開顯示面板
若要打開屏幕,只需將屏幕向上掀開即可。
關閉屏幕時,絕不可用力蓋上顯示屏幕蓋。
Page 50
1.3 上視圖
以下所示為本筆記本電腦的上視圖
E1425
系列筆記本電腦使用手冊
NO.
項目 說明
2
1
1
麥克風
內置麥克風可接收聲音或其他音頻數據,並
傳輸到可接收這類輸入的任何程序。
2
網絡攝像頭
3
顯示面板
3
4
暫停/開機按鈕
4
5
鍵盤
內置130萬畫素相機,可讓您輕鬆拍攝快照
或進行視訊聊天、視訊會議。
背光式彩色液晶顯示面板,可以顯示文字及
圖案。
此按鈕可開啟及關閉筆記本電腦的電源,並
可切換至休眠模式。
(如需詳細 資訊,請參閱第 10頁的開機一節
中的「暫停/開機按鍵」)。
具備Windows®專用鍵的標準鍵盤。
簡體中文
3
5
狀態指示燈配合各特定操作模式。
6
狀態指示燈
7
6
7
觸控板指標裝置
這些模式包括:開機 / 待命 狀態 、電 池 /
AC適配器狀態、硬盤機活動(HDD)、數字鍵
鎖 (Num Lock)、大寫鍵鎖(Caps Lock)和無
線傳輸活動。
觸控板是類似鼠標的光標控制器,有二個按
鈕以及一個對手指觸摸很靈敏的平板。
Page 51
1.4 左視圖
E1425A
以下所示為本筆記本電腦的左視圖。
1.5 右視圖
以下所示為本筆記本電腦的右視圖。
簡體中文
4
1 2
NO.
項目 說明
Kensington
1
安全鎖插槽
2
適配器輸入接口
LAN(RJ-45)
3
連接接口
調制解調器
4
(RJ-11)
5 USB
6
光驅
連接接口
連接接口
3
4 5 6
Kensington安全鎖插槽可讓您用一條選配的
安全接線,將筆記本電腦固定在一個無法移
動的物體上,以確保安全。
適配器輸入接口,提供您使用一般電源給筆記
本電腦供電,以及對電腦內的鋰電池充電。
LAN連接接口支持10/100/1000Base-T標準
RJ-45插頭。
調制解調器(RJ-11)連接接口 可用來將電話
綫接上內置的56K調制解調器。
USB連接接口讓您連接通用序列總綫裝置,
支持 標準 2.0版本 ,數 據傳輸速率最高 可達
480Mb/s。
光驅可以用來撥放媒體盤片,如CD、DVD及
BD。依據您的筆記本電腦組態設定,您可能
可以刻錄CD、DVD光盤。
1 2 3 4 5 6
E1425M
1 2 3 4 56
Page 52
NO.
項目 說明
USB
1
連接接口
US B連 接接 口讓 您連 接通用序列總綫裝
置,支持標準2.0版本,數據傳輸速率最
高可達480Mb/s
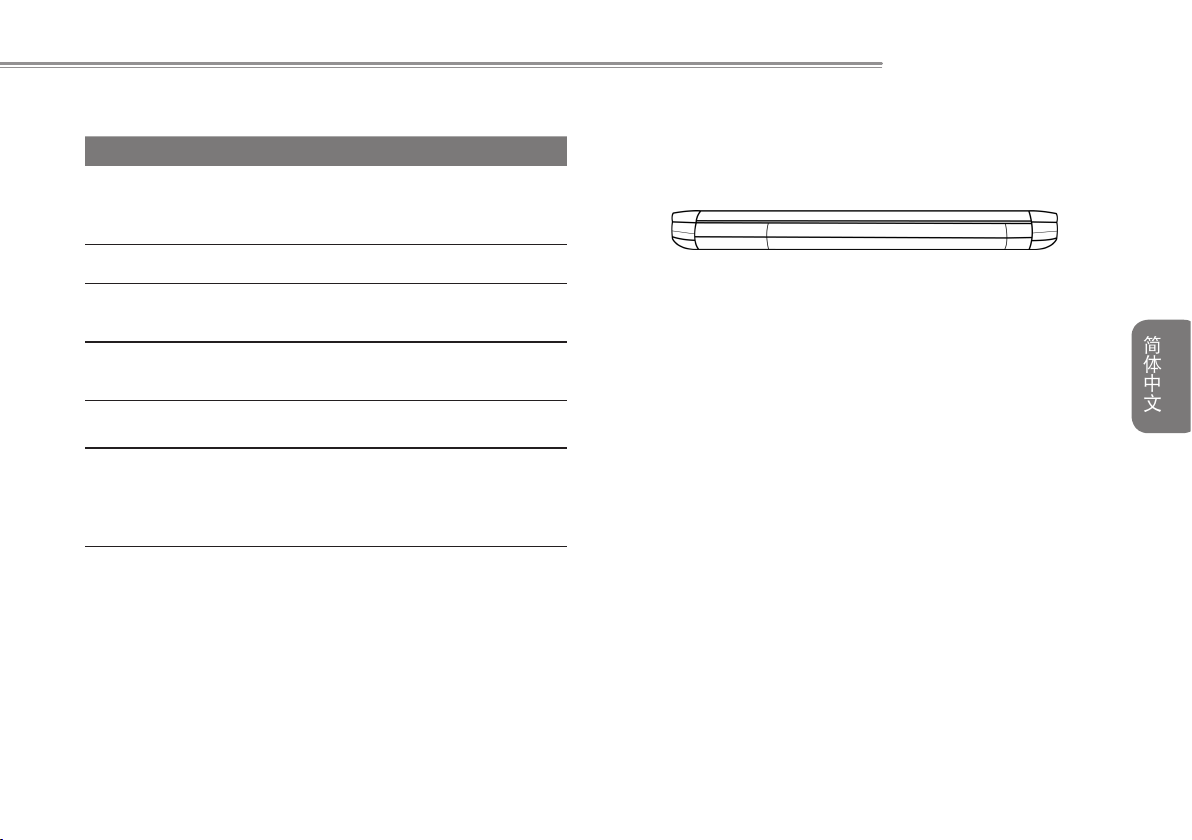
1.6 後視圖
以下所示為本筆記本電腦的後視圖。
E1425
系列筆記本電腦使用手冊
2
麥克風插孔
3
耳機插孔
4 HDMI
外接式顯示器
5
連接接口
6
通風口
連接接口
麥克風插孔可外接一個單聲道麥克風。
耳機插孔可用來連接耳機、外接喇叭及
放大器。
HDMI連接接口可讓您將視訊裝置連接電
腦,例如電視、投影機或錄像機
外接式顯示器連接接口可用來連接外接
的顯示器。
電腦內部零件所產生的熱能,會經由這
些開口散發出去,使用時請勿擋住出風
口,或將電腦擺放在容易擋住出風口的
位置。
簡體中文
。
5
Page 53
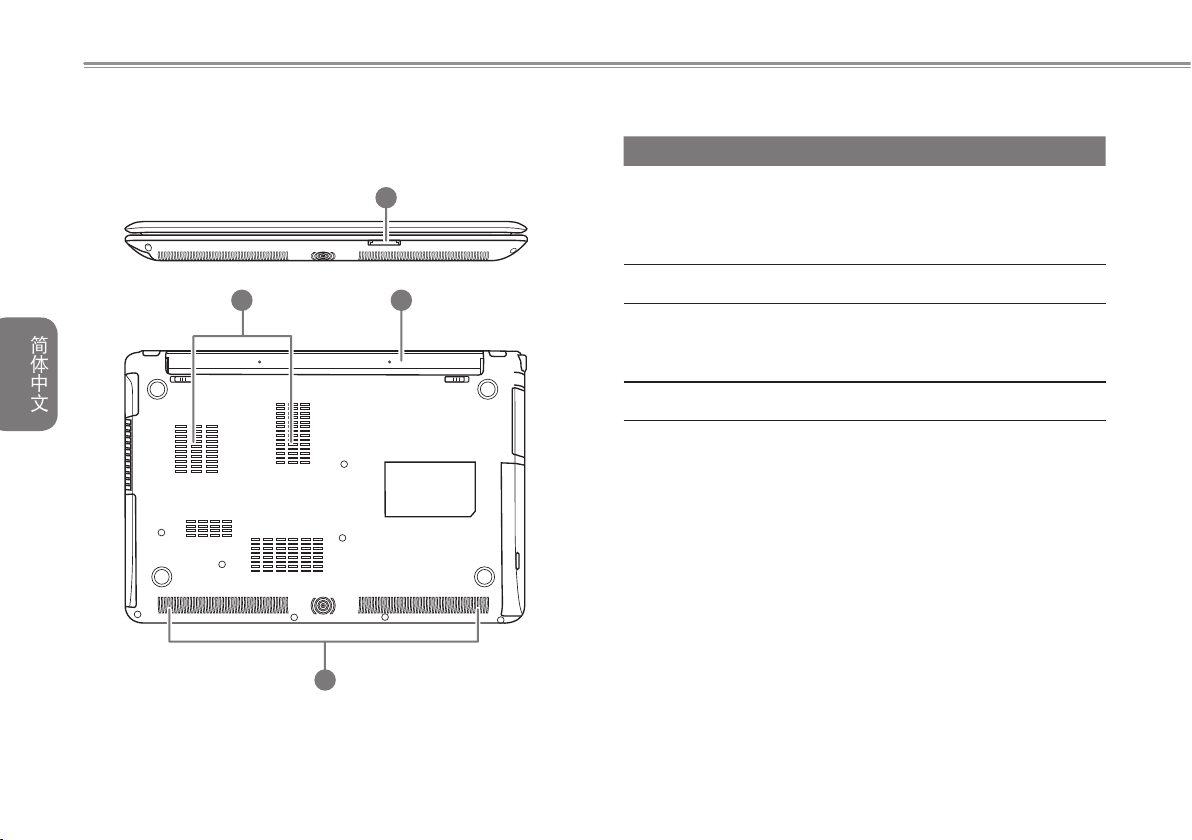
1.7 前視圖&底視圖
以下所示為本筆記本電腦的前視圖及底視圖。
1
NO.
項目 說明
1
記憶卡插槽
透過內存插槽,提供一個最快速、最便捷的方式,
將數字相機、MP3隨身聽、筆記本電腦或PDA等快
閃記憶卡兼容裝置內的相片、音樂與數據傳輸至電
腦。
2
3
4
鋰電池槽
通風口
立體聲喇叭
3 2
簡體中文
6
4
鋰電池槽內有一內接式鋰電池。
電腦內部零件所產生的熱能,會經由這些開口
散發出去,使用時請勿擋住出風口,或將電腦
擺放在容易擋住出風口的位置。
內置雙聲道喇叭、提供立體音效。
Page 54
E1425
系列筆記本電腦使用手冊
第二章 開始使用筆記本電腦
本章將帶您認識E1425各式各樣的連接接口及零件,並讓您熟悉您的
筆記本電腦。筆記本電腦的某些零件可以讓使用者升級,同時有些則
是固定不能變更的。
簡體中文
7
Page 55
2.1 電源
本產品可使用兩種電源:鋰電池或交流適配器。
連接適配器
交流適配器提供筆記本電腦操作時所需電源,並且將電池充電。
我們建議只使用隨貨搭配的適配器,使用其他任何適配器可能會造成
筆記本電腦損害或故障,並可能會對人體造成傷害。
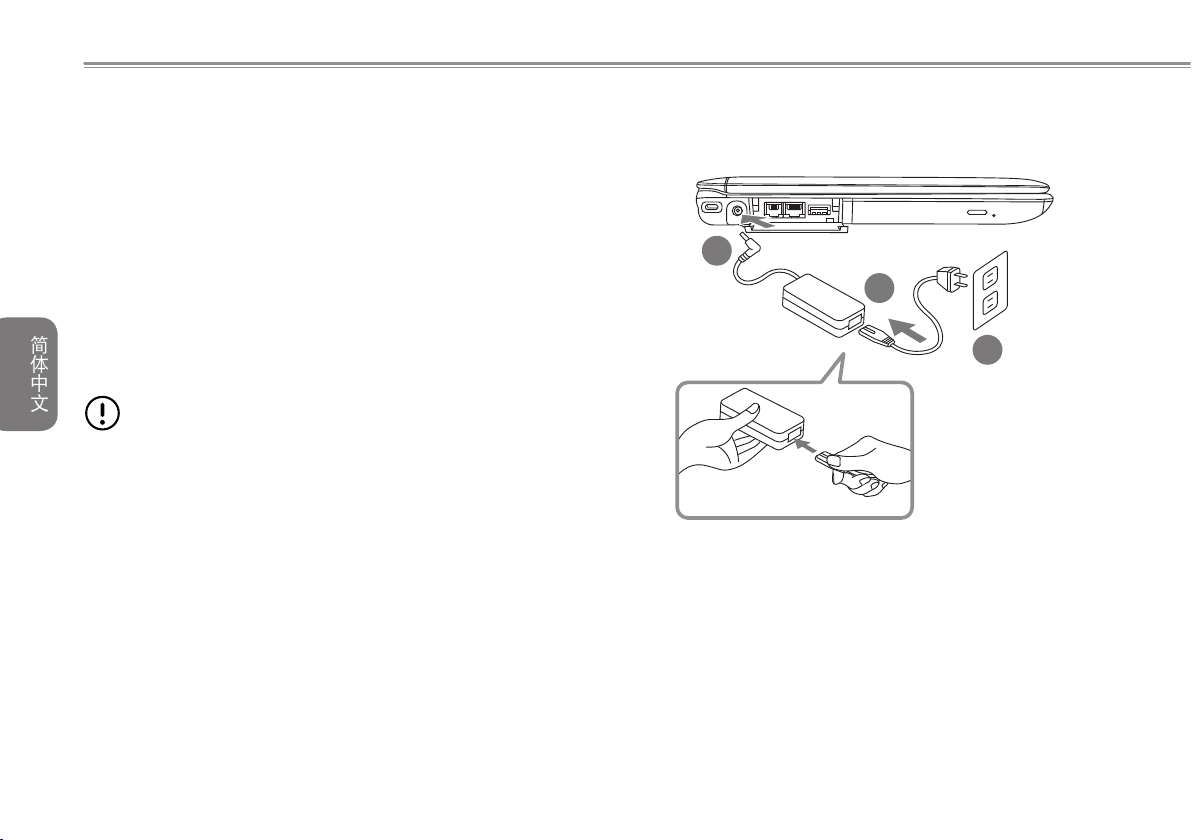
連接交流電適配器
1.將直流電的輸出纜線插入筆記本電腦的直流電源插座。
2.將交流電壓器插入交流電電源插座。
由交流電源切換為電池電源
簡體中文
1.確定至少安裝一個充好電的電池。
2.拔掉交流電壓器。電腦就會自動由直流電源切換為電池電源。
購買本電腦時,鋰電池尚未充電。開始使用本電腦時,應將交
流電壓器連接上去。
8
2
1
3
1.將電源線接上適配器。
2.將適配器連接到筆記本電腦的電源插孔。
3.將電源線插入電源插座。
Page 56
2.2 電池重新充電
電腦內的鋰電池可經由交流電適配器重新充電。要將鋰電池重新充
電,請先確定已妥當裝入電池,而且電腦以連接交流電源。
鋰電池並沒有「記憶功能」,因此在重新充電前,並不需要將鋰電池
完全放電。電池充電期間,如果正在使用筆記本電腦,充電時間會明
顯比較長。如果縮短充電時間,請在充電時,將電腦切換為暫停模式
或關機。
低電量狀態
電池電量低時,會出現通知訊息。如果您不回應電池電量不足的訊
息,電池將持續放電,直到電量過低而無法操作為止。發生此種情況
時,您的筆記本電腦將進入閒置模式,當電腦達到此情況時,並不保
證您的數據將被儲存。
為保護您的筆記本電腦免於受損,請務必使用隨附的適
注意:
配器,因為每一個適配器都有規定的電源輸出率。
一旦因為電池沒電而使電腦進入暫停模式,除非由適配器或另一個充
好電的電池提供電源,否則電腦無法恢復作業。重新提供電源後,就
可以按暫停 / 開機按鈕來恢復作業。待機模式時,您電腦內的數據
都會暫時保留,但如果等到電源指示燈停止閃爍,終究熄滅,您還沒
有接上外接電源,那所有未存檔的數據都會消失。提供電源後就可以
一邊使用電腦,一邊讓電池充電。
E1425
系列筆記本電腦使用手冊
電池更換
更換使用不正確類型的電池,可能會引發爆炸。對於可更換鋰電池組
的電腦,務必遵循下列準則:
●
如果電池的設置位置允許使用者自行更換,電池附近應有標示,或
註明操作和維修指示。
●
如果電池的設置位置允許使用者自行更換,電池附近應有標示,或
註明維修指示。標示或說明應包含下列類似文字。
更換使用不正確的電池,可能引發爆炸。廢棄電池的處
注意:
理方式須遵照說明指示。
簡體中文
9
Page 57
2.3 開啟您的筆記本電腦
暫停 / 開機按鈕
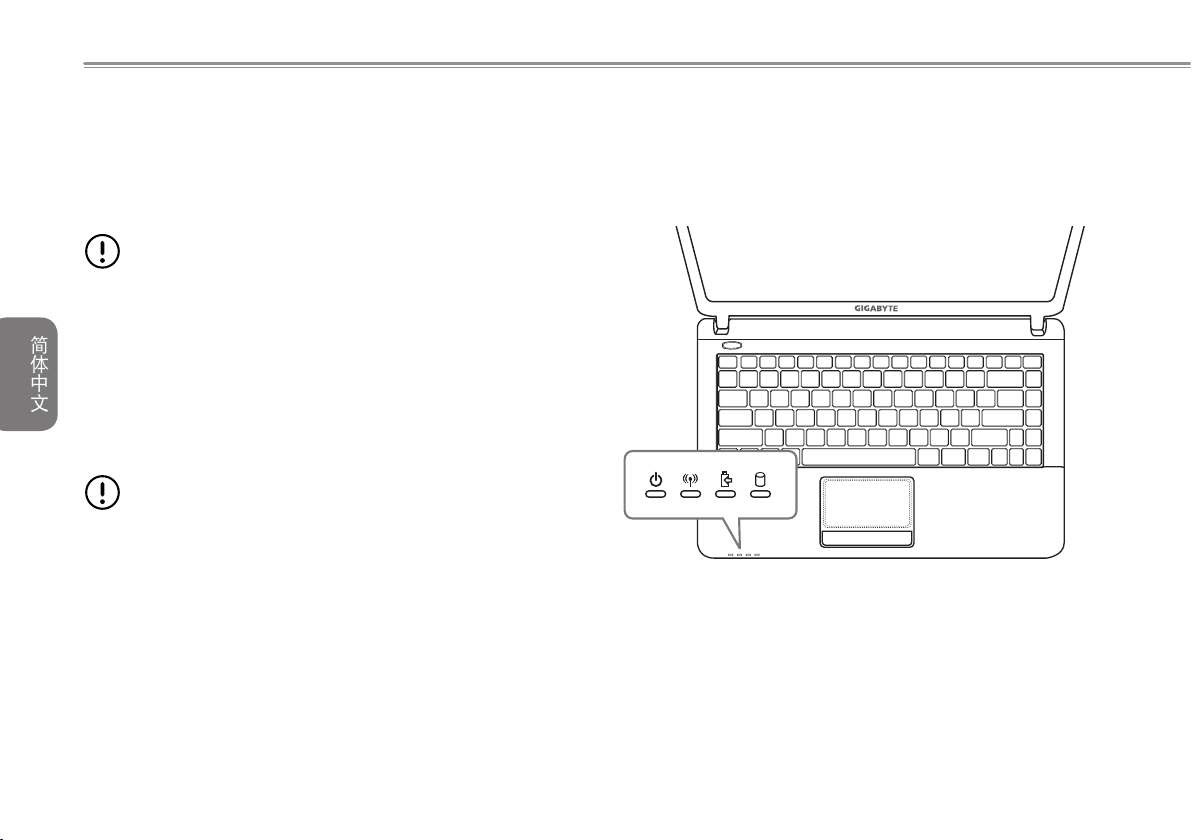
按下暫停/ 開機按鈕可開啟筆記本電腦。接上交流電壓器或充好電
的鋰電池後,就可以按下鍵盤上的暫停 /開機按鈕來啟動筆記本電
腦。如果您需要離開一段時間,請按同一個按鈕,將電腦關機。
注意:
本電腦受到撞擊或震動,否則硬盤有損壞的危險。
啟動後,筆記本電腦會執行開機自我測試(POST),以檢查內部零件
及配置是否功能正確。如果偵測到錯誤,電腦會發出警告聲,並顯示
簡體中文
錯誤訊息。
視問題的性質而定,您可能可以繼續執行作業系統,或是進入BIOS設
定程序,然後修改設定。
成功的完成自我開機測試(POST)後,筆記本電腦會載入已安裝的作
業系統。
10
注意:
會發生無法復原的錯誤。
不要帶著已開機的筆記本電腦四處走動,也不要讓筆記
電腦執行開機自我測試(POST)時,請勿關機,否則可能
2.4 狀態指示燈
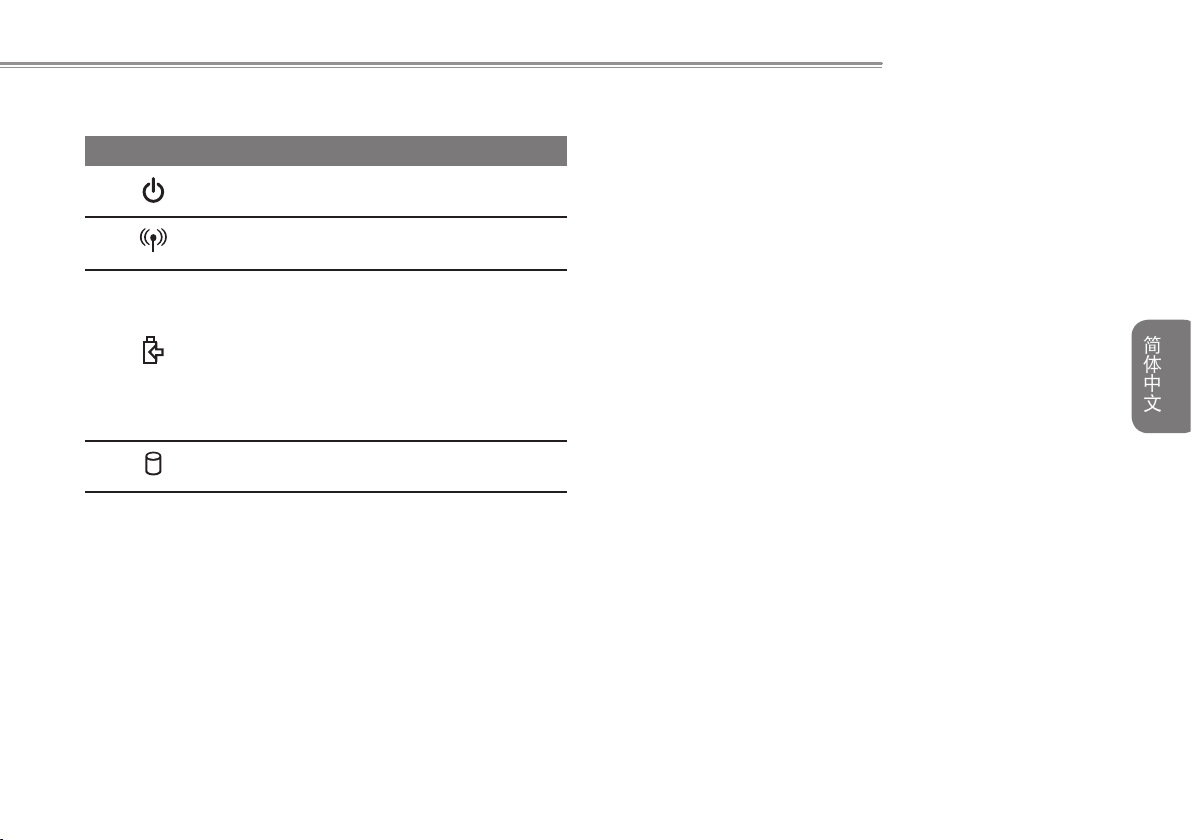
狀態指示燈配合各特定操作模式。這些模式包括:「開啟 / 待機」
狀態、電池 / AC適配器狀態,硬盤活動 (HDD),數字鍵鎖定(Num
Lock),大寫鎖定(CapsLock)和無線傳輸活動。
Page 58
NO.
符號 項目 說明
1
2
3
4
開機/待命
指示燈
無線傳輸活動
狀態指示燈
電池指示燈
(HDD)
硬盤
存取指示燈
電腦電源開啟時,此燈號會亮起,而電
腦處於待命模式時,此燈號會閃爍。
「無線傳輸活動」指示燈會顯示您的電
腦是否連接到藍牙/無線網絡。
電池指示燈顯示電池正在充電或已充飽電。
●
如果您正在為電池充電,即使您的筆記本
電腦已經關機,電池指示燈仍會保持亮
起。
●
如果沒有電池活動、未連接適配器,或電
源為關閉時,電池指示燈將會熄滅。
●
電池如果遭受撞擊、震動、極端的溫度,
可能會導致永久性的損壞。
硬盤(HDD)存取指示燈顯示硬盤是否正
被存取,以及存取的速度。
E1425
系列筆記本電腦使用手冊
2.5 使用功能鍵
您的電腦擁有12個功能鍵,F1~F12。功能鍵的指令用途會隨應用軟
體而有所不同。請參考軟件的說明文件,以確定各個功能鍵的使用方
法。
● [FN]:
鍵可擴充筆記本電腦的功能,而且會固定與另一鍵同時使用。
● [FN+F1]:
腦回到操作模式。
● [FN+F2]:
● [FN+F3]:
● [FN+F4]:
● [FN+F5]:
● [FN+F6]:
● [FN+F7]:
● [FN+F8]:
● [FN+F9]:
● [FN+F10]:
● [FN+F11]:
● [FN+F12]:
使筆記本電腦進入暫停模式。按電源按鈕,則可讓行動電
關閉風扇。
關閉電腦的聲音。
讓您選擇是否送出畫面視訊。每一次按這兩個組合鍵,
就進入下一個選擇。選擇的先後順序為:僅內置顯示屏
幕、內置顯示屏幕及外接式顯示器,或僅外接式顯示器。
降低電腦音量。
提高電腦音量。
降低屏幕亮度。
提高屏幕亮度。
關閉觸控板。
用或停用無綫網絡聯機。單擊此按鍵組合可啓用無綫局
域網絡聯機。
關閉攝像頭。
啟用或停用3G網絡聯機。
簡體中文
11
Page 59
2.6
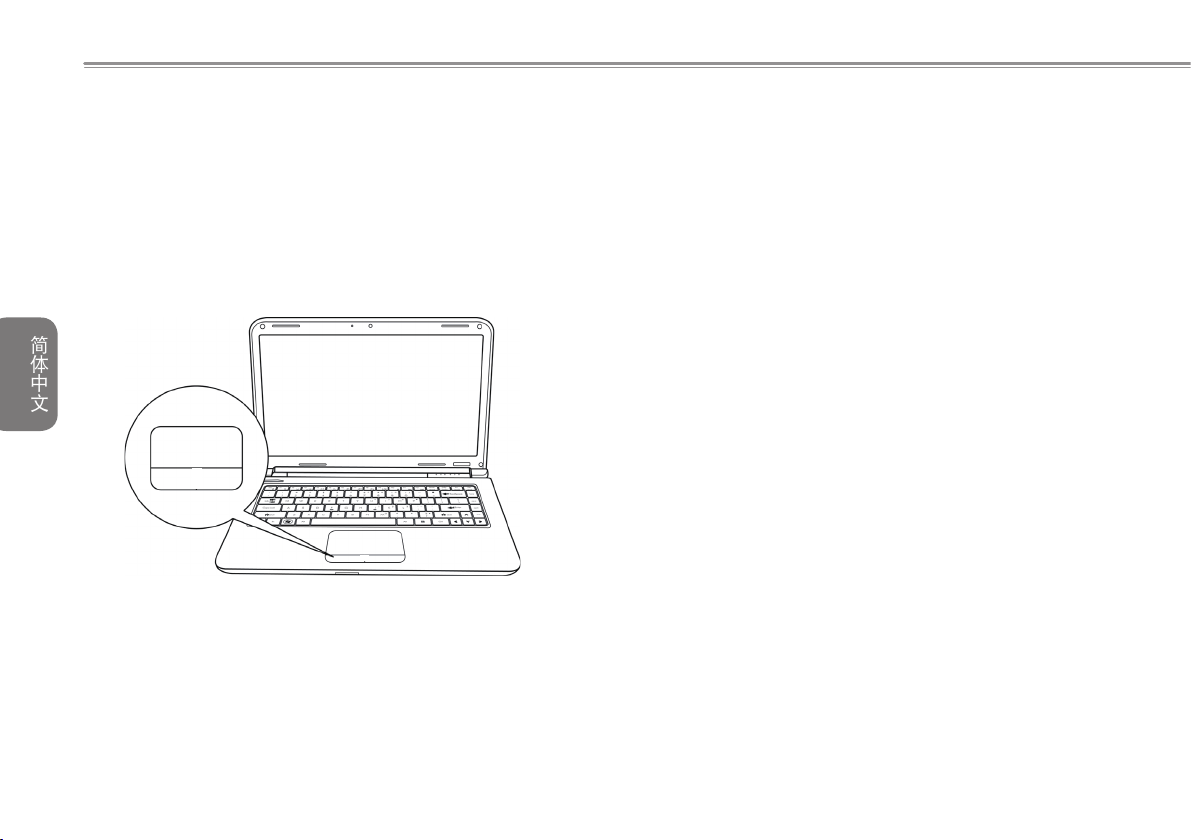
觸控板是與電腦整合在一起的指標裝置。觸控板用來控制指標,可讓
您選擇顯示屏幕上的項目。
觸控板包含一個光標控制介面、左鍵與右鍵。光標控制器的作用與鼠
標在屏幕上移動光標相同。只要用指尖輕壓,就可以在屏幕上移動光
標。左鍵與右鍵的作用與鼠標的按鍵相同。這些按鍵的實際功能視應
用軟體而定,可能會有所不同。
使用觸控板
簡體中文
12
點一下
點一下是按一下按鈕,然後放掉。左點一下是把光標移到選定的項
目,按一下左鍵,然後馬上放掉。右點一下可選擇功能,按一下右
鍵,然後馬上放掉。您也可以在觸控板上輕敲一下,效果與點一下相
同。
點二下
點兩下是連續快速的按二下左鍵,然後放掉。右鍵並沒有這個功能。
要點二下,先把光標移到選定的項目,按二下左鍵,然後馬上放掉。
您也可以在觸控板上輕敲二下,效果與點二下相同。
拖曳
拖曳就是移動光標時按住左鍵。把光標移到您想移動的項目,按住左
鍵,然後把該項目拖曳到新的位置,再放開左鍵。使用觸控板也可以
拖曳。首先,在要被移動的項目上點二下,點二下後,手指必須留在
觸控板上。接下來,手指在觸控板上移動,將該項目移動到新的位
置,然後放開手指。
Page 60
E1425
系列筆記本電腦使用手冊
第三章 GIGABYTE
SmartRecovery
簡體中文
13
Page 61
3.1 GIGABYTESmartRecovery
系統還原–修復您的
當作業系統使用上出現不穩定的情況,
區,其內容為作業系統的完整備份映像檔,可以用來救援系統將硬盤
還原到出廠預設值。
如果硬盤有更換過或刪除該隱藏磁區,還原選項將無法使用,需送維
修中心還原。
啟動系統還原
系統還原功能的部份是工廠在筆記本電腦出貨前預先安裝的。 該選
簡體中文
項可以啟動Windows故障還原工具,重新安裝作業系統為出廠預設
值。
下面將簡要介紹如何啟動還原工具,並開始還原系統。
筆記本電腦作業系統
E1425
的硬盤有一個隱藏磁
E1425
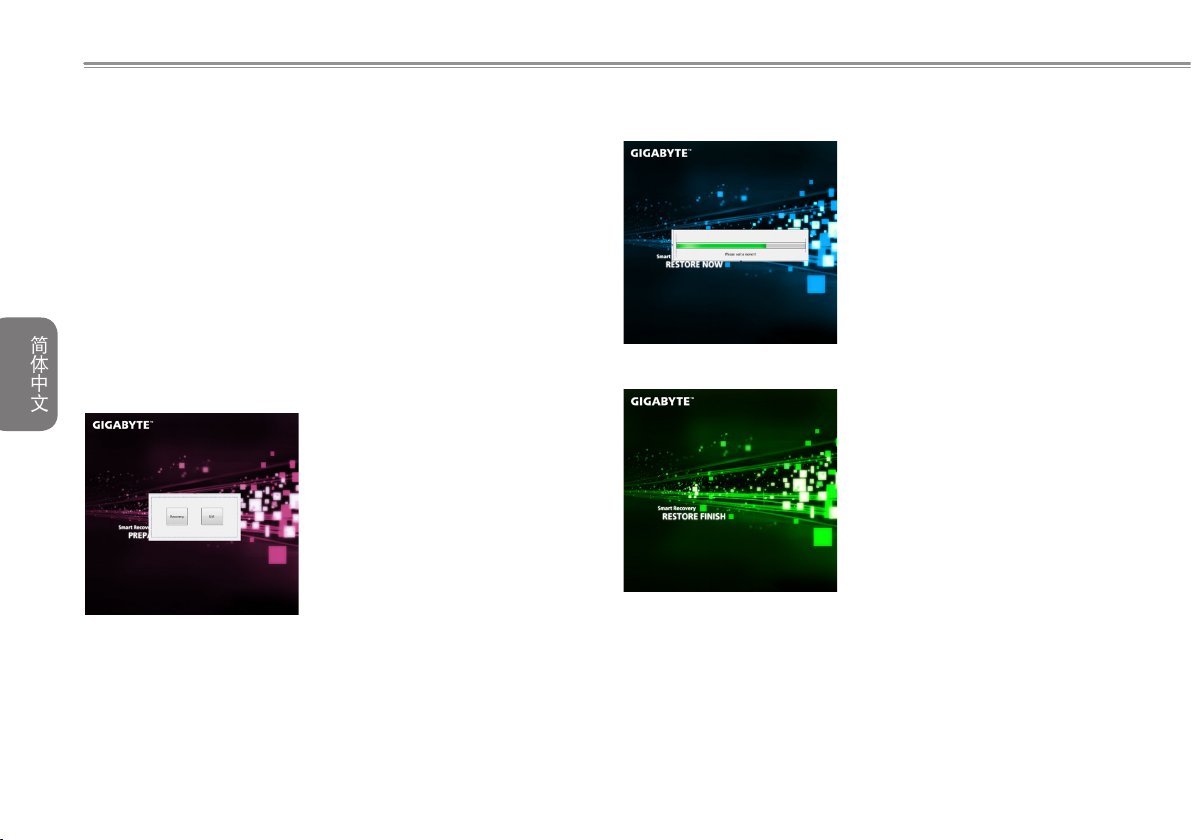
4.還原的視窗會打開 並開始進行系
統還原。
14
1.關機或重新啟動筆記本電腦。
2.啟動筆記本電腦後,按著F9按鍵
幾秒鐘以啟動還原工具。
3.還原視窗會打開, 工具列會有還
原選 項,如您確 定要系 統還 原,
點 選 還原 選項 , 就 開始 進 行修
復。
5.當完成系統還原時 即可重新啟動
筆記本電腦。
Page 62
第四章 疑難排解
E1425
系列筆記本電腦使用手冊
這章節提供您若機器需送修前您可自行先檢查的步驟。
您也可參考技嘉科技官方網站或是直接與您購買的經銷商連繫尋求專
業協助。
簡體中文
15
Page 63

4.1 疑難排解
找出問題
使用本產品時如果碰到了問題,在進一步送修前,先按下列程序檢查:
1.先將筆記本電腦關機。
2.確認交流電適配器已插入筆記本電腦,並且連接到交流電電源。
3.確認外接的裝置已插穩。或者拔掉這些裝置,以排除其造成問題的
可能原因。
4.筆記本電腦開機。關機與開機間隔至少10秒。
5.執行一遍開機程序。
6.如果仍然不能解決問題,請聯絡專門維修人員。
簡體中文
聯絡維修人員前,請先準備好以下數據,以便維修人員提供最迅速有
效服務:
●
產品名稱
●
產品配置號碼
●
產品序號
●
16
購買日期
●
問題發生時的狀況
請查看筆記本電腦底部的配置標籤,以確定筆記本電腦的配置及序號。
版權保護技術
本產品內置受到美國專利以及其他智慧財產權保護的版權保護技術,
必須經過Macrovision授權才可使用本版權保護技術,並且除非經過
Macrovision授權,否則不得在家庭之外的地點觀賞使用。嚴禁逆向工
程或分解。
4.2 技嘉服務資訊
更多的服務資訊,請連結到技嘉官方網站:
http://www.gigabyte.com.cn
Page 64
附錄
E1425
系列筆記本電腦使用手冊
簡體中文
17
Page 65
E1425系列規格表
項目
處理器
作業系統 內置正版
顯示屏幕
內存
簡體中文
18
系統晶片
顯示晶片
硬盤
光驅
擴充接口
音效
通訊
攝像頭
安全裝置
電池
尺寸
重量
產品 規 格
E1425A E1425M
Intel® Core™ i7/ i5/ i3 Processor Intel® Core™ i7/ i5/ i3 Processor
Microsoft® Windows® 7
14吋高解析度
2GB/4GB DDRIII 1333MHz(Max 4GB*2) 2GB/4GB DDRIII 1333MHz(Max 4GB*2)
Intel® HM55
ATI Mobility HD 5470 Intel® HD Graphics with dynamic frequency
320/500GB 2.5" 9.5mm SATA HDD 5400rpm 320/500GB 2.5" 9.5mm SATA HDD 5400rpm
12.7mm Super Multi DVD RW 12.7mm Super Multi DVD RW
USB (2.0)*3, HDMI, D-sub, RJ45, RJ11
機插孔,四合一讀卡機(
Card slot
1.5
瓦揚聲器*2,內置式麥克風
10/100/1000
內置藍牙
130
萬畫素網絡攝像頭
硬盤密碼防護,
4-cell
充電式鋰電池
342 (W) x 235 (D) x 32.4 (H) mm 342 (W) x 235 (D) x 32.4 (H) mm
2.34kg(with battery)
約
1366x768 LED
高速晶片組
SD/MMC/MS/MS Pro), SIM
乙太網絡介面,
V2.1+ EDR (選配)
Kensington
2200 mAh 4-cell
作業系統 內置正版
背光液晶屏幕 14吋高解析度
Intel® HM55
,麥克風、耳
802.11b/g/n
防盜鎖孔 硬盤密碼防護,
無線網絡,
USB(2.0)*3, HDMI, D-sub, RJ45, RJ11
合一讀卡機
1.5
10/100/1000
內置藍牙
130
約
Microsoft® Windows® 7
(SD/MMC/MS/MS Pro), SIM Card slot
瓦揚聲器*2,內置式麥克風
V2.1+ EDR (選配)
萬畫素網絡攝像頭
充電式鋰電池
2.34kg(with battery)
1366x768 LED
高速晶片組
乙太網絡介面,
Kensington
2200mAh
作業系統
背光液晶屏幕
802.11b/g/n
防盜鎖孔
,麥克風、耳機插孔,四
無線網絡,
Page 66
各國電壓列表
E1425
系列筆記本電腦使用手冊
阿富汗
地區
阿爾巴尼亞
阿爾及利亞
美屬薩摩亞
安道爾
安哥拉
安圭拉
安提瓜
阿根廷
亞美尼亞
阿魯巴
澳大利亞
奧地利
阿塞拜疆
亞速爾群島
巴哈馬
巴林
巴利阿里群島
孟加拉國
巴巴多斯
白俄羅斯
比利時
伯利茲
貝寧
百慕達
不丹
玻利維亞
電壓
功率
240V 50 Hz
220V 50 Hz
230V 50 Hz
120V 60 Hz
230V 50 Hz
220V 50 Hz
110V 60 Hz
230V 60 Hz
220V 50 Hz
230V 50 Hz
127V 60 Hz
230V 50 Hz
230V 50 Hz
220V 50 Hz
220V 50 Hz
120V 60 Hz
230V 50 Hz
220V 50 Hz
220V 50 Hz
115V 50 Hz
220V 50 Hz
230V 50 Hz
110V / 220V 60 Hz
220V 50 Hz
120V 60 Hz
230V 50 Hz
220V 50 Hz
博內爾
波黑
博茨瓦納
巴西
文萊
保加利亞
布基納法索
布隆迪
柬埔寨
喀麥隆
加拿大
加那利群島
佛得角
開曼群島
中非共和國
查德
海峽群島
智利
中國大陸
哥倫比亞
科摩羅
剛果-布拉薩
剛果-金夏沙
庫克群島
哥斯達黎加
科特迪瓦共和國
克羅埃西亞共和國
地區
電壓
功率
127V 50 Hz
220V 50 Hz
231 V 50 Hz
127V / 220 V 60 Hz
240V 50 Hz
230V 50 Hz
220V 50 Hz
220V 50 Hz
簡體中文
230V 50 Hz
220V 50 Hz
120V 60 Hz
220V 50 Hz
220V 50 Hz
120V 60 Hz
19
220V 50 Hz
220V 50 Hz
230V 50 Hz
220V 50 Hz
220V 50 Hz
120V 60 Hz
220V 50 Hz
230V 50 Hz
220V 50 Hz
240V 50 Hz
120V 60 Hz
230V 50 Hz
230V 50 Hz
Page 67
20
古巴
塞普勒斯
捷克共和國
丹麥
吉布地
多米尼克
多明尼加共和國
簡體中文
東帝汶
厄瓜多爾
埃及
薩爾瓦多
赤道幾內亞
厄立特里亞
愛沙尼亞
衣索比亞
法羅群島
福克蘭群島
斐濟
芬蘭
法國
法屬圭亞那
加薩走廊
加彭
甘比亞
喬治亞
德國
迦納
地區
230V(formerly220V) 50 Hz
230V(formerly220V) 50 Hz
電壓
功率
110V 60 Hz
240V 50 Hz
230V 50 Hz
230V 50 Hz
220V 50 Hz
230V 50 Hz
110V 60 Hz
220V 50 Hz
120V 60 Hz
220V 50 Hz
115V 60 Hz
220V 50 Hz
230V 50 Hz
230V 50 Hz
220V 50 Hz
220V 50 Hz
240V 50 Hz
240V 50 Hz
230V 50 Hz
220V 50 Hz
230V 50 Hz
220V 50 Hz
230V 50 Hz
220V 50 Hz
230V 50 Hz
直布羅陀
希臘
格陵蘭
格瑞納達
瓜德羅普
關島
瓜地馬拉
幾內亞
幾內亞-比索
蓋亞那
海地
宏都拉斯
香港
匈牙利
冰島
印度
印尼
伊朗
伊拉克
愛爾蘭
英國屬地曼島
以色列
義大利
牙買加
日本
約旦
哈薩克
地區
230V(formerly220V) 50 Hz
230V(formerly220V) 50 Hz
230V(formerly220V) 50 Hz
230V(formerly220V) 50 Hz
110V and 220V 50 Hz
電壓
功率
240V 50 Hz
220V 50 Hz
230V 50 Hz
230V 50 Hz
110V 60 Hz
120V 60 Hz
220V 50 Hz
220V 50 Hz
240V 60 Hz
110V 60 Hz
110V 60 Hz
220V 50 Hz
230V 50 Hz
220V 50 Hz
127V / 230V 50 Hz
220V 50 Hz
230V 50 Hz
240V 50 Hz
230V 50 Hz
100 V 50 Hz / 60Hz
230V 50 Hz
220V 50 Hz
Page 68
E1425
系列筆記本電腦使用手冊
肯亞
地區
吉里巴斯共和國
科威特
吉爾吉斯斯坦
寮國
拉脫維亞
黎巴嫩
賴索托
賴比瑞亞
利比亞
立陶宛
列支敦斯登
盧森堡
澳門
馬其頓
馬達加斯加
馬德拉
馬拉威
馬來西亞
馬爾地夫
馬利
馬爾他
馬提尼克
茅利塔尼亞
模里西斯
墨西哥
密克羅尼西亞
230V(formerly220V) 50 Hz
230V(formerly220V) 50 Hz
電壓
功率
240V 50 Hz
240V 50 Hz
240V 50 Hz
220V 50 Hz
230V 50 Hz
220V 50 Hz
240V 50 Hz
220V 50 Hz
120V / 240V 50 Hz
127V 50 Hz
230V 50 Hz
220V 50 Hz
220V 50 Hz
127V / 220 V 50 Hz
220V 50 Hz
230V 50 Hz
240V 50 Hz
230V 50 Hz
220V 50 Hz
230V 50 Hz
220V 50 Hz
220V 50 Hz
230V 50 Hz
127V 60 Hz
120V 60 Hz
摩爾多瓦
摩納哥
蒙古
蒙特內哥羅共和國
蒙特塞拉特
摩洛哥
莫三比克
緬甸
納米比亞
諾魯
沙烏地阿拉伯
塞內加爾
塞爾維亞
塞席爾群島
獅子山
新加坡
斯洛伐克
斯洛維尼亞共和國
索馬利亞
南非
南韓
西班牙
斯里蘭卡
蘇丹
蘇利南
史瓦濟蘭
瑞典
地區
230V(formerly220V) 50 Hz
電壓
功率
220-230V 50 Hz
127V / 220 V 50 Hz
230 V 50 Hz
220V 50 Hz
230V 60 Hz
127V / 220 V 50 Hz
220V 50 Hz
230V 50 Hz
220V 50 Hz
240V 50 Hz
127V / 220V 60 Hz
230V 50 Hz
220V 50 Hz
240V 50 Hz
230V 50 Hz
230V 50 Hz
230V 50 Hz
230V 50 Hz
220V 50 Hz
220V 50 Hz
220V 60 Hz
230V 50 Hz
230V 50 Hz
127V 60 Hz
230V 50 Hz
230V 50 Hz
簡體中文
21
Page 69
22
瑞士
敘利亞
大溪地島
台灣
塔吉克
坦尚尼亞
泰國
多哥
簡體中文
多加
千里達托貝哥
突尼西亞
土耳其
土庫曼
烏干達
烏克蘭
阿拉伯聯合大公國
英國
美國
烏拉圭
烏茲別克斯坦
萬那杜
委內瑞拉
越南
維爾京群島
西薩摩亞
葉門
尚比亞
辛巴威
地區
230V(formerly240V) 50 Hz
230V(formerly220V) 50 Hz
電壓
功率
230V 50 Hz
220V 50 Hz
110V / 220V 60 Hz / 50 Hz
110V 60 Hz
220V 50 Hz
230V 50 Hz
220V 50 Hz
220V 50 Hz
240V 50 Hz
115V 60 Hz
230V 50 Hz
230V 50 Hz
220V 50 Hz
240V 50 Hz
220V 50 Hz
220V 50 Hz
120V 60 Hz
220V 50 Hz
230V 50 Hz
120V 60 Hz
220V 50 Hz
110V 60 Hz
230V 50 Hz
230V 50 Hz
230V 50 Hz
220V 50 Hz
Page 70
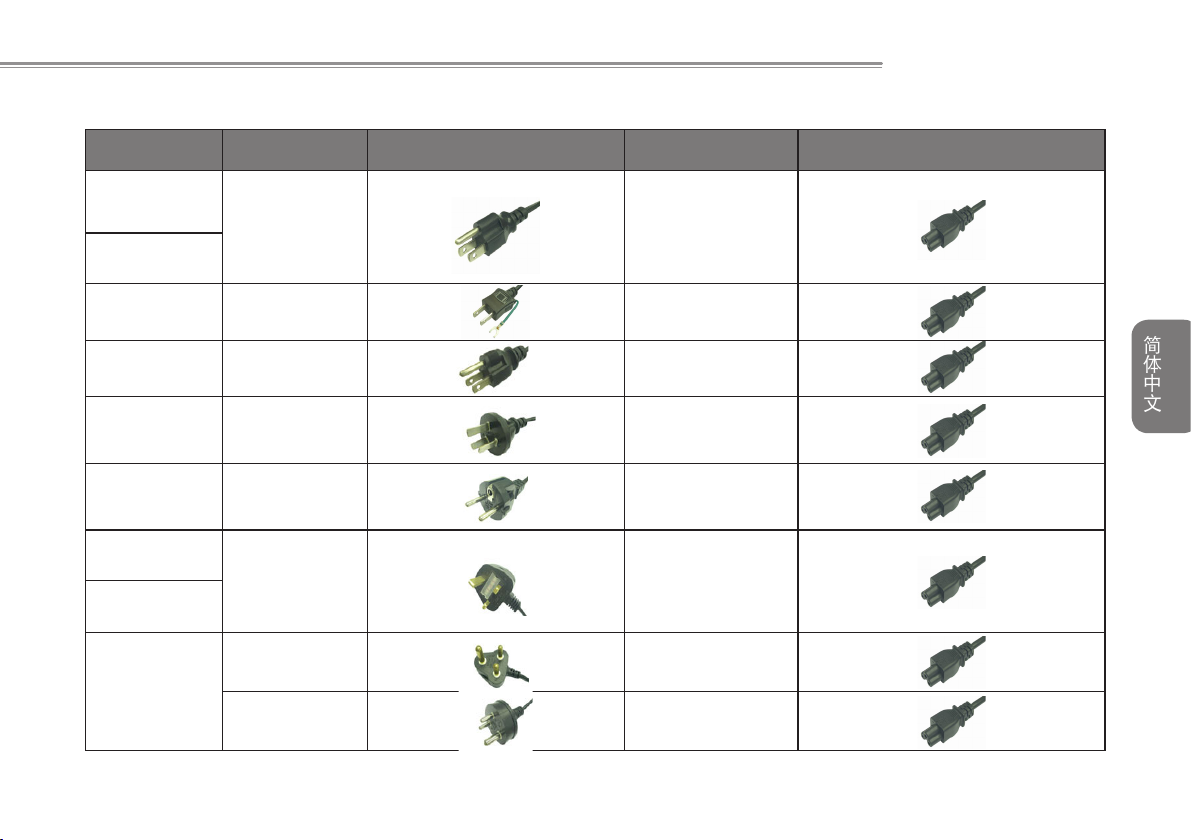
E1425
系列筆記本電腦使用手冊
各國轉接頭
Country PlugType PlugPicture ConnectorType ConnectorPicture
USA
LP-30B LS15
Canada
Japan LP-54 LS15
Taiwan LP-53 LS15
China PC-323 LS15
Korea LP-E04 LS15
England
LP-60L LS15
Singapore
PE-364 LS15
South Africa
PE-361 LS15
簡體中文
23
Page 71
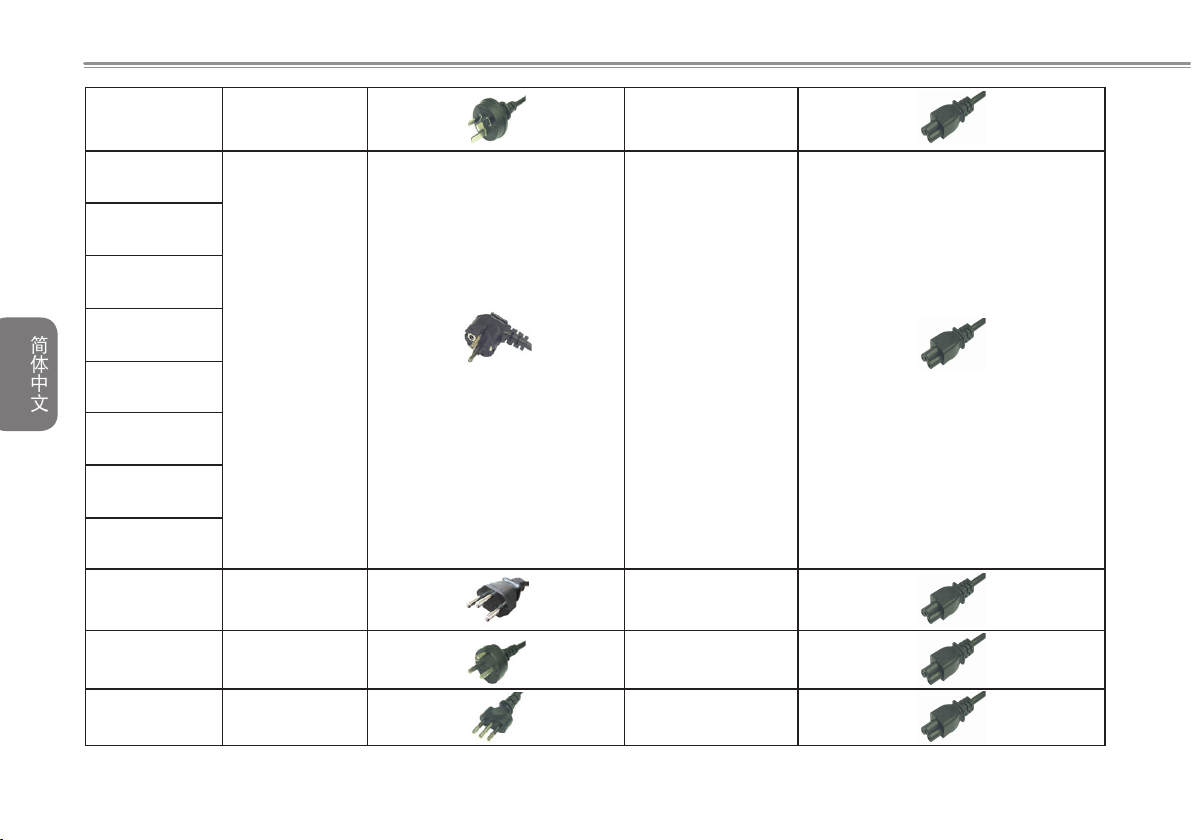
Australia LP-23A LS15
Germany
France
Sweden
24
簡體中文
Finland
Norway
Belgium
Netherlands
Austria
Switzerland LP-37 LS15
Denmark LP-38 LS15
Italy PE-336 LS15
LP-33
LS15
 Loading...