

Page 1
1
INSTRUCTIONS PERTAINING TO A RISK OF FIRE,
ELECTRIC SHOCK, OR INJURY TO PERSONS.
Precaution
WARNING :
TO REDUCE THE RISK OF FIRE OR ELECTRIC SHOCK, DO NOT
EXPOSE THIS APPLIANCE TO RAIN OR MOISTURE.
CAUTION
RISK OF ELECTRIC
SHOCK
CAUTION TO REDUCE THE RISK OF
ELECTRIC SHOCK
DO NOT REMOVE COVER (OR BACK)
NO USER SERVICEABLE PARTS INSIDE
REFER SERVICING TO QUALIFIED SERVICE
PERSONNEL
This Symbol is intended to alert the user to the presence of
uninsulated dangerous voltage within the product’s enclosure
that may be of sufficient magnitude to constitute a risk of fire
or electric shock.
This Symbol is intended to alert the user to the presence of
important in the literature accompanying this appliance.
All information should be read carefully to avoid misuse of
product.
WARNING :
DO NOT OPEN THE CABINET.
DANGEROUS HIGH VOLTAGE IS PRESENT, SERVICING SHOULD ONLY
BE PERFORMED BY QUALIFIED PERSONNEL.
CAUTION : TO PREVENT ELECTRIC SHOCK. MATCH WIDE BLADE OF PLUG
TO WIDE SLOT, FULLY INSERT.
ATTENTION :
POUR ÉVITER LES CHOC ÉLECTRIQUES, INTRODUIRE LA LAME LA PLUS
LARGE DE LA FICHE DANS LA BORNE CORRESPONDANTE DE LA PRISE
ET POUSSER JUSQU AU FOND.
Page 2

2
Precaution
IMPORTANT SAFETY INSTRUCTIONS
When using electric products, basic precaution should always be followed, including the following:
1. Read all the instructions before using the product.
2. To reduce the risk of injury, close supervision in necessary when a product is used near children.
3. Do not use this product near water - for example, near a bathtub, washbowl, kitchen sink, in a
wet basement, or near a swimming by the manufacturer.
4. This product should be used only with a cart or stand that is recommended by the manufacturer.
5. This product, either alone or in combination with an amplifier and headphones or speakers,
may be capable of producing hearing loss. Do not operate for a long period of time at a high
volume level or at a level that is uncomfortable. If you experience any hearing loss or ringing
in the ears, you should consult an audiologist.
6. The product should be located so that its location or position does not interfere with its proper
ventilation.
7. The product should be located away from heat sources such as radiators. heat registers, or
other products that produce heat.
8. The product should be connected to a power supply only of the type described in the operating
instructions or as marked on the product.
9. This product may be equipped with a polarized line plug (one blade wider than the other). This
is a safety feature. If you are unable to insert the plug into the outlet, contact an electrician to
replace your obsolete outlet. Do not defeat the safety purpose of the plug.
10. The power-supply cord of the product should be unplugged from the outlet when left unused
for a long period of time.
11. Care should be taken so that objects do not fall and liquids are not spilled into the enclosure
through openings.
12. The product should be serviced by qualified service personnel when:
A. The power-supply cord or the plug has been damaged; or
B. Objects have fallen, or liquid has been spilled into the product; or
C. The product has been exposed to rain; or
D. The product does not appear to operate normally or exhibits a marked change in performance; or
E. The product has been dropped, or the enclosure damaged.
Page 3

3
Precaution
13. Do not attempt to service the product beyond that described in the user maintenance instruction.
All other servicing should be referred to qualified service personnel.
14. To clean the exterior surfaces, wipe lightly with a clean, dry cloth. Never use solvents such
as benzine or paint thinners.
15. The product should be located away from a television, radio, or heavy equipment that can
generate electromagnetic fields.
16. The product should be located a flat, stable surface that can free of vibration.
17. Be careful to protect the product from knocks, particularly when carrying it.
18. During thunderstorms, turn the product off and disconnect the plug from the power outlet.
INFORMATION TO THE USER
This equipment has been tested and found to comply with the limits for a class B digital device,
pursuant to part 15 of the FCC Rules. These limits are designed to provide reasonable protection
against harmful interference in a residential installation. This equipment generates, uses and can
radiate radio frequency energy and, if not installed and used in accordance with the instructions,
may cause harmful interference will not occur in a particular installation. If this equipment does
cause harmful interference to radio or television reception, which can be determined by turning
the equipment off and on, the user is encouraged to try to correct the interference by one more of
the following measures :
- Reorient or relocate the receiving antenna.
- Increase the separation between the equipment and receiver.
- Connect the equipment into an outlet on a circuit different from that to which the receiver is connected.
- Consult the dealer or an experienced radio/TV technician for help.
W ARNING
Changes or modifications not expressly approved by the manufacturer could void the user’s
authority to operate the equipment.
Page 4

Welcome
4
Welcome...
Thank you and congratulations on your purchase of the DIGITAL PIANO.
Your new DIGITAL PIANO is a state-of-the-art musical instrument which
incorporates the latest electronics technology to make its operation as easy
as possible.
Your versatile DIGITAL PIANO is ideal for beginners or experienced
musicians. In order to enjoy the features and functions of this unit to their
fullest, be sure to carefully read this manual and follow the instructions
contained herein.
Page 5

5
Contents
Contents
Precaution 1
Welcome/Contents
4
Care of Your Digital Piano
6
Unpacking/Assembling Your Piano(Upright)
7
Unpacking/Assembling Your Piano (Grand)
10
Control Locations (External Appearance, Front Panel, Rear Panel, Pedals)
13~25
Connecting Headphones/Power Switch for the Virtual Pianist
26
Quick Start with Remote control
27
Playing a Demo
28
Performance Screen
29
Voice, Percussion & GM Voice
30
Layer, Split,EQ, Reverb, Chorus
32~36
Rhythm
37
Auto Accompaniment
40
Metronome
44
Registration
45
Recording
46
Setup (Octave Shift, Split Point, Voice Volume, Initializing Registration Memory,
Virtual Pianist Voice, Local Control)
48 ~ 52
Functions (Accompaniment Volume, Brilliance, Touch, Transpose, Tuning)
53 ~ 55
Play AMD/MIDI files -Disk
56
Folder, Play/Save Recorded Song -Disk
58~60
Load/Save Registration File -Disk
61~62
Play MIDI files with the Virtual Pianist
63
Play Recorded Song with the Virtual Pianist, Remote control
64
General MIDI Sound Lists
64
Drums/SFX Sound Lists
67
MIDI
69
MIDI Implementation Chart
70
Specifications
72
Page 6
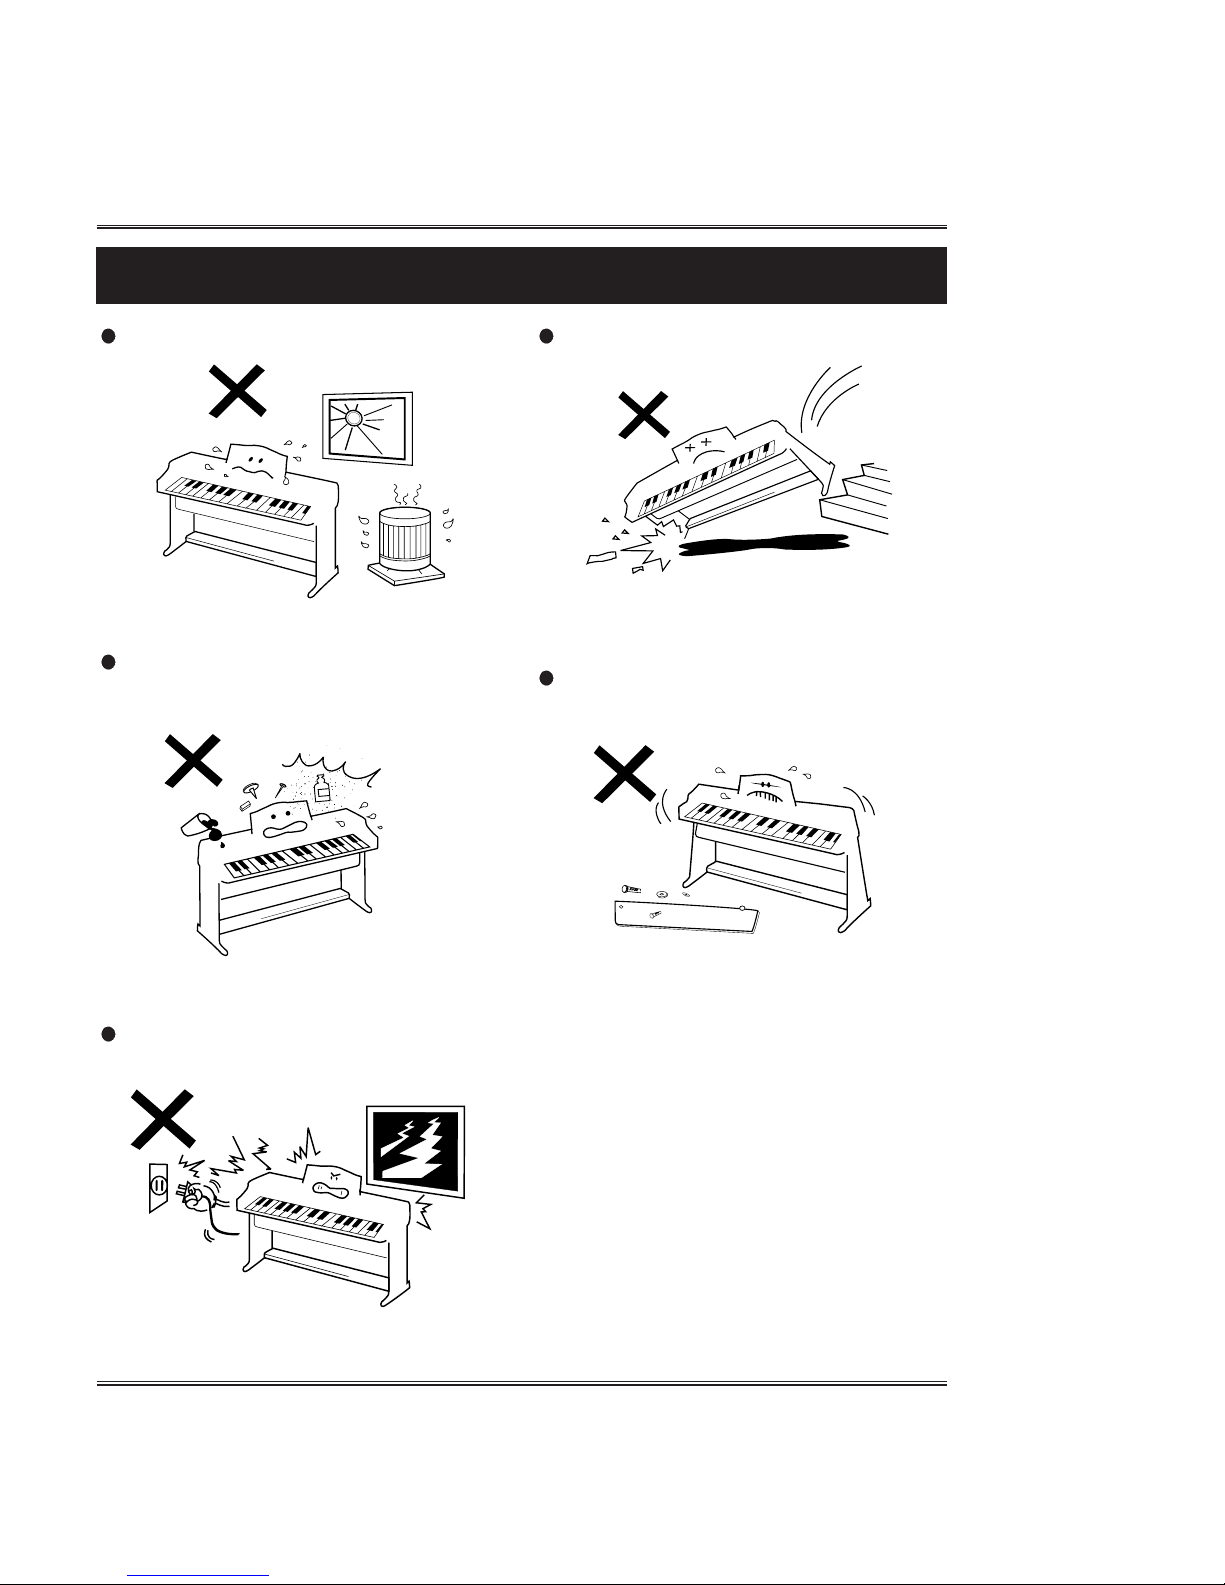
Avoid heat, humidity or direct sunlight.
Keep the unit free from liquids, dust,
etc...
During thunderstorms, turn the product off
and disconnect the plug from the power.
Take care not to drop the unit and avoid
strong impact.
Never attempt to modify any parts of the
unit.
6
Care of your Digital Piano
Care of your Digital Piano
Page 7
7
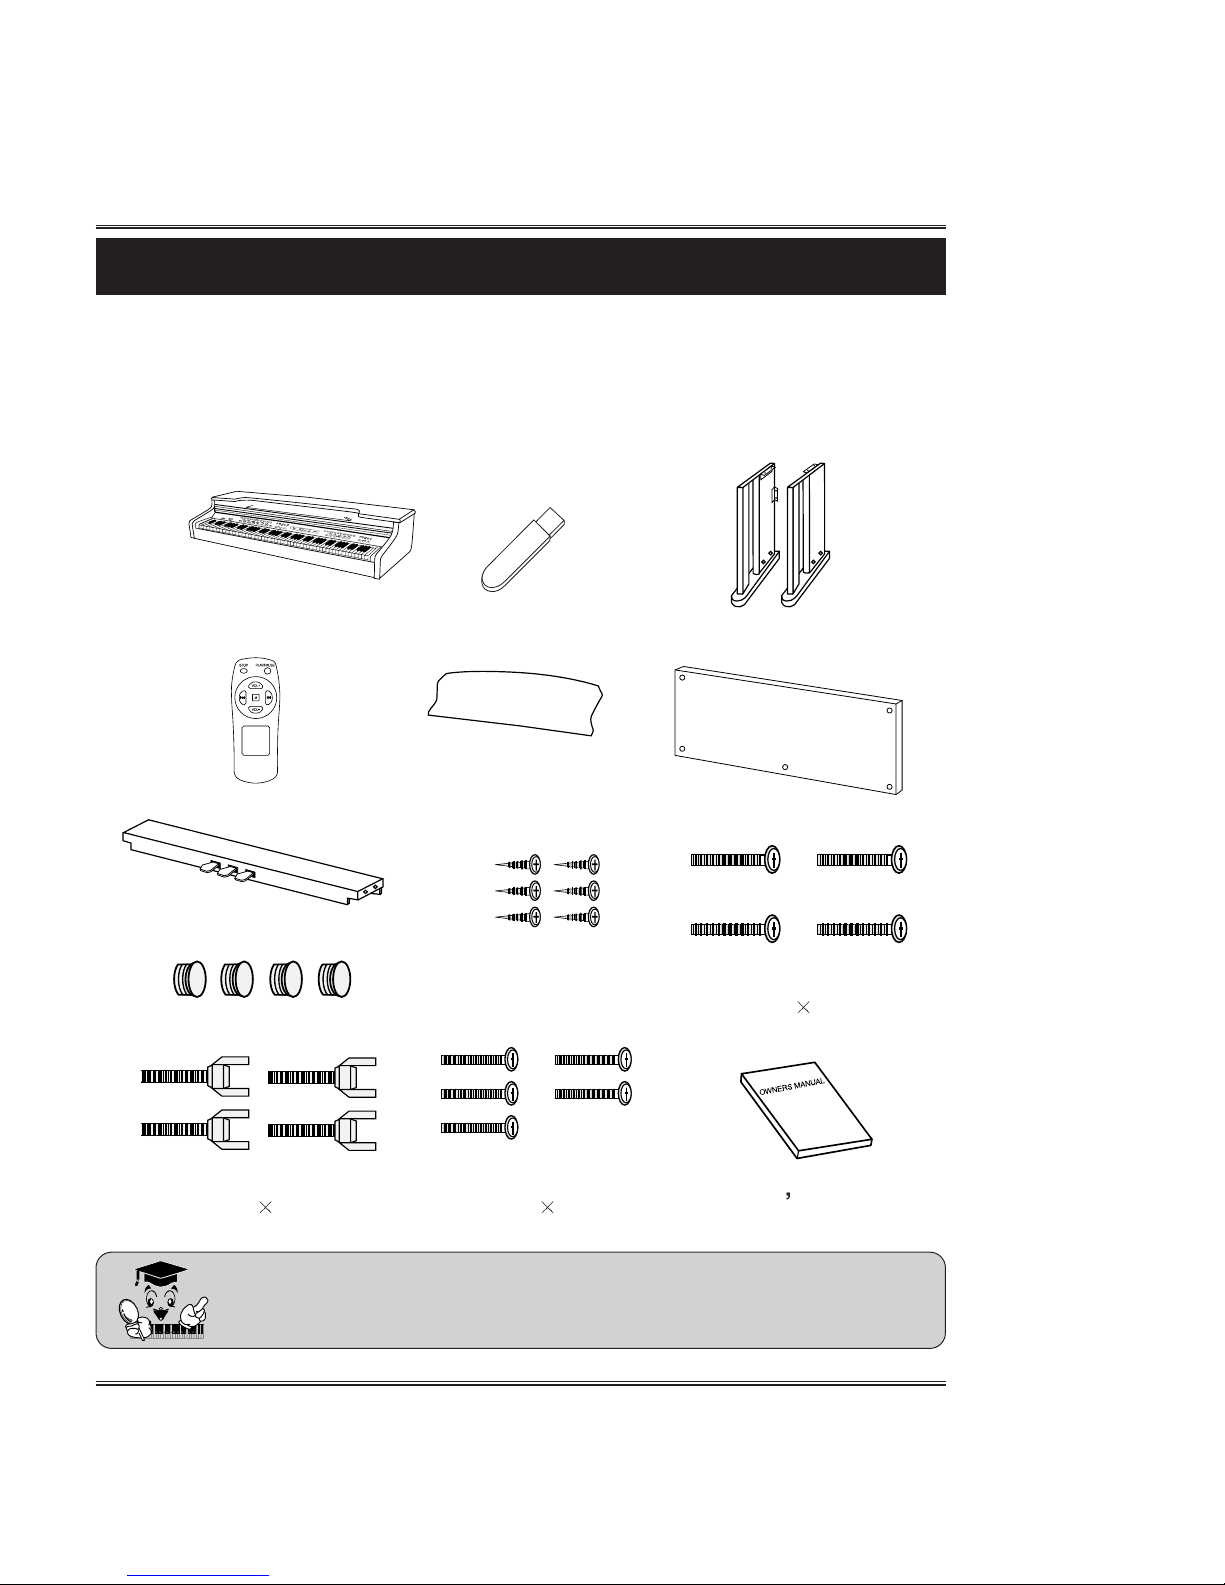
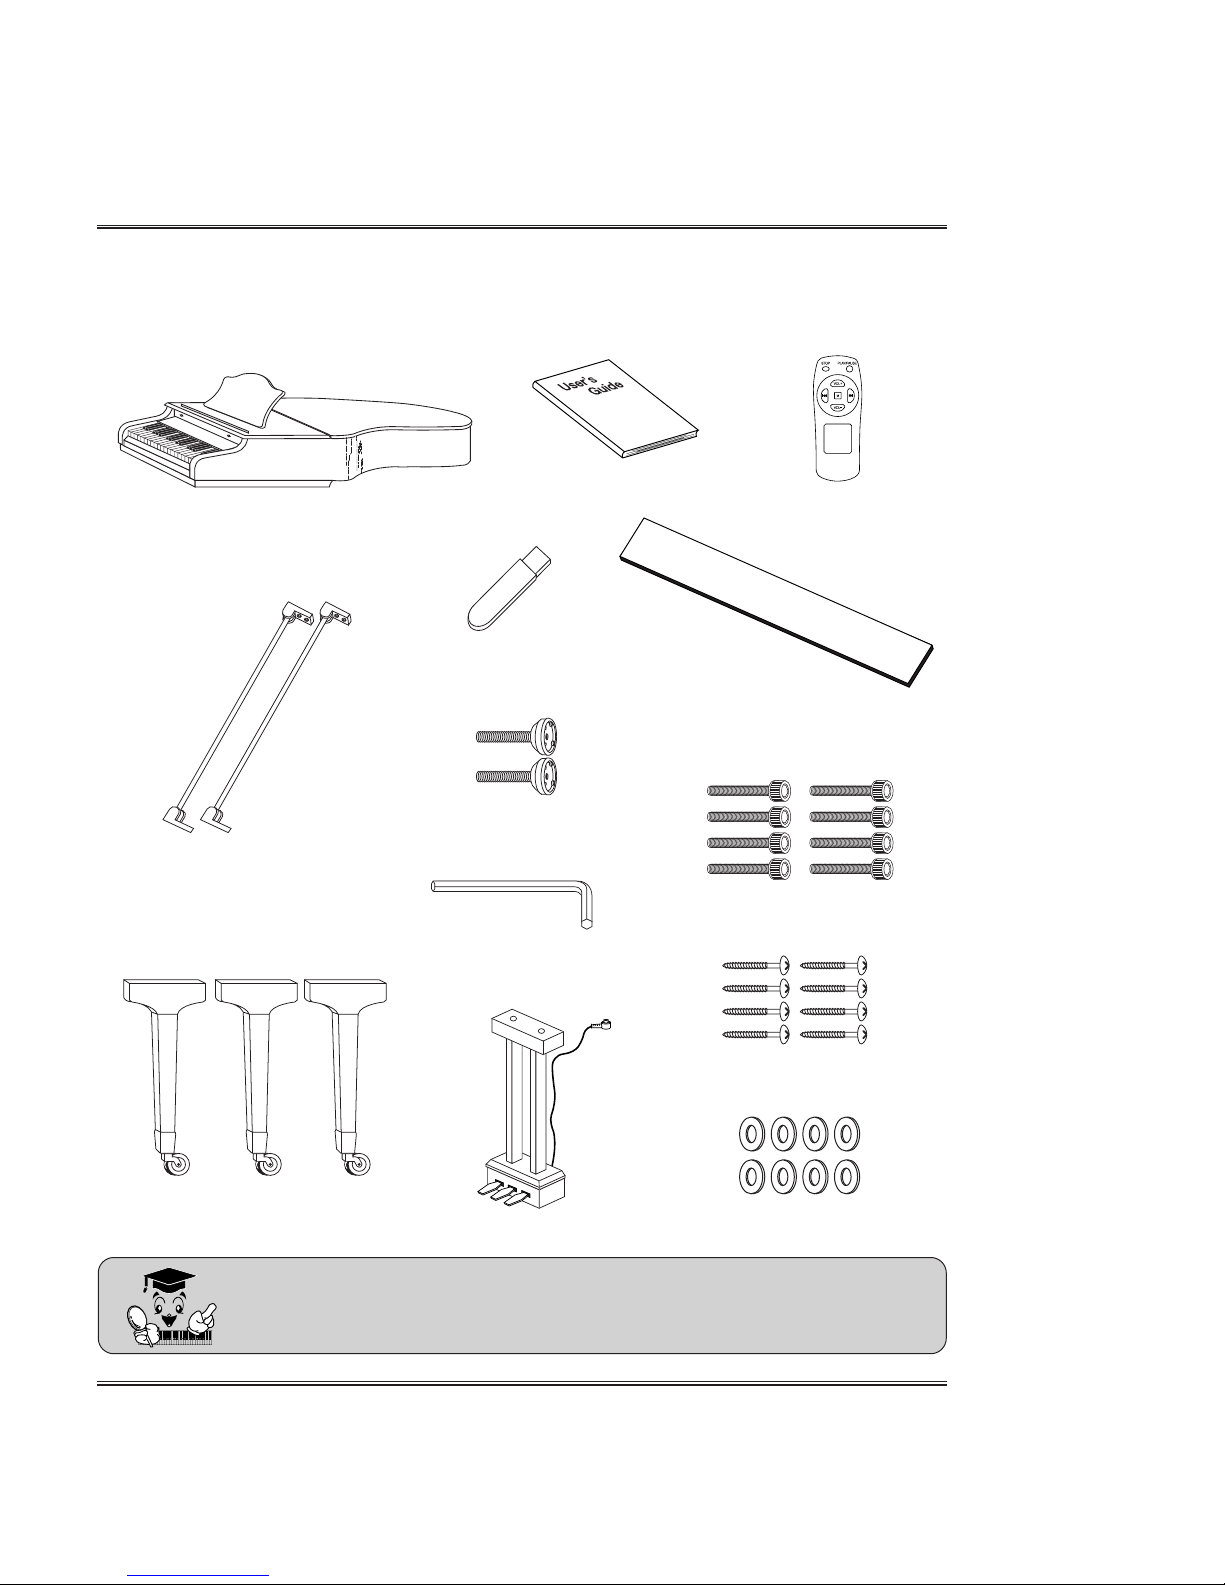
Unpacking (Upright type only)
Carefully remove the Digital Piano and its accessories from the packing box. The
Digital Piano set consists of the following items.
Main Unit
Right, Left Legs (a, b)
Pedal Box (c)
Rear Plate (d)
Four Bolts Caps for Legs (e)
Four Bolts for Main Unit
(g) (M6
15)mm
Four Bolts for Pedal Box
(f) (6
44)mm
Owner
s Manual
Five Bolts for Rear Plate
(h) (4
22)mm
Inspect each item carefully to make sure that it is in good condition. If you
find any item missing or damaged, contact the place of purchase
immediately for replacement.
Six Screws
for Music Stand (J)
Music Stand (I)
Unpacking
USB Memory
Remote Control
Page 8
8
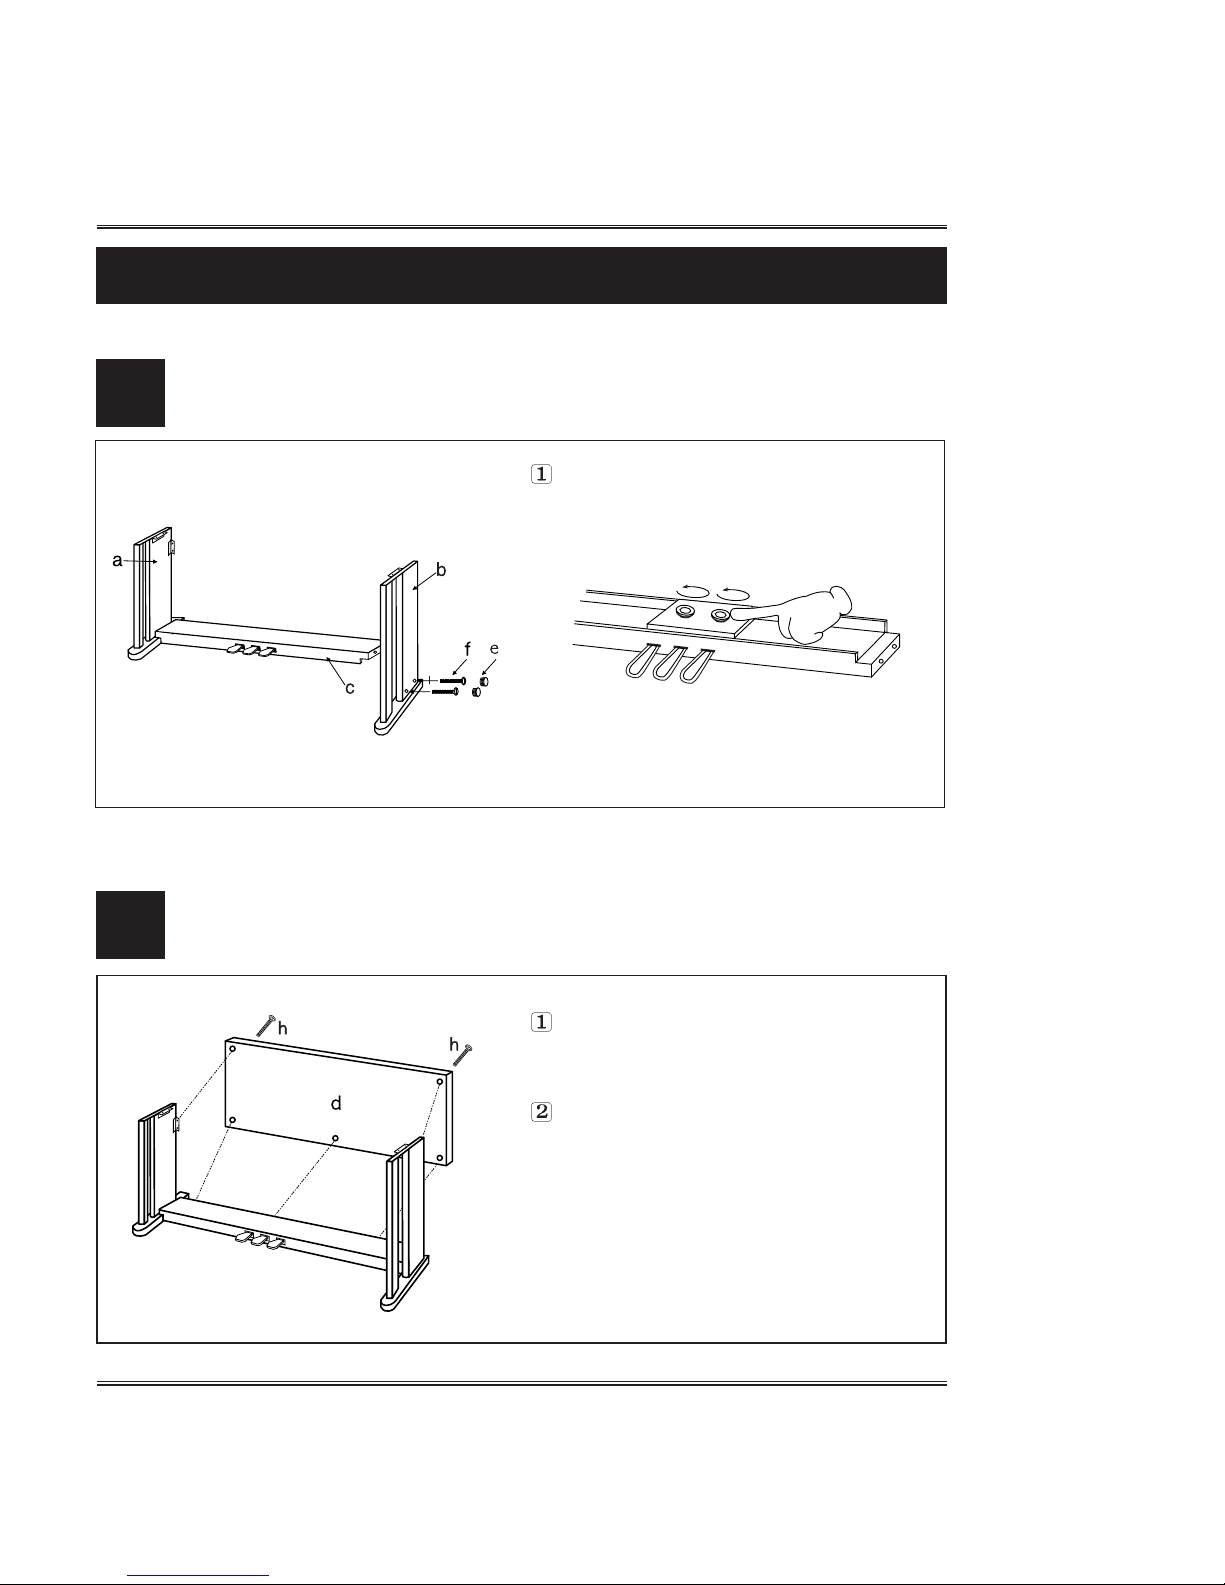
Assembling your Piano (Upright T ype only)
Assembling your Piano
Attaching the both legs and pedal box assembly
Assembling the stand
1
Securely combine both legs(a,b) pedal box
(c) assembly using four bolts(f) and four
caps(e) for pedal box.
- For pedal stability, rotate the adjusters on
the bottom of the pedal assembly unit they
comes in firm, contact with the floor surface.
2
Attach the rear plate(d) to the legs and
pedal box using five bolts for rear plate(h)
After fixing the crossing plate to the
legs, set the stand upright and make
sure the stand is parallel.
Page 9
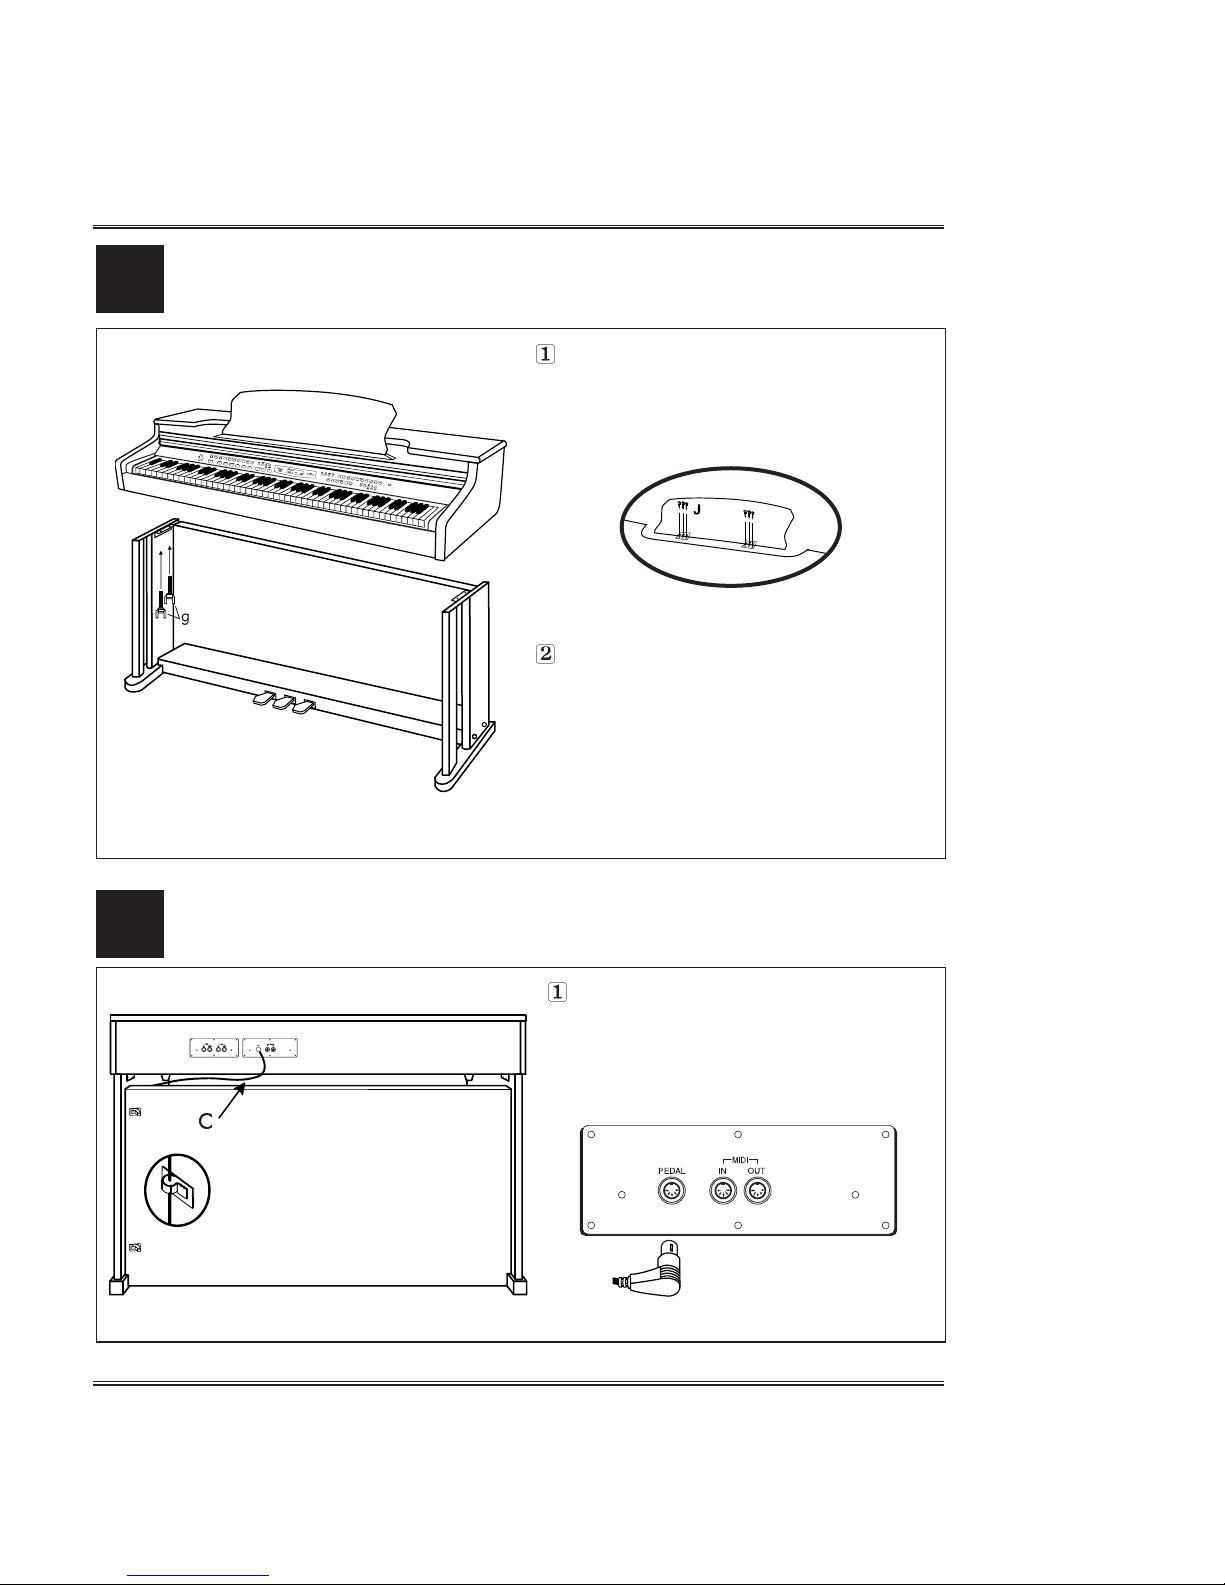
Attaching the main unit and stand
Music Stand
Attach the Music Stand(I) on the top
panel using six screws(J).
Set the stand upright and gently lower
the main unit on the stand, then tighten
the main unit with four bolts (g) for main
unit as shown in illustration.
9
3
Assembling your Piano(Upright T ype only)
Connecting the pedal cord.
Plug pedal cord(c) which is protruding
from the top of the pedal assembly into
the corresponding port in the back of
the main unit.
4
Page 10
10
Unpacking (Grand T ype only)
Carefully remove the Digital Piano and its accessories from the packing box. The
Digital Piano set consists of the following items.
Inspect each item carefully to make sure that it is in good condition. If
you find any item missing or damaged, contact the place of purchase
immediately for replacement.
Main Unit
Manual
Keyboard Protection Cover
(Option)
Legs(3EA)
USB Memory
Pedal Nuts (2EA)
Bolt M10 X 60 (8EA)
Pedal Ass’y
Pedal Stand Brace(2EA)
Wrench (1EA)
Screw 3.5 X 25 (8EA)
Washer 20 X1T (8EA)
Remote Control
Page 11
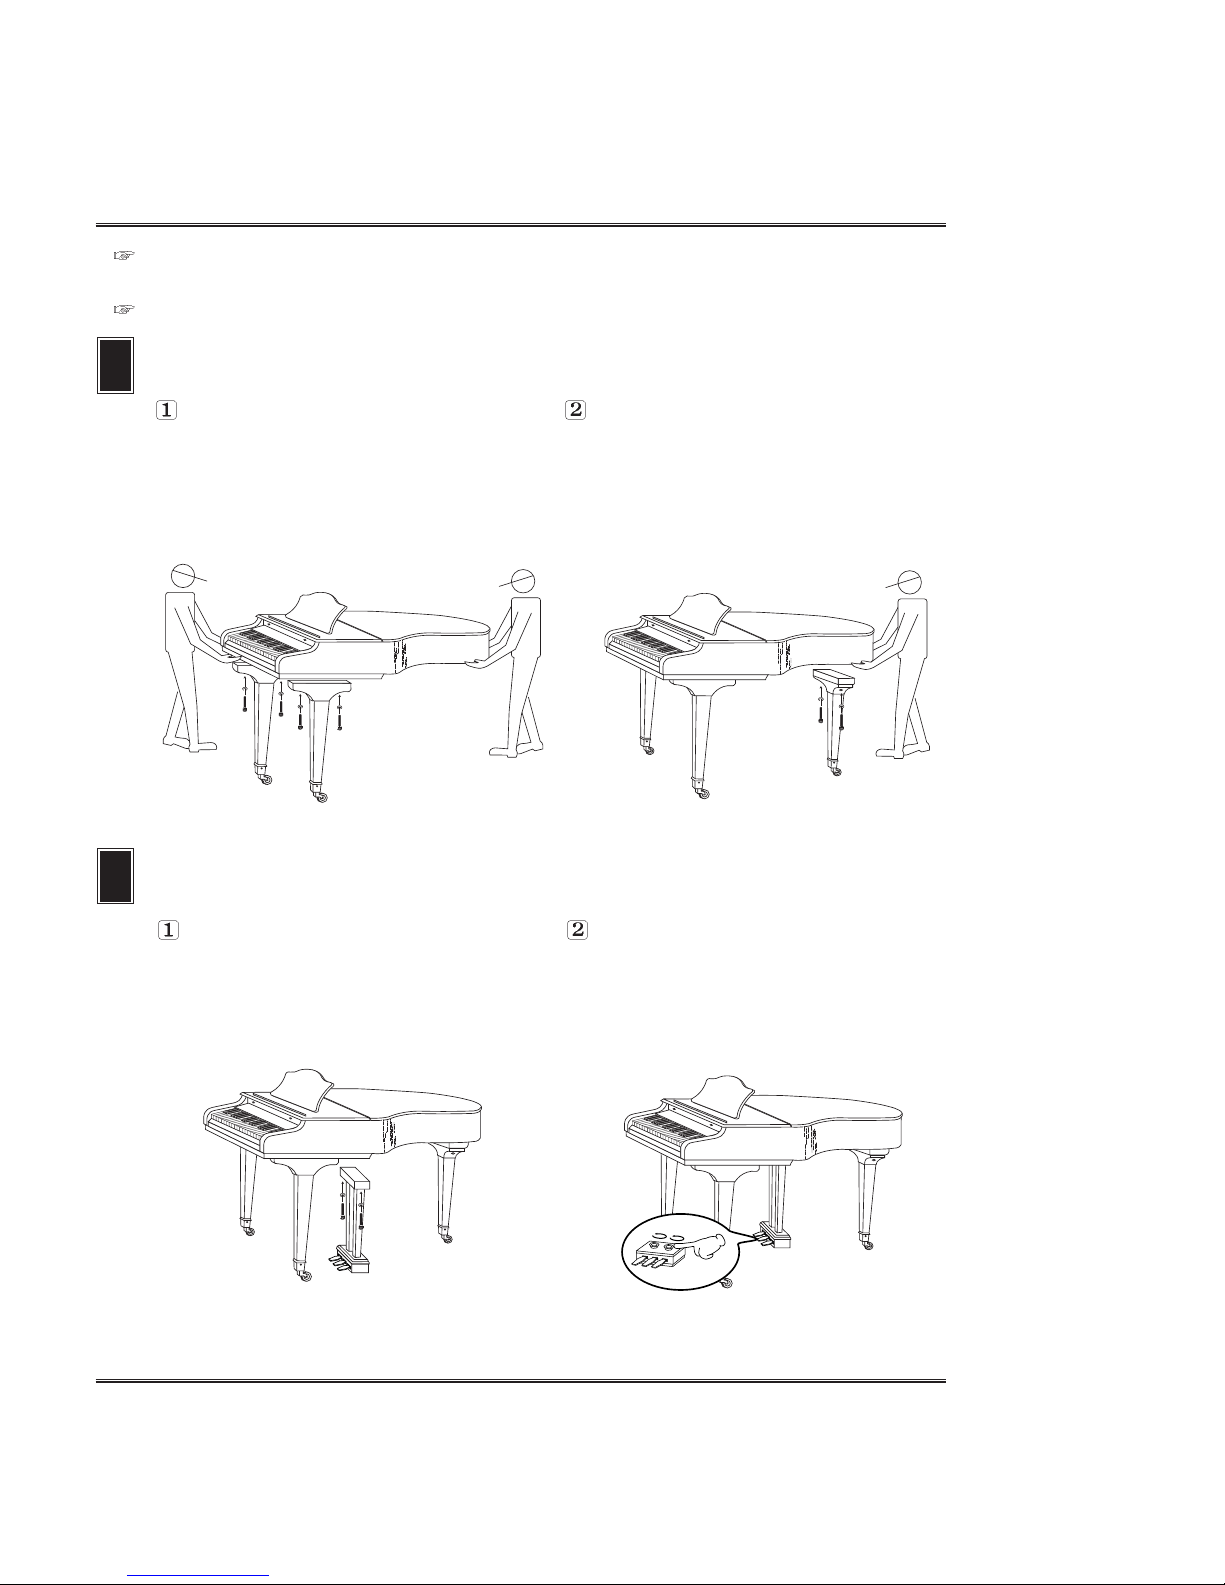
Attaching the main unit and three legs.
1
The first, Set the both legs upright
and hang the both legs at the main
unit, then tighten the main unit with
four bolts for main unit as shown in
the illustration.
After fixing the both legs to the
main unit, the remainder leg
upright and hang the leg at the
main unit, then tighten the main
unit with two bolts for main unit.
2
Set the pedal stand assembly
upright and securely attach the
pedal stand assembly and the main
unit assembly by using two bolts.
For pedal stability, rotate the
adjuster on the bottom of the pedal
stand assembly until it comes in
firm, contact with the floor surface.
Attaching the main unit and pedal stand assembly
To reduce the risk of injury, The Digital Piano should be assembled by qualified
service personnel.
Take care not to drop the unit and avoid strong impact.
11
Assembling your Piano (Grand T ype only)
Page 12
12
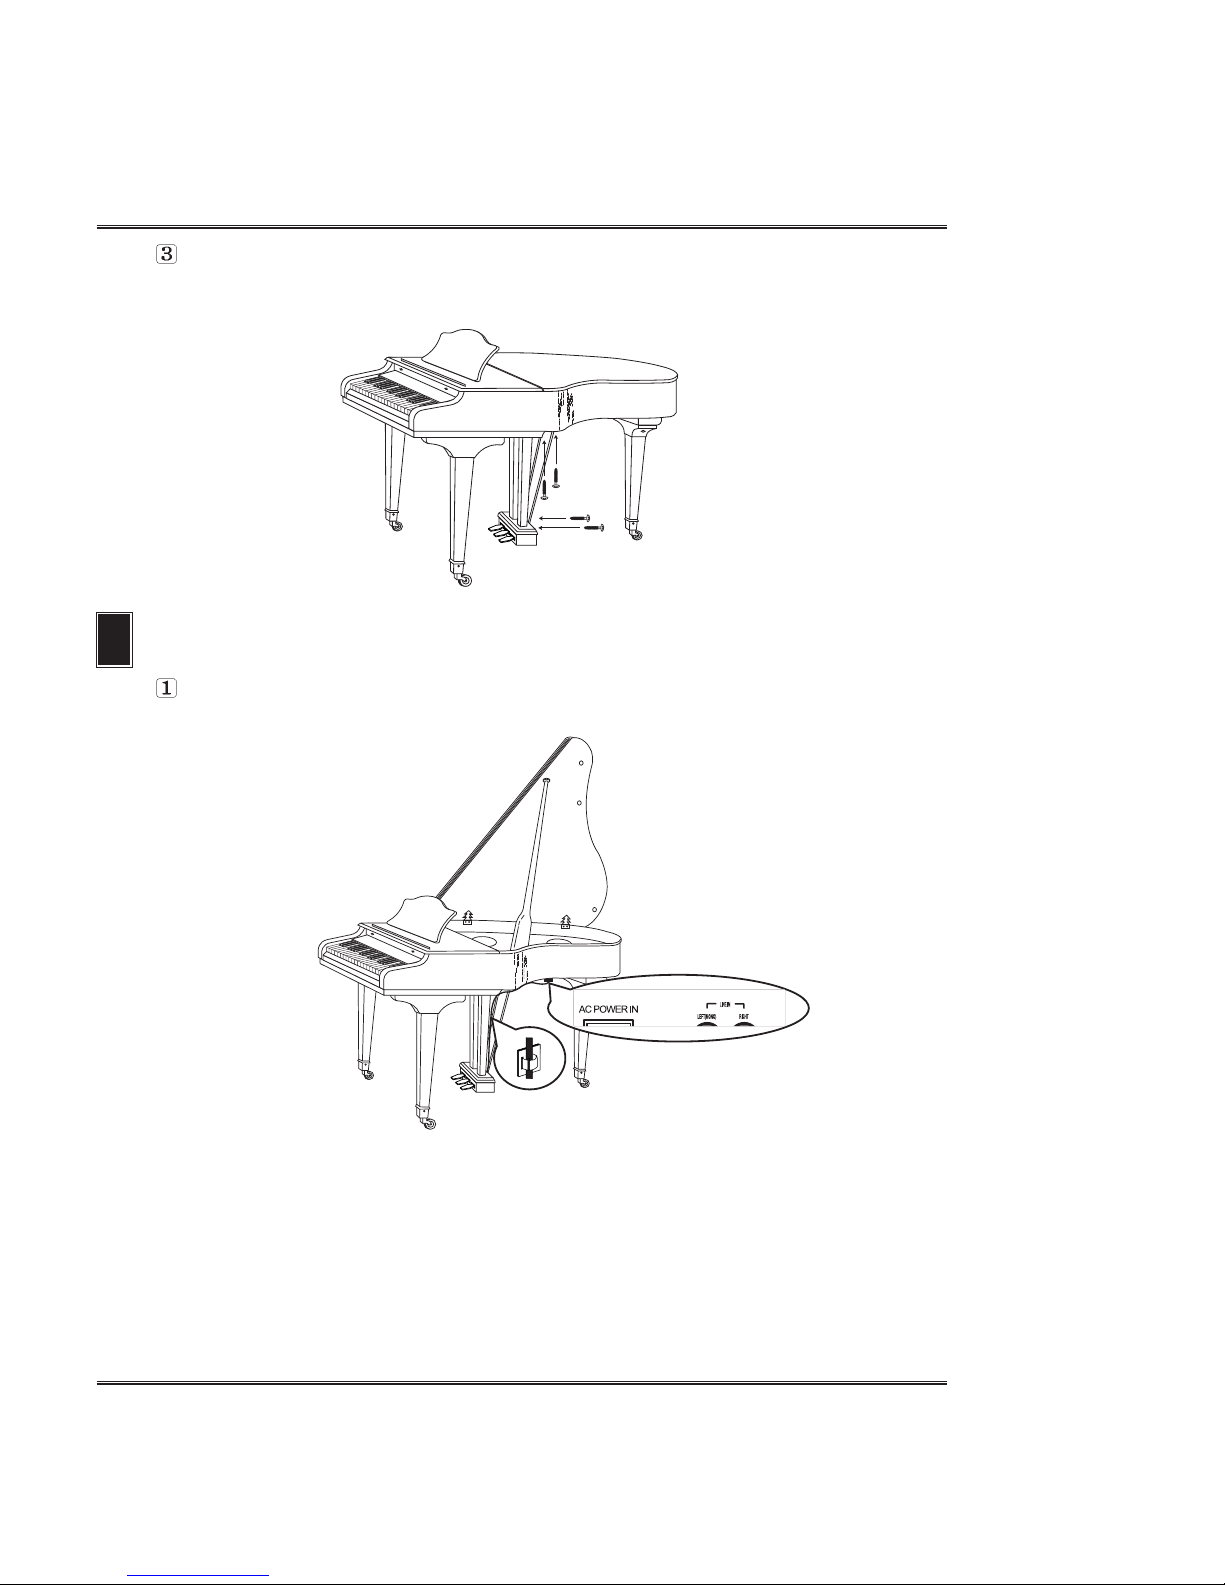
Assembling your piano (Grand T ype only)
Attach the pedal stand brace to the main unit and pedal stand assembly using four
screws. Make sure the screws are securely tightened.
3
Plug the Pedal Cord which is protruding from the top of the pedal assembly into
the corresponding port in the bottom of the main unit.
Connecting the Pedal Cord
Page 13
13
Control Locations
Control Locations
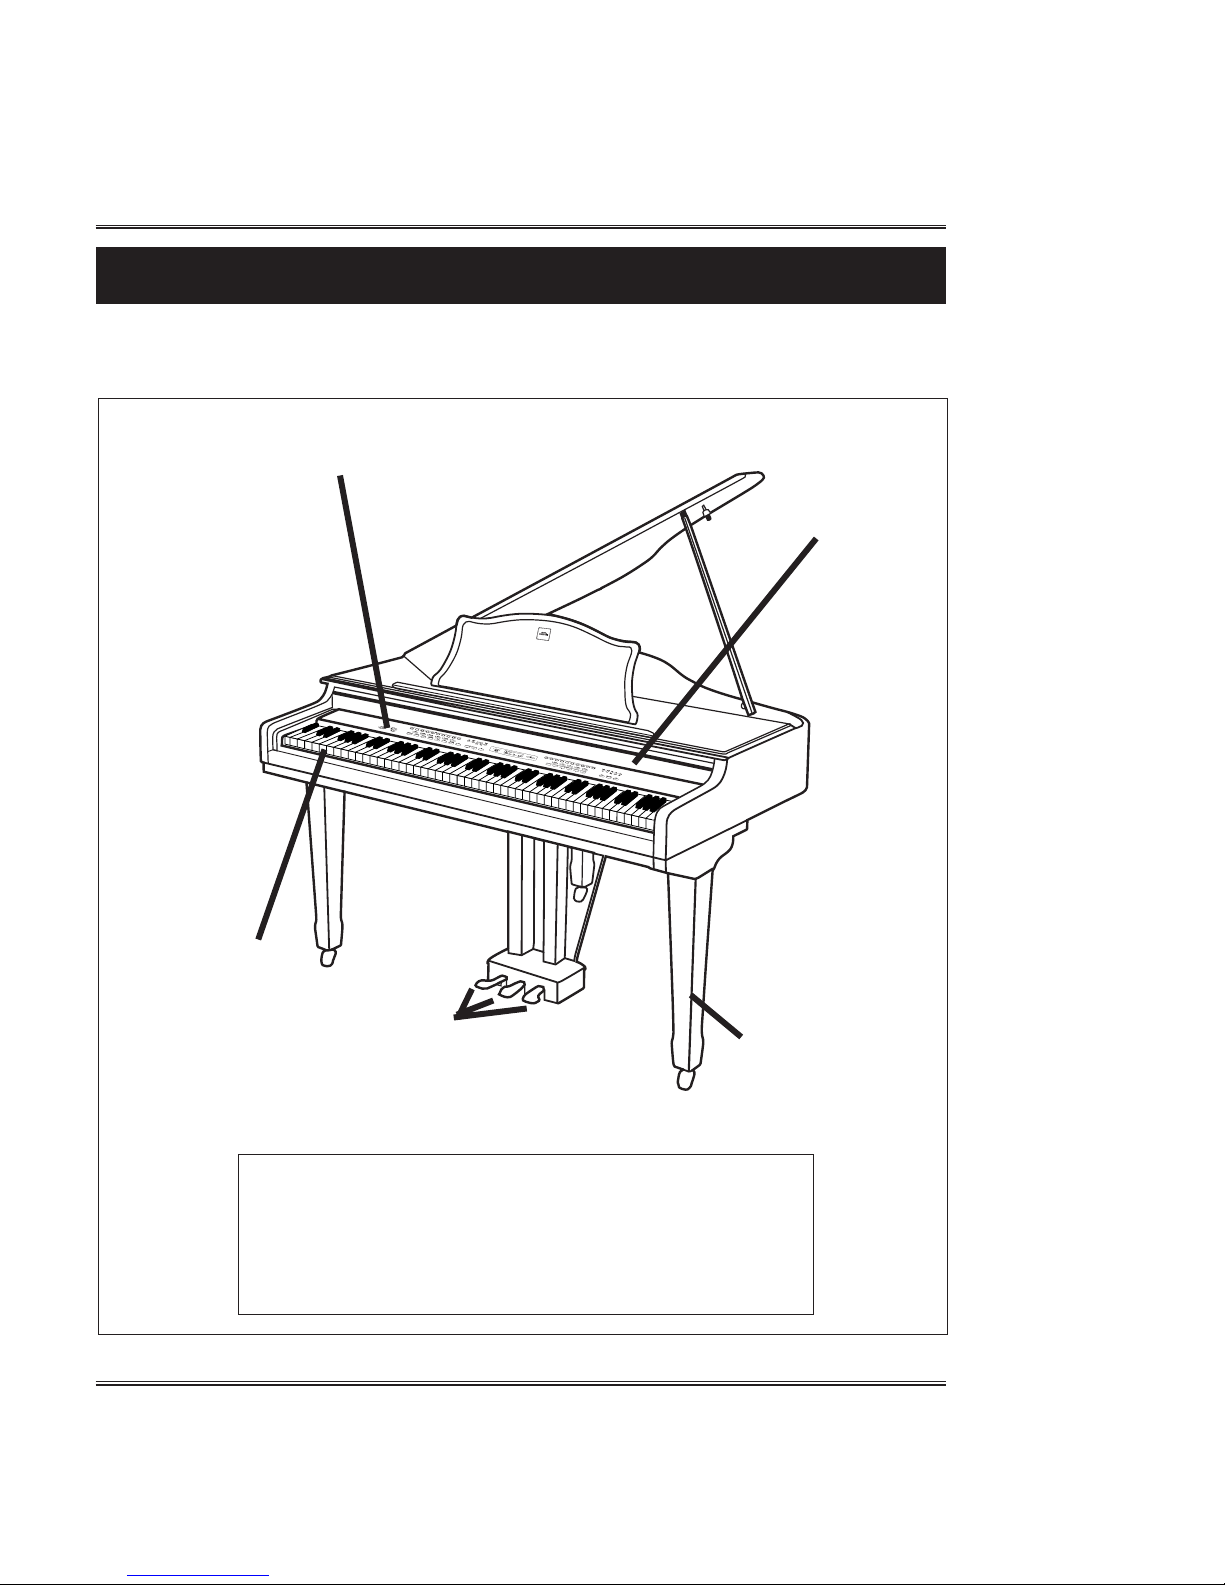
1. External appearance
2
3
4
5
1
1. Keyboard Cover
2. Control Panel
3. Keyboard
4. Pedal
5. Stand
Page 14
14
Control locations
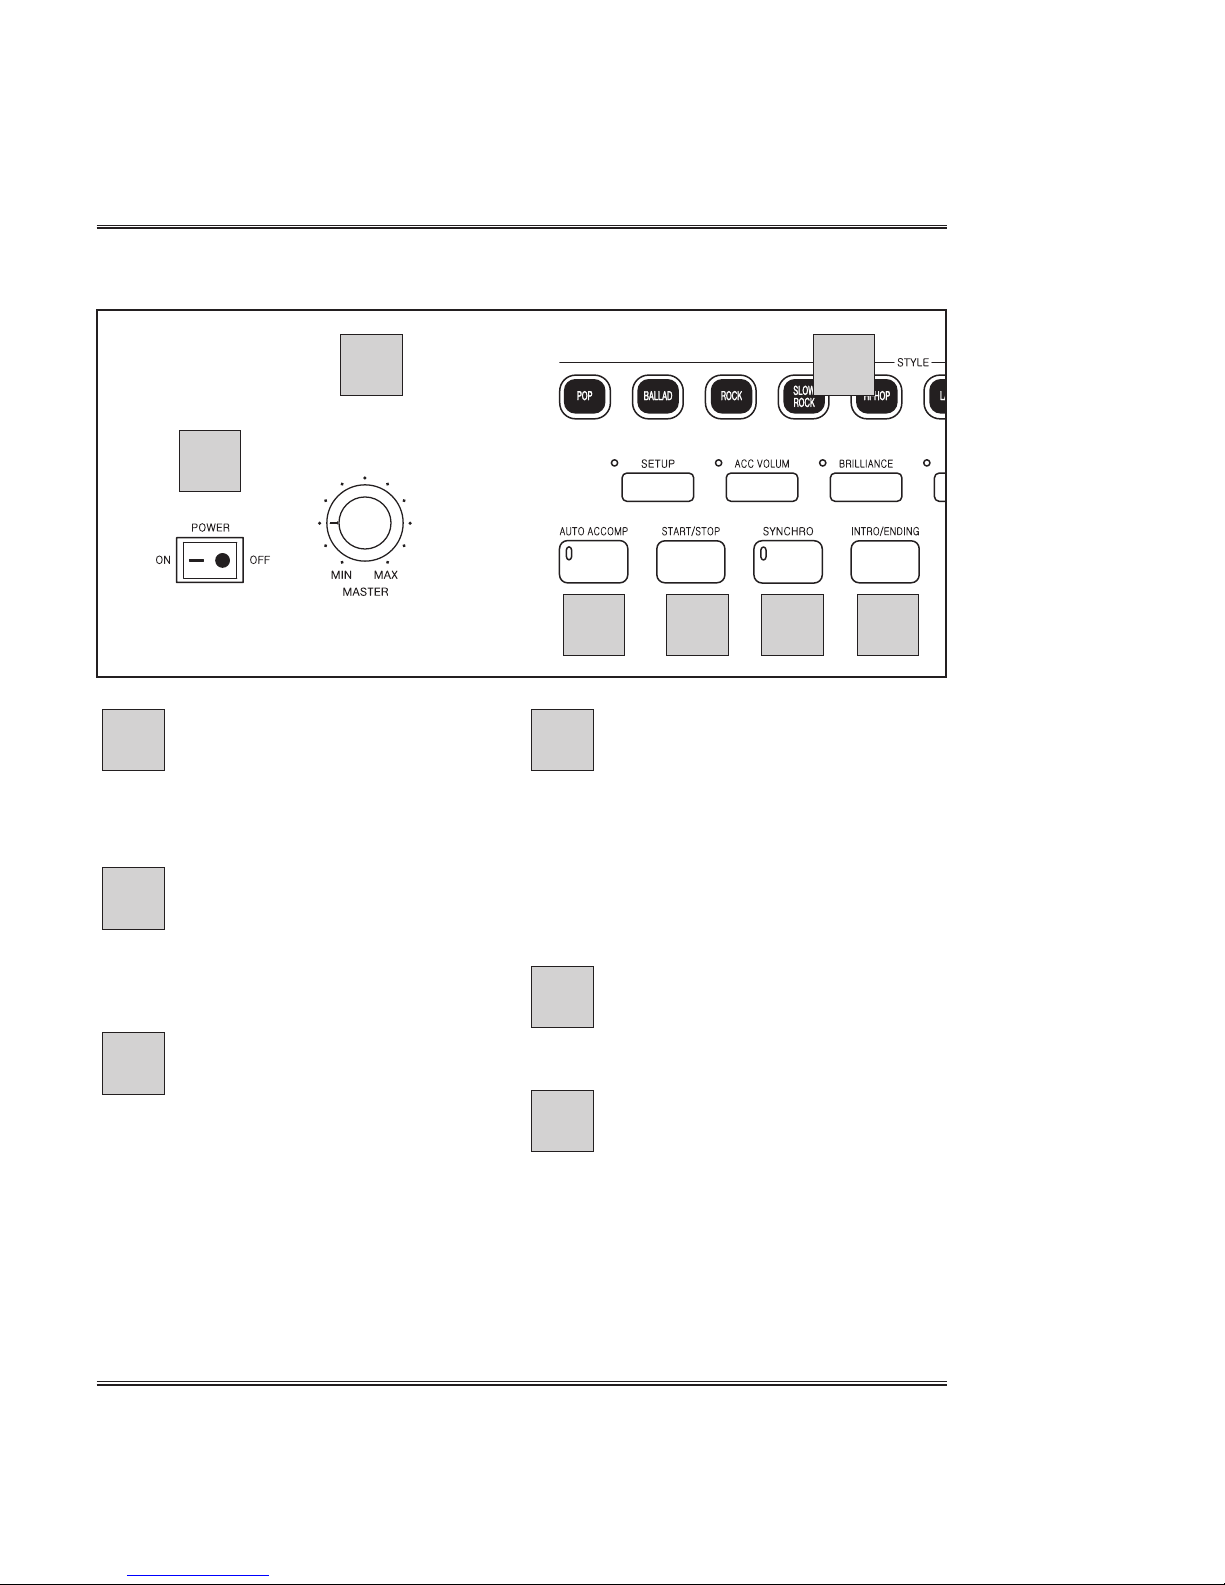
2. Front panel
POWER switch
Used to turn on or off your
instrument.
MAIN VOLUME
Used to control the overall volume
with the volume.
AUTO ACCOMP button
Used to add an automatic
accompaniment to your selected
rhythm.
STYLE Group buttons
You can select 54 rhythm patterns
using 10 STYLE group buttons.
The 54 preset rhythm styles are
divided into 10 STYLE groups, and
each is assigned to the
corresponding STYLE group
buttons.
START/STOP button
Used to start and stop the selected
rhythm.
SYNCHRO button
Used to enable the synchro start
mode. This function makes the
selected rhythm started
automatically when you play the first
note on your keyboard.
6
5
4
3
2
1
1
3 5 76
42
Page 15
15
Control Locations
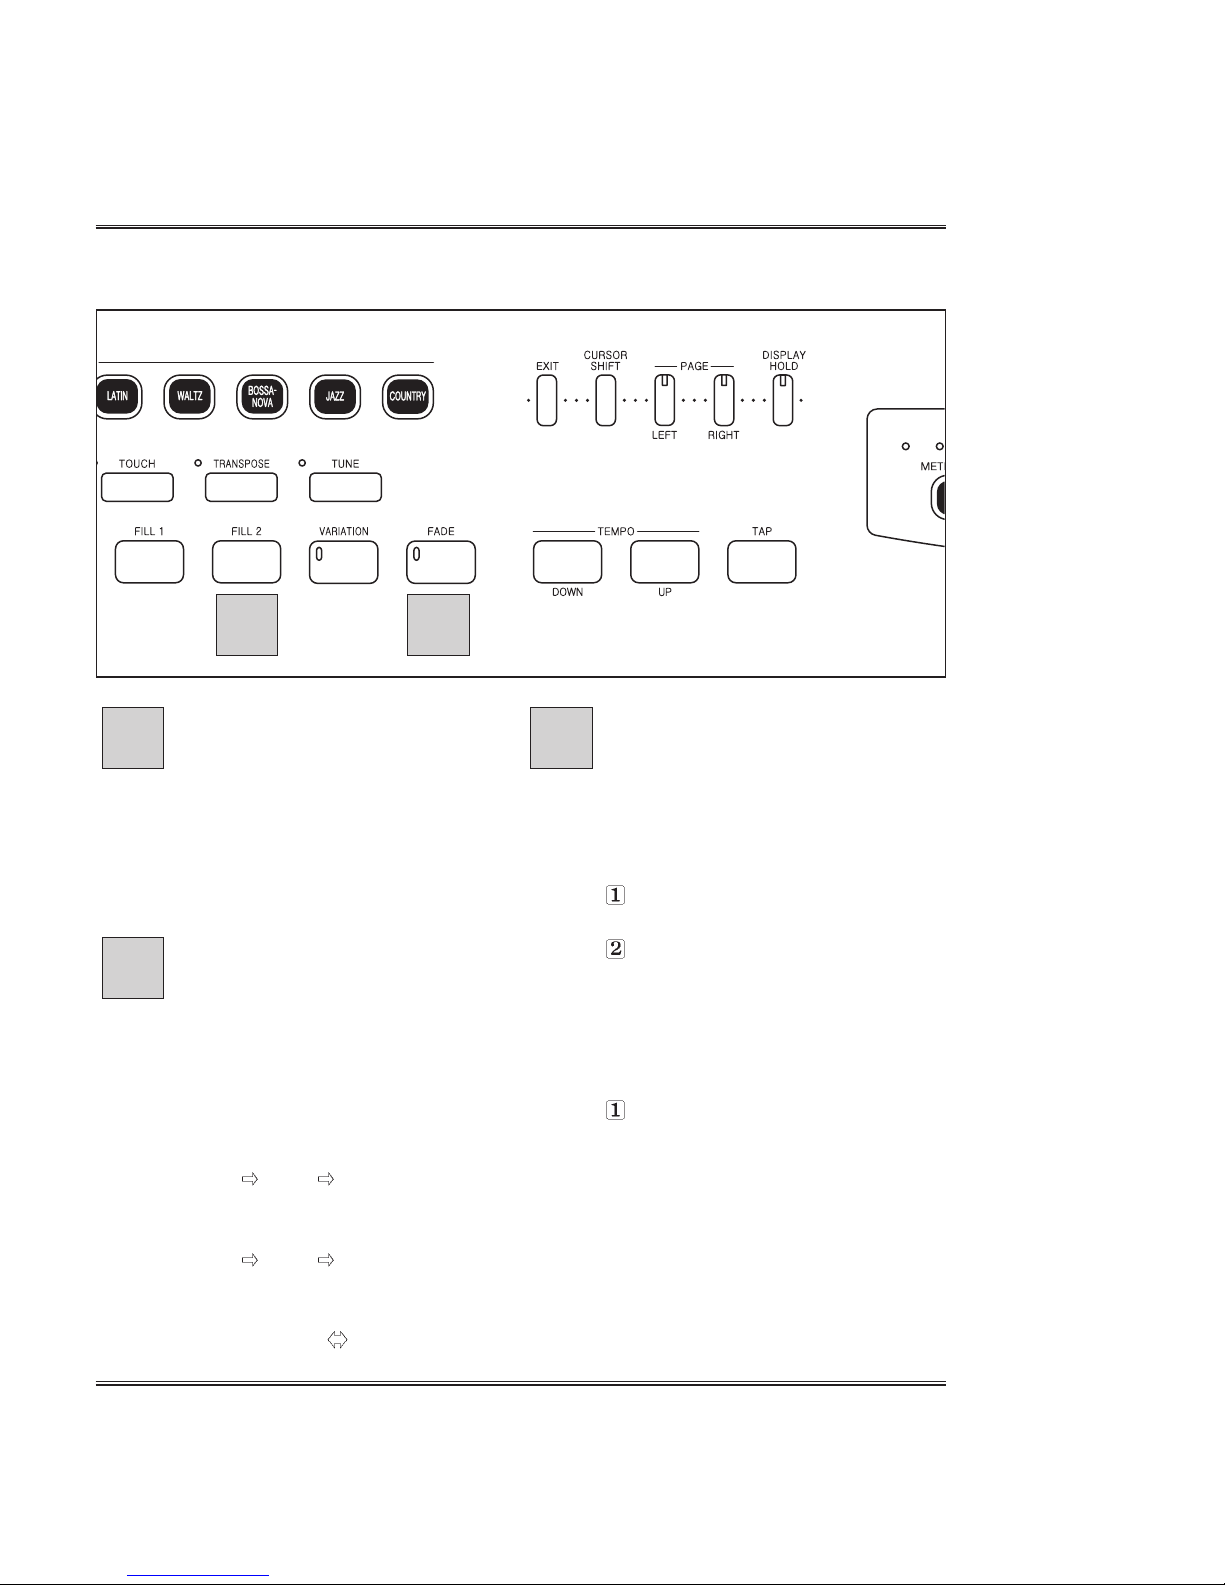
INTRO/ENDING button
When pressed before starting a
rhythm, insert a rhythm introduction
before the rhythm starts. When
pressed while a rhythm is playing,
inserts a rhythm ending before the
rhythm stops.
FILL & V ARIA TION buttons
Two different rhythm fills can be
played, in the same way that a
drummer plays a drum fill during a
song.
FILL1
LOOP
FILL1 LOOP NORMAL
FILL 2
LOOP
FILL2 LOOP V ARIA TION
VARIATION
LOOP NORMAL
LOOP V ARIA TION
F ADE button
This function lets you gradually fade in or
out the volume of the style.
ST ART with F ADE IN
Press the FADEbutton, the fade LED
will turn on.
T o start the style, press the
ST ART/STOPbutton or press the
SYNCHRO button and play a note or
chord on the keyboard.
STOP with F ADE OUT
Press the FADEbutton during rhythm
playing.
The fade LED flashes during fade in/out,
and the lamp turn off when the fade in/out
is completed.
If you press the FADE button during
fading, the fade can be canceled.
9
8
7
8 9
Page 16
16
Control Locations
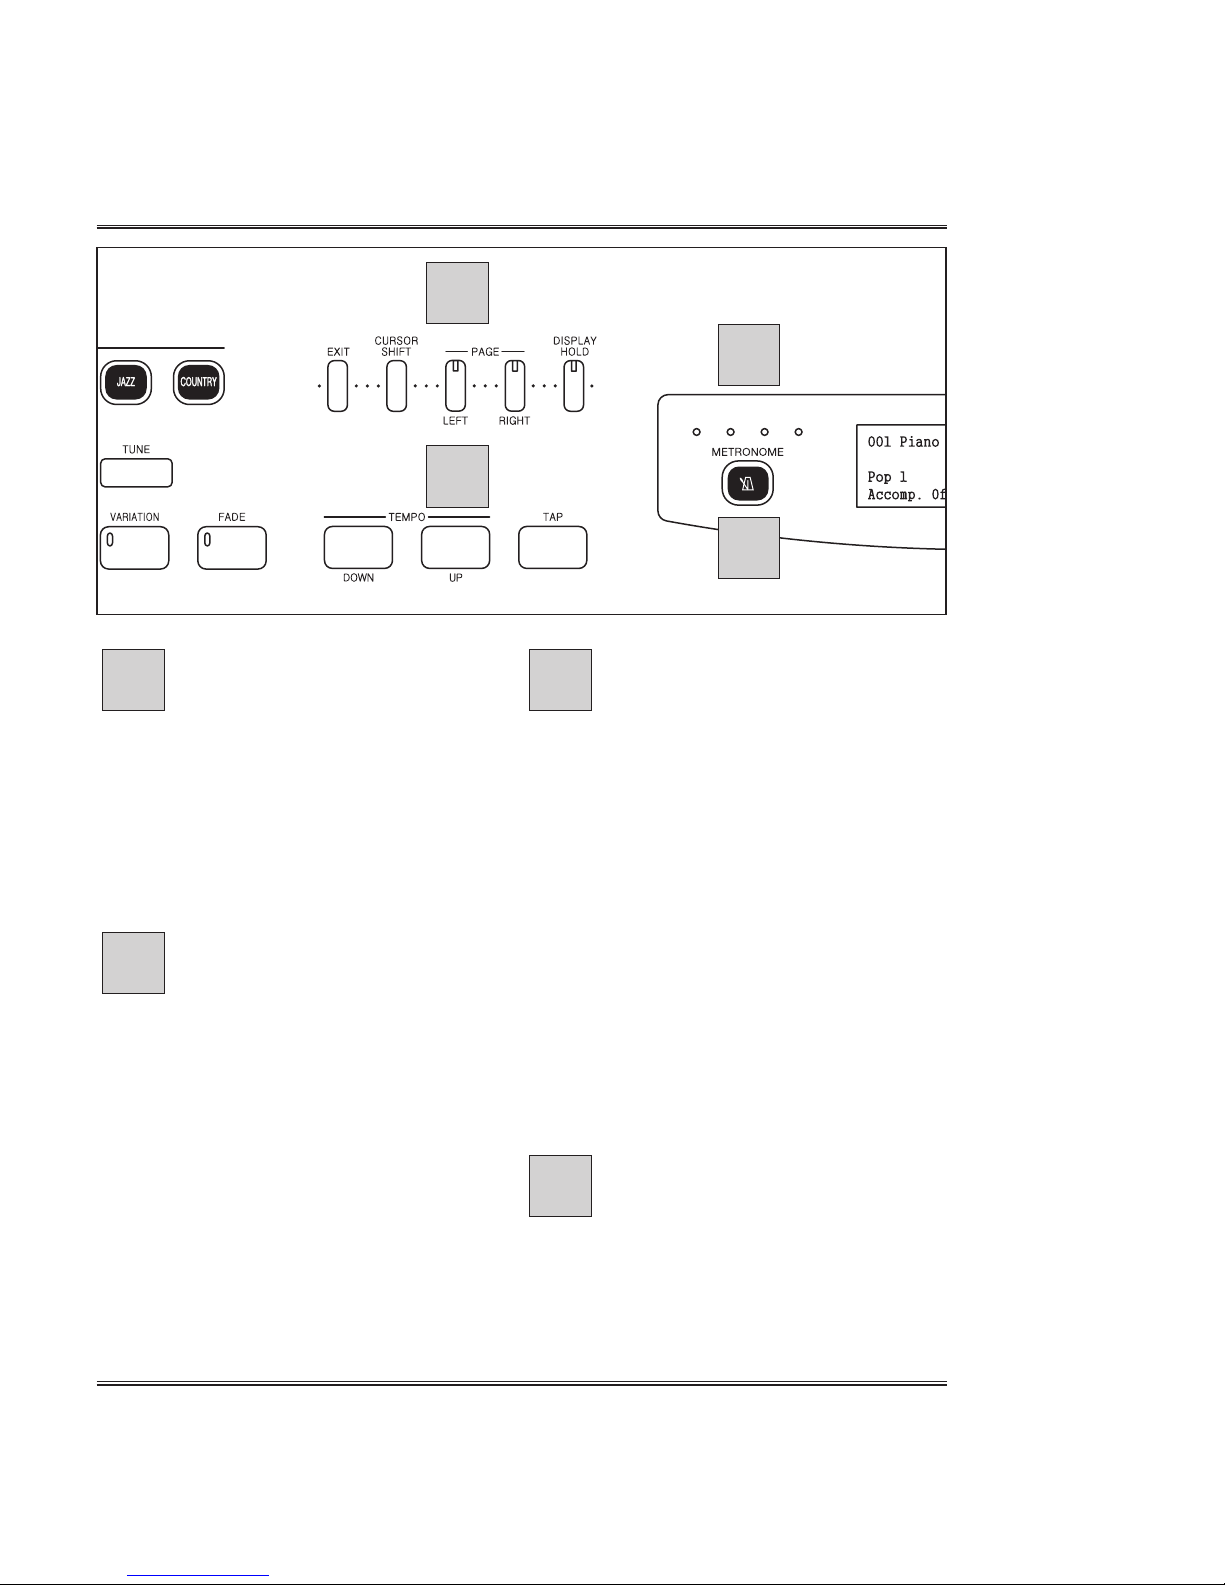
TEMPO buttons
Used to change the current tempo.
Pressing both the TEMPO UP and
DOWN buttons will set a default
value.
TAP TIME
This function lets you set the tempo
and start the style in one operation.
METRONOME button
Used to start/stop the internal
metronome.
To start the metronome, press the
METRONOME button so that its
LED lights.
The metronome pop-up display
appears and currently selected beat
and volume are indicated.
Press the METRONOME button
again to stop metronome sound.
The metronome LED turns off.
ESCAPE button
Used to return to the previous
screen or exit from a feature.
LEFT, RIGHT buttons
Used to move a page left or right in
menu pages. A LED will be lit, if a
page is available.
CURSOR SHIFT button
Used to move the cursor in the
screen.
DISPLAY HOLD button
Used to prevent the screen from
returning on the Main Menu.
BEAT LED
During style playback, the leftmost beat lamp(green) flashes on
the first beat of each measure, and
the other lamps(red) flash for each
successive beat.
13
12
11
10
10
12
11
13
Page 17
17
Control Locations
Display Panel(LCD)
Used to display the performance
information, function settings and
other messages.
DATA buttons
Used to increase or decrease the
value indicated by the cursor.
Pressing both buttons together will
set a default value. These buttons
auto repeat when held down.
1514
14 15
Page 18

18
Control Locations
SETUP buttons
Used to enter the main setup
screen. Various configuration
options can be changed from here.
ACC. VOLUME
This determines the playback
volume of the Auto
Accompaniment.
BRILLIANCE
The sound timbre can be adjusted
by using the BRILLIANCE
function.
TOUCH
This determines how your playing
strength (velocity) affects the
volume of the voices.
TRANSPOSE
The TRANSPOSE function makes
it possible to shift the pitch of the
keyboard in semitone units,
allowing you to match the pitch of
the keyboard to the range of other
instruments or singers, or letting
you easily play in a different key
without having to change your
fingering.
TUNE
The TUNE function lets you make
fine adjustments to the pitch,
allowing you to accurately match
the tuning with that of other
instruments.
21
20
19
18
17
16
16 17 18 19 20 21
Page 19

19
Control Locations
VOICE GROUP
The piano features a wealth of rich, authentic voices, including piano, strings and brass
instruments. It also features a keyboard percussion function that lets you play the
realistic drum, percussion sounds, and various effect sounds directly from keyboard.
Voice Types
128 GM sounds with 10MB Grand piano sound.
6 Drum kits.
2 SFX sets
PERCUSSION group
The piano has six Drum kits and two SFX sets in the Percussion voice group.
When one of the Drum kits, various drum and percussion sounds as assigned
individually to the keys, letting you play the sounds from keyboard.
Also when one of the SFX sets, various sound effects as assigned individually to the
keys, letting you play the sounds from keyboard.
See the Drum/SFX Table on Page 67 ~ 68 in this manual for the types of drum/effect sounds in each Drum kit/SFX set.
GM VOICE group
There are 128 different voices in the piano. When the GM VOICE group is selected,
one of 128 GM voices can be assigned.
22
22
Page 20
20
Control Locations
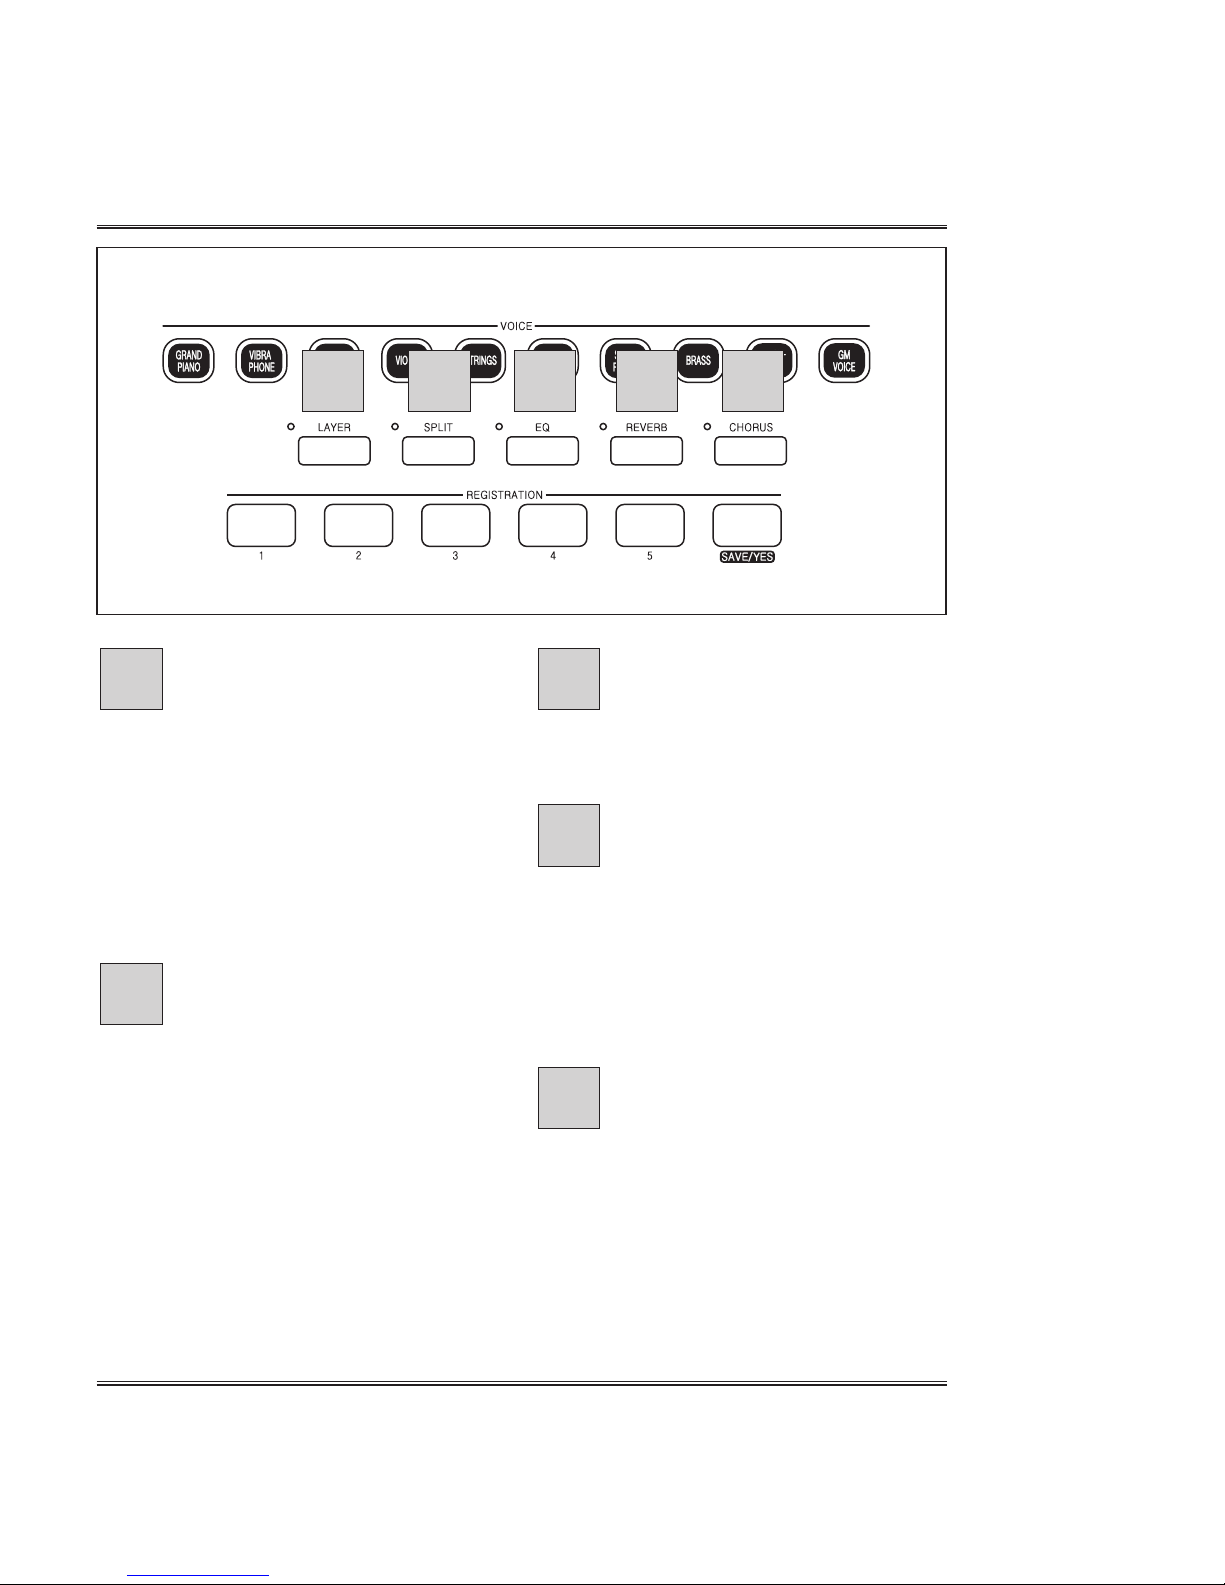
LAYER
The Layer mode of the piano
allows you to select and play two
different voices simultaneously in
a layer. This makes it easy to
create exceptionally rich and thick
tonal textures. The volume
balance can be set for the two
voices.
SPLIT
The Split mode of the piano allows
you to select and play two
different voices with your left and
right hands - For example, play
bass with the left and piano with
the right .
EQ
Used to adjust level of each
frequency bend.
REVERB
Reverb is an effect that recreates
the decaying reflections of a
sound in a performance space,
and reproduces the special
ambience of a concert hall.
CHORUS
There are six different effects:
Chorus 1, 2, 3, 4,
Flanger, Feedback Delay.
27
26
25
24
23
23 24 25 26 27
Page 21

TRACK1 /
Used to record a song into the
Track1.
You can record the song into the
Track1 with the Layered voice, the
Split voice or the Auto
Accompaniment.
REPEAT
Used to repeat playing a MIDI file.
TRACK2 /
Used to record a song into the
Track2.
It’s not available to use the Layer,
the Split or Auto-Accompaniment
function, when a song is recorded to
the Track2.
ALL
Used to play all MIDI files.
SONG CONTROL buttons
RECORD button
Used to record a song into the
memory.
PLAY/PAUSE button
Used to play(or pause) the recorded
song or the Demo tune.
STOP button
Used to stop playback of the
recorded song or the selected Demo
tune.
This button also can be used to stop
recording.
DEMO button
Used to listen to the Demo tunes
that are included in the Digital
Piano. The Digital Piano has total
12 Demo tunes.
31
30
29
28
21
Control Locations
3028 29
31 32 33
A
A
R
R
Page 22
22
Control Locations
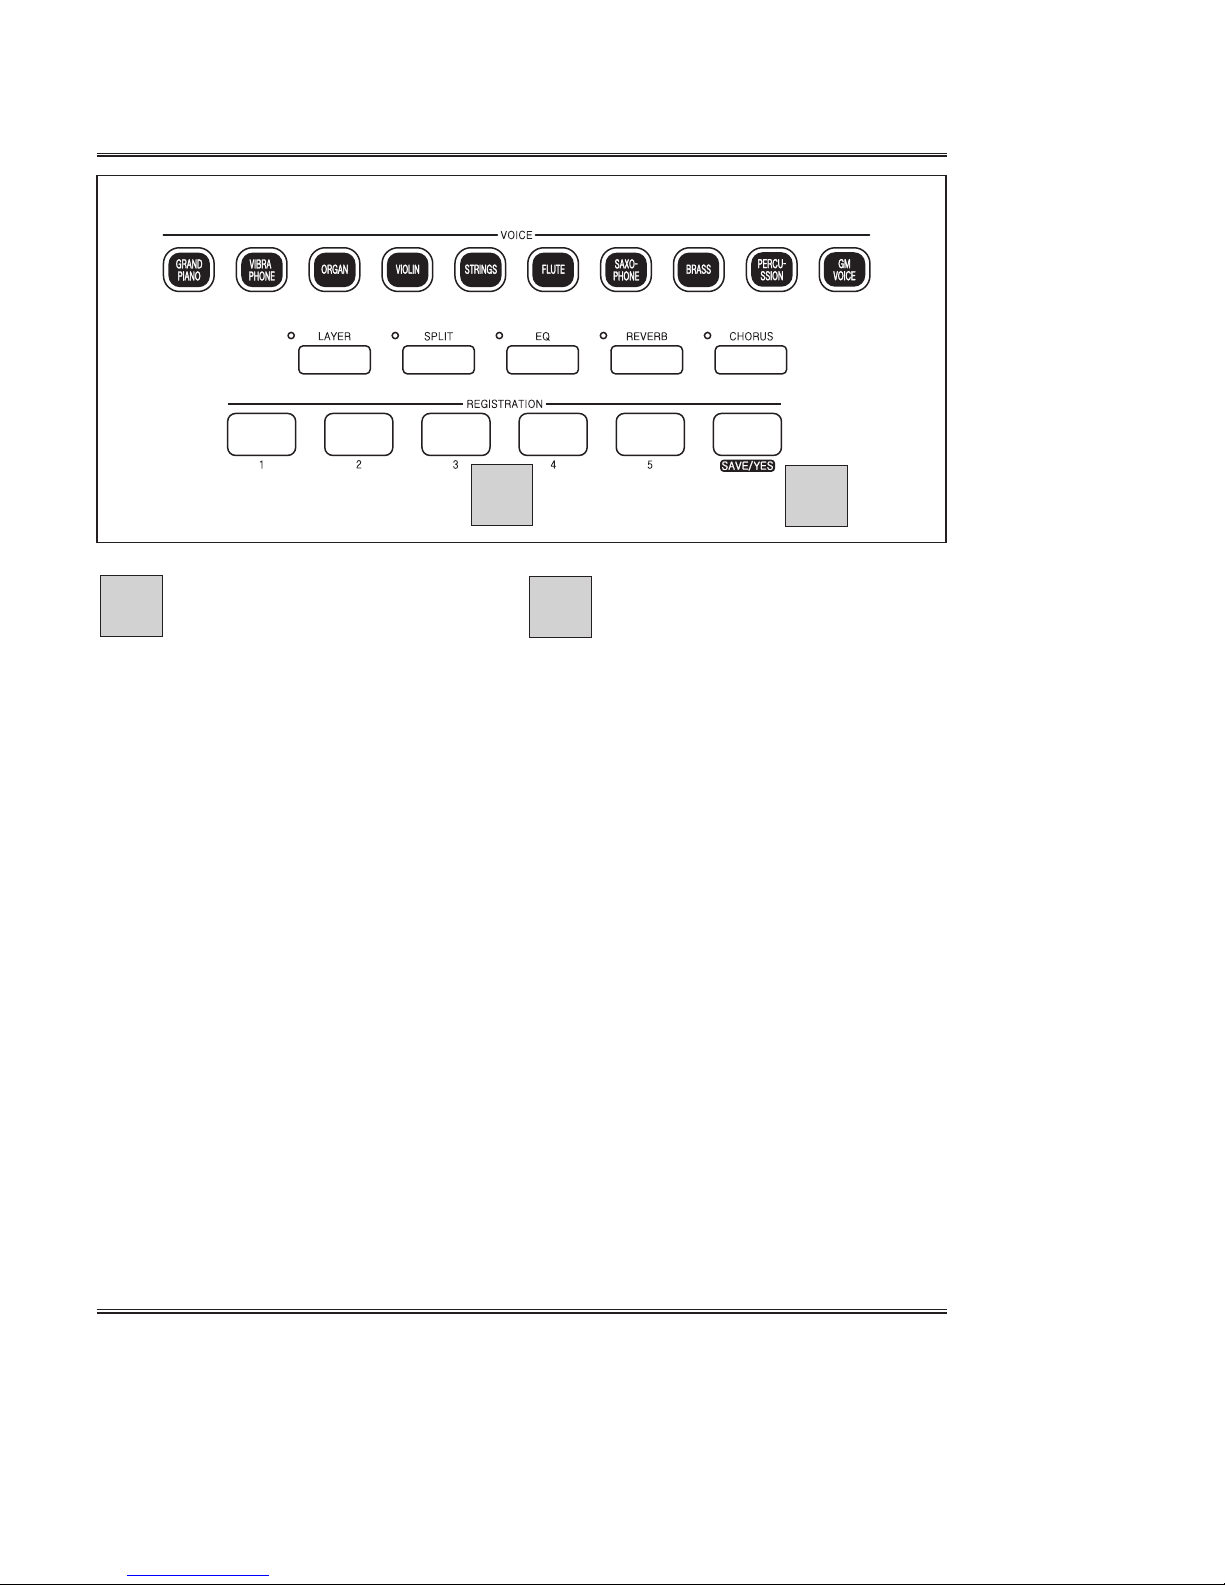
REGISTRATION 1~ 5 button
Used to store setting information
into each registration button or to
restore registration. To store
information into a registration
button, holding down the SAVE/YES
button and press the
REGISTRATION button in the
registration area. When you need to
restore the stored information, press
the button.
SAVE/YES button
Used to store setting information or
to select a function on the screen.
32
31
31
32
Page 23
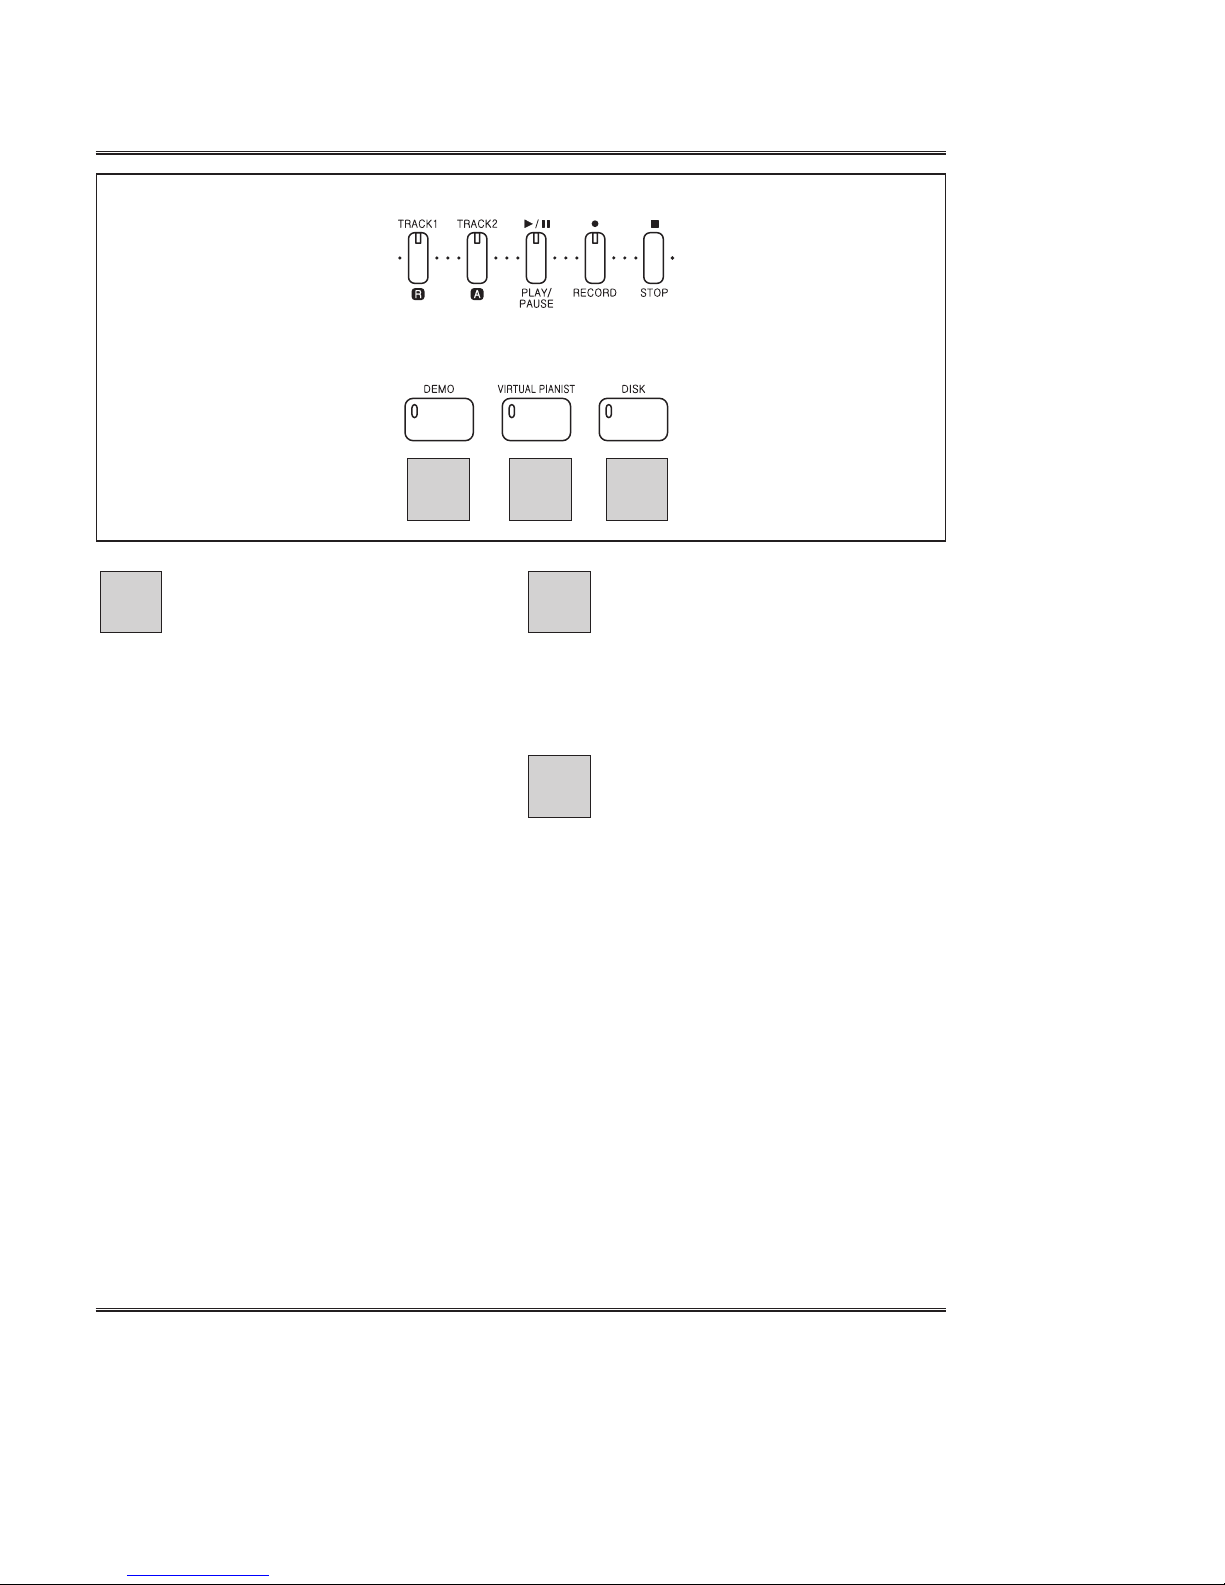
DEMO button
Used to listen to the Demo tunes
that are included in the Digital
Piano. The Digital Piano has total
12 Demo tunes.
VIRTUAL PIANIST button
Used to operate the VIRTUAL
PIANIST.
DISK button
Used to SAVE/LOAD files on the
USB memory disk.
35
3433
23
Control Locations
33 34 35
Page 24

24
Control Locations
LINE IN/OUT Jacks
LINE OUT(L/R)jacks Used to connect the piano to an external amplifier.
LINE IN(L/R)jacks Used to connect the piano as an amplifier for other
instrument etc..
PEDAL Jack
MIDI Terminals
Used to connect other MIDI instruments
MIDI OUT Used to transmit data from the piano to other equipment.
MIDI THRU Used to transmit the received data to other equipment.
MIDI IN Used to receive data from other equipment.
33
32
31
3. Rear Panel
31 3233
Page 25

25
Control Locations
Damper Pedal (Right)
The damper pedal performs the same function as the damper pedal on an actual
acoustic piano, letting you sustain the sound of the voices even after releasing your
fingers from the keys.
Certain voices in the PERCUSSION group may not be affected by use of the damper pedal.
Some voices may sound continuously or have a long decay after the notes have been released while the damper
pedal is held.
Sostenuto Pedal (Center)
If you play a note or chord on the keyboard and press the sostenuto pedal while
the note(s) are held, those notes will be sustained as long as the pedal is held, but all
subsequently played notes will not be sustained. This makes it possible to sustain a
chord, for example, while other notes are played staccato.
Certain voices in the PERCUSSION group may not be affected by use of the sostenuto pedal.
Certain voices such as STRINGS or BRASS sustain continuously when the sostenuto pedal is pressed.
Soft Pedal (Left)
Pressing this pedal reduces the volume and slightly changes the timbre of the
notes you play.
4. PEDALS
Page 26

26
Connecting Headphone(s)
Connecting Headphone(s)
Connect a set of stereo headphones(optional) to PHONES jack.
Insert plug of the headphone into the PHONES jack on the bottom panel of the piano.
When headphones are connected, the internal speaker system is automatically shut off.
Since the piano has two PHONES jacks, two sets of headphones can be used
simultaneously, allow two people to enjoy listening to the performance.
VIRTUAL PIANIST
POWER
Virtual Pianist Power Switch
If you don’t want to play the virtual pianist function, turn off the VIRTUAL PIANIST
POWER.
If the power is off, the VIRTUAL PIANIST FUNCTION doesn't operate.
Page 27

27
Quick Start with Remote control
Quick Start with Remote control
STOP
VOLUME UP
SEARCH DOWN
VOLUME DOWN
Insert the USB memory into USB inlet on right side of the control panel.
Press and hold the STOP button until hearing a click sound.
After Click sound, you can hear a bell sound.
When the piano go to the Virtual Pianist mode or escapes from Virtual Pianist mode, makes
the bell sound.
Select a desired song by using the SEARCH UP/DOWN buttons.
Press the PLAY/PAUSE button, to hear the selected song.
If there is mark < > on the selected file, this file is not song file and this is folder.
If you select a folder and press the PLAY/PAUSE button, You can select a song file in
the selected folder.
You can adjust volume of the song by using the VOL- and VOL + buttons.
REPEAT a SONG/ PLAY ALL SONGS
If you want to listen all songs, press the M button until lighting the Lamp on the track2/A button.
When the lamp is on the button s on the Track1/R button , the selected song repeats.
You can go to the repeat mode by using the M button.
To stop playing a song, press the stop.
To escape the Virtual pianist mode, Press and hold the stop button, until hearing
click sound.
PLAY/PAUSE
SEARCH UP
MODE
Page 28

Press the DEMO button.
The DEMO pop-up display appears.
Select the Demo tune by using the DATA buttons
To play the selected piece press the PLAY/PAUSE button.
To pause the tune press, the PLAY/PAUSE button again.
To resume the piece from that point, press the PLAY/PAUSE button again.
To stop the tune press the STOP button.
28
Playing a Demo
Playing a DEMO
The piano features a total 12 demo pieces. Listen to them all and hear what the piano can
do.
Page 29

29
Performance Screen
PERFORMANCE SCREEN
VOICE
There are 128 voices (sounds) in the Piano. The top line of the display screen
shows you which voice is currently selected.
RHYTHM
There are 54 rhythm styles in the piano and the display screen shows you which
rhythm style is selected.
CHORD
When you use the Auto-Accompaniment the display screen shows you the name of
the chord that you are playing. NC shows that No Chord is currently being played.
BEAT
Beat of the selected rhythm style.
AUTO ACCOMPANIMENT MODE
Shows the selected Auto Accompaniment mode such as the Single Finger, the
Fingered, the Full Keyboard and the Auto Accompaniment Off.
TEMPO
Gives you the current tempo (speed) of the Metronome, Recorder and Auto
Accompaniment in BPM (beats per minute).
When you first turn on your piano the power up status screen briefly appears in the
display followed by the Performance Screen.
The performance screen shows you all of the most important playing parameters.
A
B C D
A
B
C
D
E F
E
F
Page 30

Voice
30
Selecting a Voice
Turn on the POWER switch. The power is turned on and the initial display appears in
the Multi Function Display. The voice of Grand Piano is selected automatically at first.
Press POWER switch again when turning off the power. All lamps and LED display will turn off.
Press one of the VOICE group buttons.The VOICE select pop-up display appears.
The basic voice or the last selected voice of the selected voice group is
automatically set.
Select the desired voice on the pop-up display by using the DATA buttons.
The pop-up display returns to main display after 8 eight seconds.
Each voice group has 8 voices.
Voice
The Piano features a wealth of rich, authentic sounds including pianos, organs, strings,
brass instruments, percussion and sound effects.
Page 31

31
Percussion & GM Voice
Percussion & GM Voice
The piano has six Drum kits and two SFX sets in the Percussion voice group.
When one of the Drum kits, various drum and percussion sounds as assigned
individually to the keys, letting you play the sounds from keyboard.
Also when one of the SFX sets, various sound effects as assigned individually to the
keys, letting you play the sounds from keyboard.
See the Drum/SFX Table on Page 67 ~ 68 in this manual for the types of drum/effect sounds in each Drum
kit/SFX set.
Select the Percussion group. The percussion select pop-up display appears.
The default voice of the percussion group is the Standard drum kit.
Select the desired voice by pressing the DATA buttons.
If you don’t change the voice of the selected voice group, the last selected voice or the default voice remains.
PERCUSSION Group
There are 128 different voices in the piano. When the GM VOICE group is select, one
of 128 GM voices can be assigned.
Select the GM VOICE group. The GM Voice select pop-up display appears.
See the GM Voice Table on Page 52 ~ 54 in this manual.
Select the desired voice by pressing the DATA buttons.
If you don’t change the voice of the selected voice group, the last selected voice or the default voice remains.
GM VOICE group.
Page 32

32
Layer
Layer
The Layer mode of the piano allows you to select and play two different voices
simultaneously in a layer. This makes it easy to create exceptionally rich and thick
tonal textures. The volume balance can be set for the two voices.
Select the first voice.
Select a voice in the normal way. (See Page 30)
The default voice is the 049 Strings in the Layer mode.
Call up the Layer mode.
To call up the layer mode, press the LAYER button.
Select the second voice.
The second voice also can be selected from the pop-up display of the Voice select
by using the DATA button.
The layered voice is selected in the normal way.
Page 33

33
Split
Split
The Split mode of the piano allows you to select and play two different voices with your
left and right hands - For example, play bass with the left and piano with the right .
Select the first voice.
Select a voice in the normal way. (See Page 30)
The default voice is the 033 FINGERED BASS in the Split mode.
Hold down the SPLIT button during around 2 seconds, SPL appears on the Multi Function Display. During
displaying the SPL, new split point can be assigned by pressing a key.
Split point (F#3)
Call up the Split mode.
To call up the split mode, press the SPLIT button.
Select the second voice.
The second voice also can be selected from the pop-up display of the Voice select
by using the DATA buttons.
The split(second) voice is selected in the normal way.
Page 34

34
EQ
EQ
The Sound timbre can be adjusted by using the EQ.
Changing the Master Equalizer setting
Press the EQ button. The Equalizer menu appears.
Select the desired frequency range(Band) by using the DATA buttons and press the
CURSOR SHIFT button to change the value. Adjust the value by using the DATA
buttons .
To escape the setup menu press the EXIT button until the LCD screen shows the
Performance screen. The setup menu will be automatically returned to the
Performance Screen after approximately 8 seconds if no buttons are pressed.
Six different types are available : Normal, Piano, Pop Jazz, Rock and USER.
Adjusting the USER EQ .
Select the USER on the Equalizer pop-up display by using the DATA buttons and go
to the USER EQUALIZER page by pressing the PAGE RIGHT button.
Page 35

35
Reverb
Reverb
Reverb is an effect that recreates the decaying reflections of a sound in a performance
space, and reproduces the special ambience of a concert hall.
The REVERB pop-up display appears.
Reverb ON/OFF
To turn on reverb, press the REVERB button. The lamp lights and reverb is set ON.
There are 6Reverb types in the piano.
To turn off reverb, press the REVERB button again. The lamp turns off and reverb is
no longer active.
Selecting Reverb type
Select the Reverb type by pressing the DATA buttons while displaying the REVERB
pop-up display on the Multi Function Display.
Adjusting Reverb volume
You can also adjust the volume of the Reverb on the Reverb pop-up display.
Press the CURSOR SHIFT button. The cursor is located on the volume.
Adjust the volume by using the DATA buttons.
Page 36

36
Chorus
Chorus
There are six different effects: Chorus 1, 2, 3, 4, Flanger, Feedback delay
The CHORUS pop-up display appears.
Chorus ON/OFF
To turn on chorus, press the CHORUS button.
The lamp lights and chorus is set ON.
There are 6 Chorus types in the piano.
To turn off chorus, press the CHORUS button again. The lamp turns off and chorus
is no longer active.
Selecting Chorus type
Select the Chorus type by pressing the DATA buttons while displaying the
CHORUS pop-up display on the Multi Function Display.
Adjusting Chorus volume
You can also adjust the volume of the Reverb on the Reverb pop-up display.
Press the CURSOR SHIFT button. The cursor is located on the volume.
Adjust the volume by using DATA buttons.
Page 37

37
Rhythm
Rhythm
There are 54 available rhythm styles. Each style also has a variation.
Listening to a rhythm
Press the desired rhythm group in the STYLE section. The Rhythm Selection
pop-up display appears. Select the rhythm Style on the Rhythm select pop-up
display by using the DATA button.
The basic rhythm setting is Pop1.
The pop-up display returns to main display after 8 eight seconds.
Each group has 2 ~ 8 rhythms.
Adjusting the tempo
Press the TEMPO UP or DOWN button to change the speed either before or
during play.
Each rhythm has a default tempo that is set at the factory. If you press
both of the TEMPO UP and DOWN buttons together, the tempo will reset to
its default speed.
TAP with AUTO START
This feature lets you set the tempo and start the rhythm pattern all in one
operation.
Repeatedly tap the button at the speed you want and the rhythm will begin
to play at that tempo after 4 taps.
You can also change the tempo during playback by tapping the button twice.
In this case the tap "click" sound will not be heard.
Page 38

Immediate Rhythm starting
Press the START/STOP button.
To stop the rhythm press the START/STOP button again.
Synchronized starting
Press the SYNCHRO button and then play the keyboard to start the rhythm.
Rhythm starting with an Introduction
Press the INTRO/ENDING button to begin the selected rhythm with an
introduction arrangement.
Synchronized starting with an Introduction
After pressing the SYNCHRO button, press the INTRO/ENDING button and
then play the keyboard.
Introduction, Fill-in and Ending arrangements are available for each
rhythm pattern.
INTRODUCTION
Press the INTRO/ENDING button to begin the rhythm performance with an
introduction arrangement. After the introduction plays, then the normal
rhythm pattern begins.
38
Rhythm
Page 39

FILL
There are two fill arrangements for each rhythm pattern. Press one of the
FILL buttons to insert a fill-in pattern anytime while a rhythm is playing.
FILL 1:After the fill, the arrangement goes to Normal loop.
FILL 2:After the fill, the arrangement goes to Variation loop.
ENDING
Press the INTRO/ENDING button to finish the rhythm performance with an
arranged ending.
FADE
When starting an Auto Accompaniment after pressing this button, the volume
will gradually increase to its normal volume from zero volume.
If you press the FADE button during a rhythm performance, the volume will
gradually decrease from full volume to zero volume and then stop.
If you press the FADE button again while fading, the volume change is
canceled and reset to normal.
Beat
During style playback, the left-most beat lamp(green) flashes on the first beat of each
measure, and the other lamps(red) flash for each successive beat.
39
Rhythm
Page 40

Types of Auto Accompaniment
The Auto Accompaniment function lets you produce automatic accompaniment in
the selected style simply by indicating chords on the keyboard.
Single Finger
The Single Finger method makes it easy to produce accompaniment using major,
minor, seventh and minor seventh chords by pressing certain key (according to simple
rules) in the left range of the keyboard (lower than split point). (see page 41 )
Fingered
The Fingered method lets you produce automatic accompaniment by playing full
chords in the left range of the keyboard (lower than split point). (see page 42)
Multi Finger
Even if fingering is not full fingered chords, the piano produces auto accompaniment
with one finger more (see page 42)
Full Keyboard
Full keyboard automatically produces appropriate Auto accompaniment for virtually
anything you play on the keyboard, in any range. (see page 43)
Select a Style.
Select the desired style. (see page 37)
Set the tempo.
40
Auto-Accompaniment
Auto-Accompaniment
The piano includes a sophisticated Auto Accompaniment system that can provide
automated rhythm, bass and chord backing for your performance in 54 different styles.
Set the Auto Accompaniment function to ON
To do this, press the AUTO ACCOMP button. The lamp lights and the
Accompaniment Mode pop-up display appears.
Press the AUTO ACCOMP button again to turn off the lamp and set Auto
Accompaniment to off.
Page 41

41
Auto-Accompaniment
Select the chord indication method.
While the Auto Accompaniment mode pop-up display is active, select the auto
accompaniment mode by using the DATA buttons.
Start the Auto Accompaniment
To start Auto Accompaniment, press the START/STOP. Alternately, press the
SYNCHRO, then play the keyboard.
Single Finger
To play Auto Accompaniment to the selected style, press one, two, three or four
keys in the left range(below and including the split point), following the rules described
below.
CHORD
MAJOR
Pressing just one key produces a
full major chord corresponding to
that note.
MINOR
Simultaneously pressing any key to
the right of that note results in a full
minor chord.
SEVENTH
Similarly, pressing one more key to
the right (three keys in all) produces
a full 7th chord.
MINOR SEVENTH
Pressing a fourth key to the right
(four keys in all) creates a full minor
seventh chord.
EXAMPLE
Play C
Hear a C major
chord
Play Cm
Hear a C minor
chord
Play C7
Hear a C 7th chord
Play Cm7
Hear a C minor 7th
chord
Page 42

42
Auto-Accompaniment
Fingered
Allows you to play a complete style arrangement when you play three or four fingered
chords in the left range of the keyboard split.
Note: The digital piano will accept the following chords: Major, Minor, Seventh, Minor Seventh, Major
Seventh, Augmented, Diminished, Suspended 4, Minor 7th
5, Seventh Suspended 4, Seventh
Diminished, Seventh Augmented, Minor Major Seventh, 7th
5.
When Single Finger or Fingered is selected the keyboard is automatically divided into
left and right sections. You must use the left section to play the chords and the right
section to play the melody.
SPLIT POINT (F#3)
Major: C Minor: Cm Dominant 7: C7 Minor 7th: Cm7
Major 7th: CM 7 Augmented: Caug Diminished: Cdim Suspended 4: Csus4
Minor 7
5: Cm7-5 Dominant Sus4: C7sus4 Dominant Diminished:C7dim Dominant Augmented:C7aug
Minor Major 7th: CmM7 Dominant 7th
5: C7-5
Multi Finger
This mode allows you to produce accompaniment using full fingered chord and
simple fingering. For example, Following all cases are C chord. Pressing, (C, E, G),
(C, E) or (C).
Page 43

43
Auto-Accompaniment
Full Keyboard
When the Full Keyboard mode is selected, the piano will be automatically create
appropriate accompaniment while you play just about anything using both hands,
anywhere on the keyboard. You don’t have to worry about specifying the
accompaniment chords. The name of the detected chord will appear in the display.
(Although Full keyboard is designed to work with many songs, some arrangements
may not be suitable for use with this feature.)
Stopping the Auto Accompaniment
Press the START/STOP, the INTRO/ENDING or the FADE to stop the Auto
Accompaniment.You can also turn off the Auto Accompaniment by pressing the
AUTO ACCOMP button (the lamp turns off).
Adjusting the Auto Accompaniment Volume
Use the ACCOMP VOLUME function to adjust the Auto Accompaniment volume.
This function lets you adjust the level balance of the accompaniment and voices
played from the keyboard.
Call up the Accompaniment Volume.
Press the ACC. VOLUME. The ACCOMP VOLUME pop-up display appears.
Adjust the Accompaniment Volume.
Adjust the Accompaniment Volume by using the DATA buttons.
Page 44

Allows you to play the piano along with an audible beat in the form of a click at any
speed you choose.
TO USE THE METRONOME
To start the METRONOME, press the METRONOME button.
The display screen shows you the current beat and tempo and at the
same time you will hear the metronome sound.
The default timing of the metronome is 4/4.
To change beat
Change the beat by using the DATA UP and DOWN buttons while the LCD screen
shows the METRONOME pop-up display.
To adjust the volume of the metronome
You can also adjust the volume of the metronome on the METRONOME pop-up
display.
Press the CURSOR SHIFT button. The cursor is located on the metronome volume.
Adjust the volume by using the DATA buttons.
Adjust the tempo by using the TEMPO buttons or the Tap Time
feature. You can show the TEMPO on the main display after the METRONOME
pop-up display.
To stop the metronome, press the METRONOME button again.
44
Metronome
Metronome
*
*
Page 45

45
Registration
Registration
Selecting a Registration
Press a Registration button.
A Registration is a particular setup of rhythm, sound, Auto Accompaniment or any
other parameters or features you are using. To change the functions during playing you
can store your desired conditions in one button. And then if you select the button, your
desired conditions will be loaded immediately.
There are 5 Registration pads (1~5).
Storing a Registration
Hold the SAVE/YES button and press a RAGISTRATION button.
Registration stores the following keyboard parameters:
Current Rhythm and Tempo
Sounds and Volumes
Auto accompaniment mode
Setup Parameters
Page 46

46
Recording
Recording
Select Record mode.
Select the desired voice by using the VOICE group and DATA buttons.
Press the RECORD button, the RECORD lamp lights and the TRACK 1 lamp flashes.
The piano features comprehensive song recording functions that allow you to record
your own performance.
Start recording to the Track1.
Start playing the keyboard or press the PLAY/PAUSE button.
Stop recording to the Track1.
Stop playing the keyboard and press the STOP button. The Track2 lamp
automatically flashes. You can record the second part of the song to the Track2.
If you want to hear the recorded song in the Track1, press the TRACK2 button.
Flashing the lamp of the Track2 stops.
Press the PLAY/PAUSE button. The recorded song of the Track1 is played.
Auto Accompaniment styles can be recorded into the TRACK1. You can also use
the LAYER and the SPLIT functions when you record the song.
Page 47

47
Recording
Start recording to Track2.
Start playing the keyboard or press the PLAY/PAUSE button.
Stop recording.
Stop playing the keyboard and press the PLAY/PAUSE button.
Playback the recorded song.
Press the PLAY/STOP button again. The recorded song is played.
During recording to the Track2 you can listen the recorded song of the Track1.
To delete the recorded track, press and hold the TRACK button during 2~3 seconds.
The song memory is cleared, when the power is turned off.
Return to the normal mode.
Press the RECORD button. The Record lamp is turned off.
Page 48

48
Setup
SETUP
There are many built-in features that allow you to customize your piano. Becoming
familiar with these features will increase your playing enjoyment.
The setup menu will be automatically return to the Performance Screen after
approximately 8 seconds if no buttons are pressed.
OCTAVE SHIFT
The Octave shift setting lets you adjust the pitch of the two voices up or down an
octave.
Press the SETUP button. The keyboard setup menu appears.
To escape the setup menu press the EXIT button until the LCD screen shows the
Performance screen. The setup menu will be automatically returned to the
Performance Screen after approximately 8 seconds if no buttons are pressed.
Select either the Octave Lower or Octave High by using the DATA buttons.
Move the cursor by pressing the CURSOR SHIFT button and set the value by
using the DATA buttons. Available settings are -1 , 0, and +1.
Page 49

49
Setup
Changing the Split Point
Right range and left range for the Auto Accompaniment and the Split mode can be
divided at any key.
Press the SETUP button. The keyboard setup menu appears.
To escape the setup menu press the EXIT button until the LCD screen shows the
Performance screen. The setup menu will be automatically returned to the
Performance Screen after approximately 8 seconds if no buttons are pressed.
Select the Split Point, by using the DATA buttons.
Move the cursor by pressing the CURSOR SHIFT button and set the octave range
by using the DATA buttons.
You can also set the split point by pressing the desired key, when the cursor is on the
Split Point Value.
NEW SPLIT POINT
Page 50

50
Setup
Adjusting the Layered Voice Volume, the Split Voice Volume and the Main voice
volume.
Press the SETUP button. The keyboard setup menu appears.
To escape the setup menu press the EXIT button until the LCD screen shows the
Performance screen. The setup menu will be automatically returned to the
Performance Screen after approximately 8 seconds if no buttons are pressed.
Press the PAGE LEFT or RIGHT button until the Voice Volume page appears.
Select among the MAIN, the LAYER or the SPLIT by using the DATA buttons.
Move the cursor by pressing the CURSOR SHIFT button and set the octave range
by using the DATA buttons.
Page 51

51
Setup
Initializing the Registration Memory
Press the SETUP button. The keyboard setup menu appears.
Press the PAGE LEFT or RIGHT button until the Virtual Pianist page appears.
Press the PAGE LEFT or RIGHT button until the Regist Initial page appears.
Press the SAVE/YES button to initialize the Registration memory.
Refer to The initialized value Table on Page.
Setting the Virtual Pianist Voice in the Automatic channel mode
When you set a voice in this menu, the Virtual pianist plays the selected voice part in
the auto channel mode.
Press the SETUP button. The keyboard setup menu appears.
Set the desired voice by using the DATA buttons
Page 52

52
Setup
Local Control ON/OFF
The “Local Control” refers to the fact that, normally, the piano keyboard controls its internal tone
generator, allowing the internal voices to be played directly from the keyboard. This situation is
called “Local Control ON”. When the local control is set to off, the “keyboard” and “sound
source” are separated and no sound is out through the piano when playing the keyboard.
However, the data of the keyboard performance is output through MIDI. By setting local control
to off, you can play an external MIDI tone generator from the keyboard of the piano without
sounding the internal voices.
Press the SETUP button. The keyboard setup menu appears.
Press the PAGE LEFT or RIGHT button until the Local Control page appears.
Setting the Local control.
You can change the Local Control by using the DATA buttons on this page.
To escape the setup menu press the EXIT button until the LCD screen shows the
Performance screen. The setup menu will be automatically returned to the Performance
Screen after approximately 8 seconds if no buttons are pressed.
Page 53

53
Functions
Functions
ACCOMPANIMENT VOLUME
This determines the playback volume of the Auto Accompaniment volume.
Press the ACC VOLUME button. The ACC VOLUME pop-up display appears.
Adjust the Accompaniment Volume by using the DATA buttons.
BRILLIANCE
The sound timbre can be adjusted by using the BRILLIANCE function.
Press the BRILLIANCE button.
The BRILLIANCE pop-up appears. Adjust the BRILLIANCE by using the DATA
buttons.
The default value is 50, which is normal brilliance. Whenever press both DATA UP and DATA DOWN in the
Brilliance pop-up display, default value ‘50’ is set automatically.
If the brilliance is low, the piano makes dark sound and If it is high, the piano makes bright sound.
POP-UP Display. The pop-up display returns to the previous display after around eight(8) seconds.
Backing Up adjusted value. The last adjusted value of each Function can be retained in memory.
Page 54

54
Functions
TOUCH
Touch determines how your playing strength (velocity) affects the volume of the
voices. Ten(10) types are available for tailoring the keyboard response to the selected
voice, type of song, or your own playing preference. Press the TOUCH button and
select the desired touch type by pressing the DATA buttons while the TOUCH pop-up
display appears.
SOFT 1
SOFT 2
SOFT 3
These settings let you produce a relatively loud sound even when
playing the key softly.
TYPE
NORMAL 1
NORMAL 2
NORMAL 3
These settings are standard keyboard response and the NORMAL
2 is used as the basic setting.
HARD 1
HARD 2
HARD 3
These settings require you to play the keys quit strongly to produce
maximum loudness.
FIXED
This setting produces the same degree of loudness, no matter how
strongly or softly you play the keys. You can set the fixed loudness.
Select the Fixed velocity by using the DATA buttons. Move the
cursor on the fixed volume by pressing the CURSOR SHIFT button
and adjust the volume by using the DATA buttons.
Page 55

55
Functions
TRANSPOSE
The TRANSPOSE function makes it possible to shift the pitch of the keyboard in
semitone units, allowing you to match the pitch of the keyboard to the range of other
instruments or singers, or letting you easily play in a different key without having to
change your fingering. For example, if the TRANSPOSE is set F key, playing C results
in a pitch of F, or in other words, you can play in the key of C major on the keyboard
and automatically have the pitch transposed to F major.
Range: -12 semitones (F# ~ 0 ~ F), initial value: C key
TUNE
The Tune function lets you make fine adjustments to the pitch, allowing you to
accurately match the tuning with that of other instruments.
Range: A3 440Hz 100cents
Hz(Hertz)
The pitch is measured in units of Hertz (abbreviated Hz), which represents the number of times the sound wave
vibrates in a second.
Cent
Cent is unit of pitch, equal to 1/100 of a semitone.
Page 56

56
Disk
DISK
The disk function allows you to control all operations concerned with built in the USB
disk drive.
Play AMD/MIDI Files
The piano plays AMD (Advanced MIDI) file and standard MIDI file format.
Follow the procedure below to play back a AMD/MIDI file song on the disk.
Insert the USB disk into the disk inlet.
The screen will display the AMD/MIDI files on the disk. Select a MIDI file by using
the DATA buttons and Press the PLAY/PAUSE button.
Press the DISK button.The initial screen will display the options and indicating lamp
will lit.
Select the Play AMD Files or Play MIDI Files on the disk menu by using the DATA
buttons and the YES button.
*
Page 57

57
Disk
Stop the AMD/MIDI song
Press the STOP button.
Pause the AMD/MIDI song
Press the PLAY/PAUSE button. If press the PLAY/PAUSE buttons again, the MIDI
will be played at the stop point.
Repeat the AMD/MIDI song
Press the TRACK1/ during playing the song.
R
USB 1.0/ USB2.0 The Piano uses only USB memory disk.
NO DISK MESSAGE If there is no diskette in the USB disk drive during use, the following message will be displayed
on the display screen.
Play all AMD/MIDI songs on the disk
Press the TRACK2/ during playing the song.
A
A
MIDI file format the standard MIDI file should be MIDI format 0.
TIMEBASE & FILE SIZE
To play the song correctly, make the timebase under 120(Recommendable timbase 48) and file size 40KB.
Page 58

58
Disk
Folder
Folder name in the USB memory is displayed with < > mark.
Song and other available files is display with [ ] mark
To Go to the selected folder
Select the Play AMD files by using Data Up/down button and press the YES/SAVE
button. Piano displays available files or folder names on this LCD screen.
Move the cursor to a folder that you want to enter by using DATA UP/DOWN
buttons and press the PLAY/PAUSE button. Then piano displays available able files
and folders in the entered folder.
Move the Cursor to ‘< > . .’ and press the PLAY/PAUSE button to escape the
current folder. Piano displays higher folder files and folder on the LCD screen
Folder
Song or available
file name
Escape from
current
folder.
You can go
to higher
folder
*
*
*
*
Page 59

59
Disk
Play Recorded Song Files
The piano can play a recorded song file format.
Follow the procedure below to play back the recorded song on the disk.
Insert the USB disk into the disk inlet.
The screen will display the Song files on the disk. Select a Song file by using the
DATA buttons and Press the PLAY/PAUSE button.
Press the DISK button.The initial screen will display the options and indicating lamp
will lit.
Select the Play Song Files on the disk menu by using the DATA buttons and the
YES button.
*
All song controls are same as recorded song control. Refer to page 21.
Page 60

60
Disk
Save a Recorded Song File
The piano can save a recorded song file into USB disk.
Follow the procedure below to save the recorded song on the disk.
Record a song. Refer to Page 46.
Insert the USB disk into the disk inlet.
The screen will display the Save Song menu. Choose a Song file name by using the
DATA buttons. Press the SAVE/YES button to save the recorded song.
Press the DISK button.The initial screen will display the options and indicating lamp
will lit.
Select the Save Song on the disk menu by using the DATA buttons and the YES
button.
*
File Name The song file name start from song001. When you press data up or down button, the number
increase or decrease. You cannot use same name on the same disk.
Page 61

61
Disk
Save Registration File
The piano can save a registration file.
Follow the procedure below to save the registration file on the disk.
Store a registration. Refer to Page 45.
Insert the USB disk into the disk inlet.
The screen will display the Save Regist menu. Choose a Registration file name by
using the DATA buttons. Press the SAVE/YES button to save the registration into disk.
Press the DISK button.The initial screen will display the options and indicating lamp
will lit.
Select the Save Regist on the disk menu by using the DATA buttons and the YES
button.
*
File Name The registration file name start from reg0001. When you press data up or down button, the number
increase or decrease. You cannot use same name on the same disk.
Page 62

62
Disk
Load a Registration Files
The piano can load a saved registration file.
Follow the procedure below to load the registration file on the disk.
Insert the USB disk into the disk inlet.
The screen will display the Registration files on the disk. Select a Registration file by
using the DATA buttons and Press the SAVE/YES button to load the registration.
Press the DISK button.The initial screen will display the options and indicating lamp
will lit.
Select the Load Regist on the disk menu by using the DATA buttons and the YES
button.
*
Page 63

63
Virtual Pianist
VIRTUAL PIANIST
As a step towards providing even more musical pleasure, the piano features newly
developed keyboard movement mechanism. The virtual pianist function can be
operated with SMF or Recorded song file.
Play MIDI Files with the Virtual Pianist
Insert the USB disk into the disk inlet and press the DISK button.
The screen will display the AMD/MIDI files on the disk. Select a AMD/ MIDI file by
using the DATA buttons and Press the PLAY/PAUSE button.
Select the Play AMD Files or Play MIDI Files on the disk menu by using the DATA
buttons and the YES button.
Press the VIRTUAL PIANIST button and select a MIDI channel option.
* Select Channel *
[ ] Auto
[ ] Semi Auto
[ ] Manual Chn.01
When the Channel select menu is displayed on the screen, select the AUTO or SEMI AUTO by using
DATA buttons.
Press the SAVE/YES button.
MANUAL; Used to select the Virtual Pianist MIDI ch. Keys are moved as the selected MIDI channel.
When the Channel select menu is displayed on the screen, select the MANUAL option by using the DATA
buttons.
Move the cursor on the Channel value by pressing the CURSOR SHIFT button and set a MIDI channel by
using the DATA buttons.
Press the SAVE/YES button.
Repeat the AMD/MIDI song; Press the TRACK1/ during playing the song.
Play all AMD/MIDI songs on the disk; Press the TRACK2/ during playing the song.
A
R
A
* Select Channel *
[ ] Auto
[ ] Semi Auto
[ ] Manual Chn.01
Select Chn Option
Auto
Semi Auto
Manual
Description
When a MIDI channel includes voice that is set in the setup (refer to Page ) or MIDI
control 29, automatically the MIDI channel is set as the VP(moving key) Channel.
Piano moves keys in the MIDI channel that has a voice (default 000 Piano1).
You can select the VP channel. Piano moves keys in the selected MIDI Channel.
*
*
Page 64

64
Virtual Pianist
Play Recorded song with the Virtual Pianist
After loading a song file from a disk or recording a song file, press the RECORD
button. the Record lamp will be on.
Press the PLAY/PAUSE button.
Press the VIRTUAL PIANIST button and select a MIDI channel option.
Used to select a TRACK for moving keys.
When the Channel select menu is displayed on the screen, select the TRACK 1 or TRACK 2 by using
DATA buttons.
If you recorded only auto accompaniment into Track 1, keys don’t move. Keys can be moved, if the
recorded song has melody part.
[ ] Track 1
[ ] Track 2
*
Page 65

65
Remote Control
REMOTE CONTROL
Insert the USB memory into USB inlet on right side of
the control panel.
Press and hold the STOP button until hearing a click
sound.
After Click sound, you can hear a bell sound.
When the piano go to the Virtual Pianist mode or escapes from
Virtual Pianist mode, makes the bell sound.
Select a desired song by using the SEARCH
UP/DOWN buttons.
REPEAT a SONG/ PLAY ALL SONGS
If you want to listen all songs, press the M button until lighting the
Lamp on the track2/A button.
When the lamp is on the button s on the Track1/R button , the
selected song repeats. You can go to the repeat mode by using the M
button.
Press the PLAY/PAUSE button, to hear the selected
song.
If there is mark < > on the selected file, this file is not song file and
this is folder.
If you select a folder and press the PLAY/PAUSE button, You can
select a song file in the selected folder.
You can adjust volume of the song by using the VOL- and VOL +
buttons.
*
To stop playing a song, press the stop.
To escape the Virtual pianist mode, Press and hold the
stop button, until hearing click sound.
Page 66

66
General MIDI Sound Lists
General MIDI Sound Lists
GENERAL MIDI
(Grand) Piano 1
(Bright) Piano 2
(EI. Grd) Piano 3
Honky-tonk Piano
EI. Piano 1
EI. Piano 2
Harpsichord
Clavi
Celesta
Glockenspiel
Music Box
Vibraphone
Marimba
Xylophone
Tubular Bells
Santur
Drawbar Organ
Percussive Organ
Rock Organ
Church Organ
Reed Organ
Accordion (french)
Harmonica
Tango Accordion
Ac. Guitar (nylon)
Ac. Guitar (steel)
EI. Guitar (jazz)
EI. Guitar (clean)
EI. Guitar (muted)
Overdriven Guitar
Distortion Guitar
Guitar harmonics
Acoustic Bass
HQ Finger Bass
HQ Picked Bass
Fretless Bass
Slap Bass 1
Slap Bass 2
Synth Bass 1
Synth Bass 2
Violin
Viola
Piano 1
Piano 2
Piano 3
Honky Piano
EI. Piano 1
EI. Piano 2
Harpsichord
Clivinet
Celesta
Glockenspiel
Music Box
Vibraphone
Marimba
Xylophone
Tubular Bells
Santur
Hammond Organ
Pec.Organ
Rock Organ
Pipe Organ
Reed Organ
Accordion
Harmonica
T. Accordion
Nylon Guitar
Steel Guitar
Jazz Guitar
Clean Guitar
Muted Guitar
Ovdrv Guitar
Distr Guitar
Guitar Harmc
Acoustic Bass
Finger Bass
Pick Bass
Fretless Bass
Slap Bass 1
Slap Bass 2
Synth Bass 1
Synth Bass 2
Violin
Viola
Piano1
Piano2
Piano3
HnkPno
E Pno1
E Pno2
Harpsi
Clivi
Celest
Glockn
MusBox
Vibrap
Marimb
Xylopn
Tubulr
Santur
HamOrg
PerOrg
RckOrg
PipOrg
RedOrg
Acdion
Hamoni
TgAcdn
Nyl Gt
Stl Gt
Jzz Gt
Cln Gt
Mut Gt
Ovr Gt
Dst Gt
Gt Hrm
Aco Bs
Fng Bs
Pck Bs
Frl Bs
SlpBs1
SlpBs2
SynBs1
SynBs2
Violin
Viola
Pno1
Pno2
Pno3
H.Pn
EP 1
EP 2
Hrps
Clav
Cele
Gloc
MuBx
Vibr
Marm
Xylo
Tubl
Sant
HaOr
PcOr
RoOr
PpOr
ReOr
Acdi
HaMo
TgAc
NyGt
StGt
JzGt
ClGt
MuGt
OvGt
DsGt
GtHr
AcBs
FnBs
PcBs
FrBs
SlB1
SlB2
SyB1
SyB2
Viln
Vola
Number
1
2
3
4
5
6
7
8
9
10
11
12
13
14
15
16
17
18
19
20
21
22
23
24
25
26
27
28
29
30
31
32
33
34
35
36
37
38
39
40
41
42
MAIN MAIN+ LAYER or SPLIT MAIN + LAYER+ SPLIT
Display
Page 67

GENERAL MIDI
Cello
Contrabass
Tremolo Strings
Pizzicato Strings
Orchestral Harp
Timpani
String Ensemble 1
String Ensemble 2
Synth Strings 1
Synth Strings 2
Choir Aahs
Voice Oohs
Synth Voice
Orchestra Hit
Trumpet
Trombone
Tuba
Muted Trumpet
French Horn
Brass Section
Synth Brass 1
Synth Brass 2
Soprano Sax
Alto Sax
Tenor Sax
Baritone Sax
Oboe
English Horn
Bassoon
Clarinet
Piccolo
Flute
Recorder
Pan Flute
Blown Bottle
Shakuhachi
Whistle
Ocarina
Lead 1 (square)
Lead 2 (sawtooth)
Lead 3 (calliope)
Lead 4 (chiff)
Lead 5 (charang)
Cello
Contrabass
Tremolo Strings
Pizzicato Strings
Harp
Timpani
Str Ensemble 1
Str Ensemble 2
Synth Strings 1
Synth Strings 2
Choir Aahs
Voice Aahs
Synth Voice
Orchestra Hit
Trumpet
Trombone
Tuba
Mute Trumpet
French Horn
Brass Section
Synth Brass 1
Synth Brass 2
Soprano Sax
Alto Sax
Tenor Sax
Baritone Sax
Oboe
English Horn
Bassoon
Clarinet
Piccolo
Flute
Recorder
Pan Flute
Blown Bottle
Shakuhachi
Whistle
Ocarina
Lead 1 Square
Lead 2 Sawtooth
Lead 3 Calliope
Lead 4 Chiff
Lead 5 Charang
Cello
Ctrabs
Tr Str
Pz Str
Harp
Timpan
StrEn1
StrEn2
SyStr1
SyStr2
Choir
Voice
SynVoc
OrcHit
Trmpet
Trmbon
Tuba
MutTrp
FrnHrn
Brass
SyBrs1
SyBrs2
SprSax
AltSax
TnrSax
BrtSax
OBOE
EngHrn
Basoon
Clrnet
Piccol
Flute
Record
PanFlt
Bottle
Shakuh
Whistl
Ocarin
Lead 1
Lead 2
Lead 3
Lead 4
Lead 5
Cell
CtBs
TrSt
PzSt
Harp
Timp
StE1
StE2
SyS1
SyS2
Chor
Voic
SyVo
OHit
Tmpt
Tmbn
Tuba
MTrp
FHrn
Bras
SBr1
SBr2
SSax
ASax
TSax
BSax
Oboe
EHrn
Basn
Clnt
Picl
Flte
Recd
PnFt
Botl
Shak
Whis
Ocar
Led 1
Led 2
Led 3
Led 4
Led 5
67
General MIDI Sound Lists
Number
43
44
45
46
47
48
49
50
51
52
53
54
55
56
57
58
59
60
61
62
63
64
65
66
67
68
69
70
71
72
73
74
75
76
77
78
79
80
81
82
83
84
85
MAIN MAIN + LAYEr or SPLIT MAIN + LAYEr + SPLIT
Display
Page 68

68
General MIDI Sound Lists
Number
86
87
88
89
90
91
92
93
94
95
96
97
98
99
100
101
102
103
104
105
106
107
108
109
110
111
112
113
114
115
116
117
118
119
120
121
122
123
124
125
126
127
128
GENERAL MIDI
Lead 6 (voice)
Lead 7 (fifths)
Lead 8 (bass+lead)
Pad 1 (fantasia)
Pad 2 (warm)
Pad 3 (polysynth)
Pad 4 (choir)
Pad 5 (bowed)
Pad 6 (metallic)
Pad 7 (halo)
Pad 8 (sweep)
FX 1 (rain)
FX 2 (soundtrack)
FX 3 (crystal)
FX 4 (atmosphere)
FX 5 (brightness)
FX 6 (goblins)
FX 7 (echoes)
FX 8 (sci-fi)
Sitar
Banjo
Shamisen
Koto
Kalimba
Bag pipe
Fiddle
Shanai
Tinkle Bell
Agogo
Steel Drums
Wood block
Taiko Drum
Melodic Tom
Synth Drum
Reverse Cymbal
Gt. Fret Noise
Breath Noise
Seashore
Bird Tweet
Teleph. Ring
Helicopter
Applause
Gunshot
Lead 6 Voice
Lead 7 Fifths
Lead 8 Bass+led
Pad 1 Fantasia
Pad 2 Warm
Pad 3 Polysynth
Pad 4 Choir
Pad 5 Bowed
Pad 6 Metallic
Pad 7 Halo
Pad 8 Sweep
FX 1 Rain
FX 2 Soundtrack
FX 3 Crystal
FX 4 Atmosphere
FX 5 Brightness
FX 6 Goblins
FX 7 Echoes
FX 8 Sci-fi
Sitar
Banjo
Shamisen
Koto
Kalimba
Bag Pipe
Fiddle
Shanai
Tinkle Bell
Agogo
Steel Drums
Wood block
Taiko Drum
Melodic Tom
Synth Drum
Rev Cymbal
Gt. Fret Noise
Breath Noise
Seashore
Bird Tweet
Teleph Ring
Helicopter
Applause
Gunshot
Lead 6
Lead 7
Lead 8
Pad 1
Pad 2
Pad 3
Pad 4
Pad 5
Pad 6
Pad 7
Pad 8
FX 1
FX 2
FX 3
FX 4
FX 5
FX 6
FX 7
FX 8
Sitar
Banjo
Shamis
Koto
Kalimb
BagPipe
Fiddle
Shanai
TnkBel
Agogo
Stl Dr
Woodbl
TaikDr
MelTom
Syn Dr
RevCym
GtFret
Breath
Seasho
Bird
Telepn
Helcpt
Applau
Gun
Led 6
Led 7
Led 8
Pad 1
Pad 2
Pad 3
Pad 4
Pad 5
Pad 6
Pad 7
Pad 8
FX 1
FX 2
FX 3
FX 4
FX 5
FX 6
FX 7
FX 8
Sitr
Banj
Shmi
Koto
Kali
BPip
Fidl
Shna
TkBl
Aggo
StDr
Wobl
TaDr
MeTm
SyDr
RvCy
GtFt
Brth
Sesh
Bird
Tlpn
Hlpt
Apla
Gun
MAIN MAIN + LAYER or SPLIT MANI + LAYER + SPLIT
Display
Page 69

Drums/SFX Sound Lists
69
Drums/SFX Sound Lists
DRUM SET T ABLE (MIDI CHANNEL 10)
Prog 1: Prog 9: Prog 17: Prog 25: Prog 26
STANDARD ROOM SET POWER SET ELEC SET TR808
27 - D#1 High Q
28 - E1 Slap
29 - F1 Scratch Push
30 - F#1 Scratch Pull
31 - G1 Sticks
32 - G#1 Square Click
33 - A1 Metronome Click
34 - A#1 Metronome Bell
35 - B1 HQ STD1 Kick2 Power Kick2 Elec Kick2
36 - C2 HQ STD1 Kick1 Power Kick1 Elec Kick1 808 Base Drum
37 - C#2 Side Stick 808 Rim Shot
38 - D2 HQ Low Floor Tom Gated Snare Elec SD 808 Snare Drum
39 - D#2 Hand Clap
40 - E2 Snare Drum 2 Power Snare1 Elec Snare1
41 - F2 HQ Low Floor Tom Room Low Tom2 Power Low Tom2 Elec Low Tom2 808 Low Tom 2
42 - F#2 Closed Hi Hat [EXC1] 808 CHH[EXC1]
43 - G2 HQ High Floor Tom Room Low Tom1 Power Low Tom1 Elec Low Tom1 808 Low Tom 1
44 - G#2 Pedal Hi-Hat [EXC1] 808 CHH[EXC1]
45 - A2 HQ Low Tom Room Mid Tom2 Power Mid Tom2 Elec Mid Tom2 808 Mid Tom 2
46 - A#2 Open Hi-Hat [EXC1] 808 OHH[EXC1]
47 - B2 HQ Low-Mid Tom Room Mid Tom1 Power Mid Tom1 Elec Mid Tom1 808 Mid Tom 1
48 - C3 HQ Hi Mid Tom Room Hi Tom2 Power Hi Tom2 Elec Hi Tom2 808 Hi Tom 2
49 - C#3 Crash Cymbal 1 808 Cymbal
50 - D3 HQ High Tom Room Hi Tom1 Power Hi Tom1 Elec Hi Tom1 808 Hi Tom 1
51 - D#3 Ride Cymbal 1
52 - E3 Chinese Cymbal Reverse Cymbal
53 - F3 Ride Bell
54 - F#3 Tambourine
55 - G3 Splash Cymbal
56 - G#3 Cowbell 808 Cowbell
57 - A3 Crash Cymbal2
58 - A#3 Vibraslap
59 - B3 Ride Cymbal2
60 - C4 Hi Bongo
61 - C#4 Low Bongo
62 - D4 Mute Hi Conga 808 High Conga
63 - D#4 Open Hi Conga 808 Mid Conga
64 - E4 Low Conga 808 Low Conga
65 - F4 High Timbale
66 - F#4 Low Timbale
67 - G4 High Agogo
68 - G#4 Low Agogo
69 - A4 Cabasa
70 - A#4 Maracas
71 - B4 Short Whistle[EXC2]
72 - C5 Long Whistle[EXC2]
73 - C#5 Short Guiro[EXC3]
74 - D5 Long Guiro[EXC3]
75 - D#5 Claves
76 - E5 Hi Wood Block
77 - F5 Low Wood Block
78 - F#5 Mute Cuica[EXC4]
79 - G5 Open Cuica[EXC4]
80 - G#5 Mute Triangle[EXC5]
81 - A5 Open Triangle[EXC5]
82 - A#5 Shaker
83 - B5 Jingle Bell
84 - C6 Belltree
85 - C#6 Castanets
86 - D6 Mute Surdo[EXC6]
87 - D#6 Open Surdo[EXC6]
88 - E6
Page 70

Drums/SFX Sound Lists
70
Prog 33: Prog 41: Prog 49: Prog 58: Prog 59:
JAZZ SET BRUSH ORCHESTRA SFX SFX
27 - D#1 Closed Hi Hat Slap
28 - E1 Pedal Hi-Hat Conga
29 - F1 Open Hi Hat Short Whistle
30 - F#1 Ride Cymbal Long Whistle
31 - G1 Cymbal
32 - G#1 Short Guiro
33 - A1 Triangle
34 - A#1 Long Guiro
35 - B1 Jazz BD2 Jazz BD2 Concert BD 2 Shaker
36 - C2 Jazz BD1 Jazz BD1 Concert BD1 Open Cuica
37 - C#2 Cuica
38 - D2 Brush Tap Concert SD * Jingle
39 - D#2 Brush Slap High Q Bell Belltree
40 - E2 Brush Swirl Concert SD Slap Korean Cymbal 1
41 - F2 Timpani F Scratch Push ONE
42 - F#2 Timpani F# Scratch Pull TWO
43 - G2 Timpani G Sticks Bad Sound 1
44 - G#2 Timpani G# Square Click THREE
45 - A2 Timpani A Metronome Click Bad Sound 2
46 - A#2 Timpani A# Metronome Bell FOUR
47 - B2 Timpani B Guitar Slide Gun Shot
48 - C3 Timpani c Gt Cut Noise (down) FIVE
49 - C#3 Timpani c# Gt Cut Noise (up) SIX
50 - D3 Timpani d Double Bass Slap Korean Drum 1
51 - D#3 Timpani d# Key Click SEVEN
52 - E3 Timpani e Laughing Korean Drum 2
53 - F3 Timpani f Screaming EIGHT
54 - F#3 Punch NINE
55 - G3 Heart Beat Korean Drum 3
56 - G#3 Footsteps1 TEN
57 - A3 Concert Cymbal2 Footsteps2 Korean Drum 4
58 - A#3 Applause Rocket
59 - B3 Concert Cymbal1 Door Creaking Korean Drum 5
60 - C4 Door Closing Chirping
61 - C#4 Scratch Birds 1
62 - D4 Wind Chime Cuckoo
63 - D#4 Car Engine Start Cock
64 - E4 Car Breaking Birds 2
65 - F4 Car Pass Duck
66 - F#4 Car Crash Dog
67 - G4 Police Siren Splashing
68 - G#4 Train Pig
69 - A4 Jet Take-off Comic Sound
70 - A#4 Helicopter Cat
71 - B4 Starship Children
72 - C5 Gun Shot Goat
73 - C#5 Machinegun Cow
74 - D5 Lasergun Korean Cymbal 2
75 - D#5 Explosion wolf
76 - E5 Dog Korean Cymbal 3
77 - F5 Horse Gallop Horse
78 - F#5 Birds Frog
79 - G5 Rain Sprite
80 - G#5 Thunder Bear
81 - A5 Wind Knocking
82 - A#5 Sea Shore Tiger
83 - B5 Stream Space Sound
84 - C6 Bubble Elephant
85 - C#6 Car
86 - D6 Korean Drum 6
87 - D#6 Telephone
88 - E6 Applauses Korean Drum 7
Page 71

71
MIDI
MIDI
MIDI?
MIDI(Musical Instrument Digital Interface) is the international standard for digital communication
of electronic musical instrument data, this means that any equipment which has a MIDI terminal
- such as electronic musical instrument or personal computers - can easily exchange the digital
data with other MIDI equipment without some complicated conversions or connections.
How to connect MIDI cable
The MIDI feature makes it possible for you to send and receive a variety of digital data.
MIDI IN terminal
This is an input terminal that connects with the MIDI out terminal of other MIDI device.
MIDI OUT terminal
The terminal that transmits data from the piano to other equipment.
MUSICAL INSTRUMENT
Page 72

72
MIDI Implementation Chart
MIDI Implementation Chart
Function Recognized Transmitted Remark
Basic Channel Default ALL 1 - 3
Mode Default OMNI OFF, POLY OMNI OFF, POLY
Note ON/OFF 9nH kk vv O O #kk:note ON (0-127)
#vv:velocity (1-127)
Pitch Bender EnH bi bh O X Maximum swing +/- 1 tone
00 BnH 00H cc O X Bank Select
01 BnH 01H cc O X Modulation Wheel
05 BnH 05H cc O X Portamento Time
06 BnH 06H cc O X Data Entry
07 BnH 07H cc O X Volume
10 BnH 0AH cc O X Pan Out
11 BnH 0BH cc O X Expression
64 BnH 40H cc O O Sustain (Damper) Pedal
65 BnH 41H cc O X Portamento ON/OFF
66 BnH 42H cc O O Sostenuto Pedal
Control 67 BnH 43H cc O O Soft Pedal
Change 80 BnH 80H vv O X Reverb Prog.(vv=00H-70H)
81 BnH 51H vv O X Chorus Prog.
91 BnH 5BH vv O X Reverb Send Level
93 BnH 5DH vv O X Chorus Send Level
120 BnH 78H 00H O X All Sound Off
121 BnH 79H 00H O X Reset All Controller
123 BnH 7BH 00H O X All Notes Off
126 BnH 7EH 00H O X Mono On
127 BnH 7FH 00H O X Poly On
Program Change CnH PP O X Sounds/Drum Set List
System Exclusive General MIDI O X
Reset
O : Yes, X : No
Page 73

Troubleshooting
T roubleshooting
73
Be sure to check to following table whenever you encounter problems with the DIGITAL
PIANO operation.
PROBLEM CAUSE SOLUTION
No sound
Occasional interference
No sound when connected
to external amplifier.
1. Power supply problem.
2. Volume setting is too low.
3. Headphone is plugged in.
1. Refrigerators, washing
machines and similar
electric appliances are
interfering.
1. Volume setting is too low.
2. Defective connection cord.
1. Check the power cord
whether it’s properly in AC
outlet.
2. Adjust the volume.
3. Unplug the headphone.
1. Use outlet as far away as
possible from appliance
thought to be the cause.
1. Adjust the volume.
2. Replace connection cord.
Page 74

Section Contents
PRODUCT DIGITAL PIANO
KEYBOARD 88 KEYS (STANDARD) - 7 1/4 OCTAVES
VIRTUAL PIANIST YES (KEYBOARD MOVEMENT MECHANISM)
TOUCH RESPONSE Off, Hard1/2/3, Soft1/2/3, Normal1/2/3
MAX. POLYPHONY 124NOTES
SOUND GM 128 VOICES, 2 DRUM KITS, 2 SFX SETS
RHYTHM 54 RHYTHM STYLES
RHYTHM CONTROLS INTRO/ENDING, SYNCHRO, STAR T/STOP, FILL 1/2
AUTO ACCOMPANIMENT TEMPO (RANGE: 40~250)
SINGLE FINGER, FINGERED, MUL TI FINGER, FULL KBD
FUNCTION LAYER, SPLIT, EQ, TUNE, TRANSPOSE
DSP EFFECT(6), REVERB(6)
DISK PLAY SMF, LOAD/SAVE RECORDED SONG
METRONOME YES
DISPLAY 20Characters 4Lines with Backlit
DEMONSTRATION TUNES 12
RECORD REAL-TIME-RECORDING
2 TRACKS
MAX. 4,000NOTES
PEDAL 3PEDALS(DAMPER, SOSTENUTO, SOFT)
VOLUME CONTROLS MAIN, METRONOME, ACCOMP, VOICE
I/O TERMINALS MIDI IN/OUT, AUDIO IN L/R, AUDIO OUT L/R
2 HEADPHONES IN
SPEAKERS 9:6 INCHES 2, 2 INCHES 2
POWER AC IN
POWER CONSUMPTION 160W
DIMENSIONS (H x D X W mm) 880 520 1400(Upright) / 854 995 1400 (Grand)
WEIGHT 75Kgs(Upright) / 100Kgs(Grand)
ACCESSORY OWNER
S MANUAL
74
Specifications
Specifications
 Loading...