

Page 1

Page 2

Manual
English
Page 3

Table of contents
1 Preface.............................................................................................................................5
1.1 Welcome.................................................................................................................................................5
1.2 Use of the manual.............................................................................................................................5
1.3 Illustrations..........................................................................................................................................5
1.4 Symbols used in the manual.........................................................................................................5
1.5 Service & technical support.......................................................................................................... 6
2 Safety...............................................................................................................................7
2.1 Safe use of the bicycle.................................................................................................................... 7
2.2 Battery & charger safety............................................................................................................... 8
2.3 Luggage carrier.................................................................................................................................9
2.4 Accessories & attachments........................................................................................................ 10
3 Description....................................................................................................................11
3.1 Introduction E-Components..........................................................................................................11
3.2 EnergyPak & charger.................................................................................................................... 12
3.3 SyncDrive...........................................................................................................................................14
3.4 RideControl.......................................................................................................................................14
3.5 RideControl Dash............................................................................................................................16
3.6 RideDash EVO...................................................................................................................................17
4 Transport & Storage.................................................................................................18
4.1 Transportation.................................................................................................................................. 18
4.2 Storage...............................................................................................................................................18
5 Bike usage....................................................................................................................19
5.1 Range................................................................................................................................................... 19
5.2 EnergyPak......................................................................................................................................... 19
5.3 Charging............................................................................................................................................20
5.3.1 Use of the chargers............................................................................................................. 21
5.3.2 EnergyPak removal & installation................................................................................22
5.3.3 Charging a removed EnergyPak....................................................................................24
5.3.4 Charging inside the bike.................................................................................................. 25
5.3.5 Charging time table...........................................................................................................26
5.4 Controls............................................................................................................................................. 27
5.4.1 RideControl Ergo series.................................................................................................... 27
5.4.2 RideControl Dash................................................................................................................34
5.4.3 RideDash EVO......................................................................................................................39
5.5 Integrated head tube light......................................................................................................... 43
5.6 Keys....................................................................................................................................................44
6 Maintenance...............................................................................................................45
6.1 Cleaning..............................................................................................................................................45
Table of contents3
Page 4

6.2 Drivetrain..........................................................................................................................................45
7 Legal documentation...............................................................................................48
7.1 Warranty.............................................................................................................................................48
7.2 Exclusions......................................................................................................................................... 49
7.3 Conformity........................................................................................................................................49
7.4 Disclaimer......................................................................................................................................... 49
7.5 FCC......................................................................................................................................................50
7.6 IC..........................................................................................................................................................50
4Table of contents
Page 5

1Preface
1.1Welcome
Welcome and congratulations on your purchase of a new Giant, Liv or Momentum E-bike.
The fun of pedalling is only moments away!
Ride Life, Ride Giant
Nothing makes us happier than seeing people out riding bikes. Since 1972 Giant has
manufactured quality bikes for every type of terrain and rider imaginable. Giant bicycles
have allowed millions of cyclists just like you the opportunity to live happier, healthier
lives because of the joy, exercise and sheer exhilaration that riding a bicycle brings. And
it is this commitment to sharing the joy of the ride that inspires us to continually offer the
world’s most innovative bicycles.
1.2Use of the manual
Read all information in this manual carefully before you start riding on your new E-bike.
Safety instructions are very important and should not be overlooked. By reading the
manual you will have a better understanding of the general operation of the various bike
parts.
This manual is a supplement to the general bike manual. For more information on other
parts and warranty, consult the general bike manual.
1.3Illustrations
Illustrations shown in this document may differ in detail from the exact configuration on
your particular e-bike model. The illustrations are a general reference for instruction and
description purposes only.
1.4Symbols used in the manual
DANGER: Warns about a situation that will cause death, serious physical injury
and/or heavy material damage if one does not obey the safety instructions.
WARNING: Warns about a situation that can cause death, serious physical injury
and/or heavy material damage if one does not obey the safety instructions.
CAUTION: Warns about a situation that can cause material damage if one does
not follow the safety instructions.
Preface5
Page 6

NOTICE: Provides important information to avoid problems.
INFO: Provides additional information.
1.5Service & technical support
NOTICE: This manual is not intended to be an extensive reference book about
service, maintenance and/or repairs. Please consult your dealer for service and
technical support. You can find more information about our products or find a
dealer via our global website: www.giant-bicycles.com.
6Preface
Page 7

2Safety
2.1Safe use of the bicycle
Before using the E-bike on the open road, ride the bike in a secure area to get acquainted
with riding a bike with electric pedalling support. Try all settings on the bike and get
familiar with the results.
WARNING: Keep both hands on the grips on the handlebar and the brake levers
within reach while riding, to be able to immediately respond to any circumstance.
Failing to do so can cause you to loose control over the bicycle.
WARNING: Never exceed the maximum permissible load of the bicycle with any
kind of load.
NOTICE: The A-weighted emission sound pressure level at the rider's ears is less
than 70 dB(A).
Safety7
Page 8

2.2Battery & charger safety
WARNING:
• Keep the EnergyPak battery
& charger away from water
and open fire.
• Do not use the battery &
charger for other purposes.
• Do not connect terminals.
• Keep the battery away from
children and pets.
• Do not subject the battery
& charger to shocks (e.g. by
dropping).
• Do not cover the battery &
charger or place objects on
top of it.
• Stop the charging procedure
immediately if you notice a
strange smell or smoke.
• In the unlikely case that
the battery is on fire, do
NOT try to put it out with
water. Use sand instead and
call emergency services
immediately.
8Safety
Page 9
CAUTION: Avoid contact with battery and charger during charging operation.
The charger heats up. Please read/note additional information on the rear of the
battery case.
2.3Luggage carrier
WARNING: Warning: Always make sure that any luggage or child-seat
feature fitted to the luggage carrier is securely fitted in accordance with the
manufacturer’s instructions, and that there are no loose straps or other items
that can get caught in the wheel.
CAUTION: Warning: Luggage can only be safely carried on the carrier(s). Do not
attach luggage to any other part of the bike.
CAUTION: Warning: The bicycle may behave differently (particularly with regard
to steering and braking) when the luggage carrier is loaded.
NOTICE: Notice: It is recommended to check and adjust positioning of reflectors
and lamps such that these are not obscured when luggage is attached to the
luggage carrier.
INFO: Info: It is recommended distribute luggage evenly between the two sides
of the luggage carrier.
Carrier with integrated battery:
On some bikes the battery holder and
luggage carrier are combined. Please
ensure that luggage is securely fixed to
avoid damage to the battery and/or holder.
CAUTION: Maximum rear carrier
capacity including EnergyPak: 22
kg.
Safety9
Page 10

2.4Accessories & attachments
Bicycle trailers & trailer bicycles
CAUTION: Please be aware that the use of a (third party) bicycle trailer or
trailer bicycle will cause extra load stress and increased wear on the E-bike’s
electric and/or mechanical parts. Since there are different types of trailer
attachments available (depending on brand/model/etc.) it is not possible to
list each combination and predict the outcome for each usage scenario. Always
follow the trailer manufacturer’s instructions for installation, usage and safety.
Never modify any original parts of the E-bike to accommodate a (third party)
trailer. Never exceed the total permissible load weight of the E-bike as stated
elsewhere in this user manual.
Child seats
CAUTION: Please be aware that the use of a child seat can cause extra load
stress and increased wear on the E-bike’s electric and/or mechanical parts.
Since there are different types of child seats available (depending on brand/
model/etc.) it is not possible to list each combination. Always follow the child
seat manufacturer’s instructions for installation, usage and safety. Never modify
any original parts of the E-bike to accommodate a child seat. Never exceed
the carrier load capacity and/or total permissible load weight of the E-bike
as stated elsewhere in this user manual. If a child seat is used, and the bike is
fitted with a saddle with exposed coil springs underneath the saddle, there is a
substantial risk that the child’s fingers can get injured from getting trapped in
the coil springs. Please take appropriate steps to prevent the trapping of the
child’s fingers.
Carriers
10Safety
CAUTION: There are many types of carriers that can have different
specifications. Before use, always consult the documentation that came with
the carrier and/or consult your local dealer for installing instructions, maximum
load, torque specifications, parts specifications, maximum compatible wheel
size, trailer- and child seat compatibility. For information about the name and
address of the manufacturer, importer or representative, trademark, model and
production batch number or reference, check the carrier's documentation and/or
on the carrier itself.
Page 11

3Description
3.1Introduction E-Components
Giant, Liv and Momentum e-bikes are equipped with unique components and technology
developed by Giant, aimed to provide the highest performance and best experience
for each rider’s usage. We briefly explain some of the major system components and
terminology below.
Giant EnergyPak batteries produce maximum performance in an integrated package. The
EnergyPak charges very fast compared to earlier battery systems and provides a superb
riding range. The EnergyPak Plus accessory battery can be added to various models to
extend the range even more. All EnergyPaks are thoroughly tested in Giant factories to
ensure maximum quality, safety and reliability.
The SyncDrive motor is widely acclaimed for its performance and reliability. Finely tuned
by Giant for best performance on each model, the small mid-drive motor delivers a
powerful, yet smooth and natural pedalling assistance in every assist mode. Choose the
higher assist levels when you’re riding in tough conditions, rough terrain and when the
roads are pointing upward. Maximum torque is available in the “Power” level to help you
climb the steepest slopes.
The low power assist levels save battery capacity to help you cover greater distances.
Ideal for riding urban and suburban roads, or whenever less power assistance is needed.
The sophisticated Smart Assist function provides an optimal balance of power and range.
Smart Assist uses the input from all the sensors to instantly and automatically adapt the
power output to changing riding conditions.
The RideControl Ergo series provide an ergonomic layout with easy-to-operate controls.
Visual feedback comes from bright LED indicators or a screen like the RideDash EVO. The
RideControl Dash features all the essential controls plus a colour screen, integrated into a
single compact unit.
Connect the RideControl app on your smartphone with your e-bike to add even more
possibilities, which are ever expanding and improving with updates.
Description11
Page 12
The RideControl Dash is a remote with integrated colour display screen that shows
extensive bike and ride information from the EnergyPak(s), SyncDrive motor, sensors,
lights and other connected e-components. Ergonomically placed at the left handlebar grip,
it offers many features of the RideControl Ergo remotes and the RideDash EVO, into a
single compact unit.
The RideDash EVO gives the rider extensive bike and ride information on a beautiful, large
colour screen placed in the centre of the handlebar. Operated by the RideControl Ergo
series, it shows clear and large indications of items like speed, distance, battery status,
remaining range, and other useful information.
3.2EnergyPak & charger
EnergyPaks
EnergyPak (rear rack) EnergyPak (integrated)
A. EnergyPak
B. Charging socket
C. Energy level check (button)
12Description
A. EnergyPak
B. Charging socket
C. Energy level check (button)
Page 13
Chargers
4A charger Smart charger
A. AC socket (110~230 V) (type will
vary)
B. Charger
C. Charging indicator
D. Charging socket
A. AC socket (110V/110~240 V) (type will
vary)
B. Charger
C. Charging indicator 60%
D. Charging indicator 100%
E. Charging socket
F. Charge adapter
Description13
Page 14

3.3SyncDrive
The powerful SyncDrive motor technology
uses a range of sensors and smart
processing to provide responsive pedalling
assistance that is perfectly synchronized
with human input. The result is a very
natural and predictable power output
pattern, keeping the assistance in harmony
with the rider. There are several SyncDrive
motor variations, all custom tuned by Giant
to fit the bike model’s intended type of use.
INFO: SyncDrive motors
equipped with a square taper
bottom bracket have up to one
millimetre horizontal play on the
axle by design.
3.4RideControl
The RideControl Ergo series of remotes provide the control over all important system
functions. The clear LEDs give visual feedback on the status of the EnergyPak, SyncDrive
motor, sensors, lights and other connected e-components.
14Description
Page 15
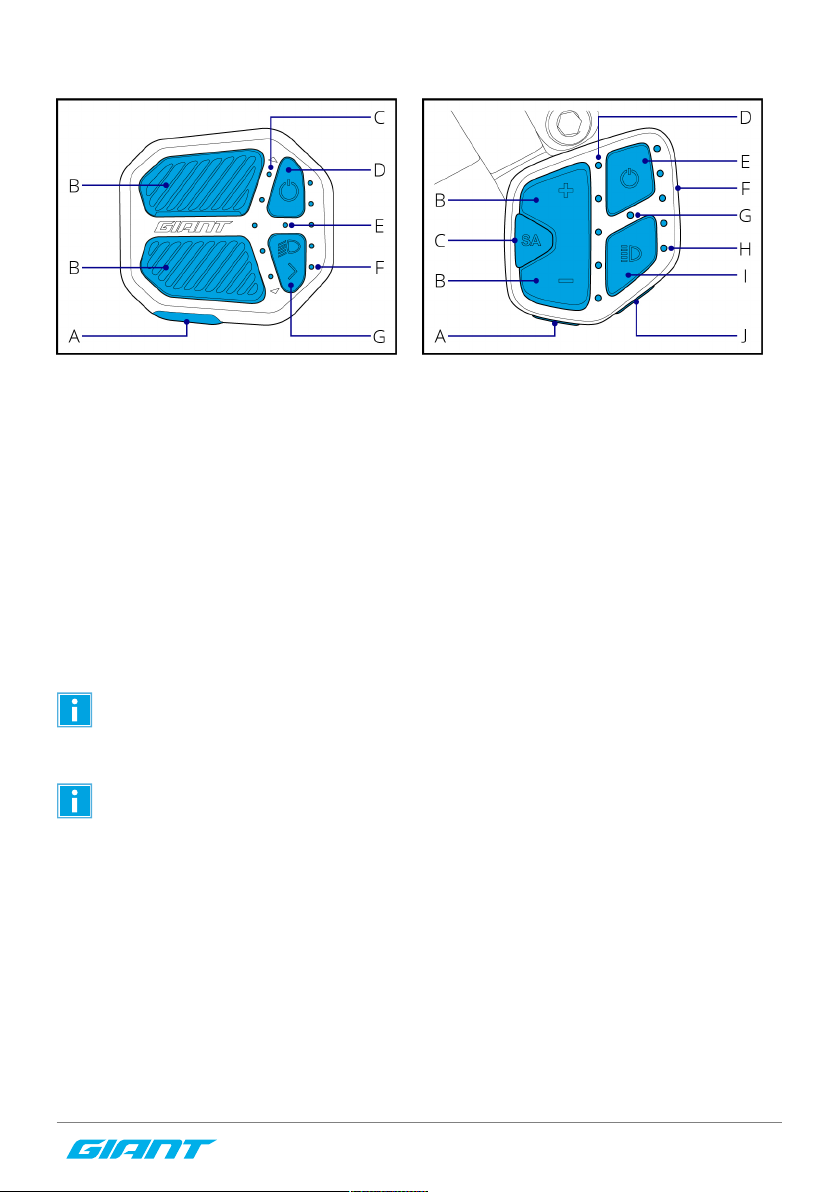
RideControl Ergo RideControl Ergo 2
A. Walk Assist
B. Assistance level (up / down)
C. Power Assist indicator (5 LEDs)
D. On / Off
E. Light indicator (white) / Error
indicator (red)
F. EnergyPak charge indicator (5 LEDs)
G. Light / Info
INFO: The Walk Assist function is not available in some countries due to local
regulations.
INFO: RideControl Ergo series remotes can also control the RideDash EVO
screen if present. The RideDash EVO can also be purchased separately.
Availability and pricing may vary. Contact your authorized dealer or visit the
Giant website for more information.
A. Info
B. Assistance level (up / down)
C. Smart Assist (AUTO function)
D. Power Assist indicator (5 LEDs)
E. On / Off
F. USB-C port
G. Light indicator (white) / Error
indicator (red)
H. Battery level indicator (5 LEDs)
I. Light / Screen backlight
J. Walk Assist
Description15
Page 16
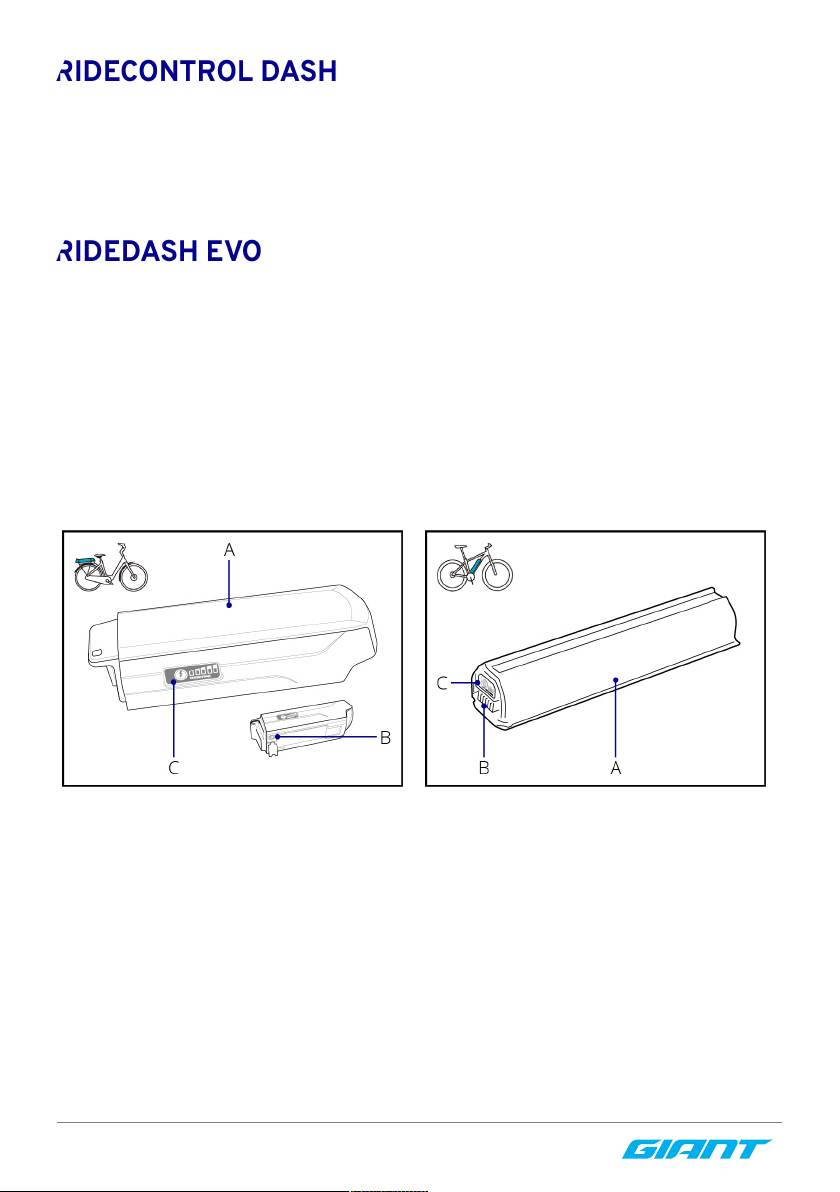
3.5RideControl Dash
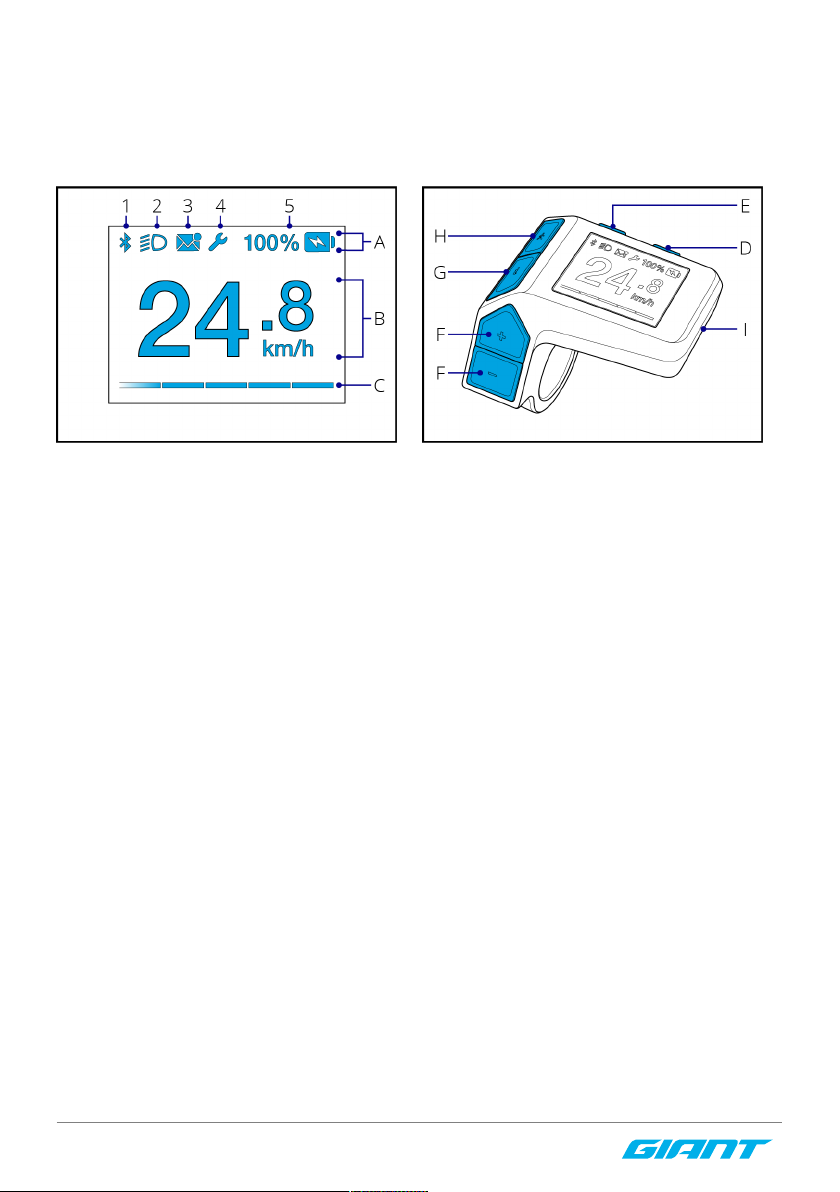
The RideControl Dash is a remote and colour display screen integrated in a single unit,
with features similar to RideControl Ergo series and the RideDash EVO.
Screen Buttons
A. Status bar
1. Wireless connection
2. Light status
3. Phone notification
4. Service
5. Battery status
B. Data field
C. Assist level indicator
D. Light / screen backlight
E. Power on/off
F. Assistance level up/down
G. Info
H. Walk Assist
I. USB-C port
16Description
Page 17

INFO: The Walk Assist function is not available in some countries due to local
regulations.
3.6RideDash EVO
The RideDash EVO is a colour display screen that shows extensive bike and ride
information from the EnergyPak(s), SyncDrive motor, sensors, lights and other connected
e-components. The RideDash EVO is operated by the RideControl Ergo or Ergo 2.
A. Status bar
1. Wireless connection
2. Light status
3. Phone notification
4. Service
5. Battery status
B. Data field
C. Assistance level indicator
D. Sub data fields
1. Sub data field 1
2. Sub data field 2
E. Page indicator
1. Active page
Description17
Page 18

4Transport & Storage
This chapter describes specific information regarding the e-bike parts. For more
information on transport and storage of the bike, consult the general bike manual.
4.1Transportation
CAUTION: Batteries are not designed to be on the bike during transportation by
car. Batteries must be taken off the bike(s) and transported inside the car.
4.2Storage
E-bike
Store the bike in a location where it is protected from snow, rain, sun etc. Snow and rain
can cause the bike to corrode. The ultraviolet light from the sun can fade the paint or crack
any rubber or plastic on the bike.
EnergyPak
If the bike is not used for a longer period (one month or more) the EnergyPak is best
stored:
• At 60% of its capacity. Smart Charger only: use the Smart Charger's ‘Long Storage’
charge mode.
• Separate from the bike.
• At temperatures between 0°C and 40°C.
NOTICE: Check the EnergyPak every month to see if at least one LED is still
blinking. Charge the EnergyPak if necessary.
CAUTION: Charge the EnergyPak every 3 months. Negligence to do so may void
the warranty of the EnergyPak.
18Transport & Storage
Page 19

5Bike usage
5.1Range
The range on one charge strongly depends on several circumstances, such as (but not
limited to):
• Weather conditions, such as ambient temperature and wind;
• Road conditions, such as elevation and road surface;
• Bike conditions, such as tire pressure and maintenance level;
• Bike usage, such as acceleration and shifting;
• Rider and luggage weight;
• Amount of charge and discharge cycles;
• Age and condition of the EnergyPak.
Shifting recommendations
For better range, Giant advises to shift according to the speed. For low speeds and setting
off, low gearing is best. The higher the speed, the higher the gear can be chosen. For
smooth support and optimum range, it is best to release pedal pressure while shifting
gears.
• High speed, high gear.
• Low speed, low gear.
• Release power during shifting.
5.2EnergyPak
Power in the EnergyPak can be checked by
pushing the energy level check button.
Bike usage19
Page 20

NOTICE:
• After 15 normal charges, or at least every 3 months, discharge the EnergyPak
completely before recharging the EnergyPak. This will optimize the lifespan
of the EnergyPak.
• When an EnergyPak is connected to the bike, some power will get lost in the
system when the bike is not in use. To prevent this, the EnergyPak can be
disconnected from the bike when not in use for more than a few days.
New Energypak
A new EnergyPak is shipped in a protective ‘hibernate’ state. It must be activated before it
can be used.
• A ‘hibernated’ EnergyPak can be recognized by pushing the energy level check button.
The LEDs of the EnergyPak will not light up.
• Plug an active charger in the EnergyPak;
• Unplug the charger from the EnergyPak;
• The EnergyPak is now no longer in ‘hibernate’ state. Pushing the energy level check
button will result in LEDs lighting up.
• The EnergyPak is ready for use.
It is not possible for an EnergyPak to go back to ‘hibernate’ state once it is activated.
Usually, your dealer will activate and charge the EnergyPak.
5.3Charging
INFO:
• Charge the EnergyPak battery at room temperature (±20°C/68°F).
• Charging below 0°C or above 40°C (32°F~104 °F) can lead to insufficient
charging and can have a negative impact on the battery life cycle.
20Bike usage
Page 21

5.3.1Use of the chargers
4A charger
• EnergyPak not connected:
Charger LED (A) is green (constant).
• During charging:
Charger LED is red (constant).
• Charging issue:
Charger LED is red (blinking).
• Charging is completed (100%):
Charger LED is green (constant).
Smart charger
Normal charge mode (100% charge):
• Power on sequence (self test):
Charger LED 1 (A) is fast red / green /
off.
Charger LED 2 (B) is fast green / red /
off.
• EnergyPak not connected:
Charger LED 1 is red (constant).
• During charging:
Charger LED 1 is green (blinking).
• Charging is completed:
Charger LED 1 is green (constant).
• Charging issue:
Charger LED 1 is red (blinking).
Long term storage charge mode (60% charge):
• Connect charger;
• Press LED 2 button (B);
• Charging procedure is exactly like regular charging, except:
LED 2 is yellow (constant);
Charging will stop at 60% (for long time storage).
Bike usage21
Page 22

5.3.2EnergyPak removal & installation
NOTICE: Always switch off the power first, before removing the EnergyPak.
EnergyPak Smart Integrated
Removing the EnergyPak (Key Lock Type):
• Support the weight of the battery;
• Insert the key and unlock the
EnergyPak;
• For top loading integrated batteries
only: lift out the EnergyPak and
continue with charging the EnergyPak.
• Push the drop protection lever to fully
unlock the EnergyPak;
• Remove the battery from the bike.
Removing the EnergyPak (Torx Lock
Type):
• Support the weight of the battery;
• Insert the Torx tool size 25 and turn
counter-clockwise to release the
EnergyPak (the screw is endless so it
will not come out);
• Push the drop protection lever to fully
unlock the EnergyPak;
• Remove the battery from the bike.
22Bike usage
Page 23

EnergyPak Smart Compact
Removing the EnergyPak:
• Hold the battery in the frame to make
sure it cannot drop when unlocking;
• Insert the key and unlock the
EnergyPak. The EnergyPak will be
ejected slightly;
• Some models have an extra drop
protection. Push the plastic tab
underneath the battery (light grey
arrow) to release the EnergyPak;
• Remove the battery from the bike.
Installing the EnergyPak Smart Integrated
& Compact:
• Reverse removal procedure to install
the EnergyPak.
• Make sure the slots are aligned
correctly at the bottom;
• Push the top of the EnergyPak and
make sure the EnergyPak is secured
properly (a ‘click’ can be noticed while
doing so);
• Pull out the key;
• For models without key, tighten the
Torx screw completely;
• The bike is ready for use.
Bike usage23
Page 24

EnergyPak (rear rack)
Removing the EnergyPak:
• Insert the key and unlock the
EnergyPak;
• Hold the grip and pull the EnergyPak
backwards;
• Slide out the EnergyPak;
Removing the EnergyPak:
• Reinstall the EnergyPak and make sure
the slots are aligned correctly in the
bottom;
• Push the EnergyPak forward and make
sure the EnergyPak is secured properly
(a ‘click’ can be noticed);
• Pull out the key;
• The bike is ready for use.
5.3.3Charging a removed EnergyPak
NOTICE: Always switch off the power first, before removing the EnergyPak.
NOTICE: Always take care to align all connectors properly before connecting.
Charging the EnergyPak Smart Integrated
& Compact:
• Connect the charge adapter (A) to the
charger;
• Connect the charger to the EnergyPak;
• Connect the charger to an AC outlet;
• Charging operation can be discontinued
at any given time;
• Disconnect the charger from the mains
outlet;
• Disconnect the charger from the
EnergyPak.
24Bike usage
Page 25

Charging the EnergyPak (rear rack)
• Connect the charger to the EnergyPak;
• Connect the charger to an AC outlet;
• Charging operation can be discontinued
at any given time;
• Disconnect the charger from the mains
outlet;
• Disconnect the charger from the
EnergyPak;
5.3.4Charging inside the bike
NOTICE: Always take care to align all connectors properly before connecting.
EnergyPak Smart Integrated & Compact
• Pull and rotate the charge-port cover
clockwise, or lift the rubber cover to
expose the charge-port;
• Connect the charger to the charge-port
on the bike;
• Connect the charger to an AC outlet;
• Charging can be stopped at any given
time;
• Disconnect the charger from the mains
outlet;
• Disconnect the charger from the charge
port;
• Put the charge-port cover back in place;
• The bike is ready for use.
Bike usage25
Page 26

EnergyPak (rear rack)
• Connect the charger to the EnergyPak
outlet on the front of the rear rack;
• Connect the charger to an AC outlet;
• Charging can be stopped at any given
time;
• Disconnect the charger from the mains
outlet;
• Disconnect the charger from the charge
port;
• The bike is ready for use.
5.3.5Charging time table
EnergyPak
capacity
AC voltage 110 V 200-240 V 110 V 200-240 V 110 V 200-240 V
80% charge 2:20 h 1:45 h 3:00 h 2:00 h 3:40 h 2:45 h
100% charge 4:40 h 3:30 h 6:00 h 4:30 h 7:20 h 5:00 h
Table 1: 4A charger time table (110 V / 200-240 V)
EnergyPak
type
Capacity 375 Wh 500 Wh 400 Wh 500 Wh 625 Wh
60% charge 1:05 h 1:25 h 1:10 h 1:25 h 1:50 h
80% charge 1:35 h 2:05 h 1:50 h 2:05 h 2:40 h
100% charge 3:15 h 4:10 h 3:20 h 4:10 h 5:00 h
Table 2: Smart charger time table (110-240 V)
300 Wh 400 Wh 500 Wh
Smart Compact Smart Integrated
26Bike usage
Page 27

5.4Controls
5.4.1RideControl Ergo series
Powering on and off
RideControl Ergo RideControl Ergo 2
On: Press the On / Off button (A) to switch on the system.
Off: Press the On / Off button (A) for at least 1.5 seconds and release the button to switch
off the system.
NOTICE: Light indicator LED (B) will blink 3 times, indicating the bike is being
switched off.
Power Assist level
RideControl Ergo RideControl Ergo 2
Smart Assist (AUTO):
The SyncDrive motor automatically adapts the power output to the circumstances to
optimize ride comfort and range.
Bike usage27
Page 28

• On RideControl Ergo:
• Long press (>2 sec) Assist Up or Down button (A) to activate Smart Assist.
• On RideControl Ergo 2:
• Press the Smart Assist button (B) to activate Smart Assist.
• When Smart Assist is active, press Assist Up or Down button (A) to return to manual
assist level selection.
• Only the middle Power Assist indication LED (3) will be lit to indicate Smart Assist is
active.
• If a RideDash is connected, it will show the Smart Assist level as ‘AUTO’ on the screen.
INFO: Smart Assist mode is not available on all models.
Assist level 1-5:
Manually select the power assist level.
• Short press the Assist Up or Down button (A) to change the assist level.
• The Power Assist indicator LEDs (1-5) indicate the selected level from bottom to top.
• 1 indicates the level with the lowest Power Assist, but highest distance range (ECO
level).
• 5 indicates the level with strongest Power Assist, but highest energy consumption
(POWER level).
Assist off:
For riding without Power Assist, but with indications / bicycle computer and light
functions.
• Press assist DOWN button, until all assist indicator LEDs are off.
• Motor assist is switched off
• All other system functions remain available.
28Bike usage
Page 29

Walk assist
RideControl Ergo RideControl Ergo 2
The Walk Assist function is to help you while walking with the bike. It works up to a speed
of 6 km/h (4 mph). Walk Assist is at its most powerful in the lowest gear, which means the
smallest chain ring up front and the largest sprocket on the rear.
INFO: The Walk Assist function is not available in some countries due to local
regulations.
• Press the Walk Assist button (A) to set Walk Assist standby. The assist indicator lights
up in a back and forth sequence.
• Press the Assist Up button within 3 seconds. The Walk Assist will engage.
• Release Assist Up button to stop or pause. Press again within 3 seconds to re-engage.
• Press any other button on the RideControl, to return to normal riding mode
immediately.
INFO: If no other action is performed within 3 seconds after pressing walk
assist button, the system will return to normal riding mode.
Bike usage29
Page 30

Lighting
RideControl Ergo RideControl Ergo 2
• Long press (>2 sec) the light button (B)
to switch the bike lights On / Off. The
light indicator (A) lights up.
• When switching on the bike light, the
backlight of the RideDash EVO screen
will be dimmed.
• On S-Pedelecs (high speed E-bikes) the
bike lights cannot be switched off. The
button will switch between low beam
and high beam.
• Long press (>2 sec) light button (B)
to switch the bike lights On / Off. For
S-Pedelecs (high speed E-bikes) this
button switches between low beam and
high beam.
• Short press light button to switch
RideDash EVO screen backlight: OFF /
BRIGHT / DIMMED.
30Bike usage
Page 31

Battery level indication
RideControl Ergo RideControl Ergo 2
The remaining energy level of the EnergyPak is shown by the battery indicator LEDs (1-5).
Each LED represents 20% of the EnergyPak’s capacity.
• When battery power is less than 10%, the bottom LED (1) changes from white to
orange.
• When battery power is less than 3%, bottom LED (1) blinks orange. The system will
switch to lowest assist level.
• When battery power is less than 1%, the Power Assist will shut down. The light system
will be still functional for at least 2 hours.
Info button
RideControl Ergo RideControl Ergo 2
The Info button (I) is used to control various screen functions if a RideDash or other
compatible bicycle computer is connected to the system. The specific functionality
depends on the connected device.
Bike usage31
Page 32

USB-C port (RideControl Ergo 2)
The USB-C port (U) can be used to
power or charge an external device like a
smartphone, bike light or bicycle computer.
• To access the USB-C port, use a
fingernail to lift the cover. Use the
appropriate cable (not included) for
your device to connect it.
• The port is only a power outlet (5 V / 1.5
A). It cannot be used for data transfer.
CAUTION:
• Do not use the USB-C port in wet or moist conditions.
• Make sure no liquids, mud or dirt can enter the USB-C port.
• Always close the USB port cover properly when the USB-C port is not in use.
32Bike usage
Page 33

System events
In case of a system event (malfunction), the
RideControl will show an indication of the
event:
Assist power will stop on most system
events.
Lighting indicator (F) will flash red.
One of the assist level indicators will start
blinking as event indicator.
Event descriptions:
• LED 5: Heat issue
• LED 4: Not applicable
• LED 3: Speed sensor issue
• LED 2: Motor issues
• LED 1 : Battery issues
Quick troubleshooting steps:
1. Note which assist level indicator is blinking (1-5).
2. Switch off the system.
3. Visually check for any obvious cause.
4. Solve any easy and obvious cause, if safely possible (e.g. reinstall incorrectly placed
battery).
5. Switch the system back on.
If the issue is solved:
• Normal use may be continued.
• Schedule a service check at an authorized dealer.
If the issue returns:
• Repeat step 1-5.
If the issue persists:
• Stop riding.
• Contact authorized dealer for diagnosis and repairs.
Bike usage33
Page 34

5.4.2RideControl Dash
Powering on and off
On: Press the On / Off button (E) to switch on the system.
Off: Press the On / Off button (E) for at 2 seconds to switch off the system.
Screen
A. Status bar: The status bar always shows the battery status (5). Other icons (1-4) will
appear when that function is active.
1. Wireless connection: Indicates an active wireless connection between the bike and a
smartphone with the RIdeControl app.
2. Light status: The light icon indicates that the bike lights are switched on.
3. Notification: Indicates that there are new or unread messages on a smartphone.
Only via the RideControl app.
4. Service indicator: The service indicator (wrench icon) appears when periodic
technical maintenance is due or when a system event (malfunction) has occurred.
34Bike usage
Page 35

5. Battery status indicator: The battery status indicator shows the current EnergyPak
charge level from 100% to 0%.
• When battery power is less than 3%, the battery icon starts blinking. The system
will switch to lowest assist level.
• When battery power is less than 1%, the battery icon is blinking. Power Assist will
shut down. The light system will be still functional for at least 2 hours.
INFO: Some RideControl app functions and features mentioned in this manual
may not be available at this time. Compatibility and available features may also
vary depending on app version, e-bike model, component hardware/firmware
version, smartphone specifications, operating system, etc.
B. Data field: The RideControl has a single data field to display the selected information.
The data field displays 'Speed' information by default.
Data field options:
• SPEED: Current riding speed.
• RANGE: Estimated remaining riding range on current assist level.*
• ODO: Total riding distance since first use.
• DISTANCE: Riding distance since last reset.
• TRIP TIME: Riding time since last reset.
• AVG SPEED: Average speed since last reset.
• MAX SPEED: Maximum speed since last reset.
• CADENCE: Current pedaling speed in rpm (rotations per minute).
*The range is an estimated number. Various circumstances during the ride, like terrain
profile or wind strength and direction, may affect the actual range.
Press the 'Info' button (G) on the RideControl Dash to change to a different data field. The
screen will display the description of the new field for 2 seconds and switch to the new
field.
Bike usage35
Page 36

C. Assist level indicator: The Assist Level indicator visually represents the currently
selected assist level as a row of 5 bars, that can vary in color.
Assist level options*:
• OFF
• ECO
• TOUR
• ACTIVE
• SPORT
• POWER
• SMART ASSIST (AUTO)
In SMART ASSIST (AUTO), the SyncDrive motor automatically adapts the power output to
the circumstances to optimize ride comfort and range.
*Assist levels availability and power ratio per level depend on SyncDrive motor type and
factory system settings.
Press the Assist Level UP/DOWN buttons (F) to change to the desired assist level. Long
press Up and Down simultaneously (2 sec.) to activate Smart Assist. The screen shows the
new assist level name and estimated remaining riding range for 2 seconds. Then the riding
screen will return with an updated level indicator.
36Bike usage
Page 37

Walk assist
The Walk Assist function is to help you while walking with the bike. Walk Assist works up to
a speed of 6 km/h (4mph) and is at its most powerful in the lowest (easiest) gear.
• Press the Walk Assist button (H) to set Walk Assist standby.
• Press the Assist UP button (F) within 3 seconds. Walk Assist will engage.
• Release Assist Up button to stop/pause.
• Press again within 3 seconds to re-engage.
• If Assist button is not pressed, the system will return to normal riding mode after 3
seconds.
• Pressing any other button will directly exit Walk assist mode and return to normal
riding mode.
Lighting / screen brightness
Switching the bike lights: Long press (>2 sec) the light button (D) to switch the bike lights
On / Off. The light indicator (A2) lights up.
Changing the screen brightness: Press the light button (D) repeatedly to change
brightness (low/medium/high).
Bike usage37
Page 38

USB-C port
The USB-C port (I) can be used to power
or charge an external device like a
smartphone, bike light or bicycle computer.
• To access the USB-C port, pull the
corner and lift the cover. Use the
appropriate cable (not included) for
your device to connect it.
• The port is only a power outlet (5 V / 1.5
A). It cannot be used for data transfer.
CAUTION:
• Do not use the USB-C port in wet or moist conditions.
• Make sure no liquids, mud or dirt can enter the USB-C port.
• Always close the USB port cover properly when the USB-C port is not in use.
Settings
Changing display units (metric/imperial): Press and hold 'Info' button (G) for 5 seconds.
Resetting sub data fields:
• To clear DIST, TRIP, AVG SPD: press and hold Assist up & down buttons (F)
simultaneously for 3 seconds.
• To clear MAX SPD: scroll to MAX SPD data field. Press and hold Assist up & down
buttons (F) simultaneously for 3 seconds.
38Bike usage
Page 39

System events
A system event warning screen shows when a malfunction occurs:
• A warning screen is displayed for 2 seconds.
• An event description is displayed for 5 seconds.
• The riding screen returns after the warning screen, showing the service indicator in the
status bar.
Quick troubleshooting steps:
1. Make a note of the event description.
2. Switch off the system.
3. Visually check for any obvious cause.
4. Solve any easy and obvious cause, if safely possible (e.g. reinstall incorrectly placed
battery).
Switch the system back on. If the issue is solved:
• Normal use may be continued.
• Schedule a service check at an authorized dealer.
If the issue returns, repeat step 1-5.
If the issue persists:
• Quit riding.
• Contact authorized dealer for diagnose and repairs.
5.4.3RideDash EVO
Screen
A. Status bar: The status bar always shows the battery status (5). Other icons (1-4) will
appear when that function is active.
1. Wireless connection: Indicates an active wireless connection between the bike and a
smartphone with the RideControl app.
2. Light status: The light icon indicates that the bike lights are switched on.
Bike usage39
Page 40

3. Notification: Indicates that there are new or unread messages on a smartphone.
Only via the RideControl app.
4. Service indicator: The service indicator (wrench icon) appears when periodic
technical maintenance is due or when a system event (malfunction) has occurred.
5. Battery status indicator: The battery status indicator shows the current EnergyPak
charge level from 100% to 0%.
• When battery power is less than 3%, the battery icon starts blinking. The system
will switch to lowest assist level.
• When battery power is less than 1%, the battery icon is blinking. Power Assist will
shut down. The light system will be still functional for at least 2 hours.
INFO: Some RideControl app functions and features mentioned in this manual
may not be available at this time. Compatibility and available features may also
vary depending on app version, e-bike model, component hardware/firmware
version, smartphone specifications, operating system, etc.
B/D/E. Pages and data fields: The RideDash EVO shows various ride information in 3 data
fields.
• Main data field (B): the main data field shows SPEED by default.
• Sub data fields (D): page 1 displays RANGE and ODO sub data fields by default. Change
the page to view different data fields.
• Page indicator (E): displays the number of pages and highlights the currently selected
page.
RideControl Ergo RideControl Ergo 2
Press the 'Info' button (A) on the RideControl Ergo or RideControl Ergo 2 to change to a
different data field.
Repeat to scroll through available pages:
40Bike usage
Page 41

• Page 1 (Default):
• RANGE: Estimated remaining riding range on current assist level.*
• ODO: Total riding distance since first use.
• Page 2:
• DIST: Riding distance since last reset.
• TRIP: Riding time since last reset.
• Page 3:
• AVG SPD: Average speed since last reset.
• MAX SPD: Maximum speed since last reset.
• Page 4:
• CAD: Current pedaling speed in rpm (rotations per minute).
• RANGE: Estimated remaining riding range on current assist level.*
*The range is an estimated number. Various circumstances during the ride, like terrain
profile or wind strength and direction, may affect the actual range.
C. Assist level indicator: The Assist Level indicator visually represents the currently
selected assist level as a row of 5 bars, that can vary in colour.
Assist level options:
• OFF
• ECO
• TOUR
• ACTIVE
• SPORT
• POWER
• SMART ASSIST (AUTO)
The screen shows the new assist level name and estimated remaining riding range for 2
seconds. Then the riding screen will return with an updated level indicator.
Bike usage41
Page 42

Settings
RideControl Ergo RideControl Ergo 2
Changing display units (metric/imperial):
On RideControl Ergo:
• Press and hold 'Info' button (G) for 5 seconds.
On RideControl Ergo 2:
• Press and hold 'Info' button (A) for 5 seconds.
Resetting sub data fields:
• To clear DIST, TRIP, AVG SPD: press and hold Assist up & down buttons (B)
simultaneously for 3 seconds.
• To clear MAX SPD: scroll to MAX SPD data field. Press and hold Assist up & down
buttons (B) simultaneously for 3 seconds.
Changing the screen brightness (low/medium/high):
On RideControl Ergo:
• Press and hold Walk assist button (A) for 2 seconds to change to the next brightness
level.
• Release button after 2 seconds.
On RideControl Ergo2:
• Press light button (I) to change to the next brightness level.
System events
A system event warning screen shows when a malfunction occurs:
• A warning screen is displayed for 2 seconds.
• An event description is displayed for 5 seconds.
• The riding screen returns after the warning screen, showing the service indicator in the
status bar.
42Bike usage
Page 43

Quick troubleshooting steps:
1. Make a note of the event description.
2. Switch off the system.
3. Visually check for any obvious cause.
4. Solve any easy and obvious cause, if safely possible (e.g. reinstall incorrectly placed
battery).
Switch the system back on. If the issue is solved:
• Normal use may be continued.
• Schedule a service check at an authorized dealer.
If the issue returns, repeat step 1-5.
If the issue persists:
• Quit riding.
• Contact authorized dealer for diagnose and repairs.
5.5Integrated head tube light
Certain models have an additional light integrated in the head tube to improve rider
visibility in traffic during daytime.
• When the bike lights are switched on, the front bike light sensor (B) will switch between
front bike light (C) or head tube light (D) automatically.
• Head tube light is activated in bright surroundings (with 20 second sensor delay)
• Front bike light is activated in dark surroundings (with 5 second sensor delay)
• Press button (A) underneath the front bike light to switch the light sensor on or off.
This switches between ‘auto’ and ‘manual’ lighting.
• The head tube light cannot be activated when the sensor is switched off.
Bike usage43
Page 44

5.6Keys
The bike comes standard with two keys that are used for the battery lock. Some models
are equipped with a ring lock that uses the same keys. A qualified locksmith can duplicate
the keys. On bicycles without a ring lock, on-board charging can lead to the battery lock
key being unused for a long period. When a battery is locked, it cannot be removed without
damage. Always make sure to have at least one key readily available for maintenance or
repairs.
NOTICE:
• Keep your key number and non-used key(s) in a safe place for repairs and
emergencies.
• Make sure you always have at least one spare key.
• Always bring the key when visiting the dealer for maintenance or repairs.
44Bike usage
Page 45

6Maintenance
INFO: Make sure to also read the information on maintenance in general bike
manual.
6.1Cleaning
Giant Hybrid E-bikes use plastic shells to cover electric parts. Do not use excessive water
to wash the plastic. Use a soft cloth with a neutral solution to wipe the dirt off the plastic
shells. After that, wipe it dry with a clean soft cloth.
CAUTION: Do not use high-pressure water or air hoses for cleaning. It can force
water into electric components, which may cause malfunctioning.
CAUTION: Do not wash the E-bike components with excessive water. If the
internal electrical parts are infected with water, the insulator may corrode which
leads to power-drain or other problems.
CAUTION: Do not use non-neutral soap solutions to wash plastic components.
Non-neutral solutions may cause colour-change, distortion, scratching etc.
6.2Drivetrain
Some E-bike models come equipped with
an internal gear hub. Most models have an
automatic chain-tensioner that maintains
proper chain tension, similar to bikes
with a rear derailleur. On models without
an automatic chain tensioner, the chain
tension must be checked and adjusted
manually.
CAUTION:
Adjustments should only be
performed with proper tools by a
trained mechanic.
Ask your local Giant dealer for
more information and support
on your E-bike’s technical
maintenance.
Maintenance45
Page 46

How to check the chain tension:
To check the chain tension, hold the chain
in the middle section between the front and
rear sprockets.
• Move the chain up and down to check
the slack on the chain;
• There should be between 10-15 mm of
vertical movement;
• If the movement is more or less, the
chain tension needs to be adjusted.
How to adjust the chain tension:
Some models have horizontal drop-outs,
others may have sliding rear drop-outs and
chain tension adjustment screws. To adjust
the chain tension, the rear wheel or sliding
drop-out should be released in to allow for
horizontal movement of the rear axle and
sprocket.
• Release the axle nuts, or sliding dropout bolts if applicable;
• Move the rear wheel backward or
forward by hand or by turning the
adjustment screws to achieve the
proper chain tension;
• Fix the rear wheel in place by tightening
the axle nuts or drop-out bolts;
• Always make sure the rear wheel is
centred in the frame.
46Maintenance
Page 47

Belt Drive:
Read the belt drive manufacturer’s
operating instructions provided with the
E-bike for technical specifications and
requirements.
All models with belt drive have sliding rear
drop-outs and tension adjustment screws
to adjust the belt tension. The adjustment
procedure for a belt drive is the same as for
a chain.
Maintenance47
Page 48

7Legal documentation
7.1Warranty
Giant warrants for the original owner only the frame, rigid fork, or original component
parts of each new Giant brand bicycle to be free from defects in material and workmanship
for the following specified periods:
Warranty of two years for electronic equipment such as:
• RideControl display & buttons
• SyncDrive motor
• EnergyPak battery;
• for 60% of its original nominal capacity at a maximum of 600 charges.
• Wiring
The maximum permissible total weight (bicycle, rider and luggage) for our E-bikes is 156
kg (344 lbs).
For all other parts and components we refer to Giant’s general user manual that is
delivered with this E-bike as well. That user manual is leading in case of any issues. The
information below and in Exclusions on page 49 is only for reference.
REQUIRED ASSEMBLY WHEN PURCHASED.
This warranty applies only to bicycles and frame sets purchased new from an Authorized
Giant Dealer and assembled by that dealer at the time of purchase.
LIMITED REMEDY
Unless otherwise provided, the sole remedy under the above warranty, or any implied
warranty, is limited to the replacement of defective parts with those of equal or greater
value at the sole discretion of Giant. This warranty extends from the date of purchase,
applies only to the original owner, and is not transferable. In no event shall Giant be
responsible for any direct, incidental or consequential damages, including, without
limitation, damages for personal injury, property damage, or economic losses, whether
based on contract, warranty, negligence, product liability, or any other theory.
Giant makes no other warranties, express or implied. All implied warranties, including the
warranties of merchantability and fitness for a particular purpose are limited in duration to
that of the express warranties stated above. Any claim against this warranty must be made
through an Authorized Giant Dealer or distributor. The purchase receipt or other proof of
the date of purchase is required before a warranty claim may be processed.
Claims made outside the country of purchase may be subject to fees and additional
restrictions. Warranty duration and detail may differ by frame type and/or by country. This
warranty gives you specific legal rights, and you may also have other rights which may
vary from place to place. This warranty does not affect your statutory rights.
48Legal documentation
Page 49

7.2Exclusions
Normal wear and tear on parts such as tires, chains, brakes, cables and gearwheels in
situations where there are no assembly or material defects.
• Bicycles serviced by other than an Authorized Giant dealer.
• Modifications from the original condition.
• Use of the bicycle for abnormal, competition and/or commercial activities or for
purposes other than those for which the bicycle was designed.
• Damage caused by failing to follow the user manual.
• Paint finish and decal damage resulting from taking part in competitions, jumping,
downhill and/ or training for such activities or events or as a result of exposing the bike
to, or riding the bike in, severe conditions or climates.
• Labour charges for part replacement or changeover.
Except as is provided by this warranty and subject to all additional warranties Giant and
its employees and agents shall not be liable for any loss or damage whatsoever (including
incidental and consequential loss or damage caused by negligence or default) arising from
or concerning any Giant bicycle.
7.3Conformity
Hybrid power bicycles with a maximum support speed of 45km/h fulfil the
requirements of EU Directive 168/2013/EC for L1e-B category vehicles.
Hybrid power bicycles with a maximum support speed of 25km/h fulfil the
requirements of EU Machinery Directive 2006/42/EC.
These bicycles also comply with the following non-harmonized standards:
• Bicycle standard: ISO 4210-2
• Electric bicycles: EN 15194
The declaration of conformity for your specific Giant E-bike can be found as
an inlay in this user manual.
7.4Disclaimer
Do not tamper with your bicycle. Tampering is removing or replacing any original
equipment or modifying your bicycle in anyway that may change its design and/or
operation. Such changes may seriously impair the handling, stability and other aspects
of the bicycle, making it unsafe to ride. Tampering can void the warranty and render your
bike not in compliance with the applicable laws and regulations. To ensure safety, quality
and reliability, use only original parts or Giant authorized replacements for repair and
Legal documentation49
Page 50

replacement. Giant is not responsible for any direct, incidental or consequential damages,
including, without limitation, damages for personal injury, property damage, or economic
losses due to tampering.
7.5FCC
This device complies with part 15 of the FCC Rules. Operation is subject to the following
two conditions:
1. This device may not cause harmful interference, and
2. This device must accept any interference received, including interference that may
cause undesired operation.
Please note that changes or modifications not expressly approved by the party
responsible for compliance could void the user’s authority to operate the equipment.
INFO: This equipment has been tested and found to comply with the limits
for a Class B digital device, pursuant to part 15 of the FCC Rules. These limits
are designed to provide reasonable protection against harmful interference
in a residential installation. This equipment generates, uses and can radiate
radio frequency energy and, if not installed and used in accordance with
the instructions, may cause harmful interference to radio communications.
However, there is no guarantee that interference will not occur in a particular
installation. If this equipment does cause harmful interference to radio or
television reception, which can be determined by turning the equipment off and
on, the user is encouraged to try to correct the interference by one or more of
the following measures:
• Reorient or relocate the receiving antenna.
• Increase the separation between the equipment and receiver.
• Connect the equipment into an outlet on a circuit different from that to which
the receiver is connected.
• Consult the dealer or an experienced radio/TV technician for help.
This equipment complies with radio frequency exposure limits set forth by the FCC for an
uncontrolled environment.
This equipment should be installed and operated with a minimum distance of 5mm
between the device and the user or bystanders.
This device must not be co-located or operating in conjunction with any other antenna or
transmitter.
7.6IC
This device complies with Industry Canada’s licence-exempt RSSs. Operation is subject to
the following two conditions:
1. This device may not cause interference;
50Legal documentation
Page 51

2. This device must accept any interference, including interference that may cause
undesired operation of the device.
This equipment complies with radio frequency exposure limits set forth by the Innovation,
Science and Economic Development Canada for an uncontrolled environment.
This equipment should be installed and operated with a minimum distance of 5 mm
between the device and the user or bystanders.
This device must not be co-located or operating in conjunction with any other antenna or
transmitter.
Legal documentation51
Page 52

 Loading...