

Page 1

- English -
Digital Wireless Computer
User’s Manual
Page 2

Table of contents
1
2
3
6
7
Preface
Package contents
Installation instructions
Display & buttons
Set time format & time
Set alarm
8
9
10
11
12
13
Set bike & wheel size
Set units & odometer
Set gender & weight
Set backlight & maintenance alert
Select / pair sensor & Exit
Sensor mode
14
15
16
184
20
21
Operation in sensor mode
Operation in phone mode
App setup instructions
Computer firmware update
Import trip logs to app
Troubleshooting
22
Specifications
Page 3

Preface
1
Thank you for purchasing Giant's Continuum
Sync Digital Wireless Computer. For your
safety, we recommend that you look straight
ahead while riding. Avoid staring at the
computer scre en. This may compromise your
awareness, leading to a serious accident.
Ensure that the head unit has been paired
with the speed sensor before using your
computer.
If you have any questions or problems,
please contact your local Giant dealer or go
to Giant's official website:
www.giant-bicycle.com
Let's go ride!
Page 4

Package contents
2
Head Unit
1
2
Base Unit Sensor Unit Straps
( For 410000051 / 410000052 ONLY )
3
4
5
7
6
8
9
10
11
The Continuum Sync comes with one
head unit and three accessories
1.Head unit
2.Head unit battery
3.Handlebar/stem mount
4.Mount base pads
5.Speed and cadence sensor
6.Speed sensor battery
7.Cadence sensor magnet
8.Speed sensor magnet
9.Cadence sensor magnet pads
10.Rubber straps
11.Zip ties
X 5
Page 5

Installation instructions
3
Battery Installation
Mounting Locations of Components
or
5mm
Install the battery in the back of the
head unit. Use a coin to open and
close the cover.
The head unit can be mounted in three
different locations: (A) Stem (B)
Handlebar (C) Handlebar extension
(optional).
Mount the speed and cadence sensor
to the non-drive chainstay with zip
ties, as shown. Mount the speed
sensor magnet to a spoke and the
cadence sensor to the non-drive crank
arm. Ensure each magnet passes
within 5 mm of the its respective
speed and cadence sensor.
Note: Speed and cadence sensor will
not function if the distance between
the magnet and the sensor is more
than 5 mm.
Page 6
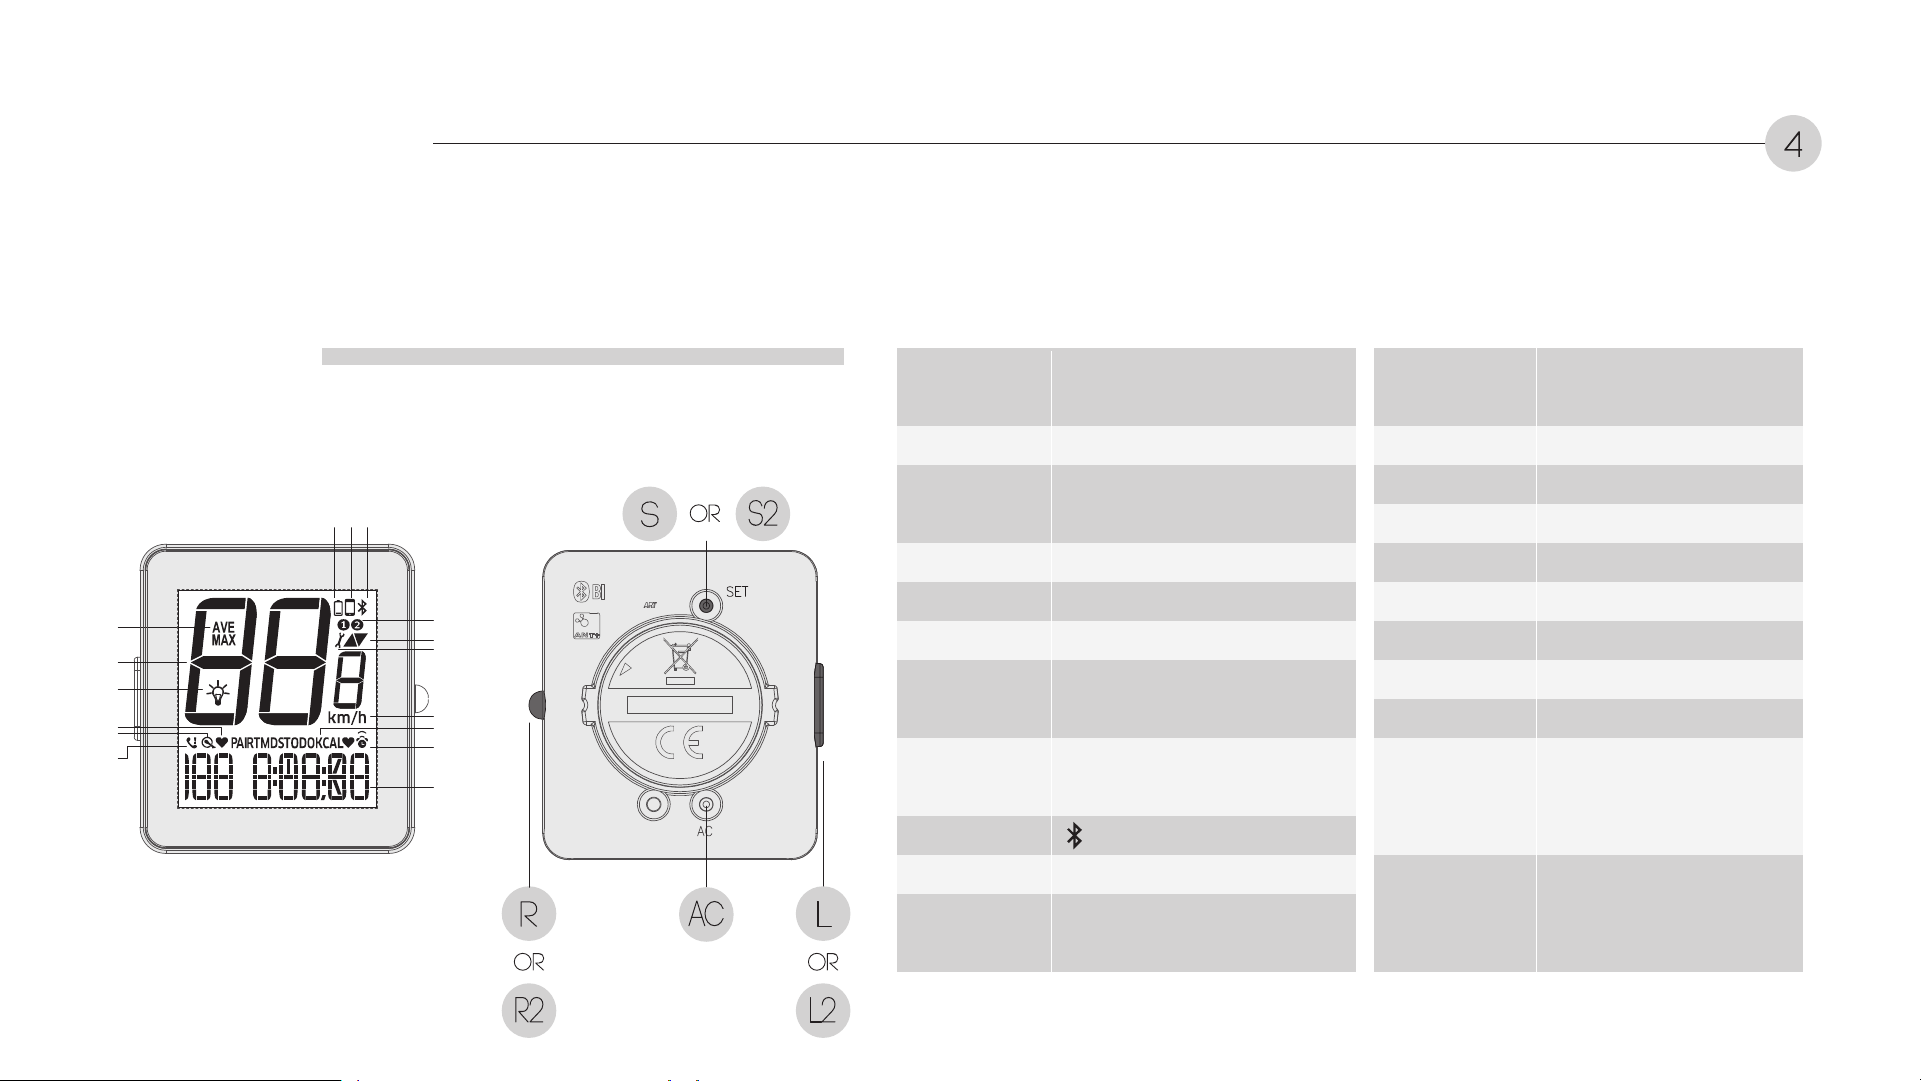
Display & buttons
4
Display & Buttons
1
2
3
4
5
6
1. Speed Options
2. Current Speed
7
89
S
or
S2
10
11
3. Backlight
4. Heart Rate
5. Cadence
6. Incoming Call
AVE (Average speed)
MAX (Max speed)
Current speed
Press the R or L key to turn on
the backlight during the preset
time (5 PM - 5 AM)
Heart Rate
Cadence
Incoming, unanswered call
12. Maintenance
Alert
13. Units
14. Function Options
RTM
DST
ODO
KCAL
12
15. Clock/Alarm
16. Function Value
Function Keys
L or R: Press and
release
L2 or R2: Press for 2
seconds and
release
Set/AC
S or AC:
Press and release
S2: Press for 2
seconds and release
13
14
15
16
R
or
AC
L
or
7. Low Battery
8. Phone Mode
9. Bluetooth
10. Bike Selection
11. Pace Arrow
Appears when battery voltage drops
below 2.4V. Replace battery soon.
Press the L key for 2 seconds to switch
between phone mode and sensor mode
is displayed while paired with a phone
Indicates which bike (1or 2) is selected
↑ = current speed is faster than average
speed.
↓ = current speed is slower thanaverage
speed.
Appears when preconfigured
maintenance mileage is reached
km/kg or mi/lb
Riding time
Distance
Odometer
Calories burnt
Clock: 12/24-hour format
Alarm: Flashes at set time
Displays value of the function
indicated in field 14.
L: Select function
L2: Switch modes,
accelerate values
R: Select function
R2: Reset
L + R: Pair again
S: Press the Set/AC key to enter
the setup menu.
AC: Reset the computer to factory
default settings.
S2: Bike1/Bike2
R2
L2
Page 7
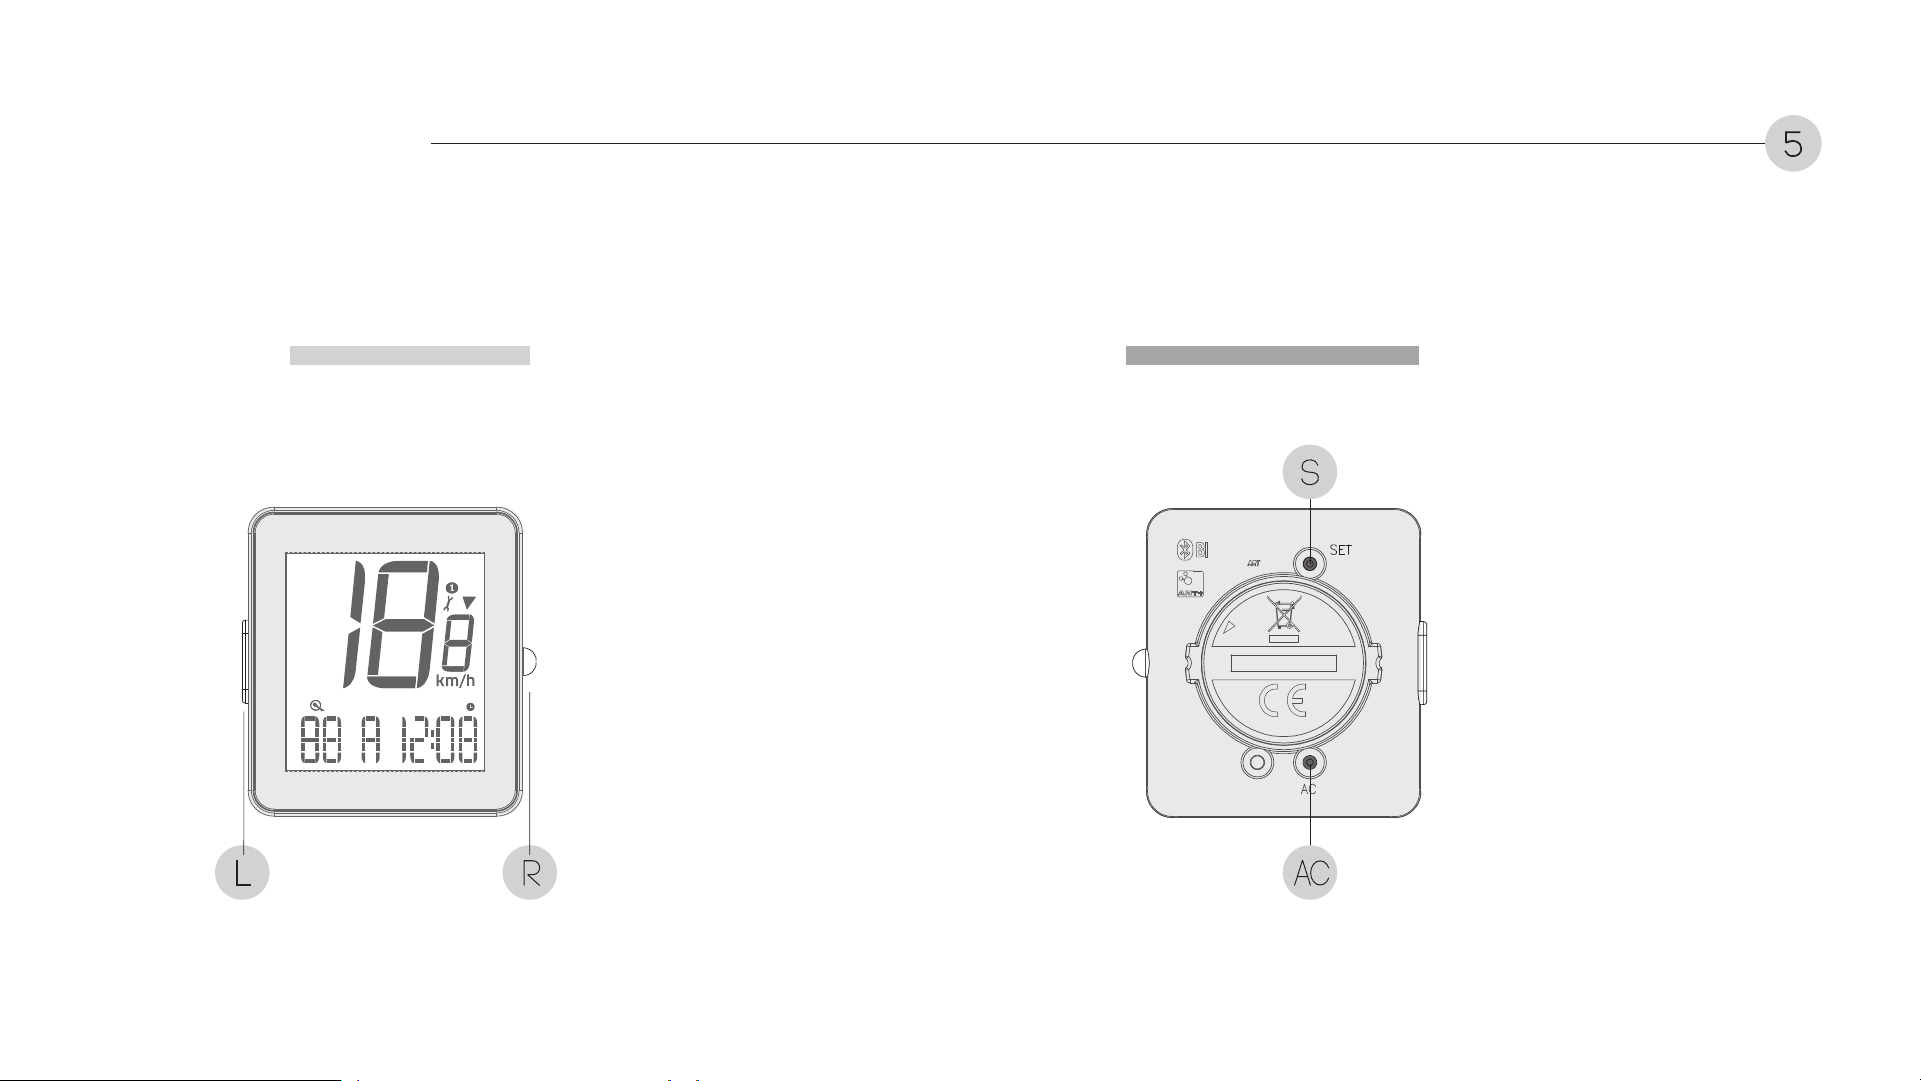
Display & buttons
5
Reset Trip Logs Reset
To reset logs, press R for 3
seconds.
RL
S
AC
If the computer does not func-
tion normally or the screen is
blank after the battery is
installed, either press the S key
on the back of the head unit to
reset settings or press the AC
key to reset the computer to
factory default settings.
Page 8

Set time format / time
RL
6
S
AC
Set Time Format
Set Time
L Rs R
R
Set alarm
Press the S key to enter time format
mode, press the L key to select 12Hr
or 24Hr. Press the R key to confirm
and move to time setup mode.
Press the L key to increase the hour
value (Press the L key for two seconds
(L2) to rapidly increase values). Press
the R key to confirm. Press the L key
to increase the minute value. Press the
R key to confirm and move to alarm
setup.
Page 9

Set alarm
7
Turn Alarm On / Off
L R R
After entering alarm setup mode,
press the L key to turn the alarm On or
Off. Press the R key to confirm and
move to alarm time setup mode.
Press the L key to increase the hour
value. Press the R key to confirm.
Press the L key to increase the minute
value. Press the R key to confirm and
move to bike/wheel size setup.
*The alarm is a flashing light only.
R
Set bike / wheel size
Page 10

Set bike / wheel size
8
*Same as Bike2 setting
After entering bike setup mode, press the L key to select Bike 1 or 2. Press the R key to
confirm and move to wheel size setup mode.
Press the L key to select from ten pre-programmed wheel sizes.
Press the R key to confirm. If wheel size is not shown, move to custom wheel circumference
setup.
Press the L key to increase the first number.
Press the R key to confirm and move to the next number. When all numbers are set, press the
R key to confirm and move to units/odometer setup mode.
Set Bike Set Wheel Size
1 2
L R R R
R
Unit setting
WHEEL CIRCUMFERENCE
EASY CALIBRATION &
CIRCUMFERENCE
REFERENCE TABLE
Tire Size
700x20C 2086
700x23C 2096
700x25C 2105
700x28C 2136
700x32C 2155
700x35C 2168
700x38C 2180
600x23C 1930
26x1.5 2010
26x1.90 2045
26x1.95 2050
26x2.0 2055
26x2.1 2068
26x2.2 2075
27.5x1.50 2079
27.5x1.95 2090
27.5x2.1 2148
27.5x2.25 2182
29x2.1 2288
29x2.2 2298
29x2.3 2326
Custom 0-3999
a. (mm)
Page 11

Unit setting / odometer
9
Set Units
Set Odometer
L R R
After entering unit setup mode,
press the L key to select km/h
(kilometers/hour) or m/h (miles/hour).
Press the R key to confirm and move
to odometer setup mode.
Press the L key to increase the first
number. Press the R key to confirm
and move to the next number. When all
numbers are set, press the R key to
confirm and move to gender/weight
setup.
R
Set gender / weight
Page 12

Set gender / weight
10
Set Gender Set Weight
L R
After entering gender setup mode,
press the L key to select MALE or FEMALE.
Press the R key to confirm and move to
weight setup mode.
Press the L key to increase the weight
number.
Press the R key to confirm and move to
backlight/maintenance alert setup.
Page 13

Set backlight / maintenance alert
Set Backlight
R
Set Maintenance Alert
11
After entering backlight setup
mode, press the L key to select
smart backlight "on" time. Press
the R key to confirm. Press the L
key to select the smart backlight
“off” time. Press the R key to
confirm and move to maintenance
alert setup mode.
Press the L key to set the
LR
maintenance alert to your desired
distance (300-700 km or 180-430
mi). Press the R key to confirm and
move to select/pair sensor mode.
R
R
Select sensor
If set to 500 km, the computer will
display every time the
accumulated trip distance reaches
500 km. Trip distance and total
distance are logged separately.
Press R for 2 seconds or ride 50
km to clear the alert symbol.
Page 14

Select / pair sensor
12
Select Sensor SENSOR Mode
R
L
PHONE Mode
L
L
R
P.15
Pairing
successful
Pairing failed
Select sensor
After entering select sensor mode, press the L key to select
SENSOR, PHONE, or OUT. Press the R key to confirm.
Selecting OUT will exit setup mode. Selecting SENSOR or
PHONE will enter pairing mode for that sensor.
SENSOR mode: To pair heart rate strap wear the strap on
your chest. To pair, speed/cadence sensor, rotate the
cranks to activate the sensor. Press the R key to enable
device pairing for 30 seconds. The ride screen displays
after 30 seconds.
PHONE mode: Enable Bluetooth pairing on your phone.
Enter the verification code shown on the computer to your
phone in within 1 minute to start pairing. The ride screen
displays if pairing is successful, FAIL displays if pairing was
not successful.
*See page 15 for app connection.
R
Page 15

Sensor mode
13
Sensor Mode Sensor and Phone
ANT
+
ANT
+
Mode
Sensor mode
L2 L2 L2
Phone mode
Phone Mode
In the ride screen, press the L2 key to
switch between phone mode and sensor
mode.
Sensors paired only:
If computer is paired with sensors only, the
computer will not work if you switch to
phone mode.
Sensor and phone paired:
If computer is paired with sensors and
phone, you can switch to either of these
two modes and the computer will work
normally.
Phone paired only:
If computer is paired with phone only, the
computer will not work if you switch to
sensor mode.
Page 16

Operation in sensor mode
14
Press L key to select cadence or heart rate in sensor mode.
Press R key to select RTM, DST, ODO, KCAL, Heart Rate, Clock, AVE or MAX.
*AVE and MAX will be displayed when bike is not running.
*Heart rate will be displayed after a heart rate belt is paired successfully.
*Fast pairing:In sensor mode, press and hold both L and R keys for 3 seconds to enter the
ANT+ pairing mode.
L R
L
R
R R
When bike is not running
R
R
R
R
RR
Page 17

Operation in phone mode
15
Press L key to select cadence, heart rate or incoming call in phone mode.
Press R key to select RTM, DST, ODO, KCAL, Heart Rrate, Clock, AVE or MAX.
*AVE and MAX will be displayed
when bike isnot running.
*Heart rate will be displayed after
a heart rate belt is paired successfully.
L L
*Fast pairing:In phone mode, press and hold both
L and R keys for 3 seconds to enter the Bluetooth
pairing mode(see page 15.)
L
L
R
When bike is not running
R
R
R
R
RR R R
Page 18

App connection
First riding
Please download and install Giant RideSync App to your smartphone.
Compatible with iPhone 4s/
iOS 7 or later
Compatible with Android 4.3/
Bluetooth 4.0 or later
16
2 6
4 51 3
L2
7 109 11 12
8
L +R 2 s
Page 19

App connection
17
Second ridingFirst riding
13 14
16
17 3
15
1
L2
2
Page 20

Computer firmware update
Manual update
18
Auto update
1
1
2
3
4 5 6
Page 21

Computer firmware update
Manual update
19
7 8
9
10
Page 22

Import the trip logs to app
20
1
5
2 3
4
*Ensure your Continuum Sync is paired with
your phone before attempting to import ride
data. Only run the import function while the
computer is in sensor mode.
Running the import function while the computer is in phone mode will erase your ride
data.
86 7
Page 23

Troubleshooting
21
Problem
No image on
screen
Speed is not
displayed
Heart rate is not
displayed
Possible cause Solution Problem Possible cause Solution
Battery is not installed
Battery is dead
Battery is installed backwards
1.Sensor battery is dead
(sensor mode)
2.Gap between the sensor and
magnet is too large
3.Bluetooth connection lost
(phone mode)
4.GPS satellite connection lost
1.Heart rate strap battery is dead
2.Bluetooth connection lost
Install battery
Replace battery
Install battery correctly with
positive pole facing outward
1.Replace sensor battery
2.Adjust the sensor or magnet to
reduce the gapto less than 5 mm
3.Pair the computer to
Bluetooth phone again
1.Replace battery
2.Pair the heart rate strap to
computer or Bluetooth phone again
Cadence is not
displayed
Abnormal numbers
are displayed
Gap between the cadence sensor
and magnet is too large
Bluetooth connection lost
Gap between the sensor and
magnet is too large
Sensor battery voltage is low Replace sensor battery
Electromagnetic interference
nearby; e.g. computer, transmitting
station, radar station, tunnel and
viaduct, etc.
Adjust the sensor or magnet to
reduce the gap to less than 5 mm
Pair the computer to Bluetooth
Adjust the sensor or magnet to
reduce the gap to less than 5 mm
Move away from the area
phone again
with interference
Page 24

Specifications
22
Current speed 0 ~ 99.9km/mi
Average speed
Maximum speed
Distance
Total trip distance
Odometer
0 ~ 99.9km/mi
0 ~ 99.9km/mi
0 ~ 999.9km/mi
0 ~ 999.9km/mi
0 ~ 99999km/mi
0:00:00 ~ 9:59:59 30~240rpmRiding time Cadence
Riding time
Time (12/24)
Calories burnt
Total calories burnt
Heart rate
Calories
0:00:00 ~ 99:59:59
12:00 / 00:00
0~9999Kcal
0~99999Kcal
30~240bpm
9999kcal
Weight
Backlight
Units
Auto hibernation
Auto power-on
Maintenance alert
20~199Kg
44~331Lb
12:00 / 00:00
Km / mi, Kg / Lb
25 minutes
Auto power-on upon
receipt of signal
(must be installed on
the base)
300-700 km,
180-430 mi
Low battery alert
Battery life 1h/day
Operating
temperature
Storage
temperature
Signals
Display system
2.7V
8 months
-10 ~ + 50 ℃
-14 ~ 122 ℉
-20 ~ + 60 ℃
-4 ~ 140 ℉
ANT+
&
Bluetooth smart
7 segments
EnglishCR2032Battery type Language
 Loading...