

Page 1
P.O. Box 1017, Riverwood NSW 2210, Australia
Ph: +612 9534 0099 Web: www.gfb.com.au Email: sales@gfb.com.au
Installation of GFB dv+ TMS Diverter Valve (part # T9301)
• Loosen the hose clamps from the existing factory diverter valve and remove it from the car.
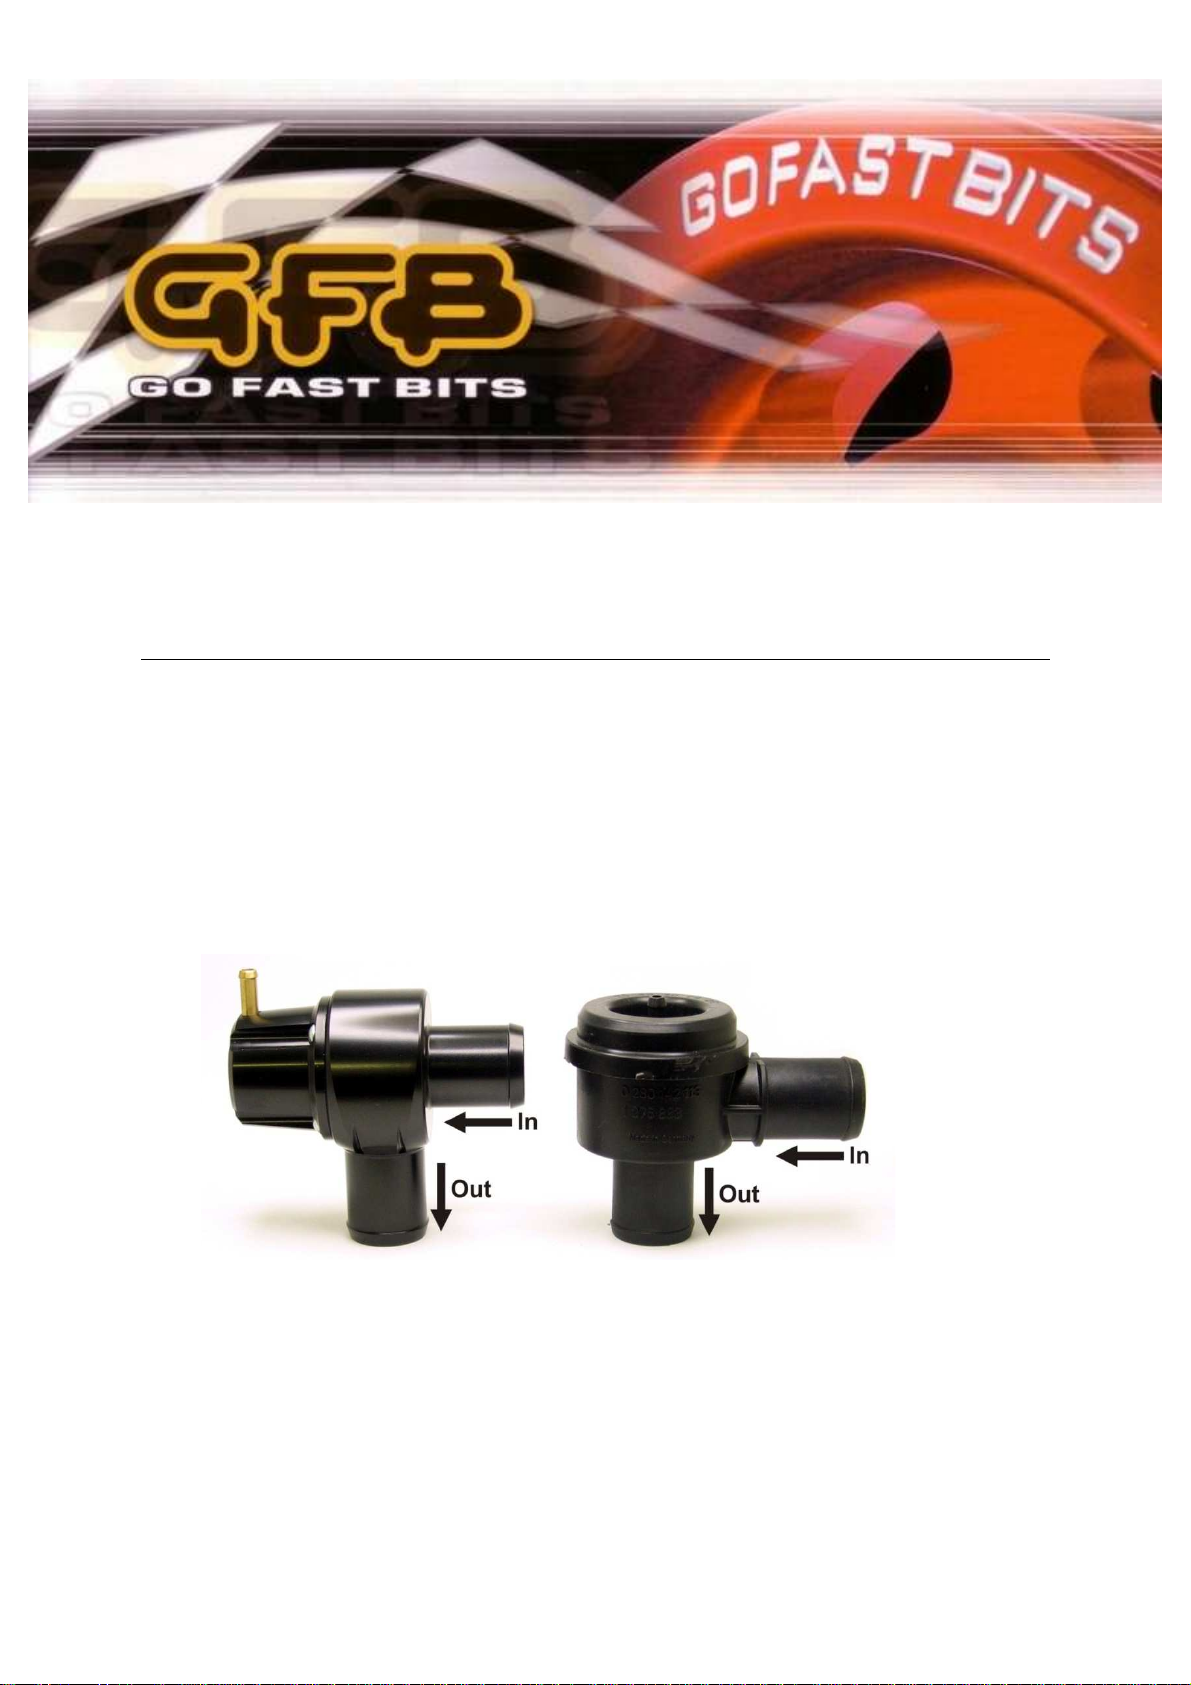
• CHECK THE ORIENTATION BEFORE INSTALLING THE dv+!
The GFB dv+ is designed to be installed with boost pressure entering the bottom, and
dumping through the side, which in most cases, is opposite to how manufacturers typically
install factory Bosch valves.
You can easily check for the correct orientation by tracing the 2 large diverter valve hoses –
the bottom inlet of the dv+ connects to the intercooler piping, and the side outlet connects
to the turbo intake.
• Push the hoses onto the GFB dv+ and make sure to tighten hose clamps.
If the vacuum nipple needs to be rotated for clearance, follow the disassembly instructions
in the maintenance section.
Page 2

Spring Pre-Load Adjustment
The dv+ can be installed and used directly out-of-the-box without any adjustment to the
spring pre-load at all, regardless of the boost pressure your car runs.
So if you are not inclined to tinker, you can finish the installation here, or you can read on
for more tech info on the subject!
Unlike other aftermarket Bosch replacement valves on the market, the GFB dv+ DOES NOT require
spring pre-load adjustment to suit specific boost pressures. The pressure-balancing design of the dv+
means that under wide open throttle conditions there is equal boost pressure on both sides of the
piston, so it will stay shut under boost REGARDLESS of the spring setting or the boost pressure.
However, adjustments to the spring pre-load can often help improve throttle response and reduce
lag, so it can pay to experiment.
Adjusting the spring pre-load changes how easily the valve vents when the throttle is closed. The
best throttle response is typically found when the spring is set to the firmest setting possible that
does not cause compressor surge (turbo fluttering) at when the throttle is closed on a high
boost/high RPM gearshift.
To explain further, contrary to popular belief, venting as much air as possible to “let the turbo
freewheel” does not reduce lag. Perhaps 20 years ago it may have been true, but turbos these days
spool up very quickly, and the greater benefit comes from setting the valve up to keeps as much
pressure in the intercooler as possible during a gear-shift or brief throttle lift.
This is especially true when a large front-mount intercooler is fitted – venting all of the air means the
intercooler must be re-pressurised, and even though a turbo does shift a lot of air, it still takes a
measurable amount of time to fill an intercooler.
Here’s where adjusting the spring pre-load can help. Increasing the spring pre-load can help retain a
small amount of pressure in the intercooler during a gearshift, which leads to a faster return to peak
boost. The limiting factor in how much you can increase the spring pre-load is compressor surge
(turbo flutter). Once this starts to occur at high boost/RPM, there is no further gain to be had and for
the life expectancy of the turbo it is best avoided.
Note that it is common however for compressor surge to occur at low RPM/boost, even if it doesn’t
occur at high boost/RPM. This is not really a concern for the turbo because the shaft speed and loads
on the turbo at this point are much smaller, and the pressure spikes from compressor surge are
much lower than those experienced at peak boost.
Page 3

Spring Pre-Load - continued
The dv+ comes with two different methods of spring pre-load adjustment, depending on your
preference and how much space you have above the valve:
• Grub screw/locknut – quick and easy
adjustment on applications where there is
enough room above the valve to
accommodate it
• Fixed length screw with low-profile head for limited space applications – the dv+ comes with an
assortment of screws to achieve different spring pre-loads. The screws are:
o 6mm (installed as standard – this is the
softest spring pre-load)
o 8mm
o 10mm
o 12mm
The softest spring pre-load is achieved using the
6mm screw length (the dv+ is supplied with this
screw installed). To increase the spring pre-load,
remove the existing screw, taking care not to
drop the o-ring (spare o-rings are supplied just in
case). Install a longer screw with the o-ring on
the thread as shown.
This product is intended for racing use only, and it is the owner’s responsibility to be aware of the legalities of fitting
this product in his or her state/territory regarding noise, emissions and vehicle modifications. GFB recommends that
only qualified motor engineers fit this product.
Materials and workmanship of this product are covered by a lifetime warranty. Moving components subject to wear
are covered for a period of one year from the date of purchase. Warranty is limited only to the repair or
replacement of GFB products provided they are installed and used as intended, and in accordance with all applicable
warnings and limitations. No other warranty is expressed or implied.
GFB products are engineered for best performance, however incorrect use or modification of factory systems may
cause damage to or reduce the longevity of the engine or drivetrain components.
Page 4

Maintenance
Disassembly:
• Using a 2.5mm hex key, remove the 4 cap screws (3) whilst
holding the cap (4) to prevent it from popping off – the
spring force is relatively small, but if it pops off
unexpectedly, the internal parts can be easily lost. Note
that the friction from the o-ring (5) may hold the cap on
even after the screws are removed. If this is the case,
simply twist the cap and pull at the same to remove it.
• Remove the spring cap (6), spring (7) and piston (8) from
the body (9). The o-rings (5) will remain attached to the
cap.
Reassembly:
• Fit the spring cap (6), spring (7) and piston (8) into the cap
(4), then slide the cap into the body (9).
• Twist the cap so the vacuum nipple points in the desired
direction, then re-install the cap screws (3).
Lubrication:
There is no set specific re-lube interval, as the dv+ does not rely
on lubrication in order to function correctly. Whereas other
brands use the internal o-rings to actually guide and support
the piston, the dv+ instead uses precision tolerances between
the piston and bore for support and the majority of sealing
duties, and the internal o-ring simply acts as a final “wiping”
seal.
This arrangement means the o-ring lasts much longer (almost
indefinitely) instead of requiring frequent “re-building”, does
not rely on a set lubrication schedule to work properly, and
friction is kept to a minimum for optimum performance.
Oil vapour passing through with the vented air in most cases is
sufficient to keep the valve lubricated, but the amount of oil vapour varies from car to car and
sometimes it is necessary to clean and lube the internals. Typically, if the venting sound changes
over time, this is typically an indication that there may be a build-up of carbon that needs to be
cleaned out.
When disassembled, wipe everything clean with a rag, then apply light grease or engine oil to the
piston, inside the bore, and on the o-rings (5), then reassemble.
 Loading...