

German Light Products Impression X4 Bar 20 Users Manual
Instruction Manual
20
from software version: v0.60
support@glp.de
www.glp.de

GLP German Light Products GmbH
Contents
1 Description of Device ....................................................................................................................... 3
2 Safety Instructions ........................................................................................................................... 4
3 Mounting ......................................................................................................................................... 6
3.1.1 Operating on the Floor (Upright) ..................................................................................... 7
3.1.2 Mounting in hanging or sideways position...................................................................... 7
3.2 Securing the Fixture ................................................................................................................. 7
3.3 Alignment of the Fixtures ........................................................................................................ 7
3.4 Connections ............................................................................................................................. 8
3.4.1 Power Supply ................................................................................................................... 8
3.4.2 DMX ................................................................................................................................. 8
4 The Menu Field ................................................................................................................................ 9
5 Programing Notes .......................................................................................................................... 11
5.1 Guide to the Set Layers.......................................................................................................... 11
5.2 Example of Set Layer Programing .......................................................................................... 11
6 DMX Chanel Selection (DMX Protocol).......................................................................................... 13
6.1 Notes on DMX Functions ....................................................................................................... 13
6.2 Normal Mode (norm) 34 DMX channels: .............................................................................. 14
6.3 Compressed Mode (comp) 20 DMX Channels: ...................................................................... 15
6.4 High Resolution Mode (Hires) 35 DMX Channels: ................................................................. 16
6.5 Single Pixel Mode (spix) 88 DMX Channels: .......................................................................... 17
6.6 Single Pixel High Resolution Mode (SPixH) 89 DMX Channels: ............................................. 19
6.7 Dual Pixel Mode (dpix) 48 DMX Channels: ............................................................................ 21
6.8 Dual Pixel High Resolution Mode (DPixH) 49 DMX Channels: ............................................... 22
6.9 Special Functions Channel, All Modes ................................................................................... 23
7 Accessories .................................................................................................................................... 24
7.1 Optional diffuser filter: .......................................................................................................... 24
7.2 End Omega Bracket: .............................................................................................................. 25
8 Maintaining and Cleaning .............................................................................................................. 26
8.1 Safety precautions ................................................................................................................. 26
8.2 Maintenance and Cleaning Interval (rule-of-thumb) ............................................................ 26
9 Technical Specifications ................................................................................................................. 27
10 Dimensions ................................................................................................................................ 28
impression X4 BAR 20 manual (v1.8) from software version: v0.60 2
GLP German Light Products GmbH
4 5 236
7
8
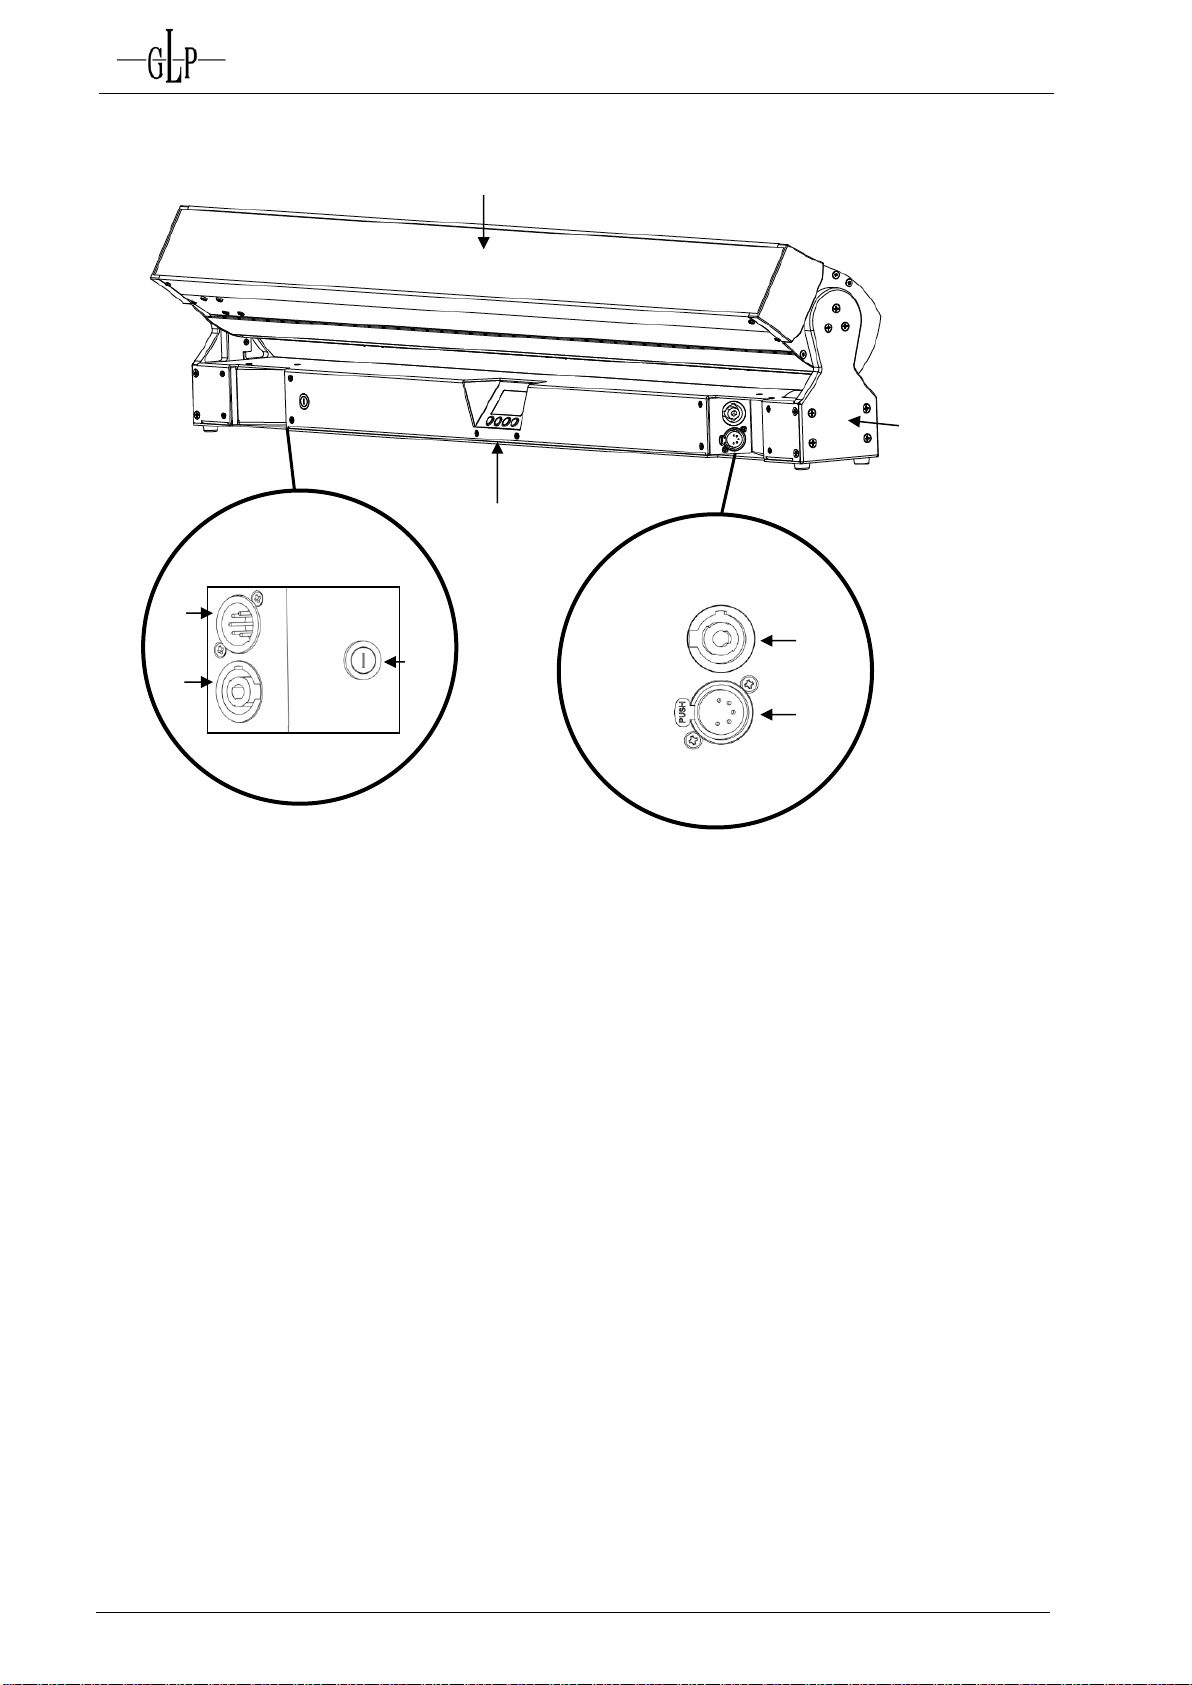
1 Description of Device
1. Moving Bar (actively and passively cooled)
2. DMX Input (5 pin)
3. Mains Input (blue powerCON)
4. Micro-fuse 5x20mm, T5A
5. LCD Display / Menu (data entry)
6. Mains Output (white powerCON)
7. DMX Output (5 pin)
8. Base with rubber feet and Camlock mounting system
impression X4 BAR 20 manual (v1.8) from software version: v0.60 3
GLP German Light Products GmbH
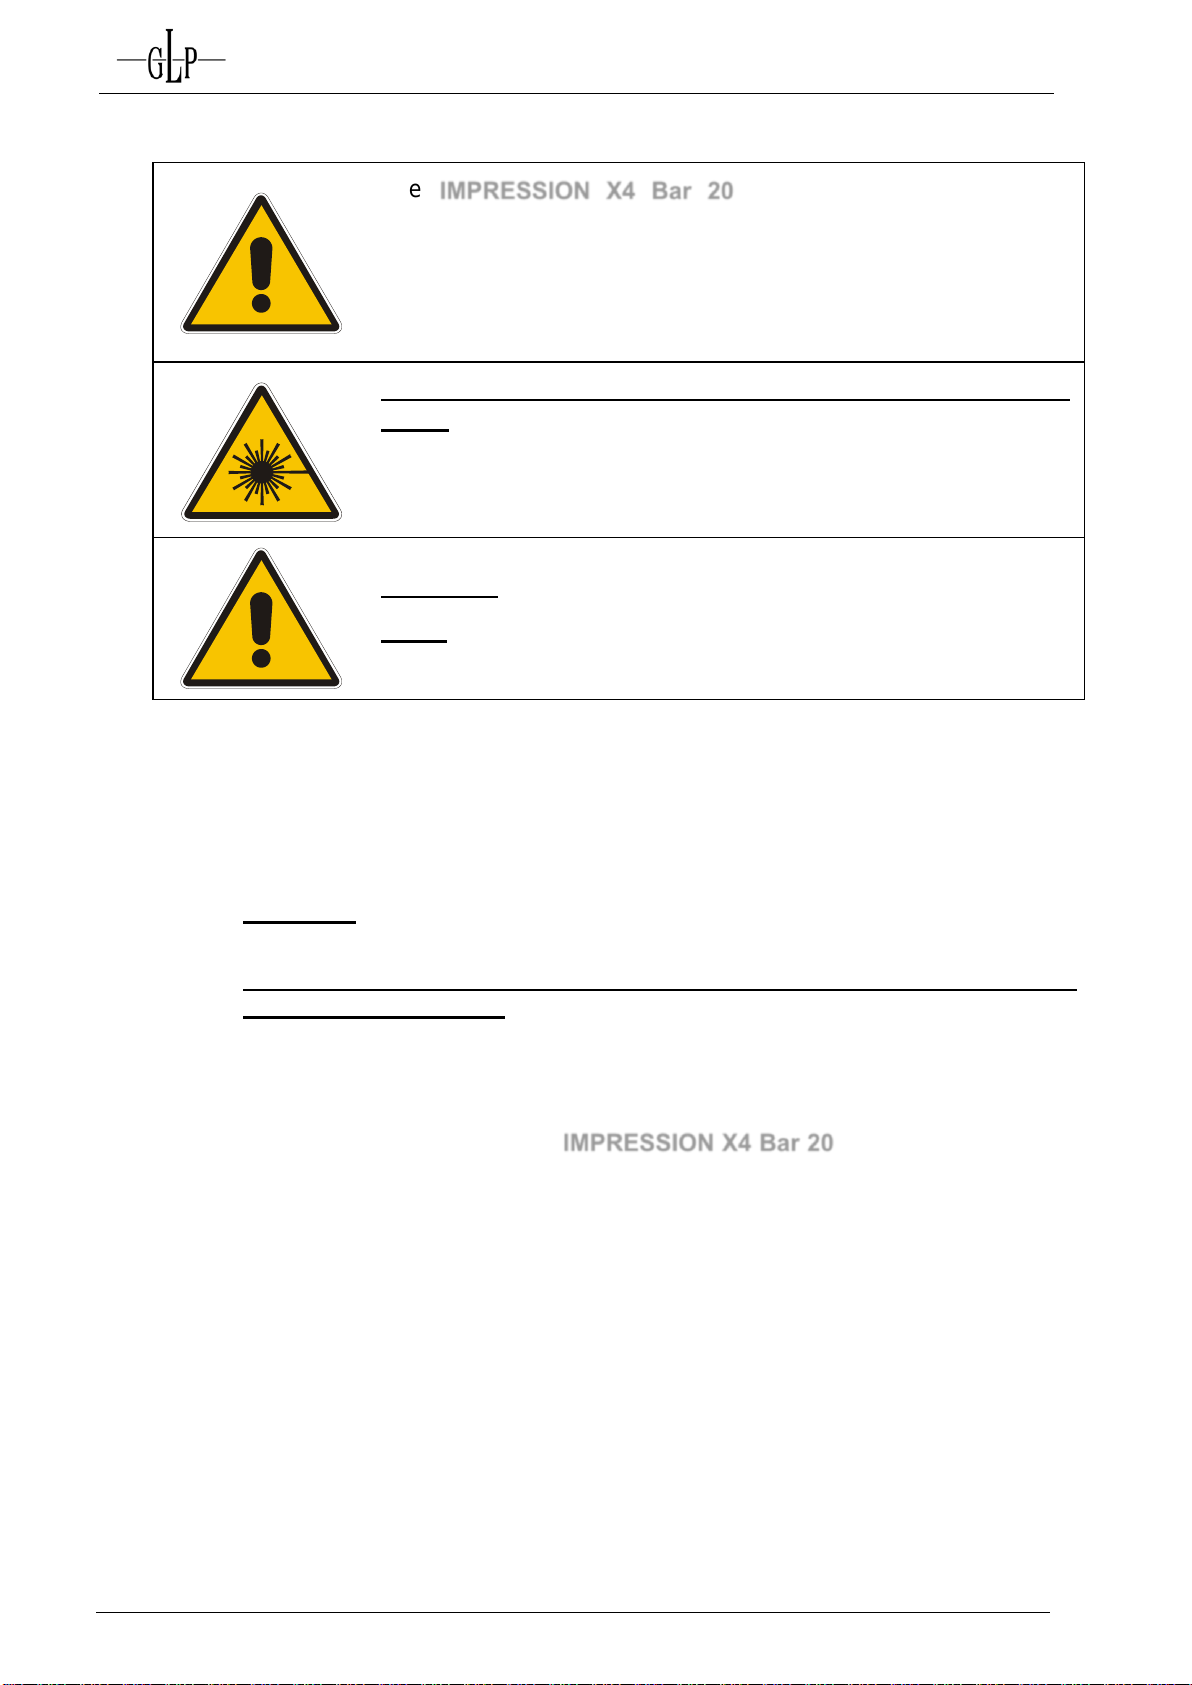
The
IMPRESSION X4 Bar 20
is a High-Tech Product. To
guarantee a smooth operation, it is necessary to respect the
following rules. The manufacturer of this device will not take
responsibility for damages through any disregard of the
information provided in this manual. Warranty claims also will be
voided in the case that the fixture housing is opened.
Never look directly into the beam of light or into one of the
LEDs. Attention: LED Class 2M can cause injuries of your eyes
even without optical instruments in front of them or within a
distance of less than 0.5m and short exposure time.
Hence: Avoid direct radiation into your eyes!
WARNING:
Never let optical parts come in contact with alcohol,
solvents or similar cleaners.
2 Safety Instructions
1. Before powering on the fixture, make sure that the fixtures fans and air inlets
are clean and not blocked.
2. Ensure that the fixture head can rotate unhindered throughout its complete
range of pan and tilt movement. A safety distance of at least 0.5 m must be
maintained between the fixture and any easily inflammable material (e.g.
decoration material).
3. Attention! Don’t touch the fixture during the operation. This can cause injuries
and/or damages.
4. The fixture doesn’t contain any user serviceable parts. Opening the fixture
will void all warranties.
5. It is necessary to wait at least 15 minutes after disconnecting the mains power
before handling the fixture. Pay attention to possible hot parts of the fixture.
6. To ensure safe operation, follow also the Installation guide described in the
chapter below. Operating the IMPRESSION X4 Bar 20 without suitable safety
aids like Safety cables or clamps/hooks can increase the risk of an accident and
must be avoided.
7. Repair, maintenance, and installation work shall be done by qualified or GLP
certified staff only. You need to pay attention to the common rules of technology
that are not explicitly mentioned in this manual.
8. Use only original GLP spare parts. Any structural modification of the system will
9. Please keep this instruction manual for future reference.
impression X4 BAR 20 manual (v1.8) from software version: v0.60 4
terminate all warranty claims.
GLP German Light Products GmbH
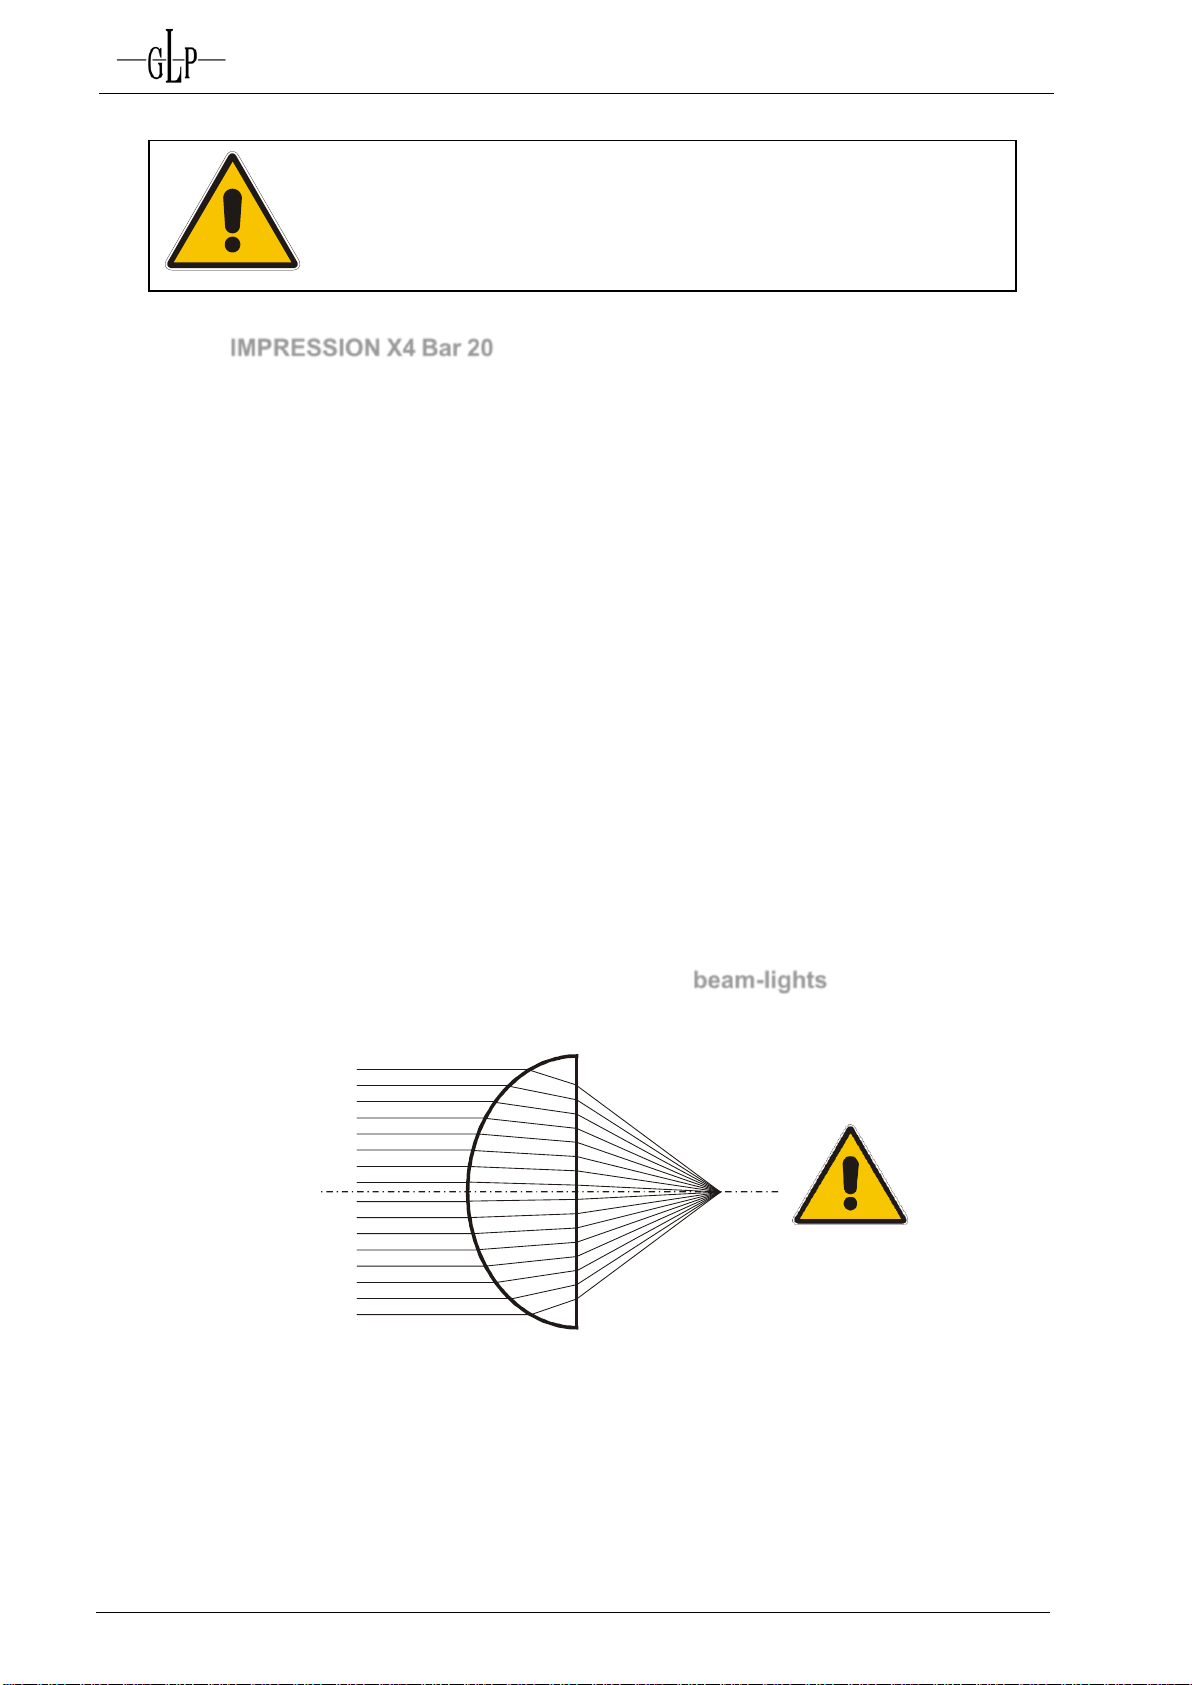
Important Safety Information
The IMPRESSION X4 Bar 20 fixture from GLP is fitted with a number of plano-convex
lenses in a highly efficient collimator cluster. This type of lens can act as a strong
magnifying glass.
If the rays from a strong light source (such as the sun or another lighting fixture) are
directed towards the front of any of these fixtures, then internal damage may occur.
In a worst case scenario with a high power light source this can happen very quickly,
damaging the fixture internally, potentially melting components or causing an internal
fire within seconds.
In order to avoid these possible problems please adhere to the following
requirements:
Do not expose the front of a fixture to direct sunlight or any other strong light
sources.
For outdoor applications during daylight make sure that the front face of any
fixture is either shielded or points away from the sun, even when fixtures are
not in use.
Do not modify the front glass or lenses of any fixture.
These requirements have to be followed regardless of whether a fixture is powered
on or off as the magnifying effect is an optical effect and therefore independent from
the (electrical) state of the fixture.
Especially when working with high powered beam-lights; extreme caution and
observance of these safety instructions is mandatory.
Should you have any questions about the operation of your fixture then please contact
your local GLP office, or their authorized distributor, a list of which can be found at
www.glp.de.
impression X4 BAR 20 manual (v1.8) from software version: v0.60 5
GLP German Light Products GmbH
Pay attention to the regulations of BGV C1 (former VBG 70)
and DIN VDE 0711-217.
The installation shall be done by qualified staff only.
4 x Camlock for bracket #1
4 x Camlock for bracket #2
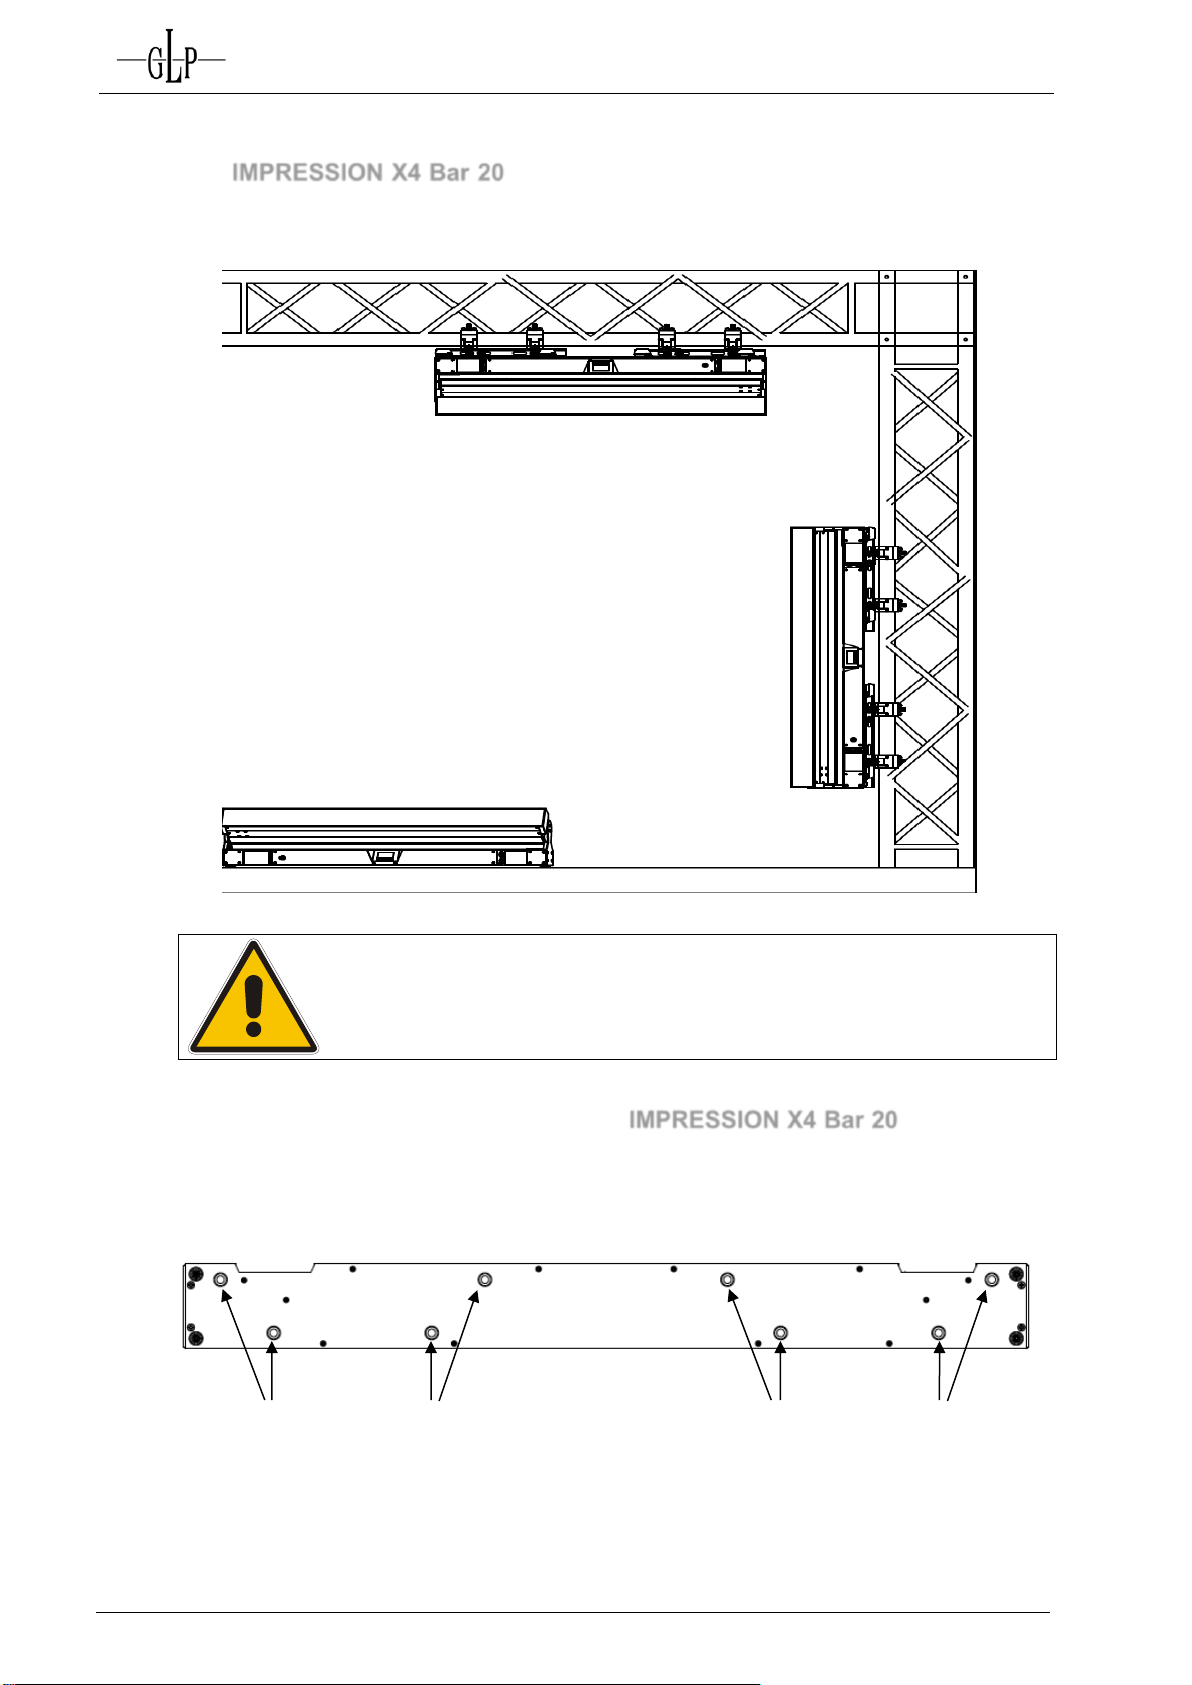
3 Mounting
The
IMPRESSION X4 Bar 20
is fully operational whether it hangs or is mounted to
the wall. It can also be operated while standing on the floor. Keep a safety distance
of min. 0.5 m towards any easily inflammable materials (decoration etc.).
For the various mounting positions of the IMPRESSION X4 Bar 20 (standing on the
floor, sideways or hanging) different accessories kits are available. Through this a
safe and firm installation is assured. You'll find dedicated connectors on the bottom
side of the fixture which should be used.
impression X4 BAR 20 manual (v1.8) from software version: v0.60 6
GLP German Light Products GmbH
3.1.1 Operating on the Floor (Upright)
The IMPRESSION X4 Bar 20 is fitted with 4 rubber feet. Additional securing is usually
not required when placed on a surface that is level and not slippery.
3.1.2 Mounting in hanging or sideways position
To operate the IMPRESSION X4 Bar 20 in a hanging position please use the two (2)
dedicated brackets supplied with your fixture. They are fixed to the base of the fixture
with fasteners called Camlock quick-release connectors. Insert the four fasteners of
each and turn each 90° to lock them. Do the opposite to release them again.
3.2 Securing the Fixture
Regardless of the mounting method of the IMPRESSION X4 Bar 20 you'll have to
use a stipulated safety wire.
Attach the safety wire through the two attachment points shown below and connect it
to the primary support structure.
The safety attachment points can be deployed by simply swinging them out from the
base.
Pay attention to a safe and proper fastening. The safety cable must comply with BGI
810-3 (EN 60598-2-17 Section 17.6.6) and be capable of bearing a static suspended
load that is ten times the weight of the fixture and all installed accessories.
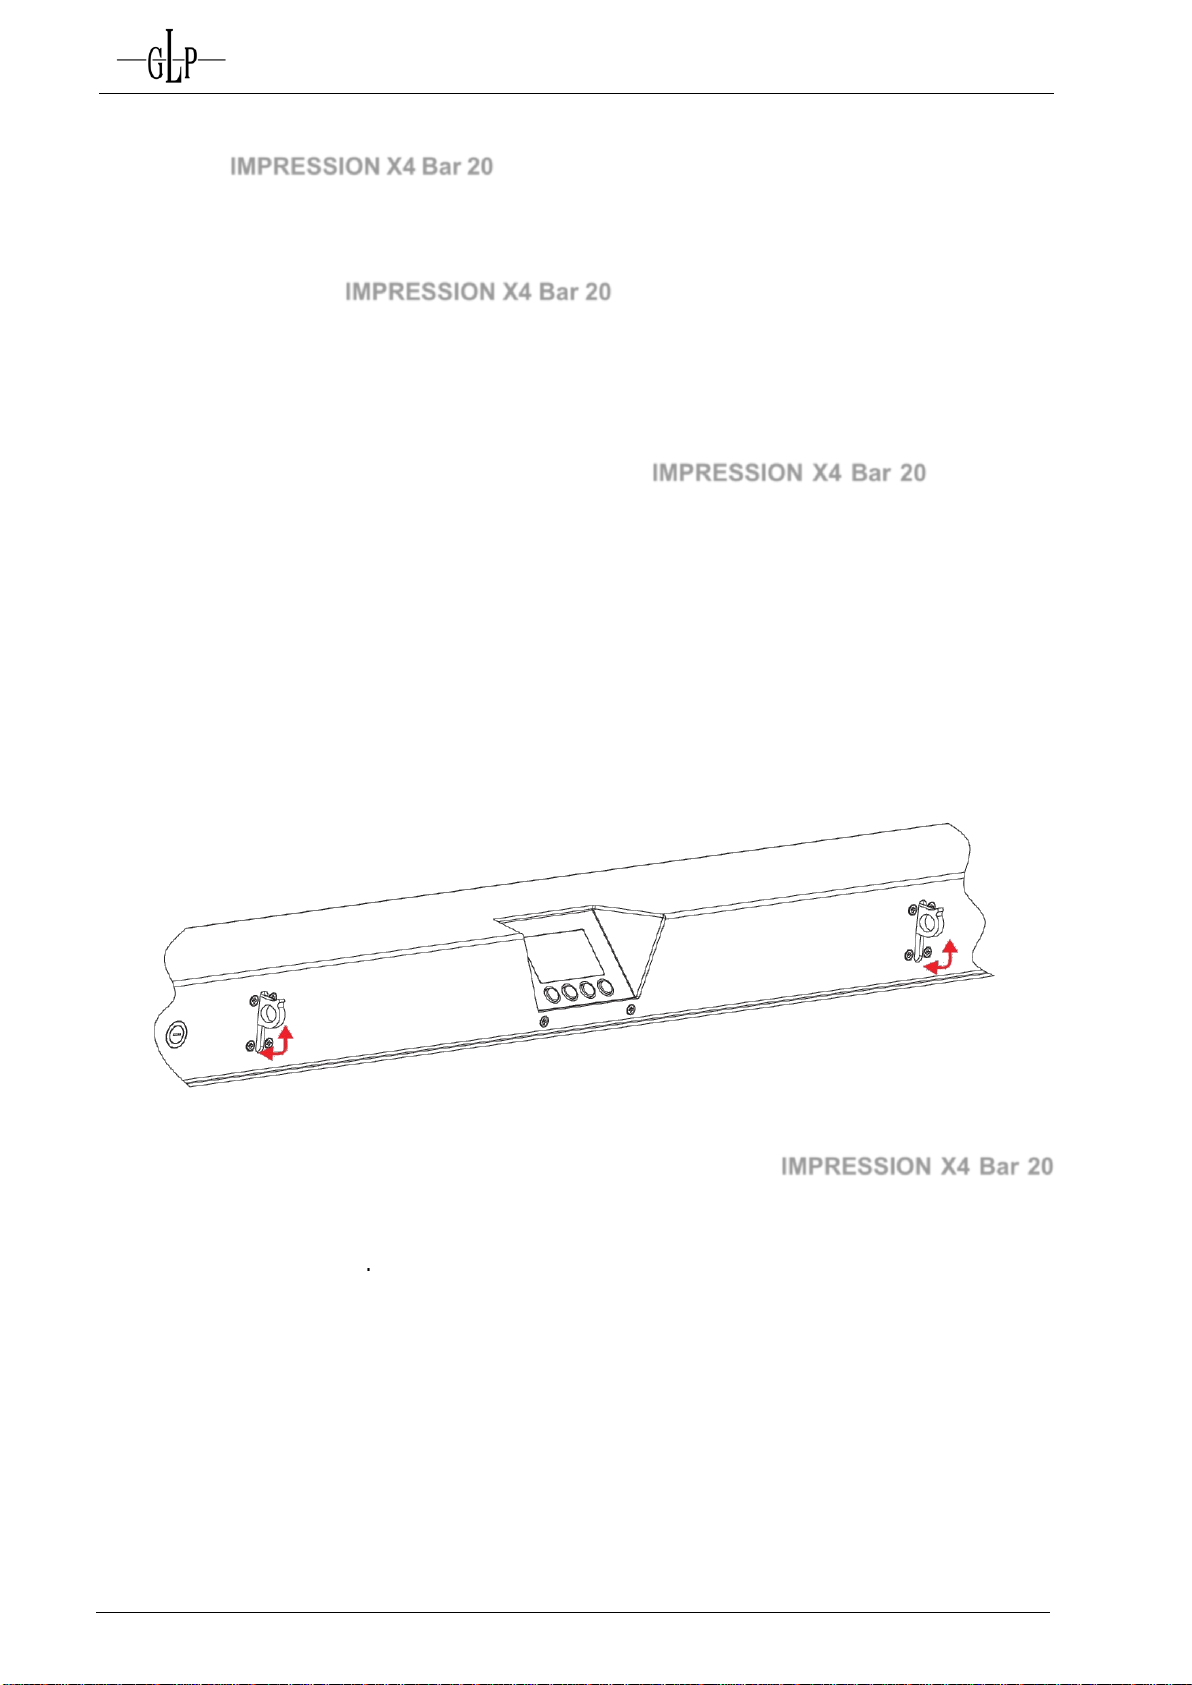
3.3 Alignment of the Fixtures
For precise and easy alignment of multiple fixtures the IMPRESSION X4 Bar 20 is
equipped with alignment pins on the side.
To deploy them, simply slide them to the side and insert the pins in the related holes
of the next fixture.
Push the knob down to slide the pins in again after every usage to avoid any damage
or injuries that could be caused by them.
impression X4 BAR 20 manual (v1.8) from software version: v0.60 7
GLP German Light Products GmbH
3.4 Connections
3.4.1 Power Supply
~100-240 Volt AC, 50-60 Hz, powerCON AC connector
Connected load 450 VA (W) <=> T5A (micro-fuse 5x20mm)
Please see printing on the case for the right electronic supply!
Disconnect from the mains supply for changing the fuse and use only the above
described micro-fuse type.
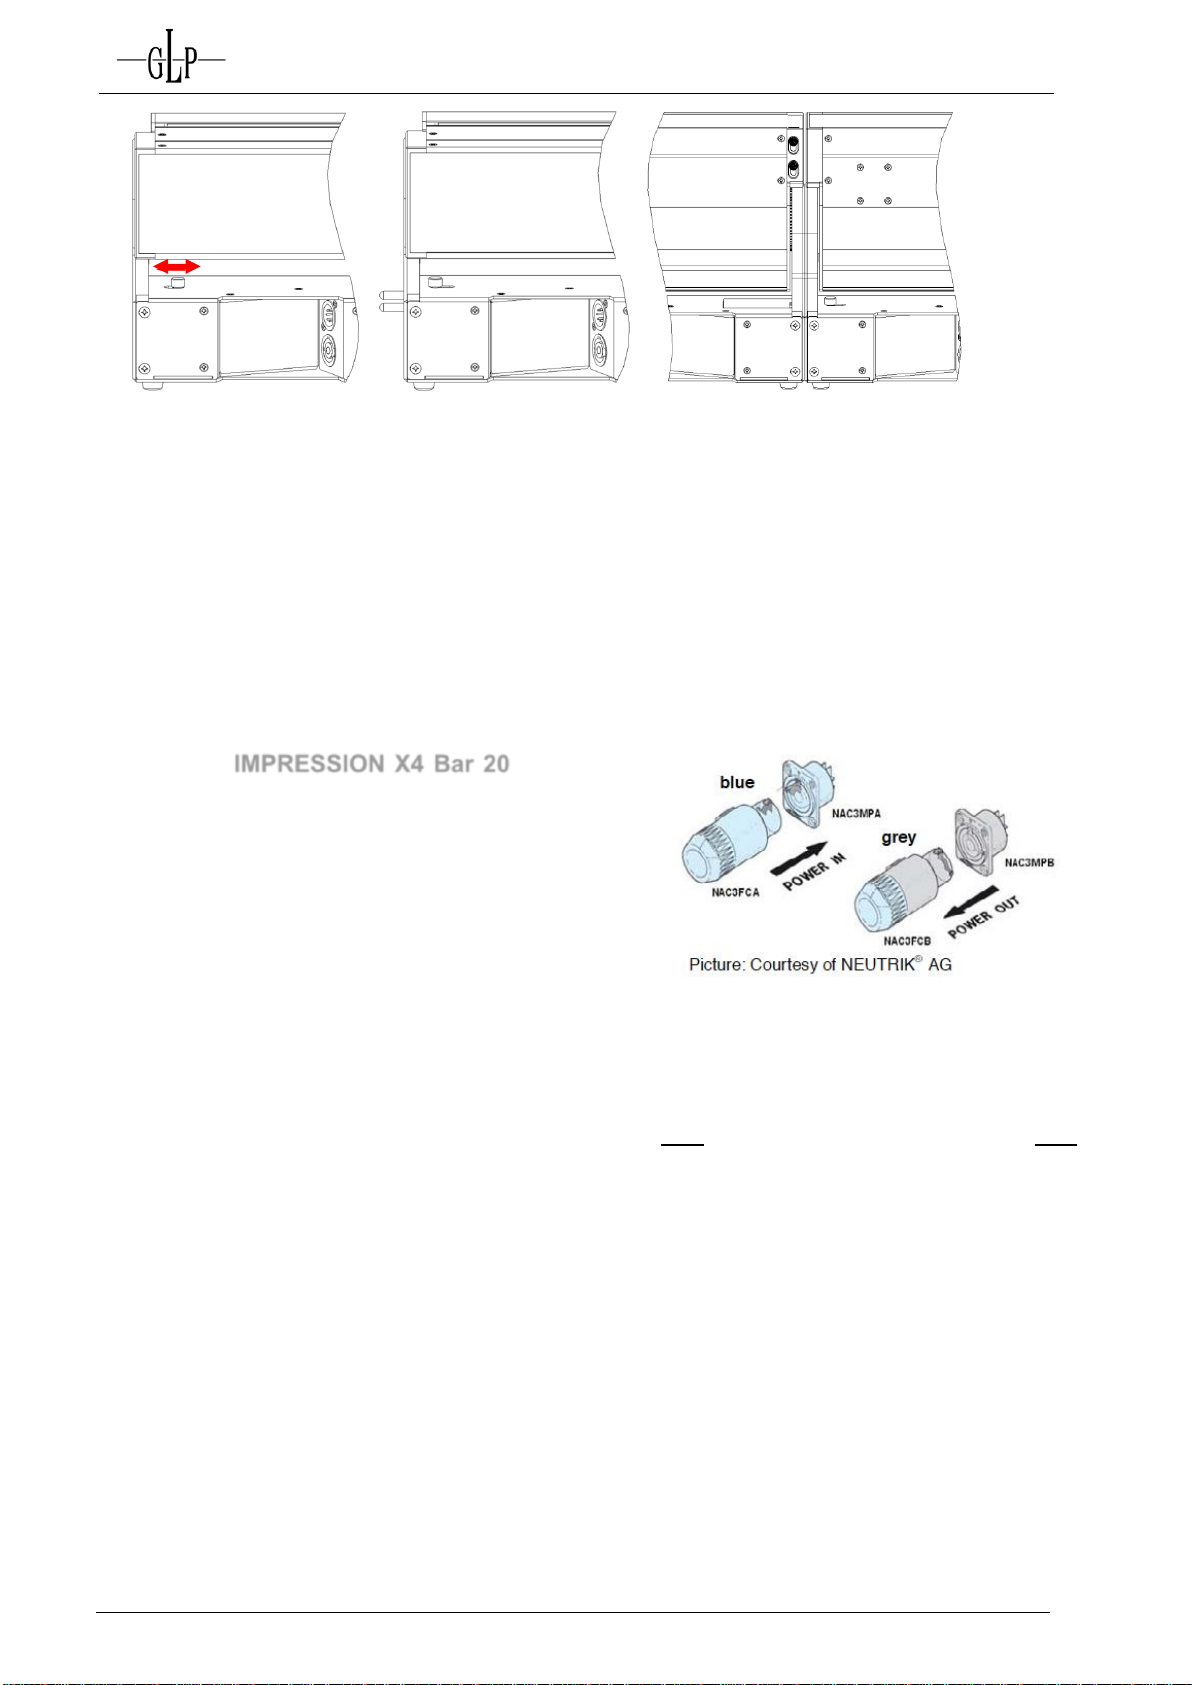
NEUTRIK® powerCON
The IMPRESSION X4 Bar 20 is fitted with
NEUTRIK® powerCON locking 3 conductor
AC connectors.
The grey connector must be used to draw
AC mains power from the fixtures`
throughput sockets and the blue connectors
must be used to supply power at the fixtures`
power input socket.
The total number of fixtures in one interconnected chain depends on your local AC
mains voltage but you must never connect more than a total load of 20A to stay within
the limits of the connector. The total load includes all connected fixtures including the
first one in the chain.
Note: The maximum allowed total load is 20A including the first fixture in one
interconnected daisy chain.
3.4.2 DMX
USITT DMX-512 Standard input/output in 5-pin connectors.
Pin 1 = [Ground] / Pin 2 = [-] / Pin 3 = [+] / Pin 4&5 N.C.
The DMX- Addressing starts at the DMX- Address [001].
impression X4 BAR 20 manual (v1.8) from software version: v0.60 8

GLP German Light Products GmbH
DOWN
– UP
MODE - ENTER
Level 1
Level 2
Level 3
Function
DMX Start Address 001
Set the DMX start address
Special
Set dimming
mode
ESOFT
Set the dimming mode to extra-soft
LIN
Set the dimming mode to linear
SOFT
Set the dimming mode to soft
DMX hold
On / Off
Enable / disable DMX hold when signal not present
Silent mode
On / Off
Enable / disable Silent mode
X4
compatibility
On / Off
Enable / disable X4 compatibility mode
Test mode
On / Off
Enable / disable test program
Set PWM
frequency
1200
Set PWM frequency to 1200Hz
600
Set PWM frequency to 600Hz
Tilt reset
On / Off
Enable / disable Tilt movement for reset *
Tilt current
On / Off
Enable / disable Tilt motor movement *
Tilt slow
On / Off
Enable / disable slow Tilt speed *
Default
OK
Reset all setting to default
Temperature
head
Read out the current temperature of the head in °C
Temperature
base
Read out the current temperature of the base in °C
Boot count
Reset counter
Fixture hours
Lifetime counter
Adjust
Key Code
Internal adjustments for trained personnel only
Set DMX Mode
NORM
Set DMX mode to Normal
SPIX
Set DMX mode to Single Pixel
4 The Menu Field
You’ll find the control board on the side part of the
arm. It allows you to make all necessary adjustments
of the IMPRESSION X4 Bar.
With the Mode-key you get into the main menu.
Afterwards you can Navigate through the menu with
the Up/Down-keys. Push the Enter-key to get in the
next menu level or to confirm your settings. Make
them and set functions ON/OFF with the Up/Downkeys. Confirm and save it with the Enter-key (the
display shows OK). Push the Mode-key to cancel the entry and go back to the main
menu.
To lock or unlock the keys of the menu field press Mode + Enter + Up
simultaneously.
impression X4 BAR 20 manual (v1.8) from software version: v0.60 9
 Loading...